
Service Information
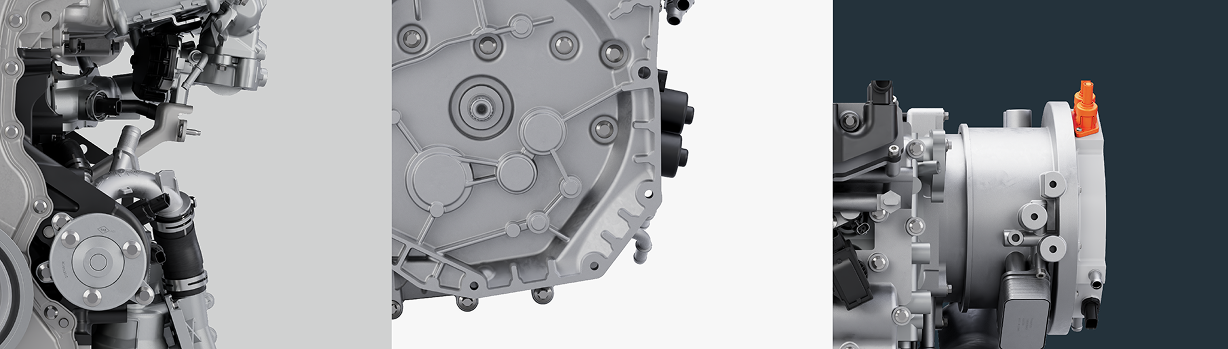
NEXT-GEN POWERTRAIN SOLUTIONS
Your complete service and diagnostics reference.
Products
Gen3
- Service Manual →
211
- Cylinder head, replace →
215
- VVT-solenoid - exhaust, replace →
- VVT-solenoid - intake, replace →
- Vibration damper, replace →
- Timing belt, replace →
- Balance Shaft Assembly, replace →
- Camshafts, replace →
- VVT unit, replace →
217
- Oil pan, replace →
222
- Oil filter, replace →
223
- Oil cooler engine, replace →
236
- Fuel pump, replace →
237
- Fuel rail, replace →
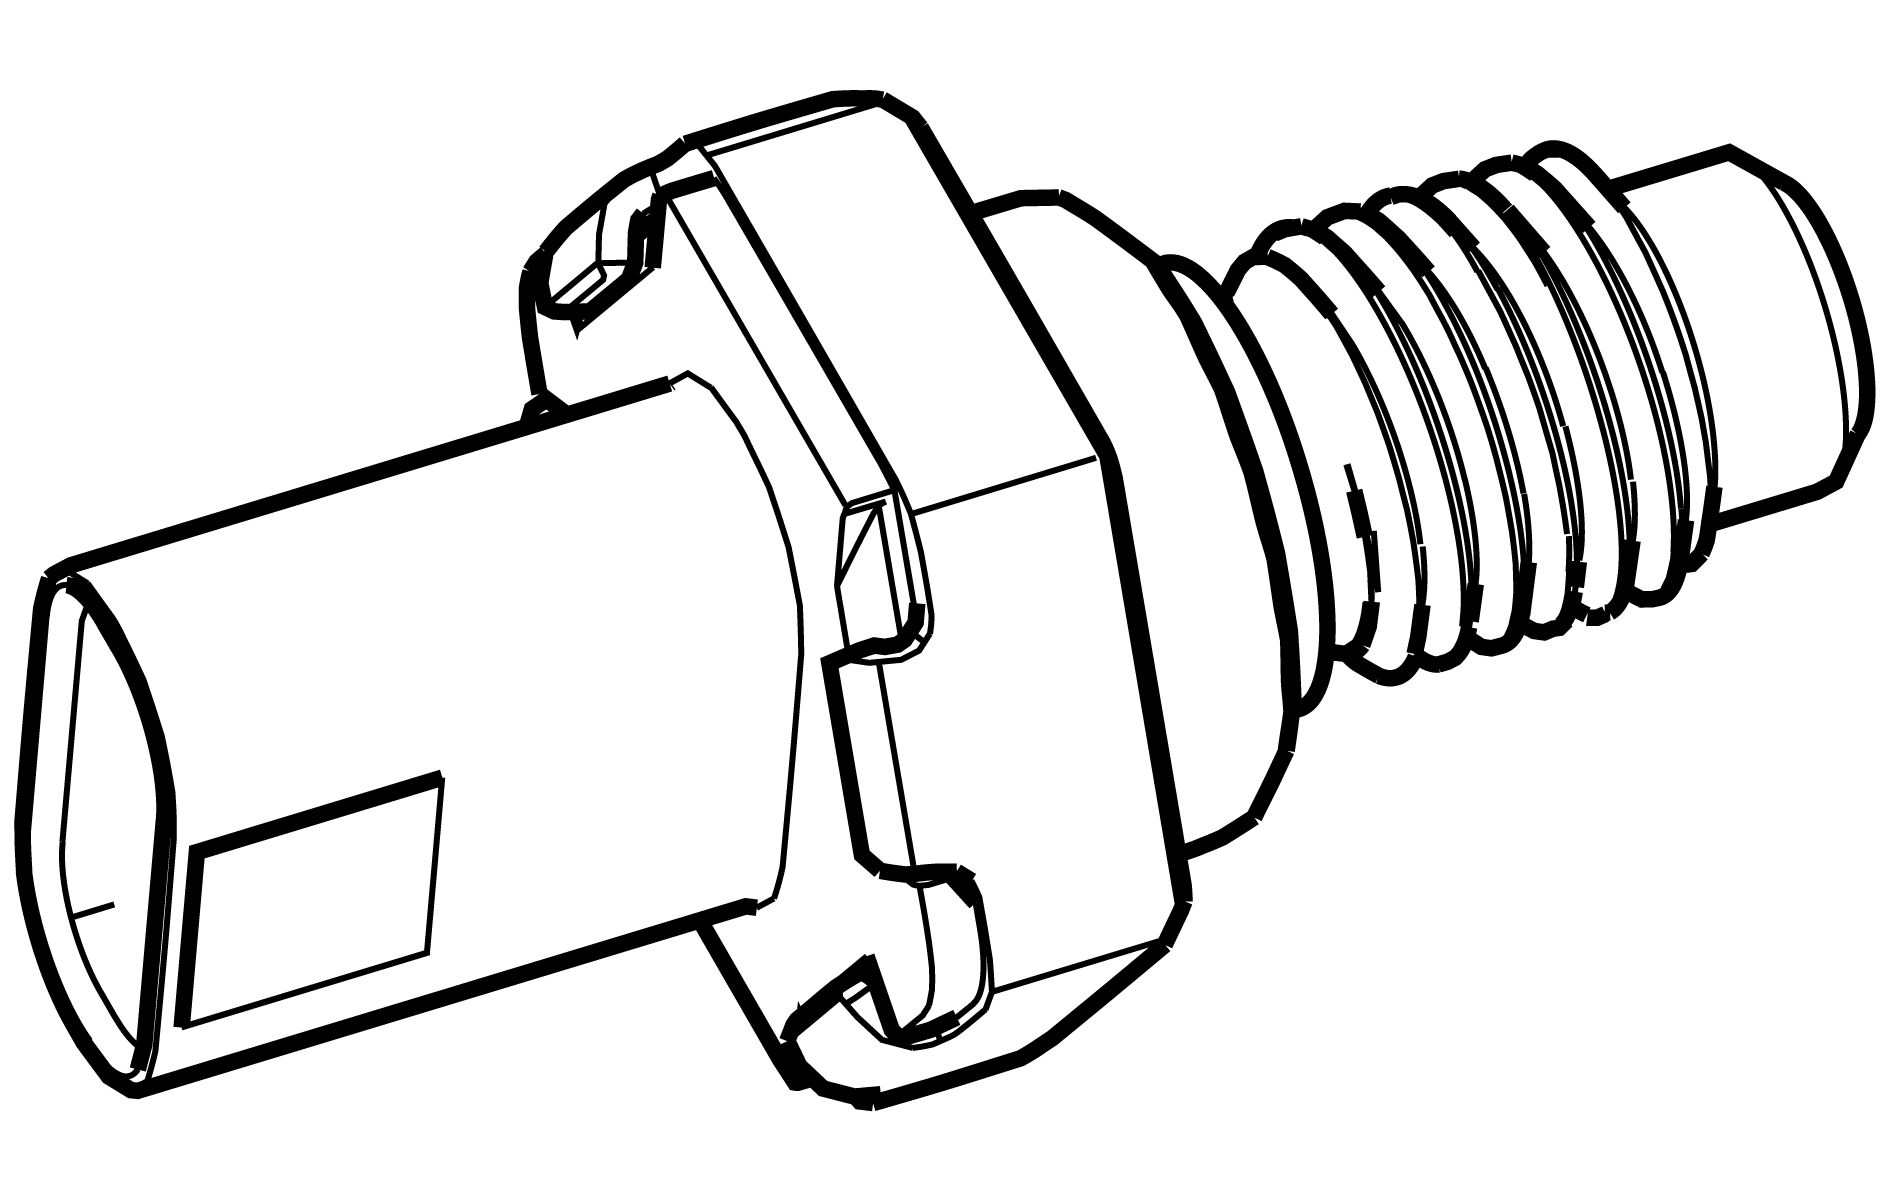
- Pressure sensor - fuel rail, replace- COPY →
- Fuel injector, replace →
251
- Induction pipe, replace →
255
- Turbocharger, replace →
256
- Throttle body, replace →
257
- Oil trap, replace →
262
- Coolant pump - engine, replace →
- Thermostat, replace →
281
- Ignition coil, replace →
- Spark plug, replace →
283
- Crankshaft position sensor, replace →
284
- Engine coolant temperature sensor, replace →
- Manifold absolute pressure MAP sensor, replace →
- Knock sensor, replace →
282
- Camshaft position sensor - exhaust, replace →
- Camshaft position sensor - intake, replace →
Gen4
- Service Manual →
210
- Specifications Engine- →
215
- VVT-solenoid - exhaust, replace →
- VVT-solenoid - intake, replace →
- Vibration damper, replace →
- Vibration damper, replace →
- Timing belt, replace →
- Timing belt, replace →
217
- Oil pan, replace →
- Oil pan, replace →
221
- Level sensor engine oil, replace →
222
- Oil filter, replace →
223
- Oil cooler engine, replace →
- Oil cooler engine, replace →
236
- Fuel pump, replace →
- Fuel pump, replace →
237
- Pressure sensor - fuel rail, replace →
- Fuel rail, replace →
- Fuel rail, replace →
251
- Intake manifold, replace →
255
- Turbocharger, replace →
256
- Throttle body, replace →
257
- Oil trap, replace →
262
- Thermostat, replace →
- Thermostat, replace →
- Coolant pump - engine, replace →
- Coolant pump - engine, replace →
- Water pump belt, replace →
281
- Ignition coil, replace →
- Spark plug, replace →
283
- Camshaft position sensor - exhaust, replace →
- Camshaft position sensor - intake, replace →
284
- Engine coolant temperature sensor, replace →
- Manifold absolute pressure MAP sensor, replace →
- Knock sensor, replace →
Installation Gen3 MP Miller
- Installation of →
Specifcations
- Measurements →
- Engine →
Requirements
- Requirements →
Electrical overview
- Electrical overview →
Electrical connectors
- Camshaft position sensor - exhaust →
- Temp sensor - coolant →
- Camshaft position sensor - intake →
- Crankshaft position sensor →
- Fuel pressure sensor →
- Fuel pump - High Pressure →
- Ignition coils →
- Fuel injectors →
- Knock sensor →
- MAP sensor →
- Oil level sensor →
- Oil pressure sensor →
- Oil pump →
- Camshaft solenoid - exhaust →
- Camshaft solenoid - intake →
- Temp sensor - air intake →
- Throttle house →
Fuel system
- Fuel system →
Crank case ventilation
- Crank case ventilation →
Cooling system
- Coolant system - overview conections →
- Coolant system - flow chart →
Oil system
- Oil system →
Maintainence
- Service →
NEXT-GEN POWERTRAIN SOLUTIONS
Fault Codes
- D000621 →
- Intake Camshaft Position Timing - Over-Advanced (Bank 1) →
- Intake Camshaft Position Timing - Over-Retarded (Bank 1) →
- Exhaust (B) Camshaft Position Timing - Over-Advanced (Bank 1) →
- Exhaust (B) Camshaft Position Timing - Over-Retarded (Bank 1) →
- Crankshaft Position - Camshaft Position Correlation - Bank 1 Sensor A →
- Crankshaft Position - Camshaft Position Correlation - Bank 1 Sensor A General Signal Failures Signal amplitude < minimum →
- Crankshaft Position - Camshaft Position Correlation - Bank 1 Sensor A General Signal Failures Signal amplitude > maximum →
- Crankshaft Position - Camshaft Position Correlation - Bank 1 Sensor A Component Failures Performance or incorrect operation →
- Crankshaft Position - Camshaft Position Correlation - Bank 1 Sensor B General Signal Failures Signal amplitude < minimum →
- Crankshaft Position - Camshaft Position Correlation - Bank 1 Sensor B General Signal Failures Signal amplitude > maximum →
- Crankshaft Position - Camshaft Position Correlation - Bank 1 Sensor B Component Failures Performance or incorrect operation →
- HO2S Heater Control Circuit Low (Bank 1, Sensor 1) →
- HO2S Heater Control Circuit High (Bank 1, Sensor 1) →
- Turbo/Super Charger Bypass Valve Control Circuit / Open →
- Turbo/Super Charger Bypass Valve Control Circuit Low →
- Turbo/Super Charger Bypass Valve Control Circuit High →
- DTC 003600 →
- HO2S Heater Control Circuit Low (Bank 1, Sensor 2) →
- HO2S Heater Control Circuit High (Bank 1, Sensor 2) →
- HO2S Heater Control Circuit (Bank 1, Sensor 3) →
- HO2S Heater Control Circuit Low (Bank 1, Sensor 3) →
- HO2S Heater Control Circuit High (Bank 1, Sensor 3) →
- Turbo/Super Charger Boost Control Solenoid Circuit / Open →
- DTC 004600 →
- Turbo/Super Charger Boost Control Solenoid Circuit Low →
- Turbo/Super Charger Boost Control Solenoid Circuit High →
- Turbocharger/Supercharger Boost Control "B" Circuit/Open →
- Turbocharger/Supercharger Boost Control "B" Circuit/Open Component Failures Performance or incorrect operation →
- Turbocharger/Supercharger Boost Control "B" Circuit Range/Performance →
- Turbocharger/Supercharger Boost Control "B" Circuit Range/Performance System Internal Failures Internal electronic failure →
- Turbocharger/Supercharger Boost Control "B" Circuit Range/Performance Component Failures Component or system over temperature →
- Turbocharger/Supercharger Boost Control "B" Circuit Low →
- Turbocharger/Supercharger Boost Control "B" Circuit Low General Electrical Failures Circuit short to ground or open →
- Turbocharger/Supercharger Boost Control "B" Circuit High →
- Turbocharger/Supercharger Boost Control "B" Circuit Intermittent/Erratic →
- Ambient Air Temperature Sensor Circuit "A" →
- Ambient Air Temperature Sensor Range/Performance General Signal Failures Signal amplitude < minimum →
- Ambient Air Temperature Sensor Range/Performance General Signal Failures Signal amplitude > maximum →
- DTC 007123 →
- DTC 007124 →
- Ambient Air Temperature Sensor Circuit Low Input →
- Ambient Air Temperature Sensor Circuit High Input →
- Intake Valve Control Circuit (Bank 1) →
- Intake Valve Control Circuit Low (Bank 1) →
- Intake Valve Control Circuit High (Bank 1) →
- Exhaust Valve Control Circuit (Bank 1) →
- Exhaust Valve Control Circuit Low (Bank 1) →
- Exhaust Valve Control Circuit High (Bank 1) →
- Fuel Rail/System Pressure - Too Low →
- Fuel Rail/System Pressure - Too High →
- Low-Pressure Fuel System Pressure - Too Low →
- Low-Pressure Fuel System Pressure - Too Low Bus Signal / Message Failures Signal below allowable range →
- Low-Pressure Fuel System Pressure - Too Low Bus Signal / Message Failures Signal above allowable range →
- Low-Pressure Fuel System Pressure - Too High →
- Intake Air Temperature Sensor 2 Circuit Range/Performance →
- Intake Air Temperature Sensor 2 Circuit Range/Performance (Bank 1) General Signal Failures Signal amplitude < minimum →
- Intake Air Temperature Sensor 2 Circuit Range/Performance (Bank 1) General Signal Failures Signal amplitude > maximum →
- Intake Air Temperature Sensor 2 Circuit Range/Performance (Bank 1) General Signal Failures Signal Stuck In Range →
- Intake Air Temperature Sensor 2 Circuit Low Input →
- Intake Air Temperature Sensor 2 Circuit High Input →
- Fuel Pressure Relief Control Performance / Stuck Off →
- Fuel Pressure Relief Control Stuck On →
- Mass or Volume Air Flow Circuit →
- Mass or Volume Air Flow Sensor "A" Circuit Component Failures Performance or incorrect operation →
- Mass or Volume Air Flow Sensor "A" Circuit Component Failures Component internal failure →
- Mass or Volume Air Flow Sensor "A" Circuit General Electrical Failures System Voltage →
- Mass or Volume Air Flow Circuit Range/Performance →
- Mass or Volume Air Flow Sensor "A" Circuit Range/Performance Component Failures →
- Mass or Volume Air Flow Circuit Low Input →
- Lost Communication With Gear Shift Control Module A →
- Manifold Absolute Pressure/BARO Sensor Range/Performance →
- Manifold Absolute Pressure/Barometric Pressure Sensor Circuit Range/Performance General signal failure →
- Manifold Absolute Pressure/BARO Sensor Low Input →
- Manifold Absolute Pressure/BARO Sensor High Input →
- Intake Air Temperature Sensor 1 Circuit Range/Performance (Bank 1) General Signal Failures Signal amplitude < minimum →
- Intake Air Temperature Sensor 1 Circuit Range/Performance (Bank 1) General Signal Failures Signal amplitude > maximum →
- Intake Air Temperature Sensor 1 Circuit Range/Performance (Bank 1) General Signal Failures Signal Stuck In Range →
- Intake Air Temperature Sensor 1 Circuit Low Input →
- Intake Air Temperature Sensor 1 Circuit High Input →
- Engine Coolant Temperature Sensor 1 Circuit Range/Performance General Signal Failures Signal amplitude < minimum →
- Engine Coolant Temperature Sensor 1 Circuit Range/Performance General Signal Failures Signal amplitude > maximum →
- Engine Coolant Temperature Sensor 1 Circuit Range/Performance General Signal Failures Signal Stuck In Range →
- Engine Coolant Temperature Circuit Low Input →
- Engine Coolant Temperature Circuit High Input →
- Throttle/Pedal Position Sensor A Circuit Low →
- Throttle/Pedal Position Sensor A Circuit High →
- Coolant Thermostat (Coolant Temp Below Thermostat Regulating Temperature) →
- Coolant Thermostat (Coolant Temp Below Thermostat Regulating Temperature) Mechanical Failures →
- Coolant Thermostat (Coolant Temp Below Thermostat Regulating Temperature) Mechanical Failures Fluid leak or seal failure →
- O2 Sensor Circuit (Bank 1 Sensor 1) →
- O2 Sensor Circuit Slow Response (Bank 1 Sensor 1) General Signal Failures Signal stuck low →
- O2 Sensor Circuit Slow Response (Bank 1 Sensor 1) General Signal Failures Signal stuck high →
- O2 Sensor Circuit Slow Response (Bank 1 Sensor 1) General Signal Failures Signal rate of change below threshold →
- O2 Circuit No Activity Detected (Bank 1, Sensor 1) →
- O2 Sensor Circuit (Bank 1 Sensor 2) →
- O2 Circuit Low Voltage (Bank 1, Sensor 2) →
- O2 Circuit High Voltage (Bank 1, Sensor 2) →
- O2 Sensor Circuit Slow Response (Bank 1 Sensor 2) →
- O2 Sensor Circuit Slow Response (Bank 1 Sensor 2) General Signal Failures Signal rate of change below threshold →
- O2 Sensor Circuit Slow Response (Bank 1 Sensor 2) Mechanical Failures Slow Response →
- O2 Sensor Slow Response - Rich to Lean (Bank 1 and Sensor 2) →
- O2 Sensor Slow Response - Rich to Lean (Bank 1 and Sensor 2) Algorithm Based Failures Event information →
- O2 Sensor Slow Response - Lean to Rich (Bank 1, Sensor 2) Algorithm Based Failures Event information →
- O2 Sensor Delayed Response - Rich to Lean (Bank 1 Sensor 2) →
- O2 Sensor Delayed Response - Rich to Lean (Bank 1 Sensor 2) Algorithm Based Failures Event information →
- O2 Sensor Delayed Response - Lean to Rich (Bank 1 Sensor 2) Algorithm Based Failures Event information →
- O2 Circuit No Activity Detected (Bank 1, Sensor 2) →
- O2 Sensor Circuit (Bank 1 Sensor 3) →
- O2 Sensor Circuit Low Voltage (Bank 1 Sensor 3) →
- O2 Sensor Circuit High Voltage (Bank 1 Sensor 3) →
- O2 Sensor Circuit Slow Response (Bank 1 Sensor 3) →
- O2 Sensor Circuit Slow Response (Bank 1 Sensor 3) General Signal Failures Signal rate of change below threshold →
- O2 Sensor Circuit No Activity Detected (Bank 1 Sensor 3) →
- O2 Sensor Slow Response - Rich to Lean (Bank 1 Sensor 1) →
- O2 Sensor Slow Response - Lean to Rich (Bank 1 Sensor 1) →
- Excessive Time To Enter Closed Loop Air/Fuel Ratio Control →
- Excessive Time To Enter Closed Loop Air/Fuel Ratio Control Algorithm Based Failures Event information →
- Excessive Time To Enter Closed Loop Air/Fuel Ratio Control Component Failures No operation →
- Fuel Trim (Bank 1) Algorithm Based Failures Event information →
- System Too Lean (Bank 1) →
- System Too Rich (Bank 1) →
- Fuel Temperature Sensor "A" Circuit Range/Performance General Signal Failures Signal amplitude < minimum →
- Fuel Temperature Sensor "A" Circuit Range/Performance General Signal Failures Signal amplitude > maximum →
- Fuel Temperature Sensor "A" Circuit Range/Performance General Signal Failures Signal Stuck In Range →
- Fuel Temperature Sensor "A" Circuit Low →
- Fuel Temperature Sensor "A" Circuit High →
- Fuel Pressure Sensor "B" Circuit →
- Fuel Pressure Sensor "B" Circuit Low →
- Fuel Pressure Sensor "B" Circuit High →
- Fuel Rail Pressure Sensor "A" Circuit Range/Performance →
- Fuel Rail Pressure Sensor Low Input →
- Fuel Rail Pressure Sensor High Input →
- Engine Oil Temperature Sensor "A" Circuit General Signal Failures Signal Stuck In Range →
- Engine Oil Temperature Sensor "A" Circuit System Internal Failures Internal electronic failure →
- Engine Oil Temperature Sensor "A" Circuit Component Failures Component internal failure →
- Engine Oil Temperature Sensor "A" Range/Performance General Signal Failures Signal amplitude < minimum →
- Engine Oil Temperature Sensor "A" Range/Performance General Signal Failures Signal amplitude > maximum →
- Engine Oil Temperature Sensor "A" Range/Performance General Signal Failures Signal stuck high →
- Engine Oil Temperature Sensor "A" Range/Performance FM (Frequency Modulated) / PWM (Pulse Width Modulated) Failures Signal high time < minimum →
- Engine Oil Temperature Sensor "A" Range/Performance FM (Frequency Modulated) / PWM (Pulse Width Modulated) Failures Signal high time > maximum →
- Engine Oil Temperature Sensor "A" Circuit Intermittent/Erratic System Internal Failures Internal electronic failure →
- DTC 019A00 →
- Turbocharger Outlet Pressure Sensor "A"/"B" Correlation →
- Cylinder 1 Injector Circuit / Open →
- Cylinder 2 Injector Circuit / Open →
- Cylinder 3 Injector Circuit / Open →
- Cylinder 4 Injector Circuit / Open →
- Engine Coolant Overtemperature Condition →
- Throttle/Pedal Position Sensor/Switch B Circuit Low →
- Throttle/Pedal Position Sensor/Switch B Circuit High →
- Turbo/Super Charger Overboost Condition →
- Turbo/Super Charger Boost Sensor A Circuit Range/Performance →
- Turbo/Super Charger Boost Sensor A Circuit Low →
- Turbo/Super Charger Boost Sensor A Circuit High →
- Charge Air Cooler Coolant Pump Control Circuit/Open General Electrical Failures Circuit open →
- Charge Air Cooler Coolant Pump Control Circuit Low General Electrical Failures Circuit short to ground →
- Charge Air Cooler Coolant Pump Control Circuit High General Electrical Failures Circuit short to battery →
- Manifold Absolute Pressure - Turbocharger/Supercharger Boost Sensor "A" Correlation →
- Manifold Absolute Pressure - Turbocharger/Supercharger Boost Sensor "B" Correlation →
- DTC 024000 →
- DTC 024100 →
- DTC 024200 →
- Turbocharger/Supercharger Wastegate Solenoid A General Electrical Failures →
- Turbocharger/Supercharger Wastegate Solenoid "A" Low Mechanical Failures Commanded position not reachable →
- Turbocharger/Supercharger Wastegate Solenoid "A" Low Mechanical Failures Alignment or adjustment incorrect →
- Turbocharger/Supercharger Wastegate Solenoid "A" High Mechanical Failures Commanded position not reachable →
- Turbocharger/Supercharger Wastegate Solenoid "A" High Mechanical Failures Alignment or adjustment incorrect →
- Fuel Pump Module "A" Control Circuit Range/Performance →
- Fuel Pump Module "A" Control Circuit Low General Electrical Failures Circuit short to ground or open →
- Fuel Pump Module "A" Control Circuit High →
- Cylinder 1 Injector Circuit High →
- Cylinder 2 Injector Circuit High →
- Cylinder 3 Injector Circuit High →
- Charge Air Cooler Efficiency Below Threshold Component Failures Component or system over temperature →
- Charge Air Cooler Coolant Pump Performance General Electrical Failures Circuit voltage below threshold →
- Charge Air Cooler Coolant Pump Performance General Electrical Failures Circuit voltage above threshold →
- Charge Air Cooler Coolant Pump Performance Mechanical Failures Low fluid level →
- Charge Air Cooler Coolant Pump Performance Component Failures Component internal failure →
- Cylinder 4 Injector Circuit High →
- Fuel Pump Module "B" Control Circuit/Open →
- Fuel Pump Module "B" Control Circuit Range/Performance →
- Fuel Pump Module "B" Control Circuit Range/Performance Mechanical Failures Actuator stuck →
- Fuel Pump Module "B" Control Circuit Low →
- Fuel Pump Module "B" Control Circuit High →
- Turbo / Super Charger Underboost →
- Turbocharger/Supercharger "B" Overboost Condition →
- Turbocharger/Supercharger "B" Overboost Condition Mechanical Failures →
- Turbocharger/Supercharger "B" Underboost Condition →
- Turbocharger/Supercharger "B" Underboost Condition Mechanical Failures →
- Random Misfire Detected →
- Random Misfire Detected Component Failures Performance or incorrect operation →
- Random Misfire Detected Component Failures Component or system over temperature →
- Cylinder 1 Misfire Detected →
- Cylinder 2 Misfire Detected →
- Cylinder 3 Misfire Detected →
- Cylinder 4 Misfire Detected →
- Knock Sensor 1 Circuit Range/Performance (Bank 1) General Signal Failures Signal amplitude < minimum →
- Knock Sensor 1 Circuit Range/Performance (Bank 1) General Signal Failures Signal amplitude > maximum →
- Knock Sensor 1 Circuit Low Input (Bank1) →
- Knock Sensor 1 Circuit High Input (Bank 1) →
- Knock/Combustion Vibration Sensor 2 Circuit Range/Performance (Bank 2) General Signal Failures Signal amplitude < minimum →
- Knock/Combustion Vibration Sensor 2 Circuit Low (Bank 2) →
- Knock/Combustion Vibration Sensor 2 Circuit High (Bank 2) →
- Crankshaft Position Sensor A Circuit →
- Crankshaft Position Sensor A Circuit Range/Performance →
- Crankshaft Position Sensor "A" Circuit Range/Performance Algorithm Based Failures Signal plausibility failure →
- Crankshaft Position Sensor A Circuit Intermittent →
- Camshaft Position Sensor A Circuit (Bank 1 or single sensor) →
- Camshaft Position Sensor A Circuit Range/Performance (Bank 1 or single sensor) →
- Camshaft Position Sensor "A" Circuit Range/Performance (Bank 1 or single sensor) Component Failures Performance or incorrect operation →
- Camshaft Position Sensor A Circuit Intermittent (Bank 1 or single sensor) →
- Crankshaft Position Sensor - Crankshaft Start Position Incorrect →
- Crankshaft Position Sensor - Crankshaft Direction Incorrect →
- Ignition Coil A Primary/Secondary Circuit General Electrical Failures Circuit short to ground →
- Ignition Coil A Primary/Secondary Circuit General Electrical Failures Circuit short to battery →
- Ignition Coil A Primary/Secondary Circuit General Electrical Failures Circuit open →
- Ignition Coil B Primary/Secondary Circuit General Electrical Failures Circuit short to ground →
- Ignition Coil B Primary/Secondary Circuit General Electrical Failures Circuit short to battery →
- Ignition Coil B Primary/Secondary Circuit General Electrical Failures Circuit open →
- Ignition Coil C Primary/Secondary Circuit General Electrical Failures Circuit short to ground →
- Ignition Coil C Primary/Secondary Circuit General Electrical Failures Circuit short to battery →
- Ignition Coil C Primary/Secondary Circuit General Electrical Failures Circuit open →
- Ignition Coil D Primary/Secondary Circuit General Electrical Failures Circuit short to ground →
- Ignition Coil D Primary/Secondary Circuit General Electrical Failures Circuit short to battery →
- Ignition Coil D Primary/Secondary Circuit General Electrical Failures Circuit open →
- Camshaft Position Sensor B Circuit (Bank 1) →
- Camshaft Position Sensor B Circuit Range/Performance (Bank 1) →
- Camshaft Position Sensor "B" Circuit Range/Performance (Bank 1) Component Failures Performance or incorrect operation →
- Camshaft Position Sensor B Circuit Intermittent (Bank 1) →
- Exhaust Gas Recirculation "A" Control Circuit Range/Performance →
- Exhaust Gas Recirculation Sensor "B" Circuit Low →
- Exhaust Gas Recirculation Sensor "B" Circuit High →
- Catalyst System Efficiency Below Threshold (Bank 1) →
- Evaporative Emission System Leak Detection Reference Orifice Low Flow →
- Evaporative Emission System Leak Detection Reference Orifice High Flow →
- Evaporative Emission System Incorrect Purge Flow →
- Evaporative Emission System Incorrect Purge Flow Algorithm Based Failures Event information →
- Evaporative Emission System Leak Detected (small leak) →
- Evaporative Emission System Purge Control Valve Circuit Open →
- DTC 044617 →
- DTC 044618 →
- DTC 044619 →
- DTC 04464B →
- DTC 044662 →
- DTC 044671 →
- DTC 044696 →
- DTC 044697 →
- DTC 045084 →
- DTC 045085 →
- DTC 045100 →
- DTC 045164 →
- DTC 045200 →
- DTC 045300 →
- Evaporative Emission System Leak Detected (gross leak/no flow) →
- Evaporative Emission System Purge Control Valve Circuit Low →
- Evaporative Emission System Purge Control Valve Circuit High →
- Exhaust Gas Recirculation "B" Control Circuit →
- Fuel Level Sensor "A" Circuit →
- Exhaust Gas Recirculation Sensor "B" Circuit Range/Performance General Signal Failures Signal Stuck In Range →
- Exhaust Gas Recirculation Sensor "B" Circuit Range/Performance Bus Signal / Message Failures Signal below allowable range →
- Exhaust Gas Recirculation Sensor "B" Circuit Range/Performance Bus Signal / Message Failures Signal above allowable range →
- Fan 1 Control Circuit →
- Fan 1 Control Circuit General Electrical Failures Circuit open →
- DTC 048100 →
- Fan Performance →
- DTC 04831C →
- Fan Performance System Internal Failures Over temperature →
- Fan Performance Bus Signal / Message Failures Alive / sequence counter incorrect / not updated →
- DTC 048387 →
- DTC 048392 →
- Fan Performance Component Failures Component internal failure →
- Fan Performance Component Failures Component or system over temperature →
- Fan Power/Ground Circuit →
- Fan Power/Ground Circuit General Electrical Failures Circuit voltage out of range →
- Exhaust Gas Recirculation Sensor "B" Circuit Component Failures Performance or incorrect operation →
- Exhaust Gas Recirculation Sensor "B" Circuit Component Failures Component internal failure →
- Exhaust Gas Recirculation Sensor "B" Circuit Component Failures Component or system over temperature →
- Exhaust Gas Recirculation Sensor "B" Circuit General Electrical Failures System Voltage →
- Exhaust Gas Recirculation Throttle Control Circuit "A"/Open →
- Exhaust Gas Recirculation Control Circuit Low →
- Exhaust Gas Recirculation Control Circuit Low Mechanical Failures Commanded position not reachable →
- Exhaust Gas Recirculation Control Circuit Low Mechanical Failures Alignment or adjustment incorrect →
- Exhaust Gas Recirculation "A" Control Circuit High →
- Fan Speed Low →
- Fan Speed Low Component Failures Component or system operation obstructed or blocked →
- DTC 049700 →
- DTC 049800 →
- DTC 049900 →
- Closed Loop EGR Control At Limit - Flow Too Low →
- Closed Loop EGR Control At Limit - Flow Too High →
- EVAP System High Pressure Purge Line Performance →
- Vehicle Speed Sensor A Bus Signal / Message Failures Value of signal protection calculation incorrect →
- Vehicle Speed Sensor A Bus Signal / Message Failures Signal invalid →
- Idle Control System - RPM Lower Than Expected →
- Idle Control System - RPM Higher Than Expected →
- Cold Start Idle Control System Performance →
- Cold Start Idle Control System Performance Bus Signal / Message Failures Signal below allowable range →
- Cold Start Idle Control System Performance Bus Signal / Message Failures Signal above allowable range →
- Cold Start Ignition Timing Performance →
- Cold Start Engine Coolant Temperature Performance →
- Engine Oil Pressure Sensor/Switch "A" Circuit Range/Performance General Signal Failures Signal stuck low →
- Engine Oil Pressure Sensor/Switch "A" Circuit Range/Performance General Signal Failures Signal stuck high →
- Engine Oil Pressure Too Low →
- Engine Oil Pressure Too Low Component Failures →
- Cold Start Intake (A) Camshaft Position Timing Over-Advanced (Bank 1) →
- Cold Start Intake (A) Camshaft Position Timing Over-Retarded (Bank 1) →
- A/C Refrigerant Pressure Sensor A Circuit Range/Performance →
- A/C Refrigerant Pressure Sensor "A" Circuit Range/Performance General Signal Failures Signal Stuck In Range →
- A/C Refrigerant Pressure Sensor "A" Circuit Low →
- A/C Refrigerant Pressure Sensor "A" Circuit Low General Electrical Failures Circuit short to ground or open →
- A/C Refrigerant Pressure Sensor "A" Circuit High →
- A/C Refrigerant Pressure Sensor "A" Circuit High General Electrical Failures Circuit short to battery →
- A/C Refrigerant Charge Loss →
- A/C Refrigerant Charge Loss Mechanical Failures Fluid leak or seal failure →
- Cold Start Exhaust (B) Camshaft Position Timing Over-Advanced (Bank 1) →
- Cold Start Exhaust (B) Camshaft Position Timing Over-Retarded (Bank 1) →
- Engine Oil Pressure Sensor/Switch "B" Circuit General Signal Failures Signal erratic →
- Engine Oil Pressure Sensor/Switch "B" Circuit Range/Performance →
- Engine Oil Pressure Sensor/Switch "B" Circuit Range/Performance Component Failures →
- Engine Oil Pressure Sensor/Switch "B" Circuit Low →
- Engine Oil Pressure Sensor/Switch "B" Circuit High →
- Engine Oil Pressure Out of Range →
- DSystem Voltage Low →
- System Voltage High →
- Battery Monitor Module Voltage Monitoring Performance →
- Engine Oil Bypass Valve Control Circuit/Open General Electrical Failures Circuit open →
- Engine Oil Bypass Valve Control Circuit Low General Electrical Failures Circuit short to ground →
- Engine Oil Bypass Valve Control Circuit High General Electrical Failures Circuit short to battery →
- Internal Control Module Random Access Memory (RAM) Error System Internal Failures General memory failure →
- Internal Control Module Random Access Memory (RAM) Error System Internal Failures Supervision software failure →
- Control Module Processor Algorithm Based Failures Signal compare failure →
- Control Module Processor Component Failures Component internal failure →
- Control Module Performance System Internal Failures →
- Control Module Performance System Internal Failures General checksum failure →
- Control Module Performance System Internal Failures General memory failure →
- Control Module Performance System Internal Failures Special memory failure →
- Control Module Performance System Internal Failures Data memory failure →
- Control Module Performance System Internal Failures Program memory failure →
- Control Module Performance System Internal Failures Watchdog / safety µC failure →
- Control Module Performance System Internal Failures Supervision software failure →
- Control Module Performance Bus Signal / Message Failures Alive / sequence counter incorrect / not updated →
- Internal Control Module A/D Processing Performance General electrical failure →
- Internal Control Module A/D Processing Performance General signal failure →
- Internal Control Module A/D Processing Performance FM (Frequency Modulated) / PWM (Pulse Width Modulated) Failures →
- Internal Control Module A/D Processing Performance System Internal Failures Supervision software failure →
- Internal Control Module Main Processor Performance System Internal Failures Supervision software failure →
- Internal Control Module Main Processor Performance Algorithm Based Failures Signal compare failure →
- Internal Control Module Main Processor Performance Algorithm Based Failures Event information →
- Internal Control Module Main Processor Performance Component Failures Performance or incorrect operation →
- Internal Control Module Main Processor Performance Component Failures Unexpected operation →
- Starter Relay Circuit General Electrical Failures Circuit short to ground →
- Starter Relay Circuit General Electrical Failures Circuit short to battery →
- Starter Relay Circuit General Electrical Failures Circuit open →
- Starter Relay Circuit System Internal Failures Watchdog / safety µC failure →
- Starter Relay Circuit Algorithm Based Failures Signal plausibility failure →
- Alternative Fuel Control Module RAM/ROM Error →
- Internal Control Module Torque Performance →
- DInternal Control Module Torque Performance Algorithm Based Failures Signal compare failure →
- Internal Control Module Torque Calculation Performance General signal failure →
- Internal Control Module Torque Calculation Performance Algorithm Based Failures Signal plausibility failure →
- DTC 061B92 →
- Internal Control Module Engine RPM Performance System Internal Failures Supervision software failure →
- Fuel Pump A Control Circuit / Open →
- Fuel Pump A Control Circuit High →
- Fuel Injector Driver Circuit Performance Bank 1 General electrical failure →
- Fuel Injector Driver Circuit Performance Bank 1 General signal failure →
- Fuel Injector Driver Circuit Performance Bank 1 System Internal Failures →
- Fuel Injector Driver Circuit Performance Bank 1 System Internal Failures Internal electronic failure →
- PCM / ECM / TCM Internal Temperature Too High →
- PCM / ECM / TCM Internal Temperature Too High System Internal Failures Over temperature →
- PCM / ECM / TCM Internal Temperature Too High Component Failures Component or system over temperature →
- Throttle Actuator Control Range/Performance - Bank 1 →
- Sensor Reference Voltage A Circuit Low →
- Sensor Reference Voltage A Circuit High →
- A/C Clutch Relay Control Circuit Low →
- A/C Clutch Relay Control Circuit Low General Electrical Failures Circuit short to ground →
- A/C Clutch Relay Control Circuit High →
- A/C Clutch Relay Control Circuit High General Electrical Failures Circuit short to battery or open →
- Sensor Reference Voltage "B" Circuit Low →
- Sensor Reference Voltage "B" Circuit High →
- PCM / ECM / TCM Internal Temperature Sensor Circuit Low →
- PCM / ECM / TCM Internal Temperature Sensor Circuit High →
- ECM/PCM Power Relay Control Circuit/Open →
- ECM/PCM Power Relay De-Energized - Too Late →
- Fan 1 Control Circuit Low →
- Fan 1 Control Circuit Low General Electrical Failures Circuit short to ground →
- Fan 1 Control Circuit High →
- Fan 1 Control Circuit High General Electrical Failures Circuit short to battery →
- DTC 069300 →
- DTC 069400 →
- Variable A/C Compressor Control Circuit →
- Variable A/C Compressor Control Circuit General Electrical Failures Circuit open →
- DTC 06A055 →
- DTC 06A094 →
- Variable A/C Compressor Control Circuit Low →
- Variable A/C Compressor Control Circuit Low General Electrical Failures Circuit short to ground →
- Variable A/C Compressor Control Circuit High →
- Variable A/C Compressor Control Circuit High General Electrical Failures Circuit short to battery →
- Sensor Reference Voltage "A" Circuit Range/Performance General Electrical Failures Circuit voltage below threshold →
- Sensor Reference Voltage "A" Circuit Range/Performance General Electrical Failures Circuit voltage above threshold →
- Sensor Reference Voltage "B" Circuit Range/Performance General Electrical Failures Circuit voltage below threshold →
- Sensor Reference Voltage "B" Circuit Range/Performance General Electrical Failures Circuit voltage above threshold →
- Engine Oil Pressure Control Circuit/Open →
- Engine Oil Pressure Control Circuit Low →
- Engine Oil Pressure Control Circuit High →
- Engine Oil Pressure Control Circuit Performance/Stuck Off →
- Engine Oil Pressure Control Circuit Stuck On →
- Transmission Control System (MIL Request) Algorithm Based Failures Event information →
- DTC 070168 →
- Shift Malfunction Algorithm Based Failures Event information →
- DTC 078098 →
- Park / Neutral Switch Input Circuit Bus Signal / Message Failures Signal invalid →
- Park / Neutral Switch Input Circuit Low →
- Park / Neutral Switch Input Circuit High →
Fault Traces
- Sensor- COPY →
- Relay check →
- Fuel injector - V102 →
- Engine coolant temperature sensor - S403 →
- Intake manifold air temperature sensor - S303 →
- Sensor, oil level - S503 →
- Control valve, fuel quantity - V103 →
- Camshaft position sensor - S601 →
- Crankshaft position sensor S602 →
- Fuel pressure sensor high-pressure side - S105 →
- Manifold Pressure Sensor (MAP) - S302 →
- Oil pressure- and oil temperature sensor - S502 →
- Charge air duct pressure sensor - S305 →
- Control valve, engine oil cooling - V405 →
- Engine oil pump solenoid - V500 →
- EVAP purge valve - V109 →
- Turbo bypass valve - V308 →
- Turbo control valve, wastegate - V306 →
- VVT solenoid - V603 →
- EGR differential pressure sensor - S704 →
- EVAP purge pressure sensor - S108 →
- Exhaust gas temperature sensor - S703 →
- Fuel pressure sensor low-pressure side - S104 →
- Pressure sensor, particulate filter - S701 →
- Coolant temperature sensor, water-cooled charge air cooler - S404 →
- Supercharger clutch - V311 →
- Knock sensor - S604 →
- Air pressure and temperature sensor 1 - S304-1 →
- Fuel pressure- and temperature sensor, low-pressure side - S106 →
- Fuel pump module - P101 →
- Ignition coil and spark plug, 1 - T200-1 →
Service & Repair
Component Descriptions
Parts
Wiring Diagrams
Test FT
test
Spark plugs, replace
Removal

Remove the spark plugs.
Installation
Install the spark plugs, torque 18 Nm
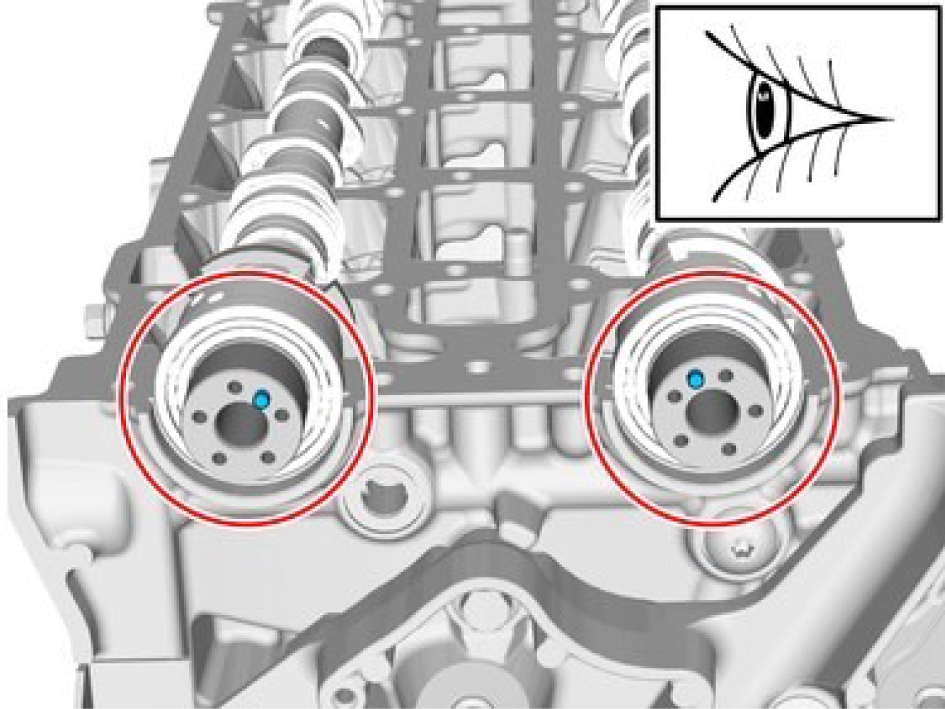
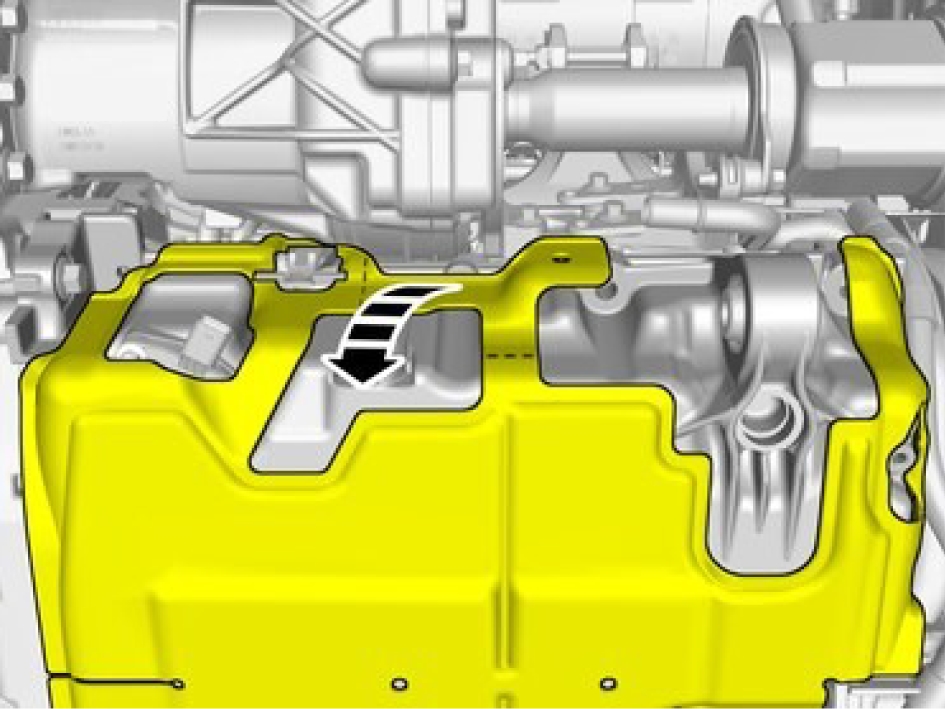
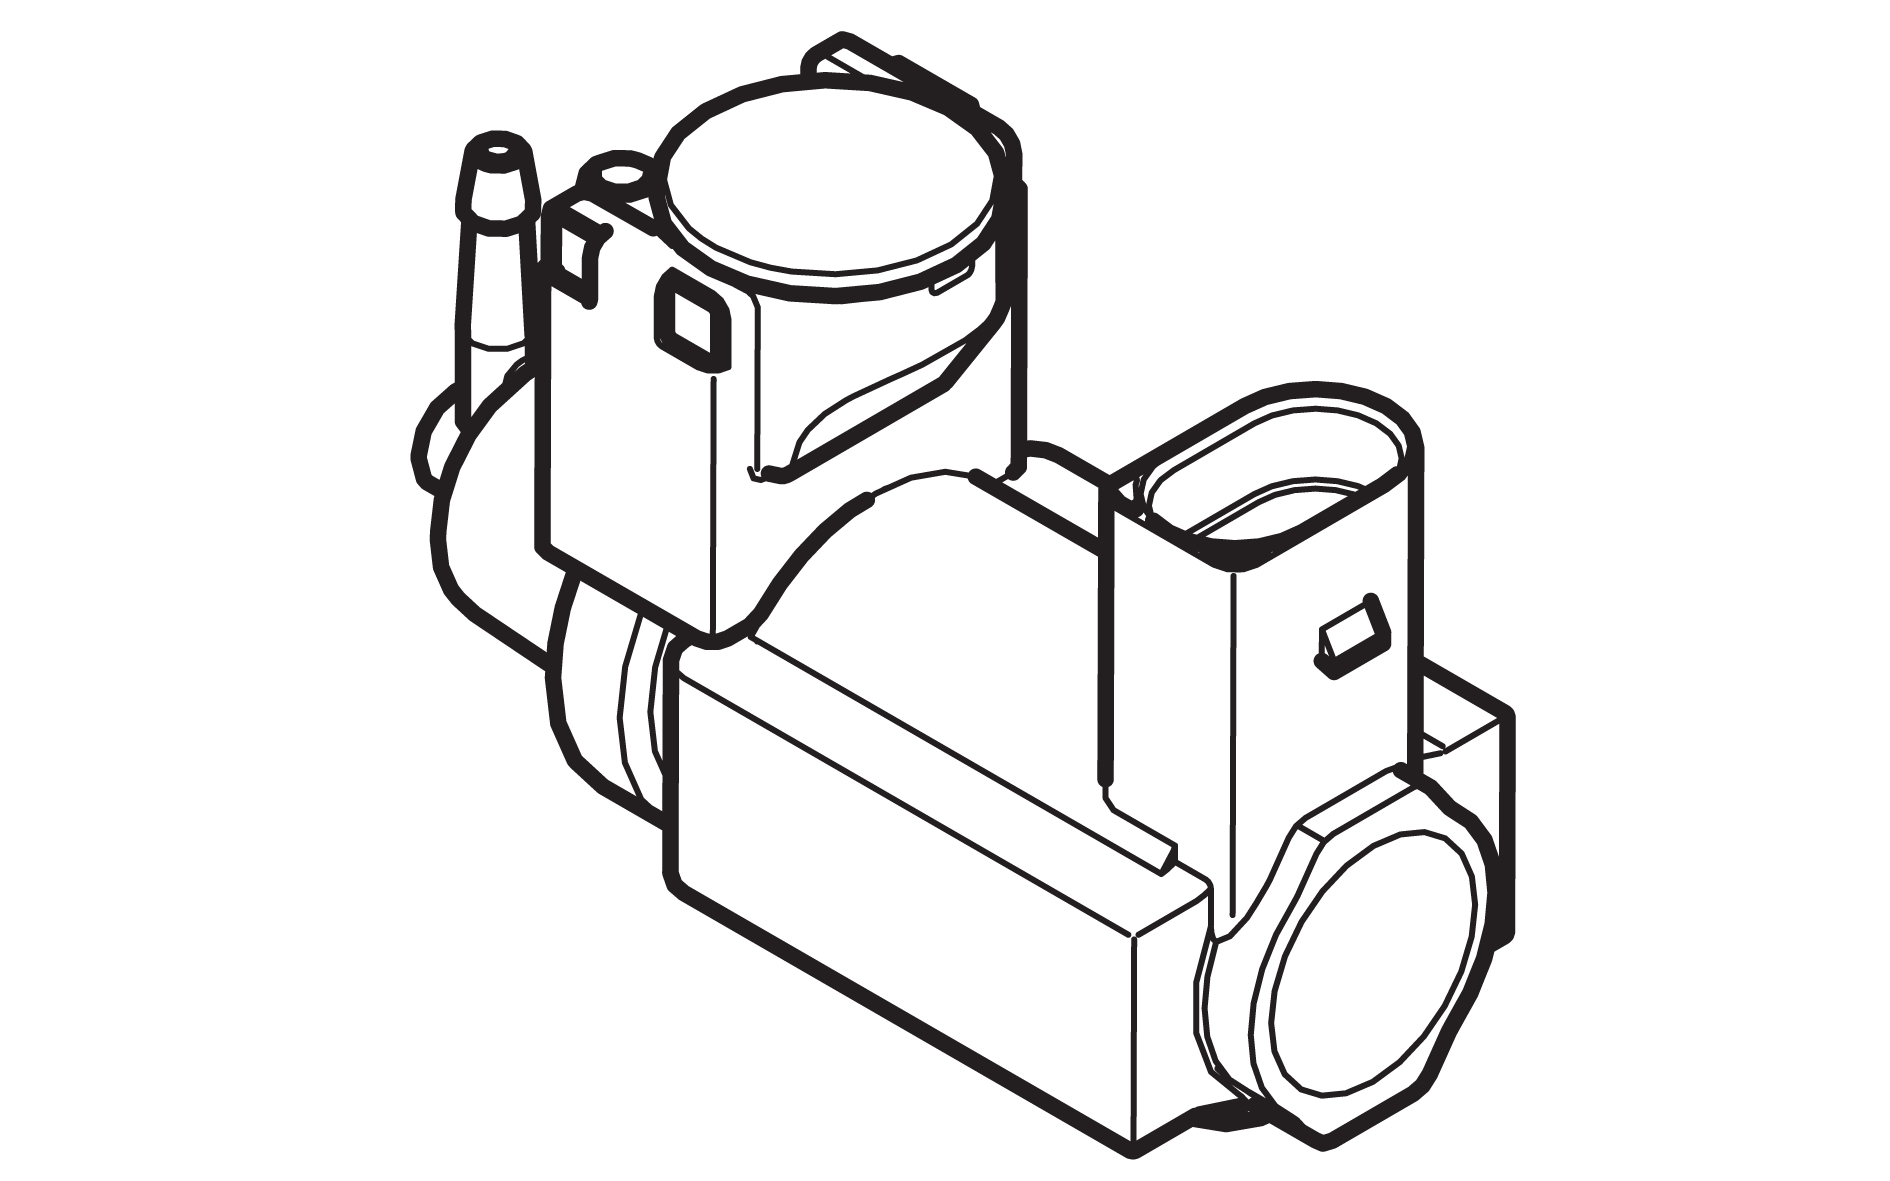
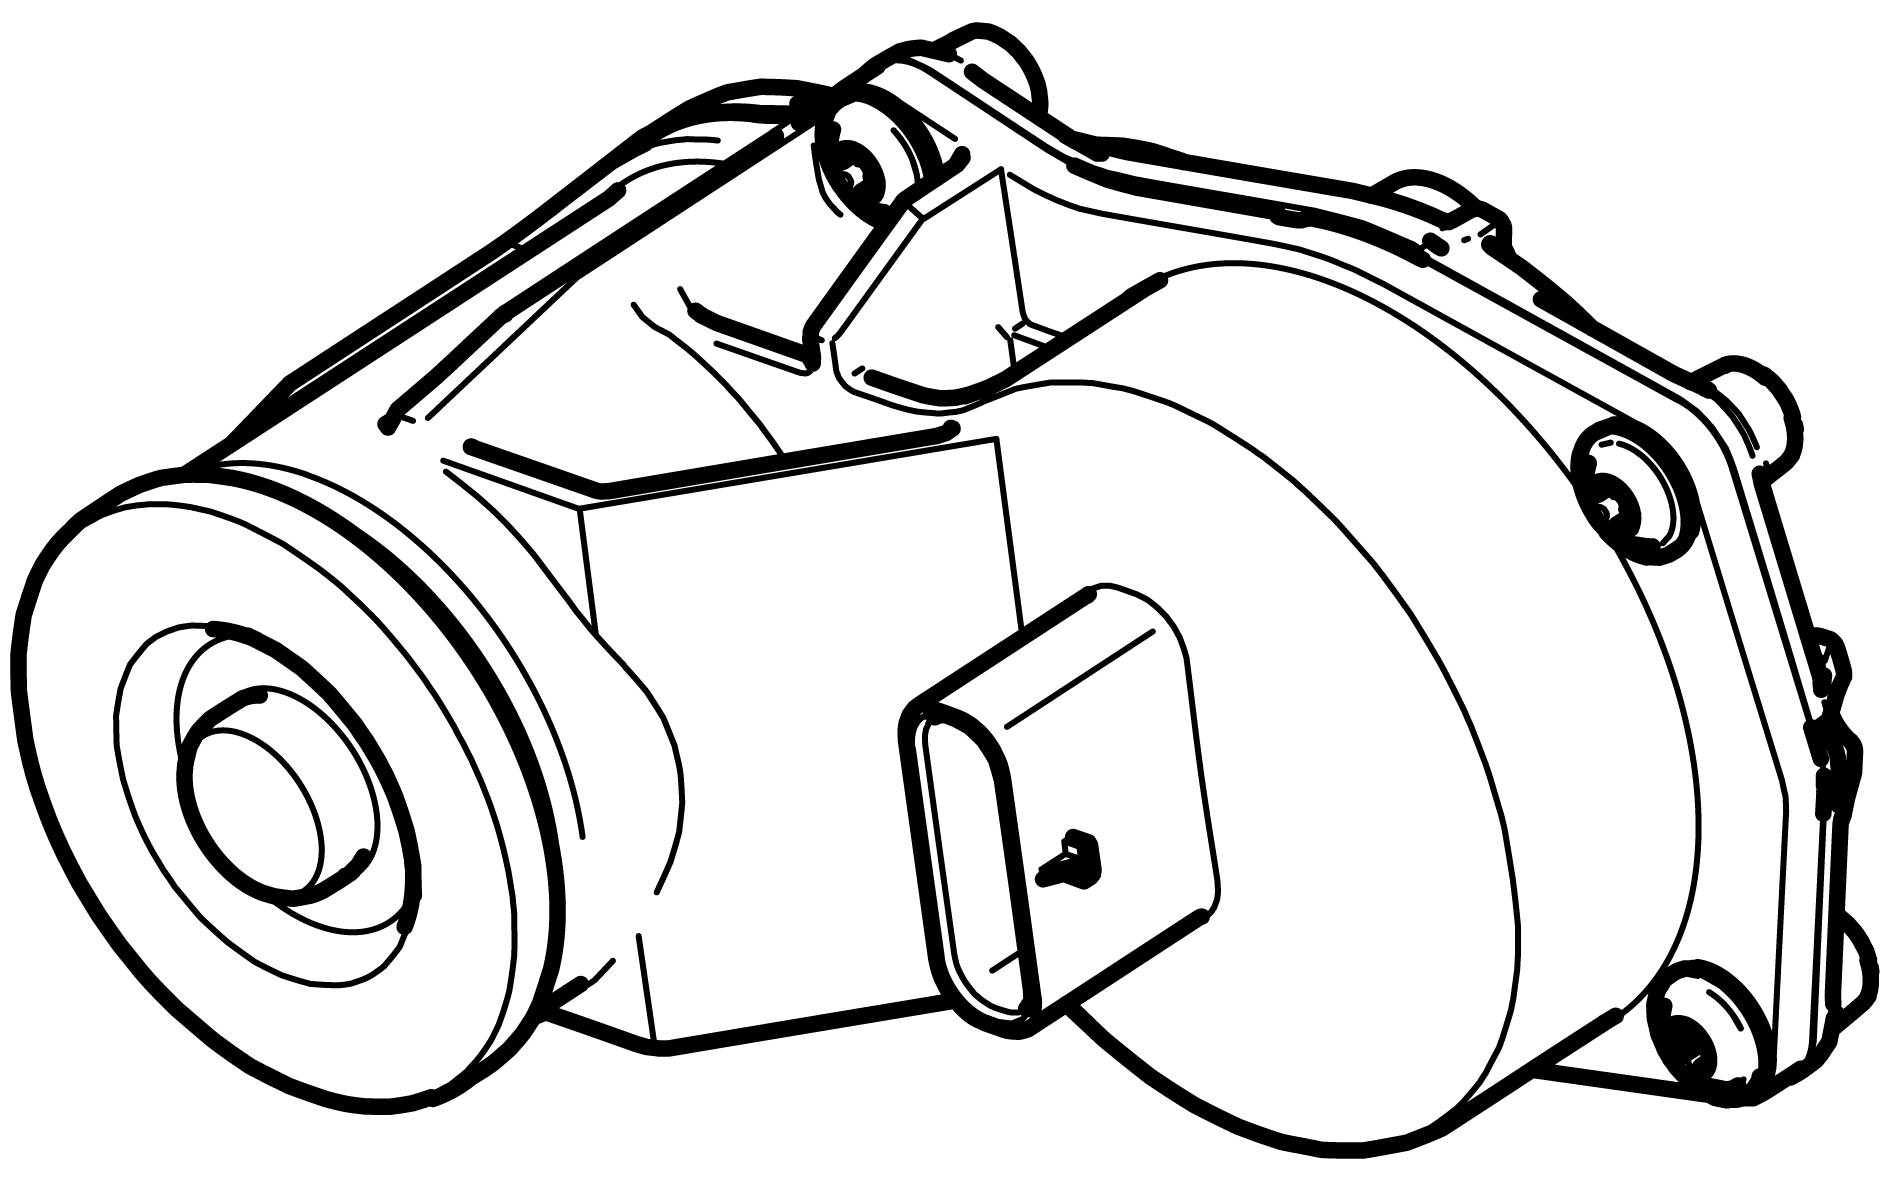
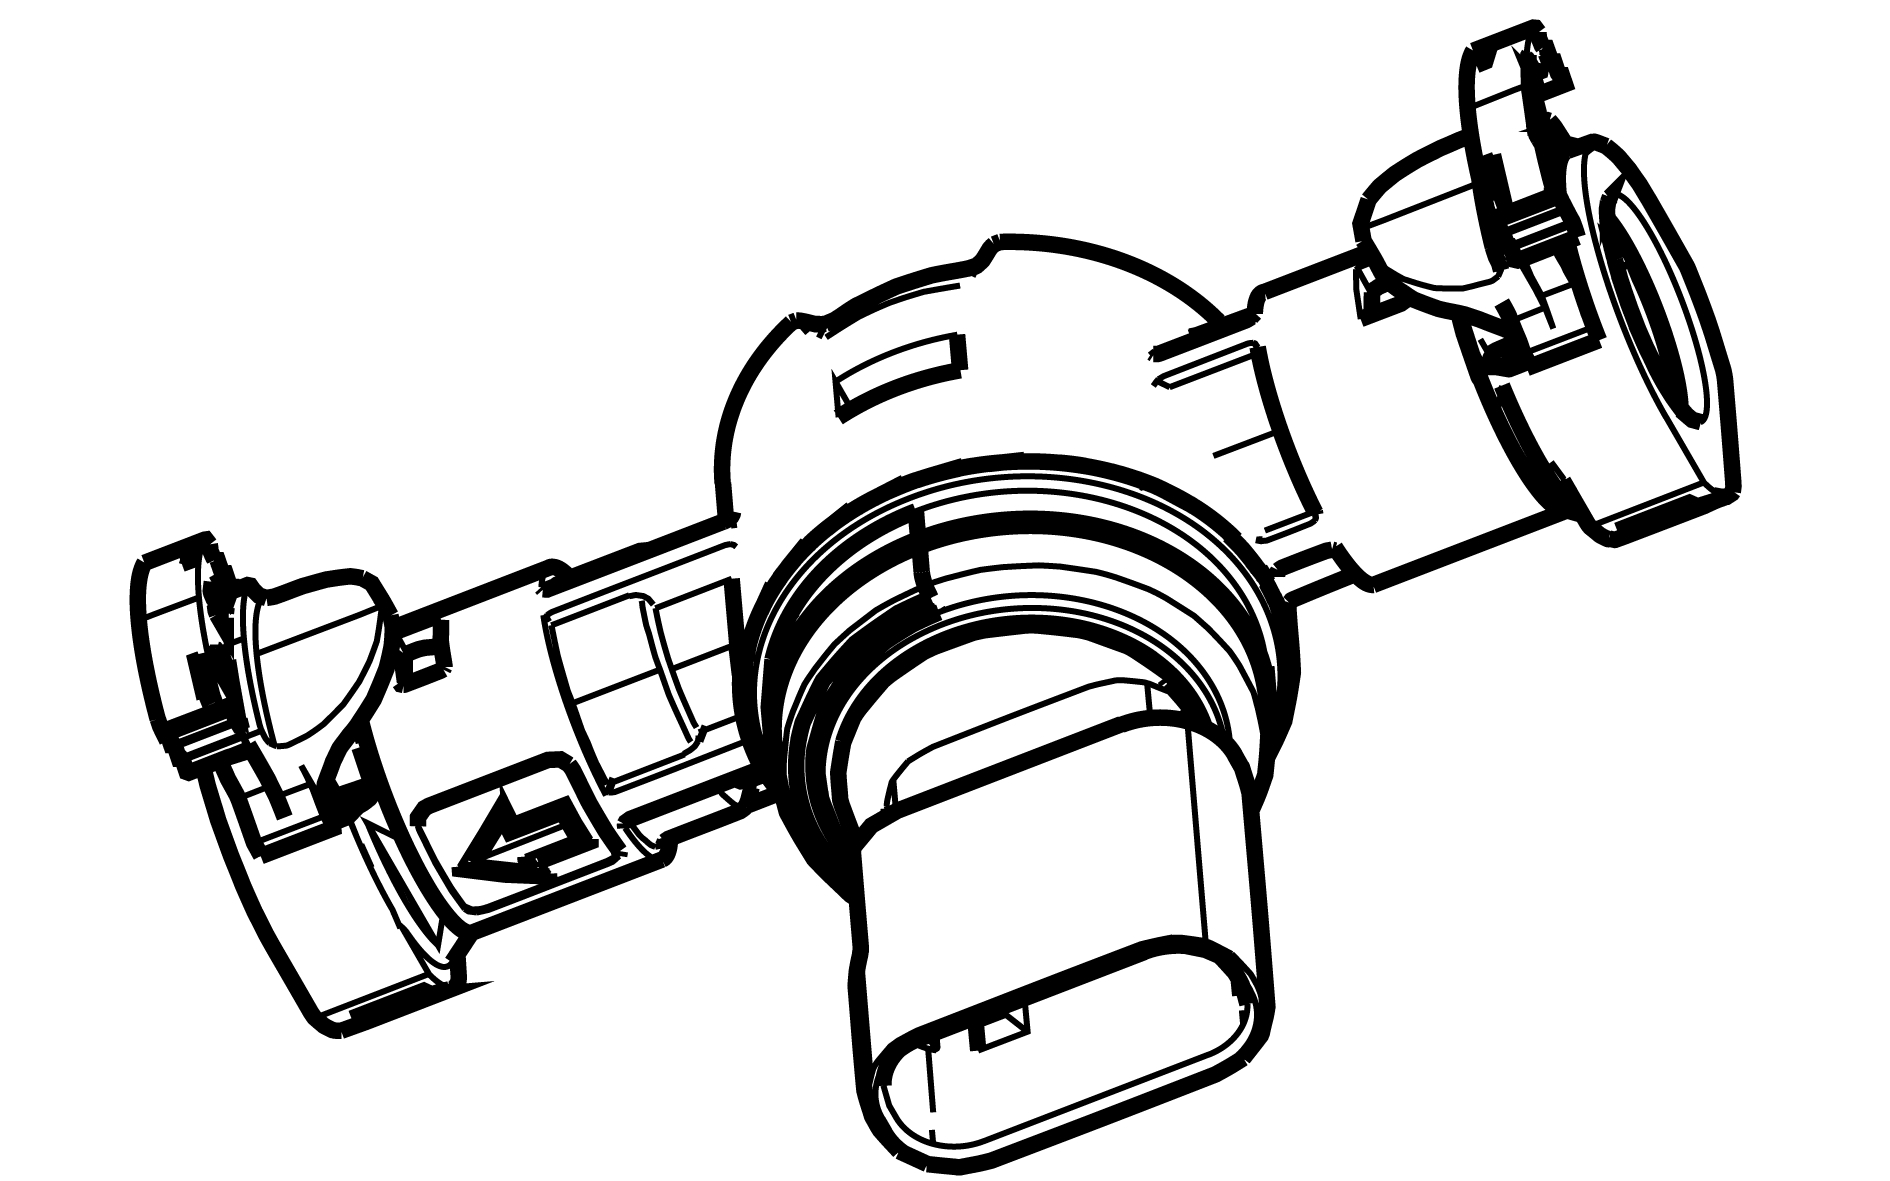
Exhaust solenoid, replace
Removal
Make sure that the area around the component is clean and free of foreign material.
Disconnect the connector.
Remove the screw.
Installation
Install the marked component.
Torque:10 Nm
Connect the connector.
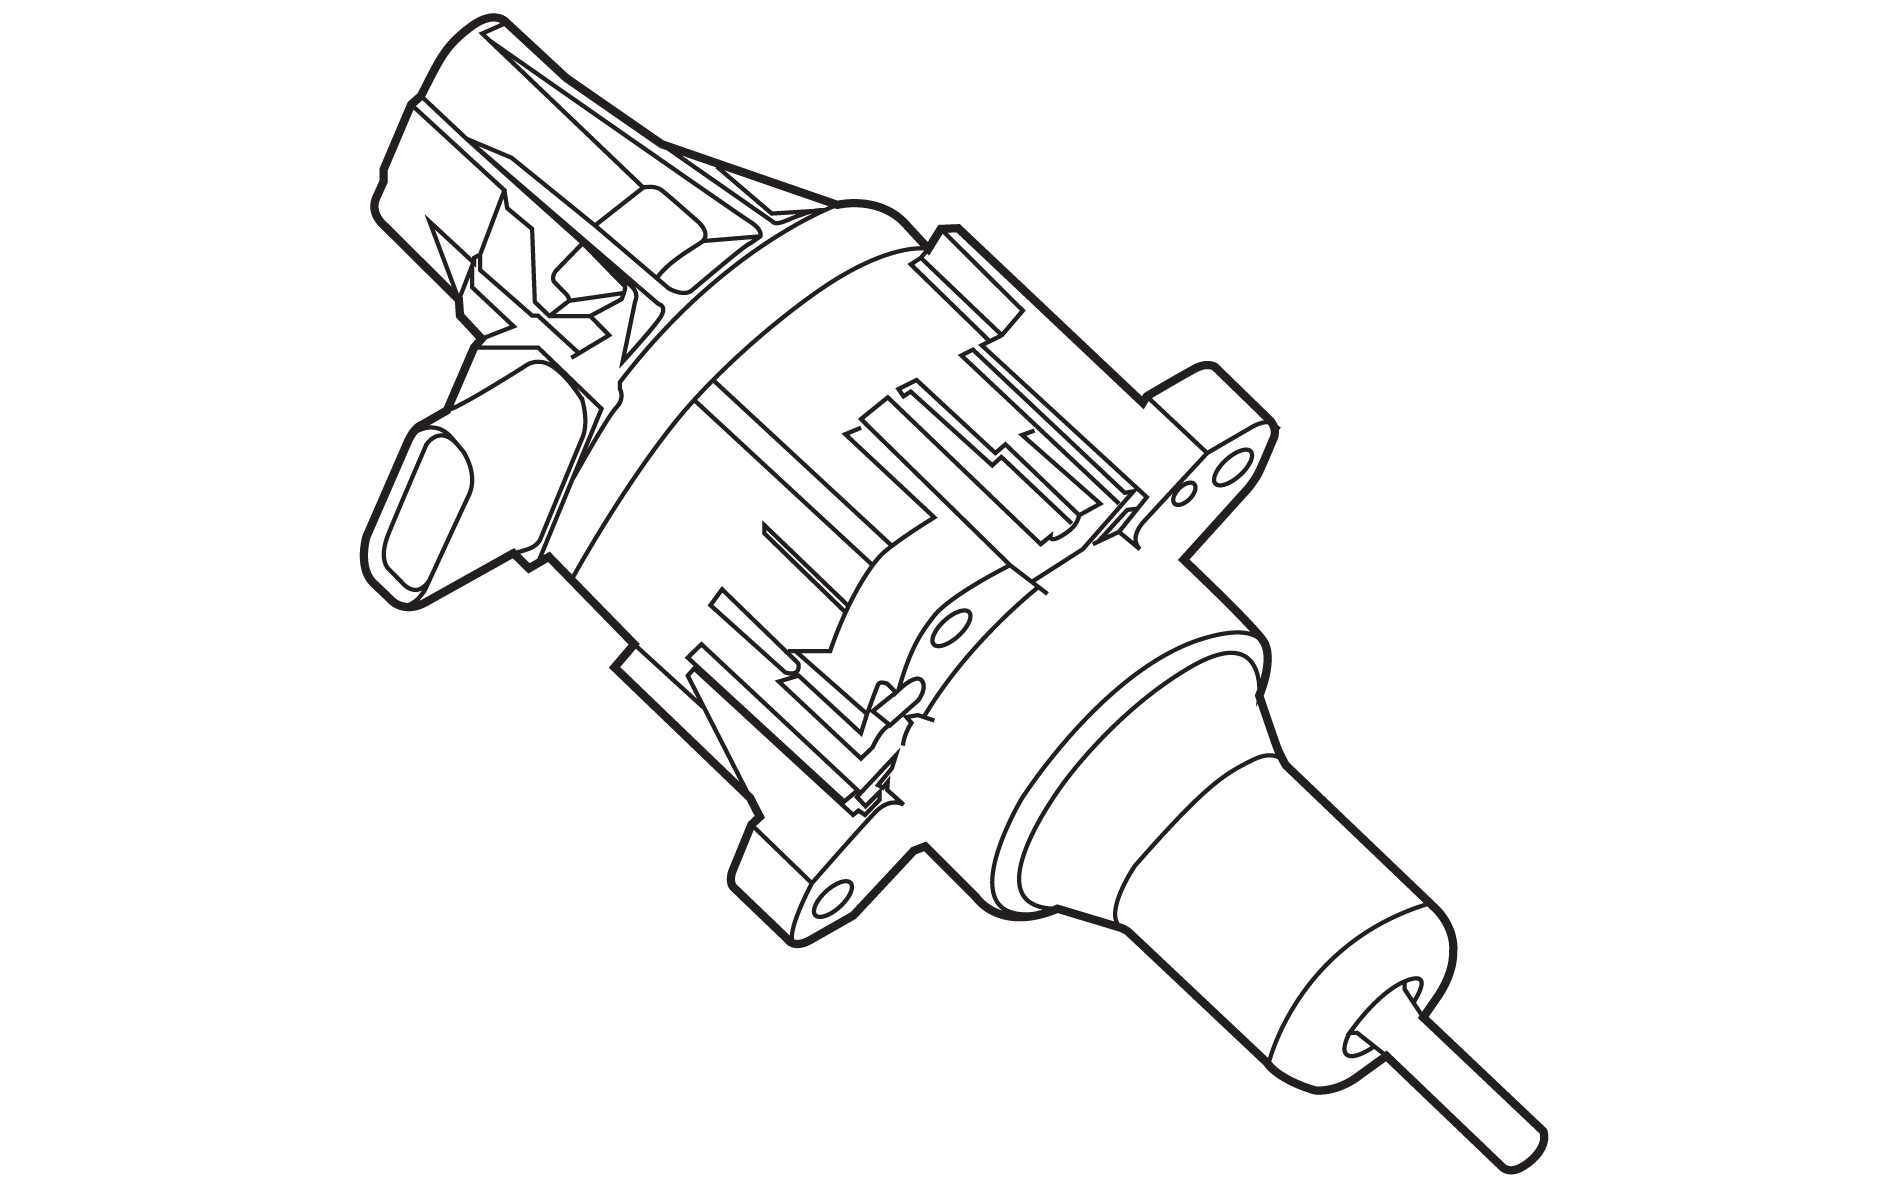
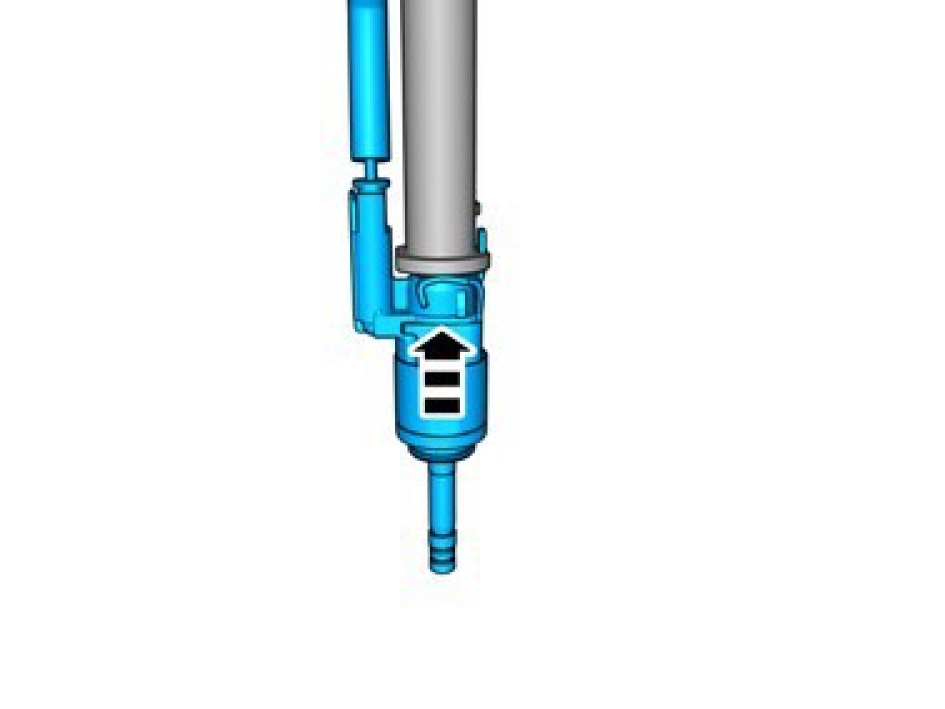
Intake solenoid, replace
Make sure that the area around the component is clean and free of foreign material.
Remove the connector.
Remove the screw.
Lift the intake solenoid straight up.
Screw M6, torque: 10 Nm
Aux
Test
Template

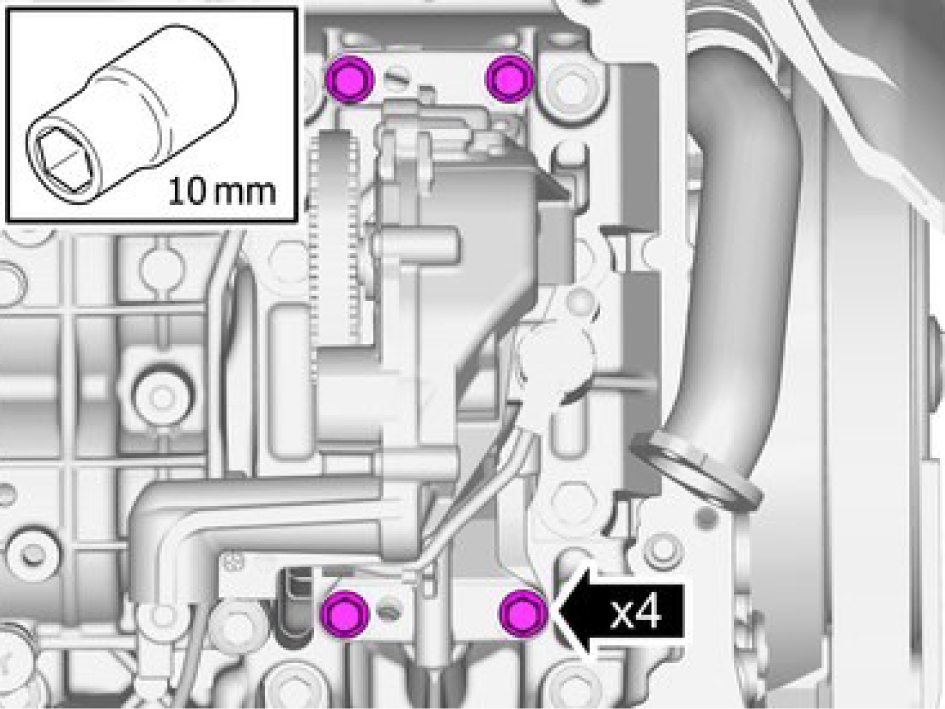
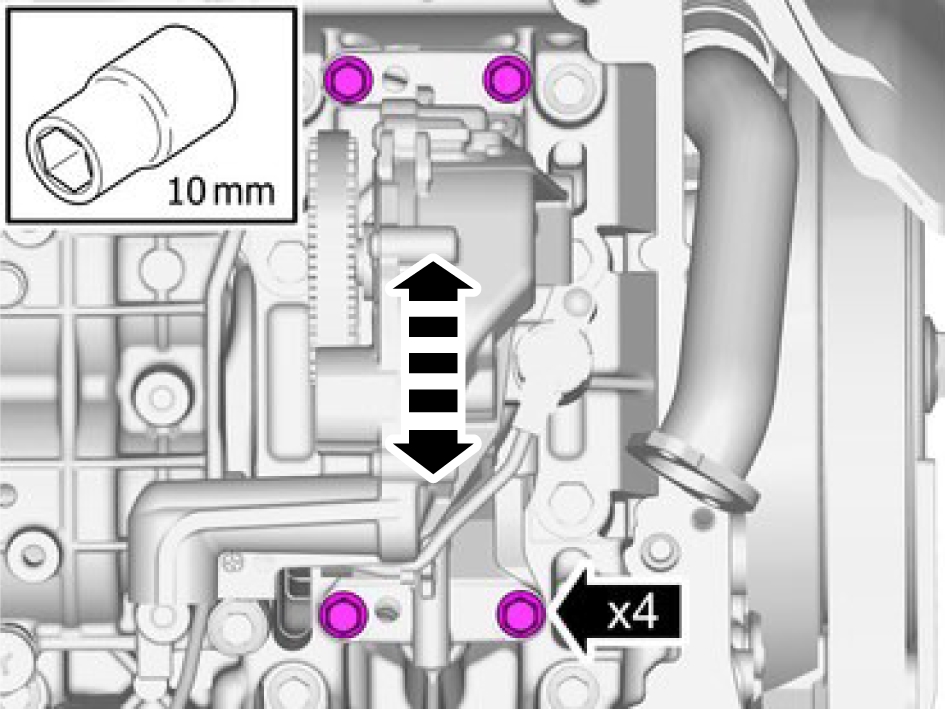
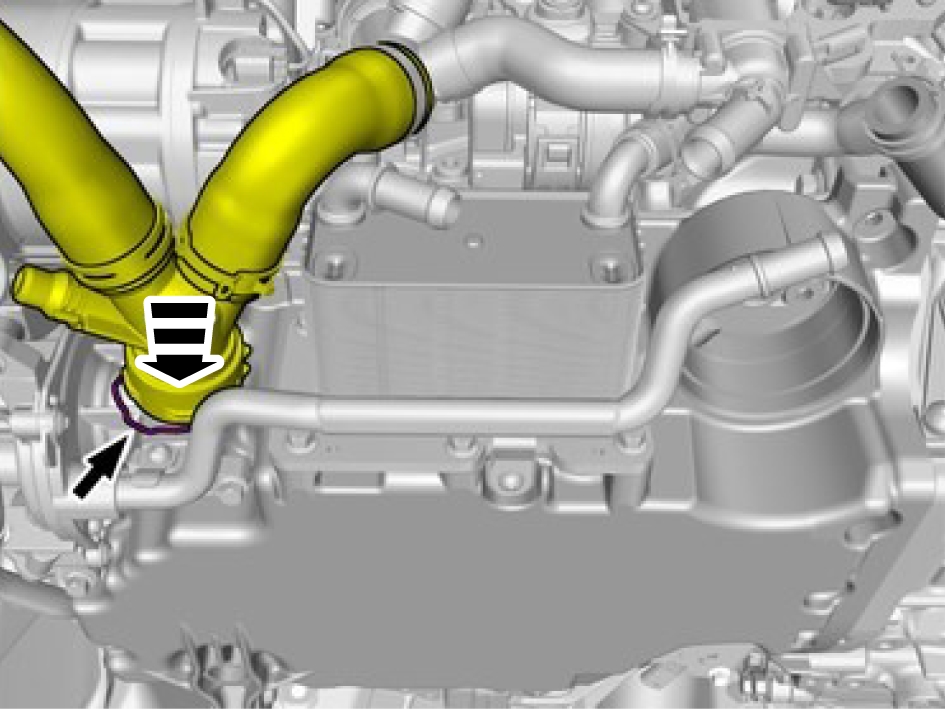
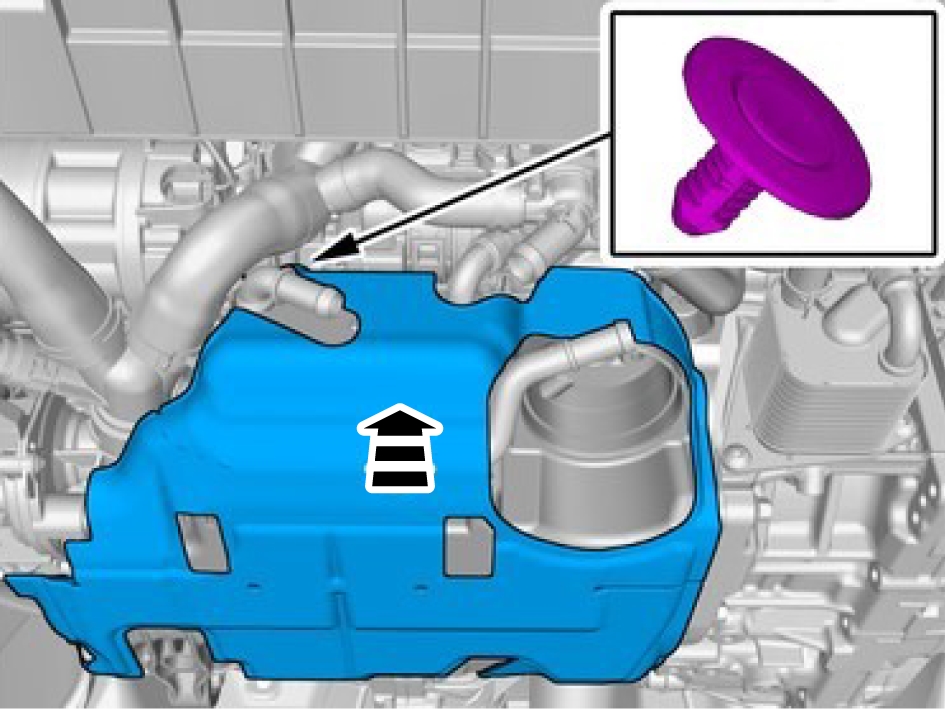
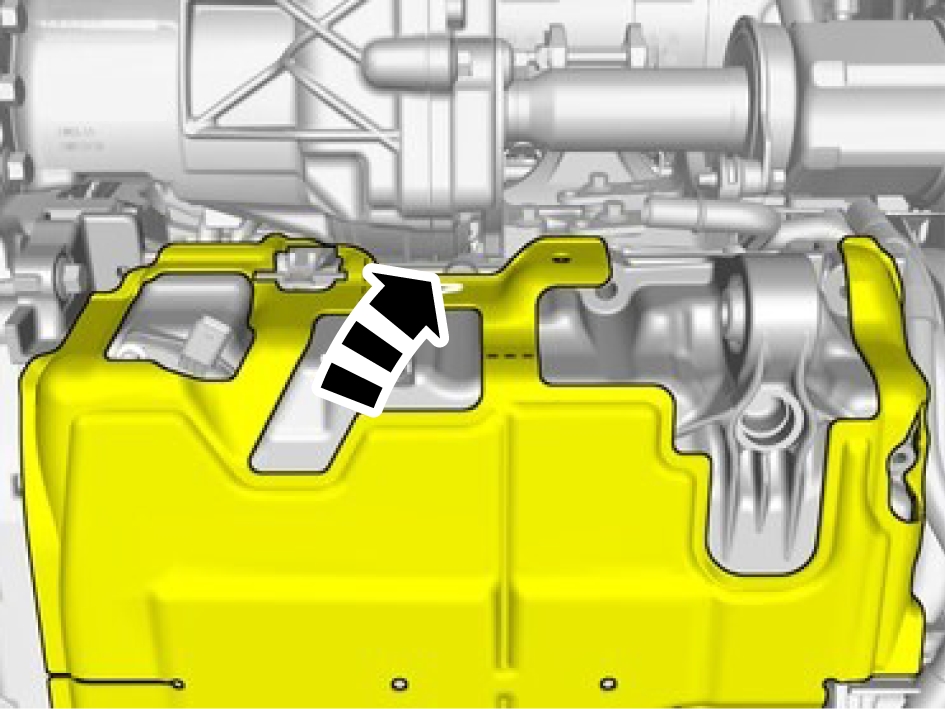
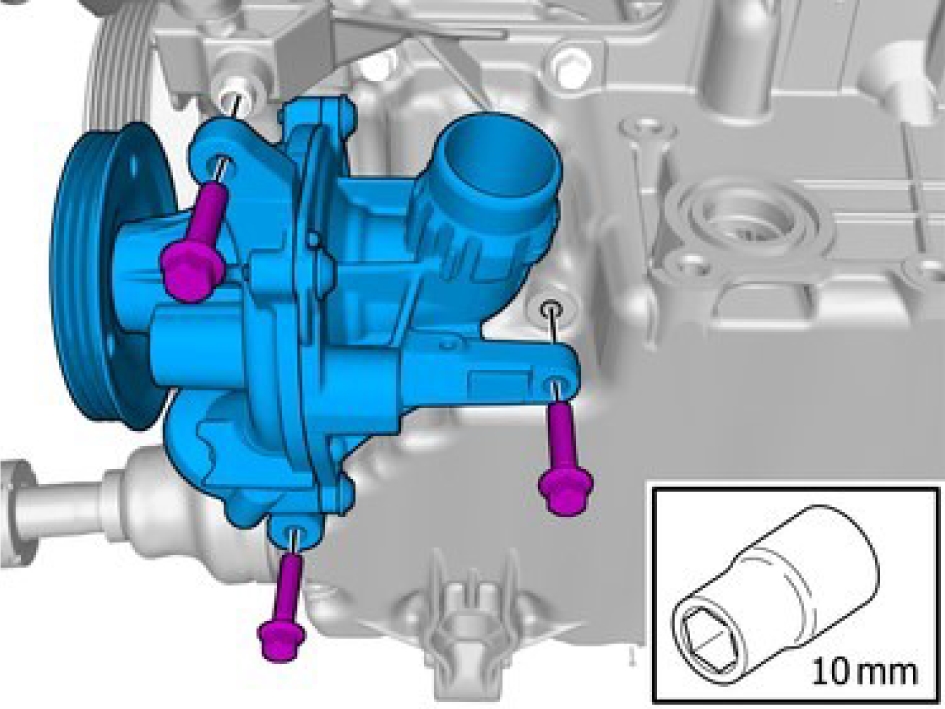
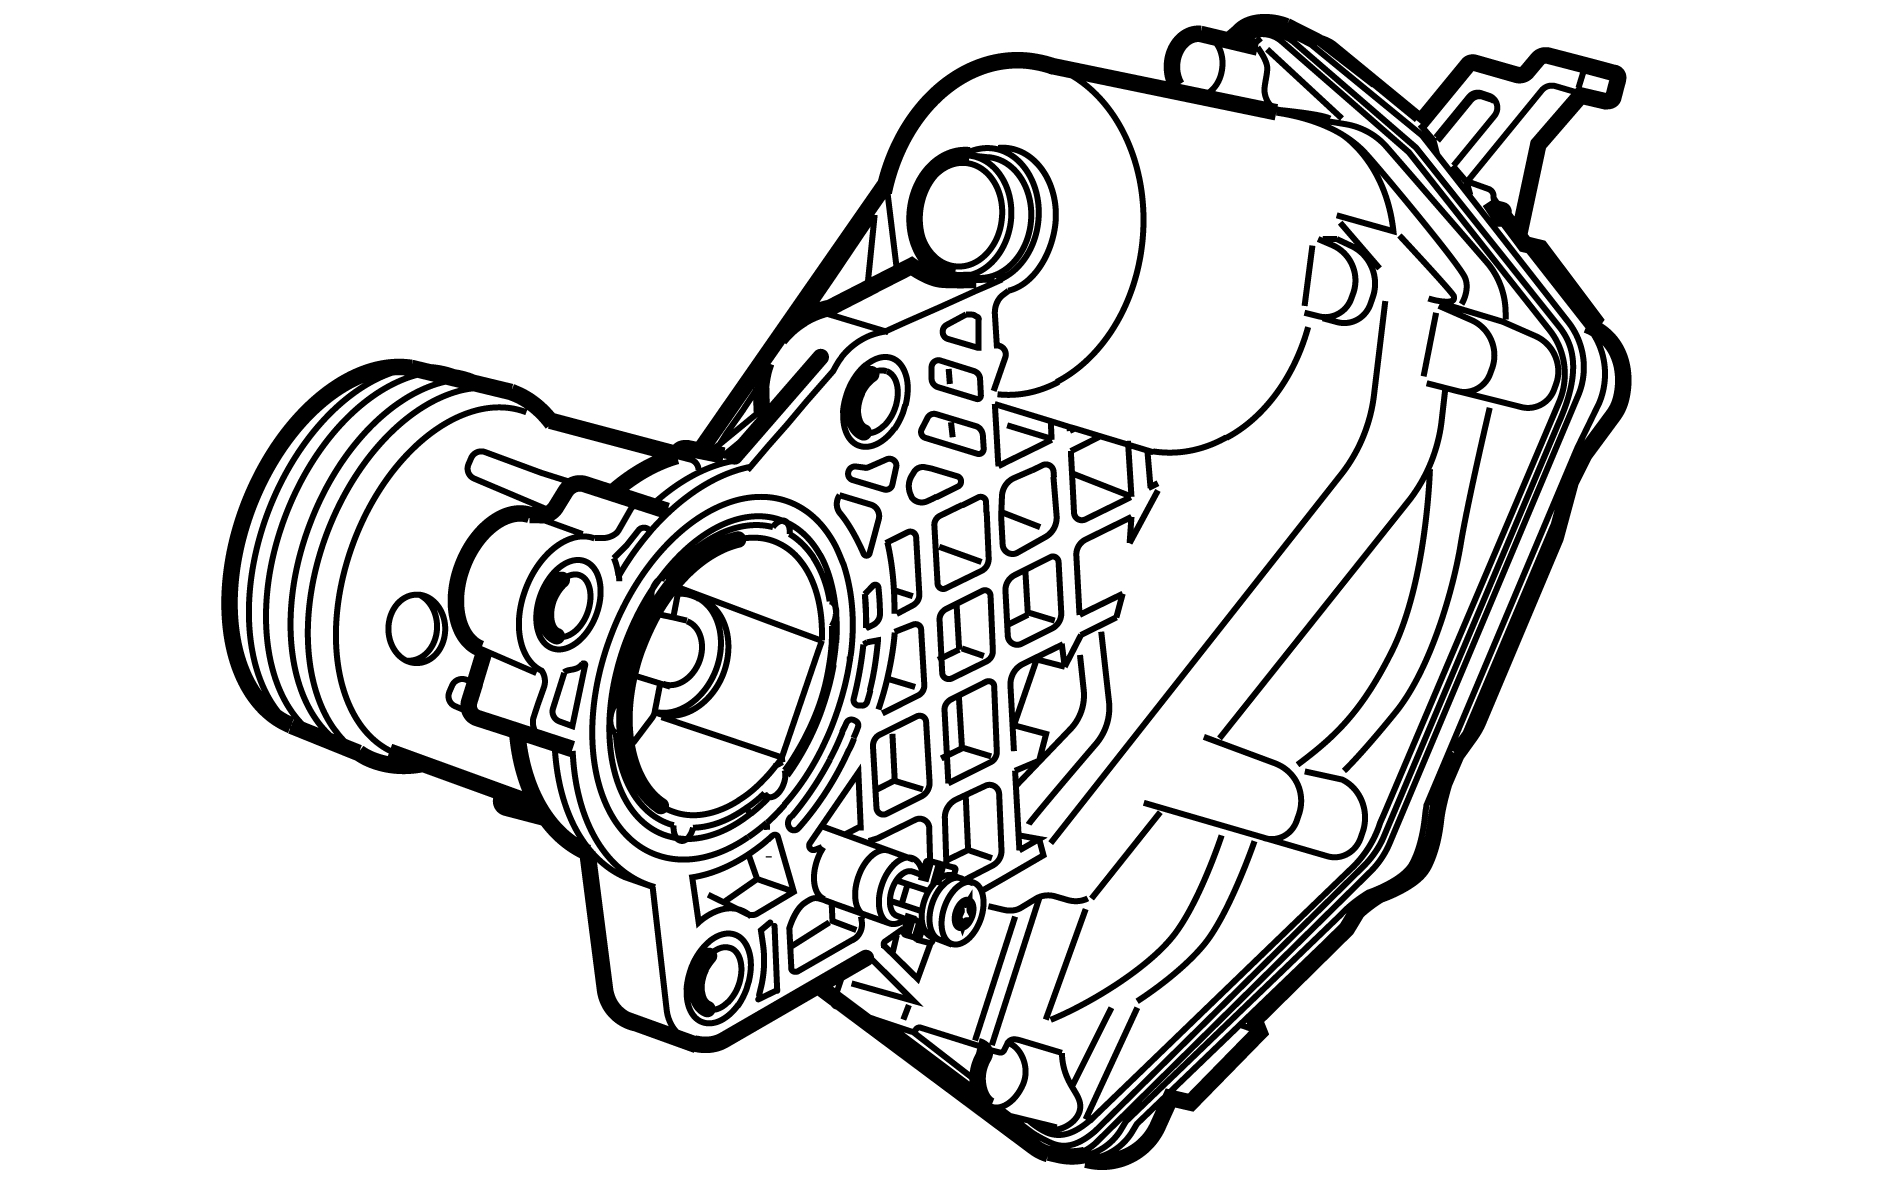
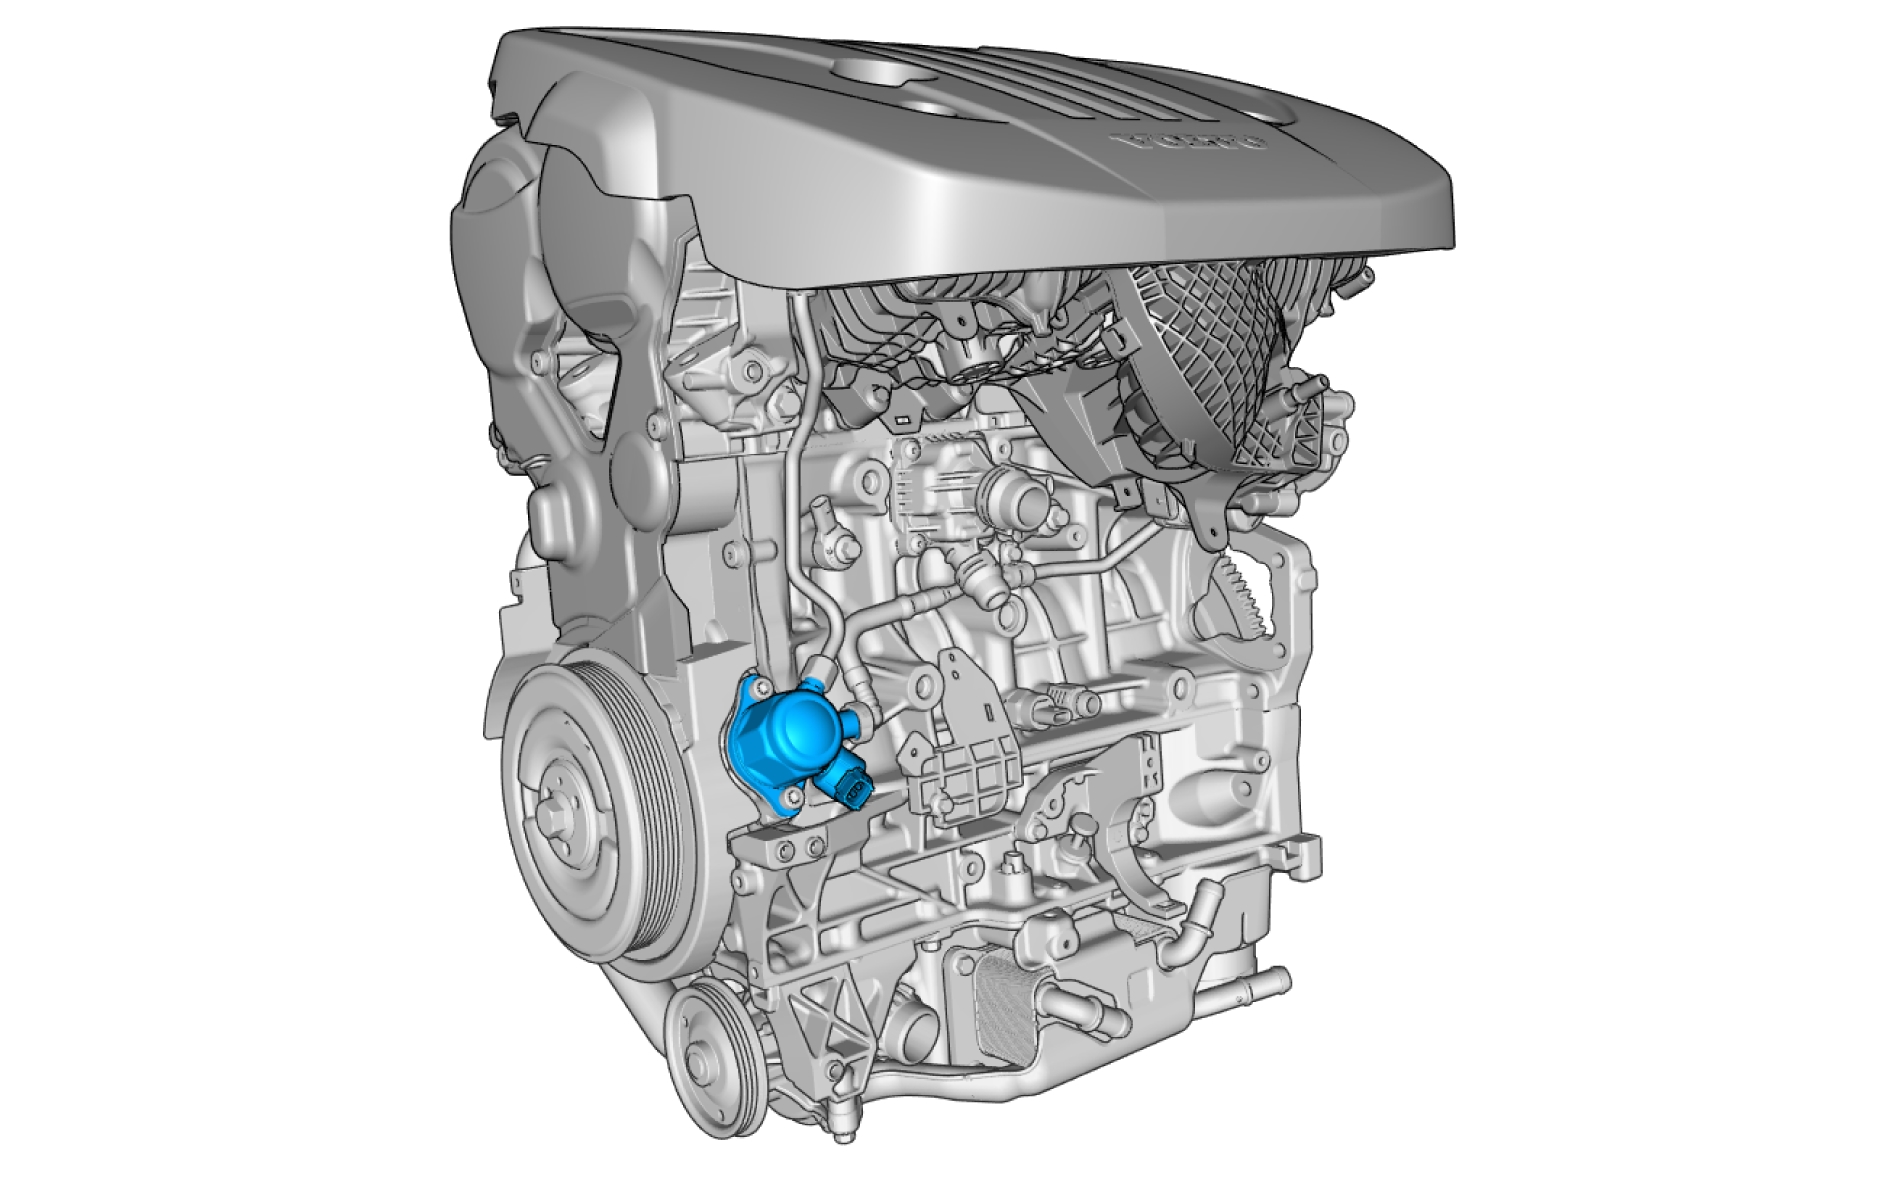
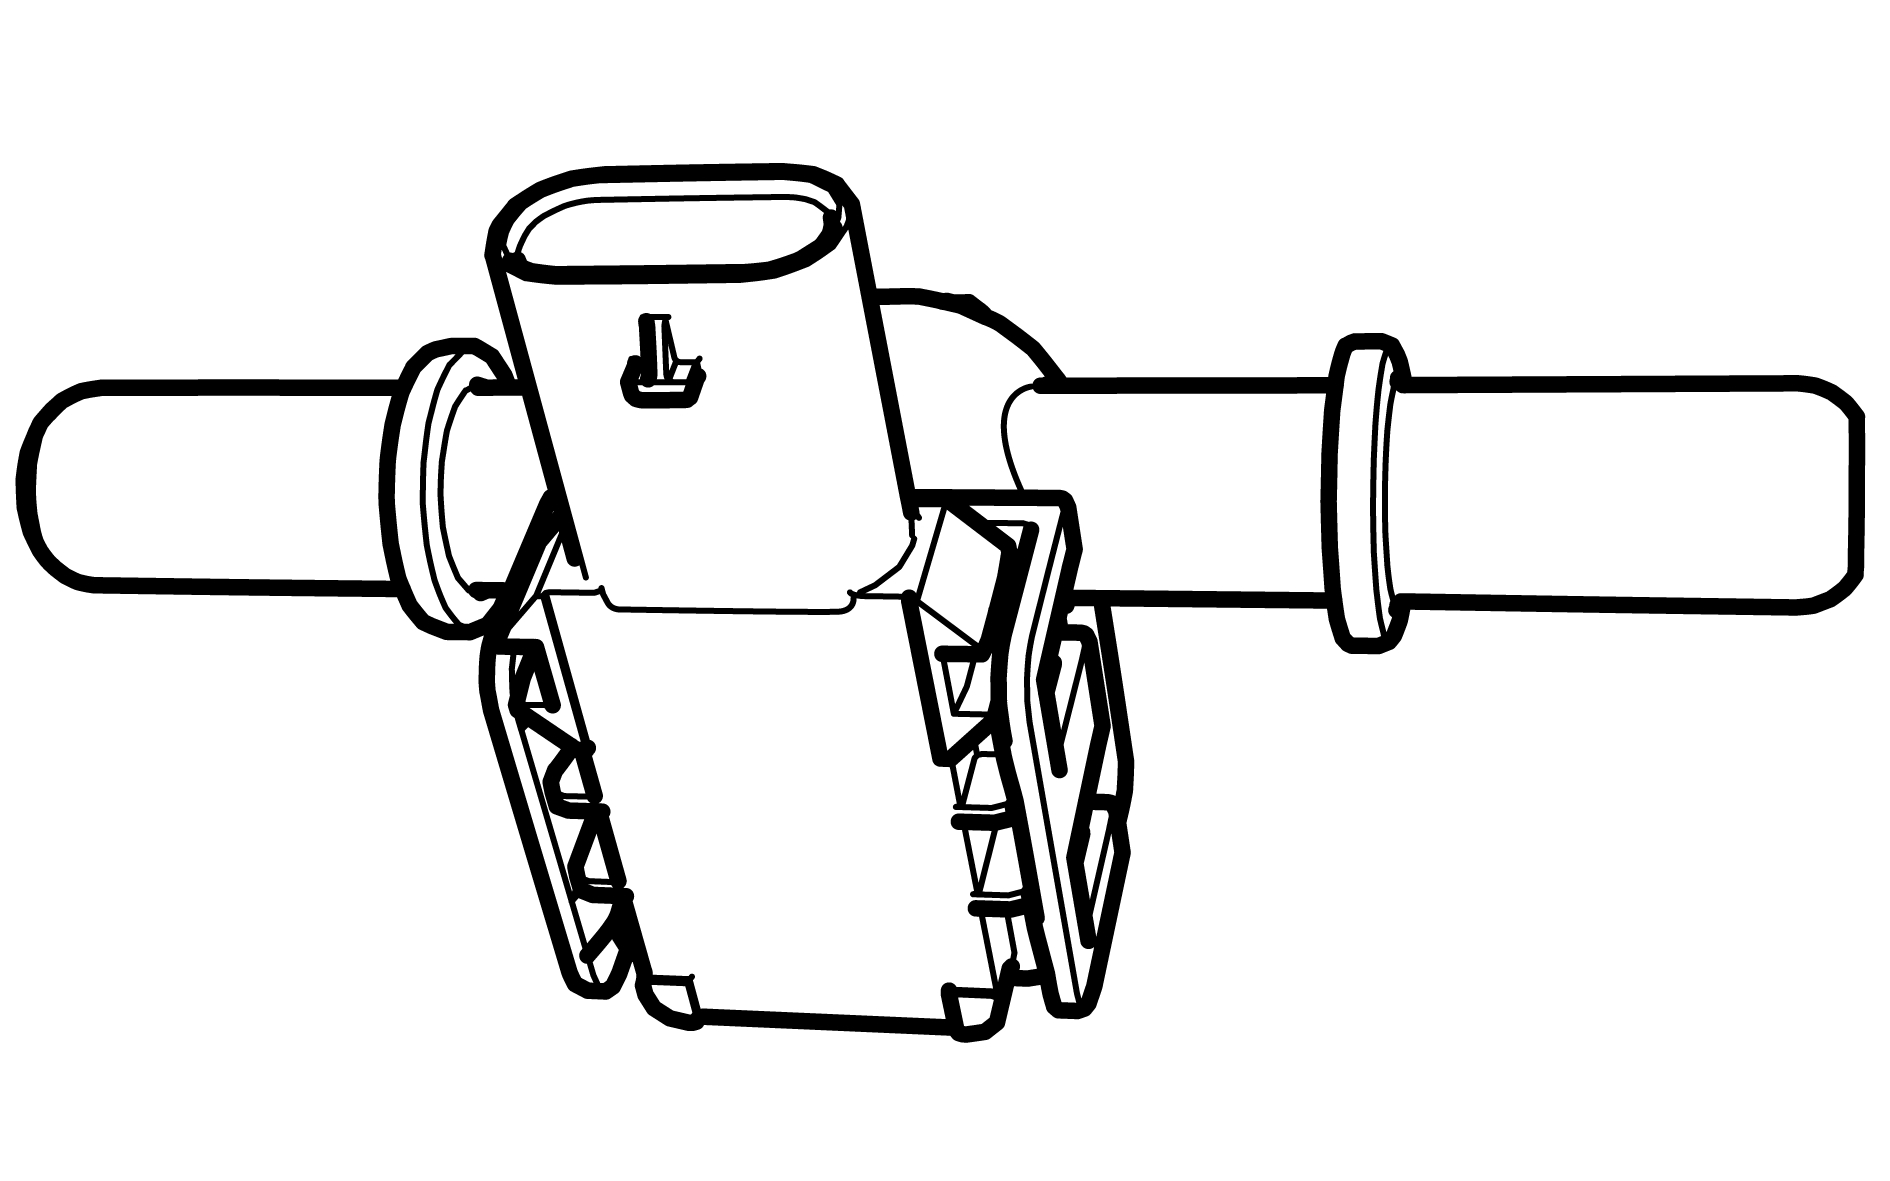
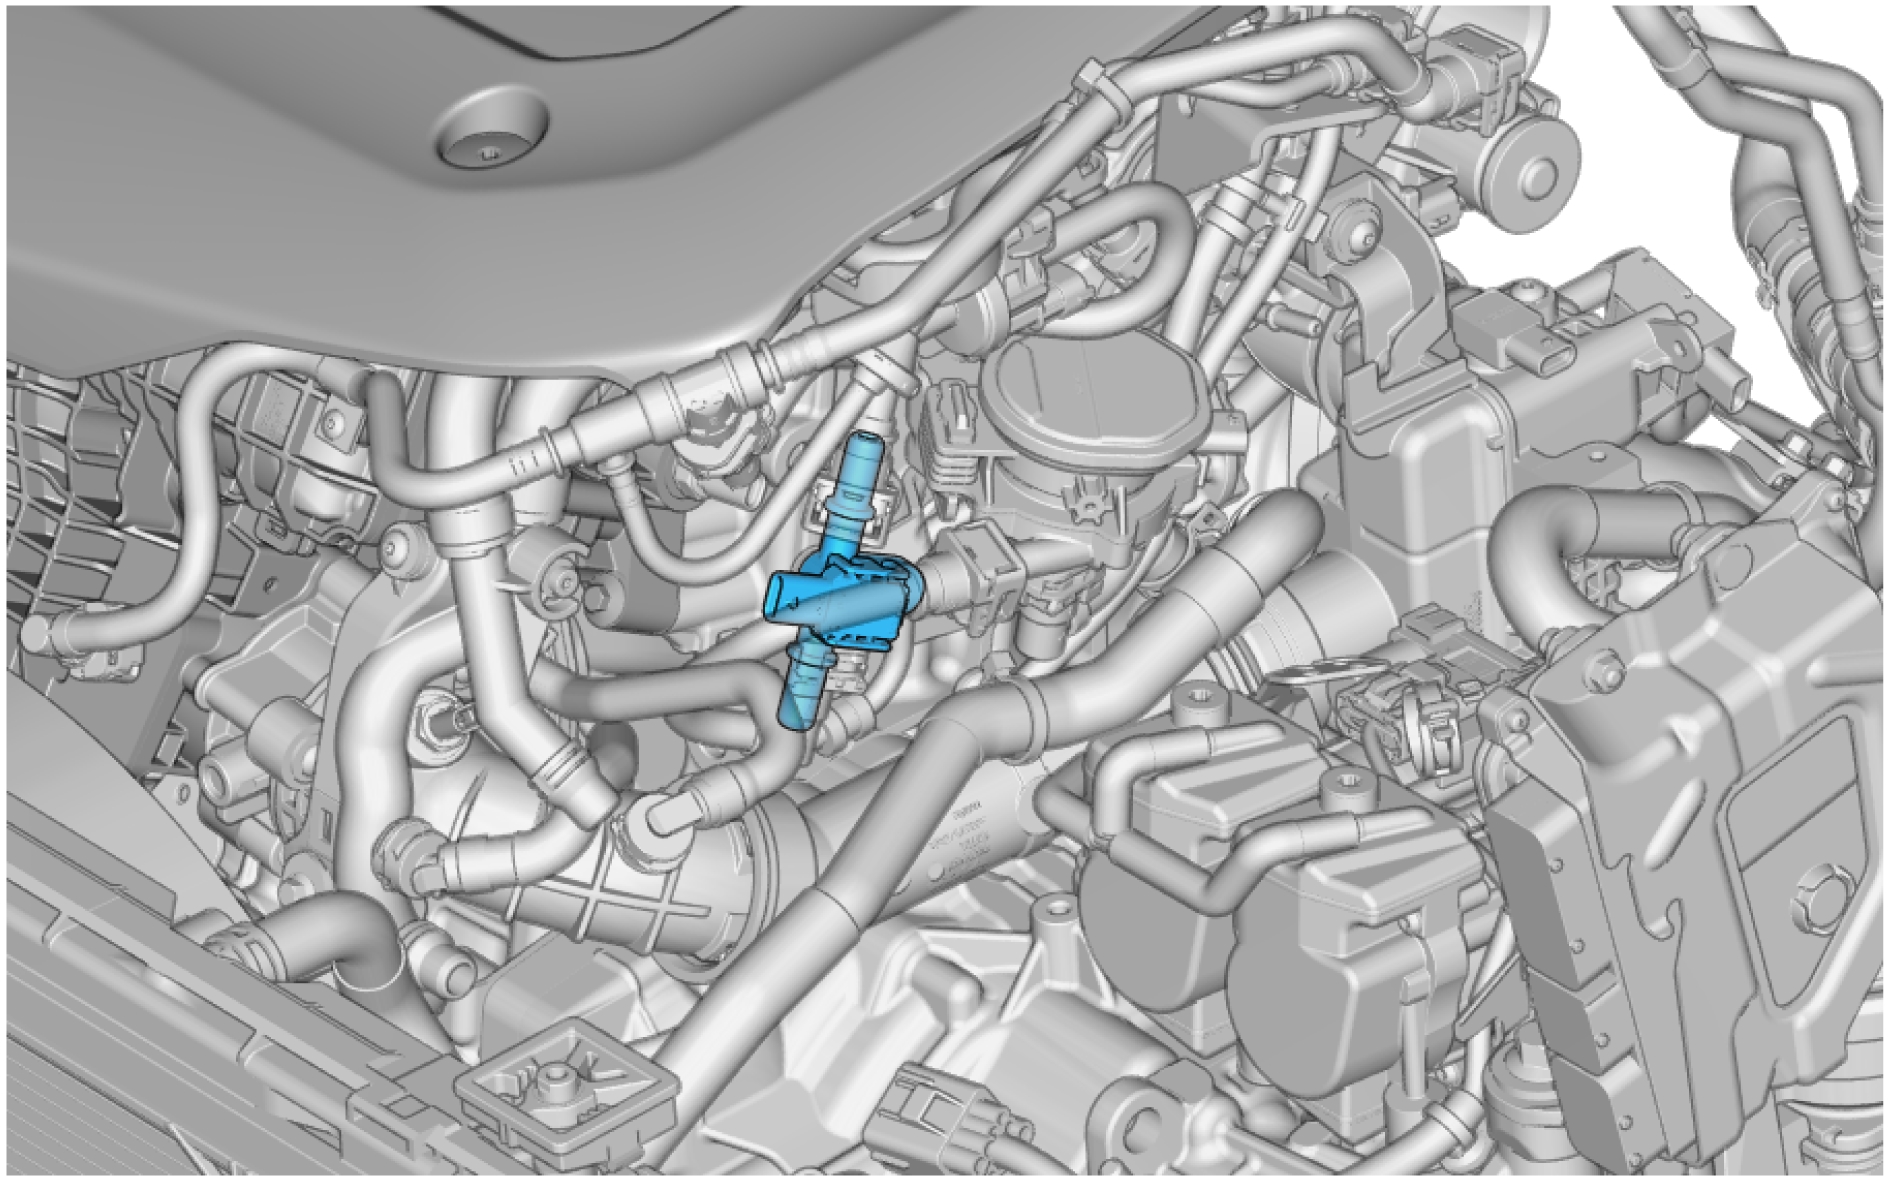
Coolant pump - engine, replace
Removal
Remove the screw.
Torque: 10 Nm
Remove the screw.
Torque: 10 Nm
Remove the screws.
Torque: 24 Nm

Remove the screw.
Torque: 24 Nm
Release the clip.
Move marked component aside.
Remove the screw.
Torque: 50 Nm
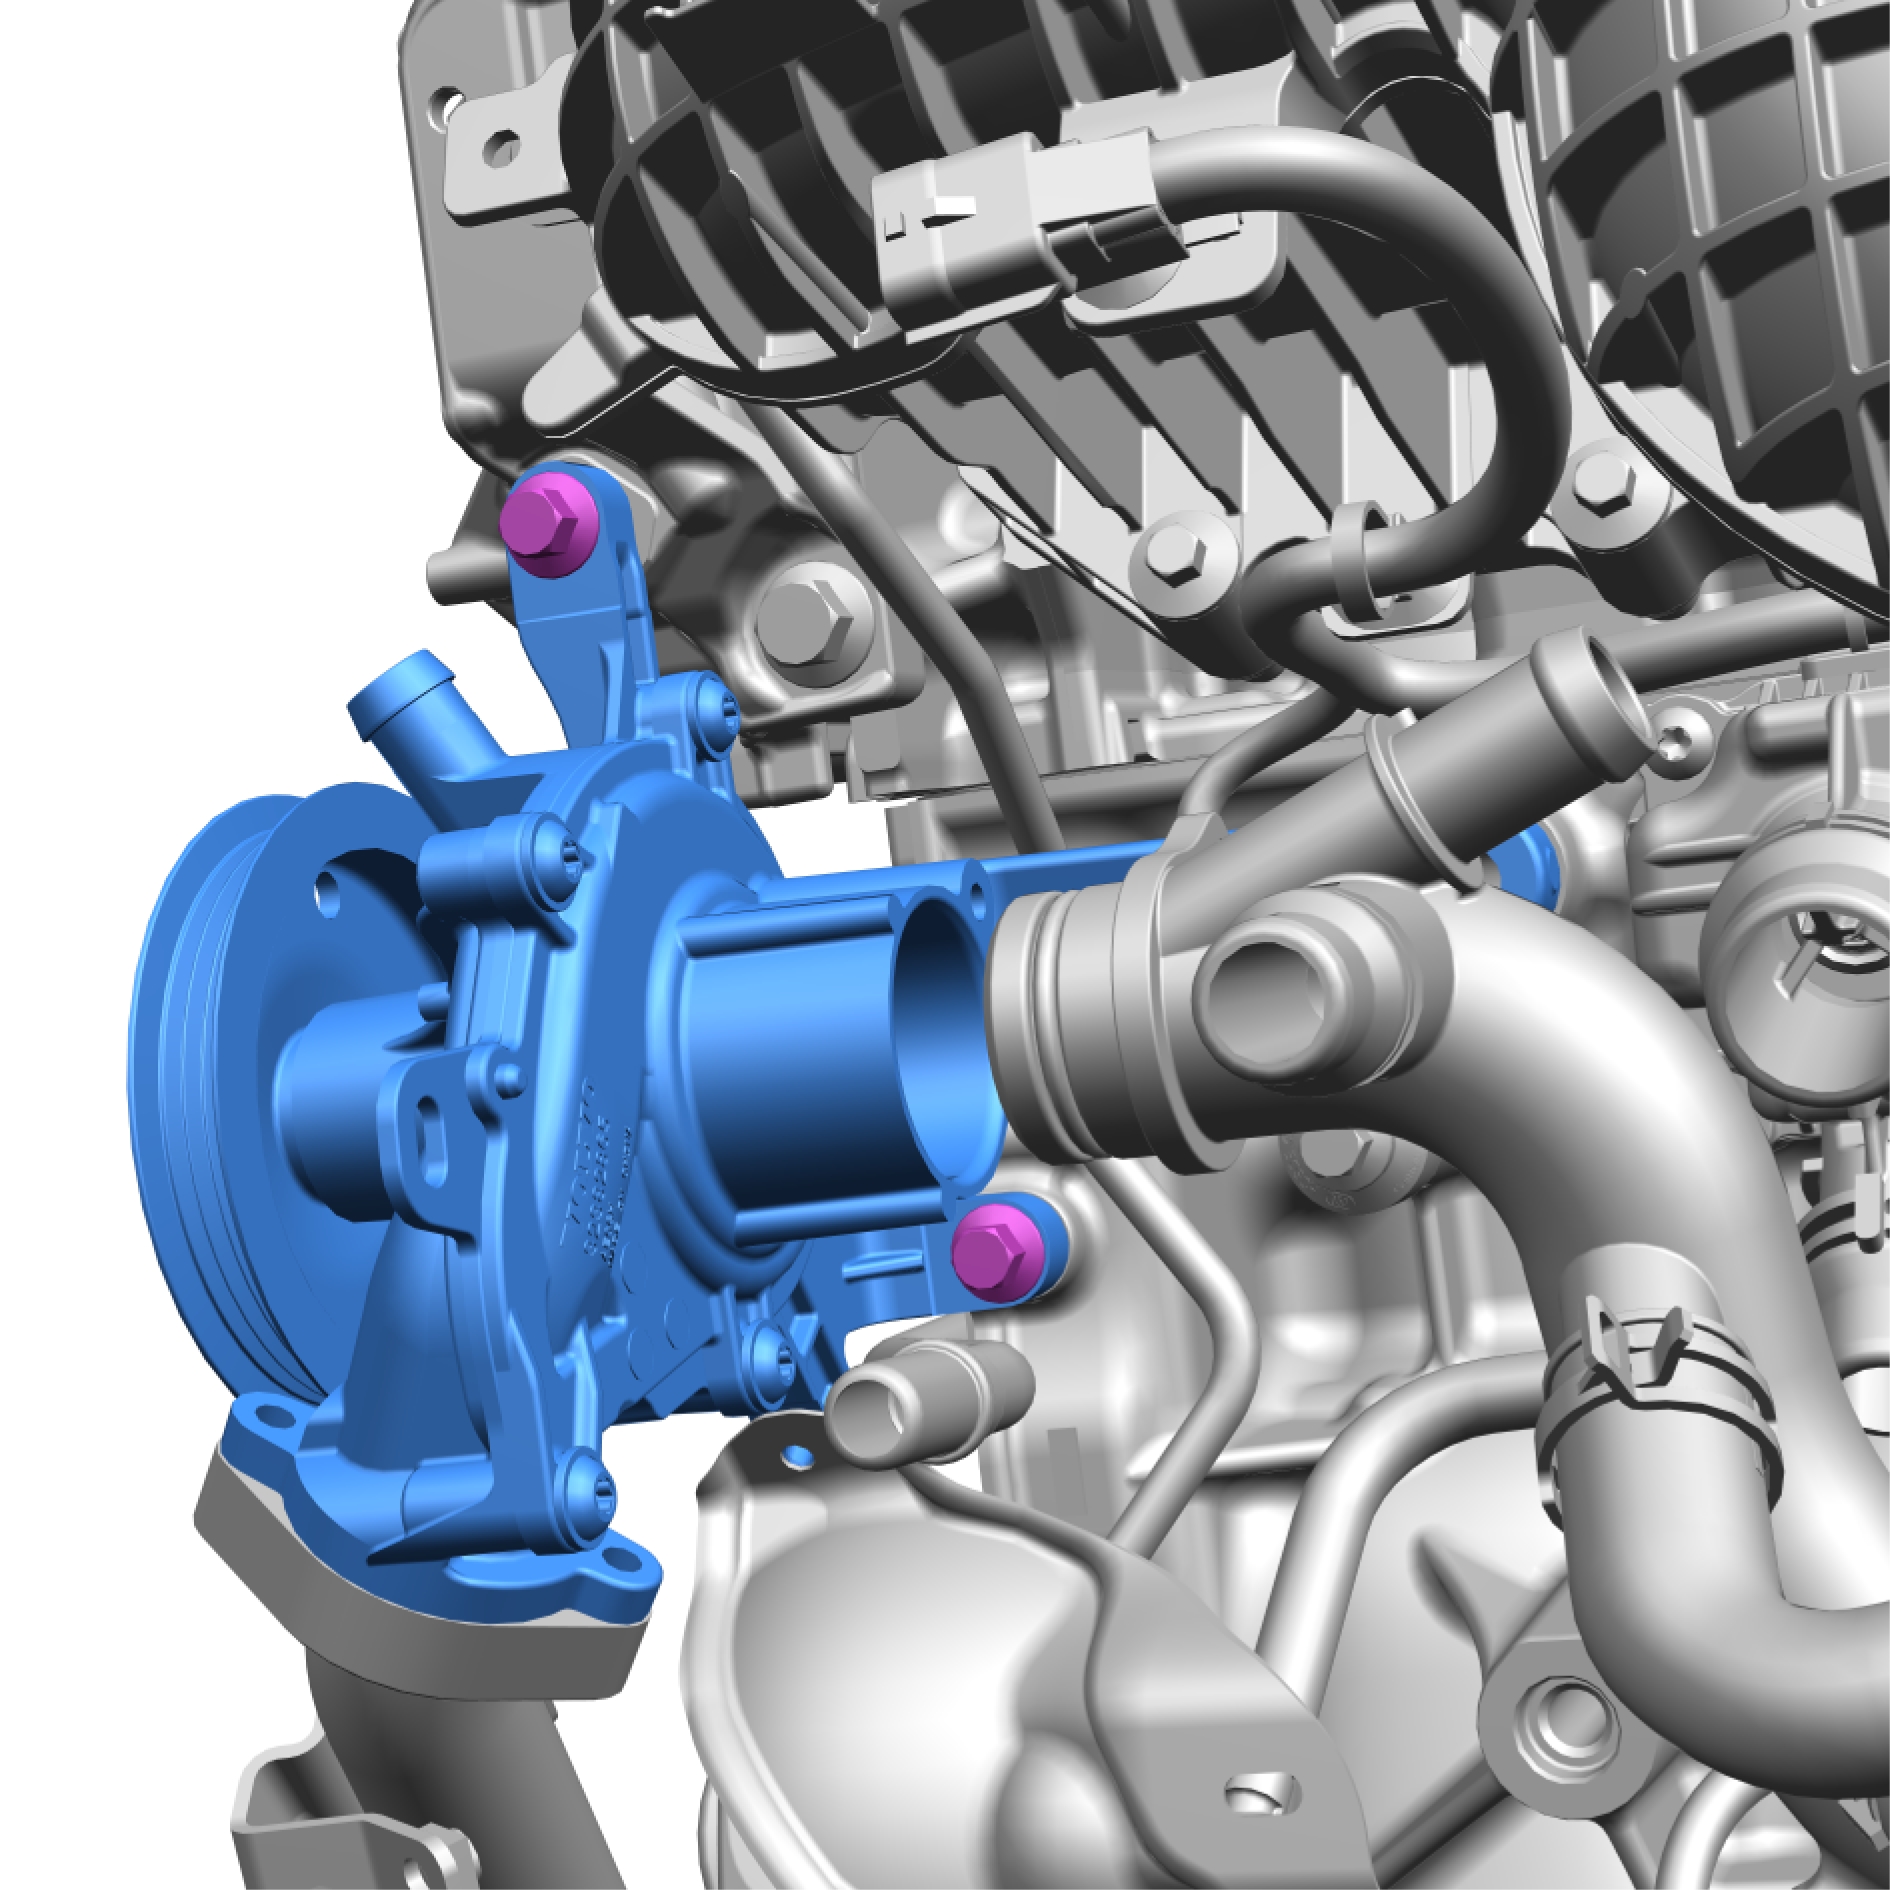
Remove the screws.
Torque: 24 Nm
Remove the marked component.
Installation
Install in reverse order.
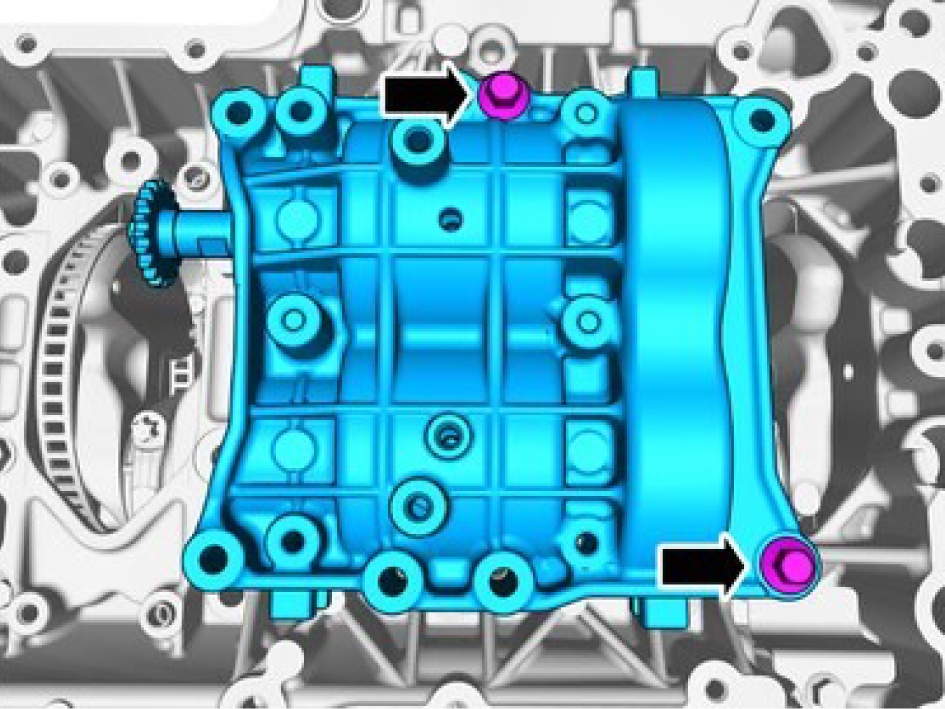
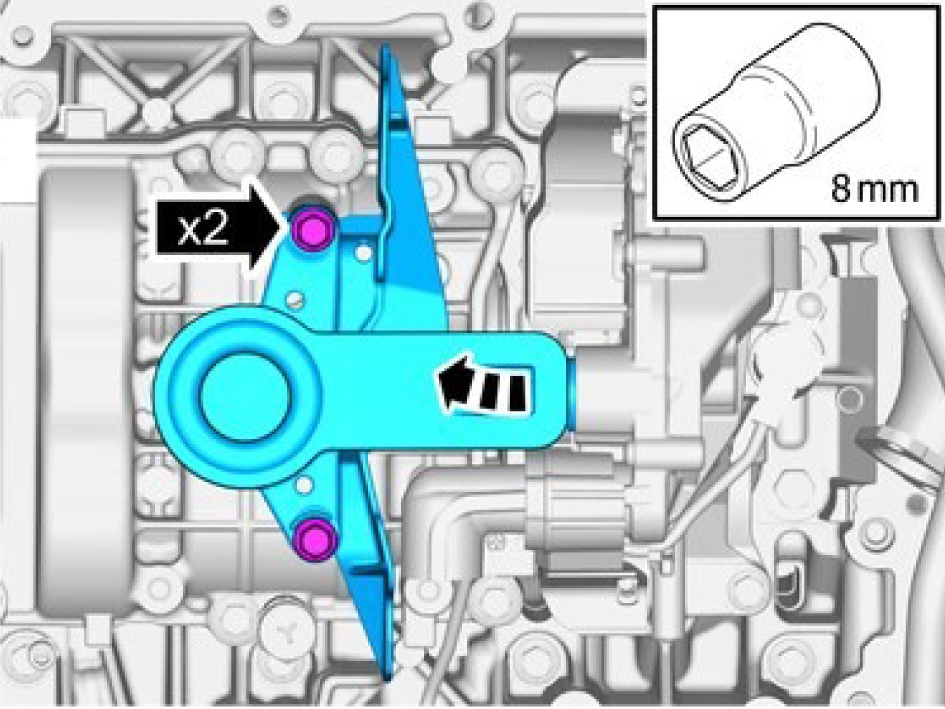
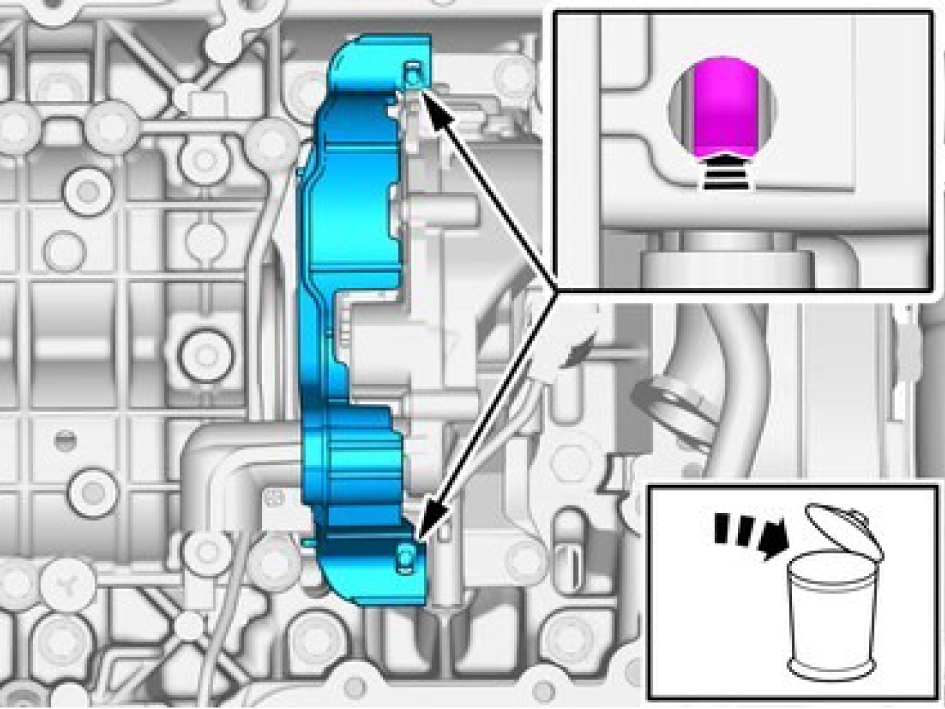
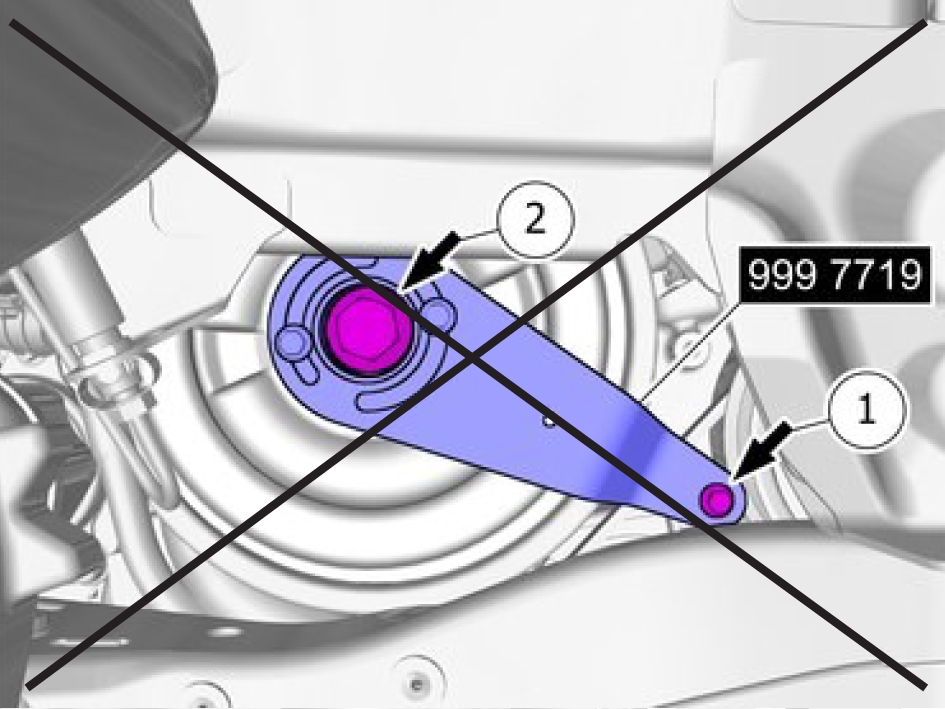
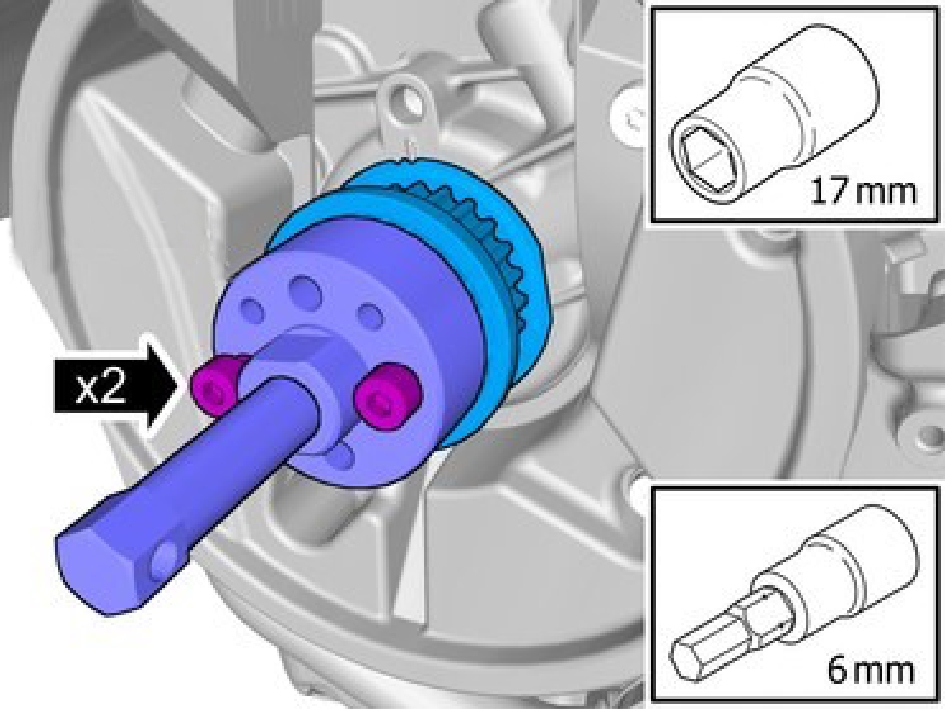
Balance Shaft Assembly, replace
Removal
Remove the vibration damper refer to:
Vibration damper, replaceRemove the oil pump refer to:
Oil pump, replace
Remove the marked component.
The item is to be reused.
Remove the screws.
Remove the marked component.
Make sure that the component is positioned correctly.
Make sure that the component is positioned correctly.
Refer to Spare part catalogue for information on correct component/ fastener.
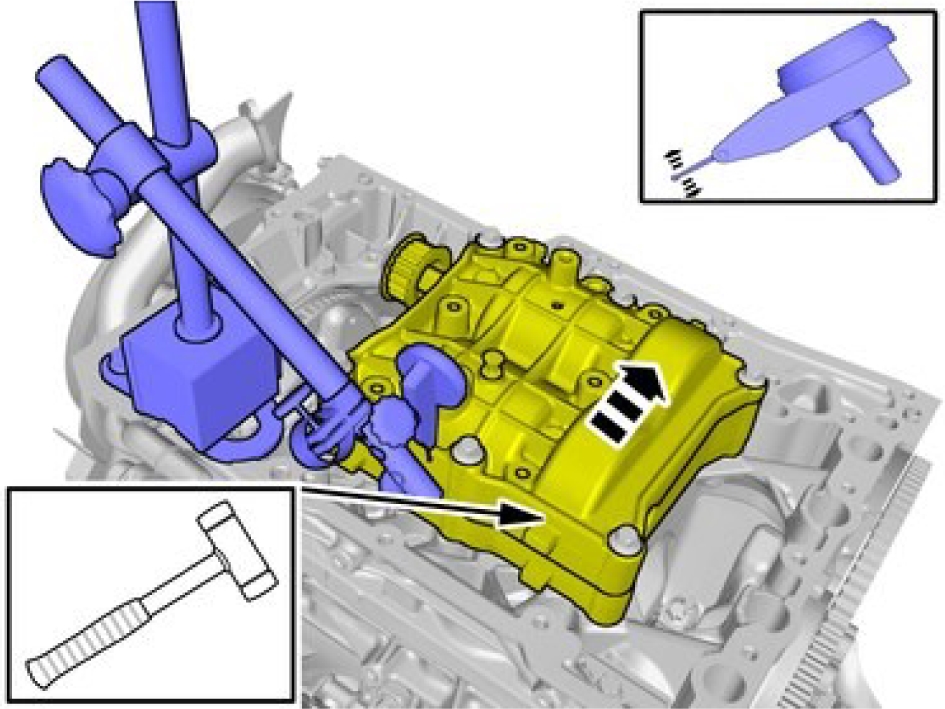
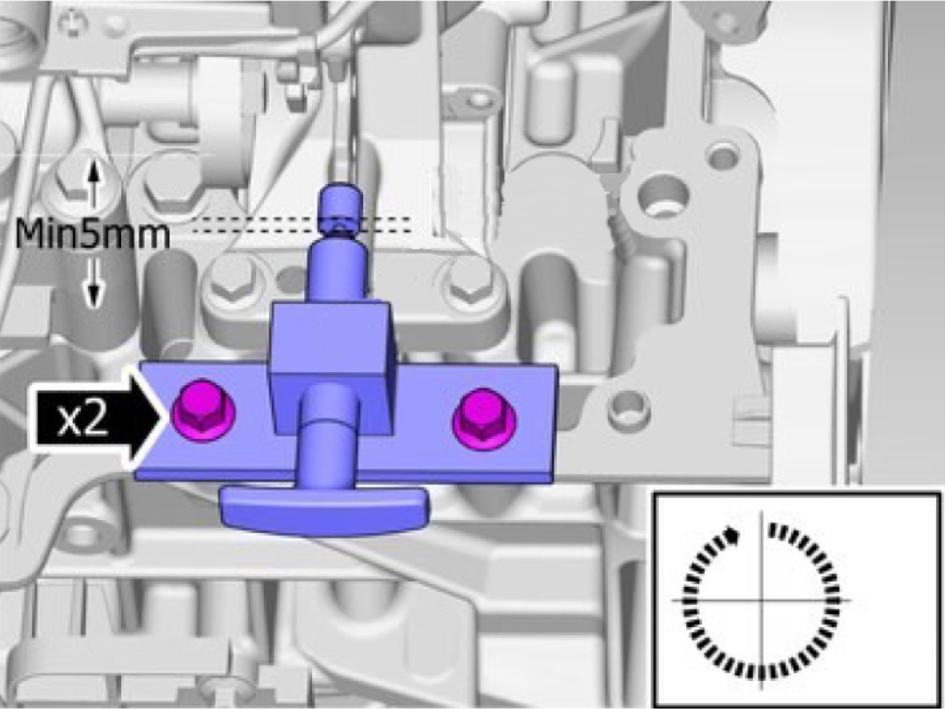
Install the special tool: 999 7809
Installation
Make sure that new screws are installed.
Install the marked component.
Tighten the screw with hands only.

Remove the tool.
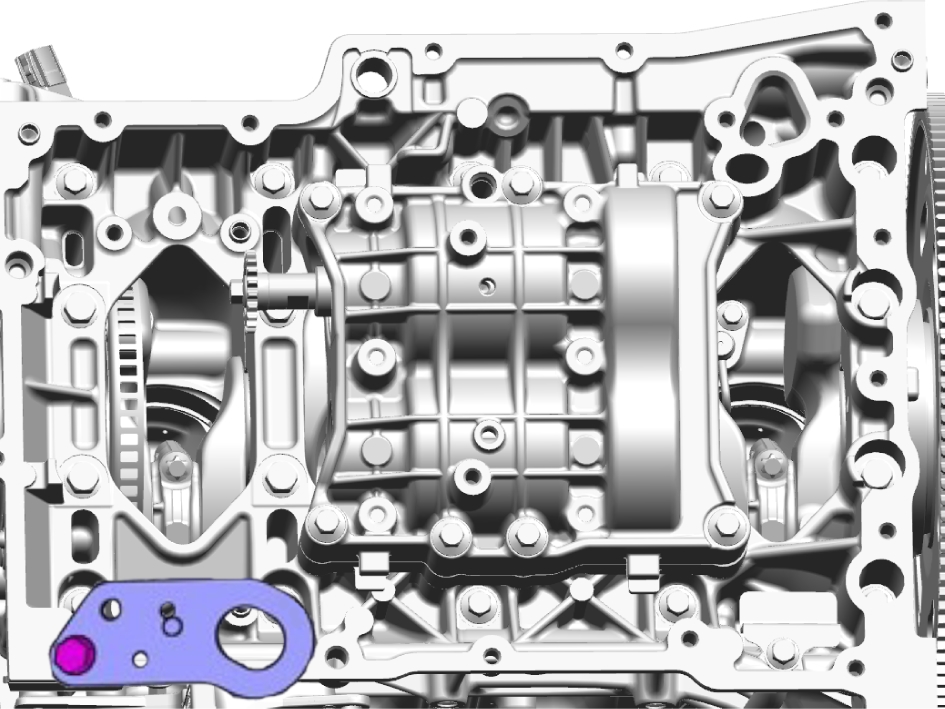
Install the tool special tool: 999 7432
Install the measurement gauge against the balance shaft assembly. Knock the balance shaft assembly towards the oil pressure switch until the measurement gauge stops changing value. Reset the measurement gauge.
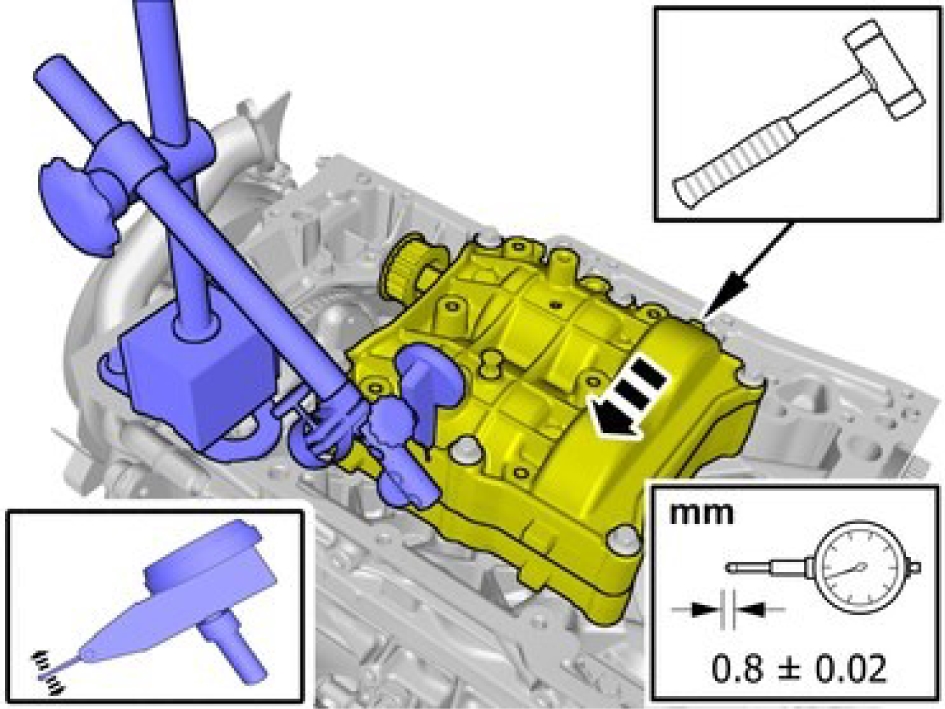
Tap the balance shaft assembly in the direction away from the oil pressure sensor until it reaches the specified value.
Leave the measurement gauge on when pulling the screws in the next step and check that the value is not changed.
Make sure that new screws are installed.
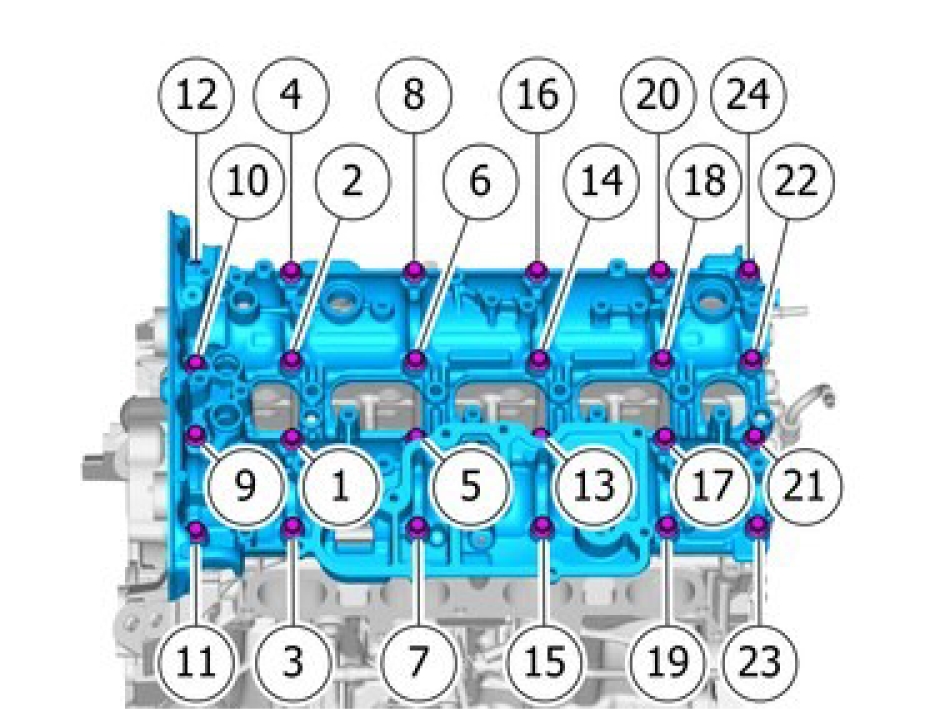
Make sure to follow the sequence indicated.
Tighten the screws
Stage 1, torque: 8 Nm
Stage 2: 210 °
Install the marked component, torque: 14 Nm
Install the oil pump refer to:
Oil pump, replaceInstall the vibration damper refer to:
Vibration damper, replaceCamshafts, replace
Removal
Remove the screws.
Remove the marked component.
Remove the screws.
Remove the marked component.
Remove the screws.
Remove the marked component.
Loosen each screw 2 turns at a time until all screws are removed.
Remove the marked component.
Note the location of the component before removal.
Take extra care when handling the components.
Remove the marked detail/details.
Installation
Take extra care not to damage the mating faces.
Make sure that the oil galleries are clean and free of foreign material.
Make sure that the mating faces are clean and free of foreign material.
Clean the marked area with abrasive cloth and isopropanol.
Take extra care not to damage the mating faces.
Make sure that the oil galleries are clean and free of foreign material.
Make sure that the mating faces are clean and free of foreign material.
Clean the marked area with abrasive cloth and isopropanol.
Apply engine oil.
Apply engine oil.
Make sure that the components are positioned correctly.
Install the marked component.
Make sure that the components are positioned correctly.
Make sure that the components are positioned correctly.
Make sure that the components are positioned correctly.
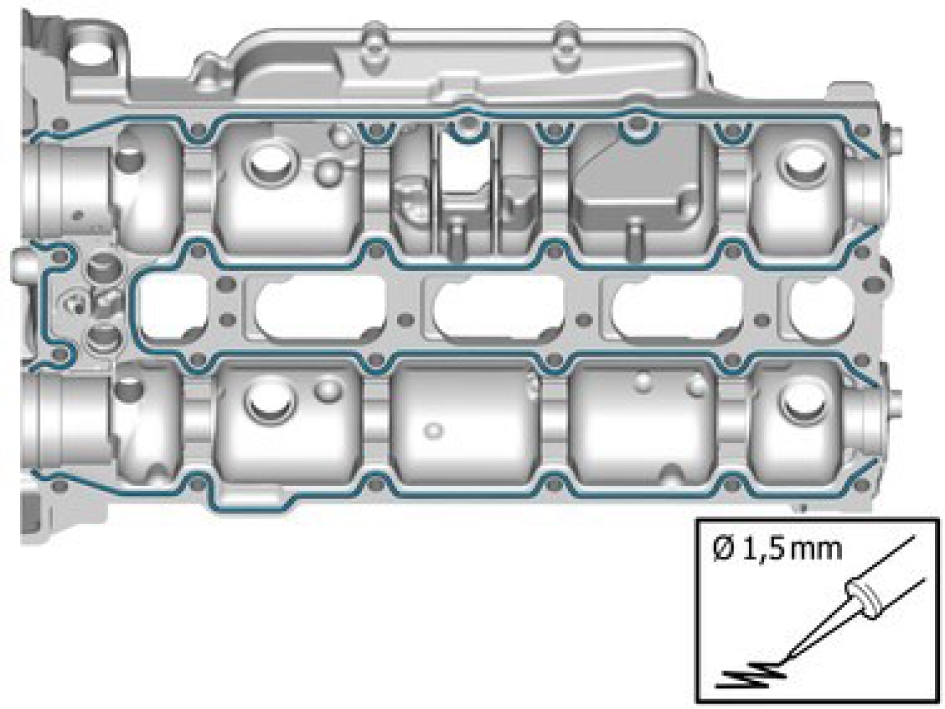
The component must be installed within 5 minutes of applying the sealant.
Use chemical gasket.
Make sure that equal pressure is applied to the full length of the component.
Make sure to follow the sequence indicated.
Install the marked component.
Install the screws.
Tighten each screw 2 turns at a time M7, torque: 17 Nm
Install the marked component.
Install the screws M6, torque: 10 Nm
Install the marked component.
Install the screws.
1, M6, torque: 10 Nm
1, M8, torque: 24 Nm
Install the marked component.
Install the screws.
1, M5, torque: 5 Nm
1, M6, torque: 10 Nm
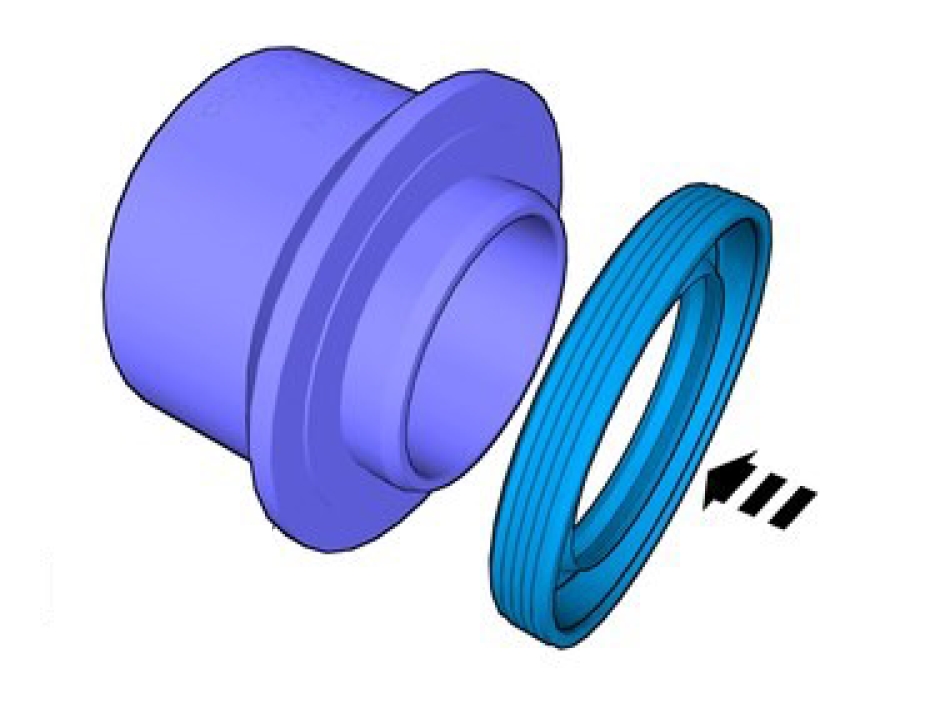
Sealing ring camshaft VVT, replace
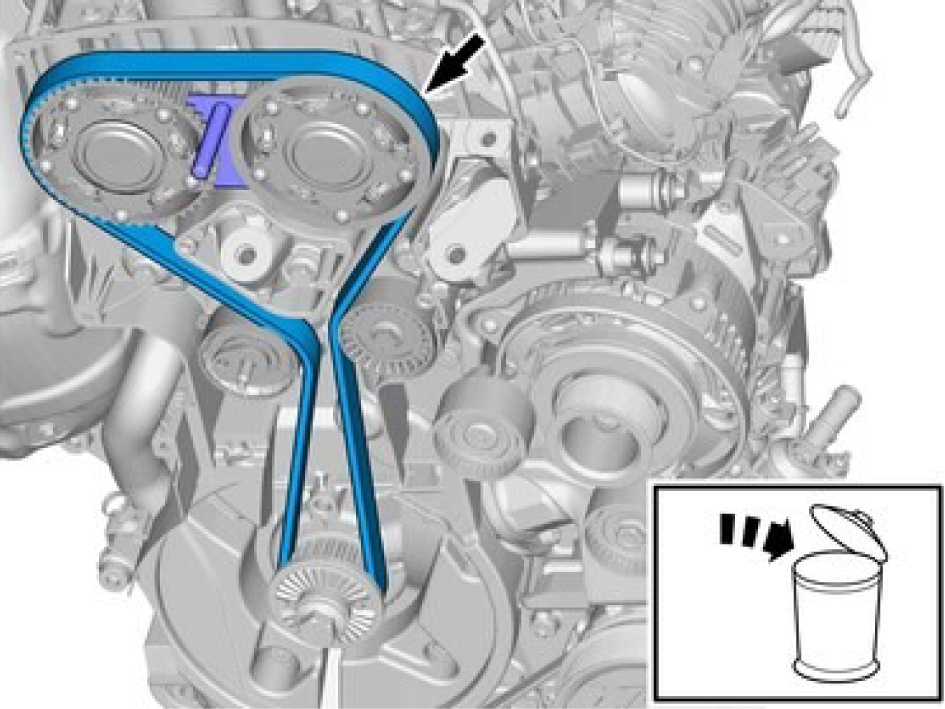
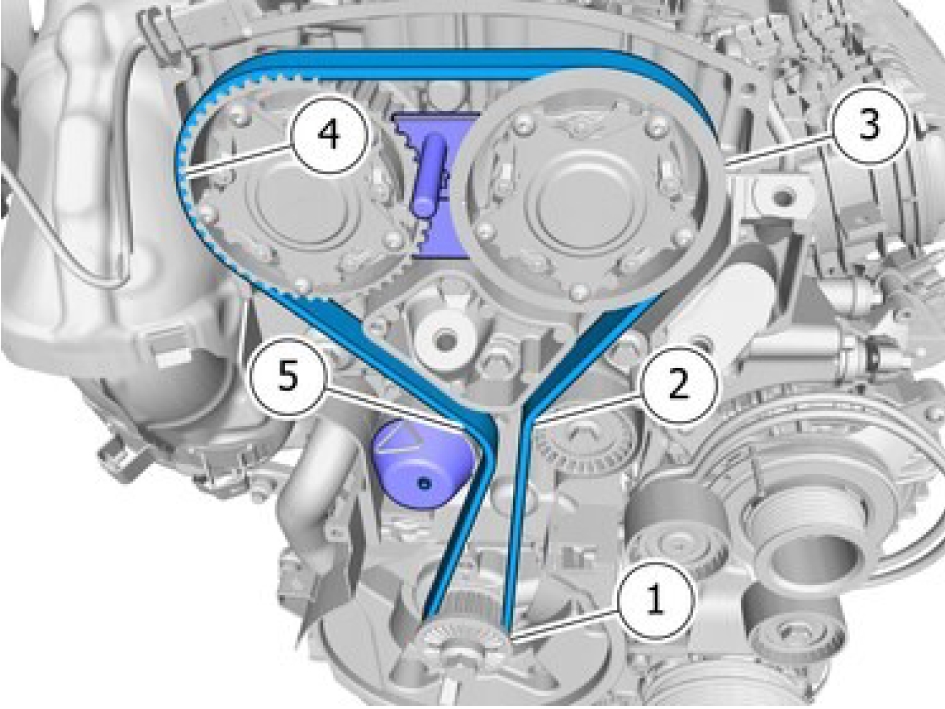
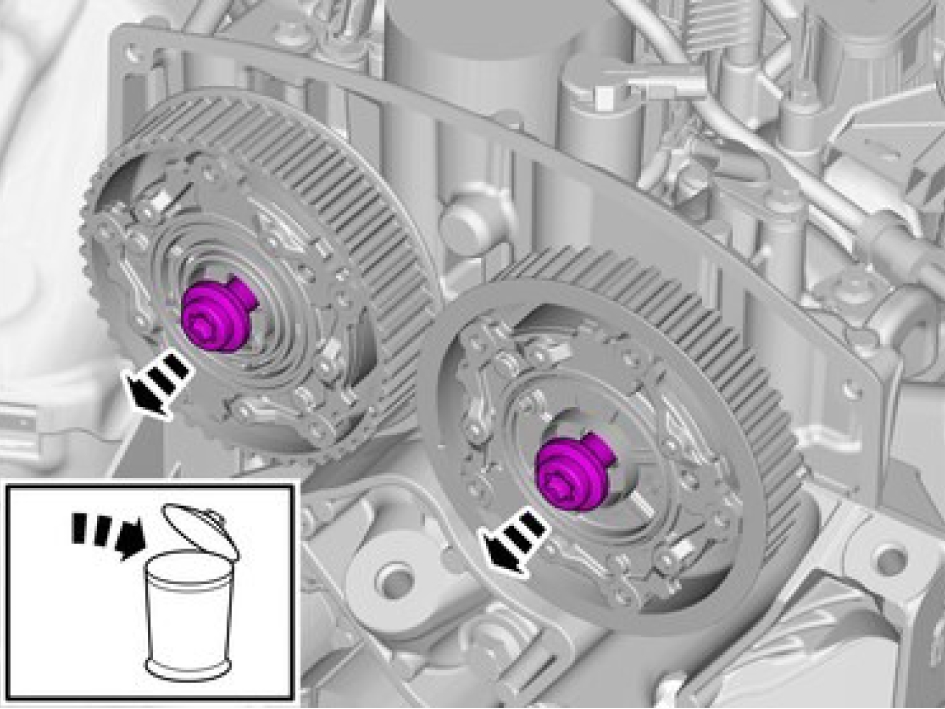
Timing belt, replace
Removal
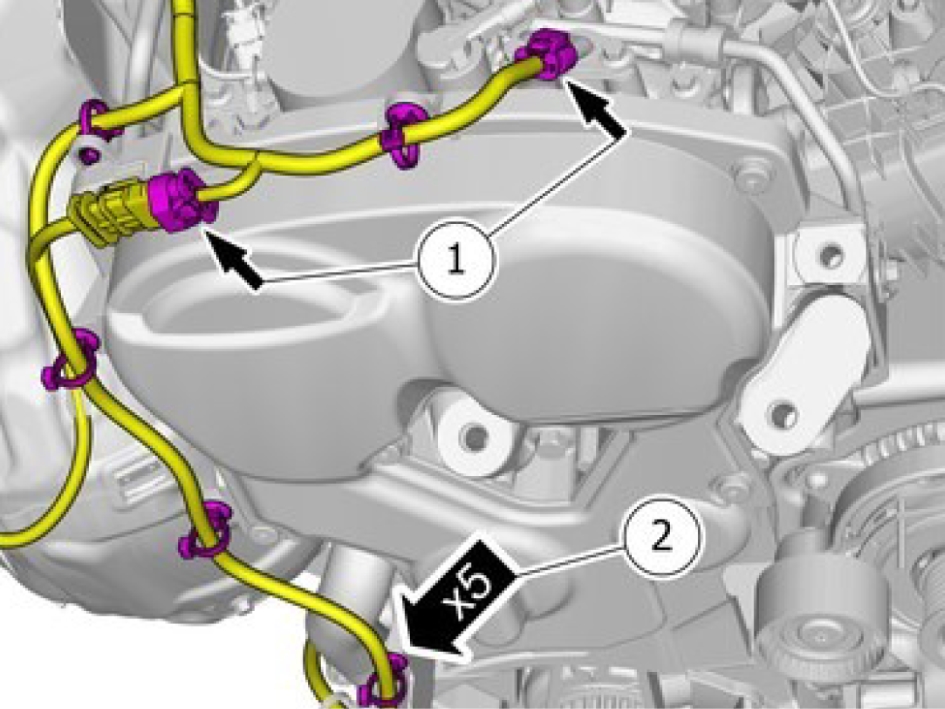
1, Disconnect the connectors.
2, Remove the cable harness clips.
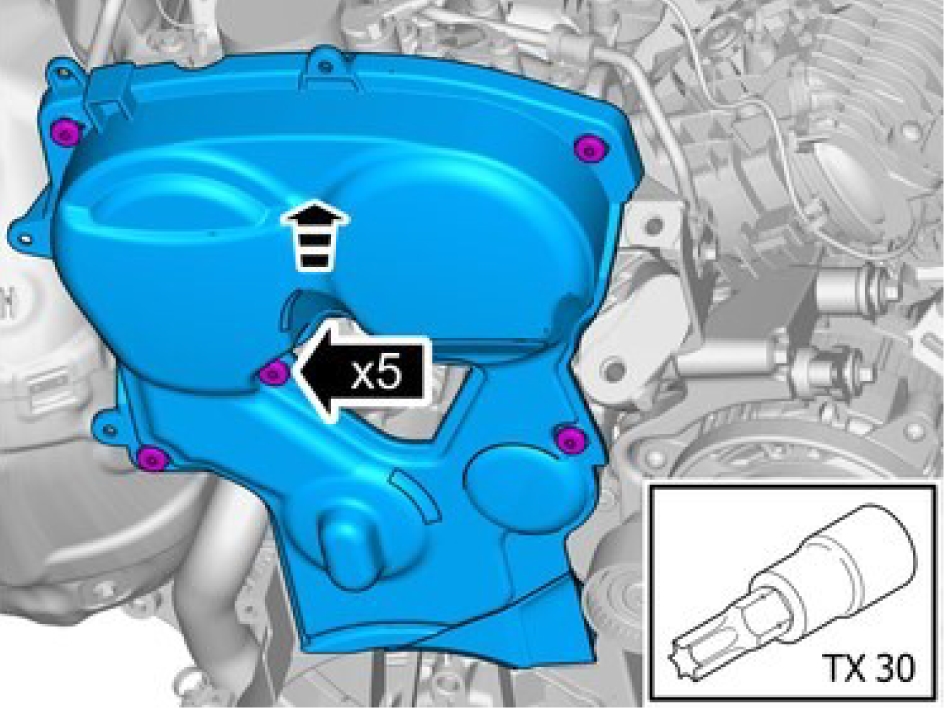
Remove the screws.
Remove the marked component.
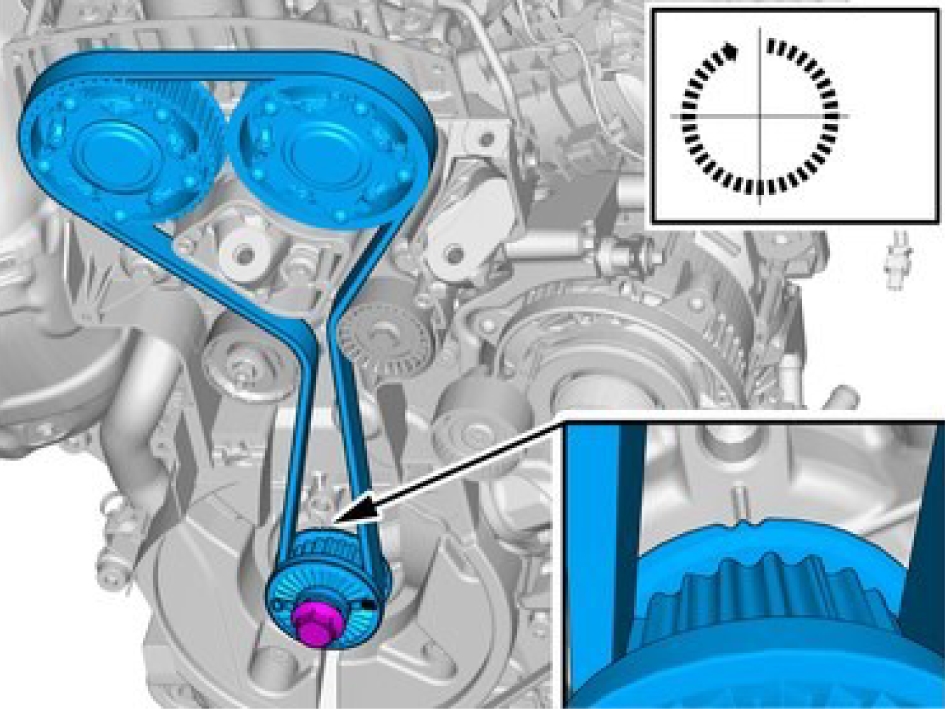
Rotate the engine to the zero position.
Install the special tool: 999 7768
Remove the nut.
Remove the marked component.
The component is not to be reused.
Remove the marked component.
Remove the screws and the marked component.
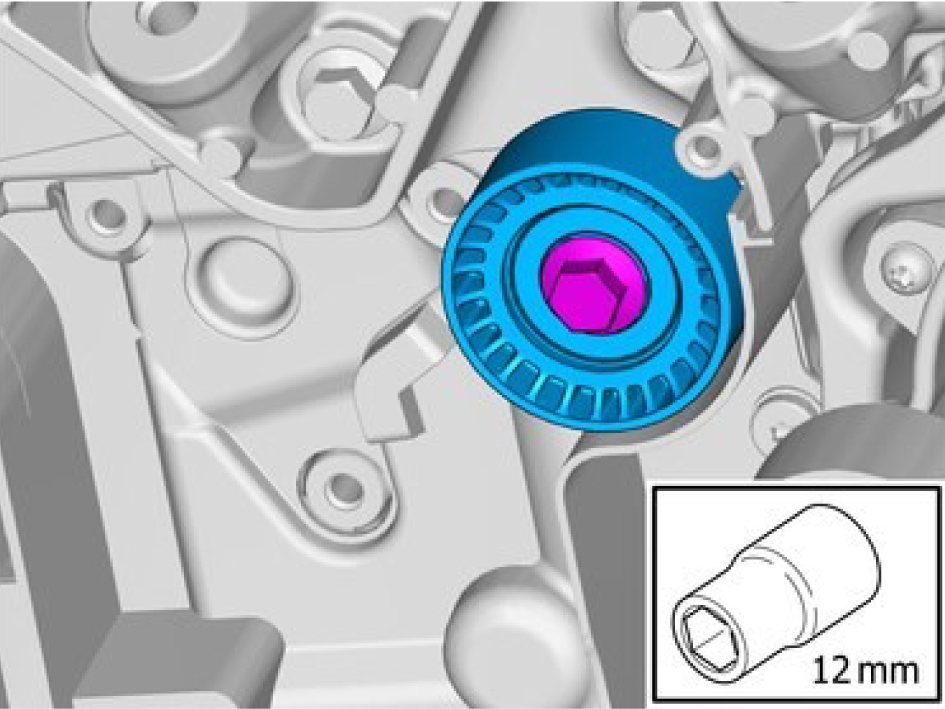
Remove the screw and the marked component.
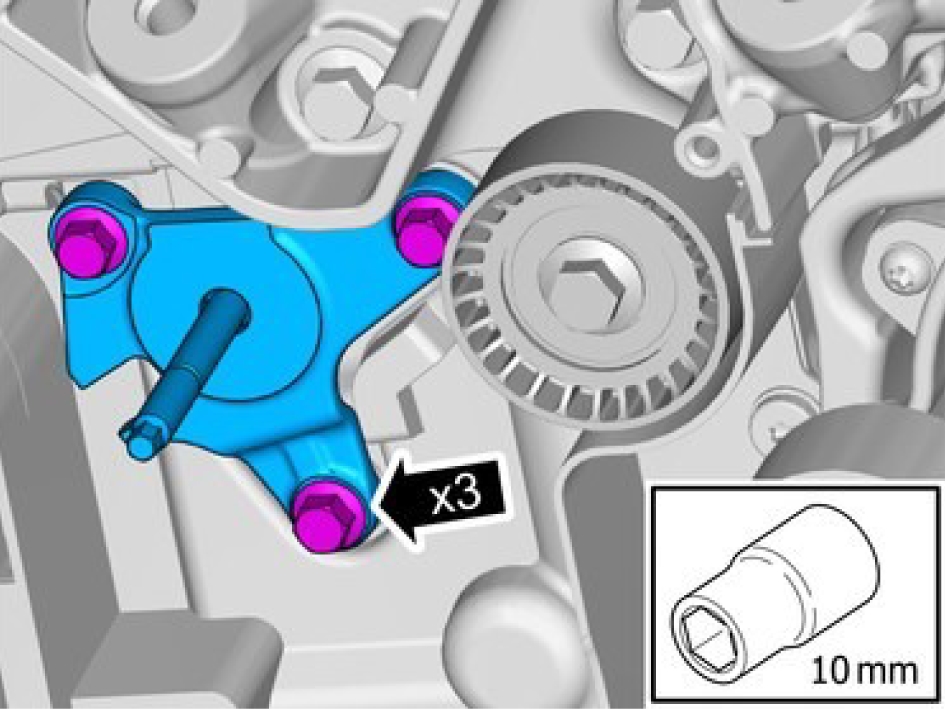
Installation
Install the marked component, M7, torque: 17 Nm
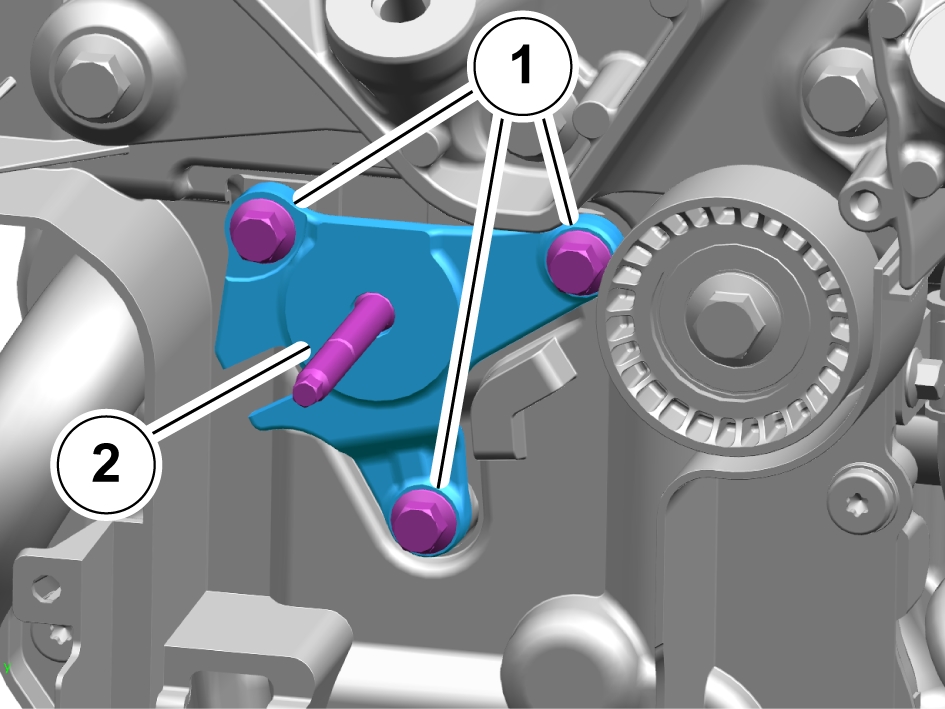
Make sure that a new component is installed.
Install the marked component.
1. M7, torque: 17 Nm
2. Tensioner console screw, torque: 13 Nm
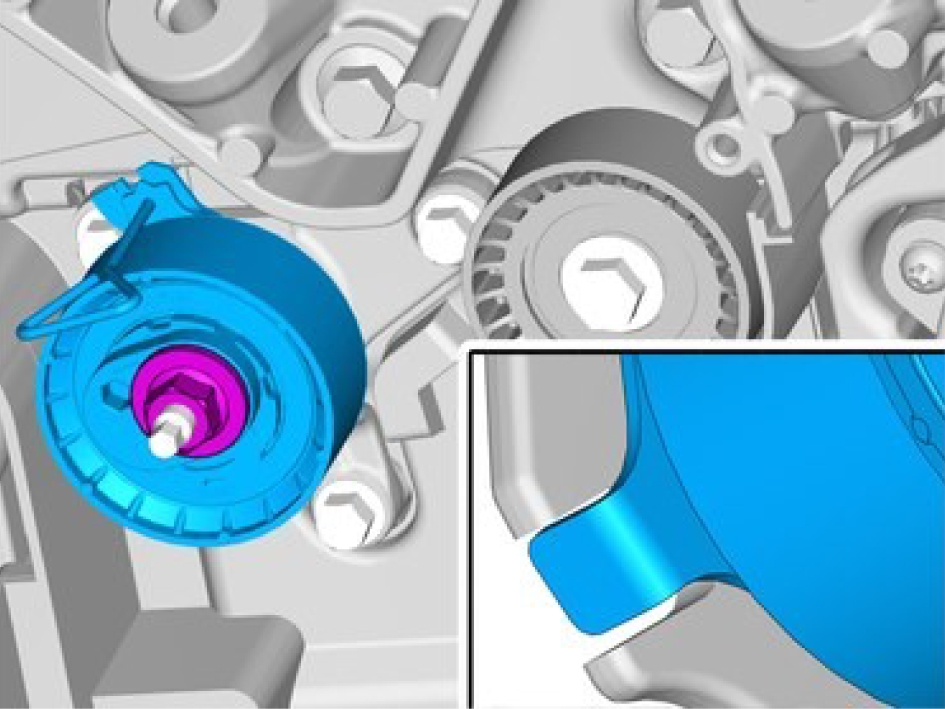
Make sure that new components are installed.
Install the marked components but tighten the nut finger tight.
Make sure that the components are positioned correctly.
Install the special tool: 999 7791
Make sure that a new component is installed.
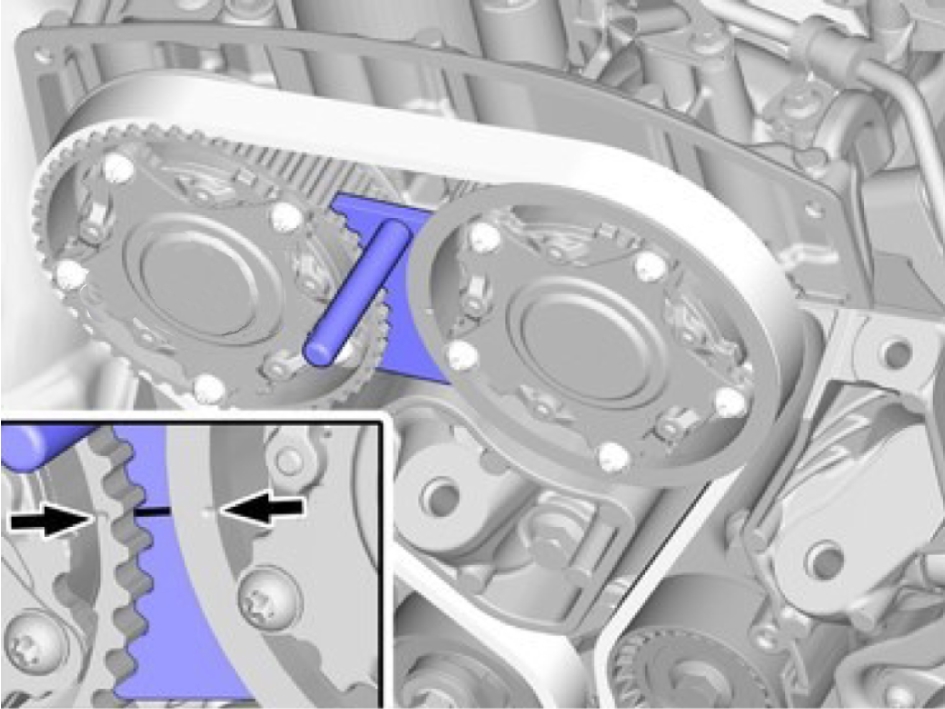
Make sure to follow the correct sequence during installation.
Install the timing belt.
Remove the special tool.

Remove the special tool.
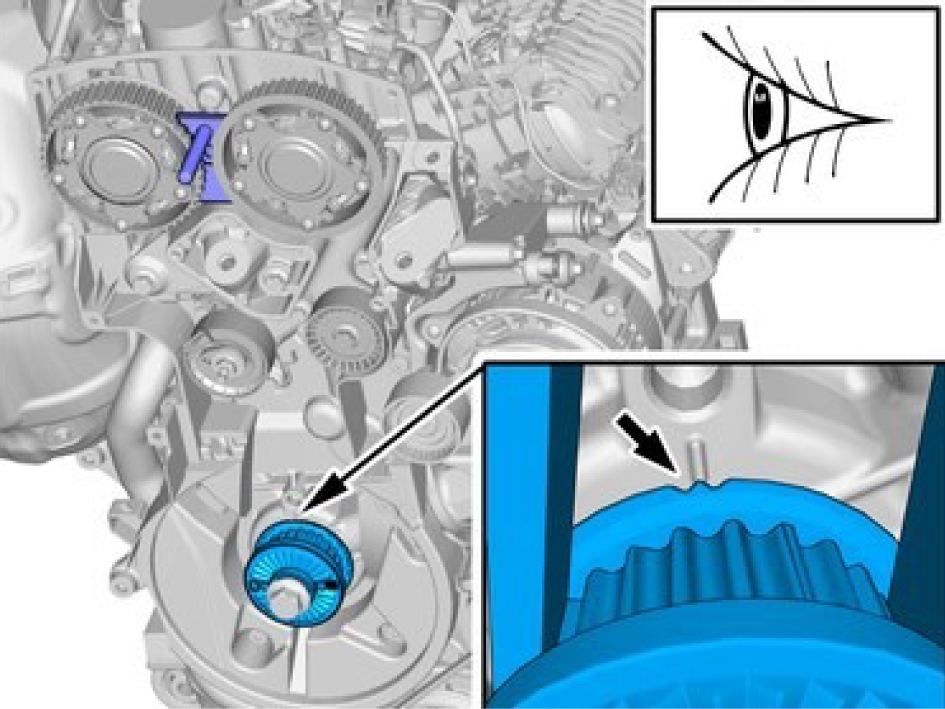
Remove the marked component.
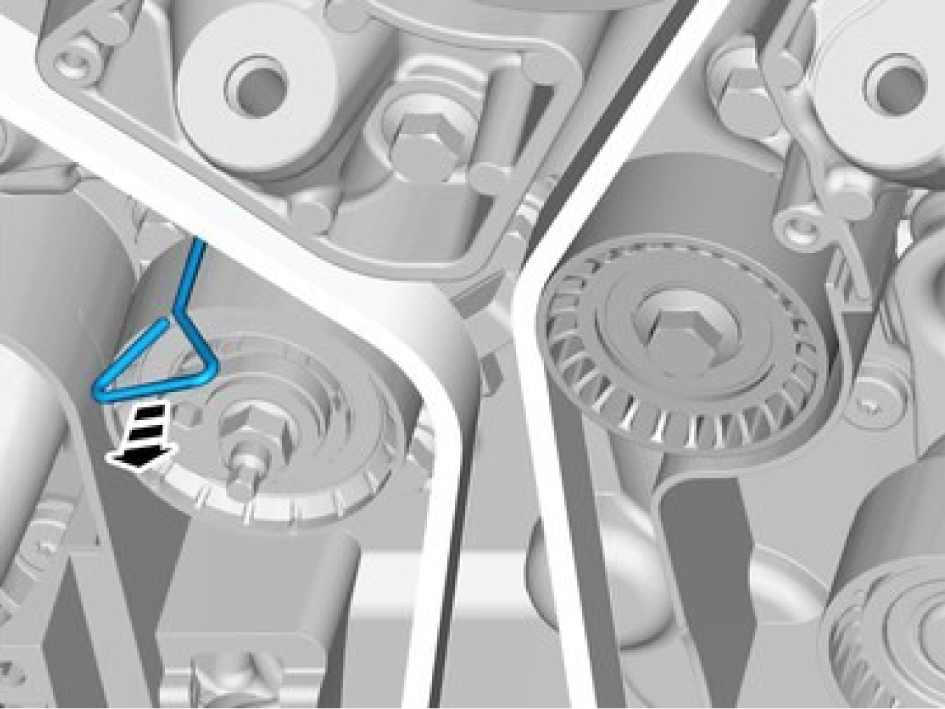
Adjust the position of the component according to image.
Tighten the nut tensioner, timing belt, torque: 30 Nm
The engine is rotated so that the belt assumes its correct position.
Turn the engine.
If the measured value is greater or less than the specified range, all steps in the adjustment section must be carried out again.
Install the marked component.
Install the screws M6, torque: 10 Nm
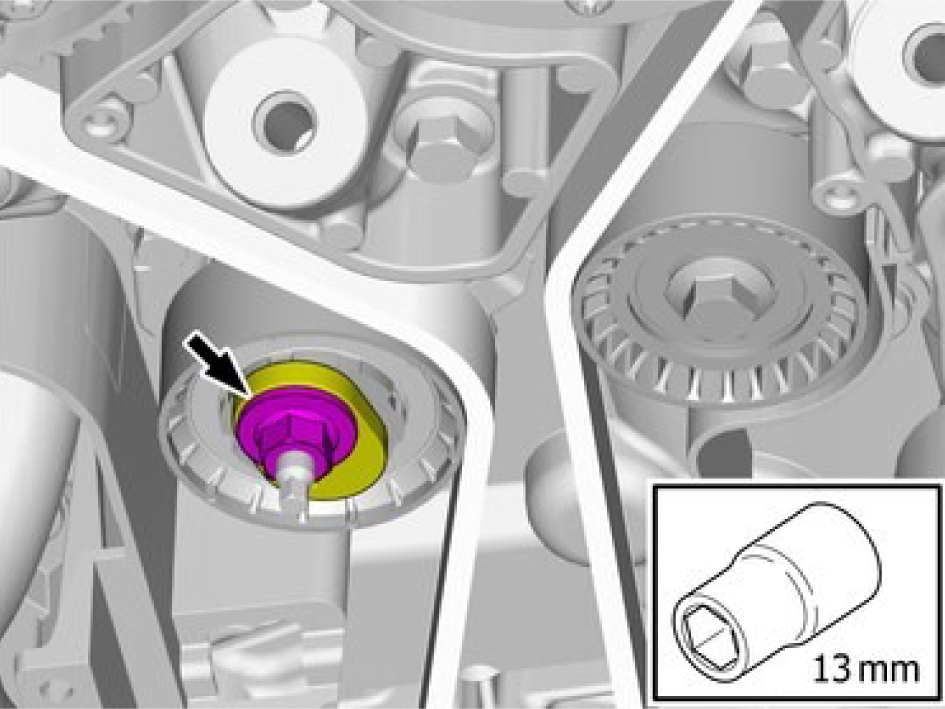
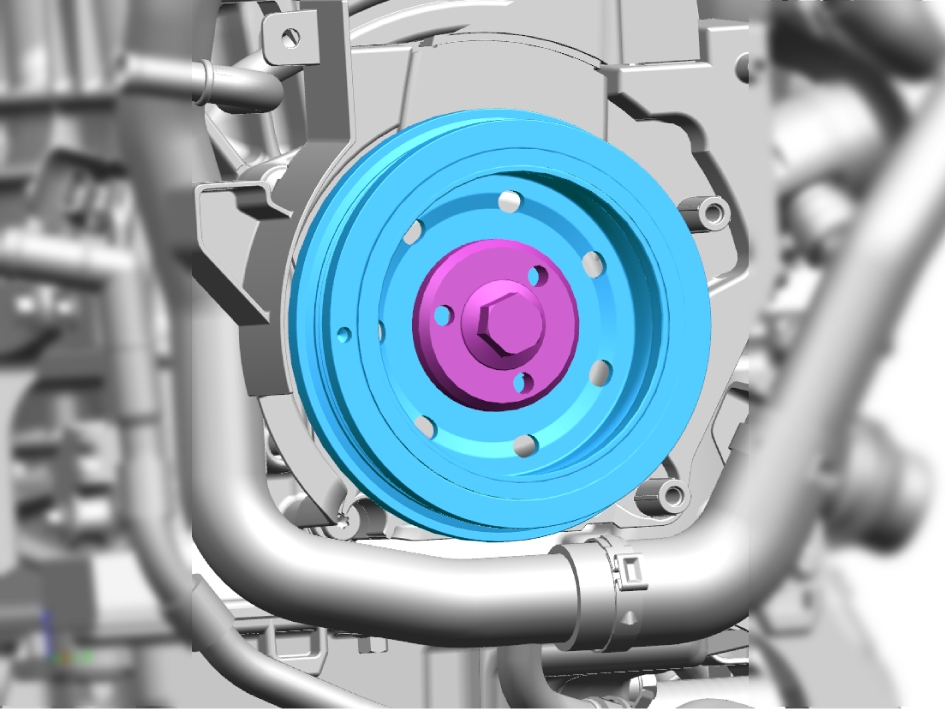
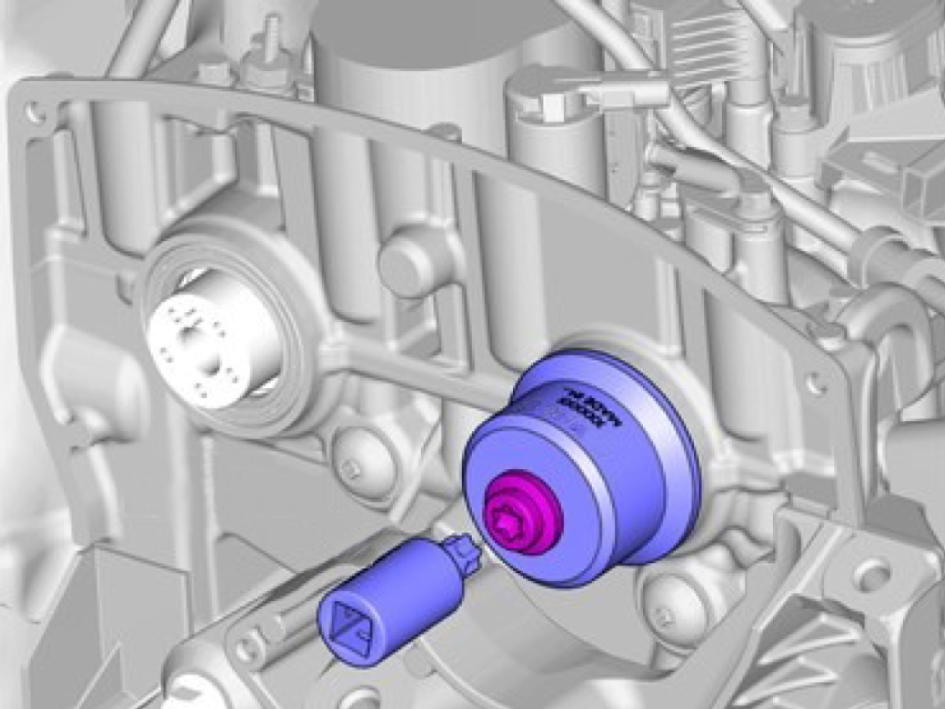
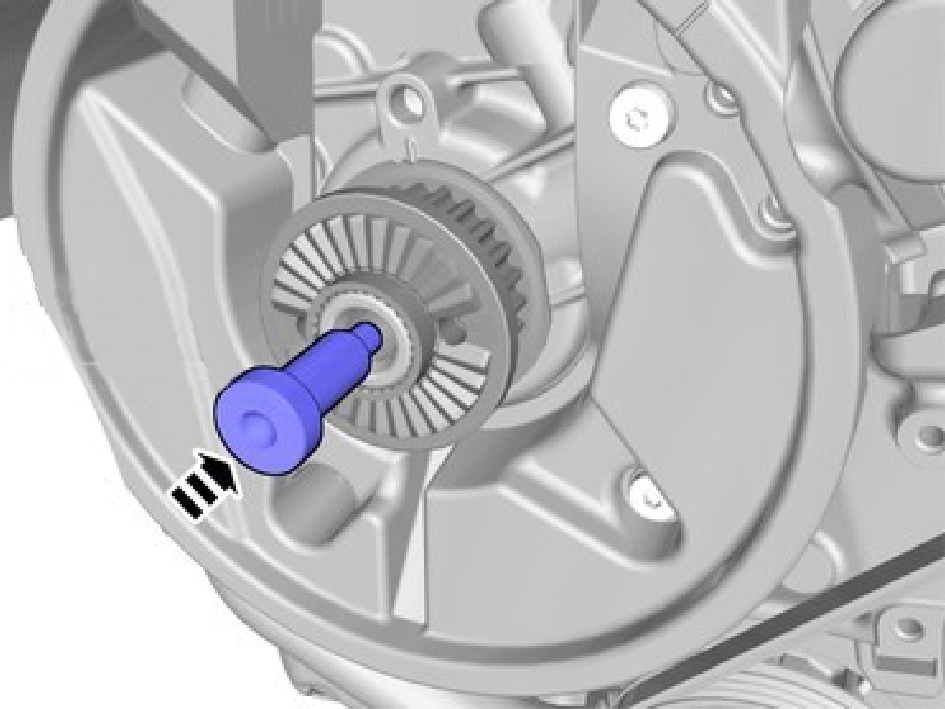
Vibration damper, replace
Removal
Fit the locking tool M6, torque: 10 Nm
Remove the center screw.
Remove the tool and the marked component.
Installation
Install the marked component.
Install the locking tool.
1. M6, torque: 10 Nm
2. Install the central screw.
Stage 1, torque: 90 Nm
Stage 2, 110 °
Remove the locking tool.
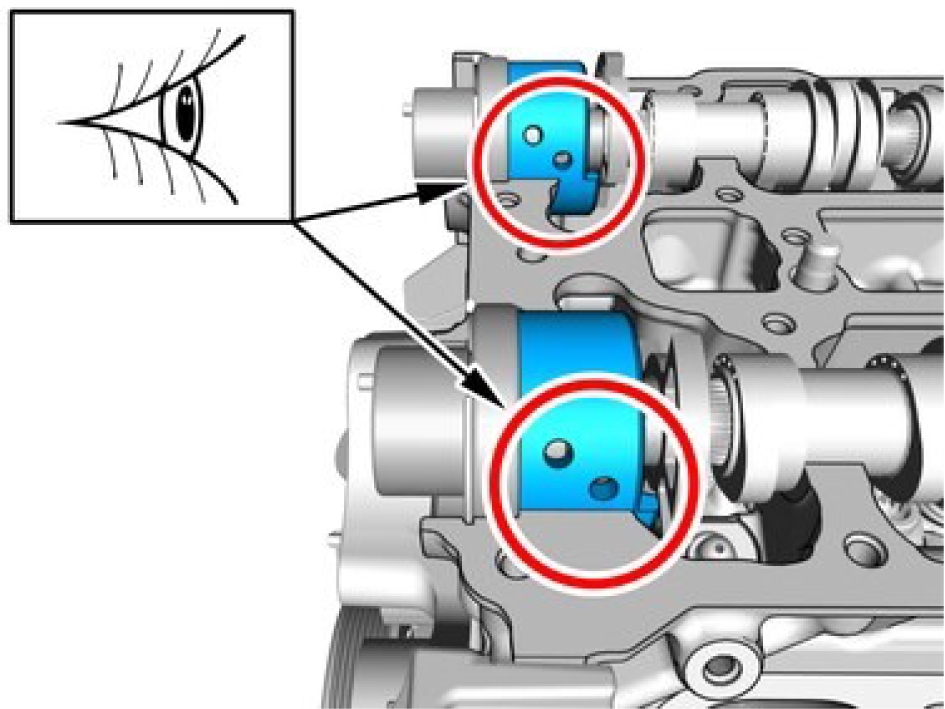
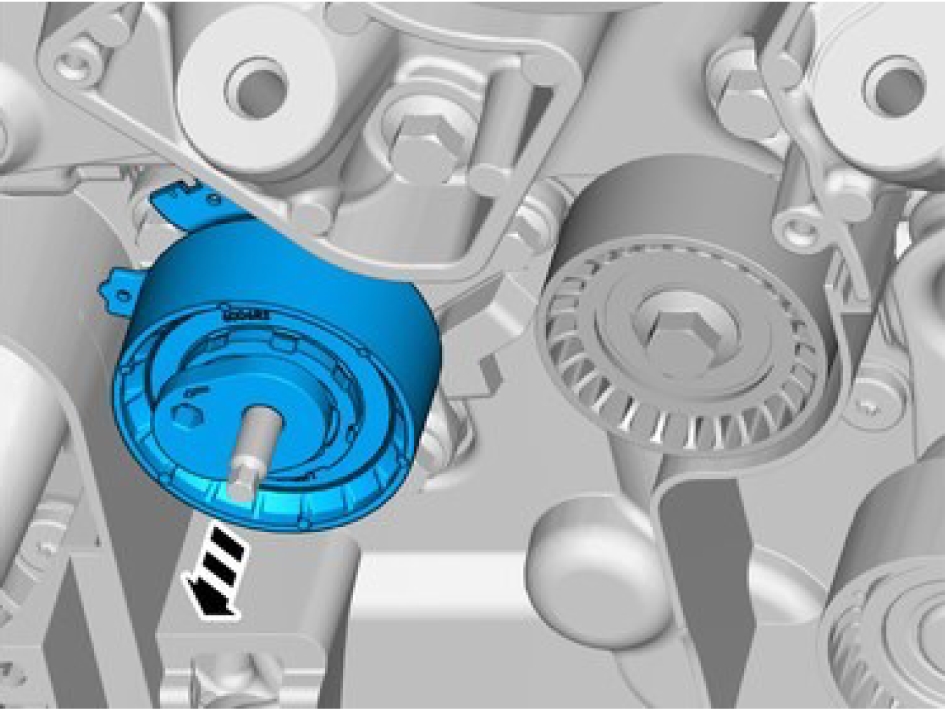
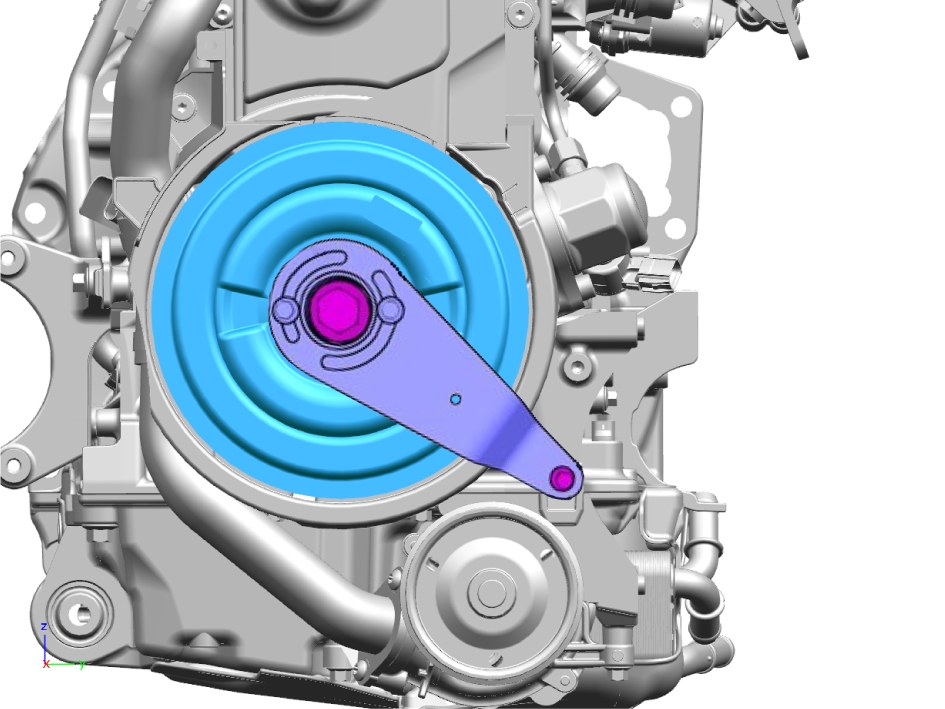
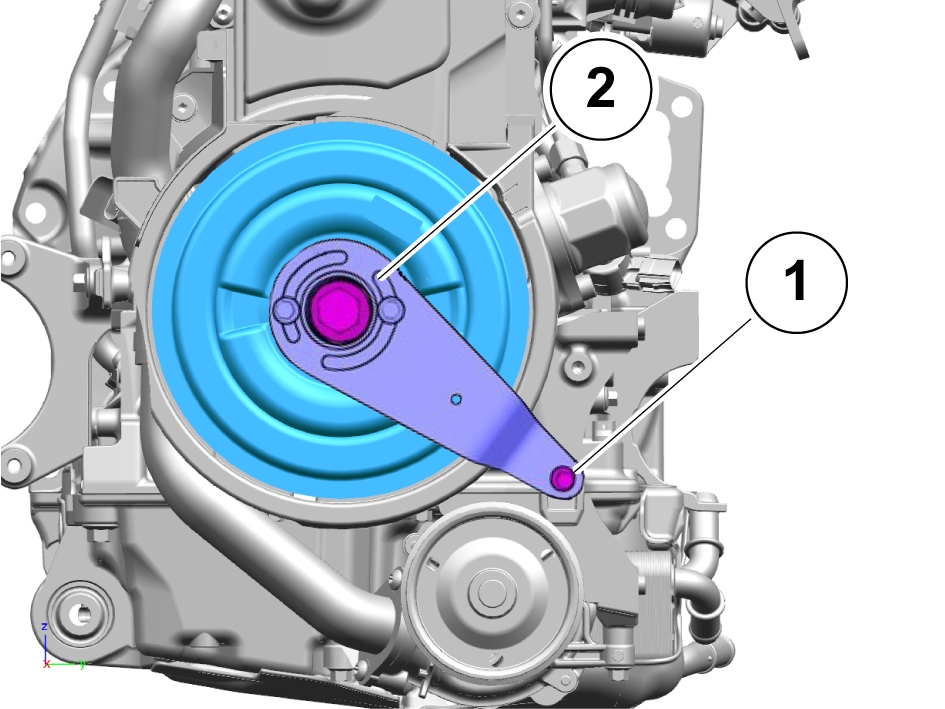
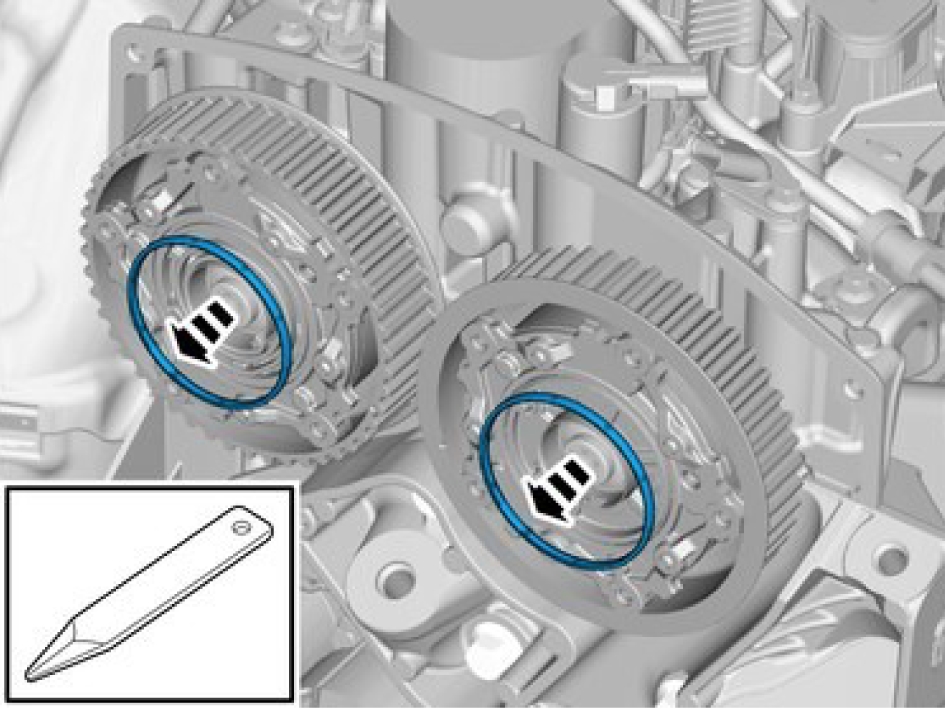
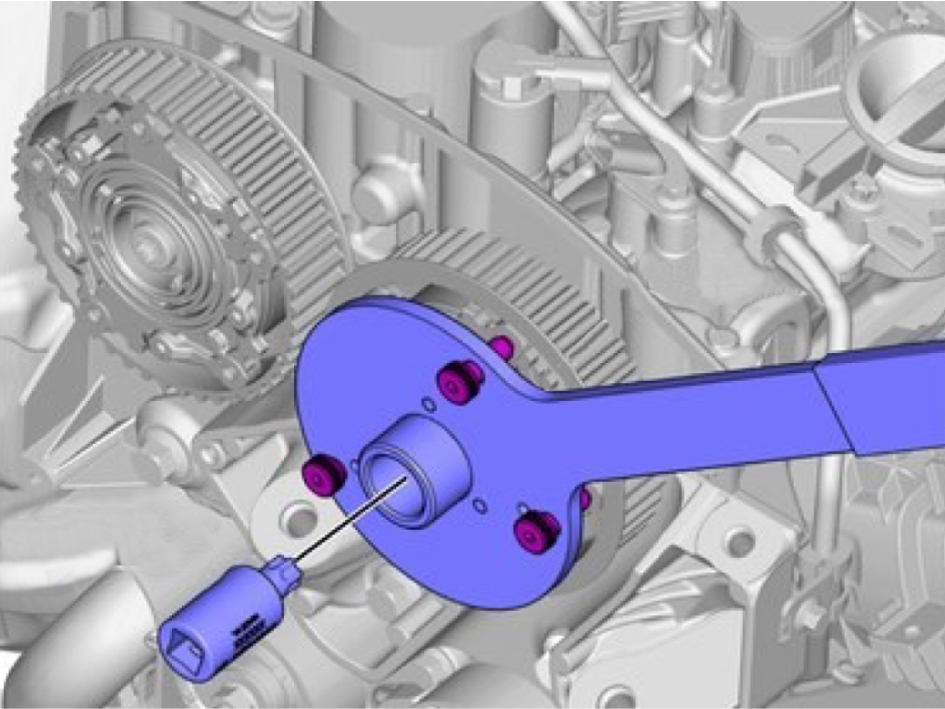
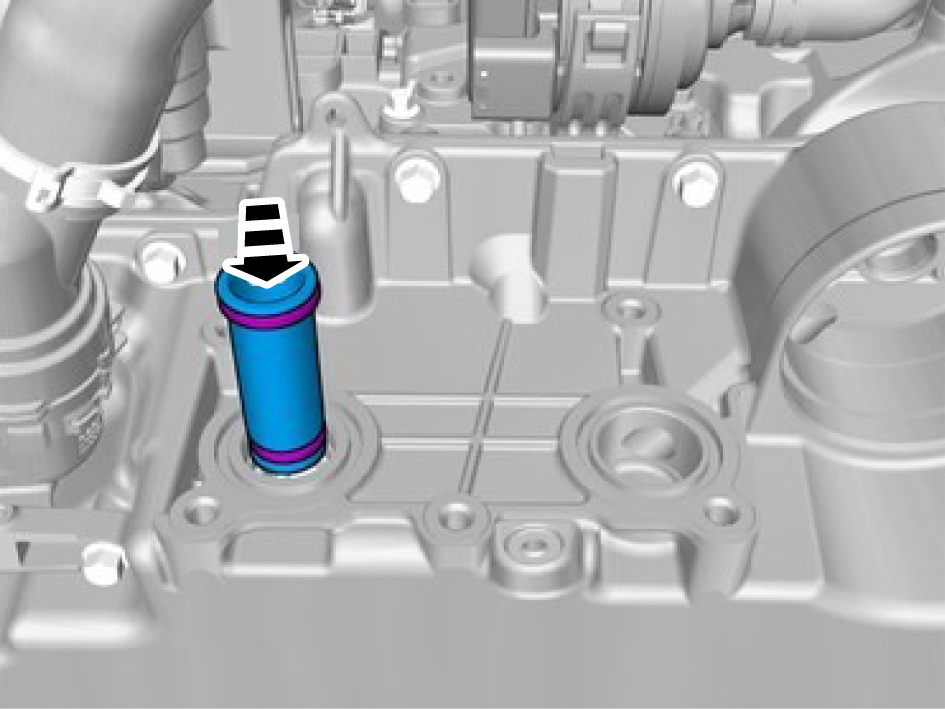
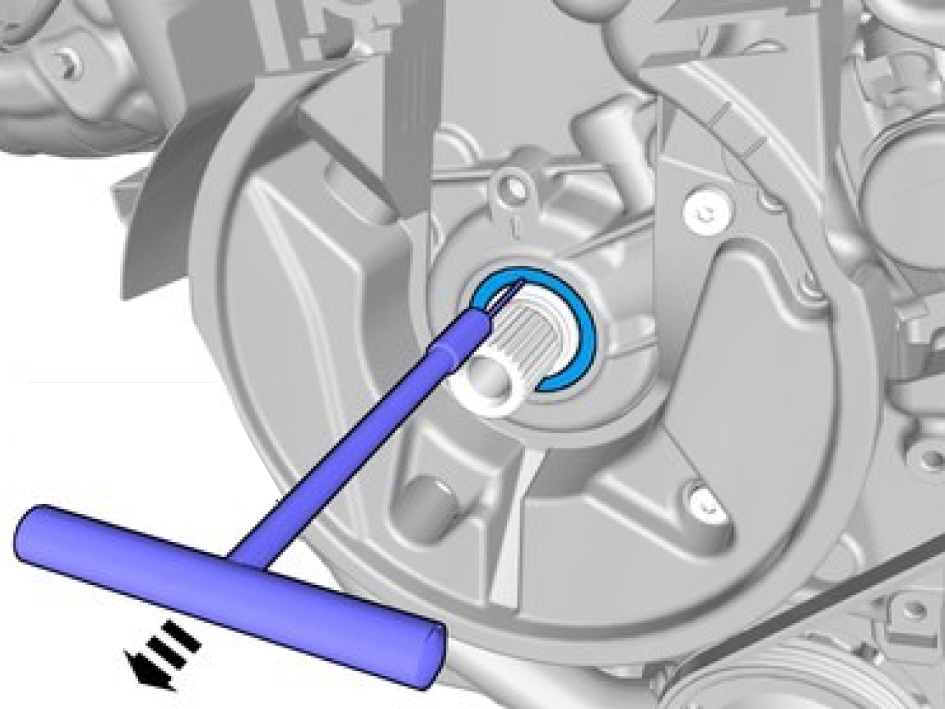
VVT unit, replace
Removal
Remove the Timing belt, refer to:
Timing belt, replace
Remove the special tool.

Be prepared to collect escaping fluid.
Note the location of the component before removal.
Remove the marked component.
Remove the marked component.
Do not use impact screwdriver/wrench
1. Special tool: 999 7684
2. Special tool: 999 7761
Loosen the screws.
Remove the screws.

Be prepared to collect escaping fluid.
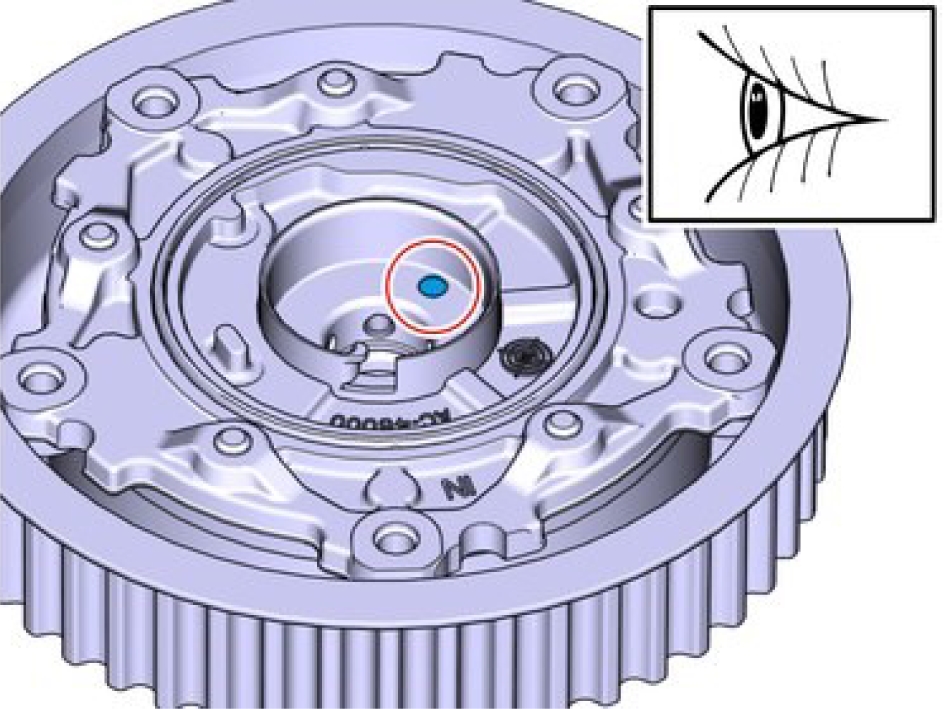
Remove the marked component.
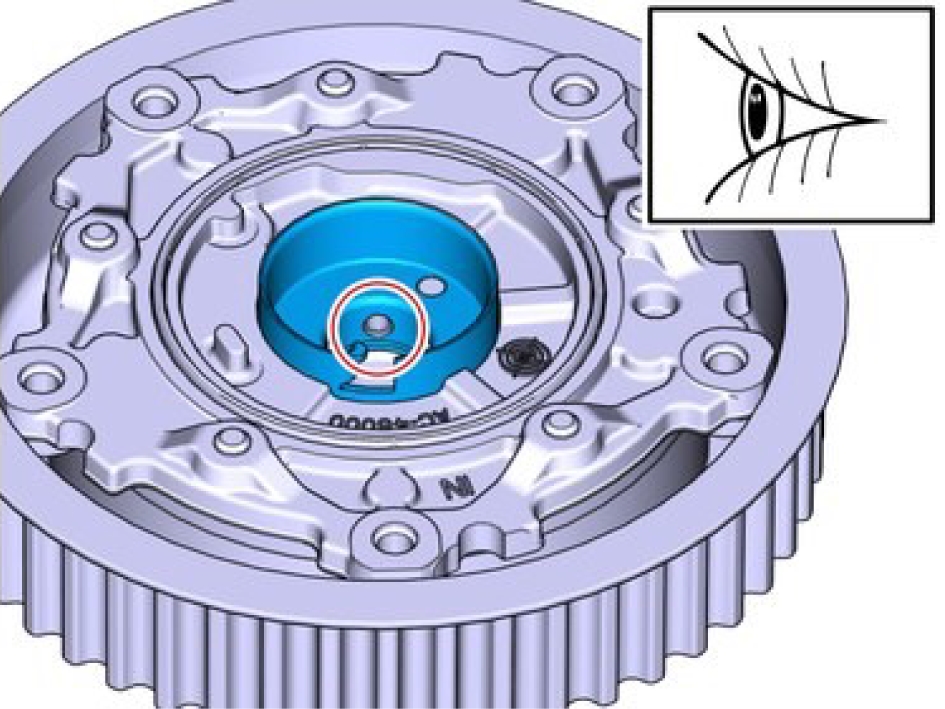
Make sure that marked component is not rotated relative to the VVT unit, and that the oil galleries are at the center of each other.
Check the component. If it displays any type of damage, it must be replaced.
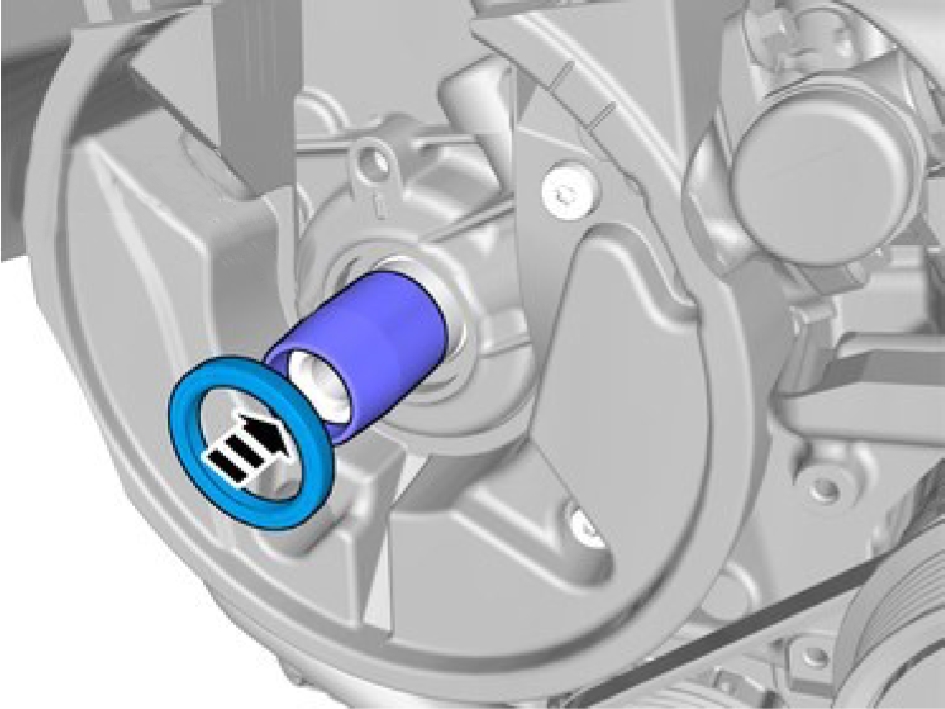
Installation
Make sure that the component is not loose
Check the component. If it displays any type of damage, it must be replaced.
Make sure that the area around the component is clean and free of foreign material.
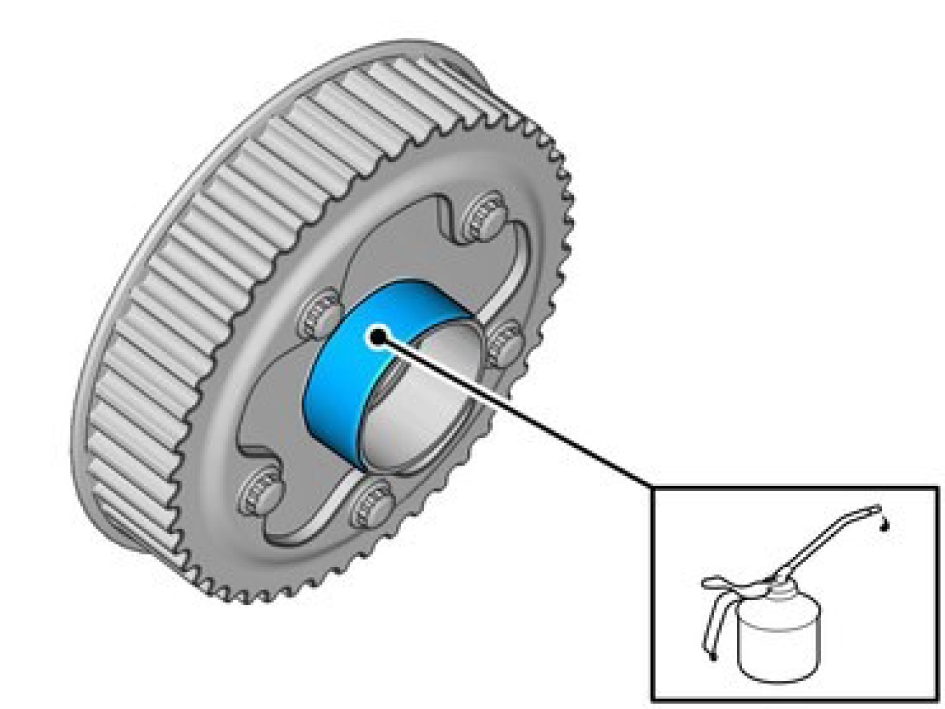
Apply oil to the marked surface.
Make sure that the area around the component is clean and free of foreign material.
The graphic shows the back of the component.
Note the position.
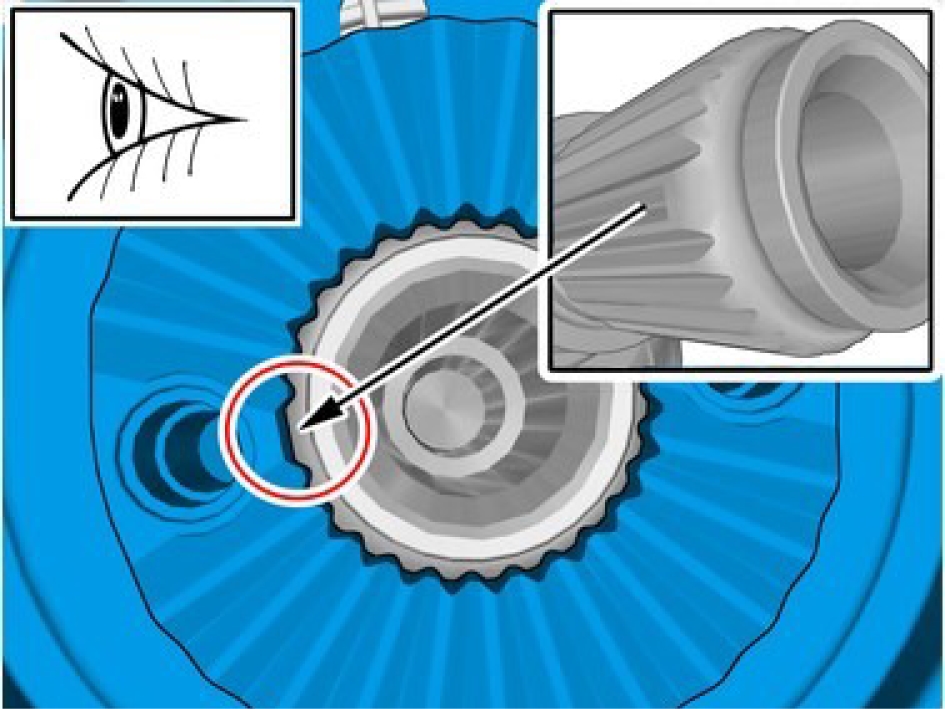
Install the marked component.
Install new screws and tighten finger tight at this stage.
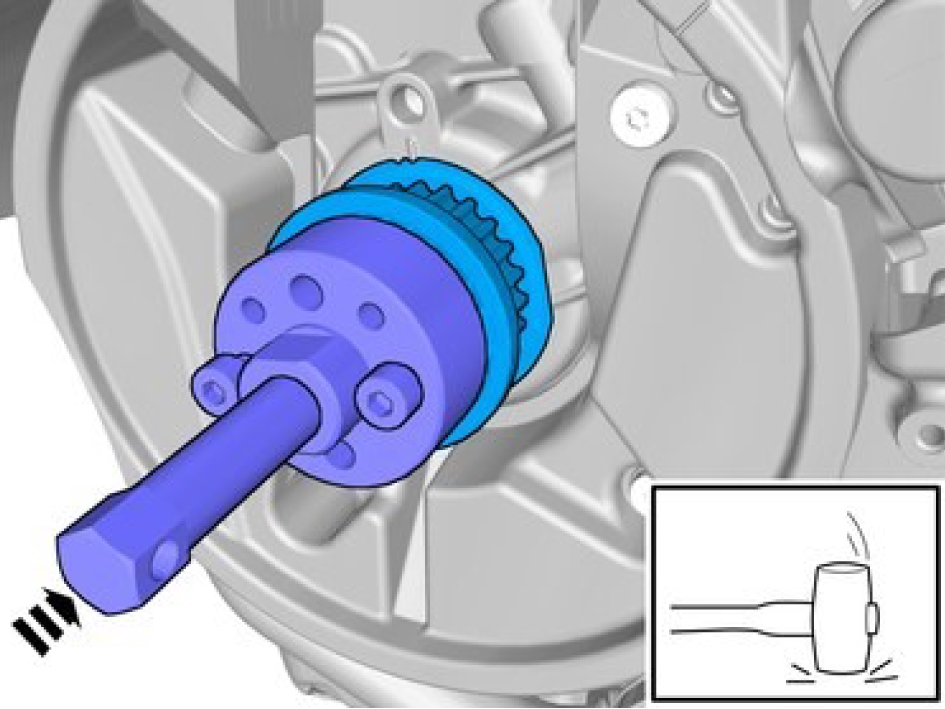
Install the screws.
Install the tool and tighten the screws.
VVT unit, center screw, torque: 90 Nm
Special tool: 999 7760
Release the locks.
Note the placing of the tool.
Install the tool.
A click confirms that the component is in the correct position.
A click confirms that the component is in the correct position.
Install timing belt, refer to:
Timing belt, replaceBelt water pump, replace
Ring crankshaft rear, replace
Oil pump, replace
Removal
Remove the oil pan, refer to:
Oil pan, replace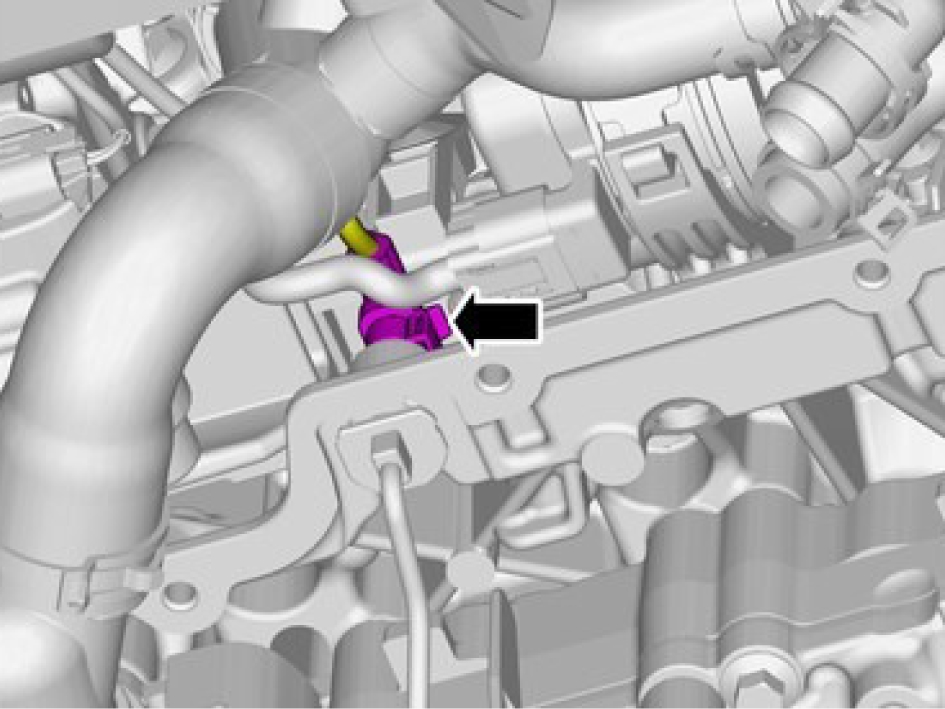
Disconnect the connector.
Disconnect the connector.
Remove the screws.
Remove the marked component.
Depress the locking devices.
Remove the marked component.
Remove the screws.
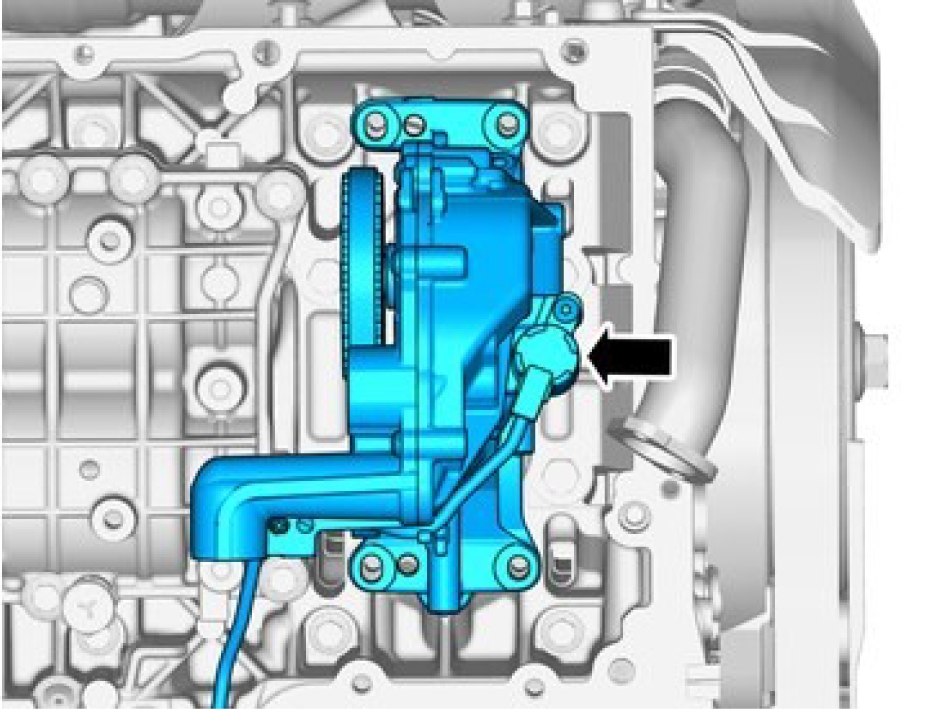
Remove the marked component. Install
Installation
Install the marked components.
Make sure that the component moves freely between the end positions.
Install the screws.
Use hands only.
Install the special tool: 999 7793
Install the screws M7, torque: 17 Nm
Adjust to the specified value.

Tighten the screws M7, torque: 17 Nm
Remove the tool.
Install the cover.
Install the marked component.
Install the screws M7, torque: 17 Nm
Install and connect the connector.
Install the oil pan, refer to:
Oil pan, replaceOil cooler, engine, replace
Removal
Drain engine oil, refer to.
Oil filter, replaceDrain the cooling system.
Be prepared to collect escaping fluid.
Remove the screws.
Release the lock.
Undo the hose from the connection.
Disconnect the connector.
Remove the marked component.
Loosen the clip.
Remove the component carefully

Be prepared to collect escaping fluid.
Loosen the hose clamp.
Undo the hose from the connection.
Be prepared to collect escaping fluid.
Loosen the hose clamps.
Undo the hose from the connection.

Loosen the clip.
Remove the marked component.
Be prepared to collect escaping fluid.
Release the lock.
Undo the hose from the connection.

Remove the screws.
Loosen the marked detail.
Remove the marked component.
Loosen the hose clamp.
Undo the hose from the connection.
Be prepared to collect escaping fluid.
Use suitable paper to absorb any escaping fluid.
Remove the screws.
Remove the marked component.
Installation
Replace the marked component.
Only tighten the screws finger tight at this stage.
Make sure to follow the sequence indicated.
Install the marked components.
Tighten the screws M7, torque: 16 Nm
Install the hose and clamp.
Install marked component.
Install screws M6, torque: 10 Nm
Install the hose.
Install the lock.
Install marked component.
Install clips.
Install the marked component.
Install the clamps.
Install the hose.
Install the clamp.
1, Install clamp
2, Install clips.
Connect the cable.
Install the hose with the lock.
Install the screw M6, torque: 10 Nm
Fill the oil according to:
Oil filter, replaceFill the cooling system.
Crankshaft seal, rear, replace
Removal
Remove the carrier plate, refer to:
Carrier plate, replace
Take extra care not to damage the mating faces.
Use suitable paper to absorb any escaping fluid.
Remove the marked component using special tool: 999 5651
Installation
Use a new seal.
Use engine oil.
Install the marked component using special tool: 999 7174
Make sure that the mating faces are clean and free of foreign material.
Install the tool.
Make sure that the seal is correctly located.
Install the tool.
Tighten the screw.
Install the carrier plate, refer to:
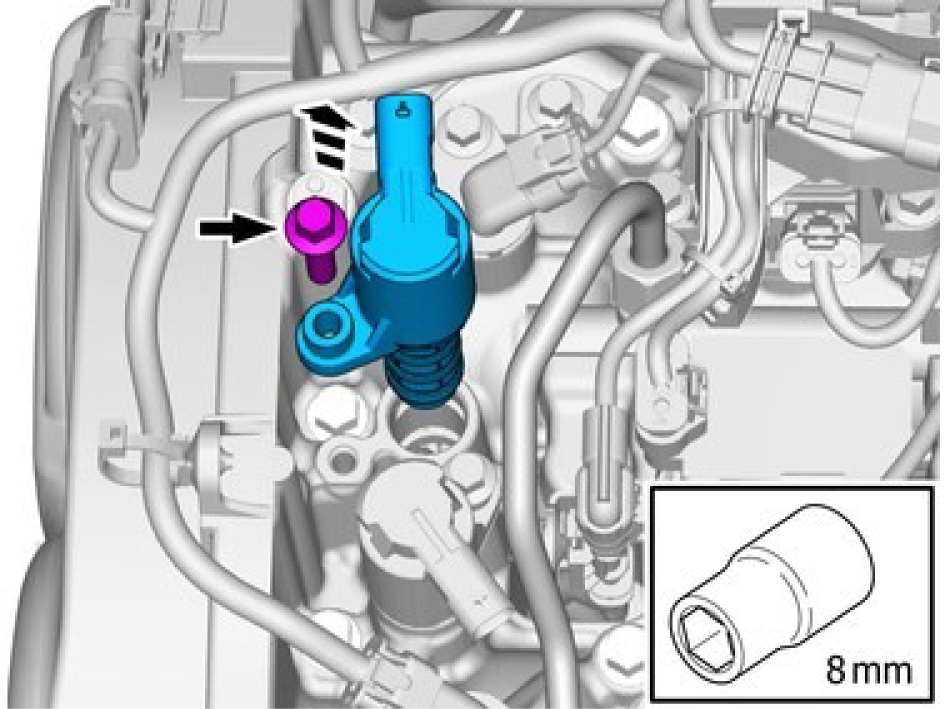
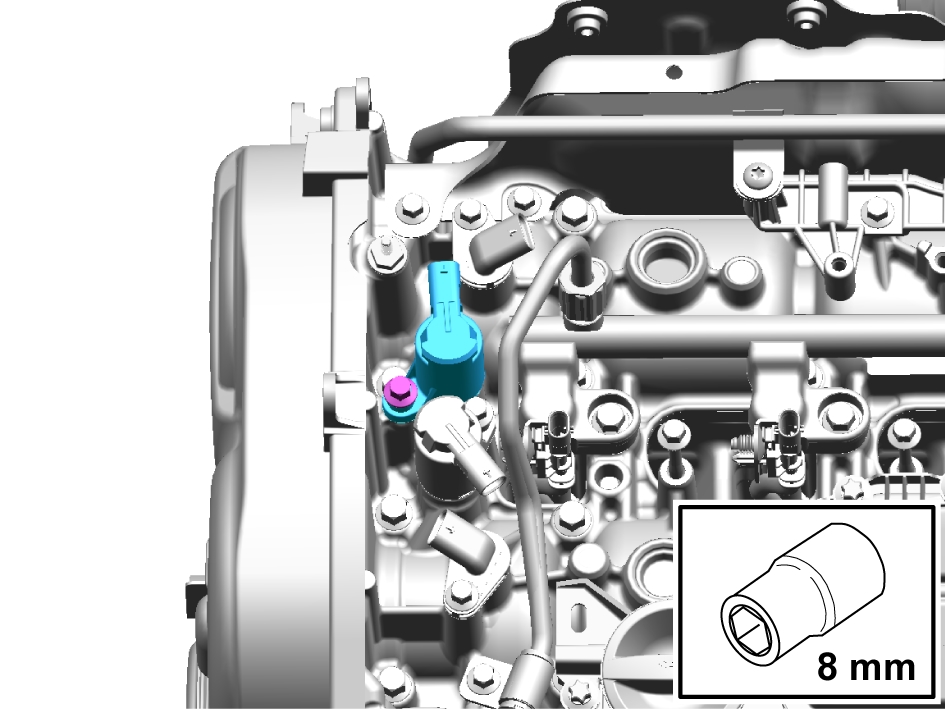
Carrier plate, replaceCamshaft position sensor exhaust, replace
Clean the area around the component to be dismantled.
Disconnect the connector.
Remove the screw.
Pull the component straight up.
Installation
Install the component and tighten M6, torque: 10 Nm
Oil filter, replace
Removal

Hot fluid.
Remove the marked component.
Hot fluid.
Make sure that the area around the component is clean and free of foreign material.
Remove the marked component.
Special tool: 999 5679
Use a new seal.
Remove the marked component.
Installation
Install the oil plug, torque: 38 Nm
Install the oil filter, use special tool 999 5679, torque: 25 Nm
Fill the oil according to specification.
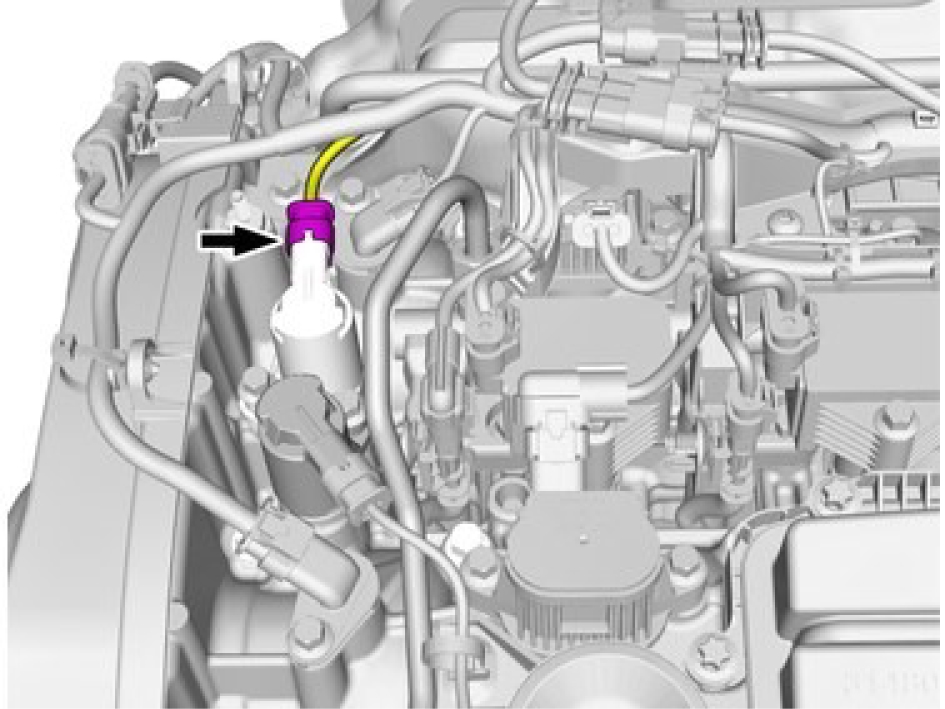
Camshaft position sensor intake, replace
Clean the area around the component to be dismantled.
Disconnect the connector.
Remove the screw.
Pull the component straight up.
Installation
Install the component and tighten M6, torque: 10 Nm
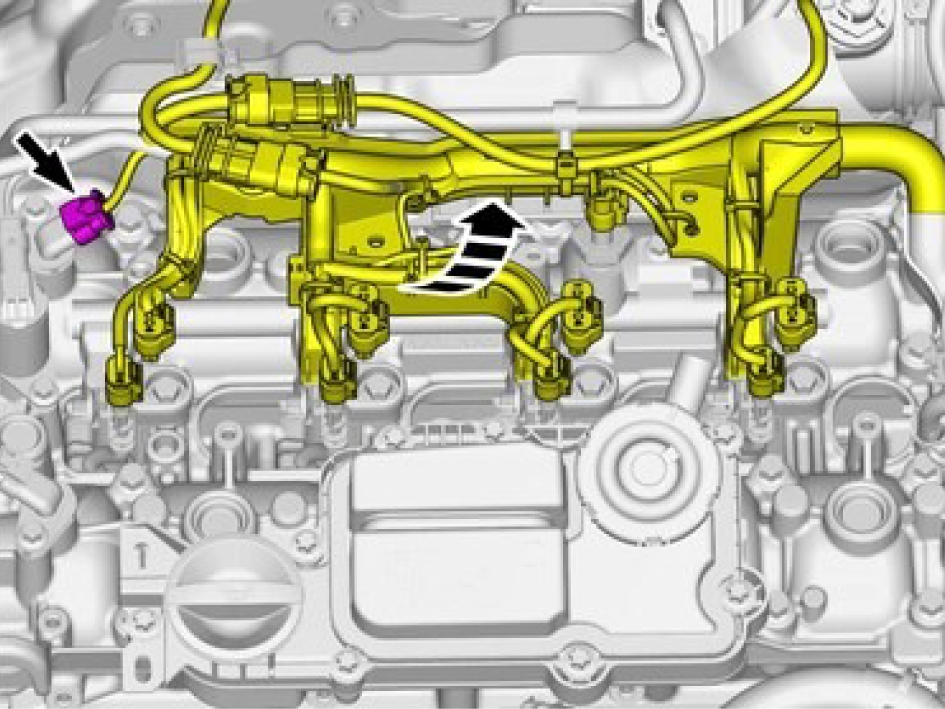
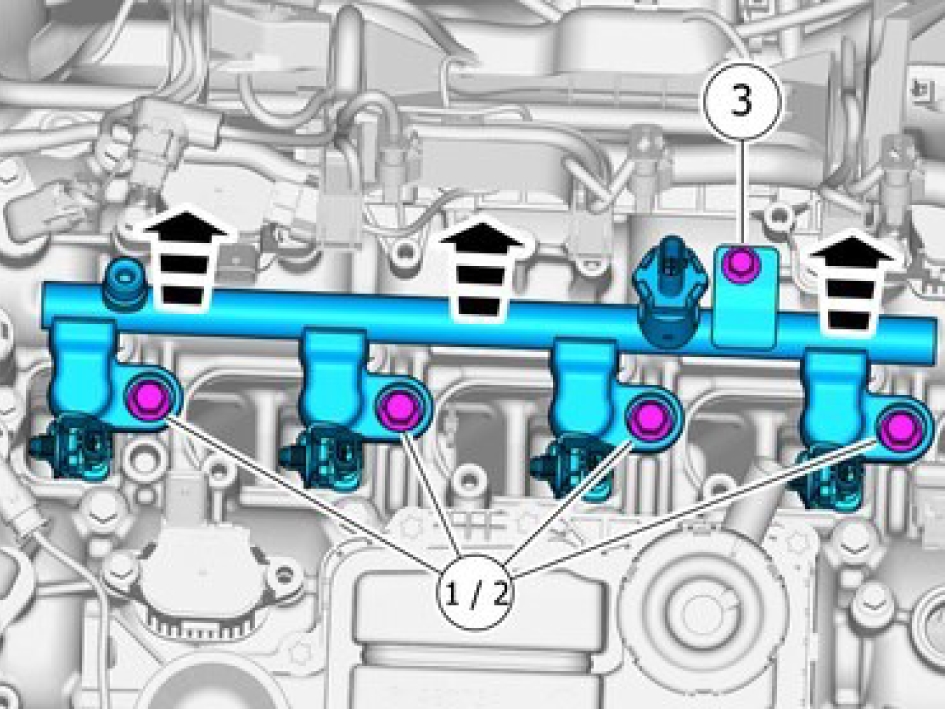
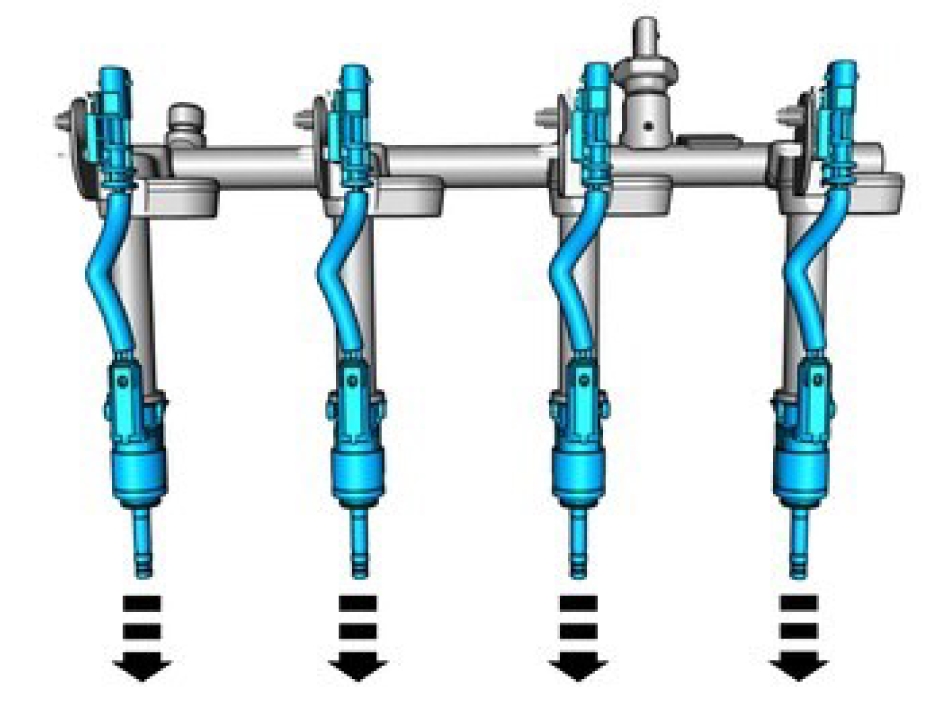
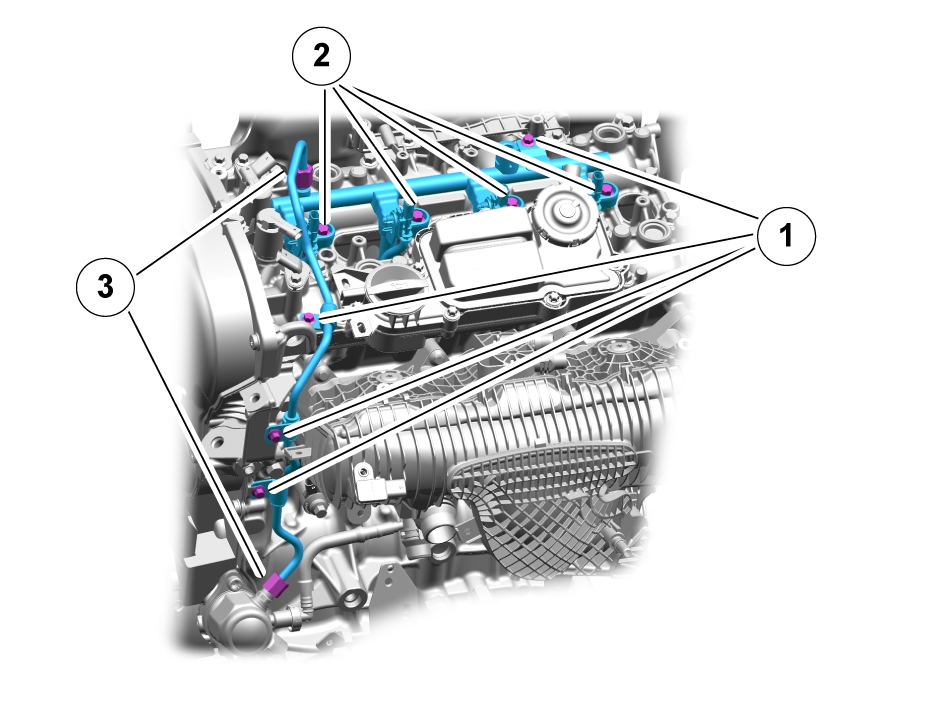
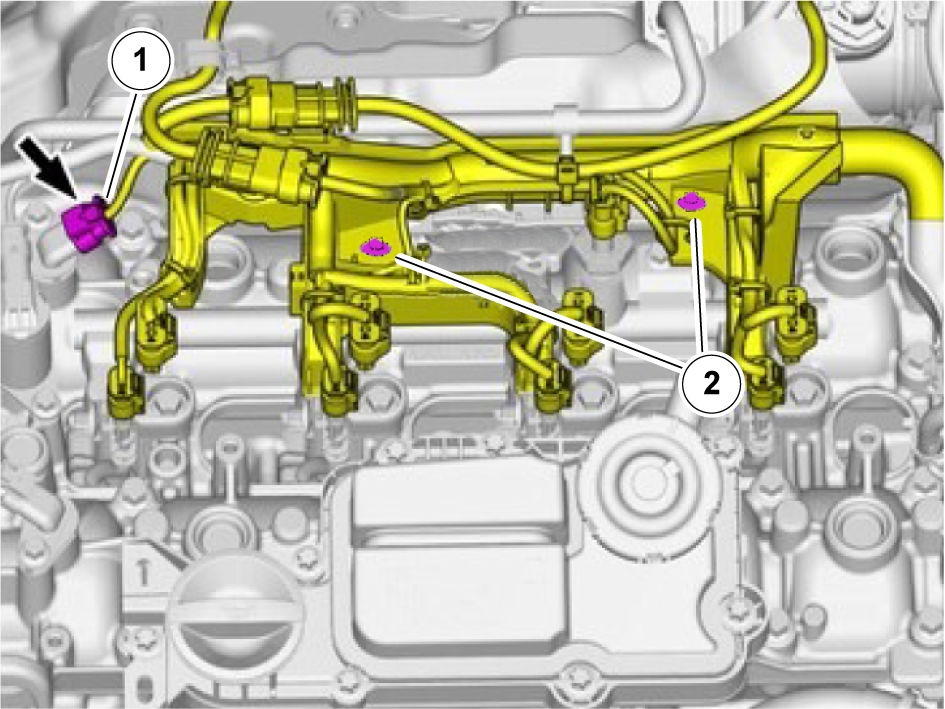
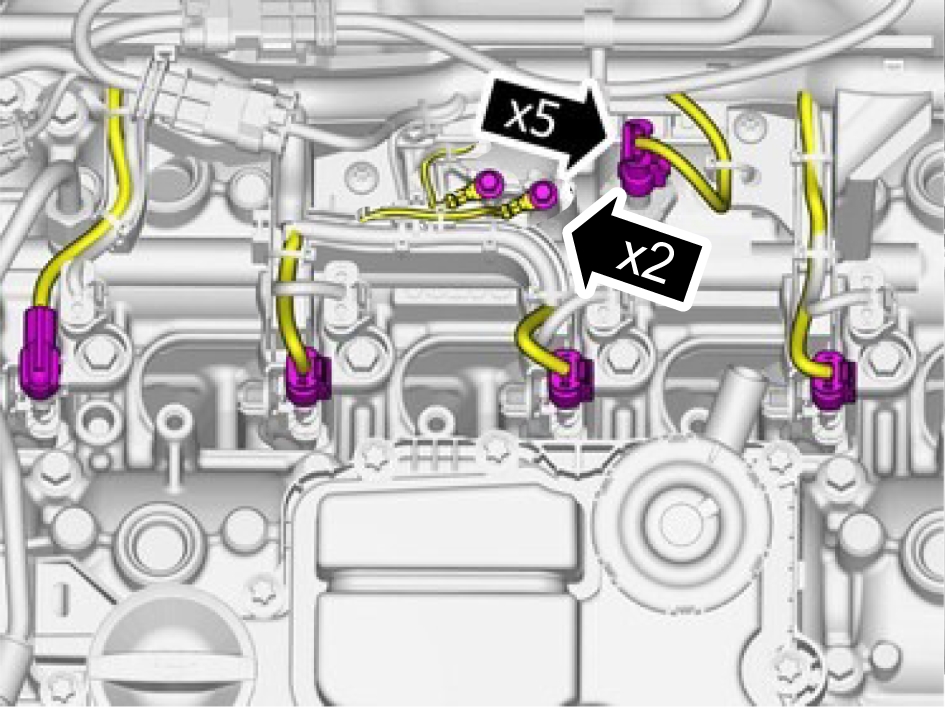
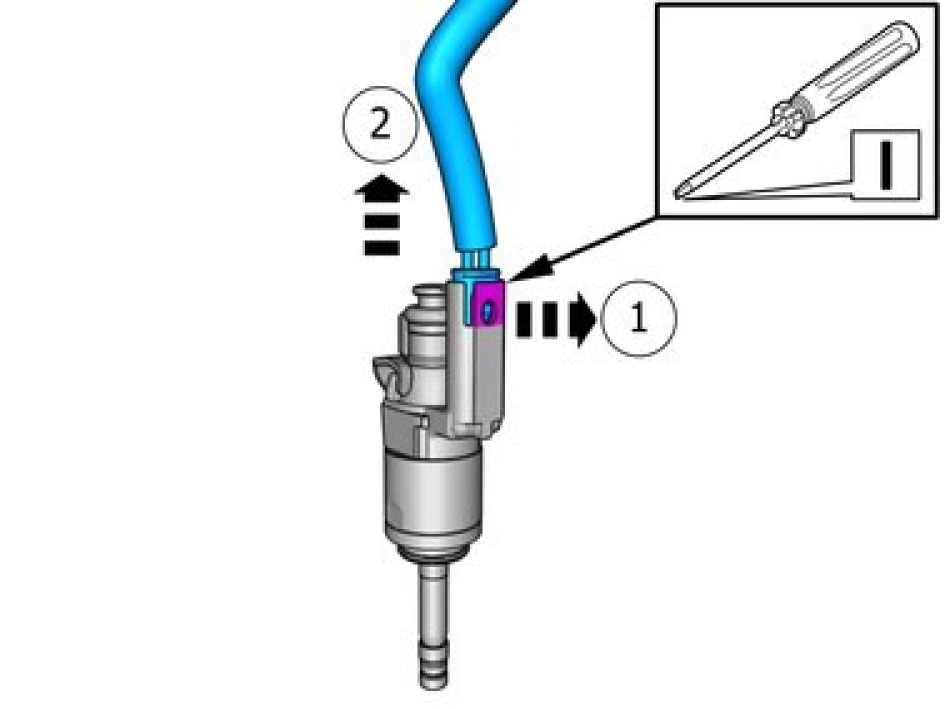
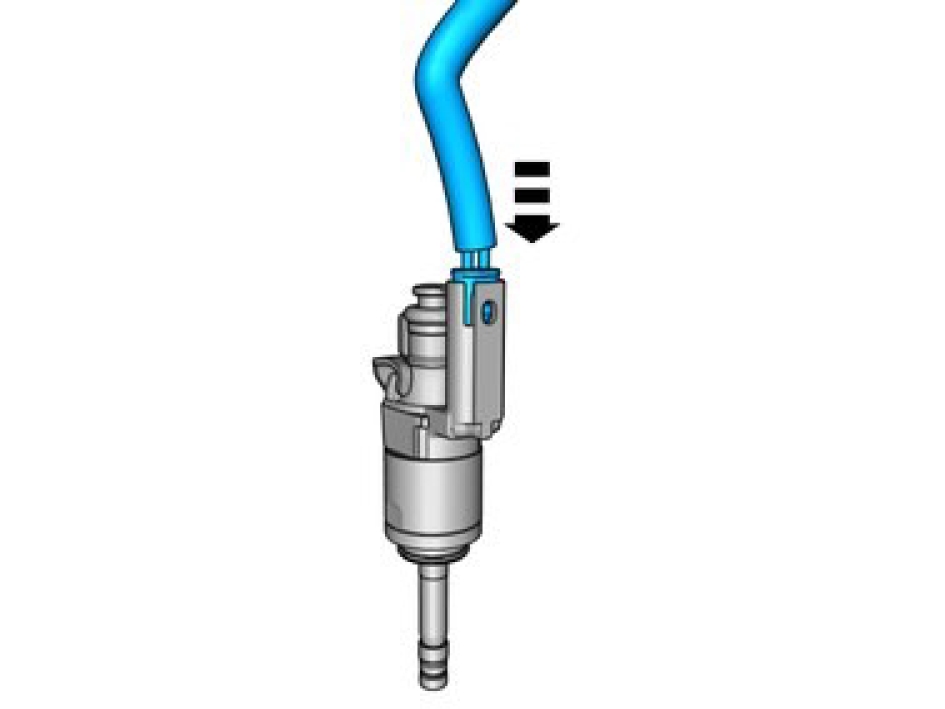
Fuel rail, replace
Removal
Exposure to fuel can be harmful and can cause severe health damage or death.
To avoid that dirt can cause damage during disassembly, the area should be cleaned both at the start and if needed after components are disassembled.
Relieve the fuel pressure preferably by running the engine without the electrical feed pump engaged until the engine stops.
Remove the ignition coil, refer to:
Ignition coil, replace
Remove the screws.
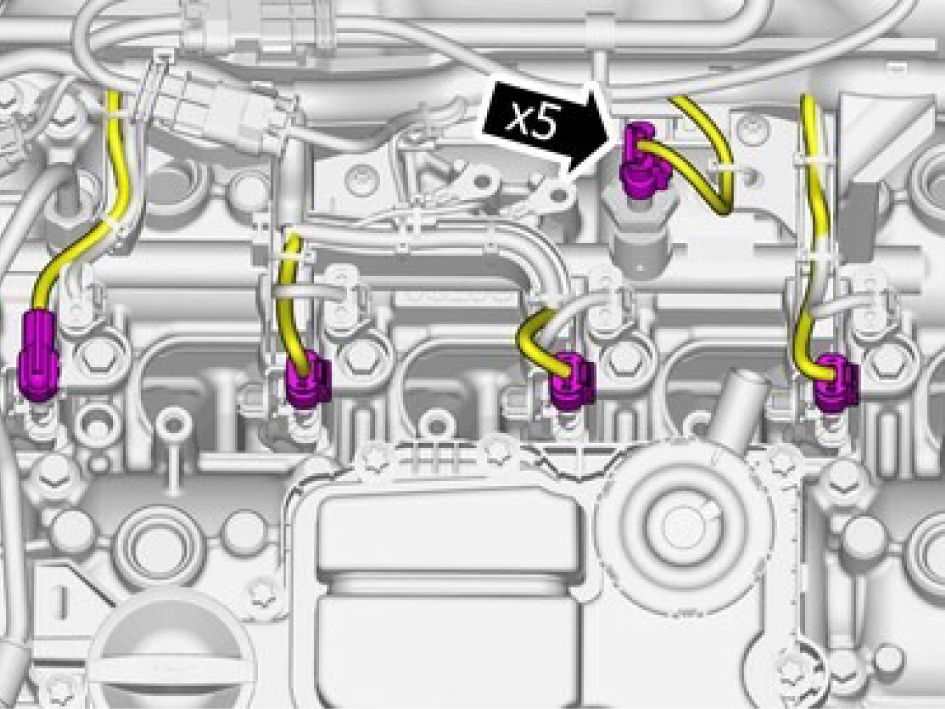
Disconnect the connectors.
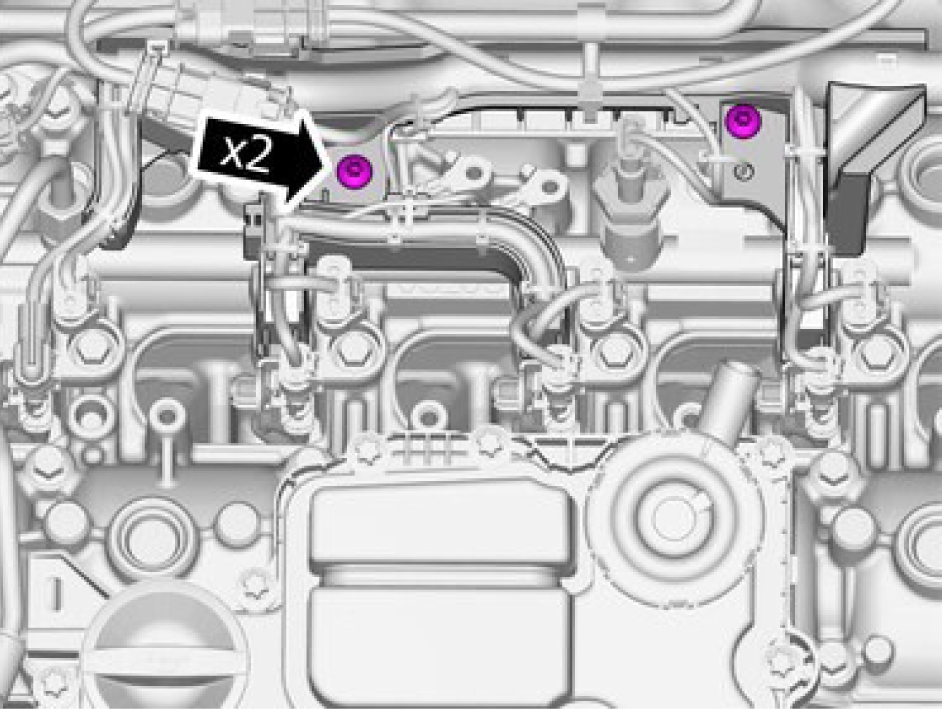
Remove the screws.
Disconnect the connector and fold marked component aside.

Remove the marked component.
Ensure that the guide sleeve remains in position.
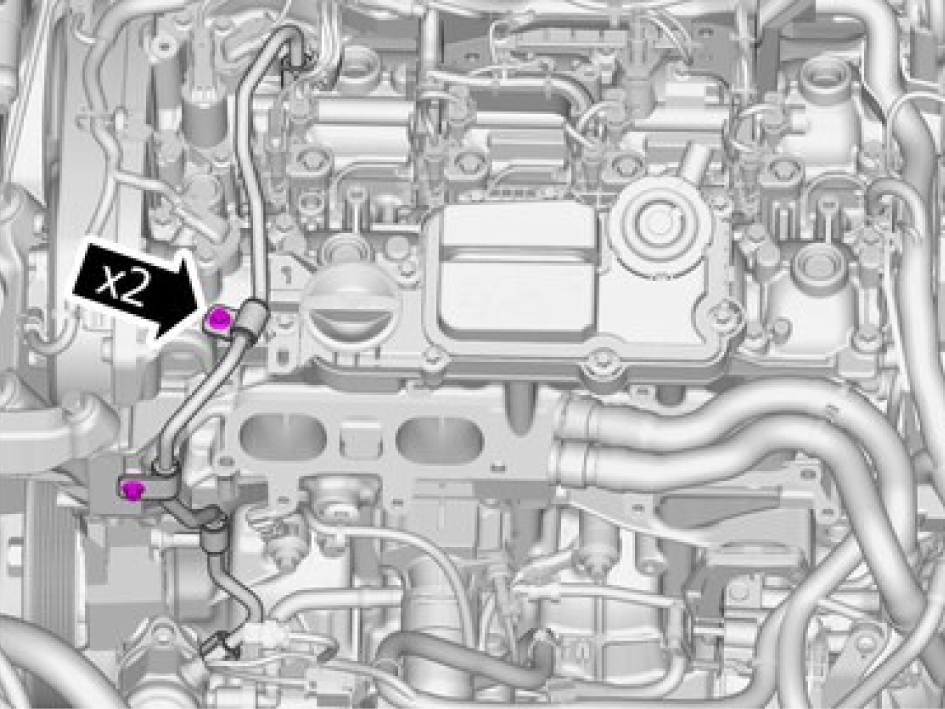
Remove the screws.
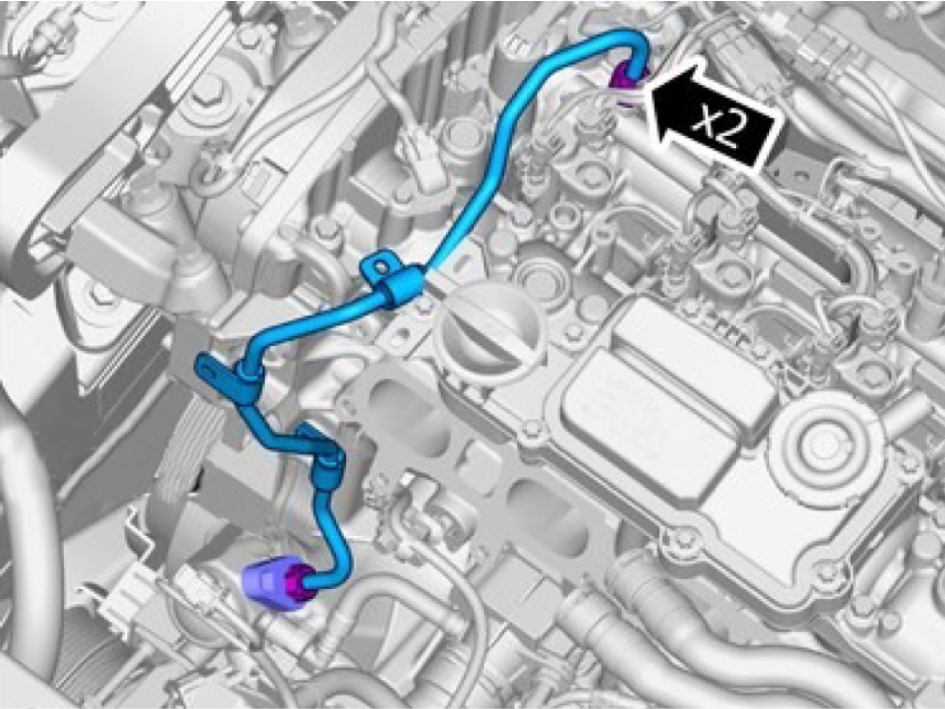
Be prepared to collect escaping fluid.
Make sure that a new component is installed.
Remove the marked component.
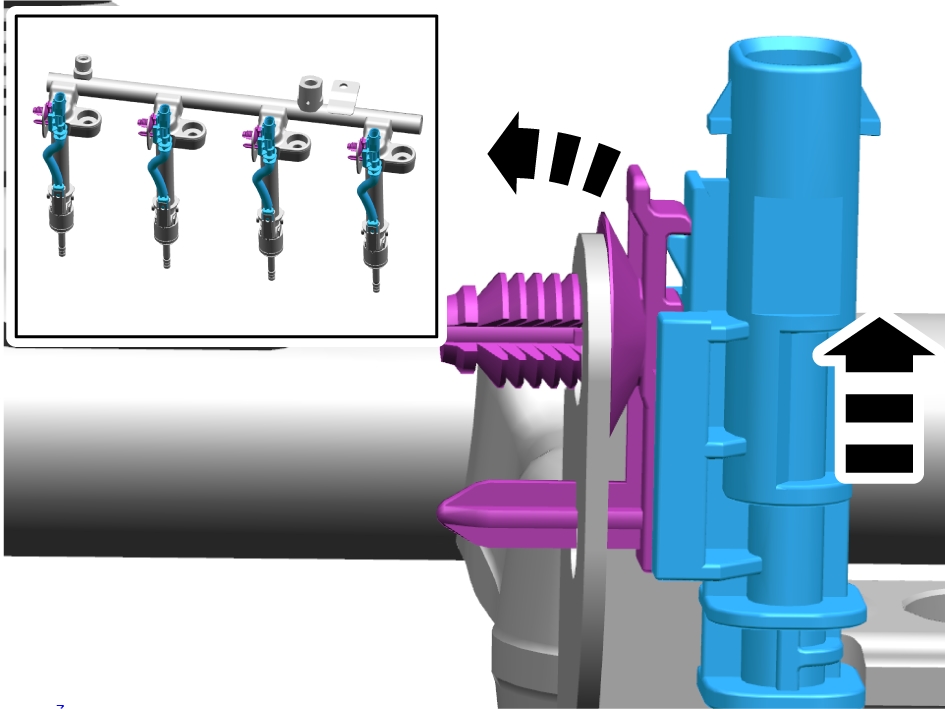
Release the connectors from the clips.
In order to avoid damage to the injectors, the component must be carefully pulled straight up.
Remove the screws and lift the component carefully.
Orientation view
In order to avoid damage to the injectors, the component must be carefully pulled straight up.
Remove the marked component. Special tool: 951 2943
Be prepared to collect escaping fluid.
Be extra careful when removing or installing this component.
Remove the marked components.
Installation
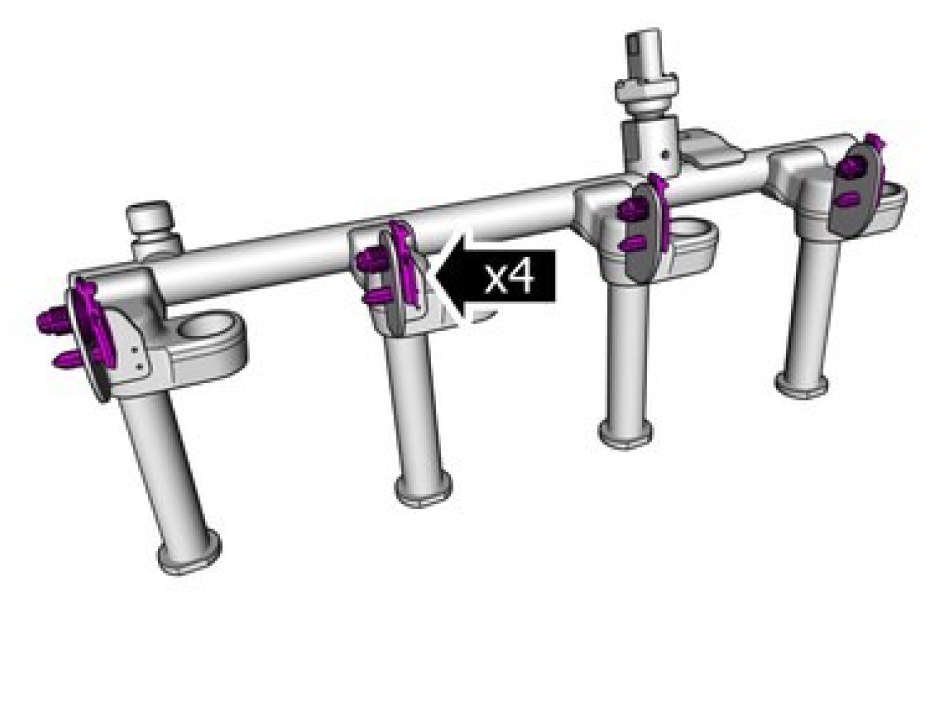
Install new clips.
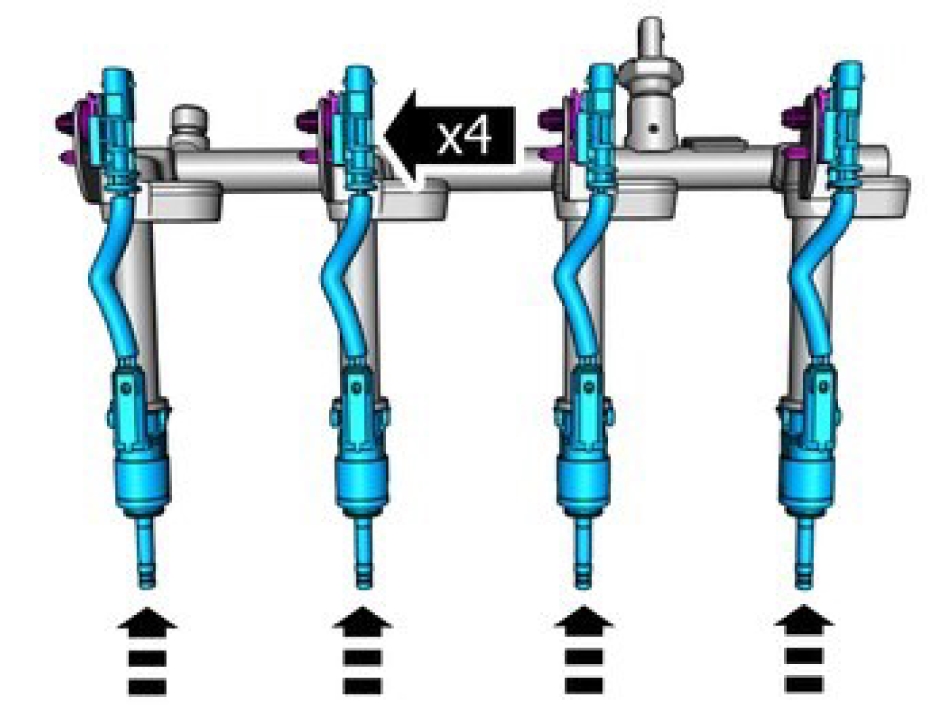
Install the marked components.

Clean carefully, using compressed air before installing.
Special tool: 999 7505
1, Fuel pipe M6, torque: 10 Nm
2, Fuel rail M7, torque: 22 Nm
3, Fuel pipe, use special tool 9814129
Step 1, torque: 19 Nm
Step 2, torque: 30 Nm
Install marked component.
1, M8, torque: 24 Nm
2. M10, torque: 50 Nm
Install the components.
M6, torque: 10 Nm
Install the connector catches.
Install the screws M6, torque: 10 Nm
Install the ignition coil, refer to:
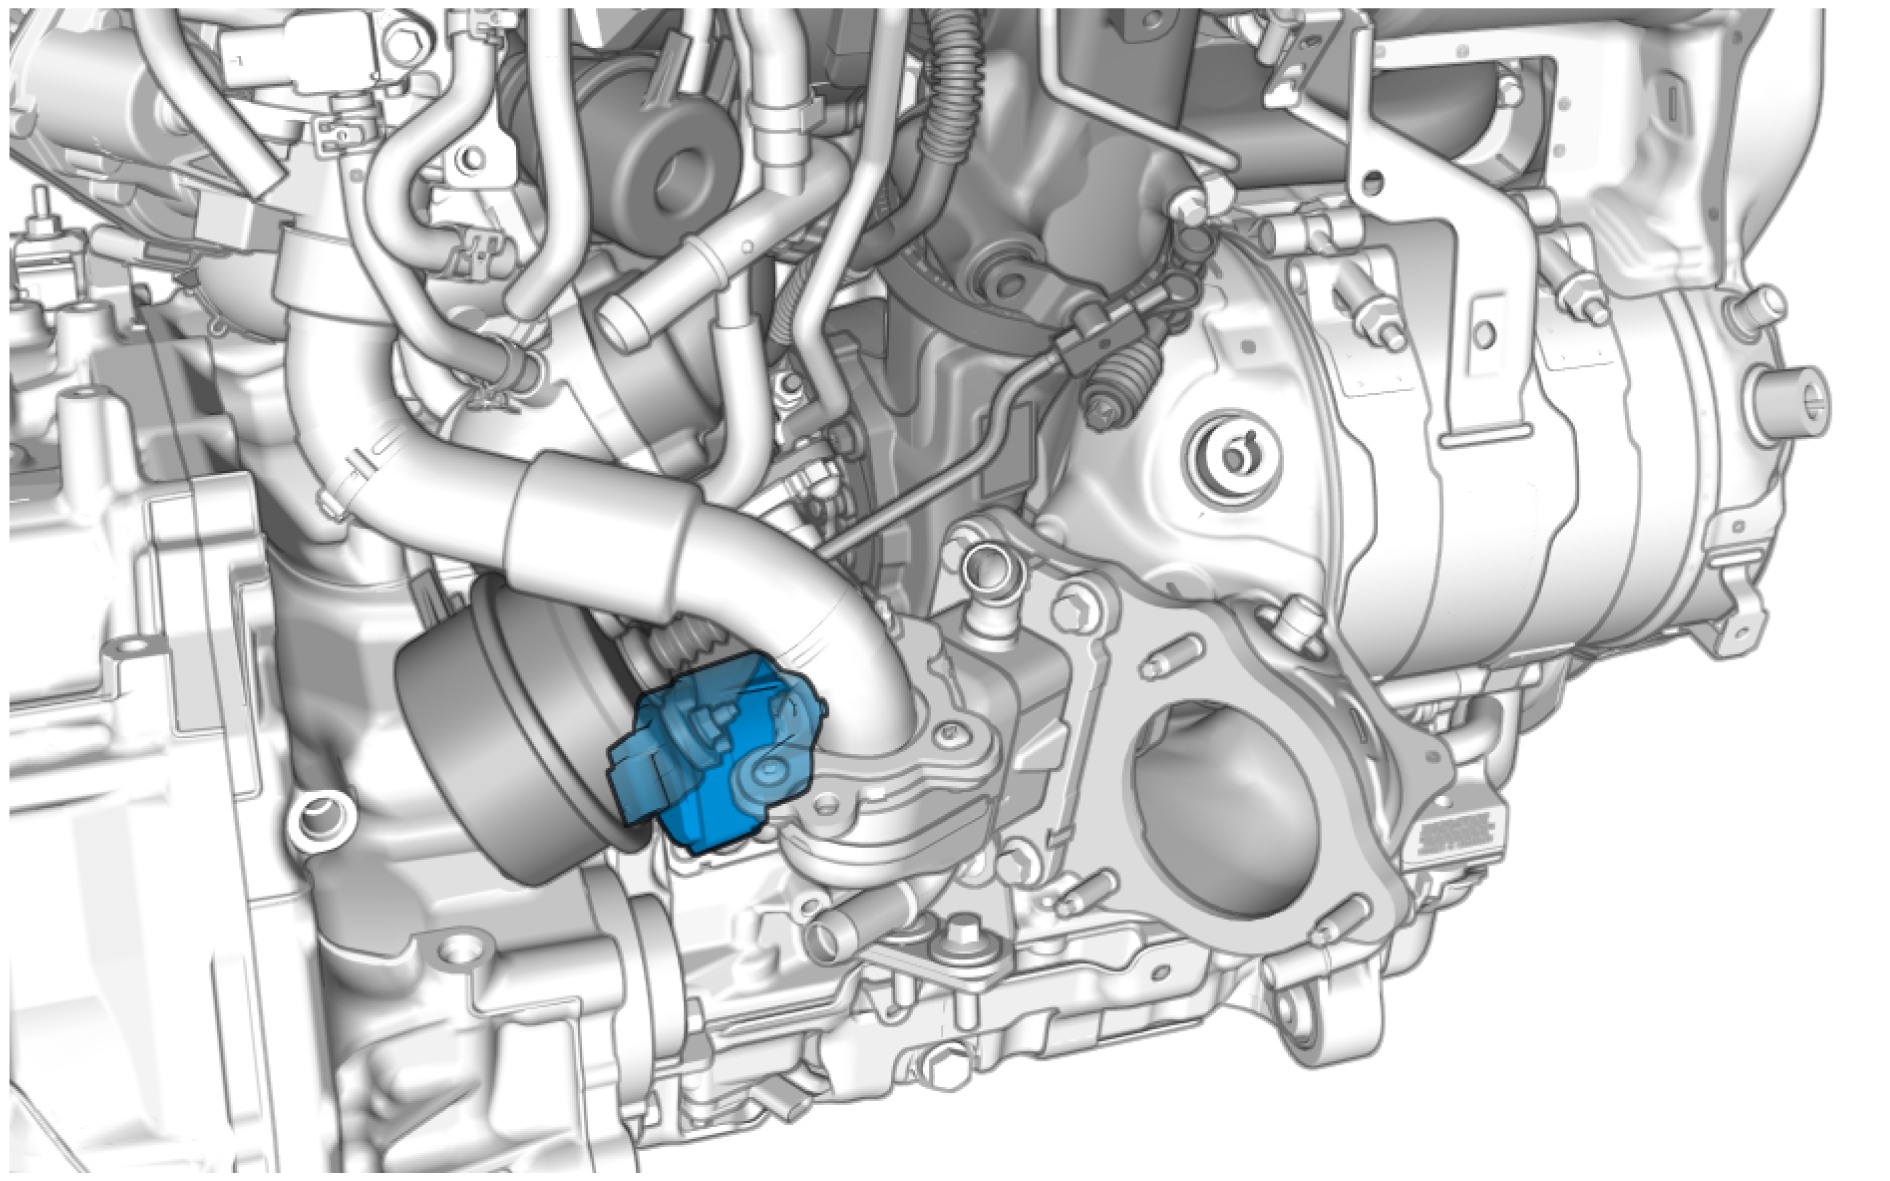
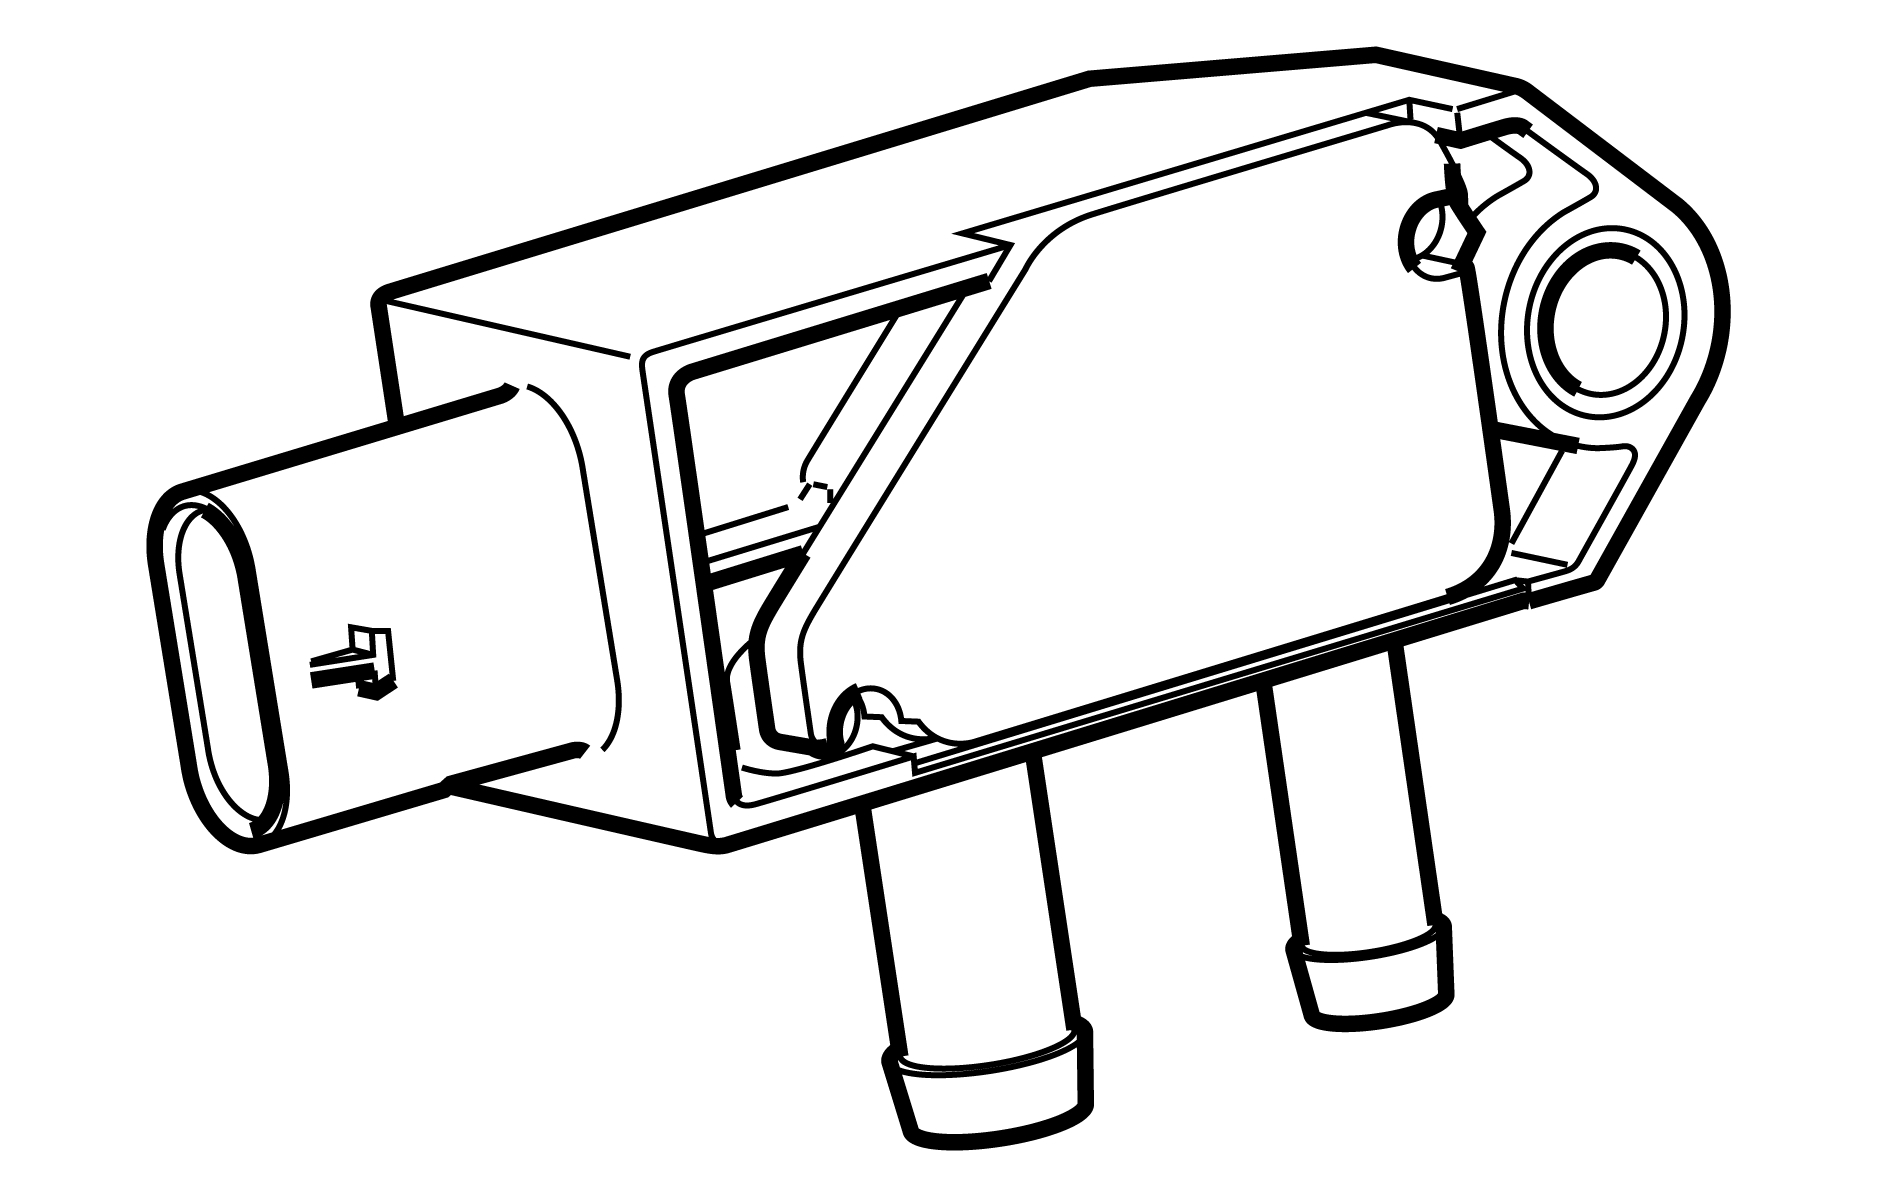
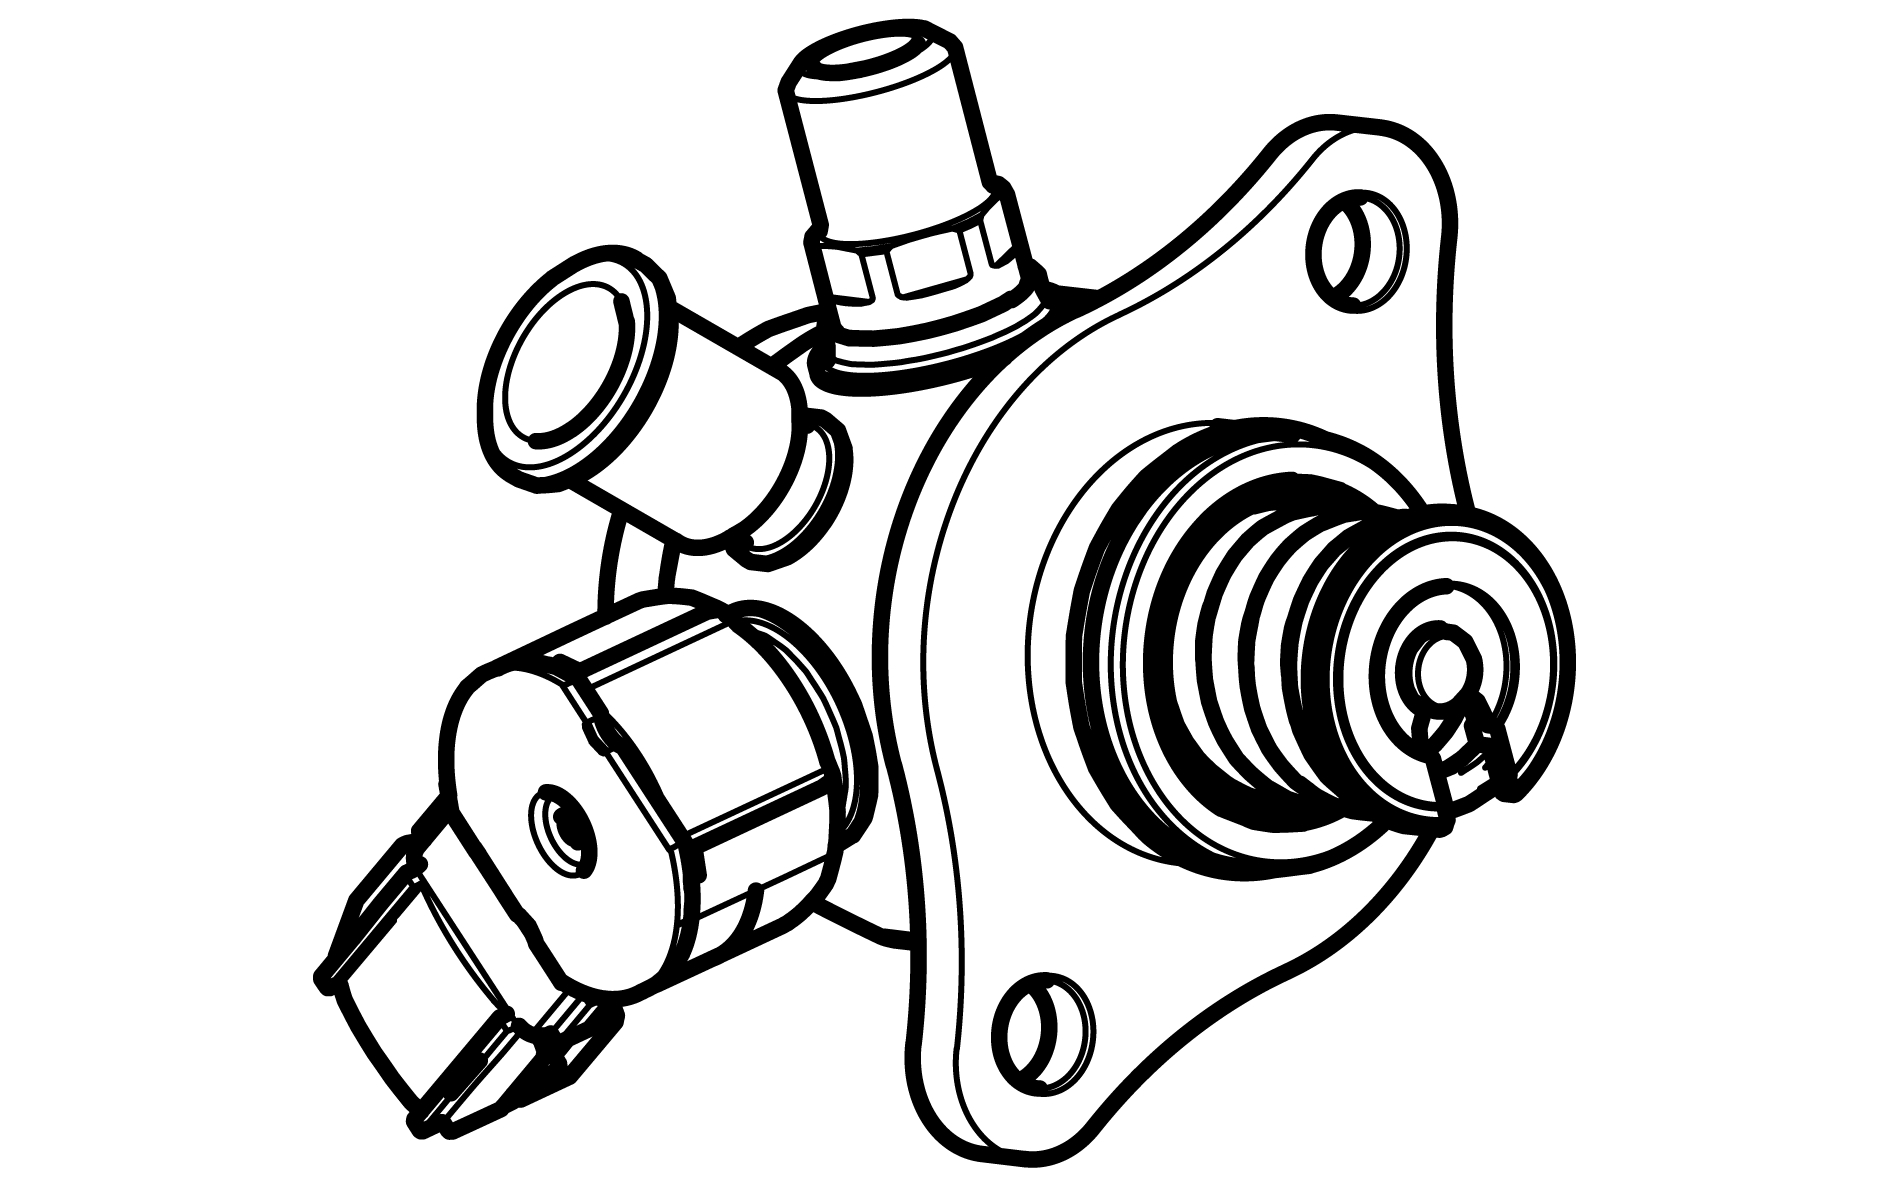
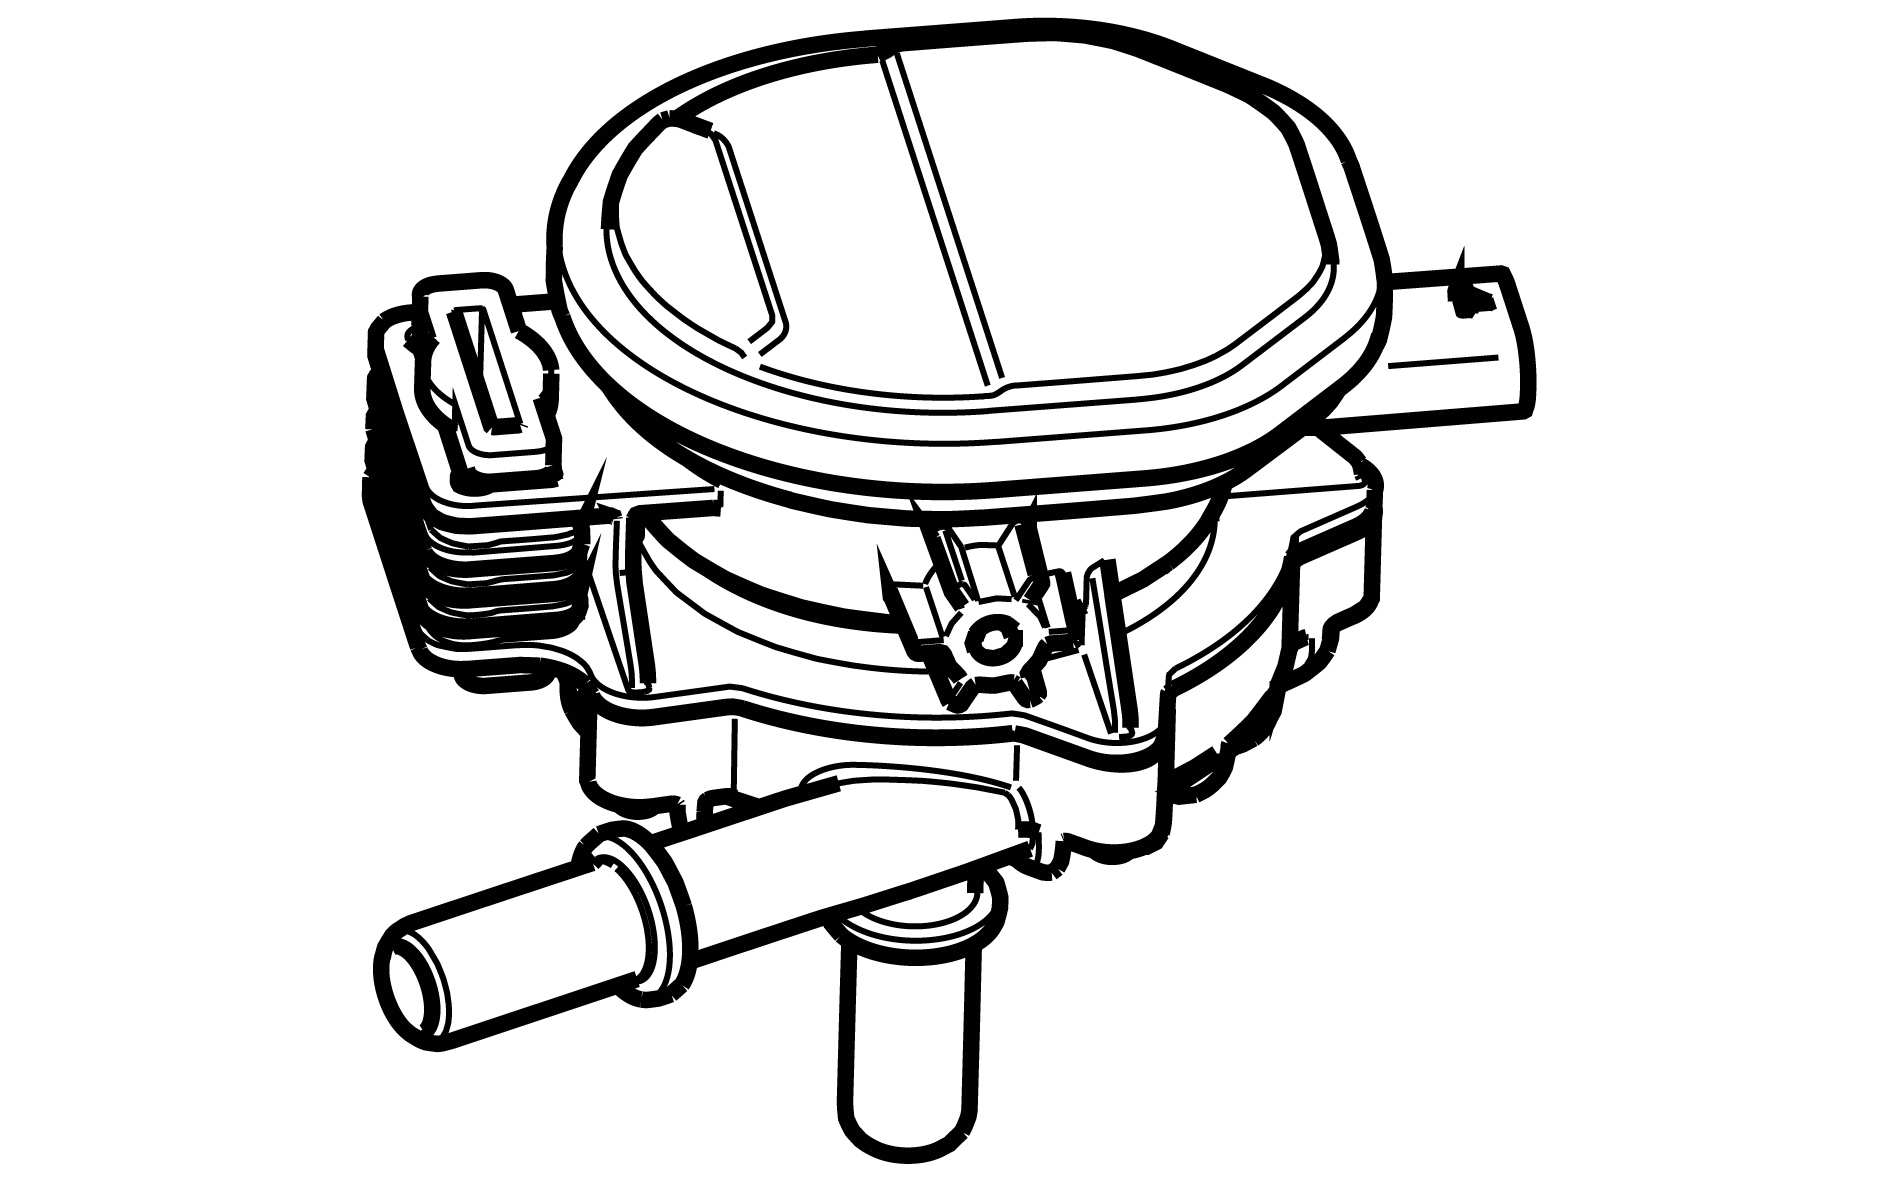
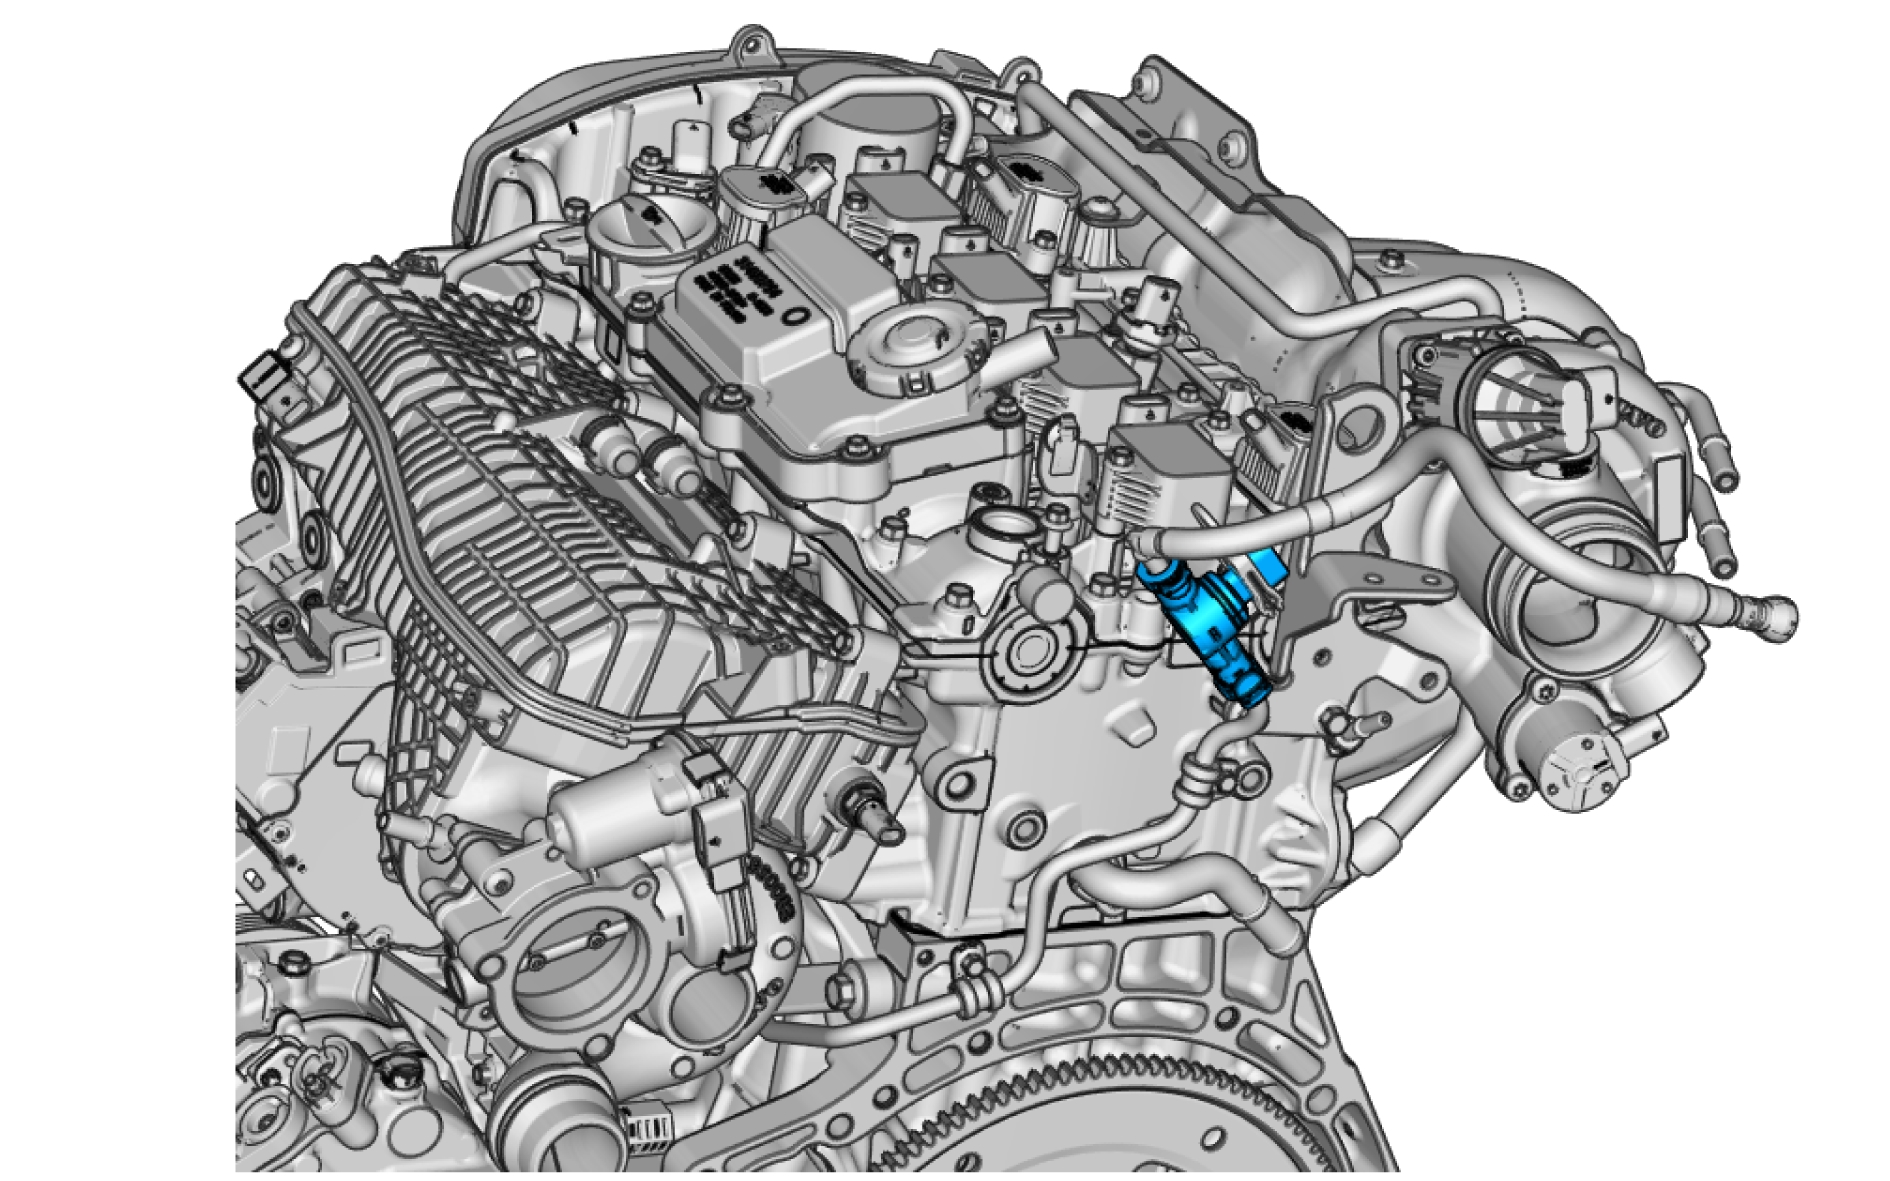
Ignition coil, replaceTurbo control valve, wastegate - V306
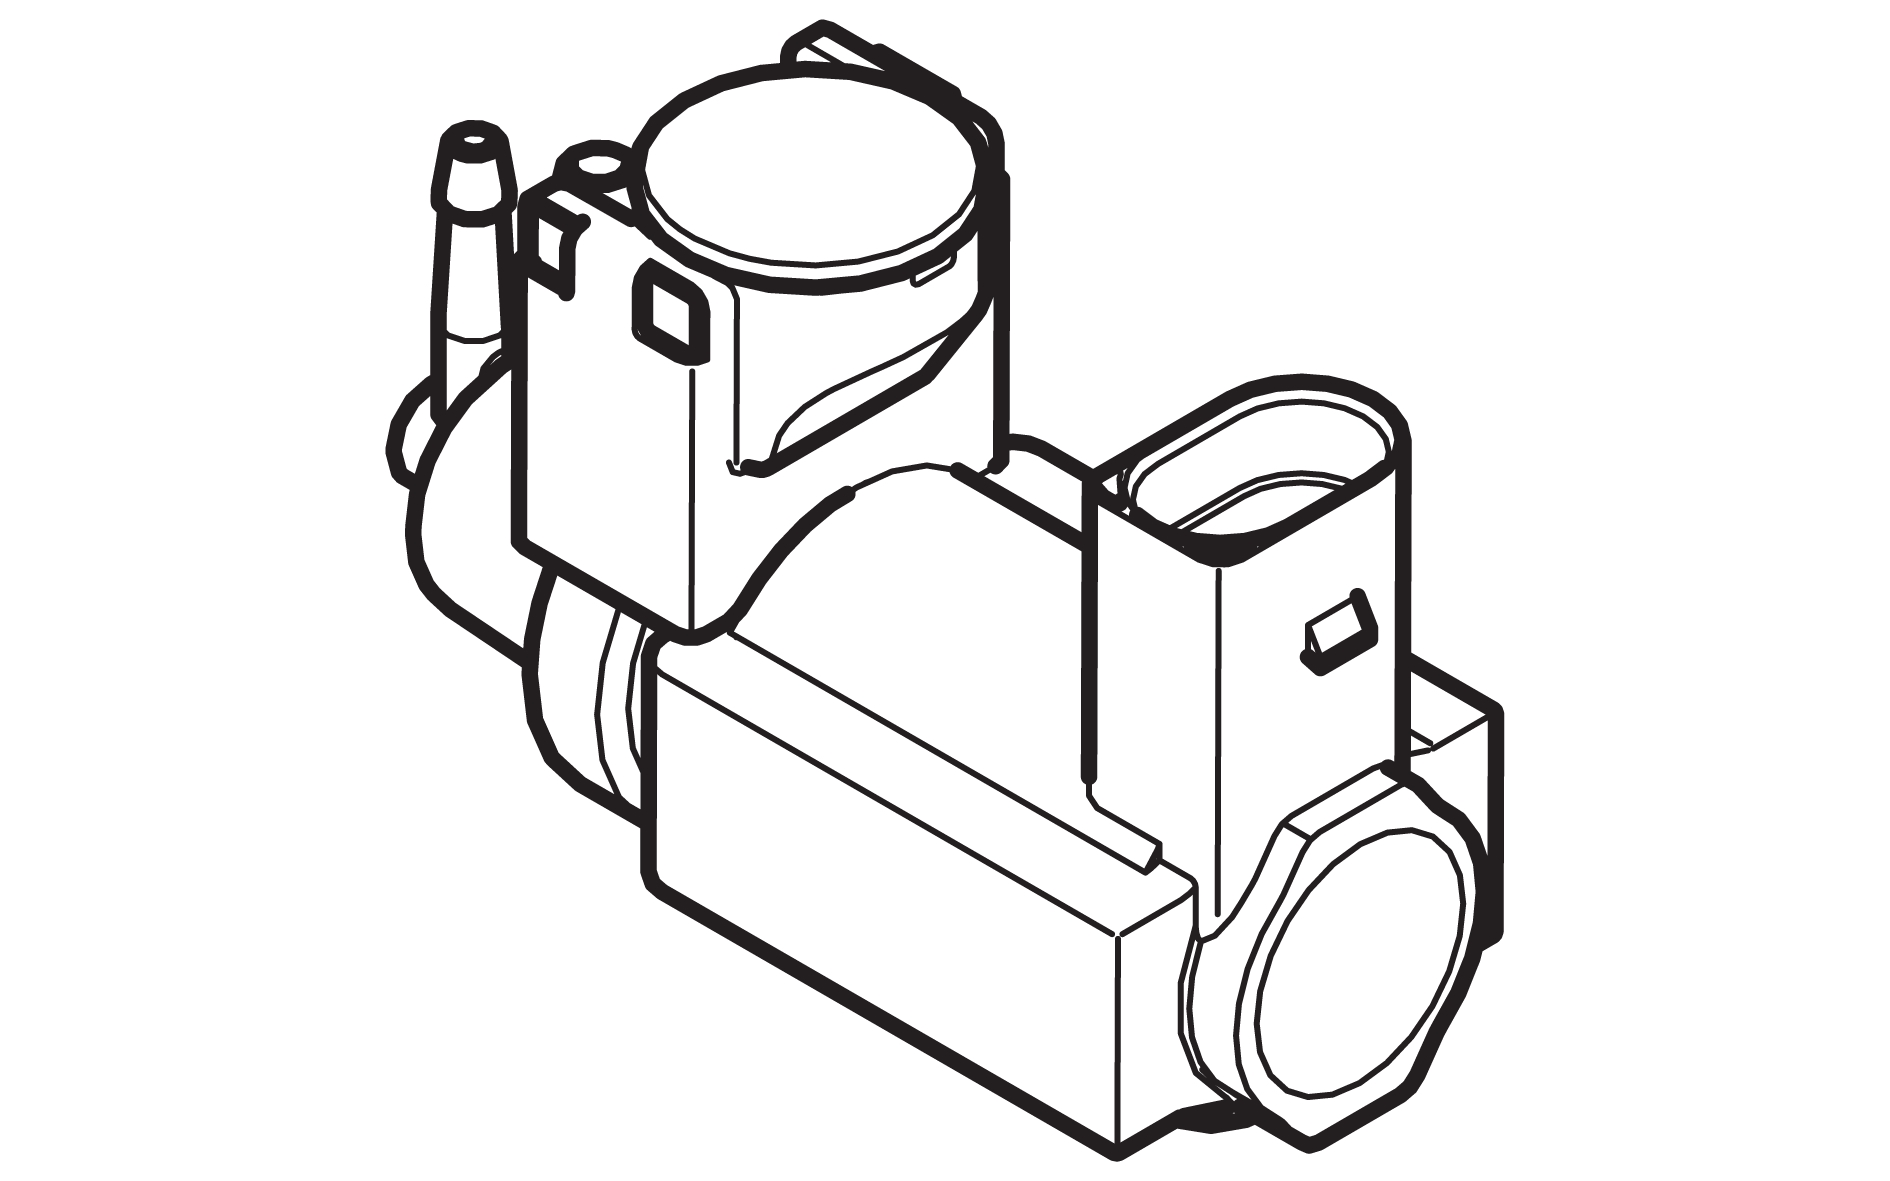
Description
The turbo control valve, wastegate regulates the desired boost pressure of the turbo. By allowing a certain amount of exhaust gas to pass through the turbo without interacting with the turbine, the turbo control valve can control the boost pressure.
In idle mode, the valve is closed. In the event of a power loss the wastegate valve opens.
Diagnostic information
The turbo control valve, wastegate does not have a built-in diagnostic system. The Engine Control Module (ECM) monitors the valve, sets DTCs and has readable parameters for it.
Connection and communication
The turbo control valve, wastegate is directly connected to the Engine Control Module (ECM).
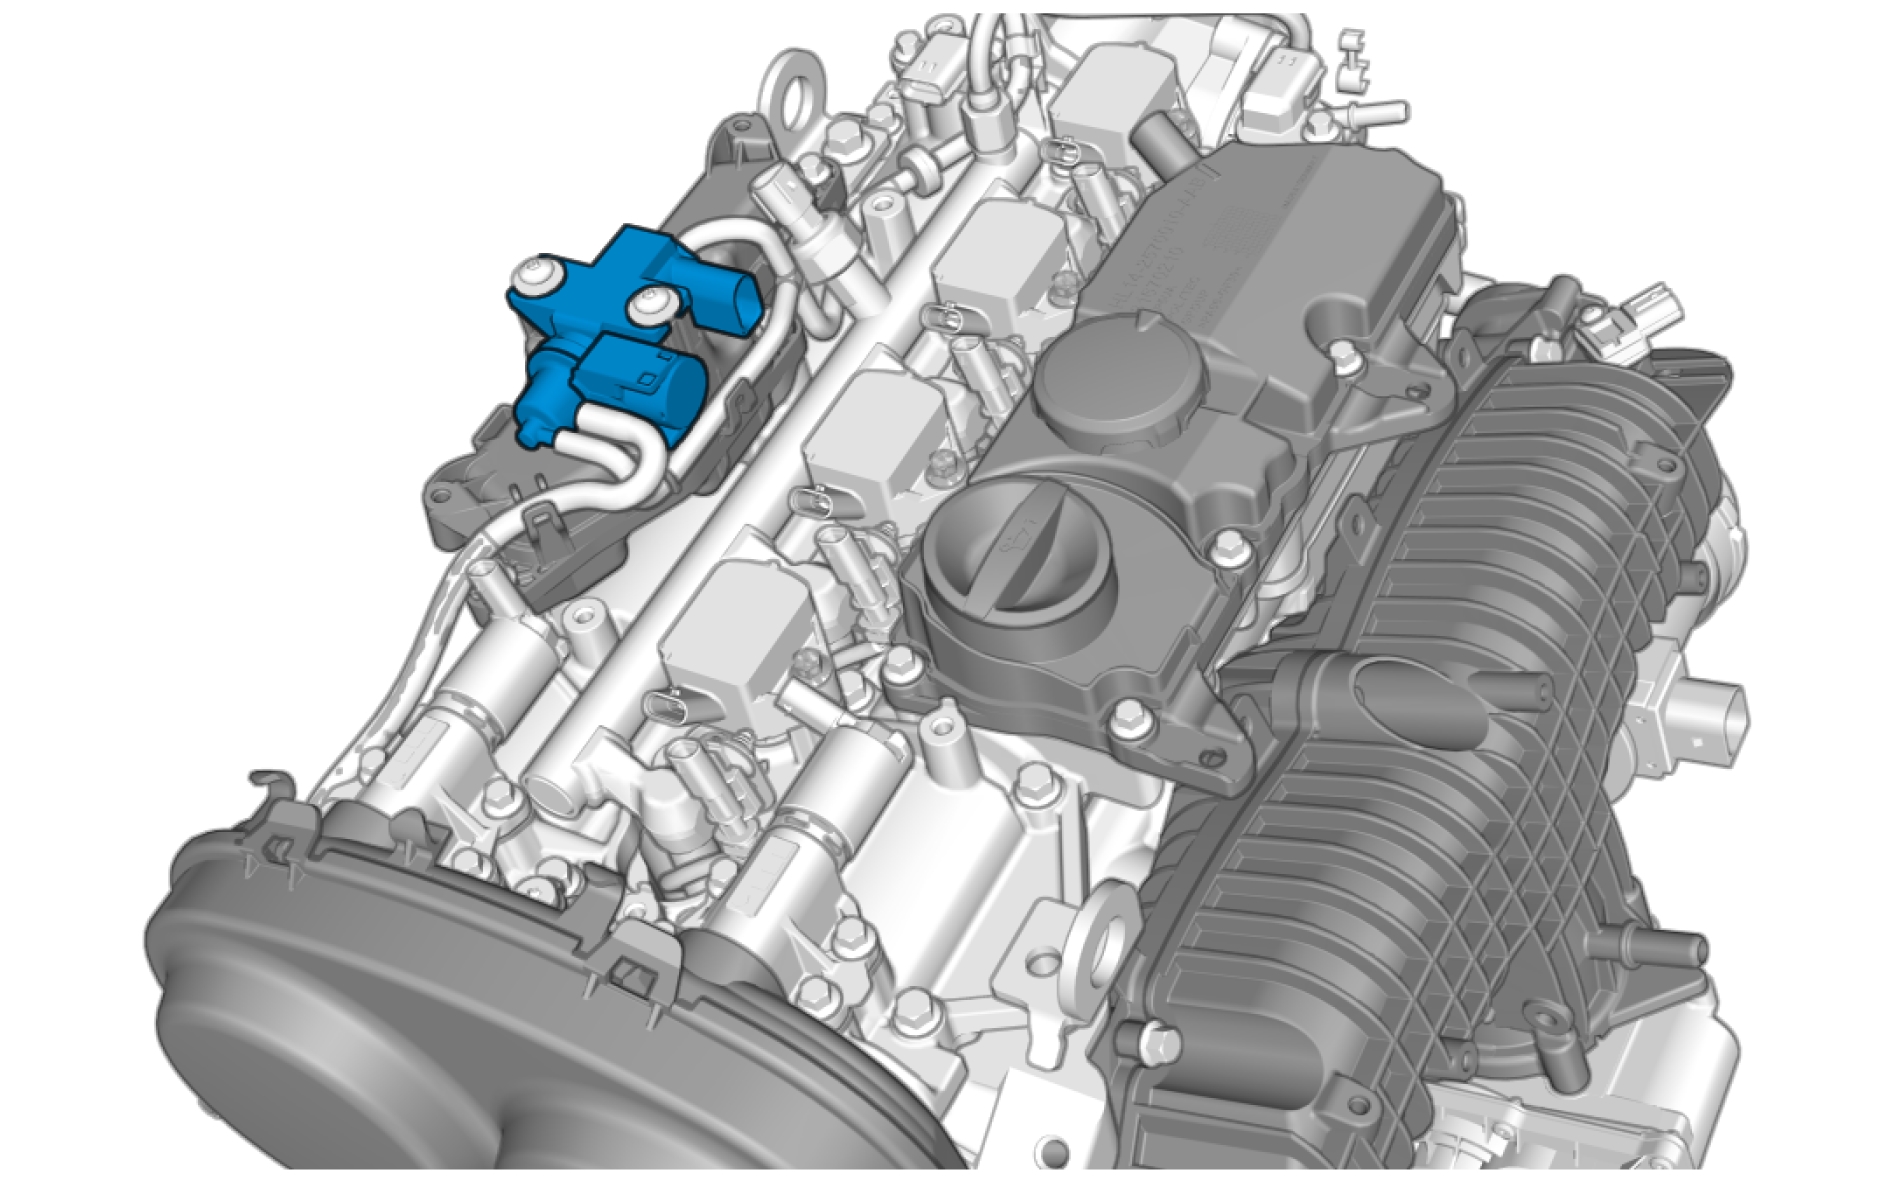
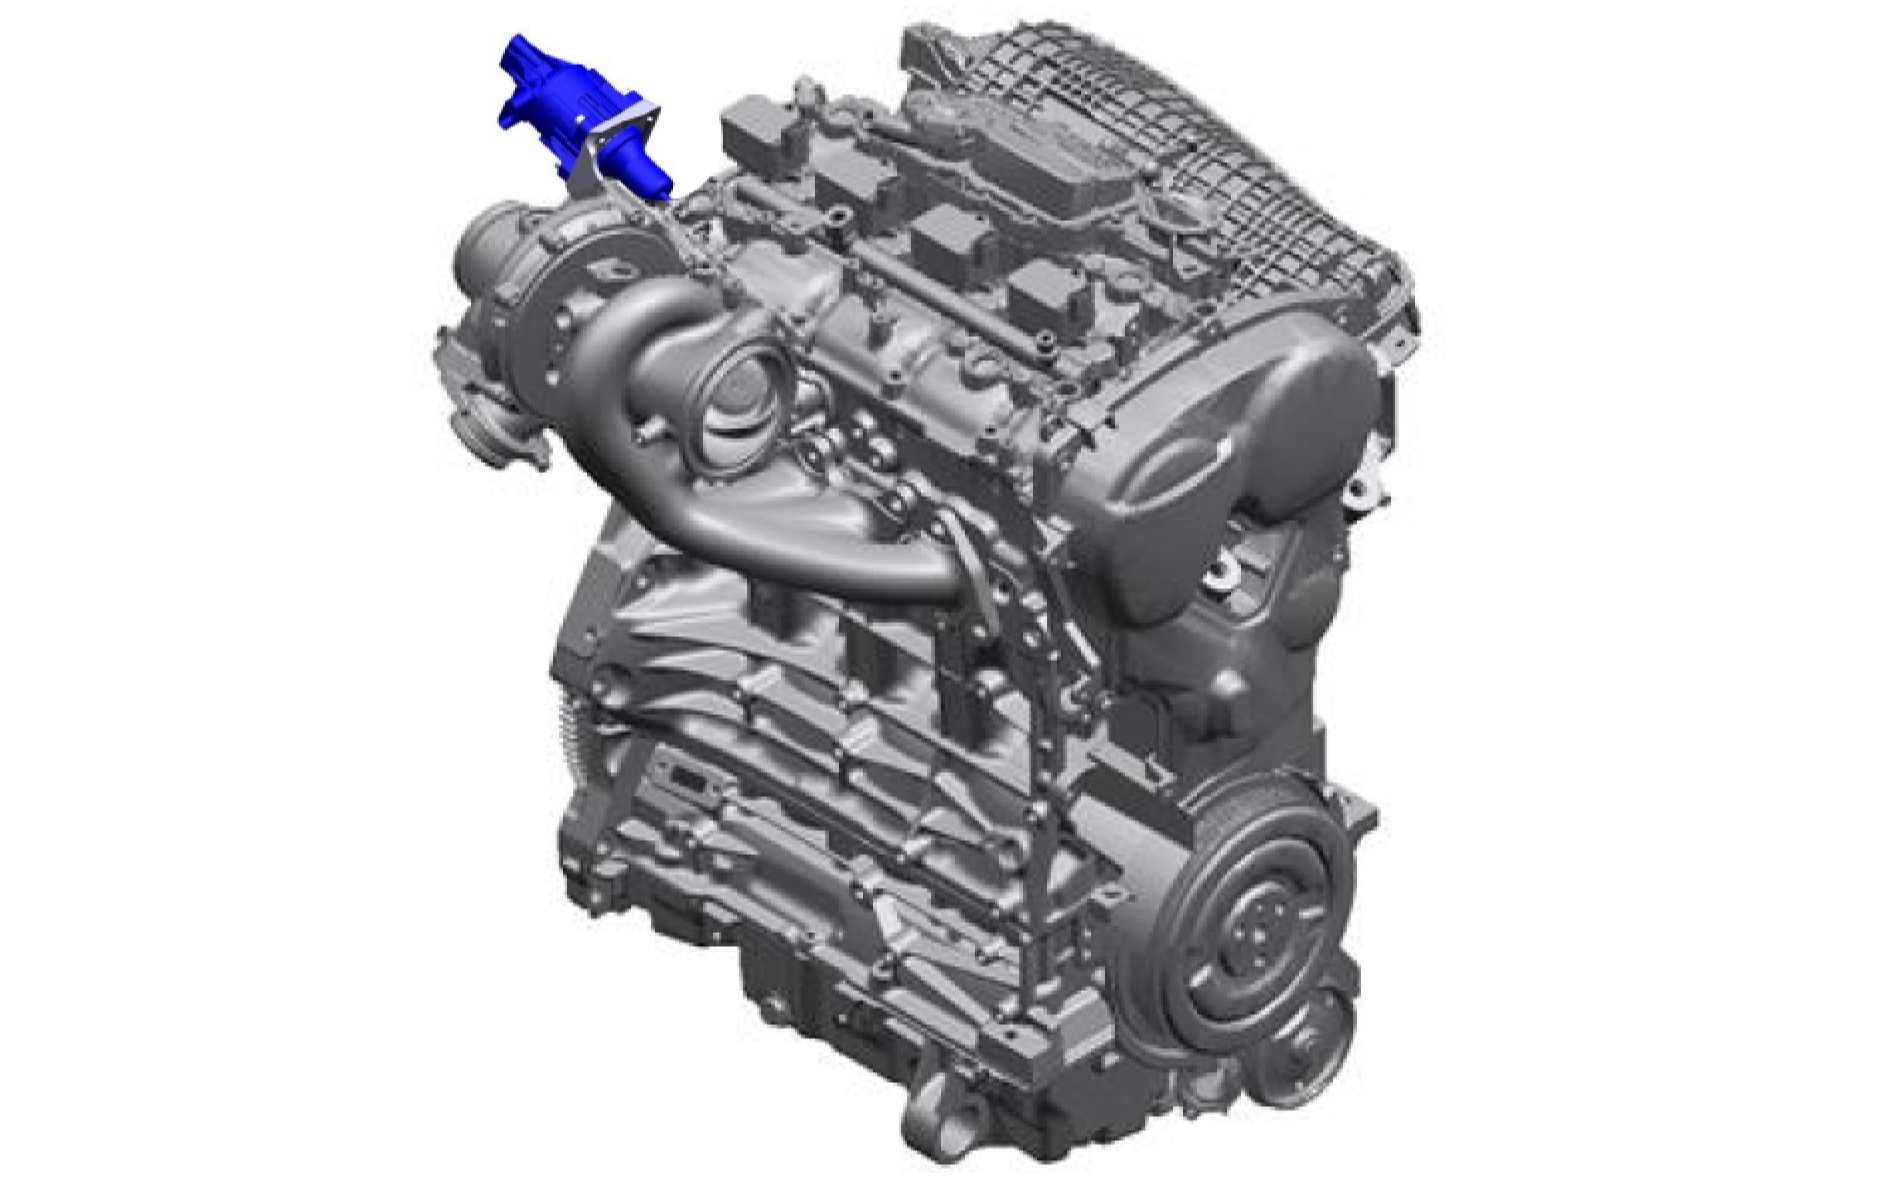
Component location

Pin-out
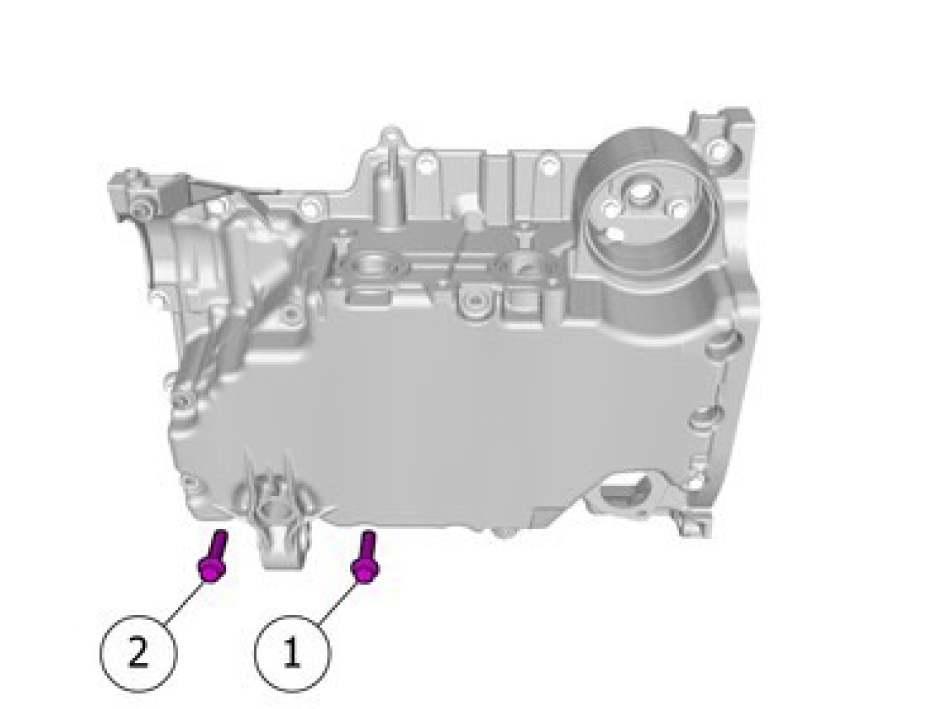
Oil pan, replace
Removal
Remove the oil cooler, engine, refer to:
Oil cooler, engine, replace
Remove the marked component.
Remove the screws.
Remove the marked component.
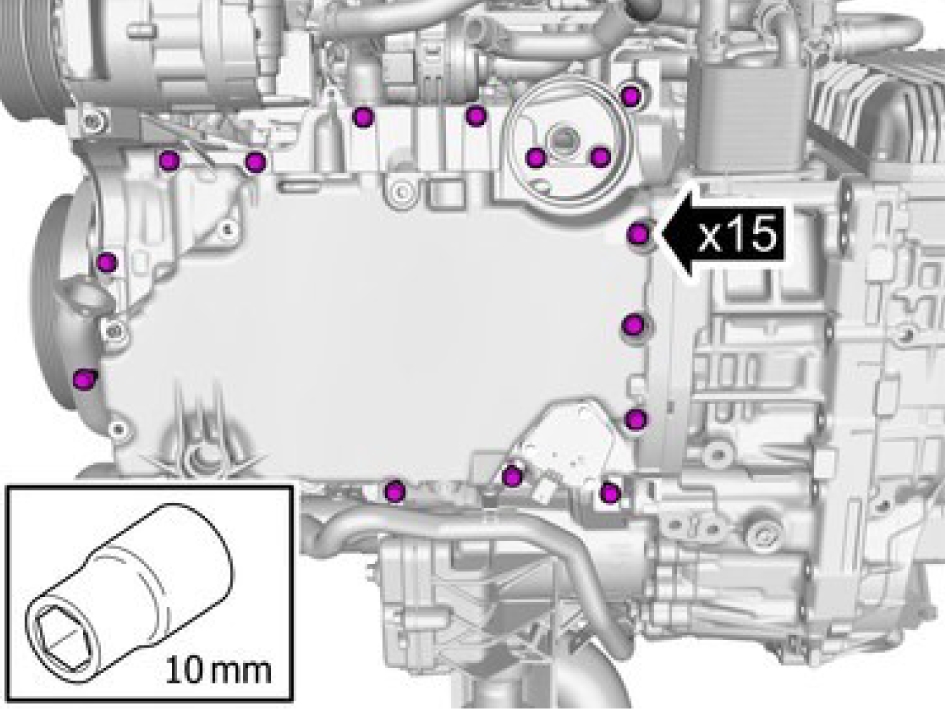
Remove the screws.
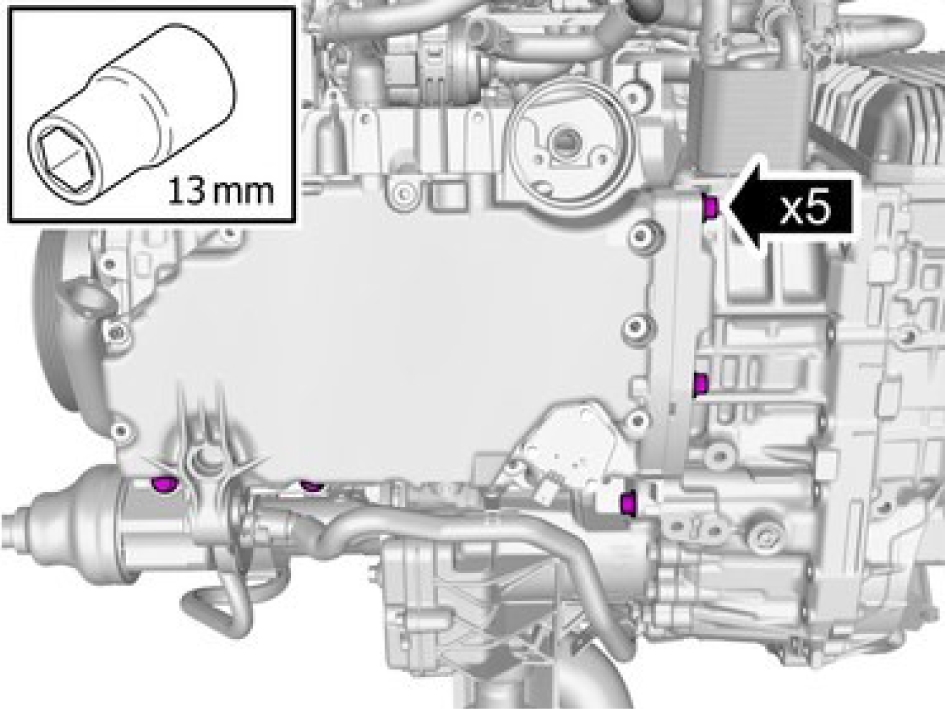
Remove the screws.
Remove the marked component.
Remove the screws.
Remove the marked component.
Installation
Make sure that the mating faces are clean and free of foreign material.
Clean the marked area.
Make sure that the mating faces are clean and free of foreign material.
Clean the marked area.
The component must be installed within 5 minutes of applying the sealant.
Apply chemical gasket.
The component must be installed within 5 minutes of applying the sealant.
Apply chemical gasket.
Take extra care not to damage the seal.
Install the marked component.
Install the screws M7, torque: 17 Nm
Install the screws M10, torque: 50 Nm
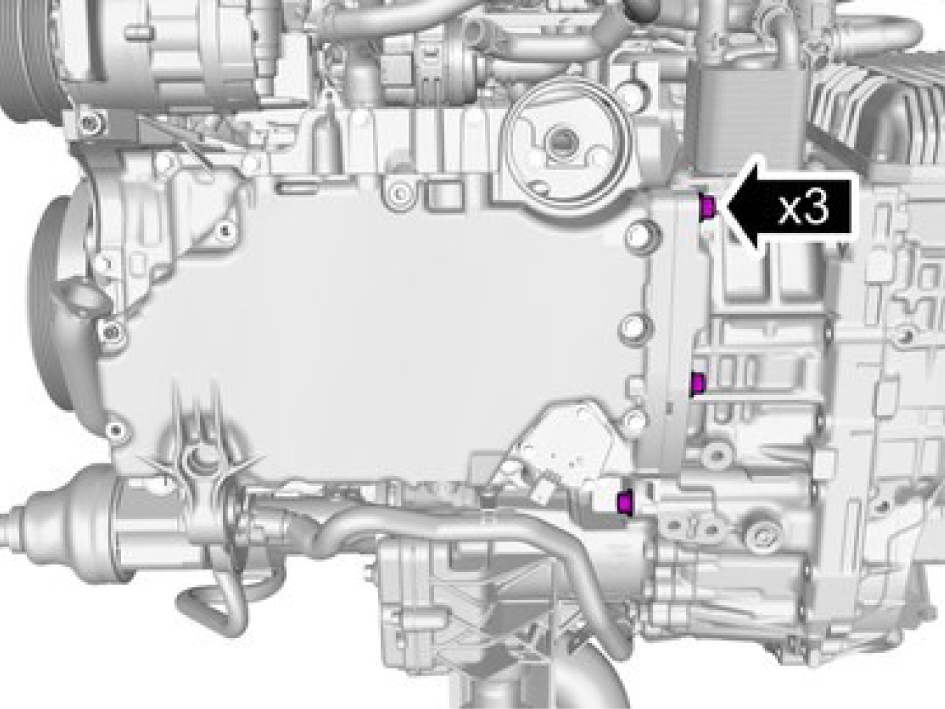
Install the screws M10, torque: 50 Nm
Make sure that no excess sealant residue is evident.
Install the marked component.
Install the screws M7, torque: 17 Nm
Make sure that a new component is installed.
Install the oil cooler, refer to:
Oil cooler, engine, replaceWater pump belt, replace
Removal
Drain the cooling system.
Cut off the water pump belt.
Remove the splash protection.
Remove the screws and pipes.
Installation
Install the pump and tighten the screws.
M1050 Nm
M824 Nm
Install the belt around the crankshaft pulley and the top of the pump pulley. Turn the pump pulley around with tool 9997717 counter hold to fit the belt.
Install the splash protection.
Water pump belt, replace
Removal
Cut off the water pump belt.
Remove the splash protection.
Installation
Install the belt around the crankshaft pulley and the top of the pump pulley. Turn the pump pulley around with tool 9997717 counterhold to fit the belt.
Install marked component.
Vibration damper, replace
Removal
Remove the screw.
Remove the marked component.
Installation
Special tool:
1. M6 10 Nm
2. Central screw.
Stage 1:90 Nm
Stage 2: 110 °
Sealing ring Camshaft VVT, replace
Remove the VVT units, refer to:
VVT unit, replace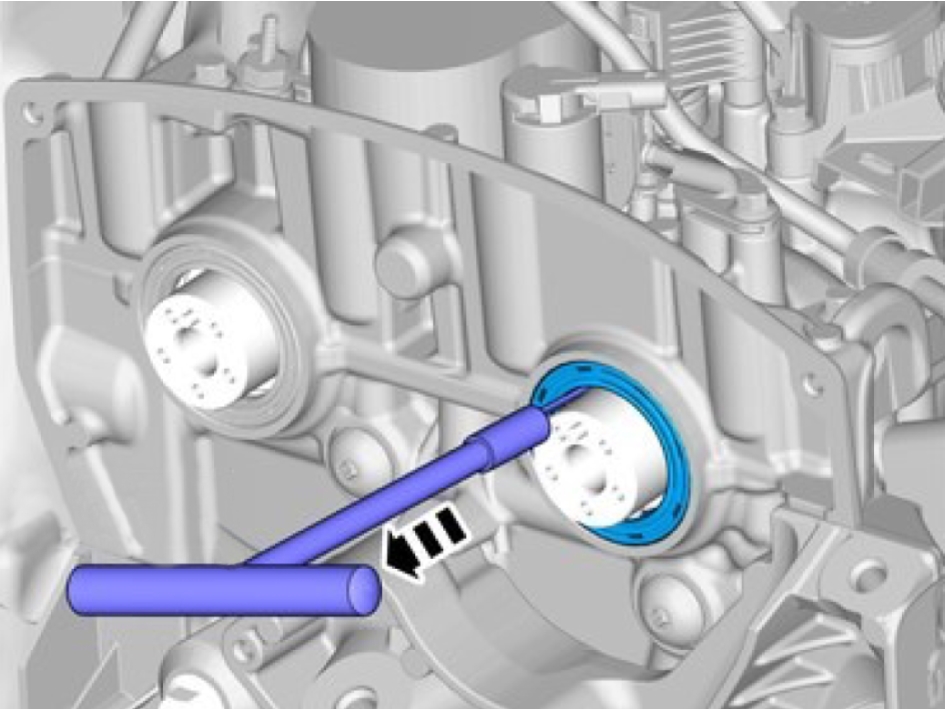
Make sure that the area around the component is clean and free of foreign material.
Make sure that the sharp edge does not damage the surrounding component.
Remove the component carefully use special tool: 999 5919
Installation
Use engine oil.
Take extra care not to damage the seal.
Install the sealing ring on the special tool: 999 7496
Install the marked component. Tighten the screw all the way so the tool is fully pressed in.
Special tool: 999 7684
Install the VVT units, refer to:
VVT unit, replacetest externalgraphic <-> graphic mapping when default image
Crankshaft front seal, replace
Install the special tool: 999 7493
Install the tool and remove marked replace with special tool: 999 7493
Make sure that the area around the component is clean and free of foreign material.
Remove the marked replace with special tool: 999 5919
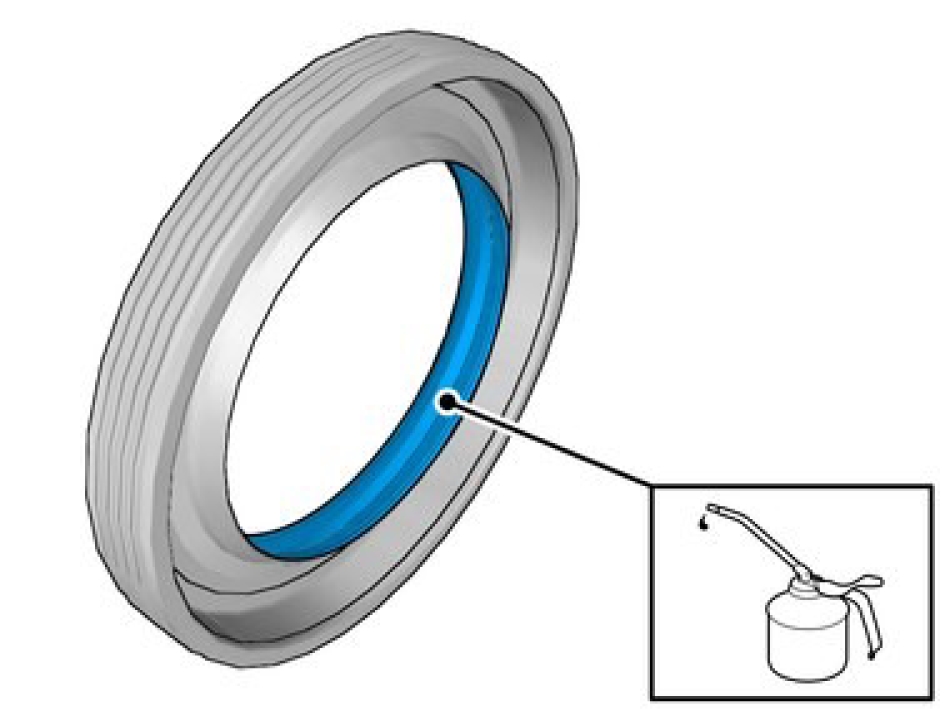
Installation

Use engine oil.
Install the tool and fit in the marked component, use special tool: 999 7532

Install the seal by tapping the tool gently. Use special tool 999 768
Fit the gear splines correctly.
Install the gear by tapping the tool gently, use special tool 999 7493
Install the Timing belt, refer to:
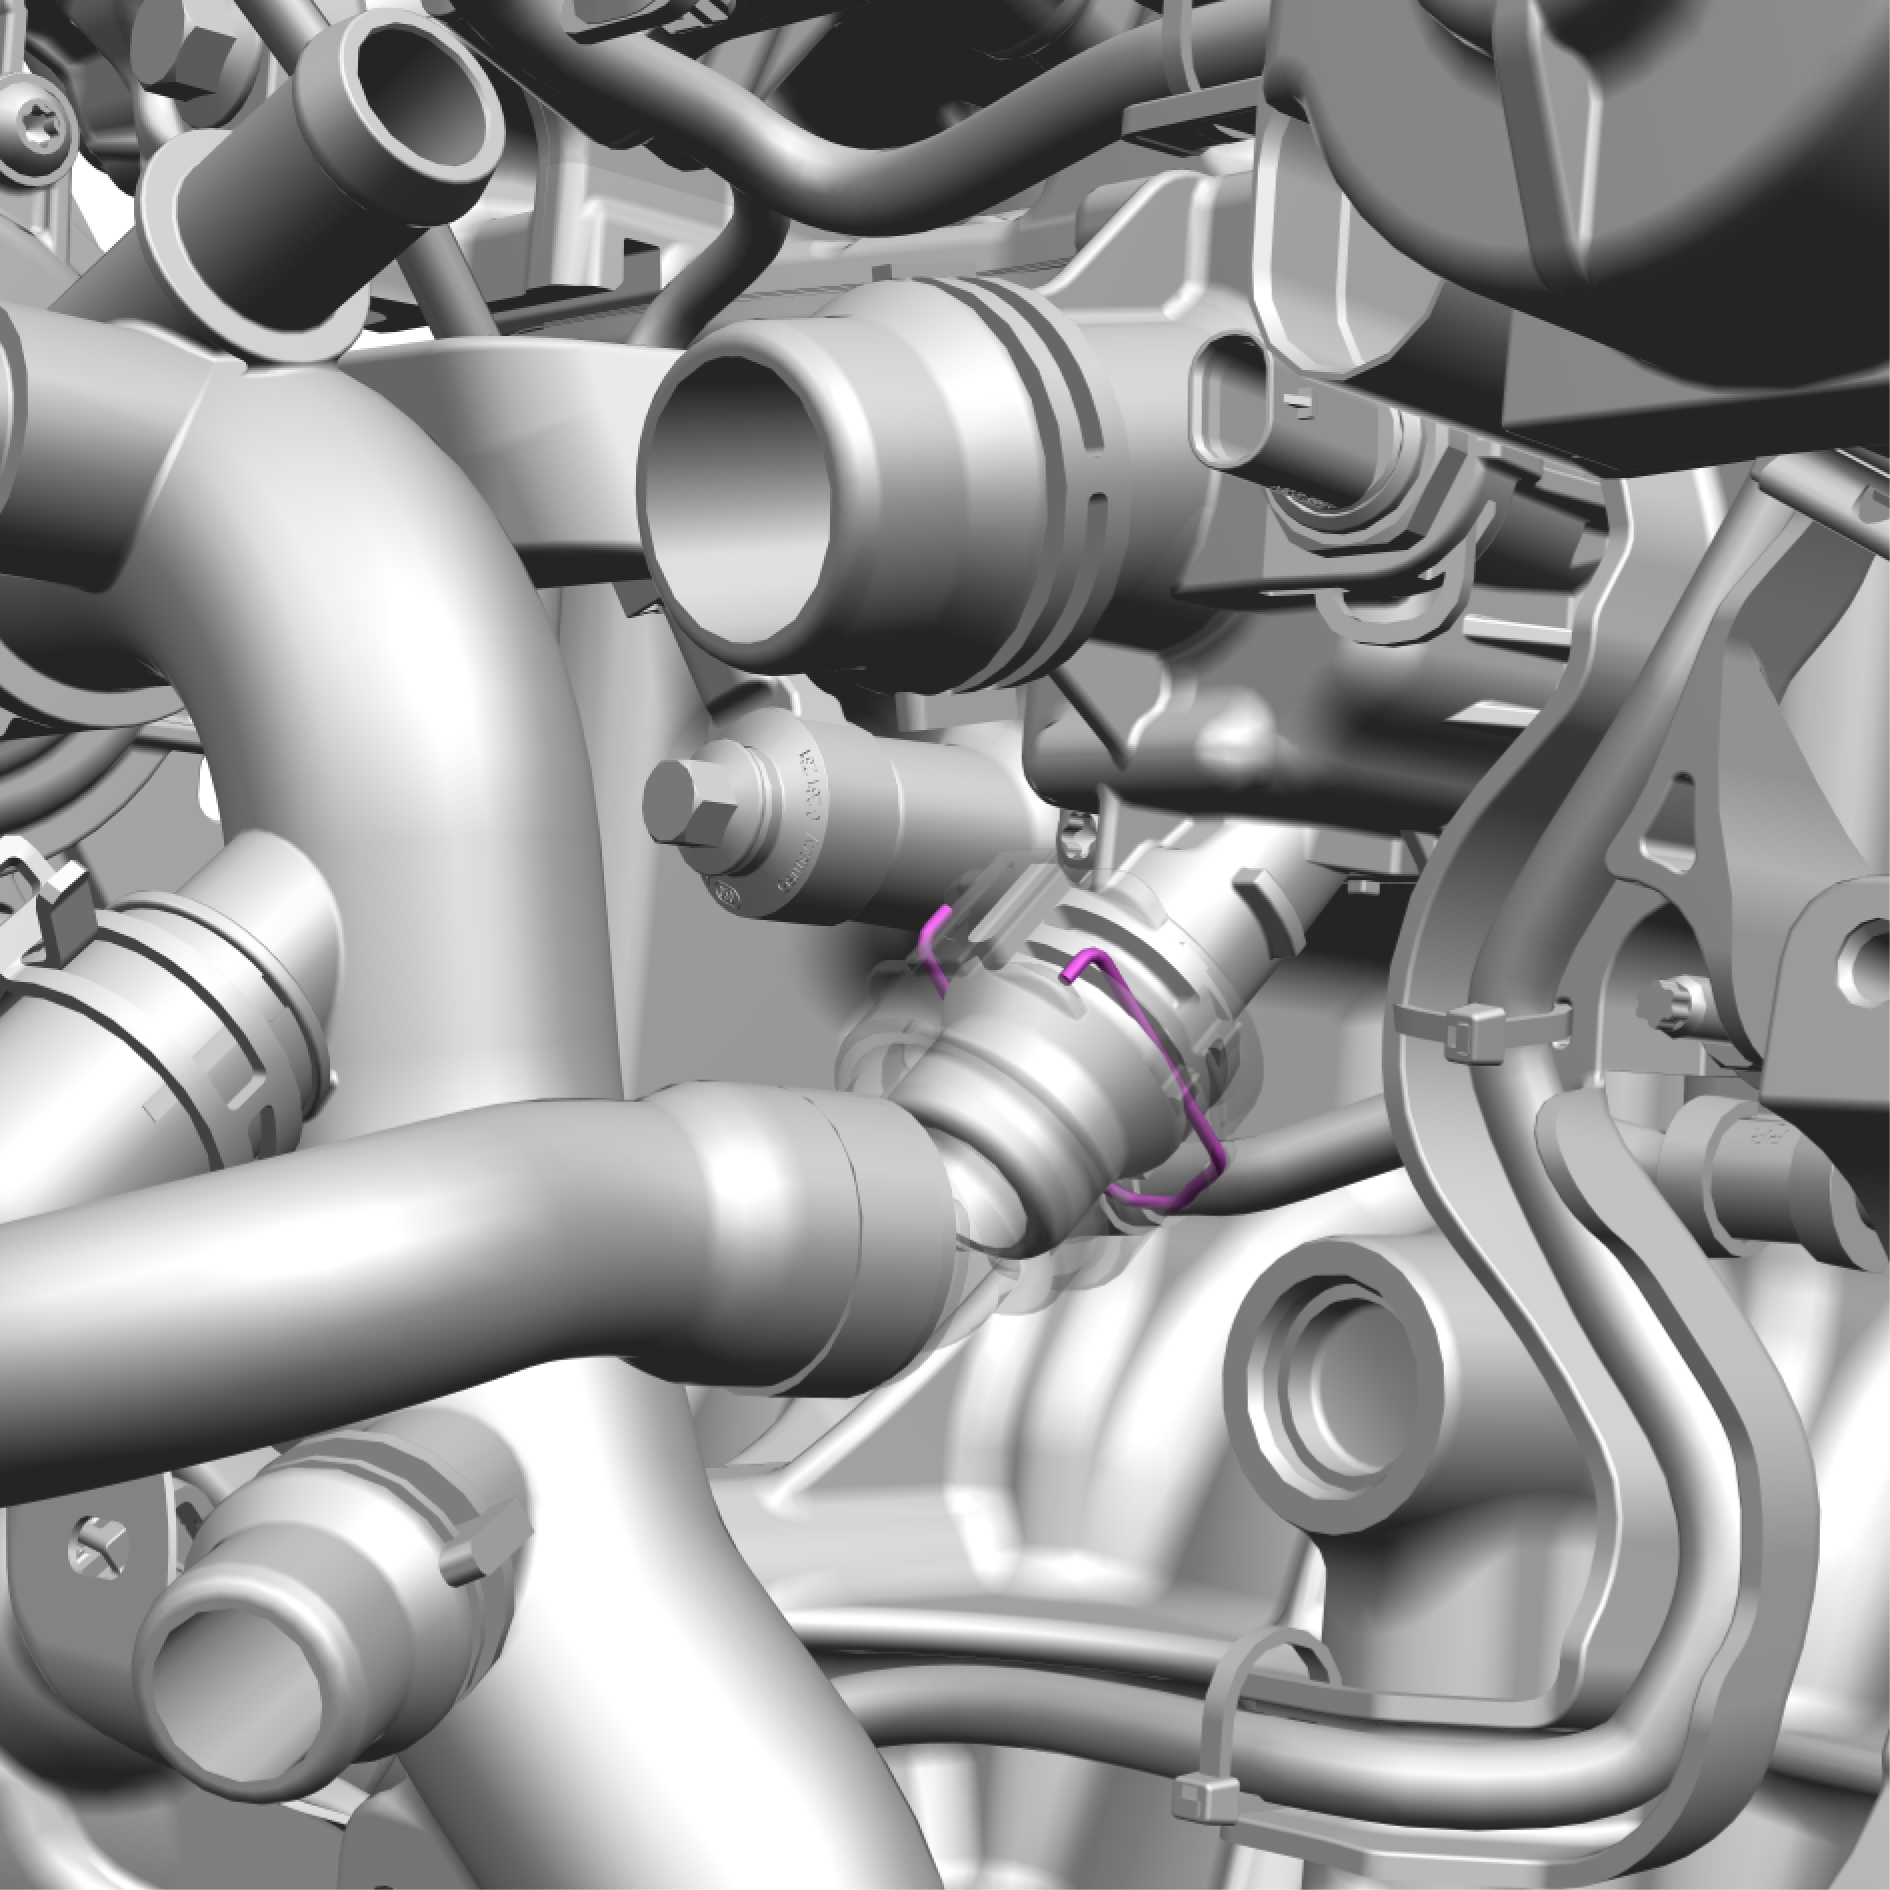
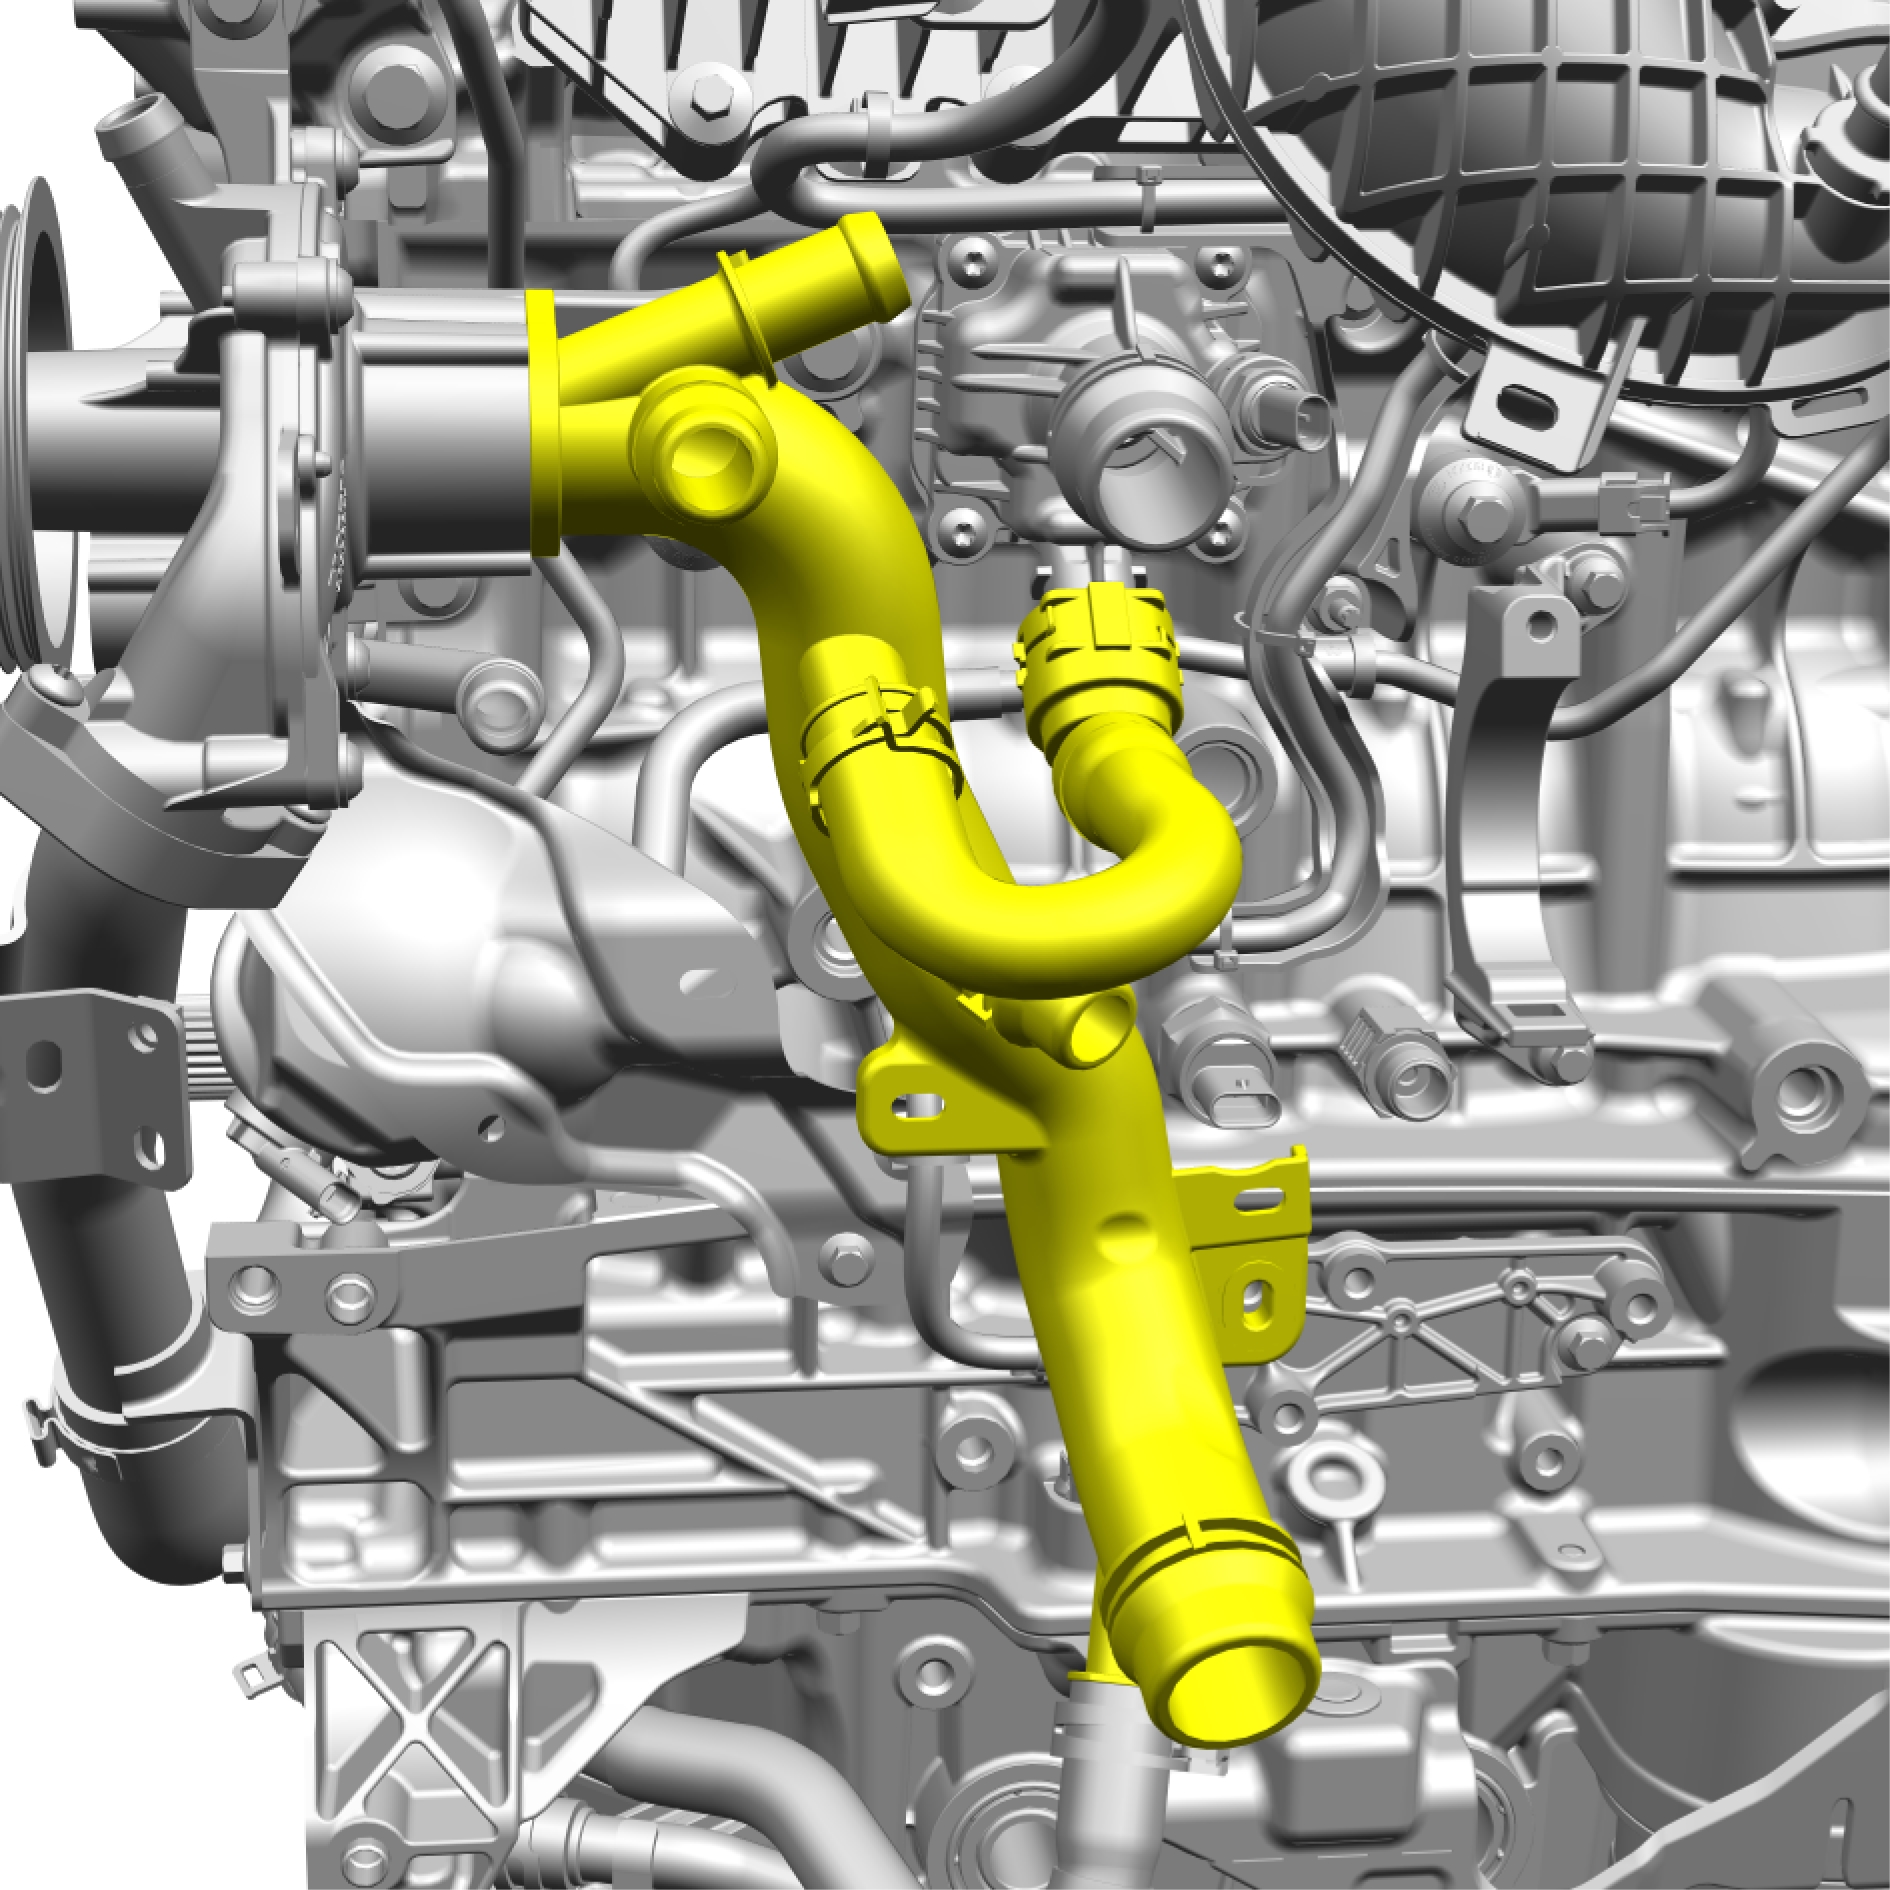
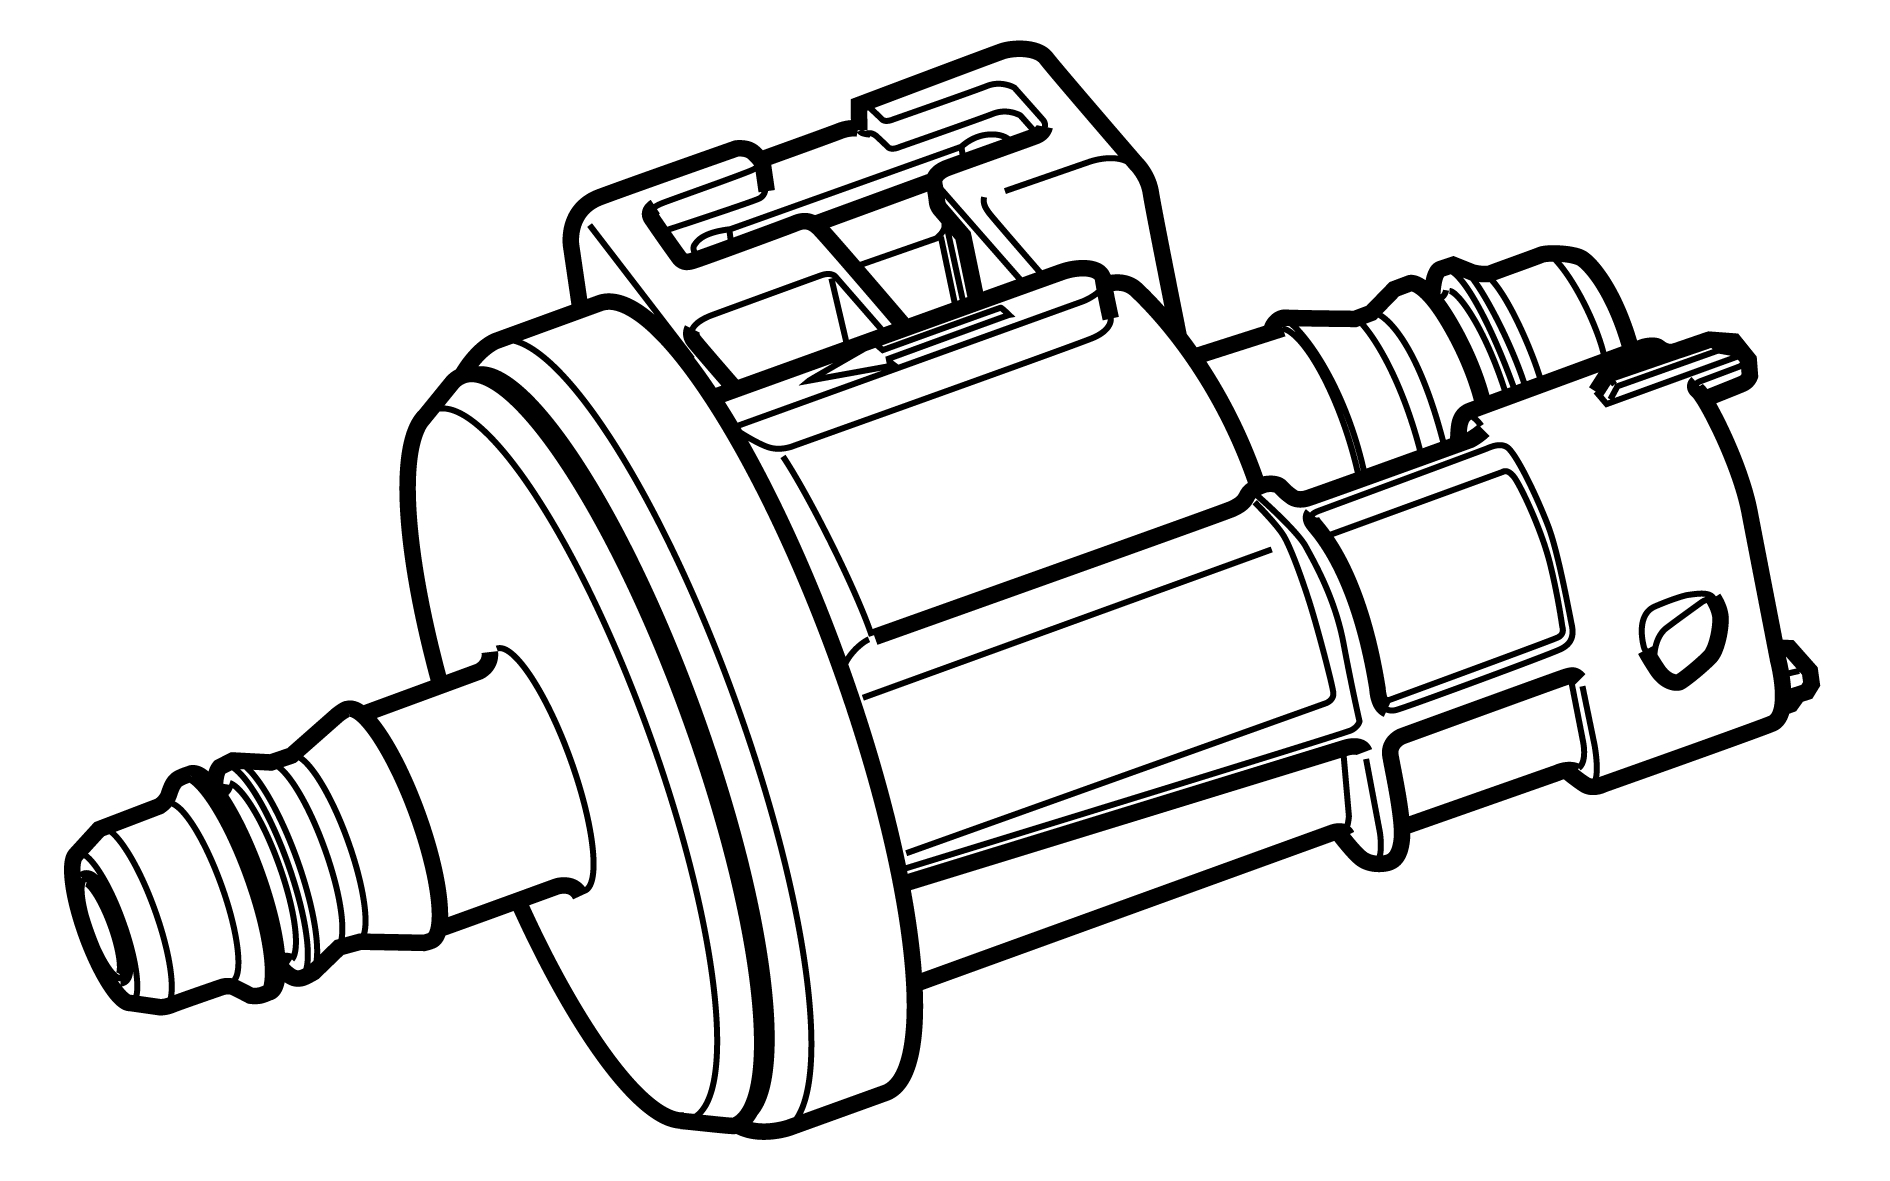
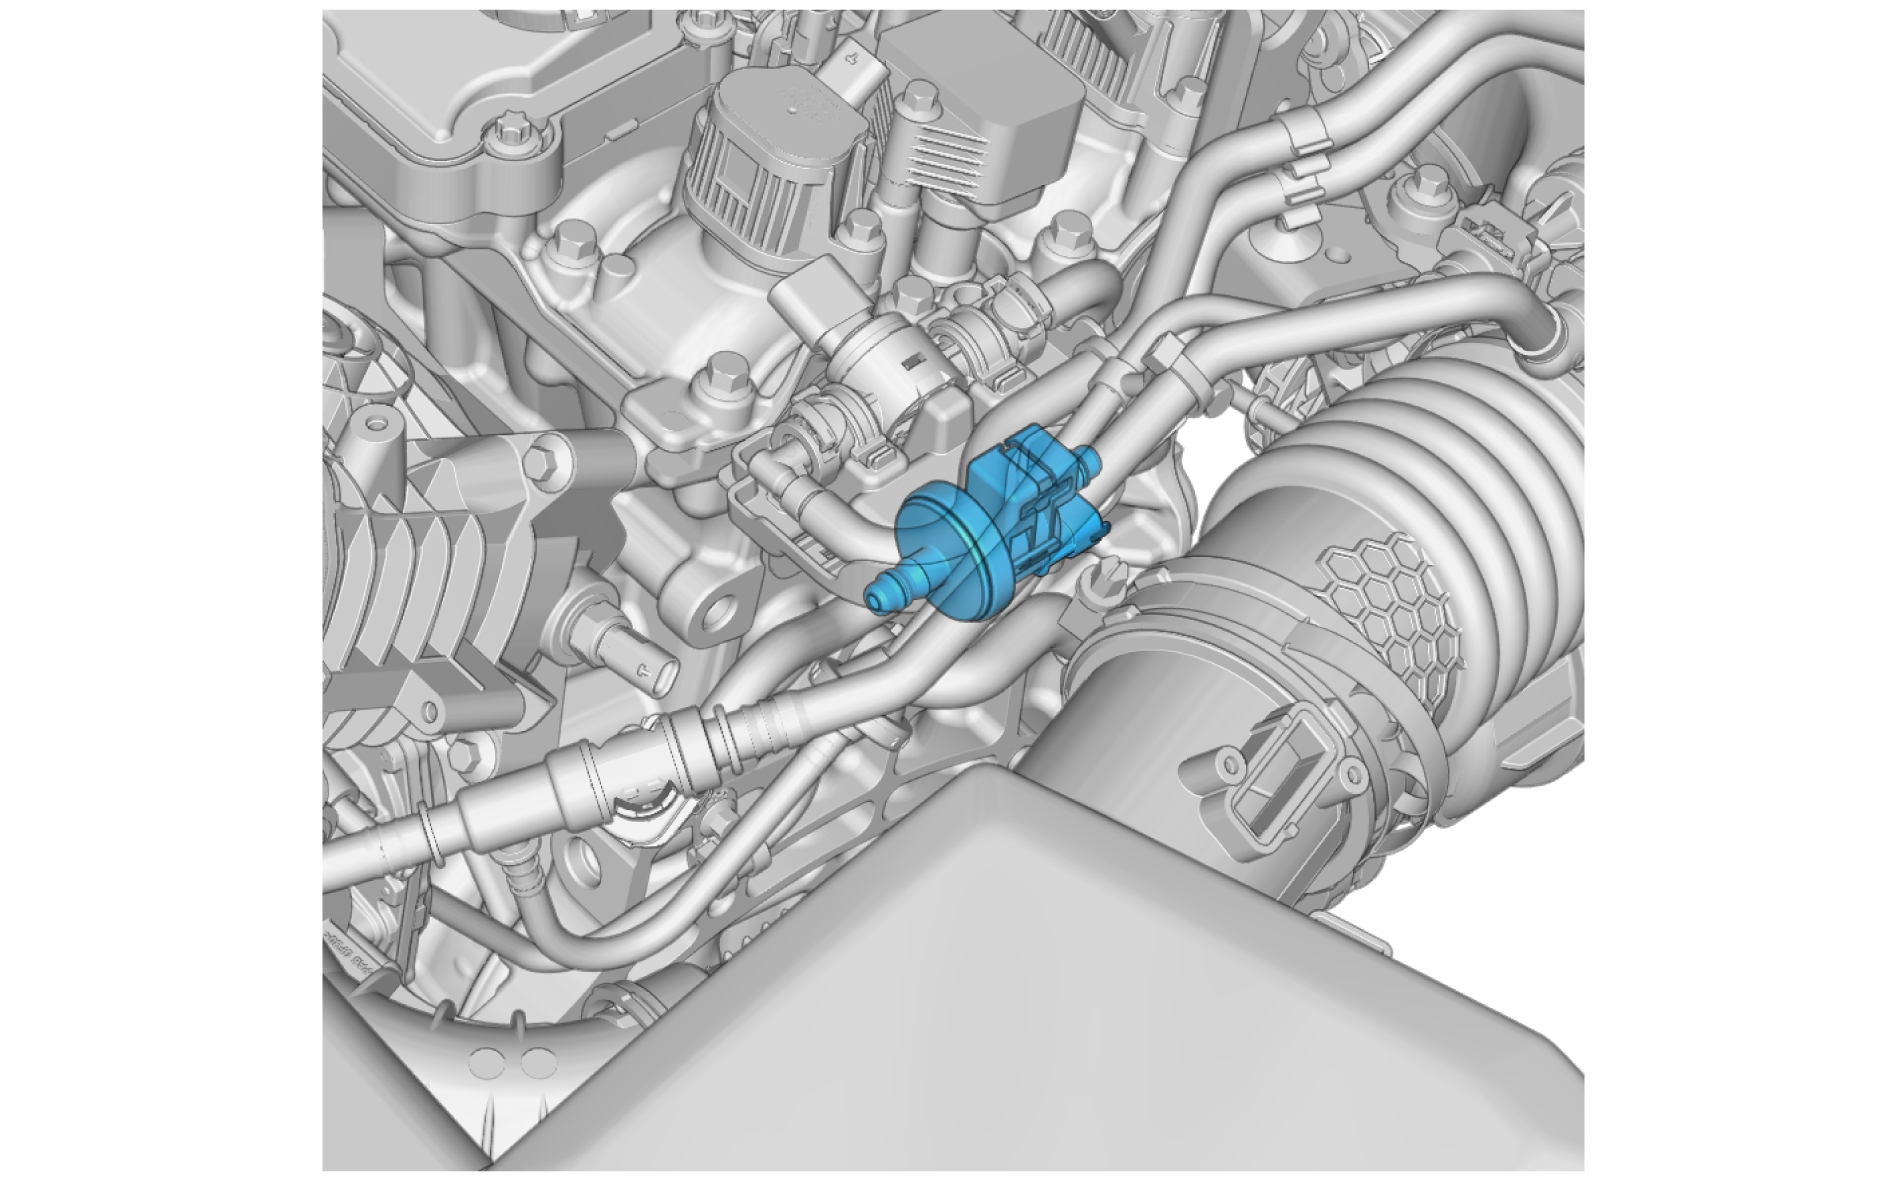
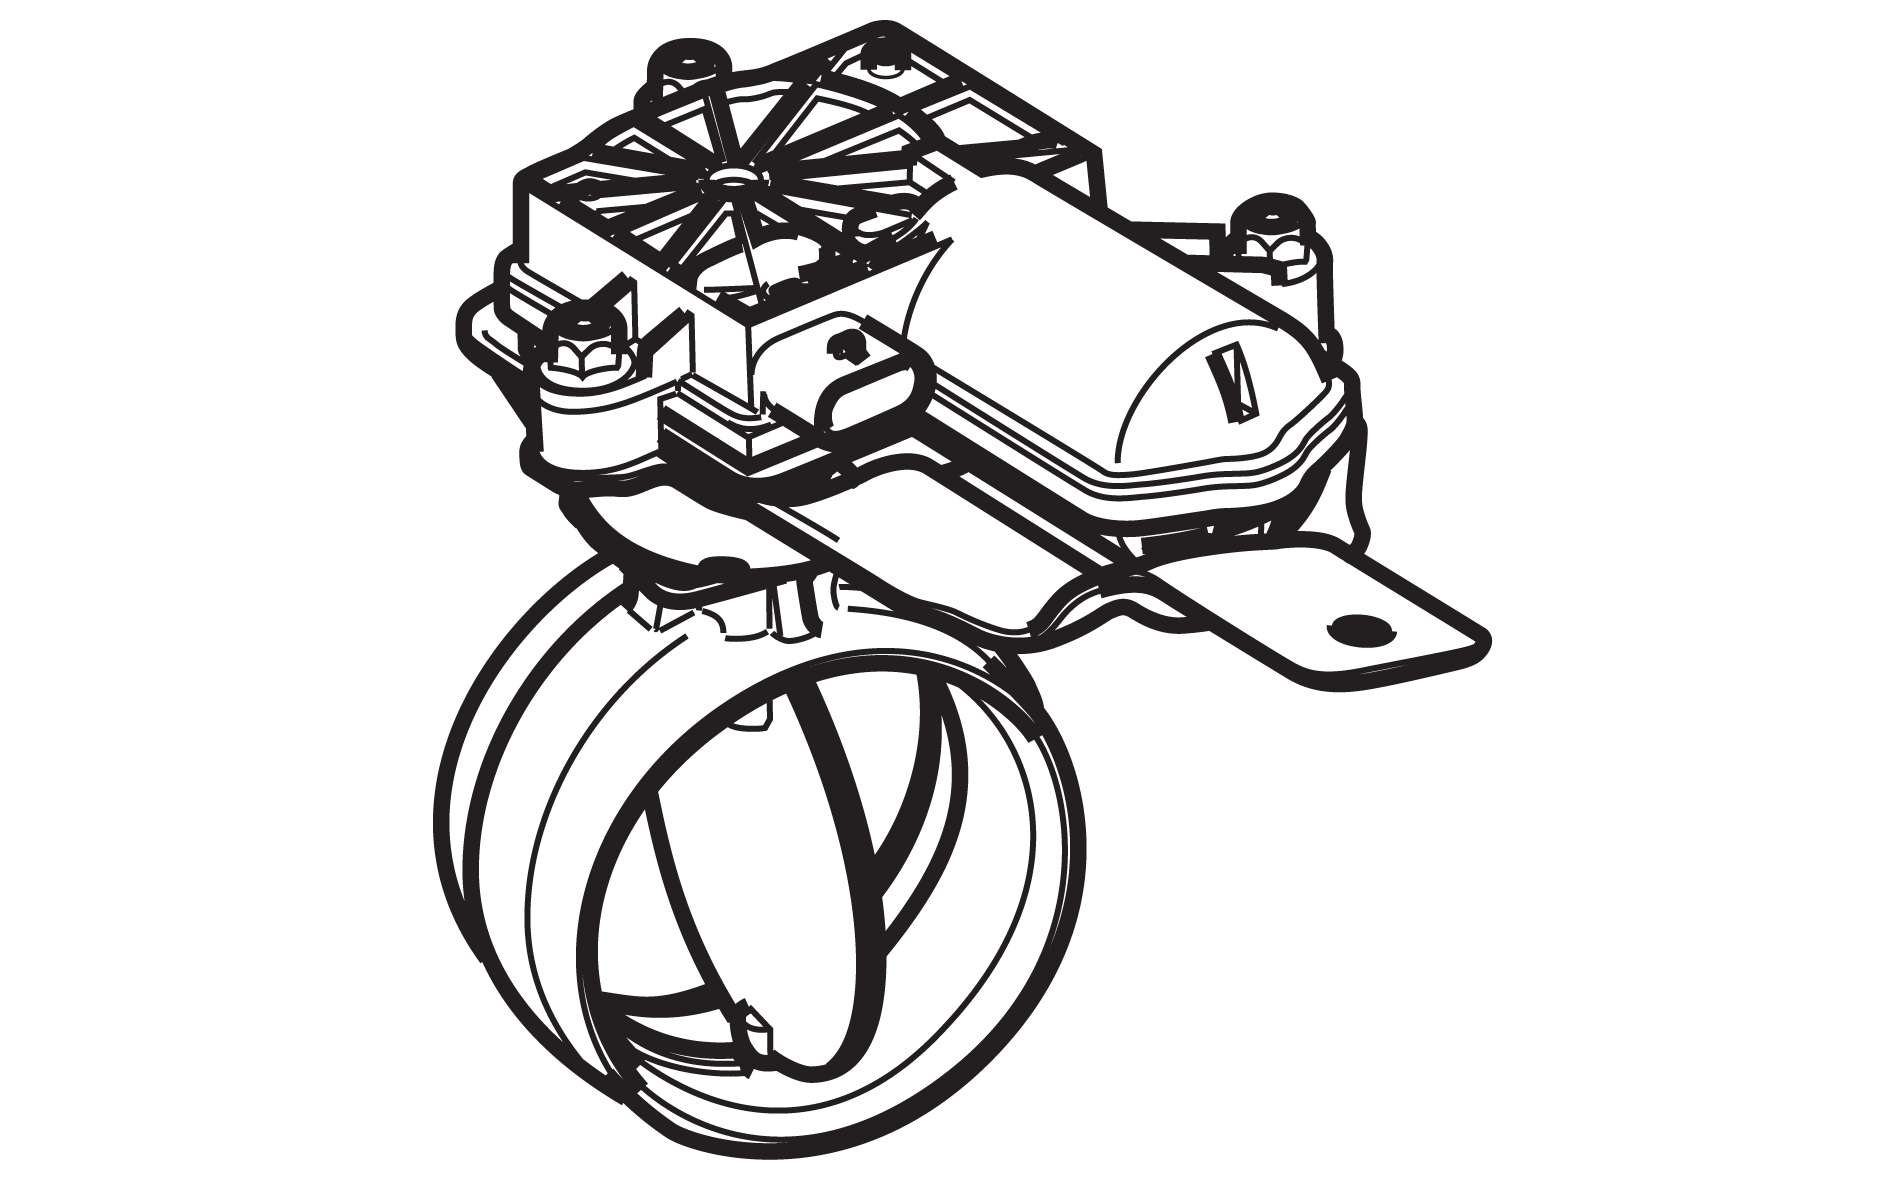
Timing belt, replaceTurbo bypass valve - V308
Description
The turbo bypass valve regulates the overpressure in the intake manifold. When the pressure is too high, the valve is opened. The turbo bypass valve leads the pressure back to the turbocharger's inlet side. This maintains the speed of the turbo and allows the boost pressure to be immediately available.
The turbo bypass valve is electronically controlled by the Engine Control Module (ECM).
Diagnostic information
The turbo bypass valve does not have a built-in diagnostic system. The Engine Control Module (ECM) monitors the bypass valve, sets DTCs and has readable parameters for it.
Connection and communication
The turbo bypass valve is directly connected to the Engine Control Module (ECM).
Component location
Pin-out
Turbo position sensor
Description
Location
Pin Out
Wastegate unit
Description
Location
Pin Out
Wastegate unit - V307
Description
The wastegate unit regulates the boost pressure of the turbo. By allowing a certain amount of exhaust gas to pass through the turbo without interacting with the turbine, the turbo control valve can control the boost pressure.
The wastegate unit is a double functioning valve that is split into a pneumatic and an electric part. The wastegate unit creates a pressure difference that is proportional to its control signal. The amount of exhaust gas that flows through the turbo can be determined by controlling the electric signal.
In the event of a power loss the wastegate unit opens.
Diagnostic information
The wastegate unit does not have a built-in diagnostic system. The Engine Control Module (ECM) monitors the wastegate unit, sets DTCs and has readable parameters for it.
Connection and communication
The wastegate unit is directly connected to the Engine Control Module (ECM).
Component location
Pin-out
VNT unit - M309
Description
Variants
| Component or function | Market, customer option, vehicle model |
|---|---|
| VNT unit | Vehicles with VNT (variable nozzle turbocharger) |
Diagnostic information
Connection and communication
Component location
Pin-out
Throttle unit - P300
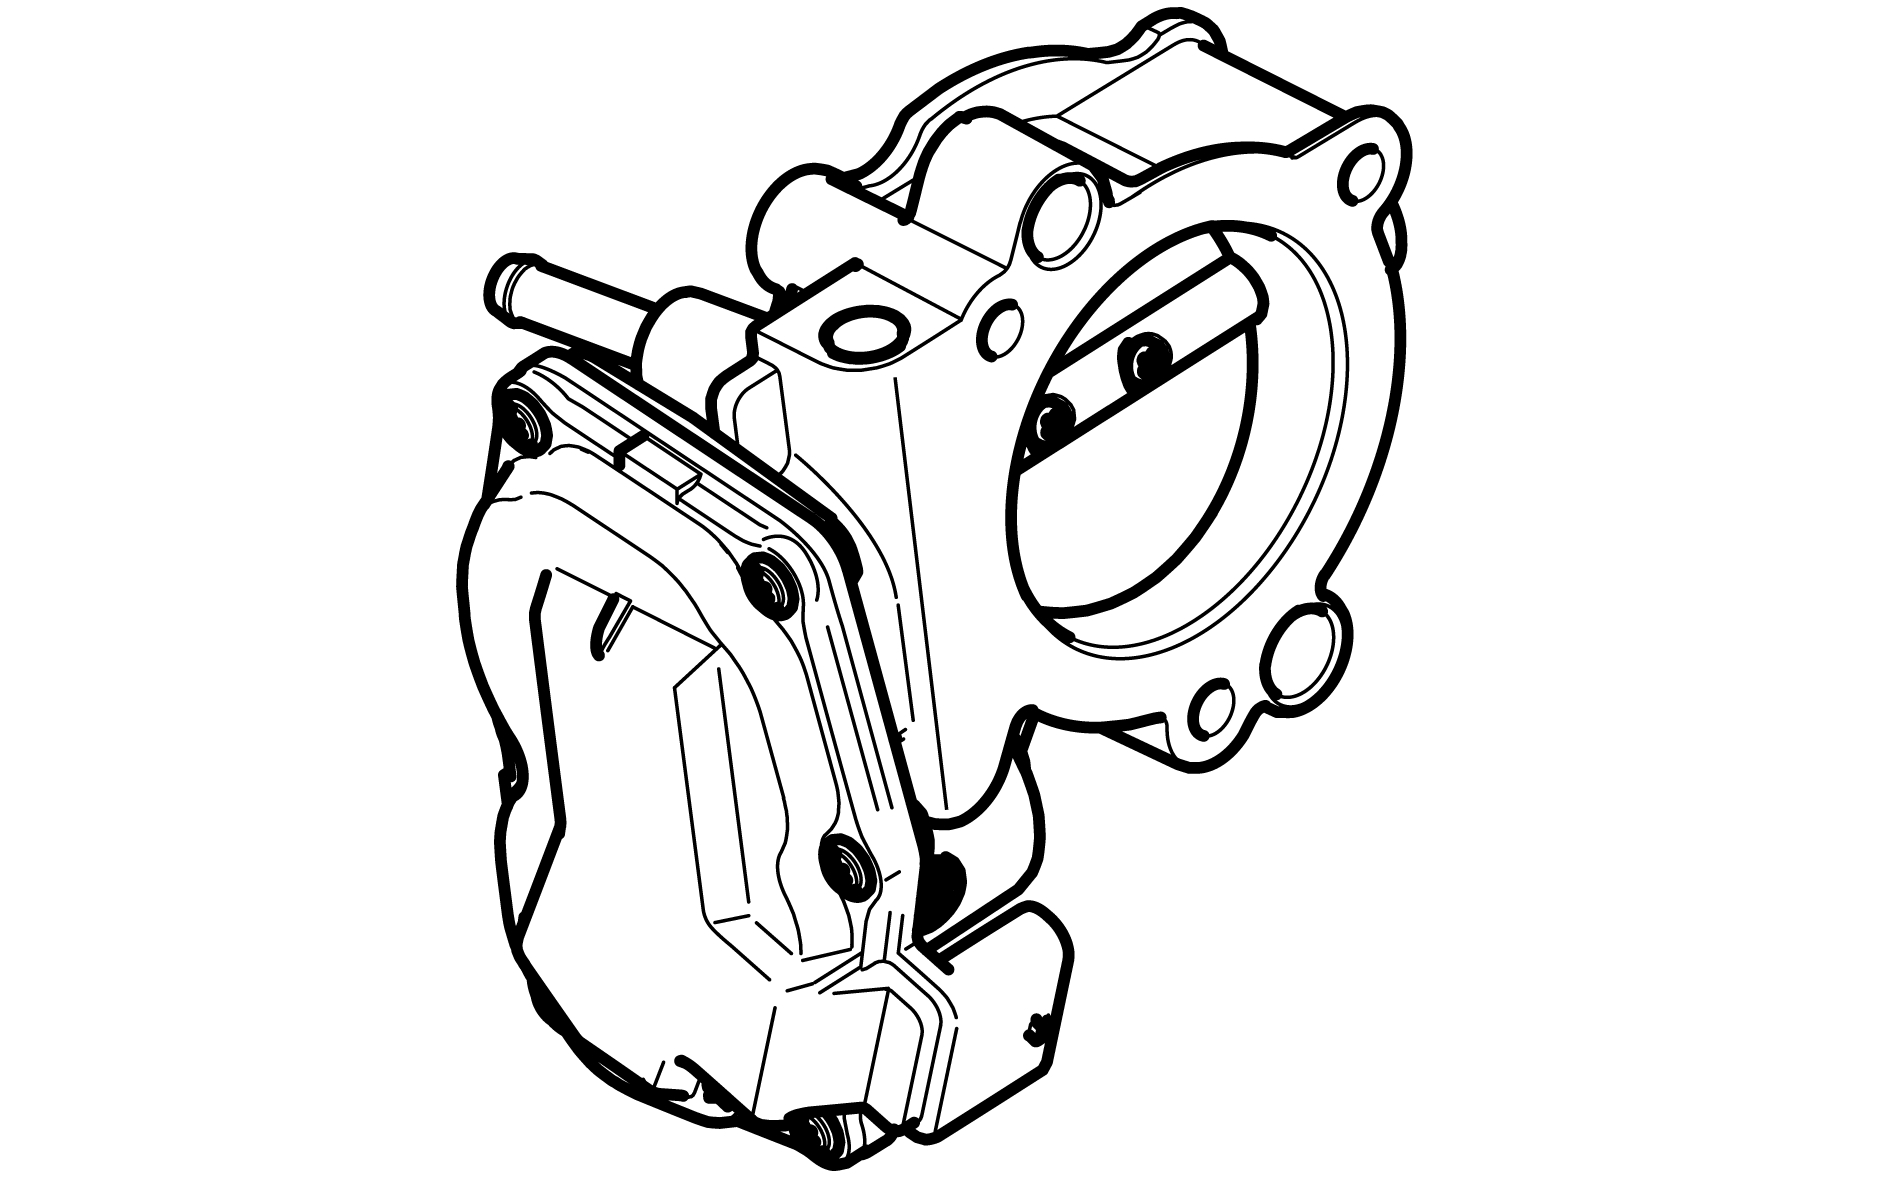
Description
The throttle unit includes an electrically controlled shutter that regulates the amount of air that passes through to the engine. The Engine Control Module (ECM) controls the electronic throttle unit with a PWM signal that sets the shutter position. A potentiometer registers the position of the shutter, which is forwarded to the Engine Control Module (ECM) via two analog 0 - 5 V signals.
The throttle unit has two connections for water cooling. Cooling is necessary since the throttle unit absorbs heat from the inlet air of the turbocharger.
Diagnostic information
The throttle unit does not have a built-in diagnostic system and is diagnosed by the Engine Control Module (ECM).
Connection and communication
The throttle unit is directly connected to the Engine Control Module (ECM).
Component location
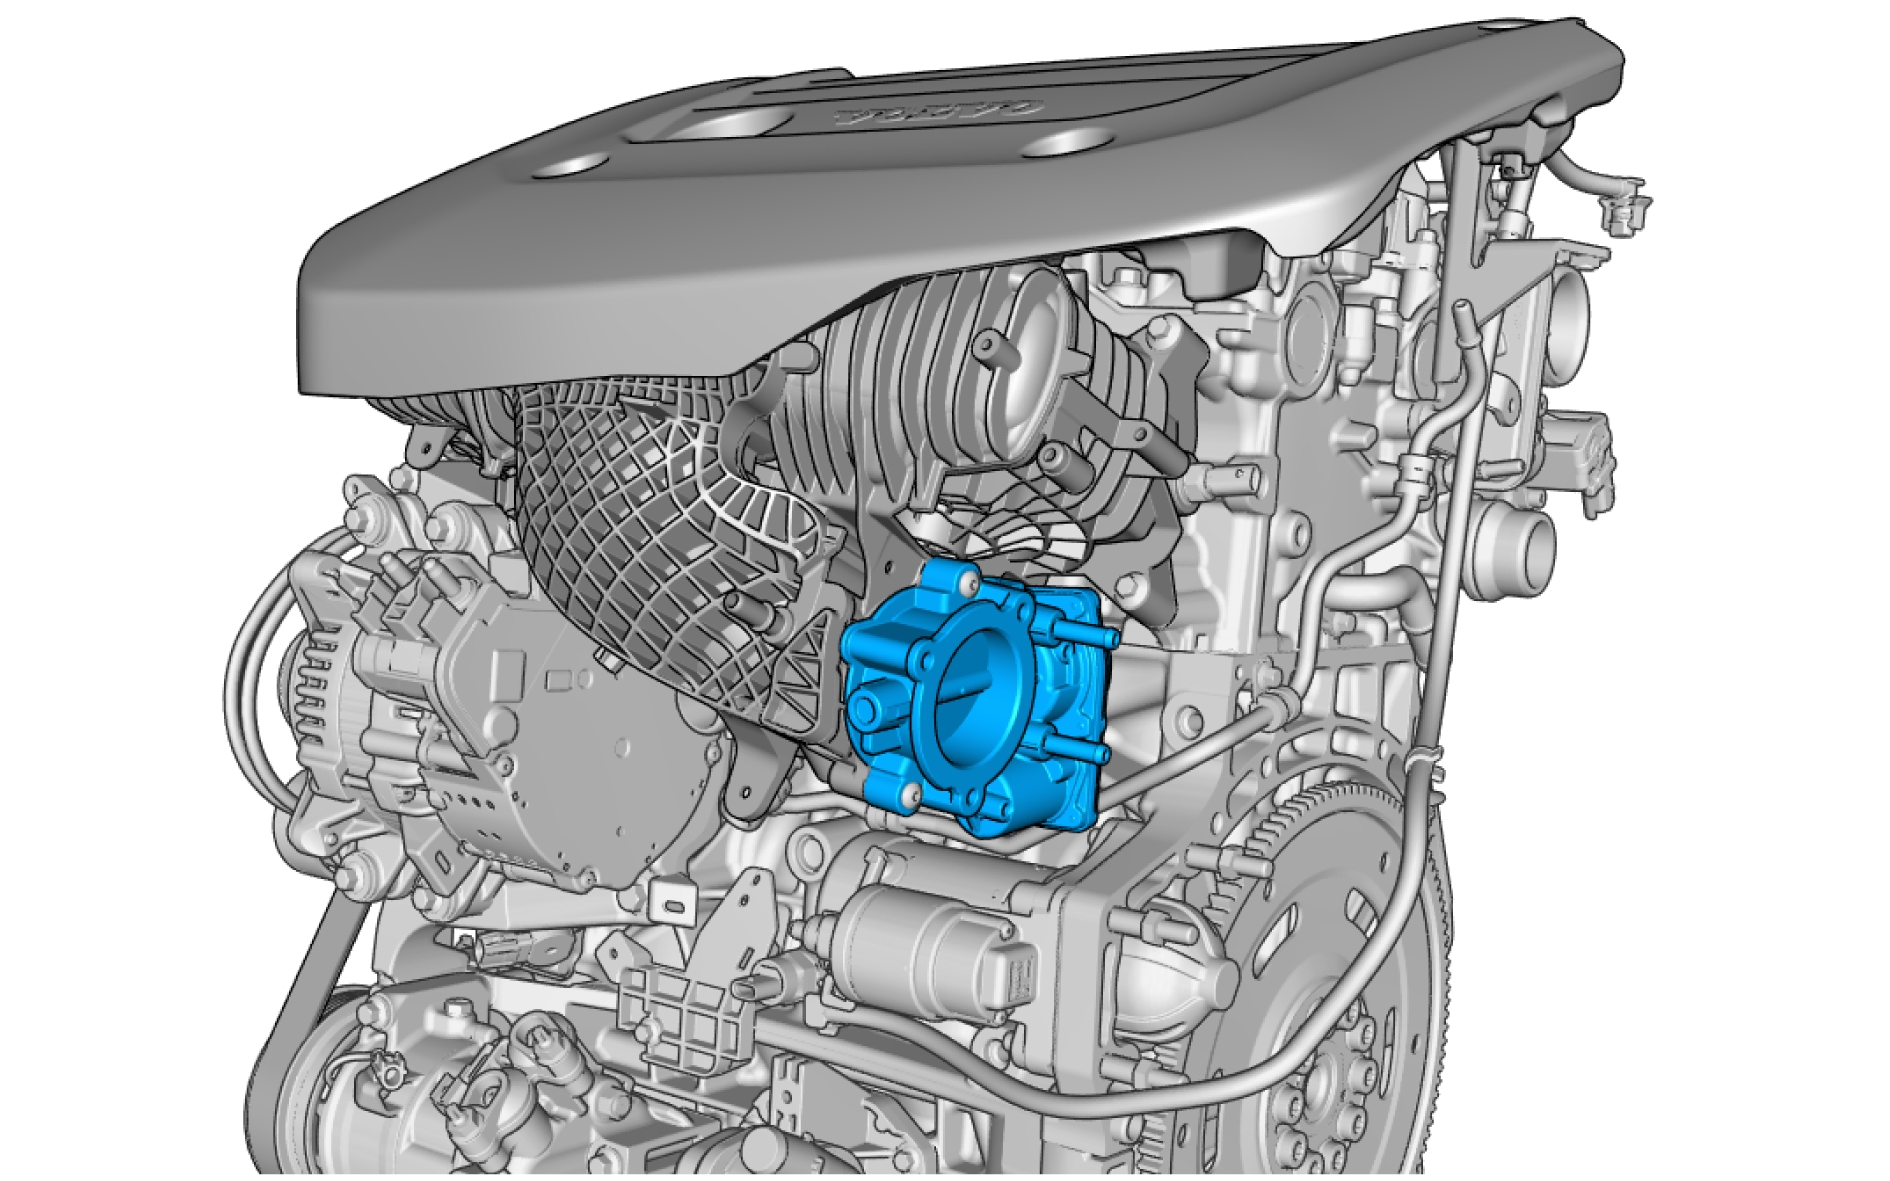
Pin-out
Pressure sensor, particulate filter - S701
Description
The pressure sensor, particulate filter, is a differential pressure sensor that is used to measure the amount of soot in the particulate filter. This is done by measuring the pressure difference before and after the particulate filter. The pressure difference generates a voltage signal that is monitored by the Engine Control Module (ECM).
Diagnostic information
The pressure sensor, particulate filter, does not have a built-in diagnostic system. The Engine Control Module (ECM) monitors the sensor, sets DTCs and readable parameters for it.
Connection and communication
The pressure sensor, particulate filter, is directly connected to the Engine Control Module (ECM).
Component location
Pin-out
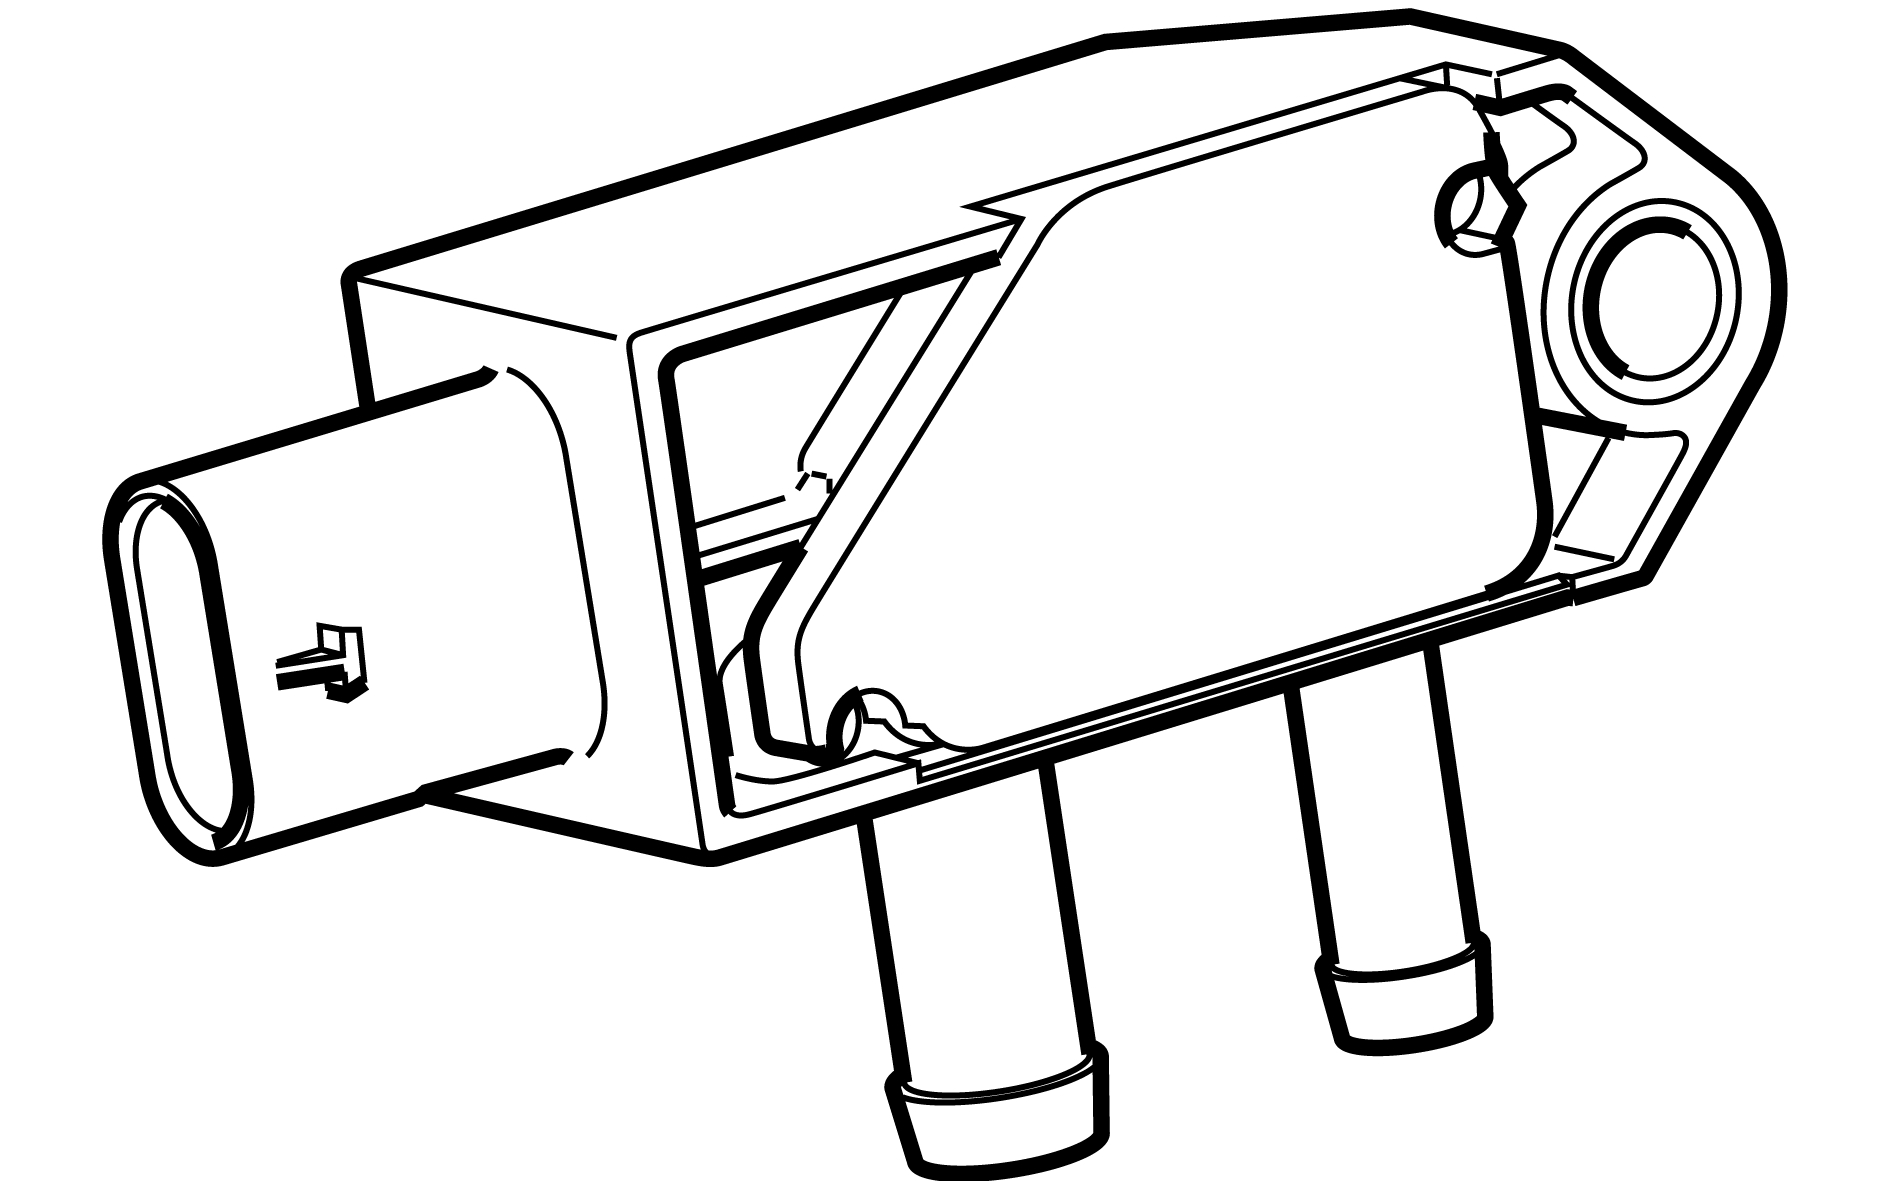
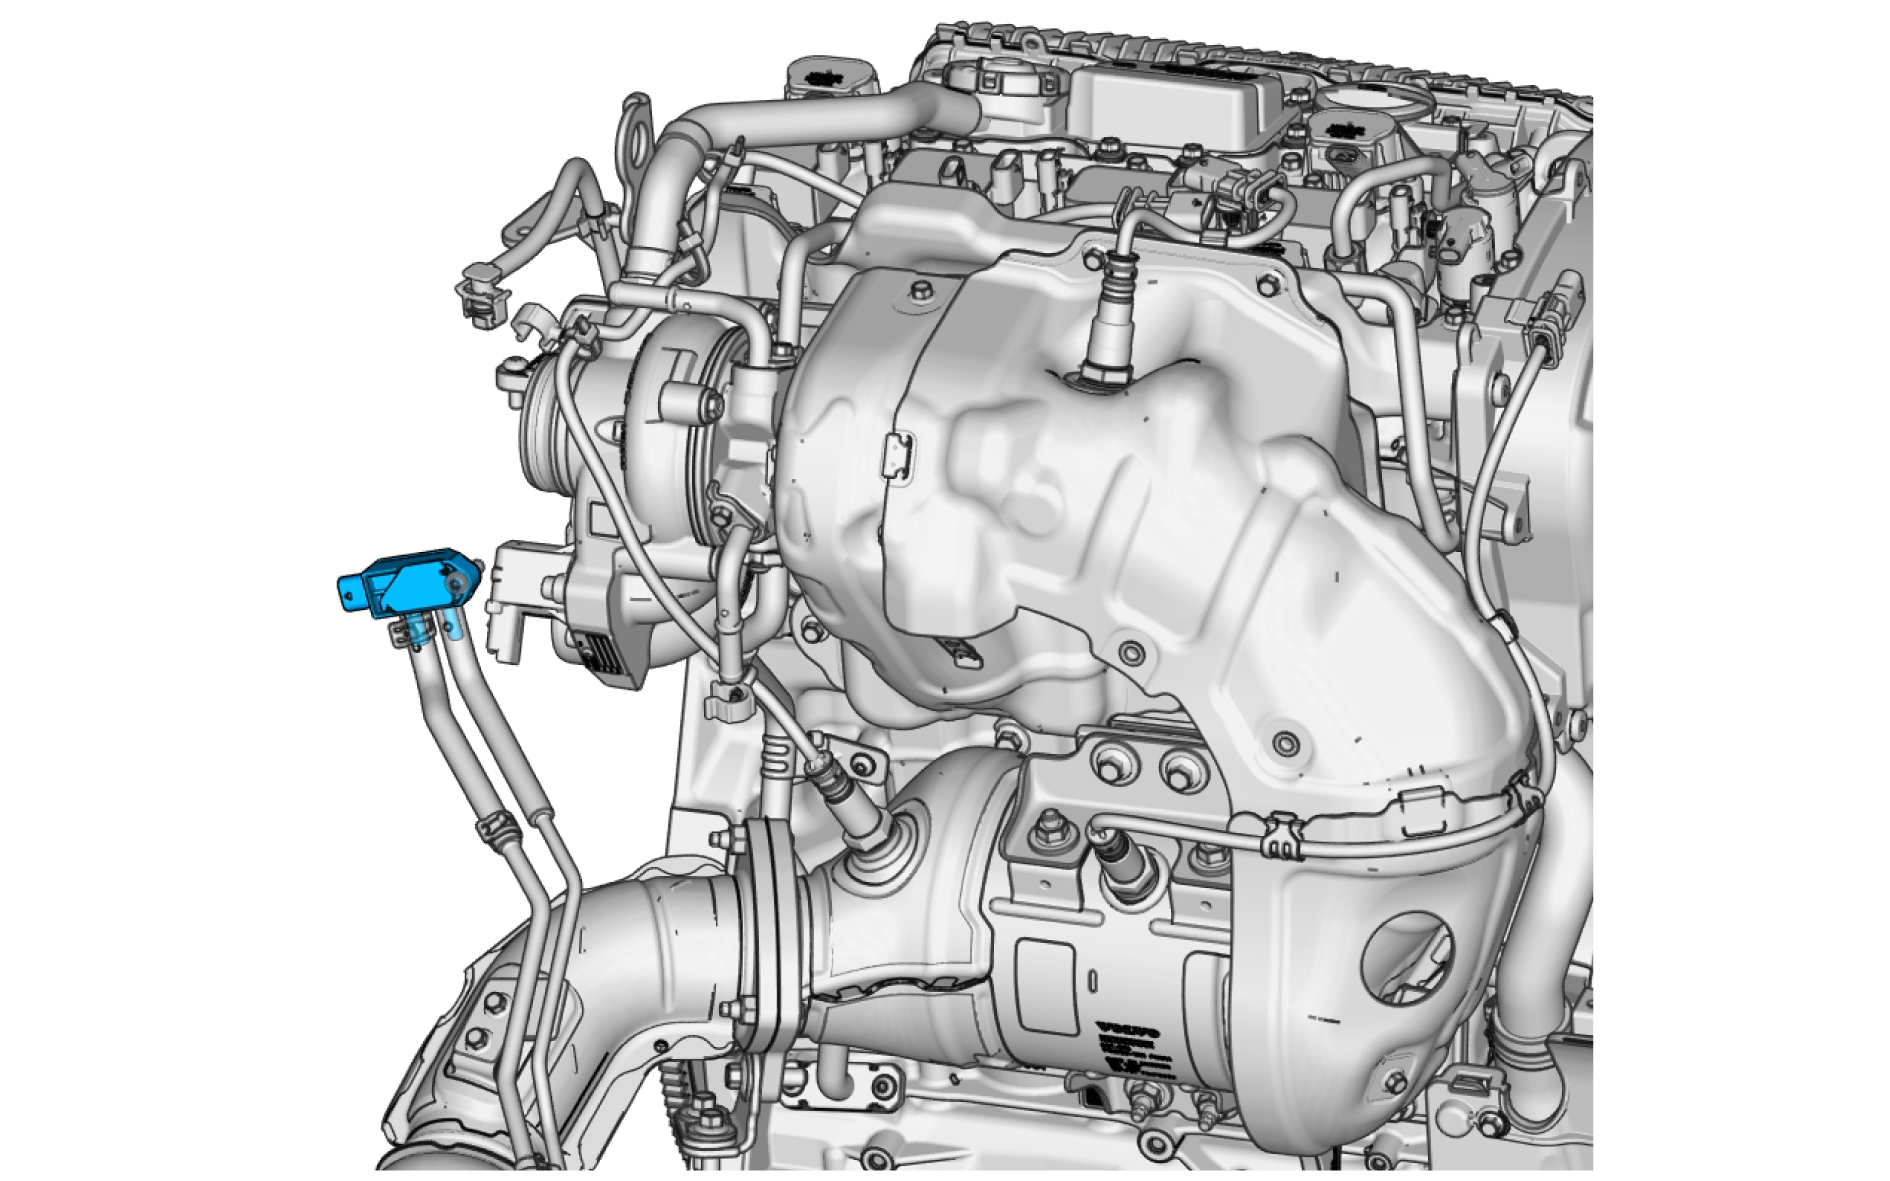
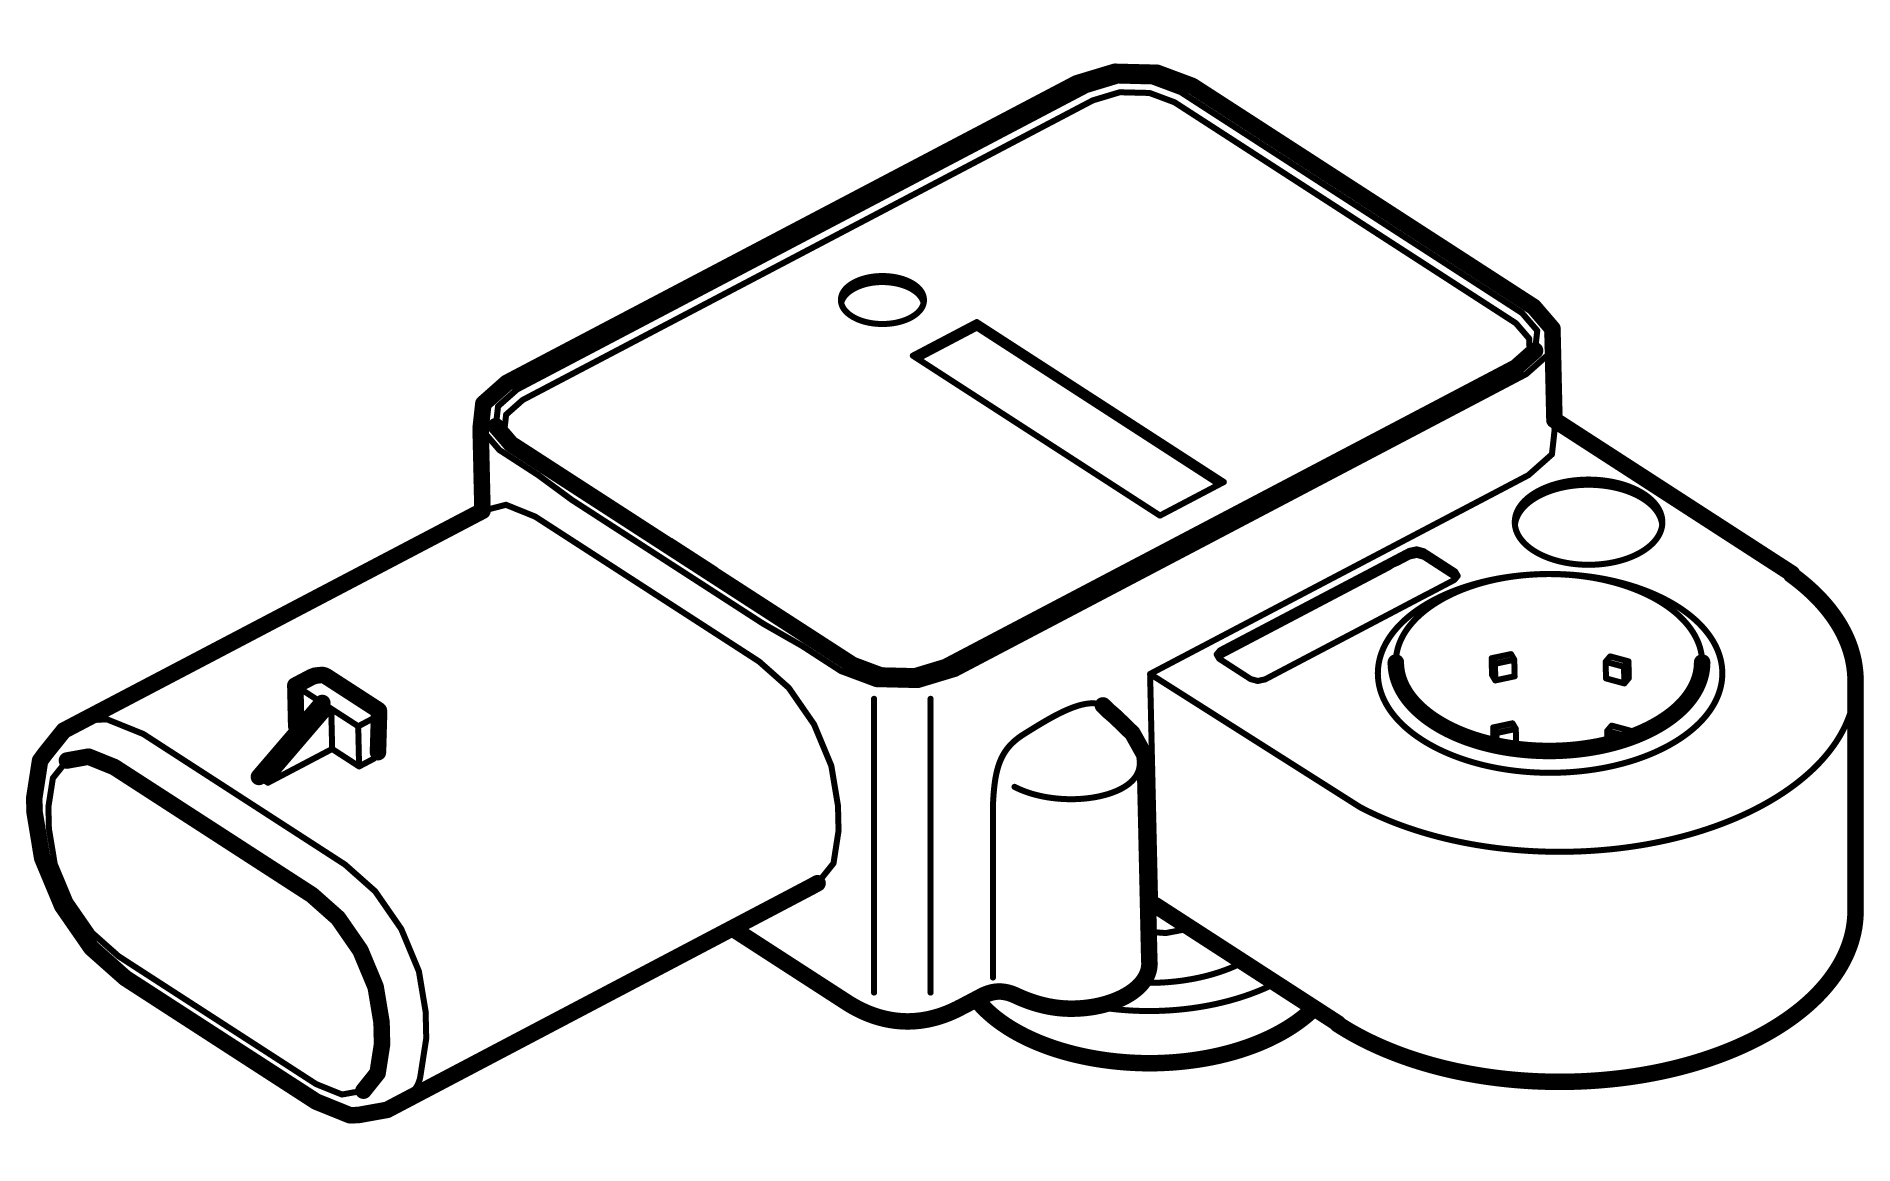
Manifold Pressure Sensor (MAP) - S302
Description
The Manifold Pressure Sensor (MAP) measures the pressure in the intake pipe between the charge air cooler and the throttle unit.
The Engine Control Module (ECM) uses the signal from the sensor to regulate the operation of the turbocharger. The sensor is a piezo-resistor and supplied with 5 V from the Engine Control Module (ECM).
Depending on the pressure, the silicone membrane in the sensor moves, which changes the resistance and thus the voltage level of the analog signal to the control module varies.
Diagnostic information
The Manifold Pressure Sensor (MAP) does not have a built-in diagnostic system. The Engine Control Module (ECM) monitors the sensor, sets DTCs and readable parameters for it.
Connection and communication
The Manifold Pressure Sensor (MAP) is directly connected to the Engine Control Module (ECM).
Component location
Pin-out
Low-pressure EGR valve - V706
Description
Variants
| Component or function | Market, customer option, vehicle model |
|---|---|
| Low-pressure EGR valve | HP, VEP4 G3 |
Diagnostic information
Connction and communication
Component location
Pin-out
EGR valve - V705
Description
The EGR (Exhaust Gas Recirculation) valve reroutes exhaust gas back to the intake side of the engine.
The EGR valve consists of a circular throttle disc on a shaft. The shaft is moved by a DC motor.
An internal sensor detects the actual position of the valve, which is sent as a PWM signal to the Engine Control Module (ECM). If there is no signal, a spring ensures that the valve is closed. When the damper disc is closed, no exhaust gas can pass through the EGR valve. Maximum EGR flow is achieved when the valve is fully opened.
Diagnostic information
The EGR valve does not have a built-in diagnostic system. The Engine Control Module (ECM) monitors the valve, sets DTCs and has readable parameters for it.
Connection and communication
The EGR valve is directly connected to the Engine Control Module (ECM).
Component location
Pin-out
EGR differential pressure sensor - S704
Description
The EGR differential pressure sensor is used to determine the applicable amount of low-pressure exhaust gas recirculation. The sensor measures the pressure difference between the exhaust system and the air intake system, before the low-pressure turbocharger. The sensor transmits the measured value as a digital signal and is monitored by the Engine Control Module (ECM).
Diagnostic information
The EGR differential pressure sensor does not have a built-in diagnostic system. The Engine Control Module (ECM) monitors the sensor, sets DTCs and has readable parameters for it.
Connection and communication
The EGR differential pressure sensor is directly connected to the Engine Control Module (ECM).
Component location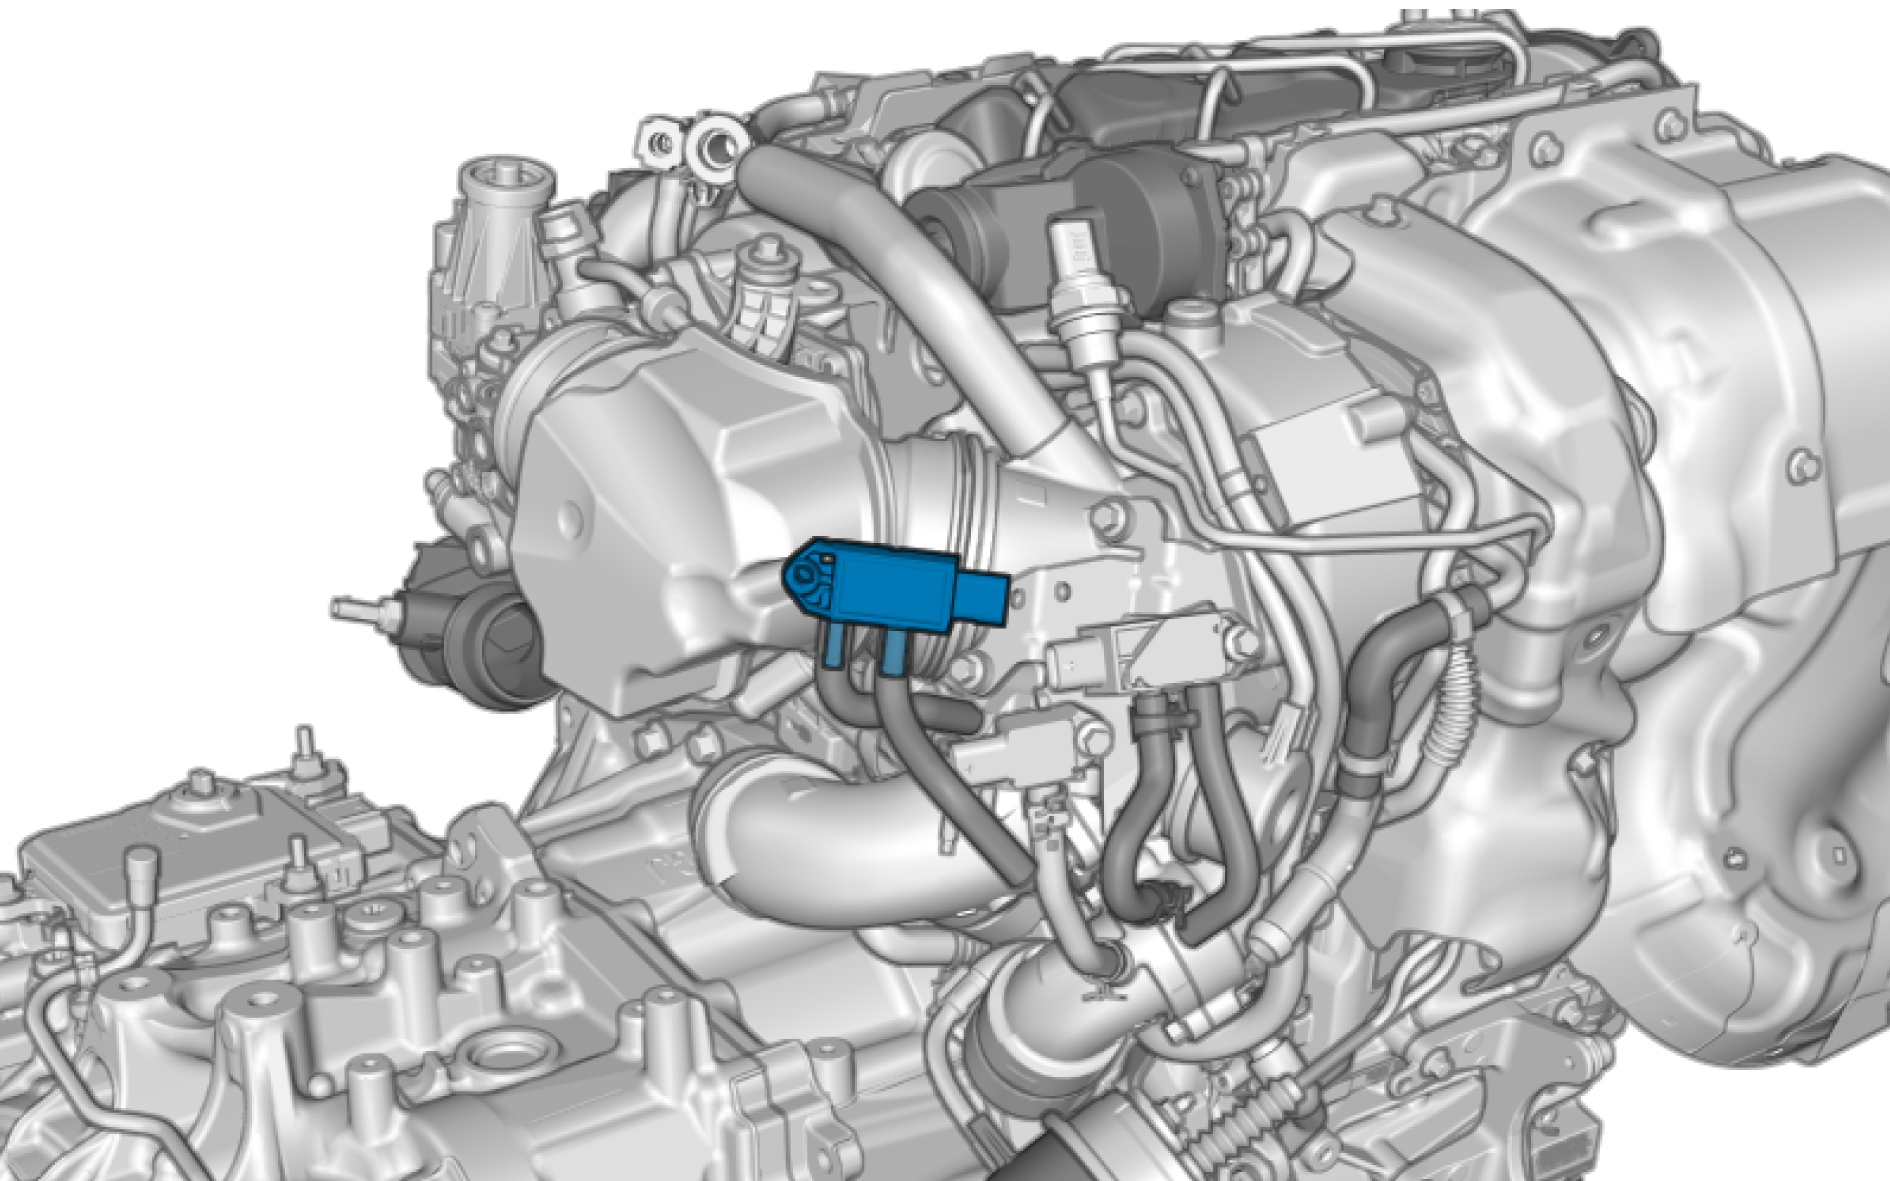
Pin-out
EGR cooler
Description
Location
Pin Out
EVAP purge valve - V109
Description
The Evaporative Emission System (EVAP) purge valve is used to open and close the connection between the charcoal canister and the intake manifold. The EVAP purge valve controls the flow of fuel vapors to be re-introduced into the engine. The Engine Control Module (ECM) controls the flow rate by regulating the duty cycle of a PWM signal sent to the EVAP purge valve.
Diagnostic information
The EVAP purge valve does not have a built-in diagnostic system. The Engine Control Module (ECM) monitors the EVAP purge valve and sets DTCs.
Connection and communication
The EVAP purge valve is directly connected to the Engine Control Module (ECM).
Component location
Pin-out
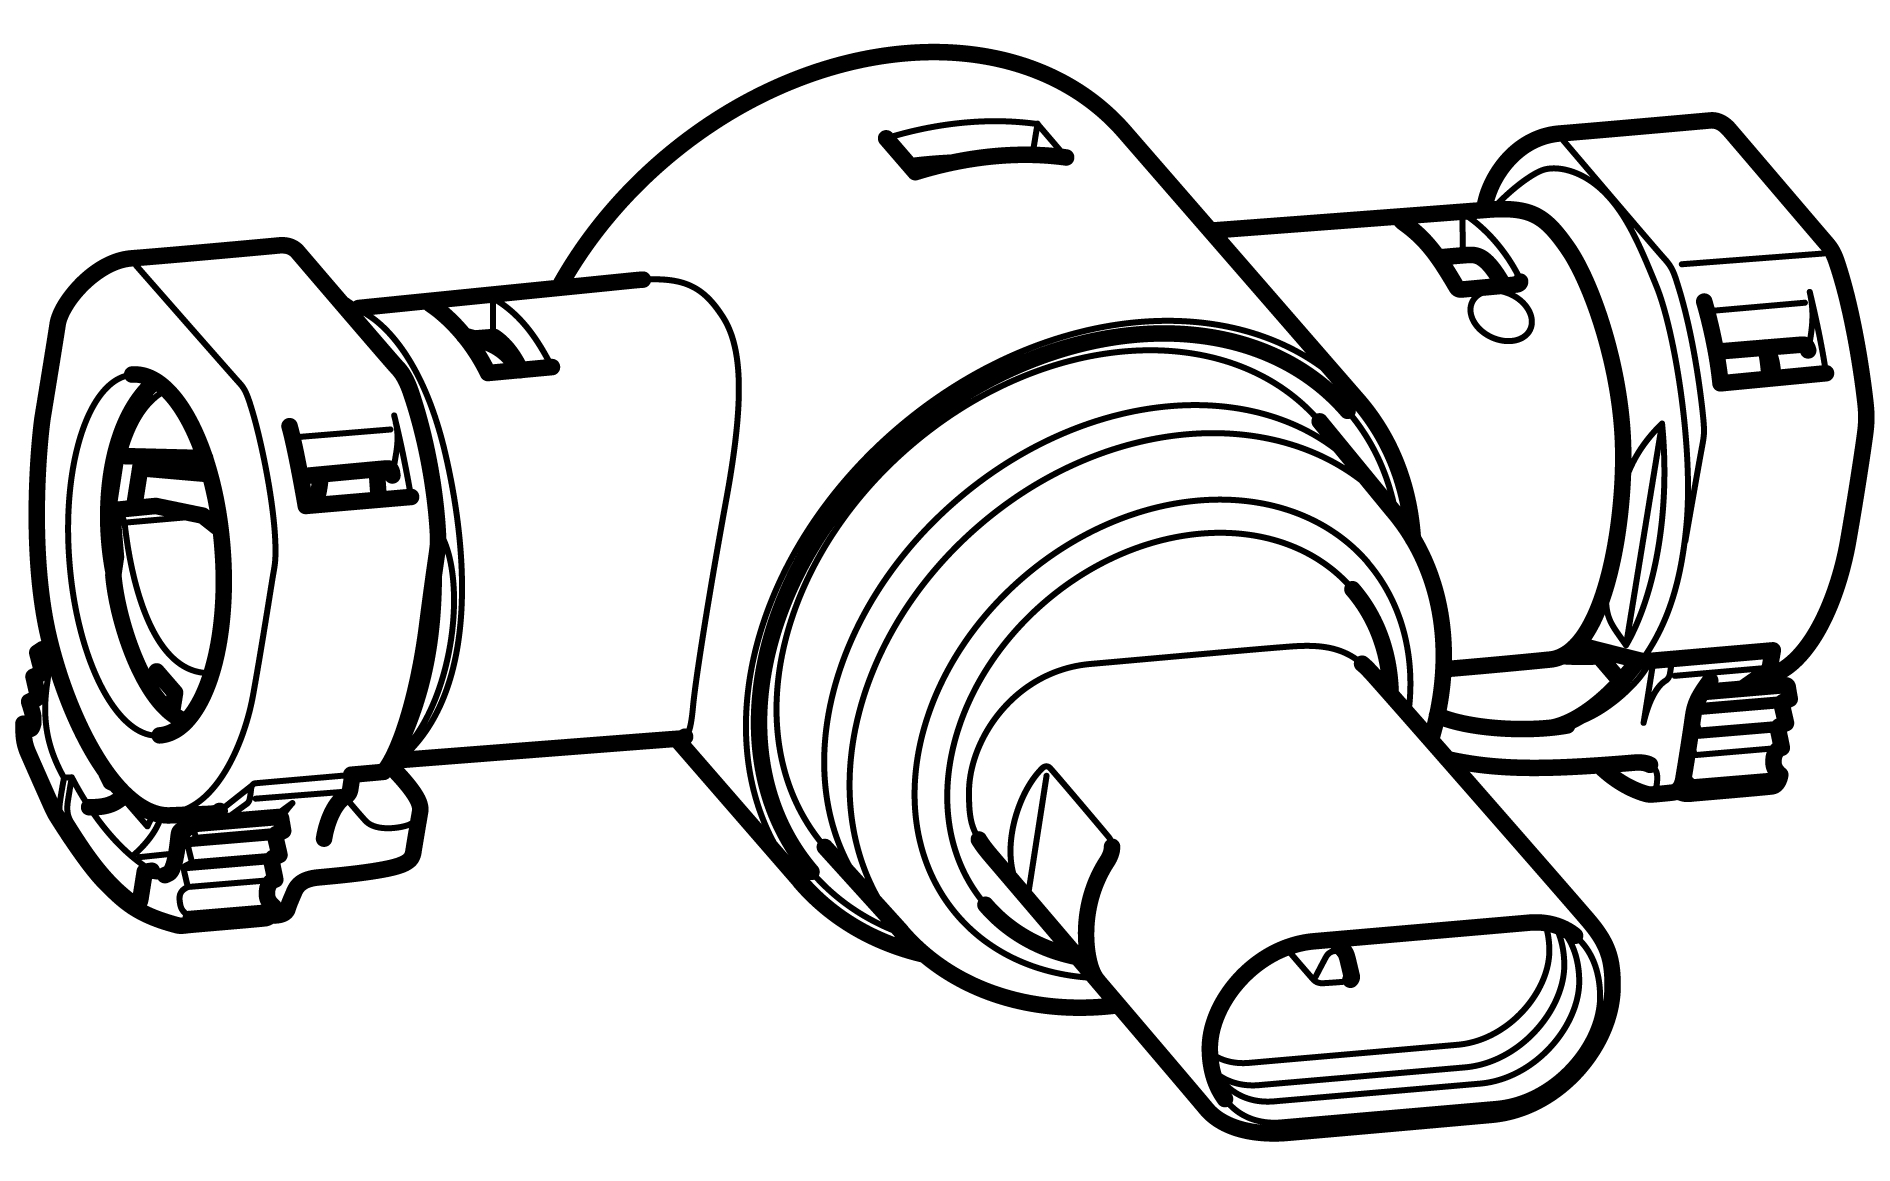
Air pressure- and air temperature sensor 1 and 2 - S304
Description
The air pressure- and air temperature sensor 1 and 2, also known as t-maps, are used to measure both air temperature and absolute pressure. The two sensors contain a piezo sensor (pressure) and NTC sensor (temperature) in order to:
-
Regulate the boost pressure.
-
Calculate the flow through the throttle by means of pressure and temperature.
-
Calculate the estimated stored mass in the charge air cooler's volume, which means that the flow in the intake system can be calculated.
-
Calculate the pressure in the manifold.
-
Calculate the engine's filling level by means of the current temperature.
Diagnostic information
The air pressure- and air temperature sensor 1 and 2 do not have a built-in diagnostic system. The Engine Control Module (ECM) monitors the sensors, sets DTCs and has readable parameters for them.
Connection and communication
The air pressure- and air temperature sensor 1 and 2 are directly connected to the Engine Control Module (ECM).
Component location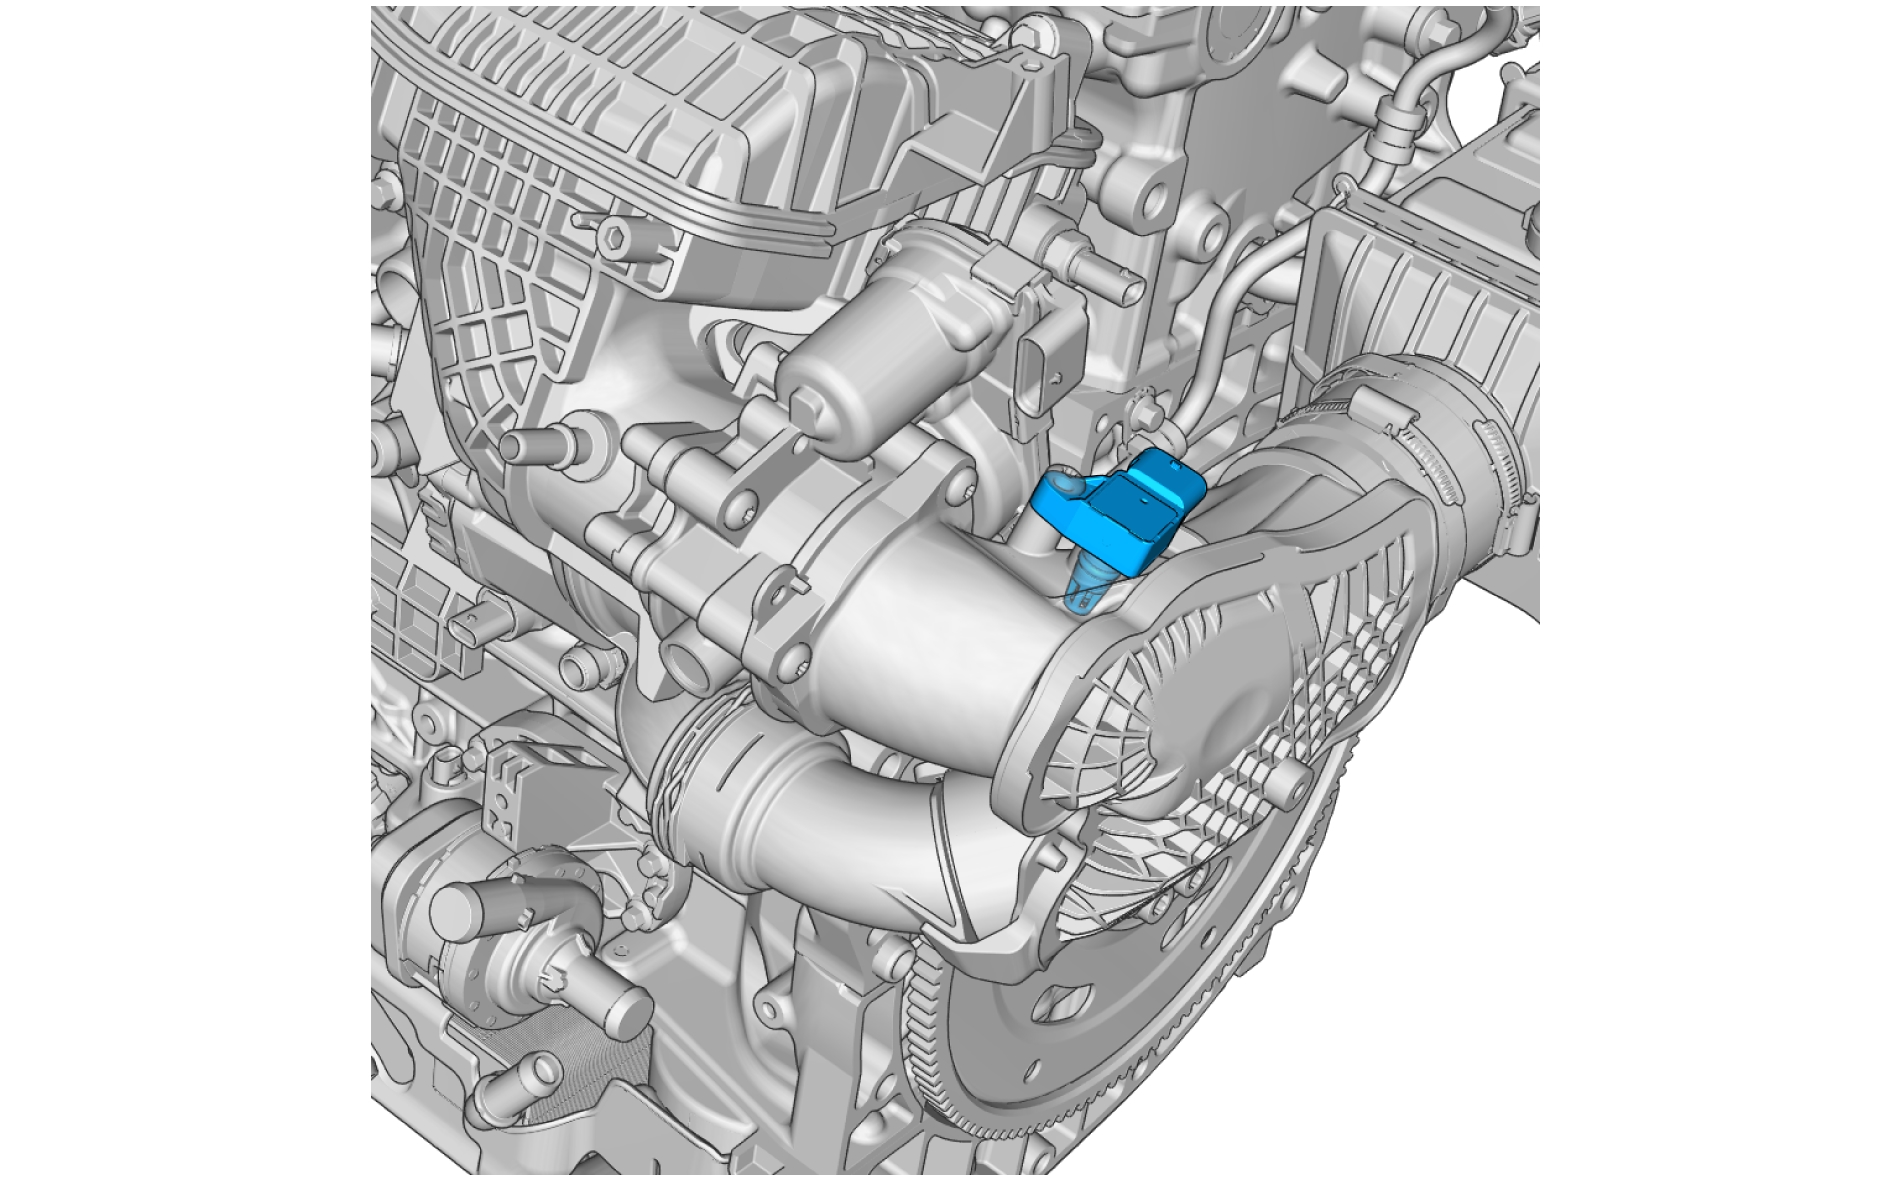
Pin-out
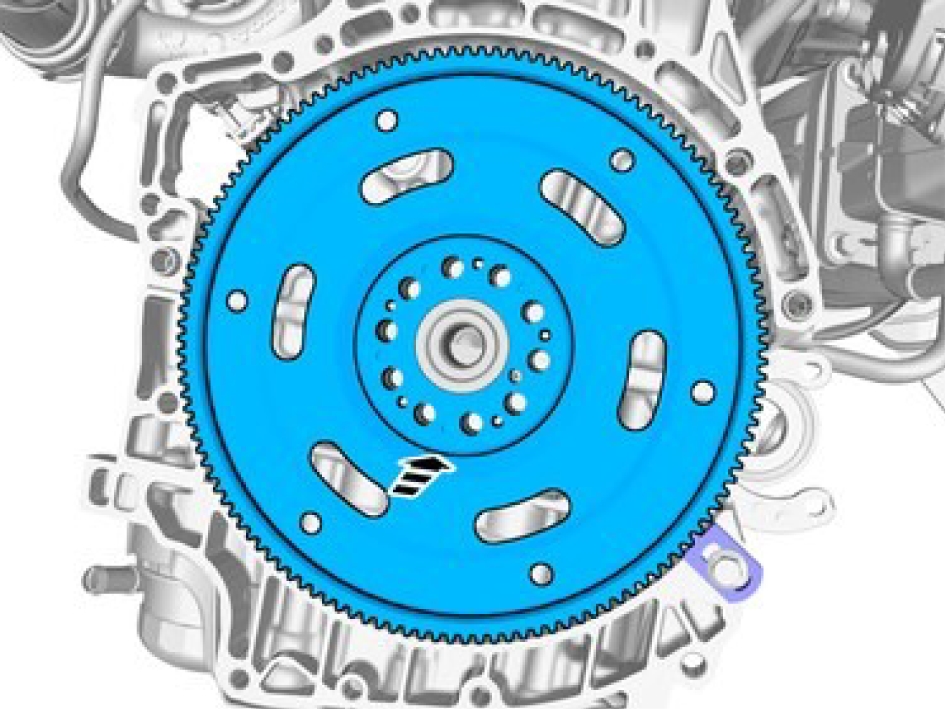
Carrier plate, replace
Install the special tool: 999 7120
Use a screw M10 x 50 mm and a nut M10
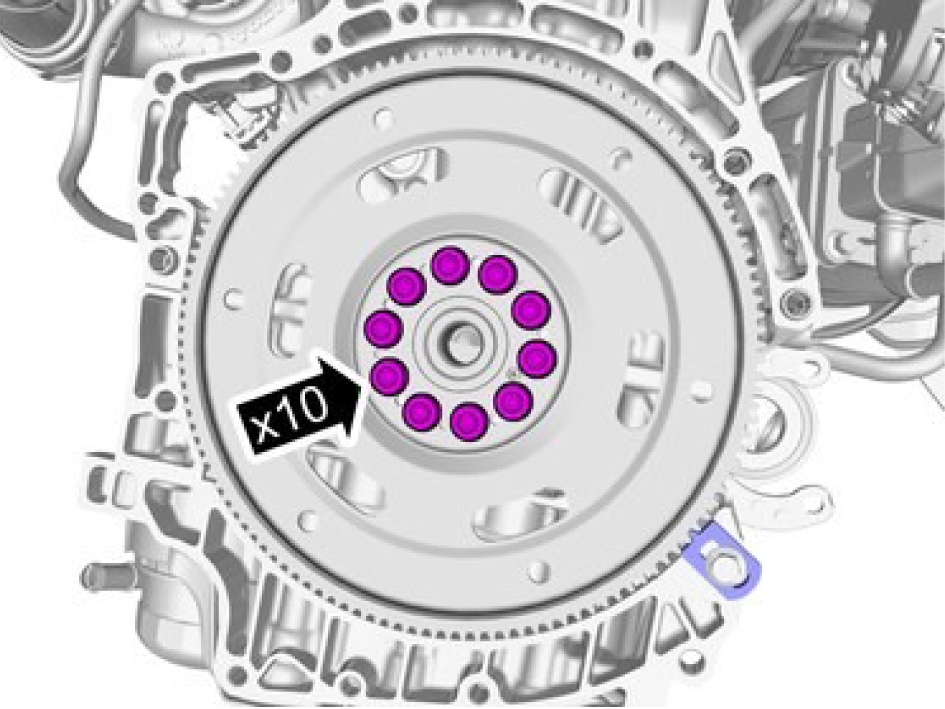
Remove the screws.
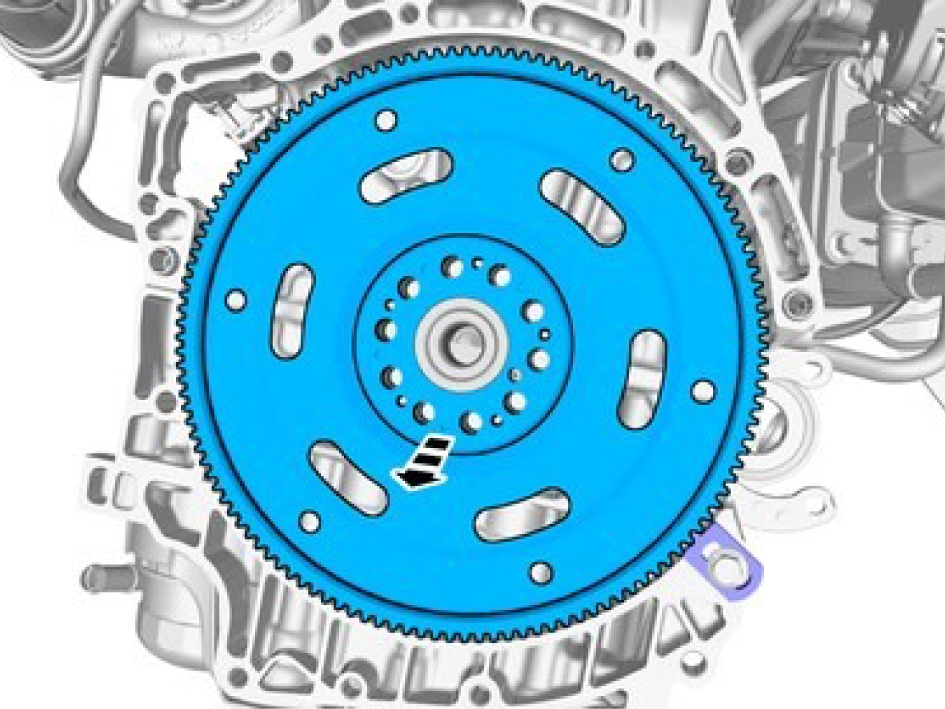
Remove the marked component.
Installation
Make sure that the mating faces are clean and free of foreign material.
Make sure that the flywheel/flexplate is in full contact with the crankshaft flange before installing the flywheel/flexplate screws.
Make sure that the locating pin on the crankshaft is aligned with the guide hole in the flywheel/flexplate.
Install the marked component.
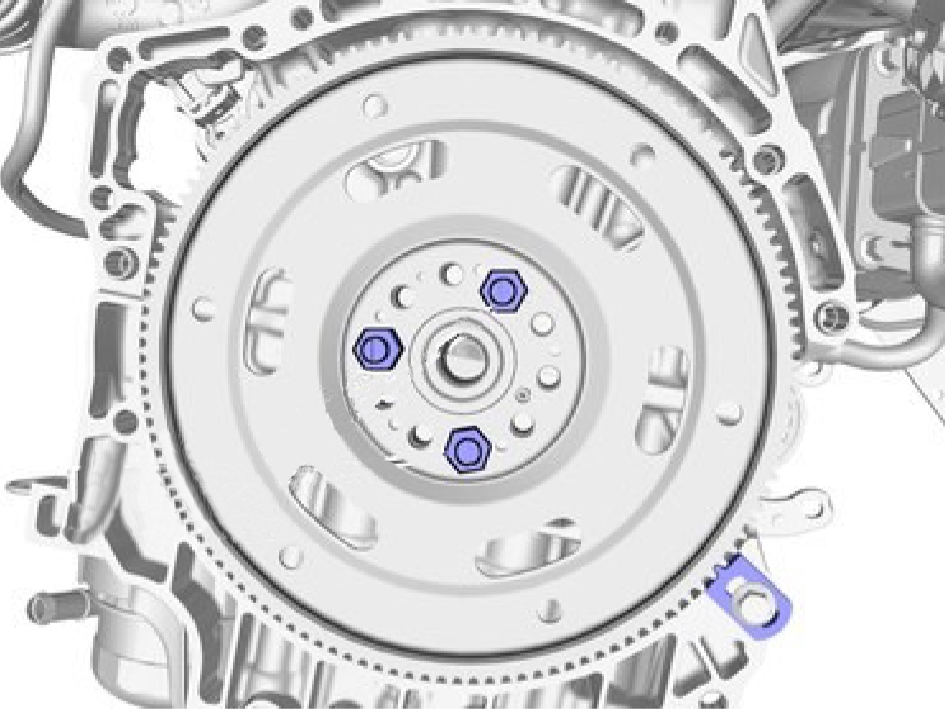
Install special tool: 999 5678

Install the screws.
Stage 1, torque: 45 Nm.
Stage 2, angle: 50 °
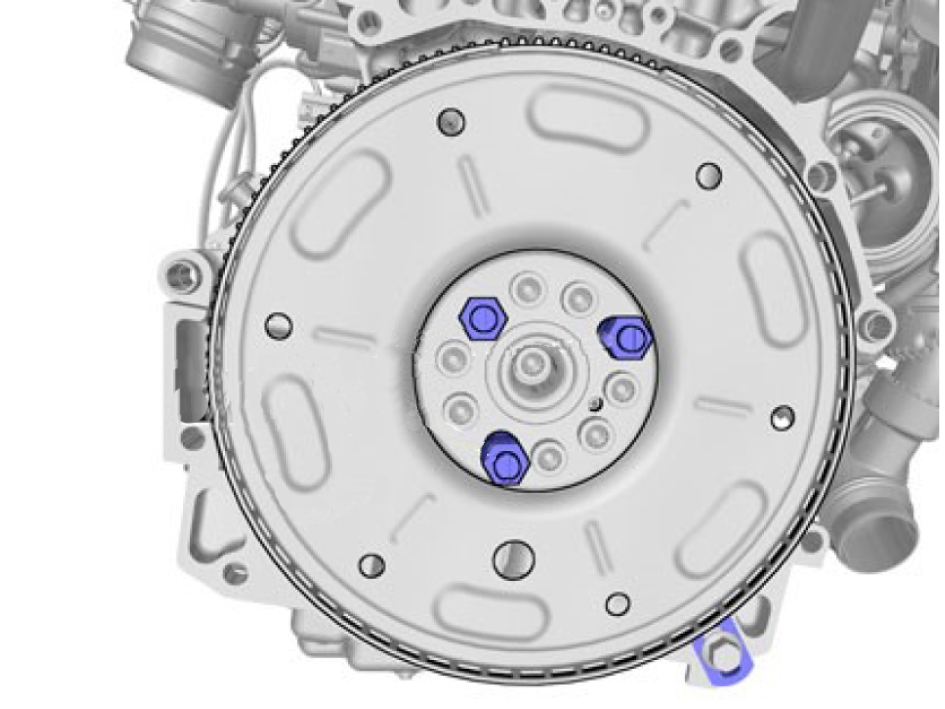
Remove the special tool.
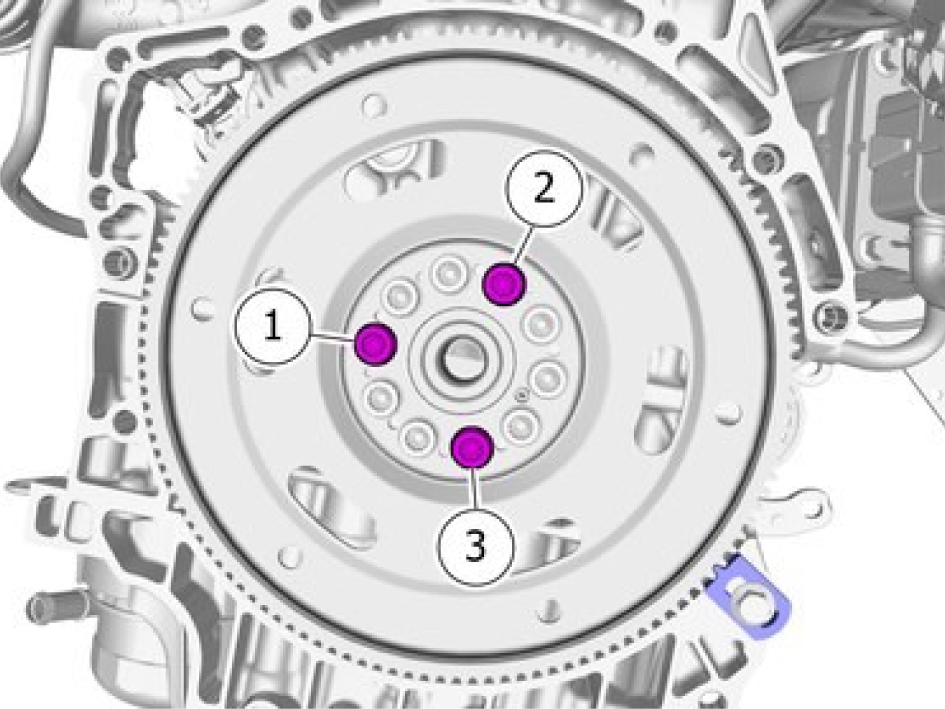
Install the screws.
Stage 1, torque: 45 Nm.
Stage 2, angle: 50 °
Remove the special tool: 999 7120
Actuator, exhaust system - M702
Description
The actuator, exhaust system is an electric motor integrated with a position sensor and controlled by the Engine Control Module (ECM). The actuator is connected to a flap that opens and closes the exhaust system. The actuator is used to reduce noise emissions.
Diagnostic information
The actuator, exhaust system does not have a built-in diagnostic system. The Engine Control Module (ECM) monitors the actuator, sets DTCs and has readable parameters for it.
Connection and communication
The actuator is directly connected to the Engine Control Module (ECM).
Component location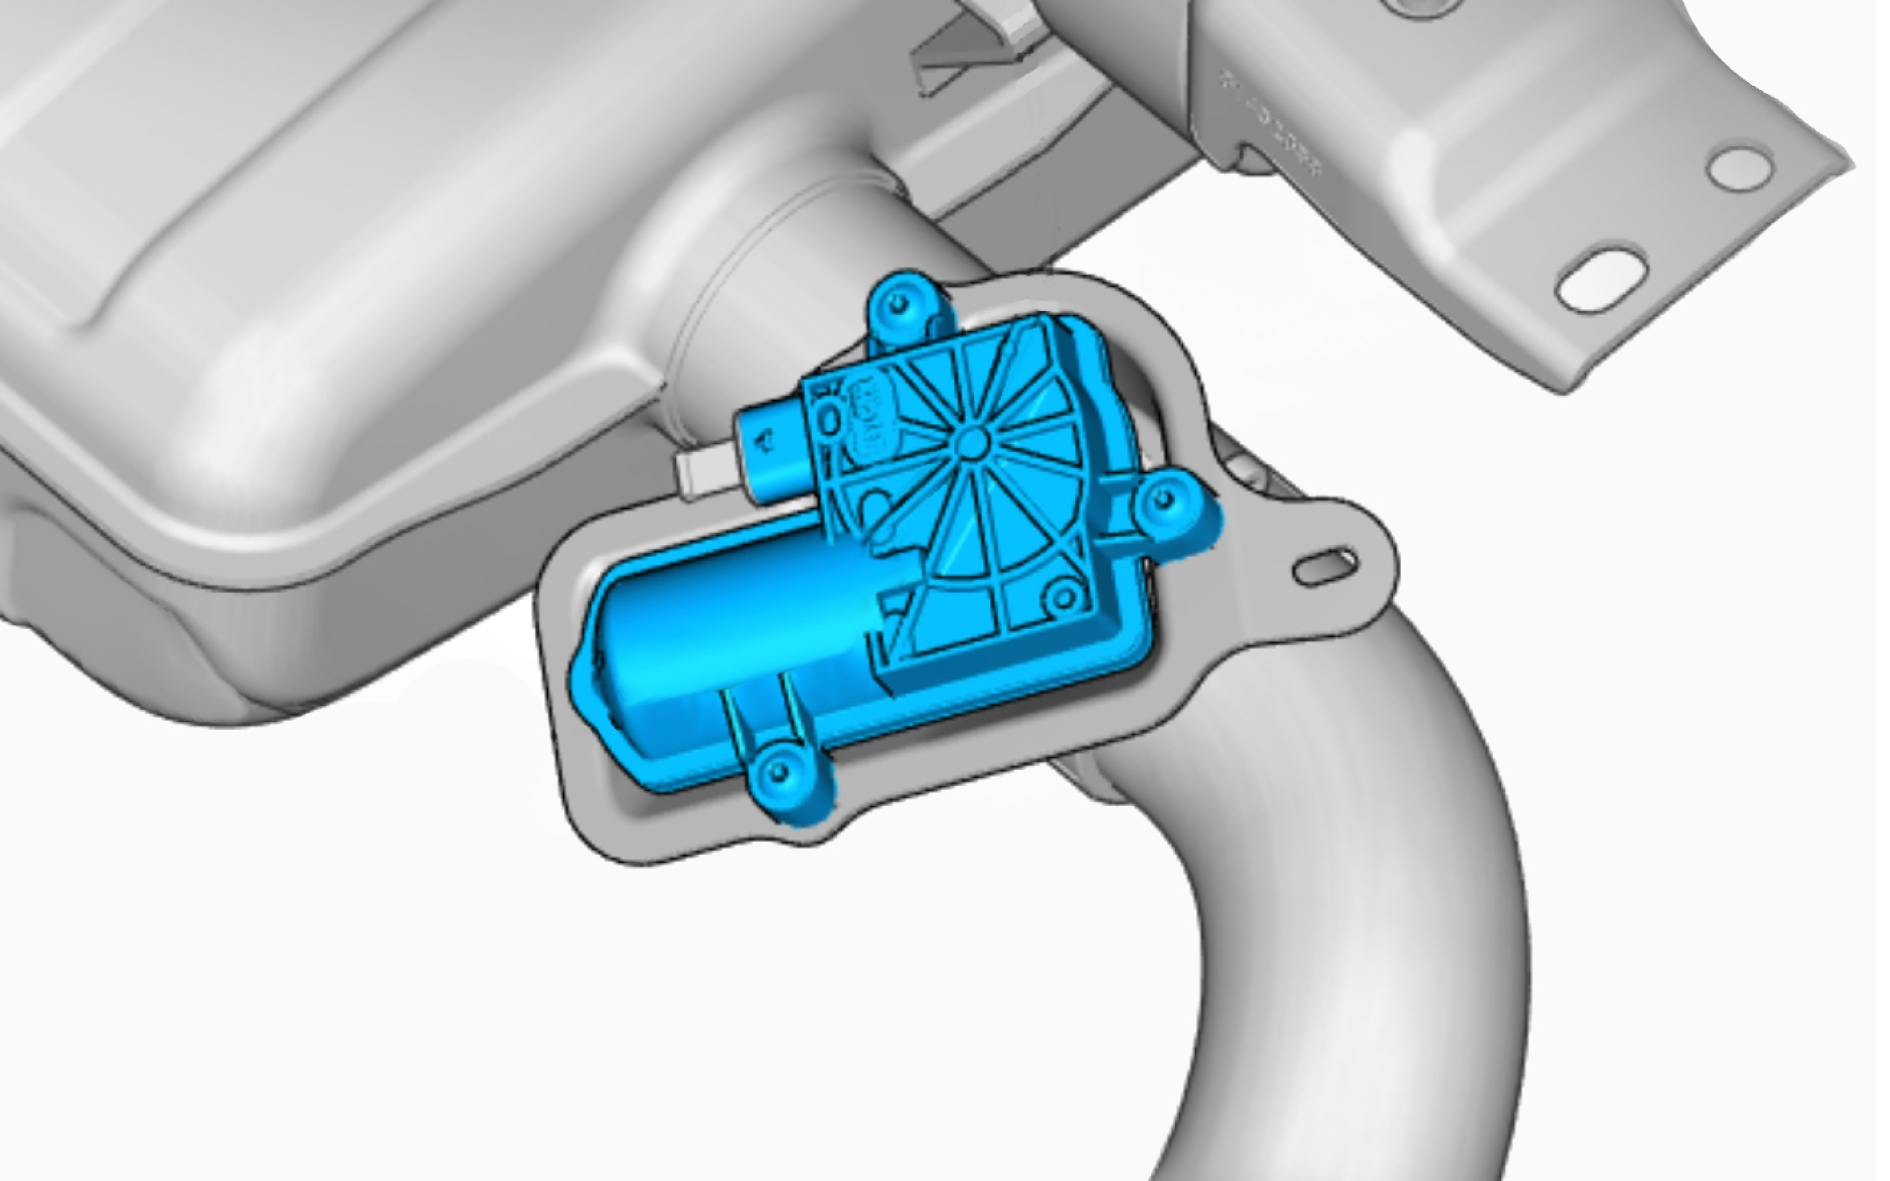
Lambda probe - S700
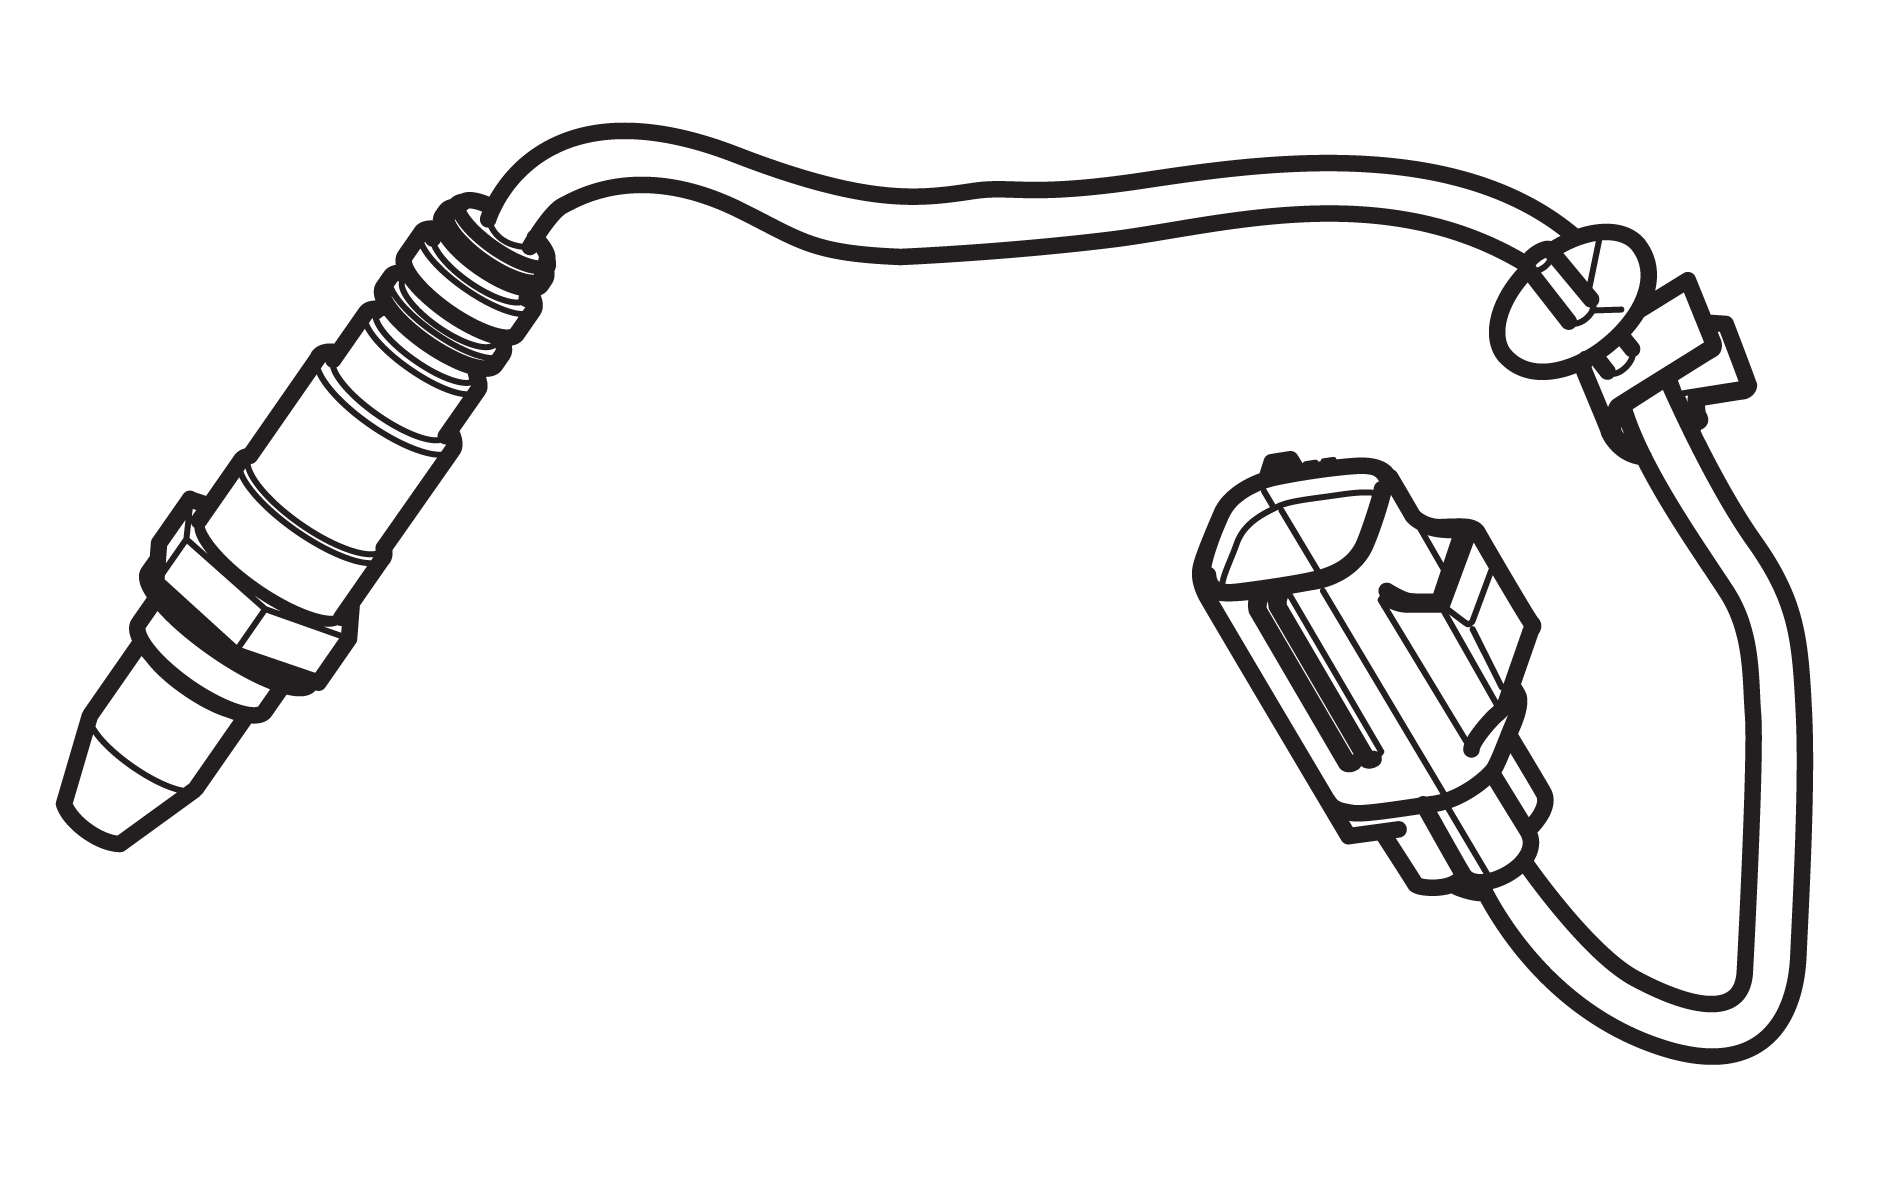
Description
The lambda probe is used to measure the remaining amount of oxygen content in the exhaust gas. It helps to govern the air to fuel ratio.
The lambda probe consists of an oxygen sensor and a heater element. It has a linear broadband function and is made with a zirconium probe. The sensor needs a reference from the surrounding air and the surrounding air reaches the oxygen sensor via its cabling.
The sensor needs to be heated in order to function properly and is electrically preheated to quickly reach operating temperature. The heating element consists of a PTC-resistor.
The wiring to the heated lambda probe must not be squeezed or in any other way damaged. It is not allowed to grease the contacts of the lambda probe as the oil would interfere with the reference air and the function of the lambda probe. The area where the cable is attached to the body of the lambda probe must be protected from contamination.
Lambda probe, front (7/15):
Lambda probe, 1 (7/15). The oxygen sensor in the lambda probe, front, uses current regulation and its signal characteristic is linear. Normal operating temperature is 700 - 900 °C. The sensor does not work below 700 °C. The heating period for the lambda probe is approximately 30 - 40 s.
Lambda probe, middle (7/82, 7/284, 7/285):
The oxygen sensor in the lambda probe,middle, is used while the lambda probe becomes sufficiently hot. Normal operating temperature is 300 - 900 °C. The sensor does not work below 300 °C. The heating period for the lambda probe is approximately 30 - 40 s.
Lambda probe, rear (7/104, 7/167, 7/215, 7/285):
The oxygen sensor in the lambda probe, rear, is used to regulate the catalytic converter and is voltage controlled. The sensor has a fine tuning and barely measurable effect on the regulation of the mixing ratio of air and fuel. Normal operating temperature is 300 - 900 °C. The sensor does not work below 300 °C. The heating period for the lambda probe is approximately 60 - 120 s.
Diagnostic information
The lambda probe does not have a built-in diagnostic system. The Engine Control Module (ECM) monitors the lambda probe, including the oxygen sensor and the heater element, sets DTCs and has readable parameters for it.
Connection and communication
The lambda probe is directly connected to the Engine Control Module (ECM).
Component location
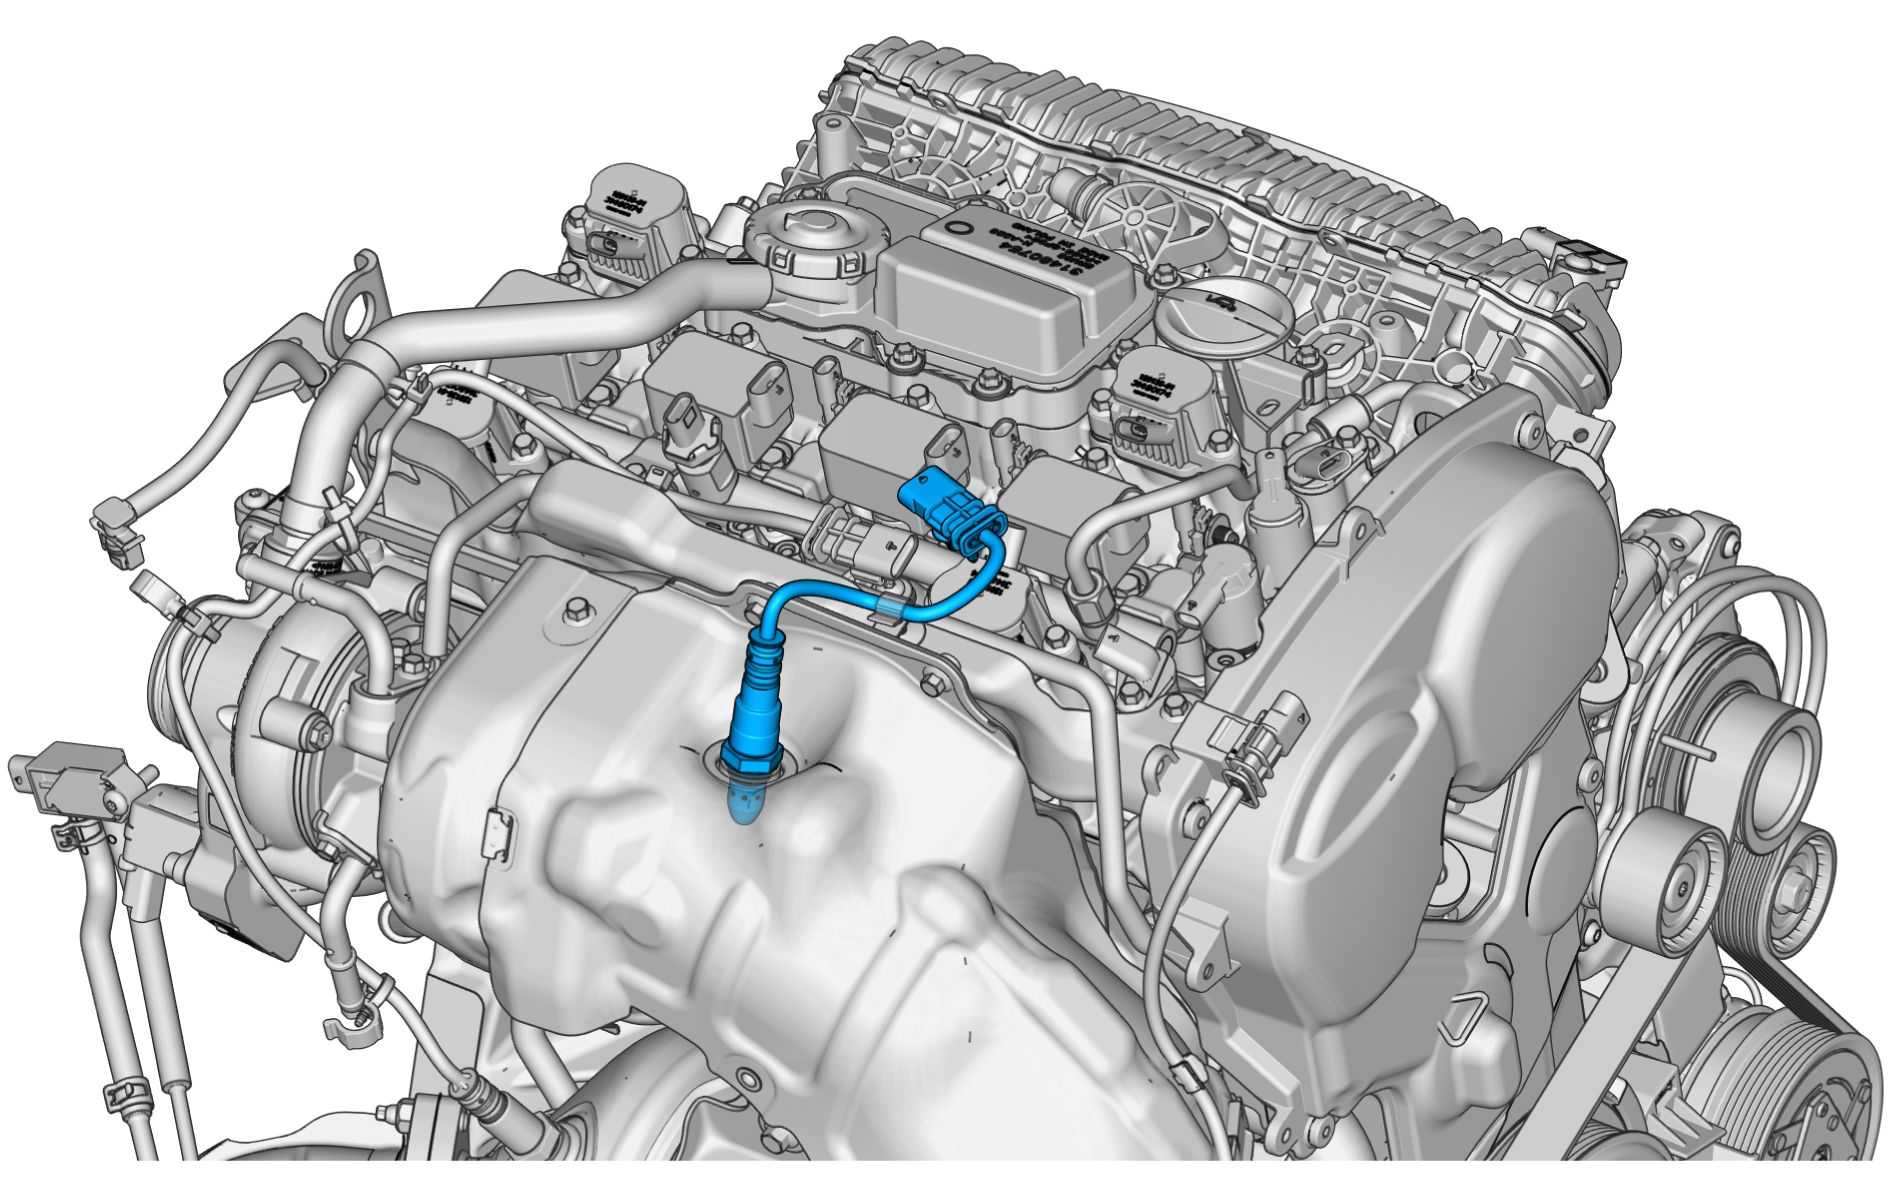
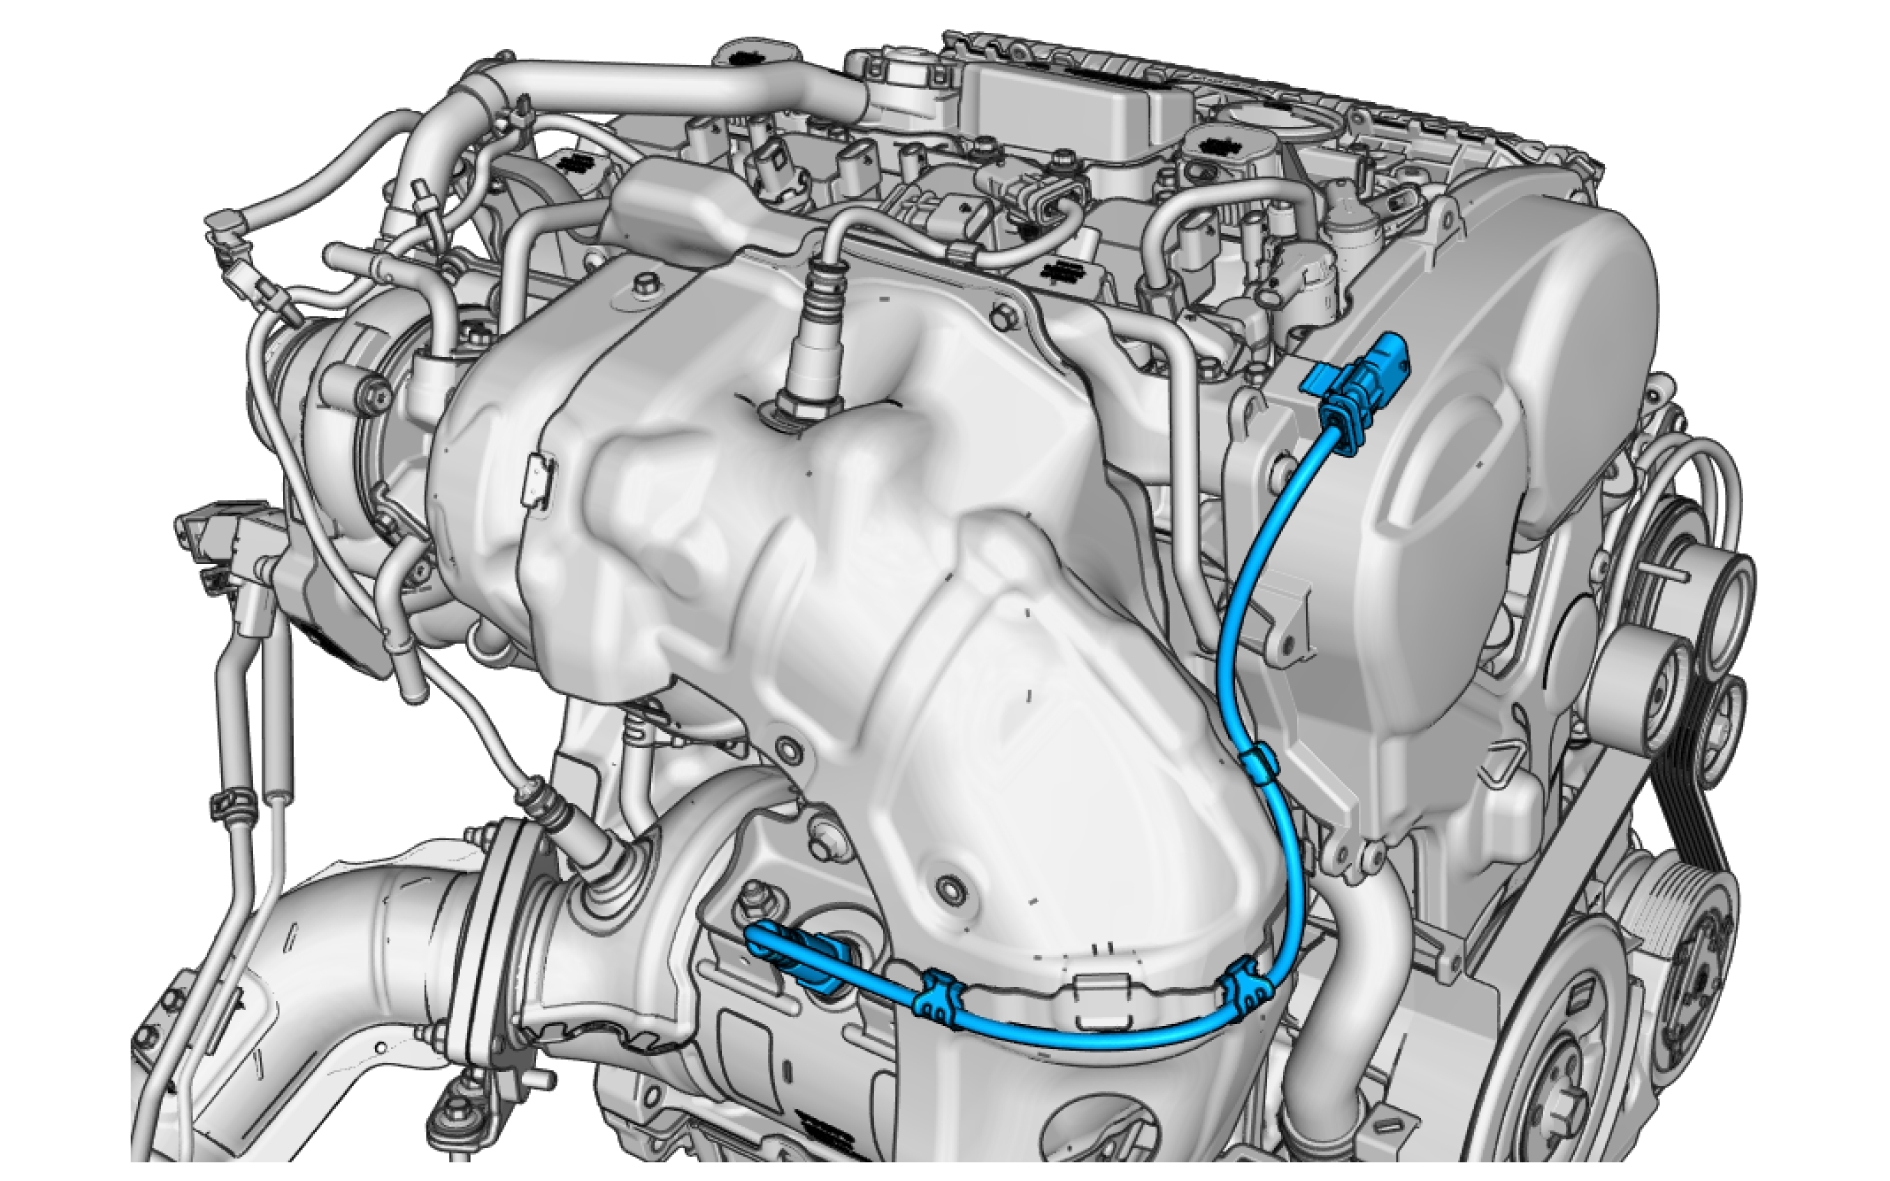
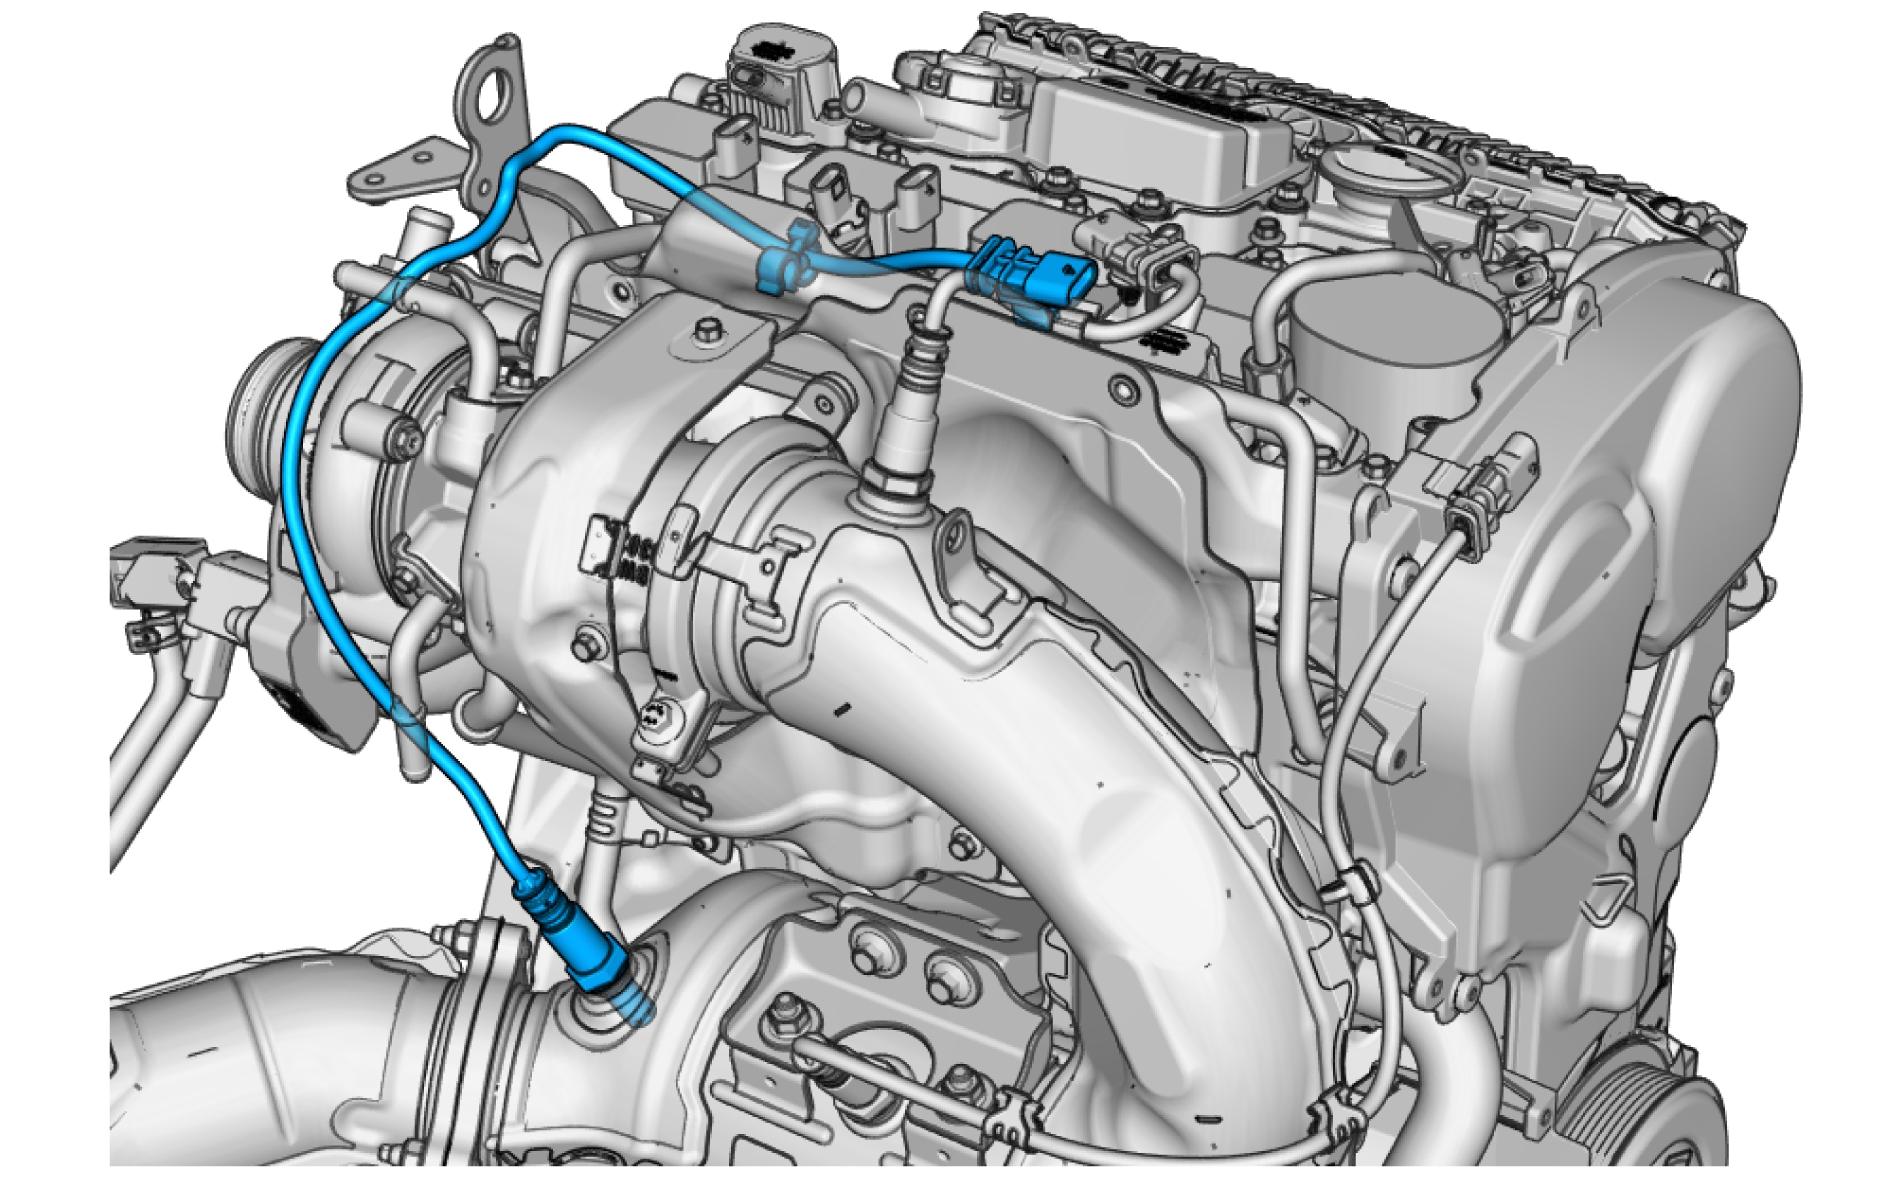
Pin-out
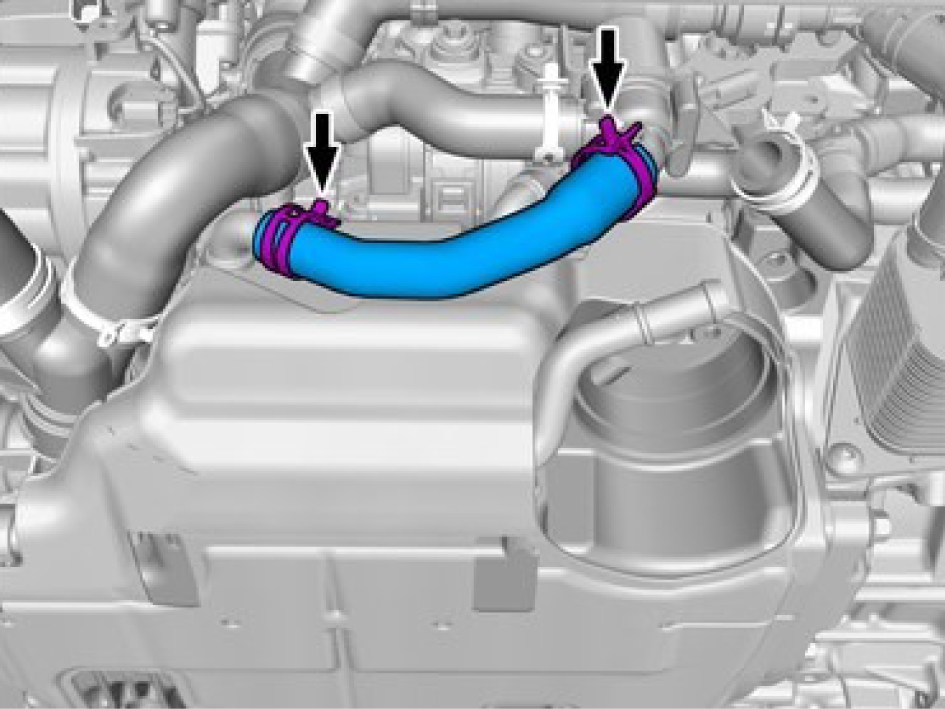
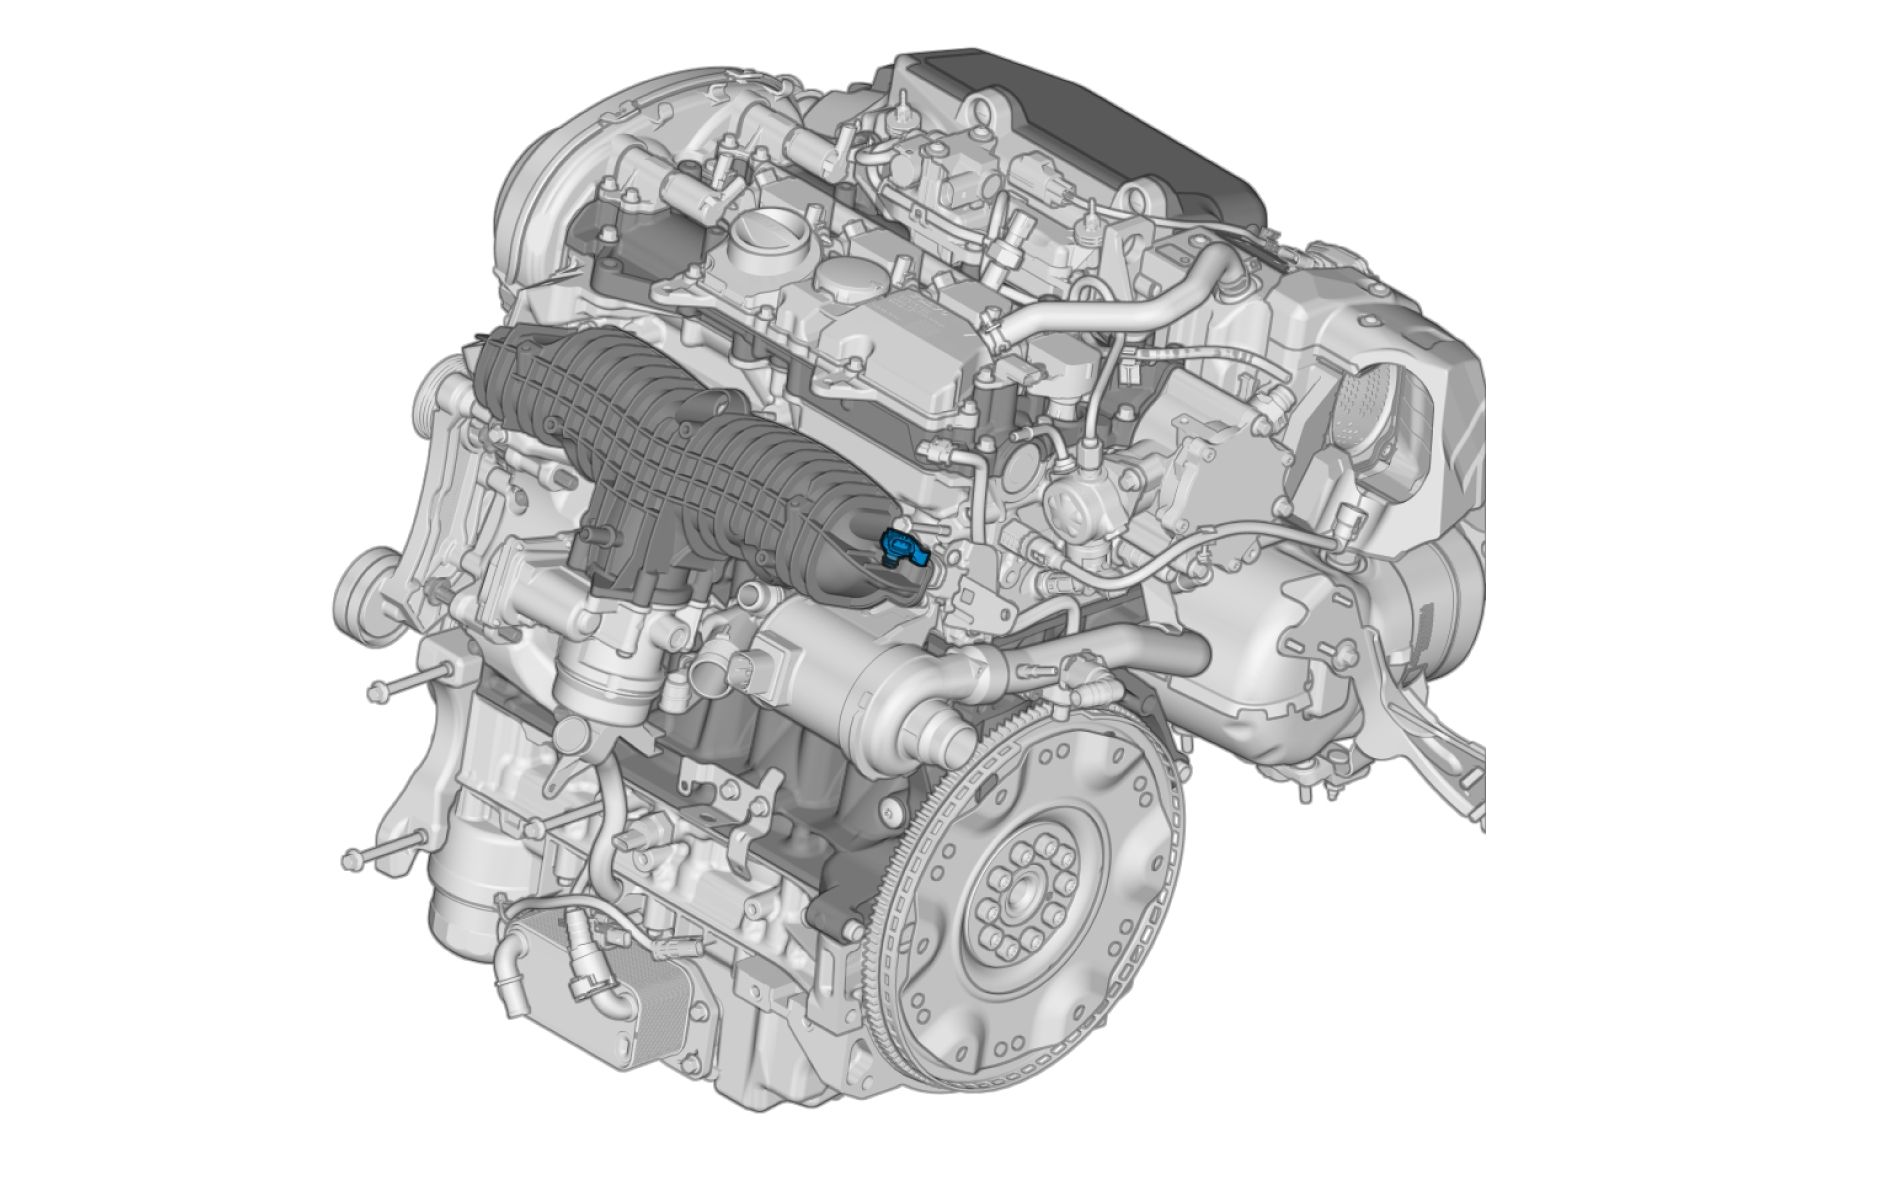
Intake manifold air temperature sensor, replace
Removal
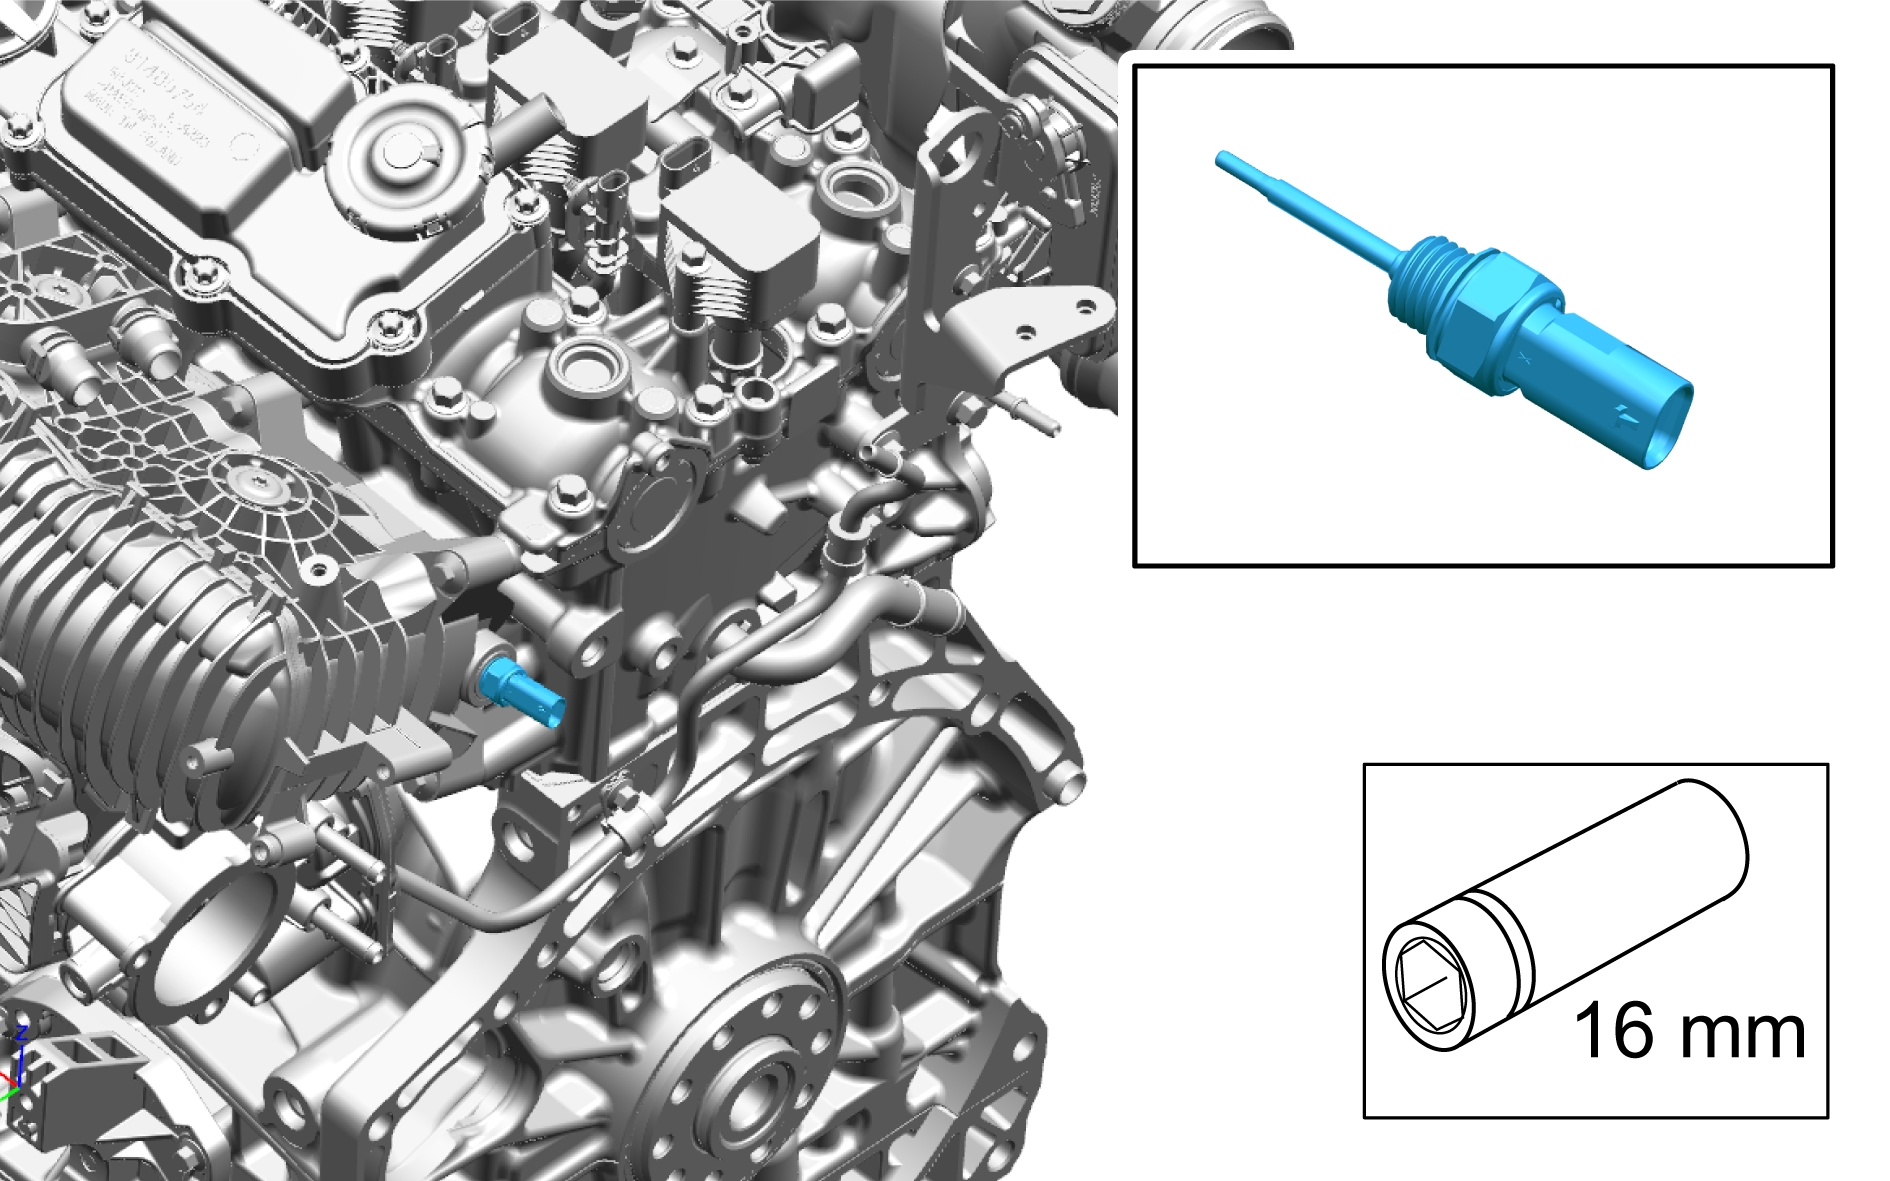
Disconnect the connector.
Remove the sensor.
Installation
Install the sensor, torque: 22 Nm
Connect the connector.
Charge air duct pressure sensor - S305
Description
The charge air duct pressure sensor measures the boost pressure after the turbocharger. The Engine Control Module (ECM) uses a pressure signal for continuous feedback control of the pressure before the E-charger.
Diagnostic information
The charge air duct pressure sensor does not have a built-in diagnostic system. The Engine Control Module (ECM) monitors the sensor, sets DTCs and has readable parameters for it.
Connection and communication
The charge air duct pressure sensor is directly connected to the Engine Control Module (ECM).
Component location
Pin-out
Control valve, fuel quantity - V103
Description
The control valve, fuel quantity regulates the amount of fuel that flows into the high-pressure fuel pump. The control valve closes during the pump's pressure phase to compress the fuel and achieve a higher pressure before it is distributed to the fuel rail.
Diagnostic information
The control valve, fuel quantity, does not have a built-in diagnostic system. The Engine Control Module (ECM) monitors the valve, sets DTCs but has no readable parameters for it.
Connection and communication
The control valve, fuel quantity, is an internal part of the high-pressure fuel pump. The valve is directly connected to the Engine Control Module (ECM).
Component location
Pin-out
EVAP purge pressure sensor - S108
Description
The EVAP purge pressure sensor is connected to the purge circuit after the EVAP Purge Pump (EPP) and before the EVAP purge valve. The sensor measures the pressure in the EVAP purge circuit and in the fuel tank (when EPP is not actuated) to determine the need for actuation of the EPP.
Diagnostic information
The EVAP purge pressure sensor does not have a built-in diagnostic system. The Engine Control Module (ECM) monitors the sensor, sets DTC’s and has readable parameters for it.
Connection and communication
The EVAP purge pressure sensor is directly connected to the Engine Control Module (ECM).
Component location
Pin-out
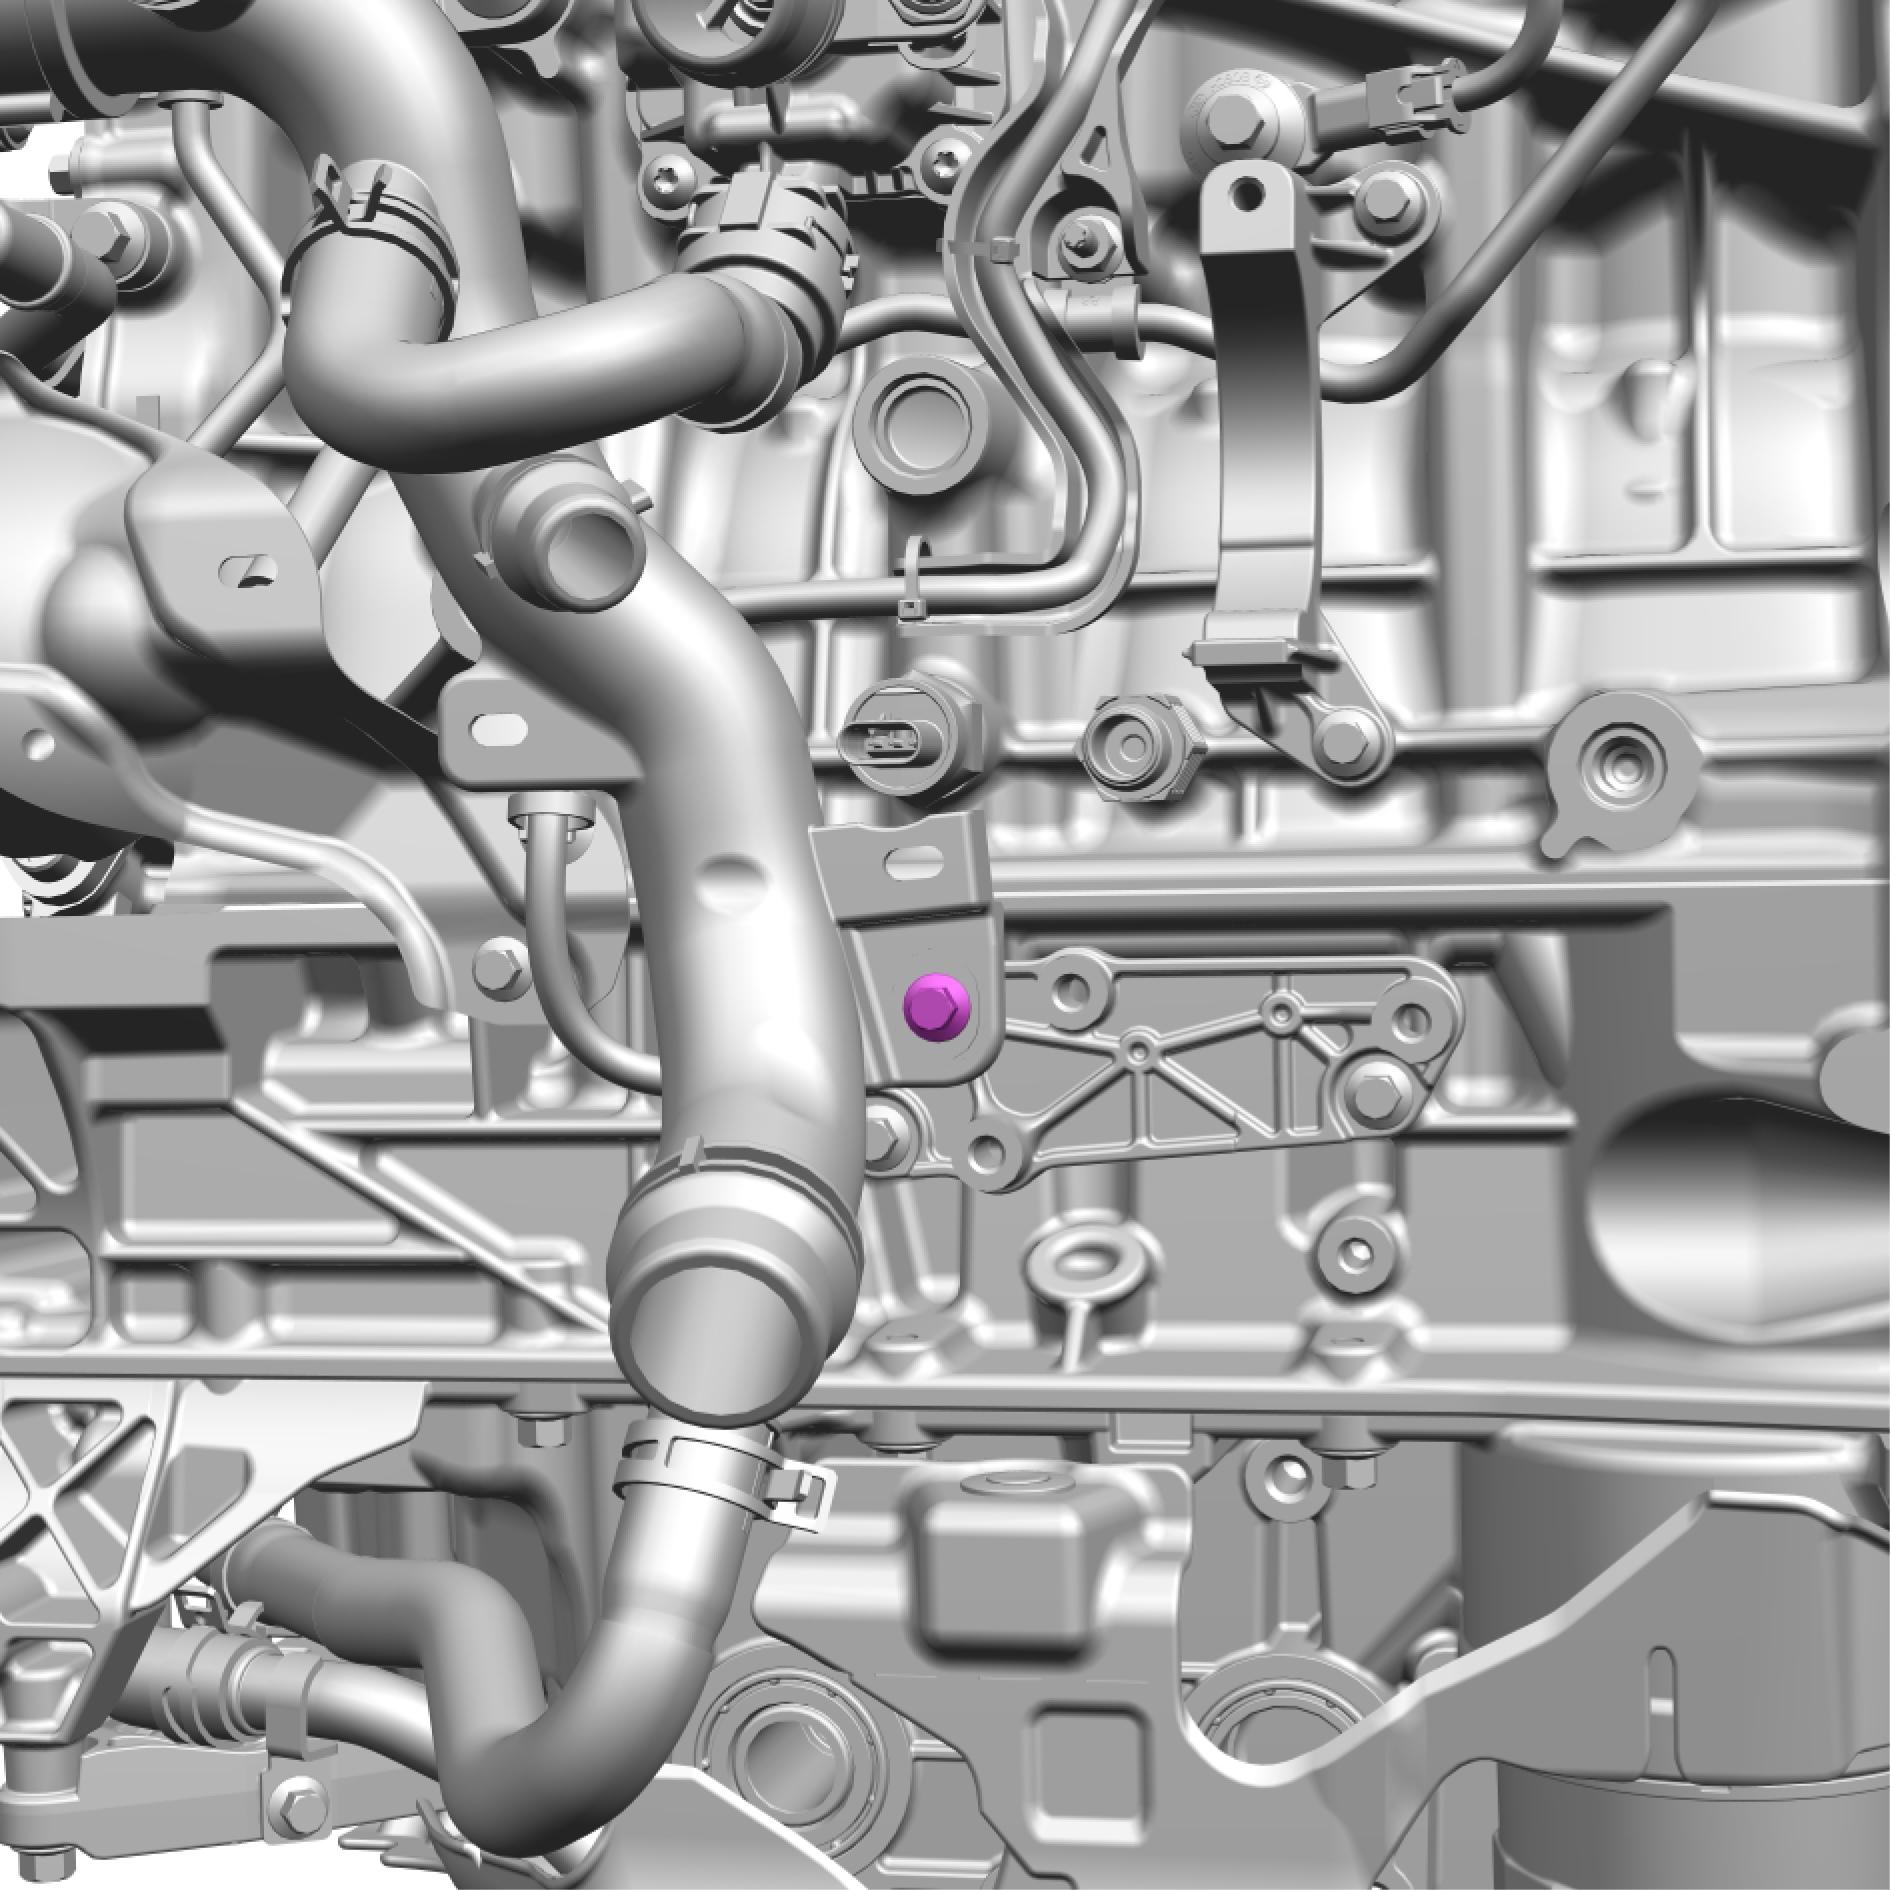
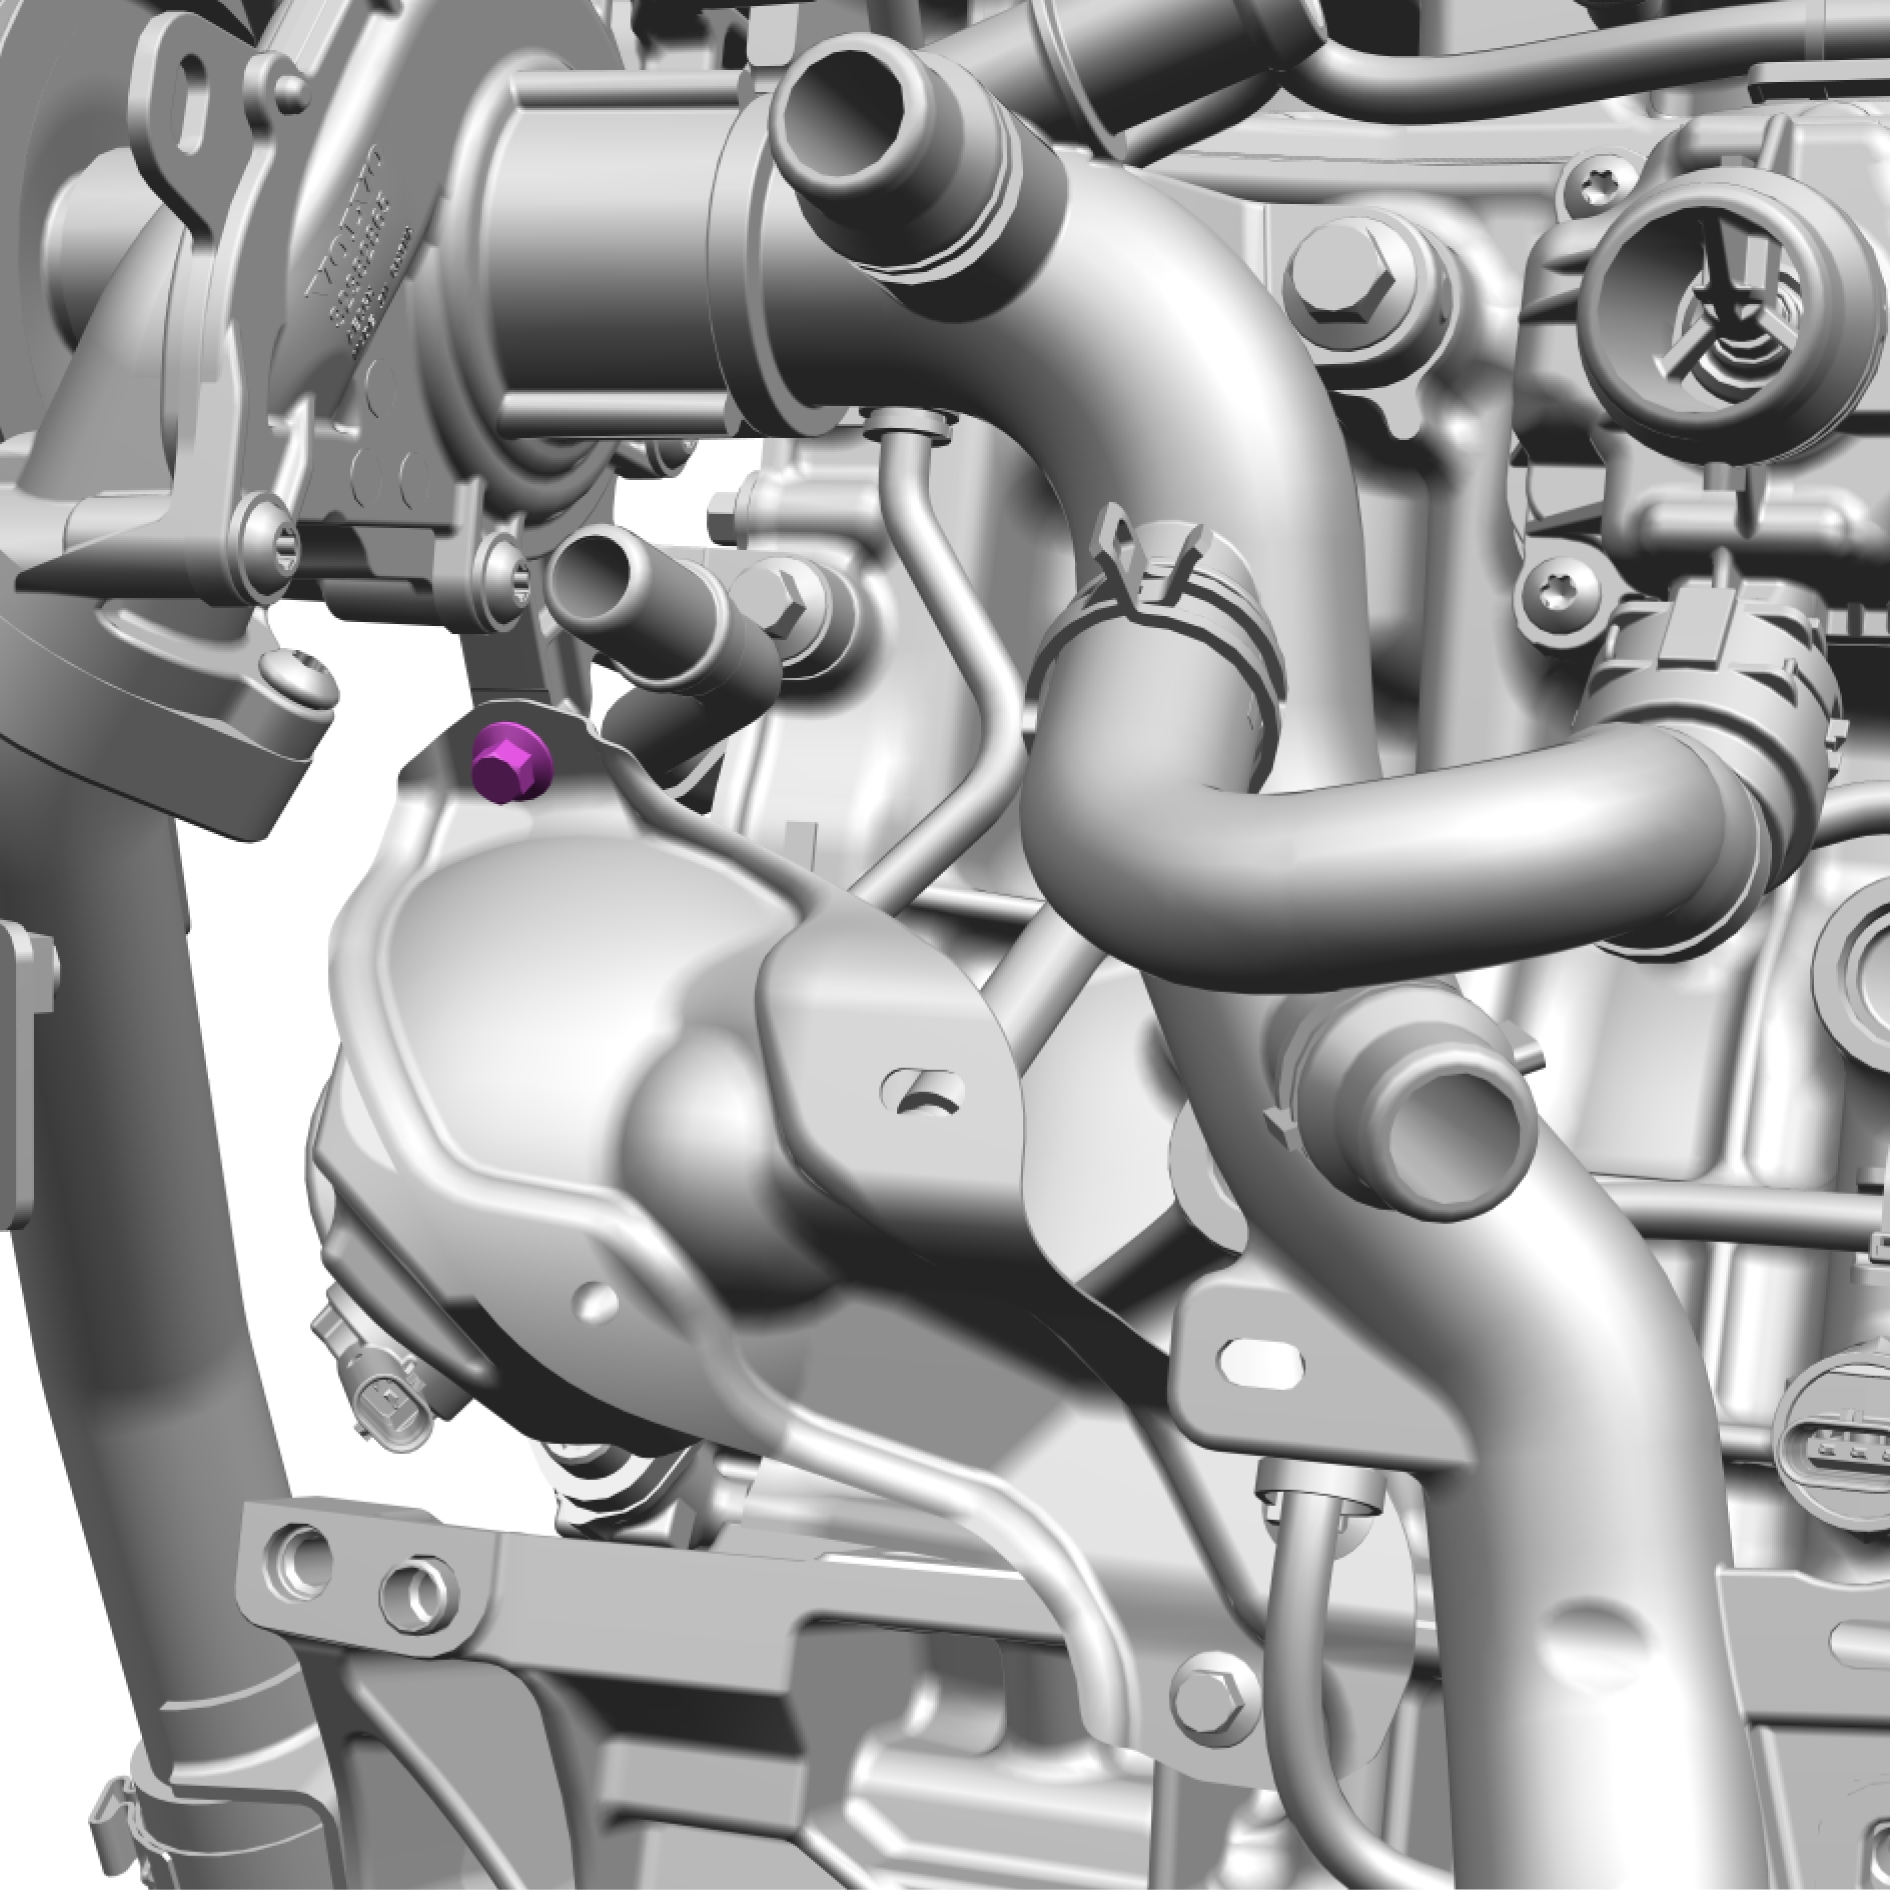
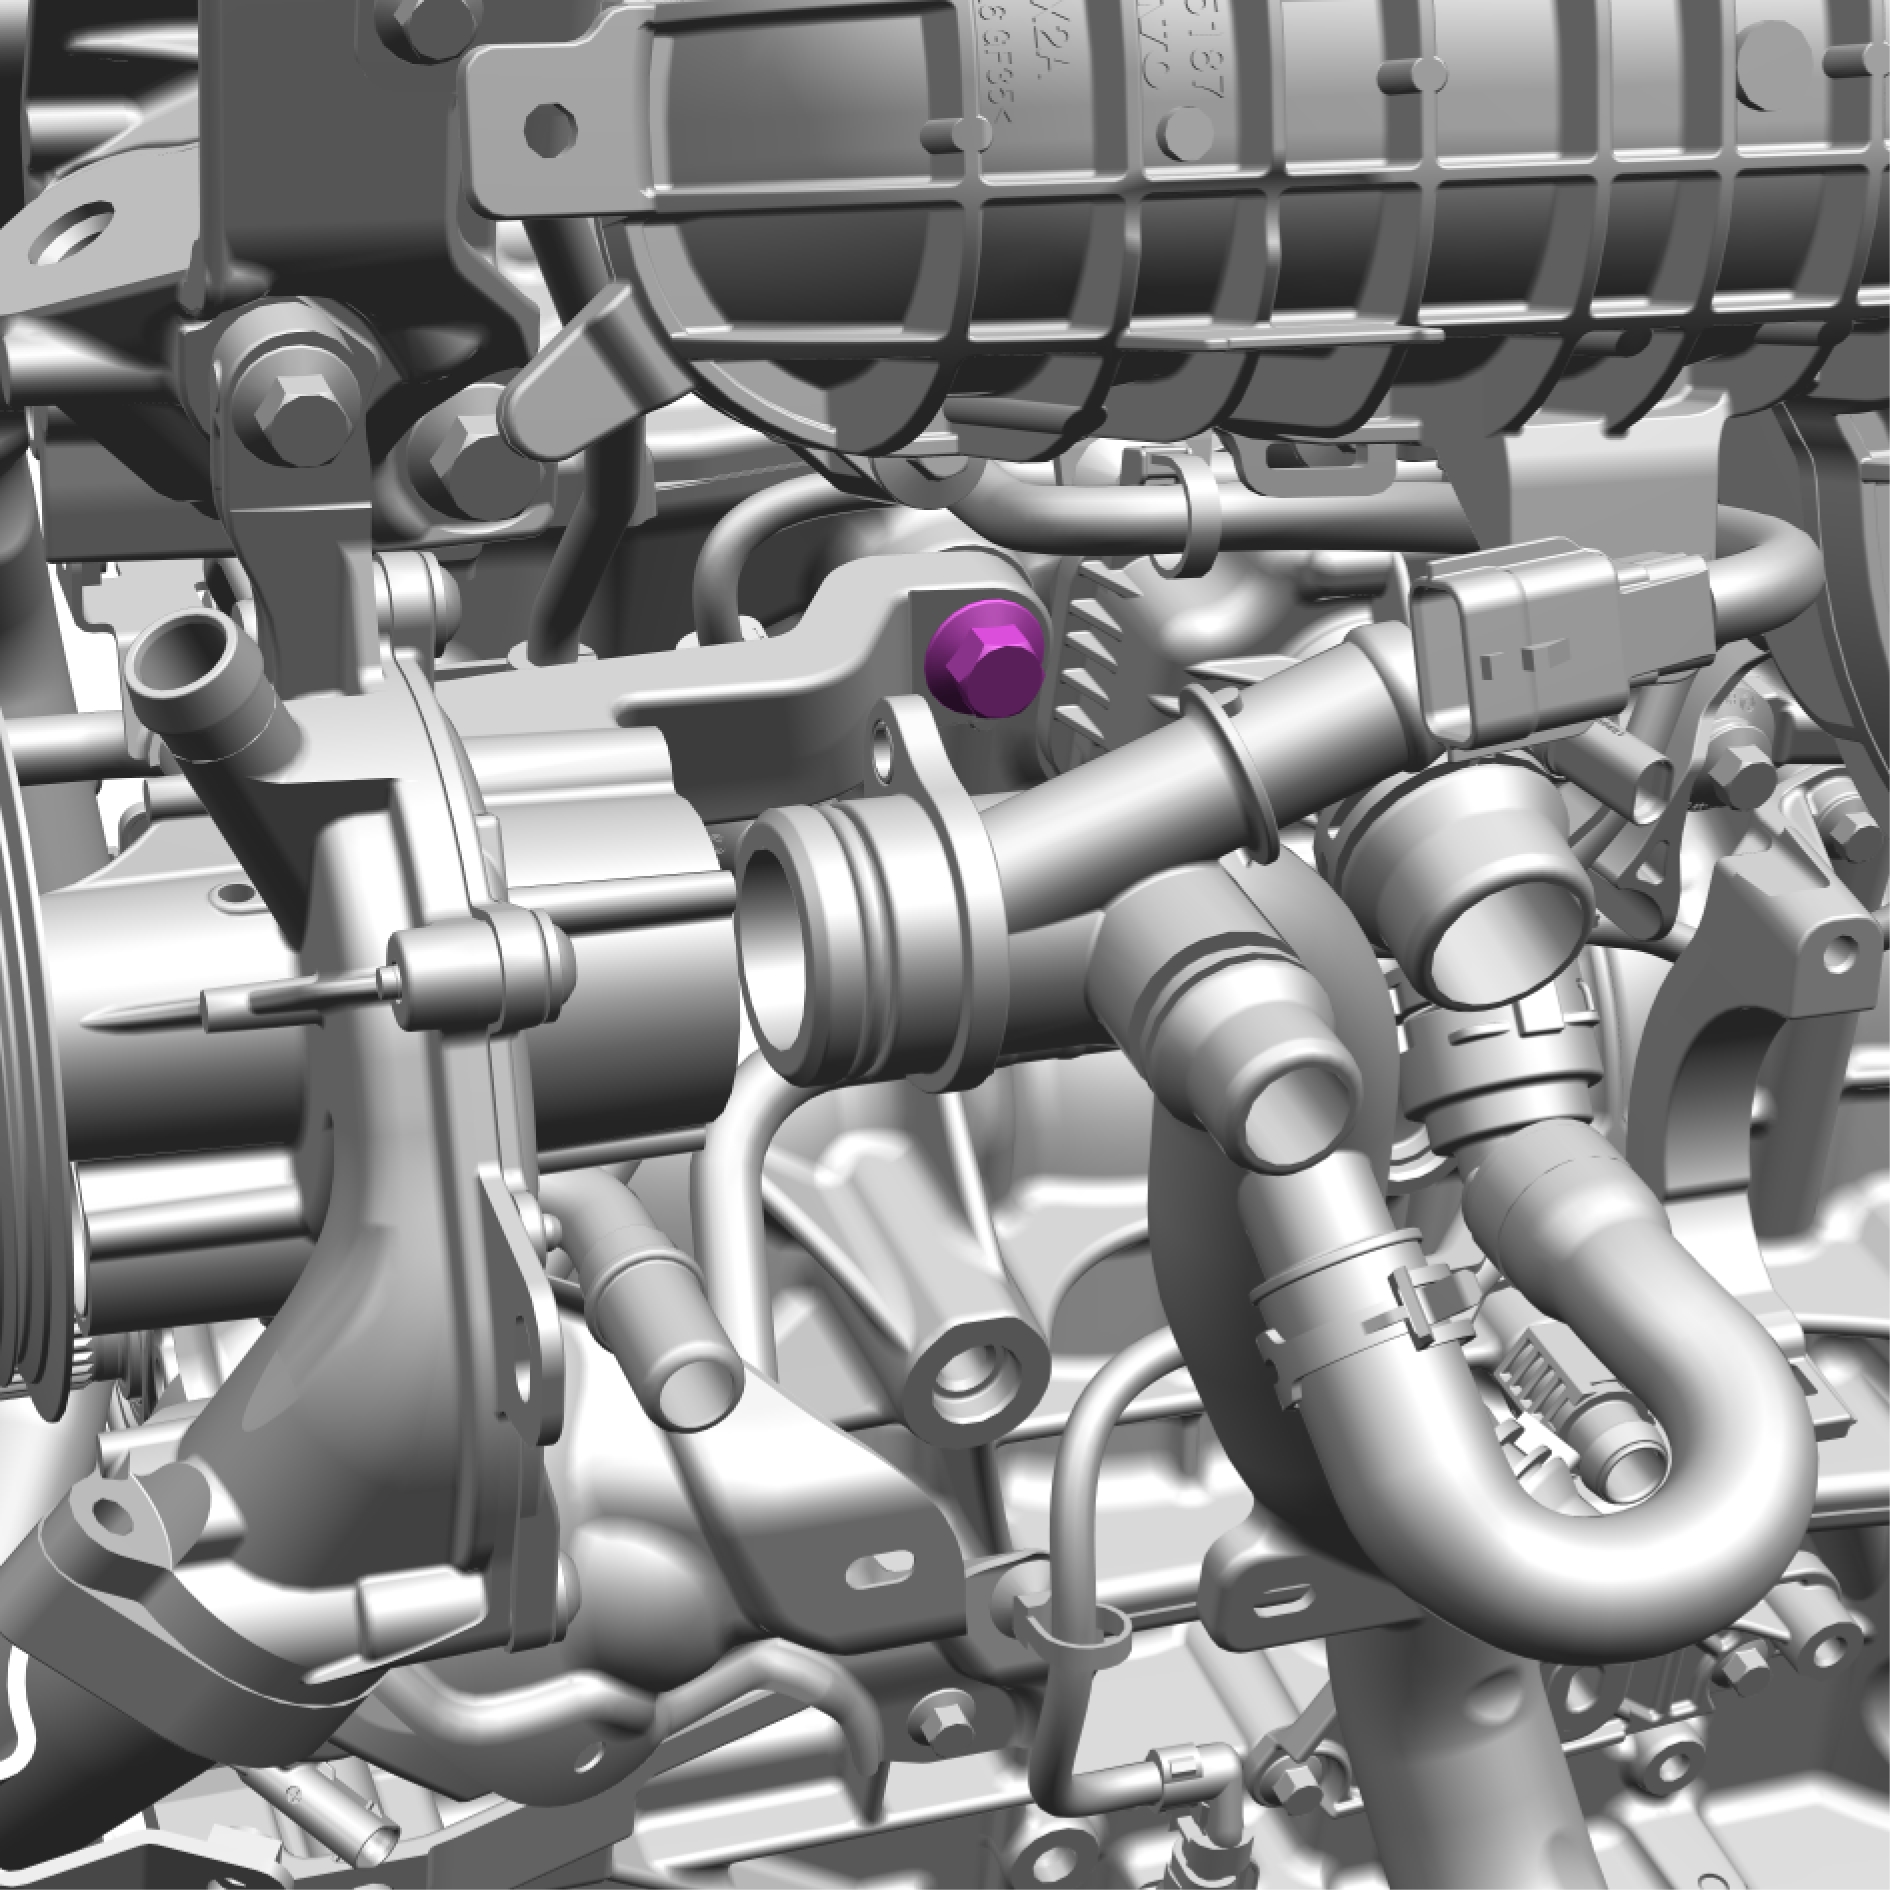
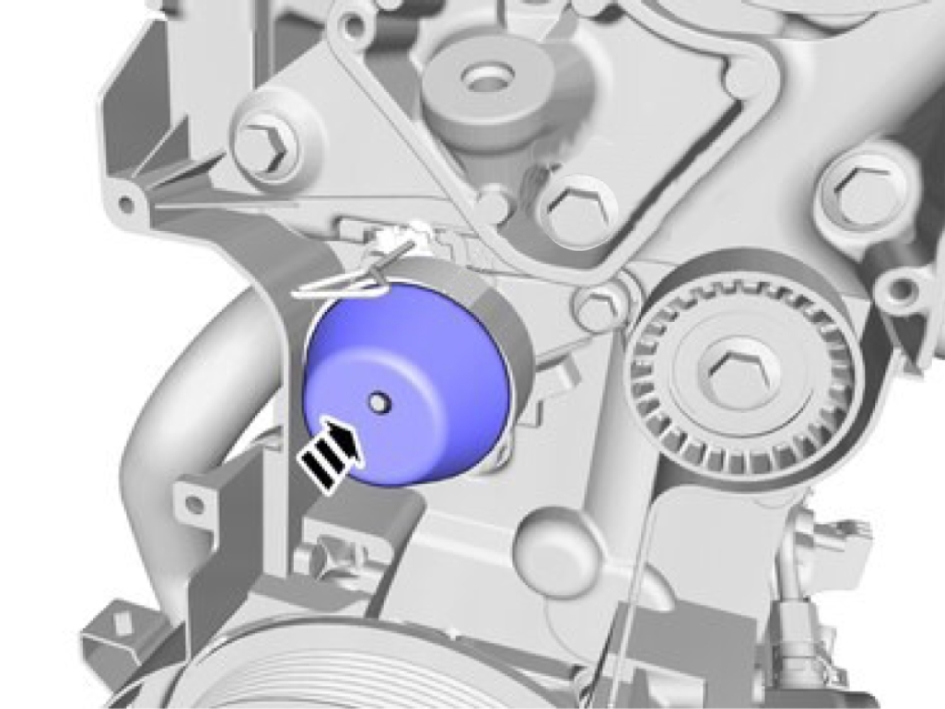
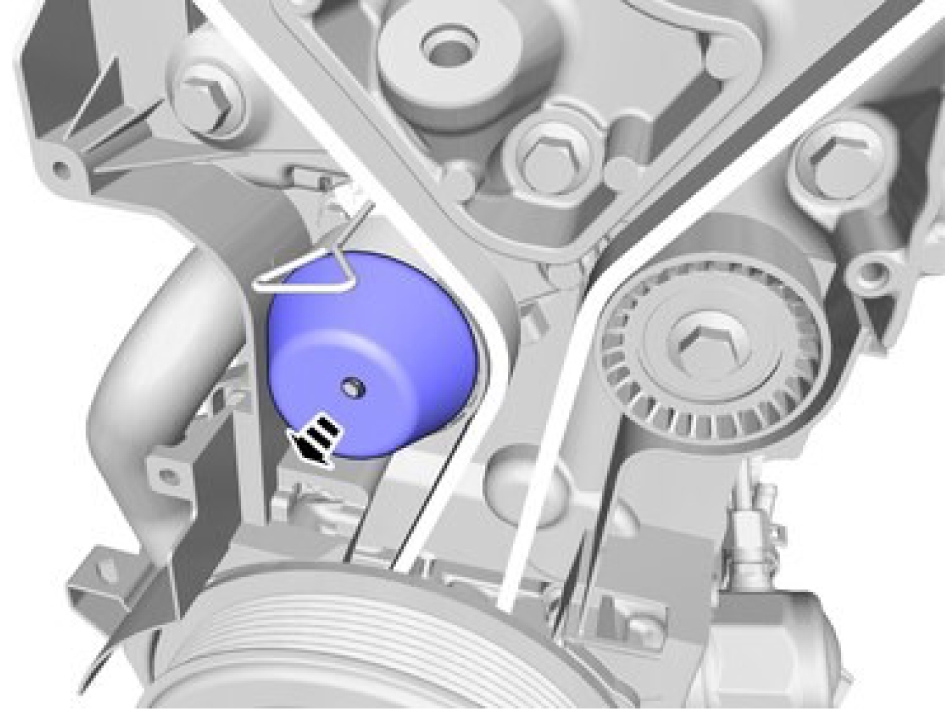
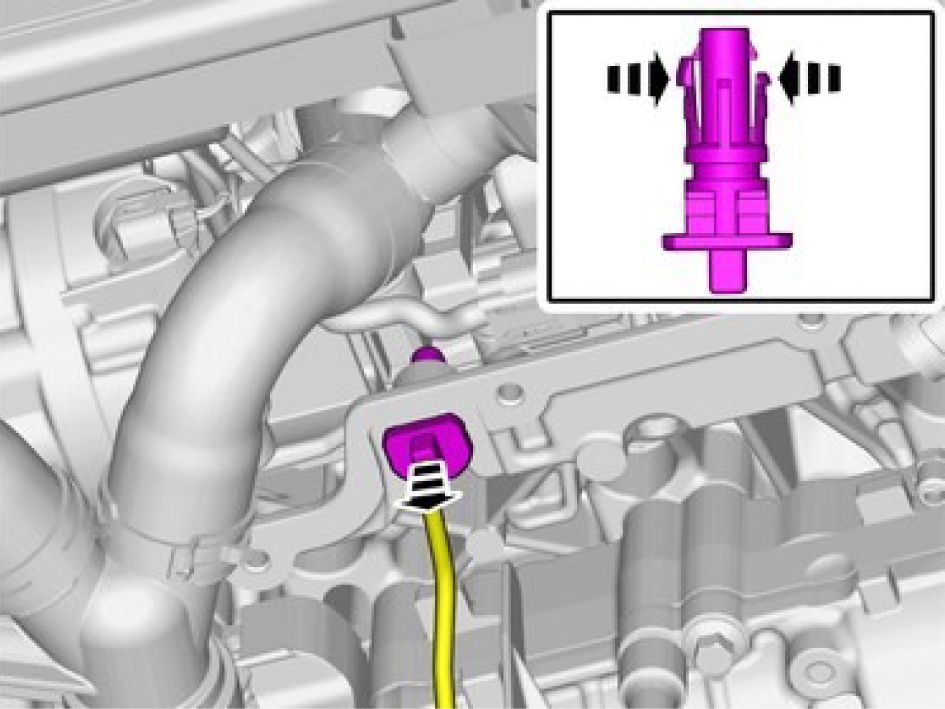
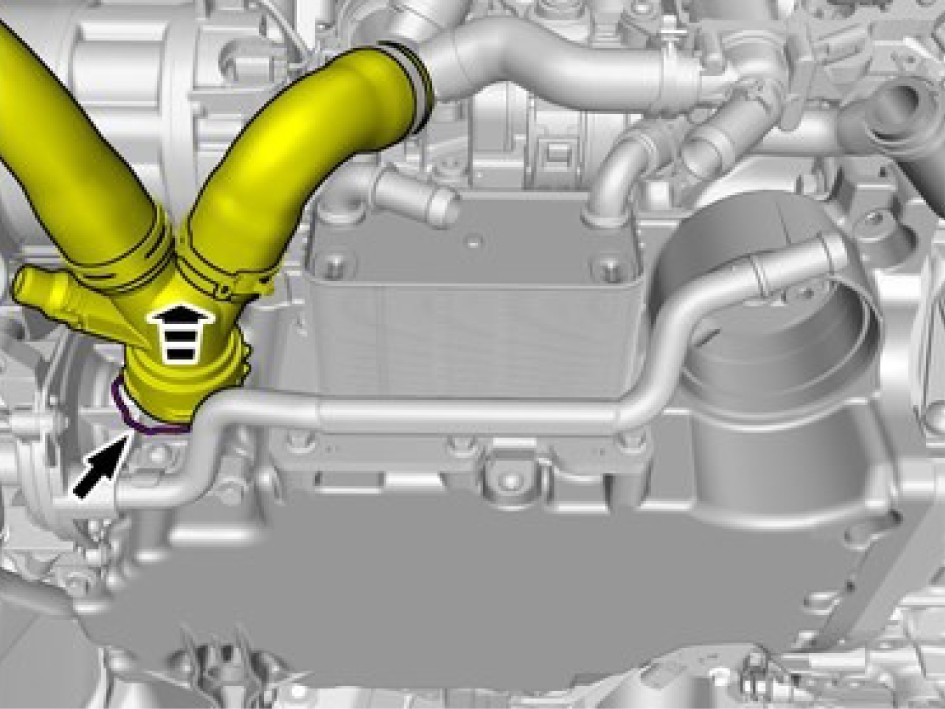
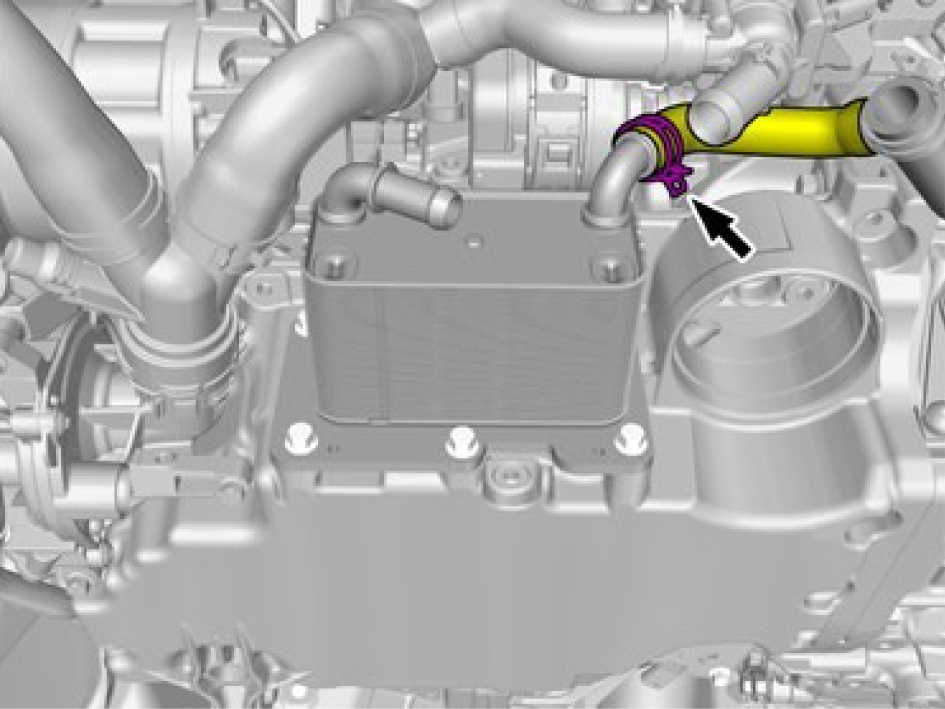
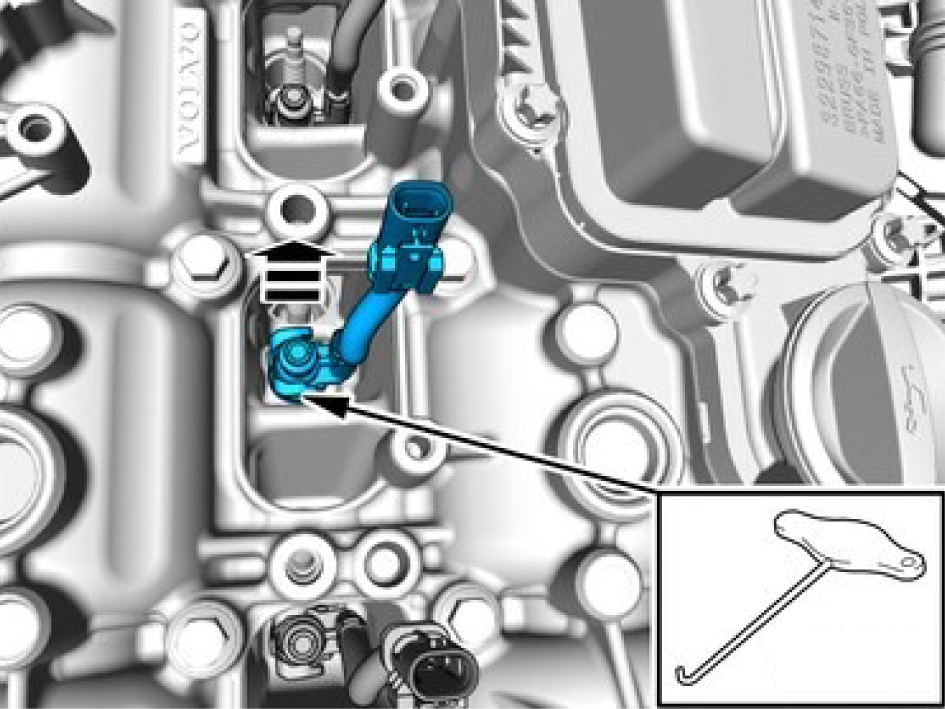
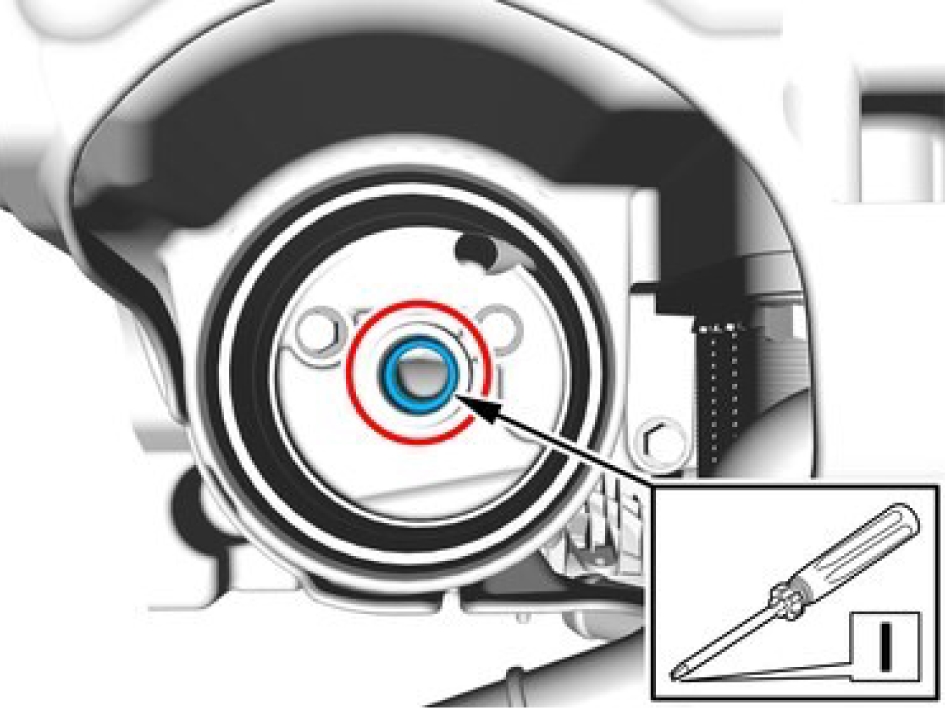
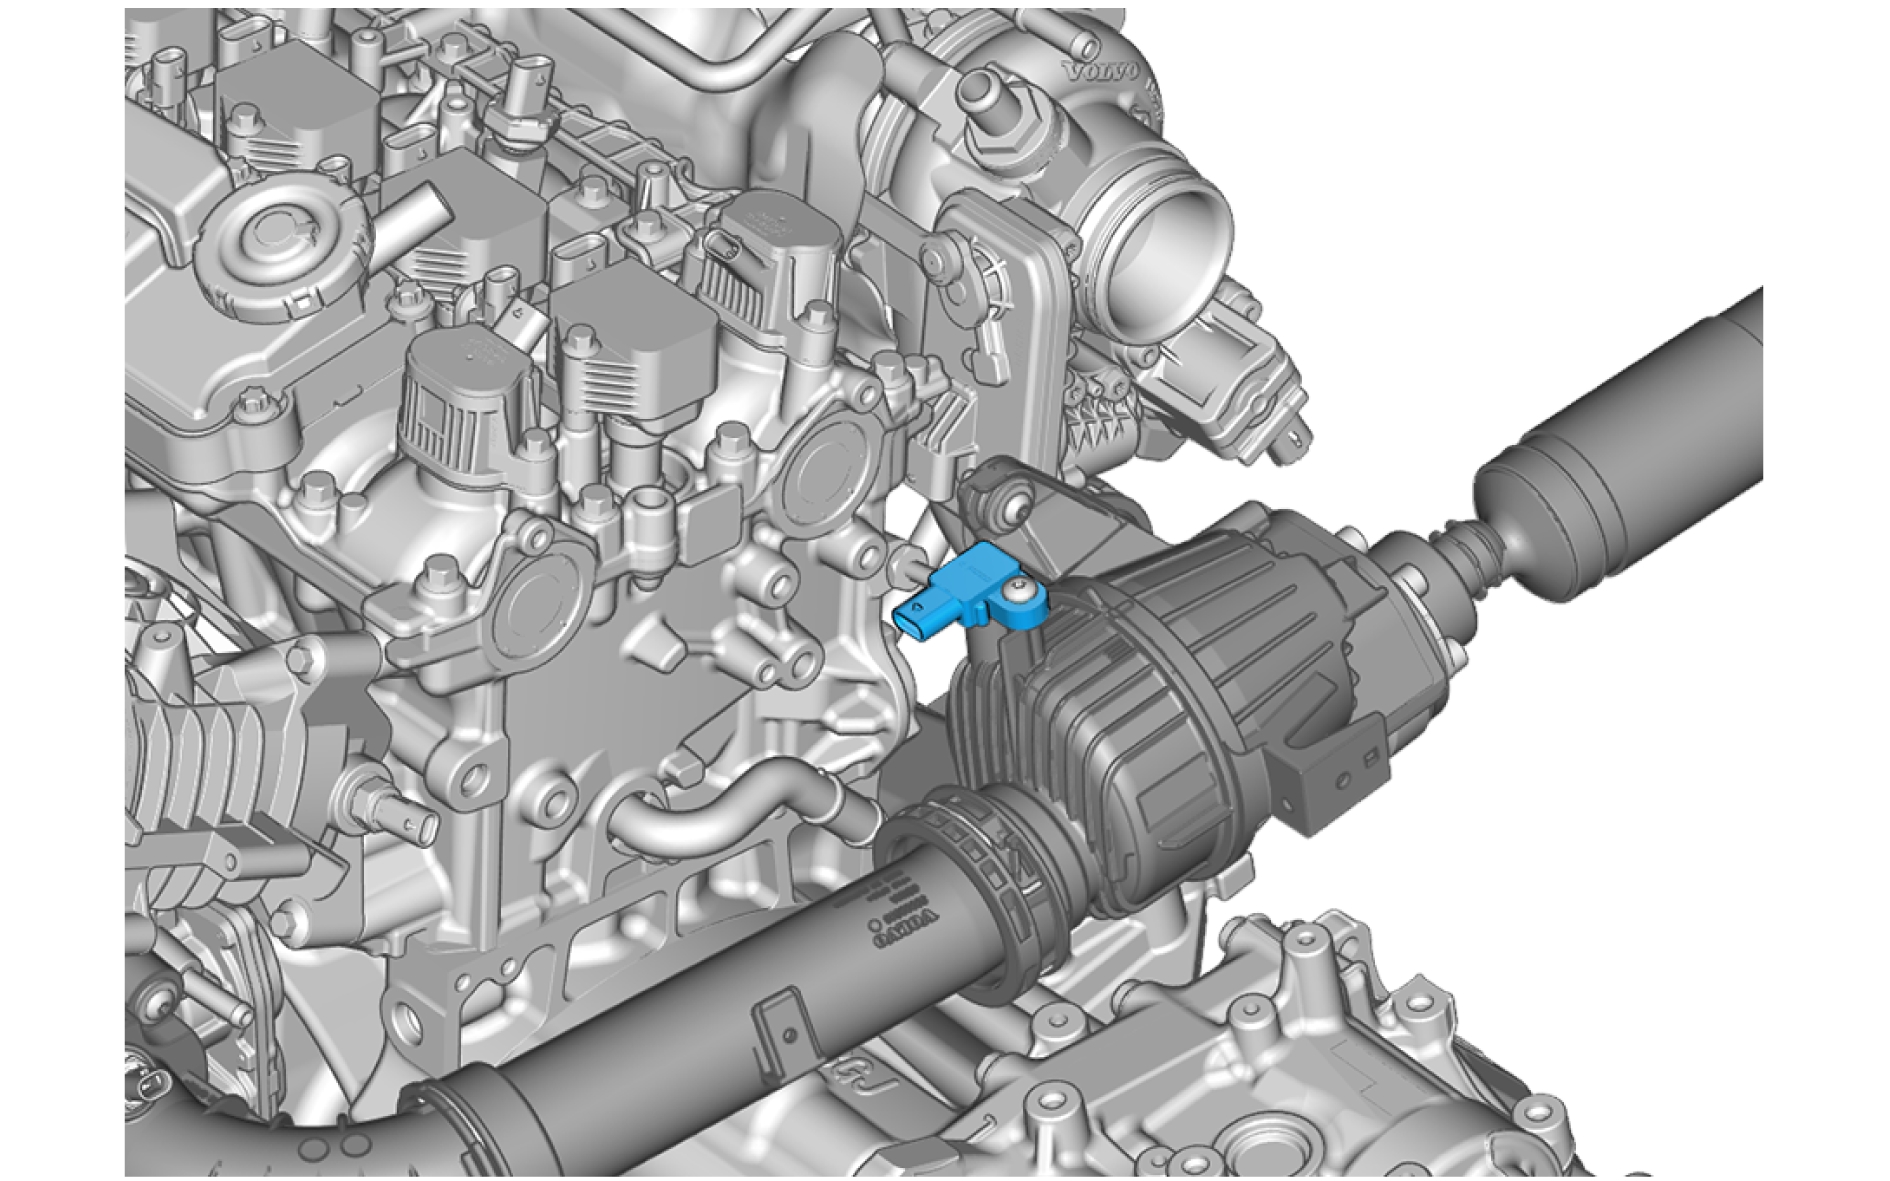
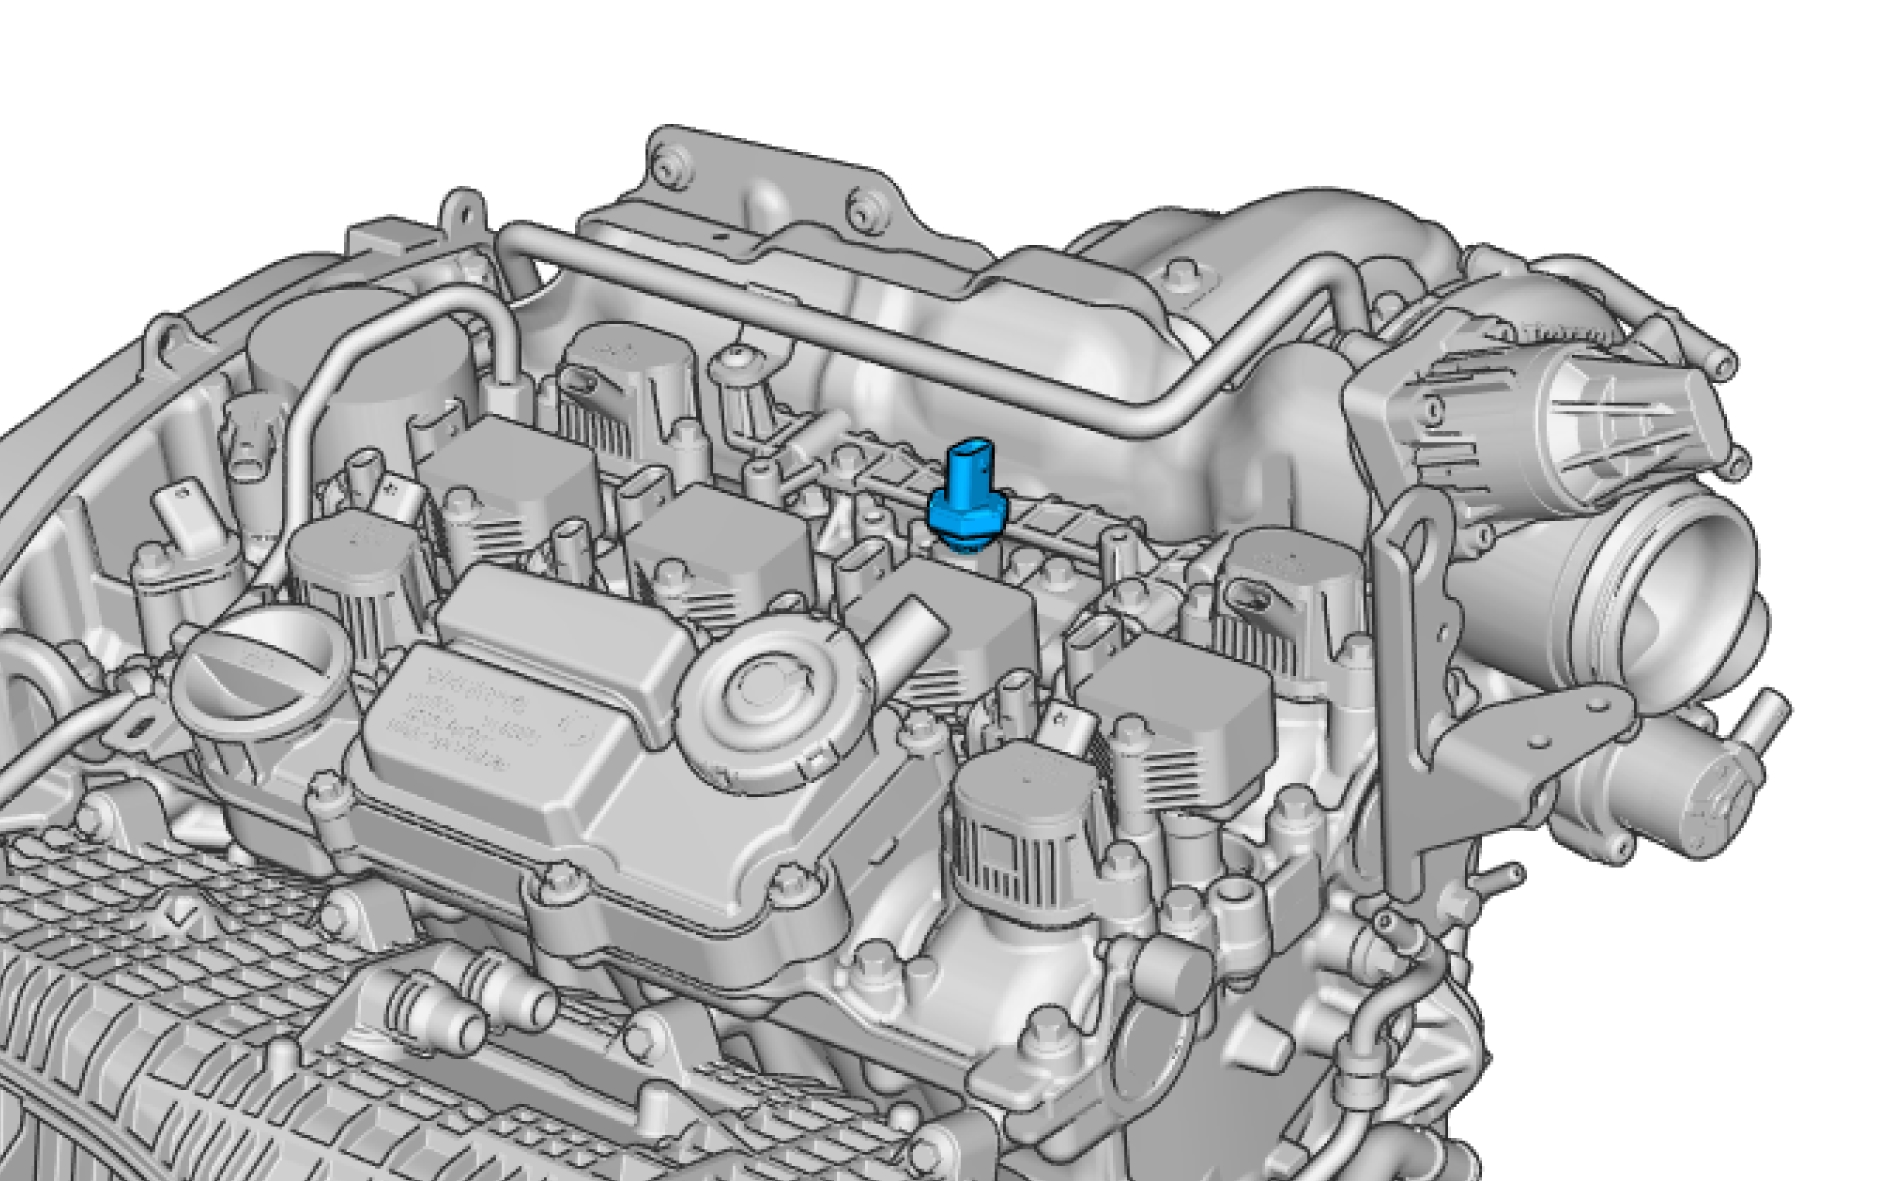
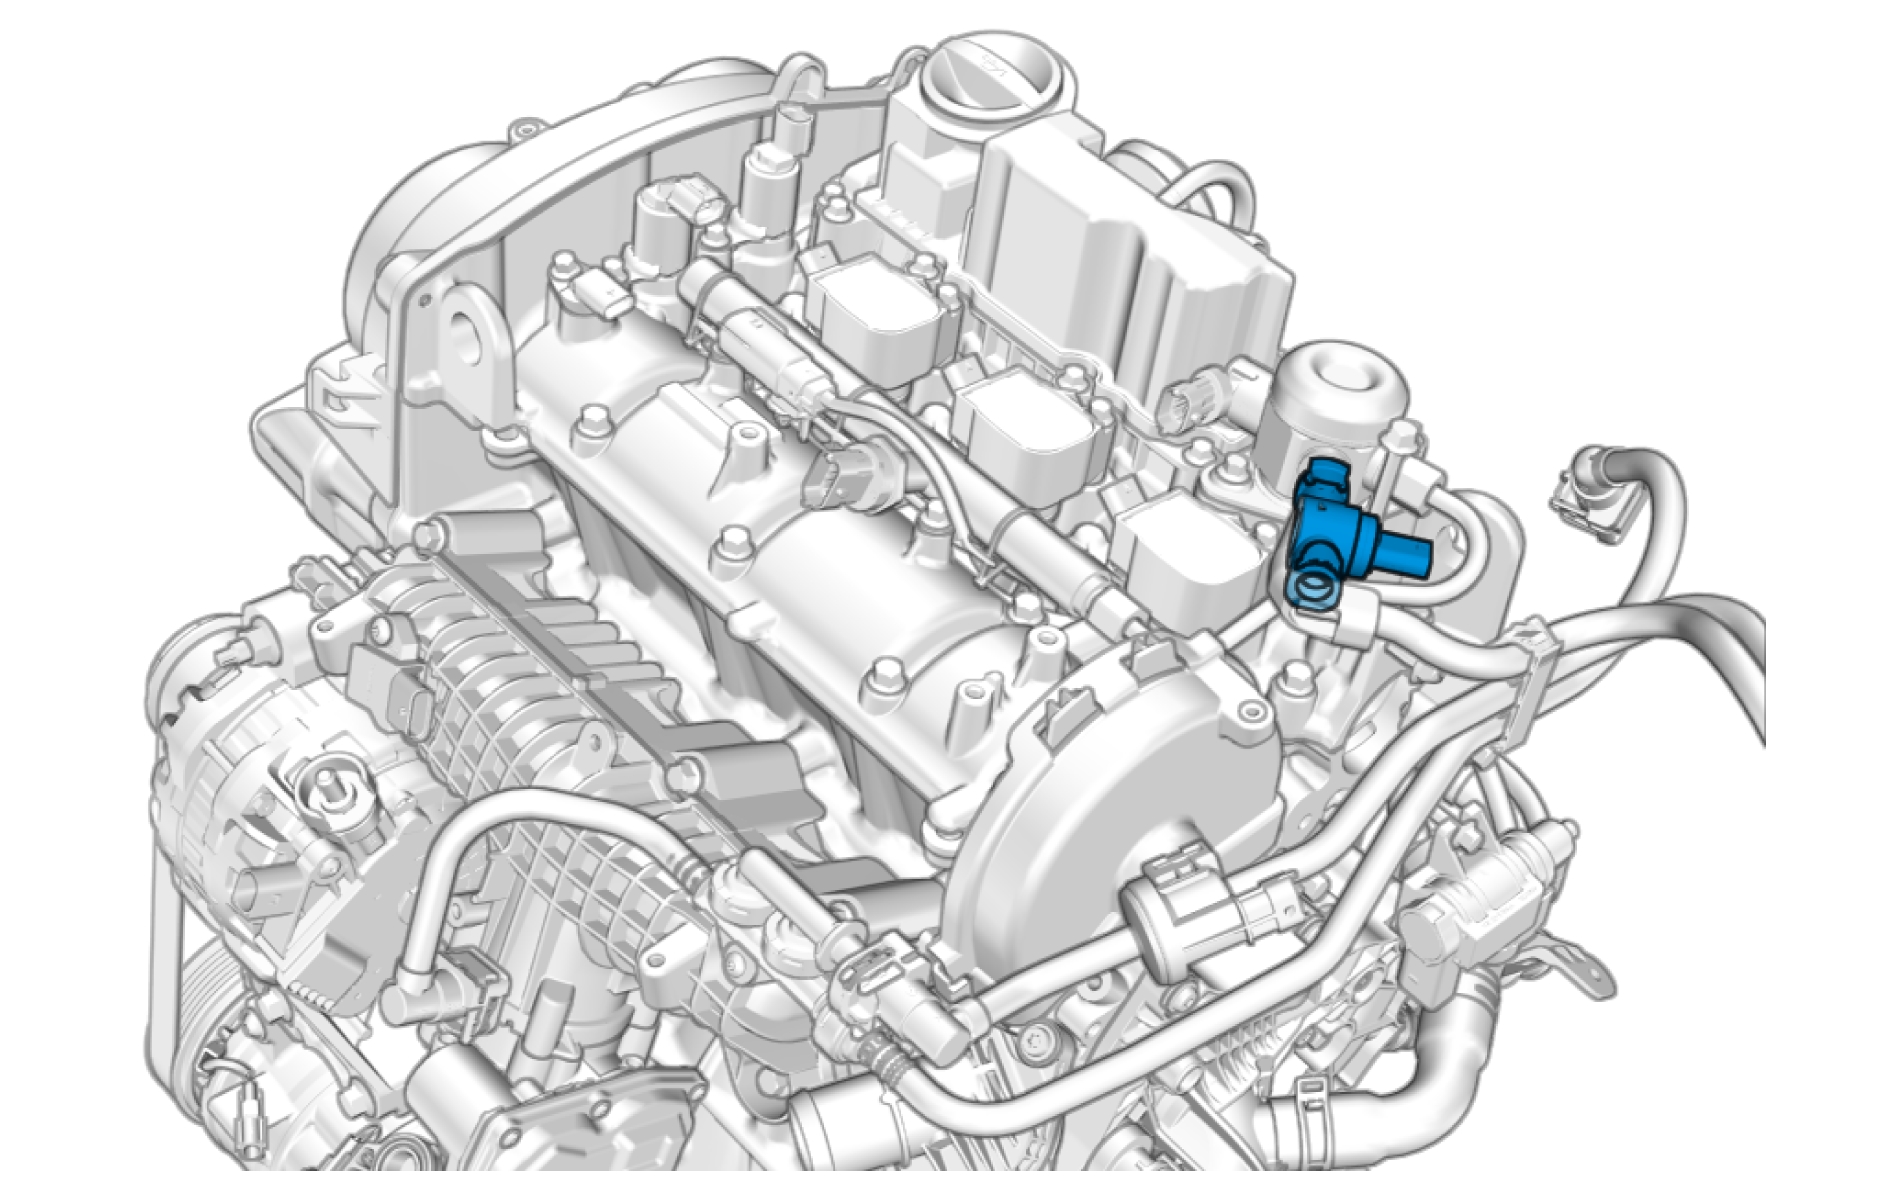
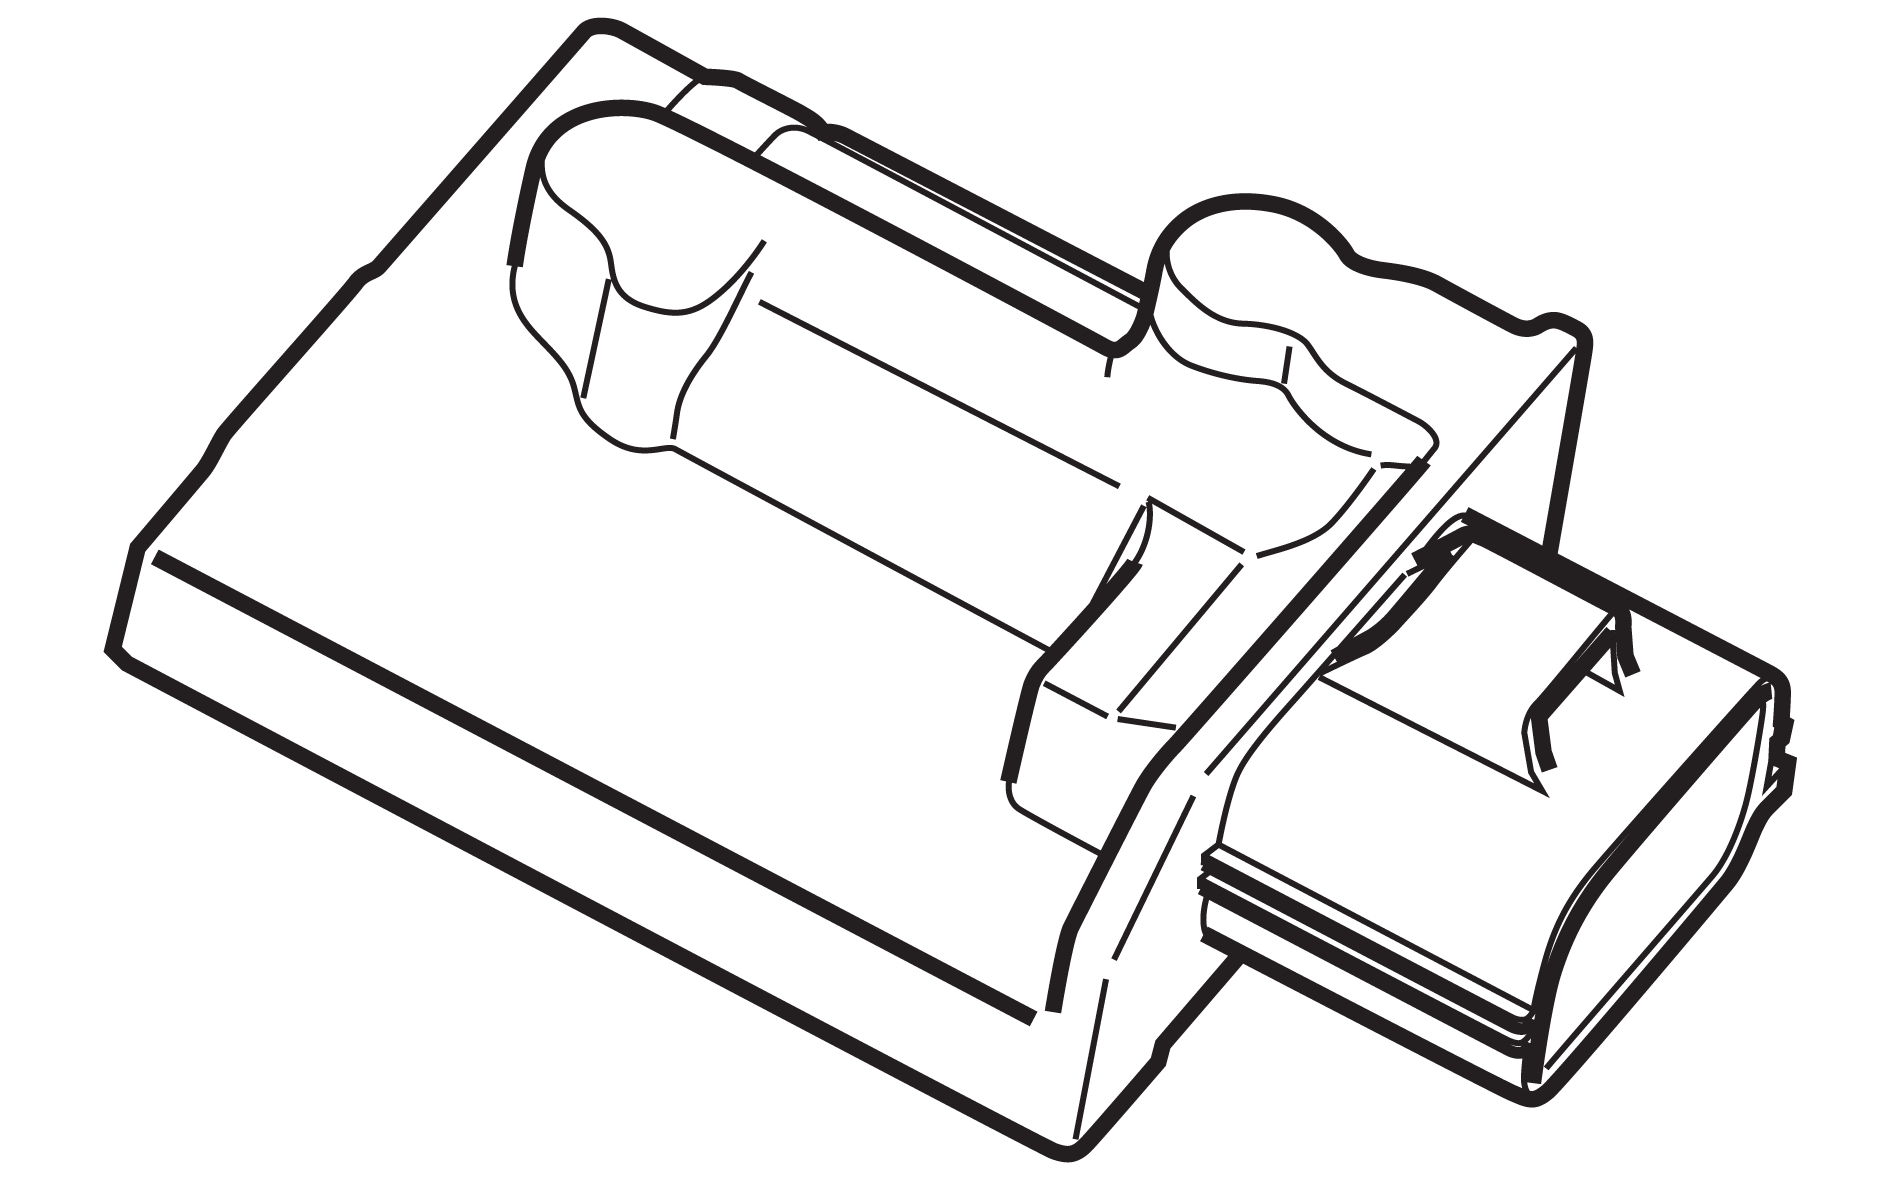
Knock sensor, replace
Remove intake manifold, refer to:
Induction pipe, replace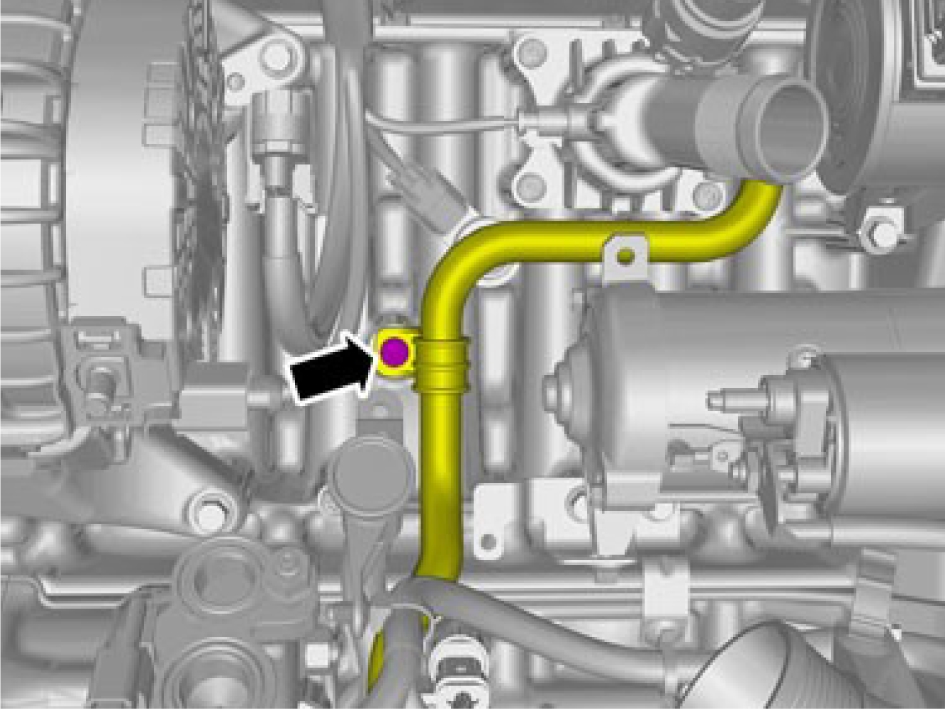
Remove the screw.
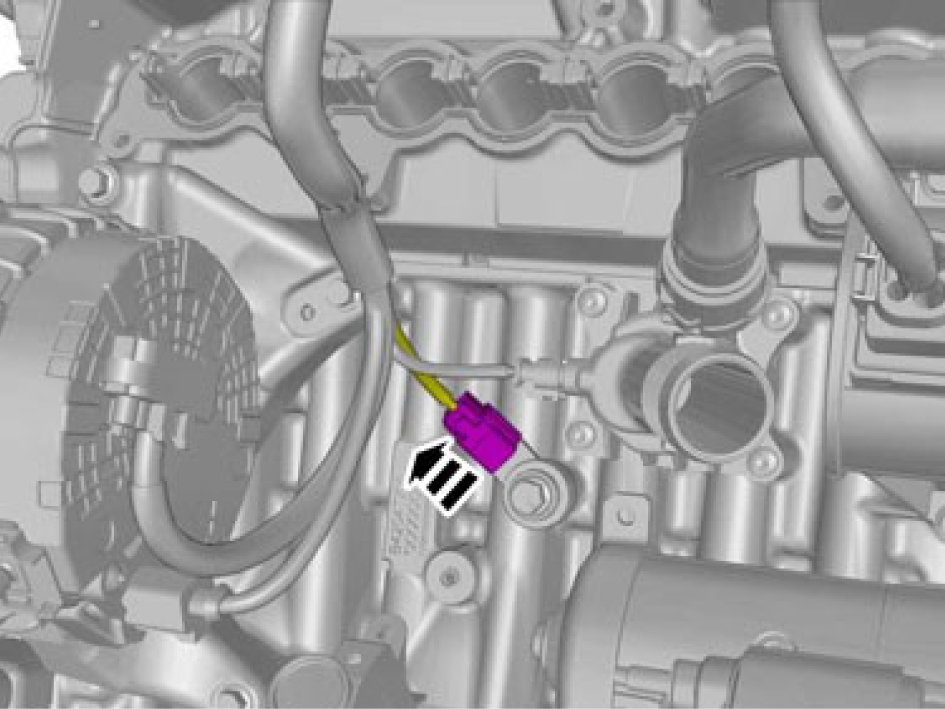
Disconnect the connector.
Note the position of the component before removal.
Remove the screw.
Installation
Install the sensor at the correct position
Install the screw, torque: 20 Nm
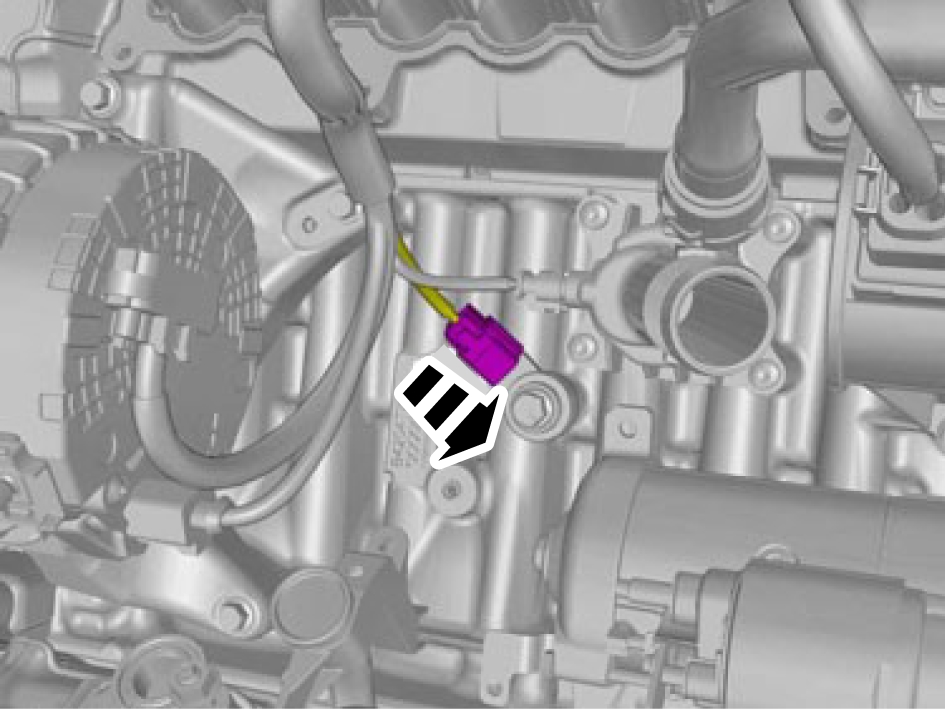
Install the connector.
Fold back the pipe.
Install the screw M7, torque: 17 Nm
Install the intake manifold, refer to:
Induction pipe, replaceEVAP Purge Pump (EPP) - P107
Description
The EVAP Purge Pump (EPP) consists of a plastic housing containing a brushless direct current motor and a radial centrifugal pump, along with internal electronics. The pump transports vapors from the fuel tank to the engine. On engines with low vacuum inside the intake manifold, sufficient purging of the active carbon canister is not possible. The EPP enables purging of vapors by creating a delta pressure between the intake manifold of the engine and the active carbon canister. Vapors enter at the gas inlet of the EPP and are ejected through the gas outlet as the impeller within the pump is rotating. Thus, purging the vapors from the fuel tank.
Diagnostic information
The EVAP Purge Pump (EPP) has a simplified built-in diagnostic system, which monitors a limited number of errors. The Engine Control Module (ECM) monitors the EPP, sets DTCs and has readable parameters for it.
Connection and communication
The EVAP Purge Pump (EPP) is a LIN-slave to the Engine Control Module (ECM). The fuse box, engine, contains the fuse which protects the electric supply circuit from current overload.
Component location
Pin-out
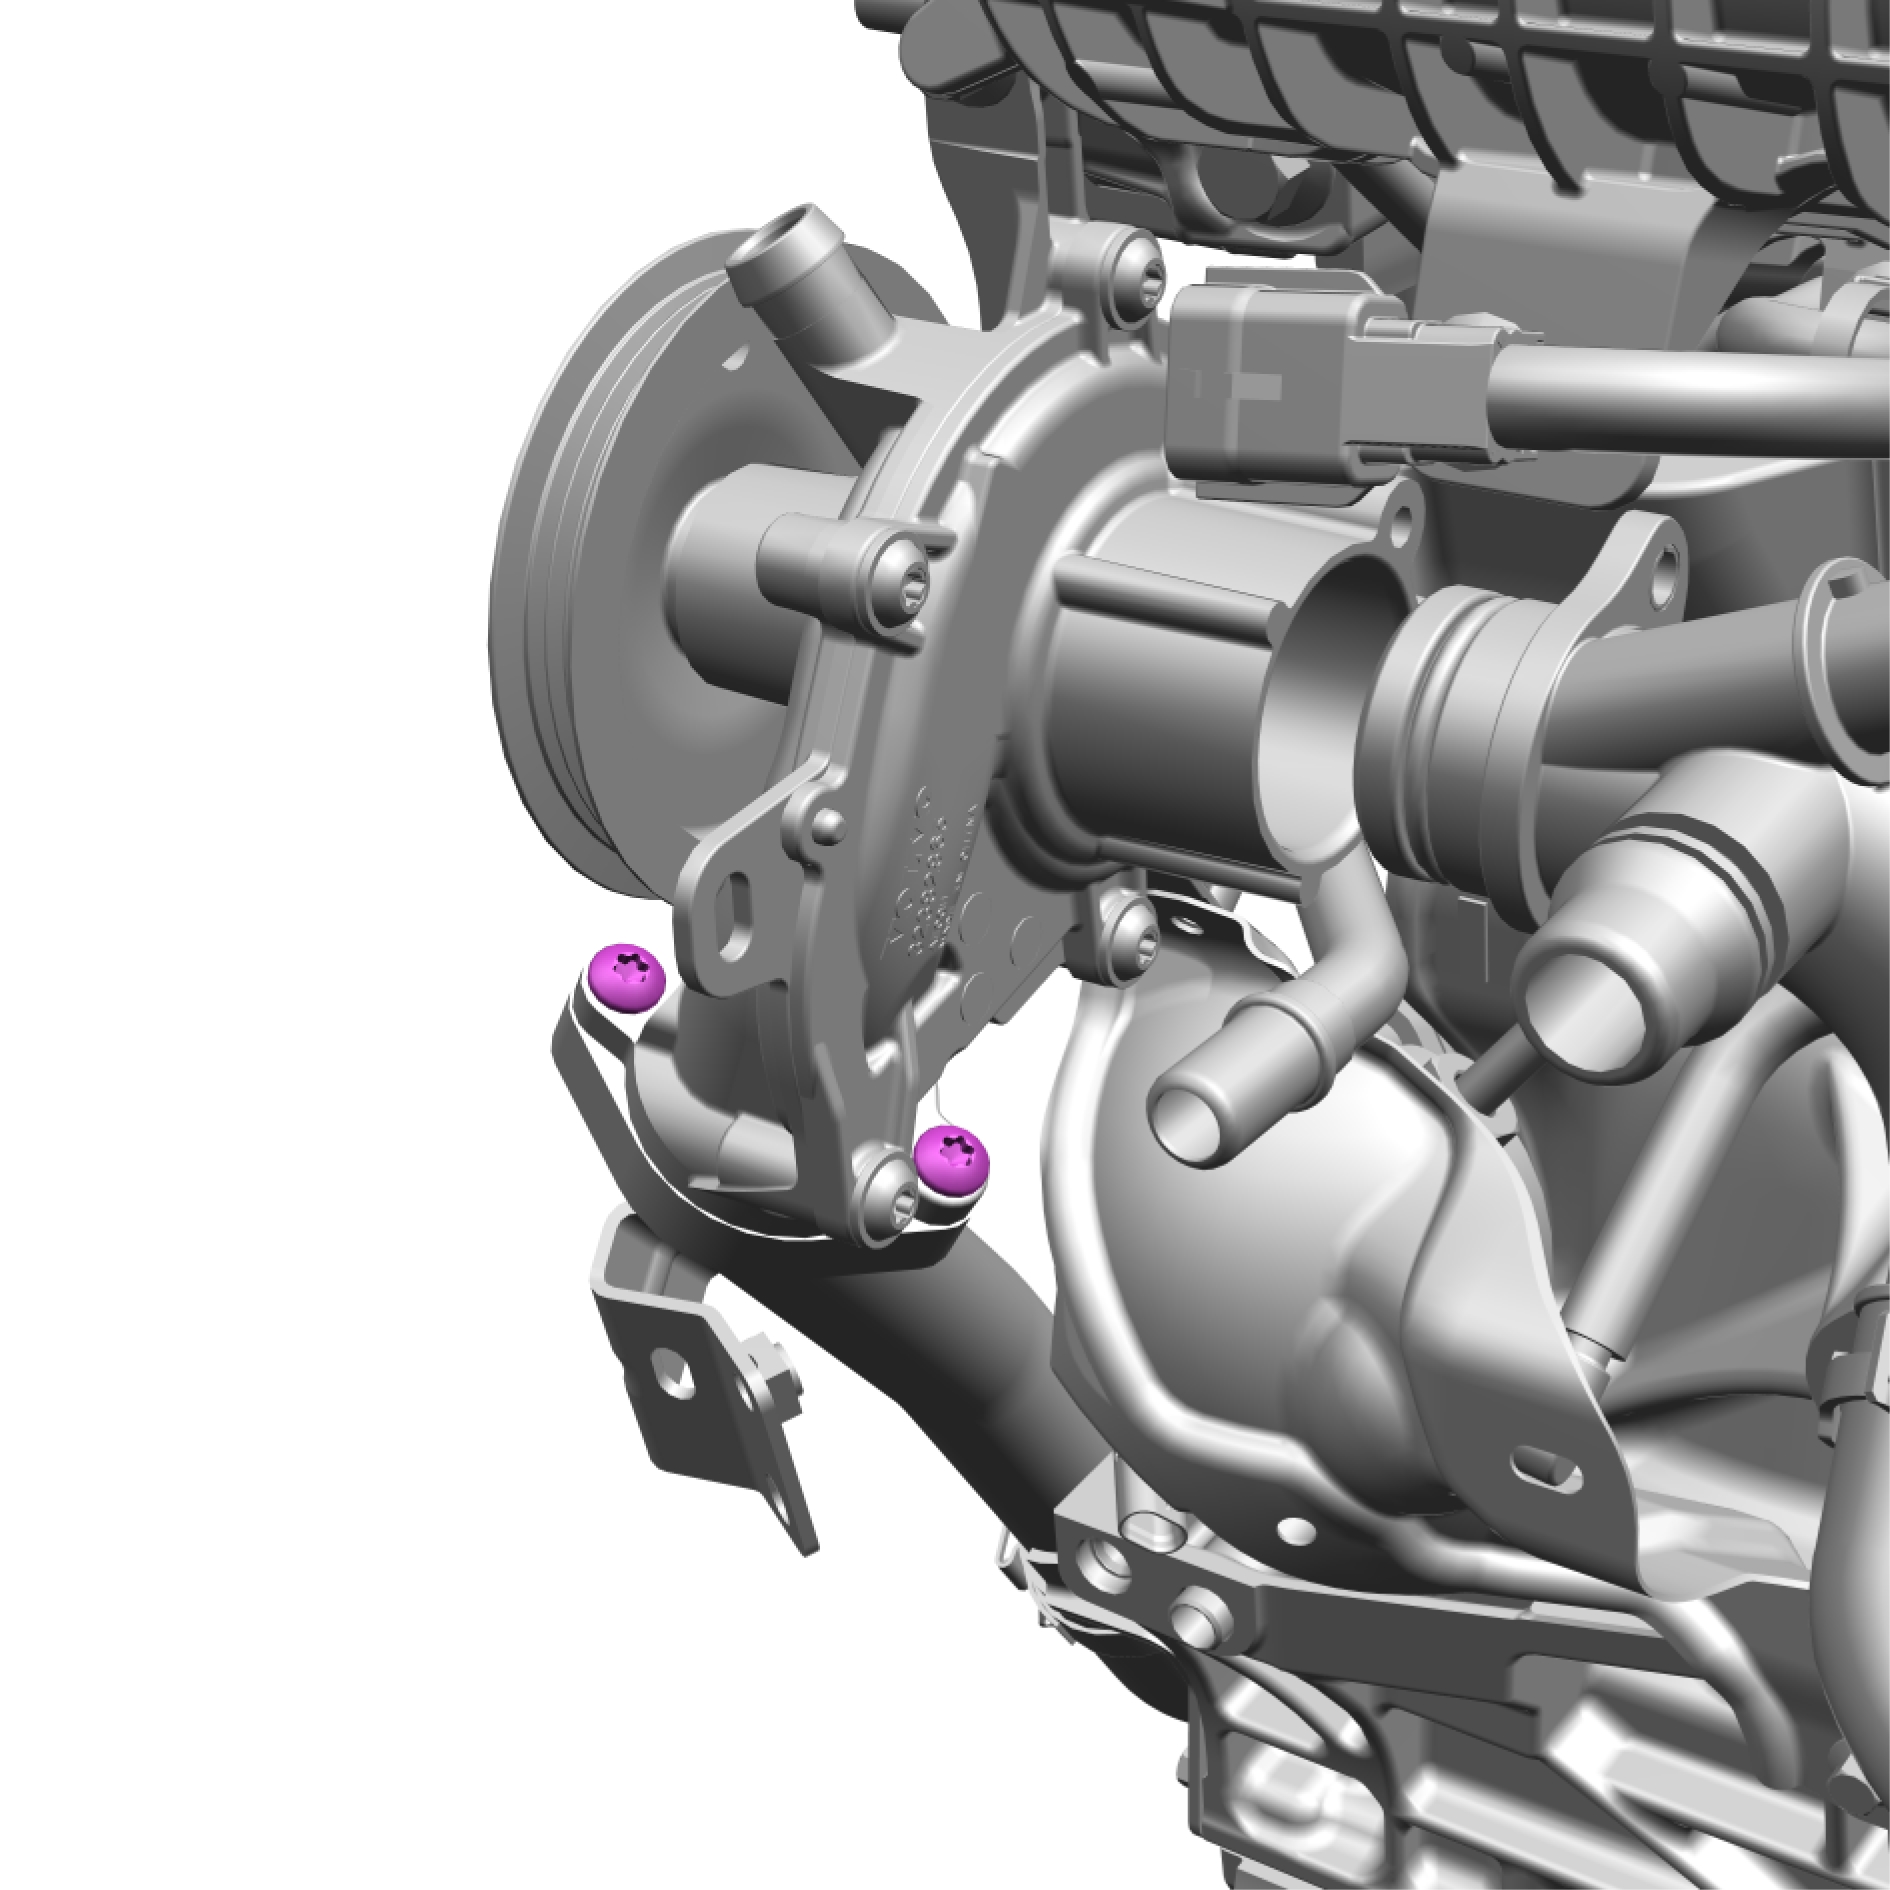
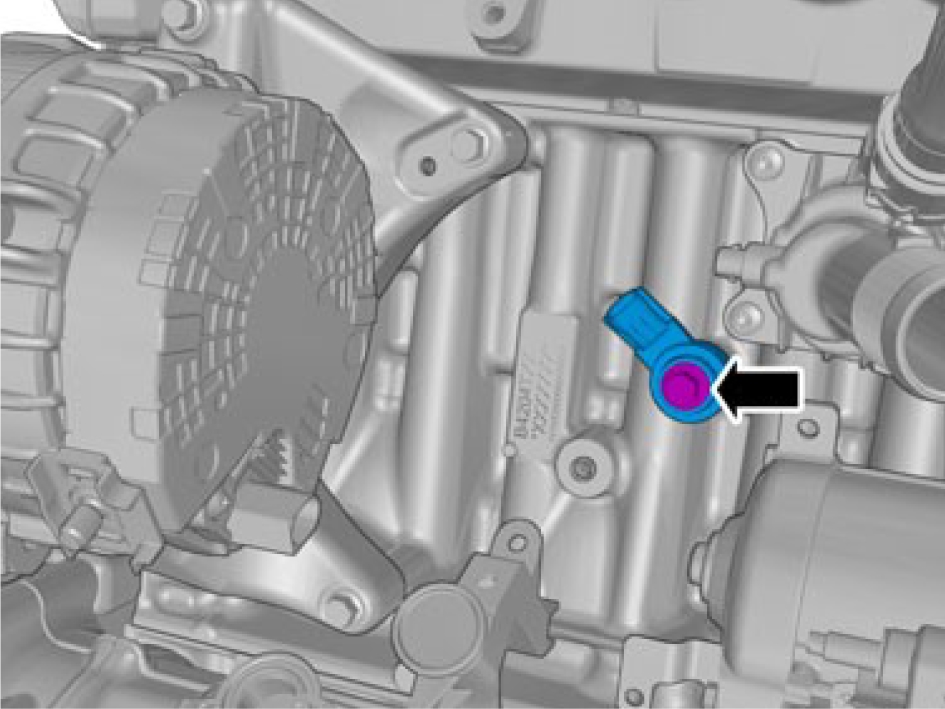
Knock sensor, replace
Removal
Note the position of the sensors.
Disconnect the connectors.
Remove the sensors.
Installation
Make sure that the component is positioned correctly.
Install the sensors, torque: 20 Nm
Connect the connectors.
Crankshaft position sensor, replace
Removal
Remove the cover.
Disconnect the connector.

Remove the nut and the sensor.
Installation
Install the sensor M6, torque: 10 Nm
Connect the connector.
Install the sensor cover M6, torque: 10 Nm
Fuel injector - V102

Description
The fuel injector sprays fuel into the combustion chamber of the engine.
The Engine Control Module (ECM) controls the fuel injectors regarding injection timing and injection length. The fuel injectors' capacity differs between the different engine performance levels. The maximum flow (static flow rate) differs between the fuel injectors. The value varies between about 20 cm³/s and 17.5 cm³/s. The values apply at a fuel pressure of 10 MPa (100 bar).
The fuel quantity and thus the injection time at idle varies depending on alternator and A/C compressor load, but is within the range of 0.9 – 1.5 ms with a fuel pressure between 5 – 15 MPa (50 – 150 bar). At maximum power output the injection time is 6 – 7 ms and the fuel pressure is 20 MPa (200 bar).
The fuel injectors are high-pressure, multi-hole, solenoid powered injectors. The function of the fuel injector is to attain an optimized mixture of fuel and air in the combustion chamber. When the engine runs homogeneously, fuel is injected early during the inlet stroke (piston on its way down), which means that the spray has time to homogenize with the air before the ignition takes place.
Diagnostic information
The fuel injector does not have a built-in diagnostic system. The Engine Control Module (ECM) monitors the fuel injector, sets DTCs and has readable parameters for it.
Connection and communication
The fuel injector is directly connected to the Engine Control Module (ECM).
Component location
Pin-out
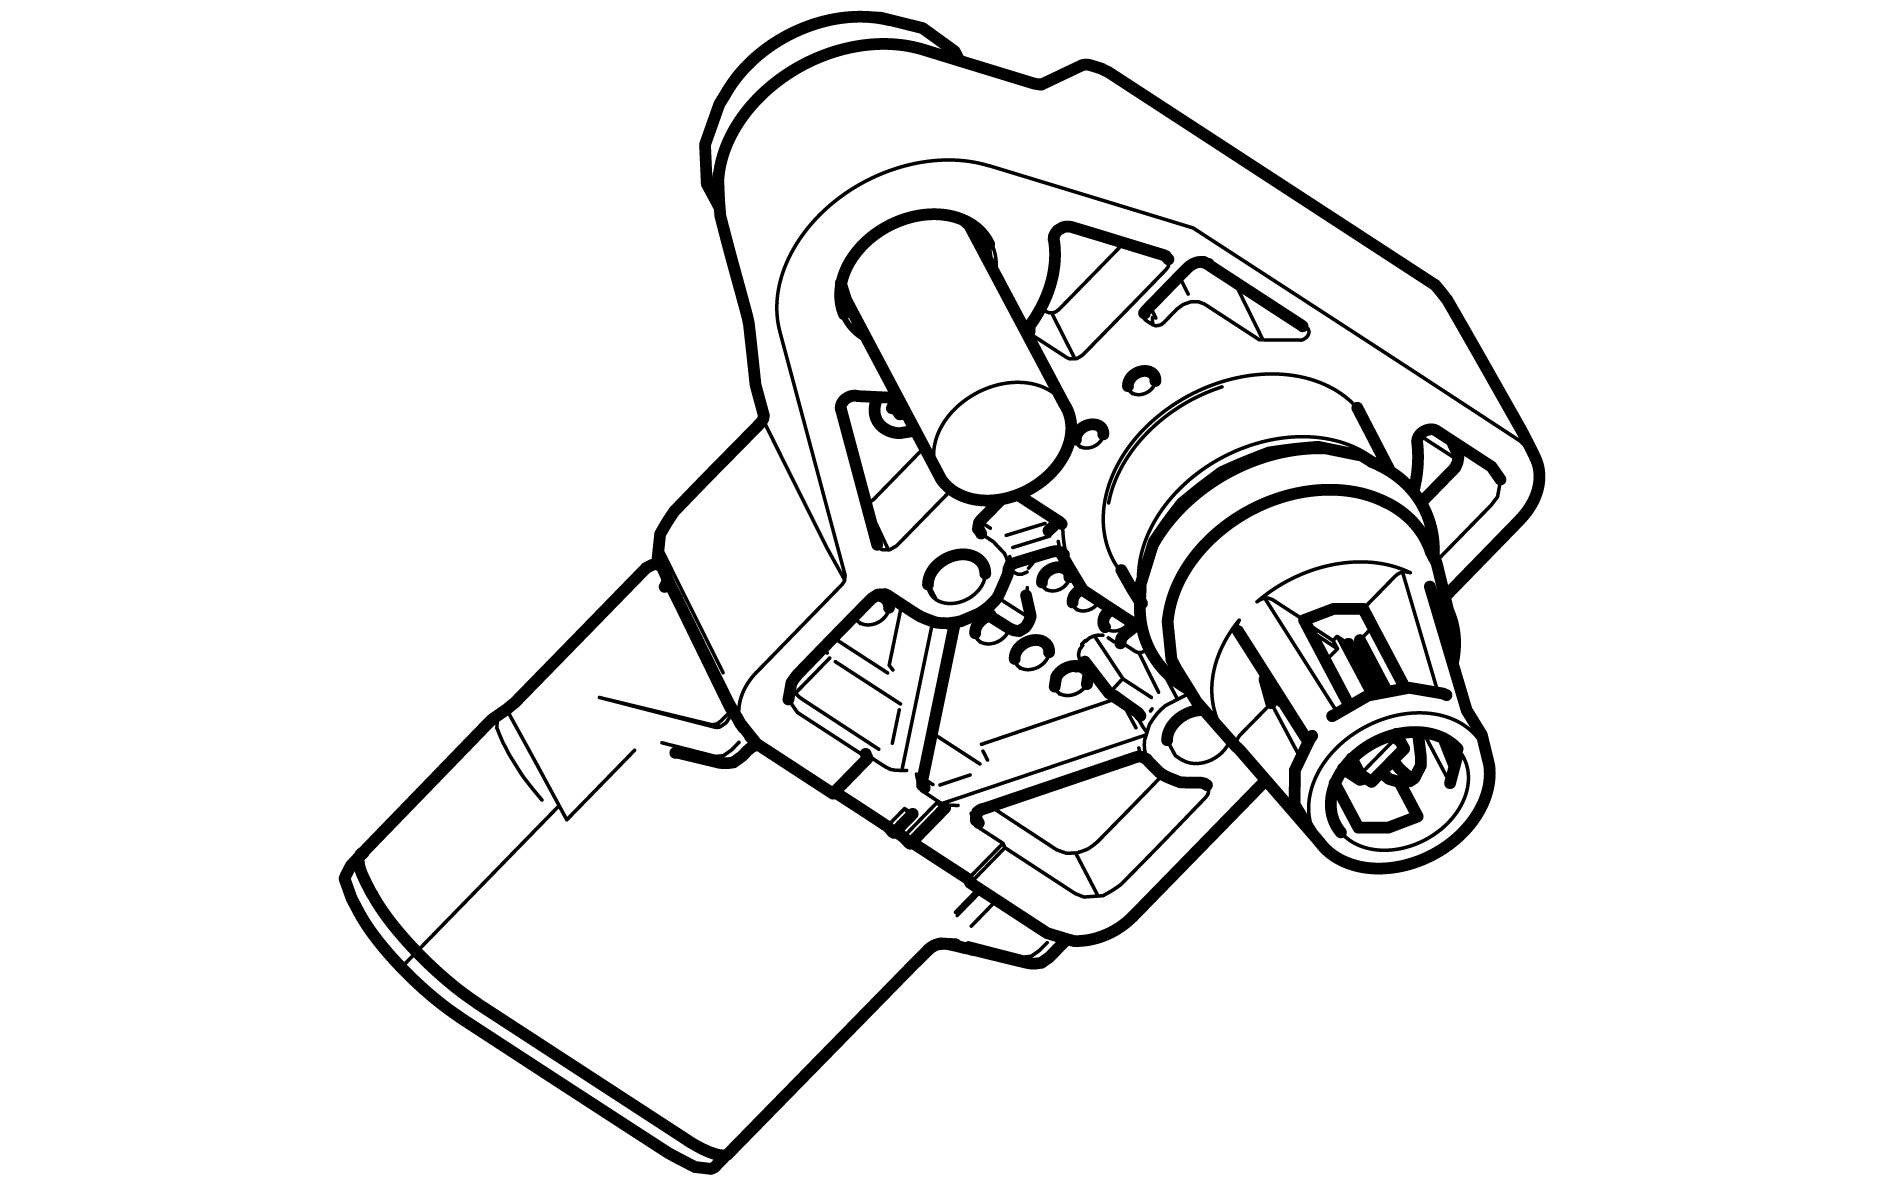
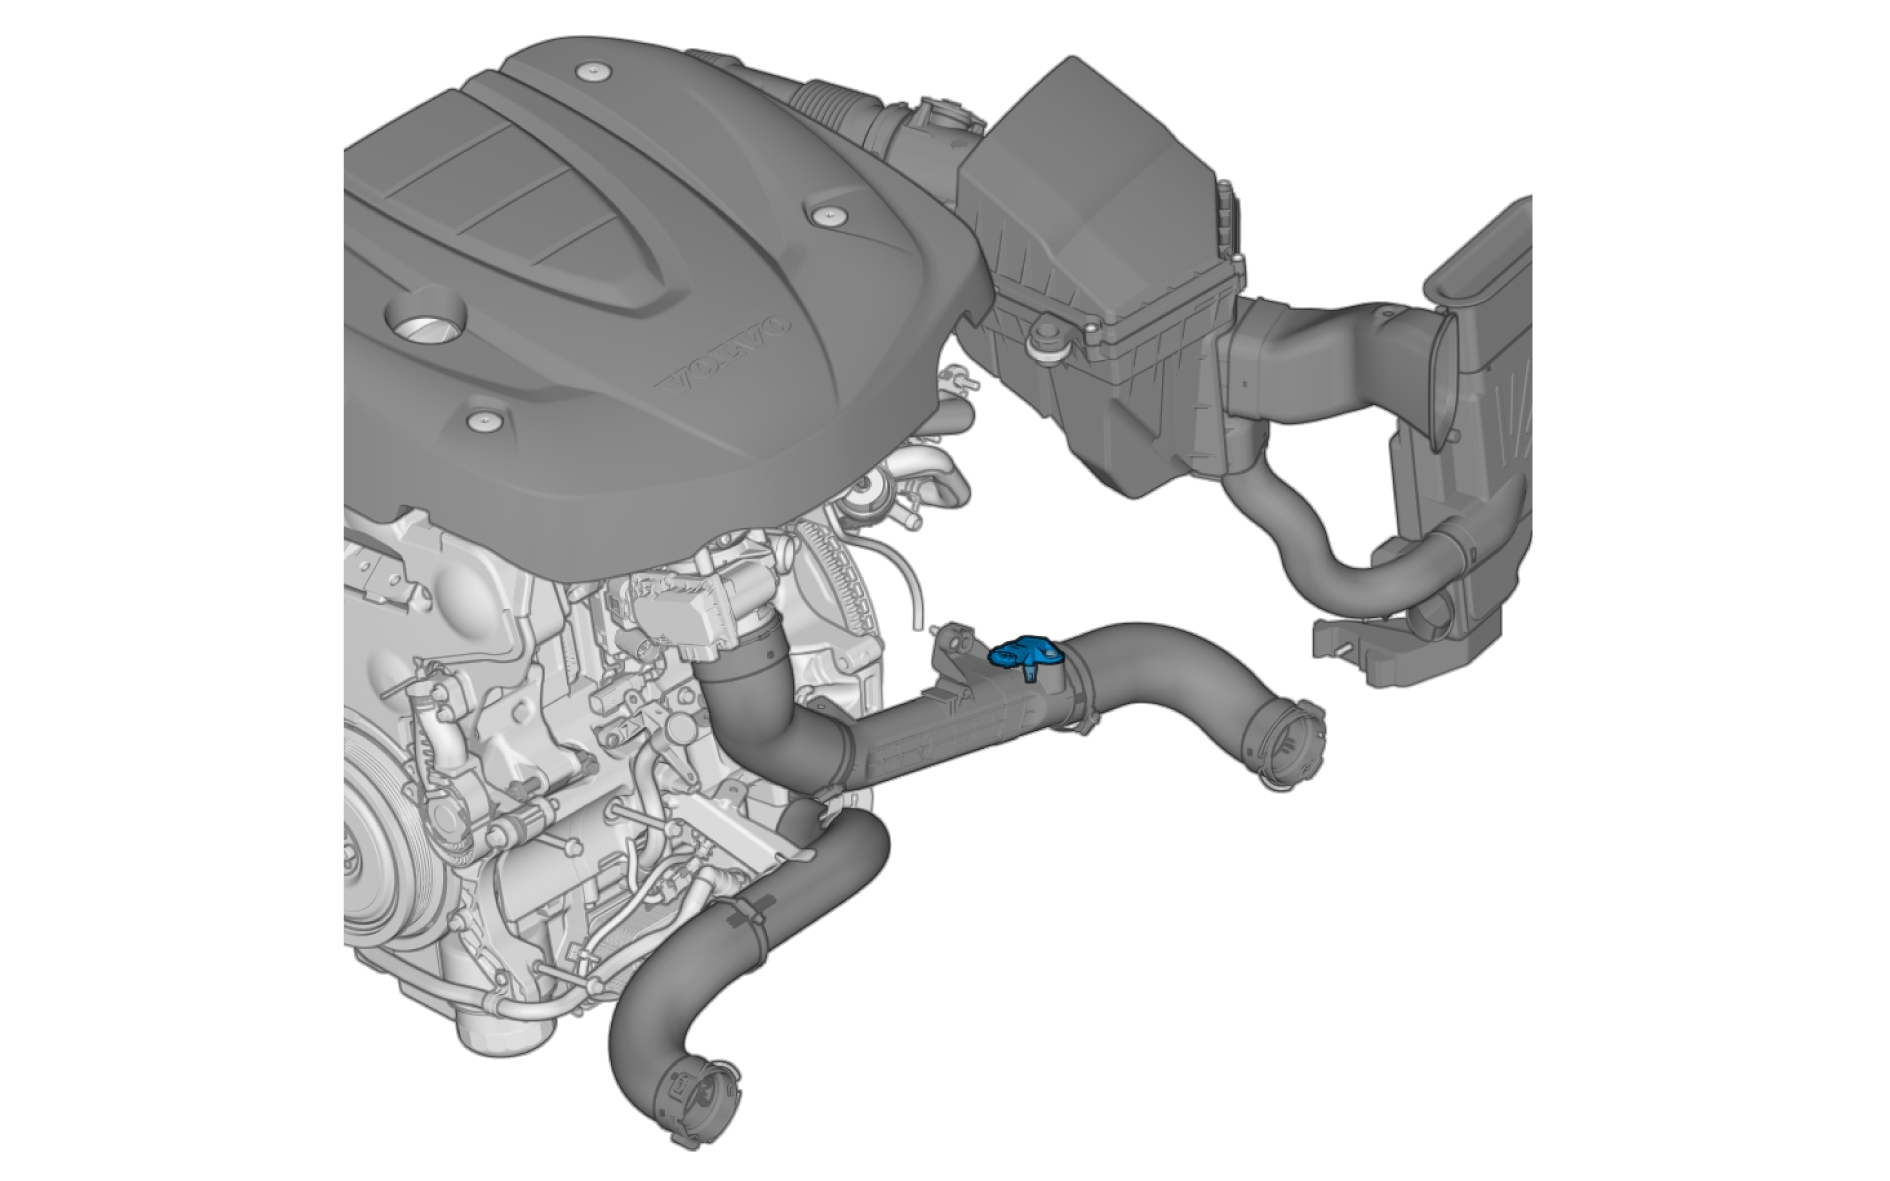
Fuel pressure sensor high-pressure side - S105
Description
The fuel pressure sensor high-pressure side supplies the Engine Control Module (ECM) with the actual fuel pressure. The pressure sensor is included as one unit in the fuel rail. The sensor uses a piezo resistor, which converts the pressure into a voltage, 0 V – 5 V.
Diagnostic information
The fuel pressure sensor high-pressure side does not have a built-in diagnostic system. The Engine Control Module (ECM) monitors the sensor, sets DTCs and has readable parameters for it.
Connection and communication
The fuel pressure sensor high-pressure side is directly connected to the Engine Control Module (ECM).
Component location
Pin-out
Fuel pressure sensor low-pressure side - S104
Description
The fuel pressure sensor low-pressure side regulates the fuel pressure in the fuel rail. The sensor converts the pressure value to a voltage, which is used by the Engine Control Module (ECM). The feedback voltage to the ECM is an analog signal where the voltage corresponds to a certain pressure:
-
0.5 V = 100 kPa (1 bar)
-
4.5 V = 1.1 MPa (11 bar)
Diagnostic information
The fuel pressure sensor low-pressure side does not have a built-in diagnostic system. The Engine Control Module (ECM) monitors the sensor, sets DTCs and has readable parameters for it.
Connection and communication
The fuel pressure sensor low-pressure side is directly connected to the Engine Control Module (ECM).
Component location
Pin-out
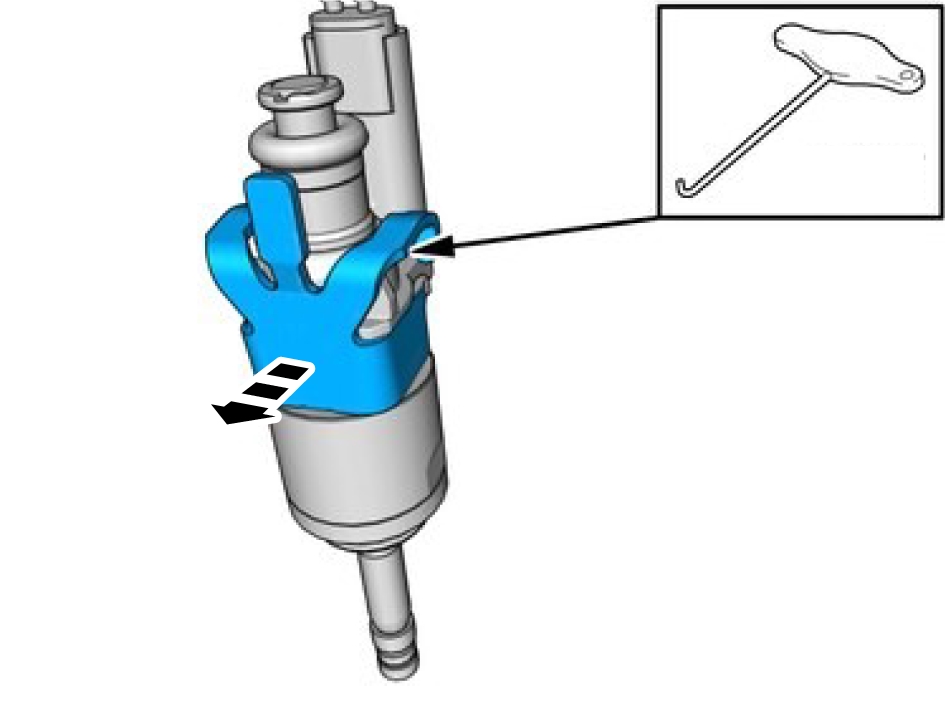
Fuel injector, replace
Remove the fuel rail, refer to:
Fuel rail, replace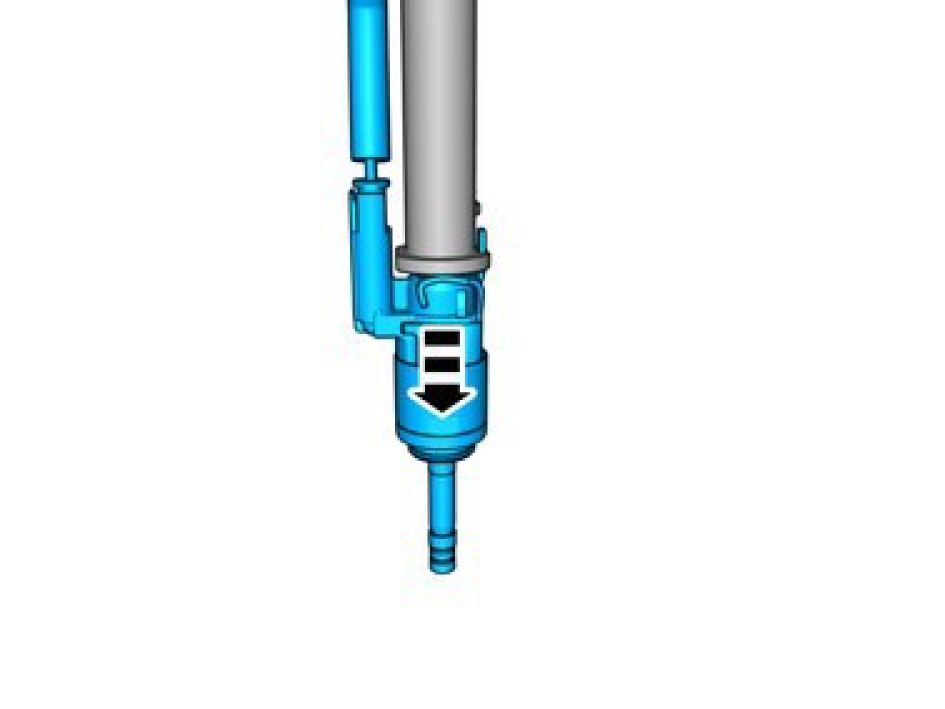
Be prepared to collect escaping fluid.
Use suitable paper to absorb any escaping fluid.
Be extra careful when removing or installing this component.
Remove the component carefully.
Release the connector's catch remove the component.
Installation
Be extra careful when removing or installing this component.
Install the component carefully.
Be extra careful when removing or installing this component.
Install the component carefully.
Install the fuel rail, refer to:
Fuel rail, replaceFuel pressure- and temperature sensor, low-pressure side - S106
Description
The fuel pressure- and temperature sensor, low-pressure side, regulates the fuel pressure from the fuel pump on the low-pressure side. The sensor converts the pressure and temperature value to a voltage, which is used by the Engine Control Module (ECM). The fuel temperature is used to regulate the desired pressure to prevent steam formation in the fuel.
Diagnostic information
The fuel pressure- and temperature sensor, low-pressure side, does not have a built-in diagnostic system. The Engine Control Module (ECM) monitors the sensor, sets DTCs and has readable parameters for it.
Connectiona and communication
The fuel pressure- and temperature sensor, low-pressure side, is directly connected to the Engine Control Module (ECM).
Component location
Pin-out
Fuel pump - M100
Description
The fuel pump provides fuel from the fuel tank to the high-pressure fuel pump. The fuel pump is controlled by the fuel pump module using a three-phase pulsed voltage signal. The fuel pump motor is brushless.
Diagnostic information
The fuel pump does not have a built-in diagnostic system. The Engine Control Module (ECM) and the fuel pump module monitor the fuel pump, set DTCs and have readable parameters for it.
Connection and communication
The fuel pump is directly connected to the:
-
Fuel pump module
-
Engine Control Module (ECM)
Component location
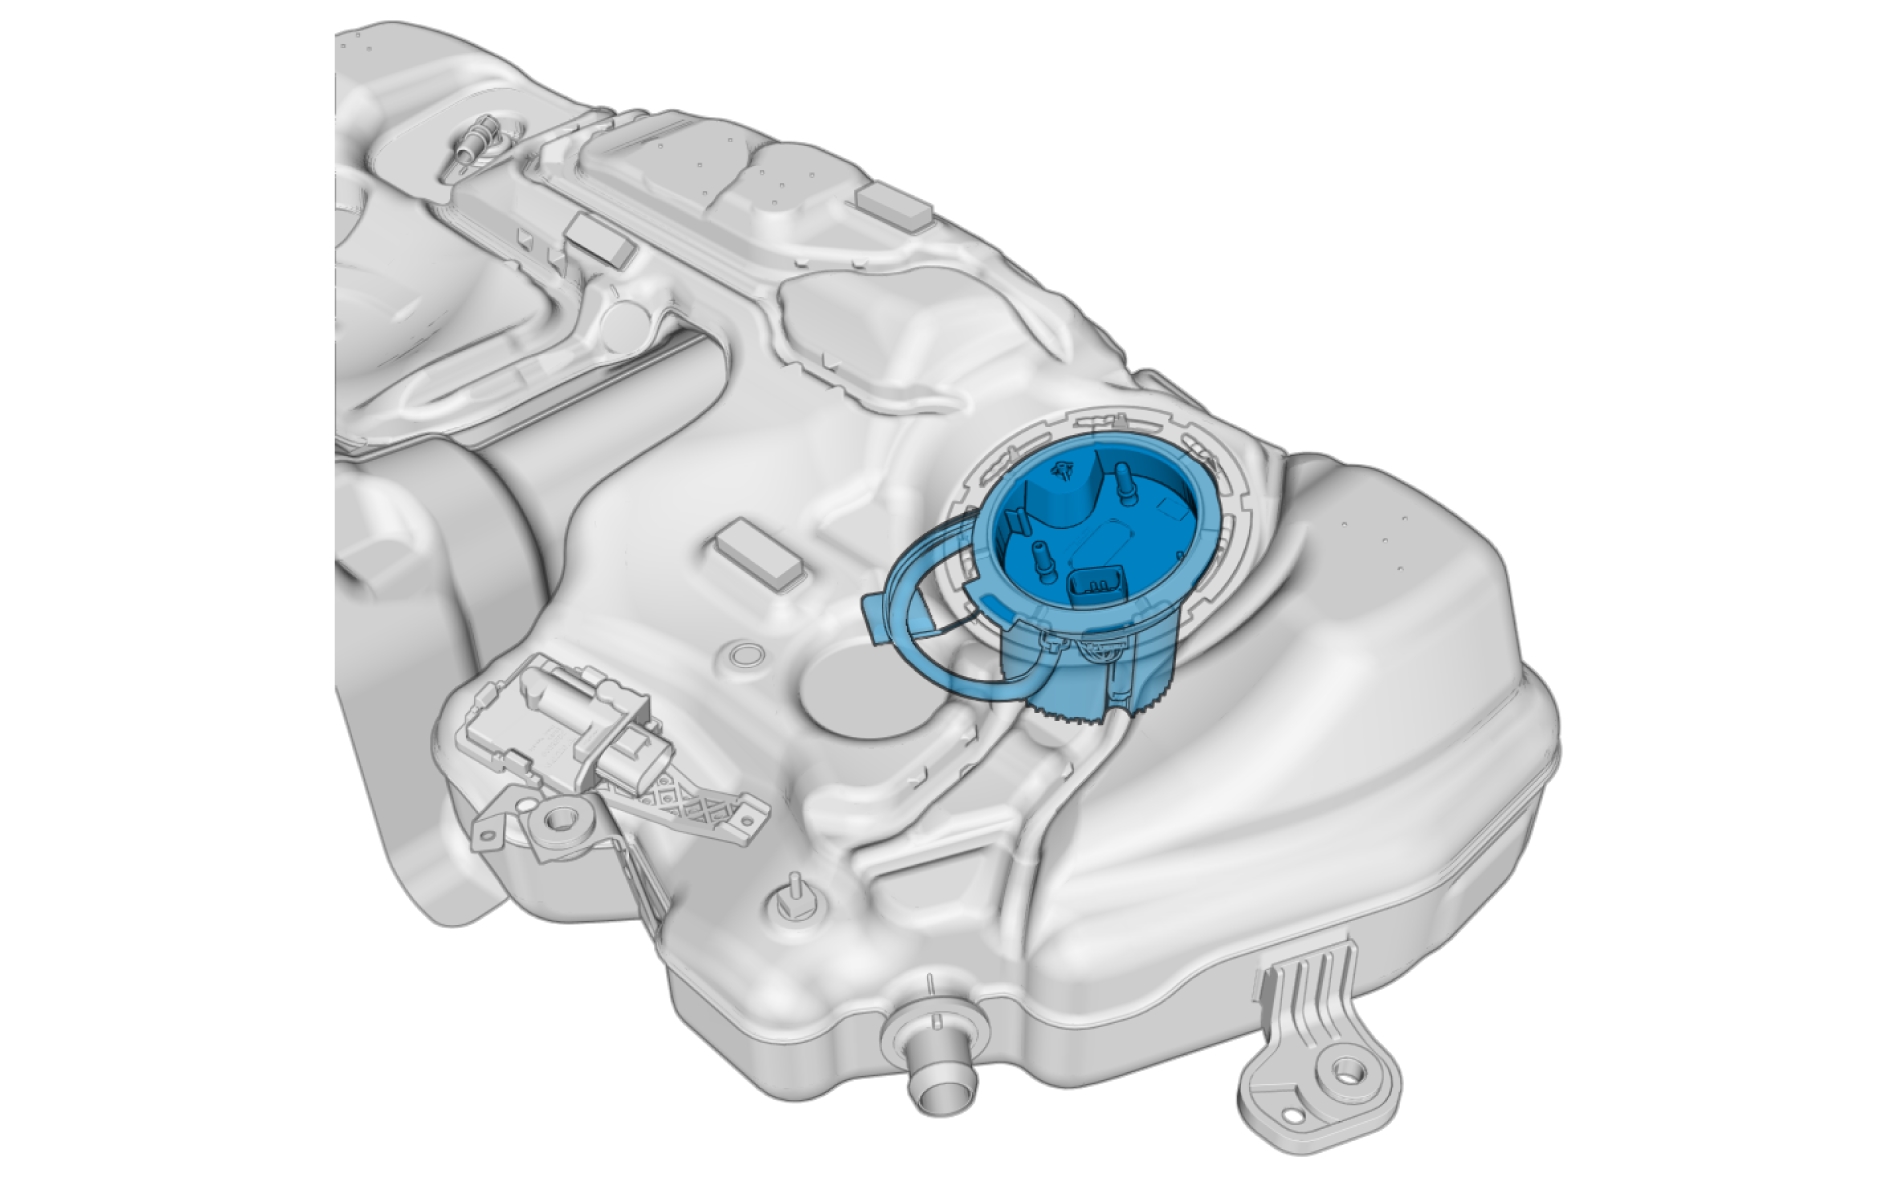
Pin-out
Fuel pump module - P101
Description
The fuel pump module controls the fuel pump. The relayed power of the fuel pump module is controlled by the Central Electronic Module (CEM) when requested by the Engine Control Module (ECM).
The power supplied to the fuel pump is proportional to the 12 V PWM control signal from the Engine Control Module (ECM). The typical frequency of the PWM output signal to the fuel pump is 16 kHz ± 1 %.
The conversion from the PWM signal to the mechanical output of the pump has a linear range between a duty cycle of 18 % and about 1300 r/min to a duty cycle of 77 % and about 7100 r/min.
Diagnostic information
The fuel pump module utilizes the PWM input from the Central Electronic Module (CEM) to send DTCs by grounding the lead with different time spans. In this way the Central Electronic Module (CEM) can receive DTCs regarding both the fuel pump module and the fuel pump. The Engine Control Module (ECM) monitors the PWM lead, sets DTCs and has readable parameters for it.
Connection and communication
The fuel pump module is directly connected to the Engine Control Module (ECM) and the fuel pump.
Component location
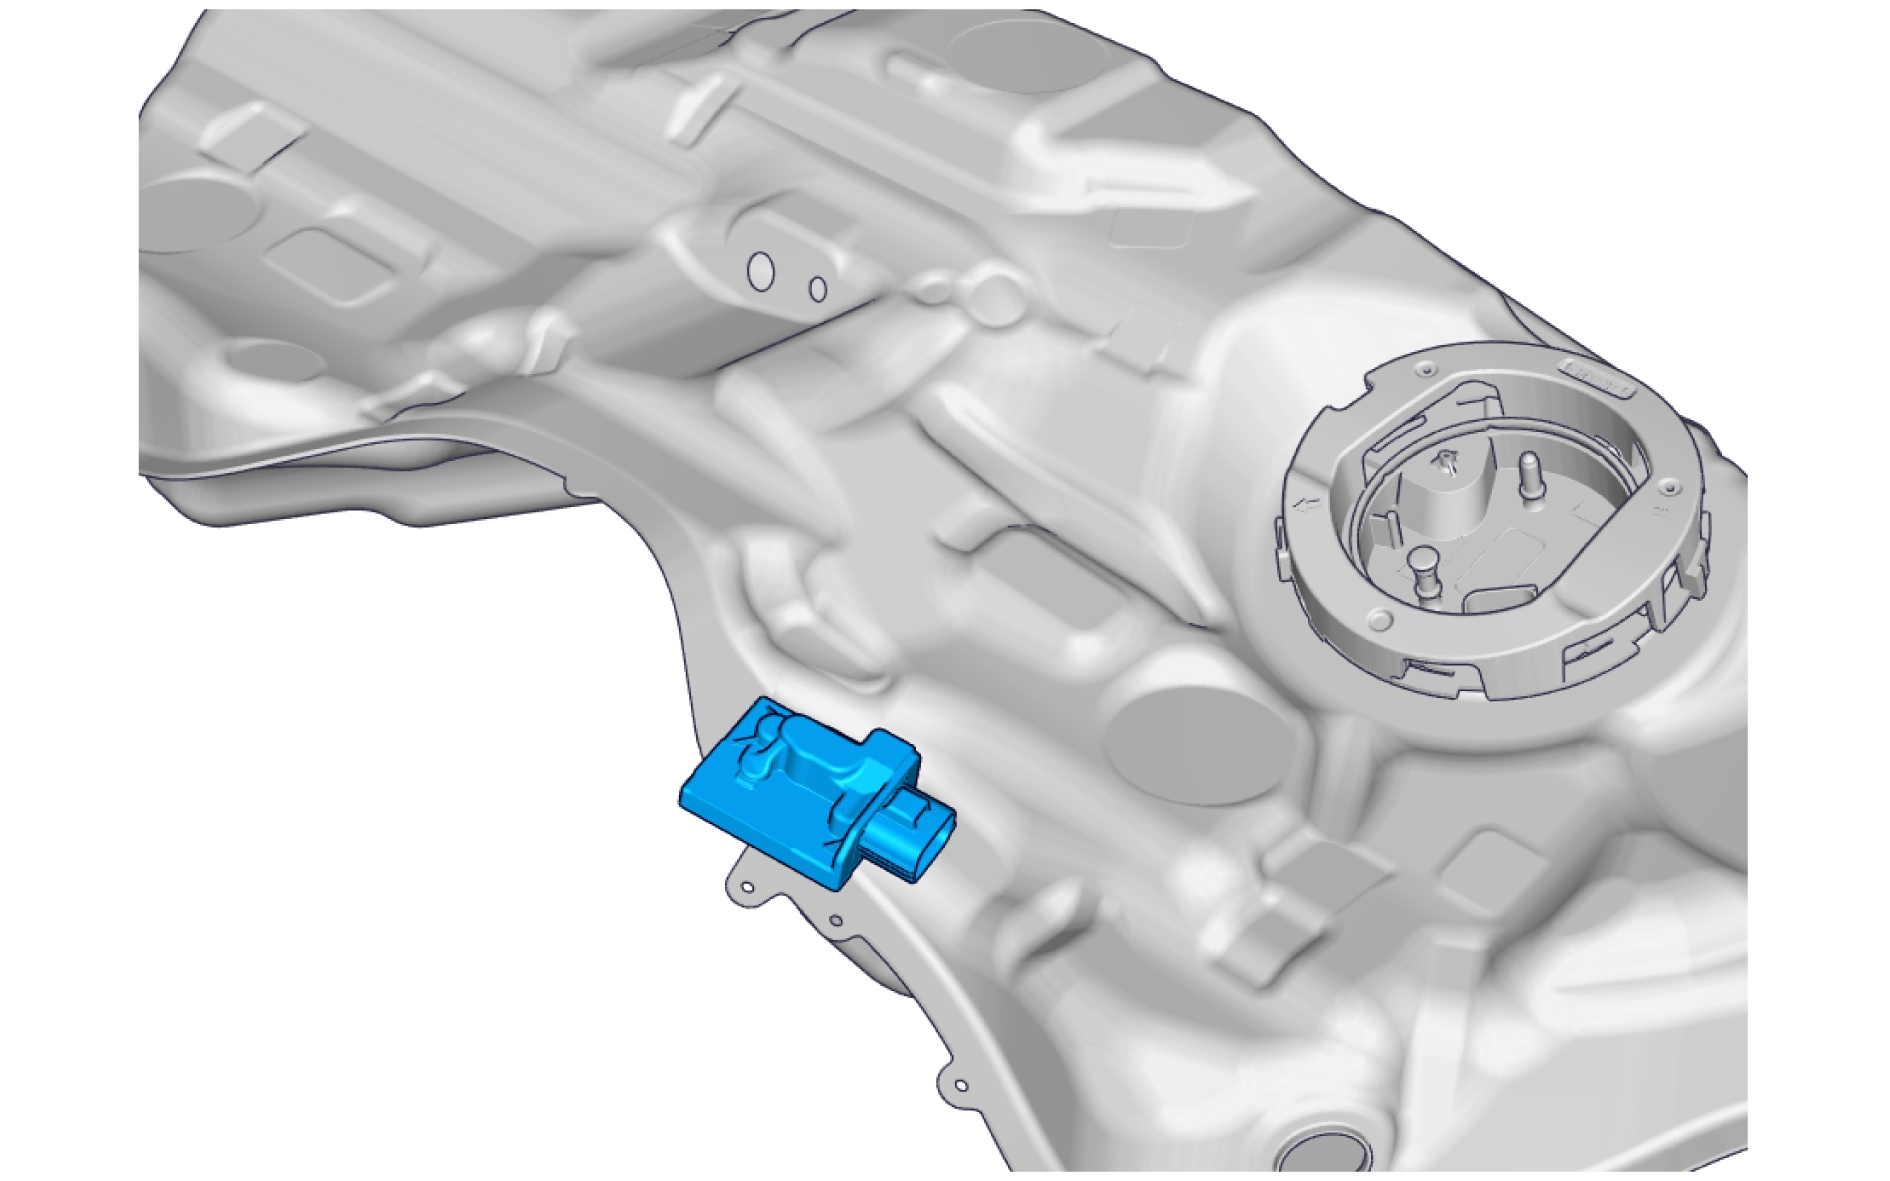
Pin-out
Intake manifold air temperature sensor - S303
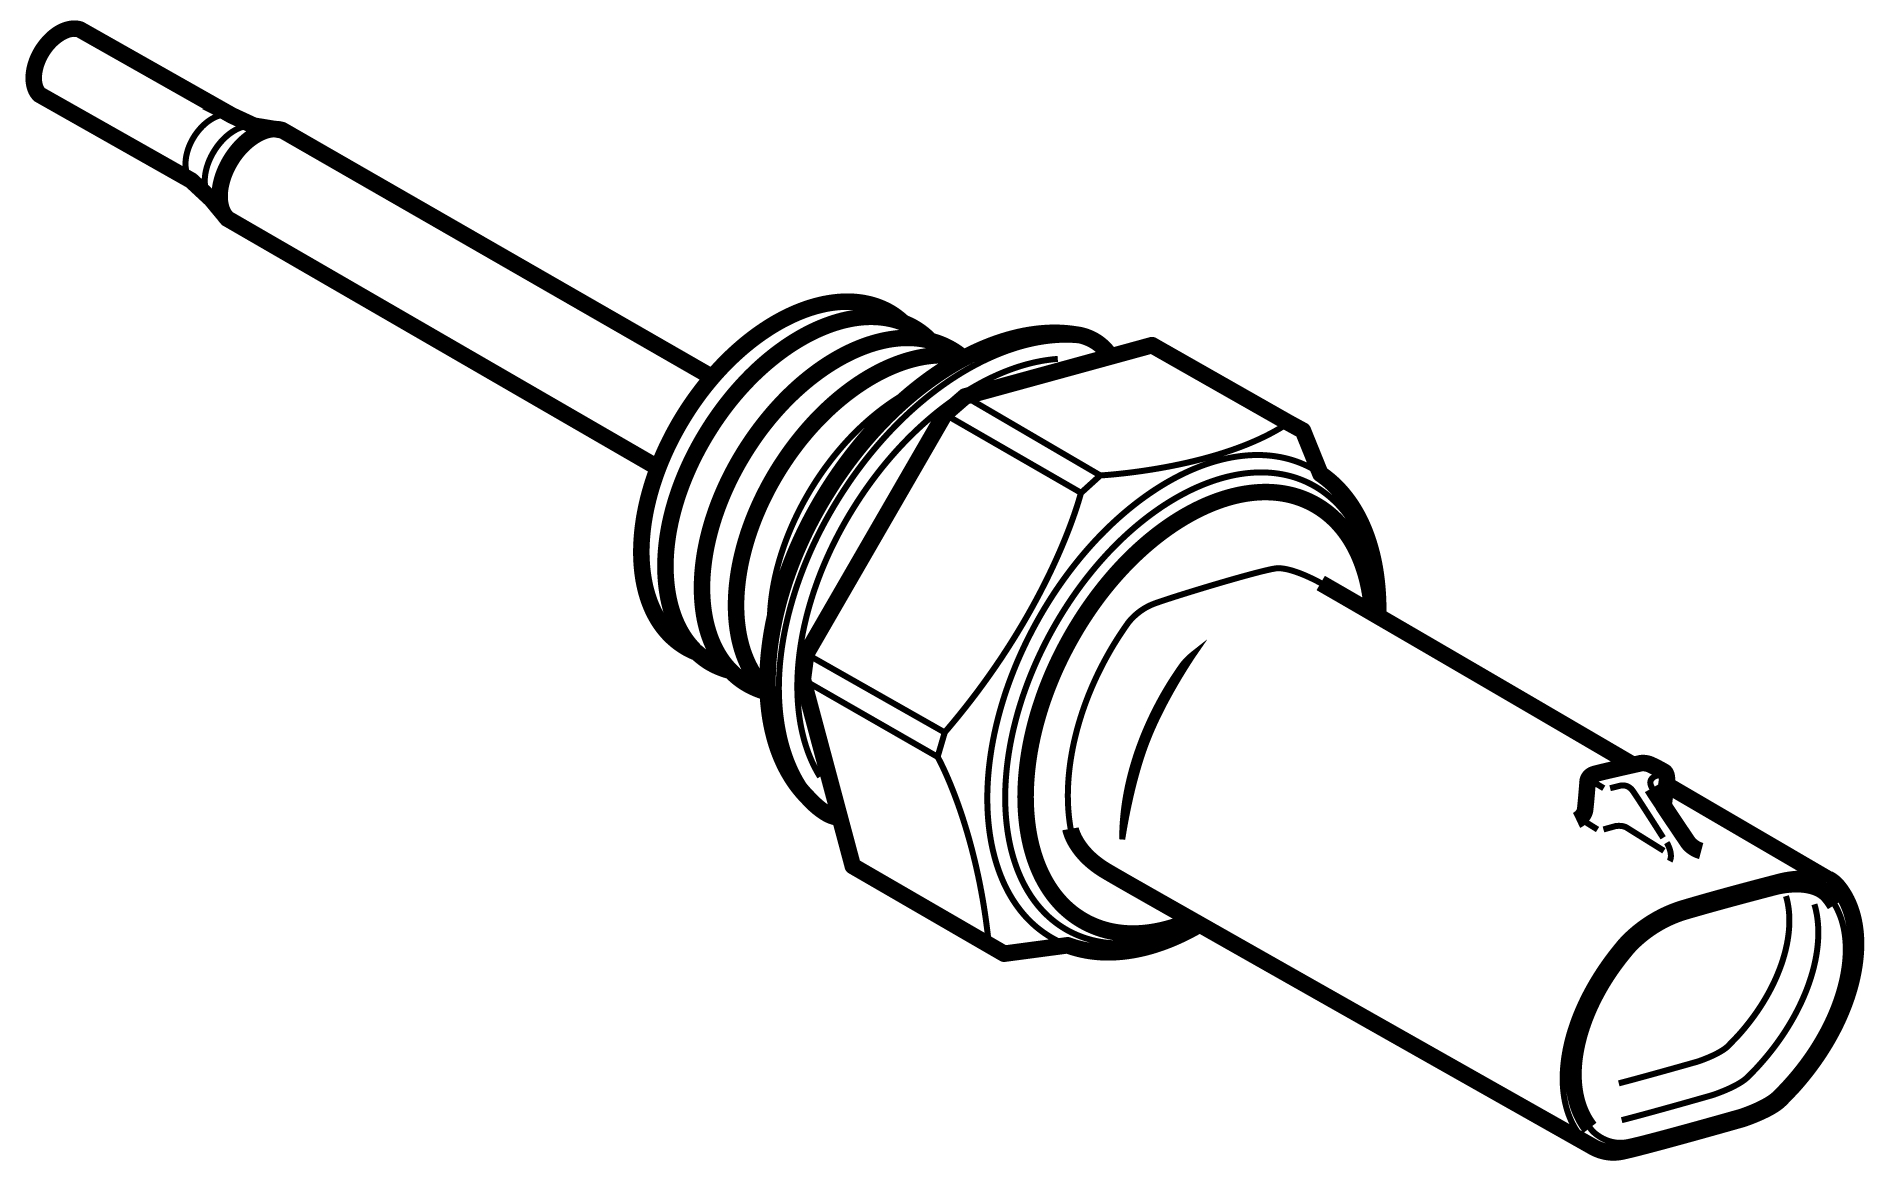
Description
The intake manifold air temperature sensor measures the charge air temperature in the intake manifold.
Diagnostic information
The intake manifold air temperature sensor does not have a built-in diagnostic system. The Engine Control Module (ECM) monitors the sensor, sets DTCs and has readable parameters for it.
Connectiona and communicaton
The intake manifold air temperature sensor is directly connected to the Engine Control Module (ECM).
Component location
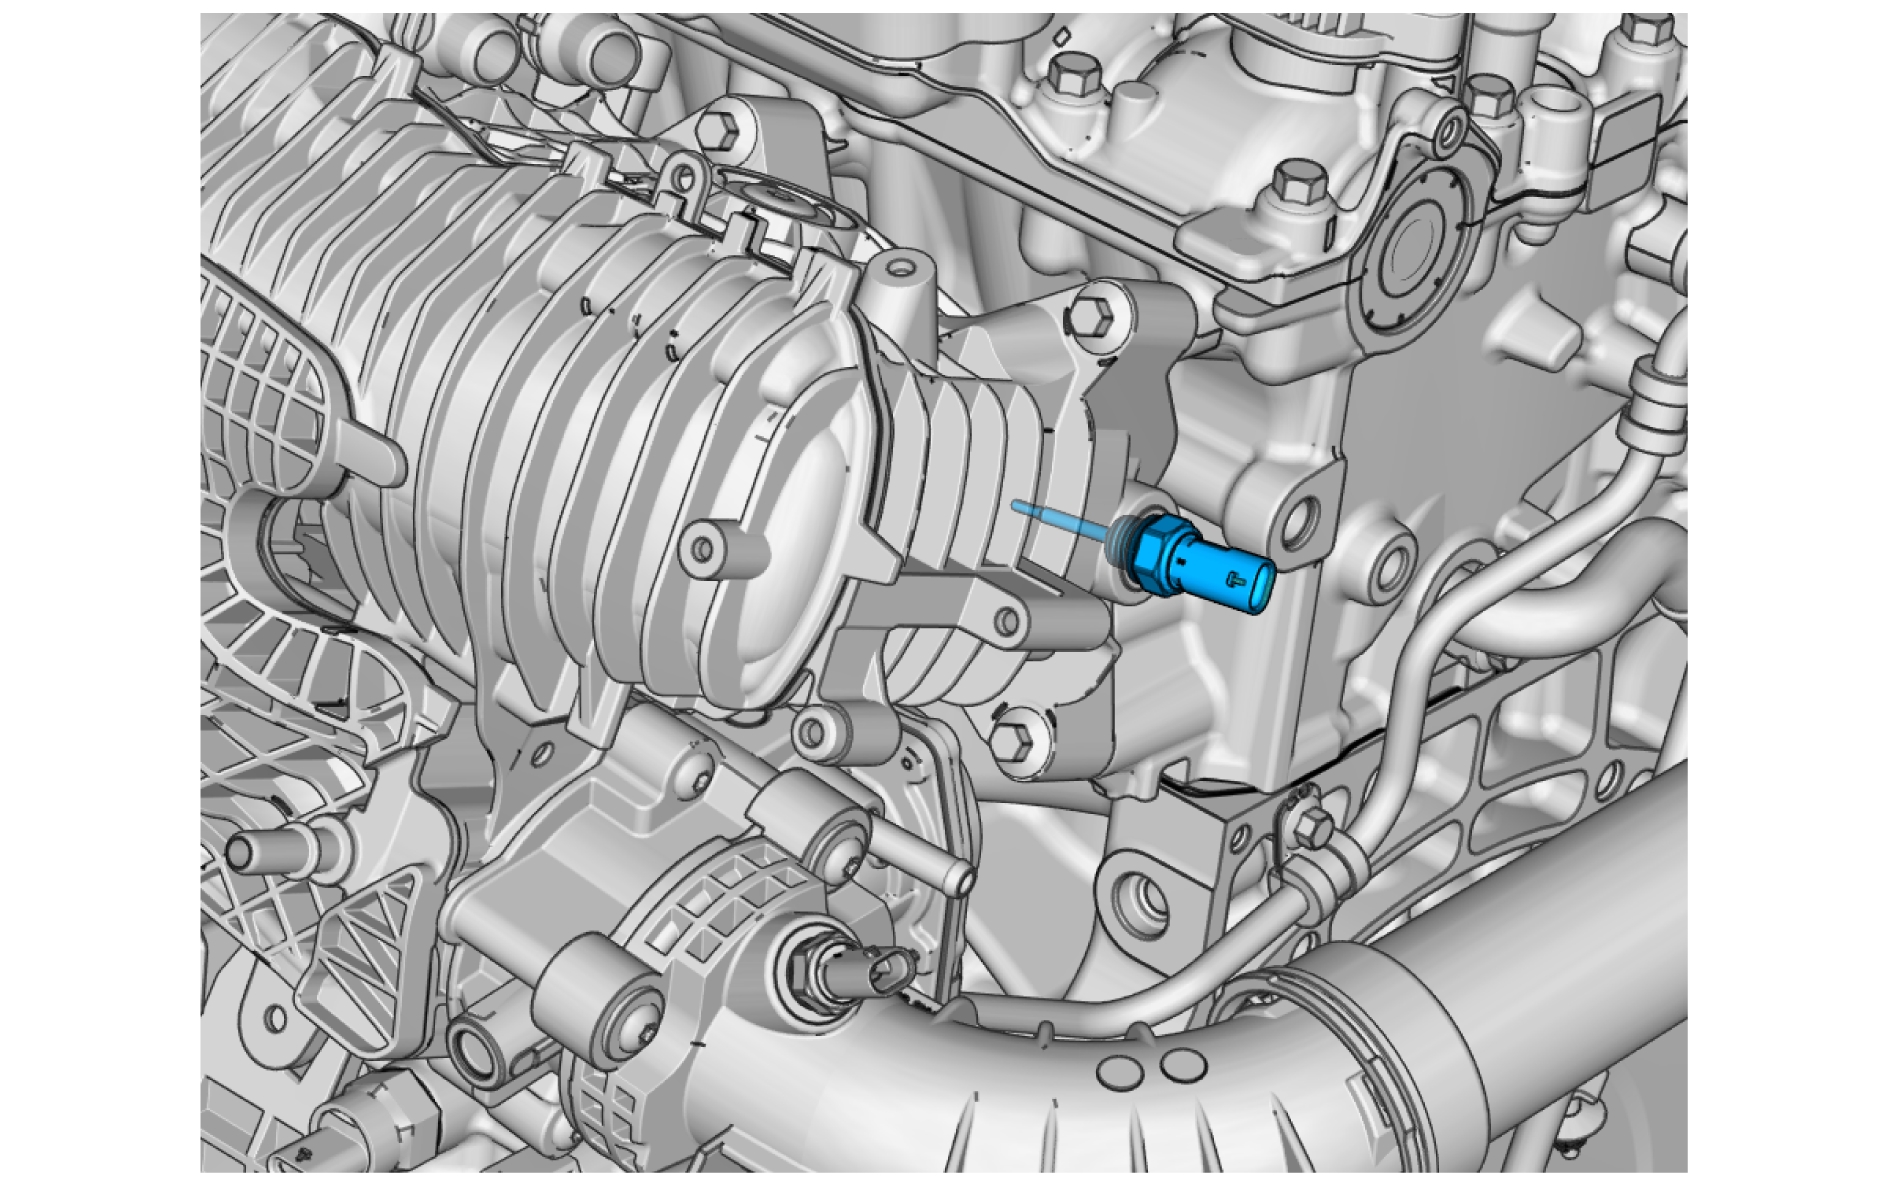
Pin-out
Thermostat, replace
Removal
Drain the cooling system, refer to:
Cooling system - draining, charging and bleeding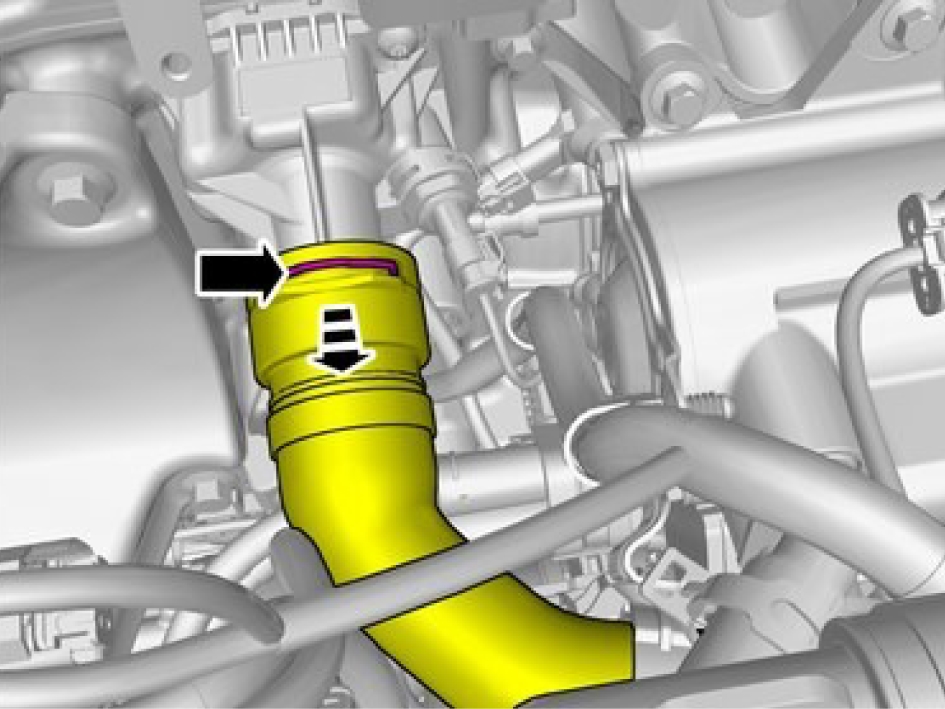
Be prepared to collect escaping fluid.
Release the lock.
Undo the hoses from the connection.
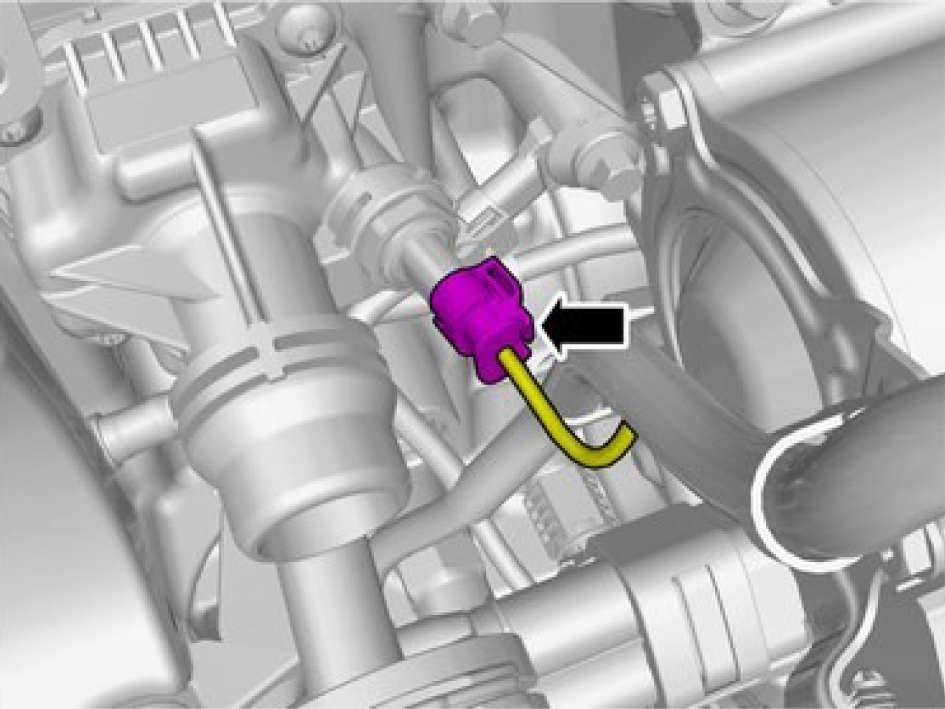
Disconnect the connector.
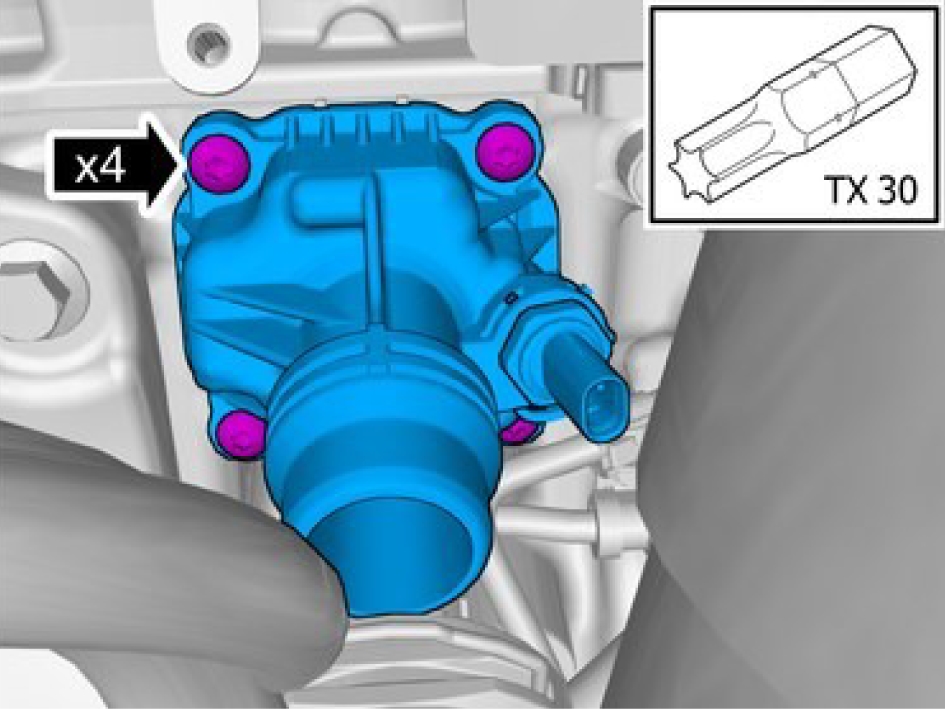
Remove the screws.
Remove the marked component.
Installation
Install the screws, M6, torque: 10 Nm
Install the connector
Install the hoses.
Fill the cooling system, refer to:
Cooling system - draining, charging and bleedingCamshaft position sensor - S601
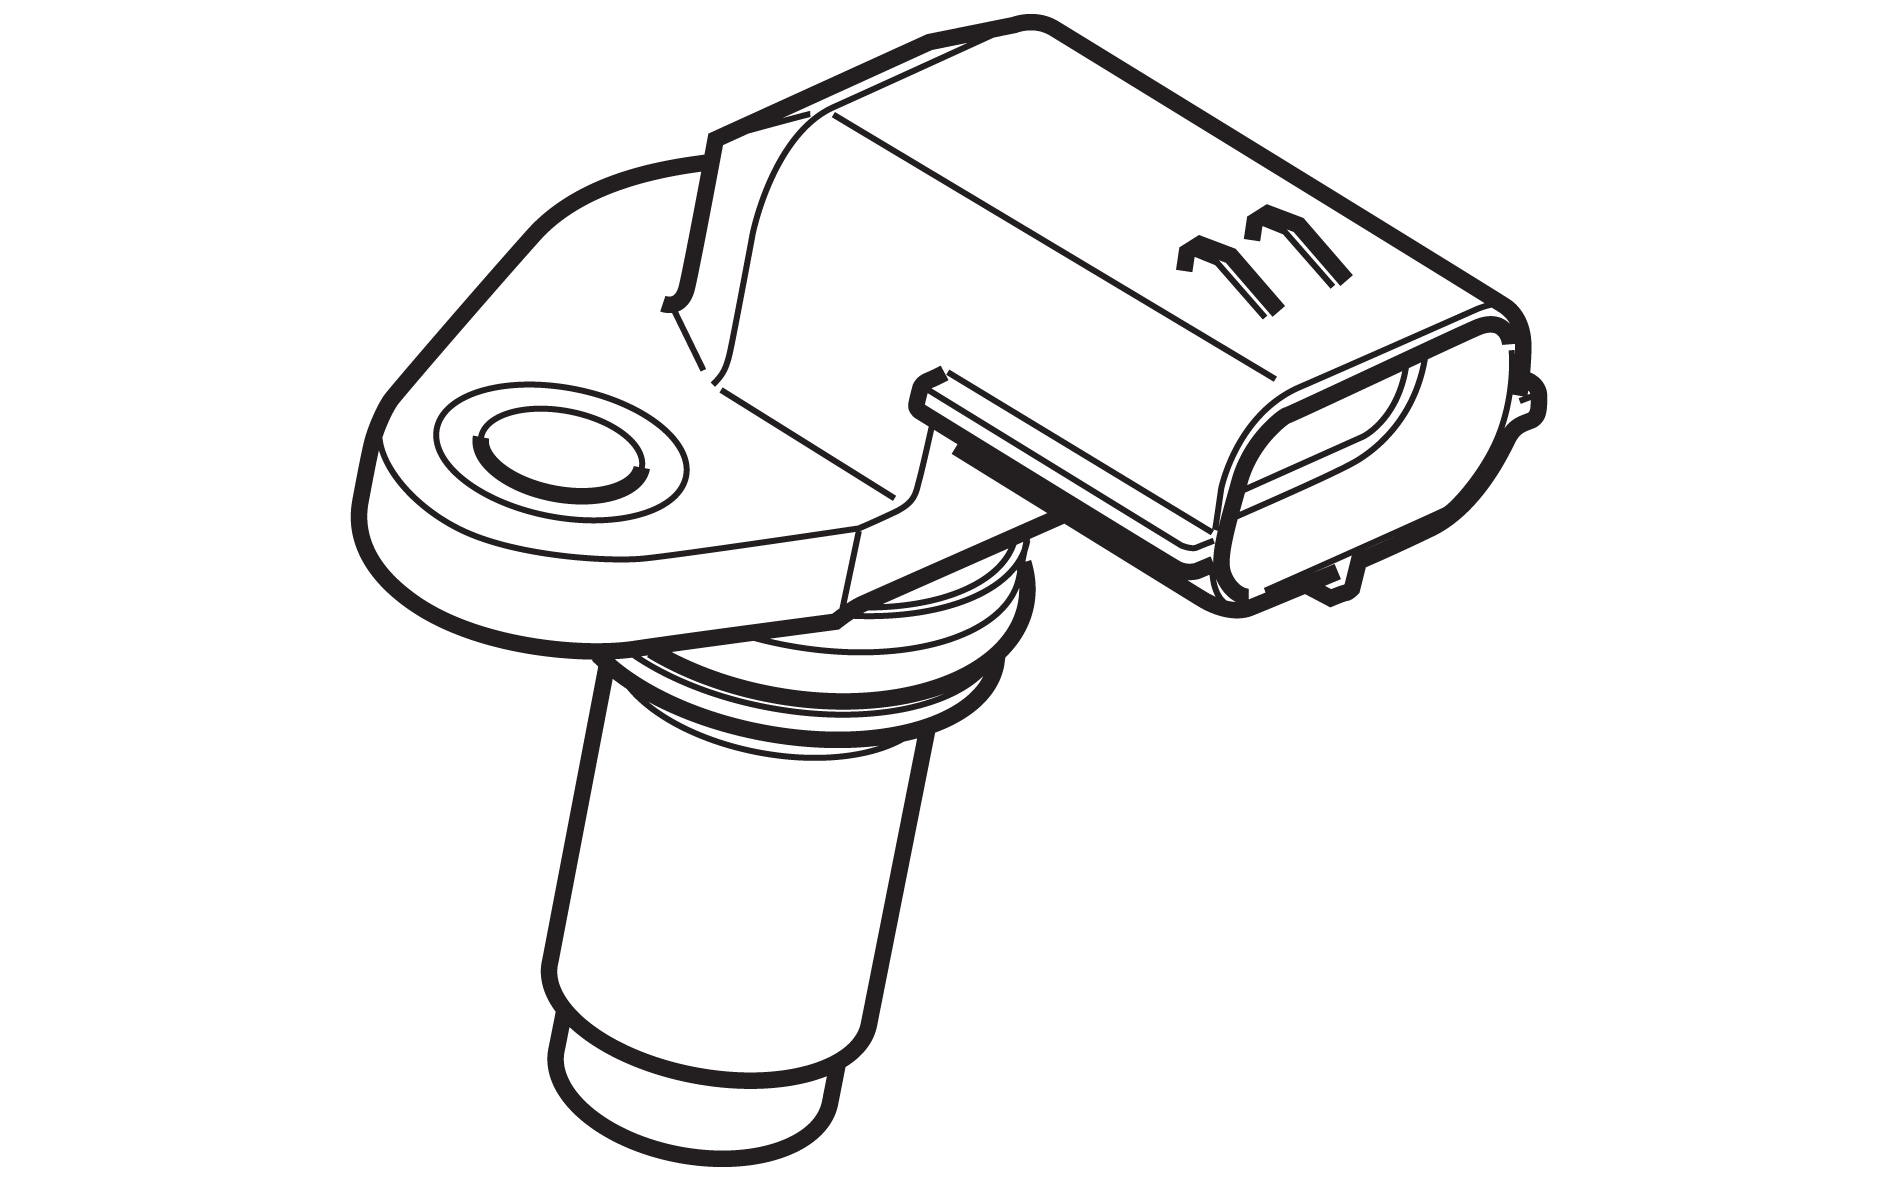
Description
The camshaft position sensor monitors the rotation of the camshaft.
The camshaft position sensor consists of a hall sensor, a permanent magnet and internal electronics. The Engine Control Module (ECM) monitors the sensor and uses its input to calculate the speed and position of the camshaft.
The camshaft position sensor has only one type of signal characteristic, making it impossible for the Engine Control Module (ECM) to identify the direction of the camshaft's rotation.
The camshaft position sensor detects changes in the magnetic field when the camshaft rotates. It is able to detect changes by the spacing between the teeth on the camshaft. The frequency of the return signal is proportional to the camshaft rotational speed.
The signal from the sensor is a square pulse signal between approximately 0.5 V and 4.5 V. A high signal corresponds to a "tooth" on the trigger wheel and a low signal corresponds to the "gaps" in the trigger wheel.
Diagnostic information
The camshaft position sensor does not have a built-in diagnostic system. The Engine Control Module (ECM) monitors the sensor, sets DTCs and has readable parameters for it.
Connection and communication
The camshaft position sensor is directly connected to the Engine Control Module (ECM).
Component location
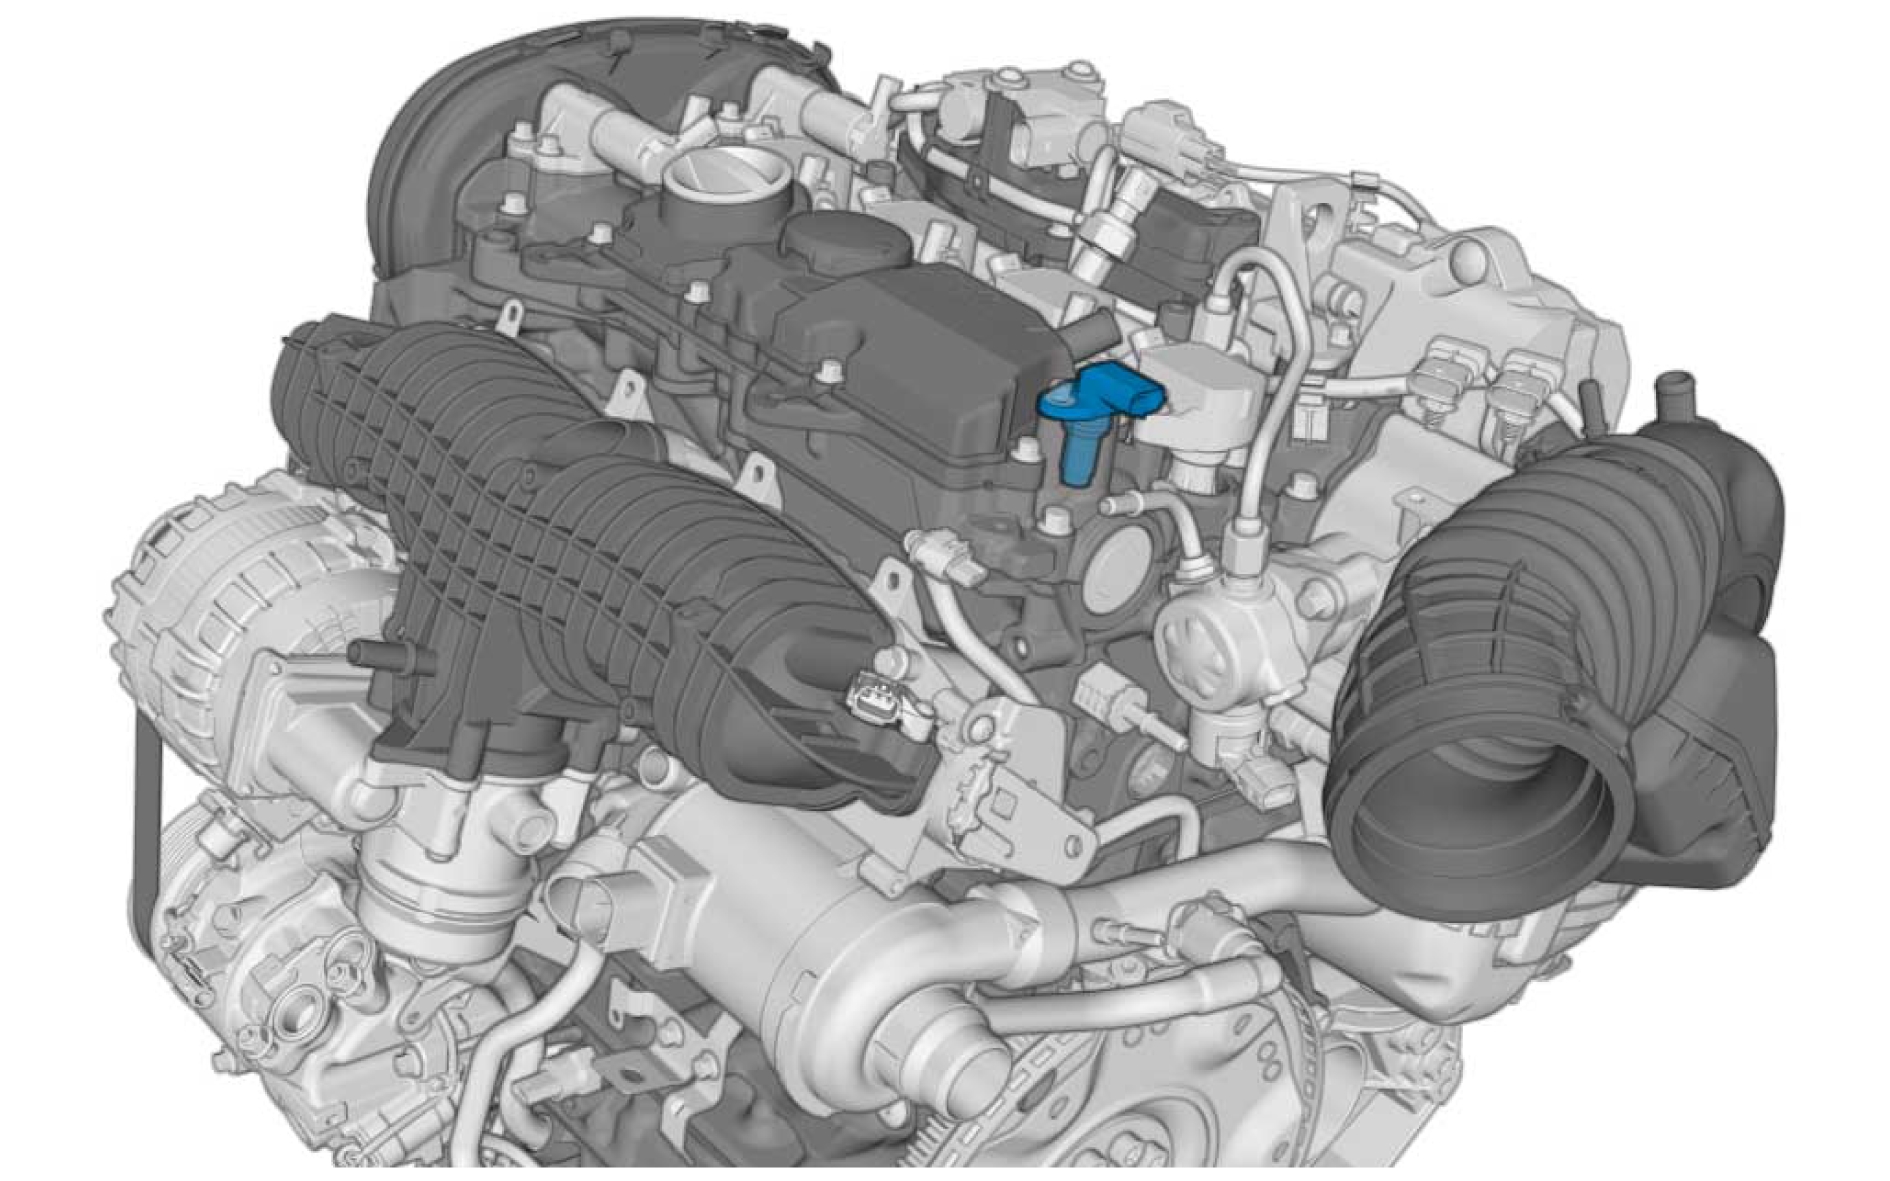
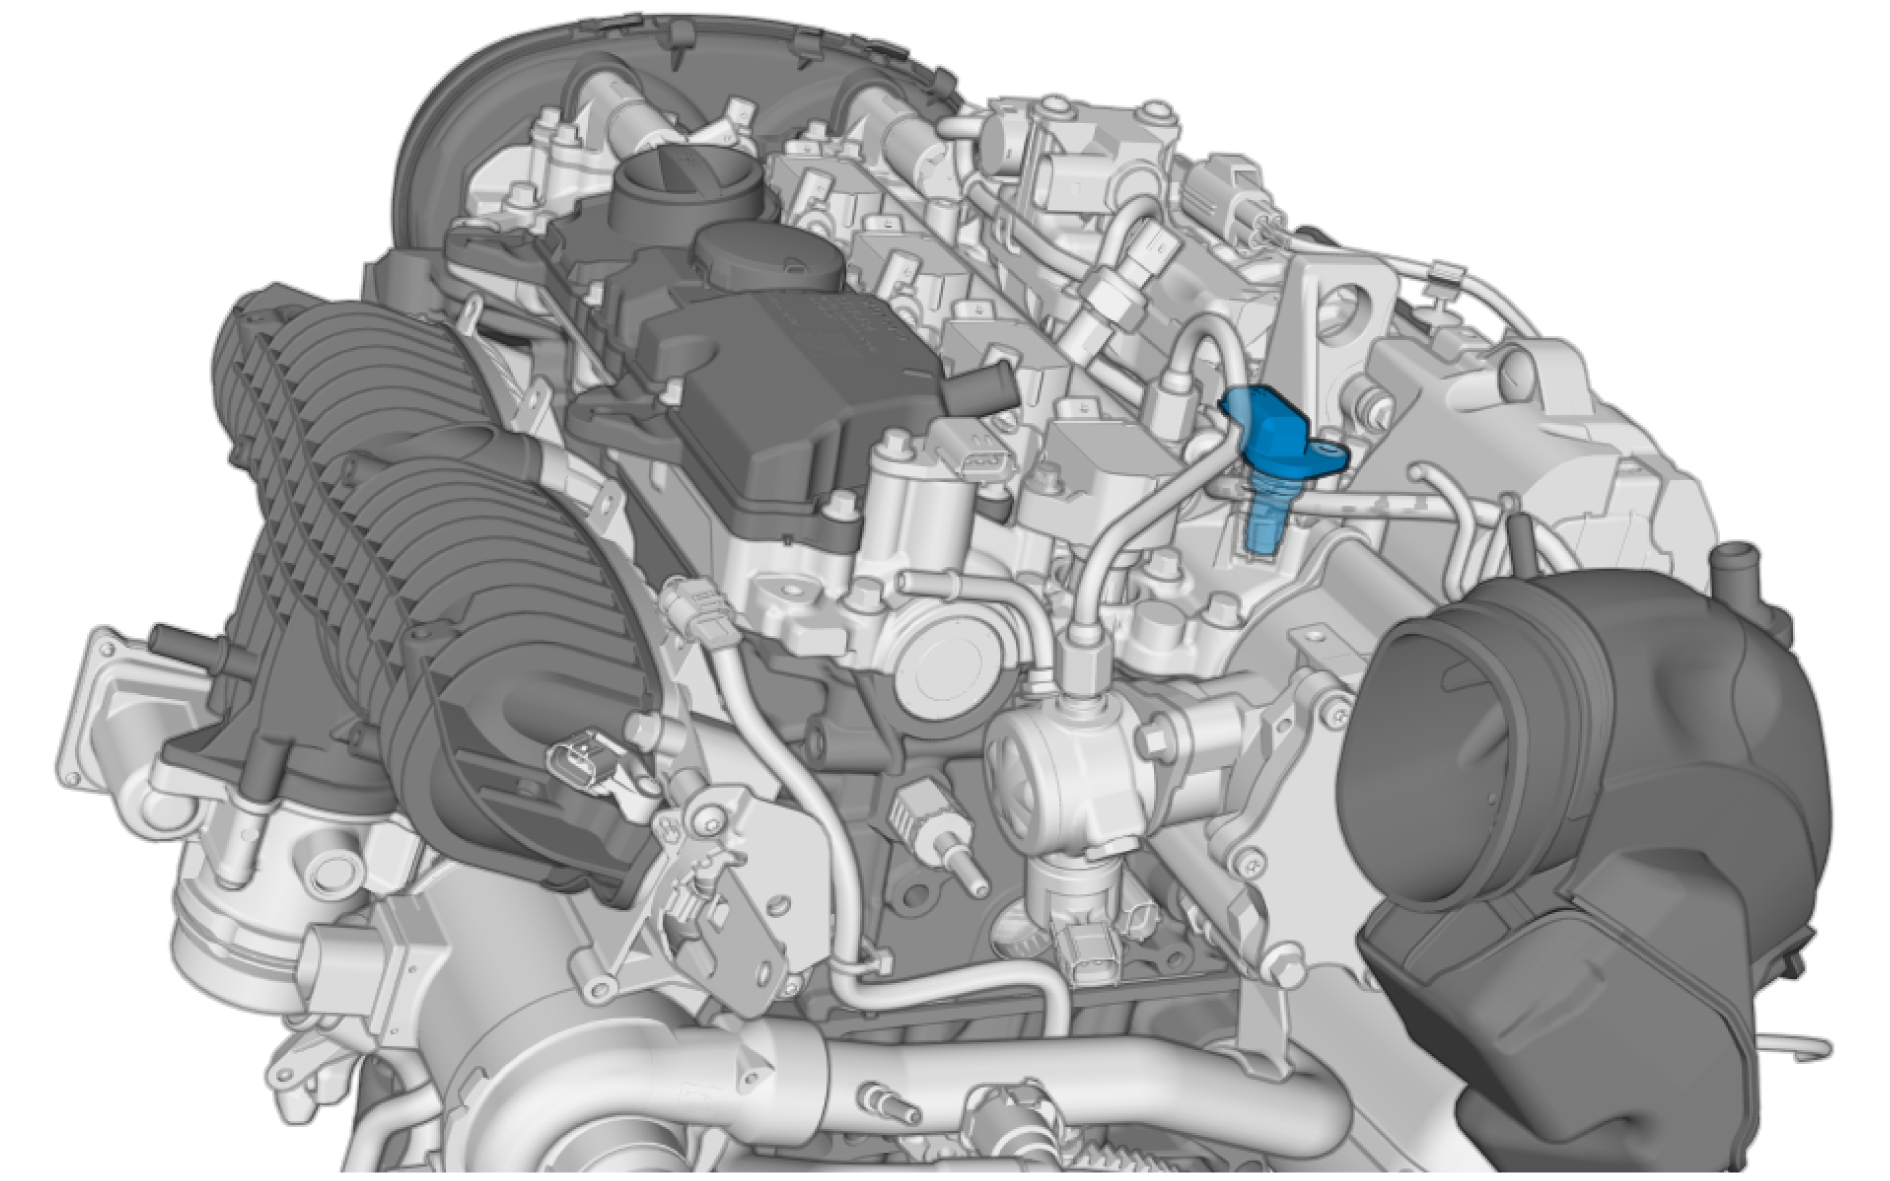
Pin-out
Crankshaft position sensor - S602
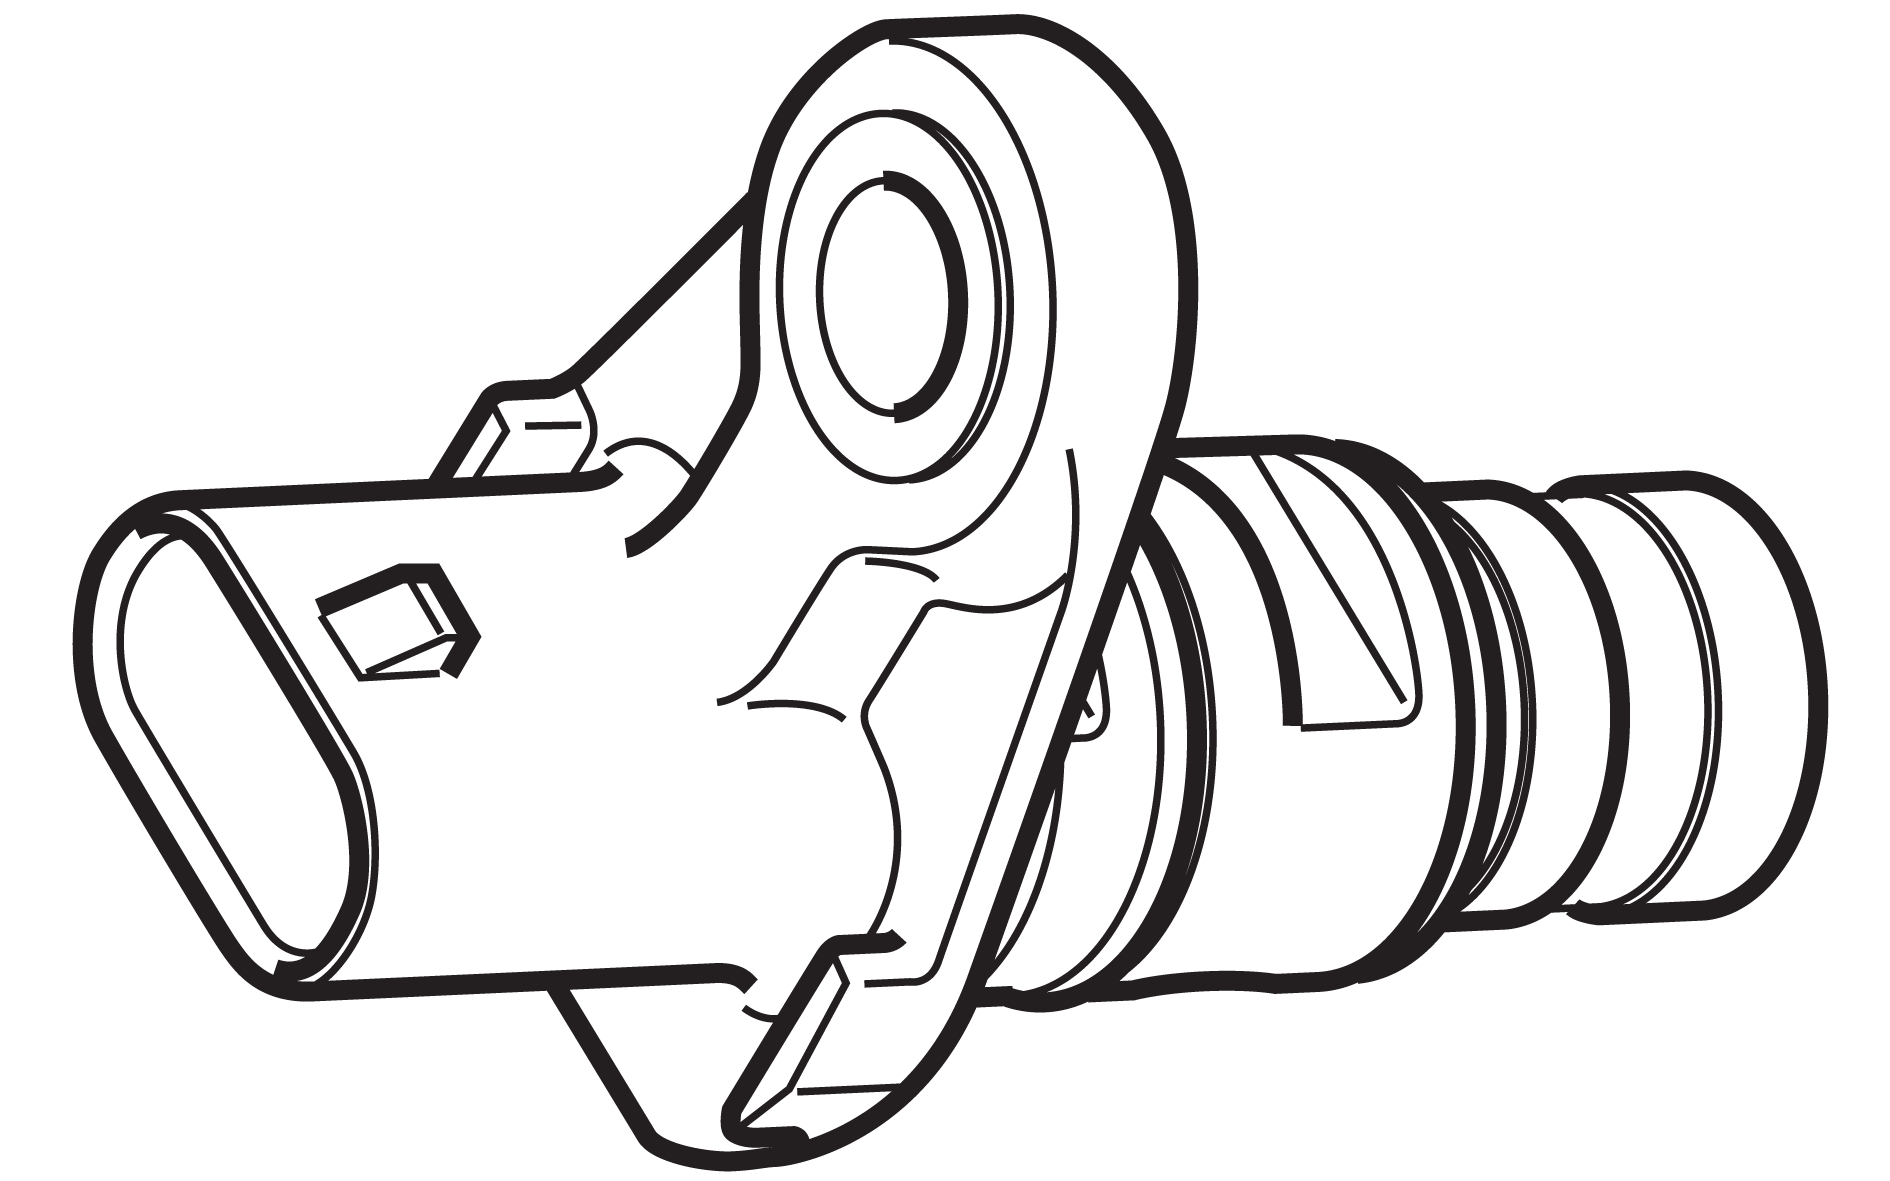
Description
The crankshaft position sensor consists of four hall sensors, permanent magnets and internal electronics. The sensor detects the stamped holes on the flywheel rim. The holes are positioned with a 6 degrees distance between each hole. The flywheel rim has a "gap" and gives the crankshaft position sensor 60-4=56 pulses per crankshaft revolution. When the Engine Control Module (ECM) has identified the reference gap, the control module can determine the exact position of the crankshaft by counting pulses. When the reference gap on the flywheel passes below the sensor, the voltage and the frequency instantly drop to zero. The first hole after the reference gap is located 84° before the top dead center on cylinder 1.
The crankshaft position sensor has different signal characteristics depending on the direction of the crankshaft rotation. The Engine Control Module (ECM) stores the crankshaft's position during the driving cycle. This means that the ECM knows, which cylinder is nearest in turn for injection and ignition at the next start after the engine was switched off during Start/Stop. The engine can therefore be started without having to "search" for a synchronizing position between the crankshaft and the camshafts. This reduces the time needed for cranking, which in turn leads to a reduced load on the batteries and the starter motor. This is especially important when starting during a Start/Stop sequence. If the driving cycle is interrupted the stored crankshaft position is removed from the ECM's memory.
Diagnostic information
The crankshaft position sensor does not have a built-in diagnostic system. The Engine Control Module (ECM) monitors the sensor, sets DTCs and has readable parameters for it.
Connection and communication
The crankshaft position sensor is directly connected to the Engine Control Module (ECM).
Component location
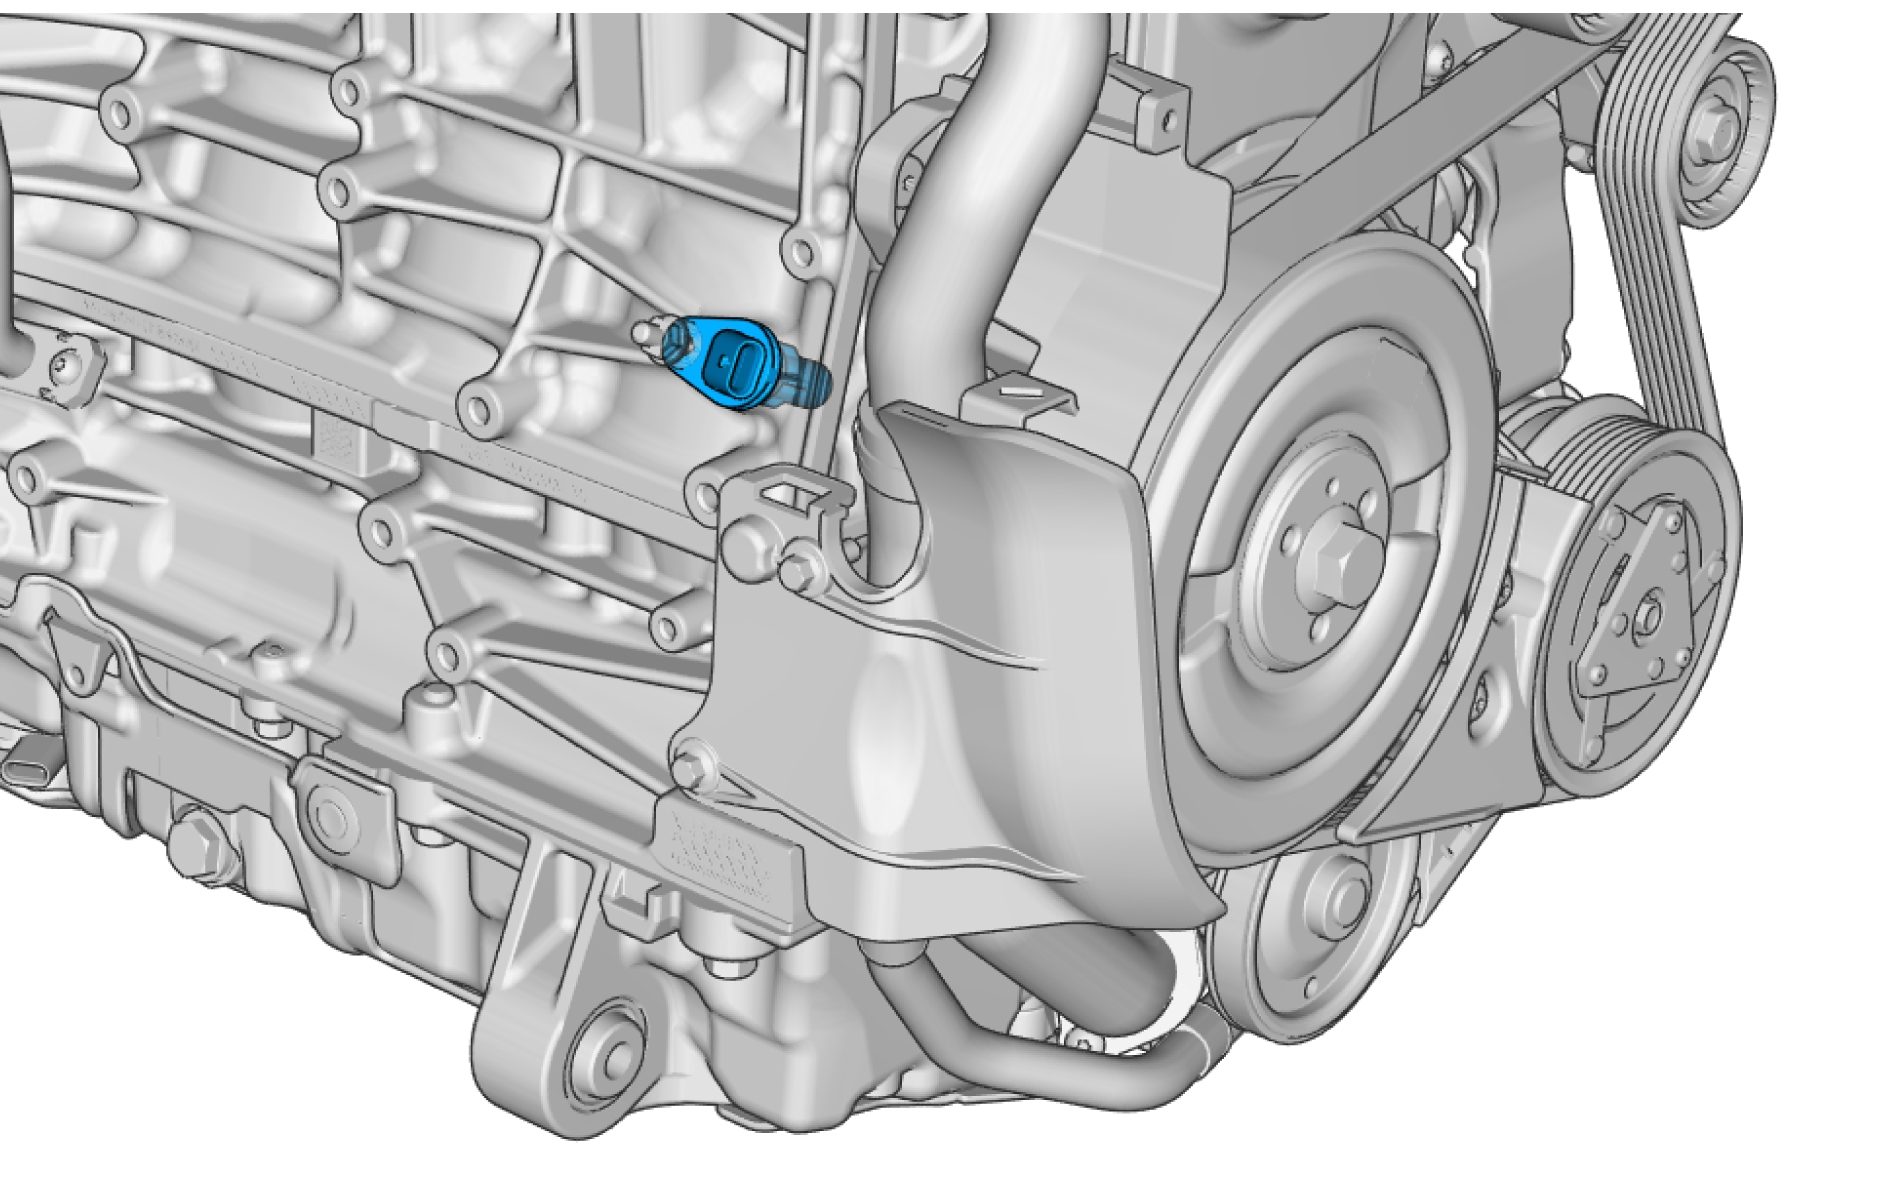
Pin-out
Ignition coil and spark plug - T200
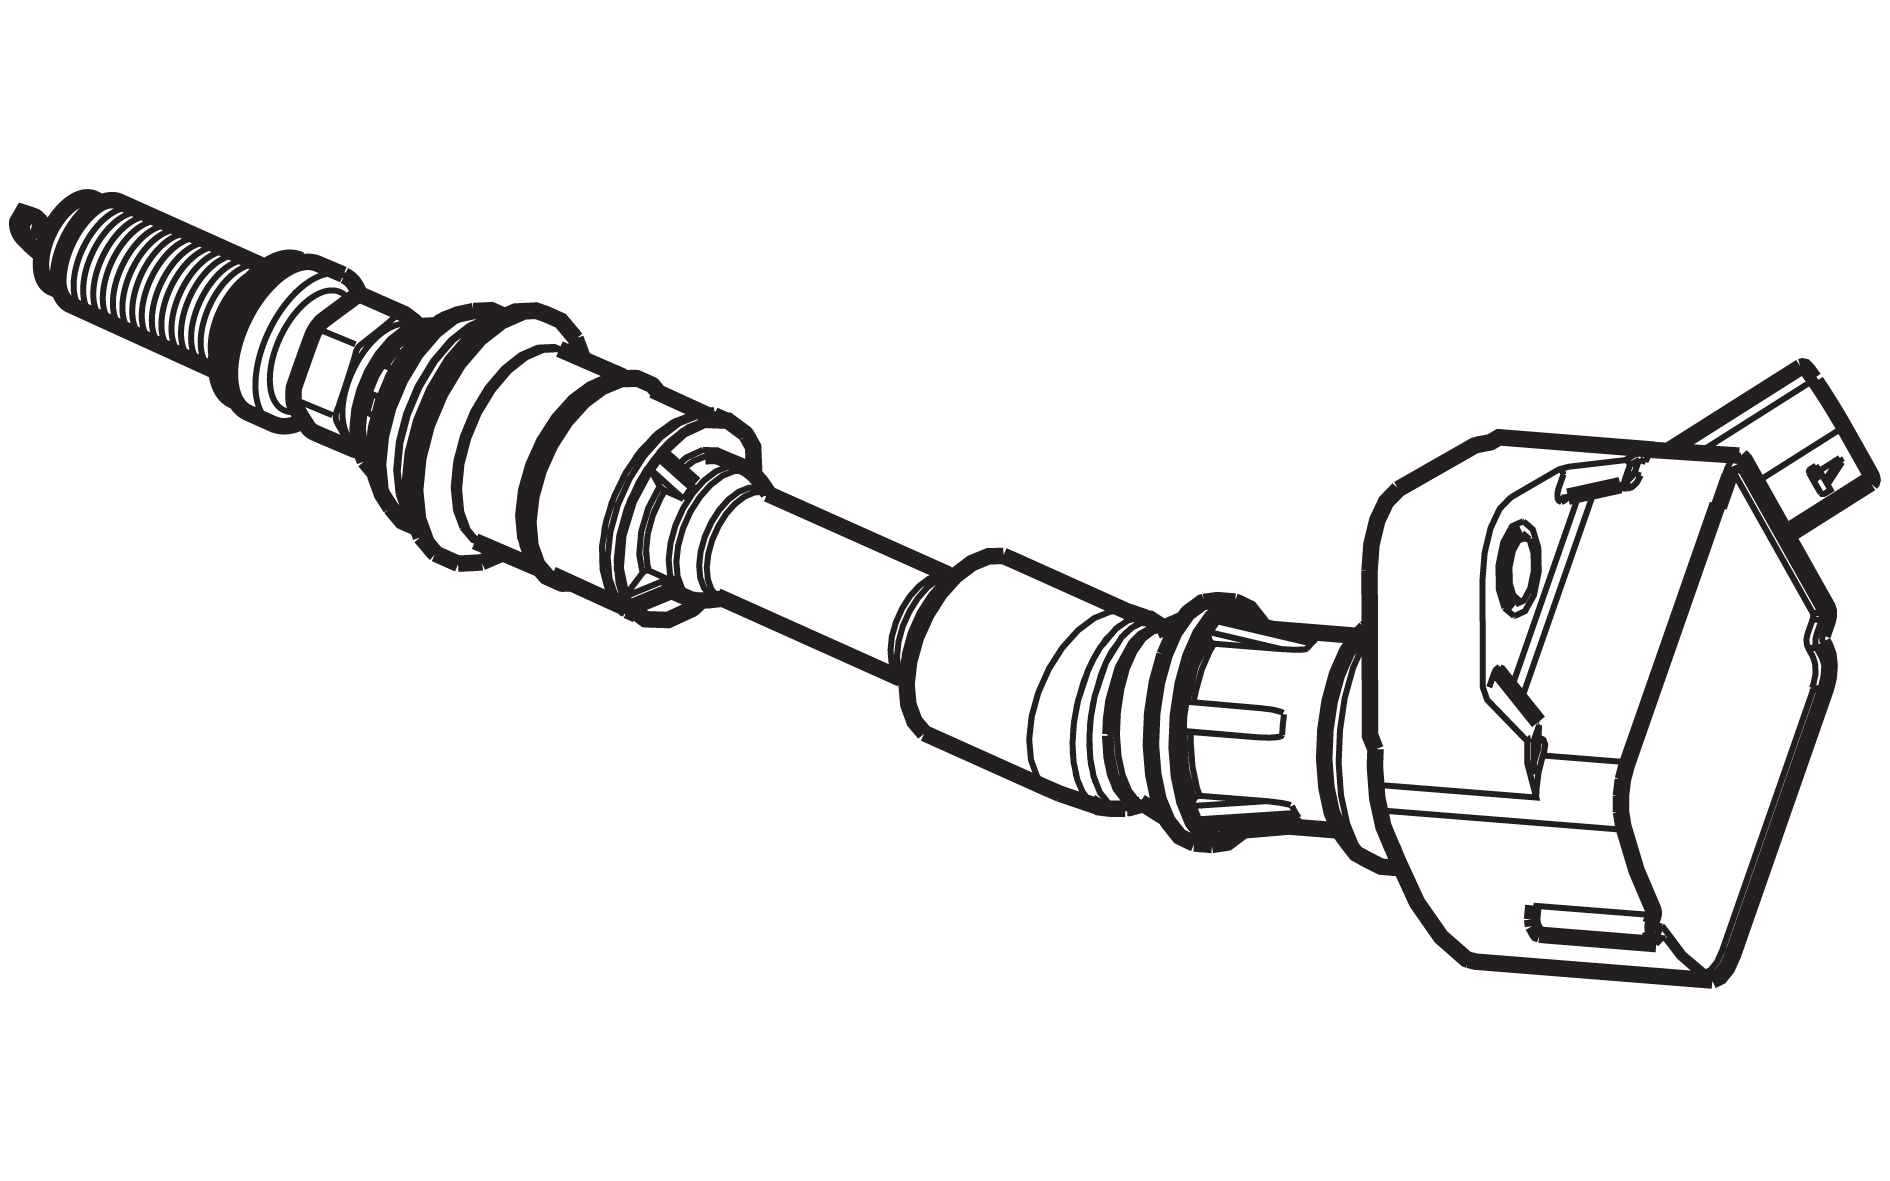
Description
The component consists of two parts, an ignition coil and a spark plug. The ignition coil supplies the spark plug with high-voltage. The ignition coil has an integrated voltage amplifier. The Engine Control Module (ECM) controls the ignition coil and ensures that the spark plug generates sparks at the correct time.
Diagnostic information
The ignition coil and spark plug component does not have a built-in diagnostic system. The Engine Control Module (ECM) monitors the ignition coil and spark plug, sets DTCs and has readable parameters for it.
Connection and communication
The ignition coil and spark plug component is directly connected to the Engine Control Module (ECM).
Component location
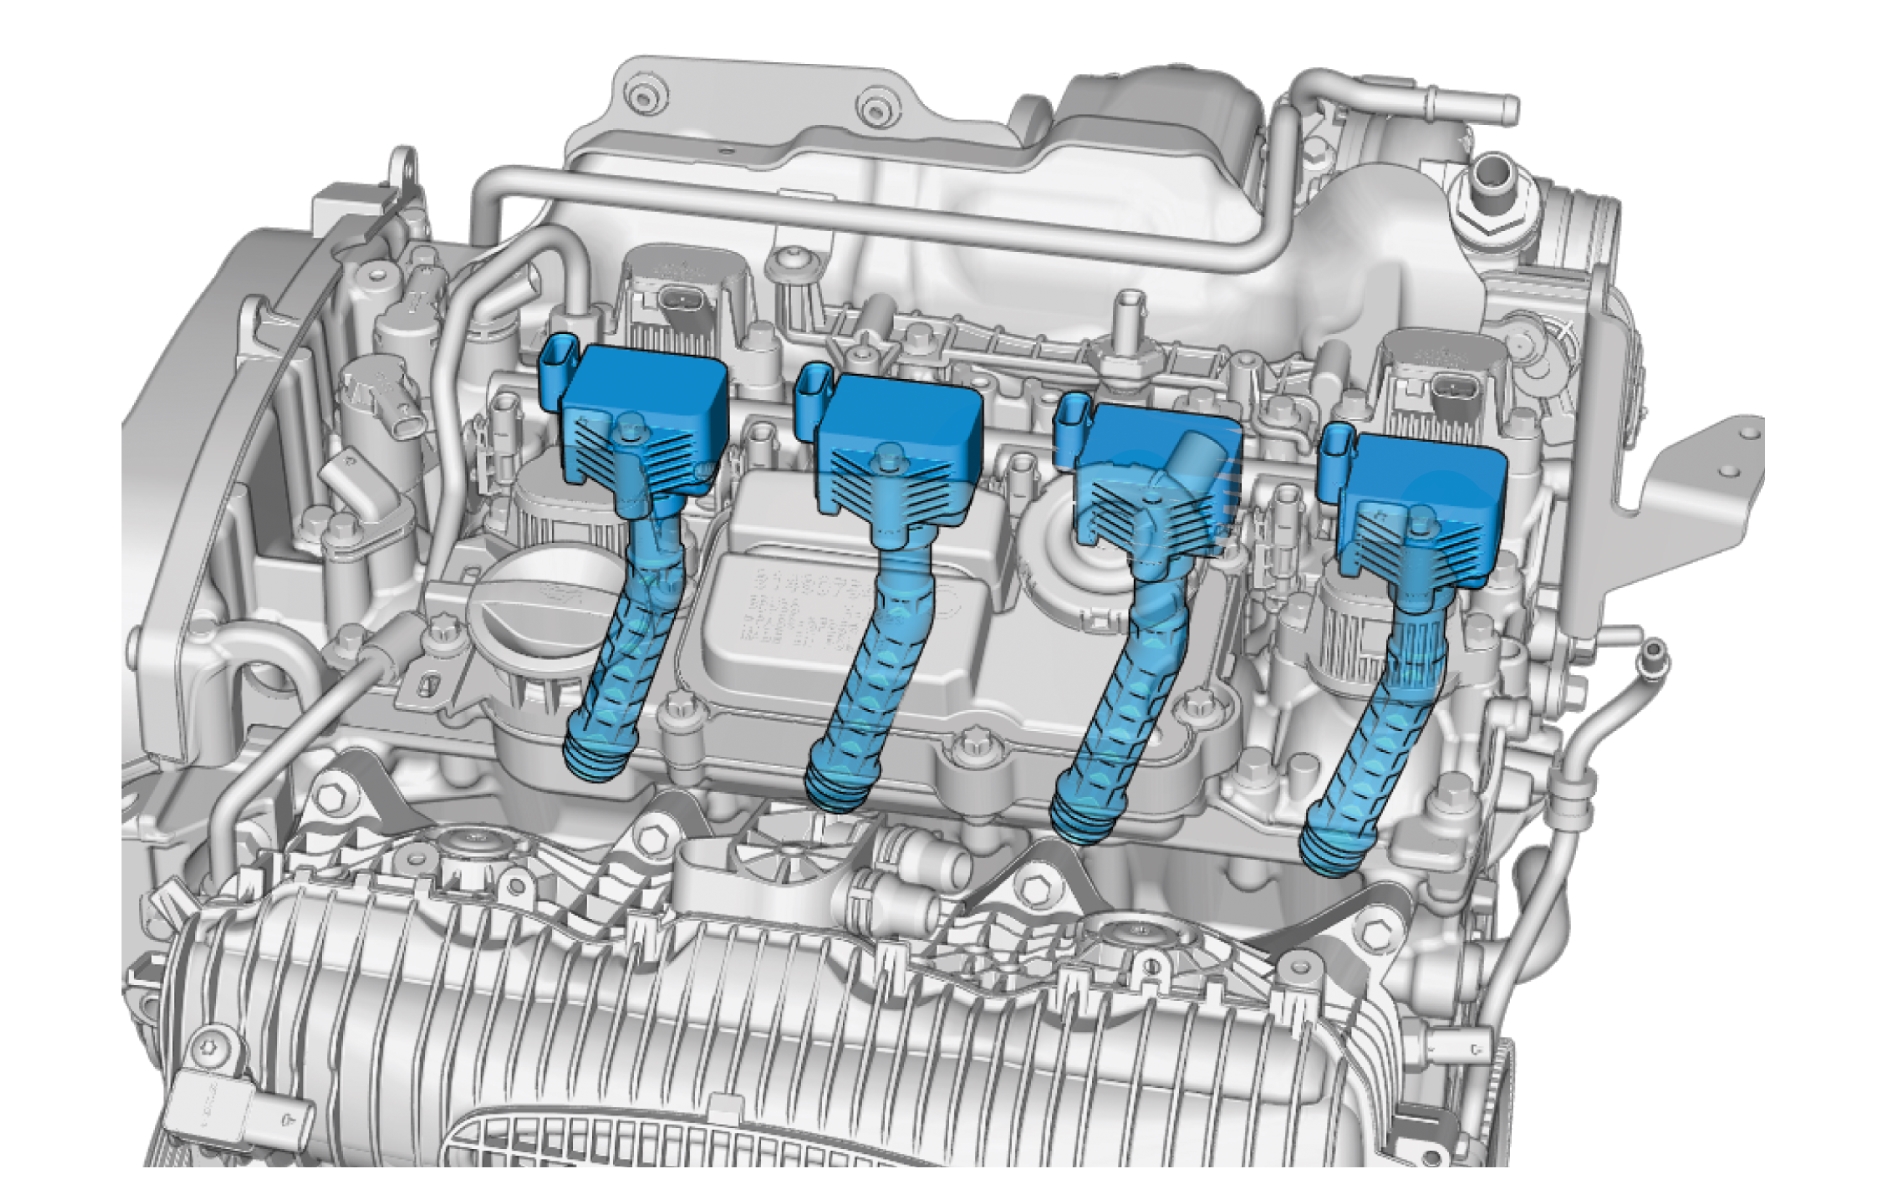
Pin-out
Knock sensor - S604
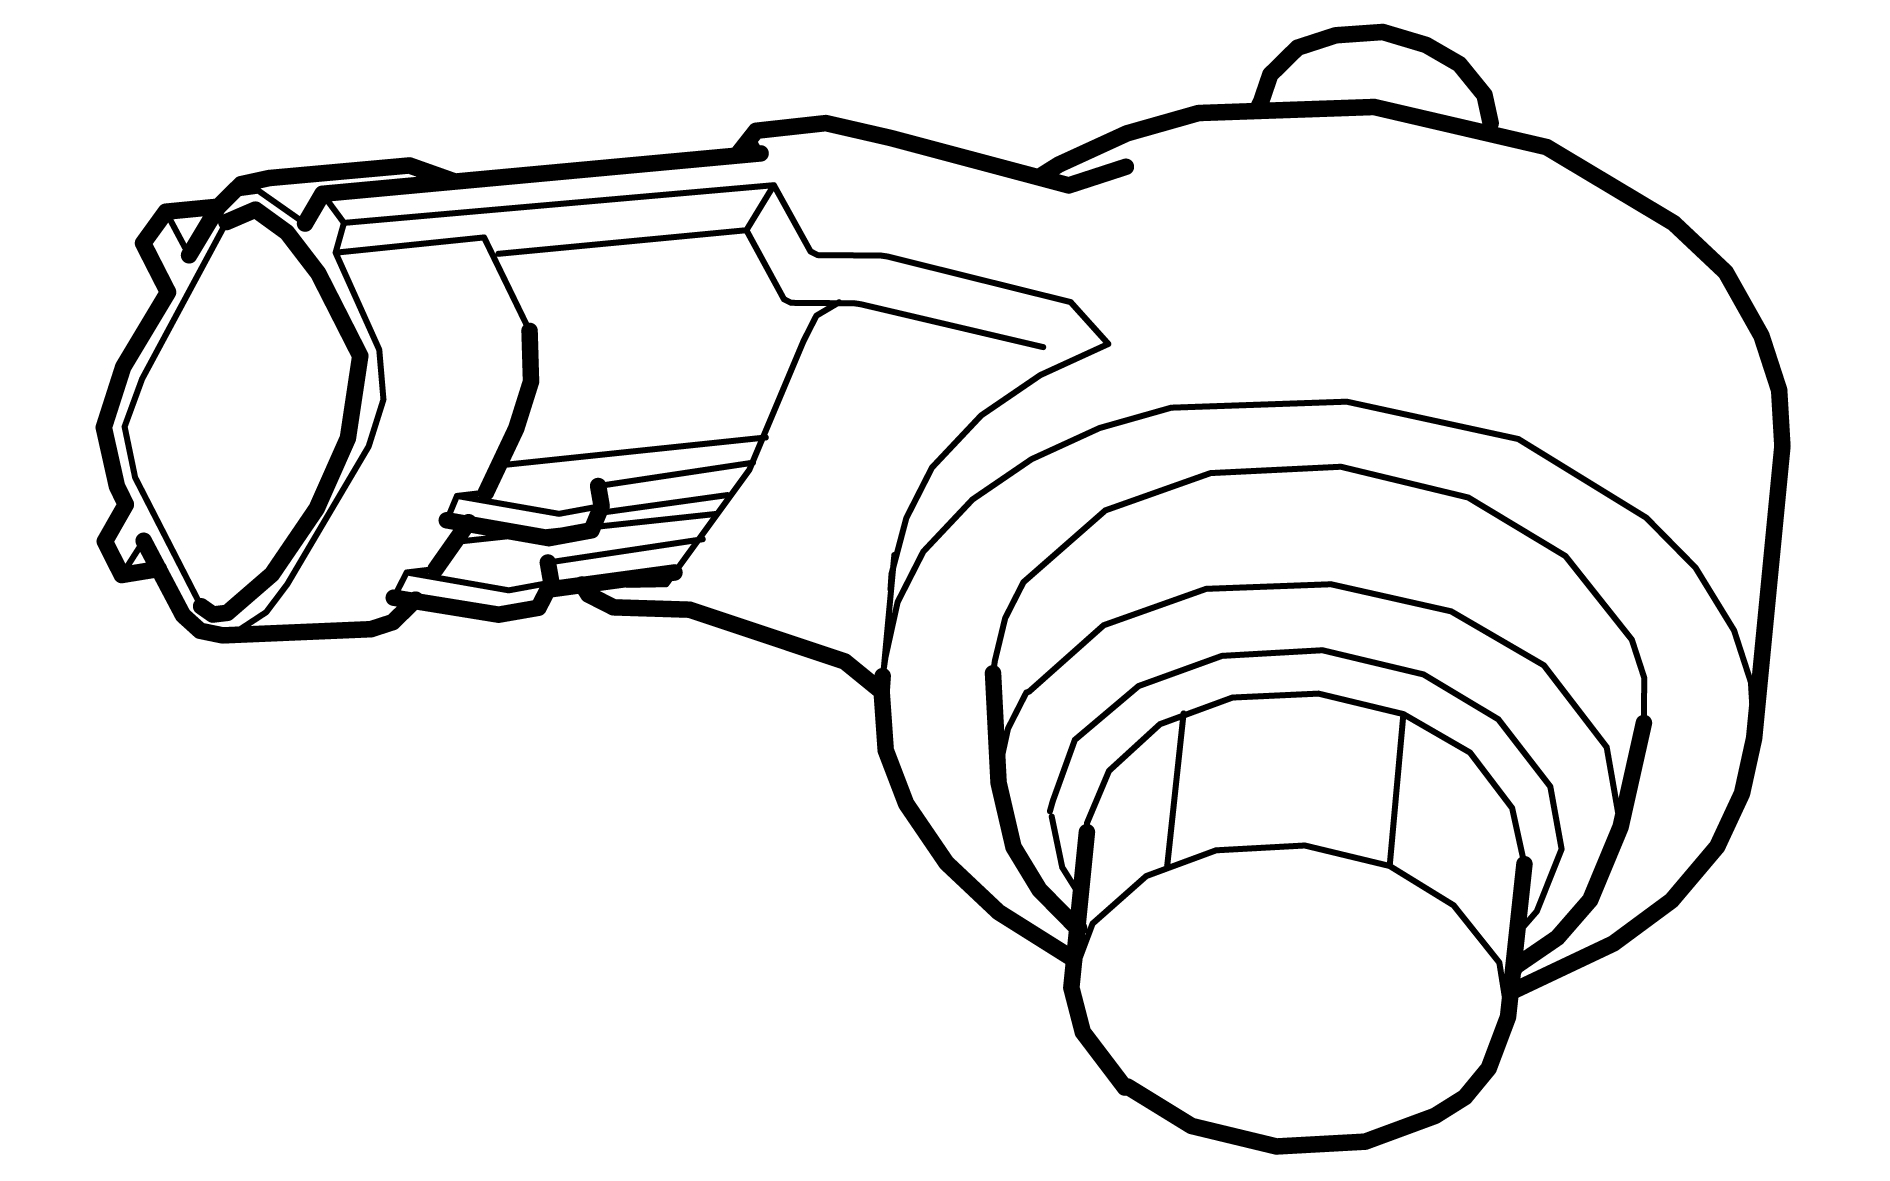
Description
The knock sensor monitors the vibrations in the engine block. The sensor converts mechanical vibration from the engine block to an electronic signal that corresponds to the frequency and amplitude of the vibration. The sensor is made of a piezoelectric crystal. The Engine Control Module (ECM) registers the signal and can thereby determine whether the engine knocks.
Diagnostic information
The knock sensor does not have a built-in diagnostic system. The Engine Control Module (ECM) monitors the sensor, sets DTCs and has readable parameters for it.
Connection and communication
The knock sensor is directly connected to the Engine Control Module (ECM).
Component location
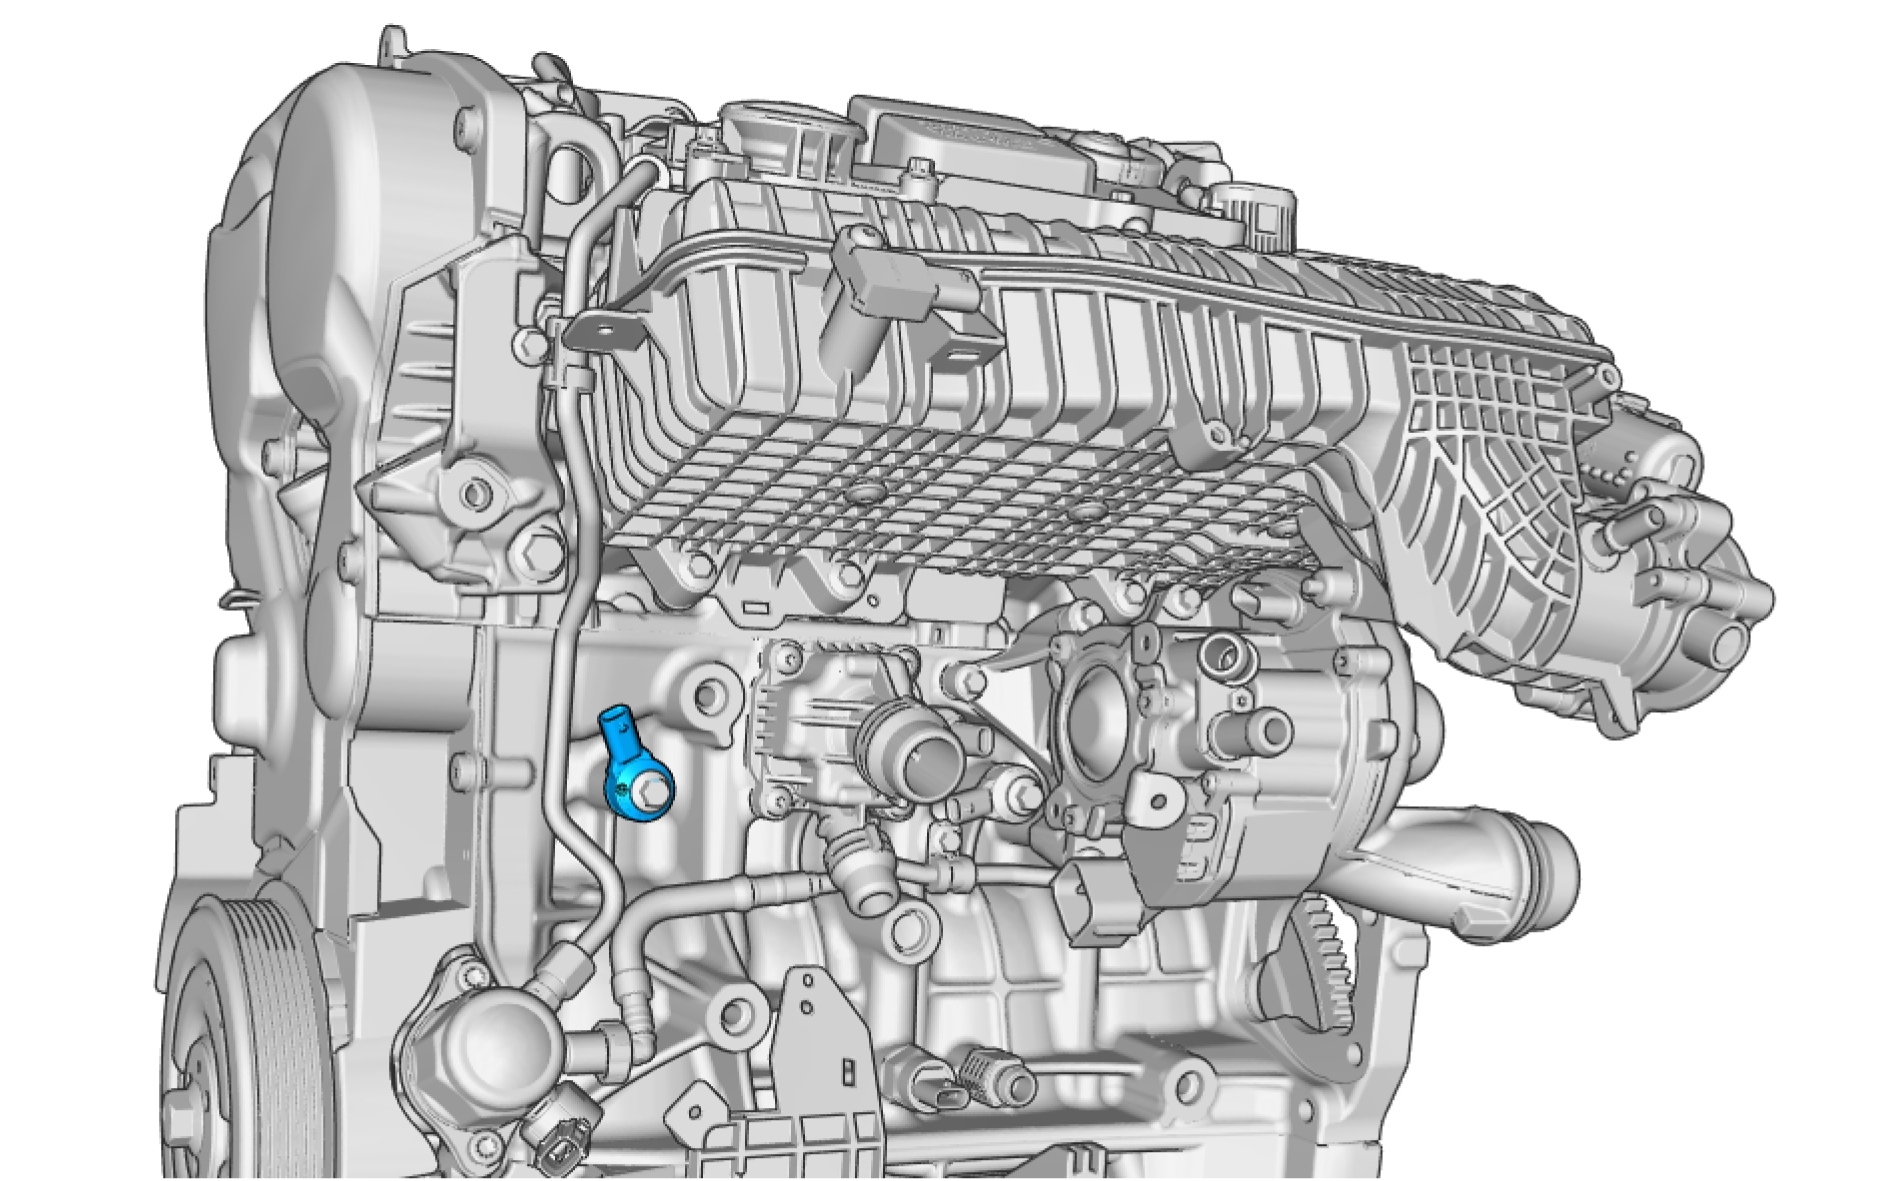
Pin-out
Fuel pump, replace
Removal
Relieve the fuel pressure, refer to:
Fuel system pressure release
Make sure that the area around the component is clean and free of foreign material.
Remove the screws.
Be prepared to collect escaping fluid.
Make sure that a new component is installed.
Loosen the nuts.
Remove the marked component.

Be prepared to collect escaping fluid.
The use of tools or excessive force will damage the quick release couplings.
Depress the locking device.
Undo the hose from the connection.
Disconnect the connector.
Turn the engine to correct position.

This component is sensitive to "mechanical stresses". If the component has been dropped onto the floor, for example, it must not be installed in a vehicle.
Remove the screws.
Remove the marked component.
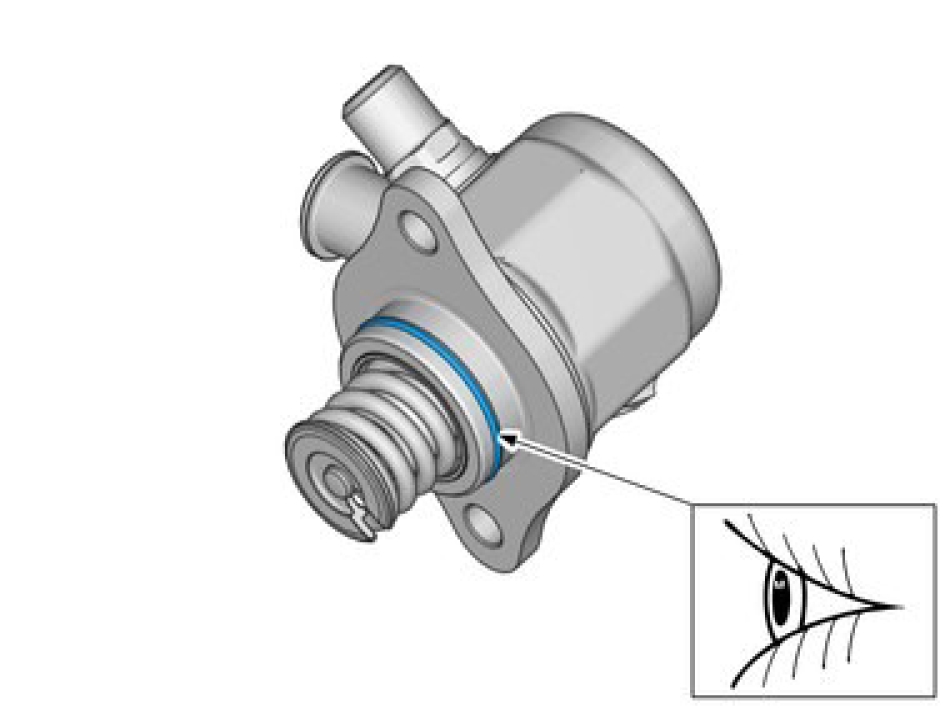
Make sure that the seal remains correctly located.
Check the component. If it displays any type of damage, it must be replaced.

Remove the marked component.
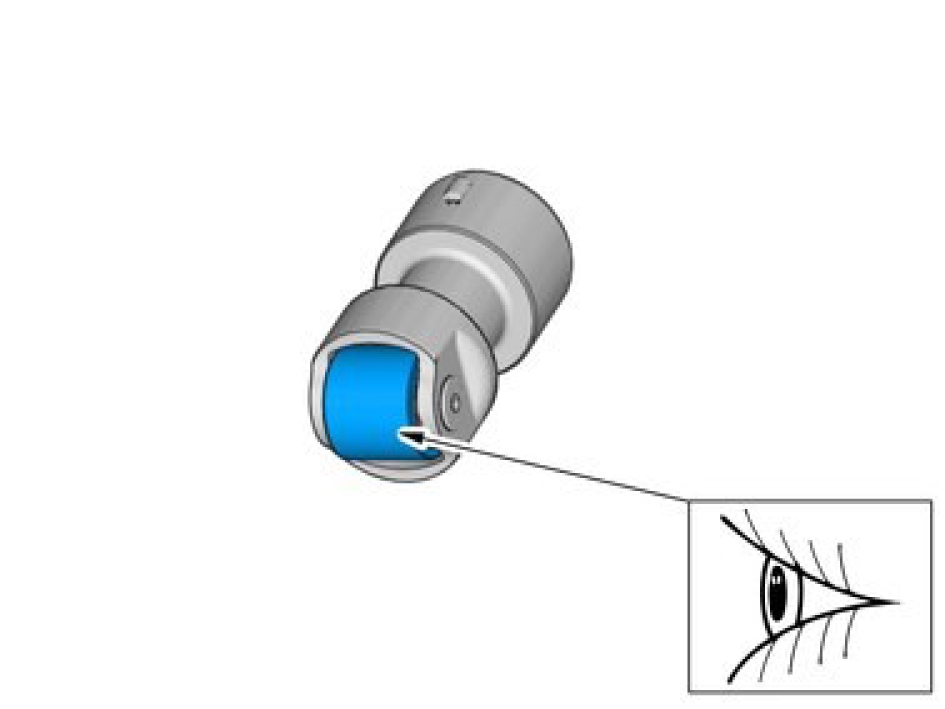
Check the component. If it displays any type of damage, it must be replaced.
Check the surfaces for abrasion.
Installation
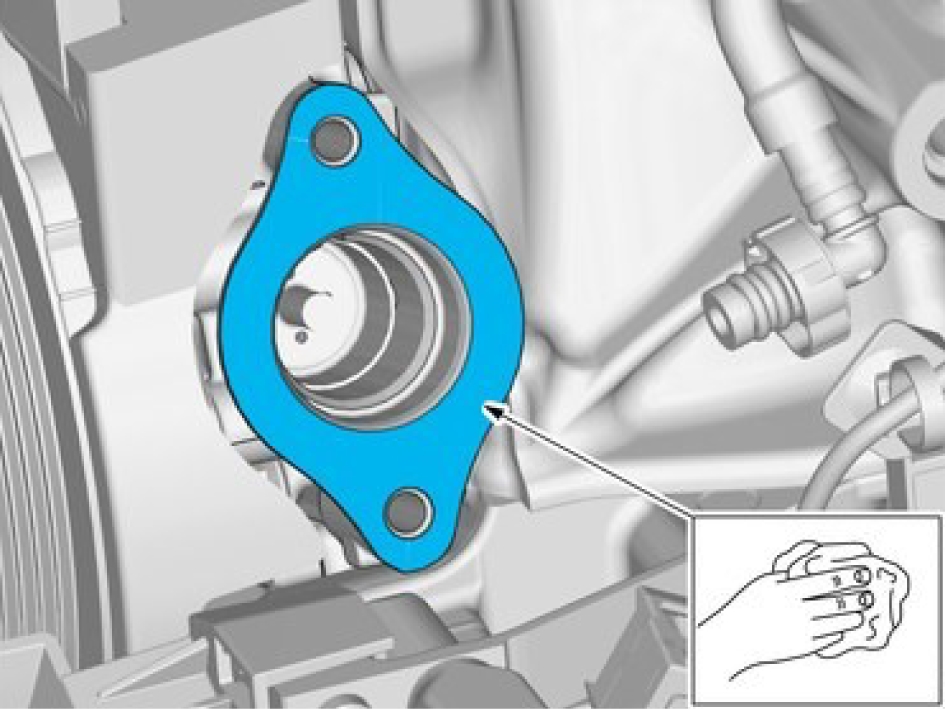
Clean the surface.

Make sure that the component is positioned correctly.
Install the marked component.

Measure with a vernier caliper.
When tightening, rotate each screw 1 turn at a time.
Install the marked component.
Install the screws.
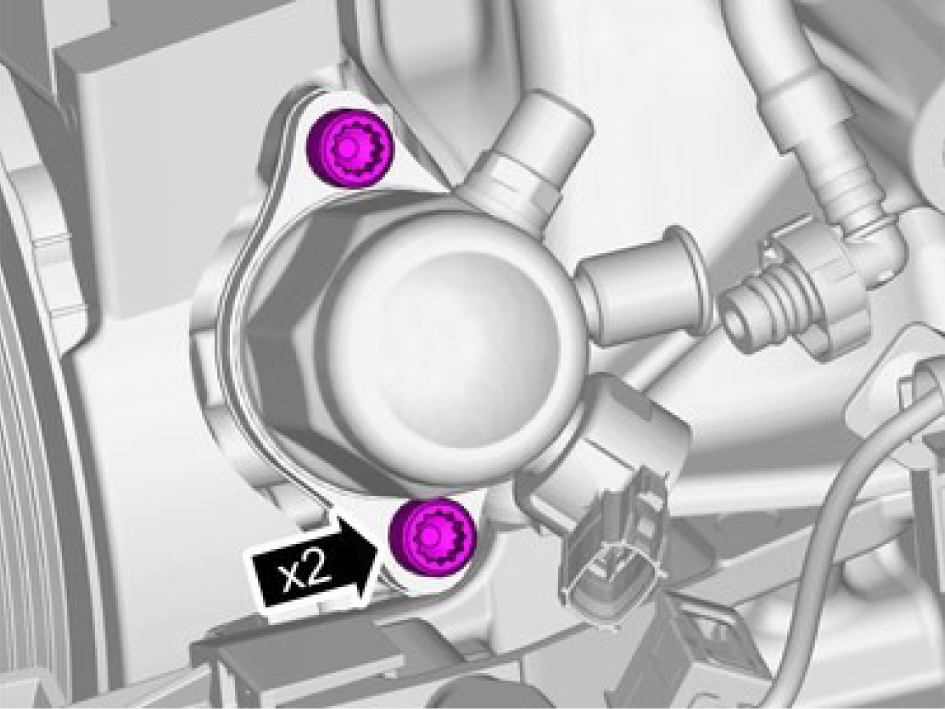
Tighten the screws, torque: 30 Nm
Only tighten the nuts finger tight at this stage.
Install the marked component.

Install the screws M6, torque: 10 Nm
Tighten the nuts using special tools, 981 4129.
Stage 1, torque: 18 Nm
Stage 2, torque: 30 Nm
Auxiliary water pump
Description
Location
Pin Out
Integrated Starter and Generator (ISG) - M801
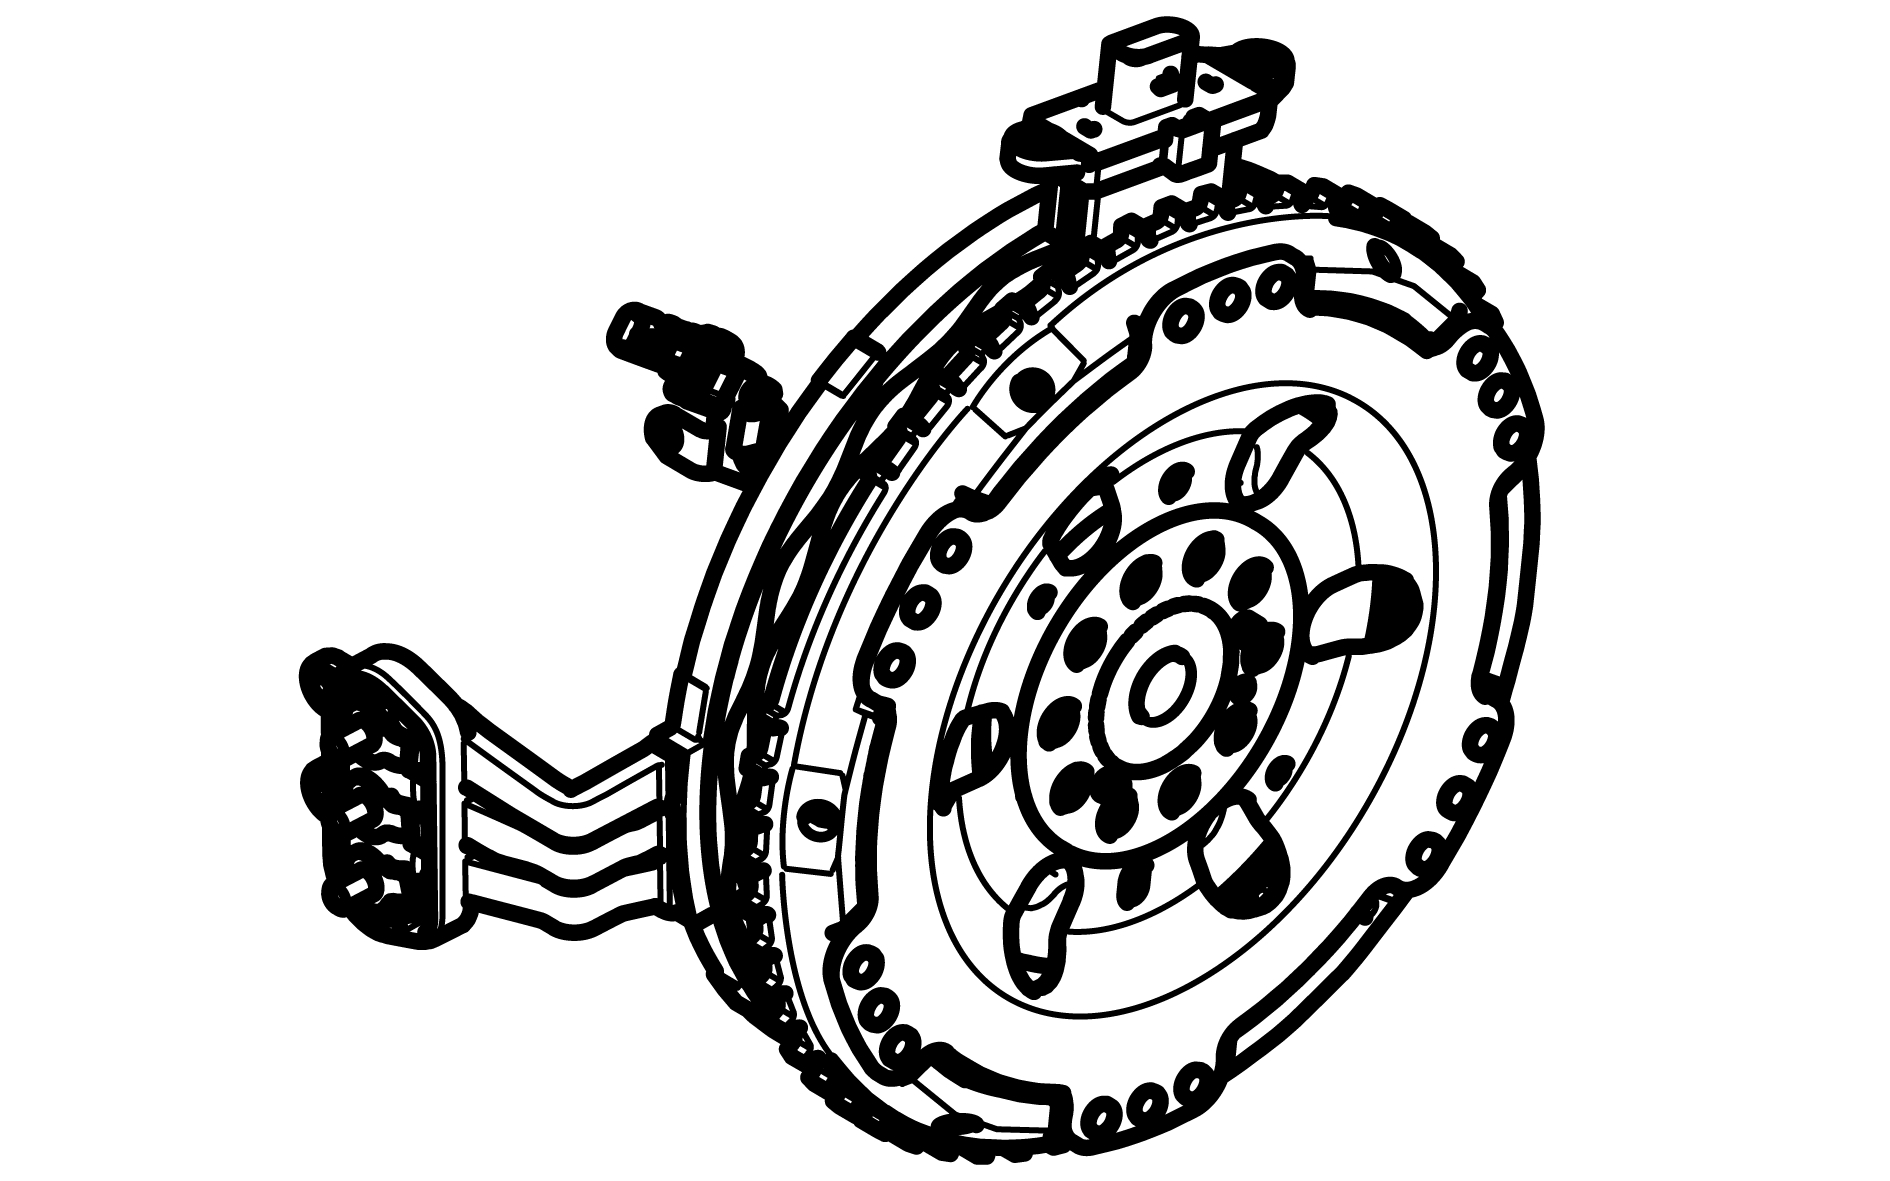
Description
Design
The Integrated Starter and Generator (ISG) is a three-phase permanent magnet synchronous motor (PMSM), which is controlled by the Inverter Generator Module (IGM).
The stator is positioned directly against the engine block and consists of three windings. The windings are in contact with the Combined Inverter DC/DC (CIDD) via a high-voltage connection. Each stator winding consists of one pole pair. When a voltage source is connected to the windings, a current flow and a magnetic field are created. The rotor is screwed to the motor's crankshaft and permanently magnetized by 32 magnets. The rotor has one north pole and one south pole. A conductive metal coil runs along the outer side of the rotor and is used by the rotor position sensor to determine the position of the rotor in relation to the stator windings. The rotor position sensor also determines the rotor's angular velocity.
The rotor position sensor sends an analogue signal to the IGM which, at approximately 180 °C, limits the current to the ISG to avoid overheating.
Functions
The basic function principle is to create a rotating magnetic field in the stator windings, so that the permanently magnetized rotor is forced to rotate. The load can then be connected to the rotor, e.g. the Electric Rear Axle Drive (ERAD). Alternatively, the rotor could induce voltage in the coils, resulting in a generating effect.
The Integrated Starter and Generator (ISG) has three main functions:
-
Acting as a starter motor for the internal combustion engine. A driving torque of >180 Nm can be generated on the rotor as the stator windings are supplied with current. The created magnetic field drives the rotor.
-
Generating electricity for the high-voltage battery, the Electric Rear Axle Drive (ERAD) and other components. As the Twin Engine does not have a conventional 12 V alternator, the Integrated Starter and Generator (ISG) may work as a generator while driving. By controlling the transistors, 3-phase high-voltage AC can be generated. The Inverter Generator Module (IGM) converts the AC to high-voltage DC.
-
Working as an electric power boost for the internal combustion engine. In the event of a request for increased torque from the Engine Control Module (ECM) to the Inverter Generator Module (IGM), the Integrated Starter and Generator (ISG) will stop generating, resulting in a power boost. Based on the driving torque situation and if the Engine Control Module (ECM) requests higher torque or a continuous requirement, all power output is transferred to the Electric Rear Axle Drive (ERAD).
The Integrated Starter and Generator (ISG) is also used to increase exhaust gas temperature in order to heat up the catalytic converter more quickly. The ISG is connected to a cooling circuit to dissipate heat generated by the unit.
The rotor's rotational speed is regulated by controlling the fundamental frequency of the voltage and the generated current. Increasing the fundamental frequency will increase the rotor's speed to the same extent. The fundamental frequency can be illustrated as a sine curve.
Specifications
| Max output | 34 kW (for max 10 s) |
| Max torque | 180 Nm |
| Max amperage | 285 A |
| Max rotational speed | 8000 r/min |
| Weight | Approximately 20 kg |
| Dimensions | D: 305 mm, W: 69 mm |
Diagnostic information
The Integrated Starter and Generator (ISG) does not have a built-in diagnostic system. The Inverter Generator Module (IGM) monitors the unit, sets DTCs and has readable parameters for it.
Connection and communication
The Integrated Starter and Generator (ISG) is directly connected to the Inverter Generator Module (IGM).
Component location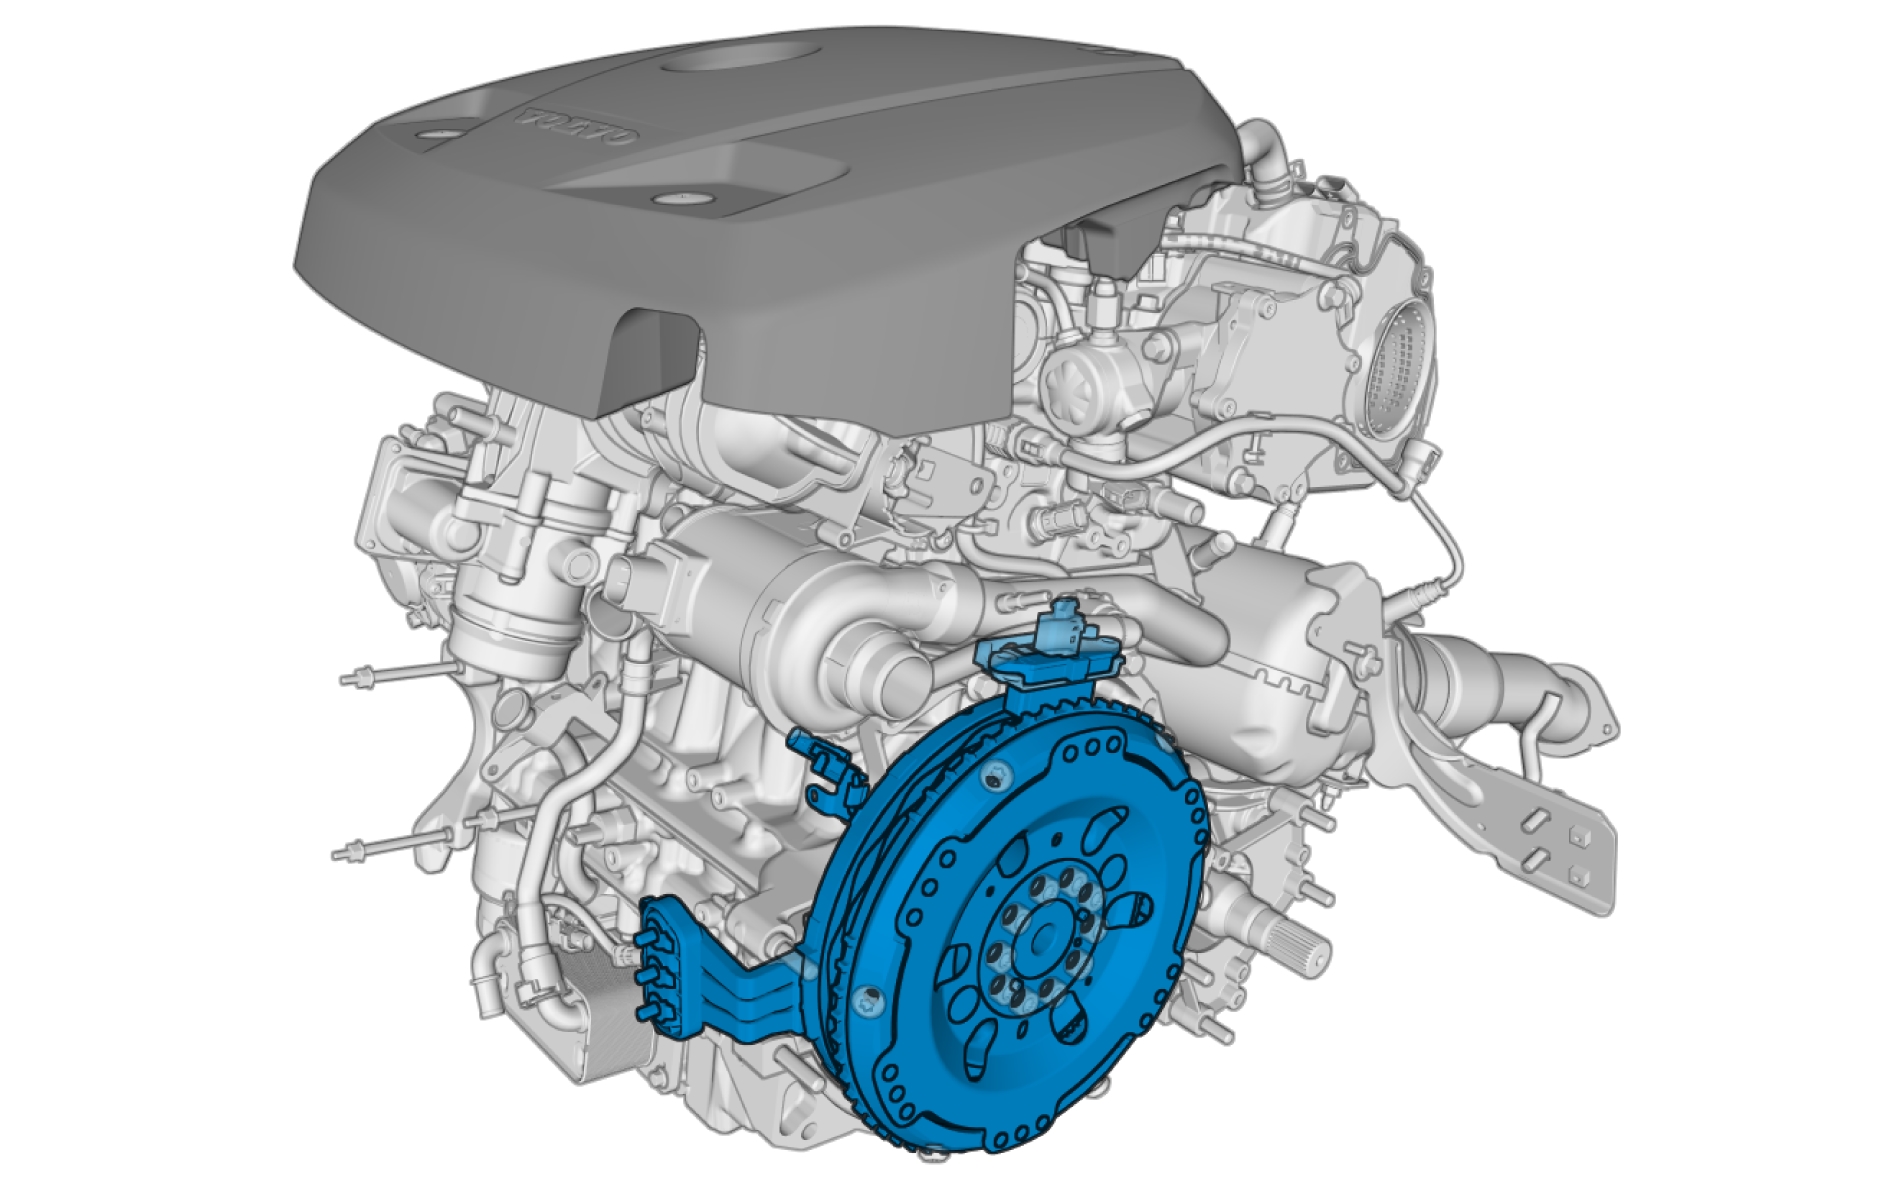
Integrated Starter Generator Module (ISGM) - P802
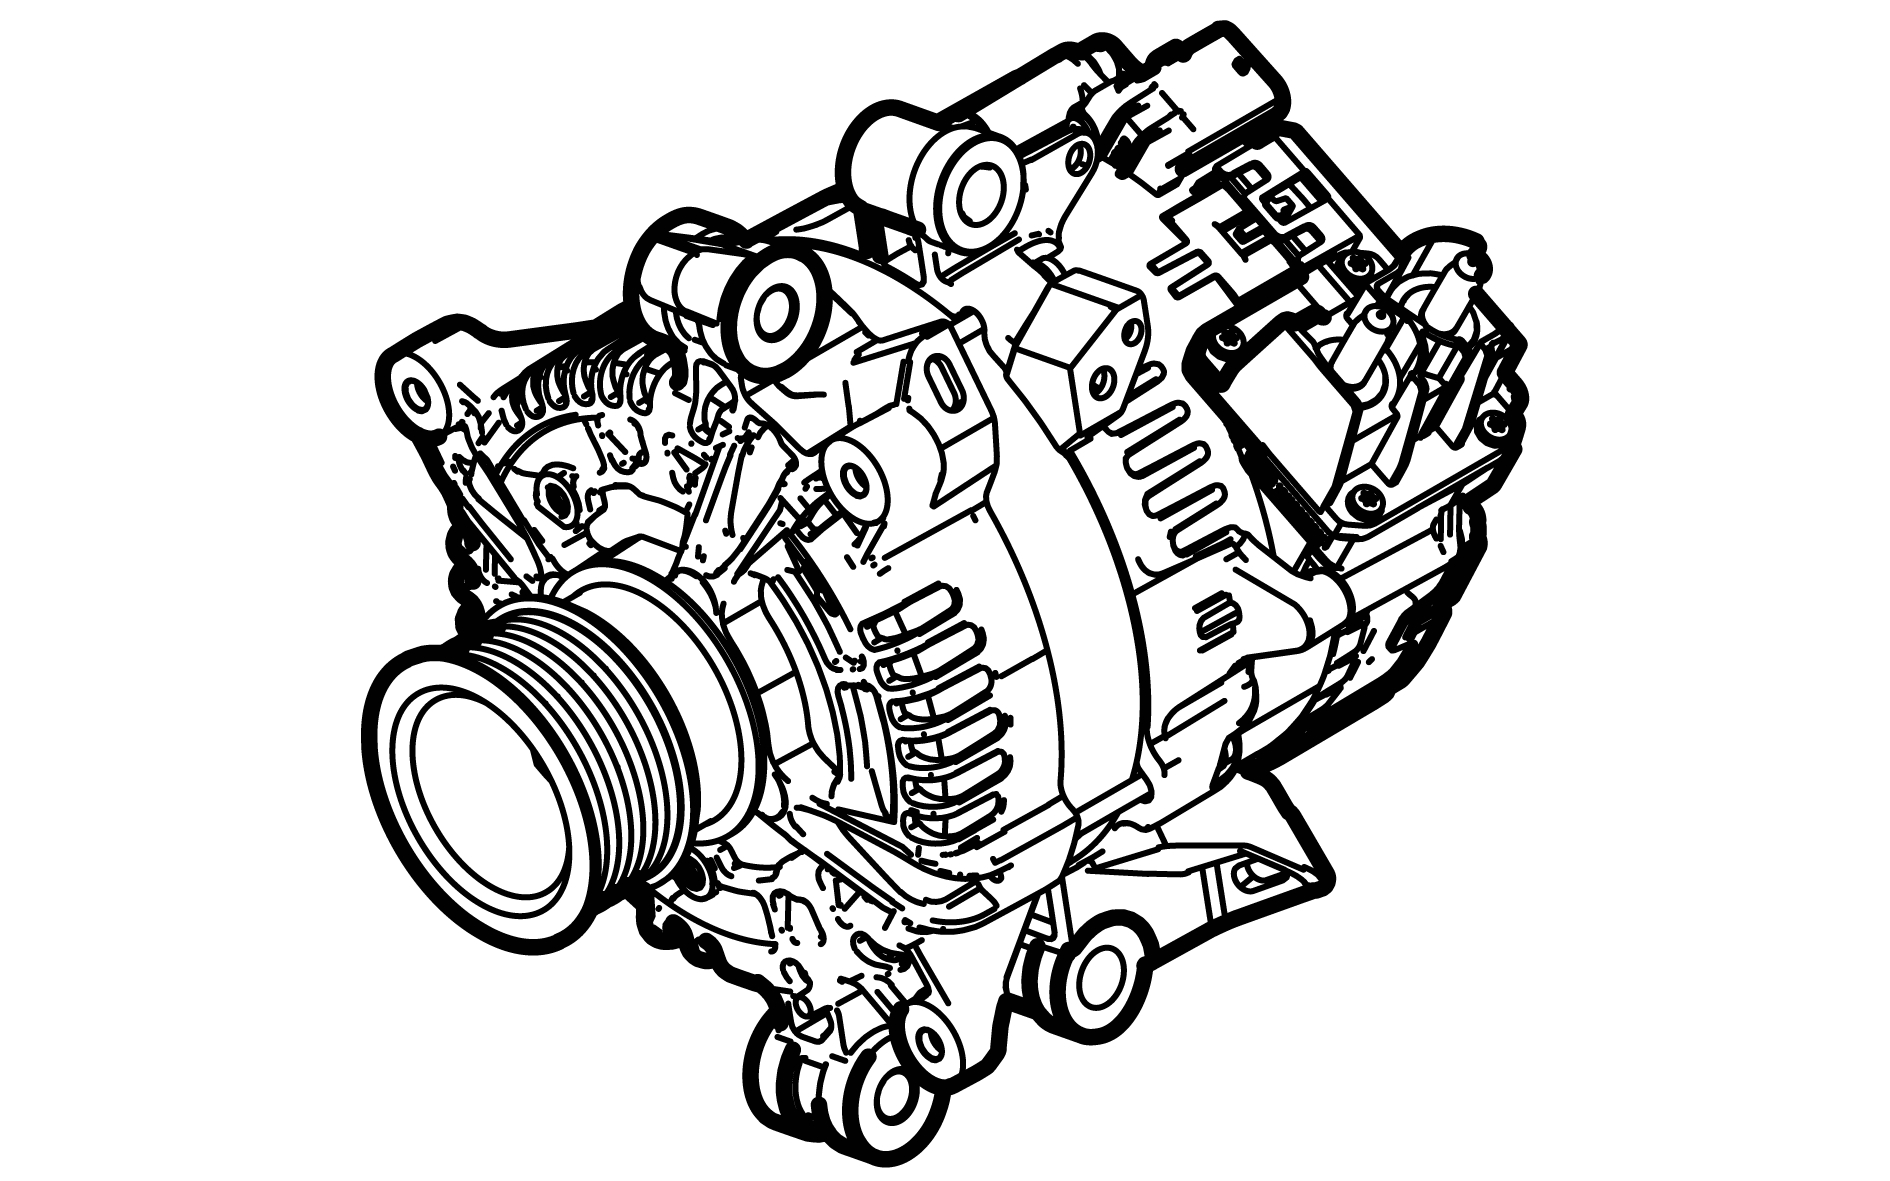
Description
The Integrated Starter Generator Module (ISGM) consists of an electrical machine and an internal control module with an integrated inverter. It is connected to the crankshaft of the internal combustion engine, via the auxiliary drive belt (FEAD). The Integrated Starter Generator Module (ISGM) performs two basic operations:
-
Generator operation: The Integrated Starter Generator Module (ISGM) converts mechanical power to electrical power. The electrical power is used to charge the 12 V and 48 V batteries. To charge the 12 V battery the electrical power is converted by the Mid-Voltage Converter Module (MVCM).
-
Motor operation: The Integrated Starter Generator Module (ISGM) converts electrical power into mechanical power. The mechanical power is used for running the starter motor and for giving an electric boost for the internal combustion engine.
Diagnostic information
The Integrated Starter Generator Module (ISGM) has built-in diagnostic system, which continuously monitors itself and the input and output signals. The ISGM sets DTCs and has readable parameters.
Connection and communication
The Integrated Starter Generator Module (ISGM) is a CAN domain slave and communicates mostly with the Engine Control Module (ECM).
Component location
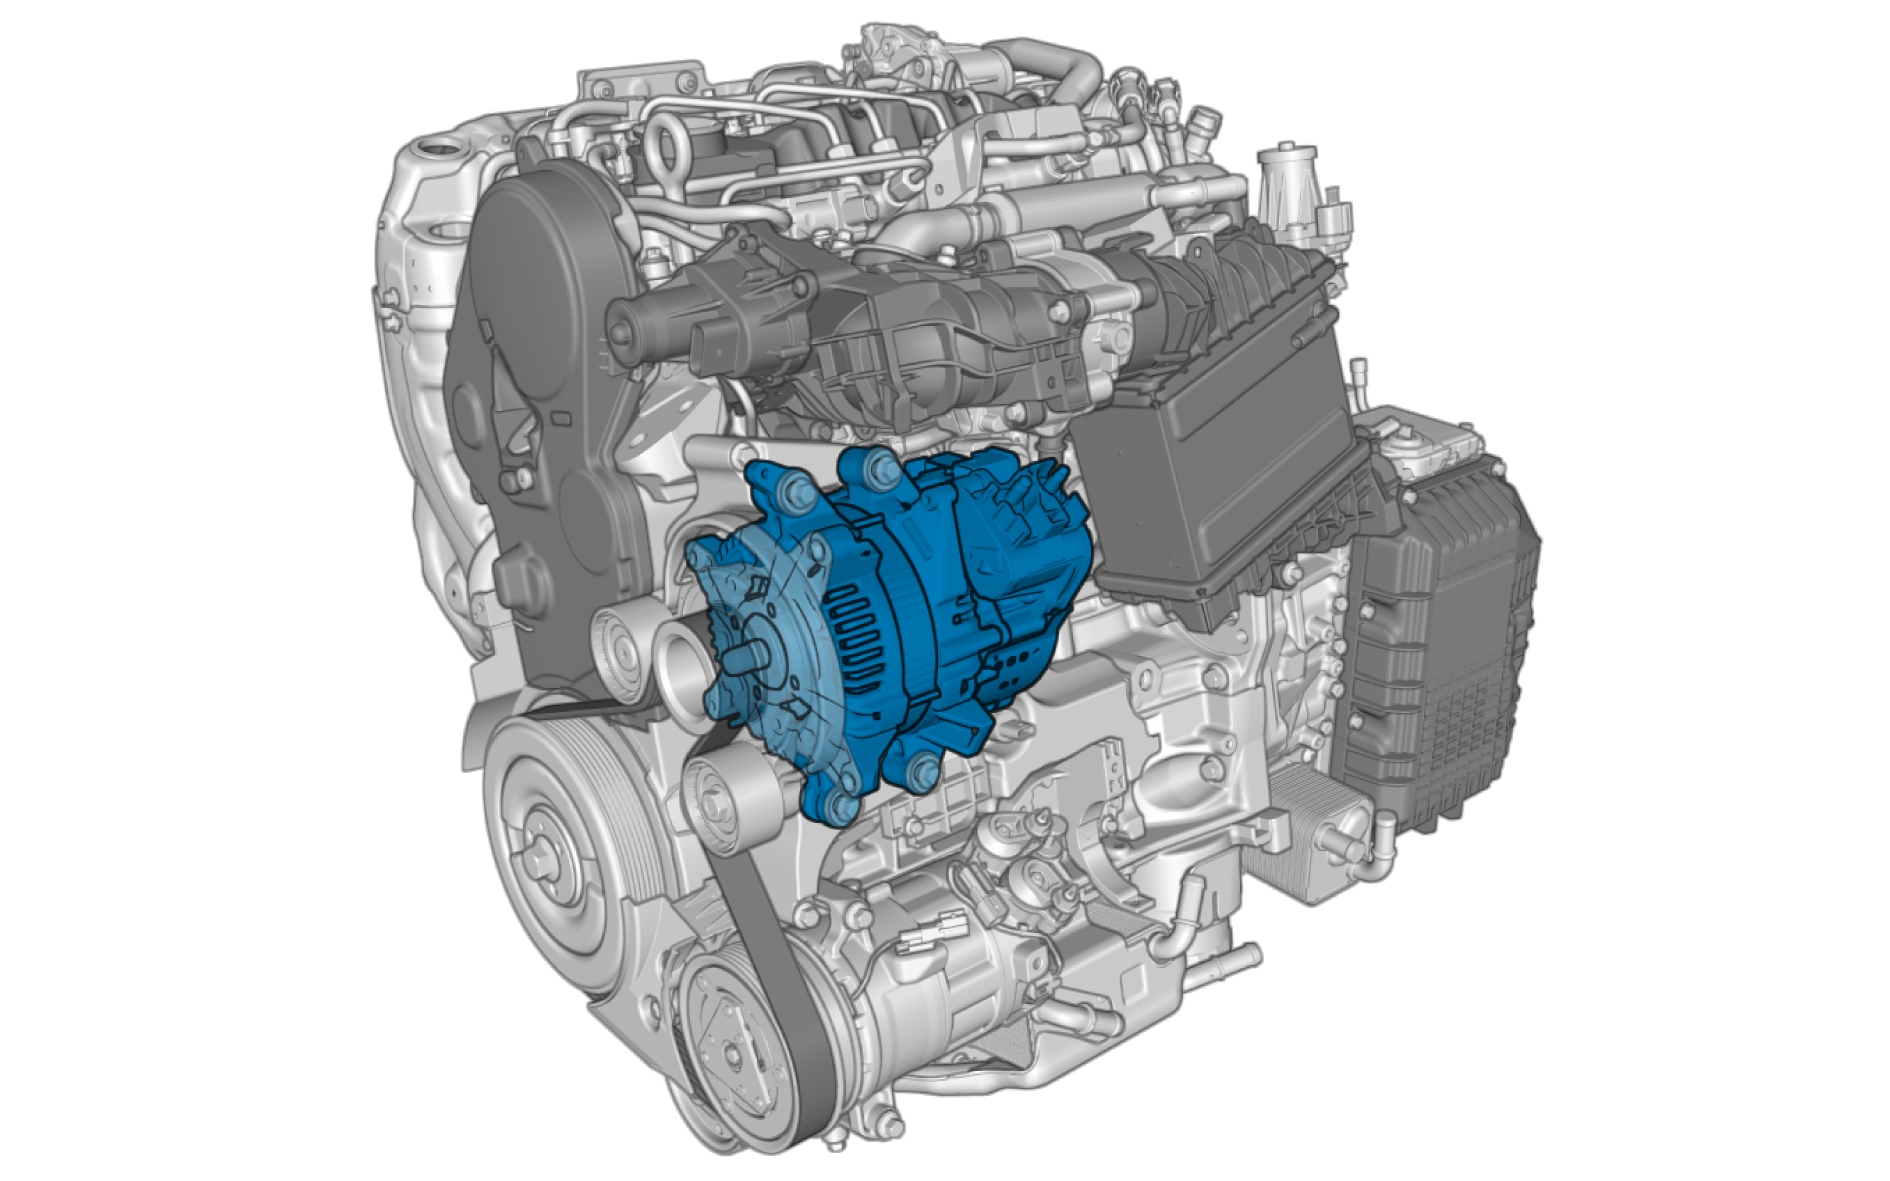
Pin-out
Oil Pressure Sensor
Description
Location
Pin Out
Mass Airflow sensor (MAF) - S301
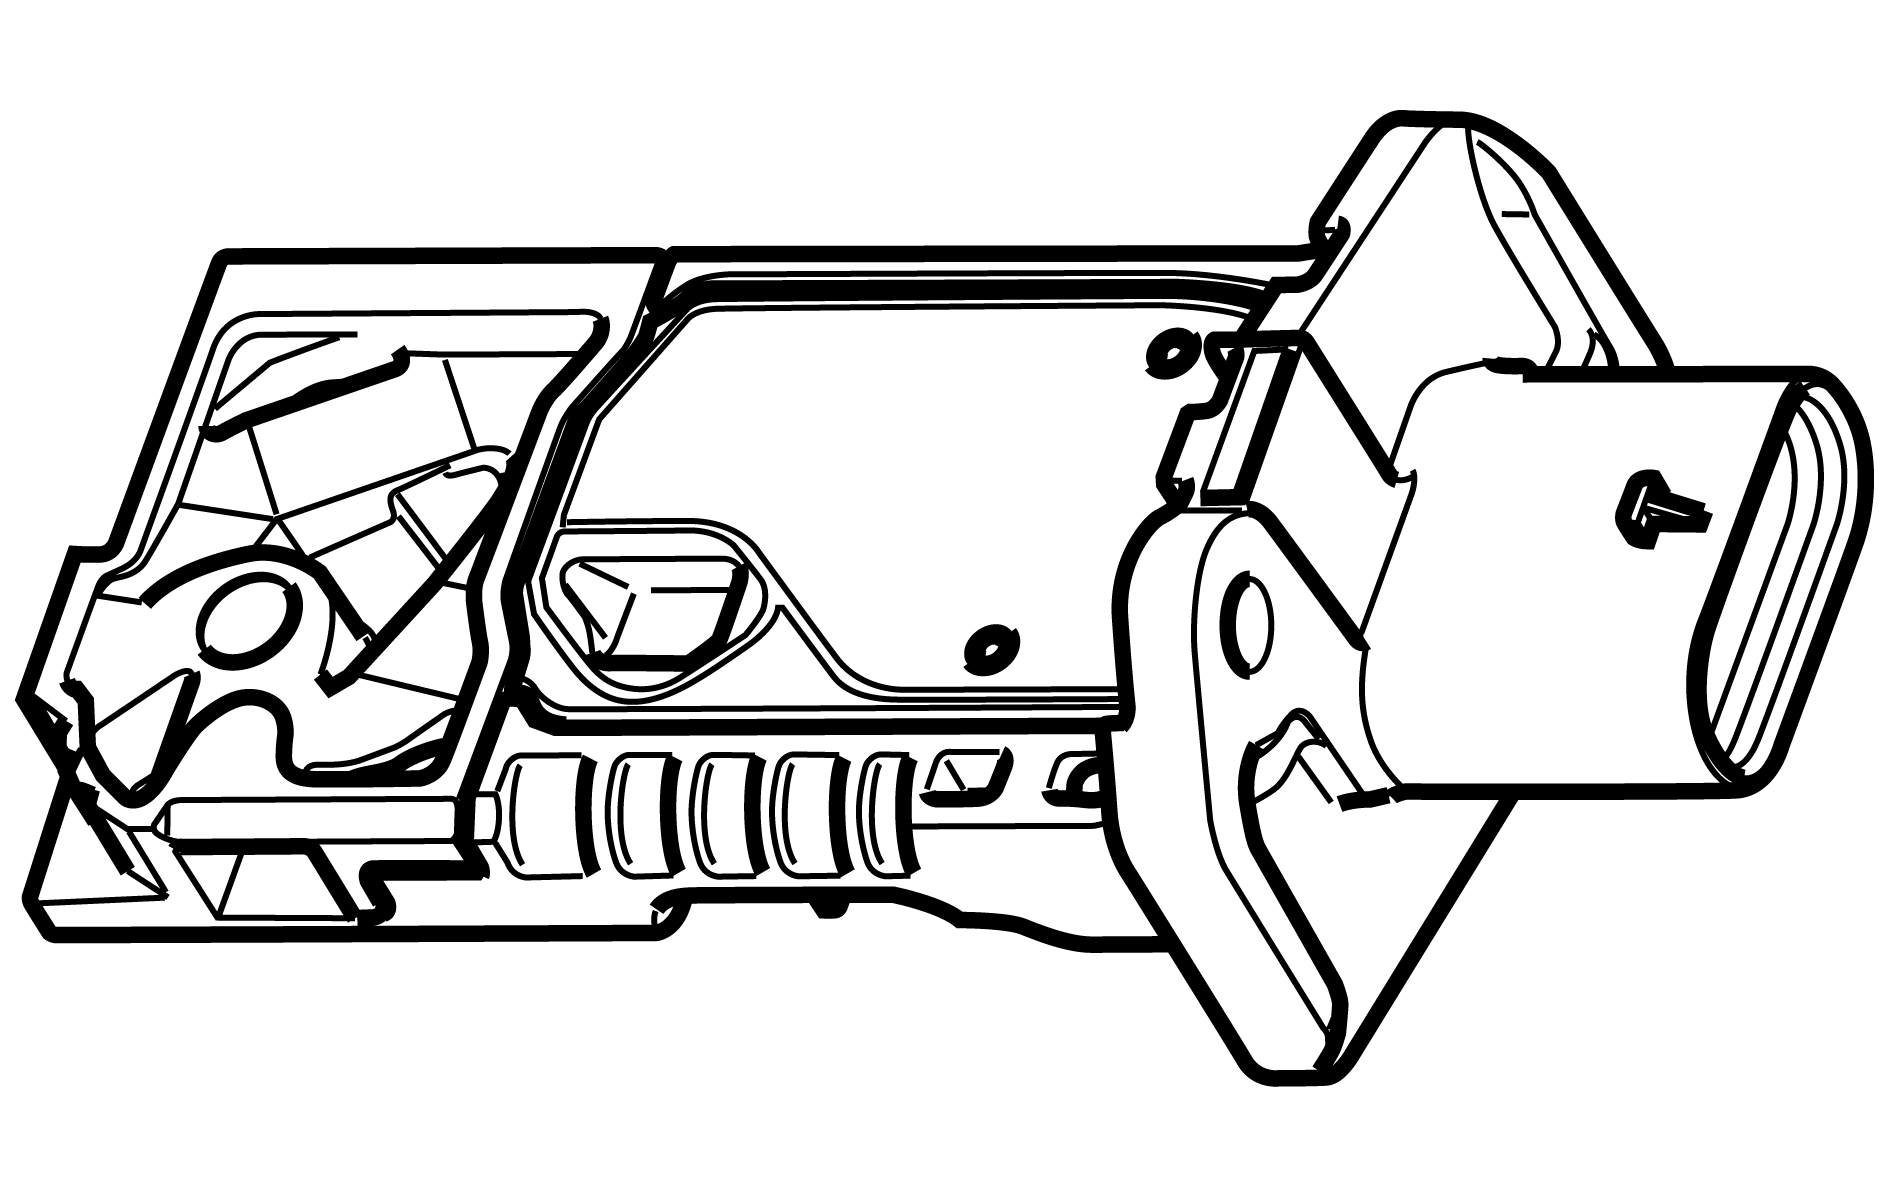
Description
The Mass Airflow sensor (MAF) contains three internal sensors, one mass airflow sensor, one temperature sensor and one humidity sensor. The mass airflow sensor measures the magnitude of air mass that enters the air intake system. The sensor consists of two resistors: a cold resistor and a heated resistor. The heated resistor is heated up to a set temperature higher than the cold resistor's temperature. Both resistors are positioned within the airflow.
The Mass Airflow sensor (MAF) uses the temperature difference between the resistors to calculate the air mass. The temperature sensor measures the intake air temperature. The humidity sensor measures the intake air humidity.
Diagnostic information
The Mass Airflow sensor (MAF) has a simplified built-in diagnostic system, which monitors a limited number of errors. All diagnostic data is sent to the diagnostic tool via the Engine Control Module (ECM). The ECM sets DTCs and has readable parameters for the MAF.
Connection and communication
The Mass Airflow sensor (MAF) is directly connected to the Engine Control Module (ECM).
Component location
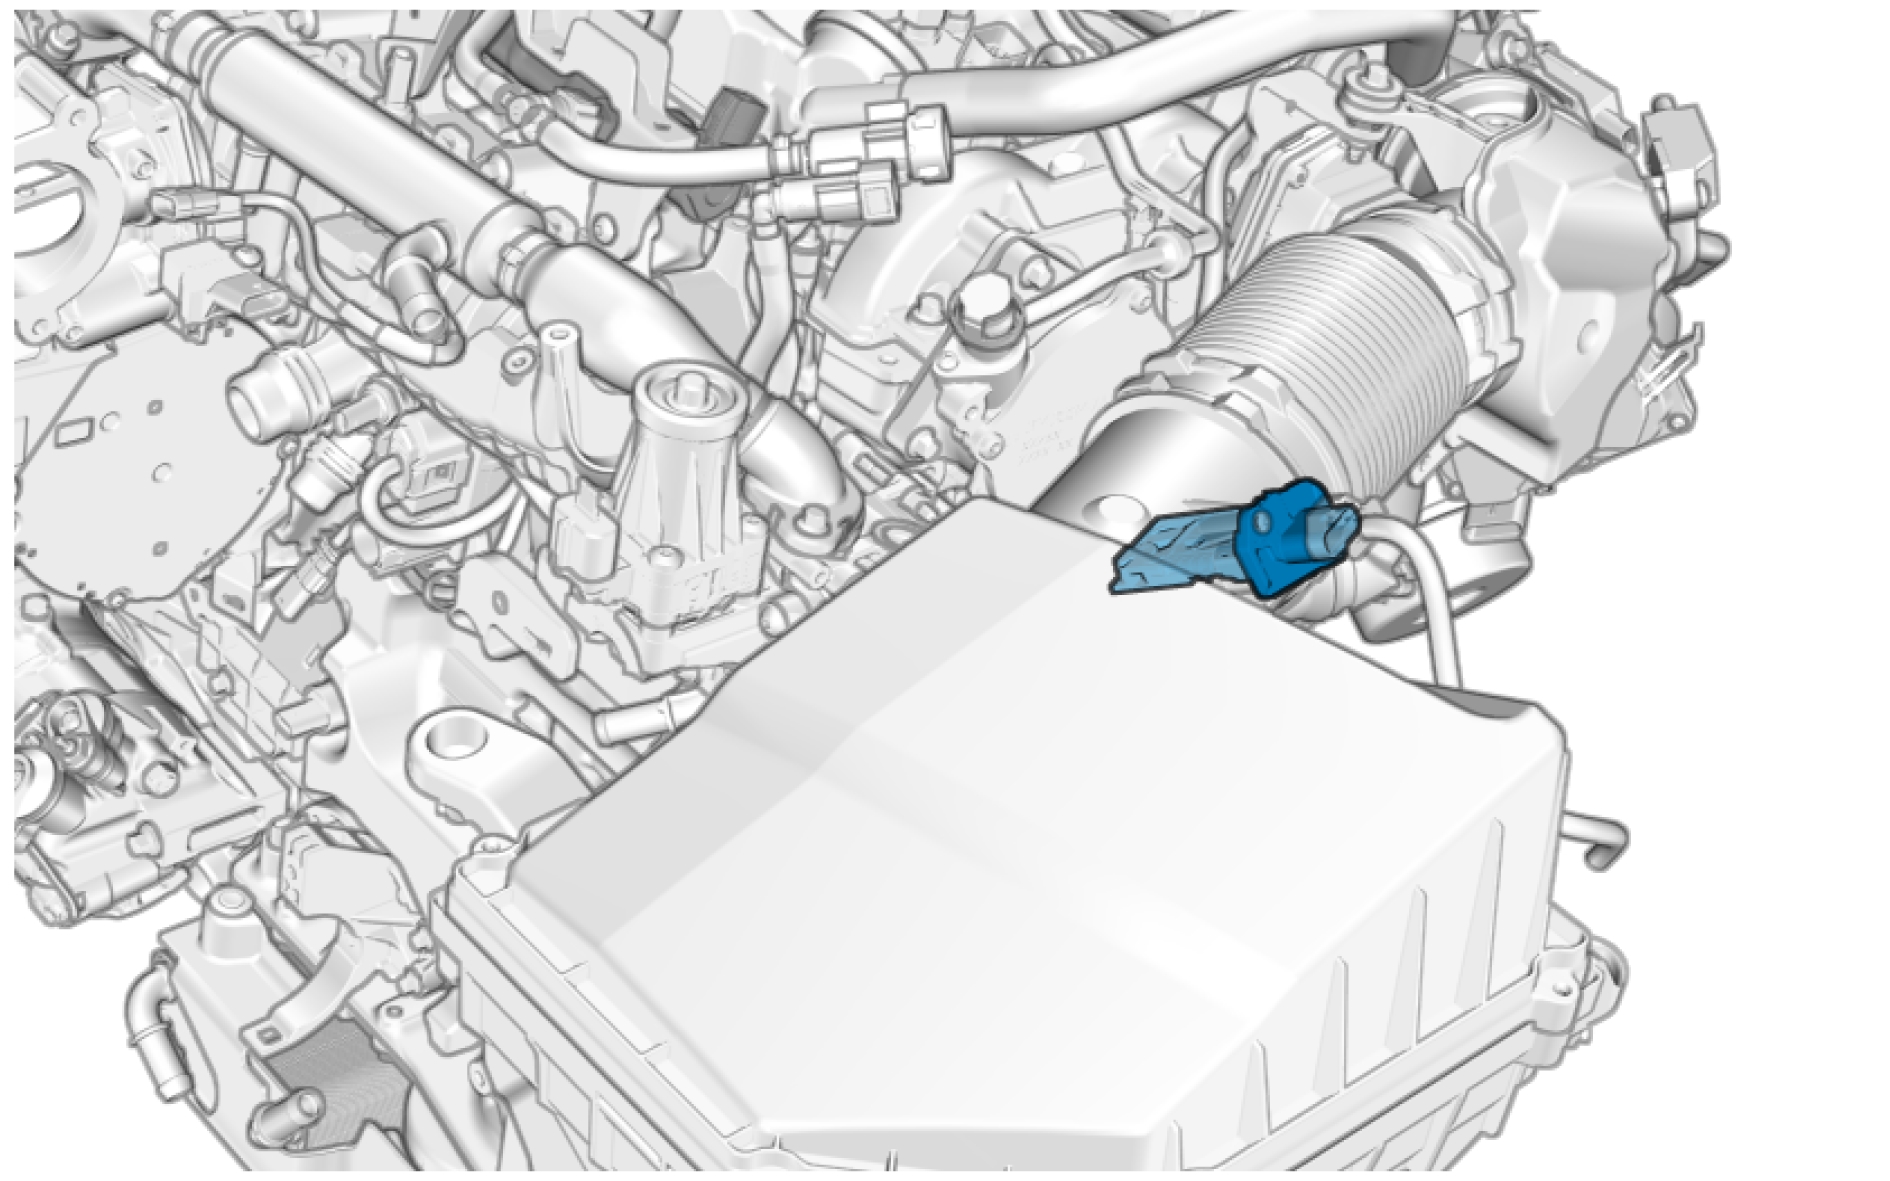
Pin-out
Oil pressure- and oil temperature sensor - S502
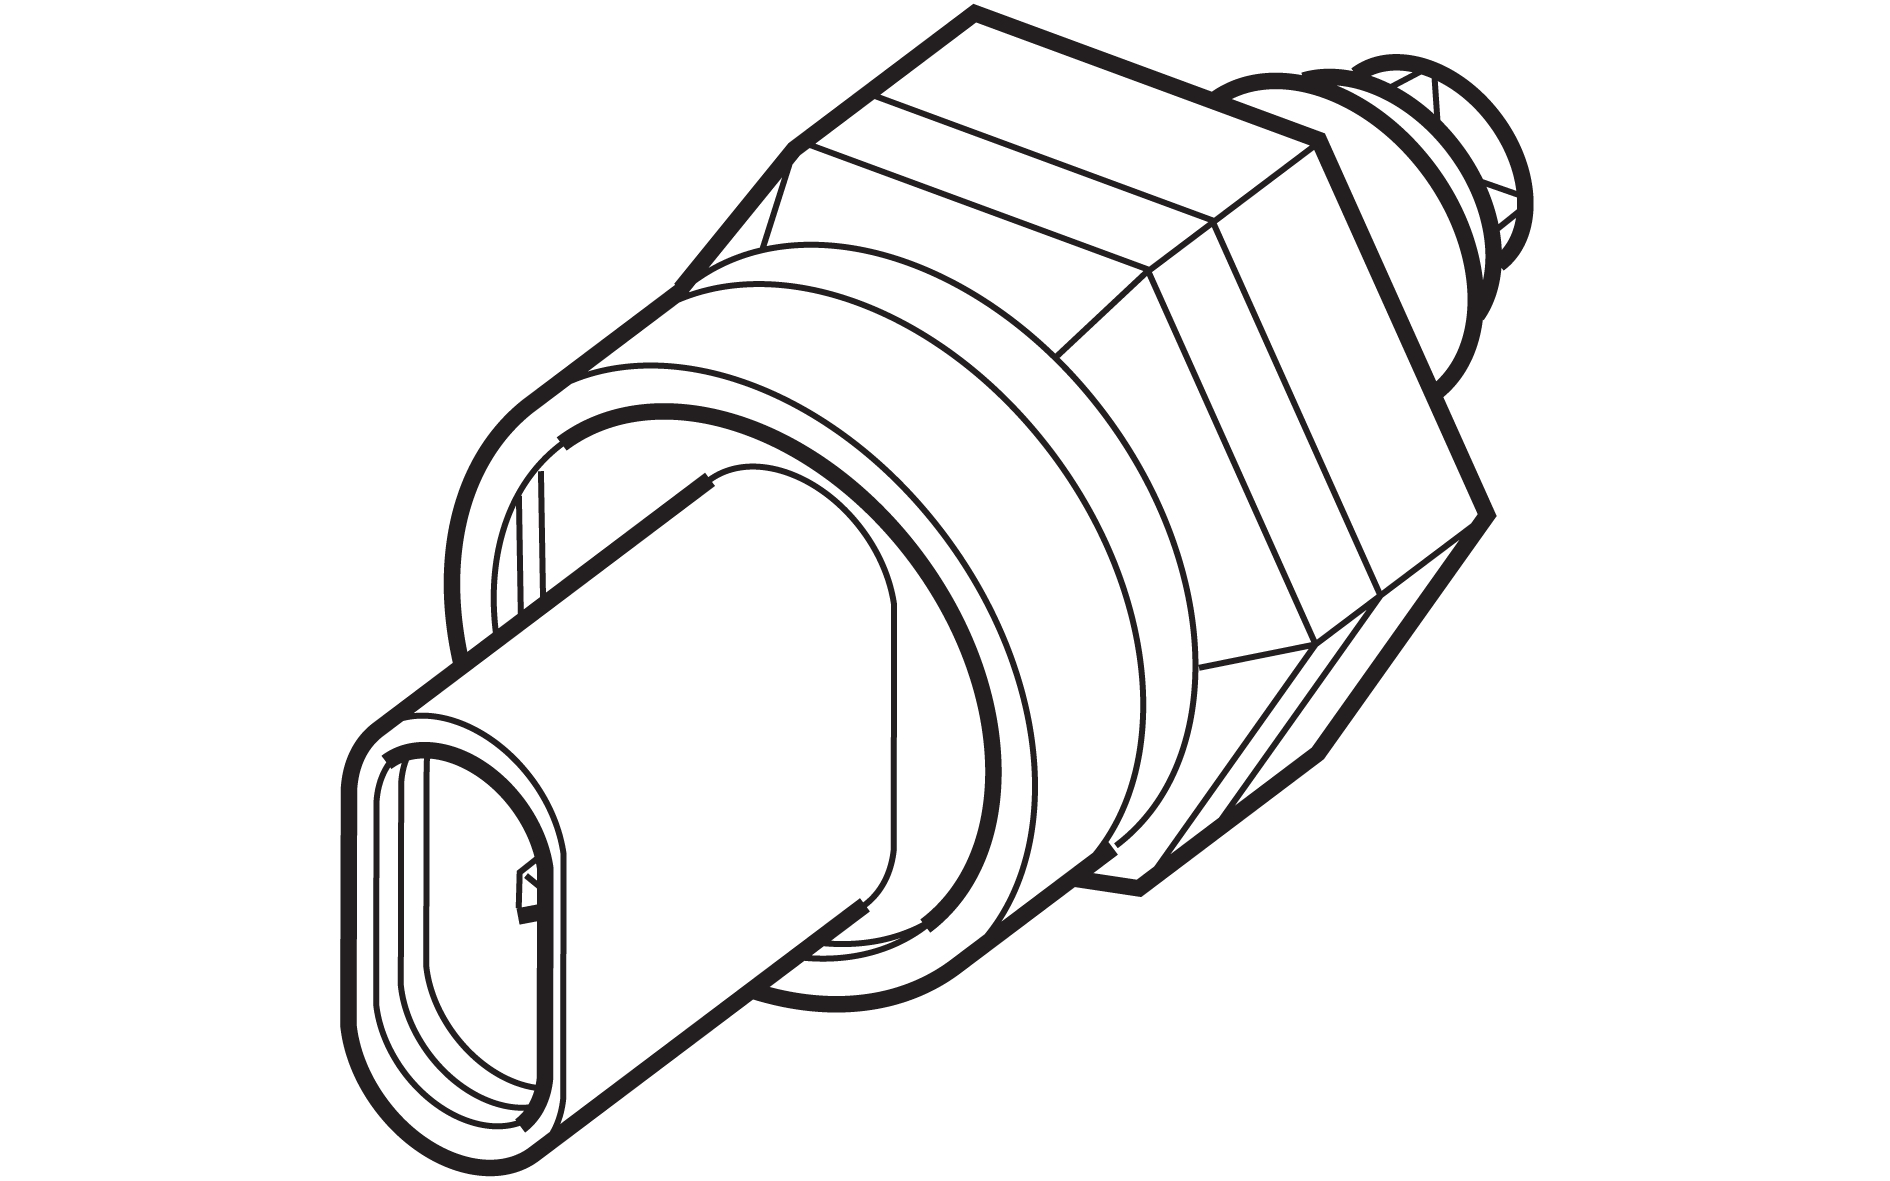
Description
The oil pressure- and oil temperature sensor consists of two sensors combined into one. The sensor is supplied with voltage by the Engine Control Module (ECM) and returns a PWM signal. The signal is divided into three areas:
-
Diagnosis
-
Temperature
-
Pressure.
Diagnostic information
The oil pressure- and oil temperature sensor does not have a built-in diagnostic system. The Engine Control Module (ECM) monitors the sensor, sets DTCs and has readable parameters for it.
Connection and communication
The oil pressure- and oil temperature sensor is directly connected to the Engine Control Module (ECM).
Location
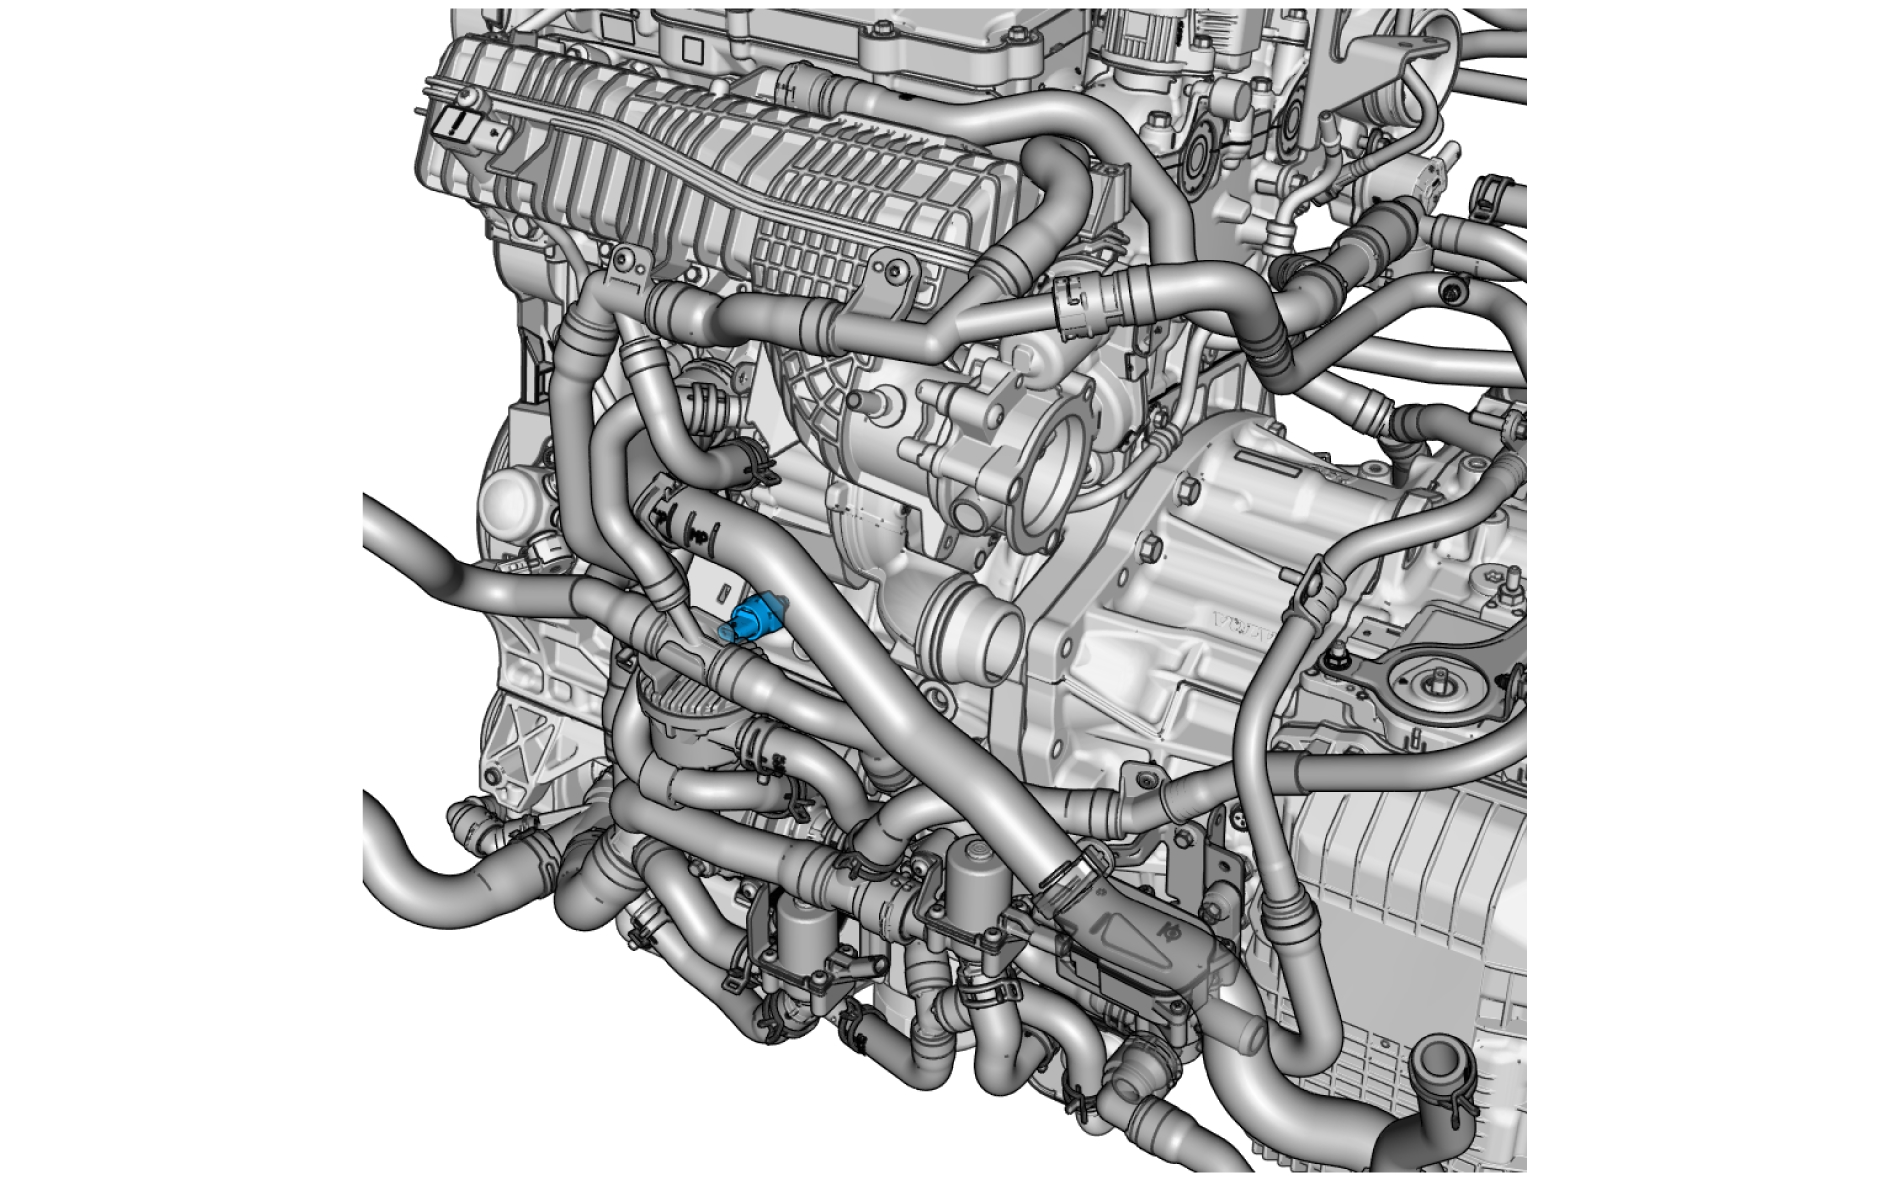
Pin Out
Engine Control Module (ECM) - P600
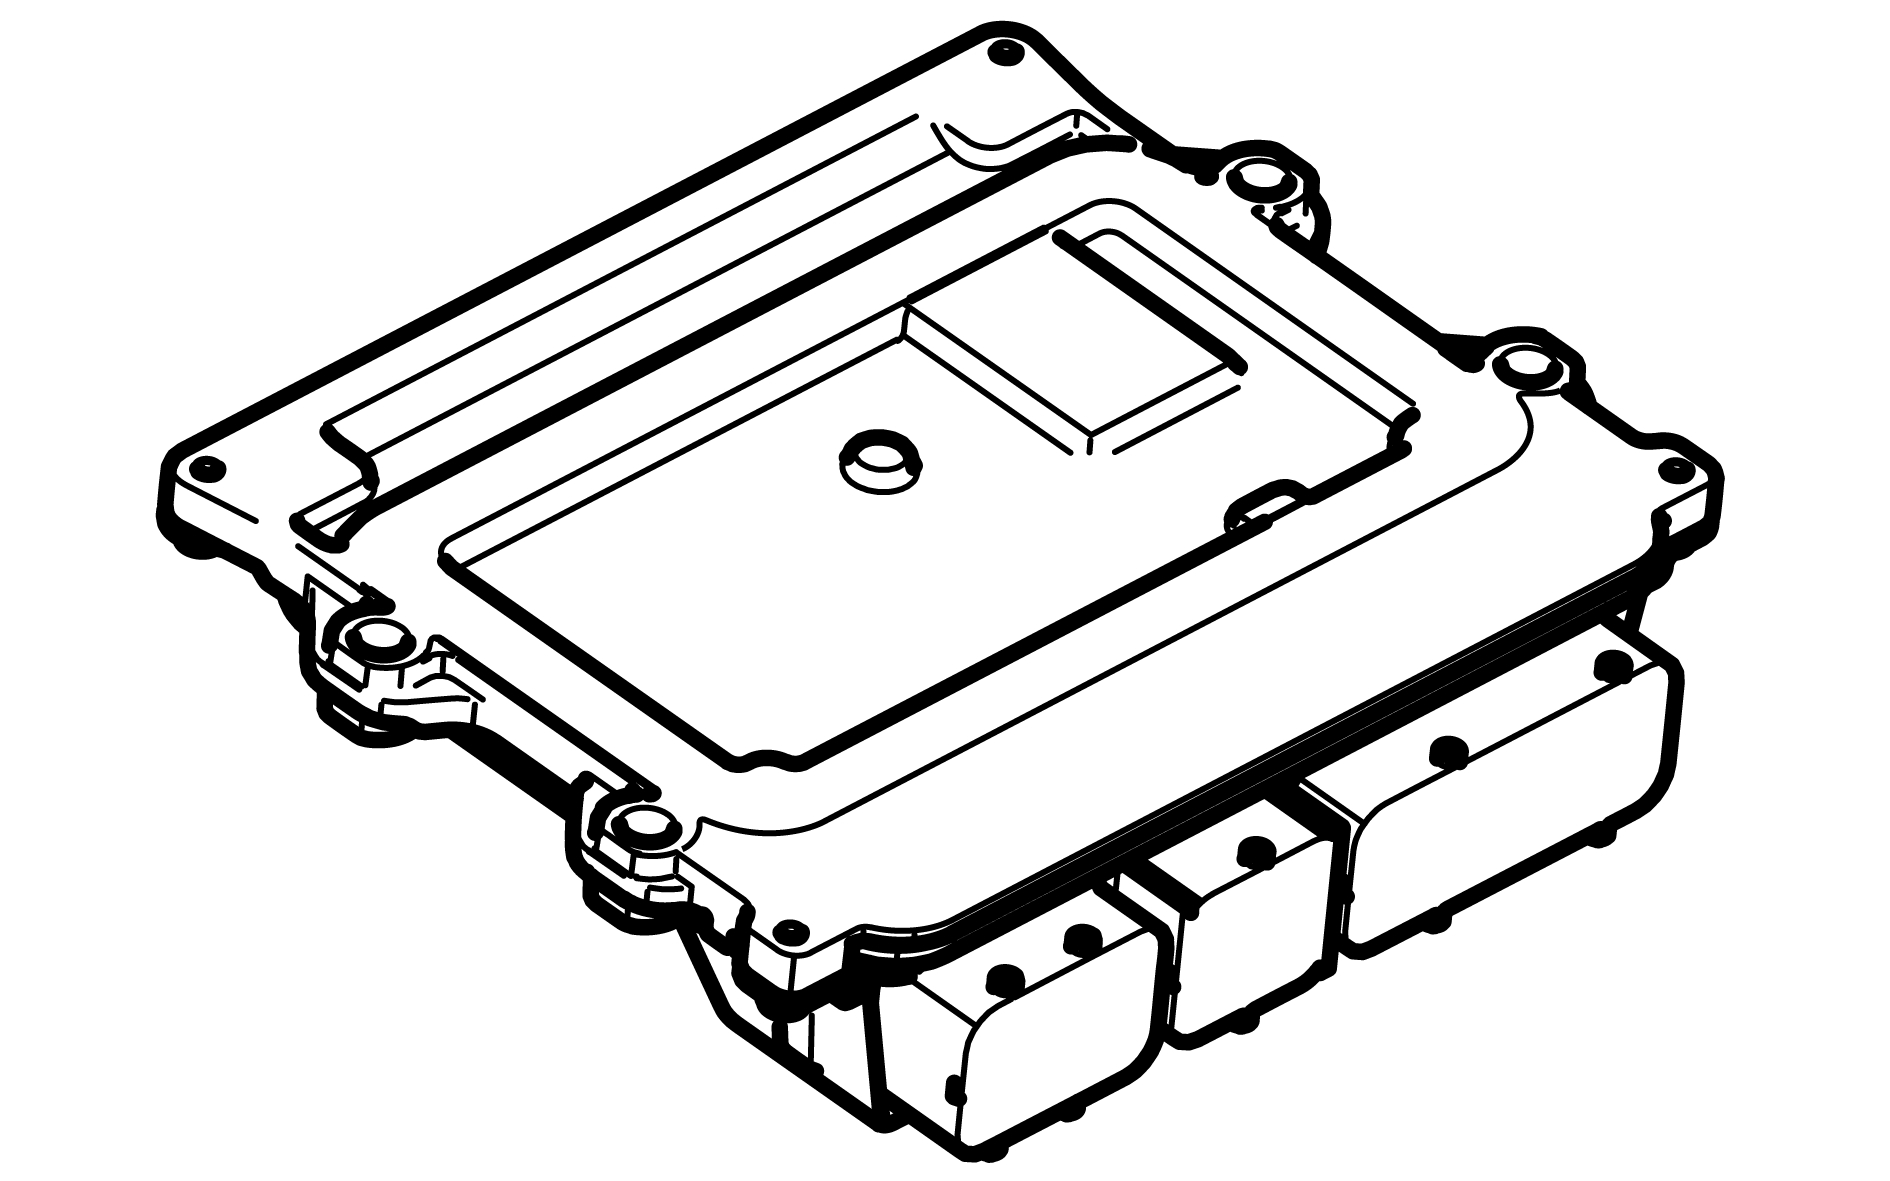
Description
The Engine Control Module (ECM) controls engine functions such as:
-
Ignition regulation.
-
Throttle control.
-
Lubrication and oil system.
-
Fuel system.
-
Inlet and exhaust system.
-
Engine cooling.
The Engine Control Module (ECM) contains:
-
A DC/DC-converter that increases the battery voltage from 12 V to approximately 40 – 50 V. A capacitor that stores the voltage required to control components that require voltage greater than 12V.
-
Four low-side drivers (one for each fuel injector) that close the circuit to the fuel injector.
-
Two high-side drivers (two fuel injectors share one high-side driver) that power supply the fuel injectors.
-
H-bridges that are used to switch the polarity of an output. This is used to control electric motors (such as the throttle unit) that changes direction when the polarity is switched.
-
An integrated sensor that registers the ambient air pressure.
-
An integrated temperature sensor.
Capacity:
-
Central Processing Unit (CPU) 200 MHz: 32 bit.
-
Random Access Memory (RAM): 256 kB.
-
Electrically Erasable Programmable Read-Only Memory (EEPROM) flash-memory: 128 kB.
The Engine Control Modules (ECM) for the diesel engine and the gasoline engines are identical in terms of:
-
External geometry.
-
Connector.
-
Circuit board.
-
The software that controls when the automatic transmission normal shifts should occur, based on factors such as accelerator pedal position, drive mode, operating conditions, and when the lock-up function must be activated.
Diagnostic information
The Engine Control Module (ECM) has a built-in diagnostic system, which continuously monitors the control module, as well as the input and output signals. The ECM sets DTCs and has readable parameters for it.
Connection and communication
Component location

Pin-out
Engine coolant temperature sensor - S403
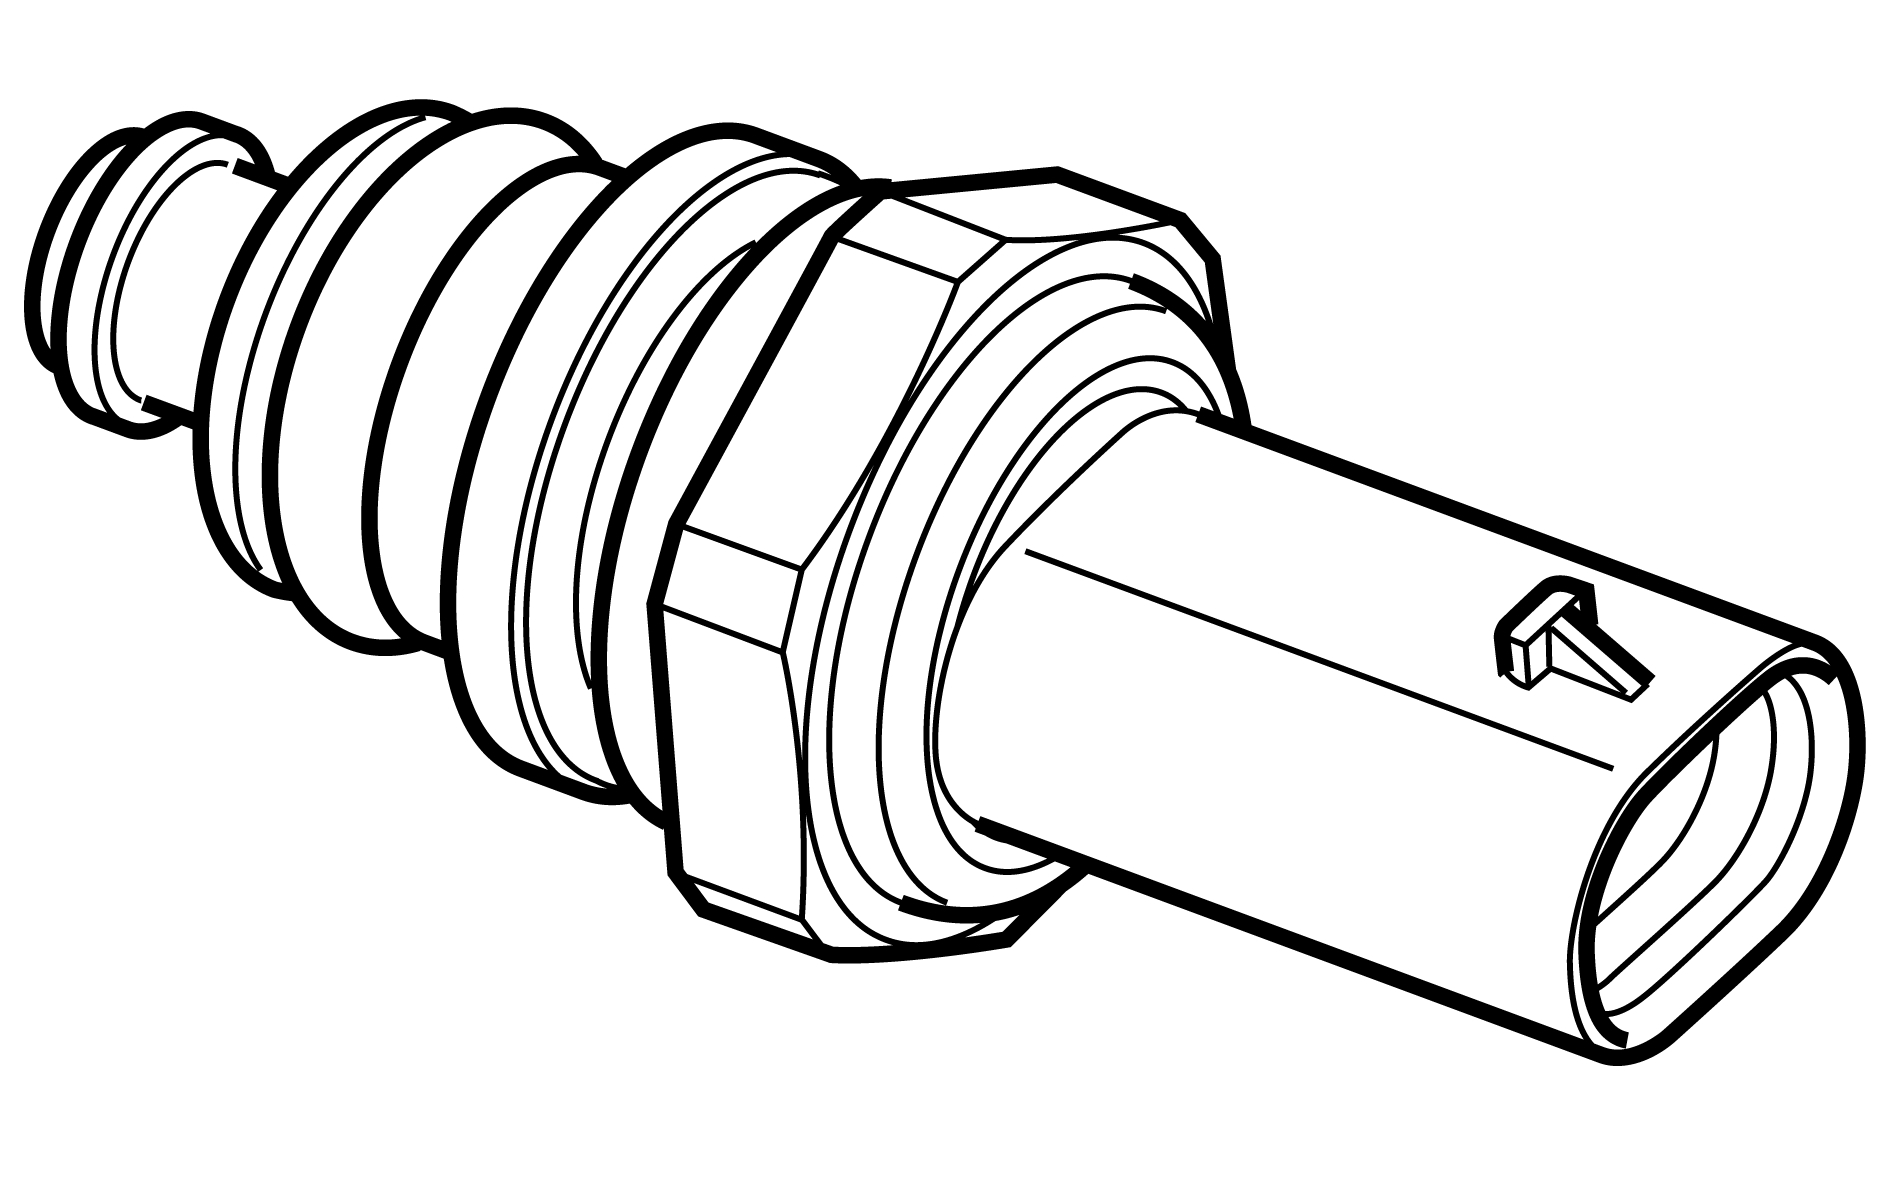
Description
The engine coolant temperature sensor measures the temperature of the engine coolant and is used by the Engine Control Module (ECM) to control a number of functions. The sensor is a NTC (Negative Temperature Coefficient) thermistor, for which the resistance changes depending on the temperature of the coolant. The sensor is powered by the Engine Control Module (ECM) with 5 V. Feedback is an analog 5 V signal where the resistance corresponds to a certain temperature:
-
at -20 °C approximately 15 kΩ
-
at +/-0 °C approximately 5.7 kΩ
-
at +20 °C approximately 2.45 kΩ
-
at +90 °C approximately 240 Ω
-
at +110 °C approximately 142 Ω
The engine coolant temperature sensor does not have a built-in diagnostic system. The Engine Control Module (ECM) monitors the sensor, sets DTCs and stores readable parameters for it.
Connection and communicationThe engine coolant temperature sensor is directly connected to the Engine Control Module (ECM).
Component location
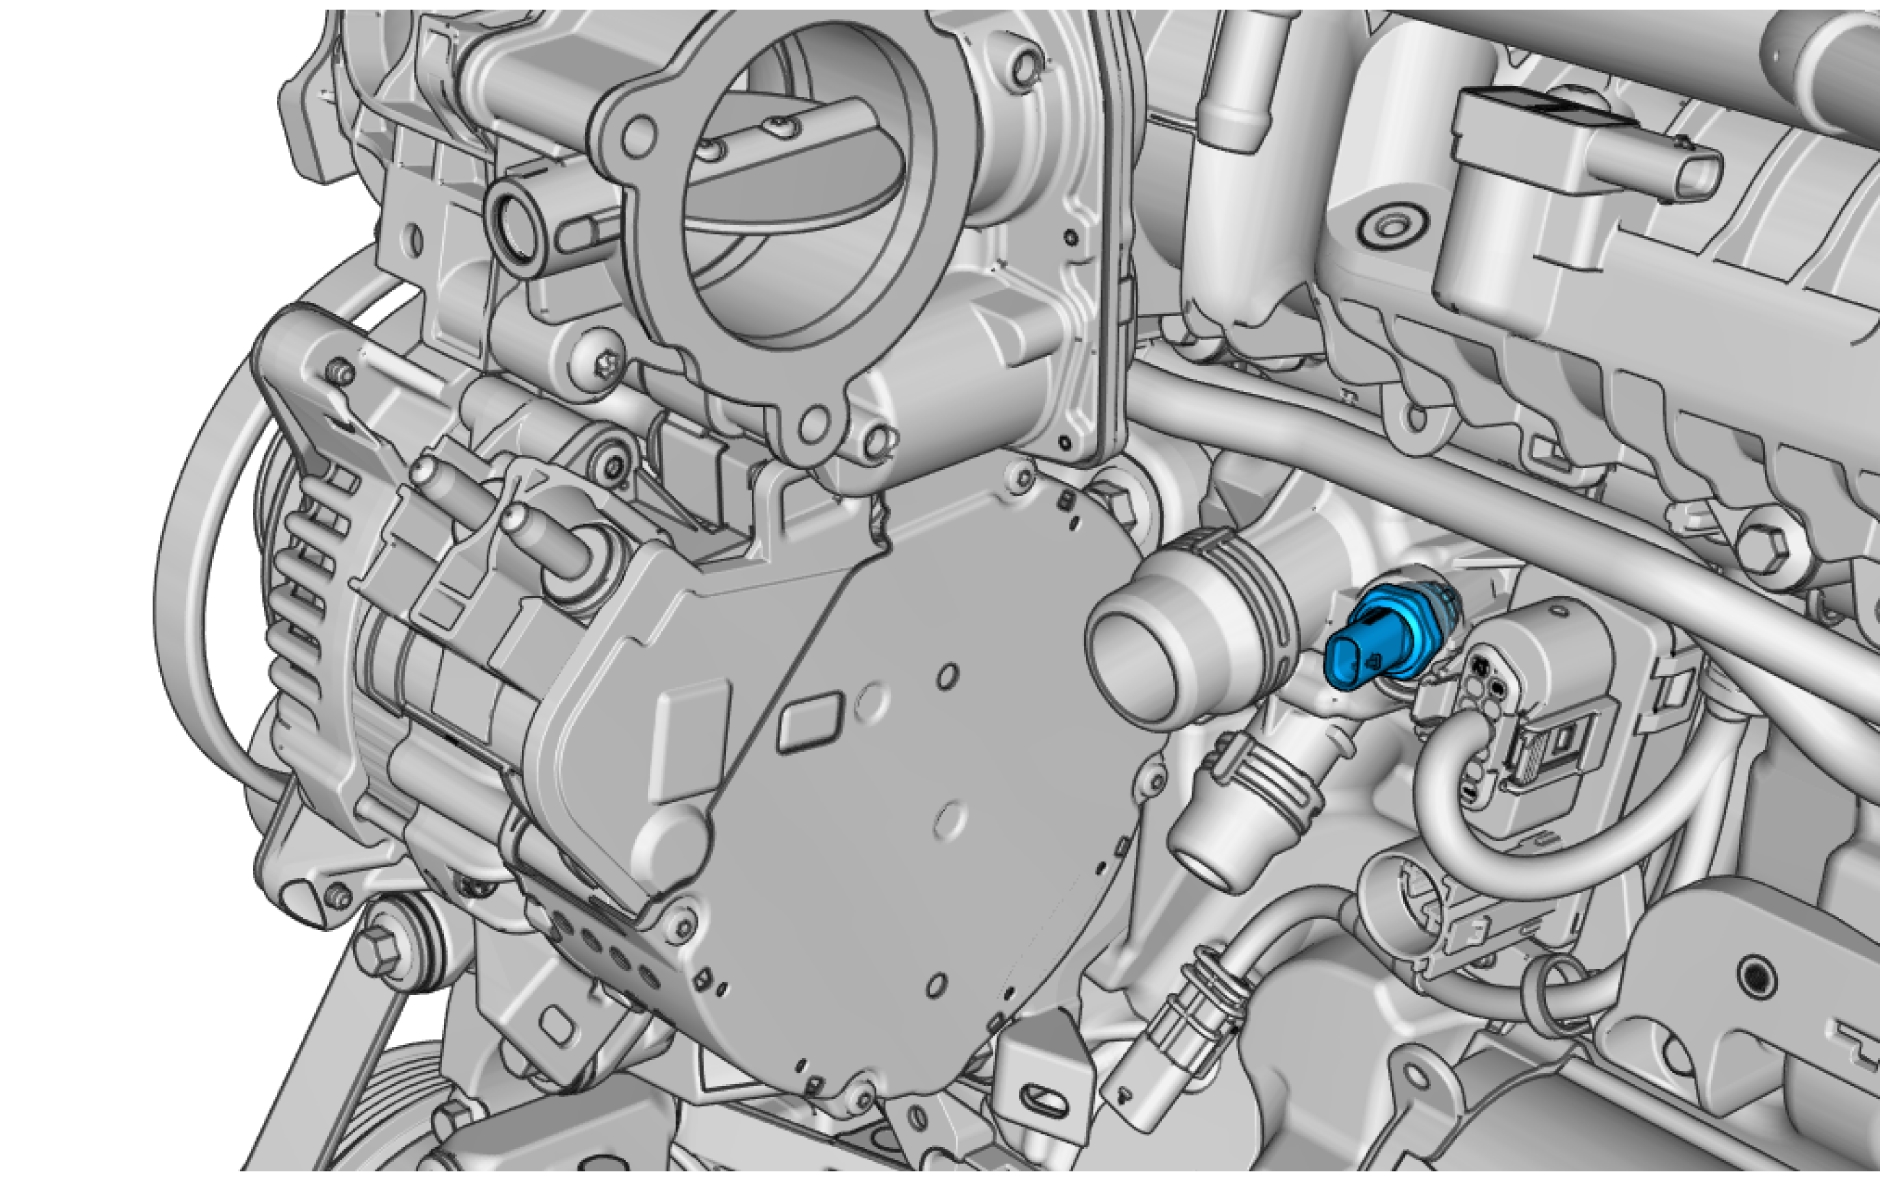
Pin-Out
High pressure fuel pump housing, replace
Removal
Remove fuel pump, refer to:
Fuel pump, replaceRemove timing belt, refer to:
Timing belt, replace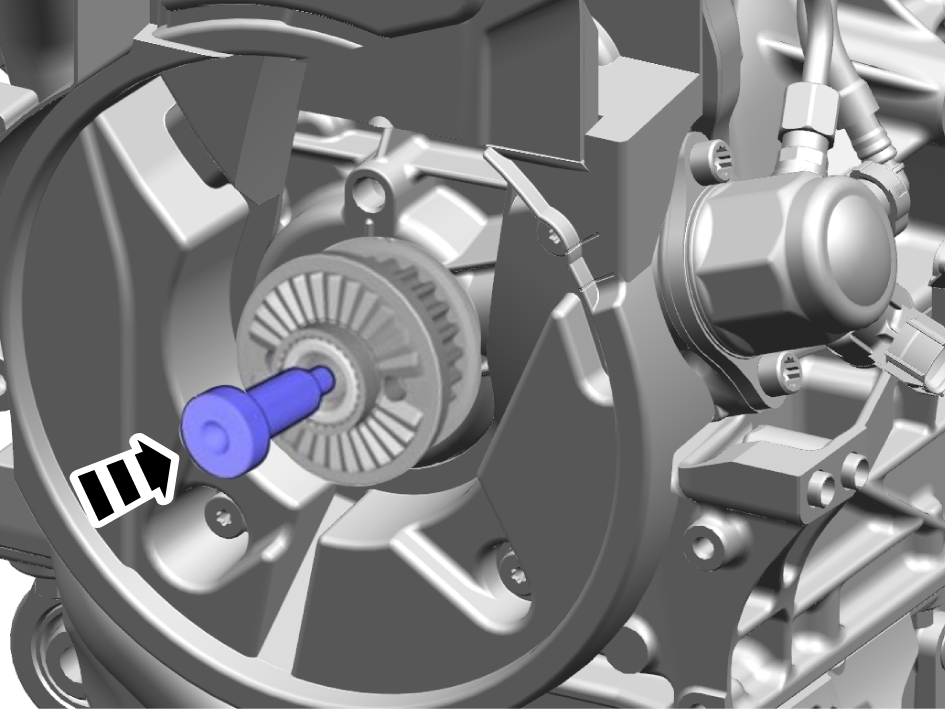
Install special tool: 999 7493
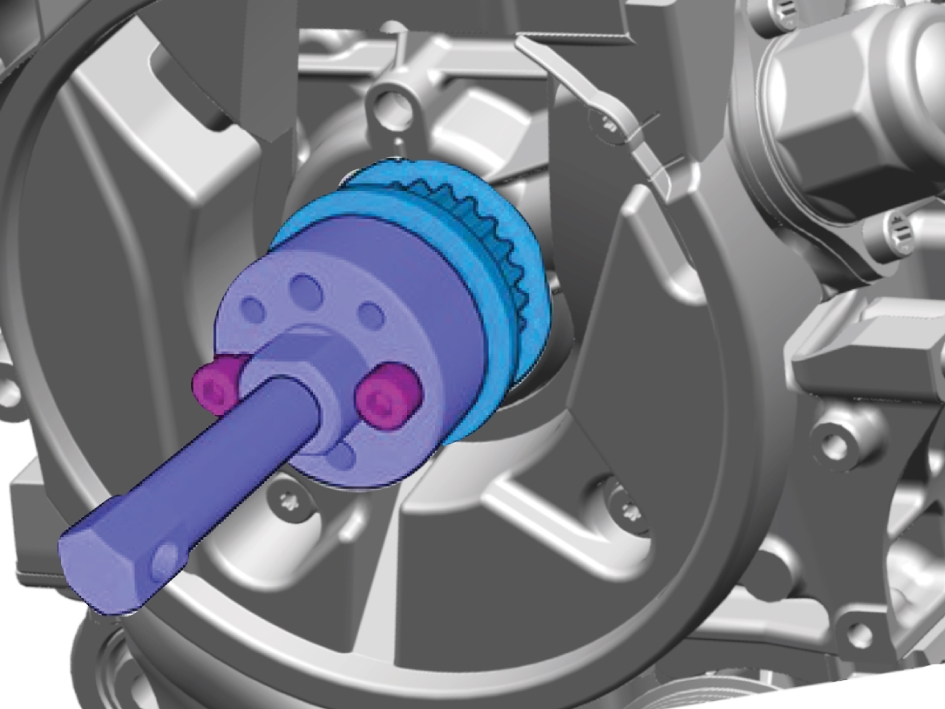
Install special tool: 999 7493
Tighten the bolts.
Remove the marked component.
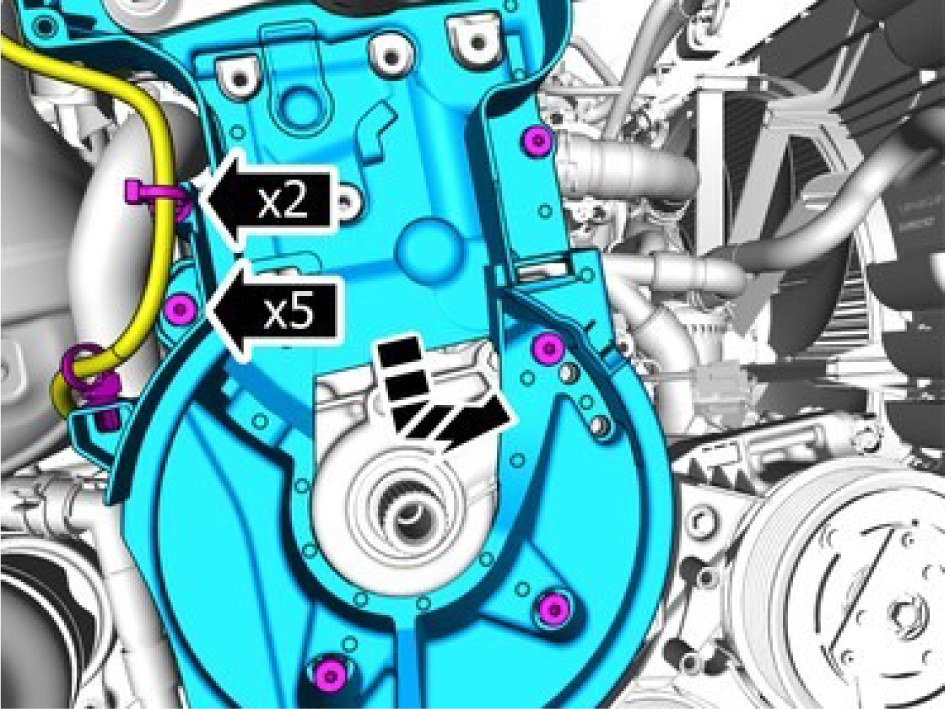
Loosen the clips.
Fold the cable aside.
Remove the screws.
Remove the marked component.
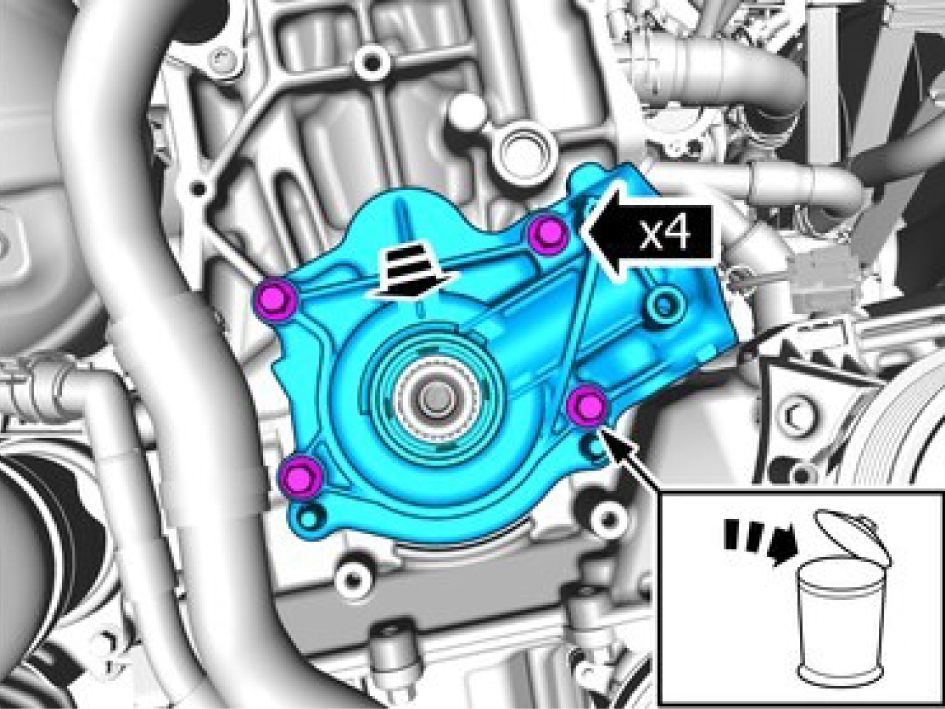
The screws are not to be reused.
Remove the screws.
Remove the marked component.
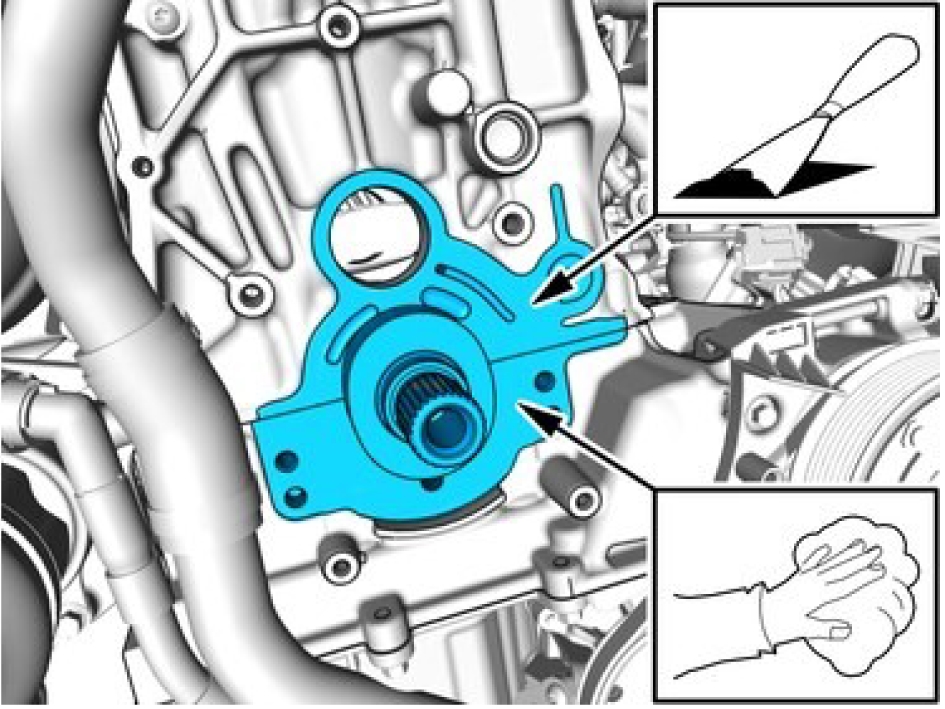
Make sure that the mating faces are clean and free of foreign material.
Clean the marked area using a plastic putty knife and an abrasive cloth.
Clean with isopropanol.
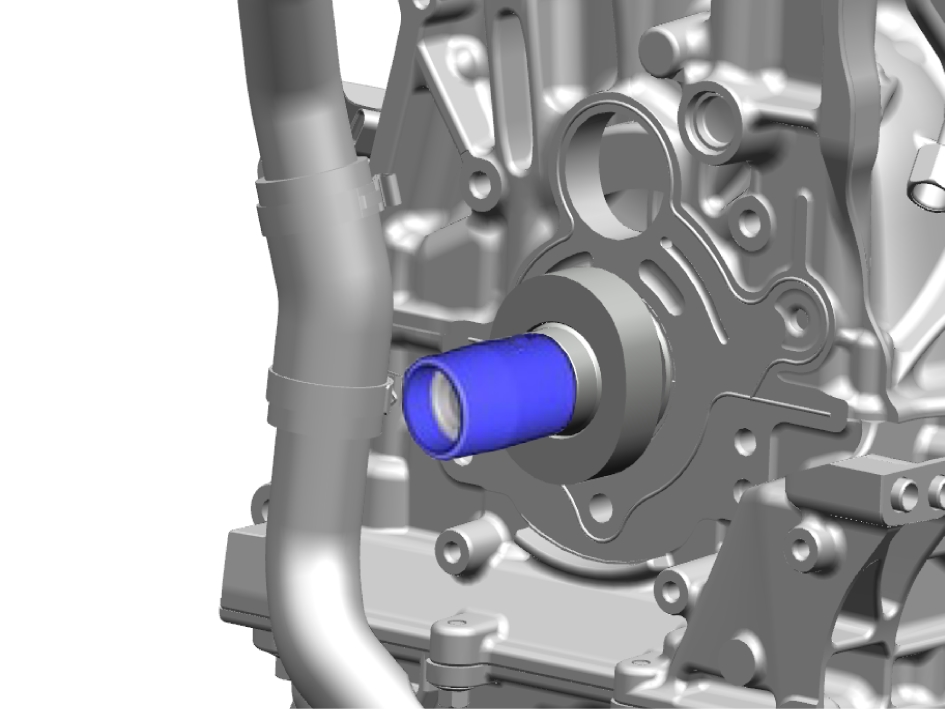
Install the special tool 999 7532
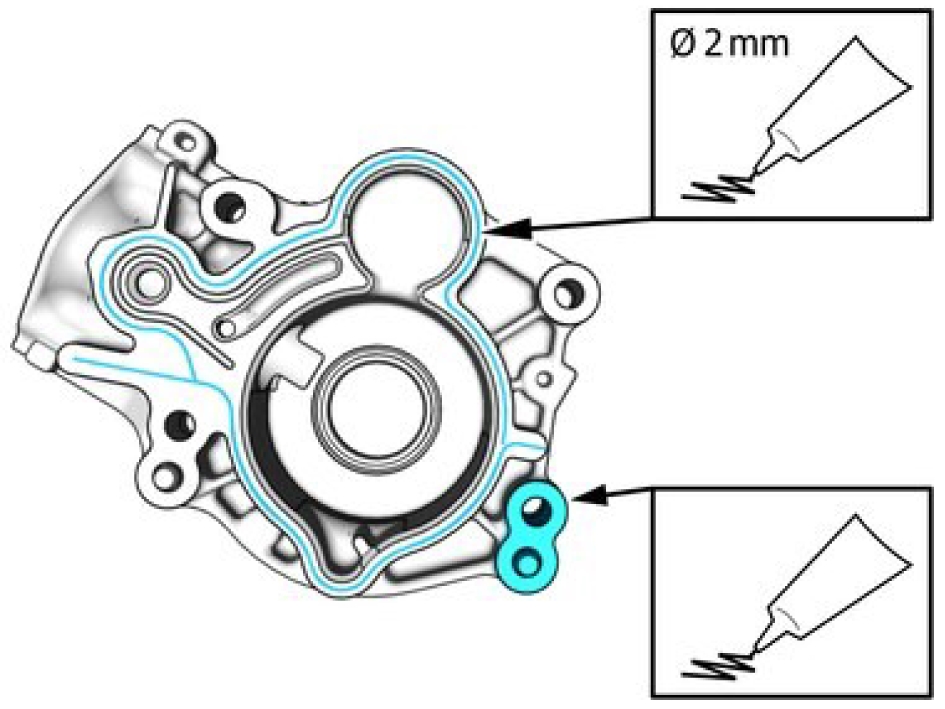
The component must be installed within 5 minutes of applying the sealant.
Use chemical gasket.
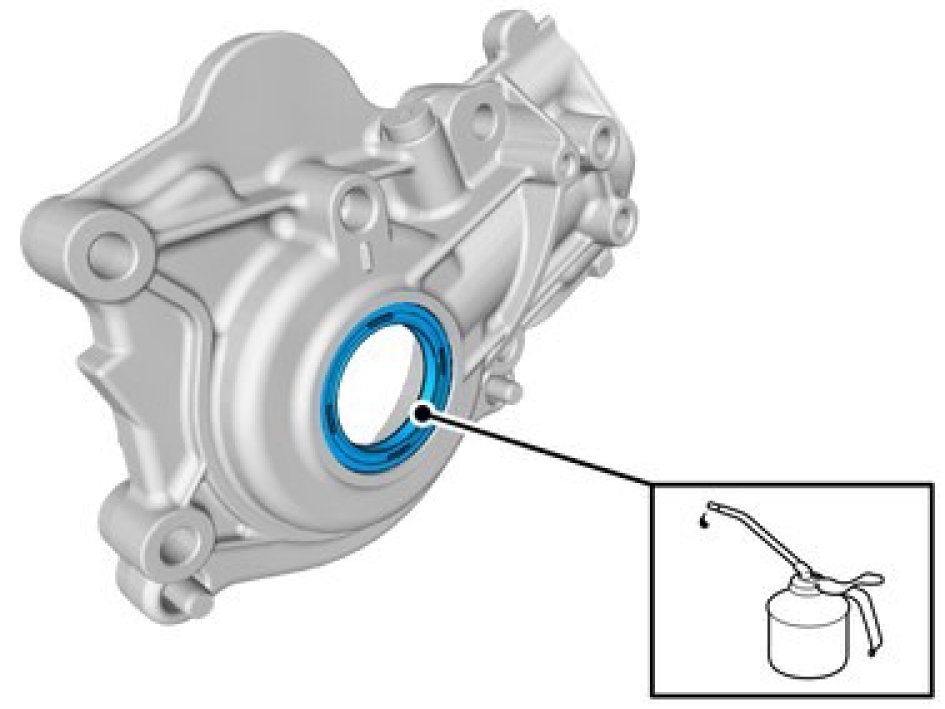
Apply a thin and even layer with engine oil.
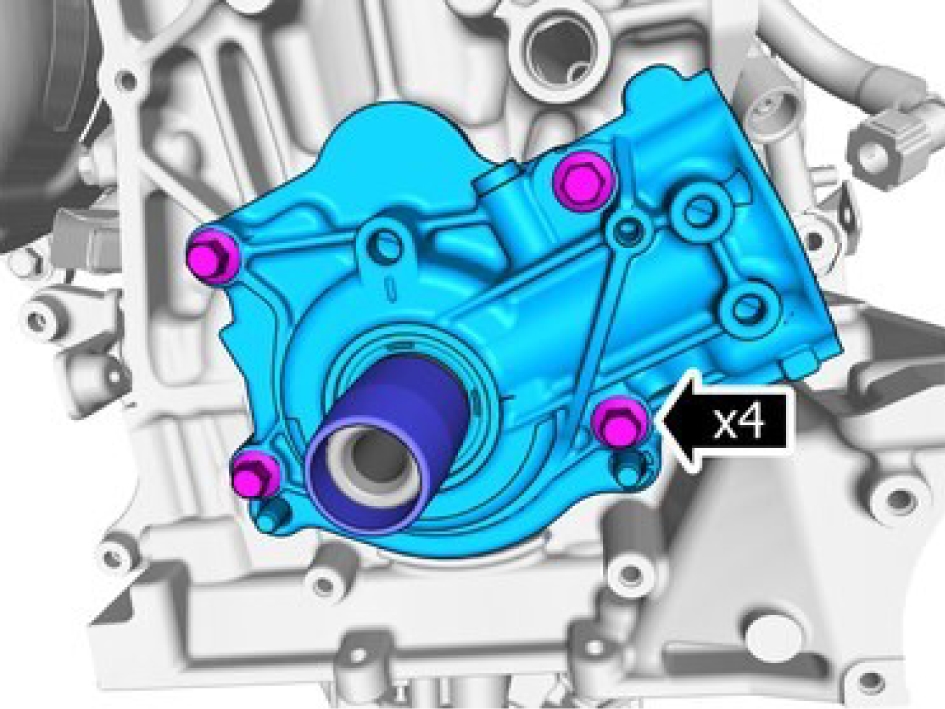
Make sure that new bolts are installed.
Install the marked component.
Install the screws.
Stage 1, torque:15 Nm
Stage 2: 90 °
Remove the special tool.
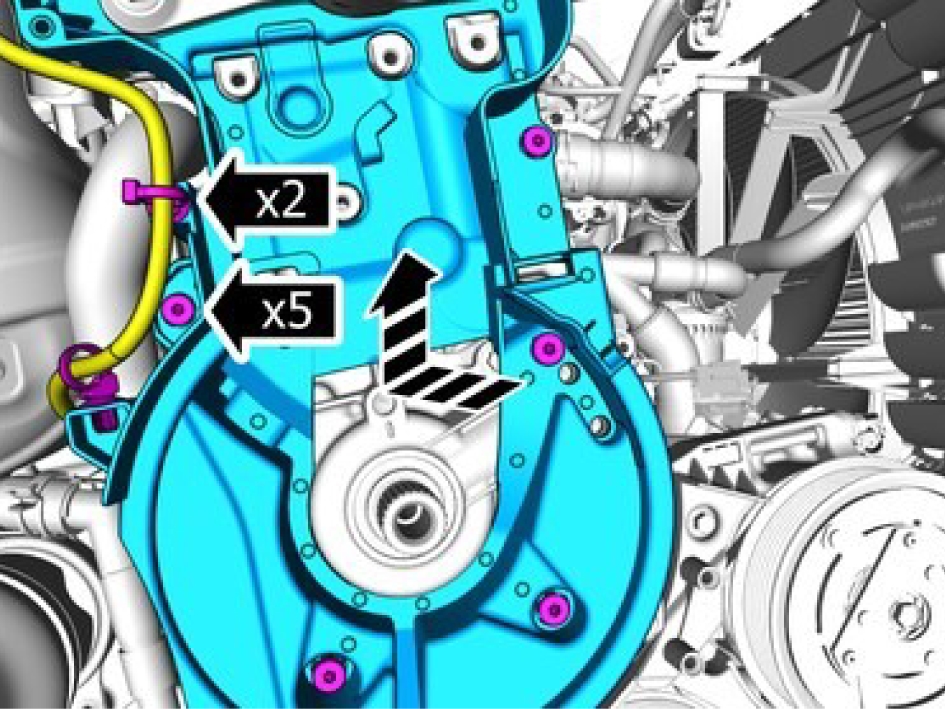
Install the marked component.
Install the clip.
Install the screws M6, torque: 10 Nm
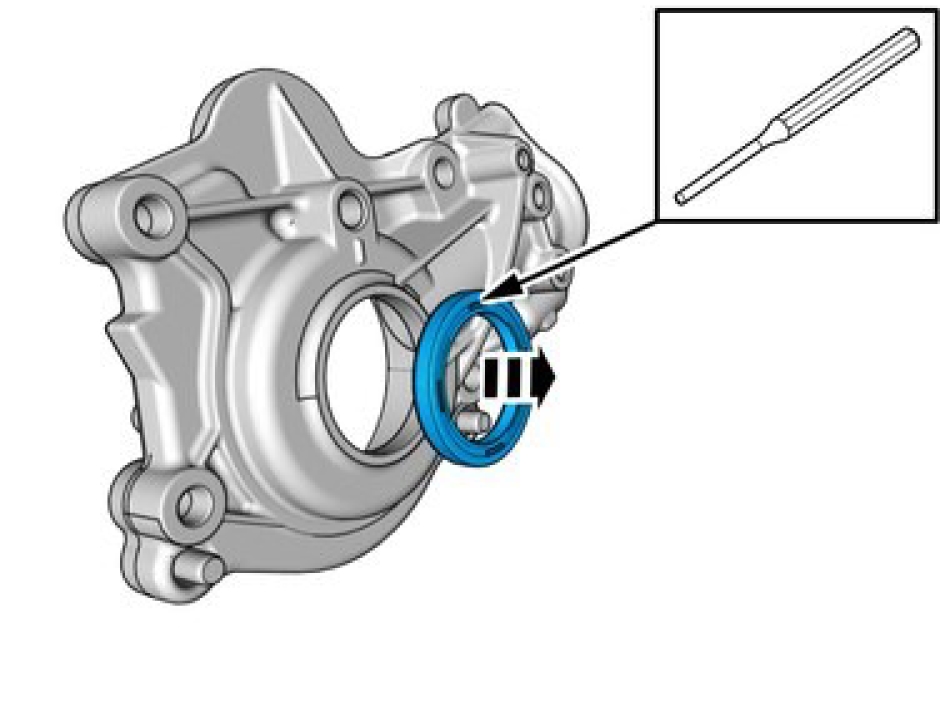
Remove the marked component.
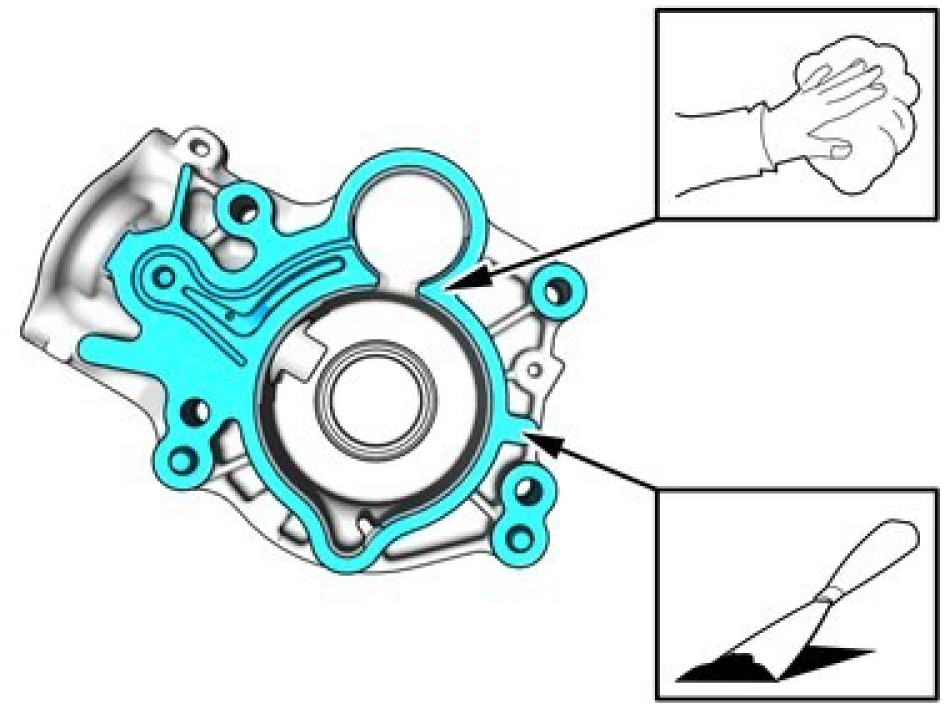
Clean the marked area using a plastic putty knife and an abrasive cloth.
Clean with isopropanol.
Use chemical gasket.
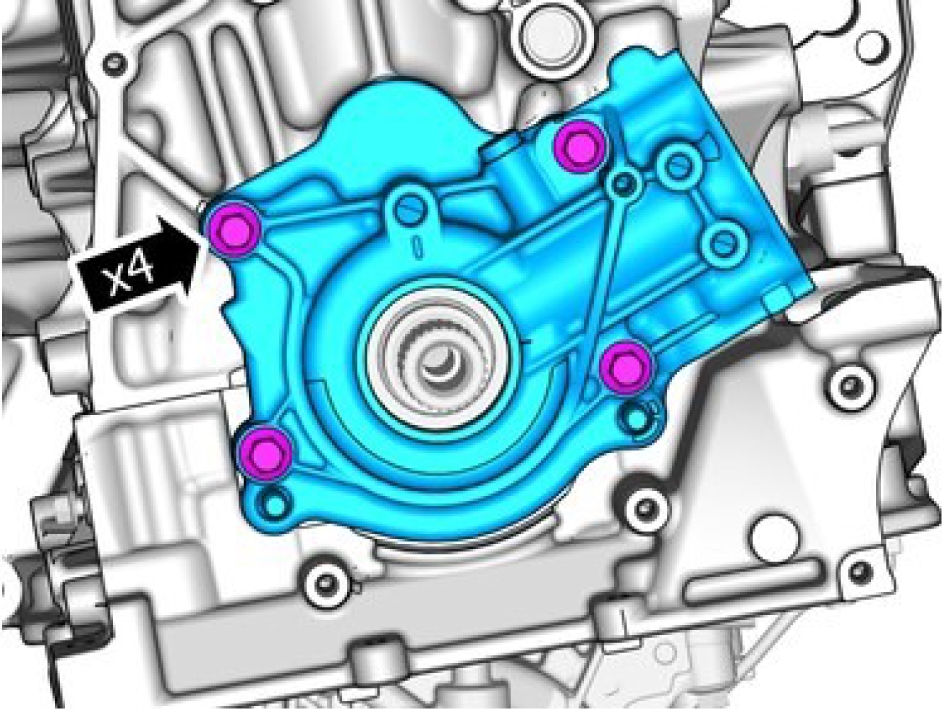
Install the marked component.
Stage 1, torque: 15 Nm
Stage 2: 90 °
Install the marked component.
Install the clip.
Install the screws M6, torque: 10 Nm
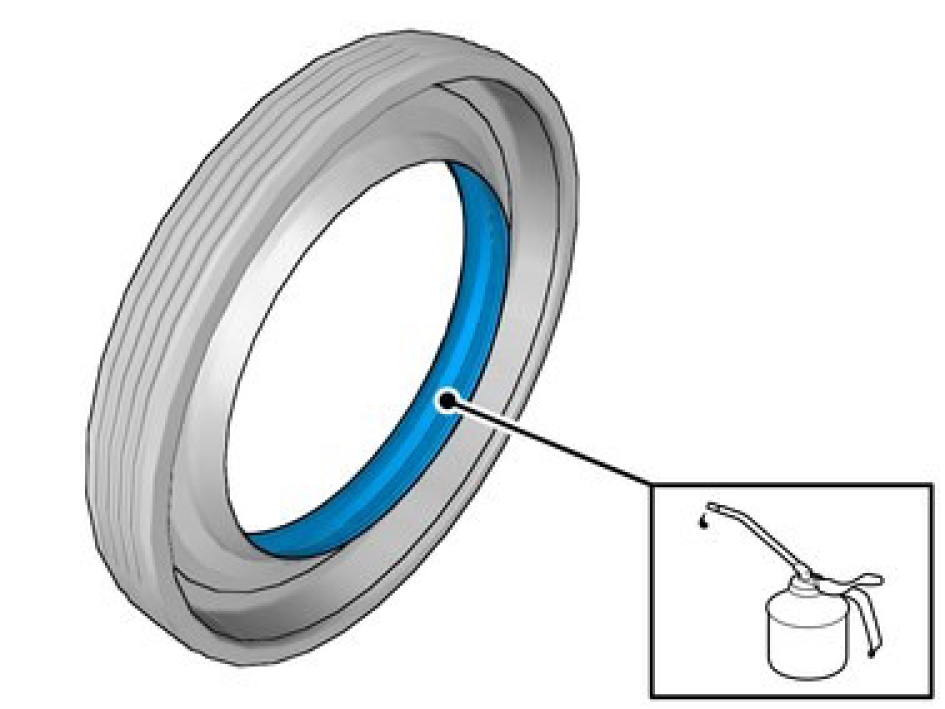
Apply a thin and even layer of engine oil.
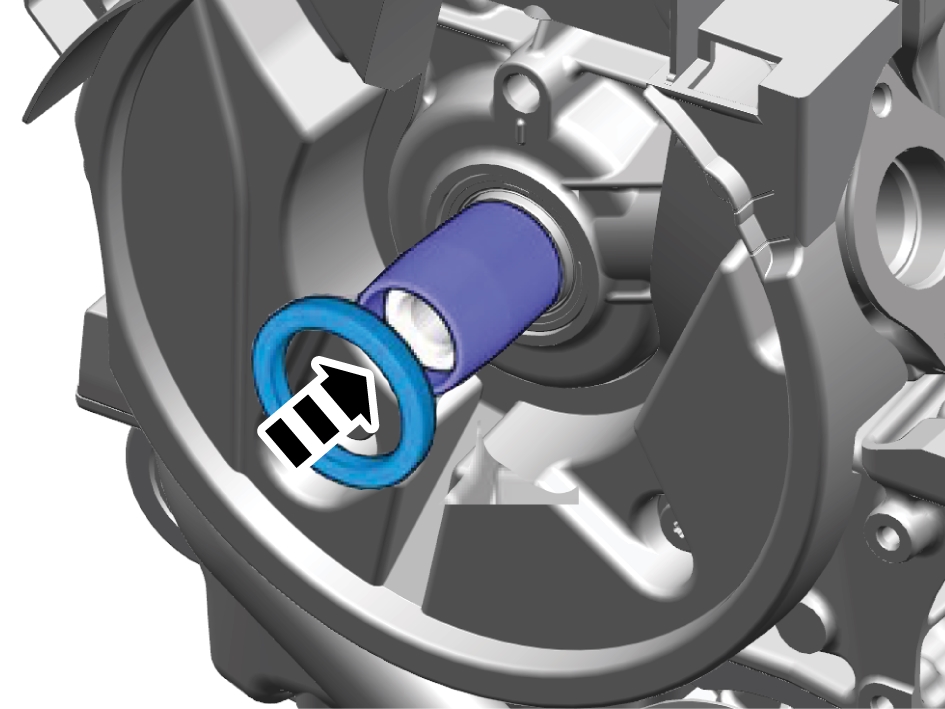
Install the special tool 999 7532
Install the marked component.
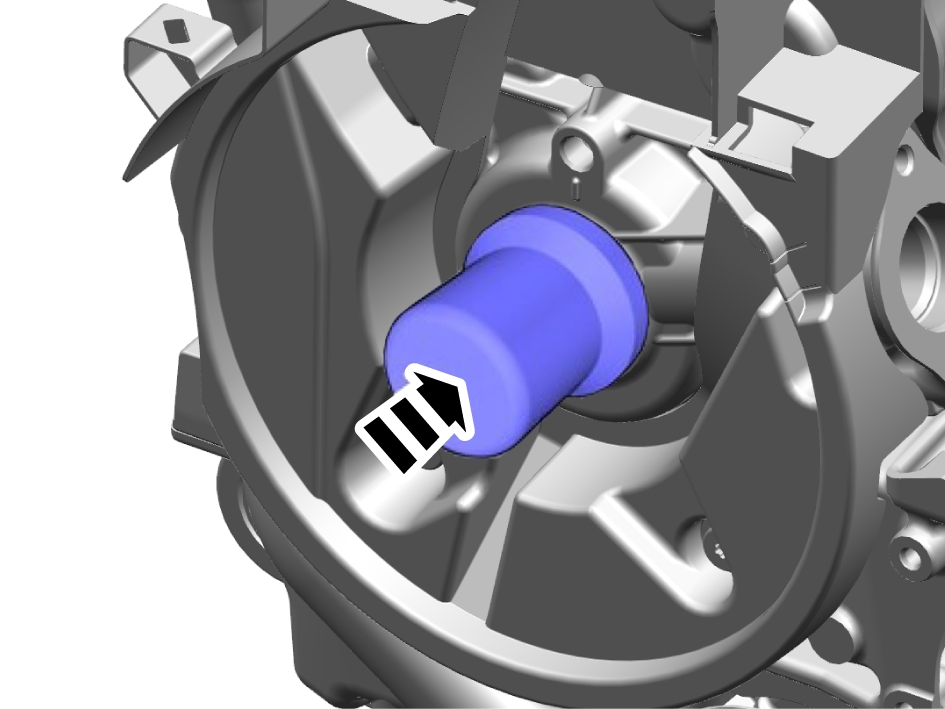
Press the marked component with the special tool 999 7682.
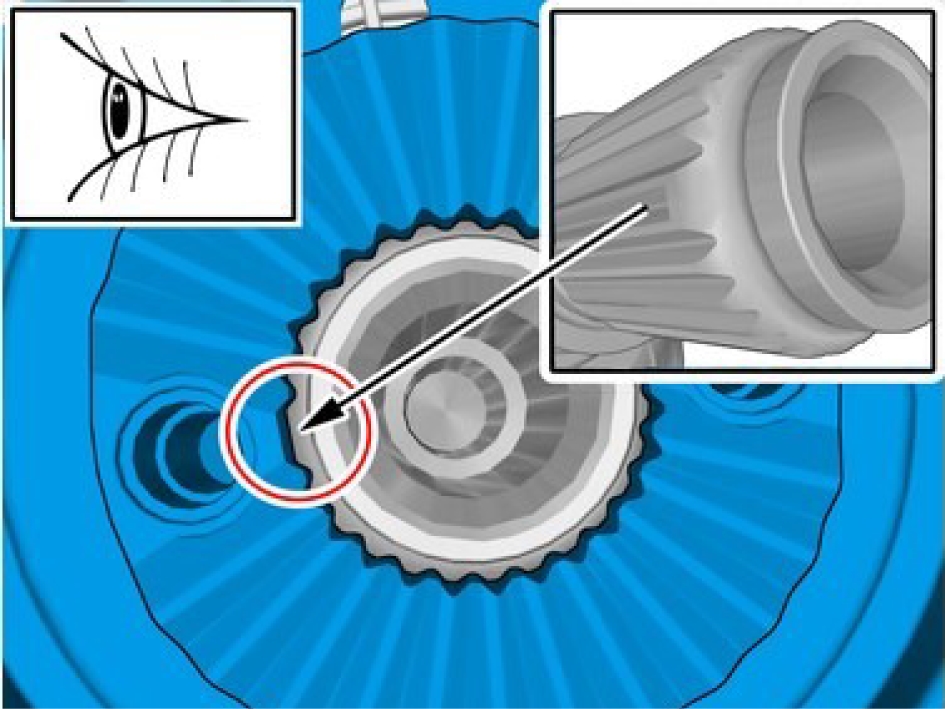
Note the position.
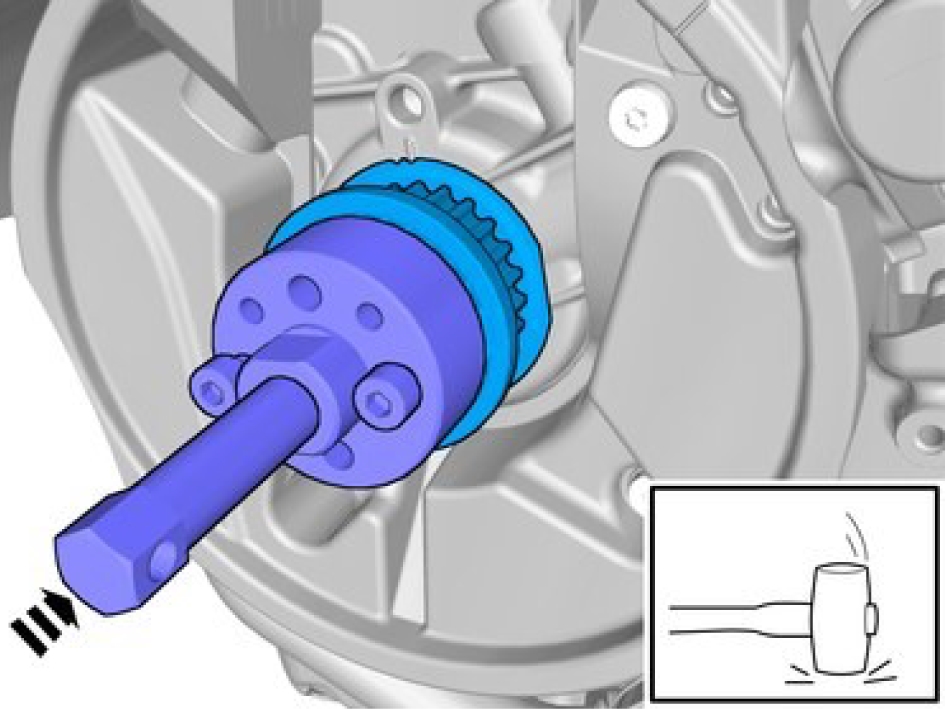
Observe caution when carrying out this step.
Reinstall the removed component.
Install fuel pump, refer to:
Timing belt, replaceInstall timing belt, refer to:
Fuel pump, replaceTransmission oil cooler valve
Description
The transmission oil cooler valve regulates the temperature in the transmission oil cooler by controlling the coolant flow through the cooler.
Diagnostic information
The transmission oil cooler valve does not have a built-in diagnostic system. The Engine Control Module (ECM) controls the valve, sets DTCs and has readable parameters for it.
Connection and communication
The transmission oil cooler valve is directly connected to the Engine Control Module (ECM).
Component location
Pin-out
Transmission oil temperature sensor
Description
The transmission oil temperature sensor is integrated in the gearbox and measures the temperature of the transmission oil.
The Transmission Control Module (TCM) determines the temperature of the transmission oil by measuring the voltage drop over the NTC (Negative Temperature Coefficient) resistor in the sensor.
Diagnostic information
The transmission oil temperature sensor does not have a built-in diagnostic system. The Transmission Control Module (TCM) monitors the sensor, sets DTCs and has readable parameters for it.
Connection and communication
The transmission oil temperature sensor is directly connected to the Transmission Control Module (TCM).c
Component location
Pin-out
Transmission oil pump
Description
The transmission oil pump provides lubrication in the transmission during hybrid electric drive when the engine is stopped. The transmission oil pump provides the correct pressure and flow to the transmission during automatic start and stop of the engine.
Diagnostic information
The transmission oil pump does not have a built-in diagnostic system. The Transmission Control Module (TCM) monitors the pump, sets DTCs and has readable parameters for it.
Connection and communication
Depending on vehicle model, the transmission oil pump is either connected to the Transmission Control Module (TCM) directly or via the driver, transmission oil pump.
Component location
Pin-out
VVT solenoid - V603
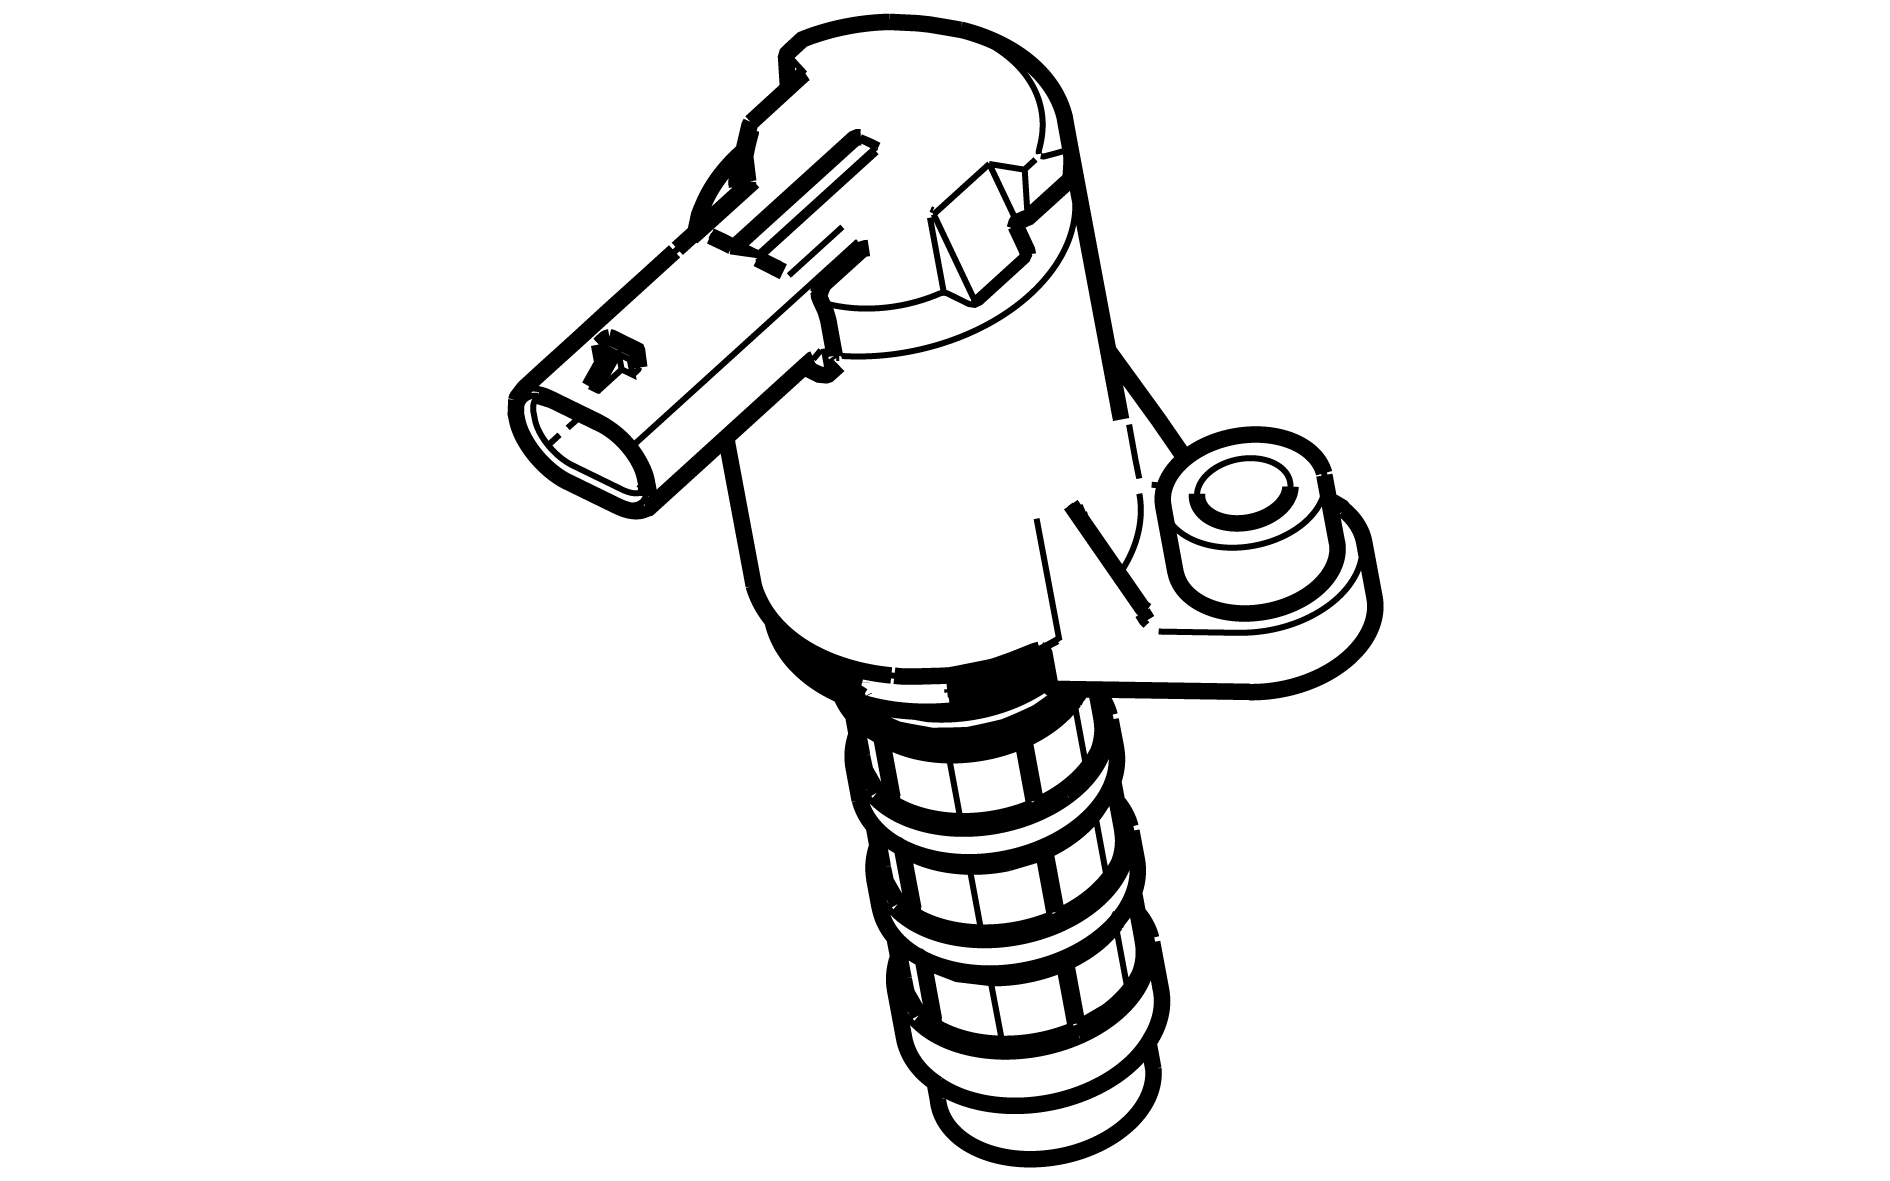
Description
The VVT solenoid is part of the VVT unit for controlling the camshaft. The solenoid controls the angle and direction of ignition and the oil flow to the VVT unit. The VVT solenoid consists of an electro-magnetic valve with a spring-loaded piston. There are slits in the piston that channel the engine lubricating oil to the VVT unit by moving the piston in the solenoid. The VVT unit turns the camshaft (the camshaft timing changes). The direction in which the camshaft turns depends on the chamber in the VVT unit, which is supplied with oil.
Diagnostic information
The VVT solenoid does not have a built-in diagnostic system. The Engine Control Module (ECM) monitors the solenoid, sets DTCs and has readable parameters for it.
Connection and communication
The VVT solenoid is directly connected to the Engine Control Module (ECM).
Component location
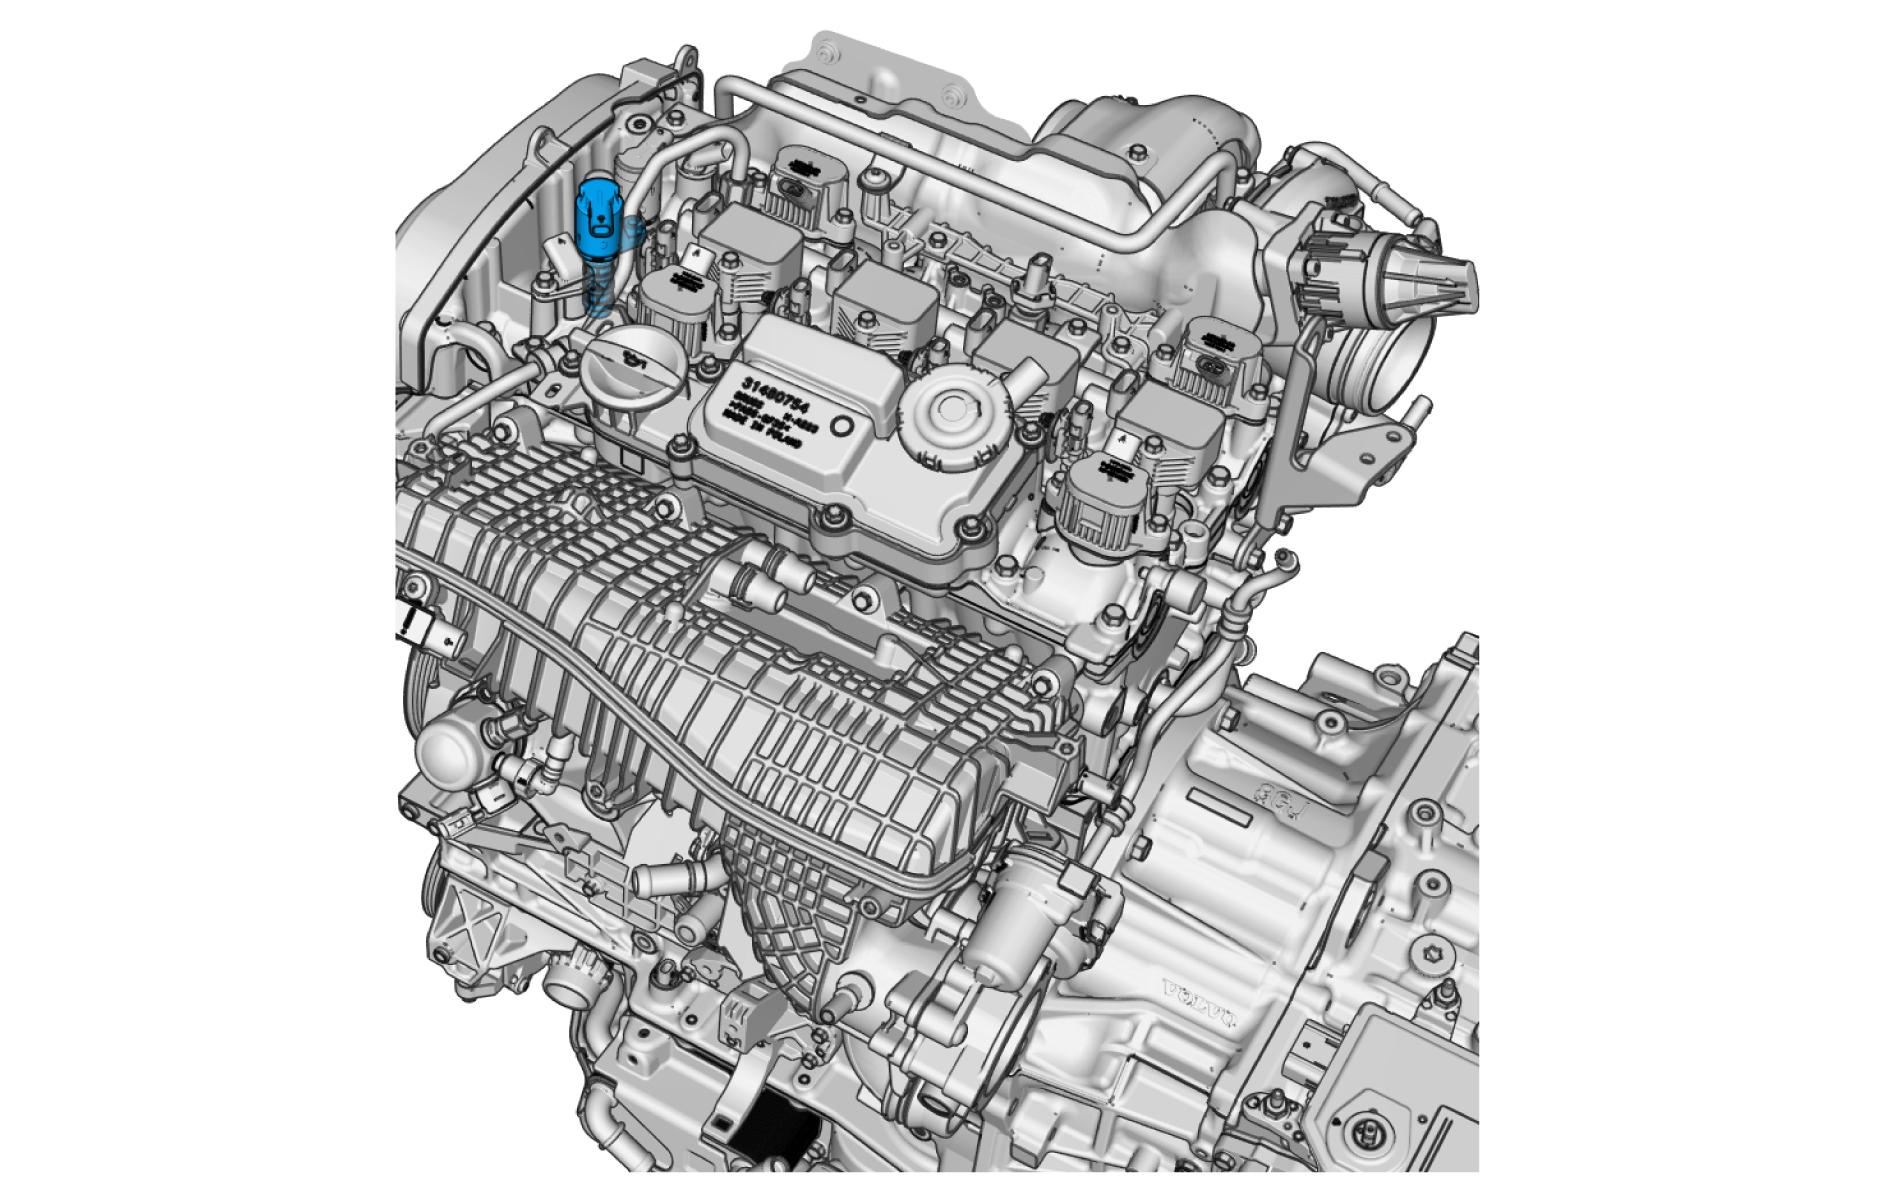
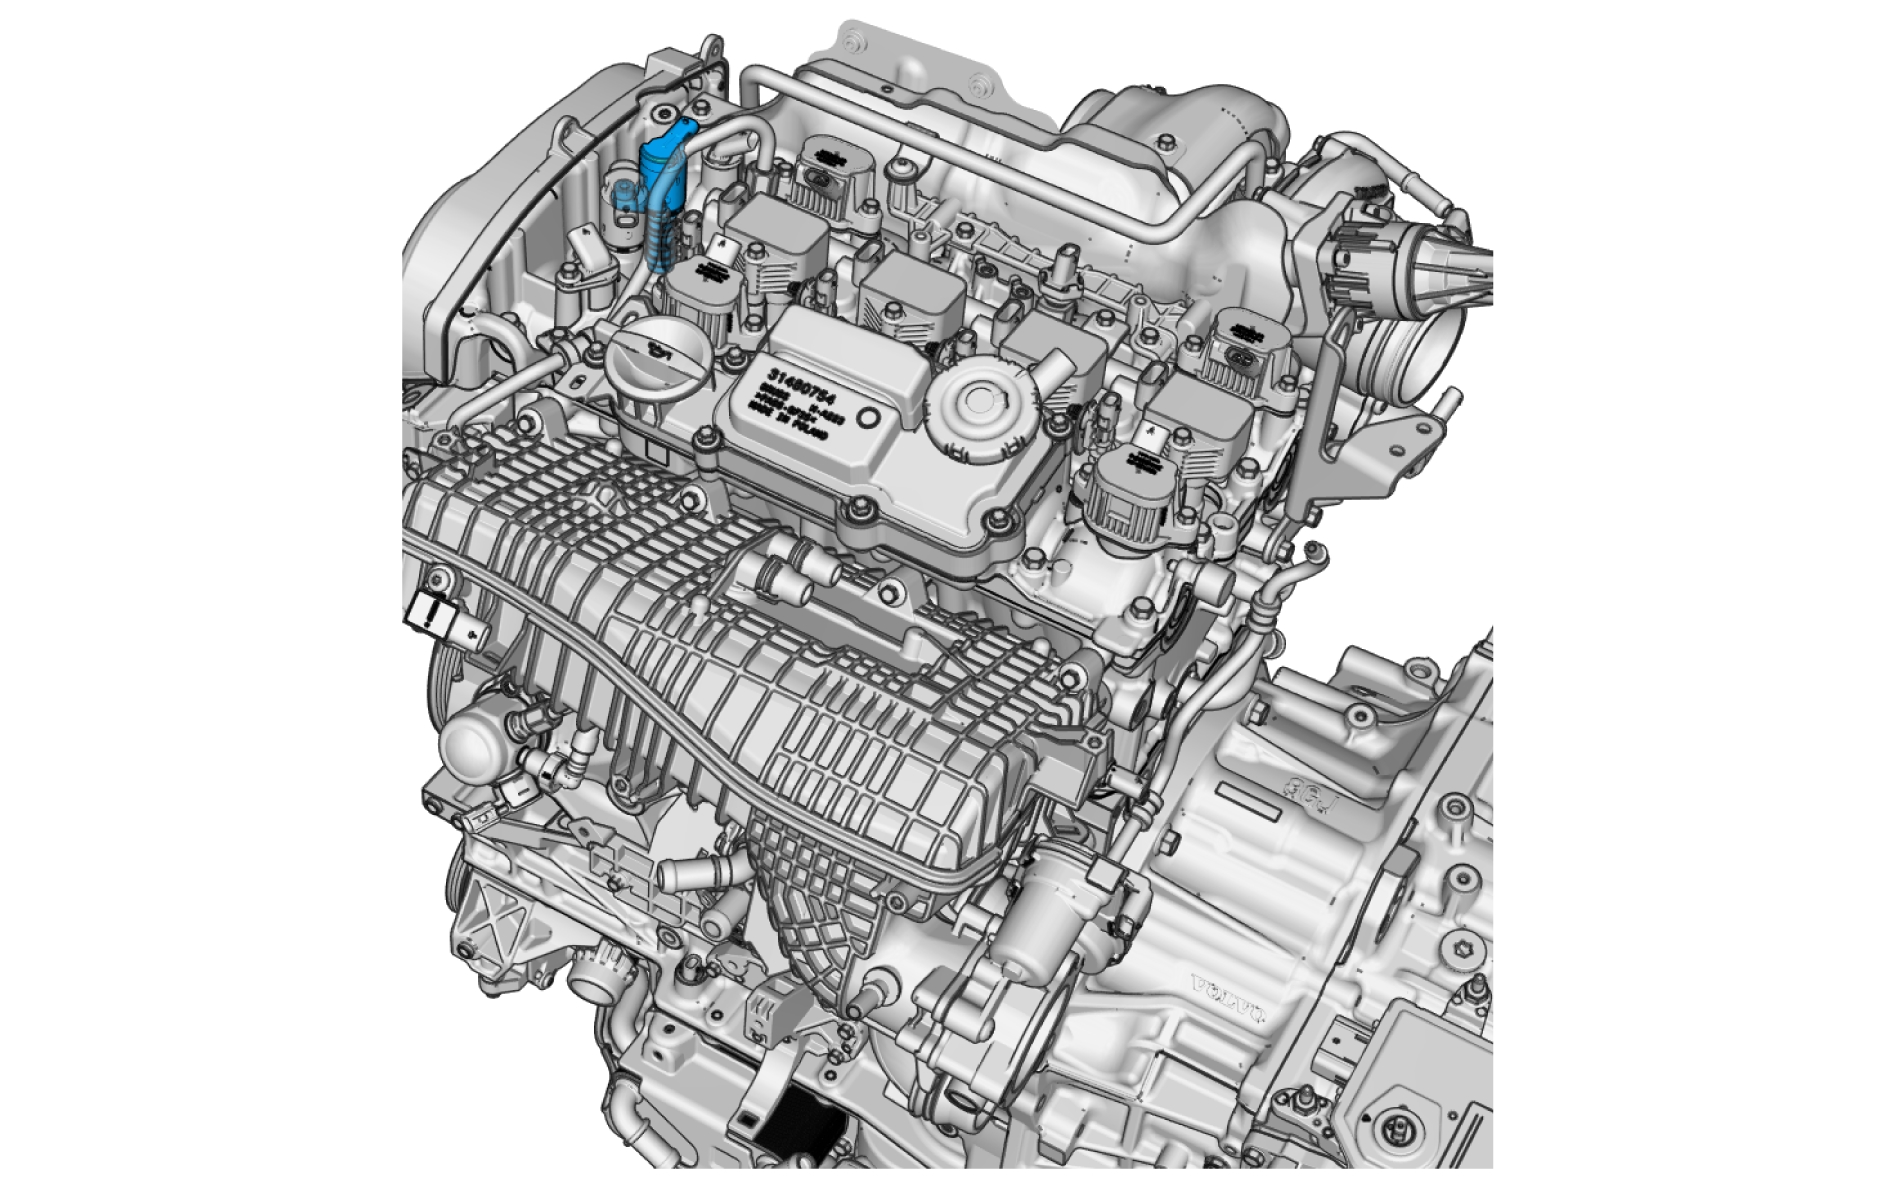
Pin-out
Engine oil pump solenoid - V500
Description
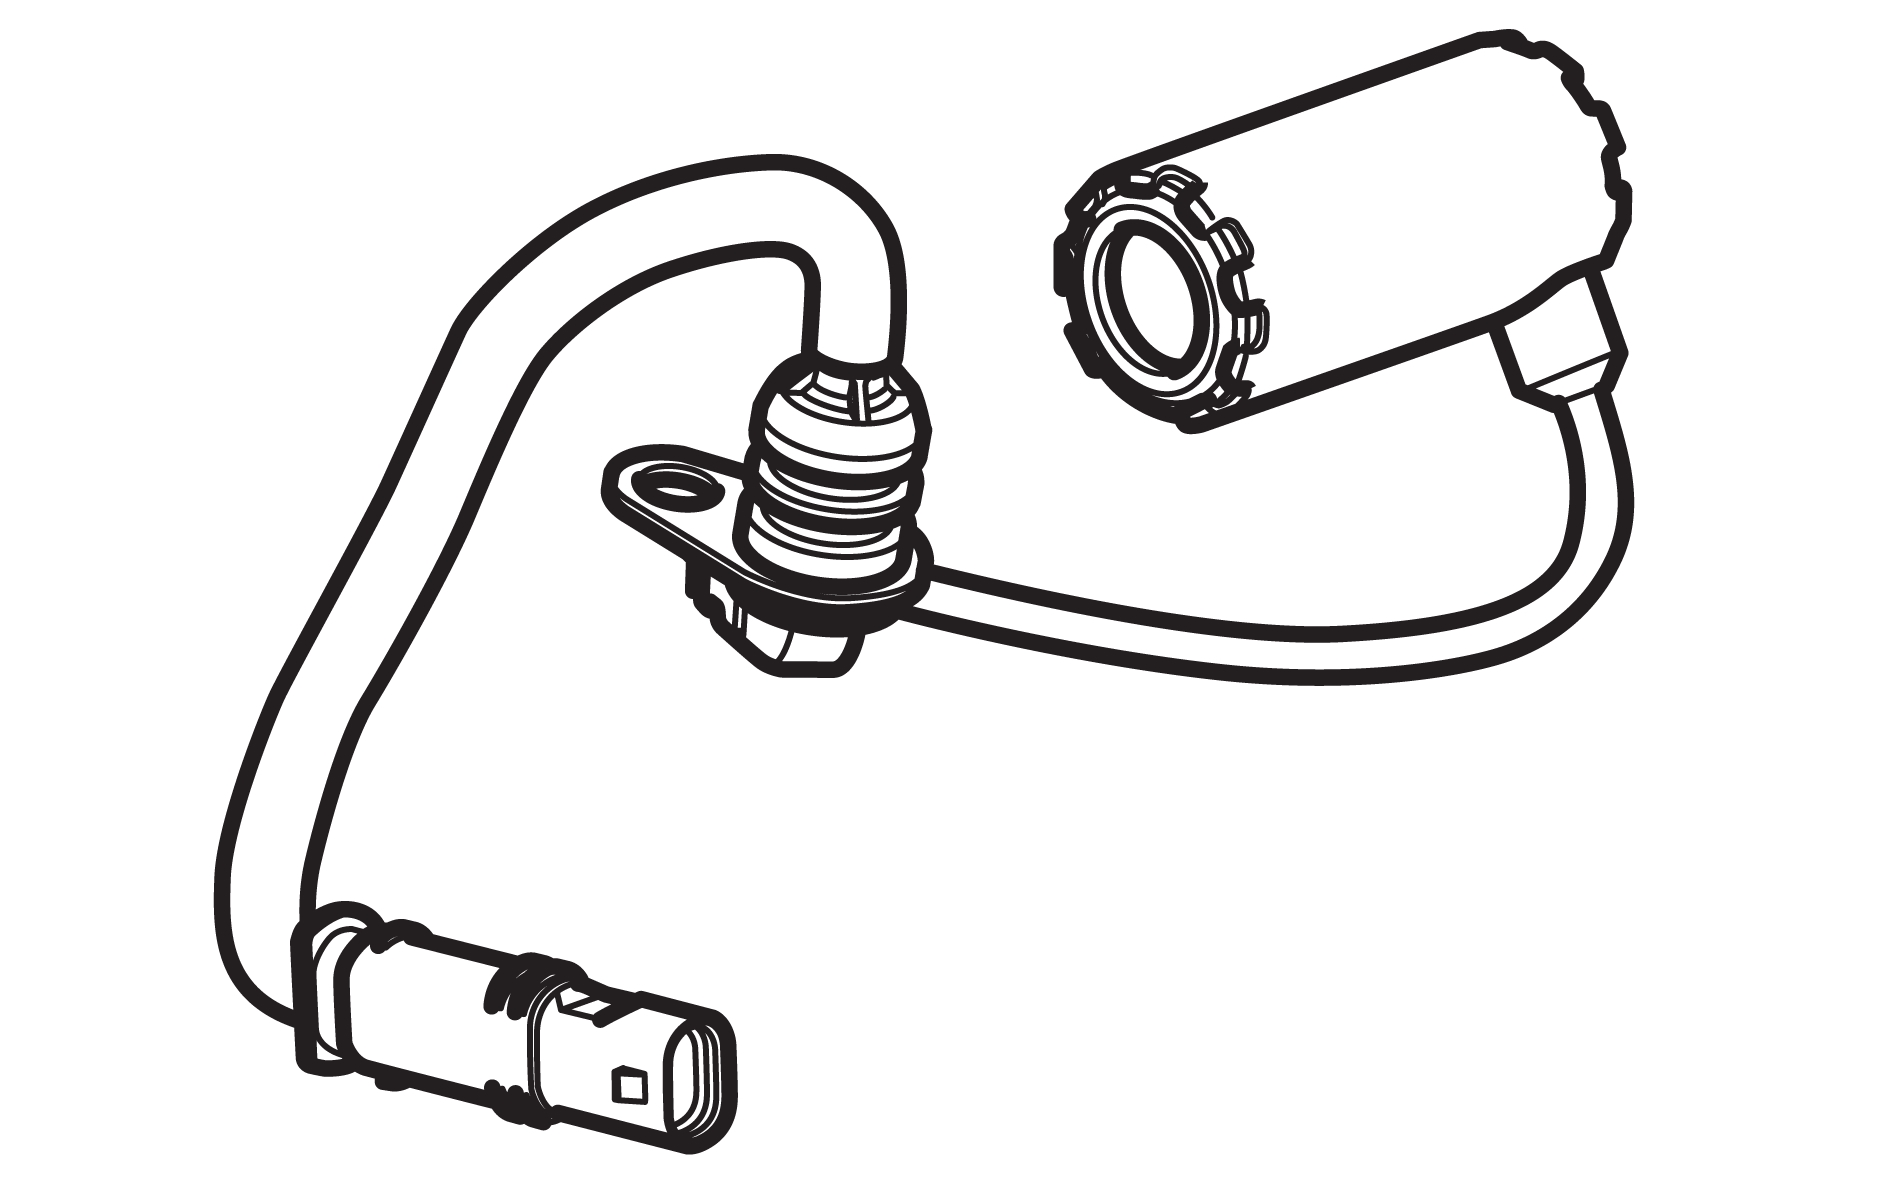
The engine oil pump solenoid controls the oil pressure in the engine. An internal proportional valve regulates the oil flow into the pump housing where the oil pump is located in a rotating cradle.
The cradle divides the pump housing into two chambers and the flow from the valve generates a pressure on one side of the cradle. The pressure aids in turning the cradle, which is otherwise returned to the mechanical limit position. When the cradle turns, the pump volume changes, which affects the flow and the oil pressure in the engine.
When the solenoid is de-energized the valve is set to its end position. The oil is then routed directly to the oil sump. The engine oil pump solenoid is controlled with a PWM signal by the Engine Control Module (ECM).
Diagnostic information
The engine oil pump solenoid does not have a built-in diagnostic system. The Engine Control Module (ECM) monitors the solenoid, sets DTCs and has readable parameters for it.
Connection and communication
The engine oil pump solenoid is directly connected to the Engine Control Module (ECM).
Component location
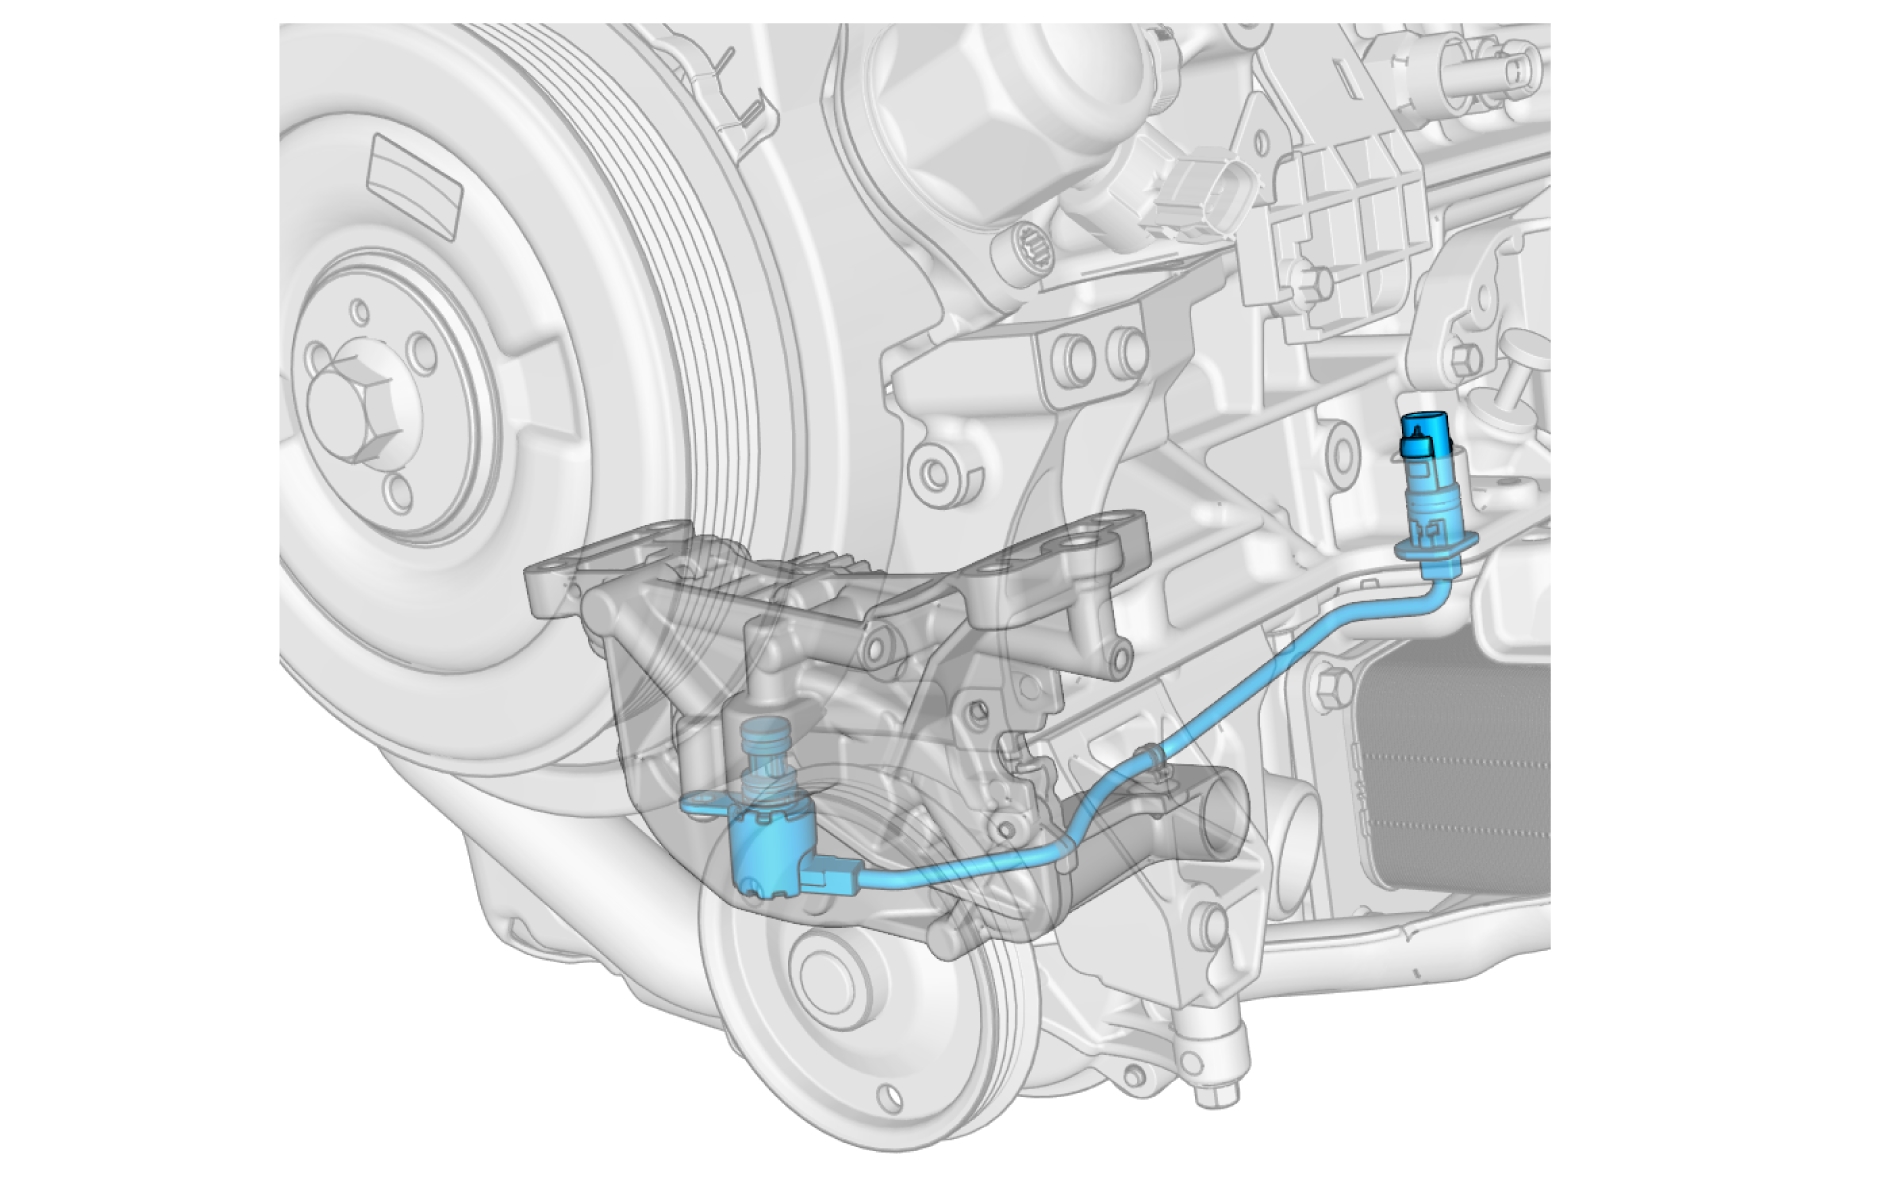
Pin-out
Oil level- and temperature sensor - S501
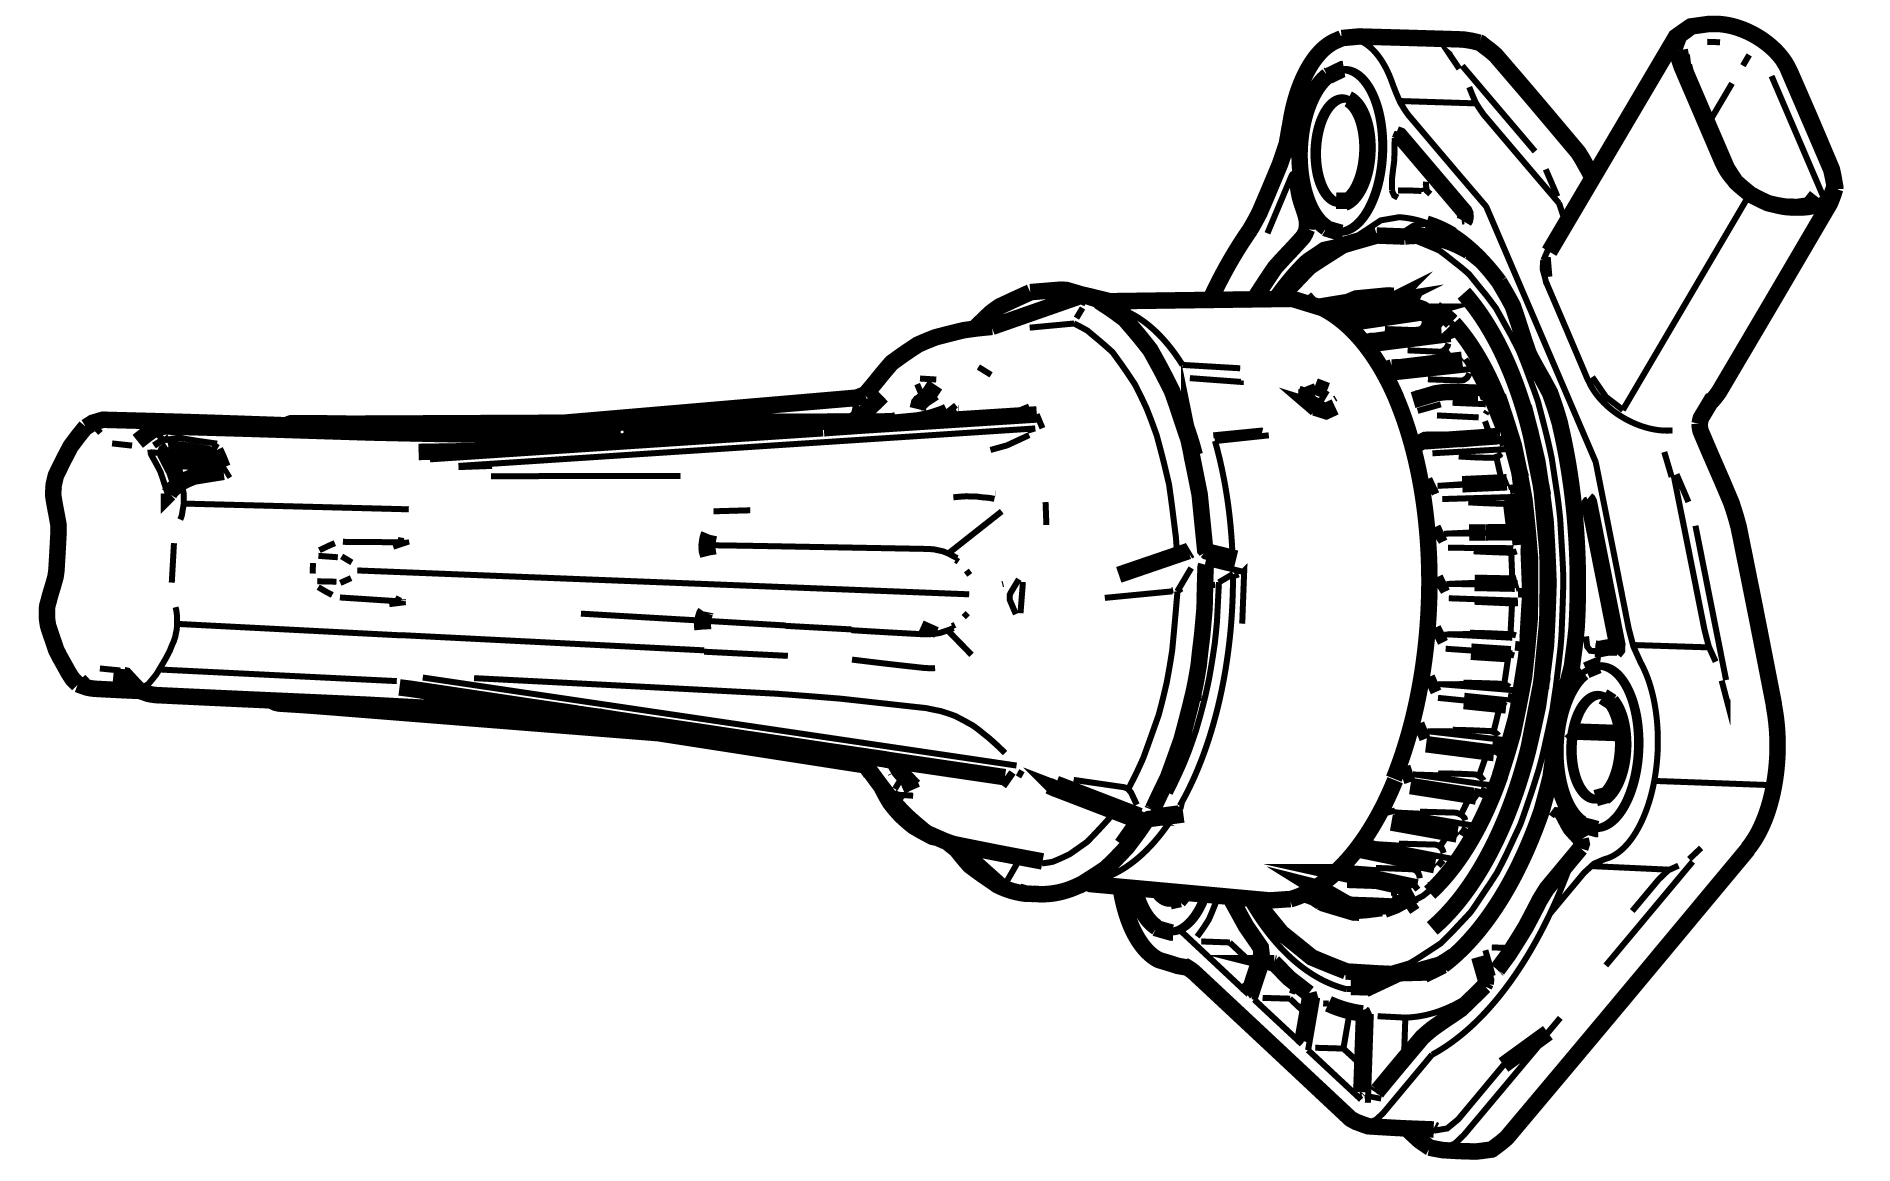
Description
The oil level and temperature sensor uses an ultrasonic technology to measure the oil level. Ultra sound waves are sent out from the MCM (multi-chip module) positioned at the bottom of the sensor. The waves are sent through the oil until they reach air. The waves are reflected back to the sensor, and an oil level measurement is available. The bottom of the sensor consistS of a labyrinth for the oil, which eliminates air bubbles that disturb the measurement.
Diagnostic information
The oil level and temperature sensor has a built-in diagnostic system and sets DTCs for internal errors, temperature and oil level.
Connection and communication
The oil level and temperature sensor is directly connected to the Engine Control Module (ECM).
Component location
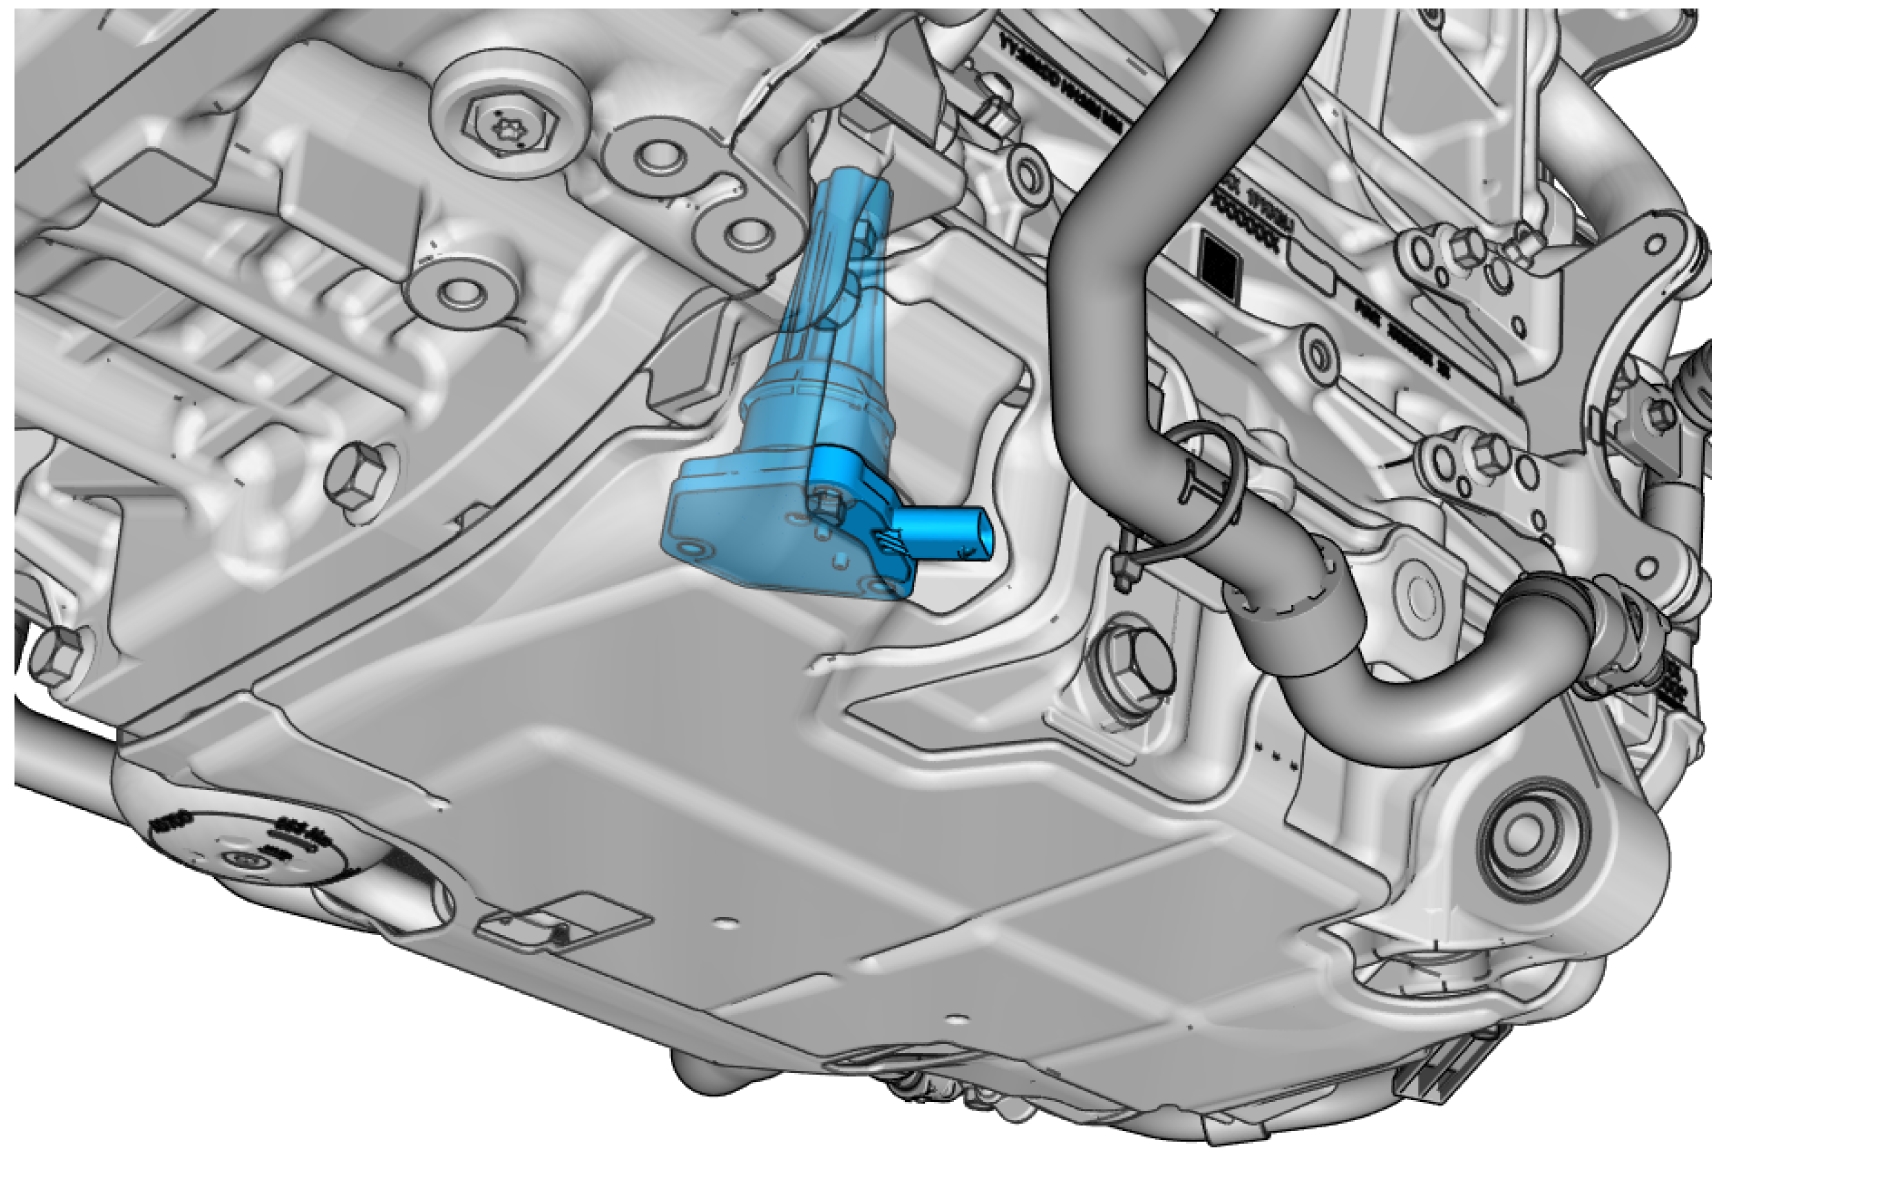
Pin-out
Oil trap, replace
Removal
Remove the hose.
Remove the cable.
Remove the screws.
Remove the marked component.
Installation
Make sure to follow the correct sequence during installation.
Use a new seal.
Install the marked component.
Install screws M6, torque: 10 Nm
Install the cables.
Install the hose.
Sensor, oil level - S503
Description
The sensor, oil level, consists of a wire made of an alloy containing iron, nickel and cobalt. This combination results in properties, such as small expansion due to heat. The wire is encased in a housing and is held in tension by a spring. The oil level measurement is performed by closing the sensor circuit for a short period and measuring the current. The oil around the sensor cools the sensor wire changing the wire's resistance. The higher the oil level, the greater the cooling. The measured current varies depending on the sensor resistance. The current provides a corresponding voltage on a resistor connected in series, located in the Engine Control Module (ECM). The ECM provides the engine oil level, based on preprogrammed information about the relation between the corresponding voltage and the oil level.
Diagnostic information
The sensor, oil level, does not have a built-in diagnostic system. The Engine Control Module (ECM) monitors the sensor, sets DTCs and has readable parameters for it.
Connection and communication
The sensor, oil level is directly connected to the Engine Control Module (ECM).
Component location
Pin-out
Control valve, engine oil cooling - V405
Description
The control valve, engine oil cooling, regulates the temperature in the engine oil cooler by controlling the coolant flow through the cooler.
Diagnostic information
The control valve, engine oil cooling, does not have a built-in diagnostic system. The Engine Control Module (ECM) monitors the valve, sets DTCs and has readable parameters for it.
Connection and communication
The control valve, engine oil cooling, is directly connected to the Engine Control Module (ECM).
Component location
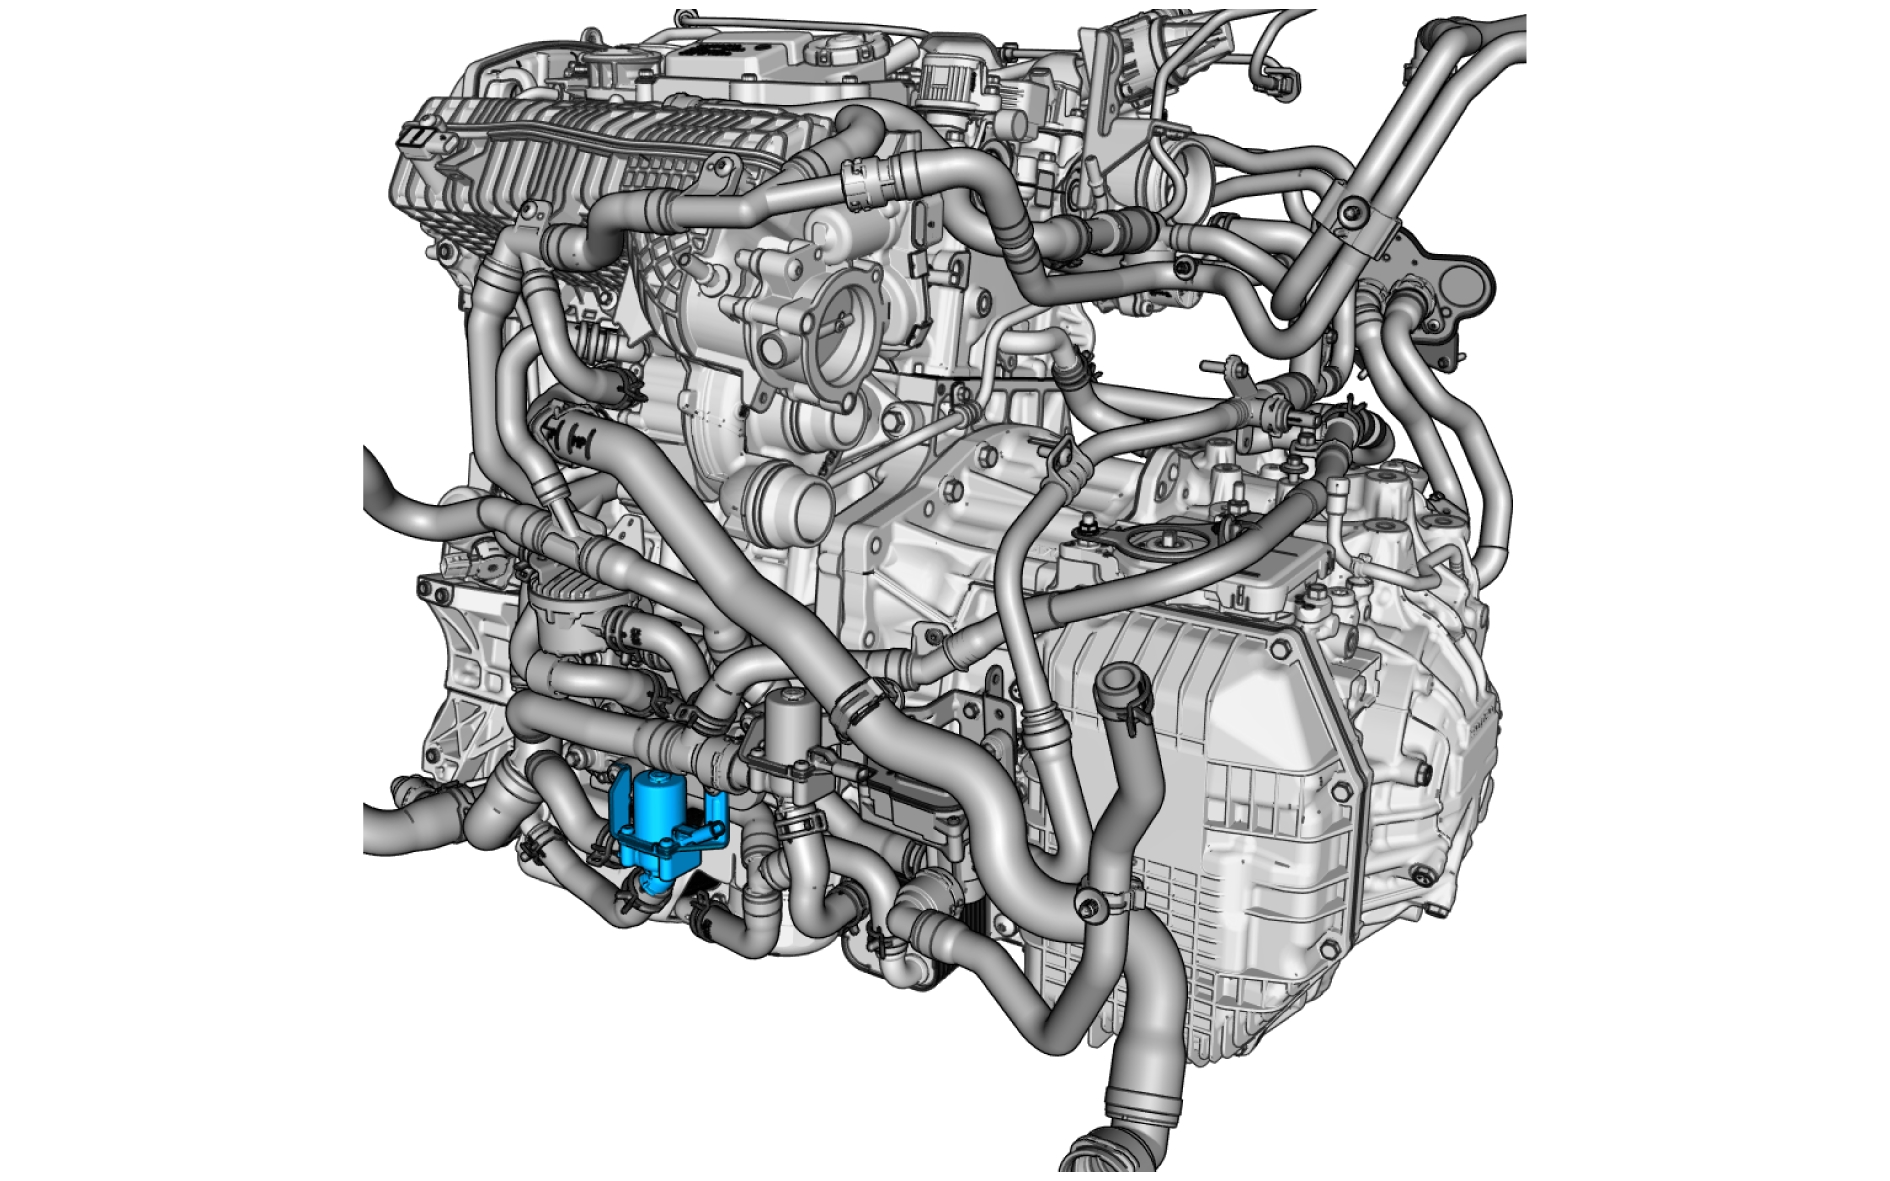
Pin-out
Exhaust gas temperature sensor - S703

Description
The exhaust gas temperature sensor measures the temperature of the exhaust gases and provides the information to the Engine Control Module (ECM). The ECM makes sure that a sufficiently high temperature is reached in order to optimize the exhaust gas recirculation (EGR) process. The exhaust gas temperature sensor is a PT-200 sensor.
Diagnostic information
The exhaust gas temperature sensor does not have a built-in diagnostic system. The Engine Control Module (ECM) monitors the sensor, sets DTCs and stores readable parameters for it.
Connection and communication
The exhaust gas temperature sensor is directly connected to the Engine Control Module (ECM).
Component location
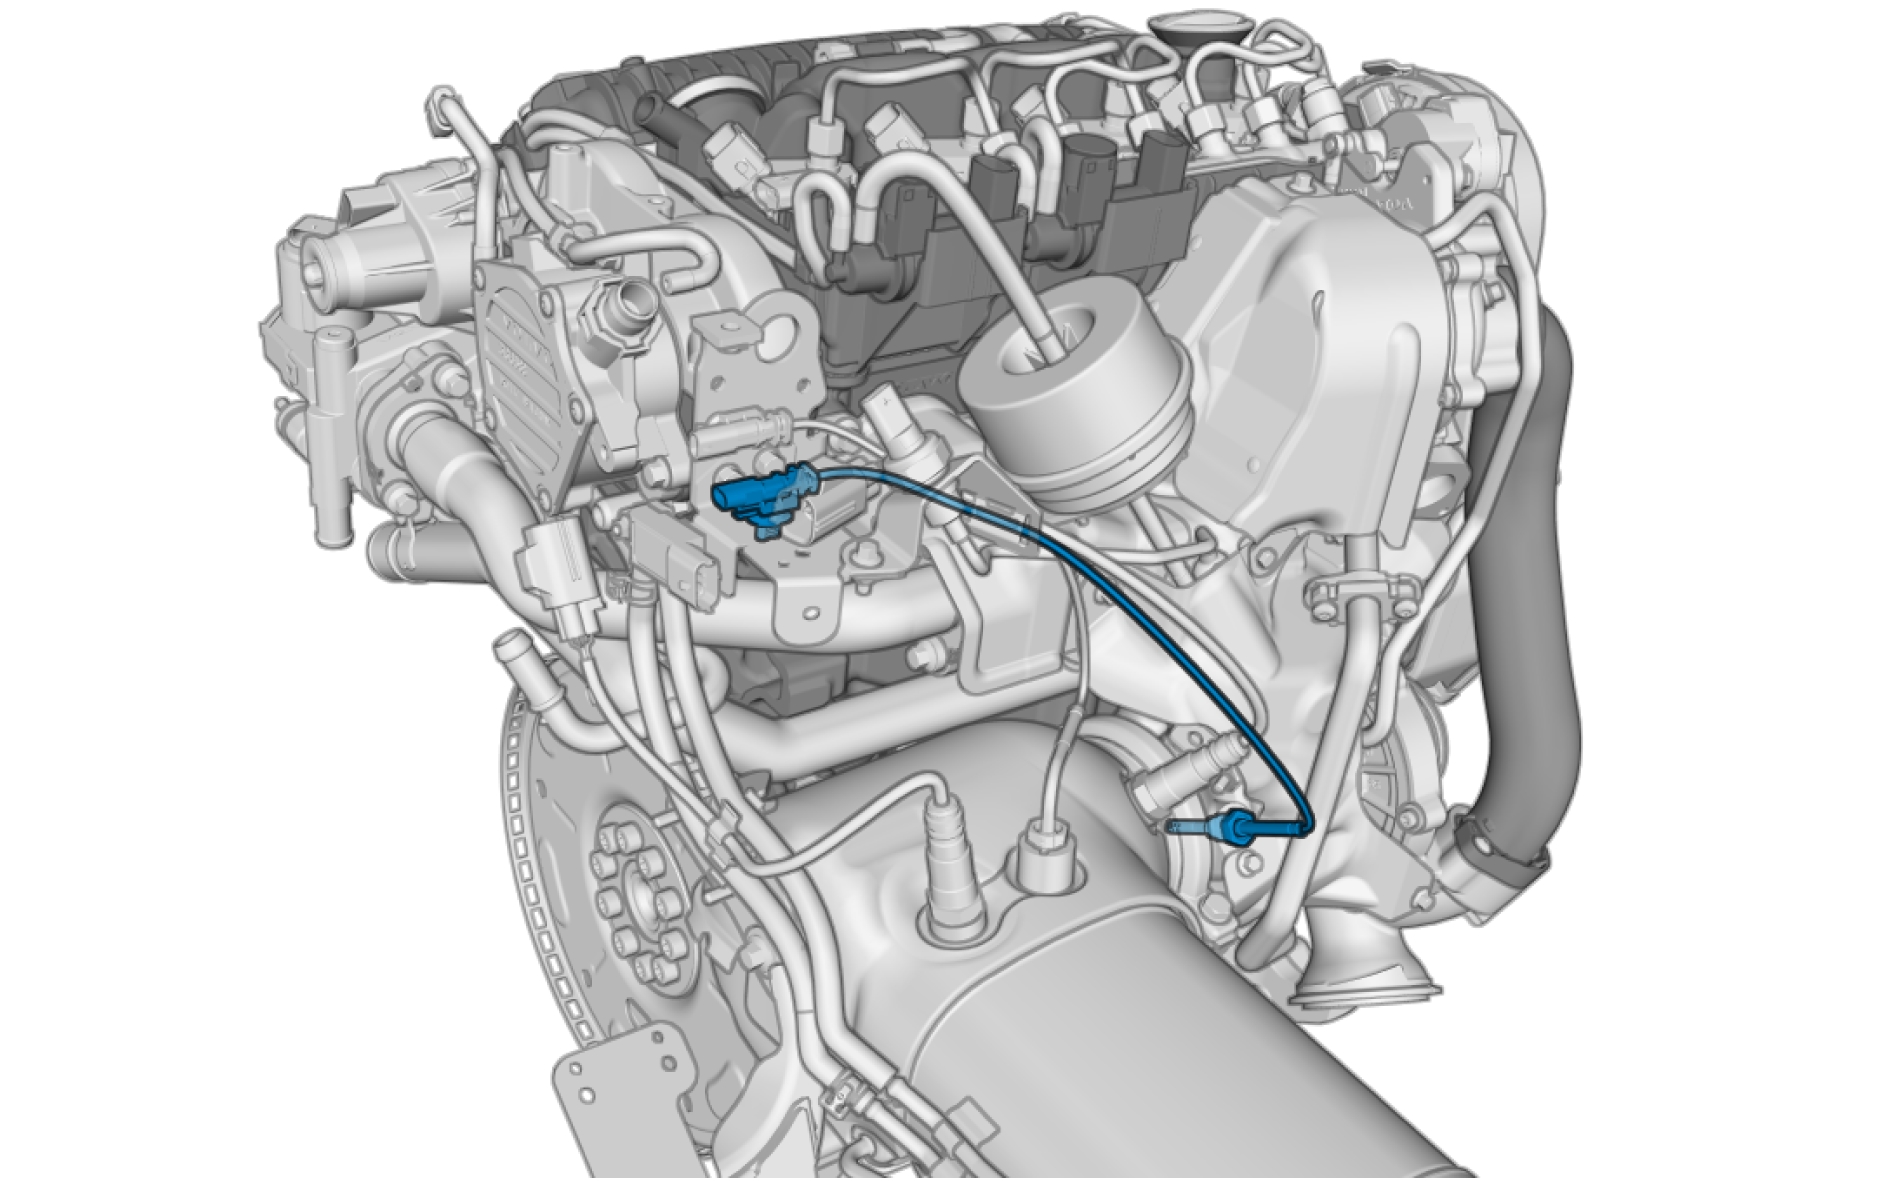
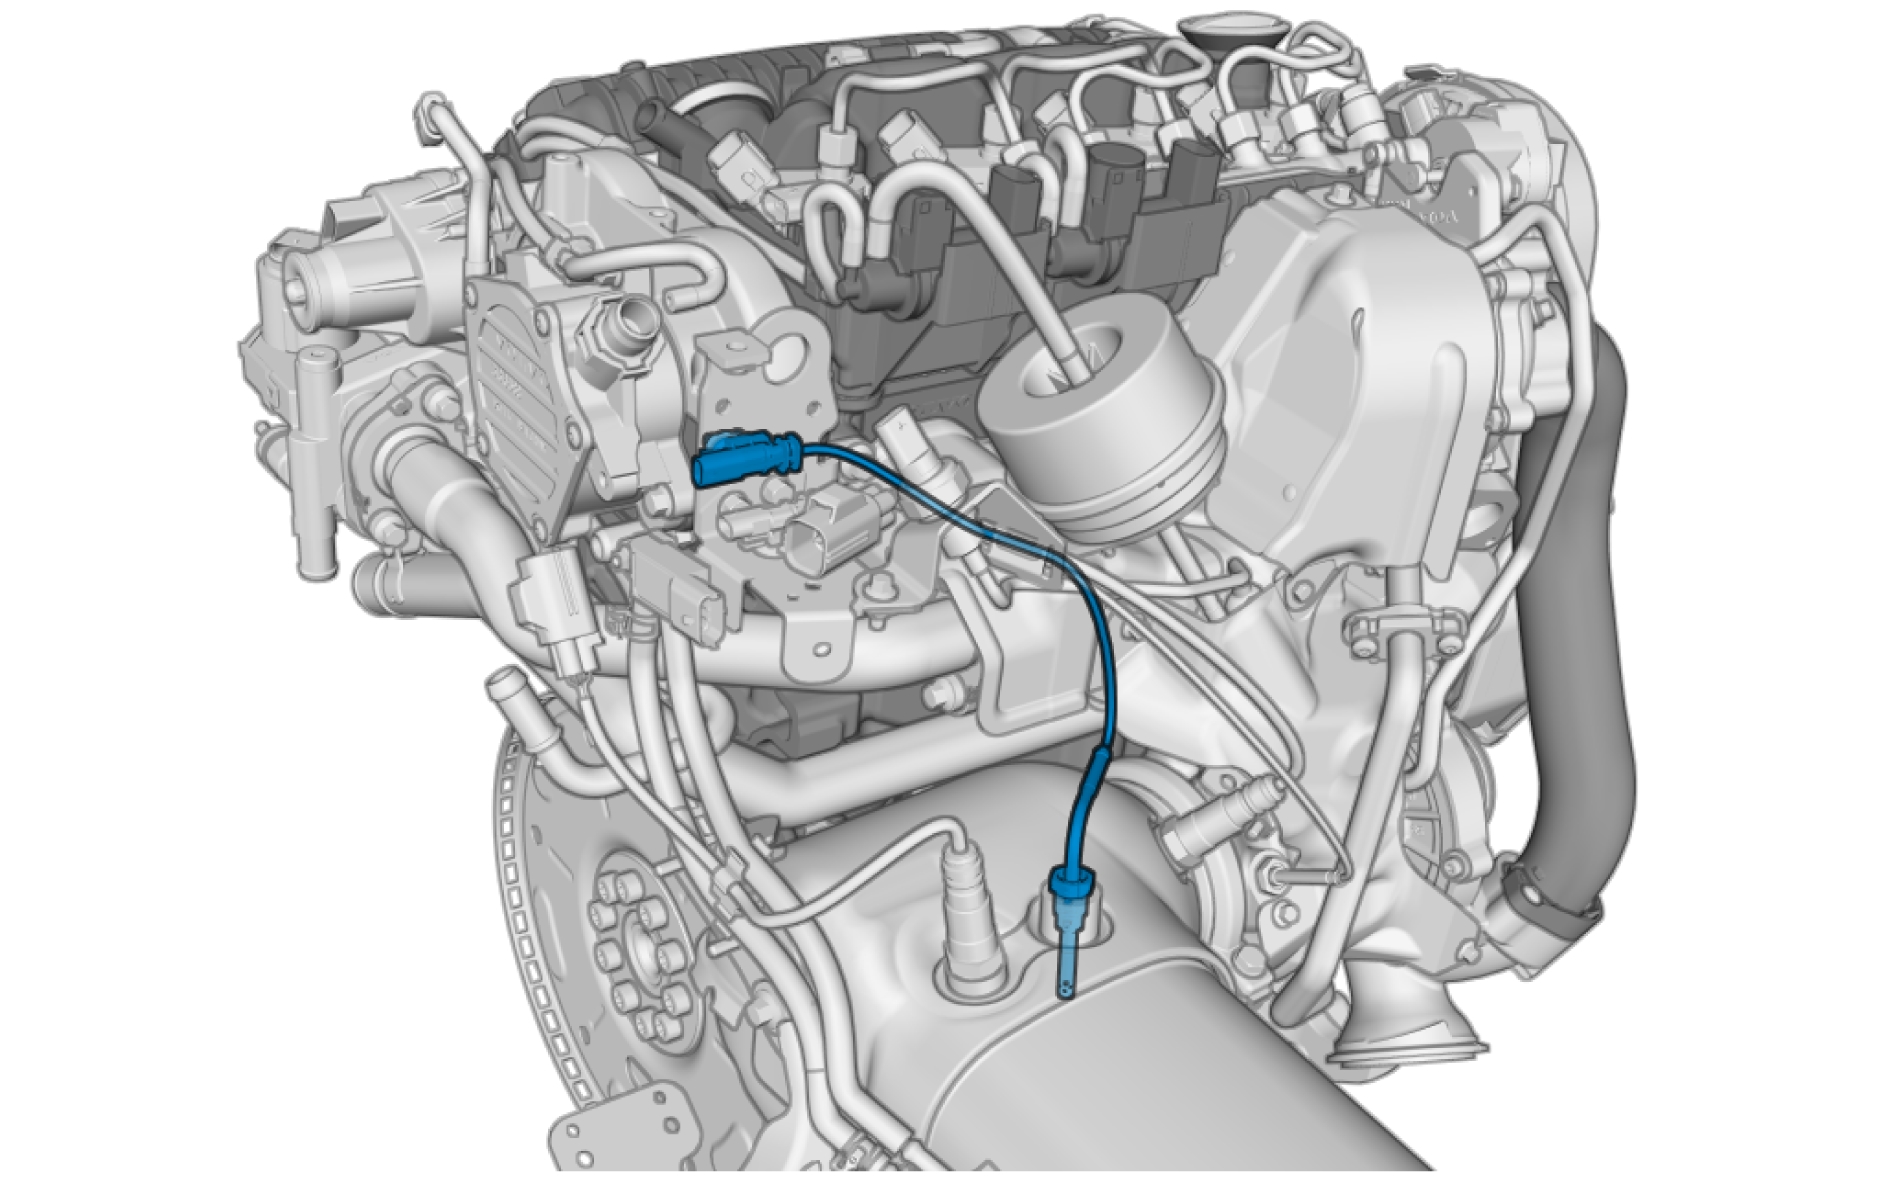
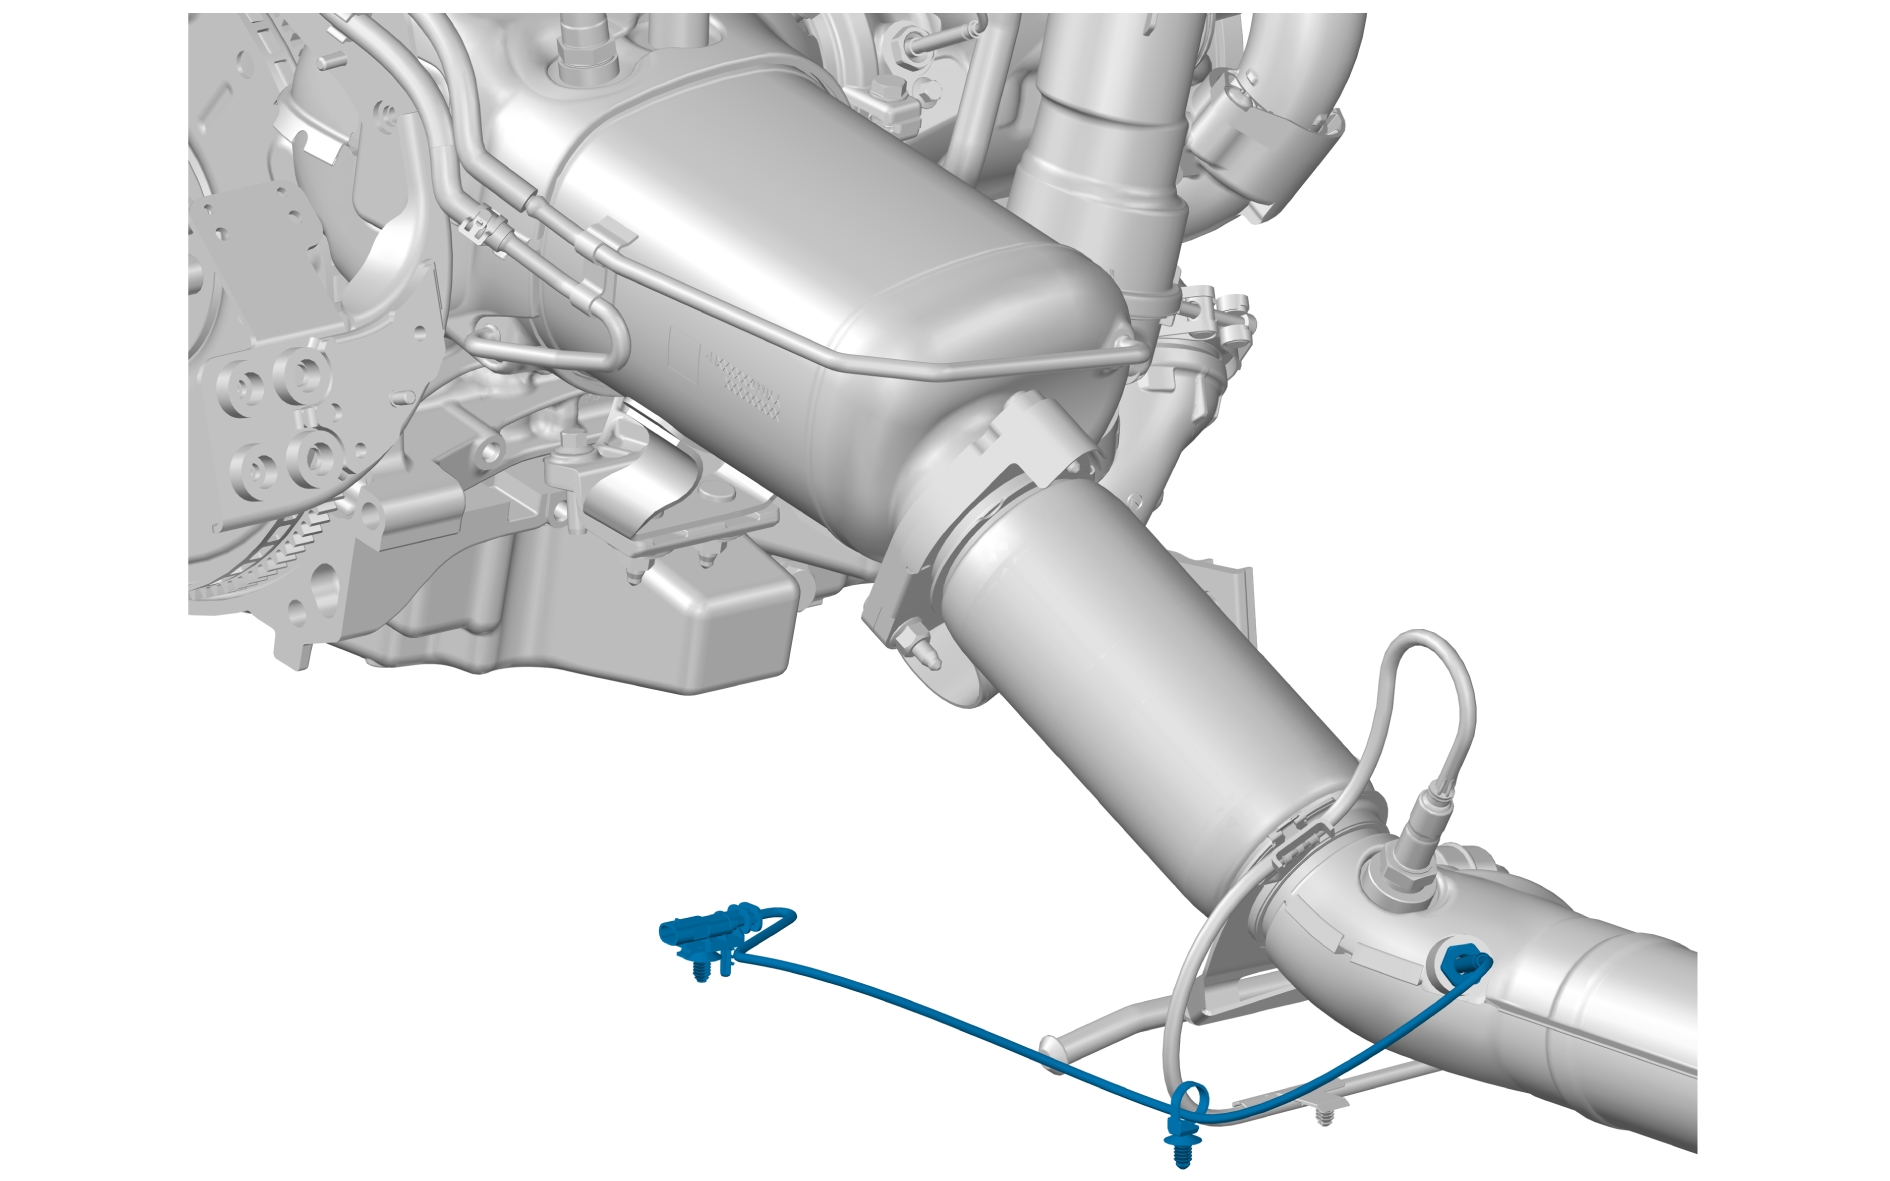
Pin-out
Engine Coolant Pump Module (ECPM) - P400

Description
The Engine Coolant Pump Module (ECPM) generates the flow in the cooling loop between the radiator and the engine. This flow keeps the engine temperature within the permitted limits and contributes to the climate system for the passenger compartment, maintaining the desired temperature. The speed varies between 750 – 5 800 r/min depending on the cooling demand. The coolant pump can supply a maximum of approximately 2 l/s. On certain occasions, such as cold starts or at idle, the coolant pump does not usually run. This partly reduces the load on the engine, thereby reducing fuel consumption. In other cases, the coolant pump does not start so that the engine can reach its operating temperature faster.
Diagnostic communication
The engine coolant pump has a simplified built-in diagnostic system, which monitors a limited amount of errors. All diagnostic data is sent to the diagnostic tool via the Engine Control Module (ECM). The ECM sets DTCs and stores readable parameters for the engine coolant pump.
Connection and communication
The engine coolant pump is a LIN slave and communicates with the Engine Control Module (ECM).
Component location
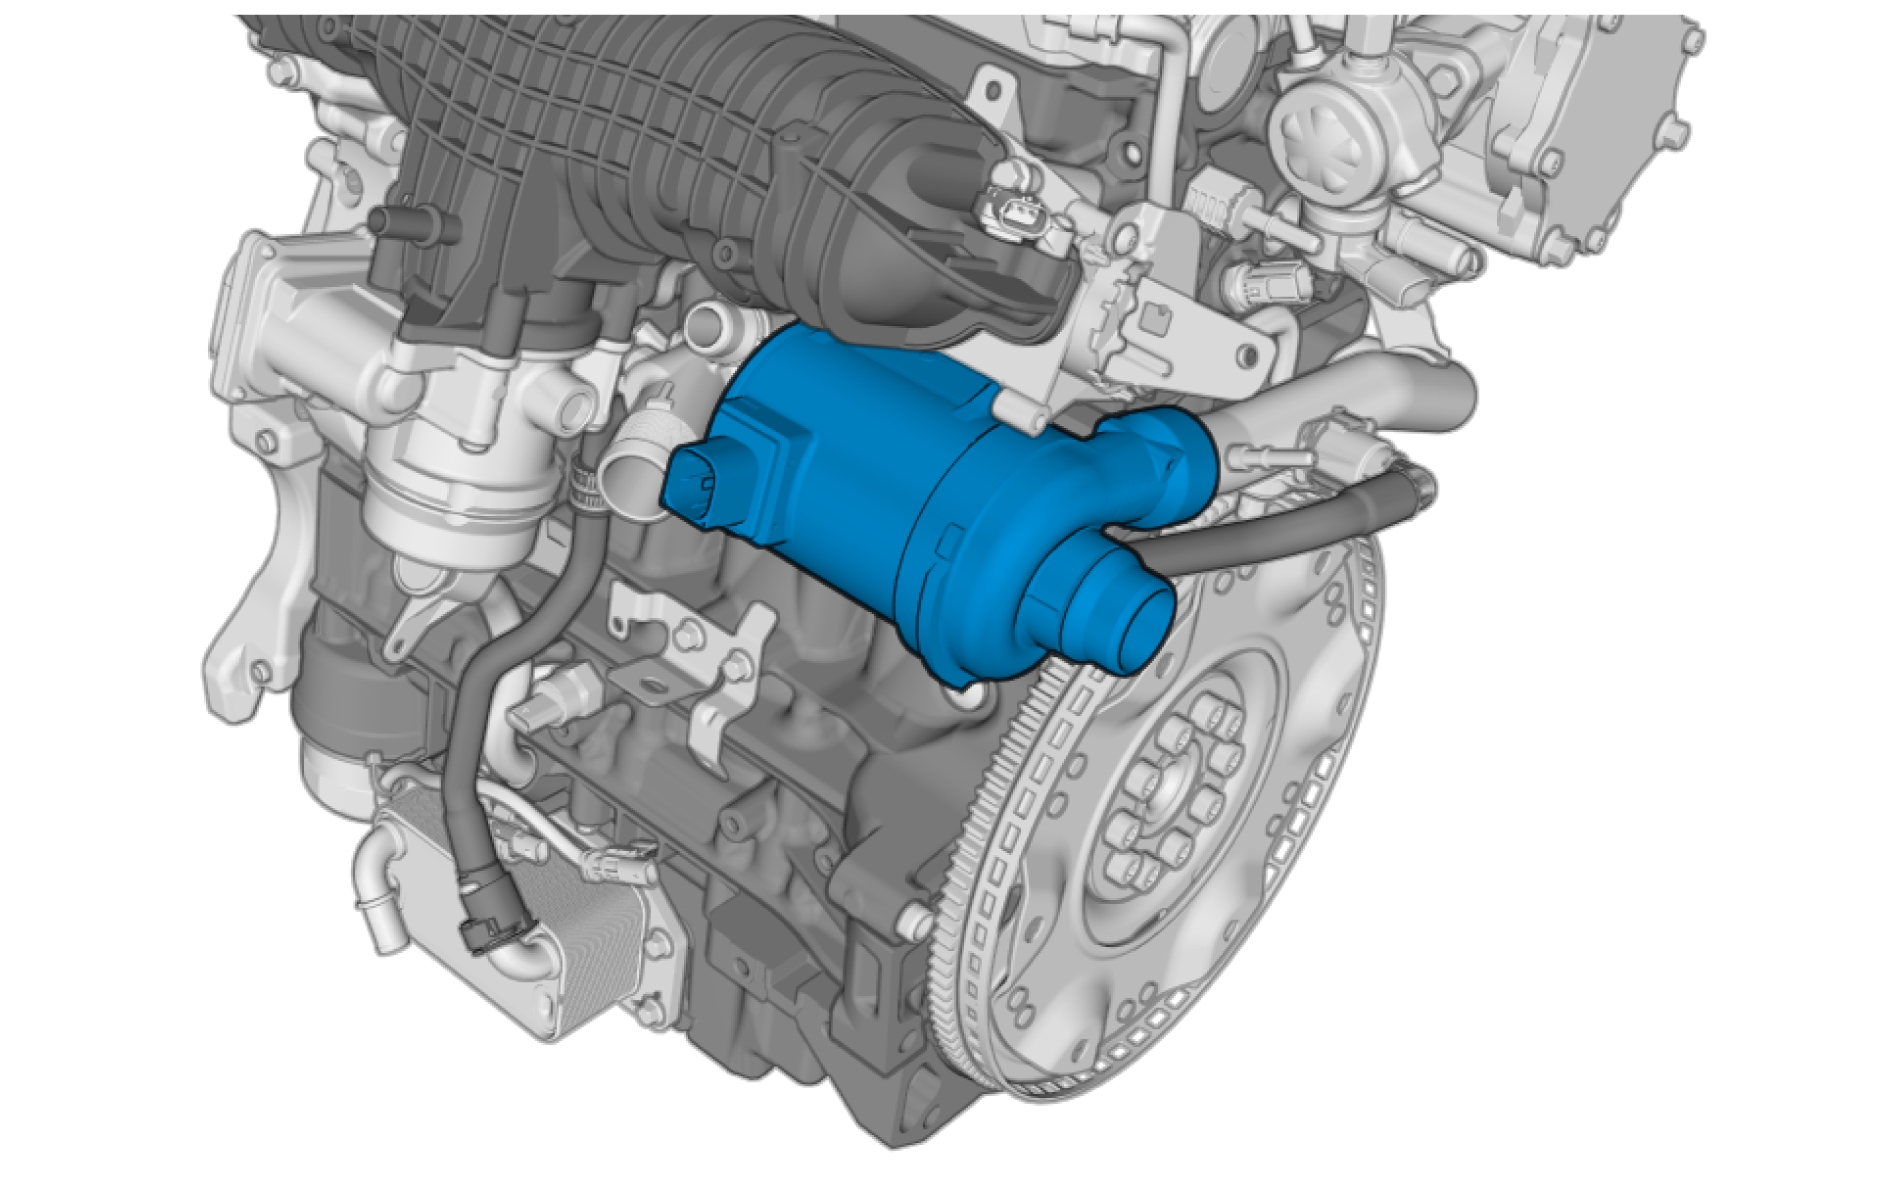
Pin-out
Engine Coolant Pump, replace
Removal
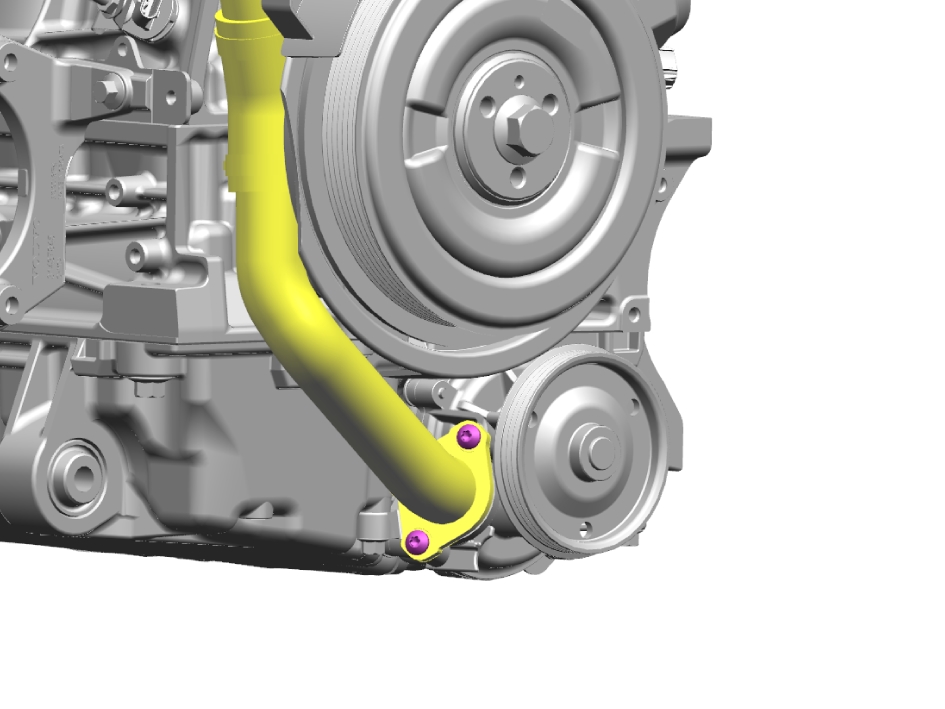
Remove the screws.
Fold away the hose.

Remove the marked component.
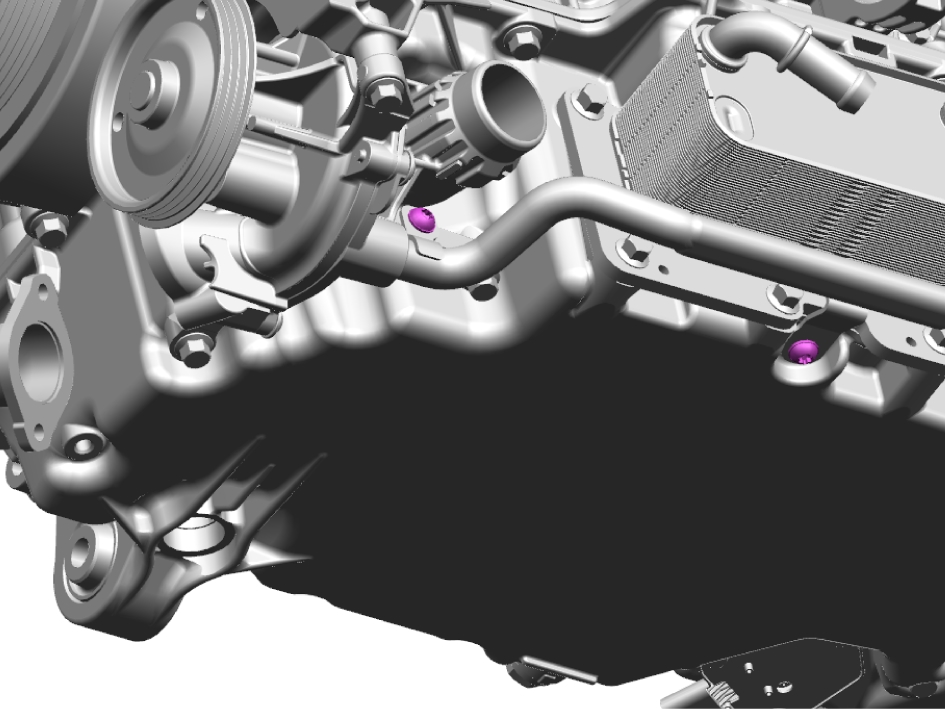
Remove the screws.
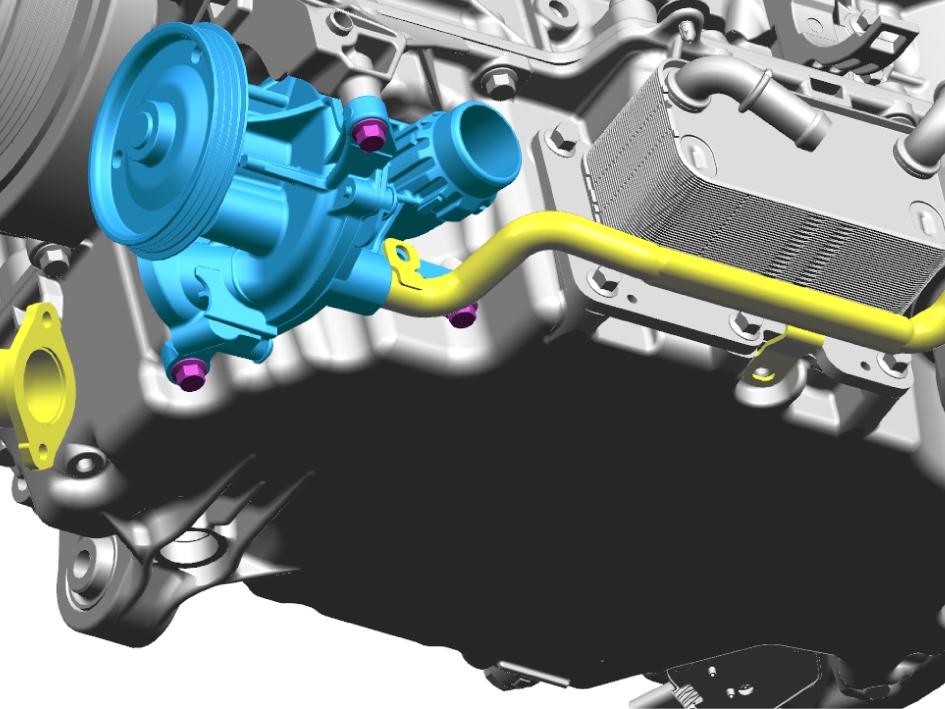
Remove the screws.
Remove the pump.
Installation
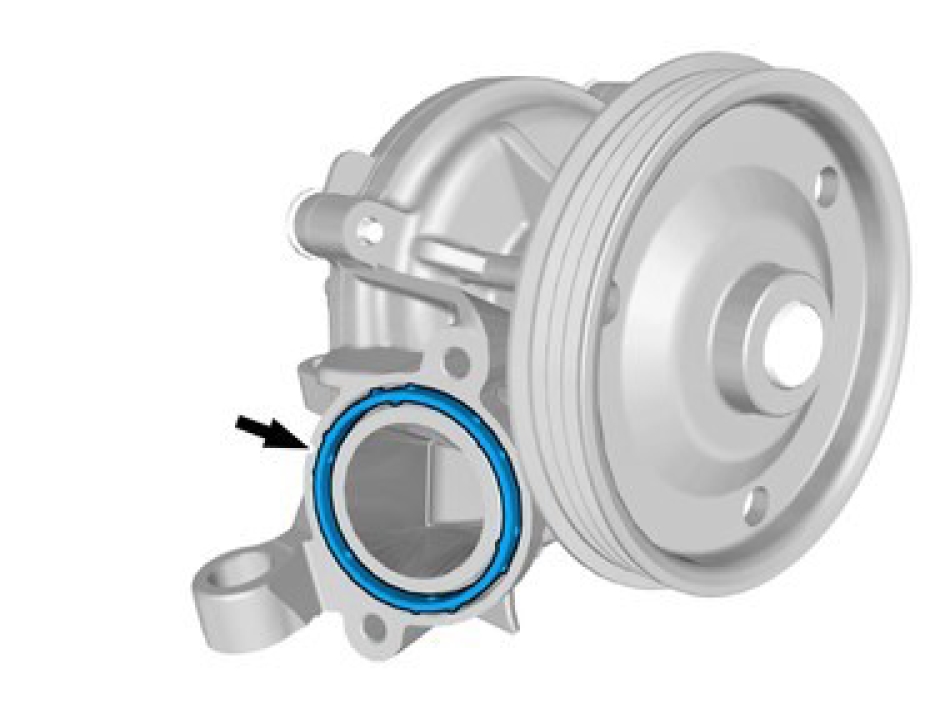
Use a new seal.
Install the pump.
Install the screws, M7, torque: 17 Nm
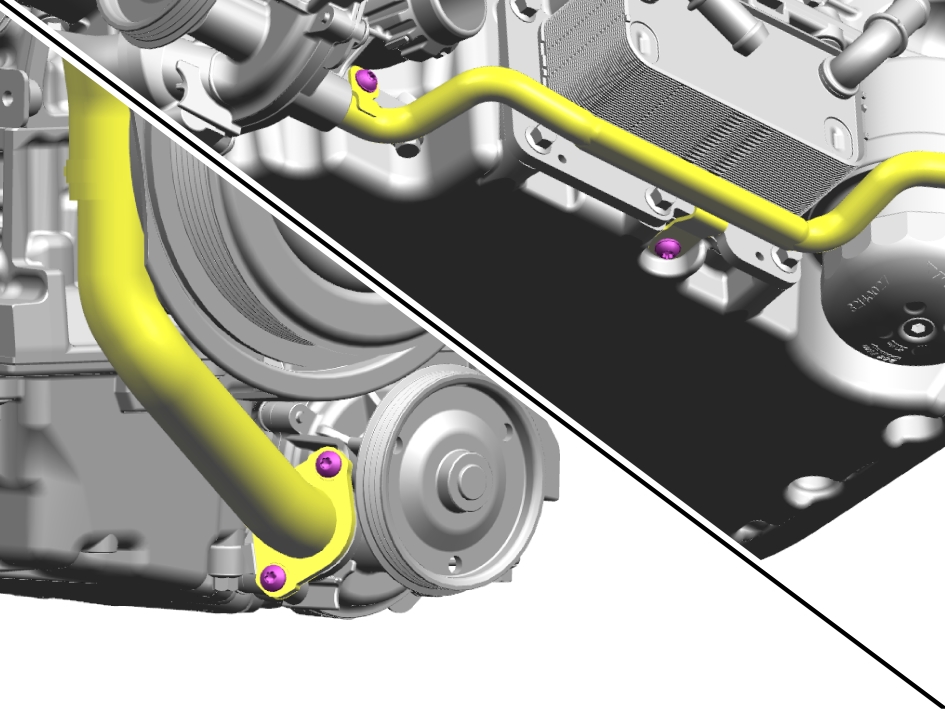
Install the pipes.
Install the screws, M6, torque:10 Nm
Manifold absolute pressure MAP sensor, replace
Removal
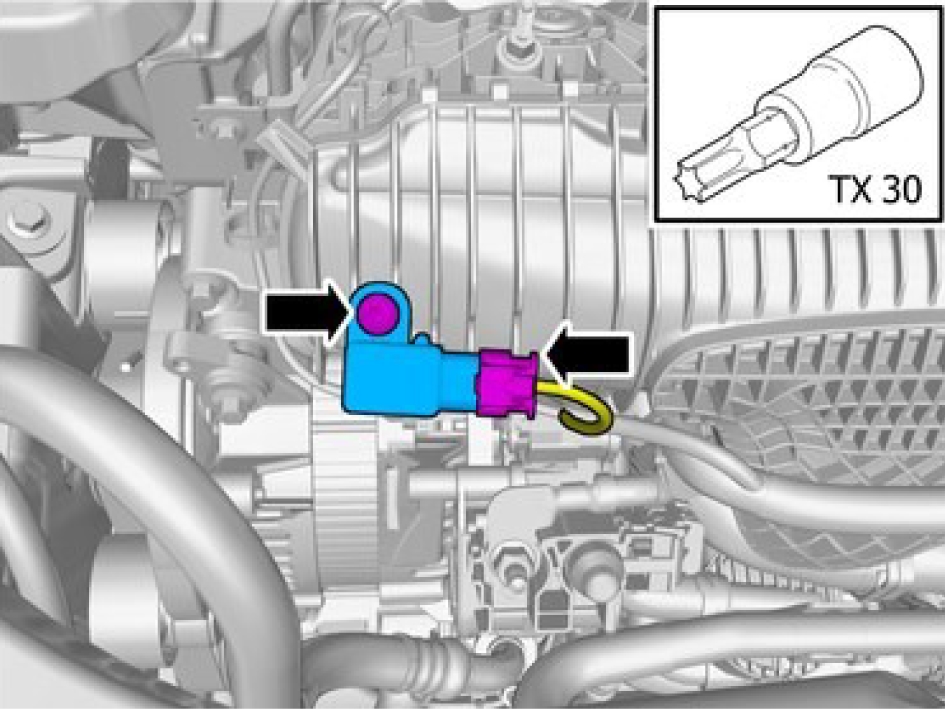
Disconnect the connector.
Remove the screw.
Remove the marked component.
Installation
Install the sensor.
Install the connector.
Install screw, torque:5 Nm
Actuator, sliding camshaft - M605
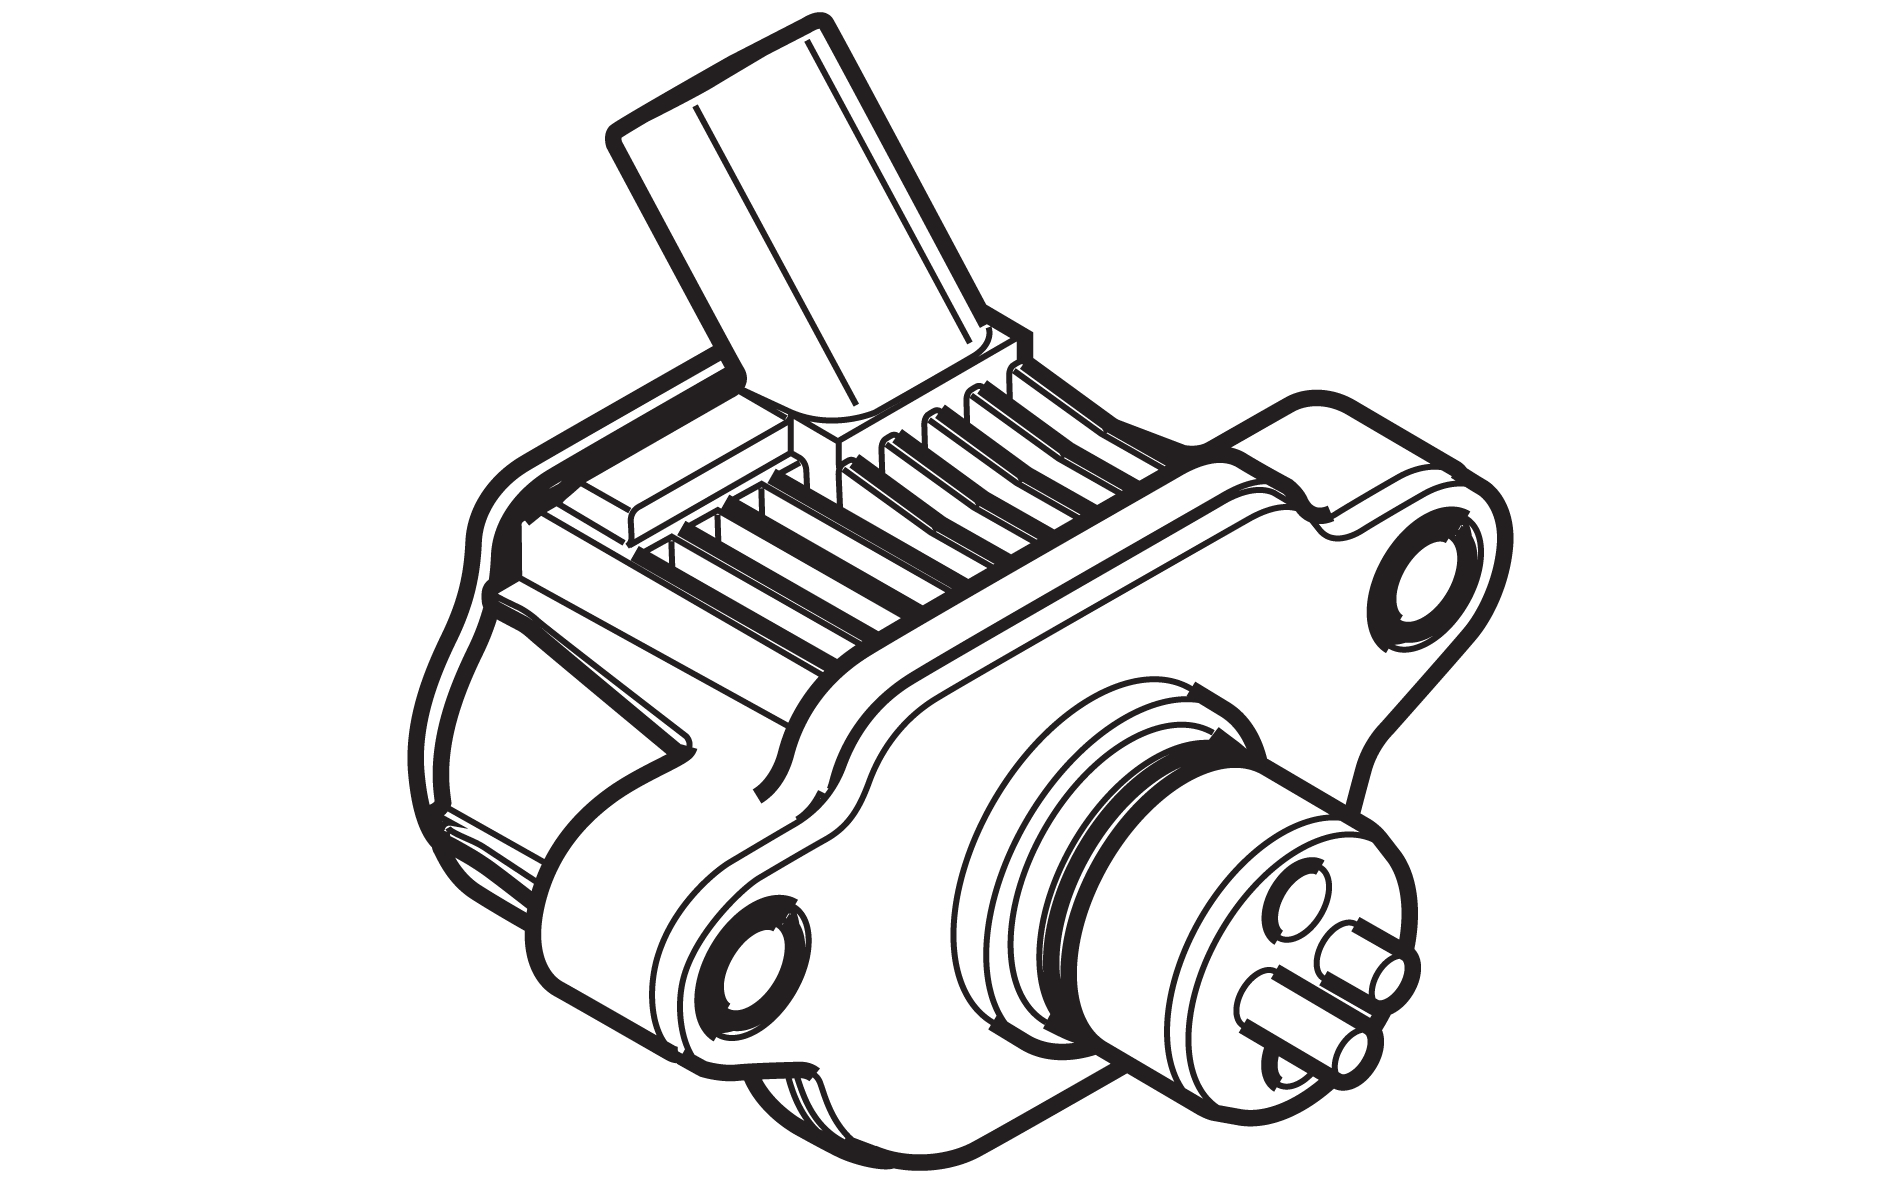
Description
The actuator, sliding camshaft, deactivates cylinder 1 and 4 when the vehicle is driving on low load. Cylinder deactivation is used to lower fuel consumption. There are two actuators per cylinder, one for the inlet valves and one for the exhaust valves. A Y-shaped groove is mounted on the camshaft and the actuators move it sideways to deactivate the valves. Cylinder 1 and 4 are always activated on idle.
Diagnostic information
The actuator, sliding camshaft, does not have a built-in diagnostic system. The Engine Control Module (ECM) monitors the actuators and sets DTCs.
Connection and communication
The actuator, sliding camshaft, is directly connected to the Engine Control Module (ECM).
Component location
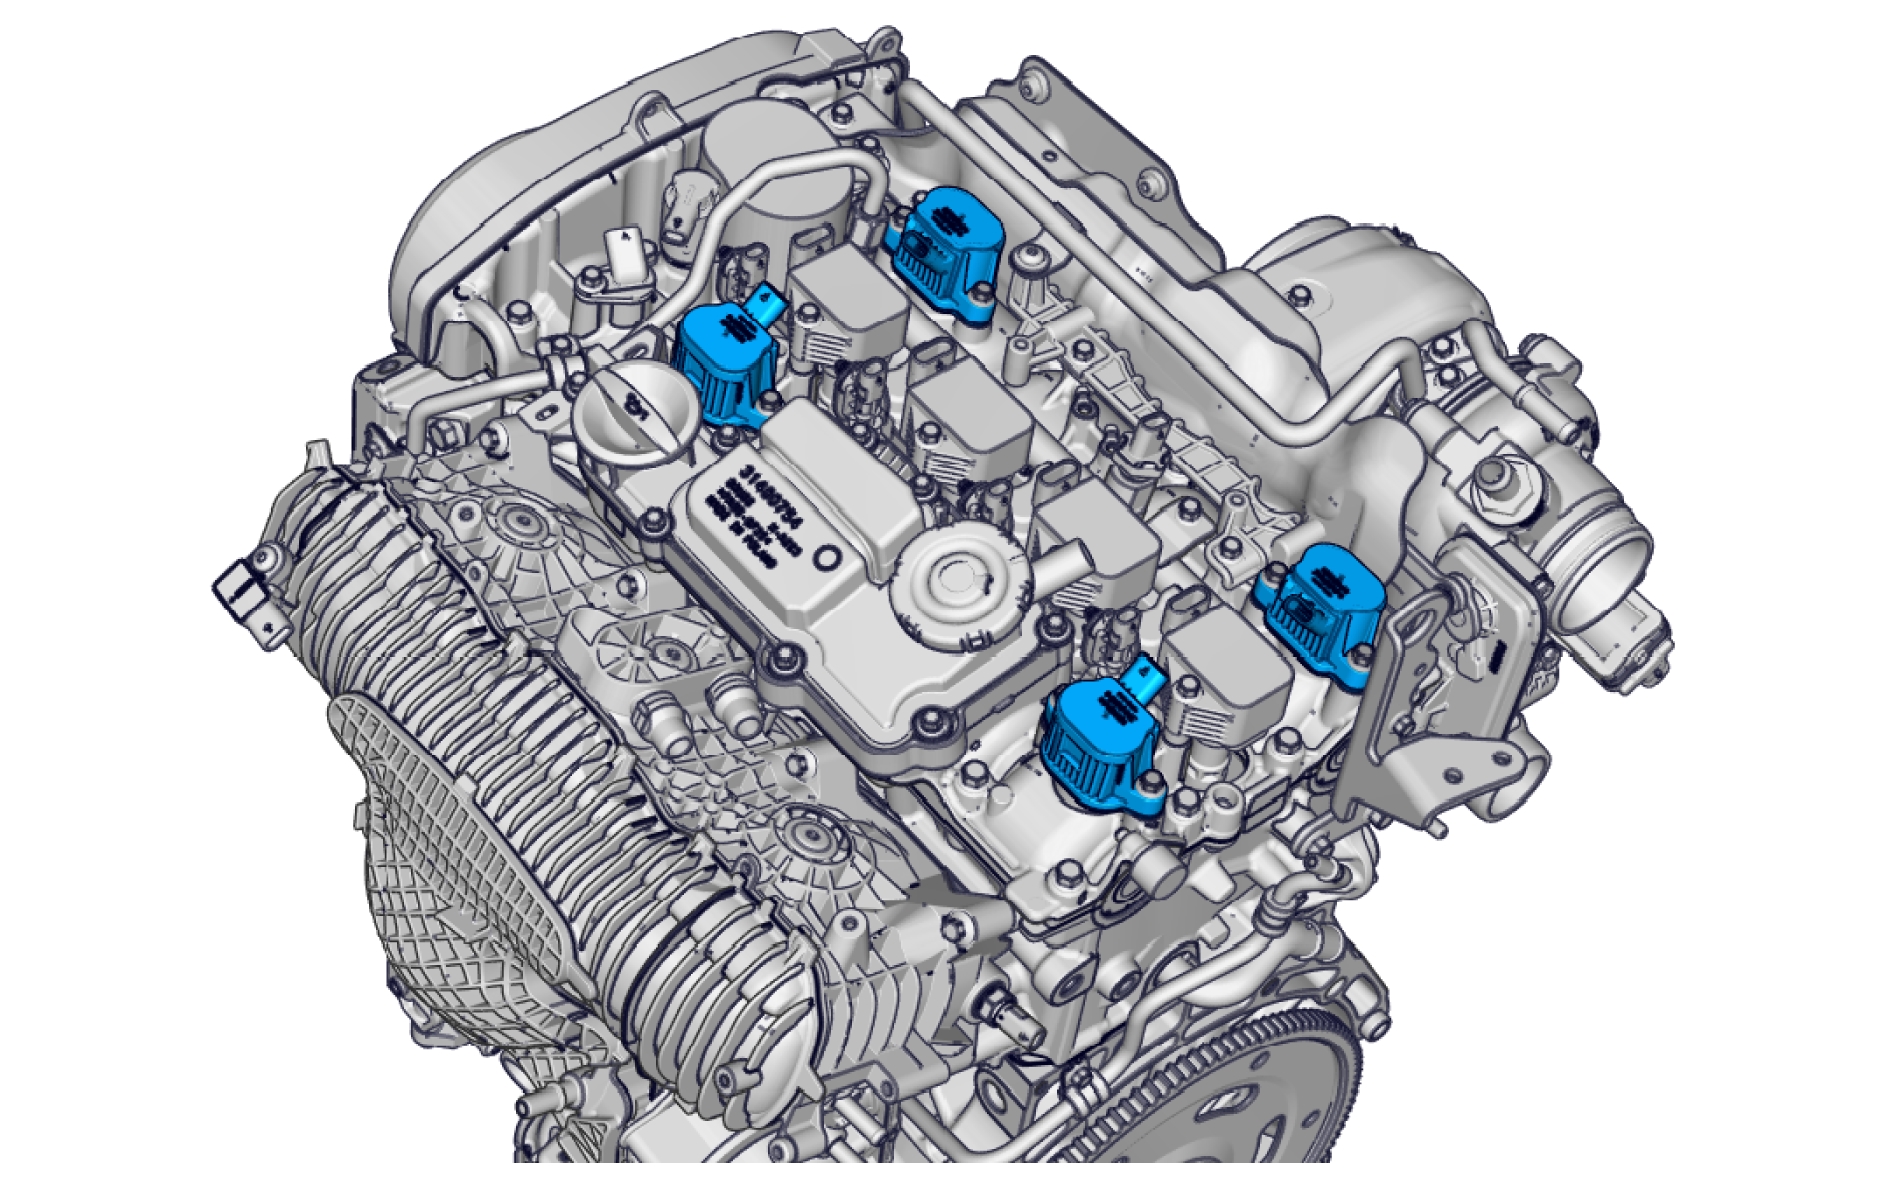
Pin-out
Control valve, fuel flow
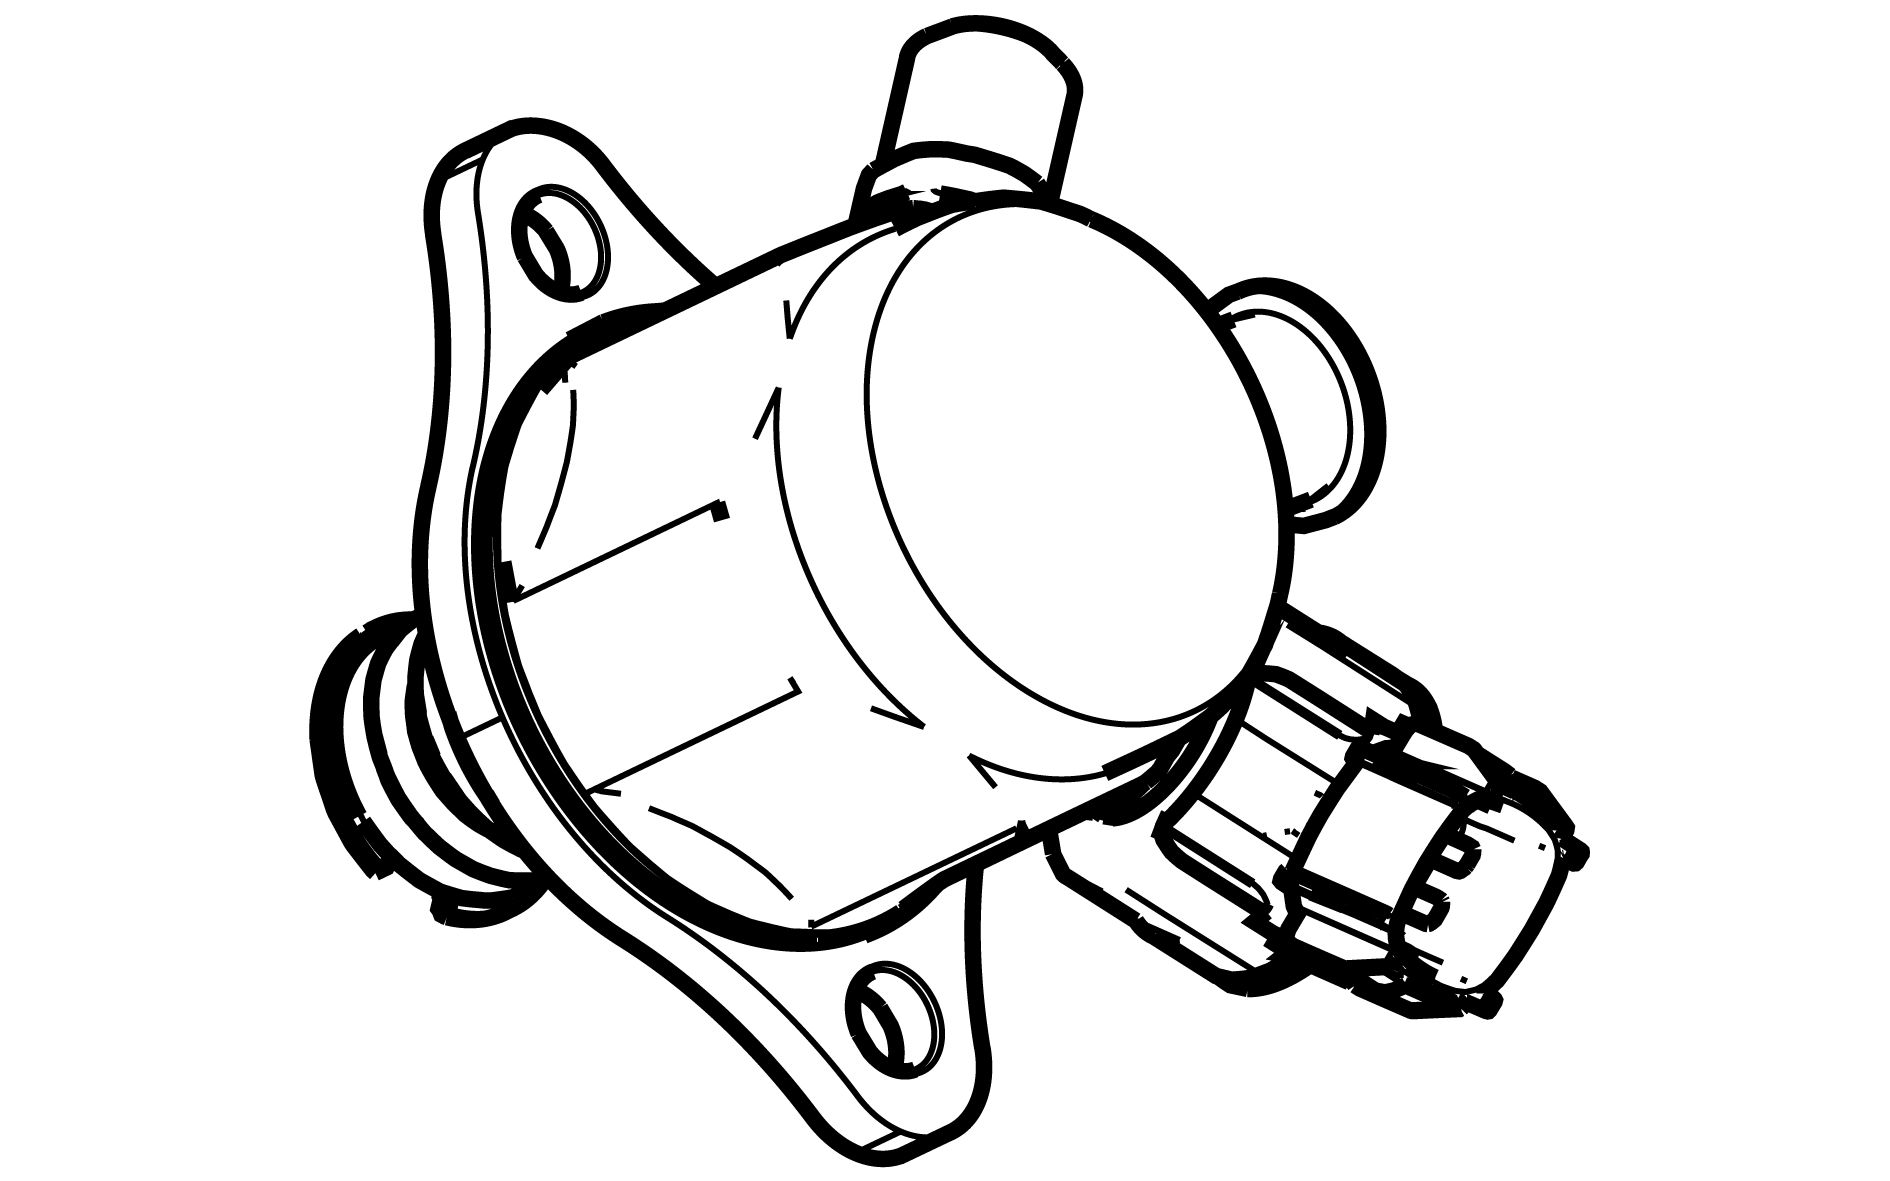
Description
The control valve, fuel flow, regulates the amount of fuel that flows to the high-pressure pump cylinder. The pressure in the fuel rail depends on the amount of fuel supplied to the high-pressure pump cylinder. The pressure in the fuel rail varies. At idle speed the pressure is approximately 30 MPa and at full load approximately 180 MPa. The Engine Control Module (ECM) regulates the control valve, fuel flow via a PWM signal.
Diagnostic information
The control valve, fuel flow does not have a built-in diagnostic system. The Engine Control Module (ECM) monitors the valve, sets DTCs and has readable parameters for it.
Connection and communication
The control valve, fuel flow is directly connected to the Engine Control Module (ECM).
Component location
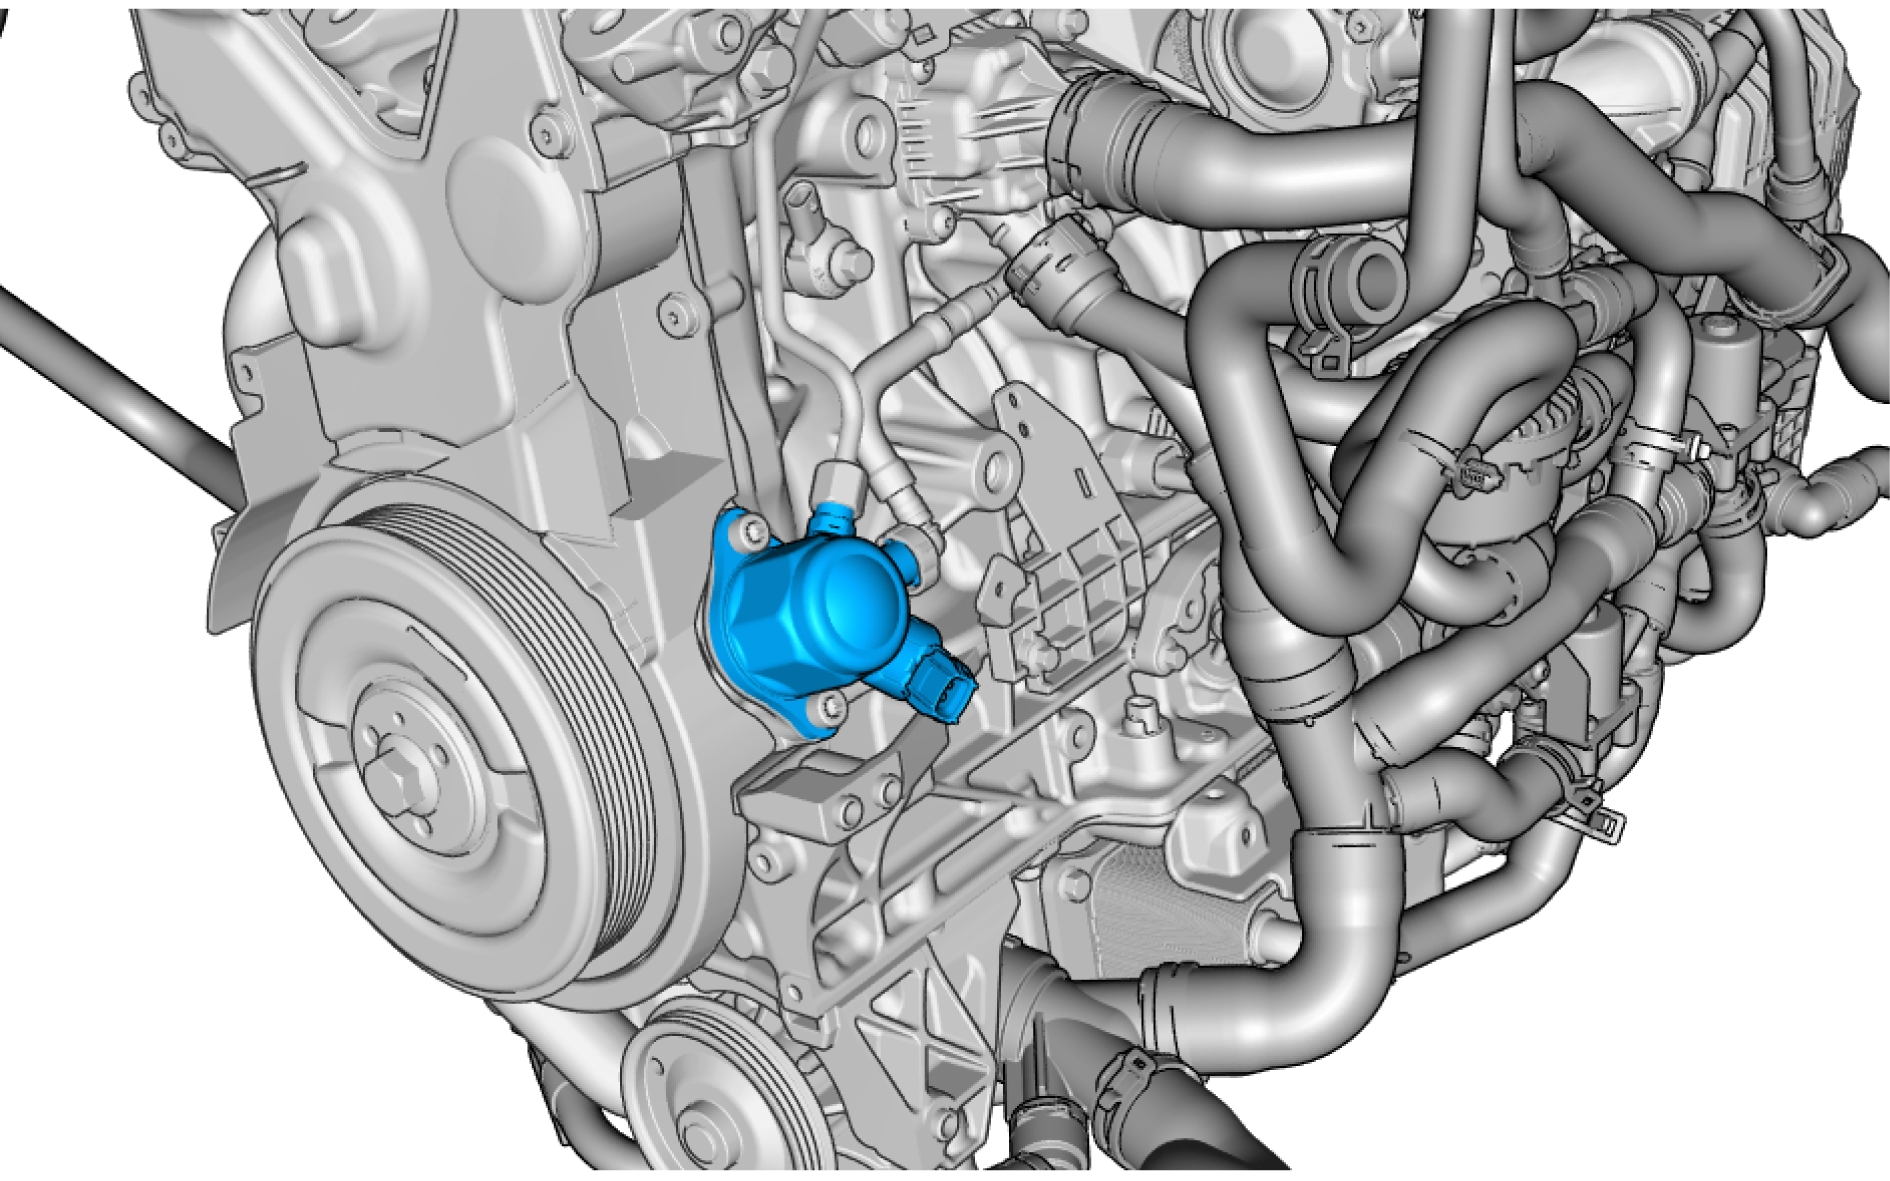
Pin-out
Electric Charge air Compressor Module (ECCM) - P402
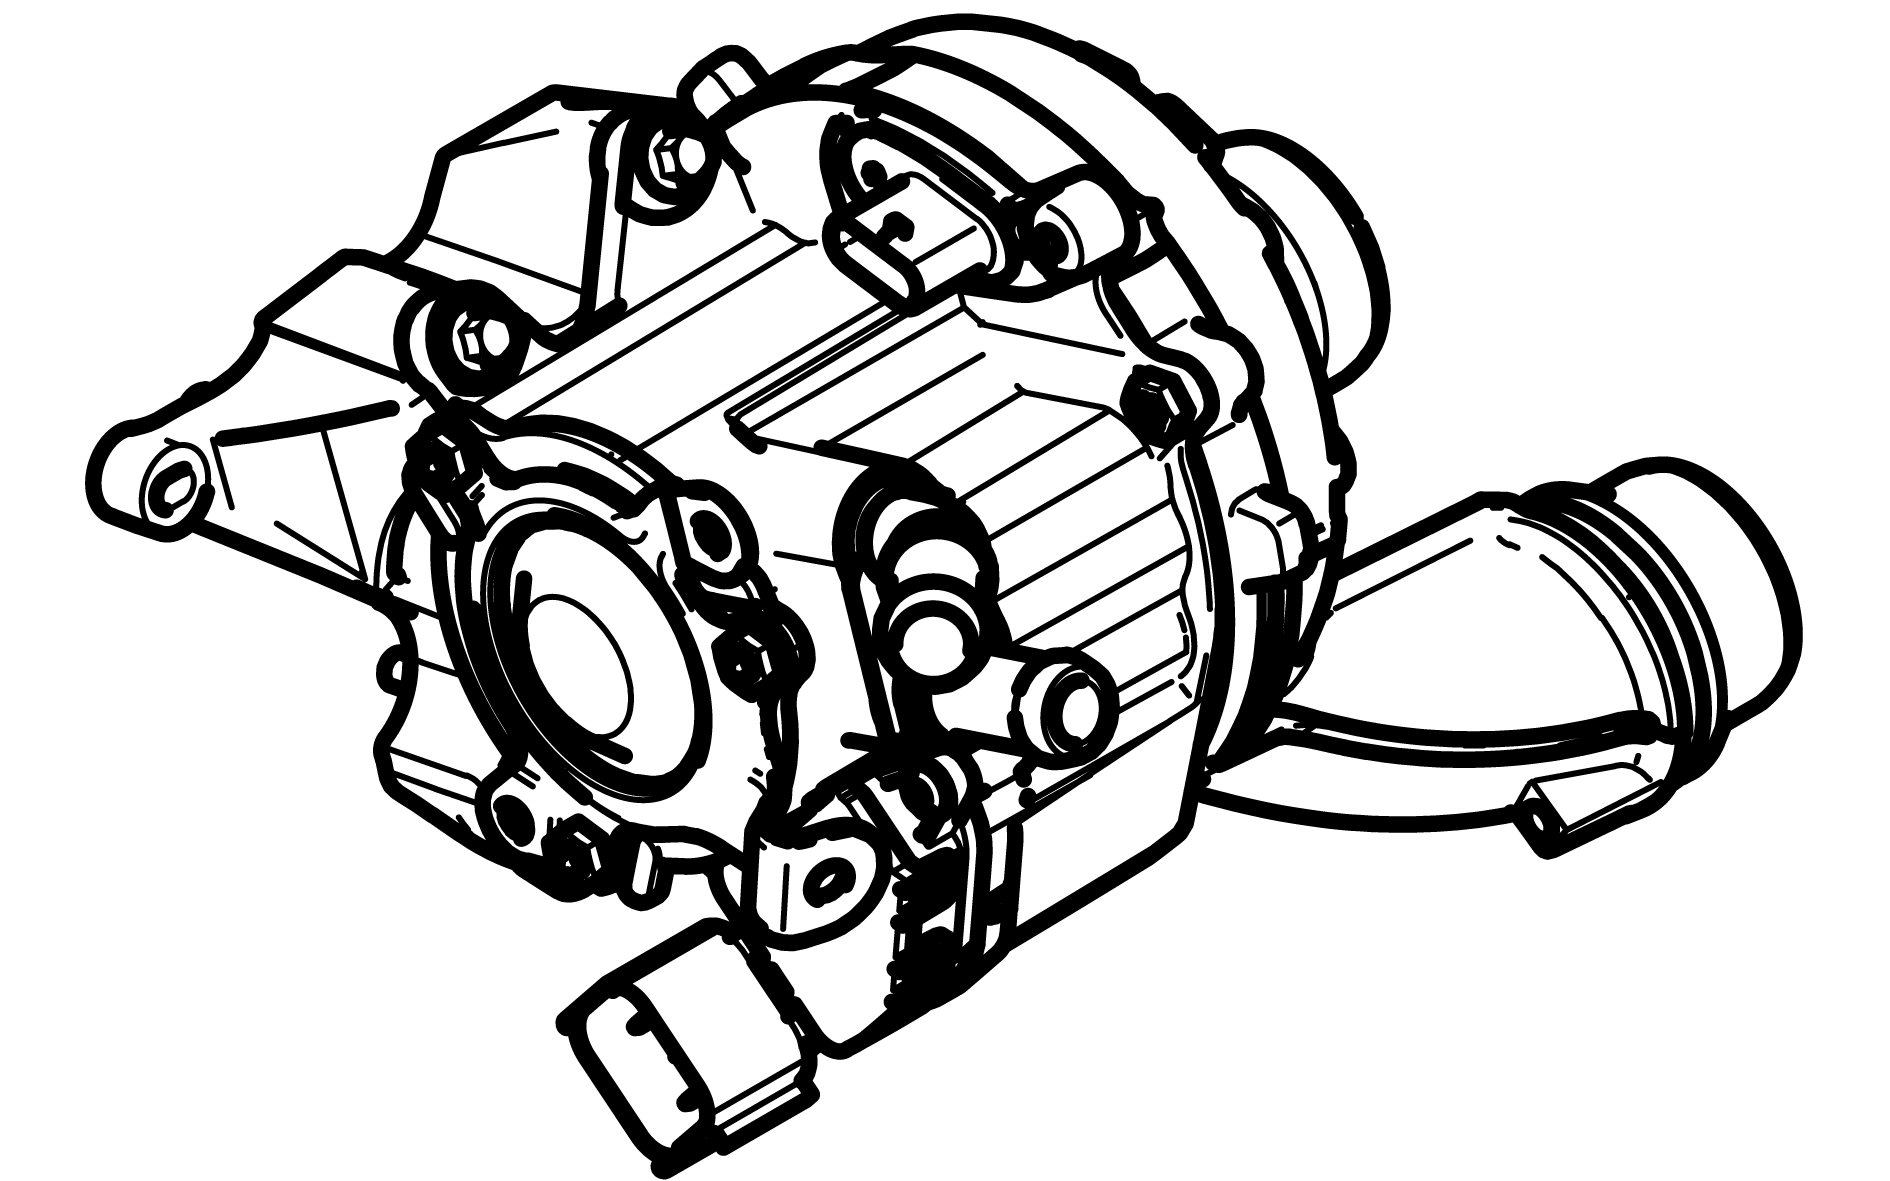
Description
The Electric Charge air Compressor Module (ECCM) controls the speed of the E-charger. The ECCM is powered through the 48 V feed via the Mid-Voltage Converter Module (MVCM). The Engine Control Module (ECM) provides the ECCM with speed information to the E-charger. The E-charger's primary function is to provide boost to the engine.
Diagnostic information
The Electric Charge air Compressor Module (ECCM) has a simplified built-in diagnostic system, which monitors a limited number of errors. The Engine Control Module (ECM) sets DTCs and has readable parameters for the ECCM.
Connection and communication
The Electric Charge air Compressor Module (ECCM) is connected to the Engine Control Module (ECM) via CAN.
Component location
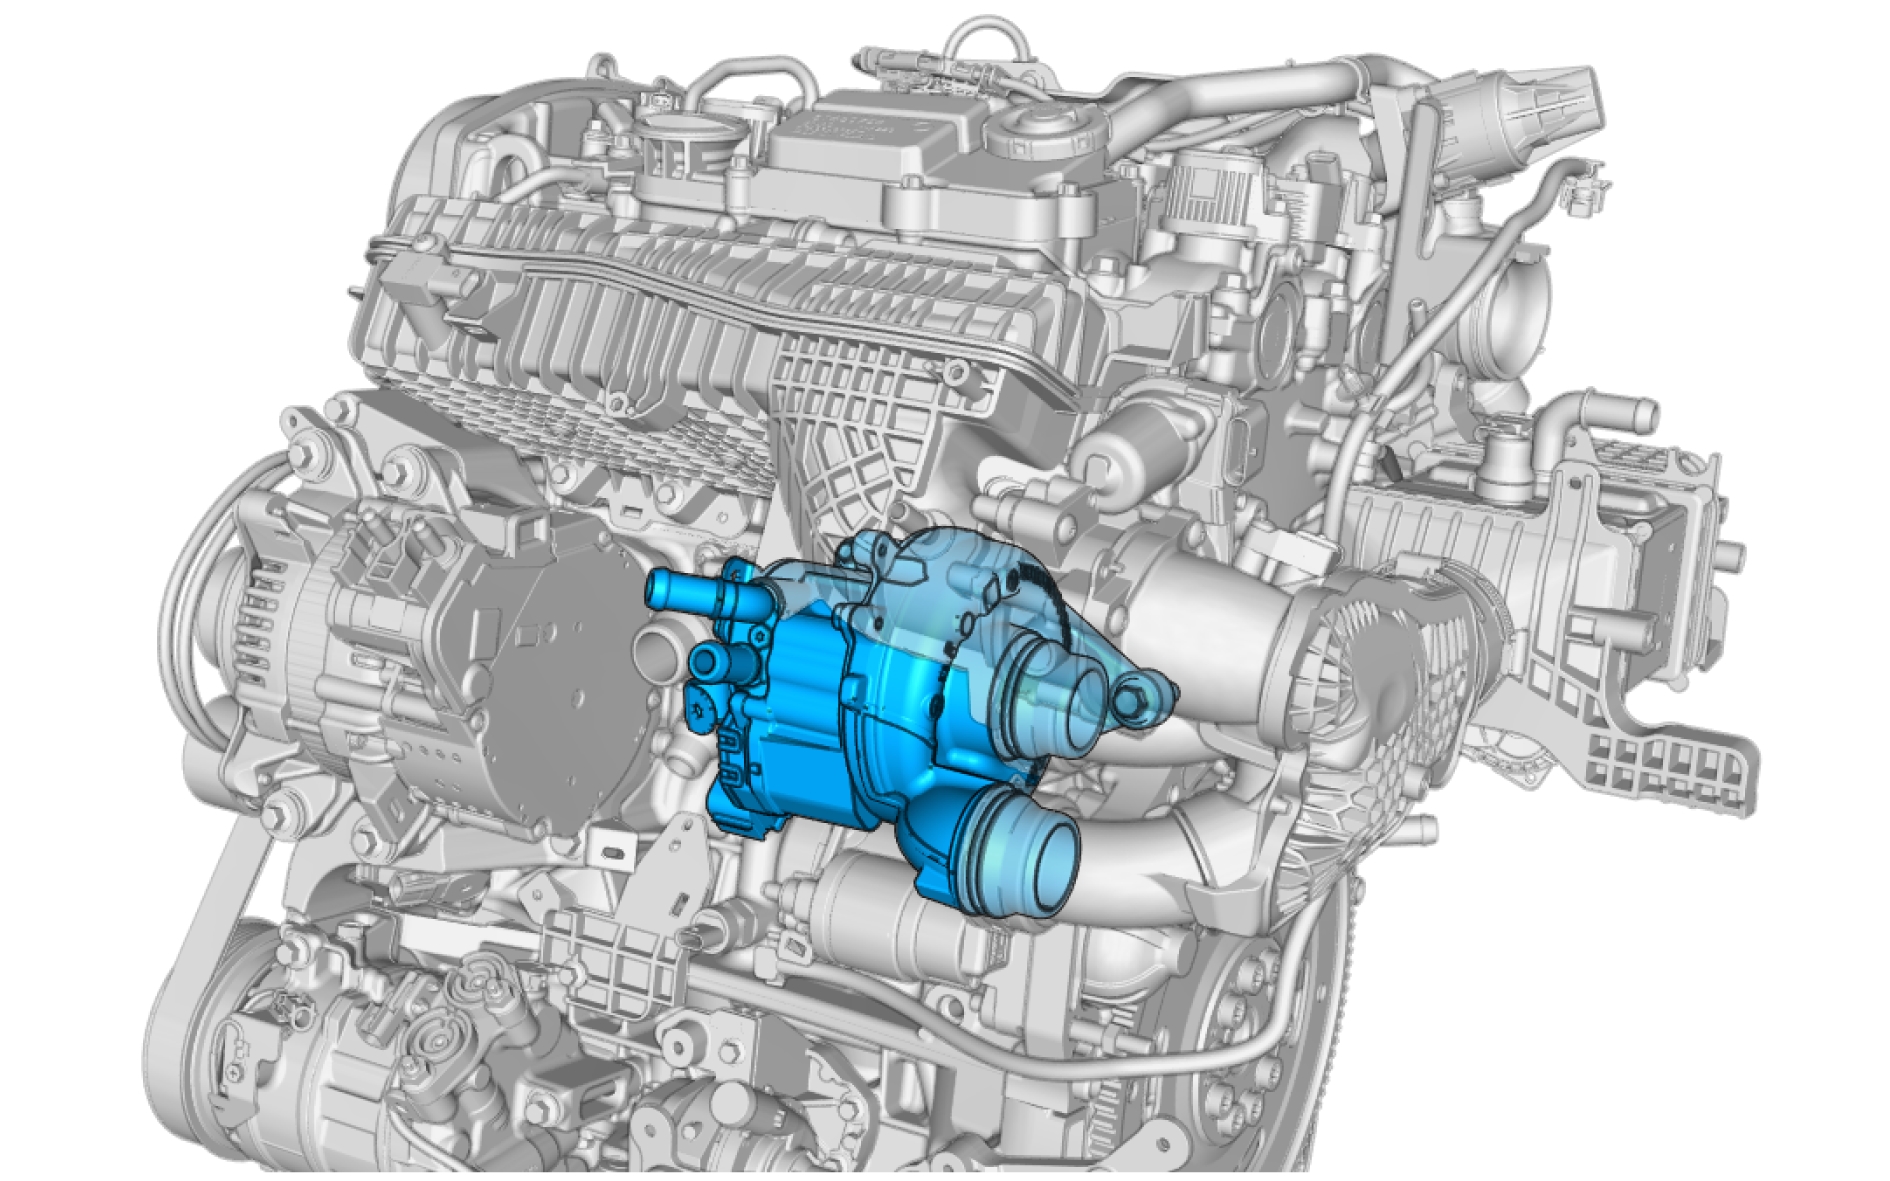
Pin-out
Turbocharger, replace
Removal
Drain cooling system, draining, filling, and bleeding, refer to:
Cooling system - draining, charging and bleeding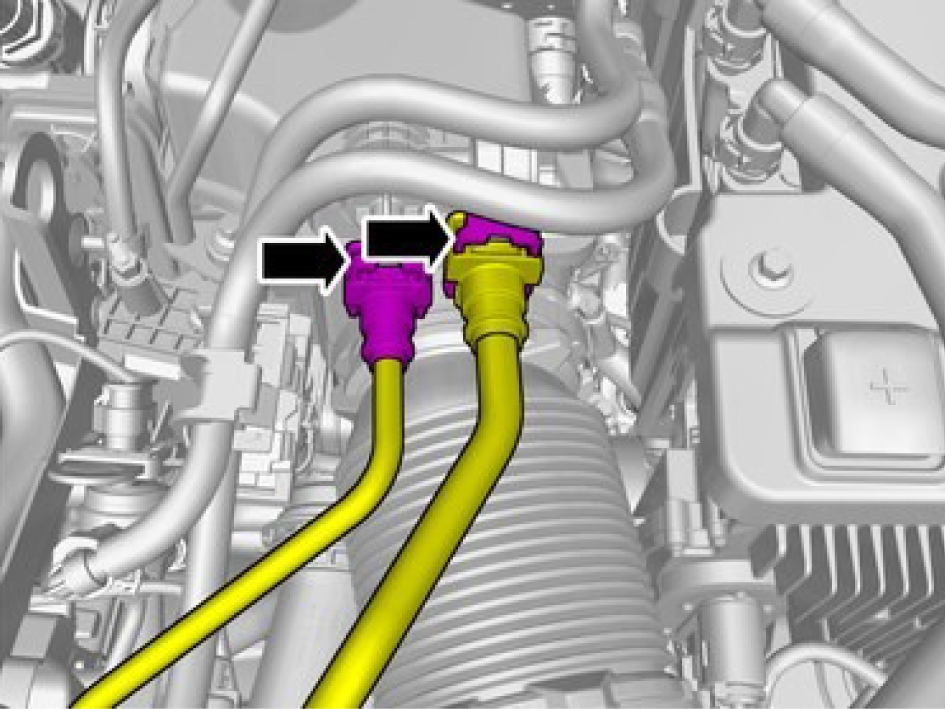
Release the locks.
Undo the hoses from the connections.
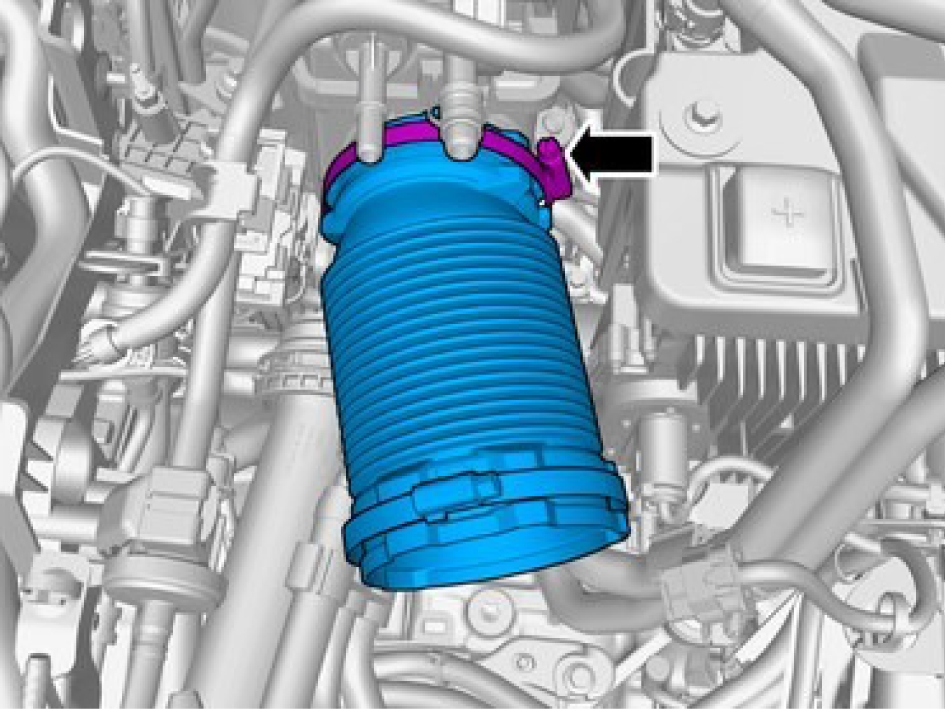
Loosen the hose clamp.
Remove the marked component.
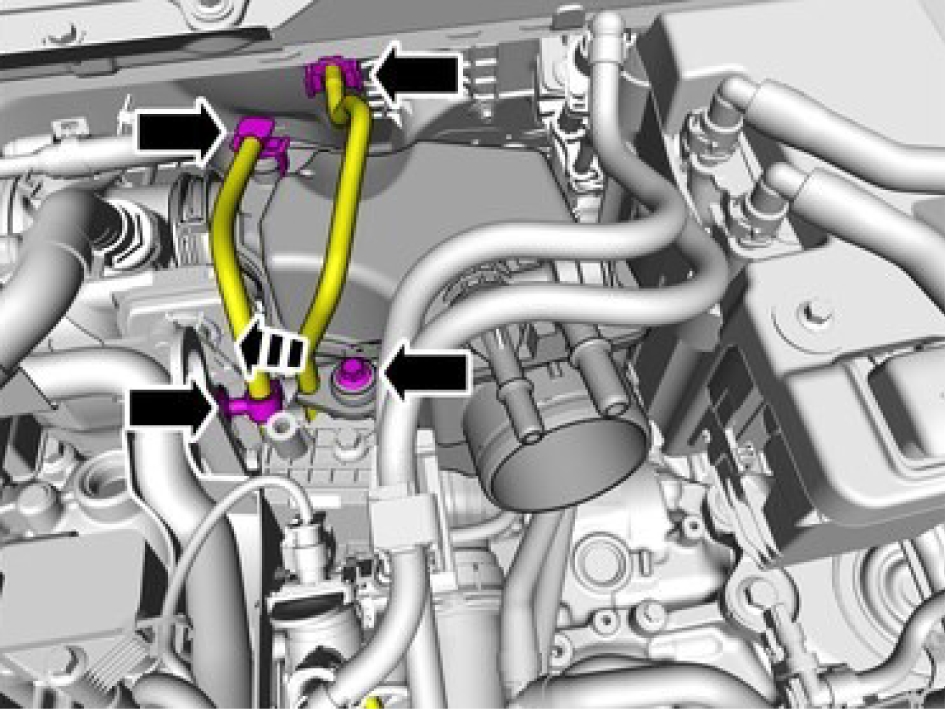
Release the locks.
Undo the hoses from the connections.
Loosen the clip.
Remove the screw.
Loosen the clip.
Fold marked component aside.
Release the lock.
Remove the marked component.
Disconnect the connectors.
Remove the cable harness clips.
Loosen the clip.
Remove the screws.
Fold marked component aside.
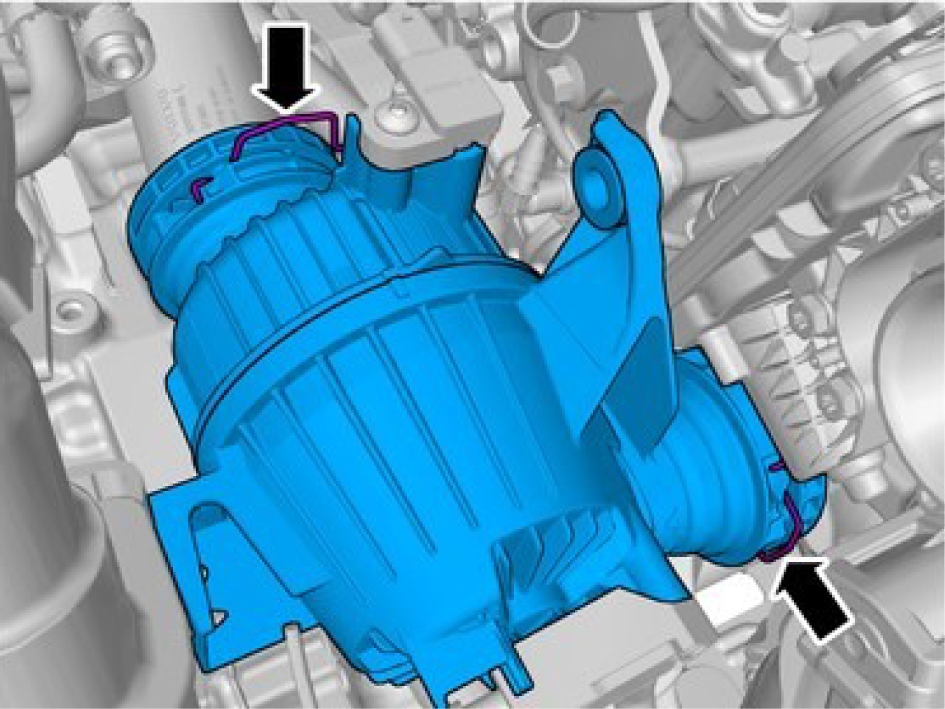
Release the locks.
Remove the marked component.
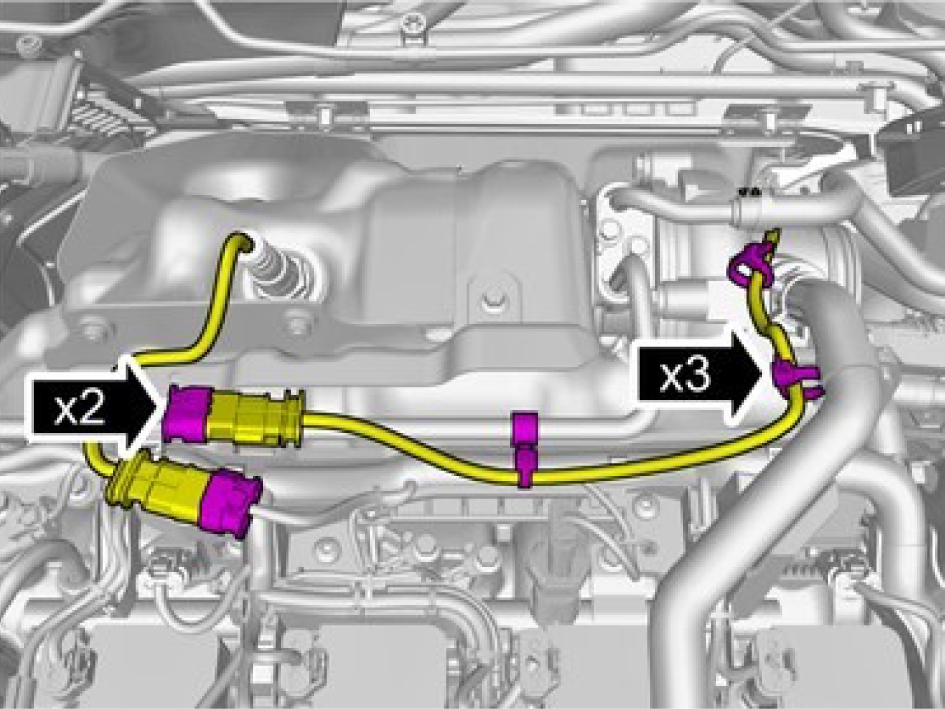
Disconnect the connectors.
Remove the cable harness clips.
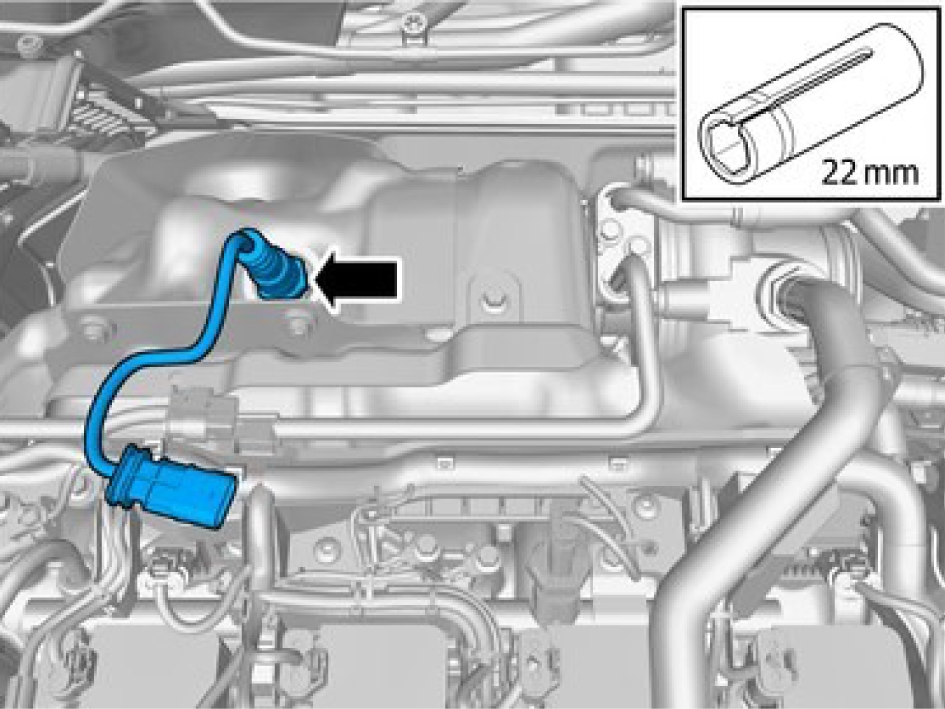
Remove the marked component.
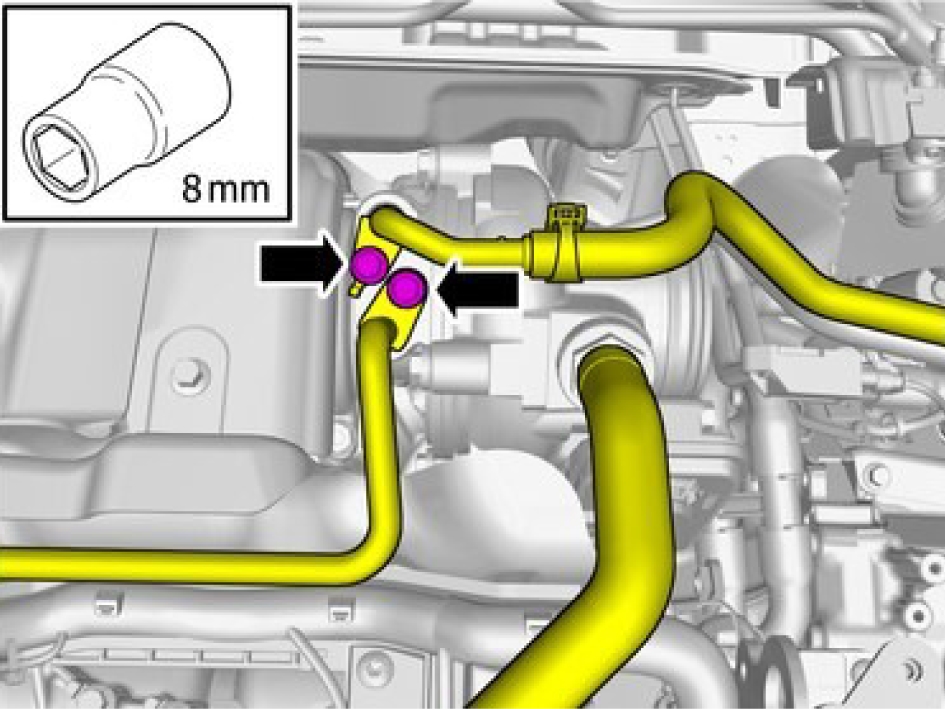
Be prepared to collect escaping fluid.
Remove the screws.
Fold marked component aside.
Undo the hose from the connection.
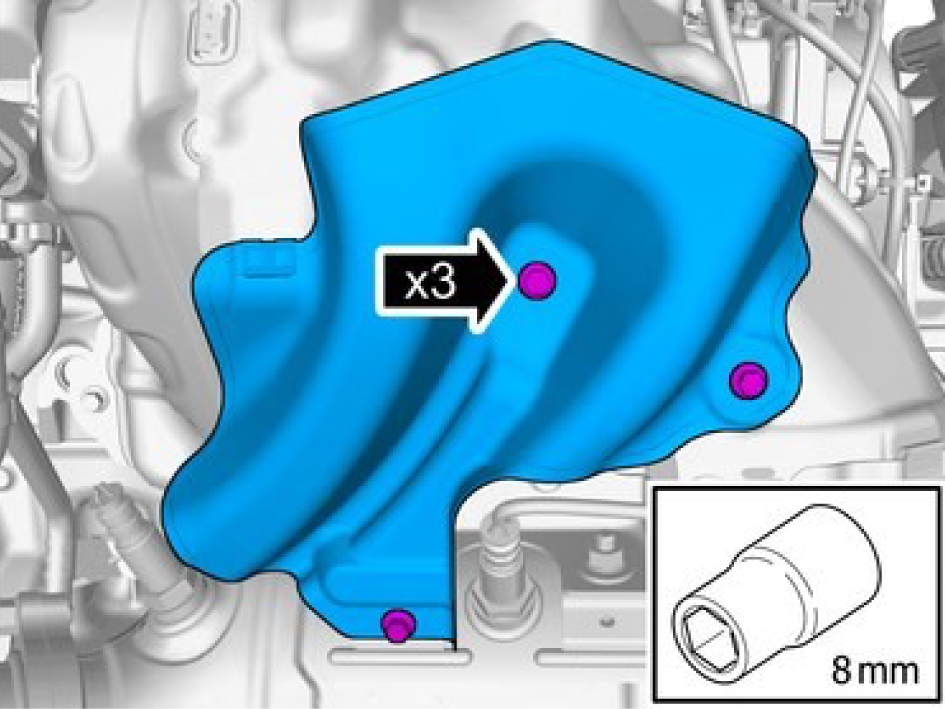
Remove the screws.
Remove the marked component.
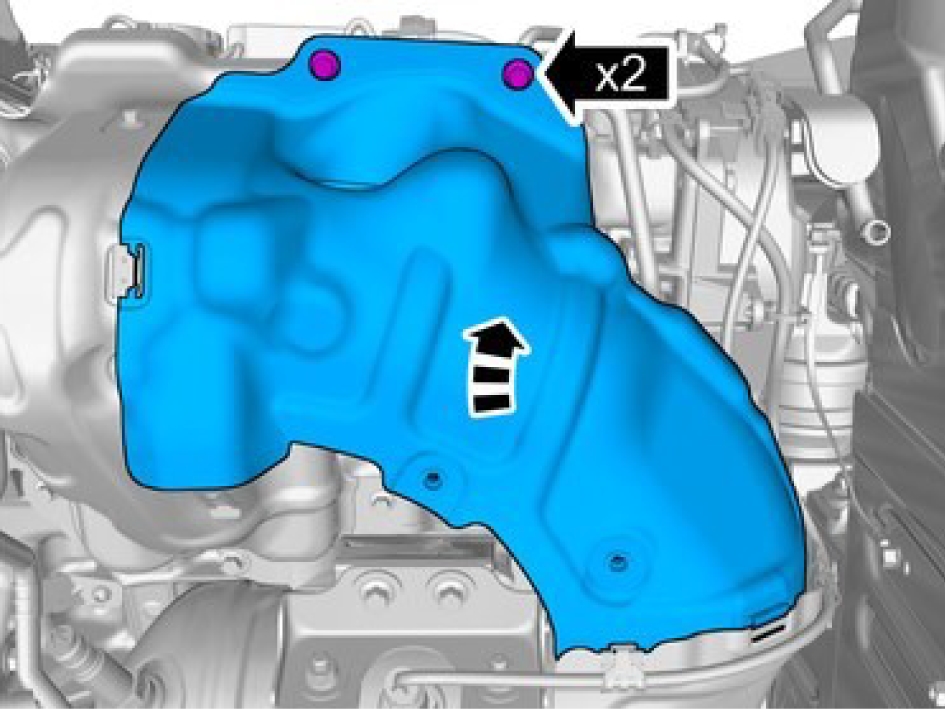
Remove the screws.
Unhook the clip(s).
Remove the marked component.
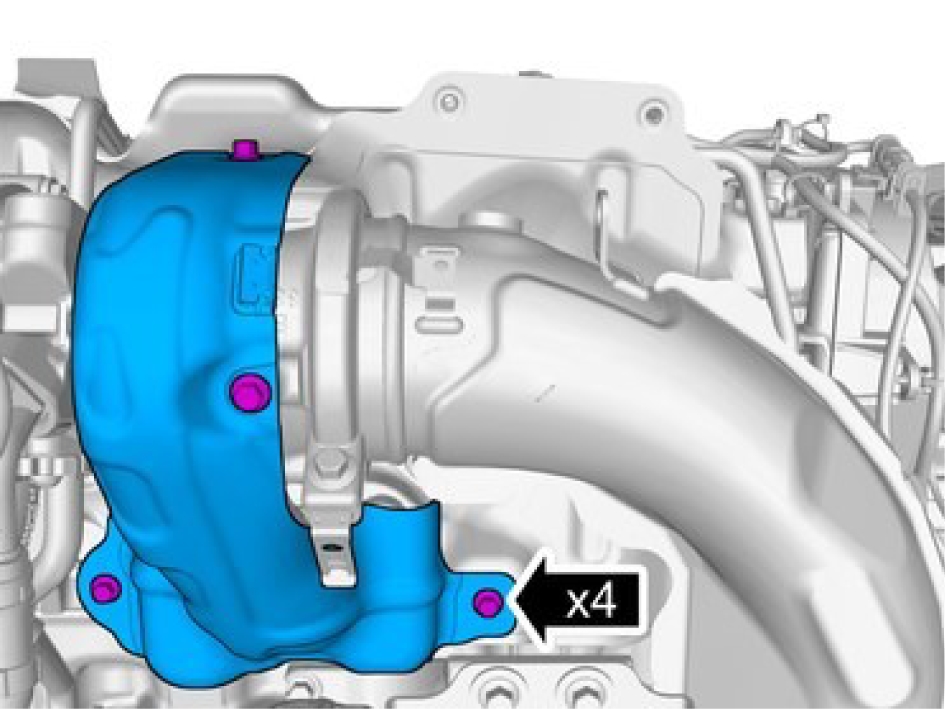
Remove the screws.
Remove the marked component.
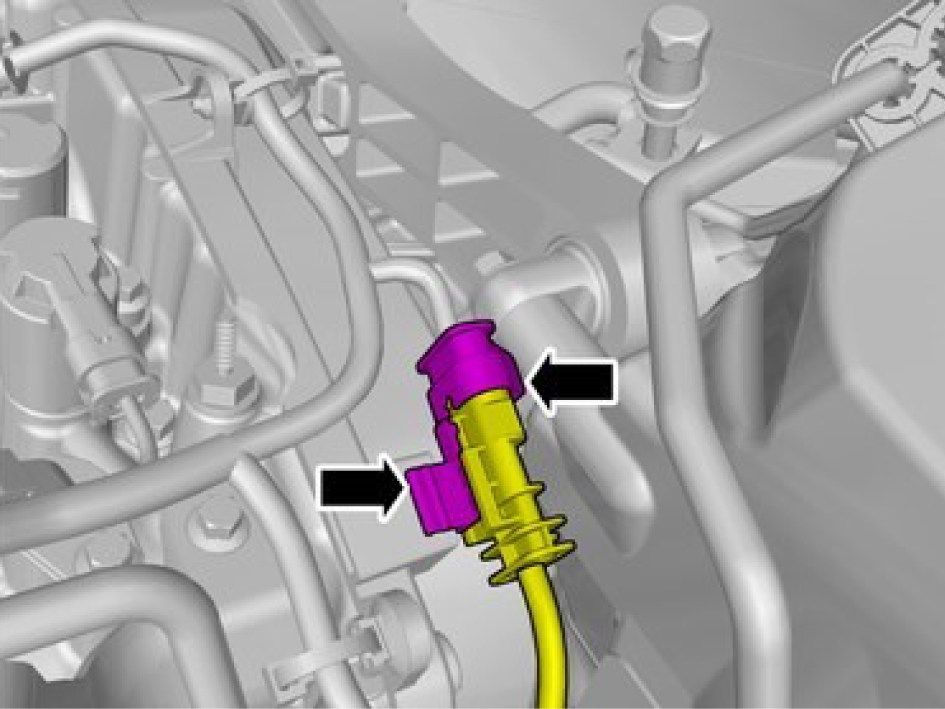
Disconnect the connector.
Loosen the clip.
Remove the cable harness clips.
Remove the marked component.
Remove the screw.
Remove the marked component.
Remove the screws.
Remove the marked component.
Be prepared to collect escaping fluid.
Remove the screw.
Fold marked component aside.
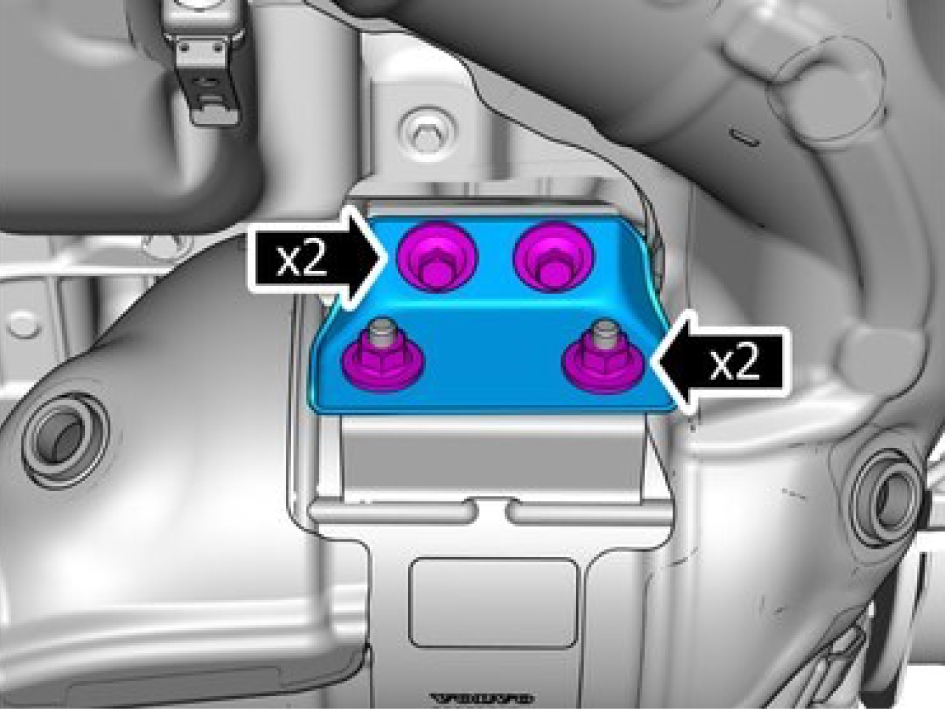
Remove the screws.
Remove the nuts.
Remove the marked component.
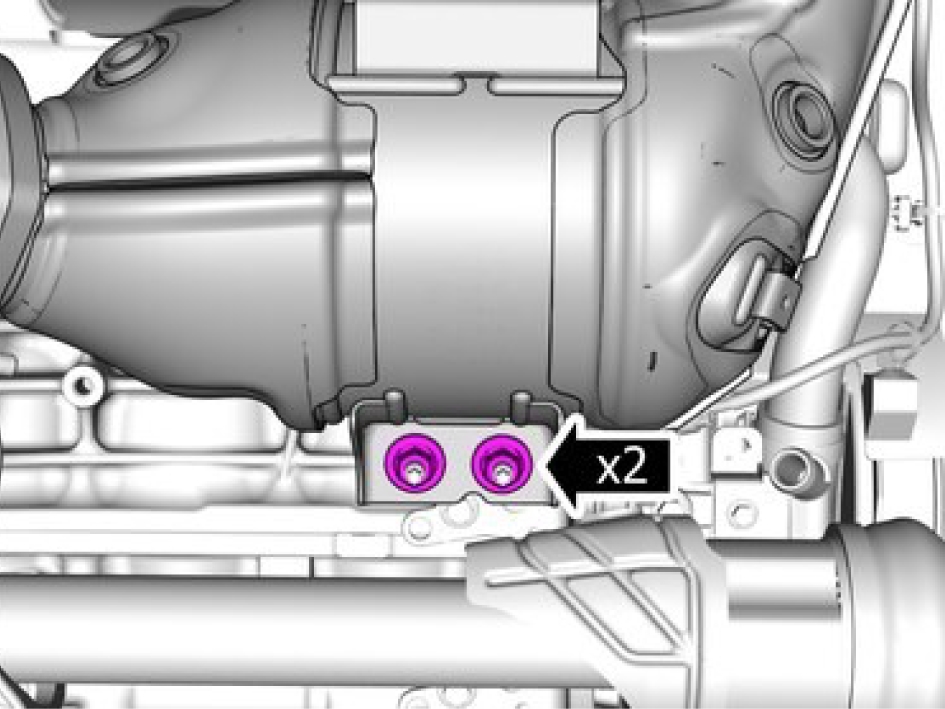
Remove the nuts.
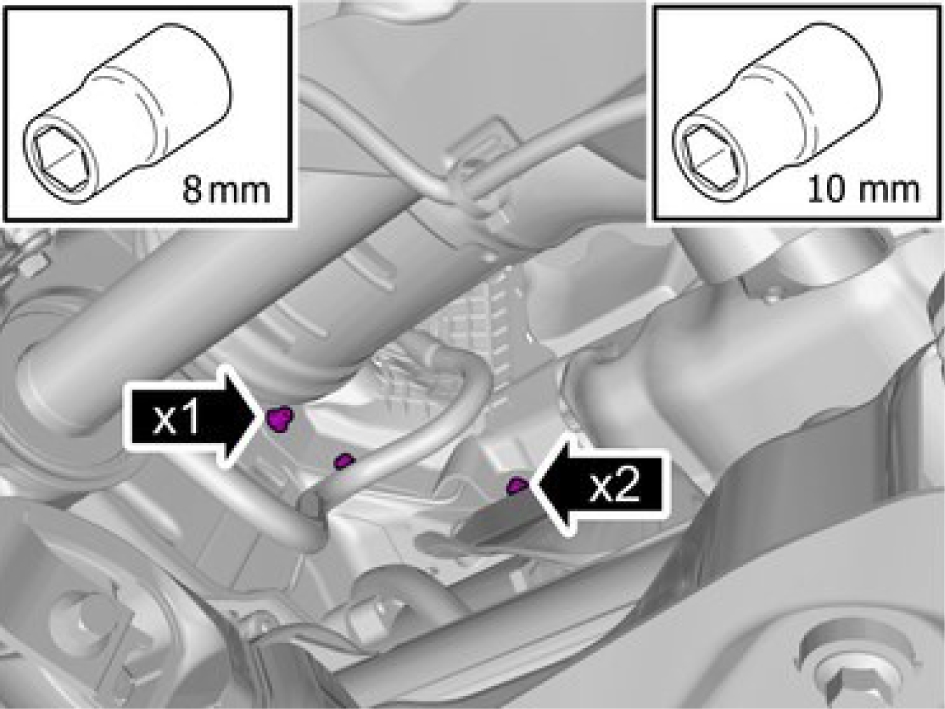
Remove the nut.
Remove the screws.
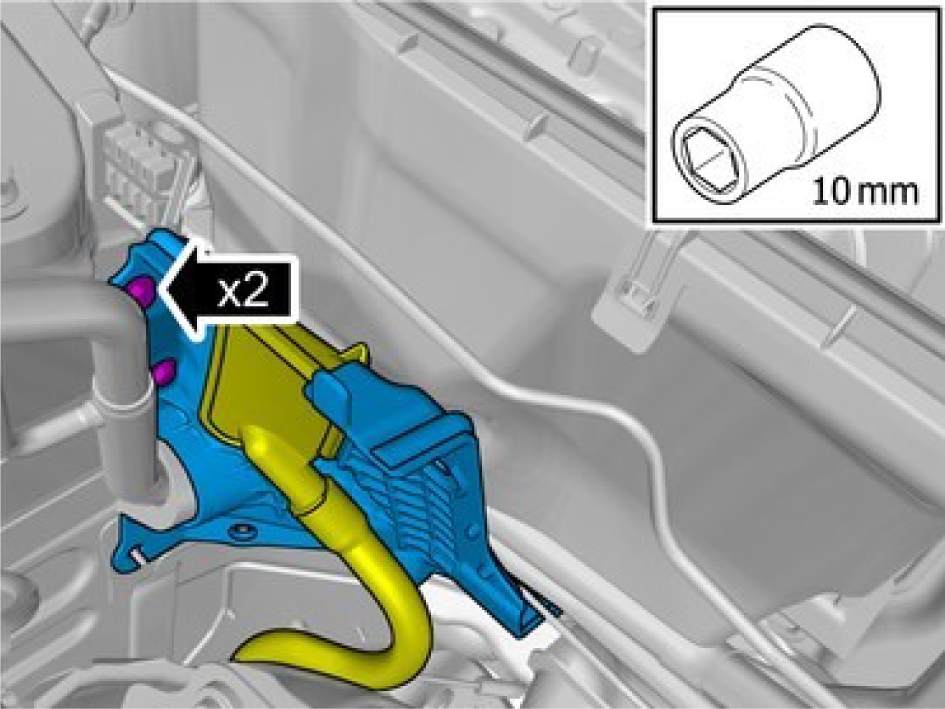
Remove the screws.
Remove the marked component.
Remove the screw.
Remove the marked component.

Fold marked component aside.

Lift the marked component up
Remove the screws.
Disconnect the connector.
Remove the nuts.
Remove the screws.
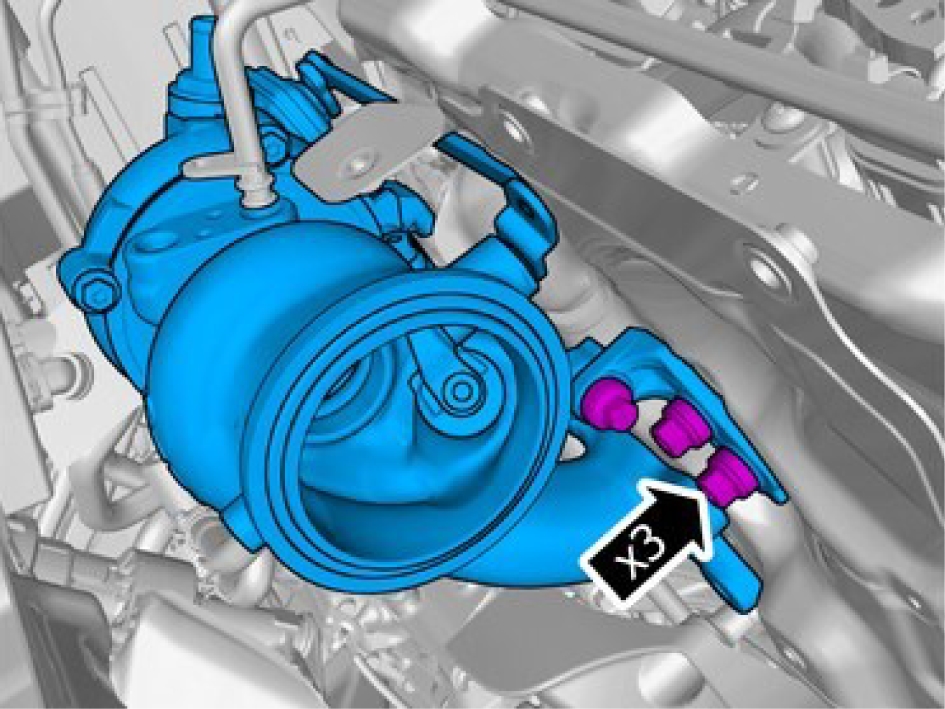
Remove the screws.
Remove the marked component.
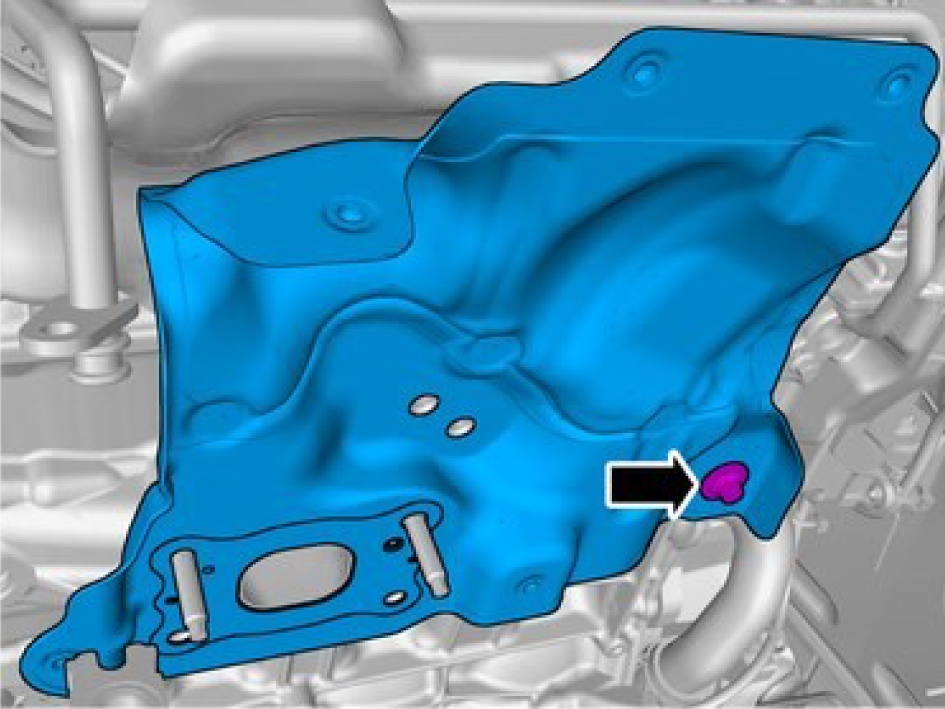
Remove the screw.
Remove the marked component.
Installation
Install marked component.
Install screw M6, torque: 10 Nm
Install the marked component.
Install the fasteners M8, torque: 24 Nm
Install the fasteners.
1, Torque: Exhaust manifold to cylinder head, nut.
Stage 1: 5 Nm
Stage 2: 18 Nm
Stage 3: 20 Nm
2, Torque: Exhaust manifold to cylinder head, bolt
Stage 1: 5 Nm
Stage 2: 16 Nm
Stage 3: 18 Nm
Install the cable.
Use new seals.
Install the screws M6, torque: 10 Nm
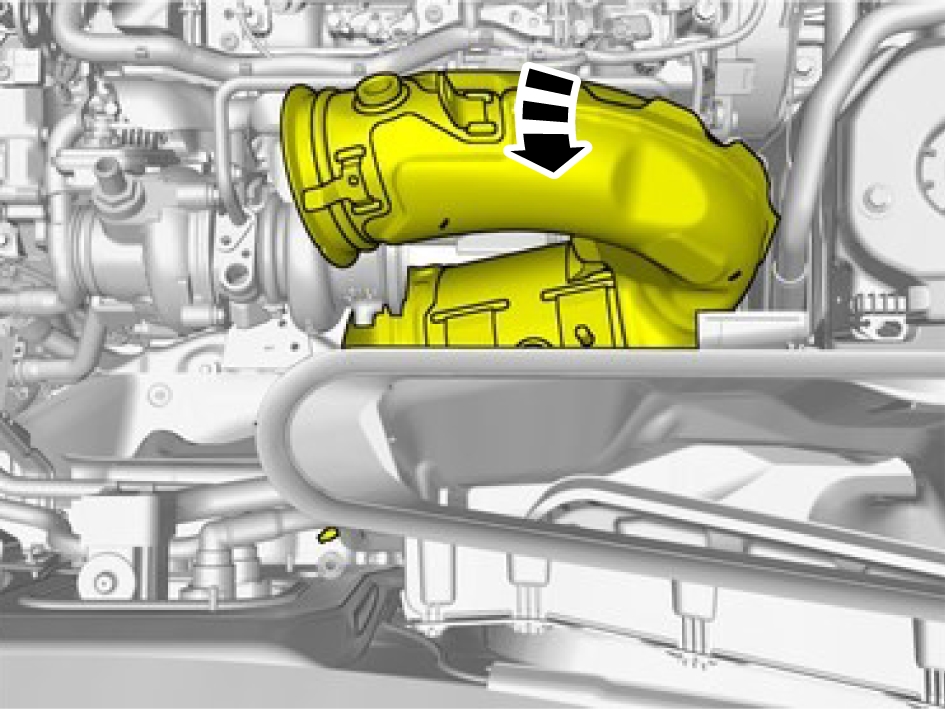
Install the marked component
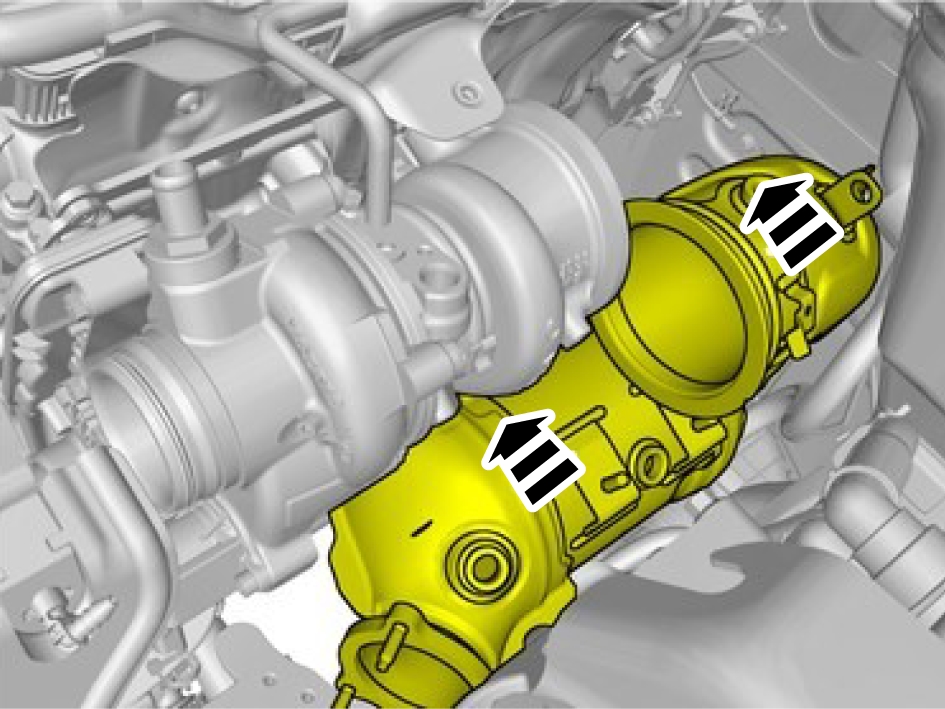
Fold marked component back.
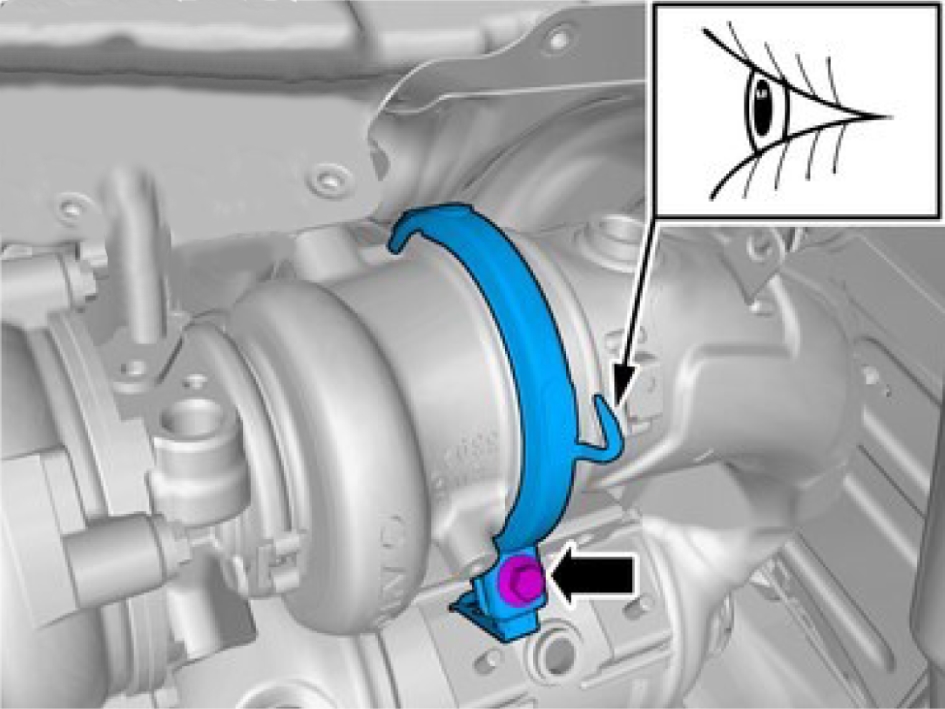
Install marked component
Adjust clamp according to picture,
Install screw, torque: 20 Nm
Install the marked component.
Install the screws.
Install the fasteners M5, torque: 5 Nm
Install the fasteners M8, torque: 24 Nm
Install marked component M8, torque: 24 Nm
Fold back and install the screw M6, torque: 10 Nm
Install the marked component.
Install the screws.
Install the marked component.
Install the screw M6, torque: 10 Nm
Remove the marked component.
Install the cable harness clips.
Install the clip.
Install the connector.
Install the marked component.
Install the screw M6, torque: 10 Nm
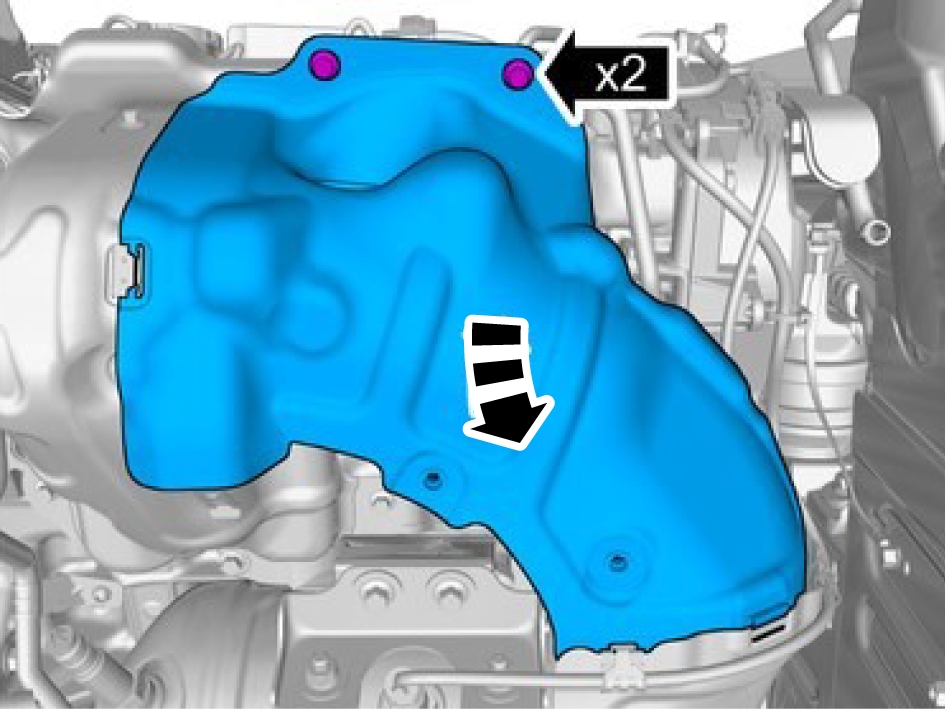
Install the marked component.
Install the screws M6, torque: 10 Nm
Install the marked component.
Install the screws M6, torque: 10 Nm
Fold back the components.
Install the screws M6, torque: 10 Nm
Install the marked component.
Install the lambda probe, torque: 45 Nm
Install the cable clips.
Connect the connectors.
Install the marked component.
Fold components back.
Install the screws.
Install the cables.
Install marked component.
Fold back the pipe and install the clip.
Install the hoses.
Install screw M6, torque: 10 Nm
Install marked component.
Install the hose and the locking clips.
Fill cooling system, draining, filling, and bleeding, refer to:
Cooling system - draining, charging and bleedingActuator, supercharger bypass - M310
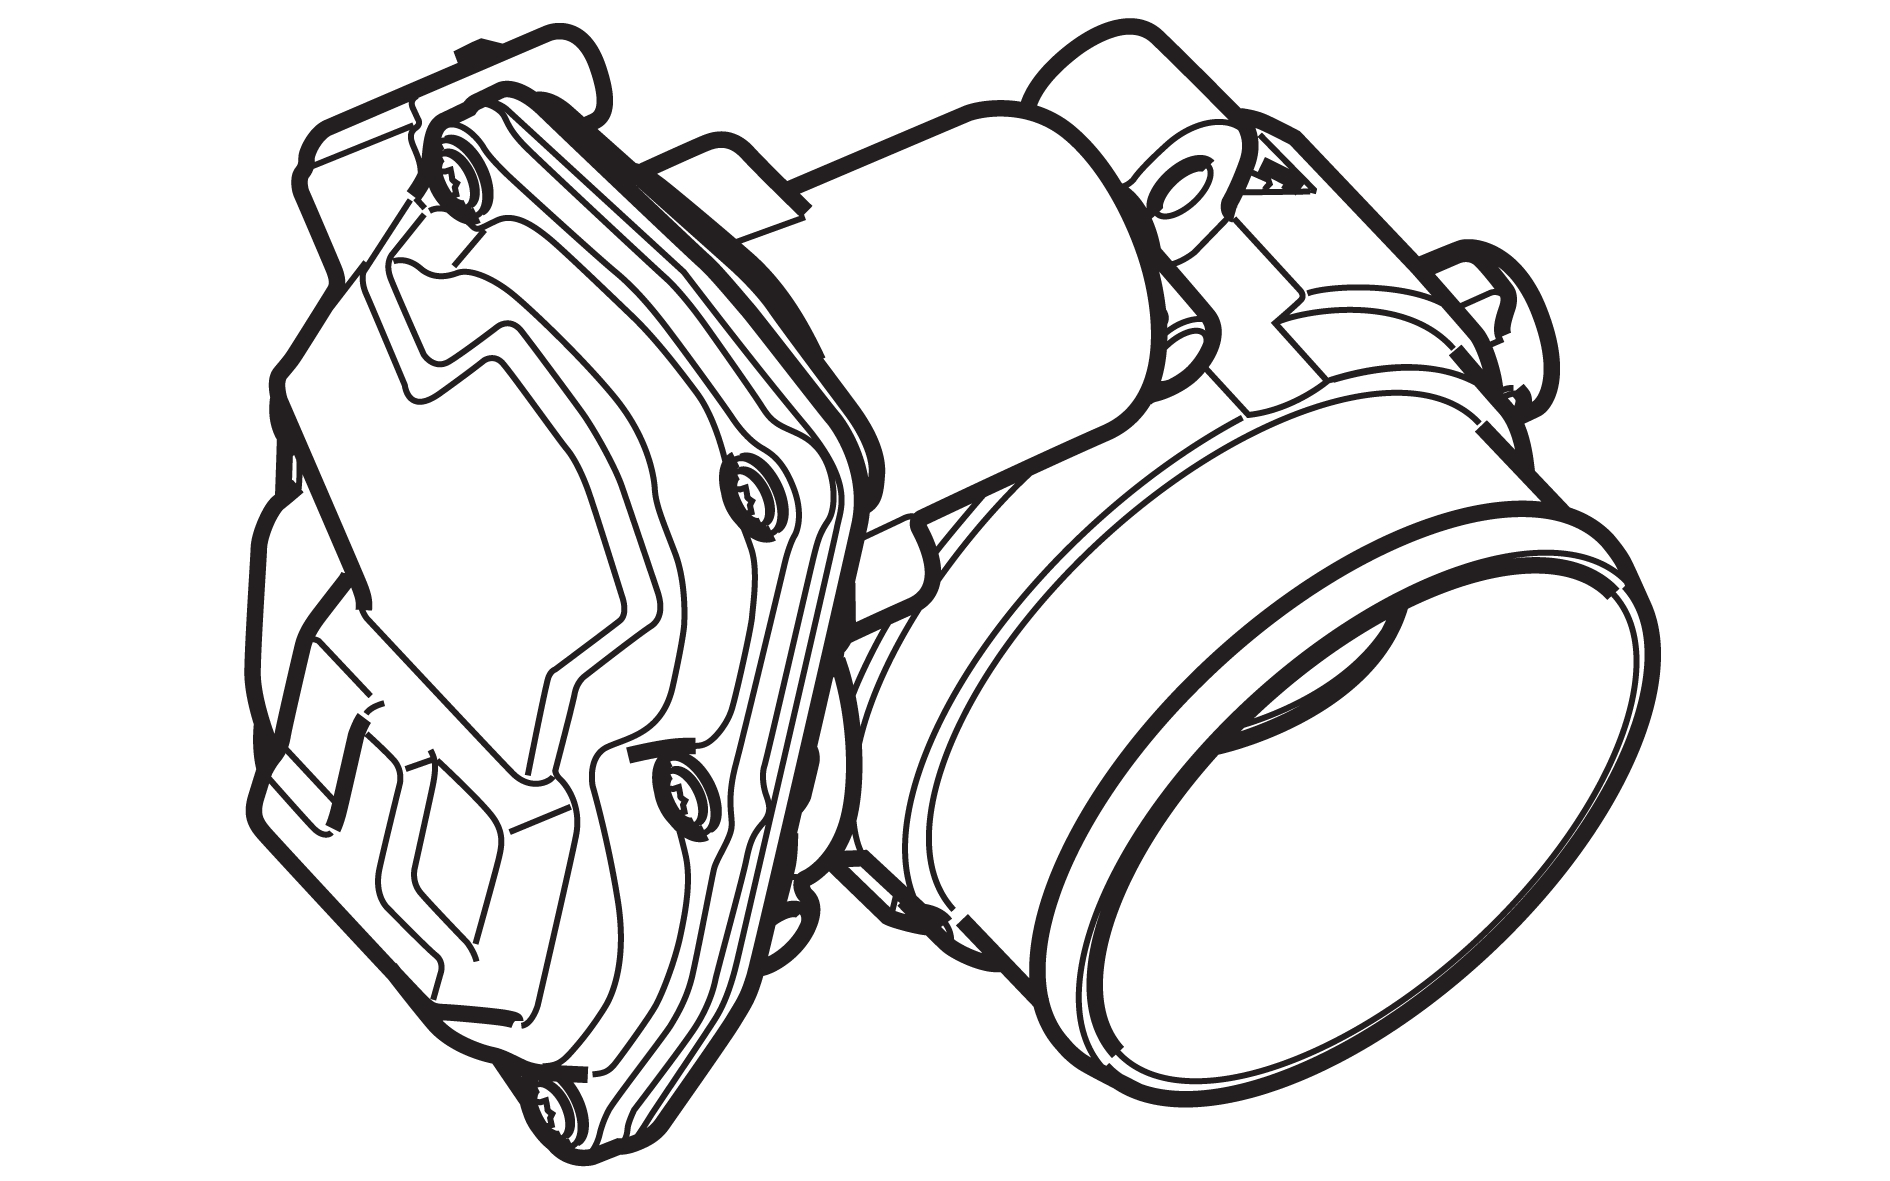
Description
The actuator, supercharger bypass opens when the supercharger has reached its maximum speed. Once open, the air bypasses the supercharger. The turbocharger takes over and provides approximately the same boost as the supercharger.
Diagnostic information
The actuator, supercharger bypass, does not have a built-in diagnostic system. The Engine Control Module (ECM) monitors the actuator, sets DTCs and has readable parameters for it.
Connection and communication
The actuator, supercharger bypass, is directly connected to the Engine Control Module (ECM).
Component location
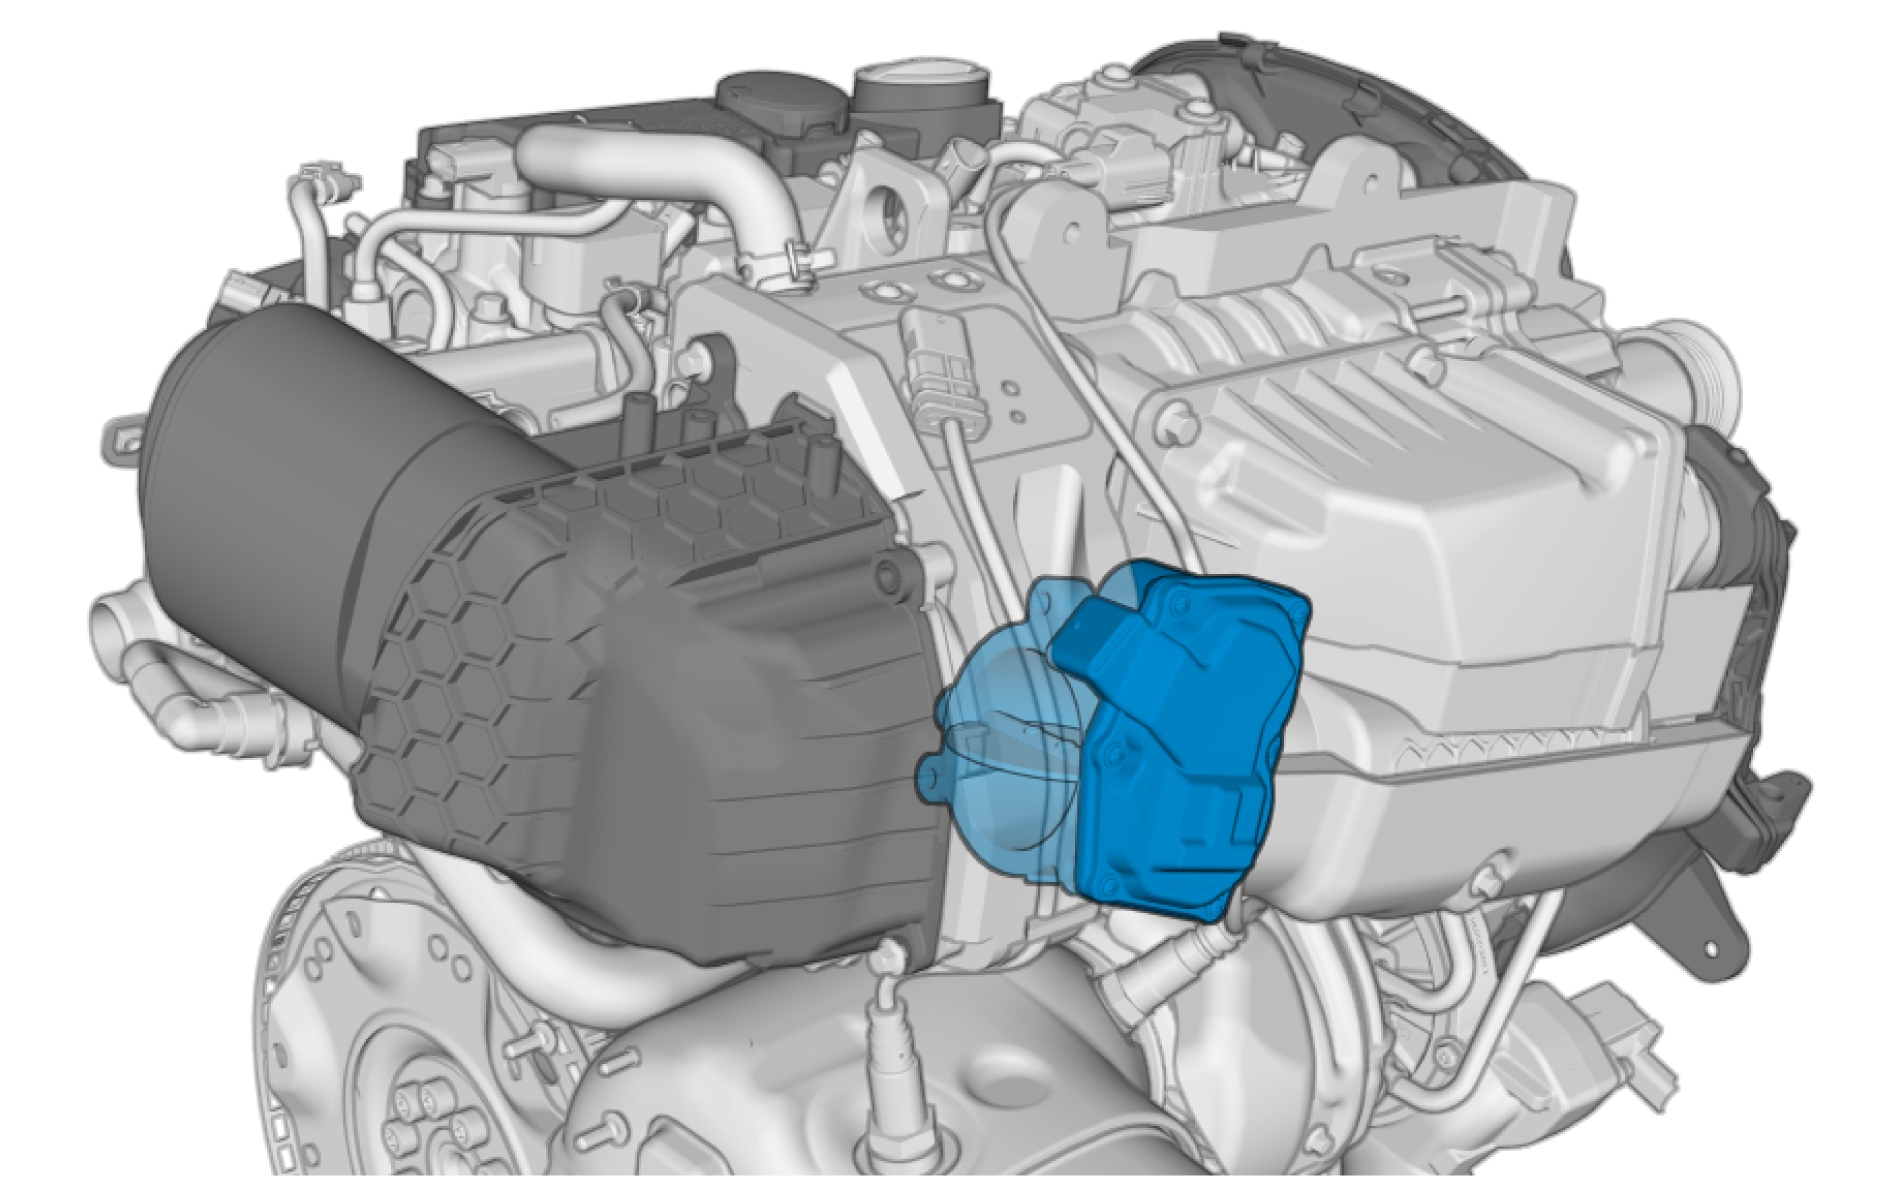
Pin-out
Supercharger clutch
Description
The supercharger clutch disengages the supercharger from the crankshaft. It is made of a solenoid clutch.
When the supercharger clutch is not power supplied, the clutch is disengaged by the return springs. The control signal is initially strong in order to quickly move the solenoid clutch to the engaged position. Thereafter, the signal strength is reduced to allow the clutch to slip easily during its operation.
Diagnostic information
The supercharger clutch does not have a built-in diagnostic system. The Engine Control Module (ECM) monitors the component, sets DTCs and has readable parameters for it.
Connection and communication
The supercharger clutch is directly connected to the Engine Control Module (ECM).
Component location
Pin-out
Oil pump-
Oil pump- (2)
Oil pump- (3)
Oil pump- (4)
Oil pump- (5)
Oil pump- (6)
Oil pump- (7)
Oil pump- (8)
Pump, water cooled charge air cooler, replace
Removal
Drain the cooling system refer to:
Cooling system - draining, charging and bleeding
Release the lock.
Undo the hose from the connection.
Remove the screws.
Fold marked component aside.
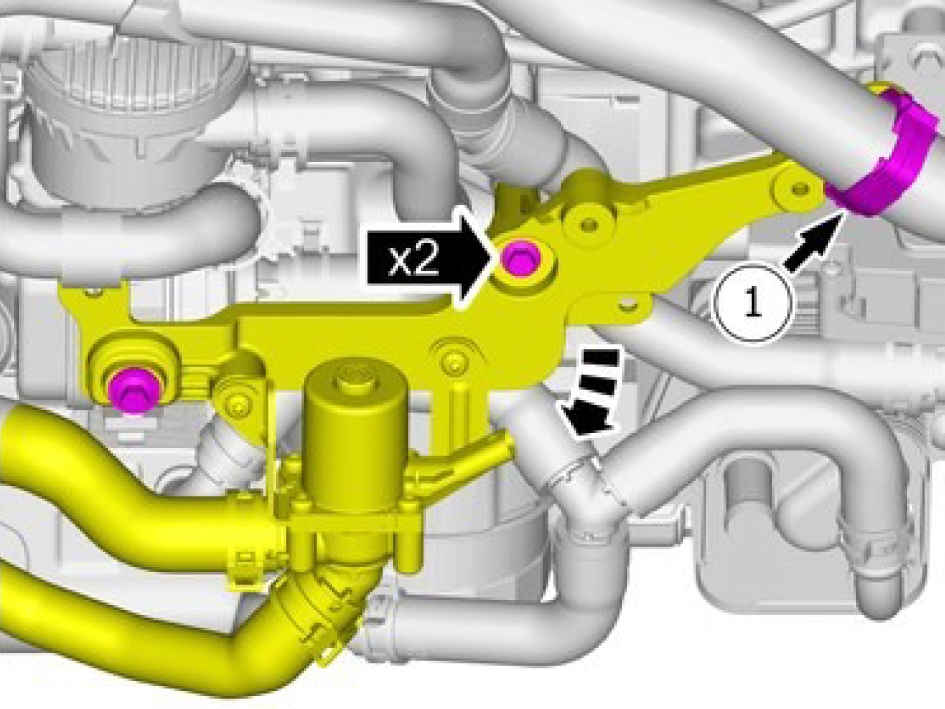
Loosen the clip.
Remove the screws.
Fold marked component aside.
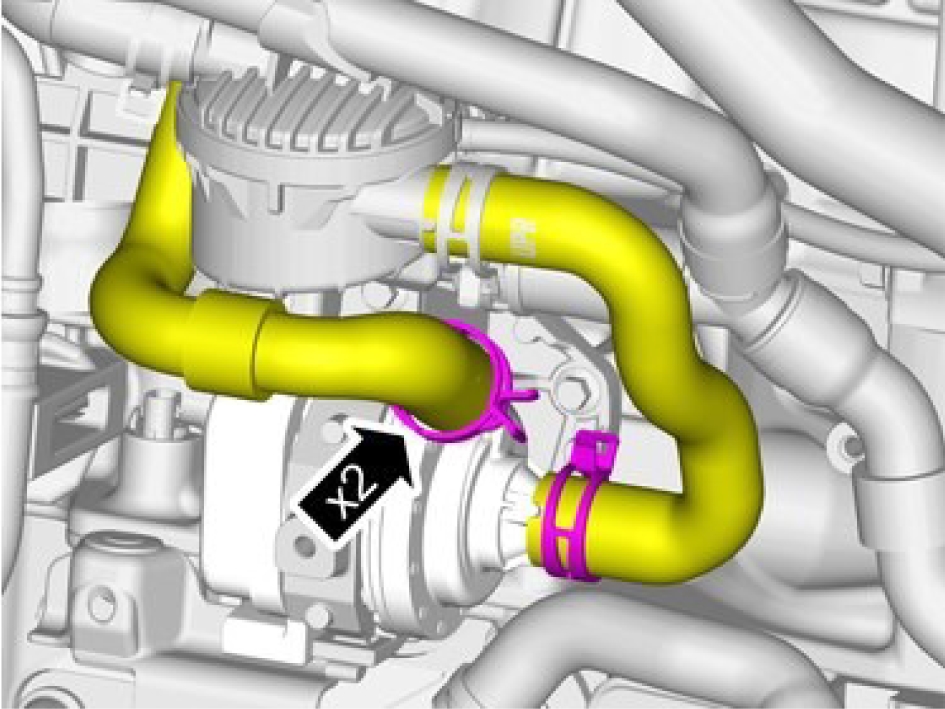
Loosen the hose clamps.
Undo the hoses from the connections.
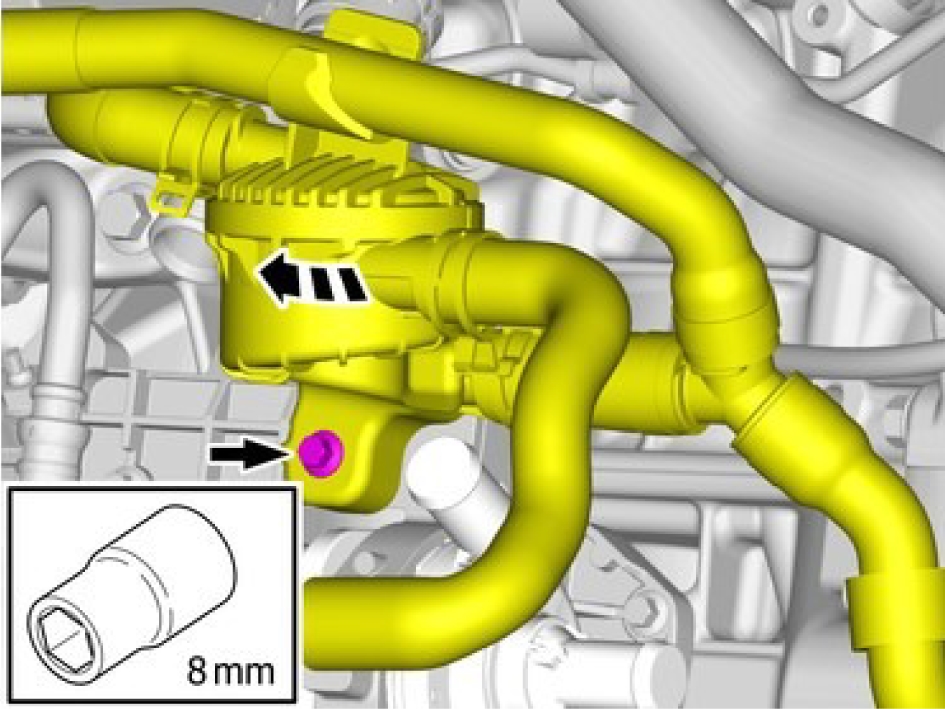
Remove the screw.
Fold marked component aside.
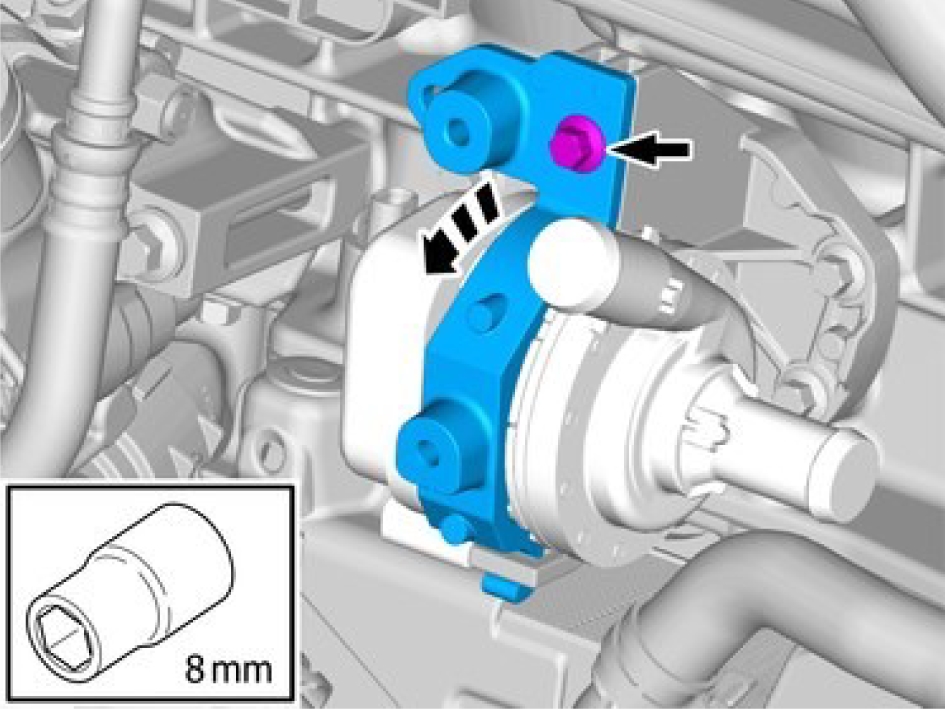
Remove the screw.
Remove the marked component.

Remove the marked component.
Installation
Install the marked component.

Install the marked component.
Install the screw M6, torque: 10 Nm
Fold the unit back and tighten the screw M6, torque: 10 Nm
Install the hoses to the connections.
Install the hose clamps.

Fold the unit back and tighten the screw M6, torque: 10 Nm
Install the clip.
Fold the unit back and tighten the screw M6, torque: 10 Nm
Install and lock the hose.
Cooling system - draining, charging and bleeding
Draining the engine cooling system
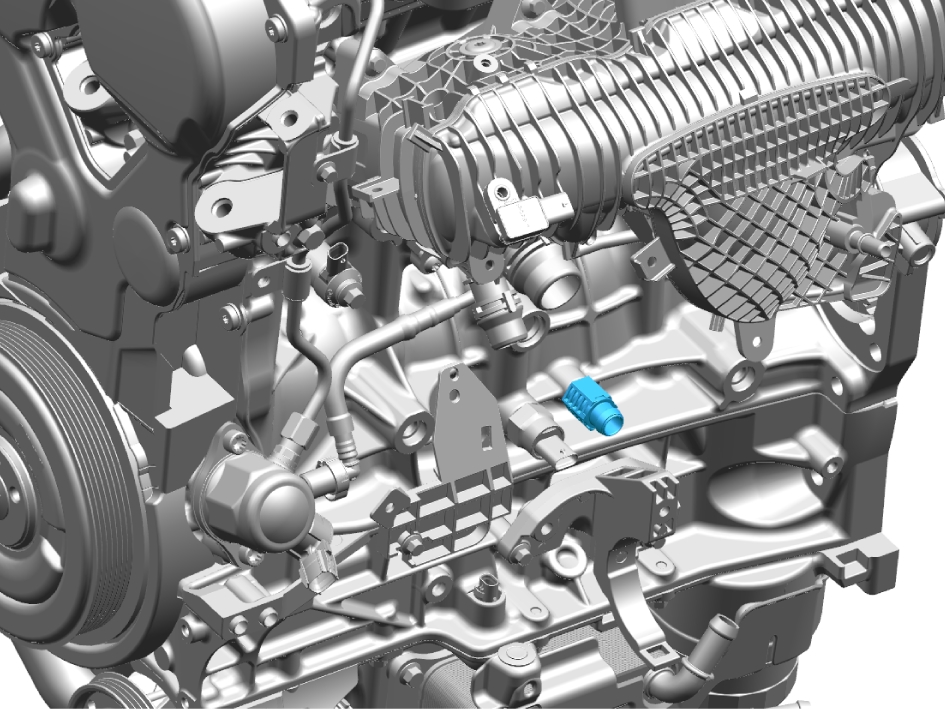
When draining the engine's cooling system, use the drain cock marked in the picture.
Filling the engine cooling system
When filling the engine's cooling system, close the drain cock marked in the picture. For best filling of the cooling system, use equipment for vacuum pumping before filling.
Cylinder head, replace
Removal
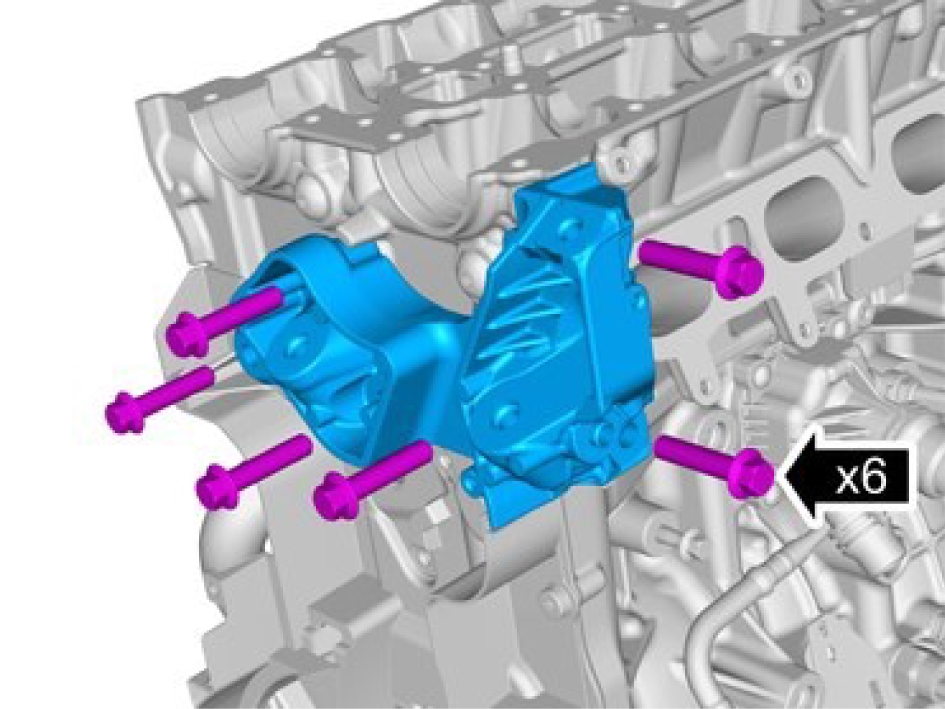
The screws are not to be reused.
Remove the screws.
Remove the marked component.
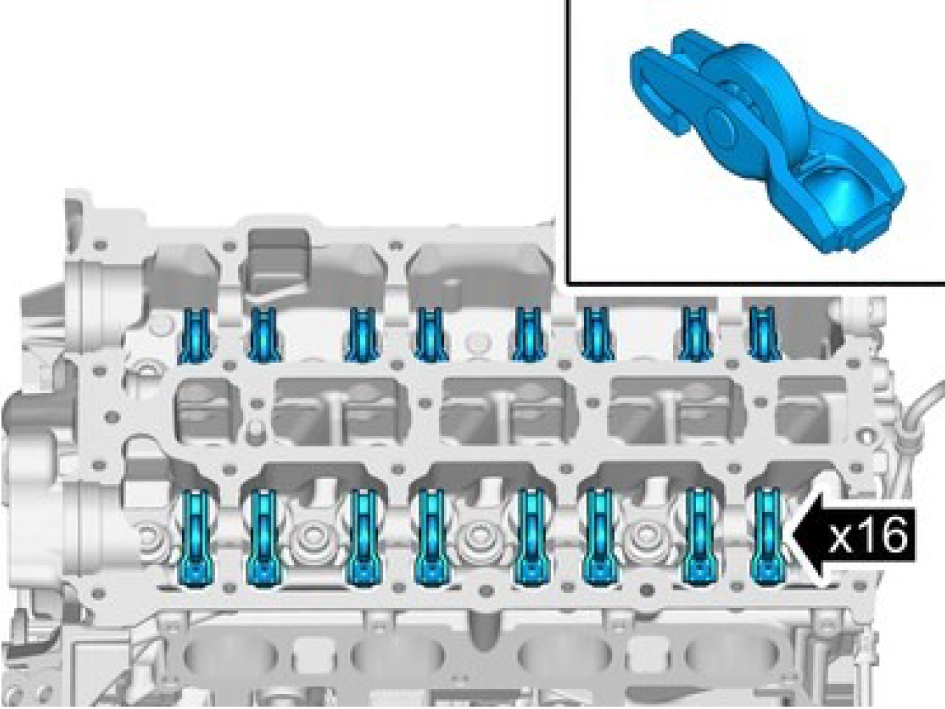
Note the position of each component before removal.
Remove the marked components.
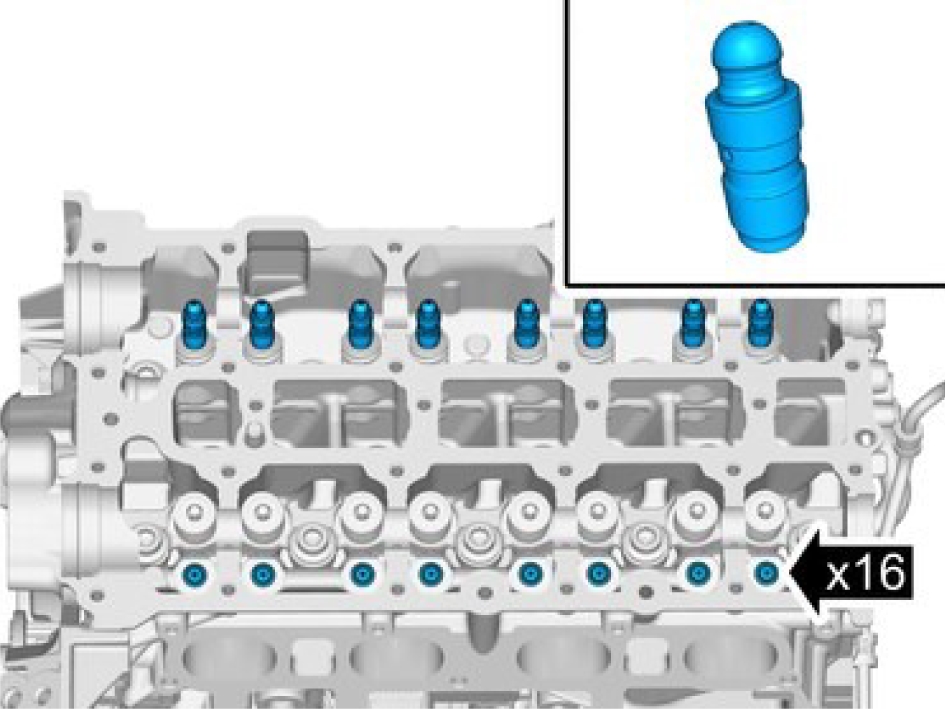
Note the position of each component before removal.
Remove the marked components.
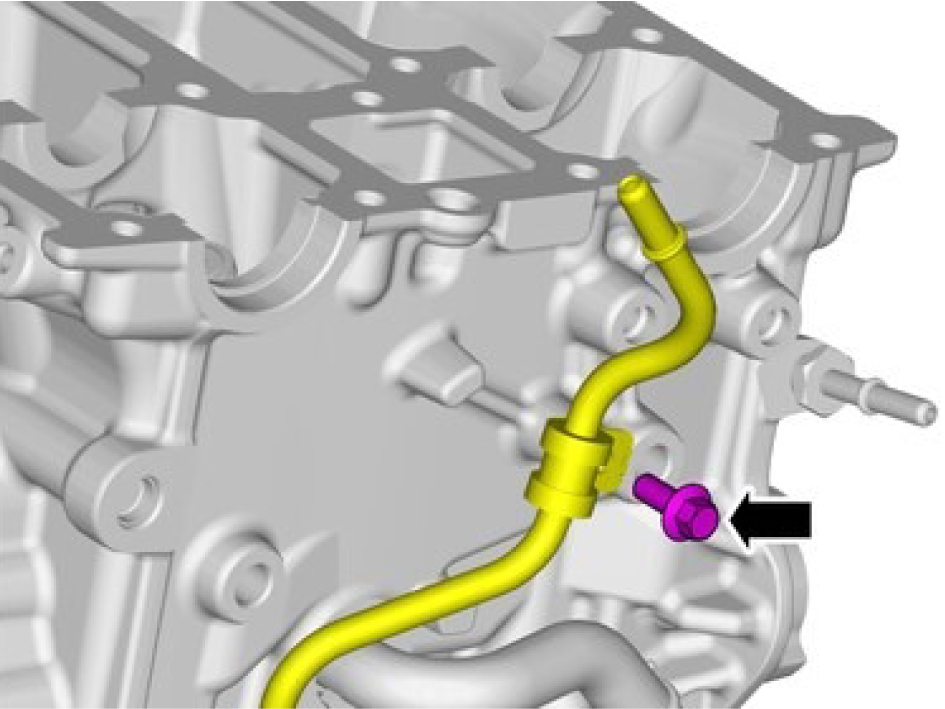
Remove the screw.
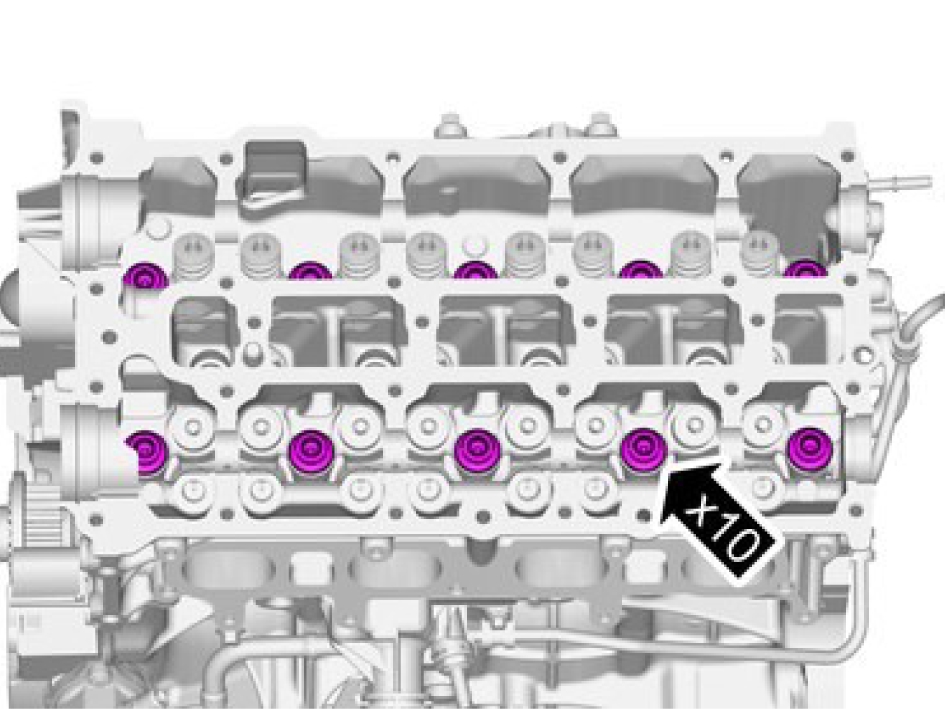
Remove the screws.
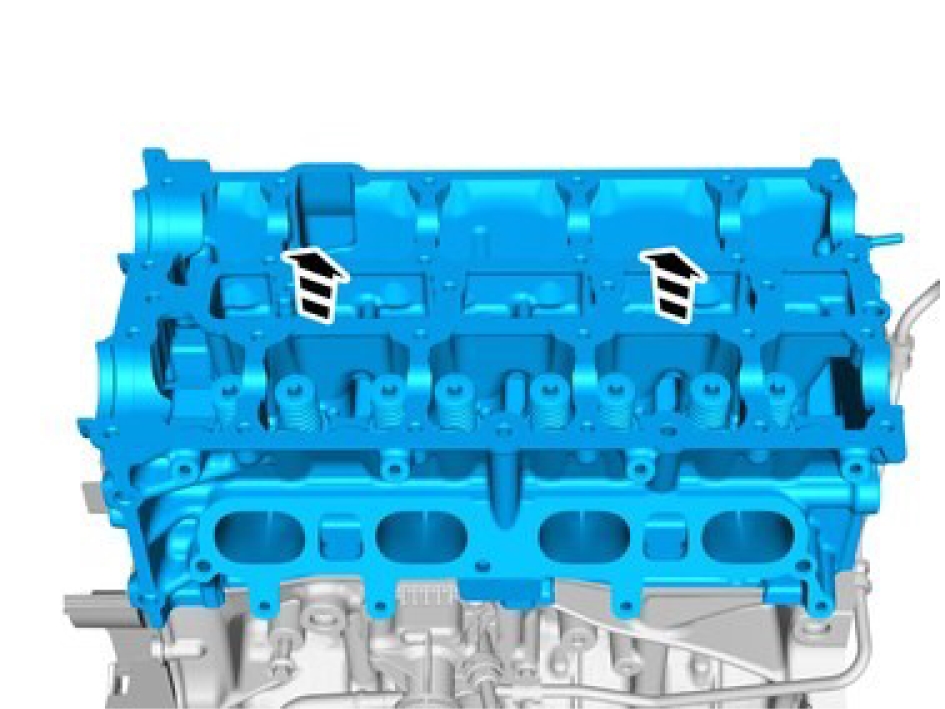
Place the component on a suitable underlay or support.
Take extra care when handling the component.
Remove the marked component.
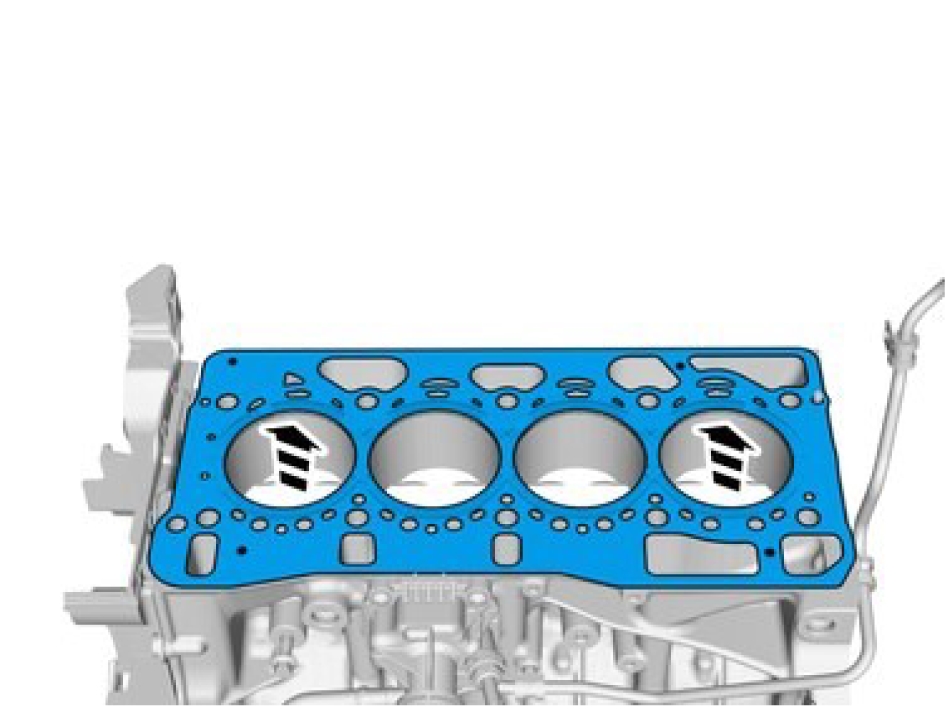
Remove the marked component.
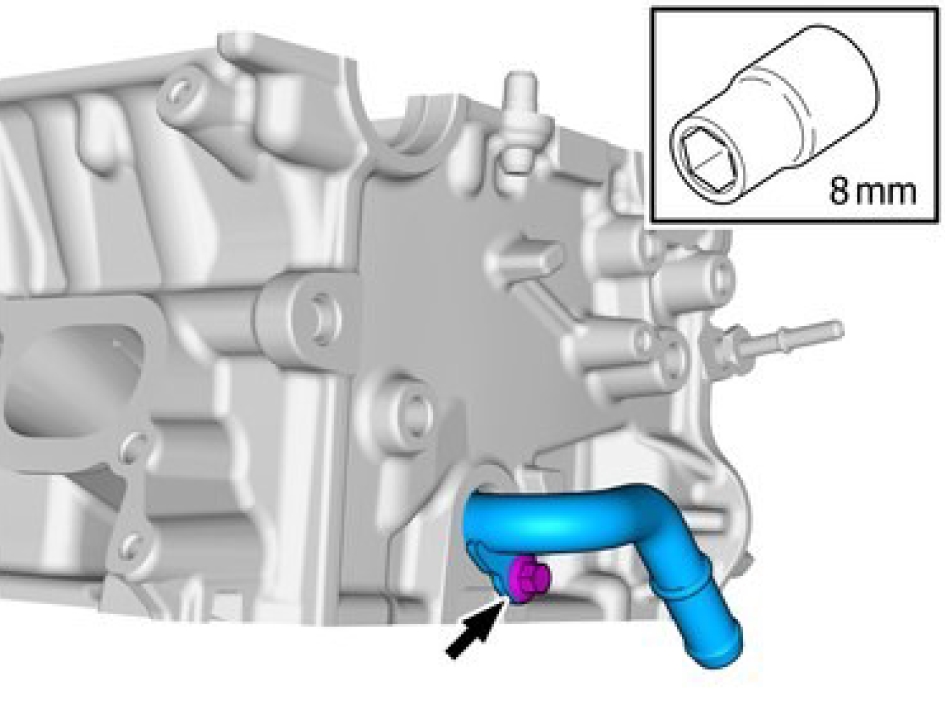
Use a new seal.
Remove the screw.
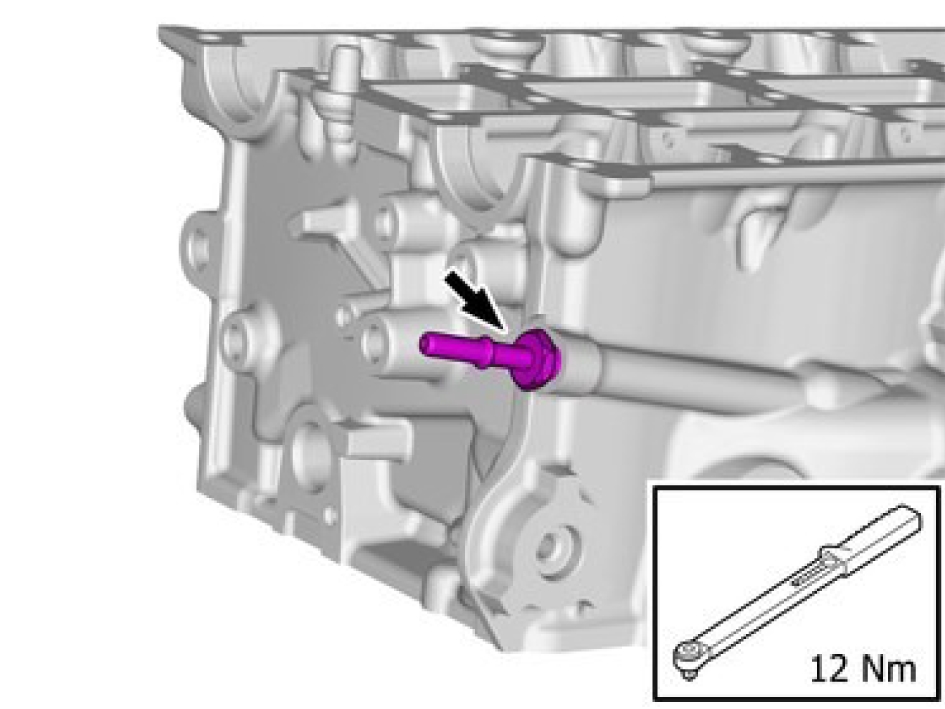
Remove the marked component.
Always follow the instruction for tightening torque value.
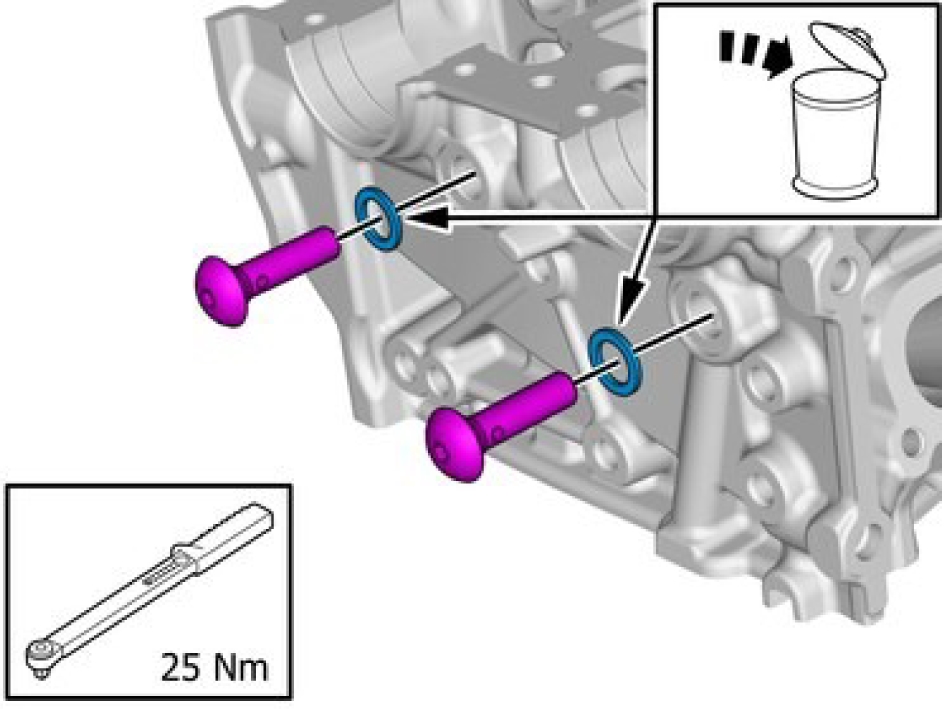
Remove the marked component.
Always follow the instruction for tightening torque value.
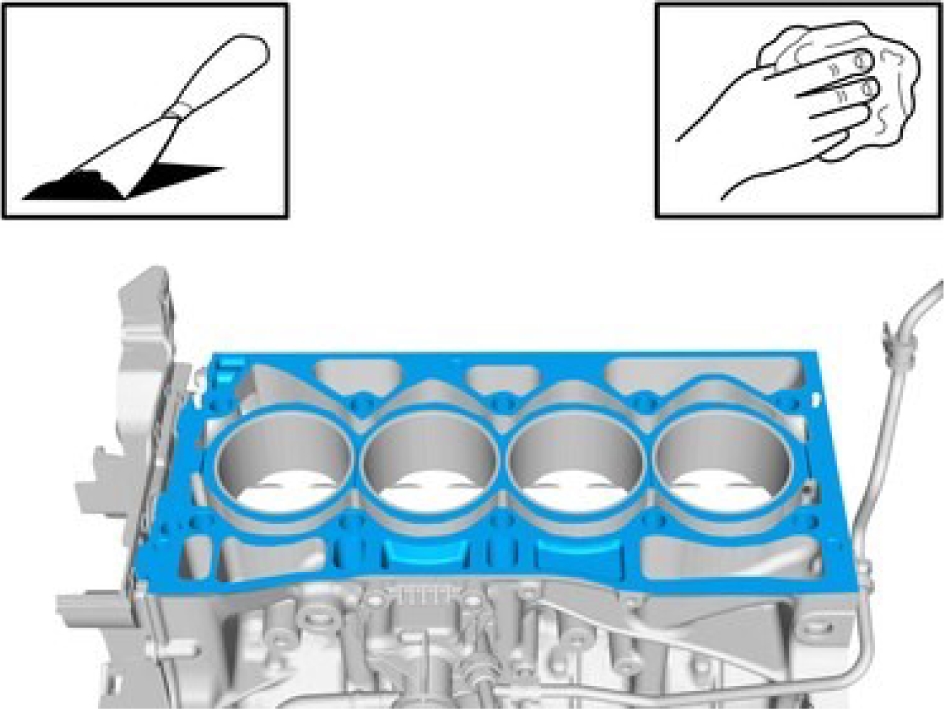
Take extra care not to damage the mating faces.
Make sure that the mating faces are clean and free of foreign material.
Clean the marked area with isopropanol.
Take extra care not to damage the mating faces.
Make sure that the mating faces are clean and free of foreign material.
Clean the marked area with isopropanol.
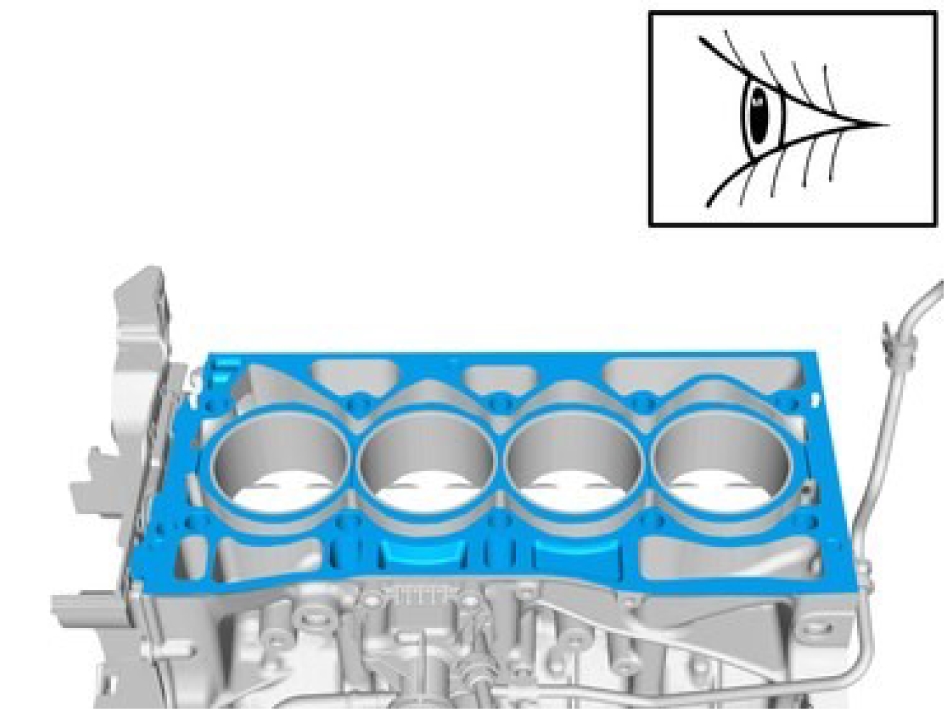
Make sure that the mating faces are clean and free of foreign material.
Make sure that no fluids are present in the cylinder head screw threaded bores.
Installation
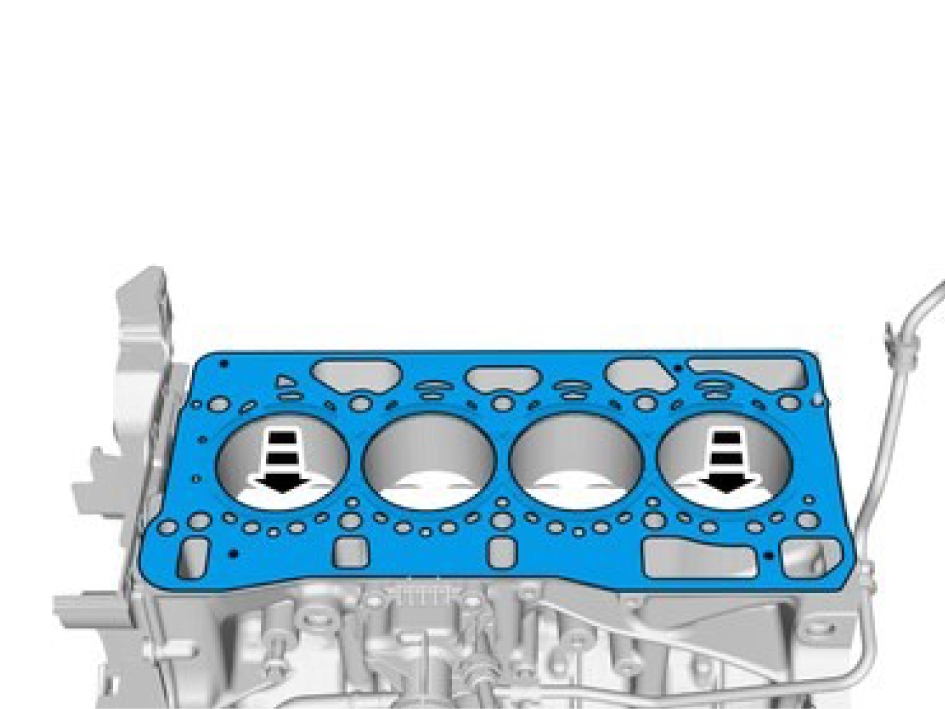
Make sure that the component is correctly located on the locating dowels.
Make sure that a new component is installed.
Install the marked component.

Make sure that the component is correctly located on the locating dowels.
Install the marked component.
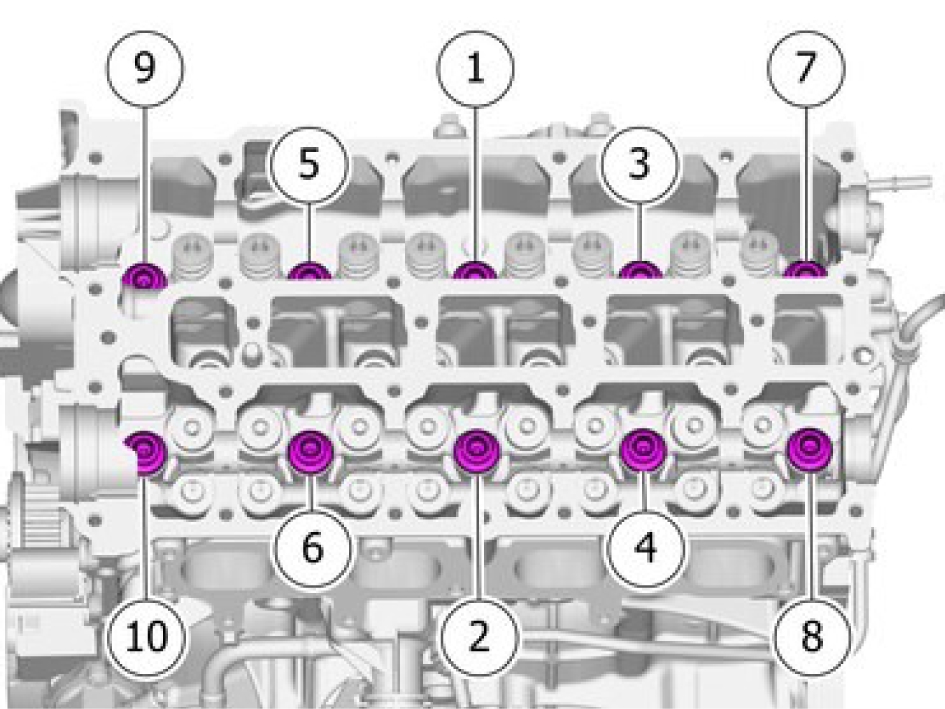
Make sure that new screws are installed.
Tightening sequence and torque.
Stage 1: 40 Nm
Stage 2: 40 Nm
Stage 3: 120 °
Stage 4: 120 °
Make sure that new screws are installed.
Only tighten the screws finger tight at this stage.

Make sure to follow the sequence indicated.
Bracket engine mounting to cylinder head, torque: 50 Nm
Make sure to follow the sequence indicated.
Bracket engine mounting to cylinder head, 120°.
Install the screw M6, torque: 10 Nm
Cylinder head, disassembly/assembly
See information about specifications refer to:
Specifications EngineRemoval
Note the position of the components before removal.
Only use moderate force.
Remove the marked components with special tool, 998 6052 and 999 5748.
Note the position of the components before removal.
Remove the marked components.
Note the position of the components before removal.
Remove the marked components.
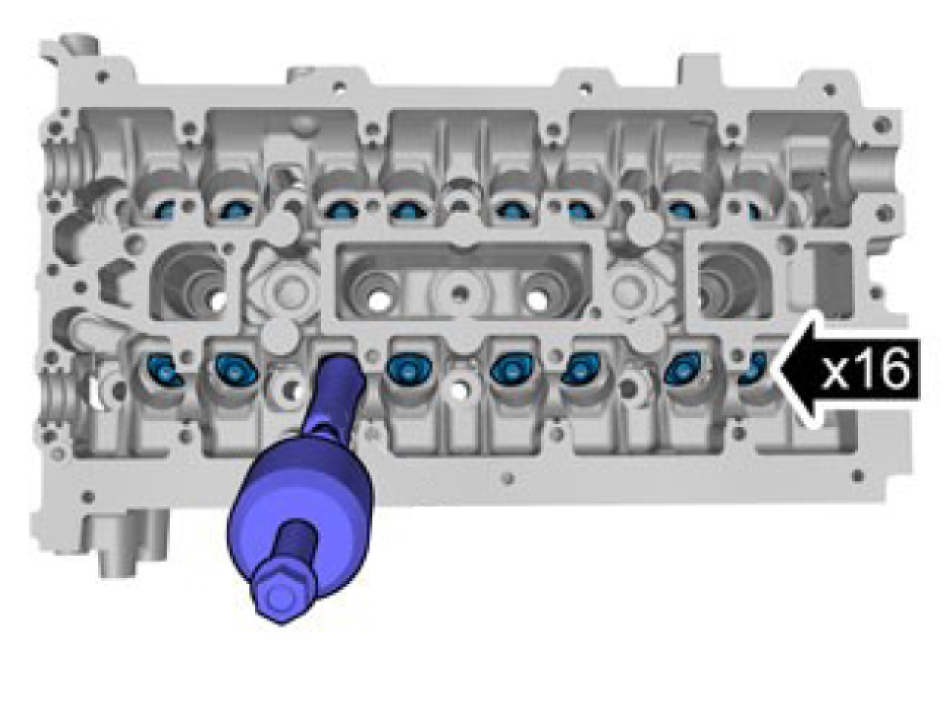
Use special tool: 999 5219
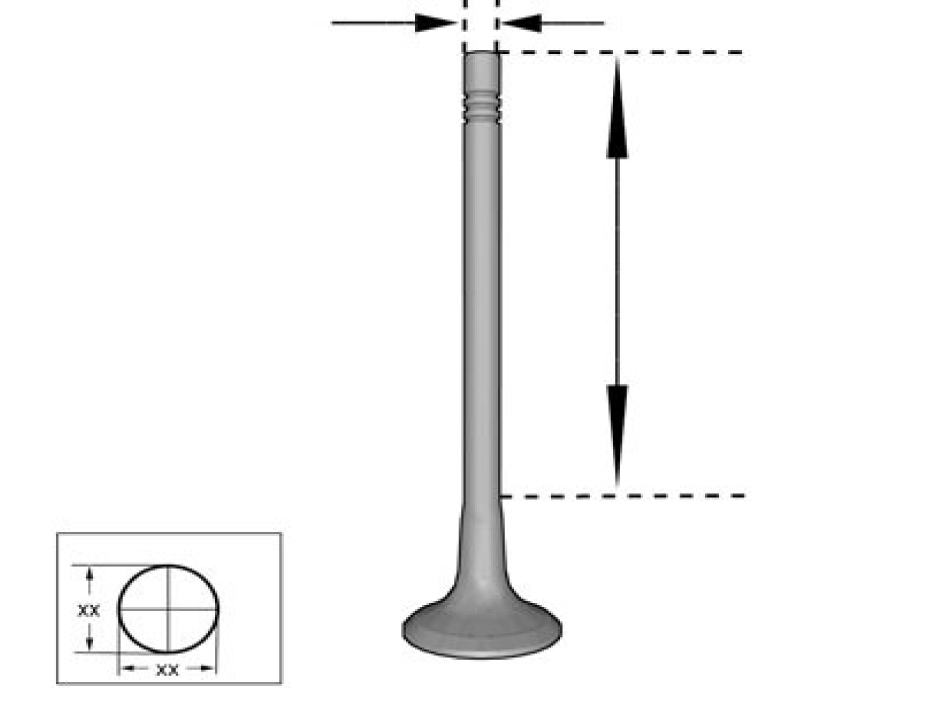
Measure with micrometer.
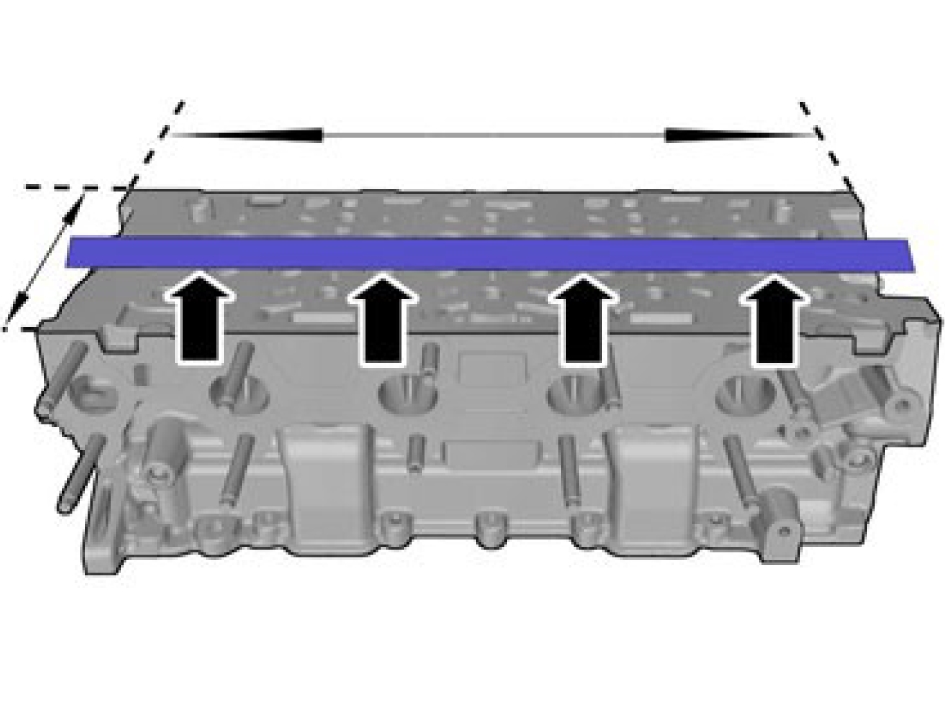
Use feeler gauge
Installation
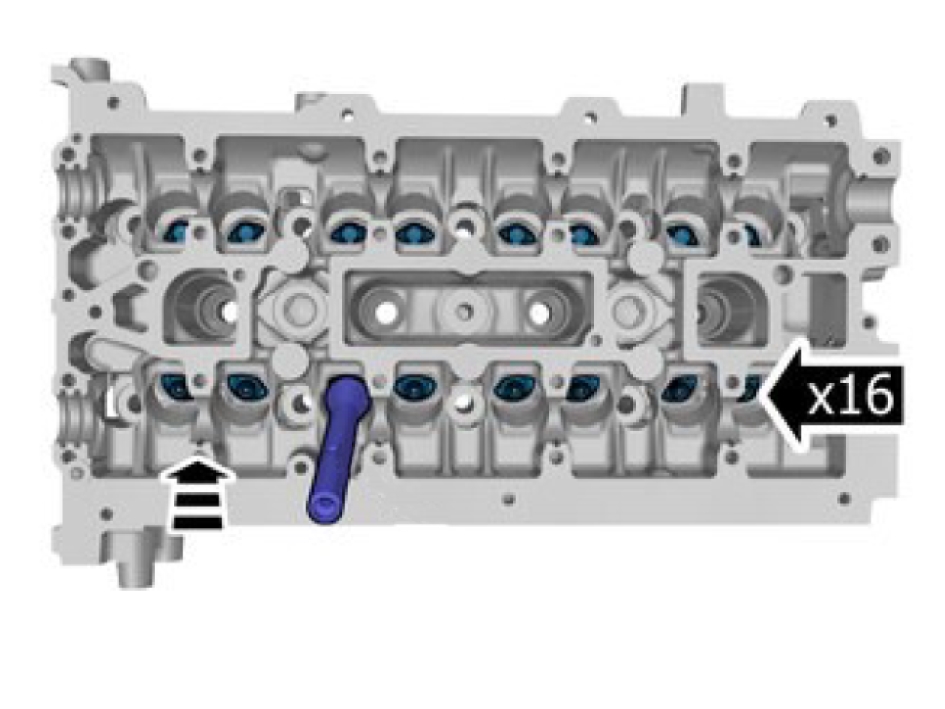
Take extra care not to damage the seal.
Only use moderate force.
Use special tool: 999 7876
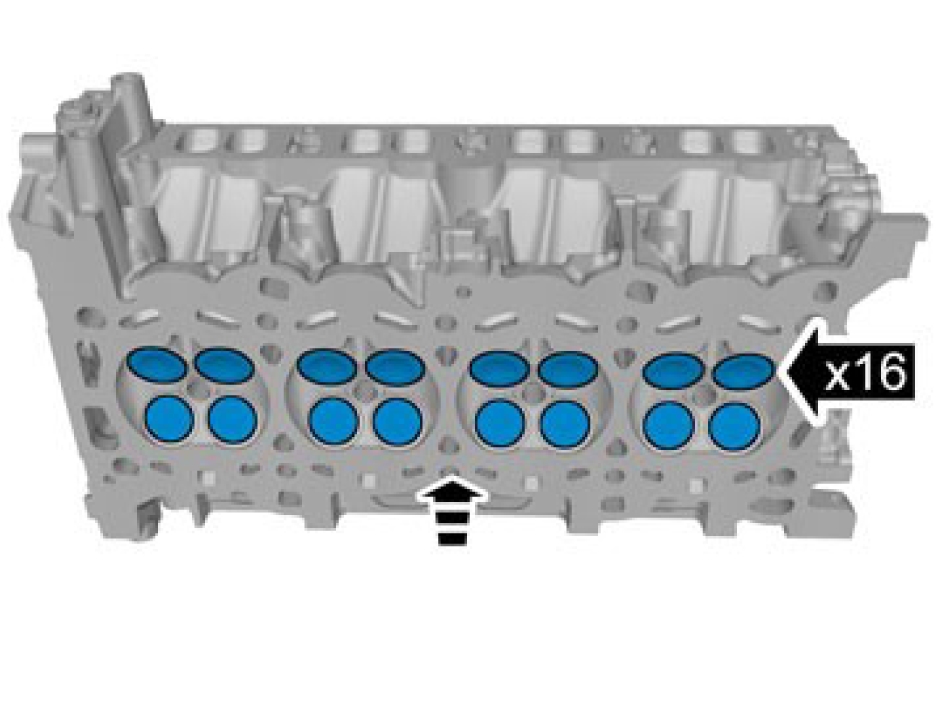
Take extra care not to damage the seal.
Make sure that these components are installed to the noted removal position.
Apply engine oil and install the marked component.
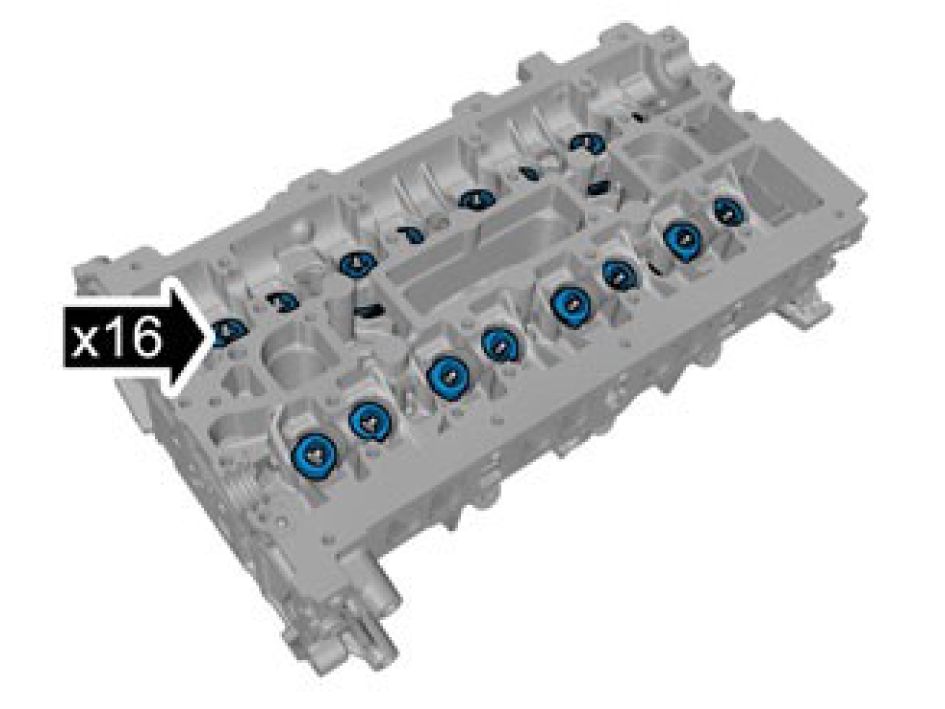
Make sure that these components are installed to the noted removal position.
Install the marked component.
Make sure that the component is positioned correctly.
Only use moderate force.
Install the catch.
Powertrain: Drive mode management
Description
Different drive modes change the vehicle functions in order to adapt to the current driving conditions and driver preferences. The intention is to adapt the vehicle to the needs of the user, such as fuel economy, high dynamic performance or off-road driving.
The available drive modes depend on vehicle type and options.
The different drive modes are:
-
Normal
-
Eco
-
Comfort
-
Dynamic
-
Off Road
-
Individual
-
Pure
-
Hybrid
-
Power
-
All-Wheel-Drive (AWD)
-
Save
The drive modes are further described in the chapter "Drive mode details".
Operation
For vehicles with drive mode option the drive mode can be changed by selecting the desired setup on the infotainment display or appropriate device for user inputs.
Not all drive modes are available at all times and the current drive mode can change automatically if certain conditions apply. For example, drive mode Off Road is only available when the vehicle speed is below 40 km/h. If the vehicle speed of 40 km/h is exceeded while in drive mode Off Road, the vehicle will automatically switch to another drive mode. The infotainment display of the vehicle informs the driver when automatic changes are made.
Several systems and vehicle functions can be affected by drive modes, such as:
-
Steering
-
Braking
-
Pedal mapping
-
Four corner air suspension
-
Damper system
-
Engine
-
Gearbox
-
All-wheel-drive system
-
Electric drivetrain
-
Active noise control
-
Driver information
-
Engine Start/Stop
-
Energy save (climate and defroster)
In drive mode Individual, the driver can select settings to use from the other drive modes.
For vehicles without the drive mode option, the mode can still be changed between drive mode Normal and drive mode Eco. The default drive mode is Normal.
Below, the conditions and settings that apply in different drive modes for different vehicle types are described in more detail.
Drive mode details
Vehicles without drive mode option
Drive mode: Normal
-
The characteristics of engine and transmission are set to normal mode.
-
Climate settings are normal.
-
Window heating settings are normal.
The vehicle is always started in drive mode Normal.
Drive mode: Eco
-
The characteristics of the engine and transmission are set to economy mode.
-
Restricted power to seat heating.
-
Restricted power to rear window heating.
-
Greater temperature differences in the passenger compartment are accepted.
Vehicles with drive mode option, except Twin Engine vehicles
The exact settings may differ. Not all drive mode settings are mentioned.
Drive mode: Comfort
-
The characteristics of the engine and gearbox are normal.
-
The steering forces needed to turn the wheels are medium.
-
The air suspension and dampers are tuned for better comfort.
-
Engine Start/Stop is activated by default.
-
Climate settings are normal.
-
Window heating settings are normal.
-
Passenger comfort and efficient fuel use are prioritized.
The vehicle is always started in drive mode Comfort, which is the standard drive mode. The vehicle changes to drive mode Comfort if another drive mode is no longer allowed, or if a problem is detected with the current drive mode.
Drive mode: Off Road
-
The characteristics of the engine, gearbox and all-wheel drive are set for maximized traction.
-
The steering forces needed to turn the wheel are light.
-
The air suspension and dampers are in high position.
-
Low Speed Control (LSC) and Hill Decent Control (HDC) are always active, if available.
-
The characteristics of the accelerator pedal are changed from requesting torque to request speed and to help preventing the driver from leaving the mode by accident.
-
Engine Start/Stop default is off.
-
The maximum vehicle speed is 40 km/h.
Drive mode: Eco
-
The characteristics of the engine and gearbox are in economic mode.
-
Climate settings are in economic mode.
-
Restricted power to seat heating.
-
Restricted power to rear window heating.
-
Greater temperature differences in the passenger compartment are accepted.
-
The defrosters are not automatically started if they have not been manually set to start automatically.
-
The driver information is adapted to help the driver drive eco-friendly.
-
Engine Start/Stop default is on.
-
The air suspension is set for low ride height.
-
The steering forces needed to turn the wheels are medium.
Drive mode: Dynamic
-
The characteristics of the engine and gearbox are in sport mode.
-
The steering forces needed to turn the wheel are heavy.
-
Air suspension and dampers are tuned for good control and handling.
-
The engine speed counter is more in focus in the driver information.
-
The active noise control enhances the engine noise.
-
Engine Start/Stop default is off.
Drive mode: Individual
The driver can combine different drive mode settings for a personalized drive mode.
Vehicles with drive mode option, Twin Engine vehicles
| Characteristics | Hybrid | AWD | Pure | Power | Off Road | Individual |
|---|---|---|---|---|---|---|
| Steering (required steering force) | Normal | Normal | Normal | High | Low | Low/Normal/High |
| Powertrain | Fuel saving settings | All-wheel-drive | Maximum electric propulsion | Power | All-wheel-drive | Eco/Comfort/Dynamic |
| Brake | Normal | Normal | Normal | Firmer pedal | Normal | Normal/Dynamic |
| Suspension (leveling, damping) | Comfort (0 mm, soft) | Comfort (0 mm, soft) | Eco (- 10 mm, medium) | Dynamic (- 20 mm, hard) | Off Road (+ 40 mm, soft) | Eco/Comfort/Dynamic |
| Active noise control | Quiet | Quiet | Quiet | Sporty sound | Quiet | N/A |
| Energy save (climate and window heating) | Normal | Normal | Eco | Normal | Normal | Normal/Eco |
This table is only an example, exact settings may differ.
When drive mode Pure is selected, the propulsion is achieved using the electric motor only. Under circumstances that cause limitations to the use of the electric motor, the drive mode automatically changes to Hybrid and the combustion engine starts. Such circumstances can be low energy in the high voltage battery, i.e. low state of charge (SoC), or low battery temperature. At this point the drive mode Pure is unavailable and is greyed out on the infotainment display.
The transition from drive mode Pure to Hybrid is completely normal and usually does not indicate a problem.
Activation and deactivation
For vehicles with drive mode option the drive mode can be changed by selecting the desired setup on the infotainment display or appropriate device for user inputs.
Settings
The driver can select settings and vehicle function characteristics of drive mode Individual.
Reduced function under fault conditions
If a problem is detected in the function, the default drive mode Comfort or drive mode Hybrid will be set, dependent on the vehicle.
Powertrain: Engine cooling
Description
Engine cooling is accomplished by the Engine Control Module (ECM) controlling the coolant flow and the airflow in the engine compartment.
Variants
| Component | Market, customer option, vehicle model |
|---|---|
| Bypass valve, EGR cooling | Gasoline engine vehicles. |
| EGR valve | Gasoline engine vehicles. |
| EGR coolant pump | Gasoline engine vehicles. |
| Electric thermostat, engine cooling | Gasoline engine vehicles. |
| Engine Coolant Pump Module (ECPM) | Gasoline engine vehicles. |
| Vehicle Dynamics Domain Master (VDDM), including Brake Control Module (BCM) | Mild hybrid vehicles. |
| Brake Control Module 2 (BCM2) | Mild hybrid vehicles. |
| Vehicle Computational Unit 1 (VCU1) | Mild hybrid vehicles. |
Operation
The main purpose of engine cooling is to avoid engine overheating and improve the overall vehicle performance, considering combustion, lubrication, and emission. To optimize the power consumption, a balance is maintained between airflow and coolant flow. When the engine is approaching the target temperature a low coolant flow is applied to avoid local hot spots. If the temperature continues to increase the Engine Control Module (ECM) requests an air flow. The engine cooling system can lower the airflow and coolant flow with the aim to reach the target temperature faster during the warm-up phase or at low ambient temperatures.
Airflow control
The Engine Control Module (ECM) calculates the needed airflow through the engine compartment based on a number of variables, including request for air conditioning, coolant temperature, exhaust gas temperature, and vehicle speed. The control module regulates the airflow by sending requests to the radiator cooling fan which controls the fan speed. The default state of fan is turned off. The airflow is typically restricted during the warm-up phase in order to quickly reach the target temperature and during conditions with low cooling requirements, like low ambient temperatures or low engine load.
The fan may have a post-run of up to approximately six minutes after the engine has been turned off. The time for the fan’s post-run depends on engine temperature, temperature in the engine compartment and the exhaust gas temperature.
Coolant flow control
The Engine Control Module (ECM) receives input on the coolant temperature and level, request for air conditioning, exhaust temperature, and vehicle speed. The control module regulates the coolant flow using an electric water pump and a thermostat with a heating element. The desired coolant temperature for a gasoline engine is +105 °C at low load and +90 °C at high load. The load is calculated based on engine torque, engine speed, ambient temperature, and vehicle speed. The expansion tank level sensor continuously monitors the coolant and reports to the Engine Control Module (ECM).
The Engine Coolant Pump Module (ECPM) generates the flow in the cooling loop between the radiator and the engine, in order to keep the engine temperature within the permitted limits and contribute to the climate system for the passenger compartment maintaining the desired temperature. On certain occasions, for example at cold start, the ECPM is not operating. For optimal engine warm-up, coolant stand still is preferred. For a gasoline engine this is achieved by setting the ECPM speed to zero.
The engine coolant pump module ECPM typically starts:
-
If heating is requested for the passenger compartment. This is to supply water to the heat exchanger.
-
If the power output is high. This is to avoid local heating peaks in cylinder head and turbo.
-
When the coolant temperature approaches +90 °C or +105 °C, depending on driving conditions. This is to create a uniform temperature distribution in the engine and over the thermostat when the thermostat opens.
-
If cooling is required after the engine has been switched off.
-
In auto stop mode.
If LIN communication is not possible, the Engine Control Module (ECM) uses a 12 V emergency signal to control the Engine Coolant Pump Module (ECPM) on a separate connection. The pump then operates at the highest rotation speed. The emergency signal changes from 0 V to 12 V directly after the engine has started. The thermostat’s wax makes the component self-regulating. When the coolant reaches a pre-defined temperature area, the thermostat opens the circuit to the radiator, in order to maintain the engine’s target temperature.
The exhaust gas temperature sensor provides information to the Engine Control Module (ECM) on the temperature of the incoming exhaust gases, in order to obtain the correct temperature during the EGR process. The EGR system is not used in low ambient temperatures due to the risk of freezing. The bypass valve, EGR cooling, either makes the exhaust gases go through or bypass the EGR cooler. During EGR regulation, during the engine´s warm-up phase, the exhaust gases are permitted to bypass the EGR cooler in most cases. However, depending on load and engine temperature the valve may change position, at which the exhaust gases are led through the EGR cooler. Certain driving conditions require cooling of the exhaust gases in order to achieve low emissions even though the engine´s operating temperature has not yet been reached. When the engine reaches its operating temperature, the exhaust gases are led through the EGR cooler during EGR regulation. The Engine Control Module (ECM) controls the EGR valve, which can be set to different positions depending on the exhaust gas temperature, in order to regulate the amount of recirculated exhaust gas. The standard position of the EGR valve is open, but under certain driving conditions, the valve can be closed thus using uncooled gases. The Engine Control Module (ECM) activates the EGR cooler pump when the EGR exhaust gases are led through the EGR cooler. By increasing the flow of coolant through the radiator, a greater amount of heat is removed. The temperature of the exhaust gases is lowered so that the desired combustion temperature is obtained.
Powertrain: Engine Start
Description
The engine start function ensures that the combustion engine is started. The function is mainly controlled by the Engine Control Module (ECM). The following subfunctions are described:
-
Engine start
-
Remote start (option)
-
Immobilization and remote-controlled immobilizaion
Operation
The engine is started by the following sequence:
Press the "Start" button.
The Central Electronic Module (CEM) receives a signal through a directly connected wire from the start button in the Start and Brake Switch Module (SBSM).
The Central Electronic Module (CEM) checks a number of preconditions (such as those described in the section “Preconditions for activation”) and if the conditions are met, a start request is sent to the Engine Control Module (ECM).
The Battery Control Switch Module (BCSM) primarily ensures that the 12 V system is supplied with voltage and current from the main battery. The BCSM does not have any specific role in the start process, except to make sure that the control modules are power supplied all the time, including during the start process.
Engine crank: The Engine Control Module (ECM) sends a request to the Mid-Voltage Battery Module (MVBM) to close the relay. The ECM also sends a positive torque request to the Integrated Starter Generator Module (ISGM) until a certain engine speed is reached. The ISGM is powered by 48 V from the MVBM. The relays in the BCSM are set to enable that the 12 V system in the vehicle is powered by the mid-voltage battery (48 V) during engine crank. 48 V is converted to 12 V by the Mid-Voltage Converter Module (MVCM).
When the ignition button is pressed, the Central Electronic Module (CEM) performs a key search through the vehicle antennas, keyless. The antennas send a wireless signal to the remote key. The authorization response from the key is then analyzed by the Multiband Antenna Module (MAM). If a remote key is found inside the vehicle, the control module sends the key identification to the ECM, which compares it to a stored value.
The Engine Control Module (ECM) authenticates the Central Electronic Module (CEM) through an encryption between them. The ECM checks the identity of the Vehicle Computational Unit 1 (VCU1) by comparing the serial number to a stored value in the ECM. Then, with the correct identification, a start attempt is made. The CEM checks the vehicle's speed and the engine's status via CAN. The ECM sends a command to the CEM that allows the fuel pump to be operated.
Since the vehicle is not equipped with a separate starter motor (12 V), the charging of the mid-voltage battery (48 V) is prioritized over the main battery (12 V) charging.
Related functions
The following functions are related to the engine start function:
-
Climate: Climate Control
-
Locks and alarm: Central locking
-
Powertrain: Driving
-
Powertrain: Start/Stop
Preconditions for activation
The start inhibition system compiles a number of parameters from the various security functions in the vehicle and then determines whether a start attempt is permitted. The following criteria are checked:
-
The brake pedal must be depressed. If a start request is denied due to the brake pedal not being depressed, a message in the combined instrument will inform the driver.
-
The gear selector must be in position P (park) or N (neutral).
-
The vehicle must be in usage mode inactive, convenience or active.
-
The immobilization is deactivated.
-
In case the vehicle is equipped with it, the alcohol lock status must be “Start allowed”.
-
The steering column lock must be unlocked.
The Engine Control Module (ECM) carries out all checks for start inhibition through the CAN network.
Steering column locking
The Central Electronic Module (CEM) controls the Steering Column Lock module (SCL) by sending commands for locking or unlocking. The Steering Column Lock module (SCL) is only activated when the vehicle is not moving and the engine is off. If the vehicle is locked from the outside, the engine is not running and the vehicle is at a standstill, the Central Electronic Module (CEM) will send a locking command to the steering column lock.
When the vehicle is unlocked, at a standstill and the engine is not running, the Central Electronic Module (CEM) sends an unlocking command to the Steering Column Lock module (SCL). The vehicle cannot be started until the lock bolt in the Steering Column Lock module (SCL) is in the unlocked position. The lock bolt’s position is indicated by a hall sensor located in the Steering Column Lock module (SCL) which is directly connected to the Central Electronic Module (CEM).
If the vehicle is unlocked and the steering column lock is locked, the Central Electronic Module (CEM) will unlock it when the ignition knob is turned to the start position. A message will be displayed in the combined instrument display if the steering column lock is not unlocked.
Remote start (option)
Operation
The engine can be remotely started by using the engine remote start function through an application. The function also heats or cools the passenger compartment prior to departure. The gearbox is disengaged from the powertrain when the engine is started remotely and then a normal start must be performed before the vehicle can be engaged. This is done by depressing the brake pedal while pressing the start button. The vehicle will then switch from usage mode active to usage mode driving and the propulsion function will be enabled. If the engine has been started by remote start and a door is opened, a message will appear on the combined instrument display informing that the engine was remotely started. The engine does not have to be switched off and started again via the start button. If the remote start function is automatically deactivated a message with information about the reasons for the deactivation will appear both in the combined instrument display and the application.
The engine remote start function should be deactivated during the workshop visit for safety reasons when working in or under the engine compartment.
Engine remote start sequence
The Vehicle Connectivity Module (VCM) receives the start request from the remote server and forwards the request to the Central Electronic Module (CEM).
The Central Electronic Module (CEM) checks all the start conditions for remote start (such as those described in the section "Preconditions"). If the start conditions are met, the Central Electronic Module (CEM) answers the Vehicle Connectivity Module (VCM) that the engine is about to start. The Vehicle Connectivity Module (VCM) sends an acknowledgment to the remote server.
The Central Electronic Module (CEM) sends a start request to the Engine Control Module (ECM) which answers the request with an acknowledgment when the engine has been started. The Central Electronic Module (CEM) informs the Vehicle Connectivity Module (VCM) which in turn informs the remote server.
The Central Electronic Module (CEM) sends a request to the Climate Control Module (CCM) to start the climate control. The Central Electronic Module (CEM) flashes the turn indicators to inform that the engine has been remotely started successfully.
Engine remote stop sequence
The Central Electronic Module (CEM) sends an engine stop request to the Engine Control Module (ECM) which stops the engine and returns a stop acknowledgement to the Central Electronic Module (CEM) and the Vehicle Connectivity Module (VCM).
The Vehicle Connectivity Module (VCM) forwards the information to the remote server. The Central Electronic Module (CEM) sends a signal to the Climate Control Module (CCM) requesting it to stop the climate control.
The Climate Control Module (CCM) stops the climate control and the Central Electronic Module (CEM) flashes the turn indicators to inform that the engine has been turned off.
Preconditions
To activate the remote start function the following preconditions must be met:
-
The gear selector must be in position P (park).
-
The vehicle must be locked.
-
The key must not be inside the vehicle.
-
The hood must be closed.
-
The fuel tank must contain at least 8 liters of fuel.
-
The coolant level must not be too low.
-
No engine faults must be detected.
Activation and deactivation
To remotely start the engine via the application, carry out the following:
Open the application.
Select the menu “Engine remote start”.
Select the time when the engine is to start running to condition the passenger compartment.
Press the start button.
Confirm engine remote start activation.
If the conditions for remote start are met, the hazard warning flashers flash rapidly three times when the engine starts. Acknowledgment that the engine has started can be obtained via the application. The engine switches off after a selected amount of time. One short and one long flash from the hazard warning flashers means that the engine is turned off. After two activations of the remote start in a row, the engine must be started normally before the function can be used again.
Ensure that the vehicle is in a safe place and that nobody can get hurt when the engine is started.
The engine remote start function deactivates in the event of any of the following:
-
An engine fault is detected.
-
A normal start is initiated by depressing the brake pedal and pressing the start button.
-
15 minutes have elapsed since the engine was remotely started.
-
The function is deactivated from the application.
For safety reasons during the workshop visit, the remote start function can be temporarily deactivated.
When the vehicle is driven above 30 km/h the function automatically returns to the normal status.
Immobilization and remote-controlled immobilization
Operation
Immobilization prevents the vehicle from being used without the authorized key. The Central Electronic Module (CEM) requests an identity authentication of the key from the Multiband Antenna Module (MAM). For more information see Locks and alarm: Central locking. If the remote key is not approved, immobilization is activated. The Engine Control Module (ECM) deactivates the ignition system and prevents the relay for the starter motor from being activated. The steering column lock will stay locked. The CEM deactivates the fuel pump.
Remote immobilization nullifies the vehicle’s programmed keys if, for example, the vehicle is stolen.
If the engine is running when immobilization is requested, the vehicle is immobilized at the next start attempt. For certain markets, the Central Electronic Module (CEM) can request immobilization if it detects that the vehicles telematics function does not answer to communication. Remote-controlled immobilization is diagnosed by the CEM. Immobilization and mobilization via diagnostic commands are controlled by the vehicle’s telematics function.
After the vehicle is immobilized remotely, the vehicle must also be mobilized remotely.
Backup key authorization
If the battery in the remote key has run out or the communication between the remote key and the keyless vehicle antennas are disrupted, it is possible to use a backup solution. The antenna, keyless vehicle, passenger, is placed inside the cup holder in the center console. To mobilize and start the vehicle this way, the remote key must be placed in the cup holder and then a normal start can be carried out.
Powertrain: Driving
Description
The Driving VEP function manages the vehicle's propulsion-related systems. The Engine Control Module (ECM) handles the function and controls the engine so that it runs smooth, effective, and as requested by the driver or during idling. There are different drive modes, such as Comfort, Eco or Dynamic, which affect the propulsion. The driving function includes the following subfunctions:
-
Engine management system
-
Lubrication and oil system
-
Fuel system
-
Inlet and exhaust system
-
Idle control
-
Propulsion.
Variants
| Component | Market, customer choice, vehicle model |
|---|---|
| Sliding camshaft | MP engines only. |
| Integrated Starter Generator Module (ISGM) (48 V) | Gasoline engine vehicles. |
Operation
Engine management system
The engine management system enables the engine to run smoothly and effectively. The engine management system includes:
-
Ignition control
-
Detection of misfiring
-
Camshaft control
-
Throttle control
Ignition control
The ignition process in the combustion chamber starts when the Engine Control Module (ECM) cuts the current to the ignition coil, which in turn ignites the spark plug. The starting sequence has a fixed ignition setting programmed in the ECM. The ECM continuously calculates the optimum ignition setting with input from various sensors such as the crankshaft position sensor and the engine coolant temperature sensor. The ECM also continuously analyzes the signal from the knock sensor when the engine has reached its normal operating temperature. If the knock sensor detects cylinder knocks, the ECM retards the ignition for the affected cylinders until the knocking ceases. The Transmission Control Module (TCM) affects the ignition control during gear shifts to make a smooth transition between gears. When a gear shift is requested, a request for torque limitation can be sent to the ECM. This retards the ignition momentarily and reduces the torque, thus allows for smoother shifting and reduced load on the transmission. Lowering of ignition is done in several levels, where the level depends on the signals from the TCM. The return signal from the ECM to the TCM confirms that the signal has reached the ECM and the gear shift can be executed.
Knock control
Knocking reduces the efficiency of the combustion and can damage the engine. A knock occurs in the combustion chamber when the fuel and air mixture self-ignites. It can occur both before ("preignition") and after ("detonation") a spark is produced. In both cases, the gas ignites in two or more places in the combustion chamber. This results in an extremely fast combustion process with flame fronts from several directions. When these flame fronts collide, the pressure in the cylinder increases rapidly and there is a mechanical knocking sound. Knocking produces a certain type of vibrations in the engine block. These vibrations are transmitted to the knock sensors. The mechanical stress generated in the knock sensor's piezoelectric materials during knocking result in a corresponding voltage, which is transmitted to the Engine Control Module (ECM). The ECM figures out which cylinder is knocking with help from the crankshaft position sensor. The knock sensors also interpret parts of the normal engine vibrations to be cylinder knocks. The ECM is able to recognize the vibrations that originate from knocking by filtering and amplifying the signal and then compare the signal to a model knock signal. If the ECM detects knocking above a certain threshold value, the ignition timing is retarded. If repeated ignition retardation does not prevent the knocking, the air and fuel mixture is enriched by increasing the injection period.
Misfiring
A misfire in the engine occurs if the air and fuel mixture does not ignite in the combustion chamber. The Engine Control Module (ECM) detects the misfire by registering deviations in the rotation of the flywheel. A deviation in the flywheel rotation can be caused by:
-
Driveline oscillations
-
Normal variations caused by uneven combustion
-
Flywheel mechanical tolerances
-
Misfiring, caused by:
-
Incorrect air and fuel mixture
-
Weak spark
-
Insufficient compression
-
The mechanical tolerances and oscillations in the driveline interfere with the frequency signal that the Engine Control Module (ECM) receives from the crankshaft position sensor. This makes it difficult to determine if a misfire has occurred or if the detection is incorrect. The ECM filters the signal from the crankshaft position sensor to remove any signal irregularities attributed to mechanical variations in the flywheel's rotation. This filtered signal from the crankshaft position sensor is adapted at different engine speed ranges. For the adaptation values to be set in the different ranges, the deviation in speed must be within certain fixed limits. If the signal from the crankshaft position sensor has not yet been adapted in the current range, the accuracy of the diagnosis is less than if it has been adapted. Misfires can be detected by comparing the filtered signal from different positions of the flywheel. If the detected misfire intensity (evaluated in 1000 revolutions increment) exceeds a certain threshold, this is interpreted as misfire that affects emissions. DTCs are set and the driver is informed by a warning light in the combined instrument display when the DTCs are confirmed. If the detected misfire intensity (evaluated in 200 revolutions increment) exceeds another certain threshold, it is interpreted as misfiring that damages the three-way catalytic converter TWC. The allowed number of misfires depends on the load and engine speed. While misfiring causing catalyst damage occurs a warning symbol is flashing and it is lit constantly once the DTC is confirmed. The ECM registers and stores the engine's speed range, load range and information about the engine temperature when misfiring is detected. The ECM can erase the set DTC and turn off the warning symbol if misfiring has not been encountered in the previous driving cycles under certain conditions. The number of misfires can be displayed in VIDA.
Camshaft control, variable valve timing VVT
The engine has two camshafts, intake and exhaust, and their opening time is controlled separately on petrol engines with a variable valve timing VVT technology. It uses the crankshaft position sensor to divide the rotation into a number of crankshaft degrees and together with the two camshaft position sensors the Engine Control Module (ECM) can control the camshafts. The intake camshaft's VVT is adjustable within a range of approximate 50 crankshaft degrees, and the exhaust camshaft within an approximate 30 degrees. Oil pressure is needed, otherwise the VVT unit is locked. The clearance in the locked position is approximate 1.5 crankshaft degrees. Both camshafts can be adjusted individually by using their separate camshaft reset valve. The camshafts are driven by the crankshaft via a gear housing located on the engine’s top side. When each camshaft is adjusted in the factory, its position is aligned with the crankshaft’s position. The camshaft’s position at alignment against the crankshaft is called the camshaft’s 0-position, its default position. With VVT, the camshaft's zero position is displaced so that the camshaft's angle position is changed. Thus, the opening and closing of the exhaust and inlet valves changes relative to the crankshaft. By controlling the camshaft's angle position, the engine's performance can be increased, idle quality can be improved, and emissions can be reduced. The camshaft position sensor uses a pulse wheel consisting of five teeth on the camshaft to detect the flanks. For the LP engine there are 12 teeth. The ECM detects the position of the camshafts by comparing the signals from the crankshaft position sensor and the camshaft position sensors. The ECM then controls the angle of the camshaft by regulating the oil flow to the VVT unit using the VVT solenoids. The LP engine is a Miller-cycle engine, which means that the intake valve opens during part of the compression stroke. This way, the engine is compressing against the pressure of the turbocharger rather than the pressure of the cylinder walls. The effect is increased efficiency. The VVT solenoid controls the oil flow to the VVT unit. The ECM uses a PWM signal to control the VVT solenoid.
The VVT solenoid:
-
Oil filter for the VVT solenoid
-
Oil channel (pressure, inlet)
-
Oil channel connected to the VVT unit's chamber (triggering)
-
Oil channel connected to the VVT unit's chamber (retriggering)
The VVT unit allows the position of the camshaft to be adjusted relative to the crankshaft. The camshaft is secured to the VVT unit's rotor. The rotor, and thus the camshaft, can rotate in relation to the timing belt pulley by the oil pressure building up on one or the other side of the rotor's vanes in the VVT unit. The VVT solenoid is PWM controlled by the Engine Control Module (ECM). This results in rapid and precise variable valve timing. The intake camshaft can be advanced approximately 50 crankshaft degrees, while the exhaust camshaft can be advanced approximately 30 crankshaft degrees. In addition to electrical checks of the VVT solenoids, the ECM checks that the position of the camshaft is correct and that the control (advancement and retardation of the camshafts) is working satisfactorily.
Synchronizing crankshaft and camshafts
The flywheel rim has a "gap" and gives the crankshaft position sensor 60 - 4 = 56 pulses per crankshaft revolution. When the Engine Control Module (ECM) has identified the reference gap, the control module can determine the exact position of the crankshaft by counting pulses. When the crankshaft has rotated 90° after top dead center, the ECM compares the position of the crankshaft with the position of the camshafts. If the positions correspond with those expected, the components are synchronized. The values for this initial synchronization are saved in the ECM. Because the signal characteristics from the crankshaft position sensor changes with the direction of rotation, the next start can occur without requiring a new synchronization. This gives a significantly shorter cranking process, since the gap does not need to pass below the crankshaft position sensor for the ECM to be able to identify the crankshaft's position. The ECM also uses the signals from the crankshaft position sensor and exhaust camshaft position sensor to identify the position of the fuel pump.
Sliding camshaft
Sliding camshaft is a deactivation of cylinder 1 and 4, the engine only runs on cylinder 2 and 3 when the engine load is low. The camshafts consists of cam units. The cam unit for cylinder 2 and 3 are fixed in place, while the cam units for cylinder 1 and 4 can slide along the camshafts on splines. There are two actuators per cylinder, one for the inlet valves and one for the exhaust valves. When the engine is working on a low load, the Engine Control Module (ECM) sends a signal to the actuators, sliding camshaft to deactivate cylinder 1 and 4. The actuators are bistable and can rest in both a triggered position (1) as well as in a nontriggered position (2). When the actuator receives a signal from the ECM, one of the two pins is triggered and ejects into a Y-shaped groove mounted on the camshaft. One pin triggers the movement to deactivate the cylinder and the other pin triggers the movement to activate the cylinder. The pins are pushed back into the actuator by the Y-shaped groove. When the engine is requested to run on 4 cylinders the Integrated Starter Generator Module (ISGM) supports in evening out the torque. When the engine is idling, all 4 cylinders are engaged.
Throttle control
The throttle control sets and optimizes the throttle opening level and is controlled by the Engine Control Module (ECM). The ECM controls the actual throttle located in the throttle unit, mainly based on the information from the sensor, accelerator pedal, and the potentiometers inside the throttle unit. The following signals and parameters are used to ensure optimum throttle control:
-
Climate system load
-
Transmission load, selected gear modes
-
Engine coolant temperature
-
Mass air flow through the intake manifold
-
Manifold absolute pressure in the intake manifold
The throttle position is measured with two potentiometers in the throttle unit. These are connected in a way that causes potentiometer 1 to produce a higher voltage as the throttle opening angle increases, while potentiometer 2 does the opposite. There is a large difference between the minimum and maximum airflow in the engine, and during low flows the regulation needs to be more precise. The signal from potentiometer 1 is amplified approximately four times in the Engine Control Module (ECM) before it reaches the AC/DC converter, which is integrated in the ECM. This means that there are three input signals; two real and one fictitious, available to the control module. These signals are used to determine the position of the throttle and to regulate the opening angle of the throttle in the throttle unit. In general, the amplified signal is primarily used for small throttle angles (small air flows), which are desirable when a high degree of accuracy is required. Because the signal is amplified, it reaches its maximum value at approximately 25 % of the maximum opening angle of the throttle. The ECM primarily uses the signal from potentiometer 1 as a measurement of throttle opening angle. The throttle opening angle is regulated so that the actual angle (actual value) is the same as the angle calculated by the ECM (desired value). The throttle unit is PWM controlled by the integrated power stage in the ECM. The torsion from the opening and return springs in the throttle unit is also used. If there is a fault and the throttle unit cannot be controlled by the ECM, the springs in the throttle unit will turn the throttle to its return position (limp home mode). This return position gives a throttle angle large enough to allow the vehicle to be driven to a workshop, although with considerably reduced drivability.
Throttle angle
The throttle angle is normally gauged by potentiometer 1 in the throttle unit. For small angles, the amplified signal is used to obtain a clearer signal. The Engine Control Module (ECM) monitors the signal from the potentiometers inside the throttle unit to check that it is plausible, within the allowed range and that it corresponds to the desired throttle angle. If there is a difference between the expected signal and the throttle signal, the ECM will disregard the throttle signal and instead calculate an approximate throttle angle. This calculated throttle angle is based on the load signal, the engine speed and the prevailing conditions, particularly pressure and temperature.
Lubrication and oil system
System view and operation
The engine contains an oil system whose main tasks are supplying oil to all bearings in order to reduce friction, supplying oil to the piston cooling jets to reduce emissions, and supplying oil to the hydraulic actuators such as hydraulic lift actuators from the camshaft. The engine oil is stored in the oil sump at the bottom of the engine. From the oil sump, the oil is transported via the oil pump, which creates an oil pressure, through the cooling circuit and the oil filter. After this, the oil flows to the oil channels/pipes in the bedplate, the engine block, the cylinder head and the turbo. The oil pump is driven by a pulley mounted on the mass balancer unit, which in turn is driven by the crankshaft. The pump also has a feedback pressure/flow, which makes it possible for it to regulate the pressure/flow. The oil pump is a two-step oil pump, which means it regulates between two pressure states, a low-pressure state and a high-pressure state. In-parameters for the regulation are temperature, engine speed and load. There is a continuous drain back down to the oil sump. The oil level- and temperature sensor measures the oil level in the oil sump.
Electronic dipstick
The oil level- and temperature sensor uses ultrasonic technology to measure to oil level. Ultrasound waves are sent out from the MCM (multichip module) positioned at the bottom of the sensor. The waves are sent through the oil until they reach the air. Then the waves are reflected back to the sensor, and an oil level measurement is available. The bottom of the sensor consists of a labyrinth for the oil, which helps eliminate air bubbles that disturb the measurements. The ultrasonic technology provides a measurement frequency of 1/s, which allows measuring during engine run. The large number of measurements enables calculation of the average value over time, which in turn determines the measurement accuracy. As a complement to the dynamic measurement, it is also possible to measure statically, i.e. with the engine turned off. In order to achieve stability and accuracy it is necessary to delimit the measurement window in regards to engine speed, oil temperature and acceleration. This implies that the measurement system does not measure all the time.
Extreme values: Low oil level. If the calculated oil level is below a certain calibrated level, the yellow warning triangle symbol lights up and a text message appears in the combined instrument display. When this happens, the user is instructed to fill up a specific amount of engine oil. Also, a DTC is set. If the oil level gets critically low, a red warning symbol is lit and the user is instructed to fill up a specific amount of engine oil. In this case, a DTC is also set. The purpose of the warning is to protect the engine.
Oil level calculation
The lubrication and oil system is controlled by the Engine Control Module (ECM). The ECM is started when the driver door is opened. The system checks whether the measurement criteria are met at the same time as a measurement is taken. An additional measurement is initiated if the driver depresses the brake pedal before the engine starts. Consequently, there are two different measuring points. This is because if the driver opens the door without starting the vehicle within a certain time, the ECM enters "sleep mode" again and the measurement value disappears. For this reason, an additional measurement point is also initiated when the brake pedal is depressed. If the conditions for the measurement are not fulfilled, for example if the oil temperature has been too low, the tilt angle too large or the engine has not been switched off for long enough, then the message "Not available" is shown. When the vehicle is in usage mode active, the measured oil level is compensated based on, amongst other things, the oil temperature (calculated parameter), time since last measurement and vehicle inclination (from the acceleration sensors in the Supplemental Restraint System module (SRS), resulting in a calculated level. The time until the measured value is displayed in the combined instrument display varies depending on the oil temperature at the time of engine switch-off.
Fuel system
The fuel system consists of a demand controlled nonreturn system and the components for the function are the following:
-
Fuel pump module
-
Fuel rail
-
Fuel pressure sensor high-pressure side
-
Fuel injector
-
Fuel pressure sensor low-pressure side
-
Fuel pump
A relatively high fuel pressure is needed for accurate injection during idling, due to the short injection pulses (below 1 ms) during idling. If the fuel pressure in the fuel rail becomes too high, a safety valve in the fuel pump opens and the fuel is led to the inlet side, i.e. the lowpressure side. In general, the higher the fuel pressure the greater the load. The principle for regulation is based on a calculation model in the Engine Control Module (ECM). Based on the driver's torque request, the following occurs (in this order):
-
Air request
-
Measured air quantity
-
Desired fuel quantity
-
Desired fuel pressure
-
Measured fuel pressure
-
Provide the desired amount of fuel by regulating the injection time
Fuel injectors
Direct injection of gasoline provides benefits such as:
-
Low fuel consumption
-
Low emissions
-
High output
Fuel injections take place directly into the cylinder at high-pressure. In order to achieve the correct this pressure, a mechanical fuel pump driven by the crankshaft is used. The fuel pump supplies the distribution pipe with fuel under high-pressure. The fuel is distributed to the fuel injectors, which are controlled by the Engine Control Module (ECM). Surplus fuel from the control valve, fuel quantity, is led back to the inlet for the fuel pump. Accordingly, the fuel system has no separate return line to the tank. The injection into the cylinder takes place one of the following ways:
-
One injection during the compression stroke, so-called stratified combustion
-
Two injections, one during the induction stroke and one during the compression stroke, so-called partially stratified combustion
-
One injection during the intake stroke, so-called homogeneous combustion
Combustion process
Stratified combustion
Injection during stratified combustion takes place during the second half of the compression stroke. When not all of the intake air is involved in the combustion process, a portion of the intake air is used to insulate and concentrate an optimum stoichiometric air-fuel mixture close to the spark plug and in the piston's combustion chamber. This creates a stable combustion. The design of the inlet ports in the head and the design of the piston crown creates an airflow, which together with the placement of the fuel injector, concentrates the air-fuel mixture close to the spark plug. This creates a stoichiometric air-fuel "pocket" around the spark plug and the recess in the piston crown. This "pocket" is surrounded by air. Even though the concentrated air-fuel mixture is stoichiometric, the total air-fuel mixture in the entire combustion chamber can be said to be 30:1, or even leaner. Stratified combustion is used during the period when the starter motor is activated and the fuel pressure has reached at least approximate 3 MPa. When the engine has started the Engine Control Module (ECM) changes operating mode to the partially stratified combustion in the event that catalytic converter heating is required. Stratified combustion is used under all conditions at temperatures above -20 °C. In colder conditions, the partially stratified combustion is also used during the starter motor sequence.
Partially stratified combustion
During partially stratified combustion the injection takes place twice. The first injection takes place in the first half of the induction stroke and the second injection during the second half of the compression stroke. The amount of fuel is allocated so that the largest amount of fuel is injected during the induction stroke and the remainder during the compression stroke. This results in a late and stable combustion with low peak pressure and low temperature, resulting in low NOx emissions. Partially stratified injection results in minor cylinder wall wetting. Minor cylinder wall wetting, combined with a lean air-fuel mixture (λ above 1), results in low HC emissions. Partially stratified combustion is used during catalytic converter heating when the engine has been started. The duration that the engine is operated in partially stratified can be anything from 0 s (engine at operating temperature and catalytic converter warmed up) to approximately 30 s when both the engine and the catalytic converter are cold. Important parameters for the calculation of the time (performed by the Engine Control Module (ECM)) is the signal from the engine coolant temperature sensor and a calculation model for the catalytic converter temperature. When the catalytic converter is considered hot enough, the engine changes operating mode to homogeneous combustion.
Homogeneous combustion
Injection during homogeneous combustion takes place during the first half of the induction stroke similar to conventional port fuel injection. The evaporation of the fuel cools the incoming air. This results in high anti-knock properties. Direct injection also results in low cylinder wall wetting, which in turn results in low HC emissions. Homogeneous combustion is used during the driving cycle, except under the conditions stated for stratified combustion or partially stratified combustion.
Miscellaneous:
-
If the fuel pressure in the fuel rail at the start has dropped to 0 kPa, then it takes approximately two to three pump strokes before the pressure reaches 3 MPa. Three pump strokes are equivalent to 1.5 crankshaft revolutions.
-
During the period for stratified combustion, 4 – 20 injections take place.
-
During the period for partially stratified combustion, the idling speed is raised to approximately 1 200 r/min. This varies depending on market.
-
During the period for partially stratified combustion, the exhaust camshaft is controlled to a later position. This means that the hot exhaust gases reach the exhaust manifold, resulting in decreased HC emissions. Together with late ignition the catalytic converter is also rapidly heated.
-
During the periods of stratified and partially stratified combustion, fuel injection takes place approximate 5 – 10 crankshaft degrees before the ignition takes place.
-
Injection timing is adapted for all strategies depending on different parameters such as load, engine speed, operating mode and injected amount of fuel.
Low-pressure side
The fuel pump module controls the fuel pump and receives a PWM control signal from the Engine Control Module (ECM). The fuel pressure sensor low-pressure side, positioned ahead of the control valve, fuel quantity, measures the pressure on the low-pressure side and sends the information to the ECM. The fuel pump module calculates a suitable fuel pressure, which normally varies, depending on the engine's operating point and fuel temperature. The fuel pump regulates to these pressure levels via a precontrol, regulator and adaptation. The precontrol is based on the engine's operating point and the work load of the control valve, fuel quantity. The regulator compensates for the actual deviation from the set point pressure and regulates the control to the fuel pump to obtain the correct pressure. The adaptation takes care of the long-term deviations from the pre-control and thus the system learns to take care of component tolerances and wear. There are two types of preparatory activations of the fuel pump to obtain the correct pressure before startup:
-
Wake-Up is used to raise the pressure before the engine is started by activating the fuel pump until a certain pressure level is reached as soon as the driver door is opened, brake or clutch pedal is depressed or usage mode convenience is activated.
-
Prerun is used when the start knob is turned and the start sequence starts. This is done to quickly increase the pressure to its desired value.
The system normally maintains enough pressure with the engine switched off. The above functions are only activated if the pressure is less than the limit values and that almost never happens at a hot start. The fuel temperature in the low-pressure system is calculated by the Engine Control Module (ECM) in a model based on the vehicle's fuel consumption, operating point, coolant temperature and ambient temperature. The fuel temperature is used to regulate the desired pressure to prevent steam formation in the fuel. If the calculated fuel temperature drops below the measured temperature at the fuel pressure sensor low-pressure side, the measured value is used.
High-pressure side
The high-pressure fuel pump is mounted on an aluminum housing, mounted on the cylinder block. The control valve, fuel quantity, is mounted on the bottom of the high-pressure fuel pump. The high-pressure fuel pump's pumping action is achieved by a reciprocating piston. The piston rolls against a cam with four lobes. The control valve, fuel quantity, regulates the effective pump stroke so that the correct amount of fuel is supplied to the fuel rail. If the fuel pressure in the fuel rail exceeds and are becoming too high, a safety valve opens in the high-pressure fuel pump and the fuel is released back to the low-pressure side.
Fuel level measurement
The fuel level is measured with two sensors in the fuel tank. If one sensor does not give a correct value, the Central Electronic Module (CEM) uses the lowest value and calculates a fuel level value. A warning light is displayed in the combined instrument display when the calculated driving distance is below 100 km. The fuel level indication is only shown in usage mode active or driving.
Fuel trim
Fuel trim reduces nitrous oxides (NOx), carbon monoxide (CO) and hydrocarbon (HC) emissions. Theoretically, if the correct amount of oxygen is consumed during the combustion, the exhaust gases from the combustion will only contain water (H2O) and carbon dioxide (CO2). In practice, considerable amounts of hydrocarbons (HC) and varying amounts of carbon monoxide (CO) and carbon dioxide (CO2) remain. Due to the high temperature and pressure, nitrogen oxides such as NO and NO2 are also formed. The common designation of these nitrogen oxide gases is NOx. By speeding up the reaction between the remaining reactive components using a catalytic converter, these can be converted to water (H2O), carbon dioxide (CO2) and nitrogen (N2) (see image below). However, this can only happen if the balance of hydrocarbons (HC), carbon monoxide (CO), oxygen (O2) and nitrous oxides NOx is exactly right in the exhaust gases. This happens when the air-fuel mixture before combustion is 14.7 kg of air per kg of fuel. The lambda value is then said to be one, λ=1. A base program in the Engine Control Module (ECM) calculates the injection period based on data about load, which depends on the measured air mass and engine speed. The calculated injection time from the base program is then modified by the short-term fuel trim. The signals from the lambda probesare used to finely adjust the injection period so that λ=1 is reached. The short-term fuel trim is a circuit that finely adjusts the injection period so that the air-fuel mixture is optimized to λ=1. The ECM also uses the signals from the front and rear lambda probes to correct the lambda probe, front (offset adjustment) and thereby the injection period. This gives a higher degree of accuracy during fuel trim. Fuel trim is a rapid process, which may take place several times a second. Adjustment of the injection period calculated in the base program is limited. The short-term fuel trim can be displayed in VIDA. The air-fuel mixture is affected by factors like fuel pressure, air leakage on the intake side, or tolerance deviations in the Mass Airflow sensor (MAF) or fuel injectors. In order to compensate for this, the ECM has an adaptive, self-learning function. When the engine is new the short-term fuel trim varies cyclically around a nominal central line 1.00, with, for example, a 5 % change of injection time when fuel trim is in operation. If there is air leakage, for example in a normally aspirated engine, the engine sucks in more air and the short-term fuel trim is quickly offset to a new position and then work for example between 1.10 (+10 %) and 1.20 (+20 %), although still at an amplitude of 5 %, but with an offset in relation to the original center line. The injection period has then been increased to compensate the increase in the amount of air. The adaptive functions correct the change, so that the short-term fuel trim works around the new center line where the fuel trim again has its full range of control available. Put simply, fuel trim is a measurement of the difference between the original short-term fuel trim center line and the new center line . The adaptive functions are split into various operational ranges based on the load and speed of the engine. The different adaption ranges can be read off. The adaptive adjustments of injection time are continuously stored in the ECM. This means that, at different operating ratios, the correct mixture ratio is achieved before the lambda probe reaches operating temperature. If any adaption value is too high or too low, DTCs are set in the ECM.
EVAP system
The EVAP system prevents gasoline vapors from being released to the atmosphere by collecting the evaporation from the fuel tank. Evaporation occurs with pressure and temperature changes in the tank. The system is emissions-related and is governed by legal requirements at different levels. It is applicable for vehicles with gasoline combustion engines. The fuel vapors are led from the fuel tank to a charcoal canister used for temporary storage, until the Engine Control Module (ECM) decides that the conditions for consuming the vapors are fulfilled. The EVAP system is sealed but can take in fresh air through an air filter when the tank pressure changes.
Purging
The EVAP system includes the EVAP purge valve that vents the fuel vapors, from the canister to the inlet side of the combustion engine, where it is blended with fresh air and led to the combustion chambers. Combustion of fuel vapors decreases the total emission impact and the fuel consumption.
Dual purge
With a dual purge system, the fuel vapors are led through the EVAP purge valve, which is set to open position by the Engine Control Module (ECM), either to the intake manifold of the engine (as in single purge), or to the inlet system, prior to the turbocharger or supercharger. This means that purging can also be active in engine states and driving conditions where air pressure in the intake manifold is above atmospheric pressure. The fuel vapors are led, with the help of check valves, to the inlet system prior to the turbocharger or the supercharger. A venturi effect creates a suction in the purge line and the vapors are led to the inlet, through the turbocharger/supercharger and into the intake manifold. The LP engine also contains an EVAP Purge Pump (EPP) and an EVAP purge pressure sensor. The sensor measures the pressure flow before the EVAP purge valve. The ECM uses the pressure value from the sensor to set the speed of the EPP. The EVAP system operates close to the atmospheric pressure, which means that the driving force for purge is very low. Therefore, the pump creates enough driving pressure at or slightly below atmospheric pressure.
Leakage detection
In certain applications the EVAP system is equipped with a pump, leakage detection. This component contains a pump, a pressure sensor, a valve and a 0.5 diameter reference orifice. The component is connected to the EVAP system close to the canister. Governed by legal requirements, the Engine Control Module (ECM) controls when the EVAP system is tested for leakage. The test takes place when the vehicle is shut down. A complete leakage test contains the following phases:
-
Functional check: The pump, leakage detection is tested.
-
Calibration/reference phase #1: The valve is set to the position to connect the pump with the internal reference orifice. The pump starts and the electrical current consumption of the pump is measured and stored.
-
Fuel tank test phase: The valve is set to the position to connect the pump with the fuel tank system. The pump starts to apply an under-pressure and monitors the pressure and the electrical current consumption at the same time.
-
Reference phase #2: The reference phase is executed once more to verify the result.
-
Evaluation phase: The test result is evaluated, and DTC actions are taken.
A complete leakage detection test takes up to 20 min to carry out. In applications with both a pump, leakage detection, and a valve, fuel tank isolation, a faster version of the leakage detection test can, as an addition to the complete test described above, be run with the valve, fuel tank isolation, closed. This version only tests the section between the valve, fuel tank isolation, and the EVAP purge valve. Further, an even quicker but less accurate test is run after each refueling event in order to find leakages larger than 1.0 mm in diameter. It takes less than 1 min to carry out and is run when the vehicle is in normal use, i.e. during driving.
Leakage test in the workshop
The workshop can use VIDA to request a complete leakage detection, “Quick test of the EVAP system”. The Engine Control Module (ECM) performs the five phases according to above and the result will be presented on the screen. This is useful for reproducing a fault and to be able to verify a remedy.
Inlet and exhaust system
The inlet and exhaust system controls the forced induction of the engine, management of the exhaust emissions and measurement of the oxygen levels.
Forced induction system
Various components provide the Engine Control Module (ECM) with information such as the actual throttle angle and the engine load and knock. Based on this information, the ECM calculates the desired boost pressure. The ECM calculates the actual boost pressure using information from the charge air duct pressure sensor (located after the turbocharger) and the Manifold Pressure Sensor (MAP) (located in the intake manifold). This way there is automatic compensation of boost pressure control when driving at different altitudes and at different temperatures. As a result, engine power will not be noticeably affected by the air density or temperature. The charge air is cooled in a water-cooled charge air cooler before it reaches the intake manifold. The ECM receives information about the intake air temperature from the Mass Airflow sensor (MAF), about the charge air temperature after the turbocharger from the air inlet temperature sensor and about the charge air temperature in the intake manifold from the intake manifold air temperature sensor. In the event of a too high boost pressure in the intake system, such as when the accelerator pedal is quickly released, the increasing pressure build-up towards the throttle can result in noise and turbocharger wear. To prevent this, the ECM opens the turbo bypass valve, which routes the pressure back to the turbocharger’s inlet side. Since the excess air is routed back to the turbocharger inlet, it does not affect any readings from the MAF.
Light performance configuration
The forced induction system consists of a turbocharger with variable turbine geometry (variable nozzle turbine, VNT). With VNT-technology, it is possible to combine the fast response of a small turbocharger with a large turbocharger's high capacity. By varying the guide rails' angle relative to the exhausts' flow angle, the turbine's inlet area is adjusted. Thus, the exhaust speed and flow angle against the turbine are changed, which enables a wide operating range for the turbo. Closed guide rails create a small flow area. This in turn generates high exhaust speed and high bottom torque. Open guide rails create a large flow area and reduced exhaust speed. This prevents overrevving of the turbocharger. The guide rails are actuated by the VNT unit, which the Engine Control Module (ECM) regulates via a PWM signal. The ECM receives information on guide rail position via a position sensor in the VNT unit. The VNT regulation also controls the boost pressure, which eliminates the need of a wastegate valve.
Medium performance configuration
The forced induction system consists of a one-stage turbocharger with a fixed turbine geometry. The Engine Control Module (ECM) controls the electrical wastegate unit to ensure that the correct boost pressure is achieved. When the boost pressure has reached the desired value, the wastegate unit opens, and some of the exhaust gases bypass the turbocharger's turbine rotor, limiting the boost pressure.
The E-charger is used at low engine speeds when the exhaust gas flow is low, and the turbocharger is used at high engine speeds when the exhaust gas flow is higher. The E-charger is powered by a 48 V electric motor and is controlled by the Electric Charge air Compressor Module (ECCM), which in turn is controlled by the Engine Control Module (ECM) via CAN. The E-charger is usually already engaged from idle speed to ensure a sufficient boost air pressure. At high engine speed, the E-charger only engages if the torque request exceeds what the turbocharger can deliver alone. The E-charger can, however, continue to be active if activation occurred earlier, at an acceleration from low speed. At the highest engine speeds, the E-charger is always disengaged. In parallel with the E-charger there is a passive bypass valve to allow the charge air to bypass the E-charger. By the time the air is bypassed, the turbocharger has managed to increase its turbine speed enough to ensure a smooth transition from the E-charger to the turbocharger. The ECM controls the electrical wastegate unit to ensure that the correct boost pressure is achieved. When the boost pressure has reached the desired value, the wastegate unit opens, and some of the exhaust gases bypass the turbocharger's turbine rotor, limiting the boost pressure.
Exhaust after-treatment
For the exhaust after-treatment, a close-coupled catalytic converter is used. The catalytic converter's compact design and its location near the engine enables a very fast heating, sufficient flow and an efficient purification of the exhaust.
Lambda probe
The engines have three lambda probes. The front lambda probe is of the broadband type and has a linear signal characteristic, while the middle and the rear have binary signal characteristics. To provide a fast working temperature, all lambda probes have an integrated heating element that is controlled by the Engine Control Module (ECM).
Gasoline particular filter
The gasoline particulate filter operates using the through flow principle. The system uses the lambda probes and the temperature and differential pressure sensors for control and monitoring. The Engine Control Module (ECM) calculates the level of soot, measured in grams. The particular filter is self-regenerated i.e. normal driving at engine working temperature together with fuel cuts will automatically burn soot and keep the soot mass on a low level. Cold climate and short distance driving can build up a high level of soot in the filter and that will trigger actions at certain levels. High temperatures can occur inside the filter if high levels of soot are regenerated in a short time. To protect the filter from excessive temperatures during the self-regeneration, the fuel cut can in some cases be inhibited. When the soot mass in the filter is below 5 g (approx.), no action is taken to increase the soot burn rate. When the soot mass in the filter exceeds 5 g, control actions are applied, e.g. spark retard to increase the temperature and lean air fuel mixture to increase the oxygen flow to the particulate filter. If soot increases to the next predetermined level (approx. 10 g), a message to the driver “Read manual” is displayed in the CenterConsole Display (CCD). The manual instructs the driver to run the vehicle in a manner that enhances the soot regeneration. If soot still increases above approx. 12 g, the message “Service requested” is displayed and the driver will be instructed via the combined instrument display to drive to the workshop for repair.
Low-pressure EGR system
Exhaust gases are led from the exhaust system through the EGR cooler. The gases are cooled by a flow of coolant from the high-temperature engine coolant circuit. The EGR cooler is equipped with a filter that prevents soot and other particles from entering the turbo. In order to reduce fuel enrichment, the low-pressure EGR will help to achieve lambda 1 by cooling the exhaust gases as they enter the combustion chamber. High load driving results in high temperatures in the combustion chamber, leading to hot exhaust gases. Reducing the temperature is important to avoid damage on the engine. The low-pressure EGR valve regulates how much exhaust gases that can be recirculated into the intake manifold.
Control of the actuator, exhaust system (only certain versions)
The Engine Control Module (ECM) regulates the exhaust gases by controlling when the actuator, exhaust system, opens and closes. At idle, the actuator, exhaust system, is closed. The actuator is opened during gear shifts and acceleration. Factors like engine load and speed and ambient temperature can also cause the ECM to open the actuator. For example, the actuator is always open when the ambient temperature is under 10 °C. When the vehicle is in drive mode Dynamic, the actuator will be open to let out more exhaust and give the vehicle a more sporty sound. The ECM performs an initialization of the actuator when the ignition is switched on or if the actuator has been disconnected. During the initialization, the ECM moves the actuator to its mechanical end positions and registers relevant positions. If an electrical fault occurs, the actuator cannot be regulated and remains in the same position. DTCs are set by the ECM.
Idle control
The idle control function enables the engine to run stable at low engine r/min. The number of r/min at idle varies depending on different factors, such as high load from the climate system, throttle request, engine temperature and battery charging. The Engine Control Module (ECM) handles the function and controls the different driving systems to match the requirements. The ECM is given a torque request and uses the throttle unit to achieve the desired engine r/min.
Idle coast
The idle coast function can be activated under specific conditions in Eco drive mode. The function is intended for use in the event of an anticipated reduction in speed, for example rolling forward to an intersection or a red light. It disengages the engine brake and the engine drops to idle r/min. This helps the vehicle to maintain its kinetic energy when the accelerator pedal is fully released. The idle coast function is activated when the accelerator pedal is fully released and the following conditions apply:
-
Drive mode Eco is activated
-
The gear selector is in drive
-
The gear shift paddles are not in use
-
The speed is within the range of 65 – 140 km/h
-
The gradient of the road is more than 6 %
-
The cruise control is not activated
-
The engine and gearbox have reached normal operating temperature
After activation, and depending on engine alternative, idle coast is active down to 50 km/h. To reactivate idle coast the vehicle need to reach at least 65 km/h. In certain situations, the driver may want to deactivate the idle coast function, for example when engine braking downhill. This can be performed as follows:
-
Actuate the accelerator or brake pedal. The idle coast function is deactivated until the pedal is released. The idle coast function is reactivated if the above conditions are met.
-
Deactivate the Eco drive mode. All functions within Eco drive mode are then deactivated.
-
Move the gear selector to Geartronic mode or sport mode. The climate control system Eco mode remains active.
-
Use the gear shift paddles. The climate control system Eco mode remains active and idle coast is deactivated as long as Geartronic mode is active.
Mid-voltage system
The following components are connected to or directly adjacent to the mid voltage system:
-
Mid-Voltage Battery Module (MVBM). The MVBM consist of a 48 V lithium-Ion battery (mid-voltage battery), an internal control module and an internal mechanical relay and fuse.
-
Main battery, complete (12 V).
-
Mid-Voltage Converter Module (MVCM). The MVCM is a DC/DC converter that normally converts 48 V DC to 12 V DC, which means that it replaces the conventional 12 V generator. MVCM also converts in reversed direction, i.e. from 12 V DC to 48 V DC, if needed.
-
Battery Control Switch Module (BCSM). The BCSM is a central unit for controlling the vehicle's power supply. During engine start with the starter motor (12 V) (if equipped), the BCSM separates the electric circuits. This in order to ensure the voltage level in the vehicle by having the MidVoltage Converter Module (MVCM) supply vehicle loads, while the main battery supplies the starter motor (12 V). The BCSM is located in the engine compartment in front of the MVCM. 5. Starter motor (12 V) (if equipped).
-
Electric Charge air Compressor Module (ECCM). For HP engines, the ECCM provides boost pressure from idle to approximately 3 000 r/min. The ECCM is included in the E-charger unit. The ECCM controls the E-charger, which is powered from the 48 V DC circuit. The E-charger consists of an electric motor that drives an impeller inside a radial compressor. The Engine Control Module (ECM) communicates with the ECCM via CAN and controls the E-charger impeller speed to achieve the requested boost pressure.
-
Integrated Starter Generator Module (ISGM). The ISGM consists of a control module and an electric motor that connects to the crankshaft of the combustion engine through a belt. ISGM mainly works as a generator in the vehicle. It converts rotation energy to 48 V electrical energy by applying a negative torque to the combustion engine crankshaft. The ISGM can also create a torque boost by applying positive torque when needed. Further, the ISGM is a starter for the combustion engine, used either as the prioritized starter (for vehicles with starter motor (12 V)) or as the only starter (for vehicles without starter motor (12 V)).
Crash detection
In the event of a collision, a crash signal from the Supplemental Restraint System module (SRS) is sent on FlexRay and CAN and will be received by a number of control modules. There are also analog signals, which are sent from SRS via directly connected wires to those control modules where rapid and redundant signaling is needed:
-
The Mid-Voltage Battery Module (MVBM) receives the CAN signal and a redundant hardwired signal from the SRS. The MVBM opens the contactors and the 48 V system is disconnected. In case of a crash, the battery will be permanently disabled and needs replacing because safety can no longer be guaranteed.
-
The Mid-Voltage Converter Module (MVCM) receives the CAN signal and a redundant hardwired signal from the fuel pump relay, which is controlled by Central Electronic Module (CEM). The MVCM stops the voltage conversion.
-
The Integrated Starter Generator Module (ISGM) receives the CAN signal. The alternator functionality is disabled.
Energy control management
Charging and discharging strategies
State of Charge (SoC)
The State of Charge (SoC) is a measurement of the amount of electrical energy that is stored in the battery at a given time in relation to the amount of energy that can be stored in the fully charged battery. The SoC of the mid-voltage battery is given as a percentage of full charge and is calculated by the Mid-Voltage Battery Module (MVBM) based on State of Health (SoH). SoH is the battery's ability to store electrical energy, which decreases gradually with age and use. A properly functioning system has a SoC of 22 – 72 %. There are tolerances for both the upper and lower limit of the normal SoC range. This means that the actual SoC value may briefly move above or below these limits. The system will try to recover, but if this is not possible it will shut down for safety reasons. Operation outside the normal SoC range speeds up the battery aging. Ideally, the SoC should be kept around 55 %. The charging and discharging will be activated depending on driving conditions as well as on other internal and external factors.
Starting the combustion engine
The combustion engine is started by the Integrated Starter Generator Module (ISGM) (48 V) or the starter motor (12 V). If the vehicle is equipped with starter motor (12 V), it is the Engine Control Module (ECM) that decides which starter that should be used. ISGM start (1) is prioritized, but based on conditions such as battery SoC levels, battery temperature and the combustion engine oil temperature, the starter motor (12 V) can be preferred. To secure engine start for vehicles without starter motor (12 V), the charging of the 48 V battery is prioritized over the 12 V main battery charging. The Battery Control Switch Module (BCSM) enables the start by connecting the circuits with both power to the starter motor and ensuring correct power supply to the 12 V system during engine crank.
Integrated Starter and Generator (ISG) as an alternator
The Integrated Starter Generator Module (ISGM) converts rotation energy from the crankshaft to 48 V electrical energy by applying negative torque to the electric motor, which connects to the crankshaft of the combustion engine. The Engine Control Module (ECM) controls the ISGM. ECM sends a target torque request to the ISGM, together with other signals like engine speed, minimum/maximum torque and voltage values calculated according to signals received from the Medium Voltage Battery Module (MVBM) and the Medium Voltage Converter Module (MVCM).
Brake energy regeneration
During braking, the Engine Control Module (ECM) requests as much negative torque to the Integrated Starter Generator Module (ISGM) as possible, in order to maximize the energy regeneration. The current State of Charge (SoC) of the Mid-Voltage Battery Module (MVBM) is taken under consideration.
Electric propulsion/torque boost using Integrated Starter Generator Module (ISGM)
The Integrated Starter Generator Module (ISGM) can create a torque boost by applying positive torque to the electric motor, which connects to the crankshaft of the combustion engine when needed. The Engine Control Module (ECM) decides how and when the ISGM torque boost is used. The torque request is synchronized with other combustion engine-related parameters to give the best overall effect considering comfort, fuel/electricity economy and performance.
Voltage conversion, 48 V to 12 V
The Mid-Voltage Converter Module (MVCM) will continuously convert 48 V DC to 12 V DC to charge the 12 V main battery and to support the 12 V electrical system with energy. There is no 12 V generator, so the only way to charge the main battery is by voltage conversion through MVCM. One advantage with this system solution, compared to a system with only a conventional 12 V generator, is that charging can be active even when the combustion engine is off.
Voltage conversion, 12 V to 48 V
The Mid-Voltage Converter Module (MVCM) can also convert 12 V to 48 V. If the State of Charge (SoC) of the main battery is considered too low, this reversed conversion can be started to achieve a better SoC balance between the two batteries. The reversed conversion is also used to precharge the 48 V system before the relay in the Mid-Voltage Battery Module (MVBM) is closed.
Cooling control/management
There is no need for active cooling functionalities for the Mid-Voltage Battery Module (MVBM) or for the Integrated Starter Generator Module (ISGM). They are both air cooled. The Mid-Voltage Converter Module (MVCM) is cooled by the low-temperature engine coolant circuit, which is controlled by the Engine Control Module (ECM).
Propulsion
Each drive mode has different vehicle settings that affect the vehicle propulsion:
-
Drive mode Eco: The engine and gearbox are in Eco mode. Driver information is provided to help drive eco-friendly.
-
Drive mode Comfort: The vehicle start mode. The engine and gearbox are in standard mode.
-
Drive mode Dynamic: The engine and gearbox are in sport mode.
-
Drive mode Off-road: The gearbox and the all-wheel drive are set for maximized traction. Hill decent control is always active, the throttle pedal map is changed from requesting torque to request speed. The maximum speed is 40 km/h. There is a hysteresis and a dead band in the throttle pedal to prevent the driver from leaving the Off-road drive mode by accident.
Related functions
The Driving VEP function is related to the following functions:
-
Powertrain: Engine start
-
Powertrain: Start/Stop
-
Visual driver information
-
Braking: Brakes
-
Steering
My technical specification
Specifications Engine
General data
|
Engine |
B420T |
B420T2 |
|---|---|---|
|
Engine code |
06 |
L1 |
|
Power, engine (kw/rps) |
220/90 |
184/90–95 |
|
Power, electric motor ISG (kw/rps) |
10/50 |
10/50 |
|
Max torque, engine (Nm/rps) |
420/35–80 |
350/30–80 |
|
Max. torque, electric motor ISG (Nm/rps) |
40/38 |
40/38 |
|
Max rpm |
6600 (3s) /6300 |
6500 (3s) /6200 |
|
Idling (rpm) |
750±50 |
750±50 |
|
Cylinder bore (mm) |
82 |
82 |
|
Stroke (mm) |
93.2 |
93.2 |
|
Swept volume (litres) |
1,969 |
1,969 |
|
Firing sequence |
1-3-4-2 |
1-3-4-2 |
|
Weight, complete, including oil (kg) |
131,6 |
131,6 |
Engine manufacture number, engine serial number and type
The engine manufacture number and type are stamped in the cylinder block. There is also a decal on the timing cover with the engine type, serial number and manufacture number.
Classification of main bearings
Cylinder block
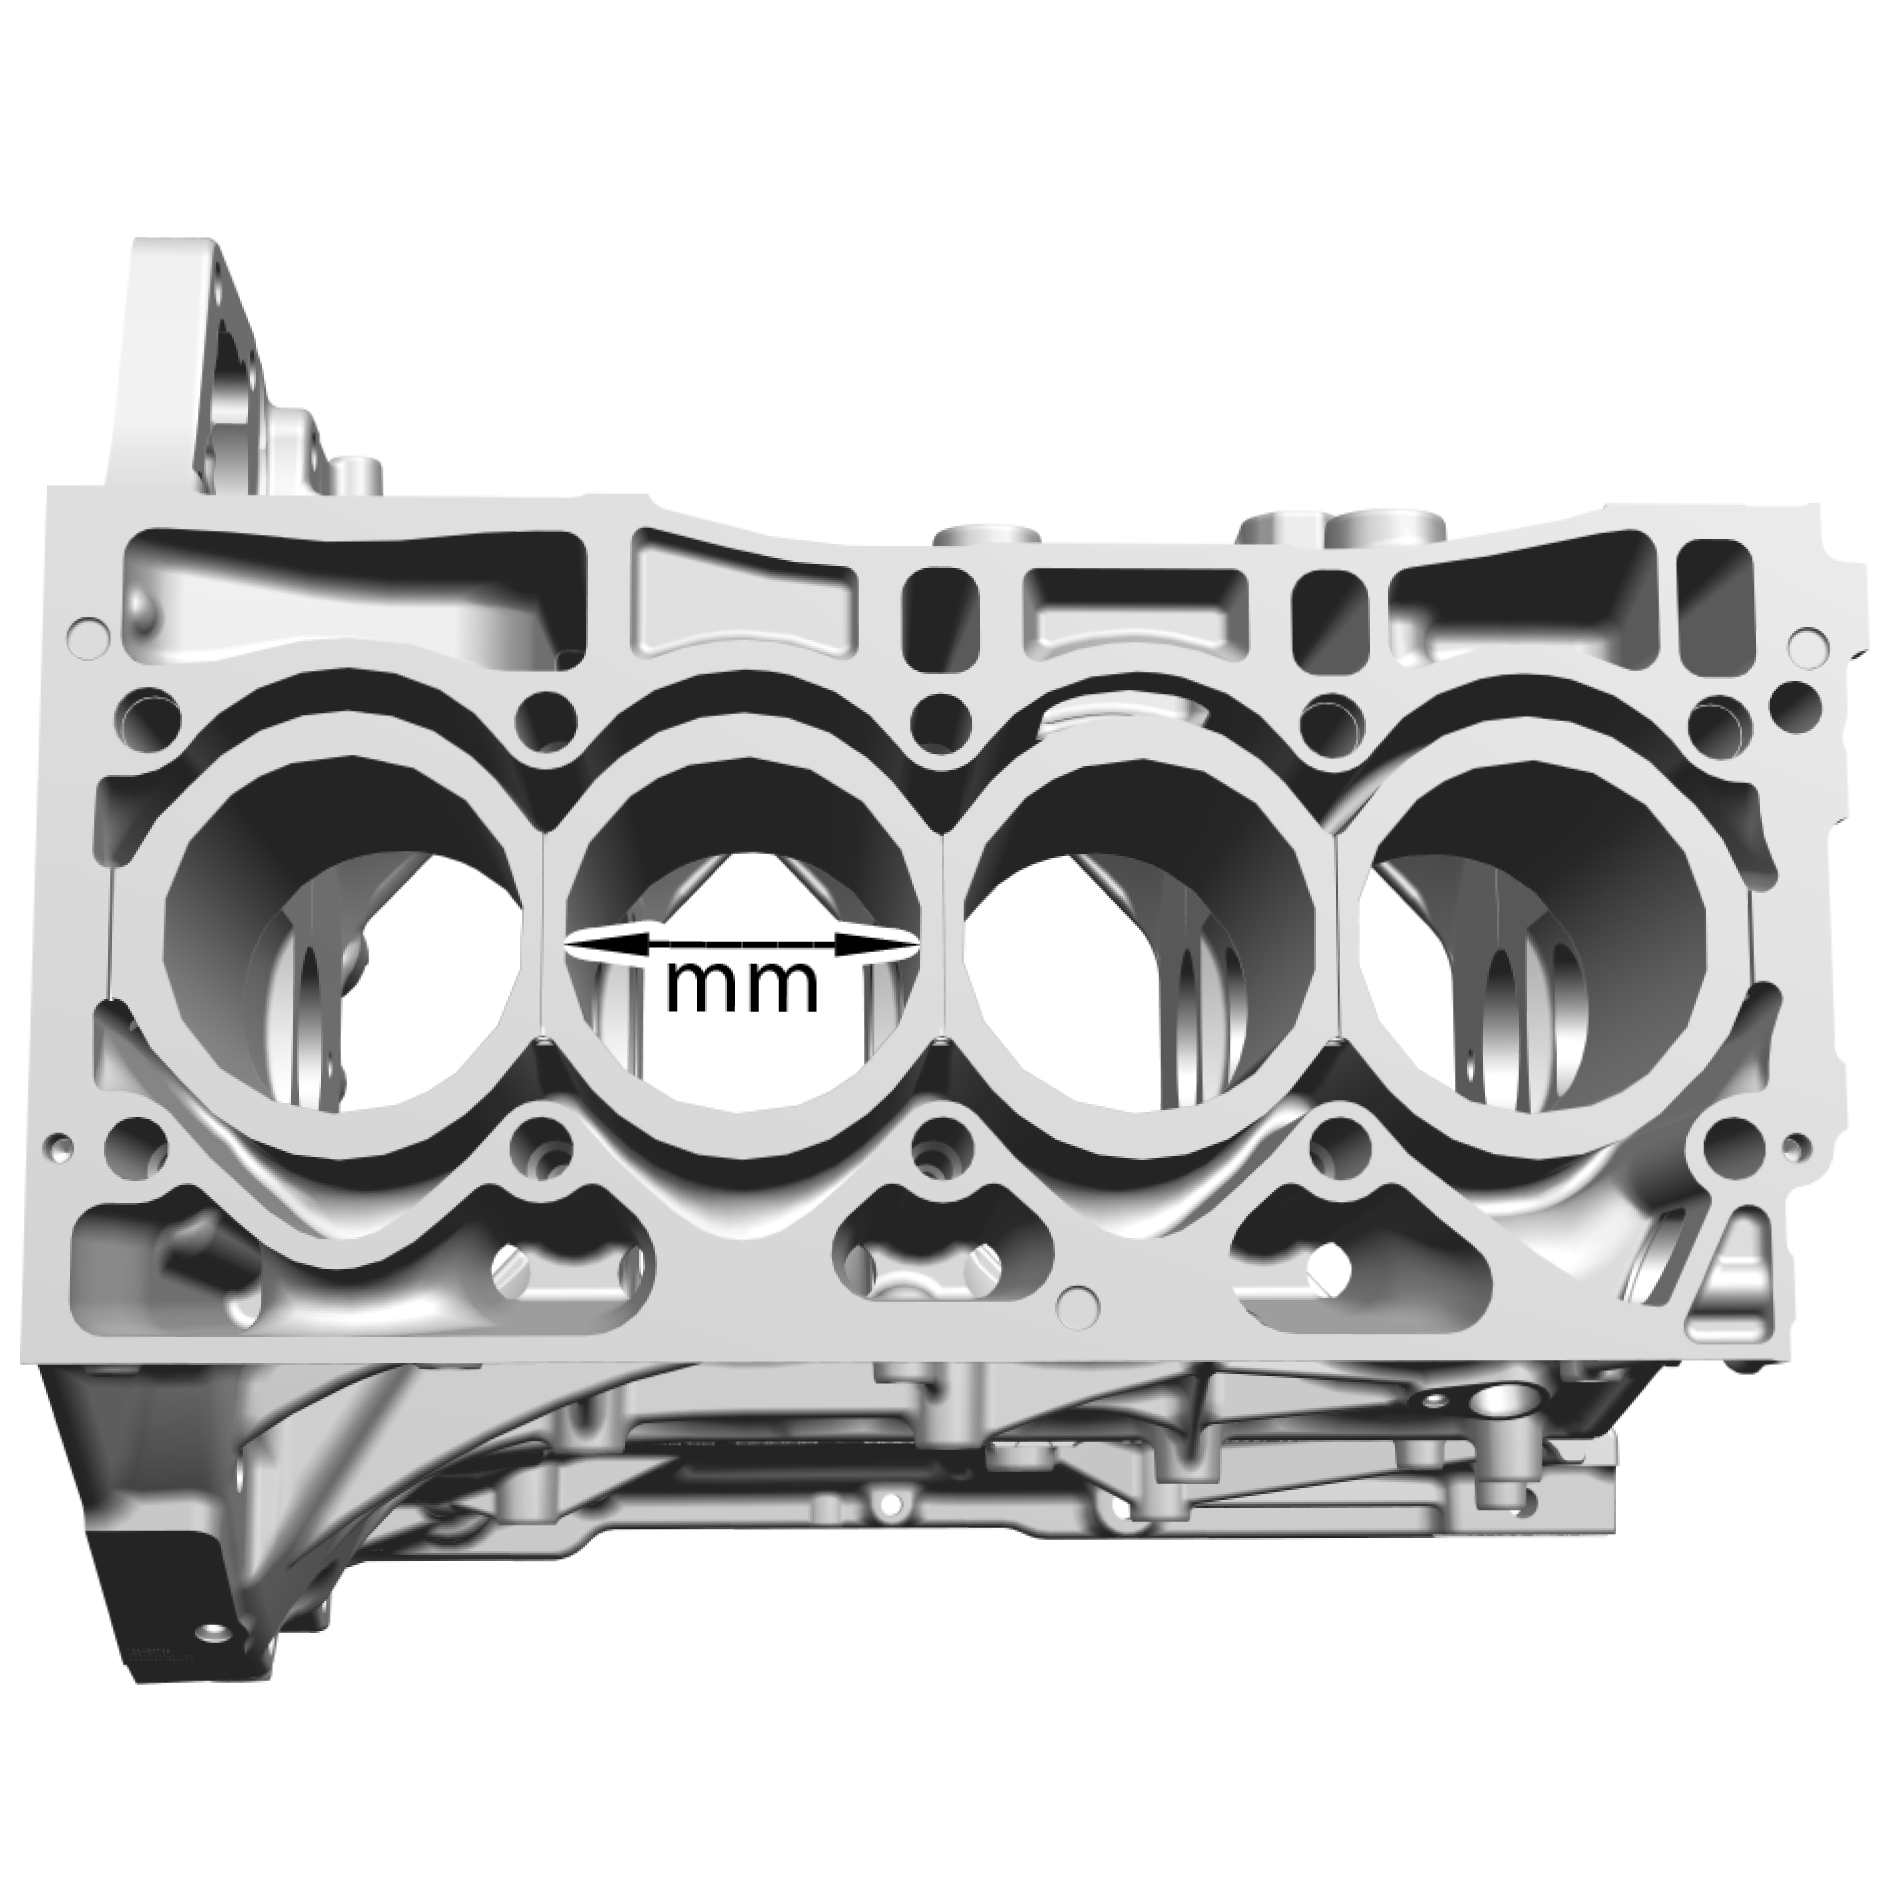
Cylinder bore (D)
| Standard........mm | 82 |
Cooling duct, engine block
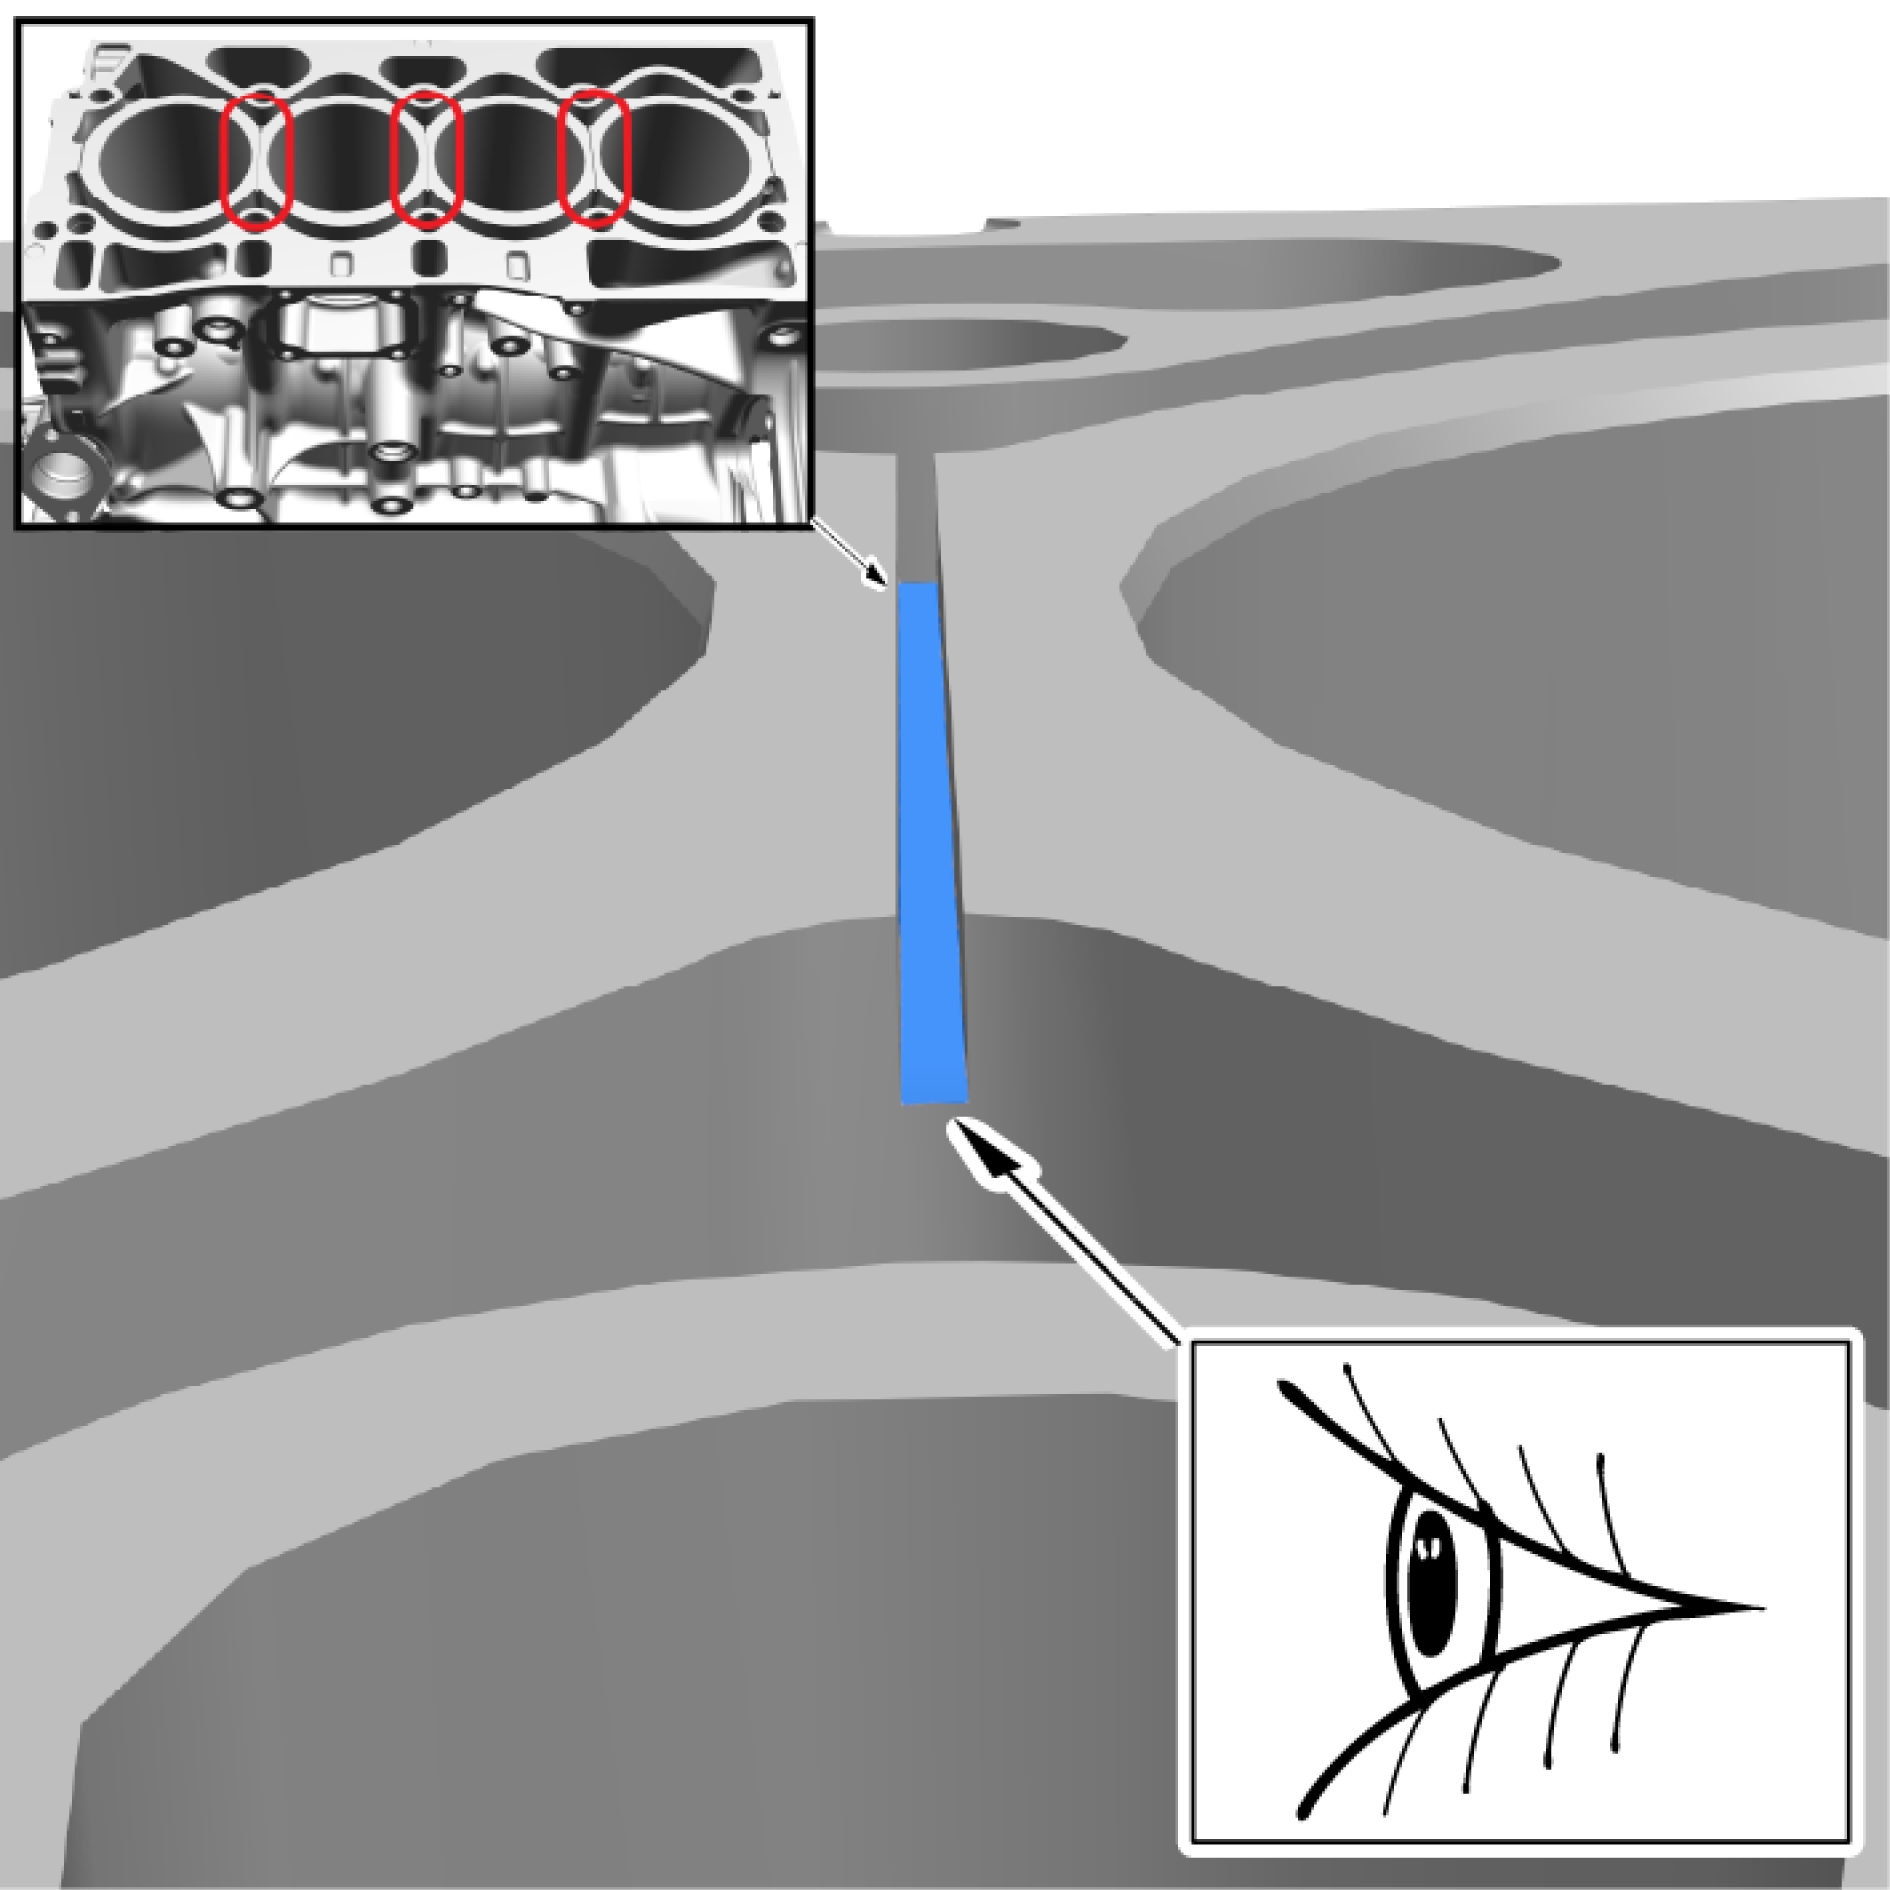
| Length ........mm | 0,8-1,1 |
Piston running clearance
| Tolerance piston/cylinder - top ........mm | 0,065 |
Piston rings
|
Top ring ........mm |
1.2 |
|
1st ring ........mm |
1.2 |
|
Oil ring ........mm |
2 |
Piston pin
|
Engine |
Engine |
B420T2 |
|---|---|---|
|
Diameter ........mm |
23 |
21 |
|
Length ........mm |
62 |
54 |
Pistons
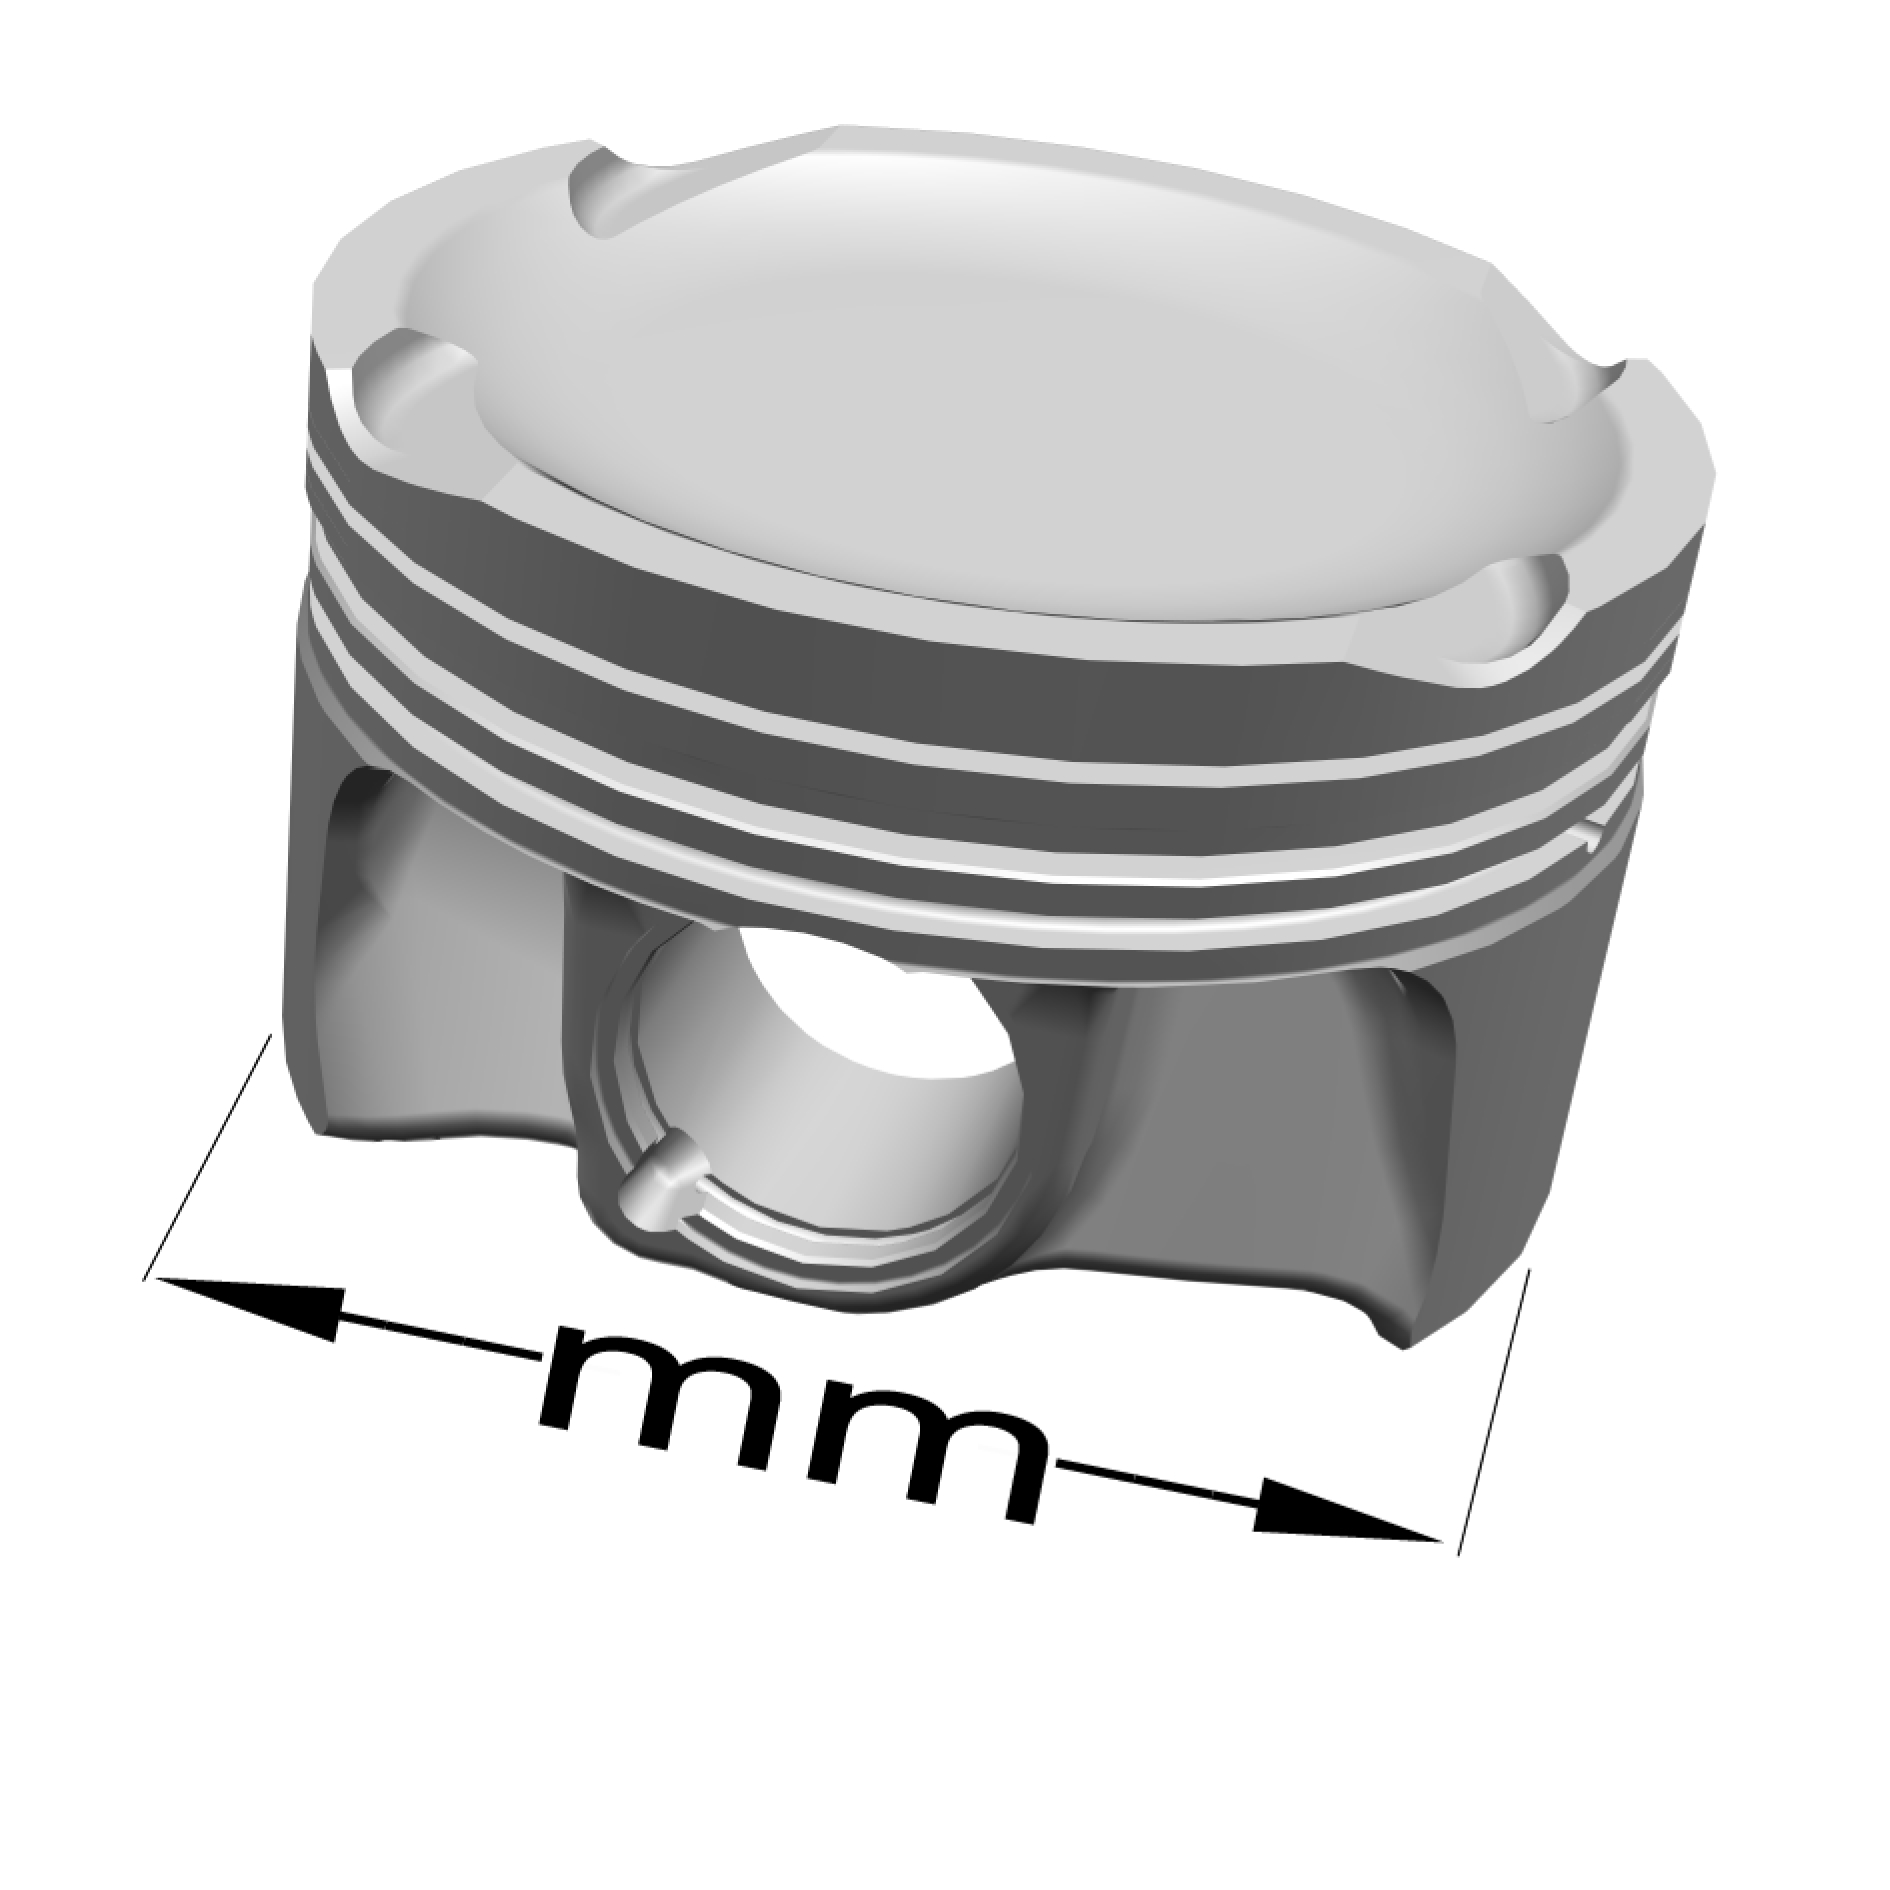
|
Standard |
The diameter is measured 20 mm from the bottom of the piston |
|---|---|
|
D-marked¹ .........mm |
81.95 |
|
¹The pistons are not classified |
Valves
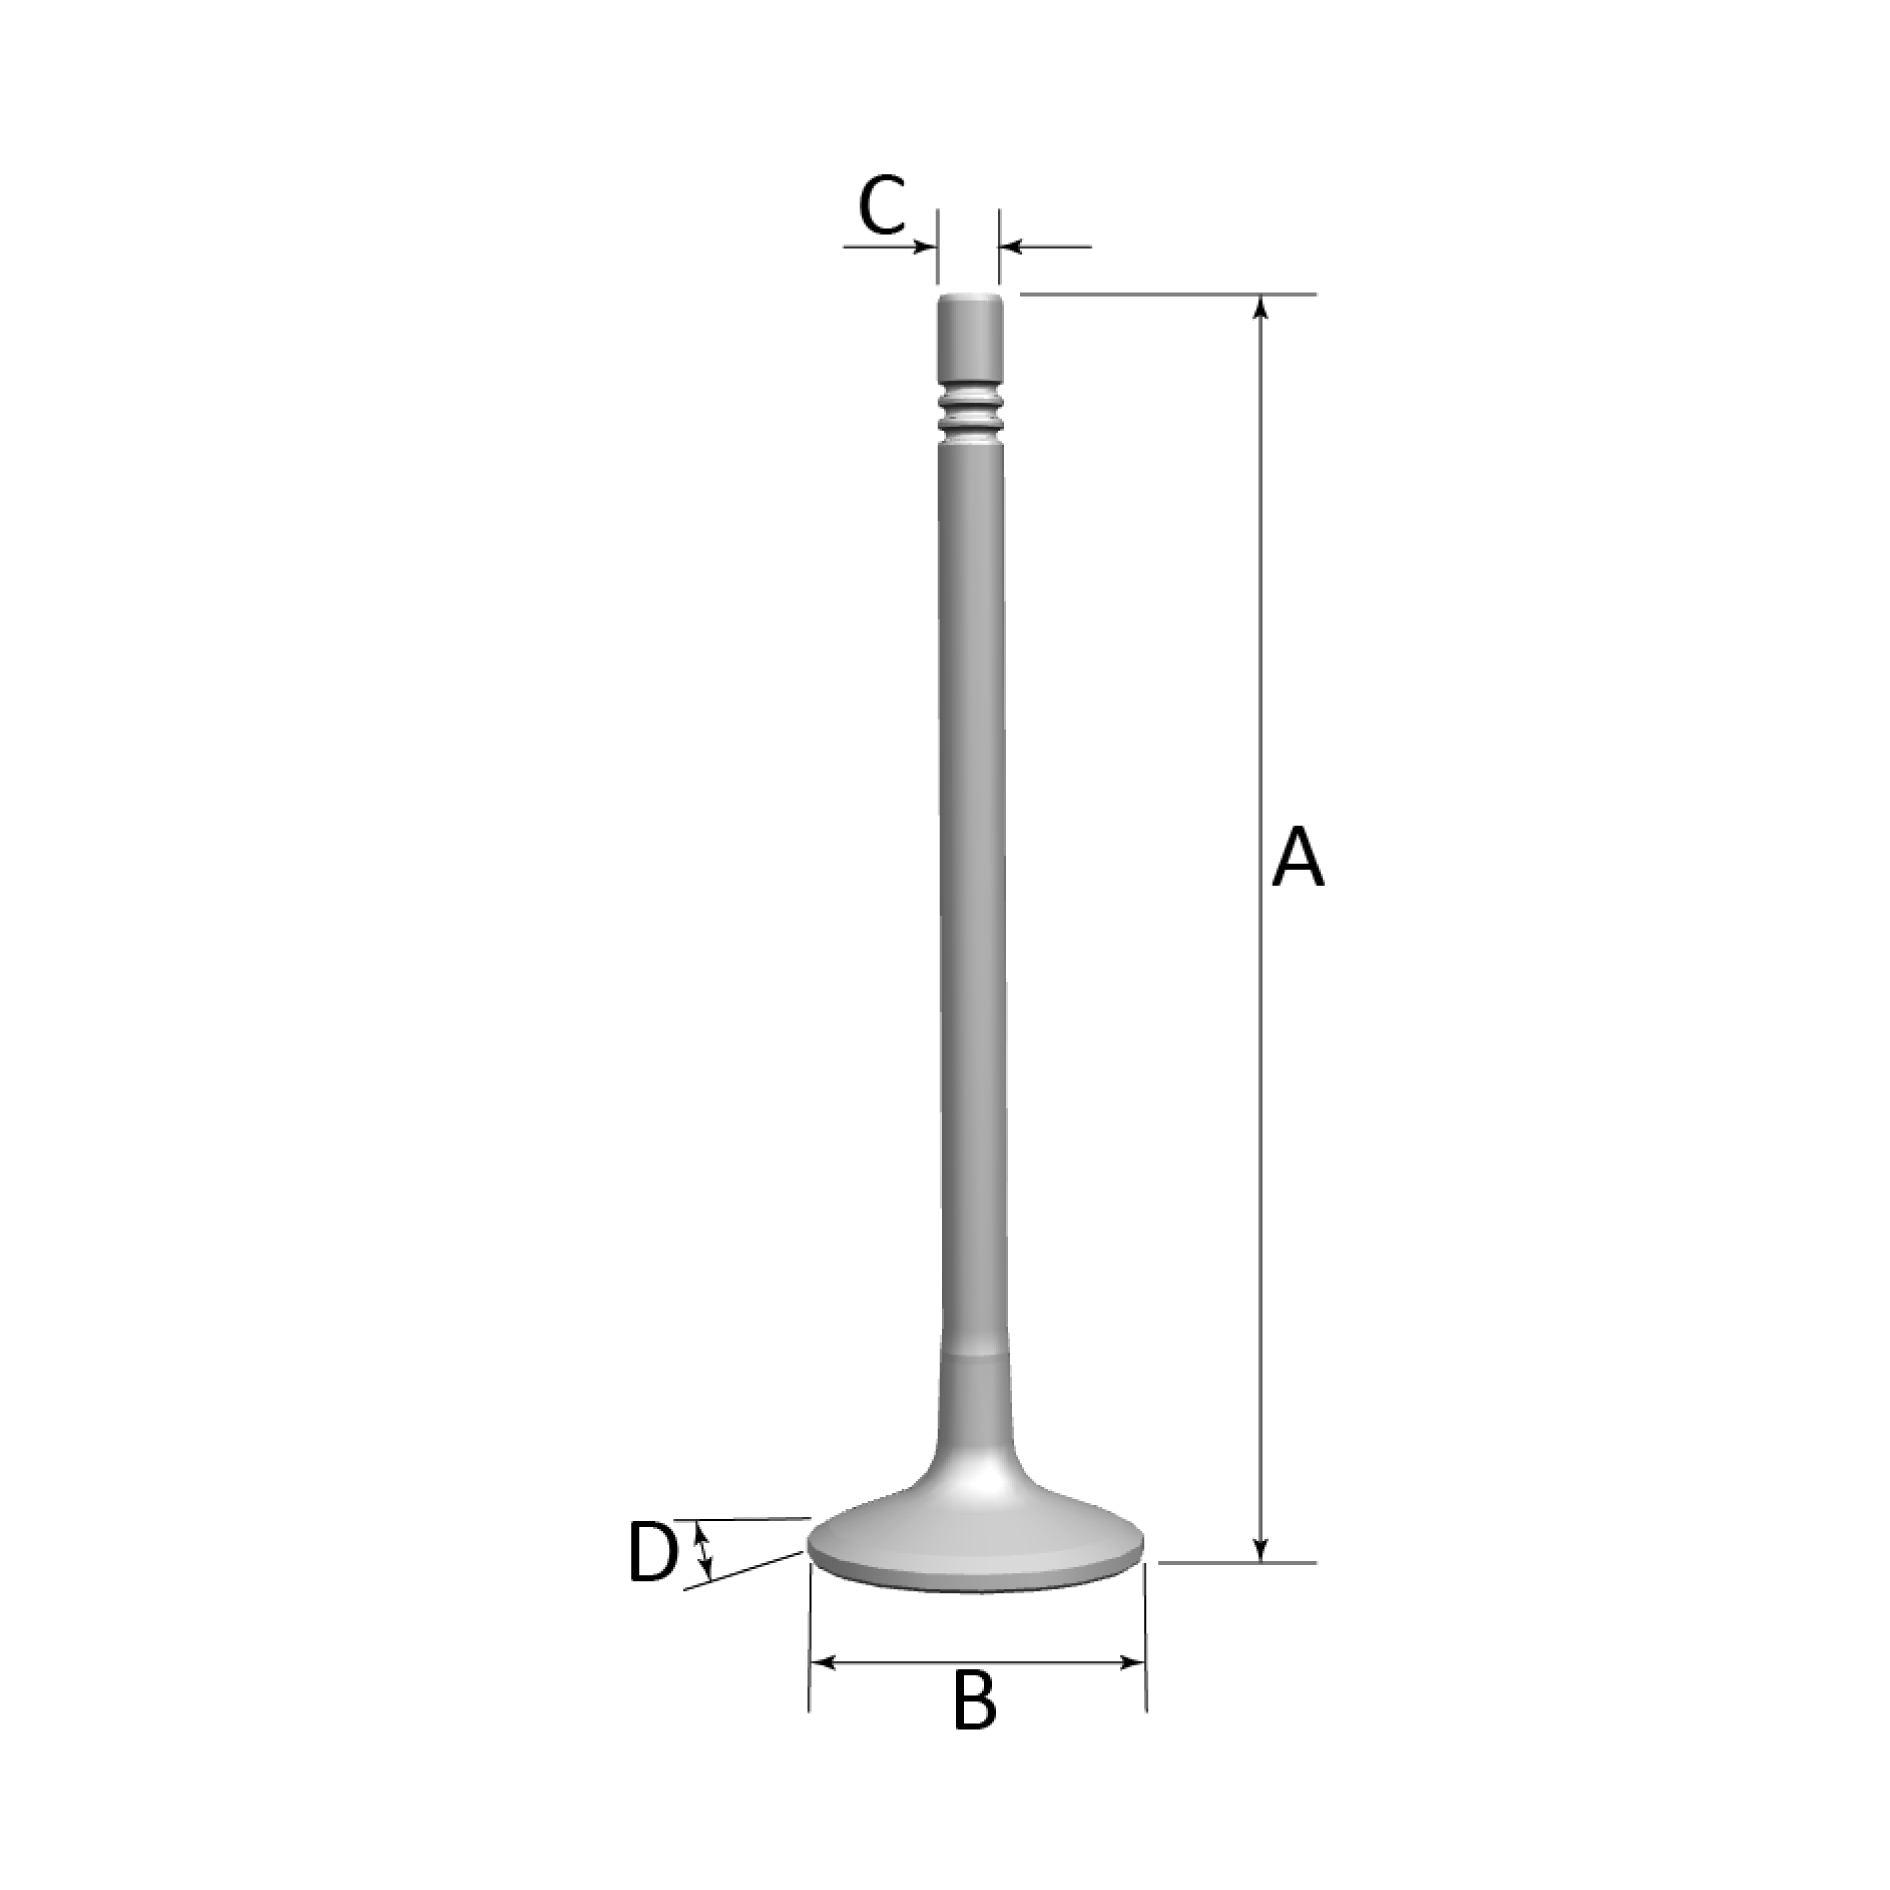
|
Intake |
|
|---|---|
|
Length (A) ........mm |
112,91 |
|
Diameter on crown (B) ........mm |
30,5 |
|
Diameter on shaft (C) ........mm |
5.97 |
|
Valve angle (D) ........° |
60,5 |
|
Clearance in guide ........μm |
30 |
|
Exhaust |
|
|---|---|
|
Length (A) ........mm |
106,97 |
|
Diameter on crown (B) ........mm |
26.5 |
|
Diameter on shaft (C) ........mm |
5,94 |
|
Valve angle (D) ........° |
60,5 |
|
Clearance in guide ........μm |
58 |
Valve seats
|
Seat angle ........° |
30 |
Cylinder head
|
Maximum distortion, longitudinal ..........mm |
0.05 |
|
Maximum distortion, transverse ..........mm |
0.02 |
|
NOTE
Surface grinding of the cylinder head is not permitted. It shall be replaced in case of excessive distortion |
|
Crankshaft
|
Radial run-out main bearing journal ........mm |
max. 0.040 |
|
Axial play (measured in the engine with the intermediate section tightened) ........mm |
0,07-0,27 |
|
Main bearing journal, radial runout ........mm |
0,022-0,035 |
Big end journals
|
Diameter, standard¹ ...........mm |
50 +0/-0.019 |
|
Bearing recess width ........mm |
24 ±0.1 |
|
Maximum out-of-round ........mm |
0.004 |
|
Max. straightness deviation ........mm |
0.004 |
|
¹The variation in diameter for each bearing journal must not exceed 0.008 mm. |
|
Main bearing journals
|
Diameter, standard¹ ...........mm |
60 +0,003/-0,016 |
|
Axial bearing width ........mm |
26+0/-0,04 |
|
Maximum out-of-round ........mm |
0.004 |
|
Max. straightness deviation ........mm |
0.004 |
|
¹The variation in diameter for each bearing journal must not exceed 0.008 mm. |
|
Connecting rods
|
Diameter, bearing recesses |
|
|---|---|
|
Big end ........mm |
53 +0,013/0 |
|
Small-end ........mm |
29 +0,028/+0,033 |
|
Maximum ovality in the bearing recesses ........mm |
0.006 |
|
Length |
|
|---|---|
|
Big end - Small end ........mm |
147,08 |
Oil pressure
|
Rotation speed |
Oil pressure (min.) |
|---|---|
|
825 (rpm |
1.6 bar |
|
3000 (rpm) |
4.2 bar |
| ¹The oil pressure that is given is for an oil temperature of 80° C, which is achieved after 10-15 minutes of driving |
Thermostat
|
Begins to open at |
90°C |
|
Fully open at |
105°C |
Crank mechanism, assembling
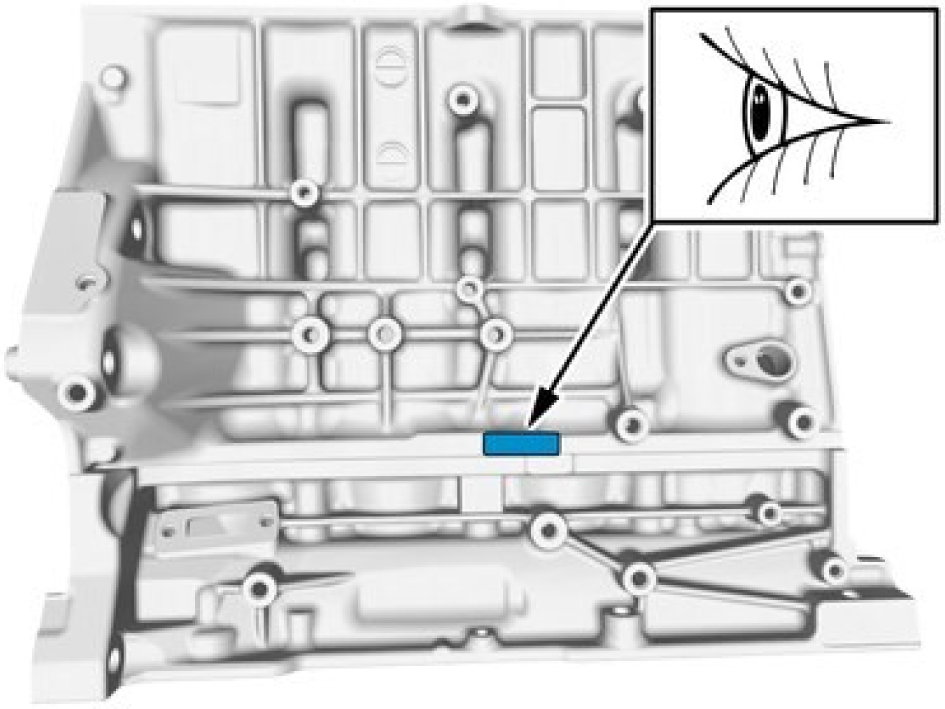
Make sure that the classification of the components correspond with each other.
See information about engine refer to:
Specifications Engine
Installation
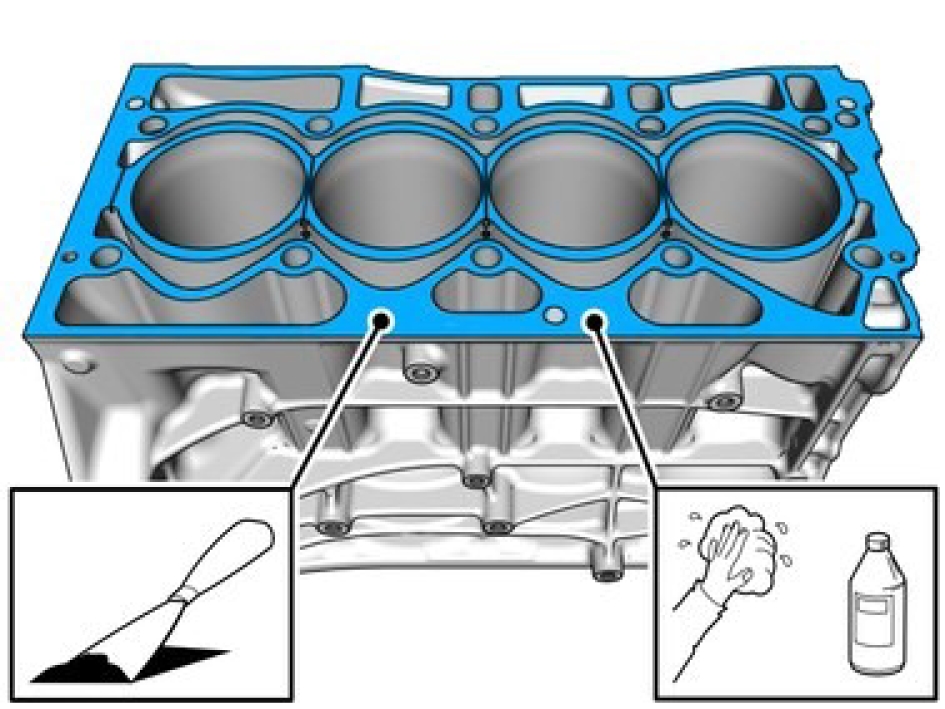
Make sure that the mating faces are clean and free of foreign material.
Take extra care not to damage the mating faces.
Clean the surface. Use putty knife and clean with abrasive cloth and isopropanol.
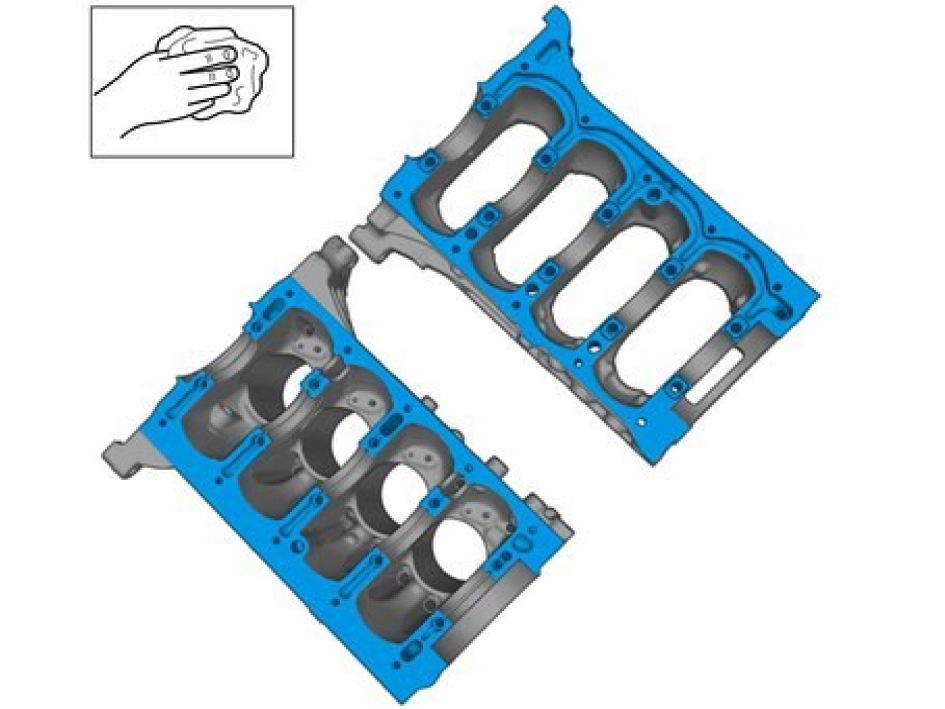
Make sure that the mating faces are clean and free of foreign material.
Take extra care not to damage the mating faces.
Clean the surface. Use putty knife and clean with abrasive cloth and isopropanol.
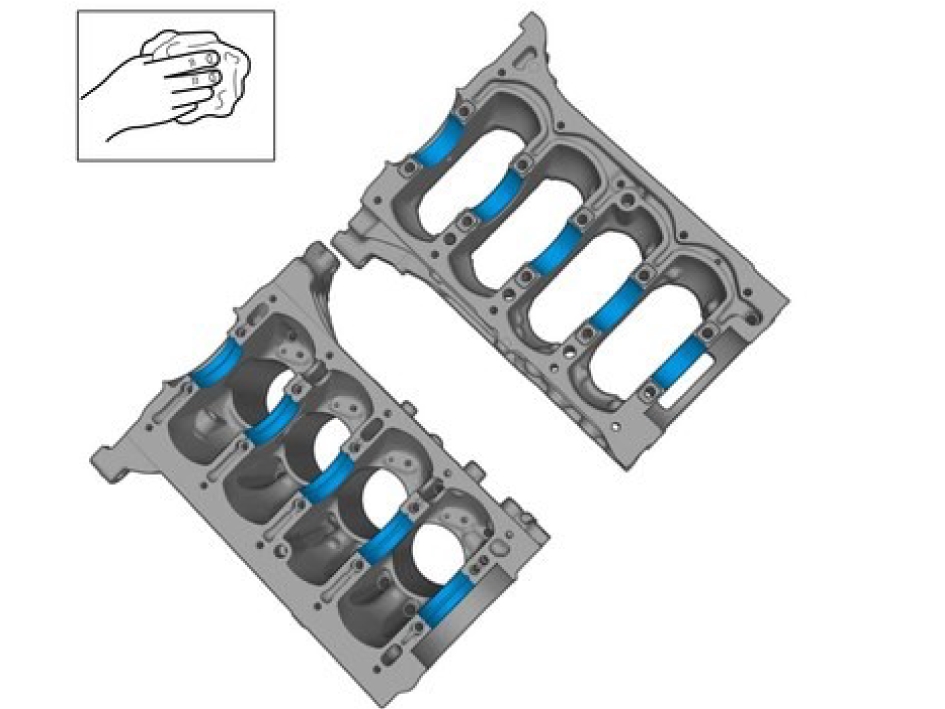
Make sure that the mating faces are clean and free of foreign material.
Clean with isopropanol.
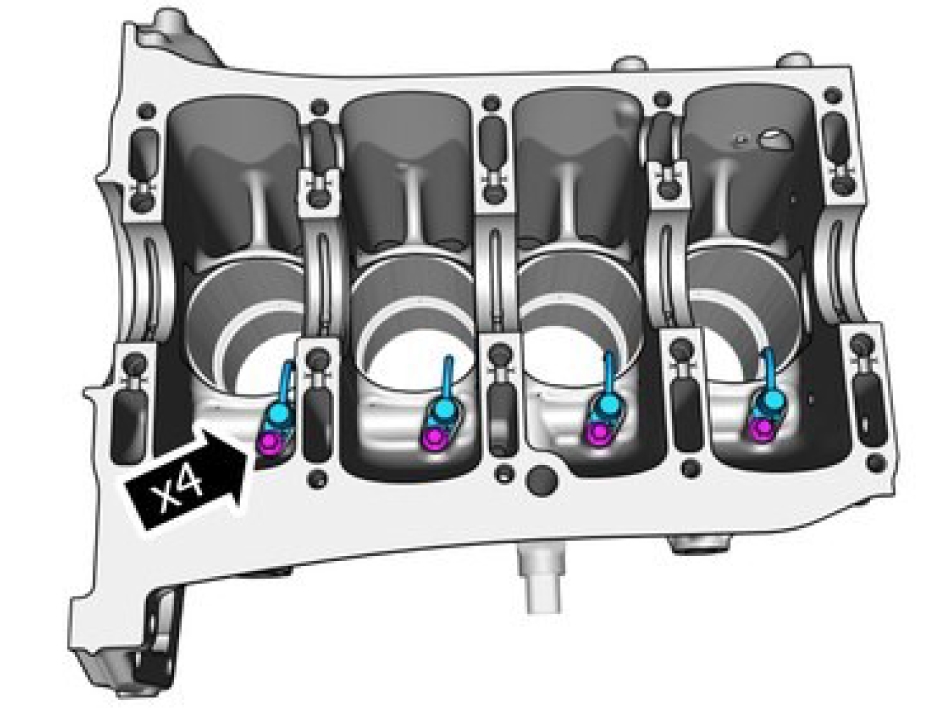
Install the marked component.
Tighten the screw M6, torque: 10 Nm
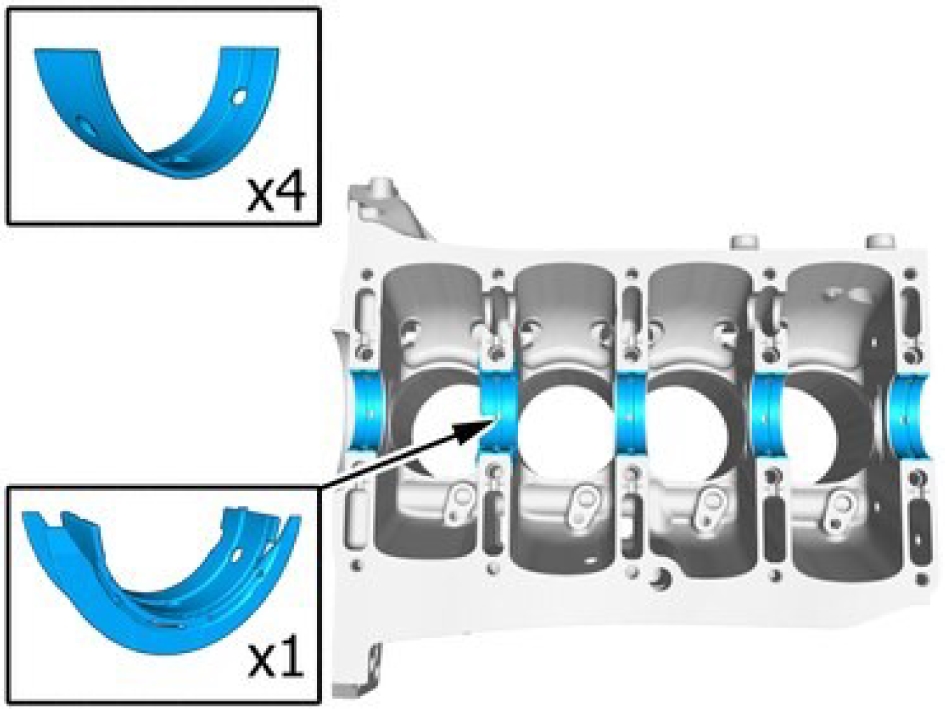
Make sure that the components are positioned correctly.
Install the marked components.
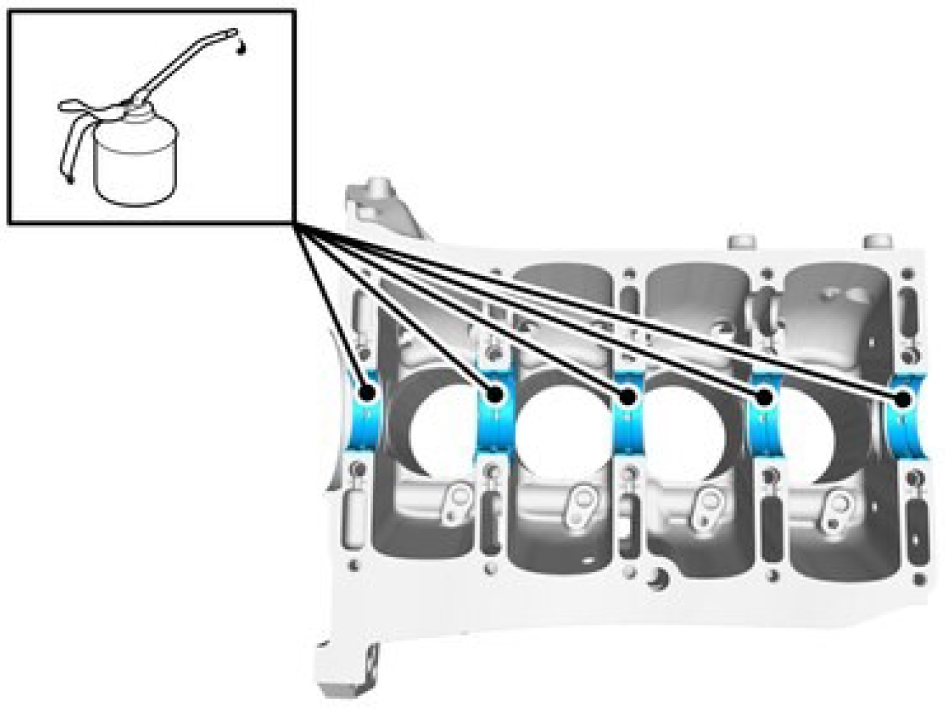
Apply a thin and even layer of engine oil.
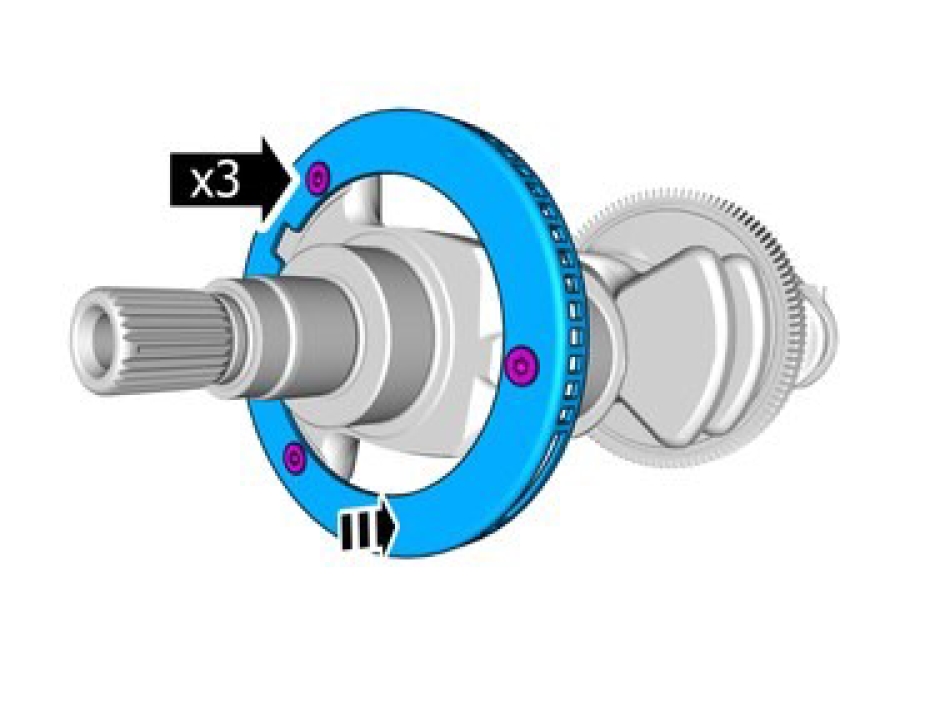
Make sure that the component is positioned correctly.
Install the marked component.
Install the screws M6, torque: 10 Nm
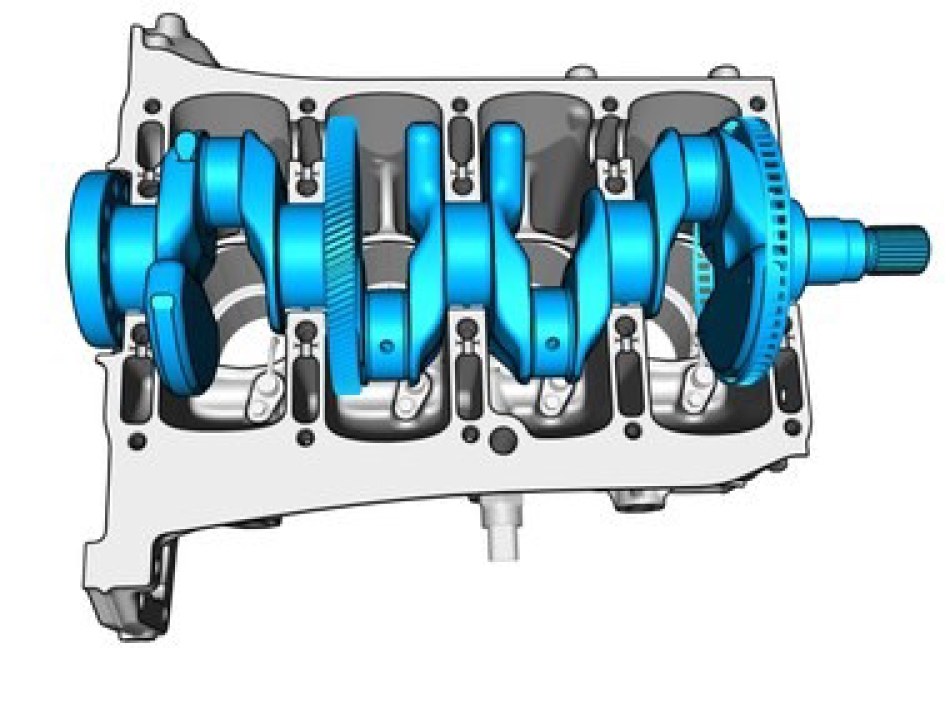
Take extra care when handling the component.
Install the marked component.
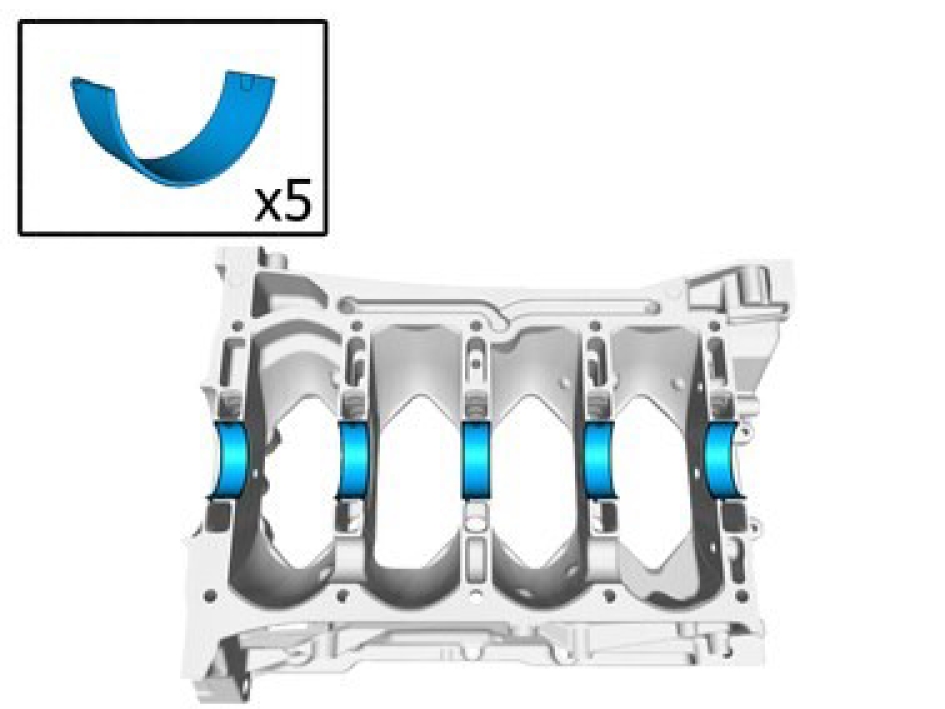
Make sure that the components are positioned correctly.
Install the marked components.
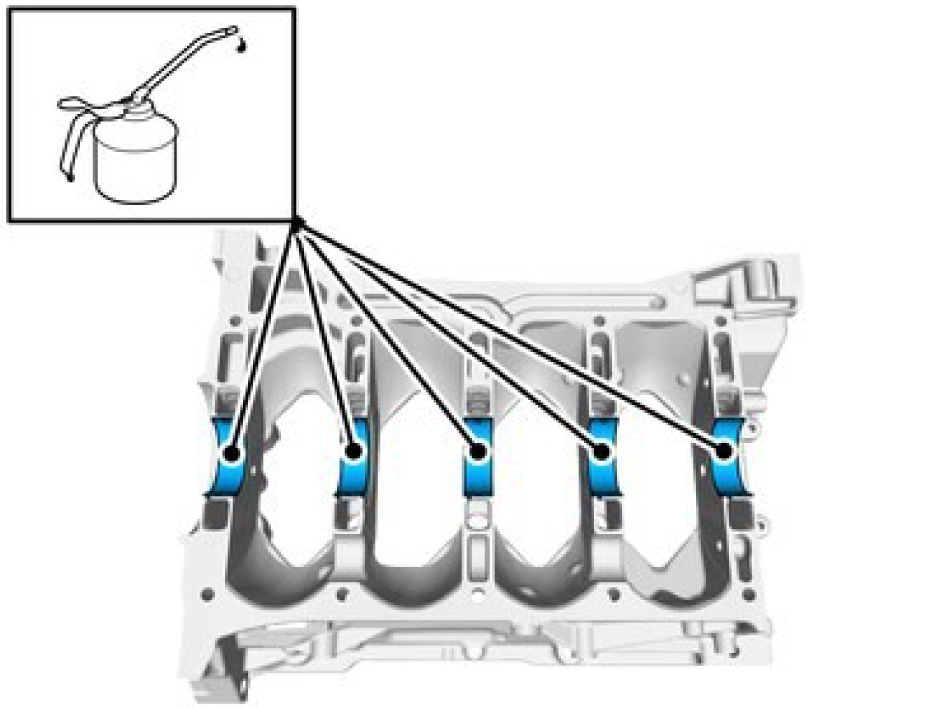
Apply a thin and even layer of engine oil.
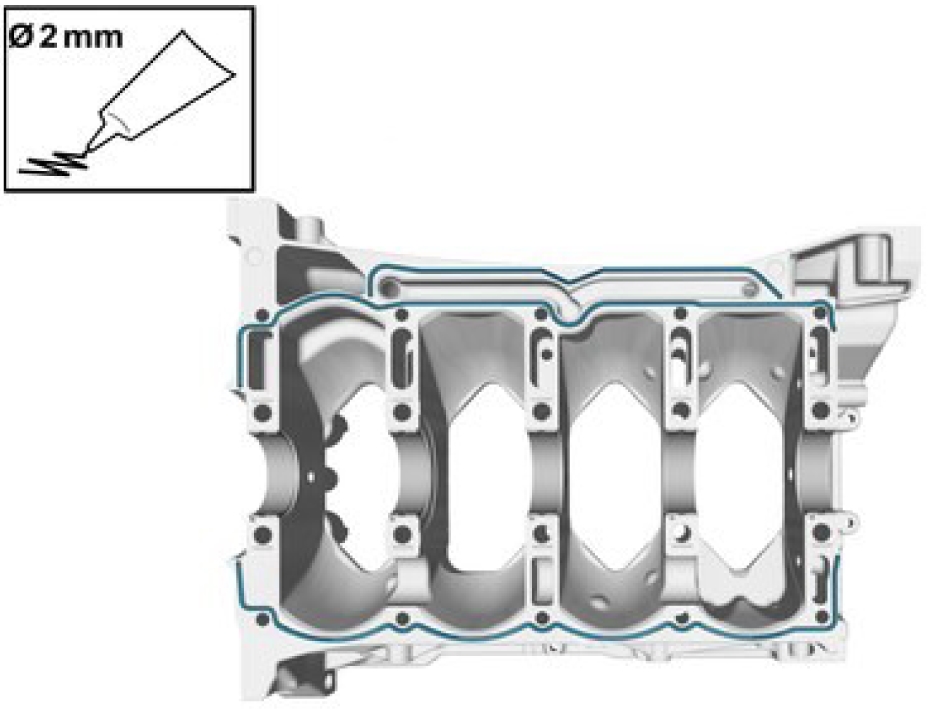
The component must be installed within 5 minutes of applying the sealant.
Apply chemical gasket.
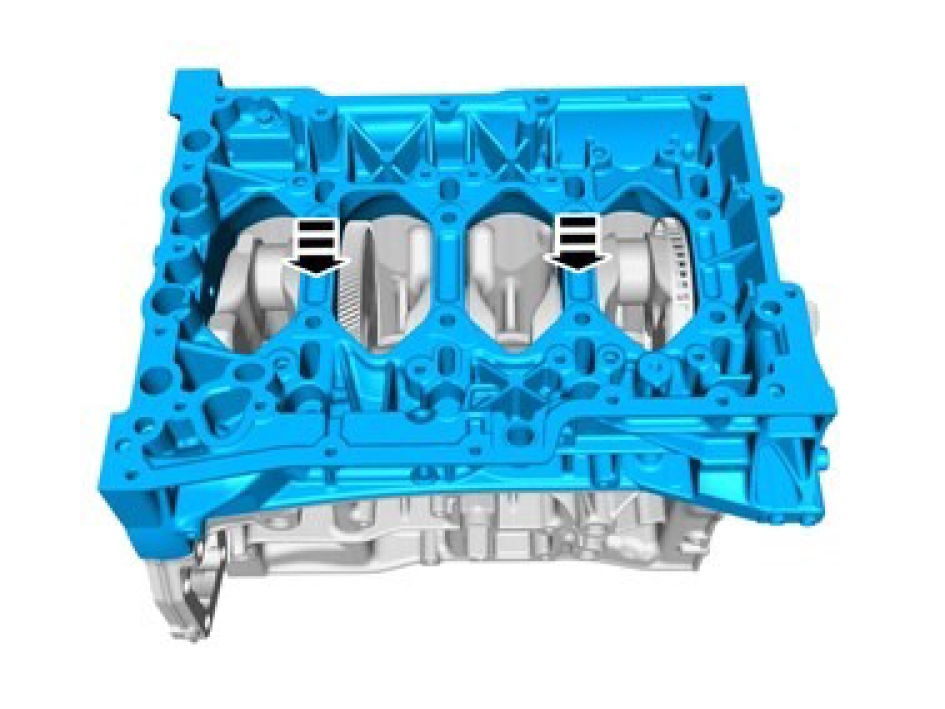
Make sure that equal pressure is applied to the full length of the component.
The component must be installed within 5 minutes of applying the sealant.
Install the marked component.

Make sure to follow the sequence indicated.
Install the screws.
Step 1, torque: 20 Nm
Step 2, torque: 40 Nm
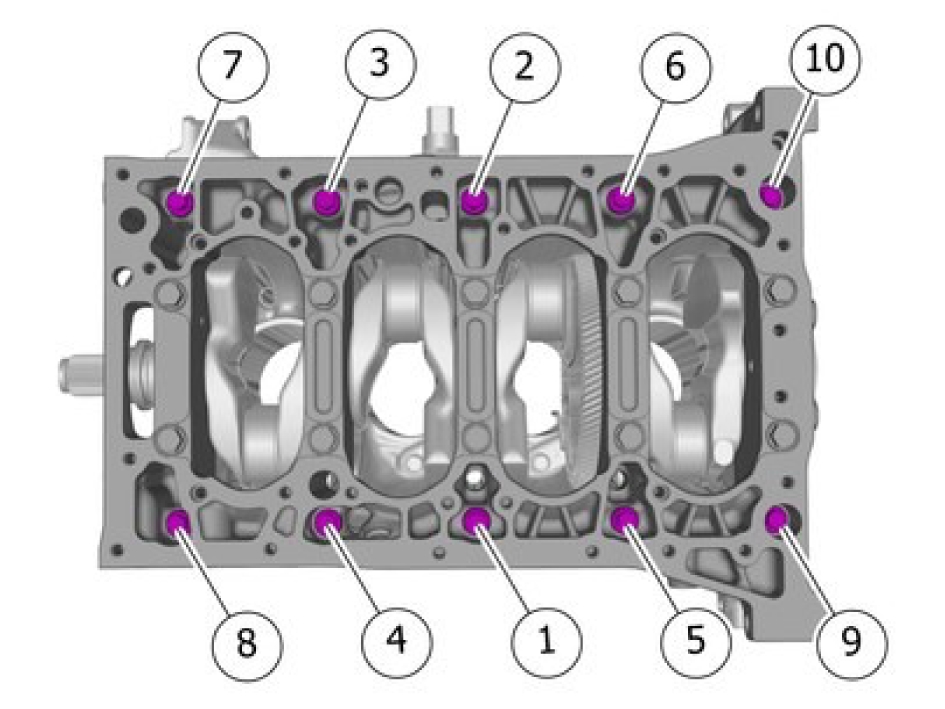
Install the screws, torque: 25 Nm
Make sure to follow the sequence indicated.
Tighten the screws, 90⁰
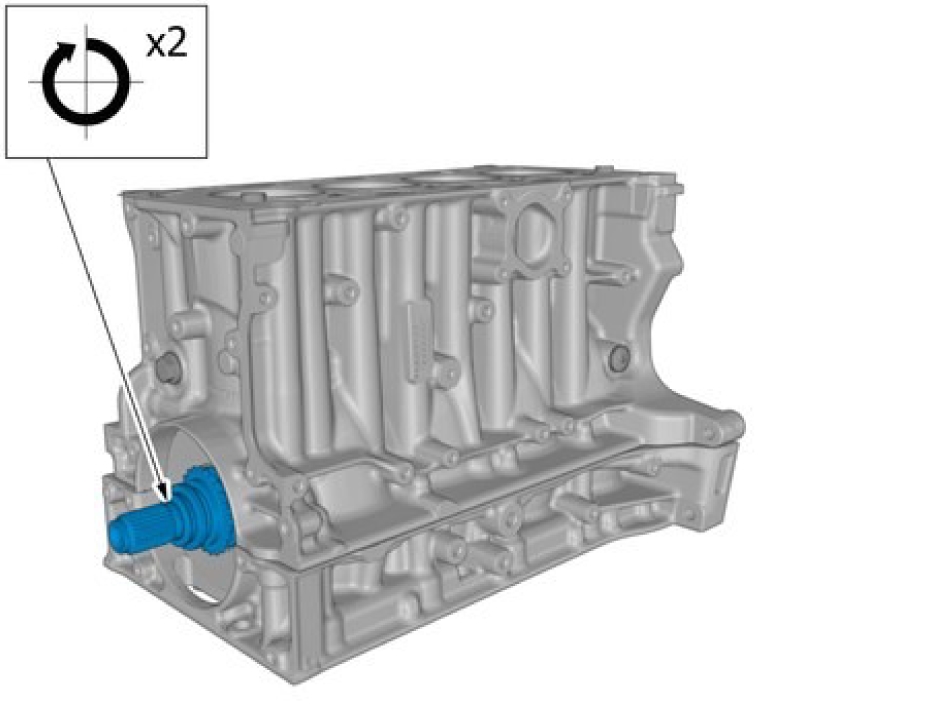
Turn the engine.
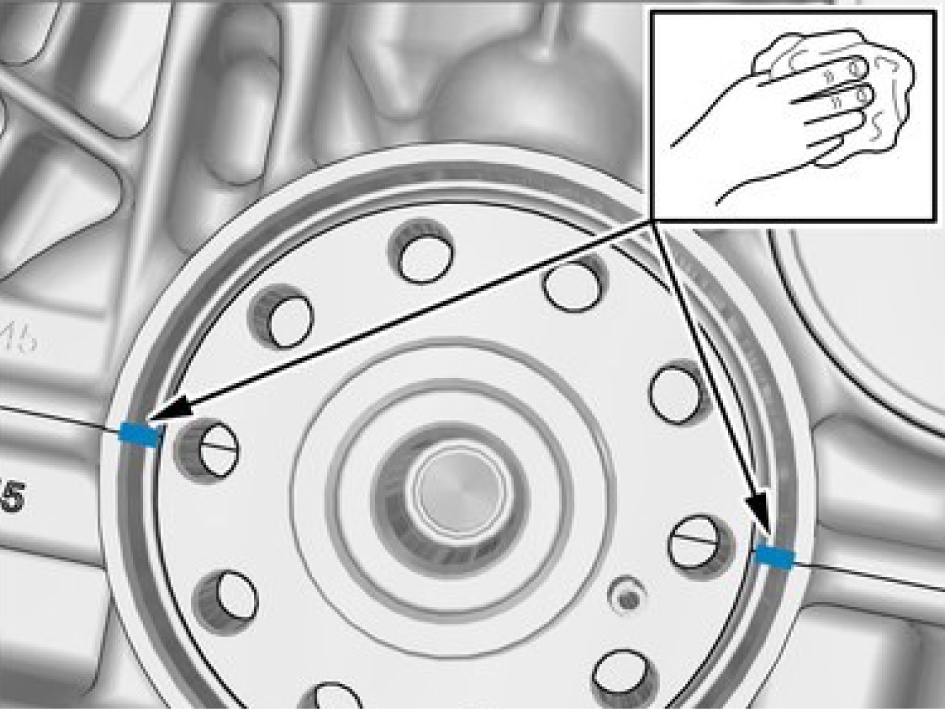
Make sure that the mating faces are clean and free of foreign material.
Install the high pressure fuel pump housing refer to:
High pressure fuel pump housing, replace
Install the marked component.
Apply a thin and even layer of engine oil.
Make sure that the components are positioned correctly.
Orientation view.
Wear safety goggles.
Make sure that the components are positioned correctly.
Install the marked components.
Make sure that the mating faces are clean and free of foreign material.
Clean with isopropanol.
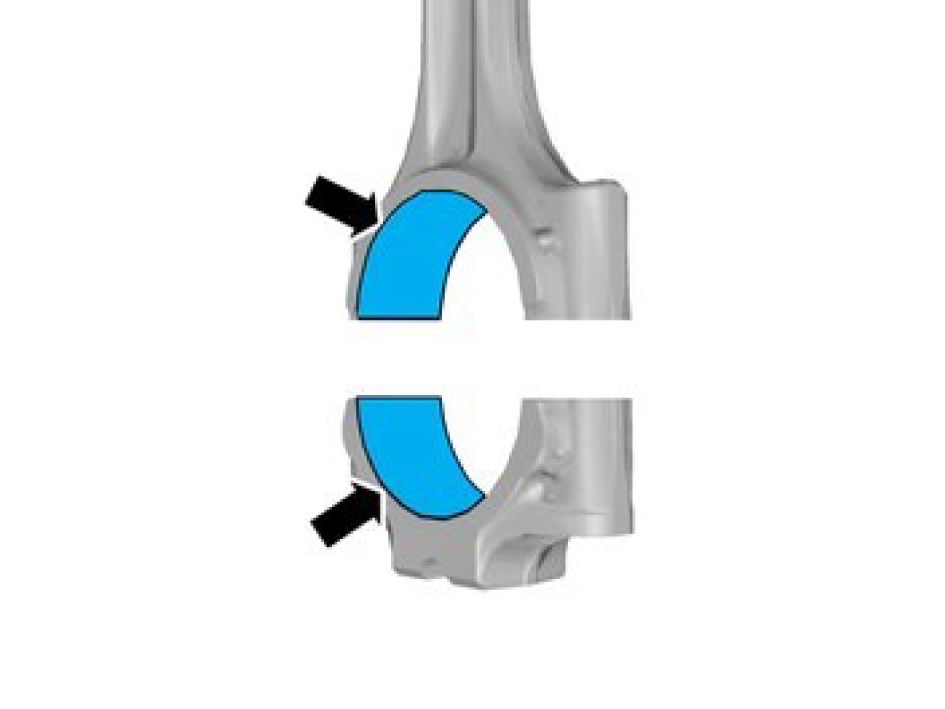
Make sure that the components are positioned correctly.
Install the marked components.
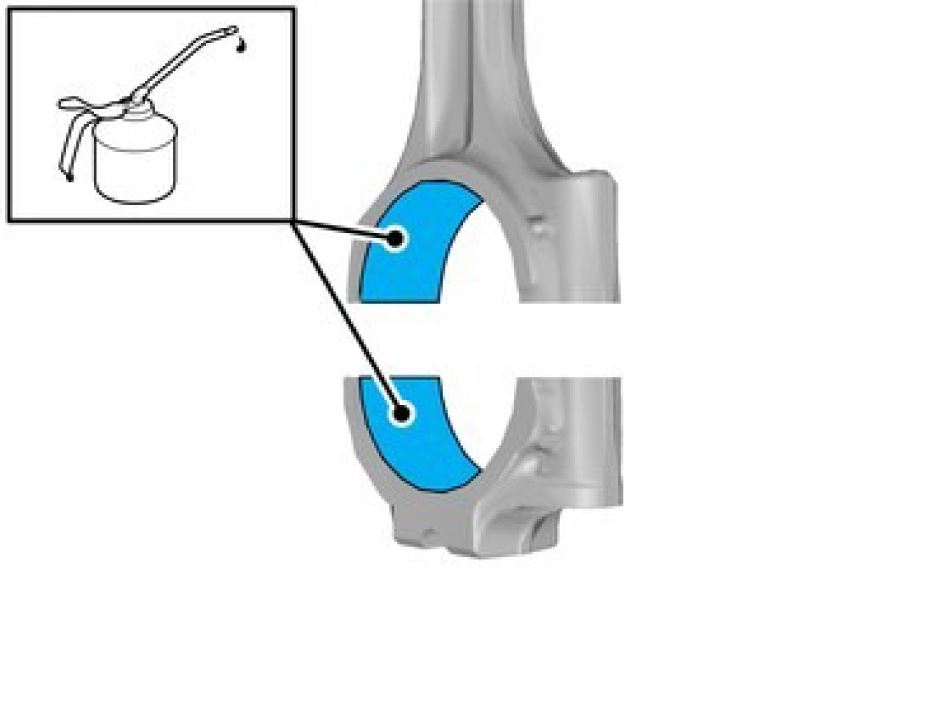
Apply a thin and even layer of engine oil.
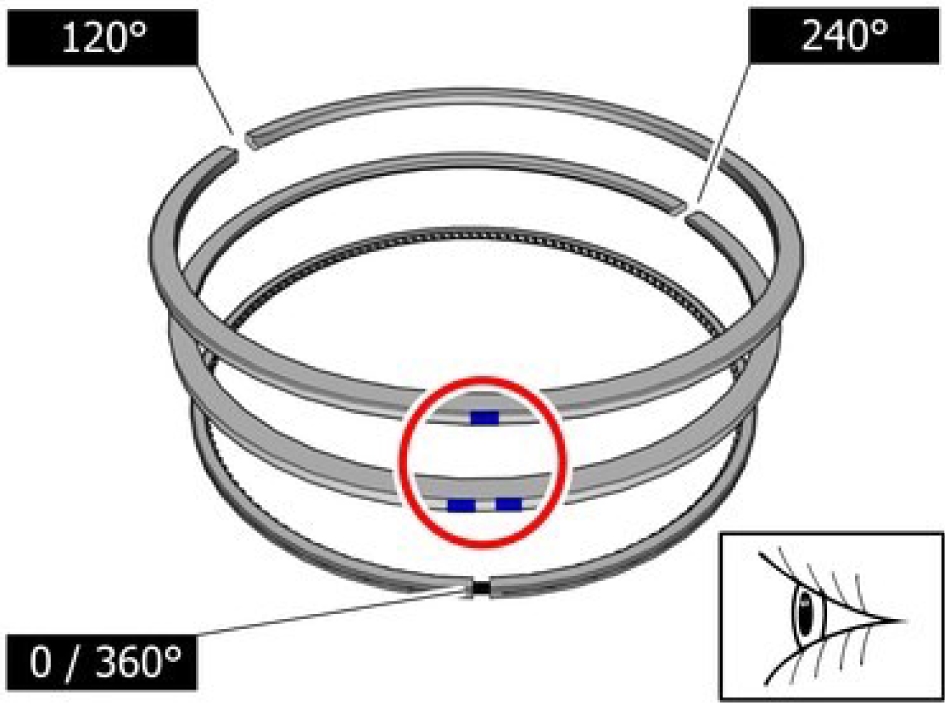
Text or marking on piston rings must be faced upwards.
Make sure that the piston rings can be easily rotated by hand in the piston ring grooves.
The piston rings must not be expanded more than necessary.
Use piston ring pliers.
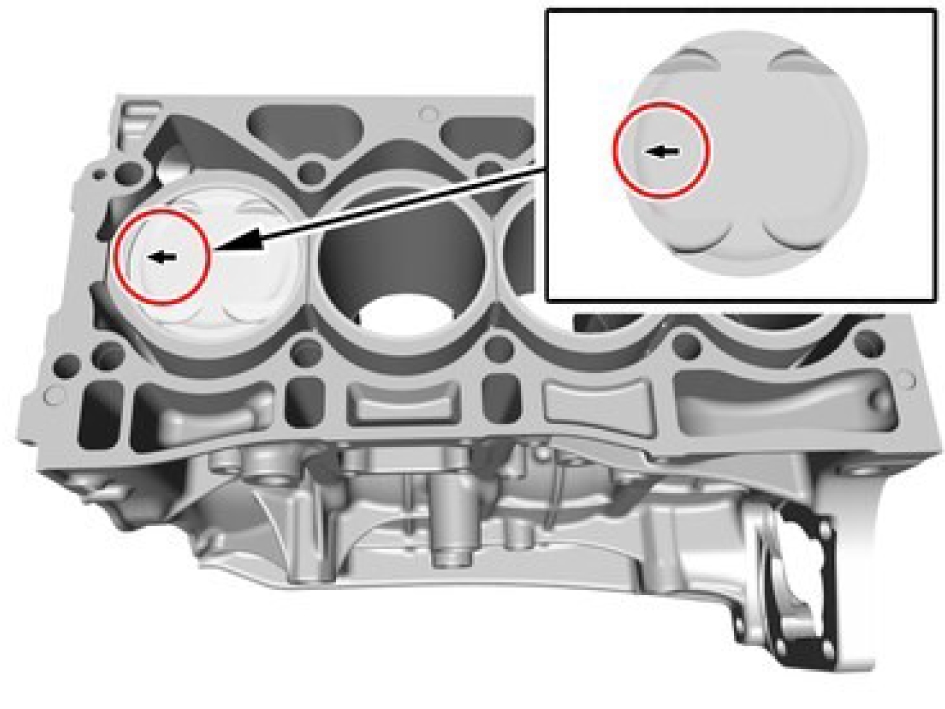
Make sure that the installation marks are aligned.
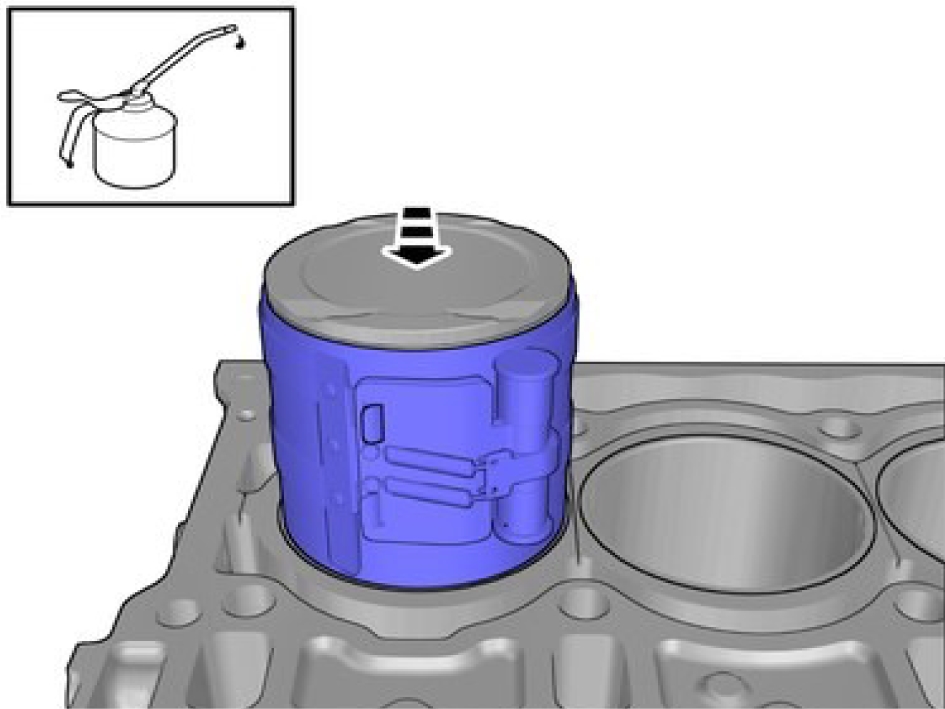
Take extra care when handling the components.
Apply a thin and even layer of engine oil.
Use piston ring compressor.
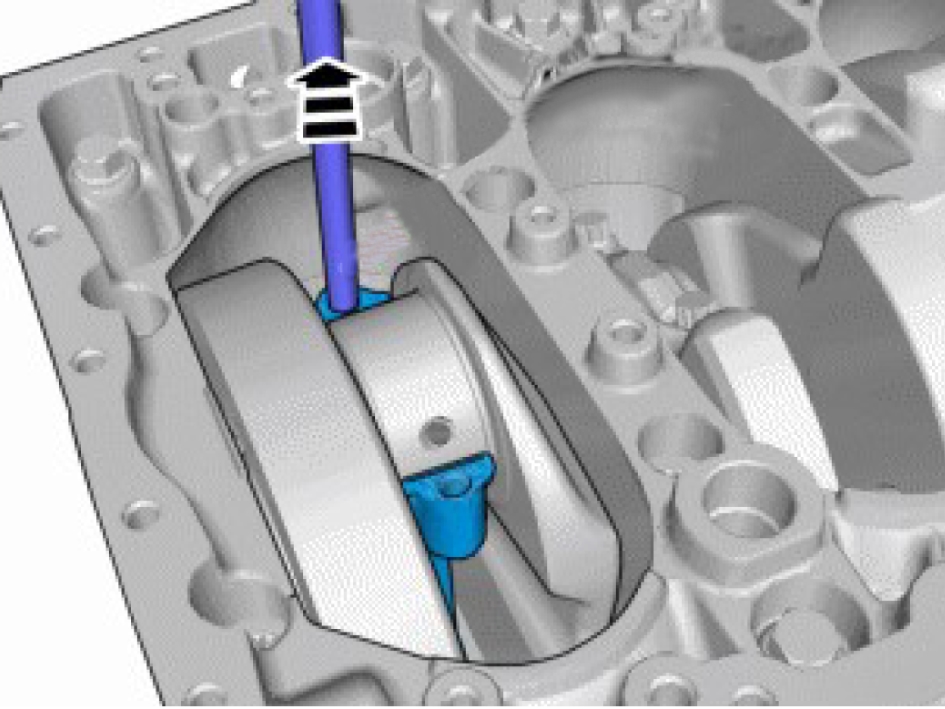
Take extra care when handling the components.
Pull up the components with special tool: 999 5746
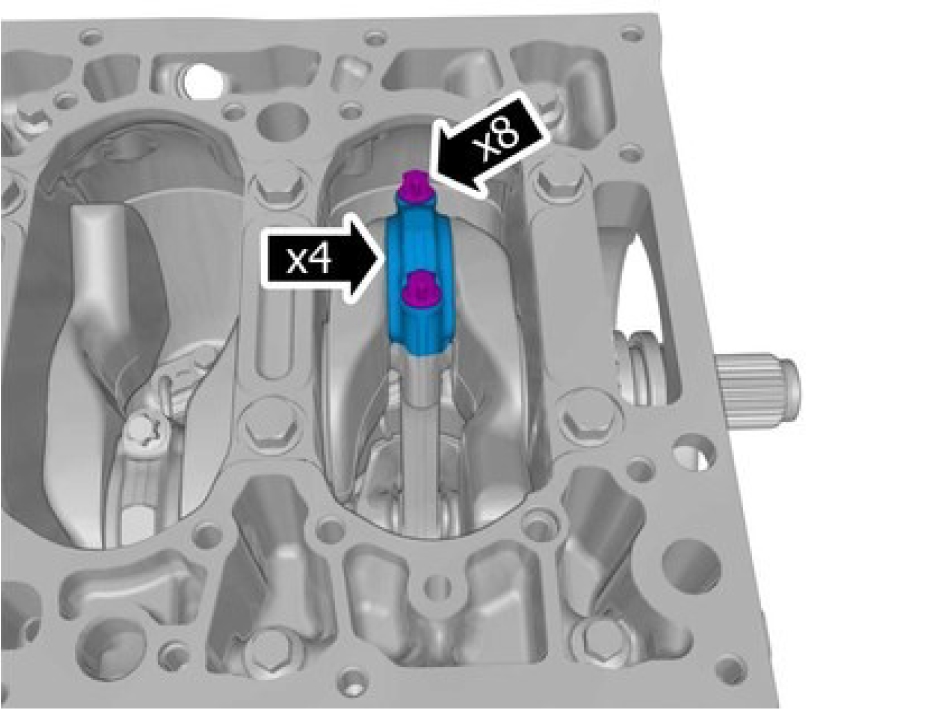
Install the marked component.
Stage 1, torque: 12 Nm
Stage 2, torque: 20 Nm
Stage 3: 100 °
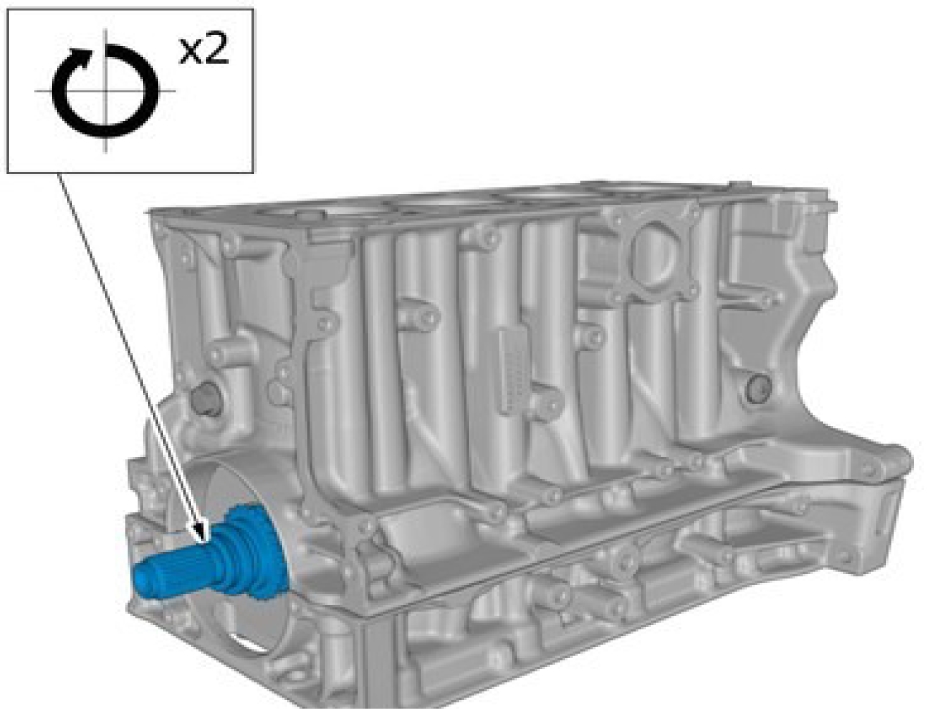
Turn the engine two turns.
Install the balance shaft assembly refer to:
Balance Shaft Assembly, replaceInstall the oil pump refer to:
Oil pump, replaceInstall the oil pan, refer to:
Oil pan, replaceInstall the oil cooler, engine, refer to:
Oil cooler, engine, replaceInstall the crankshaft front seal, refer to:
Crankshaft front seal, replaceDTC001100
DTC: 001100
Information:
The Engine Control Module (ECM) regulates the position of the intake camshaft and controls that the requested position is achieved. If a divergence from the requested position is noticed the elapsed time until it is reached is measured. The allowed time varies depending on the requested position.
Test criteria:
The control module's test for the DTC starts when:
-
The engine is at normal operating temperature.
-
The engine speed is above 1 500 r/min.
-
The camshaft is regulated by the VVT solenoid, inlet.
Detection criteria:
The DTC is set if the control module detects that:
-
The camshaft moves too slowly (to the late position).
Faultcode actions:
None.
Crank mechanism, dismantling
Remove the fuel pump, refer to:
Fuel pump, replaceRemove the high pressure fuel pump housing, refer to:
High pressure fuel pump housing, replaceRemove the oil cooler, engine, refer to:
Oil cooler, engine, replaceRemove the oil pan, refer to:
Oil pan, replaceRemove oil pump, refer to:
Oil pump, replaceRemove balance shaft Assembly, refer to:
Balance Shaft Assembly, replace
Take extra care when handling the components.
Note the position of each component before removal.
Remove the screws.
Remove the marked components.

Remove the marked component use special tool: 999 5746
Remove the screws.
Take extra care not to damage the mating faces.
Take extra care when handling the components.
Only use moderate force.
Remove the marked component.
Note the position of each component before removal.
Remove the marked component.

Take extra care when handling the component.
Remove the marked component.
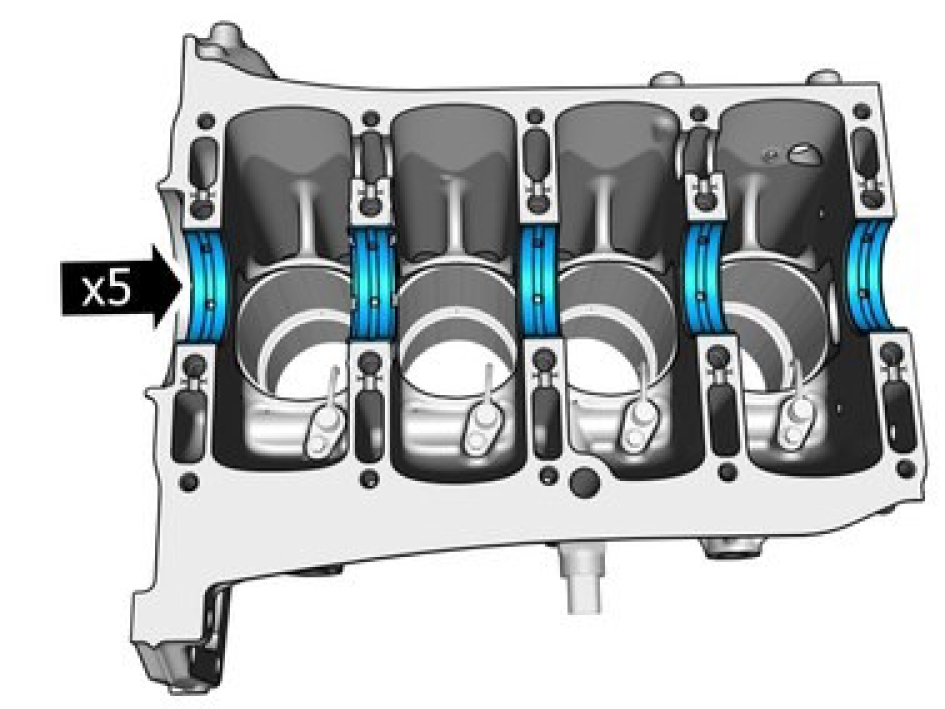
Note the position of each component before removal.
Remove the marked component.
Remove the screws.
Remove the marked components.
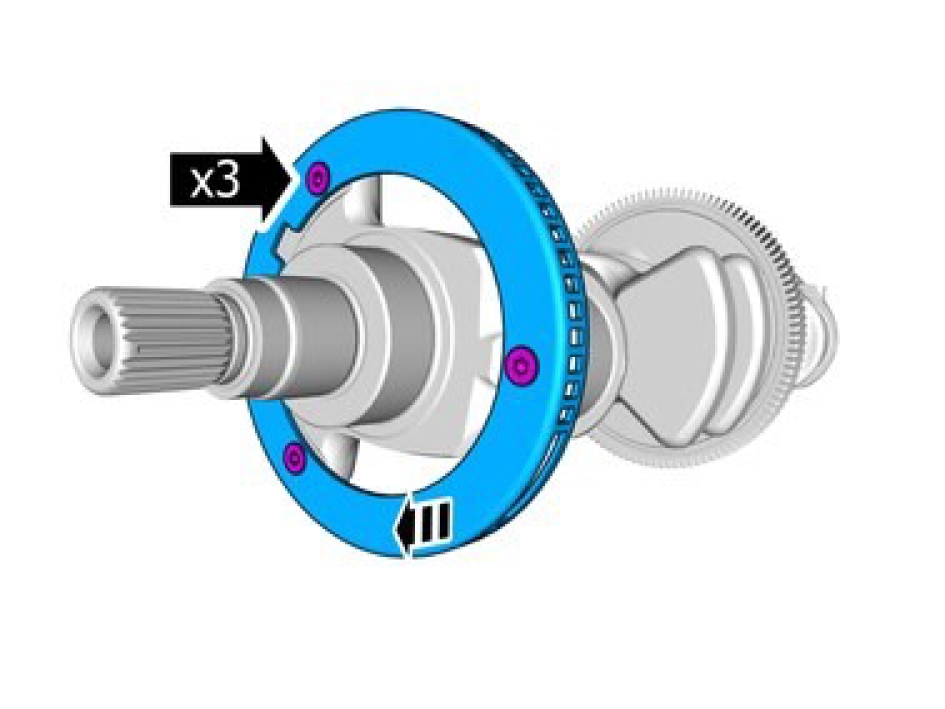
Note the position of the component before removal.
Remove the screws.
Remove the marked component.
Safety information fuel system
This document contains safety information related to fuel and fuel systems.
Exposure to fuel can be harmful and can cause severe health damage or death.
Wait for a minimum of 1 minute after the engine has stopped before carrying out any repair to the fuel injection system.
INHALED: Fuel is toxic to the respiratory and other body systems. Exposure may result in various symptoms including drowsiness, unconsciousness or severe health damage. Move a victim to fresh air. Keep a victim warm and at rest. If unconscious, place in the recovery position. If not breathing, apply artificial respiration. Give cardiac massage if necessary. Seek immediate medical attention.
SWALLOWED: Fuel is moderately toxic and tends to foam on vomiting. If drawn into the lungs, inflammation may develop. Do not induce vomiting. If spontaneous vomiting occurs place the victim in a forward position to reduce the risk of fuel being drawn into the lungs. Give nothing by mouth. If breathing but unconscious, place in the recovery position. If breathing has stopped, apply artificial respiration. Seek immediate medical attention.
EYE CONTACT: Fuel is mildly irritating to the eyes. Flush with plenty of water, blinking as often as possible. Do not force the eyelid open. Seek medical attention for any persistent eye irritation or abnormality.
SKIN CONTACT: Excessive or prolonged skin contact with vehicle fuel may cause serious skin disorders including skin cancer.
SKIN CONTACT: Fuel is mildly irritating to the skin and may cause dermatitis due to defatting effect. Remove contaminated clothing. Wash affected areas of skin with soap and water. Seek medical attention for any persistent skin irritation or abnormality. Wash contaminated clothing before reuse.
Fuel may not give adequate warning before toxic or harmful effects arise.
Fuel must not be used as a cleaning agent.
Highly flammable gases are always present when working on fuel systems. Make sure that open flames, sparks, or burning materials never are near fuel system components.
Provide adequate ventilation when working on fuel systems.
Fuel injection equipment is manufactured to extremely precise tolerances. It is essential that absolute cleanliness is observed when working with these components.
Electric Charge Air Compressor, replace
Removal
Remove the induction pipe, refer to:
Induction pipe, replace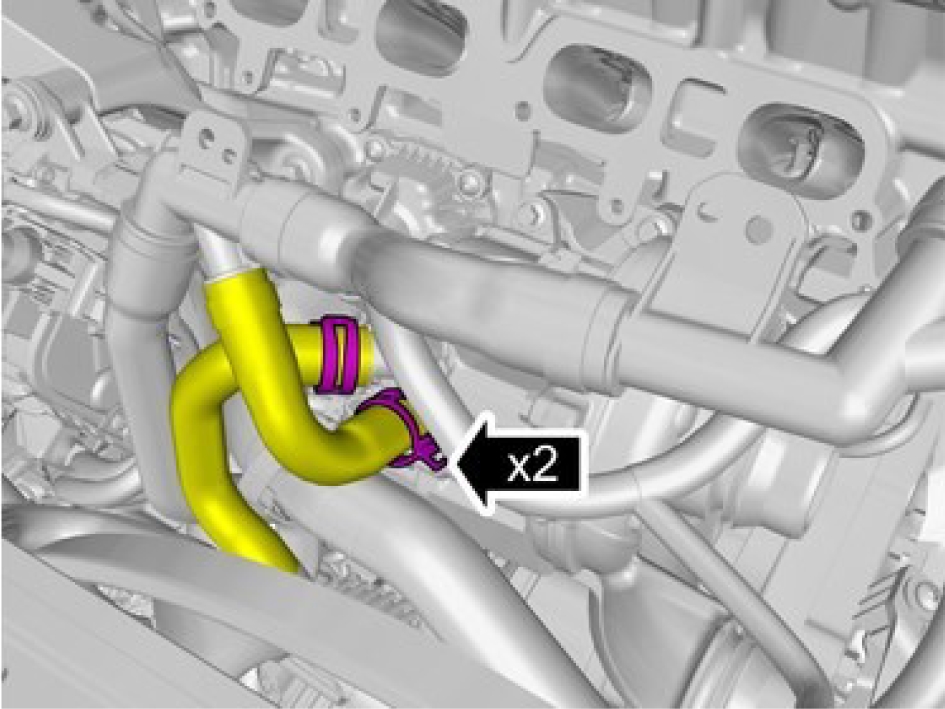
Be prepared to collect escaping fluid.
Loosen the hose clamps.
Undo the hoses from the connections.
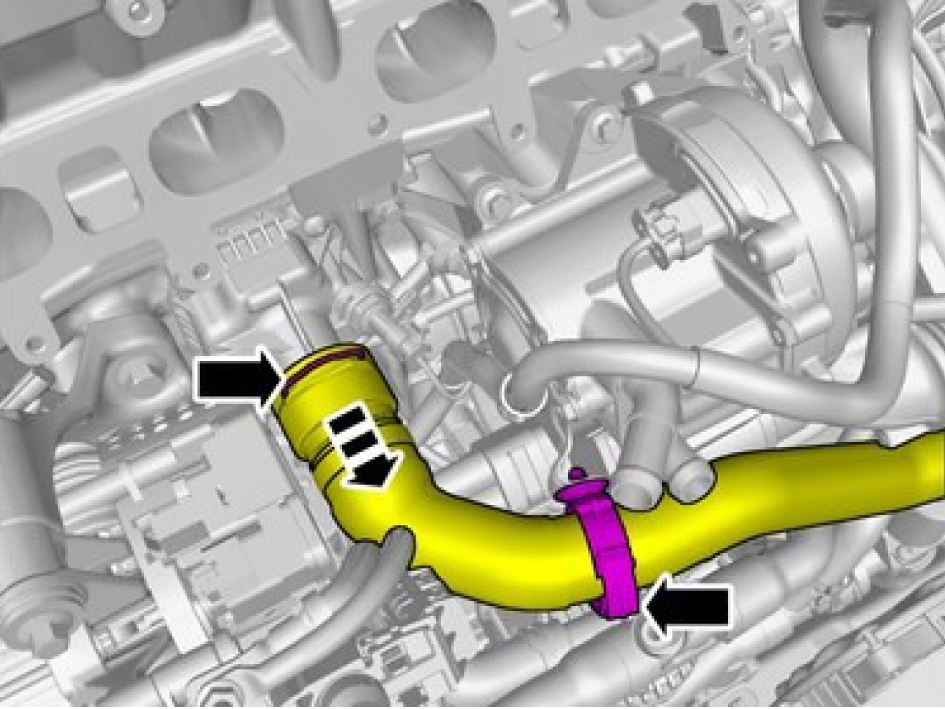
Release the lock.
Undo the hose from the connection.
Release the lock.
Undo the hose from the connection.

Disconnect the connector.
Remove the cable harness clips.
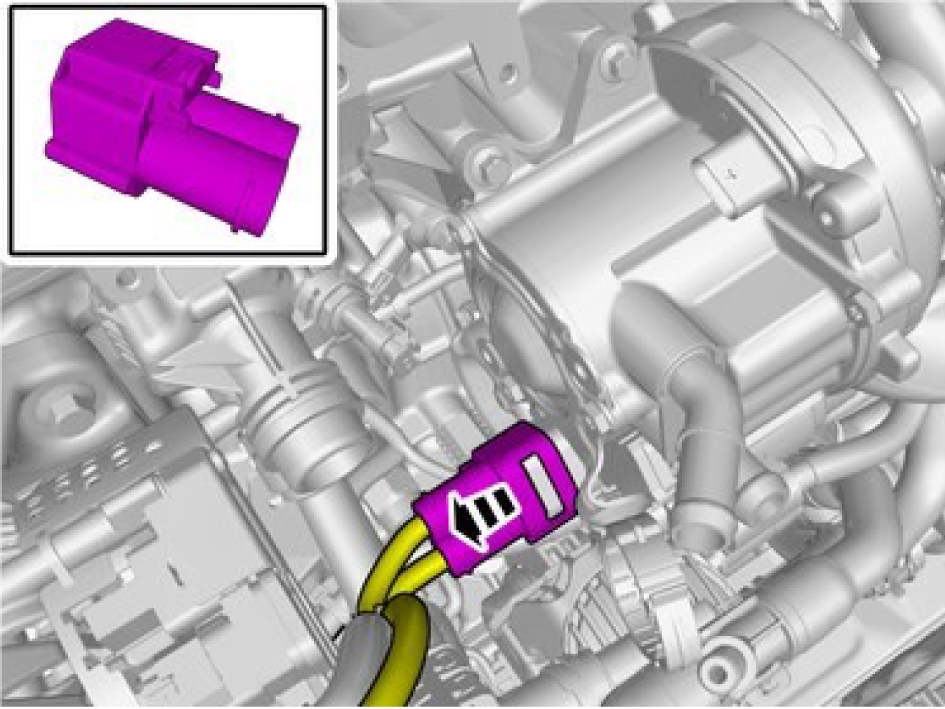
Release the connector's catch.
Disconnect the connector.
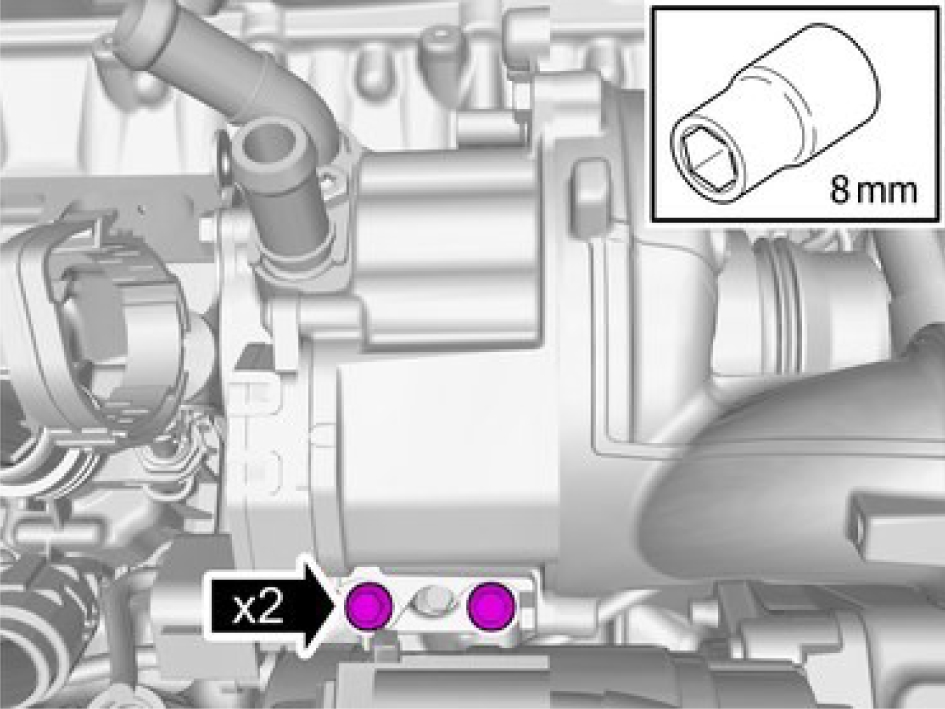
Remove the screws.
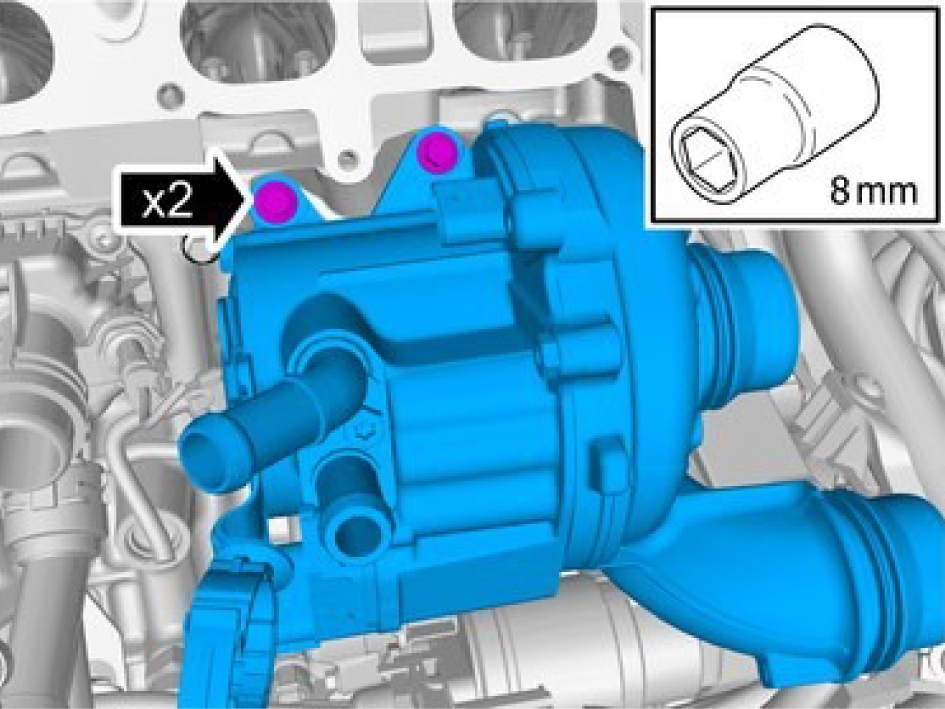
Remove the screws.
Remove the marked component.
Installation
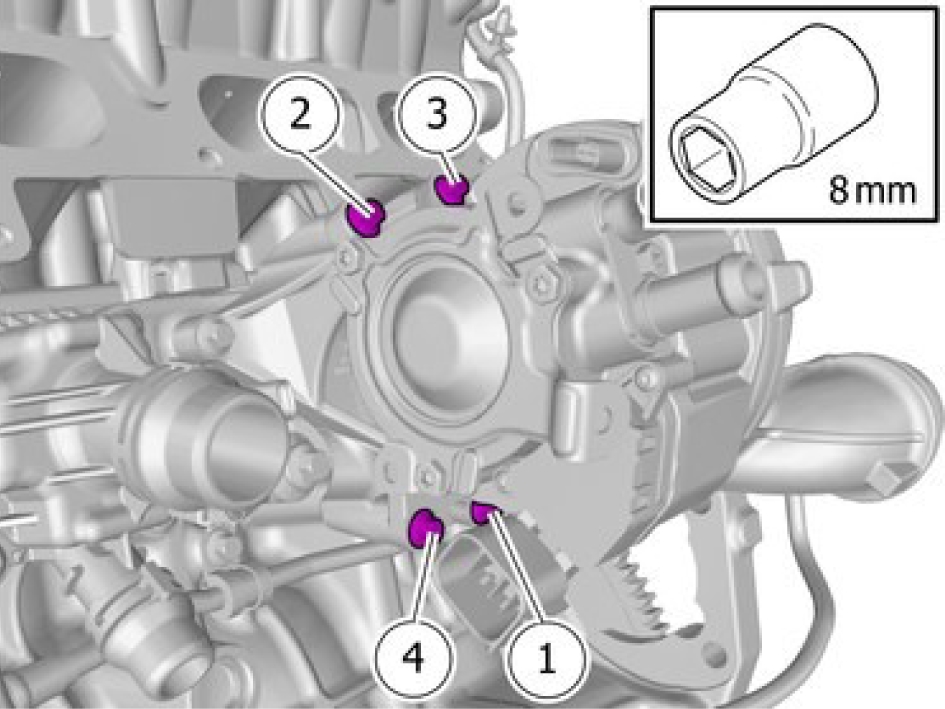
Make sure to follow the correct sequence during installation.
Install the screws M6, torque: 10 Nm
Install the cabling.
Install the cable harness clips and the connector.
Install the hose
Install the hose and the hose clamps.
Induction pipe, replace
Removal
Drain cooling system, draining, filling, and bleeding, refer to:
Cooling system - draining, charging and bleeding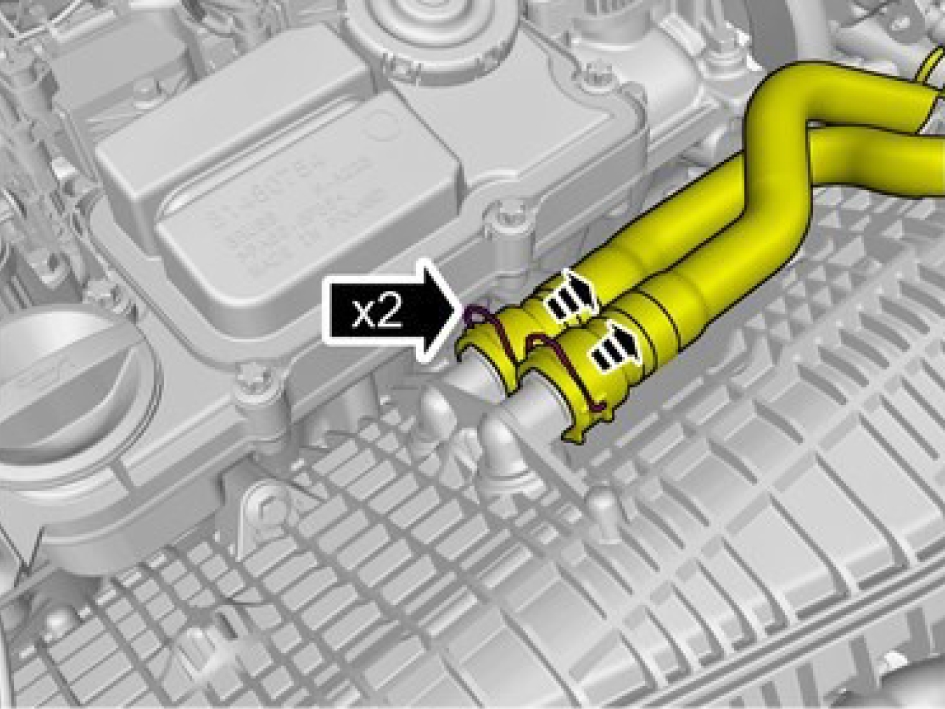
Be prepared to collect escaping fluid.
Release the locks.
Undo the hoses from the connections.
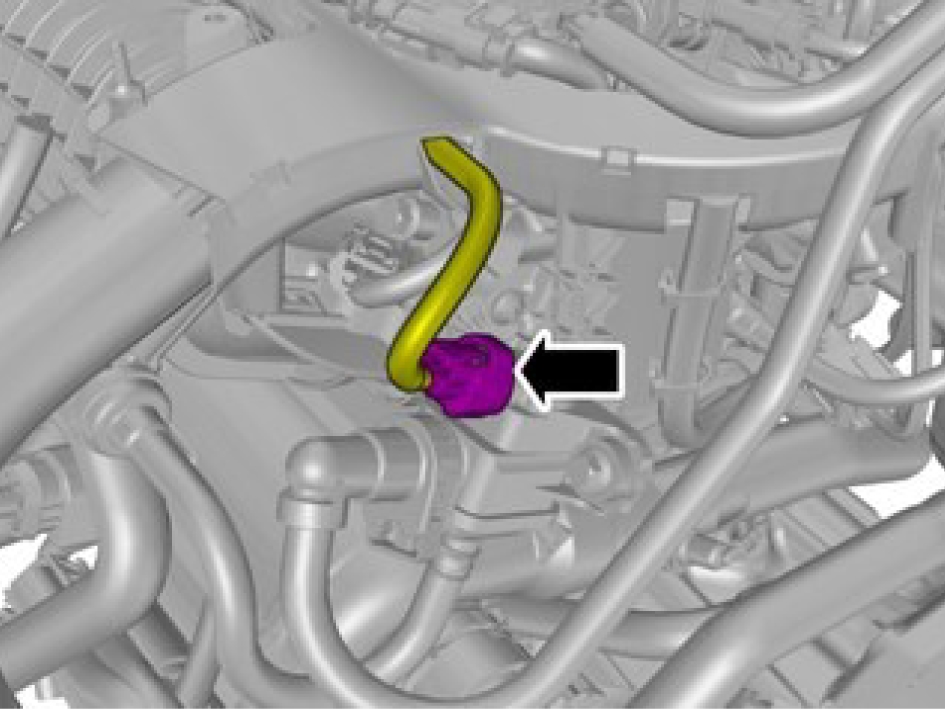
Be prepared to collect escaping fluid.
Remove the screws.
Release the lock.
Undo the hose from the connection.
Fold marked component aside.
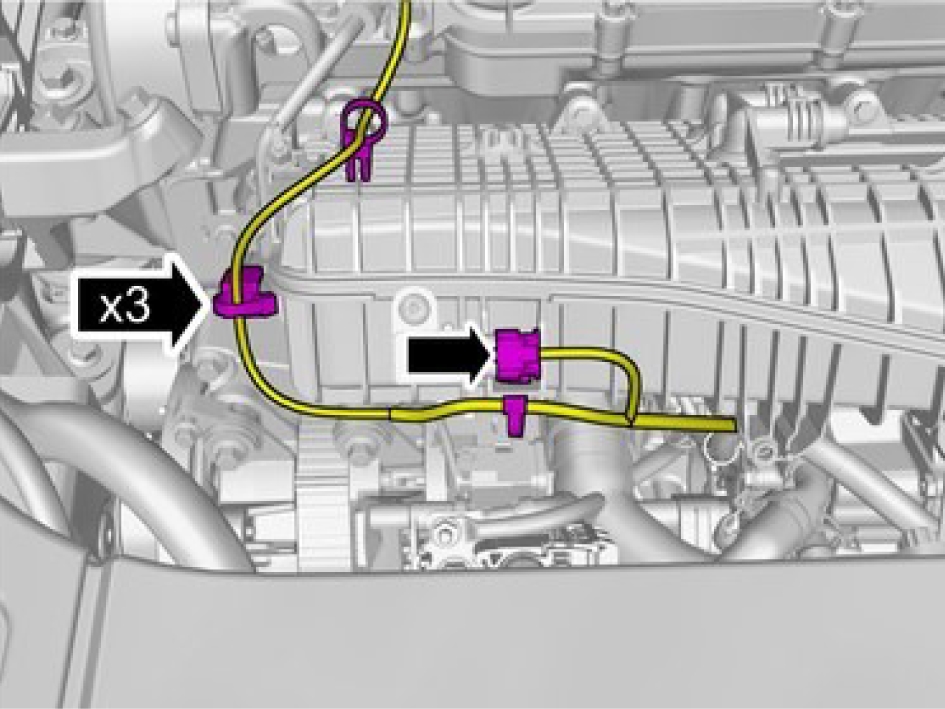
Disconnect the connector.
Remove the cable harness clips.
Remove the air filter housing.
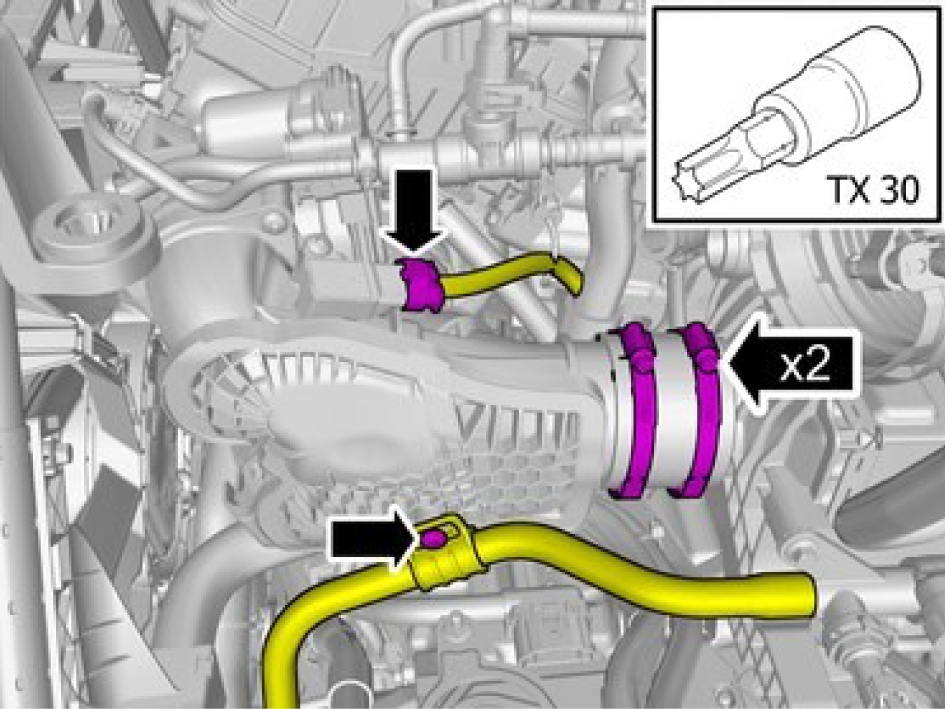
Disconnect the connector.
Remove the screw.
Loosen the hose clamps.
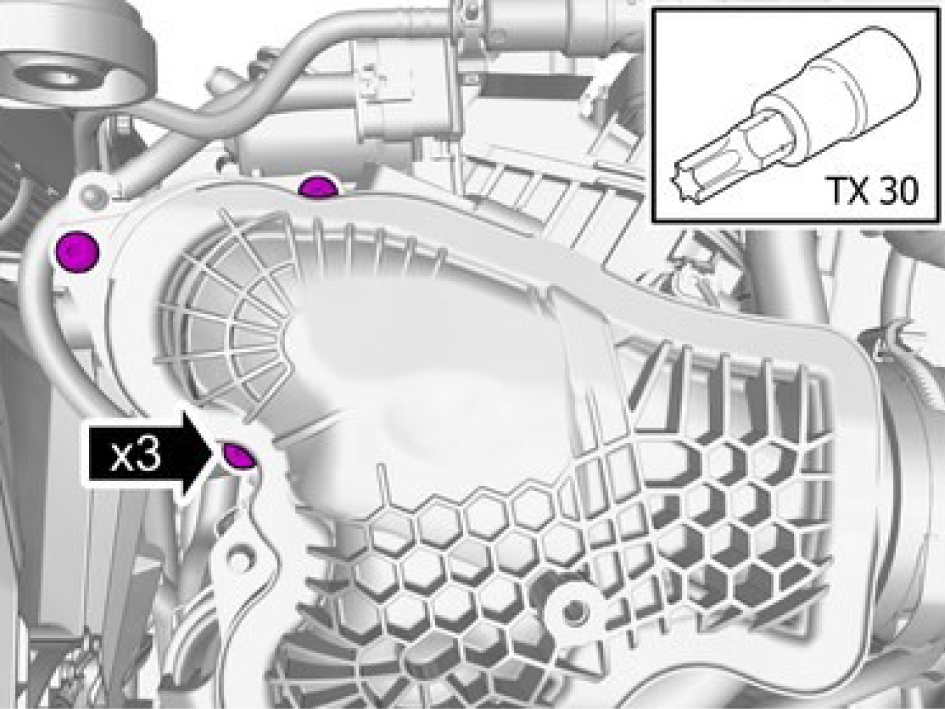
Remove the screws.
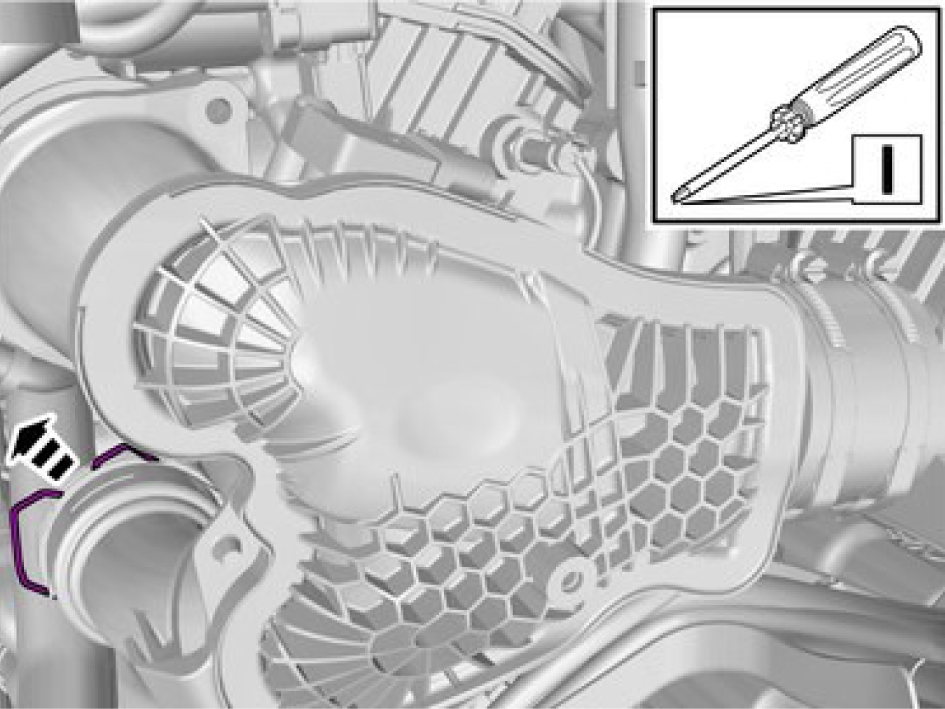
Release the lock.
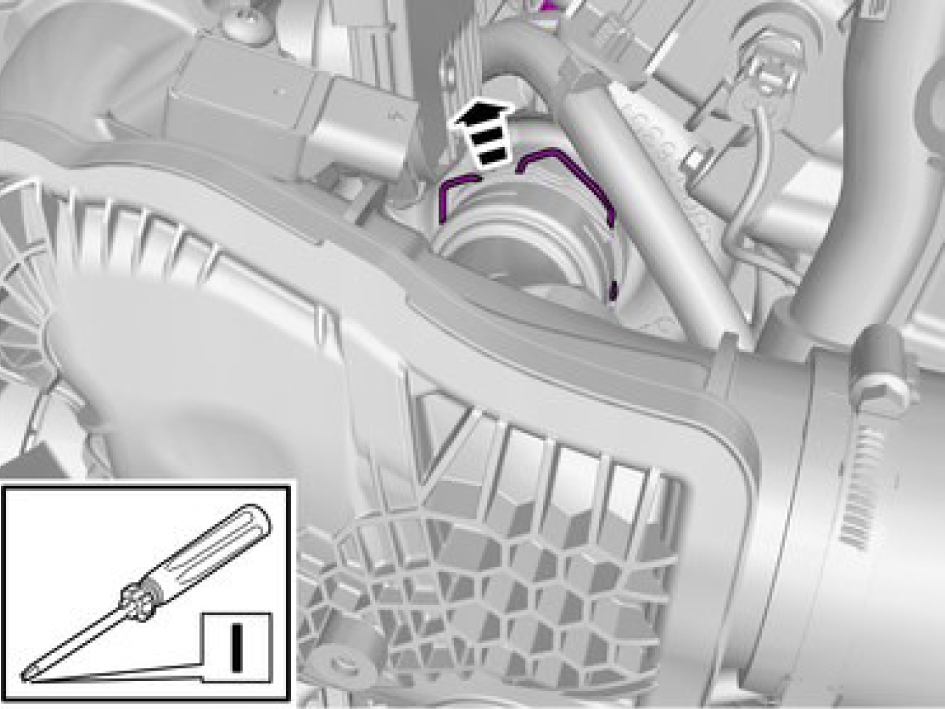
Release the lock.
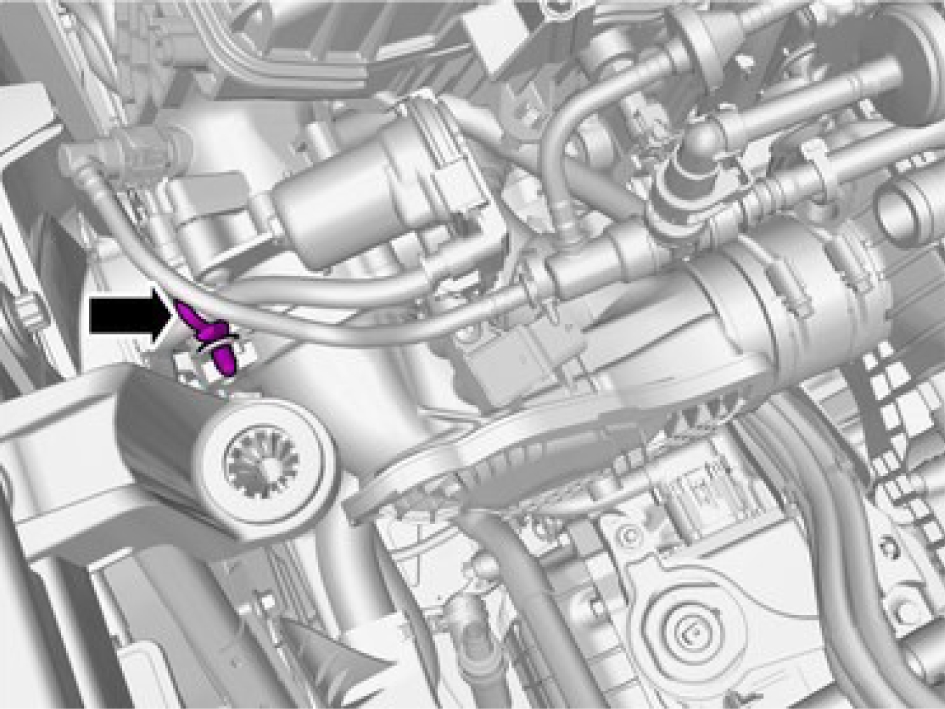
Loosen the clip.
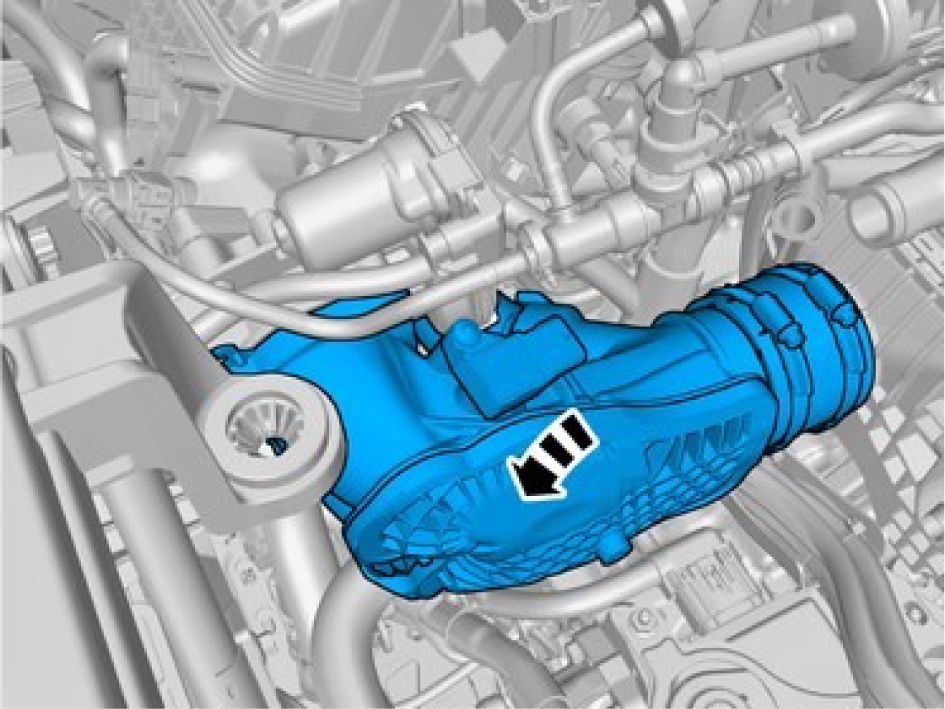
Remove the marked component.
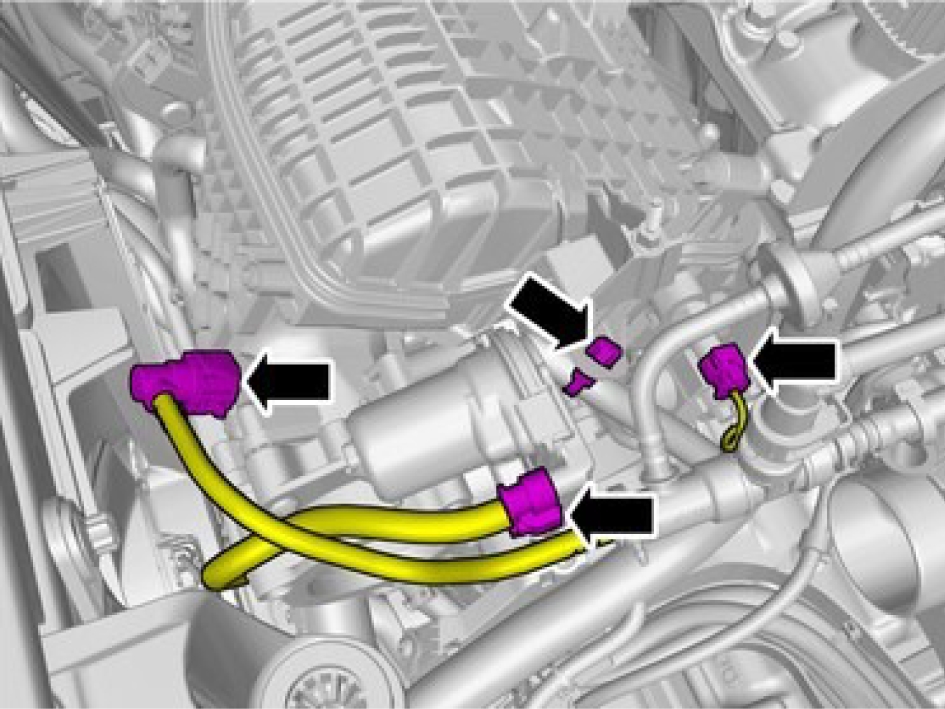
Release the lock.
Undo the hose from the connection.
Disconnect the connectors.
Remove the cable harness clips.
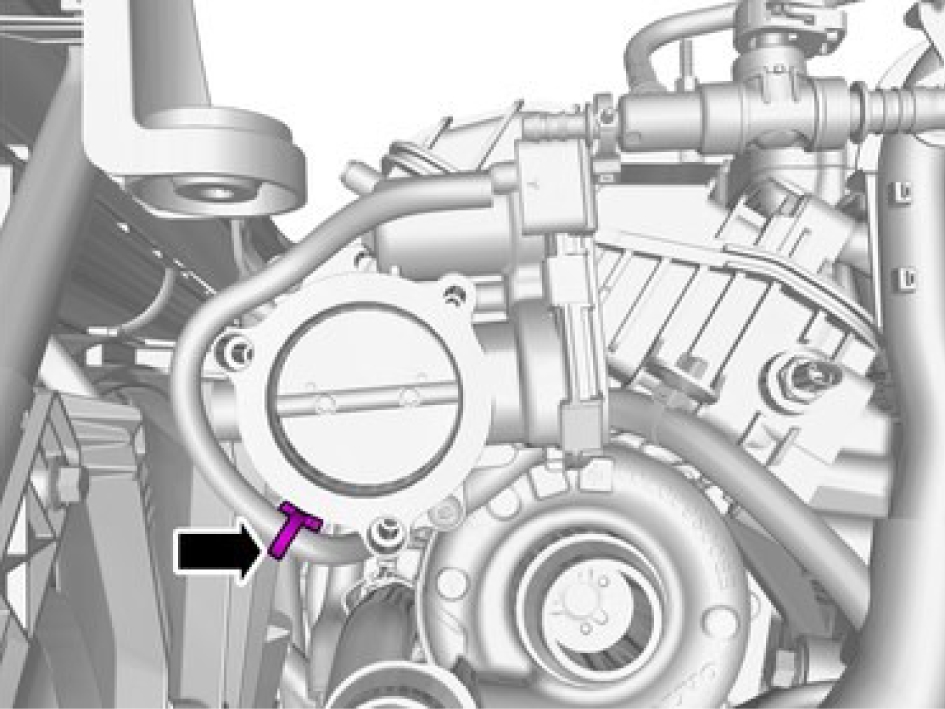
Remove the cable harness clips.
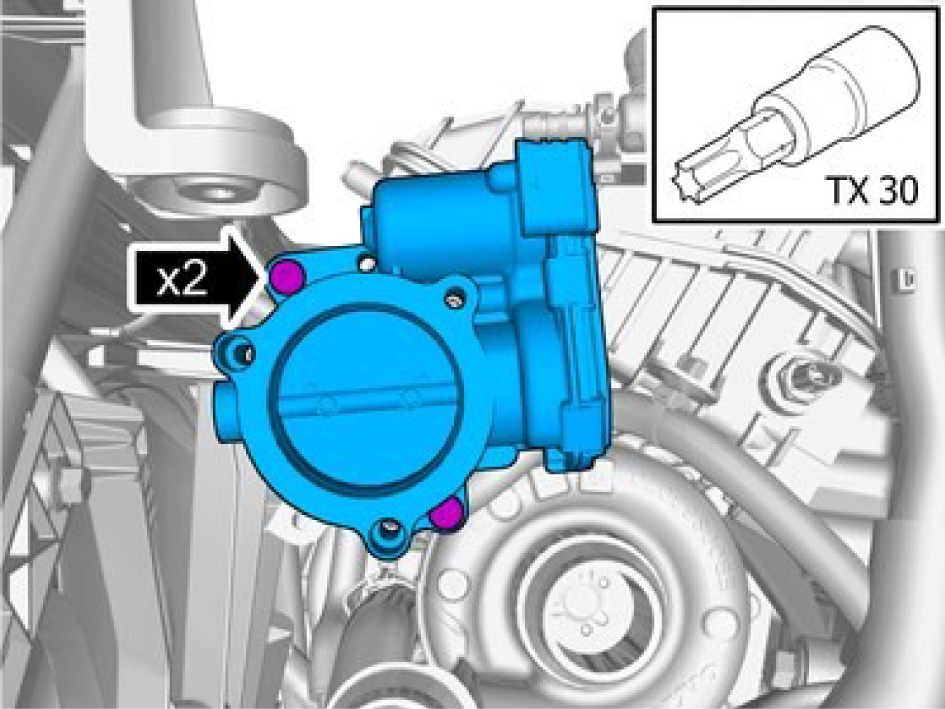
Remove the screws.
Remove the marked component.
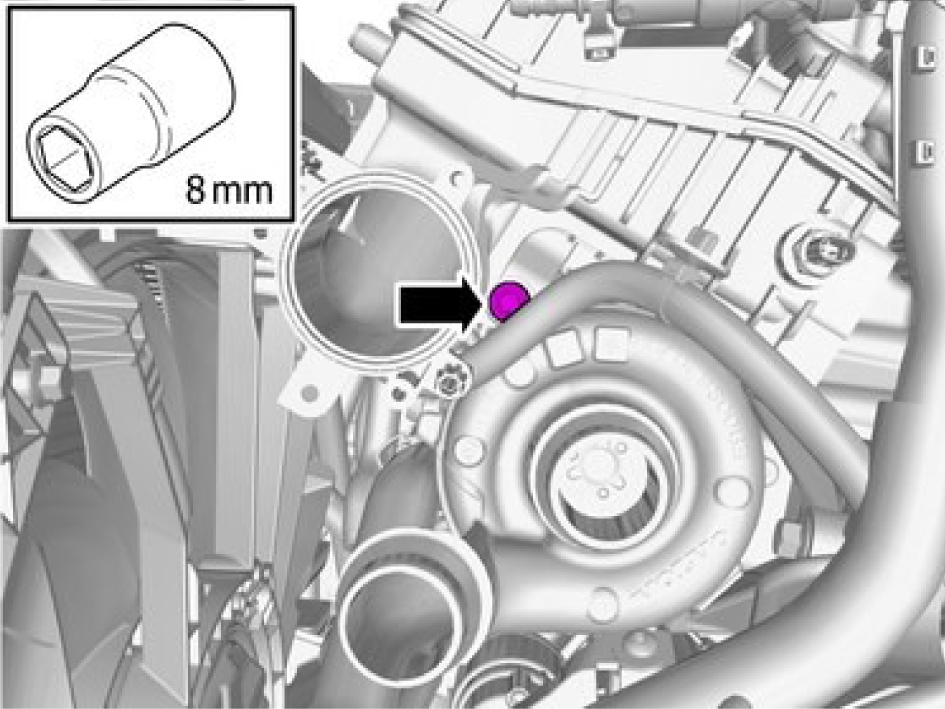
Remove the screw.
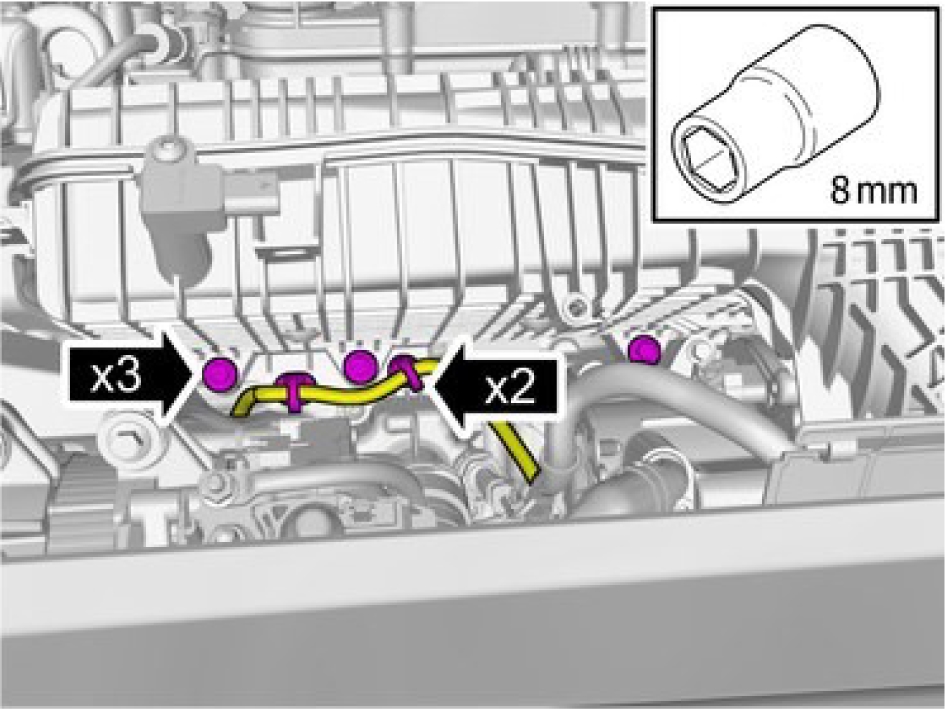
Remove the cable harness clips.
Remove the screws.
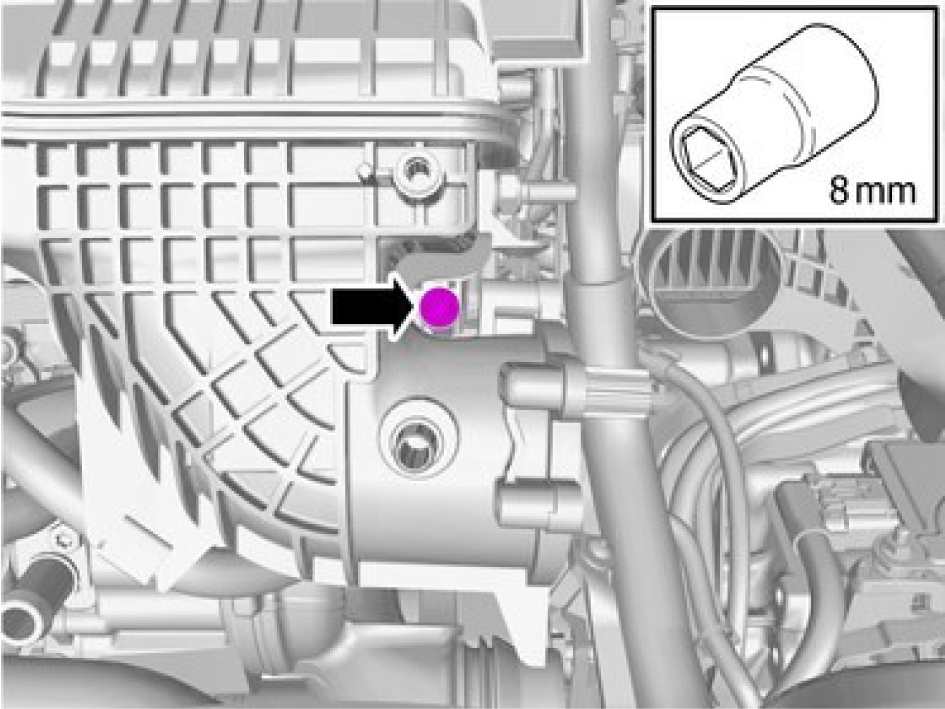
Remove the screw.
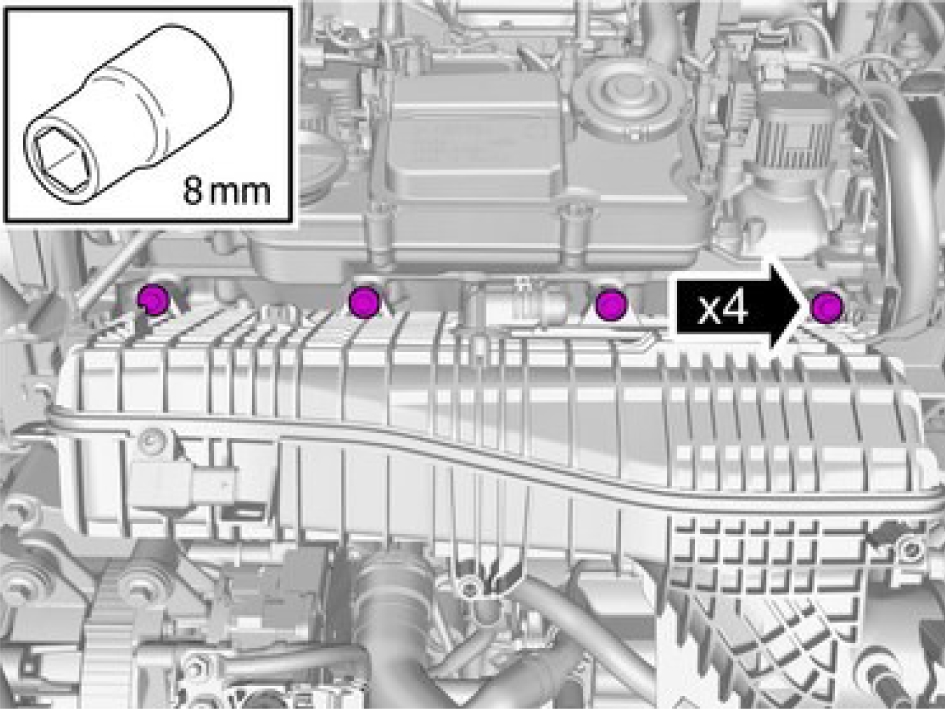
Remove the screws.
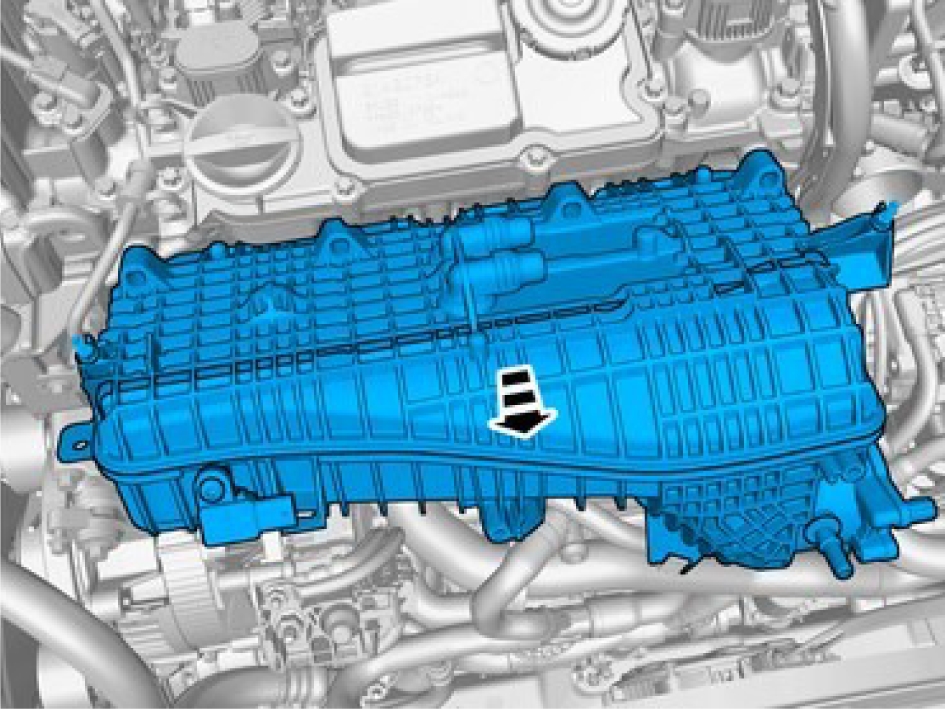
Remove the marked component.
Installation
Install the induction pipe.
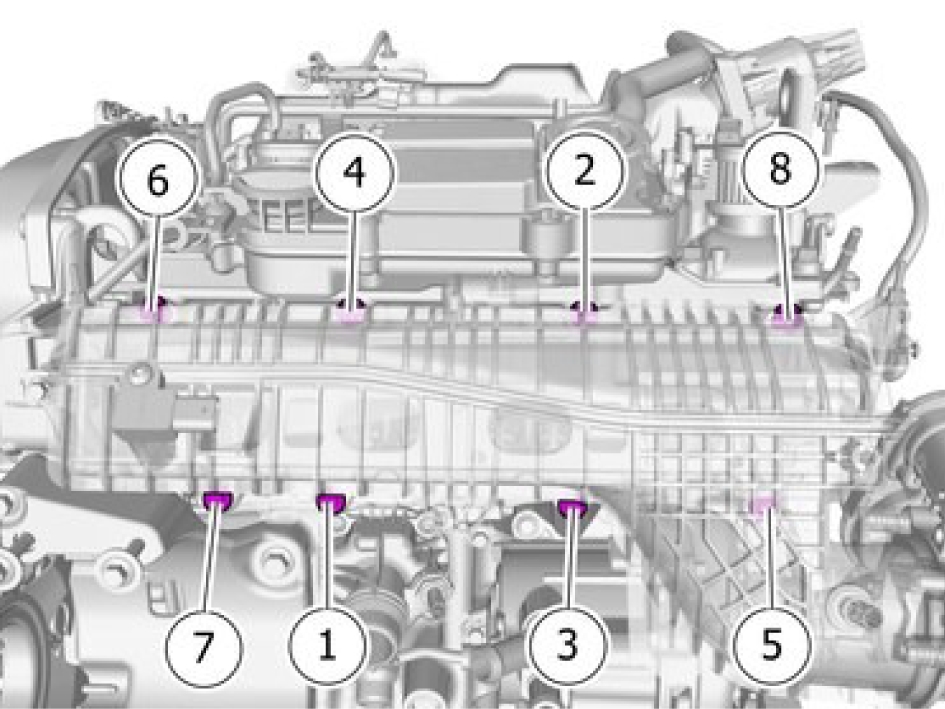
Install the screws M6, torque: 10 Nm
Install the cable harness under the induction pipe.
Install the marked component.
Install the screws throttle body, torque: 7 Nm
Fasten the cable clips under the throttle unit.
Install the components.
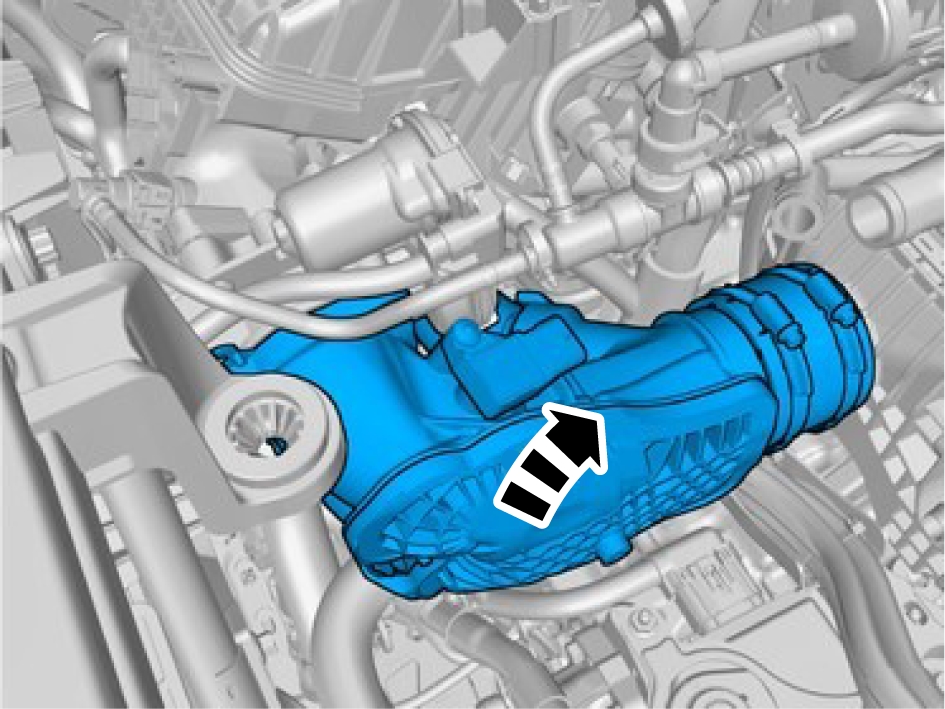
Install the marked component.
Install the clips.
Install the screws.
Install the connector.
Tighten the screws.
Tighten the hose clamps.
Install the connector and the cable harness clips.
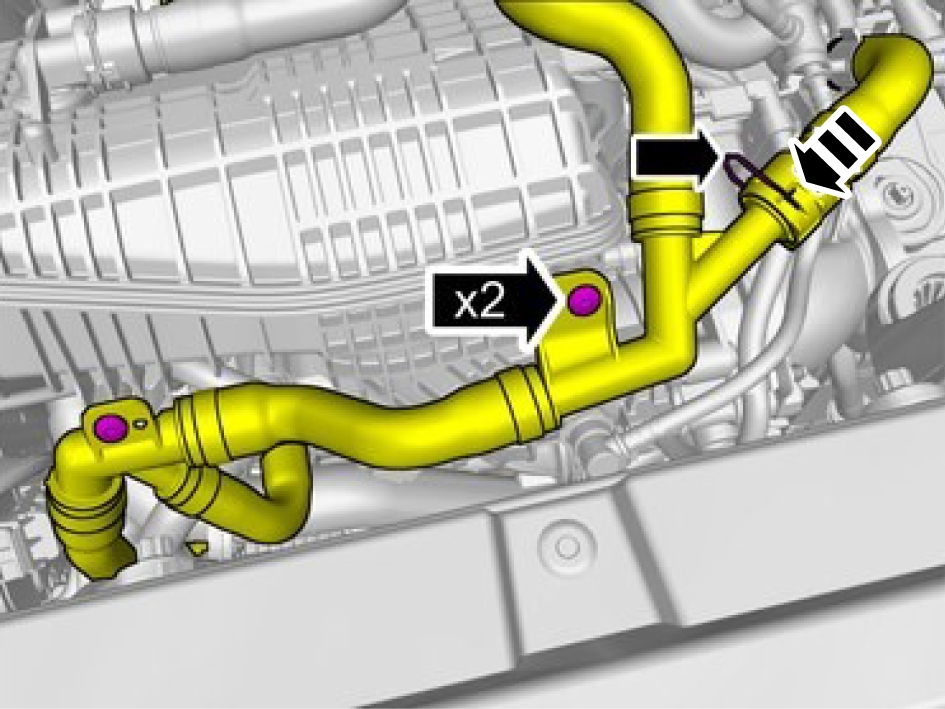
Fold the pipe back in position.
Install the pipe.
Tighten the screw.
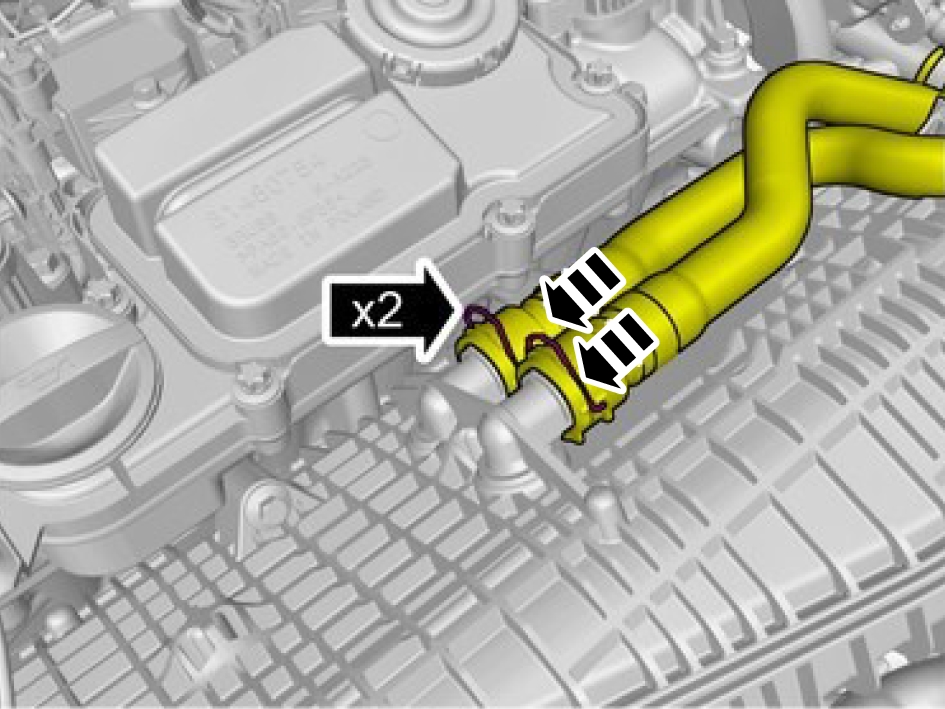
Install and lock the hoses.
Fill the cooling system, refer to:
Cooling system - draining, charging and bleedingDTC001100
Intake Camshaft Position Timing - Over-Advanced (Bank 1)
DTC: 001100
Information:
The Engine Control Module (ECM) regulates the position of the intake camshaft and controls that the requested position is achieved. If a divergence from the requested position is noticed the elapsed time until it is reached is measured. The allowed time varies depending on the requested position.
Test criteria:
The control module's test for the DTC starts when:
-
The engine is at normal operating temperature.
-
The engine speed is above 1 500 r/min.
-
The camshaft is regulated by the VVT solenoid, inlet.
Detection criteria:
The DTC is set if the control module detects that:
-
The camshaft moves too slowly (to the late position).
Faultcode actions:
None.
Related Documents
DTC001200
Intake Camshaft Position Timing - Over-Retarded (Bank 1)
DTC: 001200
Information:
The Engine Control Module (ECM) regulates the position of the intake camshaft and controls that the requested position is achieved. If a divergence from the requested position is noticed the elapsed time until it is reached is measured. The allowed time varies depending on the requested position.
Test criteria:
The control module's test for the DTC starts when:
-
The engine is at normal operating temperature.
-
The engine speed is above 1 500 r/min.
-
The camshaft is regulated by the VVT solenoid, inlet.
Detection criteria:
The DTC is set if the control module detects that:
-
The camshaft moves too slowly (to the early position).
Faultcode actions:
The regulation of the intake camshaft is switched off by the Engine Control Module (ECM).
Related Documents
DTC001400
Exhaust (B) Camshaft Position Timing - Over-Advanced (Bank 1)
DTC: 001400
Information:
The Engine Control Module (ECM) regulates the position of the exhaust camshaft and checks that the requested position is achieved. If a divergence from the requested position is noticed the elapsed time until it is reached is measured. The allowed time varies depending on the requested position.
Test criteria:
The control module's test for the DTC starts when:
-
The engine is at normal operating temperature.
-
The engine speed is above 1 500 r/min.
-
The camshaft is regulated by the VVT solenoid, exhaust.
Detection criteria:
The DTC is set if the control module detects that:
-
The cam shaft moves too slowly (to the late position).
Faultcode actions:
The regulation of the exhaust camshaft is switched off by the Engine Control Module (ECM).
Related Documents
DTC001500
Exhaust (B) Camshaft Position Timing - Over-Retarded (Bank 1)
DTC: 001500
Information:
The Engine Control Module (ECM) regulates the position of the exhaust camshaft and checks that the requested position is achieved. If a divergence from the requested position is noticed the elapsed time until it is reached is measured. The allowed time varies depending on the requested position.
Test criteria:
The control module's test for the DTC starts when:
-
The engine is at normal operating temperature.
-
The engine speed is above 1 500 r/min.
-
The camshaft is regulated by the VVT solenoid, exhaust.
Detection criteria:
The DTC is set if the control module detects that:
-
The camshaft moves too slowly (to the early position).
Faultcode actions:
The regulation of the exhaust camshaft is switched off by the Engine Control Module (ECM).
Related Documents
DTC001600
Crankshaft Position - Camshaft Position Correlation - Bank 1 Sensor A
DTC: 001600
Information:
The crankshaft position sensor is used by the Engine Control Module (ECM) to calculate crankshaft position and speed, enabling it to determine when a piston is approaching its top dead center position. When the reference gap on the crankshaft flywheel passes the crankshaft sensor, voltage and frequency instantly drop to zero.
Test criteria:
The control module's test for the DTC starts when:
-
The engine is running.
Detection criteria:
The DTC is set if the control module detects that:
-
The sensor does not observe the gap (missing four teeth) that exists in the crankshaft's correct position.
Faultcode actions:
The Engine Control Module (ECM) uses the signal from the camshaft position sensor.
Related Documents
DTC001621
Crankshaft Position - Camshaft Position Correlation - Bank 1 Sensor A General Signal Failures Signal amplitude < minimum
DTC: 001621
Information:
The Engine Control Module (ECM) determines if the camshaft is in the correct position. If not, the adaptation value will be adjusted in relation to the original position in order to compensate for the difference.
Test criteria:
The control module's test for the DTC starts when:
-
The adaptation of the intake camshaft is complete (the adaptation is performed while using the engine brake).
Detection criteria:
The DTC is set if the control module detects that:
-
The adaptation value is too low.
Faultcode actions:
None.
Related Documents
DTC001622
Crankshaft Position - Camshaft Position Correlation - Bank 1 Sensor A General Signal Failures Signal amplitude > maximum
DTC: 001622
Information:
The Engine Control Module (ECM) determines if the camshaft is in the correct position. If not, the adaptation value will be adjusted in relation to the original position in order to compensate for the difference.
Test criteria:
The control module's test for the DTC starts when:
-
The adaptation of the intake camshaft is complete (the adaptation is performed while using the engine brake).
Detection criteria:
The DTC is set if the control module detects that:
-
The adaptation value is too high.
Faultcode actions:
None.
Related Documents
DTC001692
Crankshaft Position - Camshaft Position Correlation - Bank 1 Sensor A Component Failures Performance or incorrect operation
DTC: 001692
Information:
The Engine Control Module (ECM) determines if the camshaft is in the correct position. If not, the adaptation value will be adjusted in relation to the original position in order to compensate for the difference.
Test criteria:
The control module's test for the DTC starts when:
-
The engine is at normal operating temperature.
Detection criteria:
The DTC is set if the control module detects that:
-
The camshaft adaptation value changes more than expected.
Faultcode actions:
None.
Related Documents
DTC001721
Crankshaft Position - Camshaft Position Correlation - Bank 1 Sensor B General Signal Failures Signal amplitude < minimum
DTC: 001721
Information:
The Engine Control Module (ECM) determines if the camshaft is in the correct position. If not, the adaptation value will be adjusted in relation to the original position in order to compensate for the difference.
Test criteria:
The control module's test for the DTC starts when:
-
The adaptation of the exhaust camshaft is complete (the adaptation is performed while using the engine brake).
Detection criteria:
The DTC is set if the control module detects that:
-
The adaptation value is too low.
Faultcode actions:
The Engine Control Module (ECM) will use a constant value for the adaptation of the camshaft.
Related Documents
DTC001722
Crankshaft Position - Camshaft Position Correlation - Bank 1 Sensor B General Signal Failures Signal amplitude > maximum
DTC: 001722
Information:
The Engine Control Module (ECM) determines if the camshaft is in the correct position. If not, the adaptation value will be adjusted in relation to the original position in order to compensate for the difference.
Test criteria:
The control module's test for the DTC starts when:
-
The adaptation of the exhaust camshaft is complete (the adaptation is performed while using the engine brake).
Detection criteria:
The DTC is set if the control module detects that:
-
The adaptation value is too high.
Faultcode actions:
The Engine Control Module (ECM) will use a constant value for the adaptation of the camshaft.
Related Documents
DTC001792
Crankshaft Position - Camshaft Position Correlation - Bank 1 Sensor B Component Failures Performance or incorrect operation
DTC: 001792
Information:
The Engine Control Module (ECM) determines if the camshaft is in the correct position. If not, the adaptation value will be adjusted in relation to the original position in order to compensate for the difference.
Test criteria:
The control module's test for the DTC starts when:
-
The adaptation of the exhaust camshaft is complete (the adaptation is performed while using the engine brake).
Detection criteria:
The DTC is set if the control module detects that:
-
The camshaft adaptation value changes more than expected.
Faultcode actions:
The Engine Control Module (ECM) will use a constant value for the adaptation of the camshaft.
Related Documents
DTC003100
HO2S Heater Control Circuit Low (Bank 1, Sensor 1)
DTC: 003100
Information:
The lambda probes are electrically pre-heated so that the operating temperature is rapidly reached. The heating also ensures that the lambda probes maintain a normal operating temperature and it prevents condensation which could cause damage.
Test criteria:
The control module's test for the DTC starts when:
-
The vehicle is in usage mode driving.
Detection criteria:
The DTC is set if the control module detects that:
-
The signal is too low or missing.
-
The resistance of the sensor is incorrect.
Faultcode actions:
None.
Related Documents
DTC003200
HO2S Heater Control Circuit High (Bank 1, Sensor 1)
DTC: 003200
Information:
The lambda probes are electrically pre-heated so that the operating temperature is rapidly reached. The heating also ensures that the lambda probes maintain a normal operating temperature and it prevents condensation which could cause damage.
Test criteria:
The control module's test for the DTC starts when:
-
The vehicle is in usage mode driving.
Detection criteria:
The DTC is set if the control module detects that:
-
The signal is too high.
Faultcode actions:
None.
Related Documents
DTC003300
Turbo/Super Charger Bypass Valve Control Circuit / Open
DTC: 003300
Information:
The turbo control valve bypass opens when the pressure becomes too high. The pressure is reduced by releasing the air back to before the turbo.
Test criteria:
The control module's test for the DTC starts when:
-
The vehicle is in usage mode active or higher.
Detection criteria:
The DTC is set if the control module detects that:
-
The signal is missing.
Faultcode actions:
None.
Related Documents
DTC003400
Turbo/Super Charger Bypass Valve Control Circuit Low
DTC: 003400
Information:
The turbo control valve bypass opens when the pressure becomes too high. The pressure is reduced by releasing the air back to before the turbo.
Test criteria:
The control module's test for the DTC starts when:
-
The vehicle is in usage mode active or higher.
Detection criteria:
The DTC is set if the control module detects that:
-
The signal is too low.
Faultcode actions:
None.
Related Documents
DTC003500
Turbo/Super Charger Bypass Valve Control Circuit High
DTC: 003500
Information:
The turbo control valve bypass opens when the pressure becomes too high. The pressure is reduced by releasing the air back to before the turbo.
Test criteria:
The control module's test for the DTC starts when:
-
The vehicle is in usage mode active or higher.
Detection criteria:
The DTC is set if the control module detects that:
-
The signal is too low.
Faultcode actions:
None.
Related Documents
DTC003600
DTC 003600
DTC: 003600
Information:
The lambda probes are electrically pre-heated so that the operating temperature is rapidly reached. The heating also ensures that the lambda probes maintain a normal operating temperature and it prevents condensation which could cause damage.
Test criteria:
The control module's test for the DTC starts when:
-
The vehicle is in usage mode driving.
Detection criteria:
The DTC is set if the control module detects that:
-
The signal is missing.
Faultcode actions:
The Engine Control Module (ECM) disables the control of the rear oxygen sensors.
DTC003700
HO2S Heater Control Circuit Low (Bank 1, Sensor 2)
DTC: 003700
Information:
The lambda probes are electrically pre-heated so that the operating temperature is rapidly reached. The heating also ensures that the lambda probes maintain a normal operating temperature and it prevents condensation which could cause damage.
Test criteria:
The control module's test for the DTC starts when:
-
The vehicle is in usage mode driving.
Detection criteria:
The DTC is set if the control module detects that:
-
The signal is too low or missing.
-
The resistance of the sensor is incorrect.
Faultcode actions:
None.
Related Documents
DTC003800
HO2S Heater Control Circuit High (Bank 1, Sensor 2)
DTC: 003800
Information:
The lambda probes are electrically pre-heated so that the operating temperature is rapidly reached. The heating also ensures that the lambda probes maintain a normal operating temperature and it prevents condensation which could cause damage.
Test criteria:
The control module's test for the DTC starts when:
-
The vehicle is in usage mode driving.
Detection criteria:
The DTC is set if the control module detects that:
-
The signal is too high.
Faultcode actions:
None.
Related Documents
DTC004200
HO2S Heater Control Circuit (Bank 1, Sensor 3)
DTC: 004200
Information:
The lambda probes are electrically pre-heated so that the operating temperature is rapidly reached. The heating also ensures that the lambda probes maintain a normal operating temperature and it prevents condensation which could cause damage.
Test criteria:
The control module's test for the DTC starts when:
-
The vehicle is in usage mode driving.
Detection criteria:
The DTC is set if the control module detects that:
-
The signal is missing.
Faultcode actions:
The Engine Control Module (ECM) disables the control of the rear oxygen sensors.
Related Documents
DTC004300
HO2S Heater Control Circuit Low (Bank 1, Sensor 3)
DTC: 004300
Information:
The lambda probes are electrically pre-heated so that the operating temperature is rapidly reached. The heating also ensures that the lambda probes maintain a normal operating temperature and it prevents condensation which could cause damage.
Test criteria:
The control module's test for the DTC starts when:
-
The vehicle is in usage mode driving.
Detection criteria:
The DTC is set if the control module detects that:
-
The signal is too low.
-
The resistance of the sensor is incorrect.
Faultcode actions:
The Engine Control Module (ECM) disables the control of the rear oxygen sensors.
Related Documents
DTC004400
HO2S Heater Control Circuit High (Bank 1, Sensor 3)
DTC: 004400
Information:
The lambda probes are electrically pre-heated so that the operating temperature is rapidly reached. The heating also ensures that the lambda probes maintain a normal operating temperature and it prevents condensation which could cause damage.
Test criteria:
The control module's test for the DTC starts when:
-
The vehicle is in usage mode driving.
Detection criteria:
The DTC is set if the control module detects that:
-
The signal is too high.
Faultcode actions:
The Engine Control Module (ECM) disables the control of the rear oxygen sensors.
Related Documents
DTC004500
Turbo/Super Charger Boost Control Solenoid Circuit / Open
DTC: 004500
Information:
Above a certain pressure, the turbo control valve wastegate allows a certain proportion of the exhaust gas past the turbocharger turbine, thus reducing the boost pressure to the desired level.
Test criteria:
The control module's test for the DTC starts when:
-
The vehicle is in usage mode active or higher.
Detection criteria:
The DTC is set if the control module detects that:
-
The signal is missing.
Faultcode actions:
The Engine Control Module (ECM) reduces the performance of the engine (Limp home).
Related Documents
DTC004600
DTC 004600
DTC: 004600
Information:
The Engine Control Module (ECM) regulates the boost pressure with the VNT unit by regulating the vanes inside the turbocharger.
Test criteria:
The control module's test for the DTC starts when:
-
The vehicle is in usage mode driving.
Detection criteria:
The DTC is set if the control module detects that:
-
The actual value from the VNT unit deviates too much from the desired value.
Faultcode actions:
The Engine Control Module (ECM) reduces engine performance.
DTC004700
Turbo/Super Charger Boost Control Solenoid Circuit Low
DTC: 004700
Information:
Above a certain pressure, the turbo control valve wastegate allows a certain proportion of the exhaust gas past the turbocharger turbine, thus reducing the boost pressure to the desired level.
Test criteria:
The control module's test for the DTC starts when:
-
The vehicle is in usage mode active or higher.
Detection criteria:
The DTC is set if the control module detects that:
-
The signal is too low.
Faultcode actions:
The Engine Control Module (ECM) reduces the performance of the engine (Limp home).
Related Documents
DTC004800
Turbo/Super Charger Boost Control Solenoid Circuit High
DTC: 004800
Information:
Above a certain pressure, the turbo control valve wastegate allows a certain proportion of the exhaust gas past the turbocharger turbine, thus reducing the boost pressure to the desired level.
Test criteria:
The control module's test for the DTC starts when:
-
The vehicle is in usage mode active or higher.
Detection criteria:
The DTC is set if the control module detects that:
-
The signal is too high.
Faultcode actions:
None.
Related Documents
DTC004A00
Turbocharger/Supercharger Boost Control "B" Circuit/Open
DTC: 004A00
Information:
The supercharger clutch is a magnetic clutch that is used to regulate if the supercharger is engaged or not. The supercharger clutch is spring loaded and disengages the supercharger when no power is supplied to it.
Test criteria:
The control module's test for the DTC starts when:
-
The vehicle is in usage mode driving.
-
The supercharger clutch is controlled by the Engine Control Module (ECM).
Detection criteria:
The DTC is set if the control module detects that:
-
The signal is missing.
Faultcode actions:
None.
Related Documents
DTC004A92
Turbocharger/Supercharger Boost Control "B" Circuit/Open Component Failures Performance or incorrect operation
DTC: 004A92
Information:
The Electric Charge air Compressor Module (ECCM) is used to get a rapid increase of the turbo pressure. Any faults are reported to the Engine Control Module (ECM) by the ECCM.
Test criteria:
The control module's test for the DTC starts when:
-
The vehicle is in usage mode active or higher.
Detection criteria:
The DTC is set if the control module detects that:
-
There is an internal fault in the Electric Charge air Compressor Module (ECCM).
Faultcode actions:
The Engine Control Module (ECM) disables the Electric Charge air Compressor Module (ECCM) usage.
Related Documents
DTC004B00
Turbocharger/Supercharger Boost Control "B" Circuit Range/Performance
DTC: 004B00
Information:
The supercharger clutch is a magnetic clutch that is used to regulate if the supercharger is engaged or not. The supercharger clutch is spring loaded and disengages the supercharger when no power is supplied to it.
Test criteria:
The control module's test for the DTC starts when:
-
The vehicle is in usage mode driving.
Detection criteria:
The DTC is set if the control module detects that:
-
The adaption value is outside a predefined value.
Faultcode actions:
None.
Related Documents
DTC004B49
Turbocharger/Supercharger Boost Control "B" Circuit Range/Performance System Internal Failures Internal electronic failure
DTC: 004B49
Information:
The Electric Charge air Compressor Module (ECCM) is used to get a rapid increase of the turbo pressure. Any faults are reported to the Engine Control Module (ECM) by the ECCM.
Test criteria:
The control module's test for the DTC starts when:
-
The vehicle is in usage mode active or higher.
Detection criteria:
The DTC is set if the control module detects that:
-
There is an electrical fault in the Electric Charge air Compressor Module (ECCM).
Faultcode actions:
The Engine Control Module (ECM) disables the Electric Charge air Compressor Module (ECCM) usage.
Related Documents
DTC004B98
Turbocharger/Supercharger Boost Control "B" Circuit Range/Performance Component Failures Component or system over temperature
DTC: 004B98
Information:
The Electric Charge air Compressor Module (ECCM) is used to get a rapid increase of the turbo pressure. Any faults are reported to the Engine Control Module (ECM) by the ECCM.
Test criteria:
The control module's test for the DTC starts when:
-
The vehicle is in usage mode active or higher.
Detection criteria:
The DTC is set if the control module detects that:
-
The temperature in the Electric Charge air Compressor Module (ECCM) is too high.
Faultcode actions:
The Engine Control Module (ECM) disables the Electric Charge air Compressor Module (ECCM) usage.
Related Documents
DTC004C00
Turbocharger/Supercharger Boost Control "B" Circuit Low
DTC: 004C00
Information:
The supercharger clutch is a magnetic clutch that is used to regulate if the supercharger is engaged or not. The supercharger clutch is spring loaded and disengages the supercharger when no power is supplied to it.
Test criteria:
The control module's test for the DTC starts when:
-
The vehicle is in usage mode driving.
-
The supercharger clutch is controlled by the Engine Control Module (ECM).
Detection criteria:
The DTC is set if the control module detects that:
-
The signal is too low.
Faultcode actions:
The Engine Control Module (ECM) restricts the engine speed to 3 000 r/min.
Related Documents
DTC004C14
Turbocharger/Supercharger Boost Control "B" Circuit Low General Electrical Failures Circuit short to ground or open
DTC: 004C14
Information:
The Engine Control Module (ECM) controls the supercharger clutch. The supercharger clutch is a magnetic clutch that is used to regulate if the supercharger is engaged or not. The supercharger clutch is spring loaded and disengages the supercharger when no power is supplied to it.
Test criteria:
The control module's test for the DTC starts when:
-
The vehicle is in usage mode driving.
Detection criteria:
The DTC is set if the control module detects that:
-
The signal to the supercharger clutch is too low.
Faultcode actions:
The Engine Control Module (ECM) restricts the engine speed to 3 000 r/min.
Related Documents
DTC004D00
Turbocharger/Supercharger Boost Control "B" Circuit High
DTC: 004D00
Information:
The supercharger clutch is a magnetic clutch that is used to regulate if the supercharger is engaged or not. The supercharger clutch is spring loaded and disengages the supercharger when no power is supplied to it.
Test criteria:
The control module's test for the DTC starts when:
-
The vehicle is in usage mode driving.
-
The supercharger clutch is controlled by the Engine Control Module (ECM).
Detection criteria:
The DTC is set if the control module detects that:
-
The signal is too high.
Faultcode actions:
None.
Related Documents
DTC004F00
Turbocharger/Supercharger Boost Control "B" Circuit Intermittent/Erratic
DTC: 004F00
Information:
The Engine Control Module (ECM) controls the supercharger clutch. The supercharger clutch is a magnetic clutch that is used to regulate if the supercharger is engaged or not. The supercharger clutch is spring loaded and disengages the supercharger when no power is supplied to it.
Test criteria:
The control module's test for the DTC starts when:
-
The vehicle is in usage mode driving.
Detection criteria:
The DTC is set if the control module detects that:
-
The signal to the supercharger clutch is intermittent.
Faultcode actions:
None.
Related Documents
DTC007000
Ambient Air Temperature Sensor Circuit "A"
DTC: 007000
Information:
The ambient temperature sensor, external mirror, is located in the right side external mirror and is connected to the right side door module. The door module continuously sends information about the temperature via CAN and FlexRay to the Engine Control Module (ECM), which performs the diagnostics.
Test criteria:
The control module's test for the DTC starts when:
-
The vehicle's usage mode is changed to active after the engine has been switched off for at least 6 hours.
Detection criteria:
The DTC is set if the control module detects that:
-
There is no signal from the ambient temperature sensor.
Faultcode actions:
The Engine Control Module (ECM) uses a value calculated from other sensors in the engine.
DTC007121
Ambient Air Temperature Sensor Range/Performance General Signal Failures Signal amplitude < minimum
DTC: 007121
Information:
The ambient temperature sensor, external mirror, is located in the right side external mirror and is connected to the right side door module. The door module continuously sends information about the temperature via CAN and FlexRay to the Engine Control Module (ECM), which performs the diagnostics.
Test criteria:
The control module's test for the DTC starts when:
-
The vehicle's usage mode is changed to active after the engine has been switched off for at least 6 hours.
Detection criteria:
The DTC is set if the control module detects that:
-
The measured temperature is within the allowed range, but lower than expected compared to other temperatures in the engine.
Faultcode actions:
The Engine Control Module (ECM) uses a value calculated from other sensors in the engine.
DTC007122
Ambient Air Temperature Sensor Range/Performance General Signal Failures Signal amplitude > maximum
DTC: 007122
Information:
The ambient temperature sensor, external mirror, is located in the right side external mirror and is connected to the right side door module. The door module continuously sends information about the temperature via CAN and FlexRay to the Engine Control Module (ECM), which performs the diagnostics.
Test criteria:
The control module's test for the DTC starts when:
-
The vehicle's usage mode is changed to active after the engine has been switched off for at least 6 hours.
Detection criteria:
The DTC is set if the control module detects that:
-
The measured temperature is within the allowed range, but higher than expected compared to other temperatures in the engine.
Faultcode actions:
The Engine Control Module (ECM) uses a value calculated from other sensors in the engine.
DTC007123
DTC 007123
DTC: 007123
Information:
The ambient temperature sensor, external mirror, is located in the right side external mirror and is connected to the right side door module. The door module continuously sends information about the temperature via CAN and FlexRay to the Engine Control Module (ECM), which performs the diagnostics.
Test criteria:
The control module's test for the DTC starts when:
-
The vehicle's usage mode is changed to active after the engine has been switched off for at least 6 hours.
Detection criteria:
The DTC is set if the control module detects that:
-
The measured temperature is within the allowed range, but lower than expected compared to other temperatures in the engine.
Faultcode actions:
The Engine Control Module (ECM) uses a value calculated from other sensors in the engine.
DTC007124
DTC 007124
DTC: 007124
Information:
The ambient temperature sensor, external mirror, is located in the right side external mirror and is connected to the right side door module. The door module continuously sends information about the temperature via CAN and FlexRay to the Engine Control Module (ECM), which performs the diagnostics.
Test criteria:
The control module's test for the DTC starts when:
-
The vehicle's usage mode is changed to active after the engine has been switched off for at least 6 hours.
Detection criteria:
The DTC is set if the control module detects that:
-
The measured temperature is within the allowed range, but higher than expected compared to other temperatures in the engine.
Faultcode actions:
The Engine Control Module (ECM) uses a value calculated from other sensors in the engine.
DTC007200
Ambient Air Temperature Sensor Circuit Low Input
DTC: 007200
Information:
The ambient temperature sensor, external mirror, is located in the right side external mirror and is connected to the right side door module. The door module continuously sends information about the temperature via CAN and FlexRay to the Engine Control Module (ECM), which performs the diagnostics.
Test criteria:
The control module's test for the DTC starts when:
-
The vehicle is in usage mode active or higher.
Detection criteria:
The DTC is set if the control module detects that:
-
The signal is too low.
-
An incorrect value lasts longer than 9 s.
Faultcode actions:
The Engine Control Module (ECM) uses a value calculated from other sensors in the engine.
DTC007300
Ambient Air Temperature Sensor Circuit High Input
DTC: 007300
Information:
The ambient temperature sensor, external mirror, is located in the right side external mirror and is connected to the right side door module. The door module continuously sends information about the temperature via CAN and FlexRay to the Engine Control Module (ECM), which performs the diagnostics.
Test criteria:
The control module's test for the DTC starts when:
-
The vehicle is in usage mode active or higher.
Detection criteria:
The DTC is set if the control module detects that:
-
The signal is too high.
Faultcode actions:
The Engine Control Module (ECM) uses a value calculated from other sensors in the engine.
DTC007500
Intake Valve Control Circuit (Bank 1)
DTC: 007500
Information:
The VVT solenoid controls the oil flow to the VVT unit for the intake camshaft. The valve is electro-magnetic with a spring-loaded piston.
Test criteria:
The control module's test for the DTC starts when:
-
The vehicle is in usage mode active or higher.
Detection criteria:
The DTC is set if the control module detects that:
-
The signal from the VVT solenoid is missing.
Faultcode actions:
The regulation of the intake camshaft is switched off by the Engine Control Module (ECM).
Related Documents
DTC007600
Intake Valve Control Circuit Low (Bank 1)
DTC: 007600
Information:
The VVT solenoid controls the oil flow to the VVT unit for the intake camshaft. The valve is electro-magnetic with a spring-loaded piston.
Test criteria:
The control module's test for the DTC starts when:
-
The vehicle is in usage mode active or higher.
Detection criteria:
The DTC is set if the control module detects that:
-
The signal from the VVT solenoid is too low.
Faultcode actions:
The regulation of the intake camshaft is switched off by the Engine Control Module (ECM).
Related Documents
DTC007700
Intake Valve Control Circuit High (Bank 1)
DTC: 007700
Information:
The VVT solenoid controls the oil flow to the VVT unit for the intake camshaft. The valve is electro-magnetic with a spring-loaded piston.
Test criteria:
The control module's test for the DTC starts when:
-
The vehicle is in usage mode active or higher.
Detection criteria:
The DTC is set if the control module detects that:
-
The signal from the VVT solenoid is too high.
Faultcode actions:
The regulation of the intake camshaft is switched off by the Engine Control Module (ECM).
Related Documents
DTC007800
Exhaust Valve Control Circuit (Bank 1)
DTC: 007800
Information:
The VVT solenoid controls the oil flow to the VVT unit for the exhaust camshaft. The valve is electro-magnetic with a spring-loaded piston.
Test criteria:
The control module's test for the DTC starts when:
-
The vehicle is in usage mode active or higher.
Detection criteria:
The DTC is set if the control module detects that:
-
The signal from the VVT solenoid is missing.
Faultcode actions:
The regulation of the exhaust camshaft is switched off by the Engine Control Module (ECM).
Related Documents
DTC007900
Exhaust Valve Control Circuit Low (Bank 1)
DTC: 007900
Information:
The VVT solenoid controls the oil flow to the VVT unit for the exhaust camshaft. The valve is electro-magnetic with a spring-loaded piston.
Test criteria:
The control module's test for the DTC starts when:
-
The vehicle is in usage mode active or higher.
Detection criteria:
The DTC is set if the control module detects that:
-
The signal from the VVT solenoid is too low.
Faultcode actions:
The regulation of the exhaust camshaft is switched off by the Engine Control Module (ECM).
Related Documents
DTC008000
Exhaust Valve Control Circuit High (Bank 1)
DTC: 008000
Information:
The VVT solenoid controls the oil flow to the VVT unit for the exhaust camshaft. The valve is electro-magnetic with a spring-loaded piston.
Test criteria:
The control module's test for the DTC starts when:
-
The vehicle is in usage mode active or higher.
Detection criteria:
The DTC is set if the control module detects that:
-
The signal from the VVT solenoid is too high.
Faultcode actions:
The regulation of the exhaust camshaft is switched off by the Engine Control Module (ECM).
Related Documents
DTC008700
Fuel Rail/System Pressure - Too Low
DTC: 008700
Information:
The fuel pressure sensor high-pressure side provides the Engine Control Module (ECM) with information about the current fuel pressure in the common rail. The sensor is used to regulate the fuel quantity control valve and to calculate injection time.
Test criteria:
The control module's test for the DTC starts when:
-
The engine is running.
Detection criteria:
The DTC is set if the control module detects that:
-
The sensor value is within the allowed range but lower than expected.
Faultcode actions:
The Engine Control Module (ECM) uses a value calculated from other sensors in the engine to control the fuel pump module.
Related Documents
DTC008800
Fuel Rail/System Pressure - Too High
DTC: 008800
Information:
The fuel pressure sensor high-pressure side provides the Engine Control Module (ECM) with information about the current fuel pressure in the common rail. The sensor is used to regulate the control valve, fuel quantity and to calculate injection time.
Test criteria:
The control module's test for the DTC starts when:
-
The engine is running.
Detection criteria:
The DTC is set if the control module detects that:
-
The sensor value is within the allowed range but higher than expected.
Faultcode actions:
The Engine Control Module (ECM) uses a value calculated from other sensors in the engine to control the fuel pump module.
DTC008A00
Low-Pressure Fuel System Pressure - Too Low
DTC: 008A00
Information:
The Engine Control Module (ECM) controls the fuel pressure via the fuel pump module using a PWM signal. The fuel pump module then controls the fuel pump depending on the pressure requested by the Engine Control Module (ECM).
Test criteria:
The control module's test for the DTC starts when:
-
The engine is running.
Detection criteria:
The DTC is set if the control module detects that:
-
The sensor value is within the allowed range but lower than expected.
Faultcode actions:
The Engine Control Module (ECM) uses a value calculated from other sensors in the engine to control the fuel pump module.
Related Documents
DTC008A84
Low-Pressure Fuel System Pressure - Too Low Bus Signal / Message Failures Signal below allowable range
DTC: 008A84
Information:
The Engine Control Module (ECM) controls the fuel pressure via the fuel pump module using a PWM signal. The fuel pump module then controls the fuel pump depending on the pressure requested by the Engine Control Module (ECM).
Test criteria:
The control module's test for the DTC starts when:
-
The engine is running.
Detection criteria:
The DTC is set if the control module detects that:
-
The sensor value is within the allowed range but lower than expected.
-
The fuel level is too low.
Faultcode actions:
The Engine Control Module (ECM) turns off the high-pressure fuel pump.
Related Documents
DTC008A85
Low-Pressure Fuel System Pressure - Too Low Bus Signal / Message Failures Signal above allowable range
DTC: 008A85
Information:
The Engine Control Module (ECM) controls the fuel pressure via the fuel pump module using a PWM signal. The fuel pump module then controls the fuel pump depending on the pressure requested by the Engine Control Module (ECM).
Test criteria:
The control module's test for the DTC starts when:
-
The engine is running.
Detection criteria:
The DTC is set if the control module detects that:
-
The sensor value is within the allowed range but lower than expected.
-
The fuel level is too high.
Faultcode actions:
The Engine Control Module (ECM) turns off the high-pressure fuel pump.
Related Documents
DTC008B00
Low-Pressure Fuel System Pressure - Too High
DTC: 008B00
Information:
The Engine Control Module (ECM) controls the fuel pressure via the fuel pump module using a PWM signal. The fuel pump module then controls the fuel pump depending on the pressure requested by the Engine Control Module (ECM).
Test criteria:
The control module's test for the DTC starts when:
-
The engine is running.
Detection criteria:
The DTC is set if the control module detects that:
-
The sensor value is within the allowed range but higher than expected.
Faultcode actions:
The Engine Control Module (ECM) uses a value calculated from other sensors in the engine to control the fuel pump module.
Related Documents
DTC009600
Intake Air Temperature Sensor 2 Circuit Range/Performance
DTC: 009600
Information:
The air pressure- and air temperature sensor 2 measures the temperature of the intake air between the charge air cooler and the throttle unit. The information is used by the Engine Control Module (ECM) to calculate boost pressure control and injection time.
Test criteria:
The control module's test for the DTC starts when:
-
The vehicle is in usage mode driving.
-
At least 10 accelerations have been performed with the throttle released after each acceleration.
Detection criteria:
The DTC is set if the control module detects that:
-
The measured temperature is constant (within the allowed range) during the entire driving cycle.
Faultcode actions:
The Engine Control Module (ECM) uses the temperature values from the Mass Airflow sensor (MAF) and the intake manifold air temperature sensor.
Related Documents
DTC009621
Intake Air Temperature Sensor 2 Circuit Range/Performance (Bank 1) General Signal Failures Signal amplitude < minimum
DTC: 009621
Information:
The air pressure- and air temperature sensor 2 measures the temperature of the intake air between the charge air cooler and the throttle unit. The information is used by the Engine Control Module (ECM) to calculate boost pressure control and injection time.
Test criteria:
The control module's test for the DTC starts when:
-
The engine is started after having been switched off for more than six hours.
Detection criteria:
The DTC is set if the control module detects that:
-
The measured temperature is within the allowed range, but lower than expected compared to other temperatures in the engine.
Faultcode actions:
The Engine Control Module (ECM) uses the temperature values from the Mass Airflow sensor (MAF) and the intake manifold air temperature sensor.
Related Documents
DTC009622
Intake Air Temperature Sensor 2 Circuit Range/Performance (Bank 1) General Signal Failures Signal amplitude > maximum
DTC: 009622
Information:
The air pressure- and air temperature sensor 2 measures the temperature of the intake air between the charge air cooler and the throttle unit. The information is used by the Engine Control Module (ECM) to calculate boost pressure control and injection time.
Test criteria:
The control module's test for the DTC starts when:
-
The engine is started after having been switched off for more than six hours.
Detection criteria:
The DTC is set if the control module detects that:
-
The measured temperature is within the allowed range, but higher than expected compared to other temperatures in the engine.
Faultcode actions:
The Engine Control Module (ECM) uses the temperature values from the Mass Airflow sensor (MAF) and the intake manifold air temperature sensor.
Related Documents
DTC00962A
Intake Air Temperature Sensor 2 Circuit Range/Performance (Bank 1) General Signal Failures Signal Stuck In Range
DTC: 00962A
Information:
The Engine Control Module (ECM) monitors the temperature of the intake air using the intake manifold air temperature sensor.
Test criteria:
The control module's test for the DTC starts when:
-
The engine is running with or without EGR.
Detection criteria:
The DTC is set if the control module detects that:
-
The temperature deviation is too small.
Faultcode actions:
The Engine Control Module (ECM) uses a value calculated from other sensors in the engine.
Related Documents
DTC009700
Intake Air Temperature Sensor 2 Circuit Low Input
DTC: 009700
Information:
The air pressure- and air temperature sensor 2 measures the temperature of the intake air between the charge air cooler and the throttle unit. The information is used by the Engine Control Module (ECM) to calculate boost pressure control and injection time.
Test criteria:
The control module's test for the DTC starts when:
-
The vehicle is in usage mode active or higher.
Detection criteria:
The DTC is set if the control module detects that:
-
The signal is too low.
Faultcode actions:
The Engine Control Module (ECM) uses the temperature values from the Mass Airflow sensor (MAF) and the intake manifold air temperature sensor.
Related Documents
DTC009800
Intake Air Temperature Sensor 2 Circuit High Input
DTC: 009800
Information:
The air pressure- and air temperature sensor 2 measures the temperature of the intake air between the charge air cooler and the throttle unit. The information is used by the Engine Control Module (ECM) to calculate boost pressure control and injection time.
Test criteria:
The control module's test for the DTC starts when:
-
The vehicle is in usage mode driving.
Detection criteria:
The DTC is set if the control module detects that:
-
The signal is too high.
Faultcode actions:
The Engine Control Module (ECM) uses the temperature values from the Mass Airflow sensor (MAF) and the intake manifold air temperature sensor.
Related Documents
DTC009E00
Fuel Pressure Relief Control Performance / Stuck Off
DTC: 009E00
Information:
The high-pressure fuel pump is fitted with a mechanical safety valve that opens if the fuel rail pressure is too high. The fuel pressure sensor high-pressure side provides the Engine Control Module (ECM) with information on whether the safety valve has opened or not. An opening may cause a potentially damaging pressure in the low-pressure system.
Test criteria:
The control module's test for the DTC starts when:
-
The engine is running.
Detection criteria:
The DTC is set if the control module detects that:
-
The fuel rail pressure is within the allowed range but the pressure in the low-pressure system is above the allowed range.
-
The pressure does not decrease and continues to be above the allowed range.
Faultcode actions:
The Engine Control Module (ECM) forces open the safety valve and keeps it open so that further harm to the low-pressure system is avoided.
Related Documents
DTC009F00
Fuel Pressure Relief Control Stuck On
DTC: 009F00
Information:
The high-pressure fuel pump is fitted with a mechanical safety valve that opens if the fuel rail pressure is too high. The fuel pressure sensor high-presssure side provides the Engine Control Module (ECM) with information on whether the safety valve has opened or not. An opening may cause a potentially damaging pressure in the low-pressure system.
Test criteria:
The control module's test for the DTC starts when:
-
The engine is running.
Detection criteria:
The DTC is set if the control module detects that:
-
The fuel rail pressure is within the allowed range but the pressure in the low-pressure system is above the allowed range.
-
The safety valve has opened and the pressure has been restored within the allowed range.
Faultcode actions:
The Engine Control Module (ECM) forces open the safety valve and keeps it open so that further harm to the low-pressure system is avoided.
Related Documents
DTC010000
Mass or Volume Air Flow Circuit
DTC: 010000
Information:
The Mass Airflow sensor (MAF) measures the amount of air that flows into the engine and continuously transmits the value to the Engine Control Module (ECM).
Test criteria:
The control module's test for the DTC starts when:
-
The vehicle is in usage mode active or higher.
Detection criteria:
The DTC is set if the control module detects that:
-
The signal from the sensor is incorrect or missing.
Faultcode actions:
The Engine Control Module (ECM) uses a value calculated from other sensors in the engine.
Related Documents
DTC010092
Mass or Volume Air Flow Sensor "A" Circuit Component Failures Performance or incorrect operation
DTC: 010092
Information:
The Mass Airflow sensor (MAF) measures the air flow and the humidity in the intake. The Engine Control Module (ECM) monitors the Mass Airflow sensor (MAF).
Test criteria:
The control module's test for the DTC starts when:
-
The vehicle is in usage mode active or higher.
Detection criteria:
The DTC is set if the control module detects that:
-
The signal from the sensor indicates a fault related to the Mass Airflow sensor (MAF).
Faultcode actions:
The Engine Control Module (ECM) uses a value calculated from other sensors in the engine.
Related Documents
DTC010096
Mass or Volume Air Flow Sensor "A" Circuit Component Failures Component internal failure
DTC: 010096
Information:
The Mass Airflow sensor (MAF) measures the air flow and the humidity in the intake. The Engine Control Module (ECM) monitors the Mass Airflow sensor (MAF).
Test criteria:
The control module's test for the DTC starts when:
-
The vehicle is in usage mode active or higher.
Detection criteria:
The DTC is set if the control module detects that:
-
The signal from the sensor indicates a fault related to the Mass Airflow sensor (MAF).
Faultcode actions:
The Engine Control Module (ECM) uses a value calculated from other sensors in the engine.
Related Documents
DTC0100A1
Mass or Volume Air Flow Sensor "A" Circuit General Electrical Failures System Voltage
DTC: 0100A1
Information:
The Mass Airflow sensor (MAF) measures the air flow and the humidity in the intake. The Engine Control Module (ECM) monitors the MAF.
Test criteria:
The control module's test for the DTC starts when:
-
The vehicle is in usage mode active or higher.
Detection criteria:
The DTC is set if the control module detects that:
-
The signal from the sensor indicates a fault related to the Mass Airflow sensor (MAF).
Faultcode actions:
The Engine Control Module (ECM) uses a value calculated from other sensors in the engine.
Related Documents
DTC010100
Mass or Volume Air Flow Circuit Range/Performance
DTC: 010100
Information:
The Mass Airflow sensor (MAF) measures the amount of air that flows into the engine and continuously transmits the value to the Engine Control Module (ECM).
Test criteria:
The control module's test for the DTC starts when:
-
Varied driving has been performed.
-
The throttle is lightly applied.
Detection criteria:
The DTC is set if the control module detects that:
-
The measured value is too low compared to the rest of the sensors in the engine.
Faultcode actions:
The Engine Control Module (ECM) uses a value calculated from other sensors in the engine.
Related Documents
DTC010109
Mass or Volume Air Flow Sensor "A" Circuit Range/Performance Component Failures
DTC: 010109
Information:
The Mass Airflow sensor (MAF) measures the amount of air that flows into the engine and continuously transmits the value to the Engine Control Module (ECM).
Test criteria:
The control module's test for the DTC starts when:
-
Varied driving has been performed.
-
The throttle is lightly applied.
Detection criteria:
The DTC is set if the control module detects that:
-
The measured value is too high compared to the values from the rest of the sensors in the engine.
Faultcode actions:
The Engine Control Module (ECM) uses a value calculated from other sensors in the engine.
Related Documents
DTC010200
Mass or Volume Air Flow Circuit Low Input
DTC: 010200
Information:
The Mass Airflow sensor (MAF) measures the amount of air that flows into the engine and continuously transmits the value to the Engine Control Module (ECM).
Test criteria:
The control module's test for the DTC starts when:
-
The vehicle is in usage mode active or higher.
Detection criteria:
The DTC is set if the control module detects that:
-
The signal is too low.
Faultcode actions:
The Engine Control Module (ECM) uses a value calculated from other sensors in the engine.
Related Documents
DTC010300
Lost Communication With Gear Shift Control Module A
DTC: 010300
Information:
The Mass Airflow sensor (MAF) measures the amount of air that flows into the engine and continuously transmits the value to the Engine Control Module (ECM).
Test criteria:
The control module's test for the DTC starts when:
-
The vehicle is in usage mode active or higher.
Detection criteria:
The DTC is set if the control module detects that:
-
The signal is too high.
Faultcode actions:
The Engine Control Module (ECM) uses a value calculated from other sensors in the engine.
Related Documents
DTC010600
Manifold Absolute Pressure/BARO Sensor Range/Performance
DTC: 010600
Information:
The signal from the manifold absolute pressure sensor is used by the Engine Control Module (ECM) as a complement to other pressure sensors in the intake system to control the throttle as well as to calculate injection time and requested fuel pressure. The sensor detects fast pressure changes in the intake manifold after the throttle.
Test criteria:
The control module's test for the DTC starts when:
-
The vehicle has been in usage mode active for 10 s.
Detection criteria:
The DTC is set if the control module detects that:
-
The measured pressure deviates more than expected from the other pressure sensors in the engine.
Faultcode actions:
The Engine Control Module (ECM) uses a value calculated from other sensors in the engine.
Related Documents
DTC010602
Manifold Absolute Pressure/Barometric Pressure Sensor Circuit Range/Performance General signal failure
DTC: 010602
Information:
The signal from the manifold absolute pressure sensor is used by the Engine Control Module (ECM) as a complement to other pressure sensors in the intake system to control the throttle as well as to calculate injection time and requested fuel pressure. The sensor detects fast pressure changes in the intake manifold after the throttle.
Test criteria:
The control module's test for the DTC starts when:
-
Varied driving has been performed.
Detection criteria:
The DTC is set if the control module detects that:
-
The measured pressure deviates more than expected from the other pressure sensors in the engine.
Faultcode actions:
The Engine Control Module (ECM) uses a value calculated from other sensors in the engine.
Related Documents
DTC010700
Manifold Absolute Pressure/BARO Sensor Low Input
DTC: 010700
Information:
The signal from the manifold absolute pressure sensor is used by the Engine Control Module (ECM) as a complement to other pressure sensors in the intake system to control the throttle as well as to calculate injection time and requested fuel pressure. The sensor detects fast pressure changes in the intake manifold after the throttle.
Test criteria:
The control module's test for the DTC starts when:
-
The vehicle is in usage mode active or higher.
Detection criteria:
The DTC is set if the control module detects that:
-
The signal is too low.
Faultcode actions:
The Engine Control Module (ECM) uses a value calculated from other sensors in the engine.
Related Documents
DTC010800
Manifold Absolute Pressure/BARO Sensor High Input
DTC: 010800
Information:
The signal from the manifold absolute pressure sensor is used by the Engine Control Module (ECM) as a complement to other pressure sensors in the intake system to control the throttle as well as to calculate injection time and requested fuel pressure. The sensor detects fast pressure changes in the intake manifold after the throttle.
Test criteria:
The control module's test for the DTC starts when:
-
The vehicle is in usage mode active or higher.
Detection criteria:
The DTC is set if the control module detects that:
-
The signal is too high.
Faultcode actions:
The Engine Control Module (ECM) uses a value calculated from other sensors in the engine.
Related Documents
DTC011121
Intake Air Temperature Sensor 1 Circuit Range/Performance (Bank 1) General Signal Failures Signal amplitude < minimum
DTC: 011121
Information:
The Mass Airflow sensor (MAF) measures the temperature of the air in the intake. The information is used by the Engine Control Module (ECM), both for diagnostics and for controlling the engine.
Test criteria:
The control module's test for the DTC starts when:
-
The engine is started after having been switched off for more than six hours.
Detection criteria:
The DTC is set if the control module detects that:
-
The measured temperature is within the allowed range, but lower than expected compared to other temperatures in the engine.
Faultcode actions:
The Engine Control Module (ECM) uses the ambient temperature sensor, external mirror, which is located in the right side external mirror.
Related Documents
DTC011122
Intake Air Temperature Sensor 1 Circuit Range/Performance (Bank 1) General Signal Failures Signal amplitude > maximum
DTC: 011122
Information:
The Mass Airflow sensor (MAF) measures the temperature of the air in the intake. The information is used by the Engine Control Module (ECM), both for diagnostics and for controlling the engine.
Test criteria:
The control module's test for the DTC starts when:
-
The engine is started after having been switched off for more than six hours.
Detection criteria:
The DTC is set if the control module detects that:
-
The measured temperature is within the allowed range, but higher than expected compared to other temperatures in the engine.
Faultcode actions:
The Engine Control Module (ECM) uses the ambient temperature sensor, external mirror, which is located in the right side external mirror.
Related Documents
DTC01112A
Intake Air Temperature Sensor 1 Circuit Range/Performance (Bank 1) General Signal Failures Signal Stuck In Range
DTC: 01112A
Information:
The Mass Airflow sensor (MAF) measures the temperature of the air in the intake. The information is used by the Engine Control Module (ECM), both for diagnostics and for controlling the engine.
Test criteria:
The control module's test for the DTC starts when:
-
Varied driving has been performed.
Detection criteria:
The DTC is set if the control module detects that:
-
The measured temperature is constant (within the allowed range) during the entire driving cycle.
Faultcode actions:
The Engine Control Module (ECM) uses the ambient temperature sensor, external mirror, which is located in the right side external mirror.
Related Documents
DTC011200
Intake Air Temperature Sensor 1 Circuit Low Input
DTC: 011200
Information:
The Mass Airflow sensor (MAF) measures the temperature of the air in the intake. The information is used by the Engine Control Module (ECM), both for diagnostics and for controlling the engine.
Test criteria:
The control module's test for the DTC starts when:
-
The vehicle is in usage mode driving.
Detection criteria:
The DTC is set if the control module detects that:
-
The signal is too low.
-
An incorrect value lasts longer than 5 s.
-
An incorrect value lasts for 2 or more subsequent driving cycles.
Faultcode actions:
The Engine Control Module (ECM) will set the temperature equal to the fuel temperature.
Related Documents
DTC011300
Intake Air Temperature Sensor 1 Circuit High Input
DTC: 011300
Information:
The Mass Airflow sensor (MAF) measures the temperature of the air in the intake. The information is used by the Engine Control Module (ECM), both for diagnostics and for controlling the engine.
Test criteria:
The control module's test for the DTC starts when:
-
The vehicle is in usage mode driving.
Detection criteria:
The DTC is set if the control module detects that:
-
The signal is too high.
-
An incorrect value lasts longer than 5 s.
-
An incorrect value lasts for 2 or more subsequent driving cycles.
Faultcode actions:
The Engine Control Module (ECM) will set the temperature equal to the fuel temperature.
Related Documents
DTC011621
Engine Coolant Temperature Sensor 1 Circuit Range/Performance General Signal Failures Signal amplitude < minimum
DTC: 011621
Information:
The engine coolant temperature sensor measures the temperature of the engine coolant. The temperature of the engine coolant is required for the Engine Control Module (ECM) to be able to regulate the functionality of the engine.
Test criteria:
The control module's test for the DTC starts when:
-
The vehicle's usage mode is changed to active after the engine has been switched off for at least 6 hours.
Detection criteria:
The DTC is set if the control module detects that:
-
The measured temperature is within the allowed range, but lower than expected compared to other temperatures in the engine.
Faultcode actions:
The Engine Control Module (ECM) uses a value calculated from other sensors in the engine.
Related Documents
DTC011622
Engine Coolant Temperature Sensor 1 Circuit Range/Performance General Signal Failures Signal amplitude > maximum
DTC: 011622
Information:
The engine coolant temperature sensor measures the temperature of the engine coolant. The temperature of the engine coolant is required for the Engine Control Module (ECM) to be able to regulate the functionality of the engine.
Test criteria:
The control module's test for the DTC starts when:
-
The vehicle's usage mode is changed to active after the engine has been switched off for at least 6 hours.
Detection criteria:
The DTC is set if the control module detects that:
-
The measured temperature is within the allowed range, but higher than expected compared to other temperatures in the engine.
Faultcode actions:
The Engine Control Module (ECM) uses a value calculated from other sensors in the engine.
Related Documents
DTC01162A
Engine Coolant Temperature Sensor 1 Circuit Range/Performance General Signal Failures Signal Stuck In Range
DTC: 01162A
Information:
The engine coolant temperature sensor measures the temperature of the engine coolant. The temperature of the engine coolant is required for the Engine Control Module (ECM) to be able to regulate the functionality of the engine.
Test criteria:
The control module's test for the DTC starts when:
-
After having been switched off for more than 3 hours, the vehicle's usage mode is changed to driving and this mode is kept until the engine is heating up.
Detection criteria:
The DTC is set if the control module detects that:
-
The measured temperature is constant (within the allowed range), even when the engine is heating up.
Faultcode actions:
The Engine Control Module (ECM) uses a value calculated from other sensors in the engine.
Related Documents
DTC011700
Engine Coolant Temperature Circuit Low Input
DTC: 011700
Information:
The engine coolant temperature sensor measures the temperature of the engine coolant. The temperature of the engine coolant is required for the Engine Control Module (ECM) to be able to regulate the functionality of the engine.
Test criteria:
The control module's test for the DTC starts when:
-
The vehicle is in usage mode active or higher.
Detection criteria:
The DTC is set if the control module detects that:
-
The signal is too low.
-
An incorrect value lasts longer than 9 s.
Faultcode actions:
The Engine Control Module (ECM) uses a value calculated from other sensors in the engine.
Related Documents
DTC011800
Engine Coolant Temperature Circuit High Input
DTC: 011800
Information:
The engine coolant temperature sensor measures the temperature of the engine coolant. The temperature of the engine coolant is required for the Engine Control Module (ECM) to be able to regulate the functionality of the engine.
Test criteria:
The control module's test for the DTC starts when:
-
The vehicle is in usage mode active or higher.
Detection criteria:
The DTC is set if the control module detects that:
-
The signal is too high.
-
An incorrect value lasts longer than 9 s.
Faultcode actions:
The Engine Control Module (ECM) uses a value calculated from other sensors in the engine.
Related Documents
DTC012200
Throttle/Pedal Position Sensor A Circuit Low
DTC: 012200
Information:
The throttle unit uses the PWM control signal sent from the Engine Control Module (ECM) to regulate the amount of air that is used for the engine combustion. This is done using an electronically controlled throttle. The throttle unit has two internal independent sensors, A and B, which monitor the position of the throttle.
Test criteria:
The control module's test for the DTC starts when:
-
The vehicle is in usage mode active or higher.
Detection criteria:
The DTC is set if the control module detects that:
-
The signal from the internal sensor A is too low.
Faultcode actions:
The Engine Control Module (ECM) restricts the vehicle performance if the fault occurs frequently.
Related Documents
DTC012300
Throttle/Pedal Position Sensor A Circuit High
DTC: 012300
Information:
The throttle unit uses the PWM control signal sent from the Engine Control Module (ECM) to regulate the amount of air that is used for the engine combustion. This is done using an electronically controlled throttle. The throttle unit has two internal independent sensors, A and B, which monitor the position of the throttle.
Test criteria:
The control module's test for the DTC starts when:
-
The vehicle is in usage mode active or higher.
Detection criteria:
The DTC is set if the control module detects that:
-
The signal from the internal sensor A is too high.
Faultcode actions:
The Engine Control Module (ECM) restricts the vehicle performance if the fault occurs frequently.
Related Documents
DTC012800
Coolant Thermostat (Coolant Temp Below Thermostat Regulating Temperature)
DTC: 012800
Information:
When the engine is heating up, the engine coolant temperature sensor value is compared to an expected value based on driving and starting conditions.
Test criteria:
The control module's test for the DTC starts when:
-
The engine temperature at engine start is between -10 °C and 60 °C.
-
The engine temperature reaches 72 °C.
-
The water pump has been active the entire time since the engine was started
Detection criteria:
The DTC is set if the control module detects that:
-
The measured temperature deviates too much from the expected value.
Faultcode actions:
None.
Related Documents
DTC012807
Coolant Thermostat (Coolant Temp Below Thermostat Regulating Temperature) Mechanical Failures
DTC: 012807
Information:
The Engine Control Module (ECM) monitors the engine coolant temperature in order to detect a leaking thermostat.
Test criteria:
The control module's test for the DTC starts when:
-
The vehicle has been driven for 15 minutes after the engine coolant reached 90 °C.
Detection criteria:
The DTC is set if the control module detects that:
-
The engine coolant temperature drops below 60 °C.
Faultcode actions:
None.
Related Documents
DTC01287A
Coolant Thermostat (Coolant Temp Below Thermostat Regulating Temperature) Mechanical Failures Fluid leak or seal failure
DTC: 01287A
Information:
The Engine Control Module (ECM) monitors the engine coolant temperature in order to detect a leaking thermostat.
Test criteria:
The control module's test for the DTC starts when:
-
The engine coolant temperature is heated up.
Detection criteria:
The DTC is set if the control module detects that:
-
The engine coolant temperature does not reach 60 °C.
Related Documents
DTC013000
O2 Sensor Circuit (Bank 1 Sensor 1)
DTC: 013000
Information:
The oxygen sensor inside the lambda probe, front, provides the Engine Control Module (ECM) with information about the remaining oxygen content of the exhaust gas before the catalytic converter. This provides the possibility for the Engine Control Module (ECM) to continuously check the efficiency of the catalytic converter.
Test criteria:
The control module's test for the DTC starts when:
-
The vehicle is in usage mode active.
Detection criteria:
The DTC is set if the control module detects that:
-
The voltage difference between the positive and negative output from the lambda probe, front, is too low, i.e. there is a short-circuit.
Faultcode actions:
None.
Related Documents
DTC013323
O2 Sensor Circuit Slow Response (Bank 1 Sensor 1) General Signal Failures Signal stuck low
DTC: 013323
Information:
The oxygen sensor inside the lambda probe, front, provides the Engine Control Module (ECM) with information about the remaining oxygen content of the exhaust gas before the catalytic converter. This provides the possibility for the Engine Control Module (ECM) to continuously check the combustion.
Test criteria:
The control module's test for the DTC starts when:
-
The engine has been running for at least 10 minutes after reaching normal operating temperature.
-
The vehicle speed is between 70 - 90 km/h for 40 - 50 seconds.
Detection criteria:
The DTC is set if the control module detects that:
-
The front oxygen sensor does not activate.
-
The front oxygen sensor reacts too slowly.
Faultcode actions:
None.
Related Documents
DTC013324
O2 Sensor Circuit Slow Response (Bank 1 Sensor 1) General Signal Failures Signal stuck high
DTC: 013324
Information:
The oxygen sensor inside the lambda probe, front, provides the Engine Control Module (ECM) with information about the remaining oxygen content of the exhaust gas before the catalytic converter. This provides the possibility for the Engine Control Module (ECM) to continuously check the combustion.
Test criteria:
The control module's test for the DTC starts when:
-
The engine has been running for at least 10 minutes after reaching normal operating temperature.
-
The vehicle speed is between 70 - 90 km/h for 40 - 50 seconds.
Detection criteria:
The DTC is set if the control module detects that:
-
The front oxygen sensor does not activate.
-
The front oxygen sensor reacts too slowly.
Faultcode actions:
None.
Related Documents
DTC013326
O2 Sensor Circuit Slow Response (Bank 1 Sensor 1) General Signal Failures Signal rate of change below threshold
DTC: 013326
Information:
The oxygen sensor inside the lambda probe, front, provides the Engine Control Module (ECM) with information about the remaining oxygen content of the exhaust gas before the catalytic converter. This provides the possibility for the Engine Control Module (ECM) to continuously check the combustion.
Test criteria:
The control module's test for the DTC starts when:
-
The engine has been running for at least 10 minutes after reaching normal operating temperature.
-
The vehicle speed is between 70 - 90 km/h for 40 - 50 seconds.
Detection criteria:
The DTC is set if the control module detects that:
-
The front oxygen sensor does not activate.
-
The front oxygen sensor reacts too slowly.
Faultcode actions:
None.
Related Documents
DTC013400
O2 Circuit No Activity Detected (Bank 1, Sensor 1)
DTC: 013400
Information:
The oxygen sensor inside the lambda probe, front, provides the Engine Control Module (ECM) with information about the remaining oxygen content of the exhaust gas before the catalytic converter. This provides the possibility for the Engine Control Module (ECM) to continuously check the combustion.
Test criteria:
The control module's test for the DTC starts when:
-
The engine has been running for at least 5 minutes.
Detection criteria:
The DTC is set if the control module detects that:
-
The front oxygen sensor does not activate.
-
The front oxygen sensor reacts too slowly.
Faultcode actions:
None.
Related Documents
DTC013600
O2 Sensor Circuit (Bank 1 Sensor 2)
DTC: 013600
Information:
The oxygen sensor inside the lambda probe, middle, provides the Engine Control Module (ECM) with information about the remaining oxygen content of the exhaust gas after the catalytic converter. This provides the possibility for the Engine Control Module (ECM) to continuously check the efficiency of the catalytic converter.
Test criteria:
The control module's test for the DTC starts when:
-
The vehicle is in usage mode active.
Detection criteria:
The DTC is set if the control module detects that:
-
The signal from the lambda probe, middle, is too low or missing.
Faultcode actions:
None.
Related Documents
DTC013700
O2 Circuit Low Voltage (Bank 1, Sensor 2)
DTC: 013700
Information:
The oxygen sensor inside the lambda probe, middle, provides the Engine Control Module (ECM) with information about the remaining oxygen content of the exhaust gas after the catalytic converter. This provides the possibility for the Engine Control Module (ECM) to continuously check the efficiency of the catalytic converter.
Test criteria:
The control module's test for the DTC starts when:
-
The vehicle has been driven at 70 – 90 km/h for 5 minutes after the engine reached normal operating temperature.
Detection criteria:
The DTC is set if the control module detects that:
-
The signal is within the allowed range but lower than expected.
Faultcode actions:
None.
Related Documents
DTC013800
O2 Circuit High Voltage (Bank 1, Sensor 2)
DTC: 013800
Information:
The oxygen sensor inside the lambda probe, middle, provides the Engine Control Module (ECM) with information about the remaining oxygen content of the exhaust gas after the catalytic converter. This provides the possibility for the Engine Control Module (ECM) to continuously check the efficiency of the catalytic converter.
Test criteria:
The control module's test for the DTC starts when:
-
The vehicle has been driven at 70 – 90 km/h for 5 minutes after the engine reached normal operating temperature.
Detection criteria:
The DTC is set if the control module detects that:
-
The signal is within the allowed range but higher than expected.
Faultcode actions:
None.
Related Documents
DTC013900
O2 Sensor Circuit Slow Response (Bank 1 Sensor 2)
DTC: 013900
Information:
The oxygen sensor inside the lambda probe, middle, provides the Engine Control Module (ECM) with information about the remaining oxygen content of the exhaust gas after the catalytic converter. This provides the possibility for the Engine Control Module (ECM) to continuously check the efficiency of the catalytic converter.
Test criteria:
The control module's test for the DTC starts when:
-
The engine is at normal operating temperature.
-
Normal driving at a vehicle speed of 70-90 km/h is performed for at least 5 minutes.
Detection criteria:
The DTC is set if the control module detects that:
-
The oxygen sensor reacts slower than expected when no fuel is supplied to the engine.
Faultcode actions:
None.
Related Documents
DTC013926
O2 Sensor Circuit Slow Response (Bank 1 Sensor 2) General Signal Failures Signal rate of change below threshold
DTC: 013926
Information:
The oxygen sensor inside the lambda probe, middle, provides the Engine Control Module (ECM) with information about the remaining oxygen content of the exhaust gas after the catalytic converter. This provides the possibility for the Engine Control Module (ECM) to continuously check the efficiency of the catalytic converter.
Test criteria:
The control module's test for the DTC starts when:
-
The engine is at normal operating temperature.
-
Normal driving at a vehicle speed of 70-90 km/h is performed for at least 5 minutes.
Detection criteria:
The DTC is set if the control module detects that:
-
The oxygen sensor reacts slower than expected when no fuel is supplied to the engine.
Faultcode actions:
None.
Related Documents
DTC01397C
O2 Sensor Circuit Slow Response (Bank 1 Sensor 2) Mechanical Failures Slow Response
DTC: 01397C
Information:
The oxygen sensor inside the lambda probe, middle, provides the Engine Control Module (ECM) with information about the remaining oxygen content of the exhaust gas after the catalytic converter. This provides the possibility for the Engine Control Module (ECM) to continuously check the efficiency of the catalytic converter.
Test criteria:
The control module's test for the DTC starts when:
-
The engine has been running for at least 5 minutes.
Detection criteria:
The DTC is set if the control module detects that:
-
The sensor does not activate.
-
The sensor activates too slow.
Faultcode actions:
None.
Related Documents
DTC013A00
O2 Sensor Slow Response - Rich to Lean (Bank 1 and Sensor 2)
DTC: 013A00
Information:
The oxygen sensor inside the lambda probe, middle, provides the Engine Control Module (ECM) with information about the remaining oxygen content of the exhaust gas after the catalytic converter. This provides the possibility for the Engine Control Module (ECM) to continuously check the efficiency of the catalytic converter.
Test criteria:
The control module's test for the DTC starts when:
-
The engine is at normal operating temperature.
-
Normal driving at a vehicle speed of 70-90 km/h is performed for at least 5 minutes.
Detection criteria:
The DTC is set if the control module detects that:
-
The oxygen sensor reacts slower than expected when no fuel is supplied to the engine.
Faultcode actions:
None.
Related Documents
DTC013A68
O2 Sensor Slow Response - Rich to Lean (Bank 1 and Sensor 2) Algorithm Based Failures Event information
DTC: 013A68
Information:
The oxygen sensor inside the lambda probe, middle, provides the Engine Control Module (ECM) with information about the remaining oxygen content of the exhaust gas after the catalytic converter. This provides the possibility for the Engine Control Module (ECM) to continuously check the efficiency of the catalytic converter.
Test criteria:
The control module's test for the DTC starts when:
-
The engine is at normal operating temperature.
-
Normal driving at a vehicle speed of 70-90 km/h is performed for at least 5 minutes.
Detection criteria:
The DTC is set if the control module detects that:
-
The oxygen sensor reacts slower than expected when no fuel is supplied to the engine.
Faultcode actions:
None.
Related Documents
DTC013B68
O2 Sensor Slow Response - Lean to Rich (Bank 1, Sensor 2) Algorithm Based Failures Event information
DTC: 013B68
Information:
The oxygen sensor inside the lambda probe, middle, provides the Engine Control Module (ECM) with information about the remaining oxygen content of the exhaust gas after the catalytic converter. This provides the possibility for the Engine Control Module (ECM) to continuously check the efficiency of the catalytic converter.
Test criteria:
The control module's test for the DTC starts when:
-
The engine has been running for at least 10 minutes after reaching normal operating temperature.
-
The vehicle speed is between 70 - 90 km/h for 40 - 50 seconds.
Detection criteria:
The DTC is set if the control module detects that:
-
The heated oxygen sensor reacts too slowly to changes in the fuel/air mixture.
Faultcode actions:
None.
Related Documents
DTC013E00
O2 Sensor Delayed Response - Rich to Lean (Bank 1 Sensor 2)
DTC: 013E00
Information:
The oxygen sensor inside the lambda probe, middle, provides the Engine Control Module (ECM) with information about the remaining oxygen content of the exhaust gas after the catalytic converter. This provides the possibility for the Engine Control Module (ECM) to continuously check the efficiency of the catalytic converter.
Test criteria:
The control module's test for the DTC starts when:
-
The engine is at normal operating temperature.
-
Normal driving at a vehicle speed of 70-90 km/h is performed for at least 5 minutes.
Detection criteria:
The DTC is set if the control module detects that:
-
The oxygen sensor reacts slower than expected when no fuel is supplied to the engine.
Faultcode actions:
None.
Related Documents
DTC013E68
O2 Sensor Delayed Response - Rich to Lean (Bank 1 Sensor 2) Algorithm Based Failures Event information
DTC: 013E68
Information:
The oxygen sensor inside the lambda probe, middle, provides the Engine Control Module (ECM) with information about the remaining oxygen content of the exhaust gas after the catalytic converter. This provides the possibility for the Engine Control Module (ECM) to continuously check the efficiency of the catalytic converter.
Test criteria:
The control module's test for the DTC starts when:
-
The engine is at normal operating temperature.
-
Normal driving at a vehicle speed of 70-90 km/h is performed for at least 5 minutes.
Detection criteria:
The DTC is set if the control module detects that:
-
The oxygen sensor reacts slower than expected when no fuel is supplied to the engine.
Faultcode actions:
None.
Related Documents
DTC013F68
O2 Sensor Delayed Response - Lean to Rich (Bank 1 Sensor 2) Algorithm Based Failures Event information
DTC: 013F68
Information:
The oxygen sensor inside the lambda probe, middle, provides the Engine Control Module (ECM) with information about the remaining oxygen content of the exhaust gas after the catalytic converter. This provides the possibility for the Engine Control Module (ECM) to continuously check the efficiency of the catalytic converter.
Test criteria:
The control module's test for the DTC starts when:
-
The engine has been running for at least 10 minutes after reaching normal operating temperature.
-
The vehicle speed is between 70 - 90 km/h for 40 - 50 seconds.
Detection criteria:
The DTC is set if the control module detects that:
-
The heated oxygen sensor reacts too slowly to changes in the fuel/air mixture.
Faultcode actions:
None.
Related Documents
DTC014000
O2 Circuit No Activity Detected (Bank 1, Sensor 2)
DTC: 014000
Information:
The oxygen sensor inside the lambda probe, middle, provides the Engine Control Module (ECM) with information about the remaining oxygen content of the exhaust gas after the catalytic converter. This provides the possibility for the Engine Control Module (ECM) to continuously check the efficiency of the catalytic converter.
Test criteria:
The control module's test for the DTC starts when:
-
The engine has been running for at least 5 minutes.
Detection criteria:
The DTC is set if the control module detects that:
-
The sensor does not activate.
-
The sensor activates too slow.
Faultcode actions:
None.
Related Documents
DTC014200
O2 Sensor Circuit (Bank 1 Sensor 3)
DTC: 014200
Information:
The oxygen sensor inside the lambda probe, rear, provides the Engine Control Module (ECM) with information about the remaining oxygen content of the exhaust gas after the catalytic converter. This provides the possibility for the Engine Control Module (ECM) to continuously check the efficiency of the catalytic converter.
Test criteria:
The control module's test for the DTC starts when:
-
The vehicle is in usage mode driving.
Detection criteria:
The DTC is set if the control module detects that:
-
The signal from the lambda probe, rear, is too low or missing.
Faultcode actions:
None.
Related Documents
DTC014300
O2 Sensor Circuit Low Voltage (Bank 1 Sensor 3)
DTC: 014300
Information:
The oxygen sensor inside the lambda probe, rear, provides the Engine Control Module (ECM) with information about the remaining oxygen content of the exhaust gas after the catalytic converter. This provides the possibility for the Engine Control Module (ECM) to continuously check the efficiency of the catalytic converter.
Test criteria:
The control module's test for the DTC starts when:
-
The combustion engine is at normal operating temperature and is then driven for 5 minutes of normal driving between 70 - 90 km/h.
Detection criteria:
The DTC is set if the control module detects that:
-
The signal is within the allowed range but lower than expected.
Faultcode actions:
None.
Related Documents
DTC014400
O2 Sensor Circuit High Voltage (Bank 1 Sensor 3)
DTC: 014400
Information:
The oxygen sensor inside the lambda probe, rear, provides the Engine Control Module (ECM) with information about the remaining oxygen content of the exhaust gas after the catalytic converter. This provides the possibility for the Engine Control Module (ECM) to continuously check the efficiency of the catalytic converter.
Test criteria:
The control module's test for the DTC starts when:
-
The combustion engine is at normal operating temperature and is then driven for 5 minutes of normal driving between 70 - 90 km/h.
Detection criteria:
The DTC is set if the control module detects that:
-
The signal is within the allowed range but higher than expected.
Faultcode actions:
None.
Related Documents
DTC014500
O2 Sensor Circuit Slow Response (Bank 1 Sensor 3)
DTC: 014500
Information:
The oxygen sensor inside the lambda probe, rear, provides the Engine Control Module (ECM) with information about the remaining oxygen content of the exhaust gas after the catalytic converter. This provides the possibility for the Engine Control Module (ECM) to continuously check the efficiency of the catalytic converter.
Test criteria:
The control module's test for the DTC starts when:
-
The combustion engine has been driven for five minutes of normal driving between 70 - 90 km/h with several deceleration fuel cut-offs.
Detection criteria:
The DTC is set if the control module detects that:
-
The sensor signal change is too slow at deceleration, i.e. when the fuel adaptation goes from rich to lean.
Faultcode actions:
None.
Related Documents
DTC014526
O2 Sensor Circuit Slow Response (Bank 1 Sensor 3) General Signal Failures Signal rate of change below threshold
DTC: 014526
Information:
The oxygen sensor inside the lambda probe, rear, provides the Engine Control Module (ECM) with information about the remaining oxygen content of the exhaust gas after the catalytic converter. This provides the possibility for the Engine Control Module (ECM) to continuously check the efficiency of the catalytic converter.
Test criteria:
The control module's test for the DTC starts when:
-
The engine is at normal operating temperature.
-
Normal driving at a vehicle speed of 70-90 km/h is performed for at least 5 minutes.
Detection criteria:
The DTC is set if the control module detects that:
-
The oxygen sensor reacts slower than expected when no fuel is supplied to the engine.
Faultcode actions:
None.
Related Documents
DTC014600
O2 Sensor Circuit No Activity Detected (Bank 1 Sensor 3)
DTC: 014600
Information:
The oxygen sensor inside the lambda probe, rear, provides the Engine Control Module (ECM) with information about the remaining oxygen content of the exhaust gas after the catalytic converter. This provides the possibility for the Engine Control Module (ECM) to continuously check the efficiency of the catalytic converter.
Test criteria:
The control module's test for the DTC starts when:
-
The engine has been running for at least 5 minutes.
Detection criteria:
The DTC is set if the control module detects that:
-
The sensor does not activate.
Faultcode actions:
None.
Related Documents
DTC014C00
O2 Sensor Slow Response - Rich to Lean (Bank 1 Sensor 1)
DTC: 014C00
Information:
The oxygen sensor inside the lambda probe, front, provides the Engine Control Module (ECM) with information about the remaining oxygen content of the exhaust gas before the catalytic converter. This provides the possibility for the Engine Control Module (ECM) to continuously check the combustion.
Test criteria:
The control module's test for the DTC starts when:
-
The engine has been running for at least 10 minutes after reaching normal operating temperature.
-
The vehicle speed is between 70 - 90 km/h for 40 - 50 seconds.
Detection criteria:
The DTC is set if the control module detects that:
-
The front oxygen sensor reacts too slowly.
Faultcode actions:
None.
Related Documents
DTC014D00
O2 Sensor Slow Response - Lean to Rich (Bank 1 Sensor 1)
DTC: 014D00
Information:
The oxygen sensor inside the lambda probe, front, provides the Engine Control Module (ECM) with information about the remaining oxygen content of the exhaust gas before the catalytic converter. This provides the possibility for the Engine Control Module (ECM) to continuously check the combustion.
Test criteria:
The control module's test for the DTC starts when:
-
The engine has been running for at least 10 minutes after reaching normal operating temperature.
-
The vehicle speed is between 70 - 90 km/h for 40 - 50 seconds.
Detection criteria:
The DTC is set if the control module detects that:
-
The front oxygen sensor reacts too slowly.
Faultcode actions:
None.
Related Documents
DTC016A00
Excessive Time To Enter Closed Loop Air/Fuel Ratio Control
DTC: 016A00
Information:
The oxygen sensor inside the lambda probe, front, provides the Engine Control Module (ECM) with information about the remaining oxygen content of the exhaust gas before the catalytic converter. This provides the possibility for the Engine Control Module (ECM) to continuously check the efficiency of the catalytic converter.
Test criteria:
The control module's test for the DTC starts when:
-
The engine has been running for at least 2 minutes after initial start.
Detection criteria:
The DTC is set if the control module detects that:
-
The lambda control does not enter closed loop within its designated time after initial engine start. The lambda probe, front, does not reach its working temperature within the designated time after engine start.
Faultcode actions:
None.
Related Documents
DTC016A68
Excessive Time To Enter Closed Loop Air/Fuel Ratio Control Algorithm Based Failures Event information
DTC: 016A68
Information:
The oxygen sensor inside the lambda probe, front, provides the Engine Control Module (ECM) with information about the remaining oxygen content of the exhaust gas before the catalytic converter. This provides the possibility for the Engine Control Module (ECM) to continuously check the efficiency of the catalytic converter.
Test criteria:
The control module's test for the DTC starts when:
-
The engine has been running for at least 2 minutes after being restarted (after a running stop).
Detection criteria:
The DTC is set if the control module detects that:
-
The lambda control does not enter closed loop within its designated time after engine restart. The value from the lambda probe, front, has been constant for too long.
Faultcode actions:
None.
Related Documents
DTC016A93
Excessive Time To Enter Closed Loop Air/Fuel Ratio Control Component Failures No operation
DTC: 016A93
Information:
The oxygen sensor inside the lambda probe, front, provides the Engine Control Module (ECM) with information about the remaining oxygen content of the exhaust gas before the catalytic converter. This provides the possibility for the Engine Control Module (ECM) to continuously check the combustion.
Test criteria:
The control module's test for the DTC starts when:
-
The engine has been running for at least 2 minutes after being restarted (after a running stop).
Detection criteria:
The DTC is set if the control module detects that:
-
The lambda control does not enter closed loop within its designated time after engine restart. The value from the lambda probe, front, has been constant for too long.
Faultcode actions:
None.
Related Documents
DTC017068
Fuel Trim (Bank 1) Algorithm Based Failures Event information
DTC: 017068
Information:
Note! This diagnostic troule code (DTC) status is an event controlled diagnostic troule code (DTC). An event controlled diagnostic troule code (DTC) does not mean that there is a fault in the control module when it is active, ut is designed as information. The oxygen sensor inside the lambda probe, front, provides the Engine Control Module (ECM) with information about the remaining oxygen content of the exhaust gas before the catalytic converter. This provides the possibility for the Engine Control Module (ECM) to continuously check the combustion. The lambda value from the lambda probe, front, is too low, which indicates that the Engine Control Module (ECM) has supplied too much fuel.
Test criteria:
The control module's test for the DTC starts when:
-
The vehicle is driven with maximum acceleration and an engine speed above 3000 r/min for at least 10 seconds.
Detection criteria:
The DTC is set if the control module detects that:
-
The signal is too low.
Faultcode actions:
None.
Related Documents
DTC017100
System Too Lean (Bank 1)
DTC: 017100
Information:
The front oxygen sensor and the rear oxygen sensor monitors the remaining oxygen in the exhaust.
Test criteria:
The control module's test for the DTC starts when:
-
The engine is running.
Detection criteria:
The DTC is set if the control module detects that:
-
The adaptation values deviate from the allowed range.
Faultcode actions:
None.
Related Documents
DTC017200
System Too Rich (Bank 1)
DTC: 017200
Information:
The front oxygen sensor and the rear oxygen sensor monitors the remaining oxygen in the exhaust.
Test criteria:
The control module's test for the DTC starts when:
-
The engine is running.
Detection criteria:
The DTC is set if the control module detects that:
-
The adaptation values deviate from the allowed range.
Faultcode actions:
None.
Related Documents
DTC018121
Fuel Temperature Sensor "A" Circuit Range/Performance General Signal Failures Signal amplitude < minimum
DTC: 018121
Information:
The fuel pressure- and temperature sensor, low-pressure side, measures the fuel temperature.
Test criteria:
The control module's test for the DTC starts when:
-
The vehicle's usage mode is changed to active after the engine has been switched off for at least 6 hours.
Detection criteria:
The DTC is set if the control module detects that:
-
The measured temperature is within the allowed range, but lower than expected compared to other temperatures in the engine.
Faultcode actions:
The Engine Control Module (ECM) uses a value calculated from other sensors in the engine.
Related Documents
DTC018122
Fuel Temperature Sensor "A" Circuit Range/Performance General Signal Failures Signal amplitude > maximum
DTC: 018122
Information:
The fuel pressure- and temperature sensor, low-pressure side, measures the fuel temperature.
Test criteria:
The control module's test for the DTC starts when:
-
The vehicle's usage mode is changed to active after the engine has been switched off for at least 6 hours.
Detection criteria:
The DTC is set if the control module detects that:
-
The measured temperature is within the allowed range, but higher than expected compared to other temperatures in the engine.
Faultcode actions:
The Engine Control Module (ECM) uses a value calculated from other sensors in the engine.
Related Documents
DTC01812A
Fuel Temperature Sensor "A" Circuit Range/Performance General Signal Failures Signal Stuck In Range
DTC: 01812A
Information:
The fuel pressure- and temperature sensor, low-pressure side, measures the fuel temperature.
Test criteria:
The control module's test for the DTC starts when:
-
After having been switched off for more than 3 hours, the vehicle's usage mode is changed to driving and this mode is kept until the engine is heating up.
Detection criteria:
The DTC is set if the control module detects that:
-
The measured temperature is constant (within the allowed range), even when the engine is heating up.
Faultcode actions:
The Engine Control Module (ECM) uses a value calculated from other sensors in the engine.
Related Documents
DTC018200
Fuel Temperature Sensor "A" Circuit Low
DTC: 018200
Information:
The fuel pressure and temperature sensor, low pressure side, measures the fuel temperature.
Test criteria:
The control module's test for the DTC starts when:
-
The vehicle is in usage mode active or higher.
Detection criteria:
The DTC is set if the control module detects that:
-
The signal is too high.
-
The incorrect signal lasts longer than allowed.
Faultcode actions:
The Engine Control Module (ECM) uses a value calculated from other sensors in the engine.
Related Documents
DTC018300
Fuel Temperature Sensor "A" Circuit High
DTC: 018300
Information:
The fuel pressure and temperature sensor, low pressure side, measures the fuel temperature.
Test criteria:
The control module's test for the DTC starts when:
-
The vehicle is in usage mode active or higher.
Detection criteria:
The DTC is set if the control module detects that:
-
The signal is too low.
-
The incorrect signal lasts longer than allowed.
Faultcode actions:
The Engine Control Module (ECM) uses a value calculated from other sensors in the engine.
Related Documents
DTC018A00
Fuel Pressure Sensor "B" Circuit
DTC: 018A00
Information:
The fuel pressure sensor provides information to the Engine Control Module (ECM) about the current fuel pressure in the low pressure side. The signal from the sensor is used to control the fuel pump module.
Test criteria:
The control module's test for the DTC starts when:
-
The engine is running.
Detection criteria:
The DTC is set if the control module detects that:
-
The sensor value varies less than expected.
Faultcode actions:
The Engine Control Module (ECM) disables the fuel pump module.
Related Documents
DTC018C00
Fuel Pressure Sensor "B" Circuit Low
DTC: 018C00
Information:
The fuel pressure sensor provides information to the Engine Control Module (ECM) about the current fuel pressure in the low pressure side. The signal from the sensor is used to control the fuel pump module.
Test criteria:
The control module's test for the DTC starts when:
-
The vehicle is in usage mode active or higher.
Detection criteria:
The DTC is set if the control module detects that:
-
The signal is too low.
-
An incorrect value lasts longer than 9 s.
-
An incorrect value lasts for 2 or more subsequent driving cycles.
Faultcode actions:
The Engine Control Module (ECM) uses a constant pressure value instead of the measured pressure. The Engine Control Module (ECM) uses a value calculated from other sensors in the engine to control the fuel pump module.
Related Documents
DTC018D00
Fuel Pressure Sensor "B" Circuit High
DTC: 018D00
Information:
The fuel pressure sensor provides information to the Engine Control Module (ECM) about the current fuel pressure in the low pressure side. The signal from the sensor is used to control the fuel pump module.
Test criteria:
The control module's test for the DTC starts when:
-
The vehicle is in usage mode active or higher.
Detection criteria:
The DTC is set if the control module detects that:
-
The signal is too high.
-
An incorrect value lasts longer than 9 s.
-
An incorrect value lasts for 2 or more subsequent driving cycles.
Faultcode actions:
The Engine Control Module (ECM) uses a constant pressure value instead of the measured pressure. The Engine Control Module (ECM) uses a value calculated from other sensors in the engine to control the fuel pump module.
Related Documents
DTC019100
Fuel Rail Pressure Sensor "A" Circuit Range/Performance
DTC: 019100
Information:
The fuel pressure sensor high-pressure side provides the Engine Control Module (ECM) with information about the current fuel pressure in the common rail. The sensor is used to regulate the fuel quantity control valve and to calculate injection time.
Test criteria:
The control module's test for the DTC starts when:
-
The engine is running.
Detection criteria:
The DTC is set if the control module detects that:
-
The sensor value varies less than expected.
Faultcode actions:
The Engine Control Module (ECM) disables the fuel pump module.
Related Documents
DTC019200
Fuel Rail Pressure Sensor Low Input
DTC: 019200
Information:
The fuel pressure sensor high-pressure side provides the Engine Control Module (ECM) with information about the current fuel pressure in the common rail. The sensor is used to regulate the fuel quantity control valve and to calculate injection time.
Test criteria:
The control module's test for the DTC starts when:
-
The vehicle is in usage mode active or higher.
Detection criteria:
The DTC is set if the control module detects that:
-
The signal is too low.
-
An incorrect value lasts longer than 9 s.
-
An incorrect value lasts for 2 or more subsequent driving cycles.
Faultcode actions:
The Engine Control Module (ECM) uses a constant pressure value instead of the measured pressure. The Engine Control Module (ECM) uses a value calculated from other sensors in the engine to control the fuel pump module.
Related Documents
DTC019300
Fuel Rail Pressure Sensor High Input
DTC: 019300
Information:
The fuel pressure sensor high-pressure side provides the Engine Control Module (ECM) with information about the current fuel pressure in the common rail. The sensor is used to regulate the fuel quantity control valve and to calculate injection time.
Test criteria:
The control module's test for the DTC starts when:
-
The vehicle is in usage mode active or higher.
Detection criteria:
The DTC is set if the control module detects that:
-
The signal is too high.
-
An incorrect value lasts longer than 9 s.
-
An incorrect value lasts for 2 or more subsequent driving cycles.
Faultcode actions:
The Engine Control Module (ECM) uses a constant pressure value instead of the measured pressure. The Engine Control Module (ECM) uses a value calculated from other sensors in the engine to control the fuel pump module.
Related Documents
DTC01952A
Engine Oil Temperature Sensor "A" Circuit General Signal Failures Signal Stuck In Range
DTC: 01952A
Information:
The oil level- and temperature sensor sends information about the current oil level, oil temperature and its internal diagnostics to the Engine Control Module (ECM).
Test criteria:
The control module's test for the DTC starts when:
-
After having been switched off for more than 3 hours, the vehicle's usage mode is changed to driving and this mode is kept until the engine is heating up.
Detection criteria:
The DTC is set if the control module detects that:
-
The measured temperature is constant (within the allowed range), even when the engine is heating up.
Faultcode actions:
The Engine Control Module (ECM) uses a calculated value.
Related Documents
DTC019549
Engine Oil Temperature Sensor "A" Circuit System Internal Failures Internal electronic failure
DTC: 019549
Information:
The oil level- and temperature sensor sends information about the current oil level, oil temperature and its internal diagnostics to the Engine Control Module (ECM).
Test criteria:
The control module's test for the DTC starts when:
-
The vehicle is in usage mode active or higher.
Detection criteria:
The DTC is set if the control module detects that:
-
There is a short circuit in the internal temperature element.
Faultcode actions:
None.
Related Documents
DTC019596
Engine Oil Temperature Sensor "A" Circuit Component Failures Component internal failure
DTC: 019596
Information:
The oil level- and temperature sensor sends information about the current oil level, oil temperature and its internal diagnostics to the Engine Control Module (ECM).
Test criteria:
The control module's test for the DTC starts when:
-
The vehicle is in usage mode active or higher.
Detection criteria:
The DTC is set if the control module detects that:
-
The sensor's internal diagnostics indicate that the temperature element is faulty.
Faultcode actions:
None.
Related Documents
DTC019621
Engine Oil Temperature Sensor "A" Range/Performance General Signal Failures Signal amplitude < minimum
DTC: 019621
Information:
The oil pressure- and oil temperature sensor sends information about the current engine oil temperature to the Engine Control Module (ECM).
Test criteria:
The control module's test for the DTC starts when:
-
The engine is started after having been switched off for more than six hours.
Detection criteria:
The DTC is set if the control module detects that:
-
The measured temperature deviates too much from the expected value.
Faultcode actions:
None.
Related Documents
DTC019622
Engine Oil Temperature Sensor "A" Range/Performance General Signal Failures Signal amplitude > maximum
DTC: 019622
Information:
The oil pressure- and oil temperature sensor sends information about the current engine oil temperature to the Engine Control Module (ECM).
Test criteria:
The control module's test for the DTC starts when:
-
The engine is started after having been switched off for more than six hours.
Detection criteria:
The DTC is set if the control module detects that:
-
The measured temperature deviates too much from the expected value.
Faultcode actions:
None.
Related Documents
DTC019624
Engine Oil Temperature Sensor "A" Range/Performance General Signal Failures Signal stuck high
DTC: 019624
Information:
The oil level- and temperature sensor sends information about the current oil level, oil temperature and its internal diagnostics to the Engine Control Module (ECM).
Test criteria:
The control module's test for the DTC starts when:
-
The engine is running.
Detection criteria:
The DTC is set if the control module detects that:
-
The oil temperature deviates too much from the allowed range.
Faultcode actions:
The Engine Control Module (ECM) uses a calculated value.
Related Documents
DTC019634
Engine Oil Temperature Sensor "A" Range/Performance FM (Frequency Modulated) / PWM (Pulse Width Modulated) Failures Signal high time < minimum
DTC: 019634
Information:
The oil level- and temperature sensor sends information about the current oil level, oil temperature and its internal diagnostics to the Engine Control Module (ECM).
Test criteria:
The control module's test for the DTC starts when:
-
The vehicle is in usage mode active or higher.
Detection criteria:
The DTC is set if the control module detects that:
-
The sensor's internal diagnostics indicate that the temperature is too low.
Faultcode actions:
None.
Related Documents
DTC019635
Engine Oil Temperature Sensor "A" Range/Performance FM (Frequency Modulated) / PWM (Pulse Width Modulated) Failures Signal high time > maximum
DTC: 019635
Information:
The oil level- and temperature sensor sends information about the current oil level, oil temperature and its internal diagnostics to the Engine Control Module (ECM).
Test criteria:
The control module's test for the DTC starts when:
-
The vehicle is in usage mode active or higher.
Detection criteria:
The DTC is set if the control module detects that:
-
The sensor's internal diagnostics indicate that the temperature is too high.
Faultcode actions:
None.
Related Documents
DTC019949
Engine Oil Temperature Sensor "A" Circuit Intermittent/Erratic System Internal Failures Internal electronic failure
DTC: 019949
Information:
The oil pressure- and oil temperature sensor sends information about the current engine oil temperature to the Engine Control Module (ECM).
Test criteria:
The control module's test for the DTC starts when:
-
The engine is running.
Detection criteria:
The DTC is set if the control module detects that:
-
There is an internal fault in the sensor.
Faultcode actions:
The Engine Control Module (ECM) uses a fixed oil pressure value.
Related Documents
DTC019A00
DTC 019A00
DTC: 019A00
Information:
The oxygen sensor inside the lambda probe, rear, provides the Engine Control Module (ECM) with information about the remaining oxygen content of the exhaust gas after the catalytic converter. This provides the possibility for the Engine Control Module (ECM) to continuously check the efficiency of the catalytic converter.
Test criteria:
The control module's test for the DTC starts when:
-
The combustion engine is at normal operating temperature.
-
The combustion engine has been driven for five minutes of normal driving between 70 - 90 km/h with several deceleration fuel cut-offs.
Detection criteria:
The DTC is set if the control module detects that:
-
The oxygen sensor reacts slower than expected when no fuel is supplied to the engine.
Faultcode actions:
None.
Related Documents
DTC01FF00
Turbocharger Outlet Pressure Sensor "A"/"B" Correlation
DTC: 01FF00
Information:
There are several air pressure sensors in the engine, these are compared by the Engine Control Module (ECM) for coherence. The air pressure- and air temperature sensor 1 is compared to the charge air duct pressure sensor.
Test criteria:
The control module's test for the DTC starts when:
-
The vehicle is in usage mode driving.
-
The turbo control valve, bypass, exhaust side, is open.
-
The intake air flow is stable.
Detection criteria:
The DTC is set if the control module detects that:
-
The deviation between the two sensors is outside the allowed range.
Faultcode actions:
None.
DTC020100
Cylinder 1 Injector Circuit / Open
DTC: 020100
Information:
The Engine Control Module (ECM) regulates the injection time and injection timing by controlling the fuel injectors' opening and closing. This is done by grounding the signal line to the respective valve, which causes a pulse to be sent. The control module checks the signal's shape and amplitude at opening and closing.
Test criteria:
The control module's test for the DTC starts when:
-
The vehicle is in usage mode driving.
Detection criteria:
The DTC is set if the control module detects that:
-
The signal's shape and amplitude do not follow expected signal.
-
Incorrect value in more than 20 of 400 pulses.
-
An incorrect value lasts for 2 or more subsequent driving cycles.
Faultcode actions:
The Engine Control Module (ECM) disables the lambda regulation.
Related Documents
DTC020200
Cylinder 2 Injector Circuit / Open
DTC: 020200
Information:
The Engine Control Module (ECM) regulates the injection time and injection timing by controlling the fuel injectors' opening and closing. This is done by grounding the signal line to the respective valve, which causes a pulse to be sent. The control module checks the signal's shape and amplitude at opening and closing.
Test criteria:
The control module's test for the DTC starts when:
-
The vehicle is in usage mode driving.
Detection criteria:
The DTC is set if the control module detects that:
-
The signal's shape and amplitude do not follow expected signal.
-
Incorrect value in more than 20 of 400 pulses.
-
An incorrect value lasts for 2 or more subsequent driving cycles.
Faultcode actions:
The Engine Control Module (ECM) disables the lambda regulation.
Related Documents
DTC020300
Cylinder 3 Injector Circuit / Open
DTC: 020300
Information:
The Engine Control Module (ECM) regulates the injection time and injection timing by controlling the fuel injectors' opening and closing. This is done by grounding the signal line to the respective valve, which causes a pulse to be sent. The control module checks the signal's shape and amplitude at opening and closing.
Test criteria:
The control module's test for the DTC starts when:
-
The vehicle is in usage mode driving.
Detection criteria:
The DTC is set if the control module detects that:
-
The signal's shape and amplitude do not follow expected signal.
-
Incorrect value in more than 20 of 400 pulses.
-
An incorrect value lasts for 2 or more subsequent driving cycles.
Faultcode actions:
The Engine Control Module (ECM) disables the lambda regulation.
Related Documents
DTC020400
Cylinder 4 Injector Circuit / Open
DTC: 020400
Information:
The Engine Control Module (ECM) regulates the injection time and injection timing by controlling the fuel injectors' opening and closing. This is done by grounding the signal line to the respective valve, which causes a pulse to be sent. The control module checks the signal's shape and amplitude at opening and closing.
Test criteria:
The control module's test for the DTC starts when:
-
The vehicle is in usage mode driving.
Detection criteria:
The DTC is set if the control module detects that:
-
The signal's shape and amplitude do not follow expected signal.
-
Incorrect value in more than 20 of 400 pulses.
-
An incorrect value lasts for 2 or more subsequent driving cycles.
Faultcode actions:
The Engine Control Module (ECM) disables the lambda regulation.
Related Documents
DTC021700
Engine Coolant Overtemperature Condition
DTC: 021700
Information:
The engine coolant temperature sensor measures the temperature of the engine coolant. The temperature of the engine coolant is required for the Engine Control Module (ECM) to be able to regulate the functionality of the engine.
Test criteria:
The control module's test for the DTC starts when:
-
The vehicle is in usage mode driving.
Detection criteria:
The DTC is set if the control module detects that:
-
The coolant temperature is too high.
Faultcode actions:
None.
Related Documents
DTC022200
Throttle/Pedal Position Sensor/Switch B Circuit Low
DTC: 022200
Information:
The throttle unit uses the PWM control signal sent from the Engine Control Module (ECM) to regulate the amount of air that is used for the engine combustion. This is done using an electronically controlled throttle. The throttle unit has two internal independent sensors, A and B, which monitor the position of the throttle.
Test criteria:
The control module's test for the DTC starts when:
-
The vehicle is in usage mode active or higher.
Detection criteria:
The DTC is set if the control module detects that:
-
The signal from the internal sensor B is too low.
Faultcode actions:
The Engine Control Module (ECM) restricts the vehicle performance if the fault occurs frequently.
Related Documents
DTC022300
Throttle/Pedal Position Sensor/Switch B Circuit High
DTC: 022300
Information:
The throttle unit uses the PWM control signal sent from the Engine Control Module (ECM) to regulate the amount of air that is used for the engine combustion. This is done using an electronically controlled throttle. The throttle unit has two internal independent sensors, A and B, which monitor the position of the throttle.
Test criteria:
The control module's test for the DTC starts when:
-
The vehicle is in usage mode active or higher.
Detection criteria:
The DTC is set if the control module detects that:
-
The signal from the internal sensor B is too high.
Faultcode actions:
The Engine Control Module (ECM) restricts the vehicle performance if the fault occurs frequently.
Related Documents
DTC023400
Turbo/Super Charger Overboost Condition
DTC: 023400
Information:
The Engine Control Module (ECM) regulates the boost pressure with the turbo control valve, wastegate and turbo bypass valve. The Engine Control Module (ECM) can either detect a small error in the turbo regulation over a long time or a large error in a short time.
Test criteria:
The control module's test for the DTC starts when:
-
The vehicle is driven with an engine speed above 4000 r/min.
Detection criteria:
The DTC is set if the control module detects that:
-
The boost pressure is too high.
Faultcode actions:
None.
Related Documents
DTC023600
Turbo/Super Charger Boost Sensor A Circuit Range/Performance
DTC: 023600
Information:
The air pressure- and air temperature sensor 1 measures the air pressure in the intake pipe between the charge air cooler and the throttle unit. The signal from the sensor is used by the Engine Control Module (ECM) to control turbo regulation and to check the other boost pressure sensors in the system.
Test criteria:
The control module's test for the DTC starts when:
-
The vehicle has been in usage mode active for 10 s.
Detection criteria:
The DTC is set if the control module detects that:
-
The air pressure sensor value deviates too much from the other pressure sensors in the system.
Faultcode actions:
The Engine Control Module (ECM) uses a value calculated from other sensors in the engine.
Related Documents
DTC023700
Turbo/Super Charger Boost Sensor A Circuit Low
DTC: 023700
Information:
The air pressure- and air temperature sensor 1 measures the air pressure in the intake pipe between the charge air cooler and the throttle unit. The signal from the sensor is used by the Engine Control Module (ECM) to control turbo regulation and to check the other boost pressure sensors in the system.
Test criteria:
The control module's test for the DTC starts when:
-
The vehicle is in usage mode active or higher.
Detection criteria:
The DTC is set if the control module detects that:
-
The signal is too low.
Faultcode actions:
None.
Related Documents
DTC023800
Turbo/Super Charger Boost Sensor A Circuit High
DTC: 023800
Information:
The air pressure- and air temperature sensor 1 measures the air pressure in the intake pipe between the charge air cooler and the throttle unit. The signal from the sensor is used by the Engine Control Module (ECM) to control turbo regulation and to check the other boost pressure sensors in the system.
Test criteria:
The control module's test for the DTC starts when:
-
The vehicle is in usage mode active or higher.
Detection criteria:
The DTC is set if the control module detects that:
-
The signal is too high.
Faultcode actions:
The Engine Control Module (ECM) disables the fuel trim function. The Engine Control Module (ECM) uses a value calculated from other sensors in the engine.
Related Documents
DTC023A13
Charge Air Cooler Coolant Pump Control Circuit/Open General Electrical Failures Circuit open
DTC: 023A13
Information:
The pump, water-cooled charge air cooler, is an electrical pump with internal diagnostics.
Test criteria:
-
The control module's test for the DTC starts when: The engine is running.
Detection criteria:
The DTC is set if the control module detects that:
-
The signal is missing.
Faultcode actions:
None.
Related Documents
DTC023B11
Charge Air Cooler Coolant Pump Control Circuit Low General Electrical Failures Circuit short to ground
DTC: 023B11
Information:
The pump, water-cooled charge air cooler, is an electrical pump with internal diagnostics.
Test criteria:
The control module's test for the DTC starts when:
-
The engine is running.
Detection criteria:
The DTC is set if the control module detects that:
-
The signal is too low.
Faultcode actions:
None.
Related Documents
DTC023C12
Charge Air Cooler Coolant Pump Control Circuit High General Electrical Failures Circuit short to battery
DTC: 023C12
Information:
The pump, water-cooled charge air cooler, is an electrical pump with internal diagnostics.
Test criteria:
The control module's test for the DTC starts when:
-
The engine is running.
Detection criteria:
The DTC is set if the control module detects that:
-
The signal is too high.
Faultcode actions:
None.
Related Documents
DTC023D00
Manifold Absolute Pressure - Turbocharger/Supercharger Boost Sensor "A" Correlation
DTC: 023D00
Information:
There are several air pressure sensors in the engine, these are compared by the Engine Control Module (ECM) for coherence. The signals from the Manifold Pressure Sensor (MAP) and from the air pressure- and air temperature sensor 1 are compared.
Test criteria:
-
The vehicle is in usage mode driving.
-
The throttle is more than 80 % open.
Detection criteria:
The DTC is set if the control module detects that:
-
The manifold absolute pressure sensor deviates too much from the atmospheric pressure sensor in the Engine Control Module (ECM).
Faultcode actions:
The Engine Control Module (ECM) disables the turbo control and uses a calculated value.
DTC023E00
Manifold Absolute Pressure - Turbocharger/Supercharger Boost Sensor "B" Correlation
DTC: 023E00
Information:
There are several air pressure sensors in the engine, these are compared by the Engine Control Module (ECM) for coherence. The signals from the Manifold Pressure Sensor (MAP) are compared with the signals from the charge air duct pressure sensor.
Test criteria:
The control module's test for the DTC starts when:
-
The vehicle is in usage mode driving.
-
The throttle is more than 80 % open.
Detection criteria:
The DTC is set if the control module detects that:
-
The manifold absolute pressure sensor deviates too much from the atmospheric pressure sensor in the Engine Control Module (ECM).
Faultcode actions:
None.
DTC024000
DTC 024000
DTC: 024000
Information:
The air pressure sensor, supercharger, measures the air pressure in the intake between the supercharger and the turbo. The information is used to regulate the supercharger and turbo control.
Test criteria:
The control module's test for the DTC starts when:
-
The vehicle has been in usage mode active for 10 s.
Detection criteria:
The DTC is set if the control module detects that:
-
The measured pressure deviates more than expected from the other pressure sensors in the engine.
Faultcode actions:
The Engine Control Module (ECM) uses the value from the internal atmospheric pressure sensor. The Engine Control Module (ECM) will disable the supercharger.
DTC024100
DTC 024100
DTC: 024100
Information:
The air pressure sensor, supercharger, measures the air pressure in the intake between the supercharger and the turbo. The information is used to regulate the supercharger and turbo control.
Test criteria:
The control module's test for the DTC starts when:
-
The vehicle is in usage mode active or higher.
Detection criteria:
The DTC is set if the control module detects that:
-
The signal is too low.
Faultcode actions:
None.
DTC024200
DTC 024200
DTC: 024200
Information:
The air pressure sensor, supercharger, measures the air pressure in the intake between the supercharger and the turbo. The information is used to regulate the supercharger and turbo control.
Test criteria:
The control module's test for the DTC starts when:
-
The vehicle is in usage mode active or higher.
Detection criteria:
The DTC is set if the control module detects that:
-
The signal is too high.
Faultcode actions:
The Engine Control Module (ECM) uses the value from the internal atmospheric pressure sensor. The Engine Control Module (ECM) will disable the supercharger.
DTC02430A
Turbocharger/Supercharger Wastegate Solenoid A General Electrical Failures
DTC: 02430A
Information:
Above a certain pressure, the turbo control valve, wastegate allows a certain proportion of the exhaust gas past the turbocharger turbine, thus reducing the boost pressure to the desired level. The Engine Control Module (ECM) monitors the turbo control valve, wastegate.
Test criteria:
The control module's test for the DTC starts when:
-
The vehicle is in usage mode active or higher.
Detection criteria:
The DTC is set if the control module detects that:
-
There is an electrical fault in the wastegate valve actuator.
Faultcode actions:
The Engine Control Module (ECM) opens the compressor bypass valve.
Related Documents
DTC024577
Turbocharger/Supercharger Wastegate Solenoid "A" Low Mechanical Failures Commanded position not reachable
DTC: 024577
Information:
Above a certain pressure, the turbo control valve, wastegate allows a certain proportion of the exhaust gas past the turbocharger turbine, thus reducing the boost pressure to the desired level. The Engine Control Module (ECM) monitors the turbo control valve, wastegate.
Test criteria:
The control module's test for the DTC starts when:
-
After run is in progress.
Detection criteria:
The DTC is set if the control module detects that:
-
There is an error during closed valve adaptation.
Faultcode actions:
None.
Related Documents
DTC024578
Turbocharger/Supercharger Wastegate Solenoid "A" Low Mechanical Failures Alignment or adjustment incorrect
DTC: 024578
Information:
Above a certain pressure, the turbo control valve, wastegate allows a certain proportion of the exhaust gas past the turbocharger turbine, thus reducing the boost pressure to the desired level. The Engine Control Module (ECM) monitors the turbo control valve, wastegate.
Test criteria:
The control module's test for the DTC starts when:
-
After run is in progress.
Detection criteria:
The DTC is set if the control module detects that:
-
There is an error during closed valve adaptation.
Faultcode actions:
None.
Related Documents
DTC024677
Turbocharger/Supercharger Wastegate Solenoid "A" High Mechanical Failures Commanded position not reachable
DTC: 024677
Information:
Above a certain pressure, the turbo control valve, wastegate allows a certain proportion of the exhaust gas past the turbocharger turbine, thus reducing the boost pressure to the desired level. The Engine Control Module (ECM) monitors the turbo control valve, wastegate.
Test criteria:
The control module's test for the DTC starts when:
-
After run is in progress.
Detection criteria:
The DTC is set if the control module detects that:
-
There is an error during closed valve adaptation.
Faultcode actions:
None.
Related Documents
DTC024678
Turbocharger/Supercharger Wastegate Solenoid "A" High Mechanical Failures Alignment or adjustment incorrect
DTC: 024678
Information:
Above a certain pressure, the turbo control valve, wastegate allows a certain proportion of the exhaust gas past the turbocharger turbine, thus reducing the boost pressure to the desired level. The Engine Control Module (ECM) monitors the turbo control valve, wastegate.
Test criteria:
The control module's test for the DTC starts when:
-
After run is in progress.
Detection criteria:
The DTC is set if the control module detects that:
-
There is an error during closed valve adaptation.
Faultcode actions:
None.
Related Documents
DTC025B00
Fuel Pump Module "A" Control Circuit Range/Performance
DTC: 025B00
Information:
The Engine Control Module (ECM) controls the fuel pressure via the fuel pump module using a PWM signal. The fuel pump module then controls the fuel pump depending on the pressure requested by the Engine Control Module (ECM). The fuel pump module sends diagnostic messages on the PWM signal back to the Engine Control Module (ECM).
Test criteria:
The control module's test for the DTC starts when:
-
The vehicle is in usage mode active or higher.
Detection criteria:
The DTC is set if the control module detects that:
-
The fuel pump is blocked.
Faultcode actions:
None.
Related Documents
DTC025C14
Fuel Pump Module "A" Control Circuit Low General Electrical Failures Circuit short to ground or open
DTC: 025C14
Information:
The Engine Control Module (ECM) controls the fuel pressure via the fuel pump module using a PWM signal. The fuel pump module then controls the fuel pump depending on the pressure requested by the Engine Control Module (ECM).
Test criteria:
The control module's test for the DTC starts when:
-
The vehicle is in usage mode active or higher.
Detection criteria:
The DTC is set if the control module detects that:
-
There is a short circuit to ground or an open circuit between the Engine Control Module (ECM) and the fuel pump module.
Faultcode actions:
None.
Related Documents
DTC025D00
Fuel Pump Module "A" Control Circuit High
DTC: 025D00
Information:
The Engine Control Module (ECM) controls the fuel pressure via the fuel pump module using a PWM signal. The fuel pump module then controls the fuel pump depending on the pressure requested by the Engine Control Module (ECM).
Test criteria:
The control module's test for the DTC starts when:
-
The vehicle is in usage mode active or higher.
Detection criteria:
The DTC is set if the control module detects that:
-
There is a short circuit to battery between the Engine Control Module (ECM) and the fuel pump module.
Faultcode actions:
None.
Related Documents
DTC026200
Cylinder 1 Injector Circuit High
DTC: 026200
Information:
The Engine Control Module (ECM) regulates the injection time and injection timing by controlling the fuel injectors' opening and closing. This is done by grounding the signal line to the respective valve, which causes a pulse to be sent. The control module checks the signal's shape and amplitude at opening and closing.
Test criteria:
The control module's test for the DTC starts when:
-
The vehicle is in usage mode driving.
Detection criteria:
The DTC is set if the control module detects that:
-
The signal is too high.
-
Incorrect value in more than 20 of 400 pulses.
-
An incorrect value lasts for 2 or more subsequent driving cycles.
Faultcode actions:
The Engine Control Module (ECM) disables the lambda regulation.
Related Documents
DTC026500
Cylinder 2 Injector Circuit High
DTC: 026500
Information:
The Engine Control Module (ECM) regulates the injection time and injection timing by controlling the fuel injectors' opening and closing. This is done by grounding the signal line to the respective valve, which causes a pulse to be sent. The control module checks the signal's shape and amplitude at opening and closing.
Test criteria:
The control module's test for the DTC starts when:
-
The vehicle is in usage mode driving.
Detection criteria:
The DTC is set if the control module detects that:
-
The signal is too high.
-
Incorrect value in more than 20 of 400 pulses.
-
An incorrect value lasts for 2 or more subsequent driving cycles.
Faultcode actions:
The Engine Control Module (ECM) disables the lambda regulation.
Related Documents
DTC026800
Cylinder 3 Injector Circuit High
DTC: 026800
Information:
The Engine Control Module (ECM) regulates the injection time and injection timing by controlling the fuel injectors' opening and closing. This is done by grounding the signal line to the respective valve, which causes a pulse to be sent. The control module checks the signal's shape and amplitude at opening and closing.
Test criteria:
The control module's test for the DTC starts when:
-
The vehicle is in usage mode driving.
Detection criteria:
The DTC is set if the control module detects that:
-
The signal is too high.
-
Incorrect value in more than 20 of 400 pulses.
-
An incorrect value lasts for 2 or more subsequent driving cycles.
Faultcode actions:
The Engine Control Module (ECM) disables the lambda regulation.
Related Documents
DTC026A98
Charge Air Cooler Efficiency Below Threshold Component Failures Component or system over temperature
DTC: 026A98
Information:
The coolant temperature sensor, water-cooled charge air cooler, measures the temperature of the coolant in the low temperature engine coolant circuit. The coolant temperature is required for the Engine Control Module (ECM) to be able to regulate the functionality of the engine.
Test criteria:
The control module's test for the DTC starts when:
-
The engine is running.
Detection criteria:
The DTC is set if the control module detects that:
-
The temperature measured by the coolant temperature sensor, water-cooled charge air cooler, exceeds 105 °C.
Faultcode actions:
The Engine Control Module (ECM) limits the engine torque.
Related Documents
DTC026E16
Charge Air Cooler Coolant Pump Performance General Electrical Failures Circuit voltage below threshold
DTC: 026E16
Information:
The pump, water-cooled charge air cooler, is an electrical pump with an integrated driver and motor section. The pump is monitored and controlled by the Engine Control Module (ECM).
Test criteria:
The control module's test for the DTC starts when:
-
The vehicle is in usage mode active or higher.
Detection criteria:
The DTC is set if the control module detects that:
-
The signal is continuously low.
Faultcode actions:
None.
Related Documents
DTC026E17
Charge Air Cooler Coolant Pump Performance General Electrical Failures Circuit voltage above threshold
DTC: 026E17
Information:
The pump, water-cooled charge air cooler, is an electrical pump with an integrated driver and motor section. The pump is monitored and controlled by the Engine Control Module (ECM).
Test criteria:
The control module's test for the DTC starts when:
-
The vehicle is in usage mode active or higher.
Detection criteria:
The DTC is set if the control module detects that:
-
The signal is continuously high.
Faultcode actions:
None.
Related Documents
DTC026E7B
Charge Air Cooler Coolant Pump Performance Mechanical Failures Low fluid level
DTC: 026E7B
Information:
The pump, water-cooled charge air cooler, is an electrical pump with an integrated driver and motor section. The pump is monitored and controlled by the Engine Control Module (ECM).
Test criteria:
The control module's test for the DTC starts when:
-
The vehicle is in usage mode active or higher.
Detection criteria:
-
The DTC is set if the control module detects that: The signal is too high.
Faultcode actions:
None.
Related Documents
DTC026E96
Charge Air Cooler Coolant Pump Performance Component Failures Component internal failure
DTC: 026E96
Information:
The pump, water-cooled charge air cooler, is an electrical pump with an integrated driver and motor section. The pump is monitored and controlled by the Engine Control Module (ECM).
Test criteria:
The control module's test for the DTC starts when:
-
The vehicle is in usage mode active or higher.
Detection criteria:
The DTC is set if the control module detects that:
-
There is an internal fault in the pump.
Faultcode actions:
None.
Related Documents
DTC027100
Cylinder 4 Injector Circuit High
DTC: 027100
Information:
The Engine Control Module (ECM) regulates the injection time and injection timing by controlling the fuel injectors' opening and closing. This is done by grounding the signal line to the respective valve, which causes a pulse to be sent. The control module checks the signal's shape and amplitude at opening and closing.
Test criteria:
The control module's test for the DTC starts when:
-
The vehicle is in usage mode driving.
Detection criteria:
The DTC is set if the control module detects that:
-
The signal is too high.
-
Incorrect value in more than 20 of 400 pulses.
-
An incorrect value lasts for 2 or more subsequent driving cycles.
Faultcode actions:
The Engine Control Module (ECM) disables the lambda regulation.
Related Documents
DTC027A00
Fuel Pump Module "B" Control Circuit/Open
DTC: 027A00
Information:
The Engine Control Module (ECM) controls the fuel pressure via the fuel pump module using a PWM signal. The fuel pump module then controls the fuel pump depending on the pressure requested by the Engine Control Module (ECM). The fuel pump module sends diagnostic messages on the PWM signal back to the Engine Control Module (ECM).
Test criteria:
The control module's test for the DTC starts when:
-
The vehicle is in usage mode active or higher.
Detection criteria:
The DTC is set if the control module detects that:
-
The output from the fuel pump module to the fuel pump is open or short-circuited.
Faultcode actions:
None.
Related Documents
DTC027B00
Fuel Pump Module "B" Control Circuit Range/Performance
DTC: 027B00
Information:
The Engine Control Module (ECM) controls the fuel pressure via the fuel pump module using a PWM signal. The fuel pump module then controls the fuel pump depending on the pressure requested by the Engine Control Module (ECM). The fuel pump module sends diagnostic messages on the PWM signal back to the Engine Control Module (ECM).
Test criteria:
The control module's test for the DTC starts when:
-
The vehicle is in usage mode active or higher.
Detection criteria:
The DTC is set if the control module detects that:
-
The output from the fuel pump module to the fuel pump is too low.
Faultcode actions:
None.
Related Documents
DTC027B71
Fuel Pump Module "B" Control Circuit Range/Performance Mechanical Failures Actuator stuck
DTC: 027B71
Information:
The Engine Control Module (ECM) controls the fuel pressure via the fuel pump module using a PWM signal. The fuel pump module then controls the fuel pump depending on the pressure requested by the Engine Control Module (ECM). The fuel pump module sends diagnostic messages on the PWM signal back to the Engine Control Module (ECM).
Test criteria:
The control module's test for the DTC starts when:
-
The vehicle is in usage mode driving.
Detection criteria:
The DTC is set if the control module detects that:
-
The signal from the fuel pump module has been constant for too long.
Faultcode actions:
None.
Related Documents
DTC027C00
Fuel Pump Module "B" Control Circuit Low
DTC: 027C00
Information:
The Engine Control Module (ECM) controls the fuel pressure via the fuel pump module using a PWM signal. The fuel pump module then controls the fuel pump depending on the pressure requested by the Engine Control Module (ECM). The fuel pump module sends diagnostic messages on the PWM signal back to the Engine Control Module (ECM).
Test criteria:
The control module's test for the DTC starts when:
-
The vehicle is in usage mode active or higher.
Detection criteria:
The DTC is set if the control module detects that:
-
The signal is too low.
Faultcode actions:
None.
Related Documents
DTC027D00
Fuel Pump Module "B" Control Circuit High
DTC: 027D00
Information:
The Engine Control Module (ECM) controls the fuel pressure via the fuel pump module using a PWM signal. The fuel pump module then controls the fuel pump depending on the pressure requested by the Engine Control Module (ECM). The fuel pump module sends diagnostic messages on the PWM signal back to the Engine Control Module (ECM).
Test criteria:
The control module's test for the DTC starts when:
-
The vehicle is in usage mode active or higher.
Detection criteria:
The DTC is set if the control module detects that:
-
The signal is too high.
Faultcode actions:
None.
Related Documents
DTC029900
Turbo / Super Charger Underboost
DTC: 029900
Information:
The Engine Control Module (ECM) regulates the boost pressure with the turbo control valve, wastegate and turbo bypass valve. The Engine Control Module (ECM) can either detect a small error in the turbo regulation over a long time or a large error in a short time.
Test criteria:
The control module's test for the DTC starts when:
-
Light driving with varying acceleration is performed.
Detection criteria:
The DTC is set if the control module detects that:
-
The boost pressure is too low.
Faultcode actions:
None.
Related Documents
DTC02CA00
Turbocharger/Supercharger "B" Overboost Condition
DTC: 02CA00
Information:
The Engine Control Module (ECM) monitors the pressure after the supercharger.
Test criteria:
The control module's test for the DTC starts when:
-
The engine is running.
-
The regulation of the compressor clutch is active.
Detection criteria:
The DTC is set if the control module detects that:
-
The supercharger pressure is higher than the desired value.
Faultcode actions:
None.
Related Documents
DTC02CA07
Turbocharger/Supercharger "B" Overboost Condition Mechanical Failures
DTC: 02CA07
Information:
The Engine Control Module (ECM) monitors the pressure after the supercharger.
Test criteria:
The control module's test for the DTC starts when:
-
The engine is running.
-
The regulation of the compressor clutch is active.
Detection criteria:
The DTC is set if the control module detects that:
-
The supercharger pressure is too high.
Faultcode actions:
The Engine Control Module (ECM) disconnects the compressor.
Related Documents
DTC02CB00
Turbocharger/Supercharger "B" Underboost Condition
DTC: 02CB00
Information:
The Engine Control Module (ECM) monitors the pressure after the supercharger.
Test criteria:
The control module's test for the DTC starts when:
-
The engine is running.
-
The regulation of the compressor clutch is active.
Detection criteria:
The DTC is set if the control module detects that:
-
The supercharger pressure is lower than the desired value.
Faultcode actions:
None.
Related Documents
DTC02CB07
Turbocharger/Supercharger "B" Underboost Condition Mechanical Failures
DTC: 02CB07
Information:
The Engine Control Module (ECM) monitors the pressure after the supercharger.
Test criteria:
The control module's test for the DTC starts when:
-
The engine is running.
-
The regulation of the compressor clutch is active.
Detection criteria:
The DTC is set if the control module detects that:
-
The supercharger pressure is too low.
Faultcode actions:
The Engine Control Module (ECM) disconnects the compressor. The Engine Control Module (ECM) uses the atmospheric pressure. The Engine Control Module (ECM) reduces the engine performance at low engine speeds.
Related Documents
DTC030000
Random Misfire Detected
DTC: 030000
Information:
When the mixture of air and fuel is not properly combusted, a misfire may occur. The Engine Control Module (ECM) monitors the number of misfires for each cylinder.
Test criteria:
The control module's test for the DTC starts when:
-
The vehicle is in usage mode driving.
Detection criteria:
The DTC is set if the control module detects that:
-
The intensity of the registered misfires is too high.
Faultcode actions:
None.
DTC030092
Random Misfire Detected Component Failures Performance or incorrect operation
DTC: 030092
Information:
When the mixture of air and fuel is not properly combusted, a misfire may occur. The Engine Control Module (ECM) monitors the number of misfires for each cylinder.
Test criteria:
The control module's test for the DTC starts when:
-
The vehicle is in usage mode driving.
Detection criteria:
The DTC is set if the control module detects that:
-
The intensity of the registered misfires is too high.
Faultcode actions:
None.
DTC030098
Random Misfire Detected Component Failures Component or system over temperature
DTC: 030098
Information:
When the mixture of air and fuel is not properly combusted, a misfire may occur. The Engine Control Module (ECM) monitors the number of misfires for each cylinder.
Test criteria:
The control module's test for the DTC starts when:
-
The vehicle is in usage mode driving.
Detection criteria:
The DTC is set if the control module detects that:
-
The intensity of the registered misfires is too high.
Faultcode actions:
None.
DTC030100
Cylinder 1 Misfire Detected
DTC: 030100
Information:
When the mixture of air and fuel is not properly combusted, a misfire may occur. The Engine Control Module (ECM) monitors the number of misfires for each cylinder.
Test criteria:
The control module's test for the DTC starts when:
-
The engine is running.
Detection criteria:
The DTC is set if the control module detects that:
-
There are too many misfires registered for cylinder 1.
Faultcode actions:
None.
Related Documents
DTC030200
Cylinder 2 Misfire Detected
DTC: 030200
Information:
When the mixture of air and fuel is not properly combusted, a misfire may occur. The Engine Control Module (ECM) monitors the number of misfires for each cylinder.
Test criteria:
The control module's test for the DTC starts when:
-
The engine is running.
Detection criteria:
The DTC is set if the control module detects that:
-
There are too many misfires registered for cylinder 2.
Faultcode actions:
None.
DTC030300
Cylinder 3 Misfire Detected
DTC: 030300
Information:
When the mixture of air and fuel is not properly combusted, a misfire may occur. The Engine Control Module (ECM) monitors the number of misfires for each cylinder.
Test criteria:
The control module's test for the DTC starts when:
-
The engine is running.
Detection criteria:
The DTC is set if the control module detects that:
-
There are too many misfires registered for cylinder 3.
Faultcode actions:
None.
DTC030400
Cylinder 4 Misfire Detected
DTC: 030400
Information:
When the mixture of air and fuel is not properly combusted, a misfire may occur. The Engine Control Module (ECM) monitors the number of misfires for each cylinder.
Test criteria:
The control module's test for the DTC starts when:
-
The engine is running.
Detection criteria:
The DTC is set if the control module detects that:
-
There are too many misfires registered for cylinder 4.
Faultcode actions:
None.
DTC032621
Knock Sensor 1 Circuit Range/Performance (Bank 1) General Signal Failures Signal amplitude < minimum
DTC: 032621
Information:
The knock sensor is used to monitor the combustion knocking from the engine. Knocking may damage the engine and reduces the efficiency of engine combustion.
Test criteria:
The control module's test for the DTC starts when:
-
The vehicle is in usage mode driving.
-
Varied driving has been performed.
Detection criteria:
The DTC is set if the control module detects that:
-
The signal is within the allowed range but lower than expected.
Faultcode actions:
The Engine Control Module (ECM) reduces the ignition angle. The Engine Control Module (ECM) disables the knock regulation.
Related Documents
DTC032622
Knock Sensor 1 Circuit Range/Performance (Bank 1) General Signal Failures Signal amplitude > maximum
DTC: 032622
Information:
The knock sensor is used to monitor the combustion knocking from the engine. Knocking may damage the engine and reduces the efficiency of engine combustion.
Test criteria:
The control module's test for the DTC starts when:
-
The vehicle is in usage mode driving.
-
Varied driving has been performed.
Detection criteria:
The DTC is set if the control module detects that:
-
The signal is within the allowed range but higher than expected.
Faultcode actions:
The Engine Control Module (ECM) reduces the ignition angle. The Engine Control Module (ECM) disables the knock regulation.
Related Documents
DTC032700
Knock Sensor 1 Circuit Low Input (Bank1)
DTC: 032700
Information:
The knock sensor is used to monitor the combustion knocking from the engine. Knocking may damage the engine and reduces the efficiency of engine combustion.
Test criteria:
The control module's test for the DTC starts when:
-
The vehicle is in usage mode active or higher.
Detection criteria:
The DTC is set if the control module detects that:
-
The signal is too low.
Faultcode actions:
The Engine Control Module (ECM) reduces the ignition angle. The Engine Control Module (ECM) disables the knock regulation.
Related Documents
DTC032800
Knock Sensor 1 Circuit High Input (Bank 1)
DTC: 032800
Information:
The knock sensor is used to monitor the combustion knocking from the engine. Knocking may damage the engine and reduces the efficiency of engine combustion.
Test criteria:
The control module's test for the DTC starts when:
-
The vehicle is in usage mode active or higher.
Detection criteria:
The DTC is set if the control module detects that:
-
The signal is too high.
Faultcode actions:
The Engine Control Module (ECM) reduces the ignition angle. The Engine Control Module (ECM) disables the knock regulation.
Related Documents
DTC033121
Knock/Combustion Vibration Sensor 2 Circuit Range/Performance (Bank 2) General Signal Failures Signal amplitude < minimum
DTC: 033121
Information:
The knock sensor is used to monitor the combustion knocking from the engine. Knocking may damage the engine and reduces the efficiency of engine combustion.
Test criteria:
The control module's test for the DTC starts when:
-
The vehicle is in usage mode driving.
-
Varied driving has been performed.
Detection criteria:
The DTC is set if the control module detects that:
-
The signal from the knock sensor 2 is within the allowed range but lower than expected.
Faultcode actions:
The Engine Control Module (ECM) reduces the ignition angle. The Engine Control Module (ECM) disables the knock regulation.
Related Documents
DTC033200
Knock/Combustion Vibration Sensor 2 Circuit Low (Bank 2)
DTC: 033200
Information:
The knock sensors are used to monitor the combustion knocking from the engine. Knocking may damage the engine and reduces the efficiency of engine combustion.
Test criteria:
The control module's test for the DTC starts when:
-
The vehicle is in usage mode active or higher.
Detection criteria:
The DTC is set if the control module detects that:
-
The signal from the knock sensor 2 is too low.
Faultcode actions:
The Engine Control Module (ECM) reduces the ignition angle. The Engine Control Module (ECM) disables the knock regulation.
Related Documents
DTC033300
Knock/Combustion Vibration Sensor 2 Circuit High (Bank 2)
DTC: 033300
Information:
The knock sensors are used to monitor the combustion knocking from the engine. Knocking may damage the engine and reduces the efficiency of engine combustion.
Test criteria:
The control module's test for the DTC starts when:
-
The vehicle is in usage mode active or higher.
Detection criteria:
The DTC is set if the control module detects that:
-
The signal from the knock sensor 2 is too high.
Faultcode actions:
The Engine Control Module (ECM) reduces the ignition angle. The Engine Control Module (ECM) disables the knock regulation.
Related Documents
DTC033500
Crankshaft Position Sensor A Circuit
DTC: 033500
Information:
The crankshaft position sensor is used by the Engine Control Module (ECM) to calculate crankshaft position and speed, enabling it to determine when a piston is approaching its top dead center position. When the reference gap on the crankshaft flywheel passes the crankshaft sensor, voltage and frequency instantly drop to zero.
Test criteria:
The control module's test for the DTC starts when:
-
The engine has been running with an engine speed above 650 r/min.
Detection criteria:
The DTC is set if the control module detects that:
-
The signal is incorrect or missing.
Faultcode actions:
The Engine Control Module (ECM) uses the signal from the camshaft position sensor. The Engine Control Module (ECM) limits the maximum engine speed to 3 000 r/min.
Related Documents
DTC033600
Crankshaft Position Sensor A Circuit Range/Performance
DTC: 033600
Information:
The crankshaft position sensor is used by the Engine Control Module (ECM) to calculate crankshaft position and speed, enabling it to determine when a piston is approaching its top dead center position. When the reference gap on the crankshaft flywheel passes the crankshaft sensor, voltage and frequency instantly drop to zero.
Test criteria:
The control module's test for the DTC starts when:
-
The engine has been running with an engine speed above 650 r/min.
Detection criteria:
The DTC is set if the control module detects that:
-
The number of pulses during one revolution is incorrect.
Faultcode actions:
The Engine Control Module (ECM) uses the signal from the camshaft position sensor. The Engine Control Module (ECM) limits the maximum engine speed to 3 000 r/min.
Related Documents
DTC033664
Crankshaft Position Sensor "A" Circuit Range/Performance Algorithm Based Failures Signal plausibility failure
DTC: 033664
Information:
The crankshaft position sensor is used by the Engine Control Module (ECM) to calculate crankshaft position and speed, enabling it to determine when a piston is approaching its top dead center position. When the reference gap on the crankshaft flywheel passes the crankshaft sensor, voltage and frequency instantly drop to zero.
Test criteria:
The control module's test for the DTC starts when:
-
The engine is started.
Detection criteria:
The DTC is set if the control module detects that:
-
The number of crankshaft teeth noted per revolution is incorrect.
Faultcode actions:
The Engine Control Module (ECM) limits the maximum engine speed to 3 000 r/min. The Engine Control Module (ECM) uses the signal from the camshaft position sensor.
Related Documents
DTC033900
Crankshaft Position Sensor A Circuit Intermittent
DTC: 033900
Information:
The crankshaft position sensor is used by the Engine Control Module (ECM) to calculate crankshaft position and speed, enabling it to determine when a piston is approaching its top dead center position. When the reference gap on the crankshaft flywheel passes the crankshaft sensor, voltage and frequency instantly drop to zero.
Test criteria:
The control module's test for the DTC starts when:
-
The engine is started.
Detection criteria:
The DTC is set if the control module detects that:
-
The signal is incorrect or missing.
Faultcode actions:
The Engine Control Module (ECM) uses the signal from the camshaft position sensor. The Engine Control Module (ECM) limits the maximum engine speed to 3 000 r/min.
Related Documents
DTC034000
Camshaft Position Sensor A Circuit (Bank 1 or single sensor)
DTC: 034000
Information:
The camshaft position sensor is used by the Engine Control Module (ECM) to determine the camshaft's position. The camshaft position sensor uses a pulse wheel on the camshaft consisting of five teeth to detect the flanks.
Test criteria:
The control module's test for the DTC starts when:
-
The vehicle is in usage mode driving.
Detection criteria:
The DTC is set if the control module detects that:
-
The signal is missing.
Faultcode actions:
The Engine Control Module (ECM) uses the crankshaft position sensor signal. The Engine Control Module (ECM) does not use the VVT-unit.
Related Documents
DTC034100
Camshaft Position Sensor A Circuit Range/Performance (Bank 1 or single sensor)
DTC: 034100
Information:
The camshaft position sensor is used by the Engine Control Module (ECM) to determine the camshaft's position. The camshaft position sensor uses a pulse wheel on the camshaft consisting of five teeth to detect the flanks.
Test criteria:
The control module's test for the DTC starts when:
-
The vehicle is in usage mode driving.
Detection criteria:
The DTC is set if the control module detects that:
-
One or more pulses are missing during a revolution.
Faultcode actions:
The Engine Control Module (ECM) uses the crankshaft position sensor signal. The Engine Control Module (ECM) does not use the VVT-unit.
Related Documents
DTC034192
Camshaft Position Sensor "A" Circuit Range/Performance (Bank 1 or single sensor) Component Failures Performance or incorrect operation
DTC: 034192
Information:
The camshaft position sensor is used by the Engine Control Module (ECM) to determine the camshaft's position. The camshaft position sensor uses a pulse wheel on the camshaft consisting of five teeth to detect the flanks.
Test criteria:
The control module's test for the DTC starts when:
-
The engine is started.
Detection criteria:
The DTC is set if the control module detects that:
-
The camshaft segment is outside a certain range during start-up.
Faultcode actions:
The Engine Control Module (ECM) uses the crankshaft position sensor signal.
Related Documents
DTC034400
Camshaft Position Sensor A Circuit Intermittent (Bank 1 or single sensor)
DTC: 034400
Information:
The camshaft position sensor is used by the Engine Control Module (ECM) to determine the camshaft's position. The camshaft position sensor uses a pulse wheel on the camshaft consisting of five teeth to detect the flanks.
Test criteria:
The control module's test for the DTC starts when:
-
The engine is started.
Detection criteria:
The DTC is set if the control module detects that:
-
The signal is missing.
Faultcode actions:
The Engine Control Module (ECM) uses the crankshaft position sensor signal. The Engine Control Module (ECM) does not use the VVT-unit.
Related Documents
DTC034A00
Crankshaft Position Sensor - Crankshaft Start Position Incorrect
DTC: 034A00
Information:
The crankshaft position sensor is used by the Engine Control Module (ECM) to calculate crankshaft position and speed, enabling it to determine when a piston is approaching its top dead center position. When the reference gap on the crankshaft flywheel passes the crankshaft sensor, voltage and frequency instantly drop to zero.
Test criteria:
The control module's test for the DTC starts when:
-
The vehicle has gone through at least three start and stop sequences.
Detection criteria:
The DTC is set if the control module detects that:
-
The signal is missing.
Faultcode actions:
None.
Related Documents
DTC034B00
Crankshaft Position Sensor - Crankshaft Direction Incorrect
DTC: 034B00
Information:
The crankshaft position sensor is used by the Engine Control Module (ECM) to calculate crankshaft position and speed, enabling it to determine when a piston is approaching its top dead center position. When the reference gap on the crankshaft flywheel passes the crankshaft sensor, voltage and frequency instantly drop to zero.
Test criteria:
The control module's test for the DTC starts when:
-
The engine is started.
Detection criteria:
The DTC is set if the control module detects that:
-
The crankshaft rotates backwards.
Faultcode actions:
The Engine Control Module (ECM) uses the camshaft position sensor. The Engine Control Module (ECM) limits the maximum engine speed to 3 000 r/min.
Related Documents
DTC035111
Ignition Coil A Primary/Secondary Circuit General Electrical Failures Circuit short to ground
DTC: 035111
Information:
The ignition coils supply the spark plugs with high voltage to produce sparks. The Engine Control Module (ECM) controls the ignition coils so that sparks are generated at the correct time.
Test criteria:
The control module's test for the DTC starts when:
-
The engine is started.
Detection criteria:
The DTC is set if the control module detects that:
-
The signal is too low.
-
An incorrect value lasts longer than 9 s.
-
An incorrect value lasts for 2 or more subsequent driving cycles.
Faultcode actions:
The Engine Control Module (ECM) disables the fuel trim function.
Related Documents
DTC035112
Ignition Coil A Primary/Secondary Circuit General Electrical Failures Circuit short to battery
DTC: 035112
Information:
The ignition coils supply the spark plugs with high voltage to produce sparks. The Engine Control Module (ECM) controls the ignition coils so that sparks are generated at the correct time.
Test criteria:
The control module's test for the DTC starts when:
-
The engine is started.
Detection criteria:
The DTC is set if the control module detects that:
-
The signal is too high.
-
An incorrect value lasts longer than 9 s.
-
An incorrect value lasts for 2 or more subsequent driving cycles.
Faultcode actions:
The Engine Control Module (ECM) disables the fuel trim function.
Related Documents
DTC035113
Ignition Coil A Primary/Secondary Circuit General Electrical Failures Circuit open
DTC: 035113
Information:
The ignition coils supply the spark plugs with high voltage to produce sparks. The Engine Control Module (ECM) controls the ignition coils so that sparks are generated at the correct time.
Test criteria:
The control module's test for the DTC starts when:
-
The engine is started.
Detection criteria:
The DTC is set if the control module detects that:
-
The signal is missing.
-
An incorrect value lasts longer than 9 s.
-
An incorrect value lasts for 2 or more subsequent driving cycles.
Faultcode actions:
The Engine Control Module (ECM) disables the fuel trim function.
Related Documents
DTC035211
Ignition Coil B Primary/Secondary Circuit General Electrical Failures Circuit short to ground
DTC: 035211
Information:
The ignition coils supply the spark plugs with high voltage to produce sparks. The Engine Control Module (ECM) controls the ignition coils so that sparks are generated at the correct time.
Test criteria:
The control module's test for the DTC starts when:
-
The engine is started.
Detection criteria:
The DTC is set if the control module detects that:
-
The signal is too low.
-
An incorrect value lasts longer than 9 s.
-
An incorrect value lasts for 2 or more subsequent driving cycles.
Faultcode actions:
The Engine Control Module (ECM) disables the fuel trim function.
Related Documents
DTC035212
Ignition Coil B Primary/Secondary Circuit General Electrical Failures Circuit short to battery
DTC: 035212
Information:
The ignition coils supply the spark plugs with high voltage to produce sparks. The Engine Control Module (ECM) controls the ignition coils so that sparks are generated at the correct time.
Test criteria:
The control module's test for the DTC starts when:
-
The engine is started.
Detection criteria:
The DTC is set if the control module detects that:
-
The signal is too high.
-
An incorrect value lasts longer than 9 s.
-
An incorrect value lasts for 2 or more subsequent driving cycles.
Faultcode actions:
The Engine Control Module (ECM) disables the fuel trim function.
Related Documents
DTC035213
Ignition Coil B Primary/Secondary Circuit General Electrical Failures Circuit open
DTC: 035213
Information:
The ignition coils supply the spark plugs with high voltage to produce sparks. The Engine Control Module (ECM) controls the ignition coils so that sparks are generated at the correct time.
Test criteria:
The control module's test for the DTC starts when:
-
The engine is started.
Detection criteria:
The DTC is set if the control module detects that:
-
The signal is missing.
-
An incorrect value lasts longer than 9 s.
-
An incorrect value lasts for 2 or more subsequent driving cycles.
Faultcode actions:
The Engine Control Module (ECM) disables the fuel trim function.
Related Documents
DTC035311
Ignition Coil C Primary/Secondary Circuit General Electrical Failures Circuit short to ground
DTC: 035311
Information:
The ignition coils supply the spark plugs with high voltage to produce sparks. The Engine Control Module (ECM) controls the ignition coils so that sparks are generated at the correct time.
Test criteria:
The control module's test for the DTC starts when:
-
The engine is started.
Detection criteria:
The DTC is set if the control module detects that:
-
The signal is too low.
-
An incorrect value lasts longer than 9 s.
-
An incorrect value lasts for 2 or more subsequent driving cycles.
Faultcode actions:
The Engine Control Module (ECM) disables the fuel trim function.
Related Documents
DTC035312
Ignition Coil C Primary/Secondary Circuit General Electrical Failures Circuit short to battery
DTC: 035312
Information:
The ignition coils supply the spark plugs with high voltage to produce sparks. The Engine Control Module (ECM) controls the ignition coils so that sparks are generated at the correct time.
Test criteria:
The control module's test for the DTC starts when:
-
The engine is started.
Detection criteria:
The DTC is set if the control module detects that:
-
The signal is too high.
-
An incorrect value lasts longer than 9 s.
-
An incorrect value lasts for 2 or more subsequent driving cycles.
Faultcode actions:
The Engine Control Module (ECM) disables the fuel trim function.
Related Documents
DTC035313
Ignition Coil C Primary/Secondary Circuit General Electrical Failures Circuit open
DTC: 035313
Information:
The ignition coils supply the spark plugs with high voltage to produce sparks. The Engine Control Module (ECM) controls the ignition coils so that sparks are generated at the correct time.
Test criteria:
The control module's test for the DTC starts when:
-
The engine is started.
Detection criteria:
The DTC is set if the control module detects that:
-
The signal is missing.
-
An incorrect value lasts longer than 9 s.
-
An incorrect value lasts for 2 or more subsequent driving cycles.
Faultcode actions:
The Engine Control Module (ECM) disables the fuel trim function.
Related Documents
DTC035411
Ignition Coil D Primary/Secondary Circuit General Electrical Failures Circuit short to ground
DTC: 035411
Information:
The ignition coils supply the spark plugs with high voltage to produce sparks. The Engine Control Module (ECM) controls the ignition coils so that sparks are generated at the correct time.
Test criteria:
The control module's test for the DTC starts when:
-
The engine is started.
Detection criteria:
The DTC is set if the control module detects that:
-
The signal is too low.
-
An incorrect value lasts longer than 9 s.
-
An incorrect value lasts for 2 or more subsequent driving cycles.
Faultcode actions:
The Engine Control Module (ECM) disables the fuel trim function.
Related Documents
DTC035412
Ignition Coil D Primary/Secondary Circuit General Electrical Failures Circuit short to battery
DTC: 035412
Information:
The ignition coils supply the spark plugs with high voltage to produce sparks. The Engine Control Module (ECM) controls the ignition coils so that sparks are generated at the correct time.
Test criteria:
The control module's test for the DTC starts when:
-
The engine is started.
Detection criteria:
The DTC is set if the control module detects that:
-
The signal is too high.
-
An incorrect value lasts longer than 9 s.
-
An incorrect value lasts for 2 or more subsequent driving cycles.
Faultcode actions:
The Engine Control Module (ECM) disables the fuel trim function.
Related Documents
DTC035413
Ignition Coil D Primary/Secondary Circuit General Electrical Failures Circuit open
DTC: 035413
Information:
The ignition coils supply the spark plugs with high voltage to produce sparks. The Engine Control Module (ECM) controls the ignition coils so that sparks are generated at the correct time.
Test criteria:
The control module's test for the DTC starts when:
-
The engine is started.
Detection criteria:
The DTC is set if the control module detects that:
-
The signal is missing.
-
An incorrect value lasts longer than 9 s.
-
An incorrect value lasts for 2 or more subsequent driving cycles.
Faultcode actions:
The Engine Control Module (ECM) disables the fuel trim function.
Related Documents
DTC036500
Camshaft Position Sensor B Circuit (Bank 1)
DTC: 036500
Information:
The camshaft position sensor is used by the Engine Control Module (ECM) to determine the camshaft's position. The camshaft position sensor uses a pulse wheel on the camshaft consisting of five teeth to detect the flanks.
Test criteria:
The control module's test for the DTC starts when:
-
The vehicle is in usage mode driving.
Detection criteria:
The DTC is set if the control module detects that:
-
The signal is missing.
Faultcode actions:
The Engine Control Module (ECM) uses the crankshaft position sensor signal. The Engine Control Module (ECM) does not use the VVT-unit.
Related Documents
DTC036600
Camshaft Position Sensor B Circuit Range/Performance (Bank 1)
DTC: 036600
Information:
The camshaft position sensor is used by the Engine Control Module (ECM) to determine the camshaft's position. The camshaft position sensor uses a pulse wheel on the camshaft consisting of five teeth to detect the flanks.
Test criteria:
The control module's test for the DTC starts when:
-
The vehicle is in usage mode driving.
Detection criteria:
The DTC is set if the control module detects that:
-
One or more pulses are missing during a revolution.
Faultcode actions:
The Engine Control Module (ECM) uses the crankshaft position sensor signal. The Engine Control Module (ECM) does not use the VVT-unit.
Related Documents
DTC036692
Camshaft Position Sensor "B" Circuit Range/Performance (Bank 1) Component Failures Performance or incorrect operation
DTC: 036692
Information:
The camshaft position sensor is used by the Engine Control Module (ECM) to determine the camshaft's position. The camshaft position sensor uses a pulse wheel on the camshaft consisting of five teeth to detect the flanks.
Test criteria:
The control module's test for the DTC starts when:
-
The vehicle is in usage mode driving.
Detection criteria:
The DTC is set if the control module detects that:
-
One or more pulses are missing during a revolution.
Faultcode actions:
The Engine Control Module (ECM) uses the crankshaft position sensor signal. The Engine Control Module (ECM) does not use the VVT-unit.
Related Documents
DTC036900
Camshaft Position Sensor B Circuit Intermittent (Bank 1)
DTC: 036900
Information:
The camshaft position sensor is used by the Engine Control Module (ECM) to determine the camshaft's position. The camshaft position sensor uses a pulse wheel on the camshaft consisting of five teeth to detect the flanks.
Test criteria:
The control module's test for the DTC starts when:
-
The engine is started.
Detection criteria:
The DTC is set if the control module detects that:
-
The signal is missing.
Faultcode actions:
The Engine Control Module (ECM) uses the crankshaft position sensor signal. The Engine Control Module (ECM) does not use the VVT-unit.
Related Documents
DTC040400
Exhaust Gas Recirculation "A" Control Circuit Range/Performance
DTC: 040400
Information:
The Engine Control Module (ECM) monitors the position of the low-pressure EGR valve.
Test criteria:
The control module's test for the DTC starts when:
-
The vehicle is in usage mode driving.
Detection criteria:
The DTC is set if the control module detects that:
-
The low-pressure EGR valve is unable to follow its target position.
Faultcode actions:
The Engine Control Module (ECM) disables the low-pressure EGR throttle regulation.
Related Documents
DTC040700
Exhaust Gas Recirculation Sensor "B" Circuit Low
DTC: 040700
Information:
The low pressure EGR is equipped with an EGR differential pressure sensor. The pressure signal is used for low pressure EGR control and monitoring. The Engine Control Module (ECM) monitors the EGR differential pressure sensor.
Test criteria:
The control module's test for the DTC starts when:
-
The vehicle is in usage mode active or higher.
Detection criteria:
The DTC is set if the control module detects that:
-
The signal from the EGR differential pressure sensor is too low.
Faultcode actions:
The Engine Control Module (ECM) uses a calculated pressure value instead of the measured pressure.
Related Documents
DTC040800
Exhaust Gas Recirculation Sensor "B" Circuit High
DTC: 040800
Information:
The low pressure EGR is equipped with an EGR differential pressure sensor. The pressure signal is used for low pressure EGR control and monitoring. The Engine Control Module (ECM) monitors the EGR differential pressure sensor.
Test criteria:
The control module's test for the DTC starts when:
-
The vehicle is in usage mode active or higher.
Detection criteria:
The DTC is set if the control module detects that:
-
The signal from the EGR differential pressure sensor is too high.
Faultcode actions:
The Engine Control Module (ECM) uses a calculated pressure value instead of the measured pressure.
Related Documents
DTC042000
Catalyst System Efficiency Below Threshold (Bank 1)
DTC: 042000
Information:
The Engine Control Module (ECM) controls the efficiency of the catalytic converter by switching between rich and lean mixture. When the switch is made, the Engine Control Module (ECM) checks the reaction time of the lambda probe, middle.
Test criteria:
The control module's test for the DTC starts when:
-
The engine is at normal operating temperature.
-
The vehicle speed is between 70 - 90 km/h for 30 - 40 seconds.
Detection criteria:
The DTC is set if the control module detects that:
-
The lambda probe, middle, switches too quickly, which indicates a reduced catalytic conversion efficiency.
Faultcode actions:
None.
Related Documents
DTC043E00
Evaporative Emission System Leak Detection Reference Orifice Low Flow
DTC: 043E00
Information:
The pump, leakage detection, is controlled and monitored by the Engine Control Module (ECM) and contains a vacuum pump, a pressure sensor and a valve for the detection of fuel leakage. A vacuum pressure is created by the pump to draw air through a reference orifice. This pressure is measured and used as a reference pressure. The pump creates a vacuum in the EVAP system, measures the pressure and compares it to the reference pressure also created by the pump. This evaluates if there is any leakage in the system.
Test criteria:
The control module's test for the DTC starts when:
-
The engine has been switched off for several hours.
Detection criteria:
The DTC is set if the control module detects that:
-
The reference pressure is too low.
Faultcode actions:
The leakage diagnosis is interrupted.
DTC043F00
Evaporative Emission System Leak Detection Reference Orifice High Flow
DTC: 043F00
Information:
The pump, leakage detection, is controlled and monitored by the Engine Control Module (ECM) and contains a vacuum pump, a pressure sensor and a valve for the detection of fuel leakage. A vacuum pressure is created by the pump to draw air through a reference orifice. This pressure is measured and used as a reference pressure. The pump creates a vacuum in the EVAP system, measures the pressure and compares it to the reference pressure also created by the pump. This evaluates if there is any leakage in the system.
Test criteria:
The control module's test for the DTC starts when:
-
The engine has been switched off for several hours.
Detection criteria:
The DTC is set if the control module detects that:
-
The reference pressure is too high.
Faultcode actions:
The leakage diagnosis is interrupted.
DTC044100
Evaporative Emission System Incorrect Purge Flow
DTC: 044100
Information:
The EVAP purge valve controls the flow of fuel vapor from the EVAP canister to the engine intake manifold using the vacuum in the intake manifold.
Test criteria:
The control module's test for the DTC starts when:
-
The EVAP regulation is active.
Detection criteria:
The DTC is set if the control module detects that:
-
The flow through the EVAP purge valve is incorrect.
Faultcode actions:
None.
Related Documents
DTC044168
Evaporative Emission System Incorrect Purge Flow Algorithm Based Failures Event information
DTC: 044168
Information:
Engine control module (ECM) detects a fault in the EVAP valve function by analysing the signal from the pressure sensor in the intake pipe.
Test criteria:
The control module's test for the DTC starts when:
-
The EVAP regulation is active.
Detection criteria:
The DTC is set if the control module detects that:
-
The flow through the EVAP purge valve is incorrect.
Faultcode actions:
None.
Related Documents
DTC044200
Evaporative Emission System Leak Detected (small leak)
DTC: 044200
Information:
The pump, leakage detection, is controlled and monitored by the Engine Control Module (ECM) and contains a vacuum pump, a pressure sensor and a valve for the detection of fuel leakage. A vacuum pressure is created by the pump to draw air through a reference orifice. This pressure is measured and used as a reference pressure. The pump creates a vacuum in the EVAP system, measures the pressure and compares it to the reference pressure also created by the pump. This evaluates if there is any leakage in the system.
Test criteria:
The control module's test for the DTC starts when:
-
The engine has been switched off for several hours.
Detection criteria:
The DTC is set if the control module detects that:
-
The EVAP system has an minor leak.
Faultcode actions:
None.
DTC044400
Evaporative Emission System Purge Control Valve Circuit Open
DTC: 044400
Information:
The EVAP purge valve controls the flow of fuel vapor from the EVAP canister to the engine intake manifold using the vacuum in the intake manifold.
Test criteria:
The control module's test for the DTC starts when:
-
The vehicle is in usage mode active or higher.
Detection criteria:
The DTC is set if the control module detects that:
-
The EVAP purge valve control signal is missing.
Faultcode actions:
The Engine Control Module (ECM) disables the fuel trim function.
Related Documents
DTC044617
DTC 044617
DTC: 044617
Information:
The Engine Control Module (ECM) controls and monitors the EVAP Purge Pump (EPP) via LIN. The EVAP Purge Pump (EPP) enables the combustion of fuel vapors during conditions when intake manifold vacuum is low.
Test criteria:
The control module's test for the DTC starts when:
-
The vehicle is in usage mode active or higher.
Detection criteria:
The DTC is set if the control module detects that:
-
The circuit voltage is too high.
Faultcode actions:
None.
DTC044618
DTC 044618
DTC: 044618
Information:
The Engine Control Module (ECM) controls and monitors the EVAP Purge Pump (EPP) via LIN. The EVAP Purge Pump (EPP) enables the combustion of fuel vapors during conditions when intake manifold vacuum is low.
Test criteria:
The control module's test for the DTC starts when:
-
The EVAP Purge Pump (EPP) is active.
Detection criteria:
The DTC is set if the control module detects that:
-
The current through the pump is too low.
Faultcode actions:
None.
DTC044619
DTC 044619
DTC: 044619
Information:
The Engine Control Module (ECM) controls and monitors the EVAP Purge Pump (EPP) via LIN. The EVAP Purge Pump (EPP) enables the combustion of fuel vapors during conditions when intake manifold vacuum is low.
Test criteria:
The control module's test for the DTC starts when:
-
The EVAP Purge Pump (EPP) is active.
Detection criteria:
The DTC is set if the control module detects that:
-
The current through the pump is too high.
Faultcode actions:
None.
DTC04464B
DTC 04464B
DTC: 04464B
Information:
The Engine Control Module (ECM) controls and monitors the EVAP Purge Pump (EPP) via LIN. The EVAP Purge Pump (EPP) enables the combustion of fuel vapors during conditions when intake manifold vacuum is low.
Test criteria:
The control module's test for the DTC starts when:
-
The EVAP Purge Pump (EPP) is active.
Detection criteria:
The DTC is set if the control module detects that:
-
The EVAP Purge Pump (EPP) temperature is too high.
Faultcode actions:
None.
DTC044662
DTC 044662
DTC: 044662
Information:
The Engine Control Module (ECM) controls and monitors the EVAP Purge Pump (EPP) via LIN. The EVAP Purge Pump (EPP) enables the combustion of fuel vapors during conditions when intake manifold vacuum is low.
Test criteria:
The control module's test for the DTC starts when:
-
The EVAP Purge Pump (EPP) is active.
Detection criteria:
The DTC is set if the control module detects that:
-
The actual speed of the EVAP Purge Pump (EPP) deviates too much from the desired speed.
Faultcode actions:
None.
DTC044671
DTC 044671
DTC: 044671
Information:
The Engine Control Module (ECM) controls and monitors the EVAP Purge Pump (EPP) via LIN. The EVAP Purge Pump (EPP) enables the combustion of fuel vapors during conditions when intake manifold vacuum is low.
Test criteria:
The control module's test for the DTC starts when:
-
The EVAP Purge Pump (EPP) is active.
Detection criteria:
The DTC is set if the control module detects that:
-
The EVAP Purge Pump (EPP) motor is stuck.
Faultcode actions:
None.
DTC044696
DTC 044696
DTC: 044696
Information:
The Engine Control Module (ECM) controls and monitors the EVAP Purge Pump (EPP) via LIN. The EVAP Purge Pump (EPP) enables the combustion of fuel vapors during conditions when intake manifold vacuum is low.
Test criteria:
The control module's test for the DTC starts when:
-
The vehicle is in usage mode active or higher.
Detection criteria:
The DTC is set if the control module detects that:
-
There is an internal failure in the EVAP Purge Pump (EPP).
Faultcode actions:
None.
DTC044697
DTC 044697
DTC: 044697
Information:
The Engine Control Module (ECM) controls and monitors the EVAP Purge Pump (EPP) via LIN. The EVAP Purge Pump (EPP) enables the combustion of fuel vapors during conditions when intake manifold vacuum is low.
Test criteria:
The control module's test for the DTC starts when:
-
The EVAP Purge Pump (EPP) is active.
Detection criteria:
The DTC is set if the control module detects that:
-
The impeller in the EVAP Purge Pump (EPP) is blocked.
Faultcode actions:
None.
DTC045084
DTC 045084
DTC: 045084
Information:
The Engine Control Module (ECM) monitors the signal from the EVAP purge pressure sensor.
Test criteria:
The control module's test for the DTC starts when:
-
The vehicle is in usage mode active or higher.
Detection criteria:
The DTC is set if the control module detects that:
-
The pressure signal is below the allowed range.
Faultcode actions:
None.
DTC045085
DTC 045085
DTC: 045085
Information:
The Engine Control Module (ECM) monitors the signal from the EVAP purge pressure sensor.
Test criteria:
The control module's test for the DTC starts when:
-
The vehicle is in usage mode active or higher.
Detection criteria:
The DTC is set if the control module detects that:
-
The pressure signal is above the allowed range.
Faultcode actions:
None.
DTC045100
DTC 045100
DTC: 045100
Information:
The Engine Control Module (ECM) monitors the fuel tank pressure by evaluating the signals from the valve, fuel tank isolation. The component consists of a valve and a pressure sensor, which are both monitored.
Test criteria:
The control module's test for the DTC starts when:
-
The vehicle is in usage mode driving and the combustion engine is running.
Detection criteria:
The DTC is set if the control module detects that:
-
The signal from the valve in the valve, fuel tank isolation is faulty.
Faultcode actions:
None.
DTC045164
DTC 045164
DTC: 045164
Information:
The Engine Control Module (ECM) monitors the signal from the EVAP purge pressure sensor.
Test criteria:
The control module's test for the DTC starts when:
-
The vehicle is in usage mode active or higher.
Detection criteria:
The DTC is set if the control module detects that:
-
The pressure signal is implausible.
Faultcode actions:
None.
DTC045200
DTC 045200
DTC: 045200
Information:
The Engine Control Module (ECM) monitors the fuel tank pressure by evaluating the signals from the valve, fuel tank isolation. The component consists of a valve and a pressure sensor, which are both monitored.
Test criteria:
The control module's test for the DTC starts when:
-
The vehicle is in usage mode active or higher.
Detection criteria:
The DTC is set if the control module detects that:
-
The signal from the valve in the valve, fuel tank isolation, is too low.
Faultcode actions:
None.
DTC045300
DTC 045300
DTC: 045300
Information:
The Engine Control Module (ECM) monitors the fuel tank pressure by evaluating the signals from the valve, fuel tank isolation. The component consists of a valve and a pressure sensor, which are both monitored.
Test criteria:
The control module's test for the DTC starts when:
-
The vehicle is in usage mode active or higher.
Detection criteria:
The DTC is set if the control module detects that:
-
The signal from the valve in the valve, fuel tank isolation, is too high.
Faultcode actions:
None.
DTC045500
Evaporative Emission System Leak Detected (gross leak/no flow)
DTC: 045500
Information:
The pump, leakage detection, is controlled and monitored by the Engine Control Module (ECM) and contains a vacuum pump, a pressure sensor and a valve for the detection of fuel leakage. A vacuum pressure is created by the pump to draw air through a reference orifice. This pressure is measured and used as a reference pressure. The pump creates a vacuum in the EVAP system, measures the pressure and compares it to the reference pressure also created by the pump. This evaluates if there is any leakage in the system.
Test criteria:
The control module's test for the DTC starts when:
-
The engine has been switched off for several hours.
Detection criteria:
The DTC is set if the control module detects that:
-
The EVAP system has a major leak.
Faultcode actions:
None.
DTC045800
Evaporative Emission System Purge Control Valve Circuit Low
DTC: 045800
Information:
The EVAP purge valve controls the flow of fuel vapor from the EVAP canister to the engine intake manifold using the vacuum in the intake manifold.
Test criteria:
The control module's test for the DTC starts when:
-
The vehicle is in usage mode active or higher.
Detection criteria:
The DTC is set if the control module detects that:
-
The EVAP purge valve control signal is too low.
Faultcode actions:
The Engine Control Module (ECM) disables the fuel trim function.
Related Documents
DTC045900
Evaporative Emission System Purge Control Valve Circuit High
DTC: 045900
Information:
The EVAP purge valve controls the flow of fuel vapor from the EVAP canister to the engine intake manifold using the vacuum in the intake manifold.
Test criteria:
The control module's test for the DTC starts when:
-
The vehicle is in usage mode active or higher.
Detection criteria:
The DTC is set if the control module detects that:
-
The EVAP control signal is too high.
Faultcode actions:
The Engine Control Module (ECM) disables the fuel trim function.
Related Documents
DTC045A00
Exhaust Gas Recirculation "B" Control Circuit
DTC: 045A00
Information:
The Engine Control Module (ECM) monitors the driver circuit for the low-pressure EGR valve.
Test criteria:
The control module's test for the DTC starts when:
-
The vehicle is in usage mode driving.
Detection criteria:
The DTC is set if the control module detects that:
-
The signal from the low-pressure EGR valve is missing.
Faultcode actions:
The Engine Control Module (ECM) disables the low-pressure EGR throttle regulation.
Related Documents
DTC046000
Fuel Level Sensor "A" Circuit
DTC: 046000
Information:
The Central Electronic Module (CEM) measures the fuel level in the fuel tank. The information regarding the fuel level is continuously sent from the Central Electronic Module (CEM) to the Engine Control Module (ECM). Note! Continue the fault tracing in the Central Electronic Module (CEM) or in the Driver Information Module (DIM).
Test criteria:
The control module's test for the DTC starts when:
-
The vehicle is in usage mode active or higher.
Detection criteria:
The DTC is set if the control module detects that:
-
The Central Electronic Module (CEM) sends a message to the Engine Control Module (ECM) that the fuel level signal is too low.
Faultcode actions:
Engine Control Module (ECM) assumes a fuel level of 50 %.
DTC046E2A
Exhaust Gas Recirculation Sensor "B" Circuit Range/Performance General Signal Failures Signal Stuck In Range
DTC: 046E2A
Information:
The low pressure EGR is equipped with an EGR differential pressure sensor. The pressure signal is used for low pressure EGR control and monitoring. The Engine Control Module (ECM) monitors the EGR differential pressure sensor.
Test criteria:
The control module's test for the DTC starts when:
-
The vehicle is in usage mode driving.
-
The engine is warm.
-
The air intake is sufficently high.
Detection criteria:
The DTC is set if the control module detects that:
-
The signal is stuck within the allowed range.
Faultcode actions:
The Engine Control Module (ECM) uses a calculated pressure value instead of the measured pressure.
Related Documents
DTC046E84
Exhaust Gas Recirculation Sensor "B" Circuit Range/Performance Bus Signal / Message Failures Signal below allowable range
DTC: 046E84
Information:
The low pressure EGR is equipped with an EGR differential pressure sensor. The pressure signal is used for low pressure EGR control and monitoring. The Engine Control Module (ECM) monitors the EGR differential pressure sensor.
Test criteria:
The control module's test for the DTC starts when:
-
After run is in progress.
Detection criteria:
The DTC is set if the control module detects that:
-
The signal from the EGR differential pressure sensor is too low.
Faultcode actions:
The Engine Control Module (ECM) uses a calculated pressure value instead of the measured pressure.
Related Documents
DTC046E85
Exhaust Gas Recirculation Sensor "B" Circuit Range/Performance Bus Signal / Message Failures Signal above allowable range
DTC: 046E85
Information:
The low pressure EGR is equipped with an EGR differential pressure sensor. The pressure signal is used for low pressure EGR control and monitoring. The Engine Control Module (ECM) monitors the EGR differential pressure sensor.
Test criteria:
The control module's test for the DTC starts when:
-
After run is in progress.
Detection criteria:
The DTC is set if the control module detects that:
-
The signal from the EGR differential pressure sensor is too high.
Faultcode actions:
The Engine Control Module (ECM) uses a calculated pressure value instead of the measured pressure.
Related Documents
DTC048000
Fan 1 Control Circuit
DTC: 048000
Information:
The radiator cooling fan consists of an integrated control module and one or two fans, depending on the vehicle version. The radiator cooling fan has two functions, to cool the engine compartment and to cool the condenser when the A/C compressor is active.
Test criteria:
The control module's test for the DTC starts when:
-
The vehicle is in usage mode active or higher, or after run is in progress.
Detection criteria:
The DTC is set if the control module detects that:
-
The signal is missing.
Faultcode actions:
None.
DTC048013
Fan 1 Control Circuit General Electrical Failures Circuit open
DTC: 048013
Information:
The radiator cooling fan consists of an integrated control module and one or two fans, depending on the vehicle version. The radiator cooling fan has two functions, to cool the engine compartment and to cool the condenser when the A/C compressor is active.
Test criteria:
The control module's test for the DTC starts when:
-
The vehicle is in usage mode active or higher, or after run is in progress.
Detection criteria:
The DTC is set if the control module detects that:
-
The signal is missing.
Faultcode actions:
None.
DTC048100
DTC 048100
DTC: 048100
Information:
The radiator cooling fan consists of an integrated control module and one or two fans, depending on the vehicle version. The radiator cooling fan has two functions, to cool the engine compartment and to cool the condenser when the A/C compressor is active.
Test criteria:
The control module's test for the DTC starts when:
-
The vehicle is in usage mode active or higher, or after run is in progress.
Detection criteria:
The DTC is set if the control module detects that:
-
The signal is missing.
Faultcode actions:
None.
DTC048300
Fan Performance
DTC: 048300
Information:
The radiator cooling fan consists of an integrated control module and one or two fans, depending on the vehicle version. The radiator cooling fan has two functions, to cool the engine compartment and to cool the condenser when the A/C compressor is active.
Test criteria:
The control module's test for the DTC starts when:
-
The engine has been running for at least 20 seconds.
Detection criteria:
The DTC is set if the control module detects that:
-
The fan speed is too low.
Faultcode actions:
None.
DTC04831C
DTC 04831C
DTC: 04831C
Information:
The radiator cooling fan consists of an integrated control module and one or two fans, depending on the vehicle version. The radiator cooling fan has two functions, to cool the engine compartment and to cool the condenser when the A/C compressor is active.
Test criteria:
The control module's test for the DTC starts when:
-
The engine has been running for at least 20 seconds.
Detection criteria:
The DTC is set if the control module detects that:
-
The voltage to the radiator cooling fan deviates from the allowed range.
Faultcode actions:
None.
DTC04834B
Fan Performance System Internal Failures Over temperature
DTC: 04834B
Information:
The radiator cooling fan consists of an integrated control module and one or two fans, depending on the vehicle version. The radiator cooling fan has two functions, to cool the engine compartment and to cool the condenser when the A/C compressor is active.
Test criteria:
The control module's test for the DTC starts when:
-
The vehicle is in usage mode driving, or after run is in progress.
Detection criteria:
The DTC is set if the control module detects that:
-
The temperature in the integrated control module is too high to regulate the fan.
-
There are vibrations in the fans.
Faultcode actions:
None.
DTC048382
Fan Performance Bus Signal / Message Failures Alive / sequence counter incorrect / not updated
DTC: 048382
Information:
The radiator cooling fan consists of an integrated control module and one or two fans, depending on the vehicle version. The radiator cooling fan has two functions, to cool the engine compartment and to cool the condenser when the A/C compressor is active. The integrated control module transmits information to the Engine Control Module (ECM).
Test criteria:
The control module's test for the DTC starts when:
-
The vehicle is in usage mode active or higher.
-
Updated data from another control module is received.
Detection criteria:
The DTC is set if the control module detects that:
-
All messages from the transmitting control module are not received properly.
Faultcode actions:
None.
DTC048387
DTC 048387
DTC: 048387
Information:
The radiator cooling fan consists of an integrated control module and one or two fans, depending on the vehicle version. The radiator cooling fan has two functions, to cool the engine compartment and to cool the condenser when the A/C compressor is active. The integrated control module transmits information to the Engine Control Module (ECM).
Test criteria:
The control module's test for the DTC starts when:
-
The vehicle is in usage mode active or higher.
-
Updated data from another control module is received.
Detection criteria:
The DTC is set if the control module detects that:
-
All messages from the transmitting control module are not received properly.
Faultcode actions:
The Engine Control Module (ECM) requests opening of the grill and spoil shutter.
DTC048392
DTC 048392
DTC: 048392
Information:
The radiator cooling fan consists of an integrated control module and one or two fans, depending on the vehicle version. The radiator cooling fan has two functions, to cool the engine compartment and to cool the condenser when the A/C compressor is active.
Test criteria:
The control module's test for the DTC starts when:
-
The vehicle is in usage mode active or higher, or after run is in progress.
Detection criteria:
The DTC is set if the control module detects that:
-
The temperature in the internal control module is too high.
Faultcode actions:
The Engine Control Module (ECM) stops the fan.
DTC048396
Fan Performance Component Failures Component internal failure
DTC: 048396
Information:
The radiator cooling fan consists of an integrated control module and one or two fans, depending on the vehicle version. The radiator cooling fan has two functions, to cool the engine compartment and to cool the condenser when the A/C compressor is active.
Test criteria:
The control module's test for the DTC starts when:
-
The engine has been running for at least 20 seconds.
Detection criteria:
The DTC is set if the control module detects that:
-
The fan speed is too low.
Faultcode actions:
None.
DTC048398
Fan Performance Component Failures Component or system over temperature
DTC: 048398
Information:
The radiator cooling fan consists of an integrated control module and one or two fans, depending on the vehicle version. The radiator cooling fan has two functions, to cool the engine compartment and to cool the condenser when the A/C compressor is active.
Test criteria:
The control module's test for the DTC starts when:
-
The vehicle is in usage mode active or higher, or after run is in progress.
Detection criteria:
The DTC is set if the control module detects that:
-
The temperature in the control module is too high.
Faultcode actions:
None.
DTC048500
Fan Power/Ground Circuit
DTC: 048500
Information:
The radiator cooling fan consists of an integrated control module and one or two fans, depending on the vehicle version. The radiator cooling fan has two functions, to cool the engine compartment and to cool the condenser when the A/C compressor is active.
Test criteria:
The control module's test for the DTC starts when:
-
The engine has been running for at least 20 seconds, or the the electric cooling fan has been run.
Detection criteria:
The DTC is set if the control module detects that:
-
The voltage to the electric cooling fan deviates from the allowed range for too long.
Faultcode actions:
None.
DTC04851C
Fan Power/Ground Circuit General Electrical Failures Circuit voltage out of range
DTC: 04851C
Information:
The radiator cooling fan consists of an integrated control module and one or two fans, depending on the vehicle version. The radiator cooling fan has two functions, to cool the engine compartment and to cool the condenser when the A/C compressor is active.
Test criteria:
The control module's test for the DTC starts when:
-
The engine has been running for at least 20 seconds, or the the electric cooling fan has been run.
Detection criteria:
The DTC is set if the control module detects that:
-
The supply voltage to the radiator cooling fan is too low or too high.
Faultcode actions:
None.
DTC048692
Exhaust Gas Recirculation Sensor "B" Circuit Component Failures Performance or incorrect operation
DTC: 048692
Information:
The low pressure EGR is equipped with an EGR differential pressure sensor. The pressure signal is used for low pressure EGR control and monitoring. The Engine Control Module (ECM) monitors the EGR differential pressure sensor.
Test criteria:
The control module's test for the DTC starts when:
-
The vehicle is in usage mode active or higher.
Detection criteria:
The DTC is set if the control module detects that:
-
There is an internal fault in the EGR differential pressure sensor.
Faultcode actions:
The Engine Control Module (ECM) uses a calculated pressure value instead of the measured pressure.
Related Documents
DTC048696
Exhaust Gas Recirculation Sensor "B" Circuit Component Failures Component internal failure
DTC: 048696
Information:
The low pressure EGR is equipped with an EGR differential pressure sensor. The pressure signal is used for low pressure EGR control and monitoring. The Engine Control Module (ECM) monitors the EGR differential pressure sensor.
Test criteria:
The control module's test for the DTC starts when:
-
The vehicle is in usage mode active or higher.
Detection criteria:
The DTC is set if the control module detects that:
-
There is an internal fault in the EGR differential pressure sensor.
Faultcode actions:
The Engine Control Module (ECM) uses a calculated pressure value instead of the measured pressure.
Related Documents
DTC048698
Exhaust Gas Recirculation Sensor "B" Circuit Component Failures Component or system over temperature
DTC: 048698
Information:
The low pressure EGR is equipped with an EGR differential pressure sensor. The pressure signal is used for low pressure EGR control and monitoring. The Engine Control Module (ECM) monitors the EGR differential pressure sensor.
Test criteria:
The control module's test for the DTC starts when:
-
The vehicle is in usage mode active or higher.
Detection criteria:
The DTC is set if the control module detects that:
-
The signal from the EGR differential pressure sensor deviates from the allowed range.
Faultcode actions:
The Engine Control Module (ECM) uses a calculated pressure value instead of the measured pressure.
Related Documents
DTC0486A1
Exhaust Gas Recirculation Sensor "B" Circuit General Electrical Failures System Voltage
DTC: 0486A1
Information:
The low pressure EGR is equipped with an EGR differential pressure sensor. The pressure signal is used for low pressure EGR control and monitoring. The Engine Control Module (ECM) monitors the EGR differential pressure sensor.
Test criteria:
The control module's test for the DTC starts when:
-
The vehicle is in usage mode active or higher.
Detection criteria:
The DTC is set if the control module detects that:
-
The power supply to the EGR differential pressure sensor deviates from the allowed range.
Faultcode actions:
The Engine Control Module (ECM) uses a calculated pressure value instead of the measured pressure.
Related Documents
DTC048700
Exhaust Gas Recirculation Throttle Control Circuit "A"/Open
DTC: 048700
Information:
Note! This diagnostic troule code (DTC) status is an event controlled diagnostic troule code (DTC). An event controlled diagnostic troule code (DTC) does not mean that there is a fault in the control module when it is active, ut is designed as information. The Engine Control Module (ECM) monitors the supercharger clutch.
Test criteria:
The control module's test for the DTC starts when:
-
The vehicle is in usage mode driving.
Detection criteria:
The DTC is set if the control module detects that:
-
The supercharger clutch is damaged.
Faultcode actions:
None.
Related Documents
DTC048900
Exhaust Gas Recirculation Control Circuit Low
DTC: 048900
Information:
The low-pressure EGR valve controls the amount of exhaust gas that is lead back into the engine.
Test criteria:
The control module's test for the DTC starts when:
-
After run is in progress.
Detection criteria:
The DTC is set if the control module detects that:
-
The signal from the position sensor in the low-pressure EGR valve deviates from the expected signal when the Engine Control Module (ECM) requests the adapted closed position.
Faultcode actions:
None.
Related Documents
DTC048977
Exhaust Gas Recirculation Control Circuit Low Mechanical Failures Commanded position not reachable
DTC: 048977
Information:
The low-pressure EGR valve controls the amount of exhaust gas that is lead back into the engine.
Test criteria:
The control module's test for the DTC starts when:
-
After run is in progress.
Detection criteria:
The DTC is set if the control module detects that:
-
The low-pressure EGR valve is unable to follow its target position.
Faultcode actions:
None.
Related Documents
DTC048978
Exhaust Gas Recirculation Control Circuit Low Mechanical Failures Alignment or adjustment incorrect
DTC: 048978
Information:
The low-pressure EGR valve controls the amount of exhaust gas that is lead back into the engine.
Test criteria:
The control module's test for the DTC starts when:
-
After run is in progress.
Detection criteria:
The DTC is set if the control module detects that:
-
The signal from the position sensor in the low-pressure EGR valve deviates from the expected signal when the Engine Control Module (ECM) requests the adapted closed position.
Faultcode actions:
None.
Related Documents
DTC049000
Exhaust Gas Recirculation "A" Control Circuit High
DTC: 049000
Information:
The low-pressure EGR valve controls the amount of exhaust gas that is lead back into the engine.
Test criteria:
The control module's test for the DTC starts when:
-
After run is in progress.
Detection criteria:
The DTC is set if the control module detects that:
-
The signal from the position sensor in the low-pressure EGR valve deviates from the expected signal when the Engine Control Module (ECM) requests the adapted open position.
Faultcode actions:
None.
Related Documents
DTC049400
Fan Speed Low
DTC: 049400
Information:
The radiator cooling fan consists of an integrated control module and one or two fans, depending on the vehicle version. The radiator cooling fan has two functions, to cool the engine compartment and to cool the condenser when the A/C compressor is active.
Test criteria:
The control module's test for the DTC starts when:
-
The vehicle is in usage mode driving.
Detection criteria:
The DTC is set if the control module detects that:
-
The fan speed is too low.
Faultcode actions:
None.
DTC049497
Fan Speed Low Component Failures Component or system operation obstructed or blocked
DTC: 049497
Information:
The radiator cooling fan consists of an integrated control module and one or two fans, depending on the vehicle version. The radiator cooling fan has two functions, to cool the engine compartment and to cool the condenser when the A/C compressor is active.
Test criteria:
The control module's test for the DTC starts when:
-
The vehicle is in usage mode active or higher, or after run is in progress.
Detection criteria:
The DTC is set if the control module detects that:
-
The fan is blocked or damaged.
Faultcode actions:
None.
DTC049700
DTC 049700
DTC: 049700
Information:
The Engine Control Module (ECM) monitors the EVAP Purge Pump (EPP) by analyzing the signal from the EVAP purge pressure sensor.
Test criteria:
The control module's test for the DTC starts when:
-
The vehicle is in usage mode driving.
Detection criteria:
The DTC is set if the control module detects that:
-
The purge flow is too low.
Faultcode actions:
The Engine Control Module (ECM) disables the fuel trim function.
DTC049800
DTC 049800
DTC: 049800
Information:
The Engine Control Module (ECM) monitors the fuel tank pressure by evaluating the signals from the valve, fuel tank isolation. The component consists of a valve and a pressure sensor, which are both monitored.
Test criteria:
The control module's test for the DTC starts when:
-
The vehicle is in usage mode active or higher.
Detection criteria:
The DTC is set if the control module detects that:
-
The control circuit current to the valve in the valve, fuel tank isolation, is too low.
Faultcode actions:
None.
DTC049900
DTC 049900
DTC: 049900
Information:
The Engine Control Module (ECM) monitors the fuel tank pressure by evaluating the signals from the valve, fuel tank isolation. The component consists of a valve and a pressure sensor, which are both monitored.
Test criteria:
The control module's test for the DTC starts when:
-
The vehicle is in usage mode active or higher.
Detection criteria:
The DTC is set if the control module detects that:
-
The control circuit current to the valve in the valve, fuel tank isolation, is too high.
Faultcode actions:
None.
DTC04D900
Closed Loop EGR Control At Limit - Flow Too Low
DTC: 04D900
Information:
Engine control module (ECM) monitors the difference between current flow and requested flow through the EGR-system.
Test criteria:
The control module's test for the DTC starts when:
-
The vehicle is in usage mode driving.
Detection criteria:
The DTC is set if the control module detects that:
-
The current flow is too low compared to the required flow.
Faultcode actions:
None.
DTC04DA00
Closed Loop EGR Control At Limit - Flow Too High
DTC: 04DA00
Information:
Engine control module (ECM) monitors the difference between current flow and requested flow through the EGR-system.
Test criteria:
The control module's test for the DTC starts when:
-
The vehicle is in usage mode driving.
Detection criteria:
The DTC is set if the control module detects that:
-
The actual flow is too high compared to the requested flow.
Faultcode actions:
None.
DTC04F000
EVAP System High Pressure Purge Line Performance
DTC: 04F000
Information:
The Engine Control Module (ECM) monitors the EVAP purge valve function for faults by analysing the signal from the pressure sensor inside the pump, leakage detection.
Test criteria:
The control module's test for the DTC starts when:
-
The vehicle is driving with high engine load.
-
Note! Do NOT use the diagnostic sequence “Quicktest EVAP purge valve” to verify this DTC. To verify this DTC, drive the vehicle on the road and do a full throttle acceleration several times to trigger the DTC again.
Detection criteria:
The DTC is set if the control module detects that:
-
The flow through the EVAP purge valve is incorrect.
Faultcode actions:
None.
Related Documents
DTC050083
Vehicle Speed Sensor A Bus Signal / Message Failures Value of signal protection calculation incorrect
DTC: 050083
Information:
The Brake Control Module (BCM), which is integrated in the Vehicle Dynamics Domain Master (VDDM), sends information about vehicle speed via CAN to the Engine Control Module (ECM).
Test criteria:
The control module's test for the DTC starts when:
-
The vehicle is in usage mode active or higher.
Detection criteria:
The DTC is set if the control module detects that:
-
The Brake Control Module (BCM) registers a corrupt speed signal and sends this information to the Engine Control Module (ECM).
Faultcode actions:
None.
DTC050086
Vehicle Speed Sensor A Bus Signal / Message Failures Signal invalid
DTC: 050086
Information:
The Brake Control Module (BCM), which is integrated in the Vehicle Dynamics Domain Master (VDDM), sends information about vehicle speed via CAN to the Engine Control Module (ECM).
Test criteria:
The control module's test for the DTC starts when:
-
The vehicle is in usage mode active or higher.
Detection criteria:
The DTC is set if the control module detects that:
-
The Brake Control Module (BCM) registers a corrupt speed signal and sends this information to the Engine Control Module (ECM).
Faultcode actions:
None.
DTC050600
Idle Control System - RPM Lower Than Expected
DTC: 050600
Information:
The Engine Control Module (ECM) monitors the engine speed at idle.
Test criteria:
The control module's test for the DTC starts when:
-
The engine is at normal operating temperature.
-
The engine is idling.
Detection criteria:
The DTC is set if the control module detects that:
-
The idle speed is 100 r/min lower than the nominal idle speed.
Faultcode actions:
None.
DTC050700
Idle Control System - RPM Higher Than Expected
DTC: 050700
Information:
The Engine Control Module (ECM) monitors the engine speed at idle.
Test criteria:
The control module's test for the DTC starts when:
-
The engine is at normal operating temperature.
-
The engine is idling.
Detection criteria:
The DTC is set if the control module detects that:
-
The idle speed is 200 r/min greater than the nominal speed.
Faultcode actions:
None.
DTC050A00
Cold Start Idle Control System Performance
DTC: 050A00
Information:
The Engine Control Module (ECM) controls the quick catalytic converter warm-up. The catalytic converter can be warmed up quickly for example by increasing the throttle angle or changing the camshaft angle. The Engine Control Module (ECM) calculates the difference between the requested energy applied for catalytic converter warm-up and the actual excess energy for catalytic converter warm-up.
Test criteria:
The control module's test for the DTC starts when:
-
The engine is started.
-
The engine is cold.
-
The warm up of the catalytic converter is started.
Detection criteria:
The DTC is set if the control module detects that:
-
The difference between applied energy for warm-up of the catalytic converter and the actual energy for warm-up of the catalytic converter is too great.
Faultcode actions:
None.
DTC050A84
Cold Start Idle Control System Performance Bus Signal / Message Failures Signal below allowable range
DTC: 050A84
Information:
The Engine Control Module (ECM) controls the quick catalytic converter warm-up. The catalytic converter can be warmed up quickly for example by increasing the throttle angle or changing the camshaft angle. The Engine Control Module (ECM) calculates the difference between the requested energy applied for catalytic converter warm-up and the actual excess energy for catalytic converter warm-up.
Test criteria:
The control module's test for the DTC starts when:
-
The engine is started.
-
The engine is cold.
-
The warm up of the catalytic converter is started.
Detection criteria:
The DTC is set if the control module detects that:
-
The engine speed is too low.
Faultcode actions:
None.
DTC050A85
Cold Start Idle Control System Performance Bus Signal / Message Failures Signal above allowable range
DTC: 050A85
Information:
The Engine Control Module (ECM) controls the quick catalytic converter warm-up. The catalytic converter can be warmed up quickly for example by increasing the throttle angle or changing the camshaft angle. The Engine Control Module (ECM) calculates the difference between the requested energy applied for catalytic converter warm-up and the actual excess energy for catalytic converter warm-up.
Test criteria:
The control module's test for the DTC starts when:
-
The engine is started.
-
The engine is cold.
-
The warm up of the catalytic converter is started.
Detection criteria:
The DTC is set if the control module detects that:
-
The engine speed is too high.
Faultcode actions:
None.
DTC050B00
Cold Start Ignition Timing Performance
DTC: 050B00
Information:
The Engine Control Module (ECM) controls the quick catalytic converter warm-up. The catalytic converter can be warmed up quickly for example by increasing the throttle angle or changing the camshaft angle. The Engine control module (ECM) calculates the difference between the requested energy applied for catalytic converter warm-up and the actual excess energy for catalytic converter warm-up.
Test criteria:
The control module's test for the DTC starts when:
-
The engine is started.
-
The engine is cold.
-
The warm up of the catalytic converter is started.
Detection criteria:
The DTC is set if the control module detects that:
-
The difference between applied energy for warm-up of the catalytic converter and the actual energy for warm-up of the catalytic converter is too great.
Faultcode actions:
None.
DTC050C00
Cold Start Engine Coolant Temperature Performance
DTC: 050C00
Information:
When the engine is heating up, the engine coolant temperature sensor value is compared to an expected value based on driving and starting conditions. Hint! If the DTC ECM-P012800 is set it shall be faulttraced before this DTC.
Test criteria:
The control module's test for the DTC starts when:
-
The engine temperature at engine start is between -10 °C and 60 °C.
-
The engine temperature reaches 72 °C.
Detection criteria:
The DTC is set if the control module detects that:
-
The measured temperature deviates too much from the expected value.
Faultcode actions:
None.
DTC052123
Engine Oil Pressure Sensor/Switch "A" Circuit Range/Performance General Signal Failures Signal stuck low
DTC: 052123
Information:
The oil pressure- and oil temperature sensor sends information about the current engine oil pressure to the Engine Control Module (ECM). The pressure of the sensor is compared to other pressure sensors in the engine for plausibility.
Test criteria:
The control module's test for the DTC starts when:
-
The engine is running.
Detection criteria:
The DTC is set if the control module detects that:
-
The pressure value from the oil pressure- and oil temperature sensor is within the allowed range, but deviates too much from to the ambient- and boost pressure.
Faultcode actions:
None.
Related Documents
DTC052124
Engine Oil Pressure Sensor/Switch "A" Circuit Range/Performance General Signal Failures Signal stuck high
DTC: 052124
Information:
The oil pressure- and oil temperature sensor sends information about the current engine oil pressure to the Engine Control Module (ECM). The pressure of the sensor is compared to other pressure sensors in the engine for plausibility.
Test criteria:
The control module's test for the DTC starts when:
-
The engine is running.
Detection criteria:
The DTC is set if the control module detects that:
-
The pressure value from the oil pressure- and oil temperature sensor is within the allowed range, but deviates too much from to the ambient- and boost pressure.
Faultcode actions:
The Engine Control Module (ECM) disables the regulation of the oil pressure and sets a fixed value as desired value for the oil pressure.
Related Documents
DTC052400
Engine Oil Pressure Too Low
DTC: 052400
Information:
The oil pressure- and oil temperature sensor sends information about the current engine oil pressure to the Engine Control Module (ECM). The pressure of the sensor is compared to other pressure sensors in the engine for plausibility.
Test criteria:
The control module's test for the DTC starts when:
-
The engine is running.
Detection criteria:
The DTC is set if the control module detects that:
-
The oil pressure is too low.
Faultcode actions:
None.
Related Documents
DTC052409
Engine Oil Pressure Too Low Component Failures
DTC: 052409
Information:
The oil pressure- and oil temperature sensor sends information about the current engine oil pressure to the Engine Control Module (ECM). The pressure of the sensor is compared to other pressure sensors in the engine for plausibility.
Test criteria:
The control module's test for the DTC starts when:
-
The starter motor is running.
Detection criteria:
The DTC is set if the control module detects that:
-
The oil pressure is too low.
Faultcode actions:
None.
Related Documents
DTC052A00
Cold Start Intake (A) Camshaft Position Timing Over-Advanced (Bank 1)
DTC: 052A00
Information:
The Engine Control Module (ECM) controls the position of the intake camshaft. The difference between the requested angle and the actual angle is stored in the Engine Control Module (ECM) during the warm-up of the catalytic converter.
Test criteria:
The control module's test for the DTC starts when:
-
The engine is started.
-
The engine is cold.
-
The warm up of the catalytic converter is started.
Detection criteria:
The DTC is set if the control module detects that:
-
The camshaft angle is greater than requested angle during warm up of the catalytic converter.
Faultcode actions:
None.
Related Documents
DTC052B00
Cold Start Intake (A) Camshaft Position Timing Over-Retarded (Bank 1)
DTC: 052B00
Information:
The Engine Control Module (ECM) controls the position of the intake camshaft. The difference between the requested angle and the actual angle is stored in the Engine Control Module (ECM) during the warm-up of the catalytic converter.
Test criteria:
The control module's test for the DTC starts when:
-
The engine is started.
-
The engine is cold.
-
The warm up of the catalytic converter is started.
Detection criteria:
The DTC is set if the control module detects that:
-
The camshaft angle is smaller than the requested angle during warm up of the catalytic converter.
Faultcode actions:
None.
Related Documents
DTC053100
A/C Refrigerant Pressure Sensor A Circuit Range/Performance
DTC: 053100
Information:
The Engine Control Module (ECM) monitors the A/C pressure sensor.
Test criteria:
The control module's test for the DTC starts when:
-
Varied driving is performed.
-
The A/C control is active.
-
The A/C has been active long enough for the pressure to be monitored.
Detection criteria:
The DTC is set if the control module detects that:
-
The signal is stuck within the allowed range.
Faultcode actions:
The performance of the A/C system is reduced.
DTC05312A
A/C Refrigerant Pressure Sensor "A" Circuit Range/Performance General Signal Failures Signal Stuck In Range
DTC: 05312A
Information:
The Engine Control Module (ECM) monitors the A/C pressure sensor.
Test criteria:
The control module's test for the DTC starts when:
-
Varied driving is performed.
-
The A/C control is active.
-
The A/C has been active long enough for the pressure to be monitored.
Detection criteria:
The DTC is set if the control module detects that:
-
The signal is stuck within the allowed range.
Faultcode actions:
None.
DTC053200
A/C Refrigerant Pressure Sensor "A" Circuit Low
DTC: 053200
Information:
The Engine Control Module (ECM) monitors the signal from the A/C pressure sensor.
Test criteria:
The control module's test for the DTC starts when:
-
The vehicle is in usage mode active or higher.
Detection criteria:
The DTC is set if the control module detects that:
-
The signal from the A/C pressure sensor is too low.
Faultcode actions:
None.
DTC053214
A/C Refrigerant Pressure Sensor "A" Circuit Low General Electrical Failures Circuit short to ground or open
DTC: 053214
Information:
The Engine Control Module (ECM) monitors the A/C pressure sensor.
Test criteria:
The control module's test for the DTC starts when:
-
Varied driving is performed.
-
The A/C control is active.
-
The A/C has been active long enough for the pressure to be monitored.
Detection criteria:
The DTC is set if the control module detects that:
-
The signal is too low.
Faultcode actions:
None.
DTC053300
A/C Refrigerant Pressure Sensor "A" Circuit High
DTC: 053300
Information:
The Engine Control Module (ECM) monitors the signal from the A/C pressure sensor.
Test criteria:
The control module's test for the DTC starts when:
-
The vehicle is in usage mode active or higher.
Detection criteria:
The DTC is set if the control module detects that:
-
The signal from the A/C pressure sensor is too high.
Faultcode actions:
None.
DTC053312
A/C Refrigerant Pressure Sensor "A" Circuit High General Electrical Failures Circuit short to battery
DTC: 053312
Information:
The Engine Control Module (ECM) monitors the A/C pressure sensor.
Test criteria:
The control module's test for the DTC starts when:
-
Varied driving is performed.
-
The A/C control is active.
-
The A/C has been active long enough for the pressure to be monitored.
Detection criteria:
The DTC is set if the control module detects that:
-
The signal is too high.
Faultcode actions:
None.
DTC053400
A/C Refrigerant Charge Loss
DTC: 053400
Information:
The Engine Control Module (ECM) monitors the pressure in the A/C refrigerant circuit. The A/C pressure is compared with the ambient air temperature to calculate the amount of refrigerant in the circuit.
Test criteria:
The control module's test for the DTC starts when:
-
The engine is running.
Detection criteria:
The DTC is set if the control module detects that:
-
The pressure deviates too much from the calculated minimum pressure based on the current ambient temperature.
Faultcode actions:
None.
DTC05347A
A/C Refrigerant Charge Loss Mechanical Failures Fluid leak or seal failure
DTC: 05347A
Information:
The Engine Control Module (ECM) monitors the A/C pressure sensor.
Test criteria:
The control module's test for the DTC starts when:
-
The engine is running.
Detection criteria:
The DTC is set if the control module detects that:
-
The pressure deviates too much from the calculated minimum pressure based on the current ambient temperature.
Faultcode actions:
None.
DTC054A00
Cold Start Exhaust (B) Camshaft Position Timing Over-Advanced (Bank 1)
DTC: 054A00
Information:
The Engine Control Module (ECM) requests the position for the exhaust camshaft and monitors the time it takes for the camshaft to reach this position.
Test criteria:
The control module's test for the DTC starts when:
-
The engine is started.
-
The engine is cold.
-
The warm up of the catalytic converter is started.
Detection criteria:
The DTC is set if the control module detects that:
-
The camshaft angle is greater than requested angle during warm up of the catalytic converter.
Faultcode actions:
None.
Related Documents
DTC054B00
Cold Start Exhaust (B) Camshaft Position Timing Over-Retarded (Bank 1)
DTC: 054B00
Information:
The Engine Control Module (ECM) requests the position for the exhaust camshaft and monitors the time it takes for the camshaft to reach this position.
Test criteria:
The control module's test for the DTC starts when:
-
The engine is started.
-
The engine is cold.
-
The warm up of the catalytic converter is started.
Detection criteria:
The DTC is set if the control module detects that:
-
The camshaft angle is smaller than the requested angle during warm up of the catalytic converter.
Faultcode actions:
None.
Related Documents
DTC055A2F
Engine Oil Pressure Sensor/Switch "B" Circuit General Signal Failures Signal erratic
DTC: 055A2F
Information:
The oil pressure- and oil temperature sensor sends information about the current engine oil pressure to the Engine Control Module (ECM). The pressure of the sensor is compared to other pressure sensors in the engine for plausibility.
Test criteria:
The control module's test for the DTC starts when:
-
The engine is running.
Detection criteria:
The DTC is set if the control module detects that:
-
The signal varies too much within the allowed range.
Faultcode actions:
The Engine Control Module (ECM) uses a fixed oil pressure value.
Related Documents
DTC055B00
Engine Oil Pressure Sensor/Switch "B" Circuit Range/Performance
DTC: 055B00
Information:
The oil pressure- and oil temperature sensor sends information about the current engine oil pressure to the Engine Control Module (ECM). The pressure of the sensor is compared to other pressure sensors in the engine for plausibility.
Test criteria:
The control module's test for the DTC starts when:
-
The engine is running.
Detection criteria:
The DTC is set if the control module detects that:
-
There is an internal fault in the sensor.
Faultcode actions:
The Engine Control Module (ECM) uses a fixed oil pressure value.
Related Documents
DTC055B09
Engine Oil Pressure Sensor/Switch "B" Circuit Range/Performance Component Failures
DTC: 055B09
Information:
The oil pressure- and oil temperature sensor sends information about the current engine oil pressure to the Engine Control Module (ECM).
Test criteria:
The control module's test for the DTC starts when:
-
The engine is running.
Detection criteria:
The DTC is set if the control module detects that:
-
There is an internal fault in the sensor.
Faultcode actions:
The Engine Control Module (ECM) uses a fixed oil pressure value.
Related Documents
DTC055C00
Engine Oil Pressure Sensor/Switch "B" Circuit Low
DTC: 055C00
Information:
The oil pressure- and oil temperature sensor sends information about the current engine oil pressure to the Engine Control Module (ECM). The pressure of the sensor is compared to other pressure sensors in the engine for plausibility.
Test criteria:
The control module's test for the DTC starts when:
-
The engine is running.
Detection criteria:
The DTC is set if the control module detects that:
-
The signal is too low.
Faultcode actions:
The Engine Control Module (ECM) uses a fixed oil pressure value.
Related Documents
DTC055D00
Engine Oil Pressure Sensor/Switch "B" Circuit High
DTC: 055D00
Information:
The oil pressure- and oil temperature sensor sends information about the current engine oil pressure to the Engine Control Module (ECM). The pressure of the sensor is compared to other pressure sensors in the engine for plausibility.
Test criteria:
The control module's test for the DTC starts when:
-
The engine is running.
Detection criteria:
The DTC is set if the control module detects that:
-
The signal is too high.
Faultcode actions:
The Engine Control Module (ECM) uses a fixed oil pressure value.
Related Documents
DTC055F00
Engine Oil Pressure Out of Range
DTC: 055F00
Information:
The oil pressure- and oil temperature sensor sends information about the current engine oil pressure to the Engine Control Module (ECM). The pressure of the sensor is compared to other pressure sensors in the engine for plausibility.
Test criteria:
The control module's test for the DTC starts when:
-
The engine is running.
Detection criteria:
The DTC is set if the control module detects that:
-
The signal is out of range.
Faultcode actions:
The Engine Control Module (ECM) uses a fixed oil pressure value.
Related Documents
DTC056200
DSystem Voltage Low
DTC: 056200
Information:
The Engine Control Module (ECM) checks its KL30 supply voltage.
Test criteria:
The control module's test for the DTC starts when:
-
The vehicle is in usage mode active or higher.
Detection criteria:
The DTC is set if the control module detects that:
-
The supply voltage to the control module is too low.
Faultcode actions:
None.
DTC056300
System Voltage High
DTC: 056300
Information:
The Engine Control Module (ECM) checks its KL30 supply voltage.
Test criteria:
The control module's test for the DTC starts when:
-
The vehicle is in usage mode active or higher.
Detection criteria:
The DTC is set if the control module detects that:
-
The supply voltage to the control module is too high.
Faultcode actions:
None.
DTC058D00
Battery Monitor Module Voltage Monitoring Performance
DTC: 058D00
Information:
The Engine Control Module (ECM) checks its KL30 supply voltage.
Test criteria:
The control module's test for the DTC starts when:
-
The vehicle is in usage mode active or higher.
Detection criteria:
The DTC is set if the control module detects that:
-
The supply voltage to the control module is too low.
Faultcode actions:
None.
DTC05E813
Engine Oil Bypass Valve Control Circuit/Open General Electrical Failures Circuit open
DTC: 05E813
Information:
The control valve, engine oil cooling, is used to control the coolant flow through the engine oil cooler.
Test criteria:
The control module's test for the DTC starts when:
-
The engine is running.
Detection criteria:
The DTC is set if the control module detects that:
-
The signal is missing.
Faultcode actions:
None.
Related Documents
DTC05E911
Engine Oil Bypass Valve Control Circuit Low General Electrical Failures Circuit short to ground
DTC: 05E911
Information:
The control valve, engine oil cooling, is used to control the coolant flow through the engine oil cooler.
Test criteria:
The control module's test for the DTC starts when:
-
The engine is running.
Detection criteria:
The DTC is set if the control module detects that:
-
The signal is too low.
Faultcode actions:
None.
Related Documents
DTC05EA12
Engine Oil Bypass Valve Control Circuit High General Electrical Failures Circuit short to battery
DTC: 05EA12
Information:
The control valve, engine oil cooling, is used to control the coolant flow through the engine oil cooler.
Test criteria:
The control module's test for the DTC starts when:
-
The engine is running.
Detection criteria:
The DTC is set if the control module detects that:
-
The signal is too high.
Faultcode actions:
None.
Related Documents
DTC060442
Internal Control Module Random Access Memory (RAM) Error System Internal Failures General memory failure
DTC: 060442
Information:
Note! To repair this fault, try clearing the DTC memory or updating the ECM software. Replace the Engine Control Module (ECM) only if the fault is reoccurring after these previous steps. The Engine Control Module (ECM) monitors its internal RAM memory.
Test criteria:
The control module's test for the DTC starts when:
-
The vehicle is in usage mode active or higher.
Detection criteria:
The DTC is set if the control module detects that:
-
An internal error has occurred in the Engine Control Module (ECM) RAM.
Faultcode actions:
The Engine Control Module (ECM) restricts the vehicle performance if the fault occurs frequently. The Engine Control Module (ECM) inhibits start of the combustion engine and disables the start/stop functionality.
DTC060448
Internal Control Module Random Access Memory (RAM) Error System Internal Failures Supervision software failure
DTC: 060448
Information:
Note! To repair this fault, try clearing the DTC memory or updating the ECM software. Replace the Engine Control Module (ECM) only if the fault is reoccurring after these previous steps. The Engine Control Module (ECM) monitors its internal scheduling of safety critical functions.
Test criteria:
The control module's test for the DTC starts when:
-
The vehicle is in usage mode active or higher.
Detection criteria:
The DTC is set if the control module detects that:
-
The safety critical functions have not been run within the scheduled execution time.
Faultcode actions:
The Engine Control Module (ECM) restricts the vehicle performance if the fault occurs frequently. The Engine Control Module (ECM) inhibits start of the combustion engine and disables the start/stop functionality.
DTC060662
Control Module Processor Algorithm Based Failures Signal compare failure
DTC: 060662
Information:
The Engine Control Module (ECM) monitors the amount of torque produced by the engine. The torque is calculated using two different methods which do not share the same inputs (sensors). These values are compared to the expected engine torque, which is calculated using the vehicle speed and driver input information (e.g. the accelerator pedal). Note! This fault has many possile causes. For example ECM software error, air intake system leaks, engine sensors fault, accelerator pedal fault.
Test criteria:
The control module's test for the DTC starts when:
-
The engine is running.
Detection criteria:
The DTC is set if the control module detects that:
-
The calculated engine torque is significantly higher than expected.
Faultcode actions:
The Engine Control Module (ECM) temporarily limits the torque produced by the engine.
DTC060696
Control Module Processor Component Failures Component internal failure
DTC: 060696
Information:
Note! To repair this fault, try clearing the DTC memory or updating the ECM software. Replace the Engine Control Module (ECM) only if the fault is reoccurring after these previous steps. The Engine Control Module (ECM) monitors its internal ASIC status.
Test criteria:
The control module's test for the DTC starts when:
-
The vehicle is in usage mode driving.
Detection criteria:
The DTC is set if the control module detects that:
-
Internal controls give unfeasible results.
Faultcode actions:
The Engine Control Module (ECM) restricts the vehicle performance if the fault occurs frequently.
DTC060704
Control Module Performance System Internal Failures
DTC: 060704
Information:
Note! To repair this fault, try clearing the DTC memory or updating the ECM software. Replace the Engine Control Module (ECM) only if the fault is reoccurring after these previous steps. The Engine Control Module (ECM) runs its internal start-up test that tests to execute a set of instructions. The test is performed at Engine Control Module (ECM) start-up.
Test criteria:
The control module's test for the DTC starts when:
-
The Engine Control Module (ECM) is activated.
Detection criteria:
The DTC is set if the control module detects that:
-
The initial start-up test cannot execute all instructions.
Faultcode actions:
The Engine Control Module (ECM) restricts the vehicle performance if the fault occurs frequently.
DTC060741
Control Module Performance System Internal Failures General checksum failure
DTC: 060741
Information:
Note! To repair this fault, try clearing the DTC memory or updating the ECM software. Replace the Engine Control Module (ECM) only if the fault is reoccurring after these previous steps. The Engine Control Module (ECM) runs its internal shut-down test which monitors the RAM memory. The test is performed at Engine Control Module (ECM) shut-down.
Test criteria:
The control module's test for the DTC starts when:
-
The vehicle is in usage mode active or higher.
Detection criteria:
The DTC is set if the control module detects that:
-
There is a RAM fault in the Engine Control Module (ECM).
Faultcode actions:
The Engine Control Module (ECM) restricts the vehicle performance if the fault occurs frequently.
DTC060742
Control Module Performance System Internal Failures General memory failure
DTC: 060742
Information:
Note! To repair this fault, try clearing the DTC memory or updating the ECM software. Replace the Engine Control Module (ECM) only if the fault is reoccurring after these previous steps. The Engine Control Module (ECM) runs its internal start-up test which monitors the RAM memory. The test is performed at Engine Control Module (ECM) start-up.
Test criteria:
The control module's test for the DTC starts when:
-
The vehicle is in usage mode active or higher.
Detection criteria:
The DTC is set if the control module detects that:
-
There is a RAM fault in the Engine Control Module (ECM).
Faultcode actions:
The Engine Control Module (ECM) restricts the vehicle performance if the fault occurs frequently.
DTC060743
Control Module Performance System Internal Failures Special memory failure
DTC: 060743
Information:
Note! To repair this fault, try clearing the DTC memory or updating the ECM software. Replace the Engine Control Module (ECM) only if the fault is reoccurring after these previous steps. The Engine Control Module (ECM) runs its internal start-up test which monitors the ROM memory. The test is performed at Engine Control Module (ECM) start-up.
Test criteria:
The control module's test for the DTC starts when:
-
The vehicle is in usage mode active or higher.
Detection criteria:
The DTC is set if the control module detects that:
-
There is a ROM fault in the Engine Control Module (ECM).
Faultcode actions:
The Engine Control Module (ECM) restricts the vehicle performance if the fault occurs frequently.
DTC060744
Control Module Performance System Internal Failures Data memory failure
DTC: 060744
Information:
Note! This diagnostic troule code (DTC) status is an event controlled diagnostic troule code (DTC). An event controlled diagnostic troule code (DTC) does not mean that there is a fault in the control module when it is active, ut is designed as information. The Engine Control Module (ECM) checks its internal signals continuously.
Test criteria:
The control module's test for the DTC starts when:
-
The vehicle is in usage mode active or higher.
Detection criteria:
The DTC is set if the control module detects that:
-
There is an internal error in the control module.
Faultcode actions:
The Engine Control Module (ECM) restricts the vehicle performance if the fault occurs frequently.
DTC060745
Control Module Performance System Internal Failures Program memory failure
DTC: 060745
Information:
Note! To repair this fault, try clearing the DTC memory or updating the ECM software. Replace the Engine Control Module (ECM) only if the fault is reoccurring after these previous steps. The Engine Control Module (ECM) monitors if there are checksum faults in the ROM memory. The test is performed continuously while the Engine Control Module (ECM) is active and during ECM shut-down.
Test criteria:
The control module's test for the DTC starts when:
-
The vehicle is in usage mode active or higher.
Detection criteria:
The DTC is set if the control module detects that:
-
There is a ROM checksum fault in the Engine Control Module (ECM).
Faultcode actions:
The Engine Control Module (ECM) restricts the vehicle performance if the fault occurs frequently.
DTC060747
Control Module Performance System Internal Failures Watchdog / safety µC failure
DTC: 060747
Information:
Note! To repair this fault, try clearing the DTC memory or updating the ECM software. Replace the Engine Control Module (ECM) only if the fault is reoccurring after these previous steps. The Engine Control Module (ECM) is monitored by its internal watchdog timer.
Test criteria:
The control module's test for the DTC starts when:
-
The vehicle is in usage mode active or higher.
Detection criteria:
The DTC is set if the control module detects that:
-
There is an internal error in the control module.
Faultcode actions:
The Engine Control Module (ECM) restricts the vehicle performance if the fault occurs frequently. The Engine Control Module (ECM) is reset.
DTC060748
Control Module Performance System Internal Failures Supervision software failure
DTC: 060748
Information:
Note! This diagnostic troule code (DTC) status is an event controlled diagnostic troule code (DTC). An event controlled diagnostic troule code (DTC) does not mean that there is a fault in the control module when it is active, ut is designed as information. In order to increase stability, the Engine Control Module (ECM) monitors internal signals.
Test criteria:
The control module's test for the DTC starts when:
-
The vehicle is in usage mode active or higher.
Detection criteria:
The DTC is set if the control module detects that:
-
There is an internal error in the Engine Control Module (ECM).
Faultcode actions:
The Engine Control Module (ECM) restricts the vehicle performance if the fault occurs frequently.
DTC060782
Control Module Performance Bus Signal / Message Failures Alive / sequence counter incorrect / not updated
DTC: 060782
Information:
Note! To repair this fault, try clearing the DTC memory or updating the ECM software. Replace the Engine Control Module (ECM) only if the fault is reoccurring after these previous steps. The Engine Control Module (ECM) checks its internal signals continuously. The Engine Control Module (ECM) monitors if software has been scheduled in the wrong order (SSC – Scheduling Sequence Check). The monitors are located in both main and sub-CPU.
Test criteria:
The control module's test for the DTC starts when:
-
The vehicle is in usage mode active or higher.
Detection criteria:
The DTC is set if the control module detects that:
-
The control sequence counter is incorrect or not updated.
Faultcode actions:
The Engine Control Module (ECM) will automatically reset and run the upstart diagnostic test again. The Engine Control Module (ECM) restricts the vehicle performance if the fault occurs frequently.
DTC060B01
Internal Control Module A/D Processing Performance General electrical failure
DTC: 060B01
Information:
The Engine Control Module (ECM) continuously monitors its internal components and their communication.
Test criteria:
The control module's test for the DTC starts when:
-
The vehicle is in usage mode active or higher.
Detection criteria:
The DTC is set if the control module detects that:
-
There is an internal error in the Engine Control Module (ECM).
Faultcode actions:
None.
DTC060B02
Internal Control Module A/D Processing Performance General signal failure
DTC: 060B02
Information:
The Engine Control Module (ECM) continuously monitors its internal components and their communication.
Test criteria:
The control module's test for the DTC starts when:
-
The vehicle is in usage mode active or higher.
Detection criteria:
The DTC is set if the control module detects that:
-
There is an internal error in the Engine Control Module (ECM).
Faultcode actions:
None.
DTC060B03
Internal Control Module A/D Processing Performance FM (Frequency Modulated) / PWM (Pulse Width Modulated) Failures
DTC: 060B03
Information:
The Engine Control Module (ECM) continuously monitors its internal components and their communication.
Test criteria:
The control module's test for the DTC starts when:
-
The vehicle is in usage mode active or higher.
Detection criteria:
The DTC is set if the control module detects that:
-
There is an internal error in the Engine Control Module (ECM).
Faultcode actions:
None.
DTC060B48
Internal Control Module A/D Processing Performance System Internal Failures Supervision software failure
DTC: 060B48
Information:
Note! To repair this fault, try clearing the DTC memory or updating the ECM software. If the fault returns, check the status of the crankshaft position sensor andor the camshaft position sensor. Replace the Engine Control Module (ECM) only if the fault is reoccurring after these previous steps. The Engine Control Module (ECM) monitors its internal engine speed (from different internal sources).
Test criteria:
The control module's test for the DTC starts when:
-
The vehicle is in usage mode active or higher.
Detection criteria:
The DTC is set if the control module detects that:
-
The engine speed from different sources within the Engine Control Module (ECM) differ.
-
The DTC can also be set by faults in the crankshaft position sensor / camshaft position sensor.
Faultcode actions:
The Engine Control Module (ECM) limits the torque produced by the engine. The Engine Control Module (ECM) restricts the vehicle performance if the fault occurs frequently.
DTC060C48
Internal Control Module Main Processor Performance System Internal Failures Supervision software failure
DTC: 060C48
Information:
Note! To repair this fault, try clearing the DTC memory or updating the ECM software. If the fault returns, check the status of the crankshaft position sensor. Replace the Engine Control Module (ECM) only if the fault is reoccurring after these previous steps. The Engine Control Module (ECM) monitors the crankshaft position (from different sources) and checks for signal interruptions.
Test criteria:
The control module's test for the DTC starts when:
-
The vehicle is in usage mode active or higher.
Detection criteria:
The DTC is set if the control module detects that:
-
The crank position from the crankshaft position sensor does not match the position calculated by the basic software.
Faultcode actions:
The Engine Control Module (ECM) limits the torque produced by the engine.
DTC060C62
Internal Control Module Main Processor Performance Algorithm Based Failures Signal compare failure
DTC: 060C62
Information:
The Engine Control Module (ECM) monitors the amount of torque produced by the engine. The torque is calculated using two different methods which do not share the same inputs (sensors). These values are compared to the expected engine torque, which is calculated using the vehicle speed and driver input information (e.g. the accelerator pedal). Note! This fault has many possile causes. For example ECM software error, air intake system leaks, engine sensors fault, accelerator pedal fault. Diesel specific information: If the DTC still reoccurs after checking the possible causes, reset the TrqCalcNe adaptation values. Drive the vehicle from high to low engine speed with fuel cut active to activate the adaptation process.
Test criteria:
The control module's test for the DTC starts when:
-
The engine is running.
Detection criteria:
The DTC is set if the control module detects that:
-
The calculated engine torque is significantly higher than expected.
Faultcode actions:
The Engine Control Module (ECM) temporarily limits the torque produced by the engine.
DTC060C68
Internal Control Module Main Processor Performance Algorithm Based Failures Event information
DTC: 060C68
Information:
Note! This diagnostic troule code (DTC) status is an event controlled diagnostic troule code (DTC). An event controlled diagnostic troule code (DTC) does not mean that there is a fault in the control module when it is active, ut is designed as information. In order to increase stability, the Engine Control Module (ECM) monitors internal signals.
Test criteria:
The control module's test for the DTC starts when:
-
The vehicle is in usage mode active or higher.
Detection criteria:
The DTC is set if the control module detects that:
-
Internal checks give unacceptable results.
Faultcode actions:
None.
DTC060C92
Internal Control Module Main Processor Performance Component Failures Performance or incorrect operation
DTC: 060C92
Information:
Note! This diagnostic troule code (DTC) status is an event controlled diagnostic troule code (DTC). An event controlled diagnostic troule code (DTC) does not mean that there is a fault in the control module when it is active, ut is designed as information. The sensor, accelerator pedal, provides the Engine Control Module (ECM) with information about the position of the accelerator pedal. The sensor, accelerator pedal, consists of two internal sensors, one transmitting an analogue signal and one transmitting a PWM-signal.
Test criteria:
The control module's test for the DTC starts when:
-
The vehicle is in usage mode driving.
Detection criteria:
The DTC is set if the control module detects that:
-
The results of the two different torque calculations do not match.
Faultcode actions:
The Engine Control Module (ECM) limits the torque.
DTC060C94
Internal Control Module Main Processor Performance Component Failures Unexpected operation
DTC: 060C94
Information:
Note! To repair this fault, try clearing the DTC memory or updating the ECM software. Replace the Engine Control Module (ECM) only if the fault is reoccurring after these previous steps. The Engine Control Module (ECM) monitors its internal safety integrity function. The test is performed continuously while the Engine Control Module (ECM) is active.
Test criteria:
The control module's test for the DTC starts when:
-
The vehicle is in usage mode active.
Detection criteria:
The DTC is set if the control module detects that:
-
There is an internal error in the control module.
Faultcode actions:
The Engine Control Module (ECM) restricts the vehicle performance if the fault occurs frequently.
DTC061511
Starter Relay Circuit General Electrical Failures Circuit short to ground
DTC: 061511
Information:
Note! This diagnostic troule code (DTC) status is an event controlled diagnostic troule code (DTC). An event controlled diagnostic troule code (DTC) does not mean that there is a fault in the control module when it is active, ut is designed as information. The Engine Control Module (ECM) monitors the starter relay inside the fuse box, engine.
Test criteria:
The control module's test for the DTC starts when:
-
The vehicle is in usage mode driving.
Detection criteria:
The DTC is set if the control module detects that:
-
The output to the starter relay is short-circuited to ground.
Faultcode actions:
The Engine Control Module (ECM) disables the start/stop functionality through the Central Electronic Module (CEM). The Engine Control Module (ECM) restricts the vehicle performance if the fault occurs frequently.
DTC061512
Starter Relay Circuit General Electrical Failures Circuit short to battery
DTC: 061512
Information:
Note! This diagnostic troule code (DTC) status is an event controlled diagnostic troule code (DTC). An event controlled diagnostic troule code (DTC) does not mean that there is a fault in the control module when it is active, ut is designed as information. The Engine Control Module (ECM) monitors the starter relay inside the fuse box, engine.
Test criteria:
The control module's test for the DTC starts when:
-
The vehicle is in usage mode driving.
Detection criteria:
The DTC is set if the control module detects that:
-
The output to the starter relay is short-circuited to battery voltage.
Faultcode actions:
The Engine Control Module (ECM) disables the start/stop functionality through the Central Electronic Module (CEM). The Engine Control Module (ECM) restricts the vehicle performance if the fault occurs frequently.
DTC061513
Starter Relay Circuit General Electrical Failures Circuit open
DTC: 061513
Information:
Note! This diagnostic troule code (DTC) status is an event controlled diagnostic troule code (DTC). An event controlled diagnostic troule code (DTC) does not mean that there is a fault in the control module when it is active, ut is designed as information. The Engine Control Module (ECM) monitors the starter relay inside the fuse box, engine.
Test criteria:
The control module's test for the DTC starts when:
-
The engine is started.
Detection criteria:
The DTC is set if the control module detects that:
-
There is an open circuit in the output to the starter relay.
Faultcode actions:
The Engine Control Module (ECM) disables the start/stop functionality through the Central Electronic Module (CEM). The Engine Control Module (ECM) restricts the vehicle performance if the fault occurs frequently.
DTC061547
Starter Relay Circuit System Internal Failures Watchdog / safety µC failure
DTC: 061547
Information:
Note! This diagnostic troule code (DTC) status is an event controlled diagnostic troule code (DTC). An event controlled diagnostic troule code (DTC) does not mean that there is a fault in the control module when it is active, ut is designed as information. The Engine Control Module (ECM) checks its internal signals continuously.
Test criteria:
The control module's test for the DTC starts when:
-
The vehicle is in usage mode active or higher.
Detection criteria:
The DTC is set if the control module detects that:
-
There is an internal error in the Engine Control Module (ECM).
-
An internal software error has occurred in the Engine Control Module (ECM).
Faultcode actions:
The Engine Control Module (ECM) disables the start/stop functionality through the Central Electronic Module (CEM). The Engine Control Module (ECM) restricts the vehicle performance if the fault occurs frequently.
DTC061564
Starter Relay Circuit Algorithm Based Failures Signal plausibility failure
DTC: 061564
Information:
The starter relay in the fuse box, engine, is activated by the Engine Control Module (ECM). Both ends of the primary coil in the starter relay are connected to the drivers in the Engine Control Module (ECM). The Engine Control Module (ECM) regularly checks that these driver stages operate according to the request made from the Engine Control Module (ECM). The aim is to ensure reliability during operation.
Test criteria:
The control module's test for the DTC starts when:
-
The vehicle is in usage mode active or higher.
Detection criteria:
The DTC is set if the control module detects that:
-
The actual state of the driver stage output for the starter relay is not coherent with the control module's requested state.
-
There is a software error in the Engine Control Module (ECM).
Faultcode actions:
The Engine Control Module (ECM) disables the start/stop functionality through the Central Electronic Module (CEM). The Engine Control Module (ECM) restricts the vehicle performance if the fault occurs frequently.
DTC061900
Alternative Fuel Control Module RAM/ROM Error
DTC: 061900
Information:
The Engine Control Module (ECM) controls the fuel pressure via the fuel pump module using a PWM signal. The fuel pump module then controls the fuel pump depending on the pressure requested by the Engine Control Module (ECM). The fuel pump module sends diagnostic messages on the PWM signal back to the Engine Control Module (ECM).
Test criteria:
The control module's test for the DTC starts when:
-
The vehicle is in usage mode active or higher.
Detection criteria:
The DTC is set if the control module detects that:
-
An internal fault is detected in the fuel pump module.
Faultcode actions:
None.
Related Documents
DTC061A00
Internal Control Module Torque Performance
DTC: 061A00
Information:
Note! This diagnostic troule code (DTC) status is an event controlled diagnostic troule code (DTC). An event controlled diagnostic troule code (DTC) does not mean that there is a fault in the control module when it is active, ut is designed as information. The Engine Control Module (ECM) collects and calculates information about the actual engine torque from the Mass Airflow sensor (MAF), the crankshaft position sensor and the engine coolant temperature sensor. These values are compared with the expected engine torque, which is calculated using the vehicle speed and information from the sensor, accelerator pedal, as well as with the actual torque from the Inverter Generator Module (IGM) and Electric Rear Axle Drive (ERAD).
Test criteria:
The control module's test for the DTC starts when:
-
The engine is running.
Detection criteria:
The DTC is set if the control module detects that:
-
The calculated engine torque is significantly higher than expected.
Faultcode actions:
The Engine Control Module (ECM) temporarily limits the engine tourque.
Related Documents
DTC061A62
DInternal Control Module Torque Performance Algorithm Based Failures Signal compare failure
DTC: 061A62
Information:
The Engine Control Module (ECM) monitors the amount of torque produced by the engine. The torque is calculated using two different methods which do not share the same inputs (sensors). These values are compared to the expected engine torque, which is calculated using the vehicle speed and driver input information (e.g. the accelerator pedal). Note! This fault has many possile causes. For example ECM software error, air intake system leaks, engine sensors fault, accelerator pedal fault. Diesel specific information: If the DTC still reoccurs after checking the possible causes, reset the TrqCalcNe adaptation values. Drive the vehicle from high to low engine speed with fuel cut active to activate the adaptation process.
Test criteria:
The control module's test for the DTC starts when:
-
The engine is running.
Detection criteria:
The DTC is set if the control module detects that:
-
The calculated engine torque is significantly higher than expected.
Faultcode actions:
The Engine Control Module (ECM) temporarily limits the torque produced by the engine.
DTC061B02
Internal Control Module Torque Calculation Performance General signal failure
DTC: 061B02
Information:
The Engine Control Module (ECM) continuously monitors the automatic transmission gear ratio by comparing the signals from the Engine Control Module (ECM) and the Transmission Control Module (TCM).
Test criteria:
The control module's test for the DTC starts when:
-
The vehicle is in usage mode driving.
Detection criteria:
The DTC is set if the control module detects that:
-
The signal from the Transmission Control Module (TCM) does not match the controller's calculations.
Faultcode actions:
None.
DTC061B64
Internal Control Module Torque Calculation Performance Algorithm Based Failures Signal plausibility failure
DTC: 061B64
Information:
The Engine Control Module (ECM) monitors the amount of torque produced by the engine. The torque is calculated using two different methods which do not share the same inputs (sensors). Note! This fault has many possile causes. For example ECM software error, air intake system leaks, engine sensors fault, accelerator pedal fault. Diesel specific information: If the DTC still reoccurs after checking the possible causes, reset the TrqCalcNe adaptation values. Drive the vehicle from high to low engine speed with fuel cut active to activate the adaptation process.
Test criteria:
The control module's test for the DTC starts when:
-
The vehicle is in usage mode driving.
Detection criteria:
The DTC is set if the control module detects that:
-
The result of both calculations deviate too much from each other.
Faultcode actions:
The Engine Control Module (ECM) restricts the vehicle performance if the fault occurs frequently.
DTC061B92
DTC 061B92
DTC: 061B92
Information:
The Engine Control Module (ECM) continuously monitors the Inverter Generator Module (IGM), the Electric Rear Axle Drive (ERAD) as well as the actual torque from the engine.
Test criteria:
The control module's test for the DTC starts when:
-
The vehicle is in usage mode driving.
Detection criteria:
The DTC is set if the control module detects that:
-
The propulsive torque at the Electric Rear Axle Drive (ERAD) is implausible.
Faultcode actions:
The Engine Control Module (ECM) temporarily limits the propulsive torque at the Electric Rear Axle Drive (ERAD).
DTC061C48
Internal Control Module Engine RPM Performance System Internal Failures Supervision software failure
DTC: 061C48
Information:
Note! This diagnostic troule code (DTC) status is an event controlled diagnostic troule code (DTC). An event controlled diagnostic troule code (DTC) does not mean that there is a fault in the control module when it is active, ut is designed as information. The Engine Control Module (ECM) monitors the engine speed signal by comparing the crankshaft speed signal with the camshaft speed signal.
Test criteria:
The control module's test for the DTC starts when:
-
The vehicle is in usage mode active or higher.
Detection criteria:
The DTC is set if the control module detects that:
-
The crankshaft speed signal deviates too much from the camshaft speed signal.
Faultcode actions:
The Engine Control Module (ECM) temporarily limits the engine tourque.
Related Documents
DTC062700
Fuel Pump A Control Circuit / Open
DTC: 062700
Information:
The Engine Control Module (ECM) controls the fuel pressure on the high-pressure side via a PWM signal to the fuel pump module and the control valve, fuel quantity. The fuel pump module and the control valve, fuel quantity, then controls the fuel pump to achieve the requested fuel pressure.
Test criteria:
The control module's test for the DTC starts when:
-
The engine is running.
Detection criteria:
The DTC is set if the control module detects that:
-
The signal is missing.
Faultcode actions:
None.
Related Documents
DTC062900
Fuel Pump A Control Circuit High
DTC: 062900
Information:
The Engine Control Module (ECM) controls the fuel pressure on the high-pressure side via a PWM signal to the fuel pump module and the control valve, fuel quantity. The fuel pump module and the control valve, fuel quantity, then controls the fuel pump to achieve the requested fuel pressure.
Test criteria:
The control module's test for the DTC starts when:
-
The engine is running.
Detection criteria:
The DTC is set if the control module detects that:
-
The signal is too high.
Faultcode actions:
None.
Related Documents
DTC062D01
Fuel Injector Driver Circuit Performance Bank 1 General electrical failure
DTC: 062D01
Information:
The Engine Control Module (ECM) monitors the drive circuit for the fuel injectors.
Test criteria:
The control module's test for the DTC starts when:
-
The engine is running.
Detection criteria:
The DTC is set if the control module detects that:
-
The signal is incorrect.
Faultcode actions:
None.
Related Documents
DTC062D02
Fuel Injector Driver Circuit Performance Bank 1 General signal failure
DTC: 062D02
Information:
The Engine Control Module (ECM) monitors the drive circuit for the fuel injectors.
Test criteria:
The control module's test for the DTC starts when:
-
The engine is running.
Detection criteria:
The DTC is set if the control module detects that:
-
The signal is incorrect.
Faultcode actions:
None.
Related Documents
DTC062D04
Fuel Injector Driver Circuit Performance Bank 1 System Internal Failures
DTC: 062D04
Information:
The Engine Control Module (ECM) monitors the drive circuit for the fuel injectors.
Test criteria:
The control module's test for the DTC starts when:
-
The engine is running.
Detection criteria:
The DTC is set if the control module detects that:
-
The signal is incorrect.
Faultcode actions:
None.
Related Documents
DTC062D49
Fuel Injector Driver Circuit Performance Bank 1 System Internal Failures Internal electronic failure
DTC: 062D49
Information:
The Engine Control Module (ECM) monitors the drive circuit for the fuel injectors.
Test criteria:
The control module's test for the DTC starts when:
-
The engine is running.
Detection criteria:
The DTC is set if the control module detects that:
-
The signal is incorrect.
Faultcode actions:
None.
Related Documents
DTC063400
PCM / ECM / TCM Internal Temperature Too High
DTC: 063400
Information:
Engine control module (ECM) monitors the internal temperature in the control module.
Test criteria:
The control module's test for the DTC starts when:
-
The engine is running.
Detection criteria:
The DTC is set if the control module detects that:
-
The temperature is too high.
-
The incorrect signal lasts longer than allowed.
Faultcode actions:
The Engine Control Module (ECM) activates the radiator cooling fan.
DTC06344B
PCM / ECM / TCM Internal Temperature Too High System Internal Failures Over temperature
DTC: 06344B
Information:
Engine control module (ECM) monitors the internal temperature in the control module.
Test criteria:
The control module's test for the DTC starts when:
-
The engine is running.
Detection criteria:
The DTC is set if the control module detects that:
-
The temperature is too high.
-
The incorrect signal lasts longer than allowed.
Faultcode actions:
The Engine Control Module (ECM) activates the radiator cooling fan.
DTC063498
PCM / ECM / TCM Internal Temperature Too High Component Failures Component or system over temperature
DTC: 063498
Information:
Engine control module (ECM) monitors the internal temperature in the control module.
Test criteria:
The control module's test for the DTC starts when:
-
The engine is running.
Detection criteria:
The DTC is set if the control module detects that:
-
The temperature is too high.
-
The incorrect signal lasts longer than allowed.
Faultcode actions:
The Engine Control Module (ECM) activates the radiator cooling fan.
DTC063800
Throttle Actuator Control Range/Performance - Bank 1
DTC: 063800
Information:
The Engine Control Module (ECM) monitors the signals from the throttle unit's two position sensors.
Test criteria:
The control module's test for the DTC starts when:
-
The vehicle is in usage mode active or higher.
Detection criteria:
The DTC is set if the control module detects that:
-
Both sensors are defective.
Faultcode actions:
The Engine Control Module (ECM) disables the supply to the damper motor for the electronic throttle and the throttle will set itself in the return position.
Related Documents
DTC064200
Sensor Reference Voltage A Circuit Low
DTC: 064200
Information:
The Engine Control Module (ECM) monitors the drive circuit for the 5 V supply to sensors in the engine.
Test criteria:
The control module's test for the DTC starts when:
-
The engine is running.
Detection criteria:
The DTC is set if the control module detects that:
-
There is an internal error in the control module.
Faultcode actions:
None.
DTC064300
Sensor Reference Voltage A Circuit High
DTC: 064300
Information:
The Engine Control Module (ECM) monitors the drive circuit for the 5 V supply to sensors in the engine.
Test criteria:
The control module's test for the DTC starts when:
-
The engine is running.
Detection criteria:
The DTC is set if the control module detects that:
-
There is an internal error in the control module.
Faultcode actions:
None.
DTC064600
A/C Clutch Relay Control Circuit Low
DTC: 064600
Information:
The Engine Control Module (ECM) monitors the power supply to the A/C compressor solenoid clutch.
Test criteria:
The control module's test for the DTC starts when:
-
The engine is running.
Detection criteria:
The DTC is set if the control module detects that:
-
The supply voltage to the A/C compressor solenoid clutch is too low.
Faultcode actions:
None.
DTC064611
A/C Clutch Relay Control Circuit Low General Electrical Failures Circuit short to ground
DTC: 064611
Information:
The Engine Control Module (ECM) monitors the power supply to the A/C compressor solenoid clutch.
Test criteria:
The control module's test for the DTC starts when:
-
The engine is running.
Detection criteria:
The DTC is set if the control module detects that:
-
The supply voltage to the A/C compressor solenoid clutch is too low.
Faultcode actions:
None.
DTC064700
A/C Clutch Relay Control Circuit High
DTC: 064700
Information:
The Engine Control Module (ECM) monitors the power supply to the A/C compressor solenoid clutch.
Test criteria:
The control module's test for the DTC starts when:
-
The engine is running.
Detection criteria:
The DTC is set if the control module detects that:
-
The power supply is too high.
-
There is an open circuit in the wires or inside the A/C compressor solenoid clutch.
Faultcode actions:
None.
DTC064715
A/C Clutch Relay Control Circuit High General Electrical Failures Circuit short to battery or open
DTC: 064715
Information:
The Engine Control Module (ECM) monitors the power supply to the A/C compressor solenoid clutch.
Test criteria:
The control module's test for the DTC starts when:
-
The engine is running.
Detection criteria:
The DTC is set if the control module detects that:
-
The power supply is too high.
-
There is an open circuit in the wires or inside the A/C compressor solenoid clutch.
Faultcode actions:
None.
DTC065200
Sensor Reference Voltage "B" Circuit Low
DTC: 065200
Information:
The Engine Control Module (ECM) monitors the drive circuit for the 5 V supply to sensors in the engine.
Test criteria:
The control module's test for the DTC starts when:
-
The engine is running.
Detection criteria:
The DTC is set if the control module detects that:
-
There is an internal error in the control module.
Faultcode actions:
None.
DTC065300
Sensor Reference Voltage "B" Circuit High
DTC: 065300
Information:
The Engine Control Module (ECM) monitors the drive circuit for the 5 V supply to sensors in the engine.
Test criteria:
The control module's test for the DTC starts when:
-
The engine is running.
Detection criteria:
The DTC is set if the control module detects that:
-
There is an internal error in the control module.
Faultcode actions:
None.
DTC066800
PCM / ECM / TCM Internal Temperature Sensor Circuit Low
DTC: 066800
Information:
Engine Control Module (ECM) monitors the internal temperature sensor signal in the control module.
Test criteria:
The control module's test for the DTC starts when:
-
The engine is running.
Detection criteria:
The DTC is set if the control module detects that:
-
The signal is too low for too long.
Faultcode actions:
The Engine Control Module (ECM) uses a constant internal temperature. The Engine Control Module (ECM) controls the radiator cooling fan according to a pre-defined speed.
DTC066900
PCM / ECM / TCM Internal Temperature Sensor Circuit High
DTC: 066900
Information:
Engine control module (ECM) monitors the internal temperature in the control module.
Test criteria:
The control module's test for the DTC starts when:
-
The engine is running.
Detection criteria:
The DTC is set if the control module detects that:
-
The signal is too high for too long.
Faultcode actions:
The Engine Control Module (ECM) uses a constant internal temperature. The Engine Control Module (ECM) controls the radiator cooling fan according to a pre-defined speed.
DTC068500
ECM/PCM Power Relay Control Circuit/Open
DTC: 068500
Information:
When the usage mode is changed from driving to a lower mode the Engine Control Module (ECM) performs internal checks, which takes approximately 10 minutes. When the internal checks are complete, the Engine Control Module (ECM) deactivates the system relay.
Test criteria:
The control module's test for the DTC starts when:
-
The engine is shut down.
Detection criteria:
The DTC is set if the control module detects that:
-
The system relay was unexpectedly disengaged.
Faultcode actions:
None.
DTC068B00
ECM/PCM Power Relay De-Energized - Too Late
DTC: 068B00
Information:
When the usage mode is changed from driving to a lower mode the Engine Control Module (ECM) performs internal checks, which takes approximately 10 minutes. When the internal checks are complete, the Engine Control Module (ECM) deactivates the system relay.
Test criteria:
The control module's test for the DTC starts when:
-
The engine is shut down.
Detection criteria:
The DTC is set if the control module detects that:
-
The system relay is still engaged after the activation has been interrupted.
Faultcode actions:
None.
DTC069100
Fan 1 Control Circuit Low
DTC: 069100
Information:
The radiator cooling fan consists of an integrated control module and one or two fans, depending on the vehicle version. The radiator cooling fan has two functions, to cool the engine compartment and to cool the condenser when the A/C compressor is active.
Test criteria:
The control module's test for the DTC starts when:
-
The vehicle is in usage mode active or higher, or after run is in progress.
Detection criteria:
The DTC is set if the control module detects that:
-
The signal is too low.
Faultcode actions:
None.
DTC069111
Fan 1 Control Circuit Low General Electrical Failures Circuit short to ground
DTC: 069111
Information:
The radiator cooling fan consists of an integrated control module and one or two fans, depending on the vehicle version. The radiator cooling fan has two functions, to cool the engine compartment and to cool the condenser when the A/C compressor is active.
Test criteria:
The control module's test for the DTC starts when:
-
The vehicle is in usage mode active or higher, or after run is in progress.
Detection criteria:
The DTC is set if the control module detects that:
-
The signal is too low.
Faultcode actions:
None.
DTC069200
Fan 1 Control Circuit High
DTC: 069200
Information:
The radiator cooling fan consists of an integrated control module and one or two fans, depending on the vehicle version. The radiator cooling fan has two functions, to cool the engine compartment and to cool the condenser when the A/C compressor is active.
Test criteria:
The control module's test for the DTC starts when:
-
The vehicle is in usage mode active or higher, or after run is in progress.
Detection criteria:
The DTC is set if the control module detects that:
-
The signal is too high.
Faultcode actions:
None.
DTC069212
Fan 1 Control Circuit High General Electrical Failures Circuit short to battery
DTC: 069212
Information:
The radiator cooling fan consists of an integrated control module and one or two fans, depending on the vehicle version. The radiator cooling fan has two functions, to cool the engine compartment and to cool the condenser when the A/C compressor is active.
Test criteria:
The control module's test for the DTC starts when:
-
The vehicle is in usage mode active or higher, or after run is in progress.
Detection criteria:
The DTC is set if the control module detects that:
-
The signal is too high.
Faultcode actions:
None.
DTC069300
DTC 069300
DTC: 069300
Information:
The radiator cooling fan consists of an integrated control module and one or two fans, depending on the vehicle version. The radiator cooling fan has two functions, to cool the engine compartment and to cool the condenser when the A/C compressor is active.
Test criteria:
The control module's test for the DTC starts when:
-
The vehicle is in usage mode active or higher, or after run is in progress.
Detection criteria:
The DTC is set if the control module detects that:
-
The signal is too low.
Faultcode actions:
None.
DTC069400
DTC 069400
DTC: 069400
Information:
The radiator cooling fan consists of an integrated control module and one or two fans, depending on the vehicle version. The radiator cooling fan has two functions, to cool the engine compartment and to cool the condenser when the A/C compressor is active.
Test criteria:
The control module's test for the DTC starts when:
-
The vehicle is in usage mode active or higher, or after run is in progress.
Detection criteria:
The DTC is set if the control module detects that:
-
The signal is too high.
Faultcode actions:
None.
DTC06A000
Variable A/C Compressor Control Circuit
DTC: 06A000
Information:
The A/C compressor pressurizes and transports the refrigerant, which is necessary for operation of the A/C system. The A/C compressor is of the variable displacement type and consists of the A/C compressor solenoid clutch and the A/C compressor control valve, which is used to regulate the amount of refrigerant that is compressed. The Engine Control Module (ECM) monitors the A/C compressor control valve.
Test criteria:
The control module's test for the DTC starts when:
-
The engine is running.
-
The A/C control is active.
Detection criteria:
The DTC is set if the control module detects that:
-
The signal to the A/C compressor control valve is missing.
Faultcode actions:
None.
DTC06A013
Variable A/C Compressor Control Circuit General Electrical Failures Circuit open
DTC: 06A013
Information:
The A/C compressor pressurizes and transports the refrigerant, which is necessary for operation of the A/C system. The A/C compressor is of the variable displacement type and consists of the A/C compressor solenoid clutch and the A/C compressor control valve, which is used to regulate the amount of refrigerant that is compressed. The Engine Control Module (ECM) monitors the A/C compressor control valve.
Test criteria:
The control module's test for the DTC starts when:
-
The engine is running.
-
The A/C control is active.
Detection criteria:
The DTC is set if the control module detects that:
-
The signal to the A/C compressor control valve is missing.
Faultcode actions:
None.
DTC06A055
DTC 06A055
DTC: 06A055
Information:
The A/C compressor pressurizes and transports the refrigerant, which is necessary for operation of the A/C system. The A/C compressor is of the variable displacement type and consists of the A/C compressor solenoid clutch and the A/C compressor control valve, which is used to regulate the amount of refrigerant that is compressed. The Engine Control Module (ECM) monitors the A/C compressor control valve.
Test criteria:
The control module's test for the DTC starts when:
-
The vehicle is in usage mode driving.
-
The A/C control is active.
Detection criteria:
The DTC is set if the control module detects that:
-
The signal from the pressure sensor is missing.
Faultcode actions:
None.
DTC06A094
DTC 06A094
DTC: 06A094
Information:
The Air-Conditioning Compressor module (ACCM) is a control module integrated with an A/C compressor and a power inverter in one unit. The Air-Conditioning Compressor module (ACCM) circulates the refrigerant that cools the A/C system. The Air-Conditioning Compressor module (ACCM) may also be used to cool the high voltage battery coolant circuit via the heat exchanger, high voltage battery cooling.
Test criteria:
The control module's test for the DTC starts when:
-
The engine is running.
-
The A/C control is active.
-
The heat exchanger, high-voltage battery cooling, is active.
-
Note! The heat exchanger, high-voltage attery cooling, is only active under certain conditions. Run the test for the heat exchanger, high-voltage attery cooling, to make sure that the diagnostics have run.
Detection criteria:
The DTC is set if the control module detects that:
-
The speed of the compressor inside the Air-Conditioning Compressor module (ACCM) is too low.
Faultcode actions:
The performance of the A/C system is reduced.
DTC06A100
Variable A/C Compressor Control Circuit Low
DTC: 06A100
Information:
The Air-Conditioning Compressor module (ACCM) has a simplified built-in diagnostic system that can monitor a limited amount of errors. All diagnostic data is sent from the Air-Conditioning Compressor module (ACCM) to the Engine Control Module (ECM) via LIN.
Test criteria:
The control module's test for the DTC starts when:
-
The engine is running.
-
The A/C control is active.
Detection criteria:
The DTC is set if the control module detects that:
-
The signal is too low.
Faultcode actions:
None.
DTC06A111
Variable A/C Compressor Control Circuit Low General Electrical Failures Circuit short to ground
DTC: 06A111
Information:
The A/C compressor pressurizes and transports the refrigerant, which is necessary for operation of the A/C system. The A/C compressor is of the variable displacement type and consists of the A/C compressor solenoid clutch and the A/C compressor control valve, which is used to regulate the amount of refrigerant that is compressed. The Engine Control Module (ECM) monitors the A/C compressor control valve.
Test criteria:
The control module's test for the DTC starts when:
-
The engine is running.
-
The A/C control is active.
Detection criteria:
The DTC is set if the control module detects that:
-
The signal to the A/C compressor control valve is too low.
Faultcode actions:
None.
DTC06A200
Variable A/C Compressor Control Circuit High
DTC: 06A200
Information:
The Air-Conditioning Compressor module (ACCM) has a simplified built-in diagnostic system that can monitor a limited amount of errors. All diagnostic data is sent from the Air-Conditioning Compressor module (ACCM) to the Engine Control Module (ECM) via LIN.
Test criteria:
The control module's test for the DTC starts when:
-
The engine is running.
-
The A/C control is active.
Detection criteria:
The DTC is set if the control module detects that:
-
The signal is too high.
Faultcode actions:
None.
DTC06A212
Variable A/C Compressor Control Circuit High General Electrical Failures Circuit short to battery
DTC: 06A212
Information:
The A/C compressor pressurizes and transports the refrigerant, which is necessary for operation of the A/C system. The A/C compressor is of the variable displacement type and consists of the A/C compressor solenoid clutch and the A/C compressor control valve, which is used to regulate the amount of refrigerant that is compressed. The Engine Control Module (ECM) monitors the A/C compressor control valve.
Test criteria:
The control module's test for the DTC starts when:
-
The engine is running.
Detection criteria:
The DTC is set if the control module detects that:
-
The signal to the A/C compressor control valve is too high.
Faultcode actions:
None.
DTC06A616
Sensor Reference Voltage "A" Circuit Range/Performance General Electrical Failures Circuit voltage below threshold
DTC: 06A616
Information:
The Engine Control Module (ECM) monitors the drive circuit for the 5 V supply to sensors in the engine.
Test criteria:
The control module's test for the DTC starts when:
-
The vehicle is in usage mode driving.
Detection criteria:
The DTC is set if the control module detects that:
-
There is an error in the 5 V drive circuit inside the Engine Control Module (ECM).
Faultcode actions:
The Engine Control Module (ECM) restricts the vehicle performance if the fault occurs frequently.
DTC06A617
Sensor Reference Voltage "A" Circuit Range/Performance General Electrical Failures Circuit voltage above threshold
DTC: 06A617
Information:
The Engine Control Module (ECM) monitors the drive circuit for the 5 V supply to sensors in the engine.
Test criteria:
The control module's test for the DTC starts when:
-
The vehicle is in usage mode driving.
Detection criteria:
The DTC is set if the control module detects that:
-
There is an error in the 5 V drive circuit inside the Engine Control Module (ECM).
Faultcode actions:
The Engine Control Module (ECM) restricts the vehicle performance if the fault occurs frequently.
DTC06A716
Sensor Reference Voltage "B" Circuit Range/Performance General Electrical Failures Circuit voltage below threshold
DTC: 06A716
Information:
The Engine Control Module (ECM) monitors the drive circuit for the 5 V supply to sensors in the engine.
Test criteria:
The control module's test for the DTC starts when:
-
The vehicle is in usage mode driving.
Detection criteria:
The DTC is set if the control module detects that:
-
There is an error in the 5 V drive circuit inside the Engine Control Module (ECM).
Faultcode actions:
The Engine Control Module (ECM) restricts the vehicle performance if the fault occurs frequently.
DTC06A717
Sensor Reference Voltage "B" Circuit Range/Performance General Electrical Failures Circuit voltage above threshold
DTC: 06A717
Information:
The Engine Control Module (ECM) monitors the drive circuit for the 5 V supply to sensors in the engine.
Test criteria:
The control module's test for the DTC starts when:
-
The vehicle is in usage mode driving.
Detection criteria:
The DTC is set if the control module detects that:
-
There is an error in the 5 V drive circuit inside the Engine Control Module (ECM).
Faultcode actions:
The Engine Control Module (ECM) restricts the vehicle performance if the fault occurs frequently.
DTC06DA00
Engine Oil Pressure Control Circuit/Open
DTC: 06DA00
Information:
The engine oil pump solenoid is a proportional valve. The solenoid regulates the oil flow through the engine oil pump via electromagnetism generated by a control signal from the Engine Control Module (ECM).
Test criteria:
The control module's test for the DTC starts when:
-
The engine is running.
Detection criteria:
The DTC is set if the control module detects that:
-
The signal is missing.
Faultcode actions:
None.
Related Documents
DTC06DB00
Engine Oil Pressure Control Circuit Low
DTC: 06DB00
Information:
The engine oil pump solenoid is a proportional valve. The solenoid regulates the oil flow through the engine oil pump via electromagnetism generated by a control signal from the Engine Control Module (ECM).
Test criteria:
The control module's test for the DTC starts when:
-
The engine is running.
Detection criteria:
The DTC is set if the control module detects that:
-
The oil pressure is too low.
Faultcode actions:
None.
Related Documents
DTC06DC00
Engine Oil Pressure Control Circuit High
DTC: 06DC00
Information:
The engine oil pump solenoid is a proportional valve. The solenoid regulates the oil flow through the engine oil pump via electromagnetism generated by a control signal from the Engine Control Module (ECM).
Test criteria:
The control module's test for the DTC starts when:
-
The engine is running.
Detection criteria:
The DTC is set if the control module detects that:
-
The oil pressure is too high.
Faultcode actions:
None.
Related Documents
DTC06DD00
Engine Oil Pressure Control Circuit Performance/Stuck Off
DTC: 06DD00
Information:
The engine oil pump solenoid is a proportional valve. The solenoid regulates the oil flow through the engine oil pump via electromagnetism generated by a control signal from the Engine Control Module (ECM).
Test criteria:
The control module's test for the DTC starts when:
-
The engine is running.
Detection criteria:
The DTC is set if the control module detects that:
-
The oil pressure is too low.
Faultcode actions:
None.
Related Documents
DTC06DE00
Engine Oil Pressure Control Circuit Stuck On
DTC: 06DE00
Information:
The engine oil pump solenoid is a proportional valve. The solenoid regulates the oil flow through the engine oil pump via electromagnetism generated by a control signal from the Engine Control Module (ECM).
Test criteria:
The control module's test for the DTC starts when:
-
The engine is running.
Detection criteria:
The DTC is set if the control module detects that:
-
The oil pressure is too high.
Faultcode actions:
None.
Related Documents
DTC070068
Transmission Control System (MIL Request) Algorithm Based Failures Event information
DTC: 070068
Information:
Note! This diagnostic troule code (DTC) status is an event controlled diagnostic troule code (DTC). An event controlled diagnostic troule code (DTC) does not mean that there is a fault in the control module when it is active, ut is designed as information. The Engine Control Module (ECM) communicates with the Transmission Control Module (TCM) via the Propulsion CAN.
Test criteria:
The control module's test for the DTC starts when:
-
The vehicle is in usage mode active or higher.
Detection criteria:
The DTC is set if the control module detects that:
-
An event controlled diagnostic trouble code (DTC) does not mean that there is a fault in the control module when it is active, but is designed as information. Fault tracing therefore occurs from another DTC first.
Faultcode actions:
None.
DTC070168
DTC 070168
DTC: 070168
Information:
Note! This diagnostic troule code (DTC) status is an event controlled diagnostic troule code (DTC). An event controlled diagnostic troule code (DTC) does not mean that there is a fault in the control module when it is active, ut is designed as information. The Engine Control Module (ECM) communicates with the Transmission Control Module (TCM) via CAN.
Test criteria:
The control module's test for the DTC starts when:
-
Varied driving is performed.
Detection criteria:
The DTC is set if the control module detects that:
-
The oil temperature in the transmission is too high.
Faultcode actions:
The Engine Control Module (ECM) reduces engine performance.
DTC078068
Shift Malfunction Algorithm Based Failures Event information
DTC: 078068
Information:
Note! This diagnostic troule code (DTC) status is an event controlled diagnostic troule code (DTC). An event controlled diagnostic troule code (DTC) does not mean that there is a fault in the control module when it is active, ut is designed as information. The Engine Control Module (ECM) communicates with the Transmission Control Module (TCM) via the Propulsion CAN.
Test criteria:
The control module's test for the DTC starts when:
-
The vehicle is in usage mode active or higher.
Detection criteria:
The DTC is set if the control module detects that:
-
An event controlled diagnostic trouble code (DTC) does not mean that there is a fault in the control module when it is active, but is designed as information. Fault tracing therefore occurs from another DTC first.
Faultcode actions:
None.
DTC078098
DTC 078098
DTC: 078098
Information:
Note! This diagnostic troule code (DTC) status is an event controlled diagnostic troule code (DTC). An event controlled diagnostic troule code (DTC) does not mean that there is a fault in the control module when it is active, ut is designed as information. The Engine Control Module (ECM) communicates with the Transmission Control Module (TCM) via CAN.
Test criteria:
The control module's test for the DTC starts when:
-
Varied driving is performed.
Detection criteria:
The DTC is set if the control module detects that:
-
The oil temperature in the transmission is too high.
Faultcode actions:
The Engine Control Module (ECM) reduces engine performance.
DTC085086
Park / Neutral Switch Input Circuit Bus Signal / Message Failures Signal invalid
DTC: 085086
Information:
The Engine Control Module (ECM) receives information about the current gear selected from the Transmission Control Module (TCM) via the CAN network.
Test criteria:
The control module's test for the DTC starts when:
-
The vehicle is in usage mode active.
Detection criteria:
The DTC is set if the control module detects that:
-
The gear position sensor that is integrated in the Transmission Control Module (TCM) is indicating an unplausible position.
Faultcode actions:
None.
DTC085100
Park / Neutral Switch Input Circuit Low
DTC: 085100
Information:
The Engine Control Module (ECM) receives information about the current gear selected from a direct-connected wire to the Transmission Control Module (TCM). The Engine Control Module (ECM) compares the signal from the direct-connected wire with the signal received from the Transmission Control Module (TCM) via the CAN network.
Test criteria:
The control module's test for the DTC starts when:
-
The vehicle is in usage mode active.
Detection criteria:
The DTC is set if the control module detects that:
-
The signals are not coherent.
Faultcode actions:
Engine Control Module (ECM) uses the signal from the Transmission Control Module (TCM).
DTC085200
Park / Neutral Switch Input Circuit High
DTC: 085200
Information:
The Engine Control Module (ECM) receives information about the current gear selected from a direct-connected wire to the Transmission Control Module (TCM). The Engine Control Module (ECM) compares the signal from the direct-connected wire with the signal received from the Transmission Control Module (TCM) via the CAN network.
Test criteria:
The control module's test for the DTC starts when:
-
The vehicle is in usage mode active.
Detection criteria:
The DTC is set if the control module detects that:
-
The signals are not coherent.
Faultcode actions:
Engine Control Module (ECM) uses the signal from the Transmission Control Module (TCM).
Ledig
Joining cables
Vehicles with FlexRay network
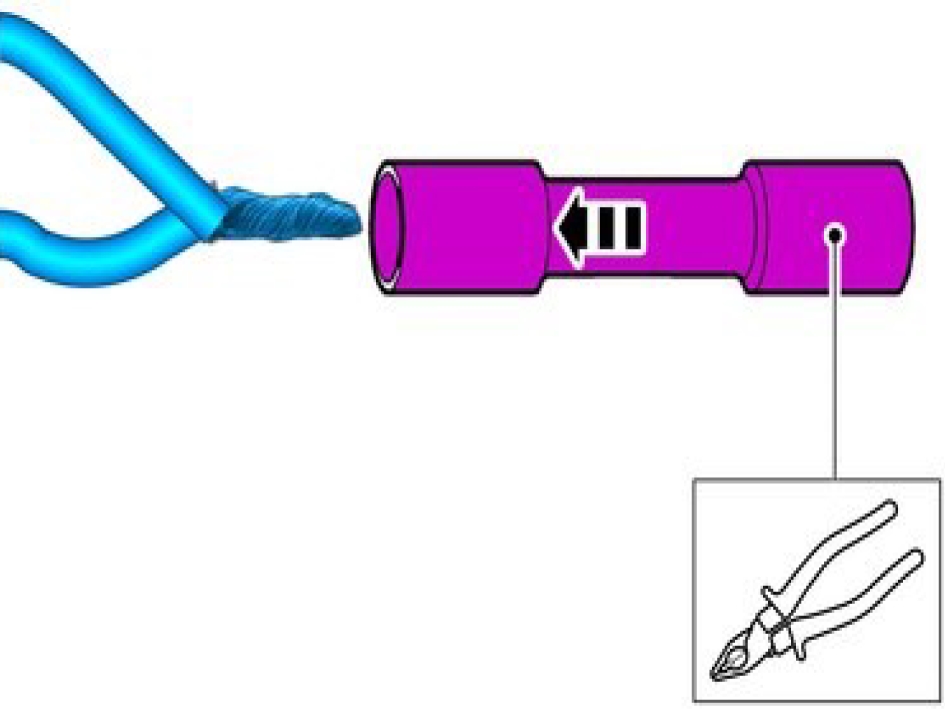
Make sure that all openings are sealed.
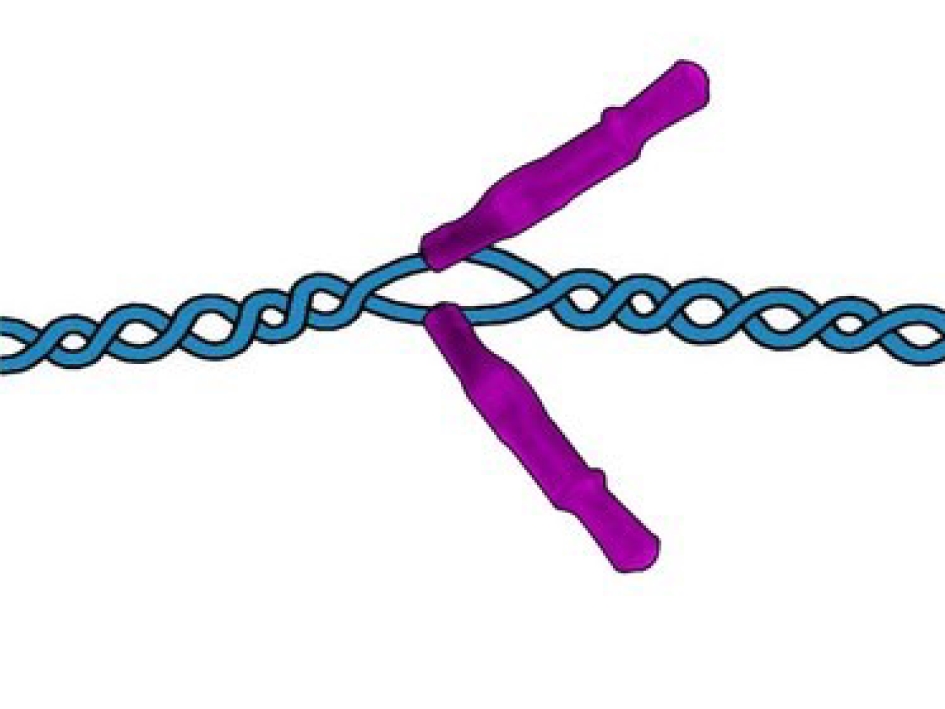
Ensure that the cable's untwisted length does not exceed 10 mm.
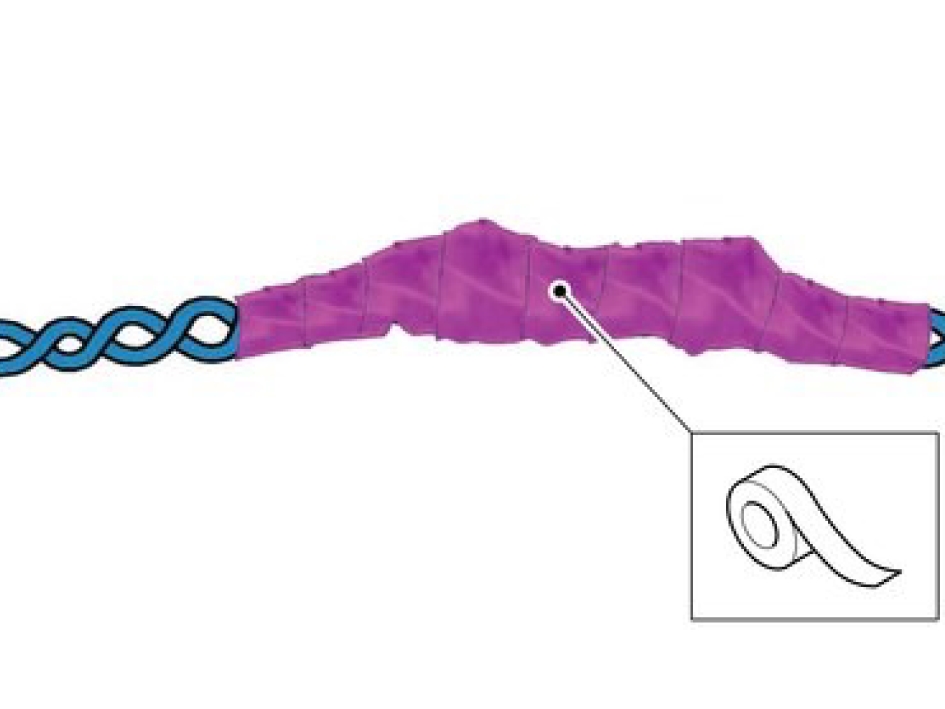
Use electrical tape.
All vehicles
Use special tool: 951 2620
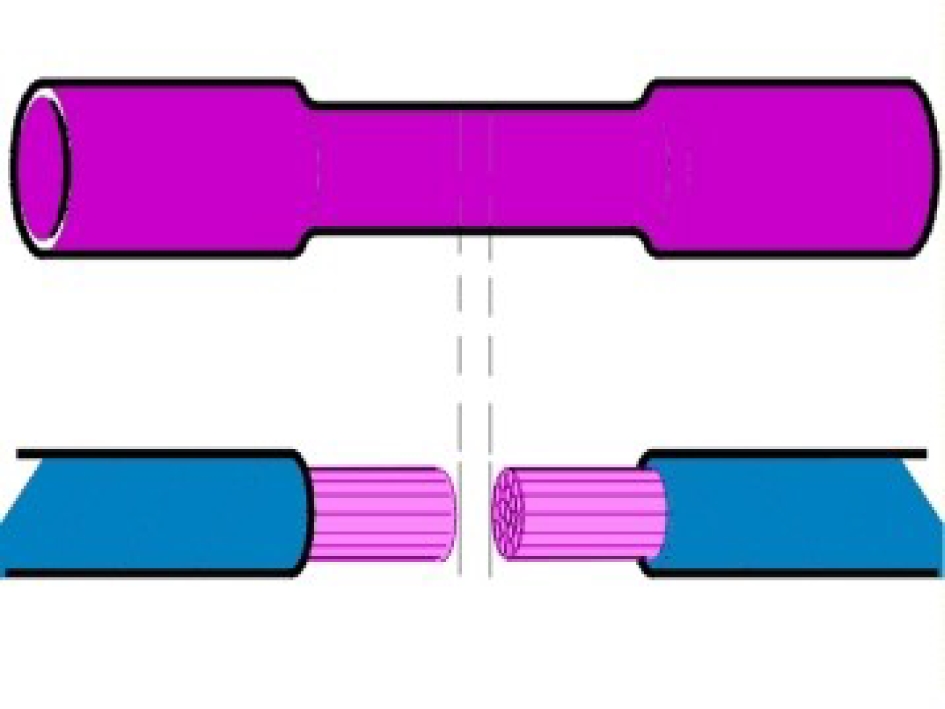
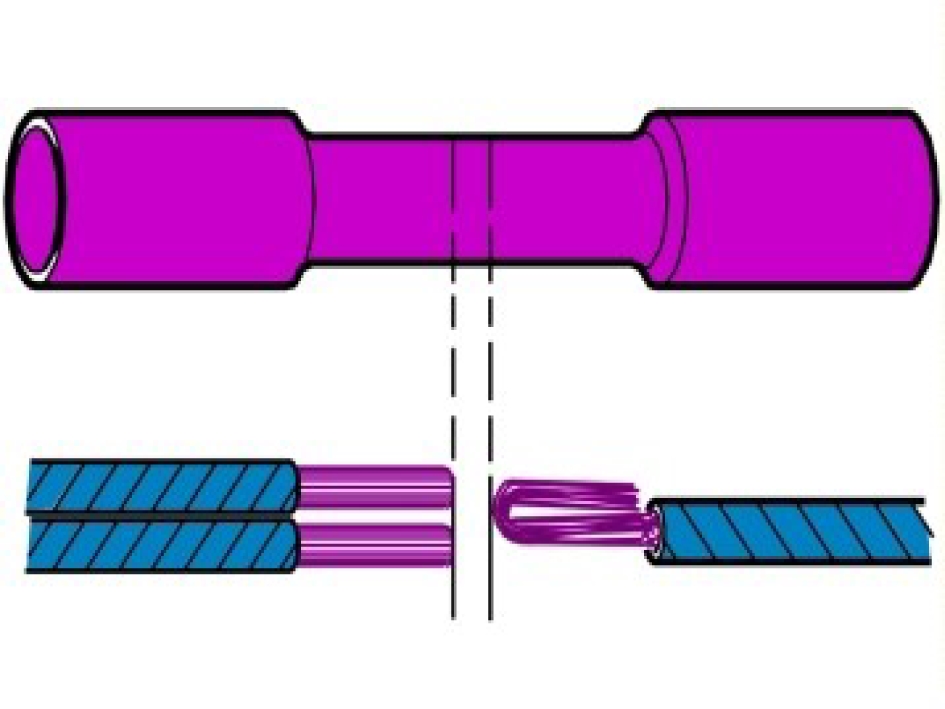
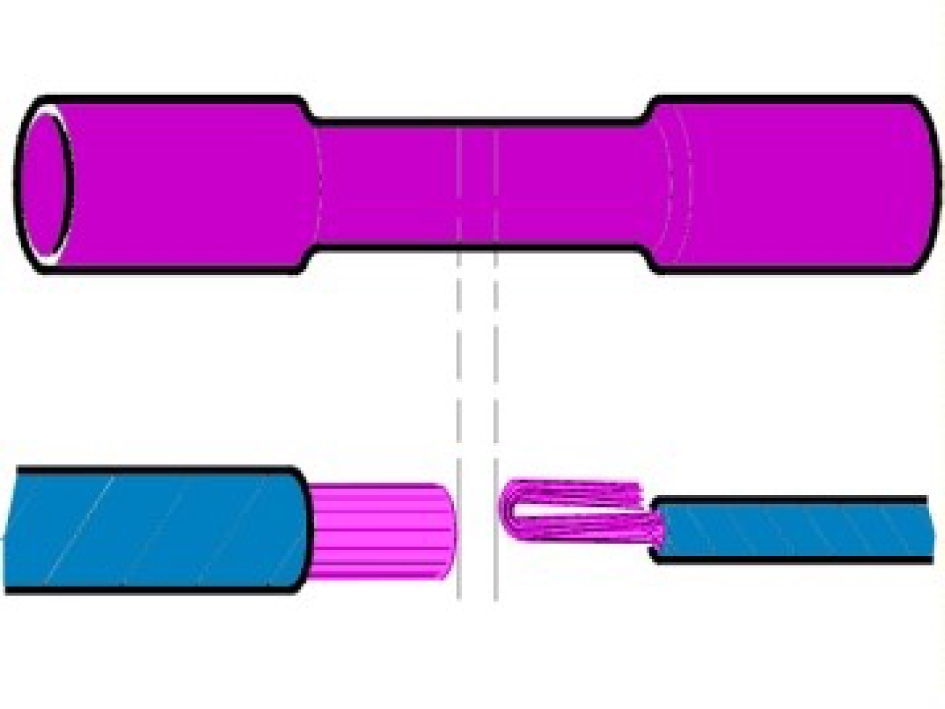

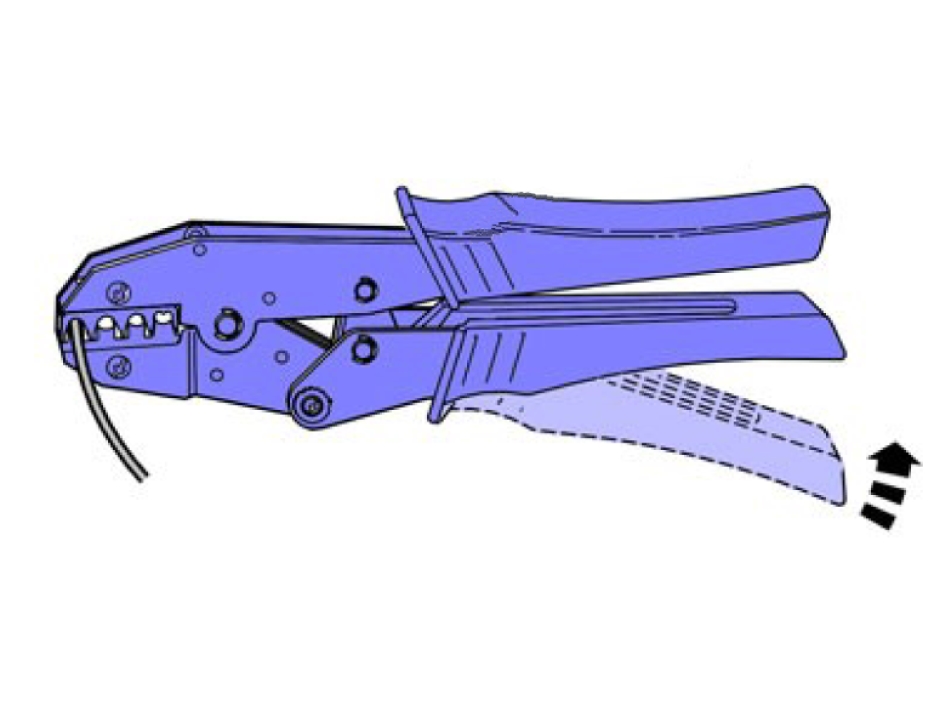
Use special tool: 951 2785
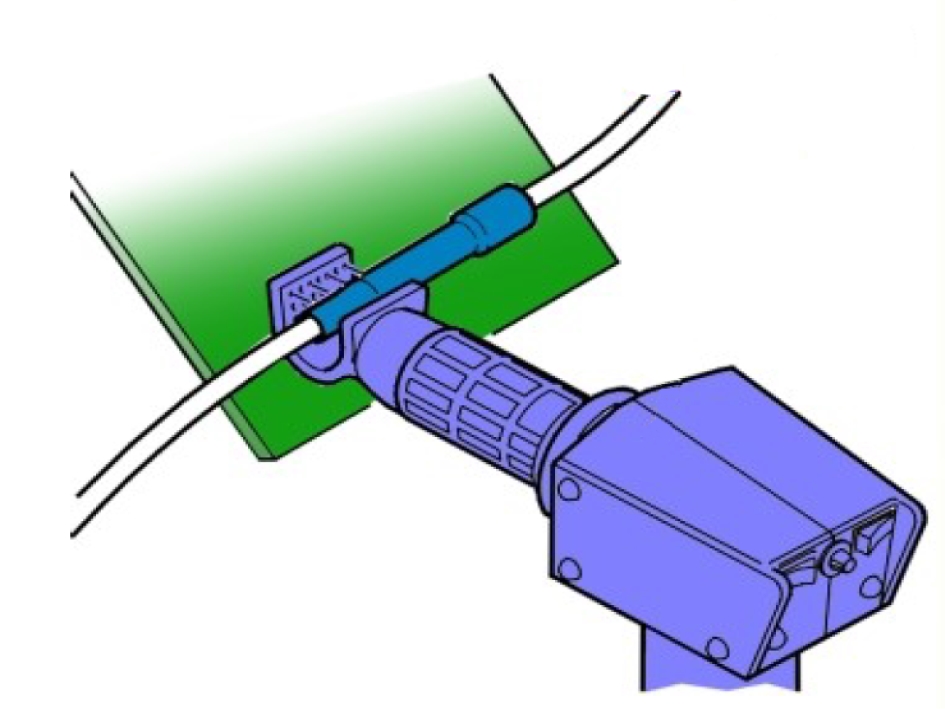
Use special tool: 951 2850 special tool: 951 2851 and special tool: 951 2777
Measuring the crankshaft assembly
Reconditioning
Make sure that the component is clean, free of foreign material and lubricant.
If the specified value is exceeded, a new component must be installed.
See information about engine specifications, refer to:
Specifications Engine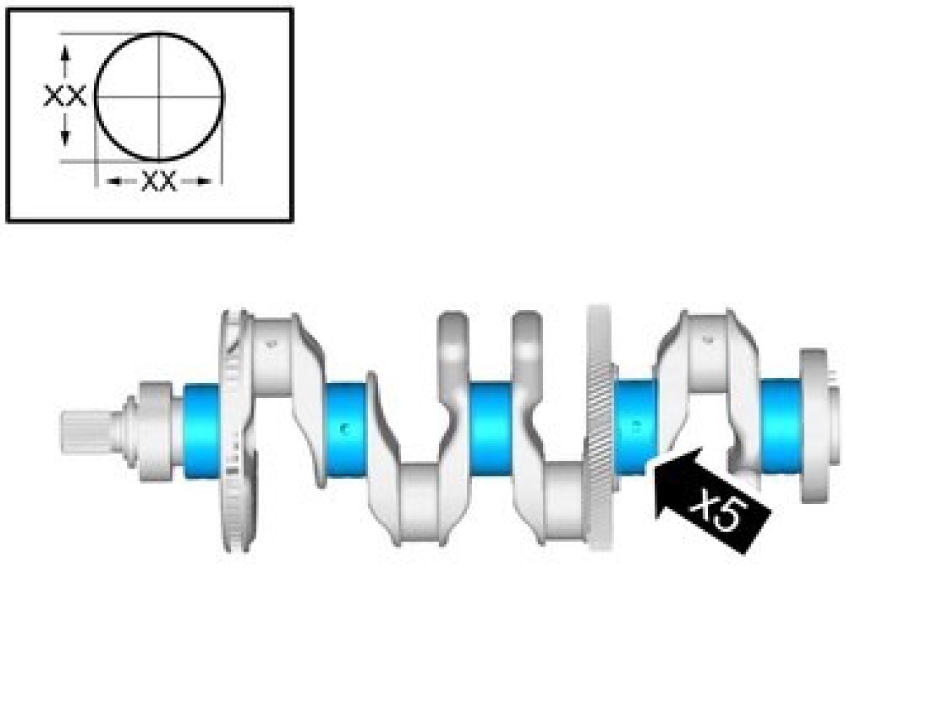
Use: Micrometer
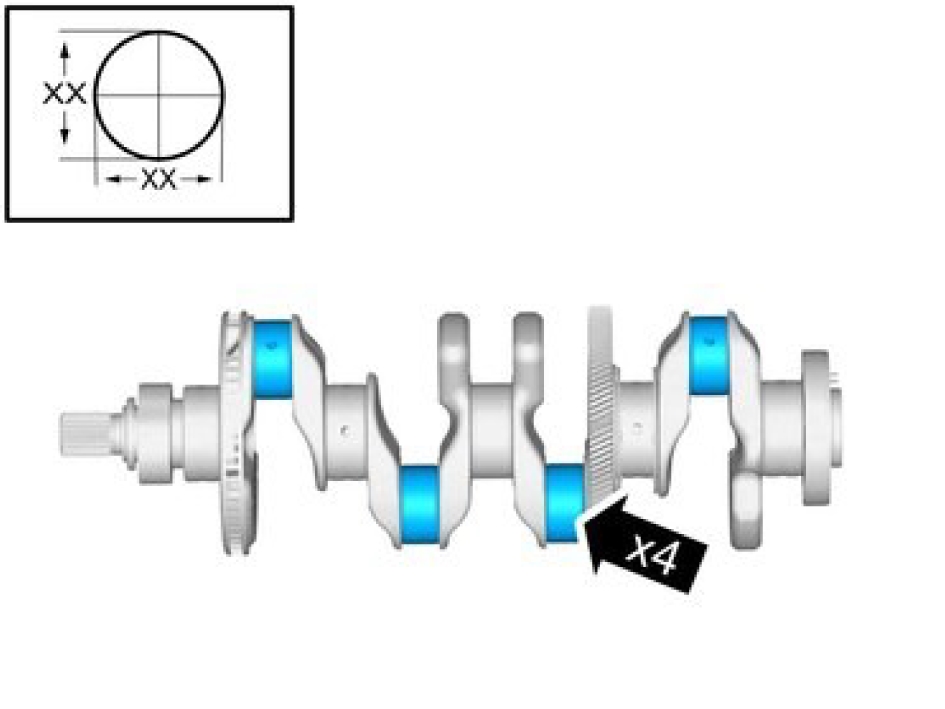
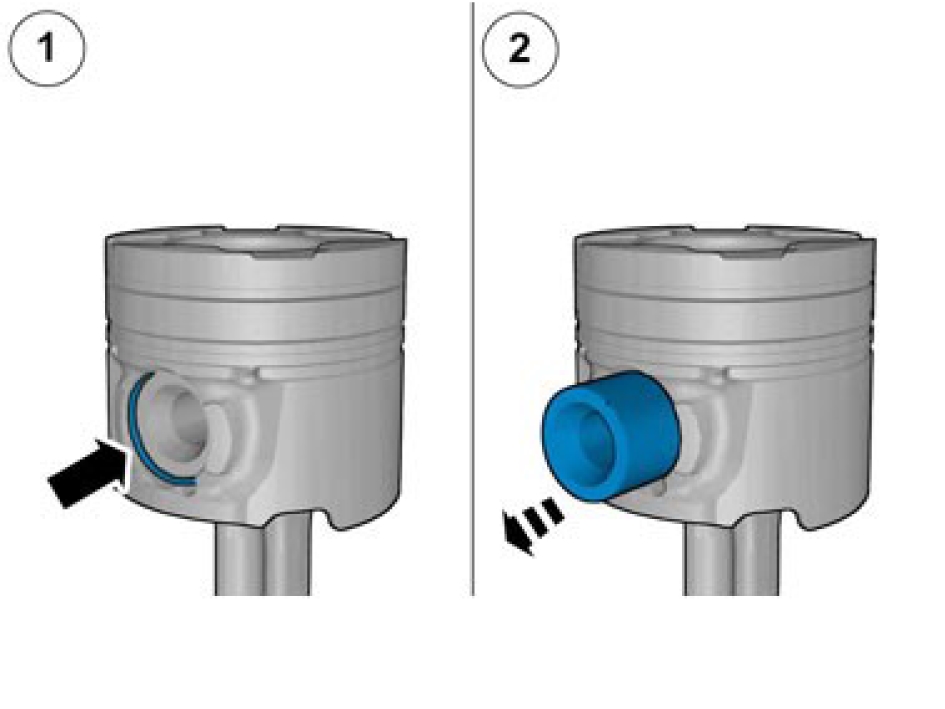
Wear safety goggles.
Remove the marked components.
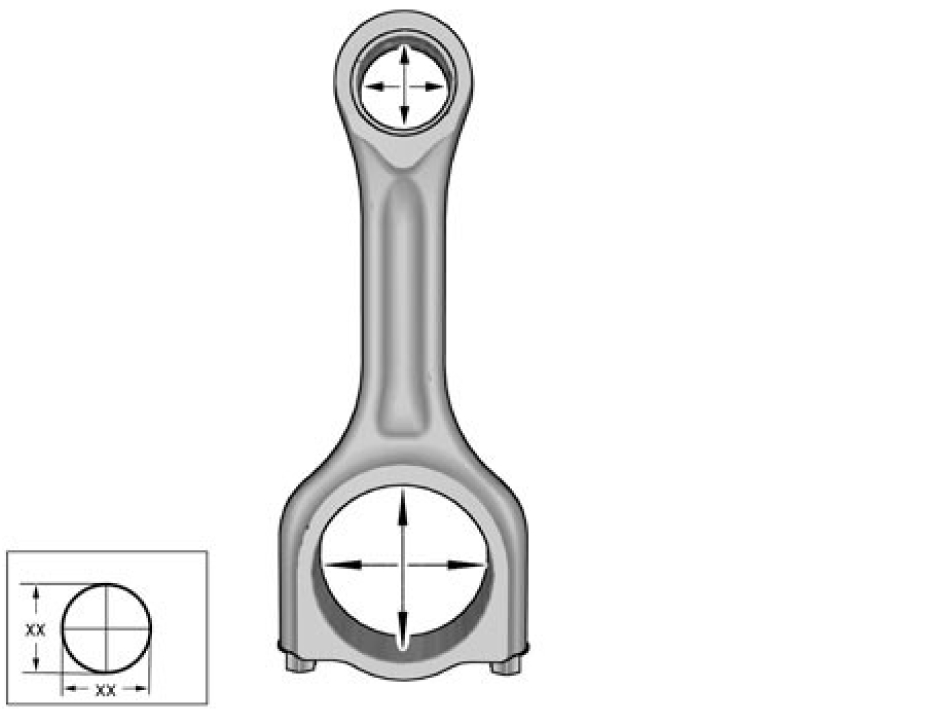
Use: Hole indicator
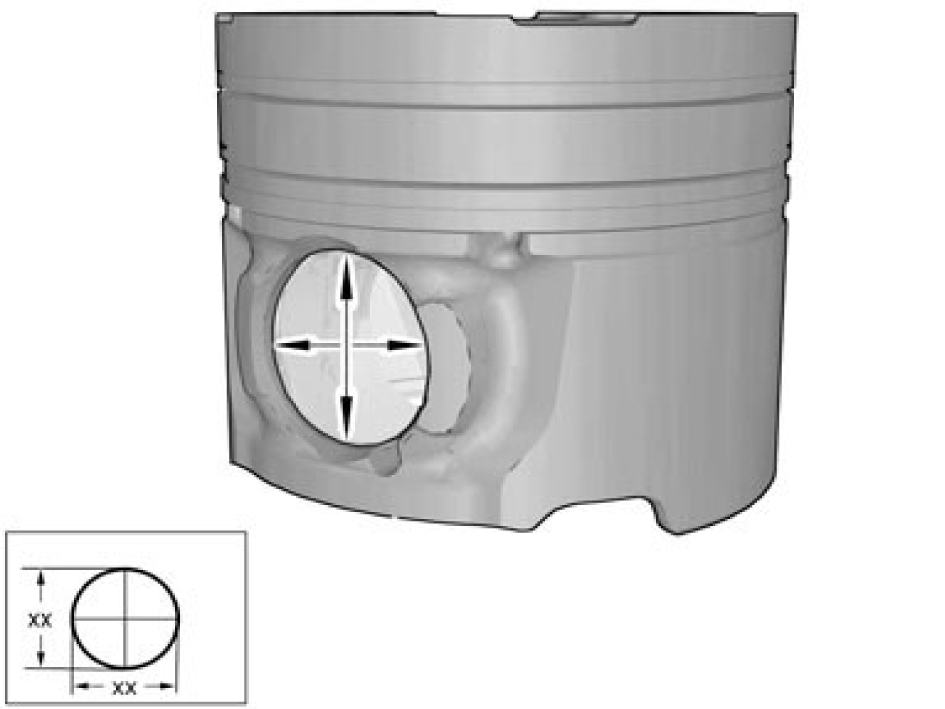
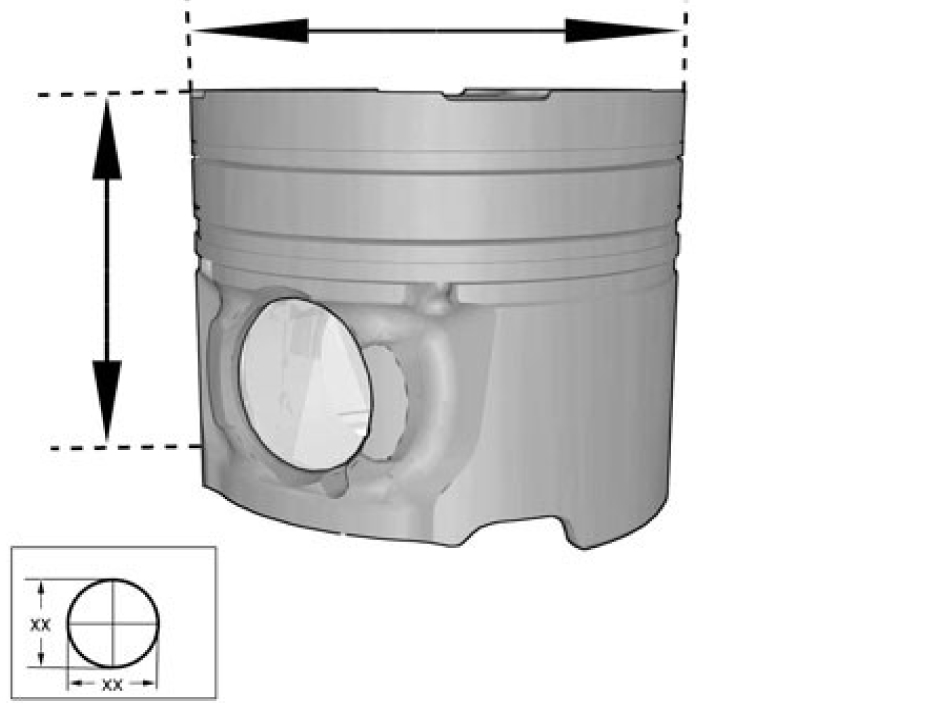
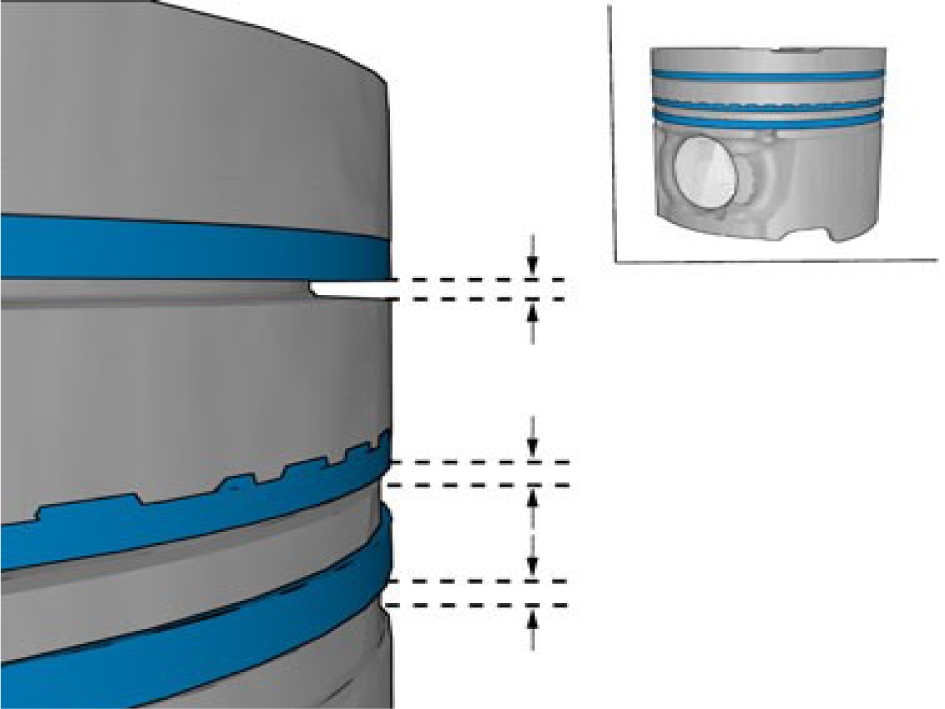
VVT solenoid, replace
Removal
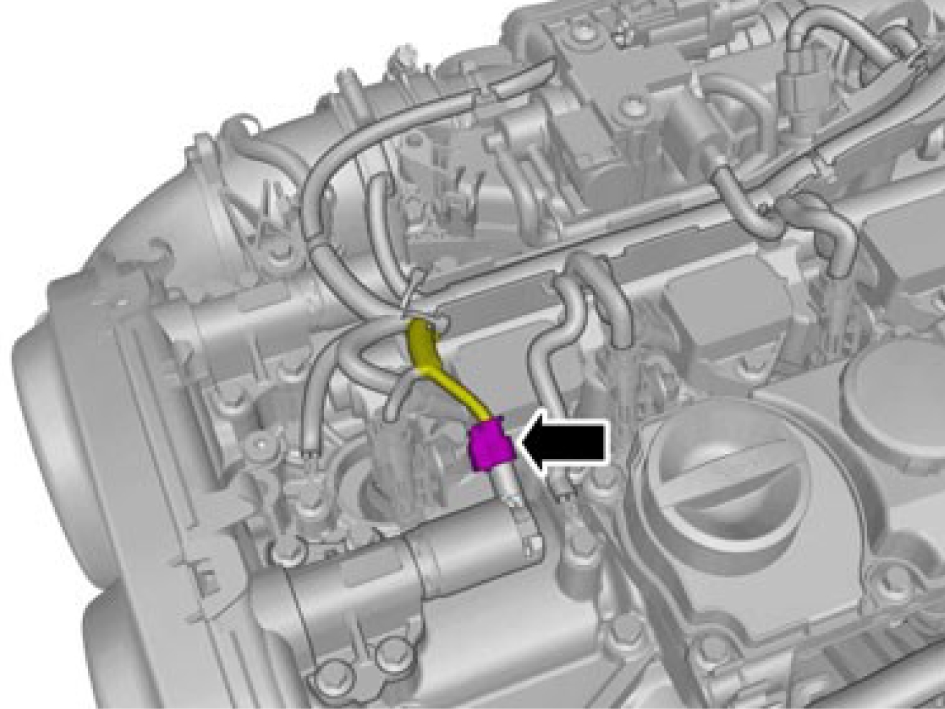
Release the lock.
Disconnect the connector.
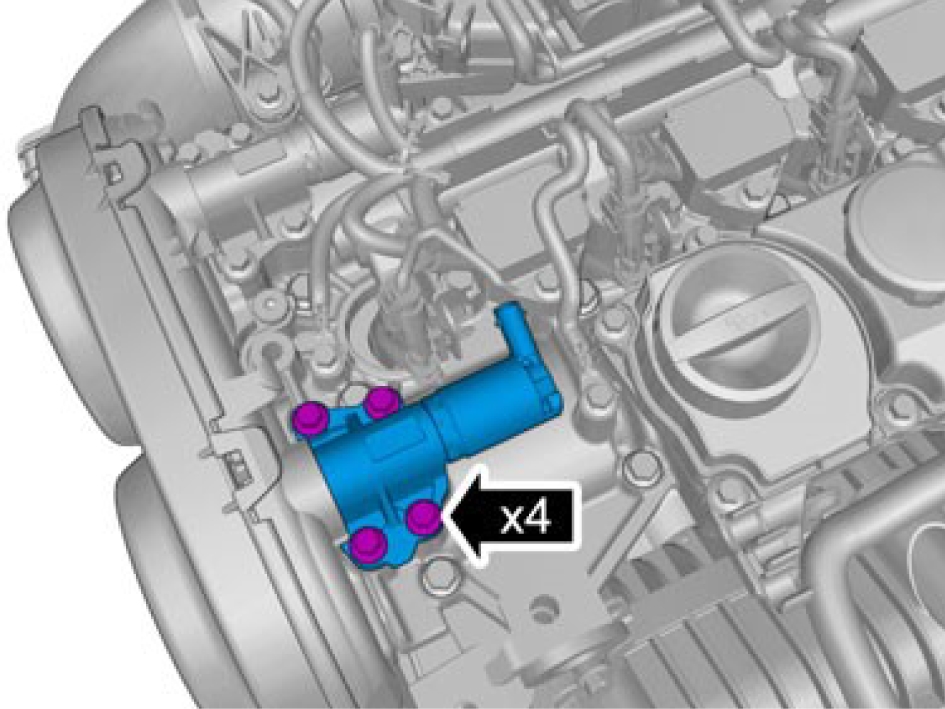
Make sure that the area around the component is clean and free of foreign material.
Remove the screws.
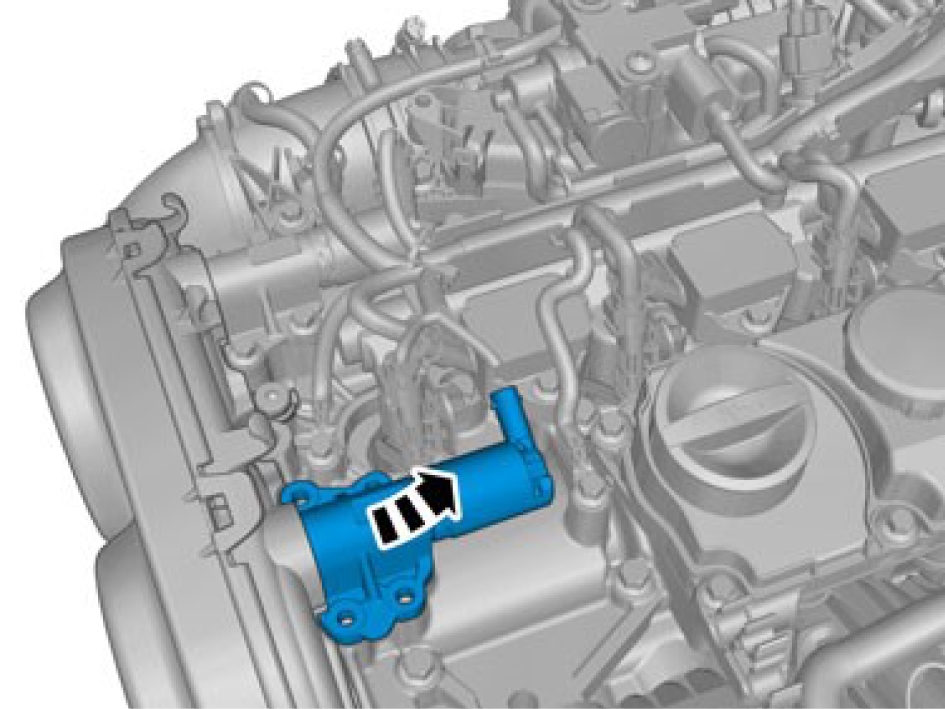
Remove the intake solenoid.
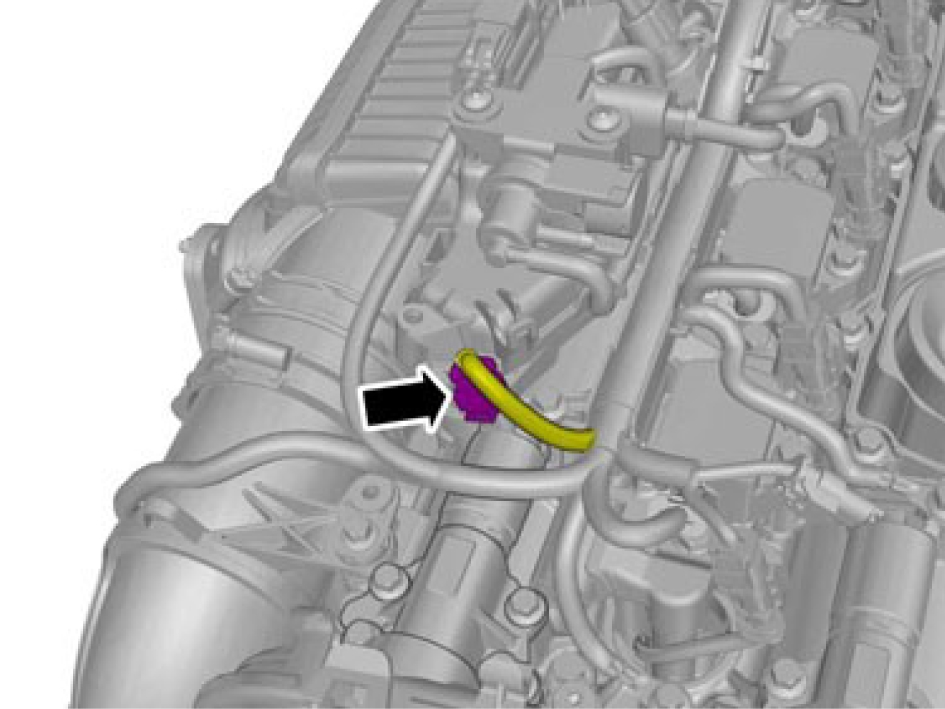
Release the lock.
Disconnect the connector.
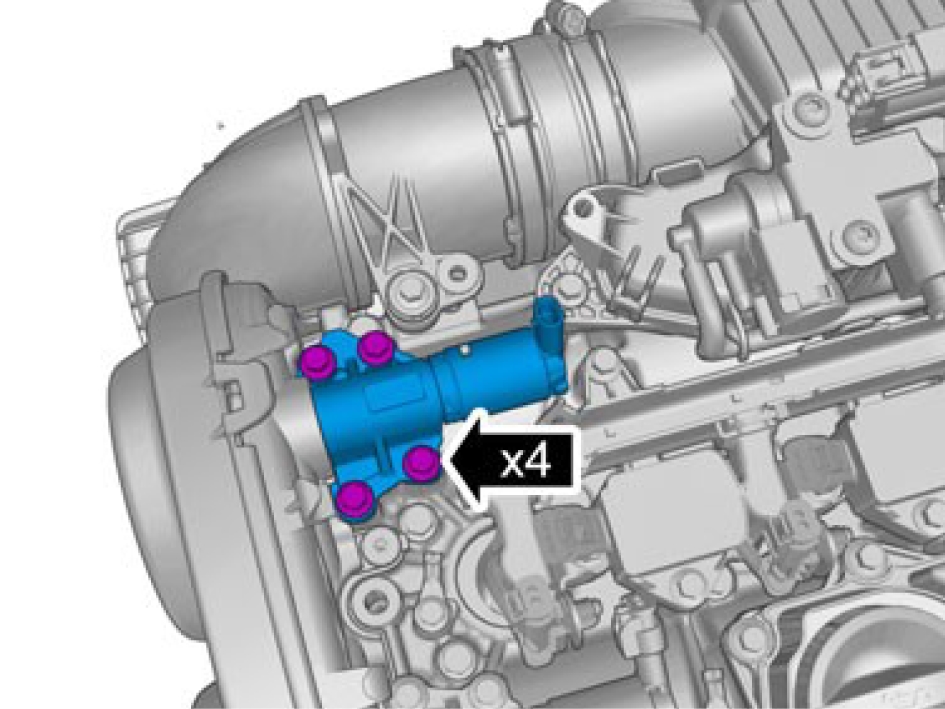
Make sure that the area around the component is clean and free of foreign material.
Remove the screws.
Installation
Make sure that the surface is clean and free of foreign material.
Clean with Isopropanol.
Install the sensors.
Fasten the screws M6, torque: 10 Nm
Connect the cables.
Engine block, installing components
Installation

Install the screws.
1, M8, torque: 24 Nm
2, M6, torque: 10 Nm
Install the marked component.
Install the screws.
1. M6, torque: 10 Nm
2. M7, torque: 17 Nm
Use new seals.
Install the marked component.
Install the screws, M6, torque: 10 Nm
Install the marked component.
Install the clip(s).
Install the marked component.
Install the clips.
Install the marked component.
Install the screws, M6, torque: 10 Nm
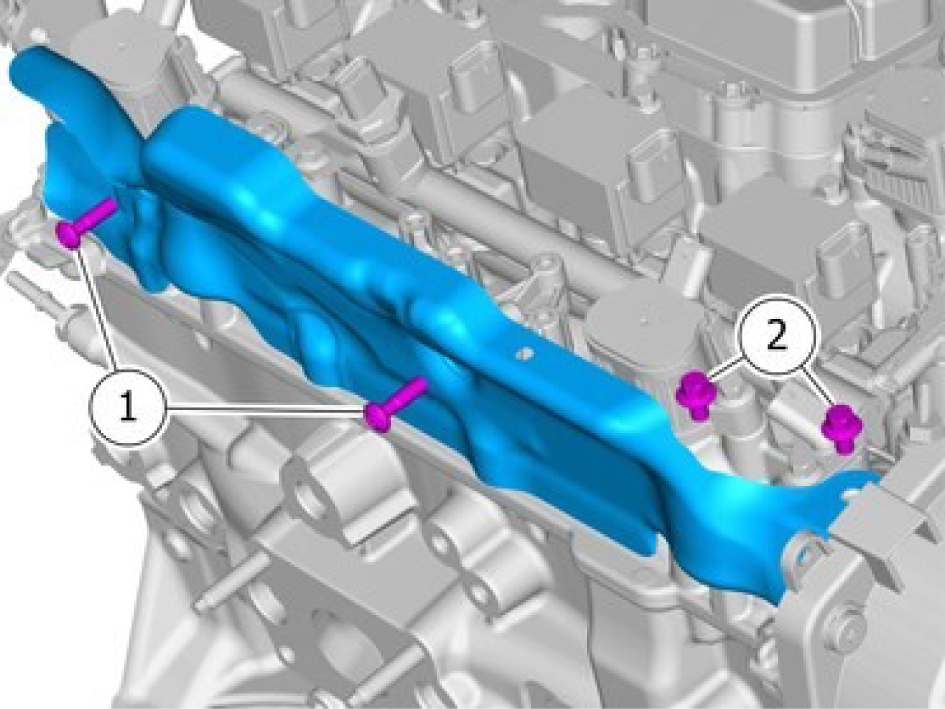
Install the marked component.
Install the screws.
1, M5, torque: 5 Nm
1, M6, torque: 10 Nm
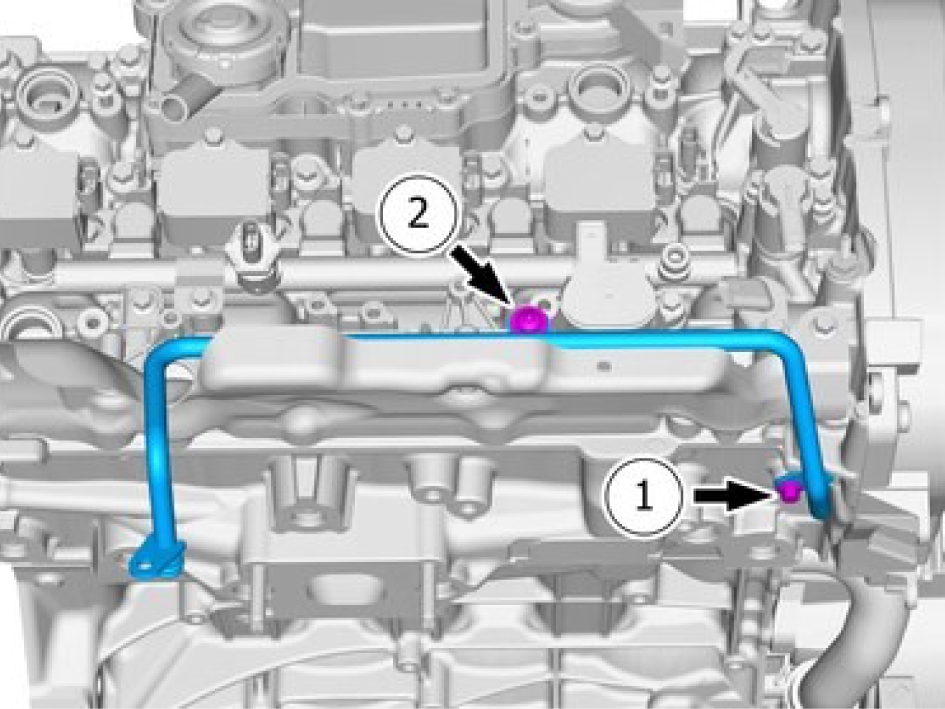
Use new seals.
Install the marked component.
Install the screws.
1. M6, torque: 10 Nm
2. M5, torque: 5 Nm
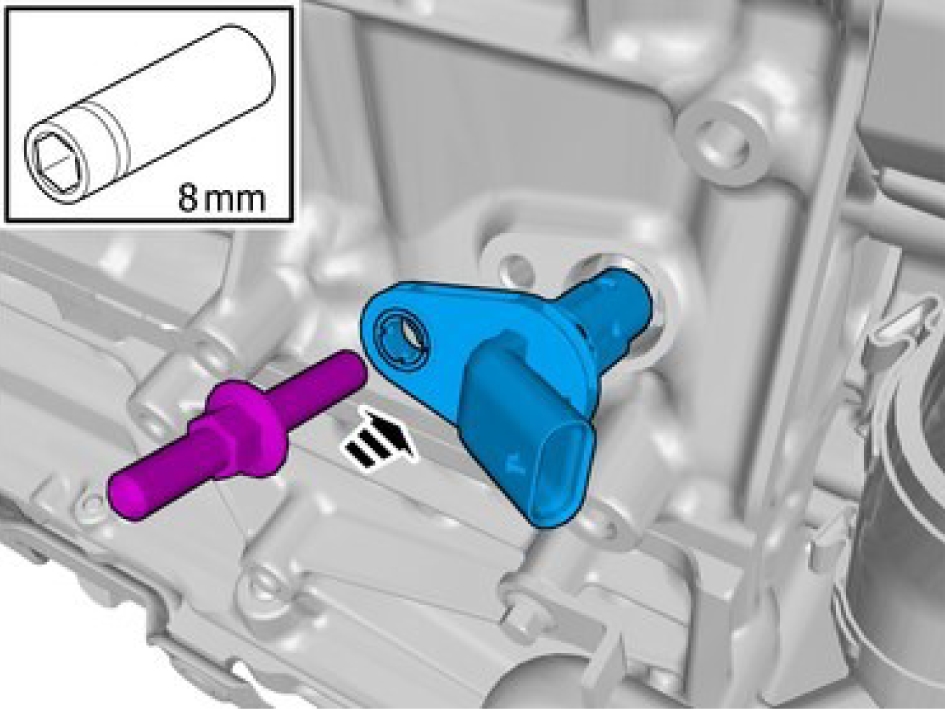
Install the marked component.
Install the screw M6, torque: 10 Nm
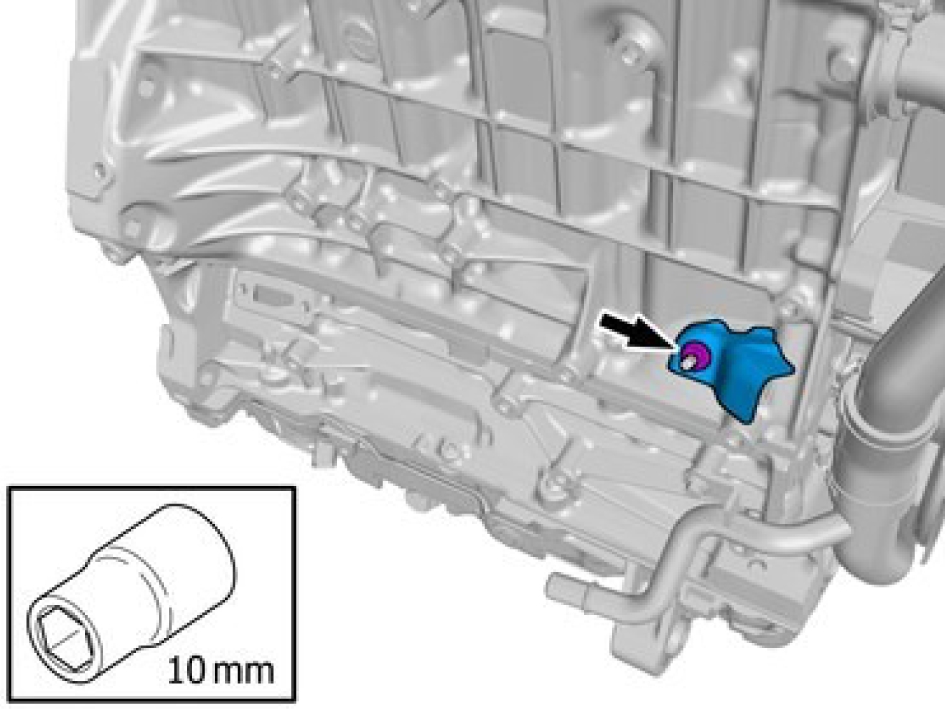
Install the marked component.
Install the nut M6, torque: 10 Nm

Install the marked component.
Install the screws M8, torque: 24 Nm
Install the screw M6, torque: 10 Nm
A click confirms that the component is in the correct position.
Install the hose.
Install the marked component.
Install the marked component. Install the screws M6, torque: 10 Nm
Install the marked component.
Install the screws M6, torque: 10 Nm
Make sure that the components are positioned correctly.
Install the marked components.
Install the screws knock sensor, torque: 20 Nm
Use a new seal.
Install the marked component.
Install the screws M6, torque: 10 Nm
Install the marked component.
Install the screw M6, torque: 10 Nm

Clean the surface.
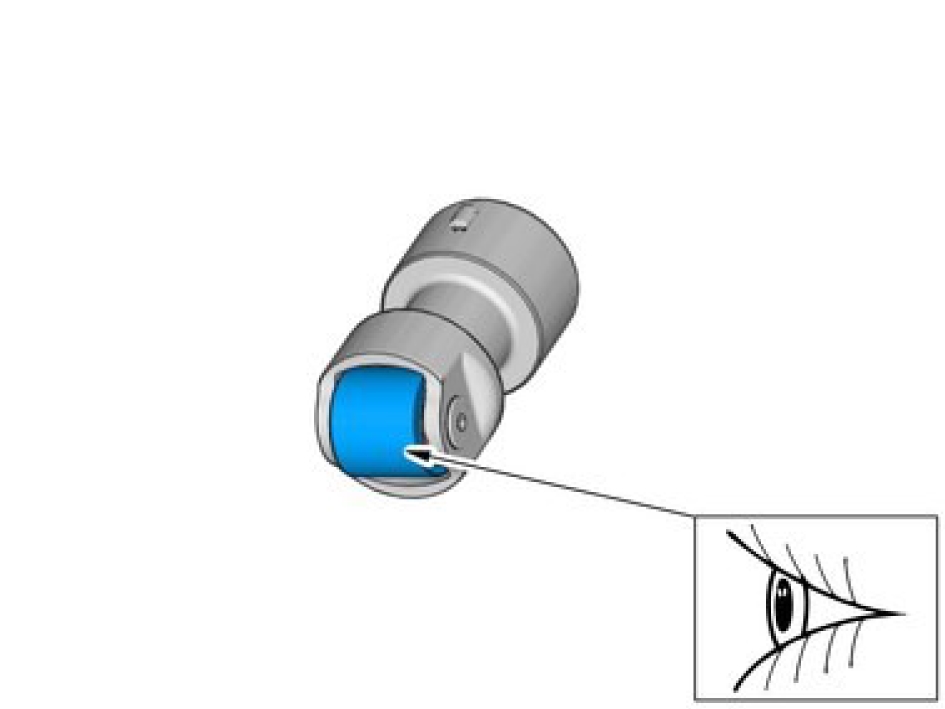
Check the component. If it displays any type of damage, it must be replaced.
Check the surfaces for abrasion.
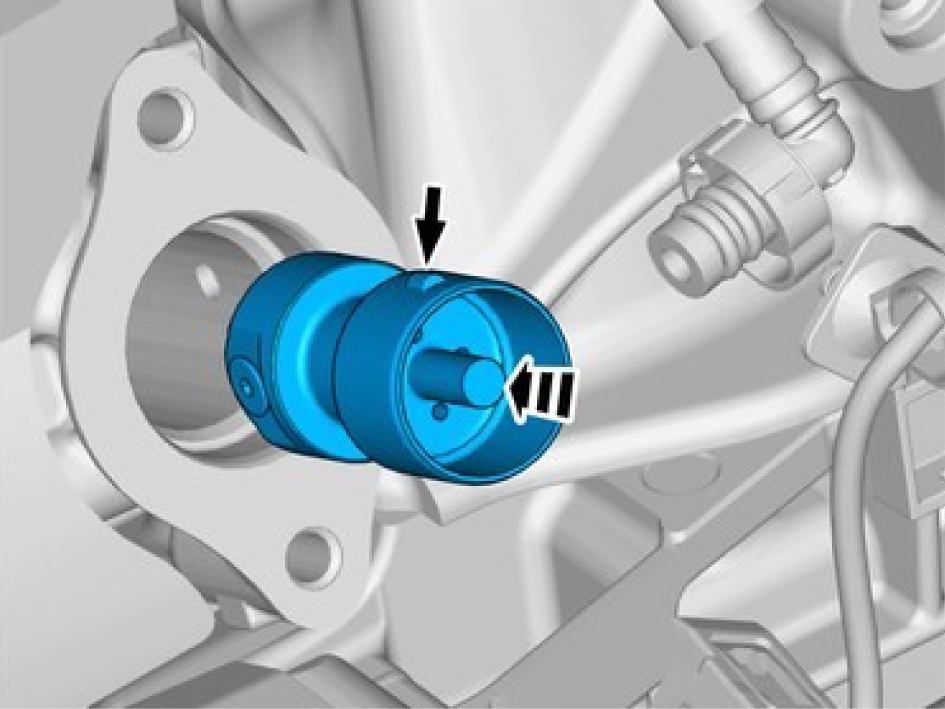
Make sure that the components are positioned correctly.
Install the marked component.
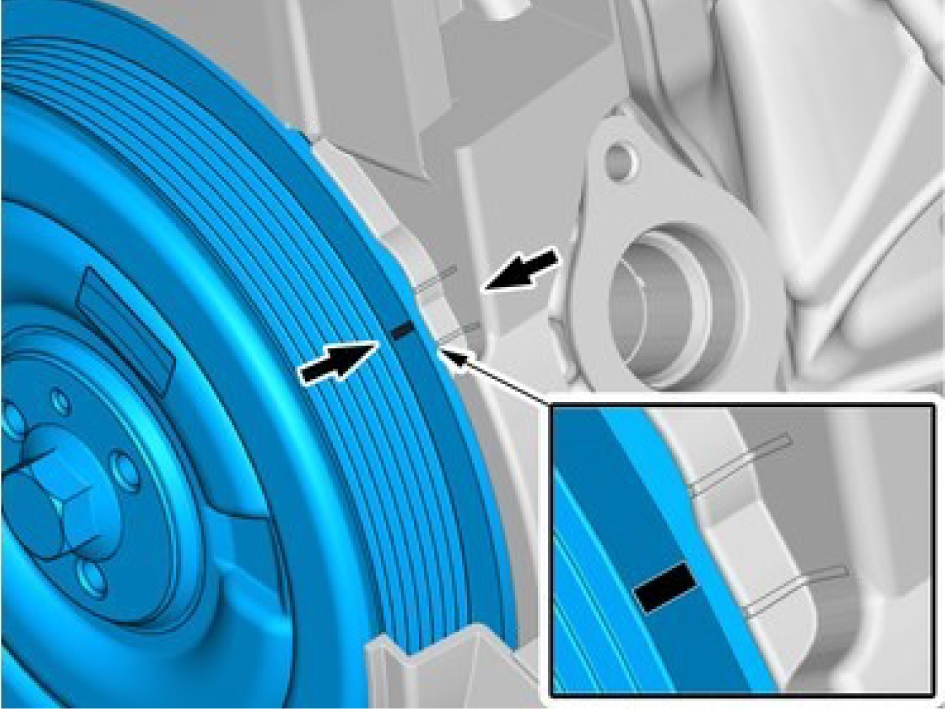
Make sure that the installation marks are aligned.
If necessary turn the engine.

Measure
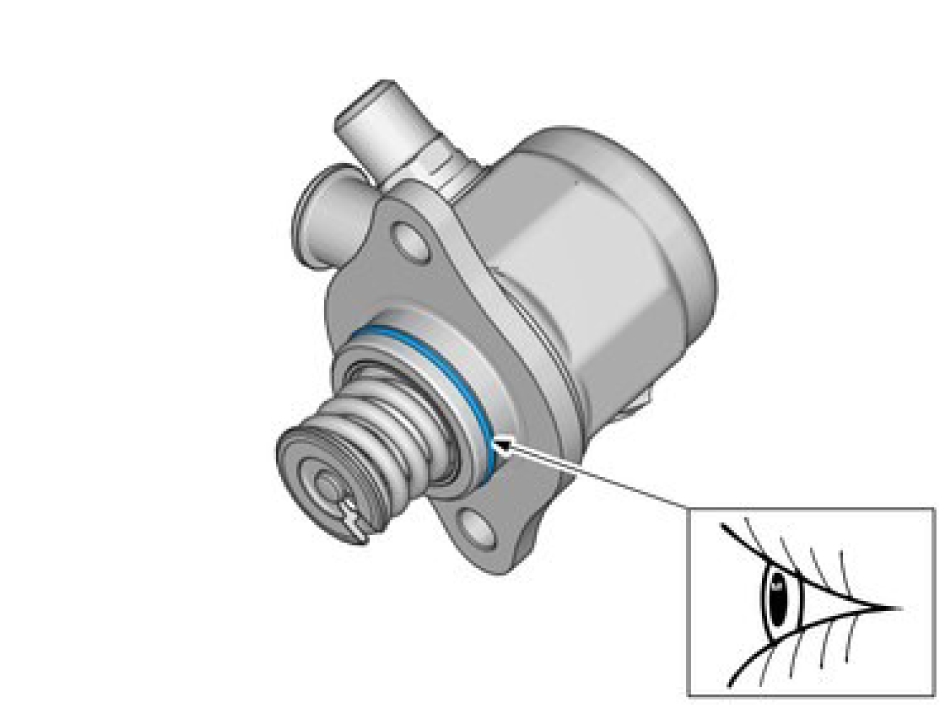
Check the component. If it displays any type of damage, it must be replaced.
Make sure that the seal remains correctly located.
Use a new seal.
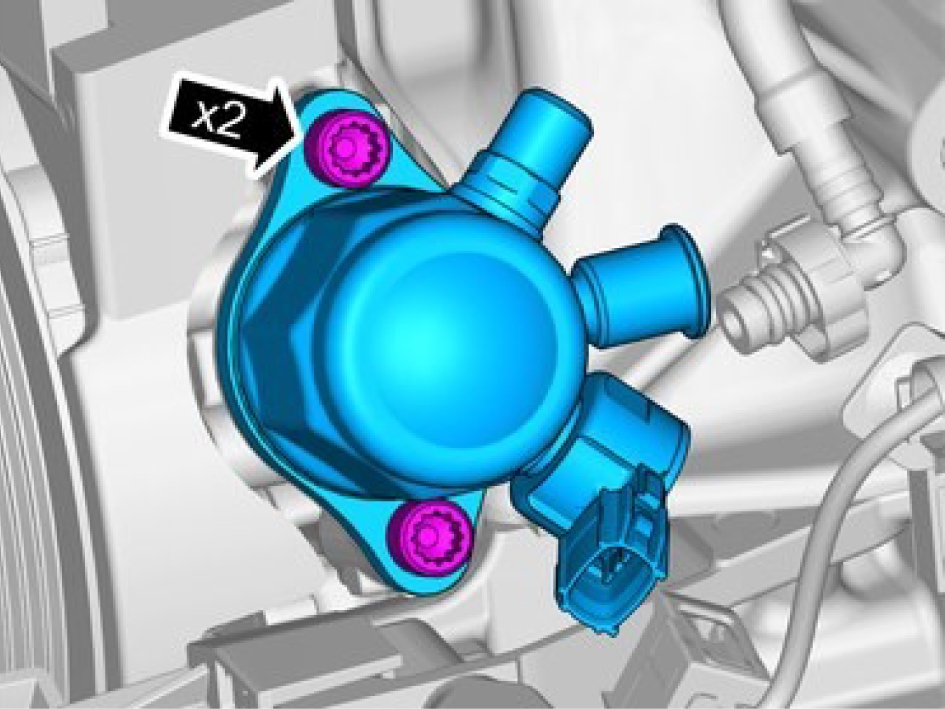
Install the marked component.
Install the screws.
Use hands only.
Tighten each bolt 1 turn at a time.
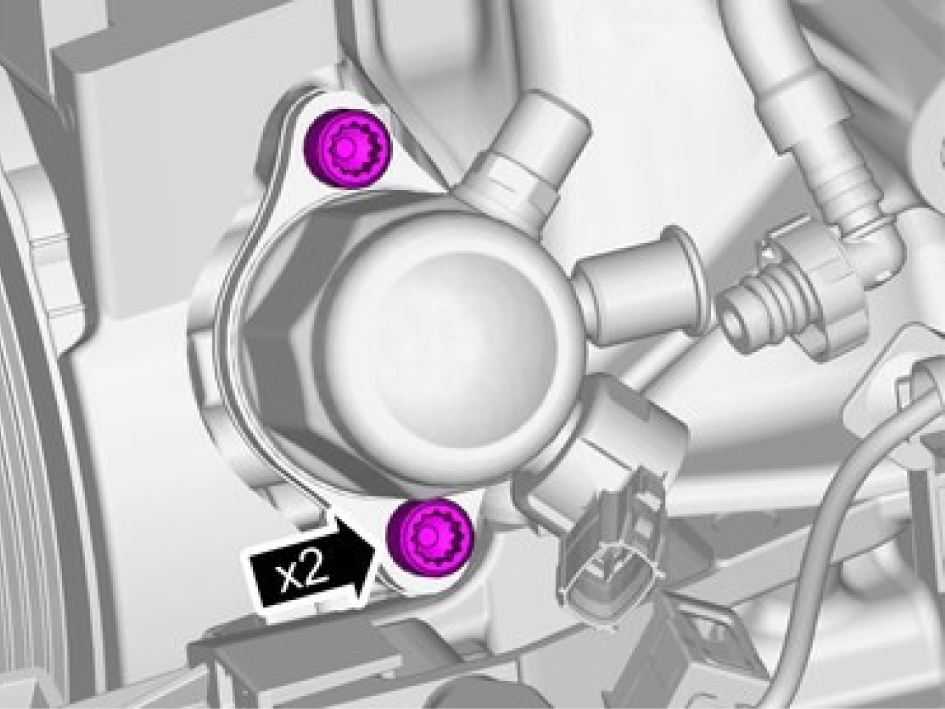
Tighten the bolts injection pump, torque: 30 Nm
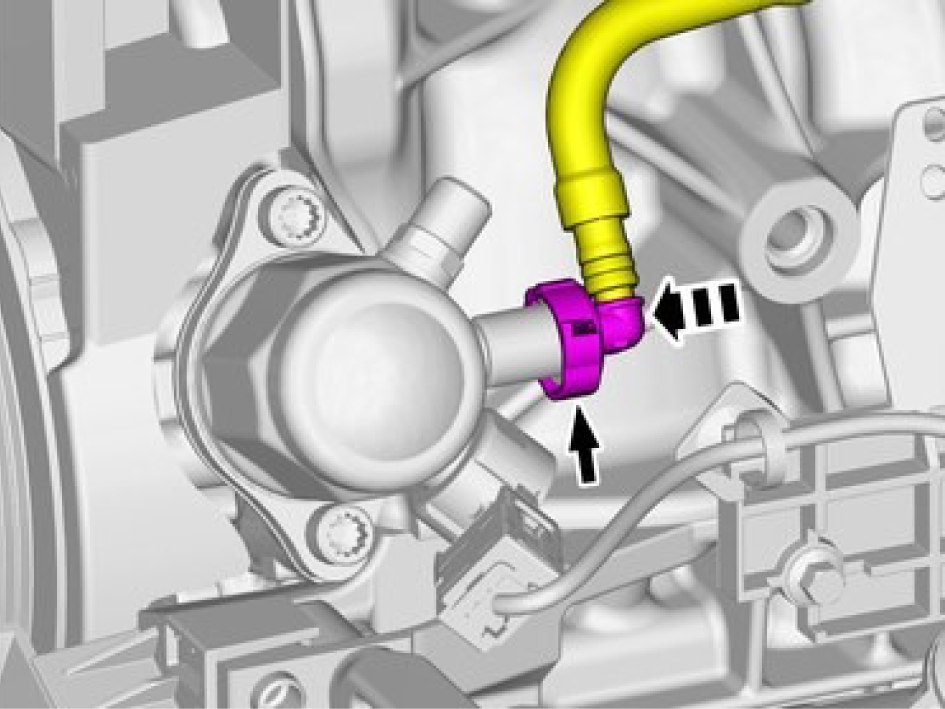
A click confirms that the component is in the correct position.
Install the marked component.
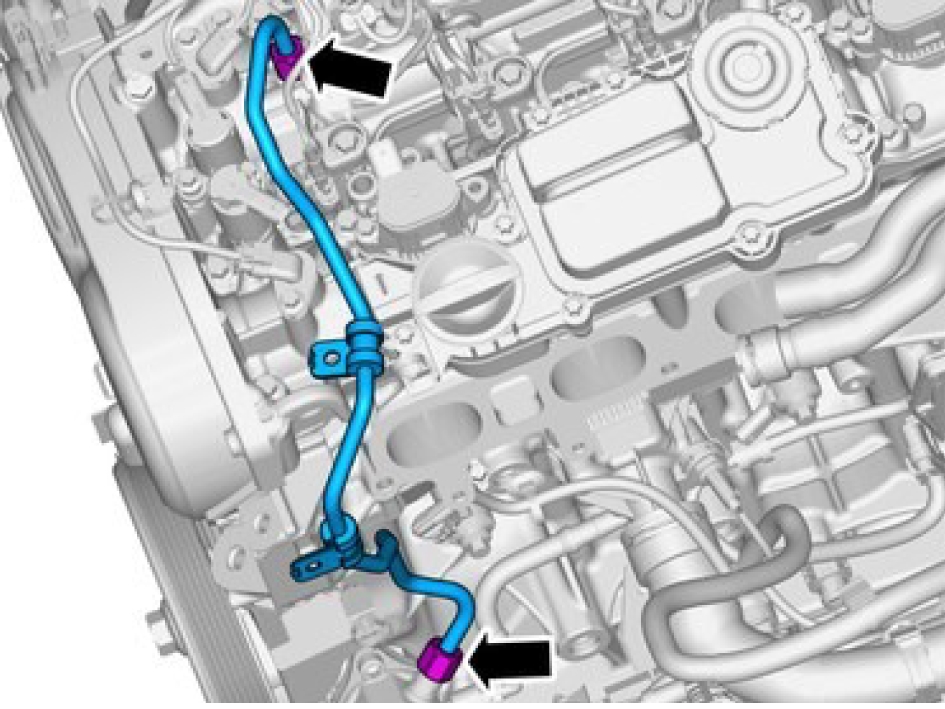
Only tighten the nuts finger tight at this stage.
Install the marked component.
Make sure to replace the marked component with a new.
Install the screws M6, torque: 10 Nm

Tighten the nuts, use special tool 981 4129
Stage 1: 18 Nm
Stage 2: 30 Nm
Engine Coolant Pump, replace
Removal
Remove intake manifold, refer to:
Induction pipe, replacePerform cooling system draining, charging and bleeding, refer to:
Cooling system - draining, charging and bleeding
Be prepared to collect escaping fluid.
Release the lock.
Remove the hose.
Remove the screws.
Installation
Install the marked component.
Install the screws M8, torque: 24 Nm
Install the hose.
Install the lock.
Install the intake manifold, refer to:
Induction pipe, replacePerform cooling system draining, charging and bleeding, refer to:
Cooling system - draining, charging and bleedingThermostat, replace-
Removal
Drain the cooling system, refer to:
Cooling system - draining, charging and bleedingRemove intake manifold, refer to:
Induction pipe, replace
Be prepared to collect escaping fluid.
Release the lock.
Undo the hoses from the connection.
Remove the screws.
Remove the marked component.
Installation
Make sure that the seal is correctly located.
Install the screws, M6, torque: 10 Nm
Install the connector
Install the hoses.
Install the hoses from the connection.
Install the Induction pipe, refer to:
Induction pipe, replaceFill the cooling system, refer to:
Cooling system - draining, charging and bleedingVibration damper, replace
Remove the screw.
Use special tool 999 7495.
Remove the screws.
Remove marked component.
Installation
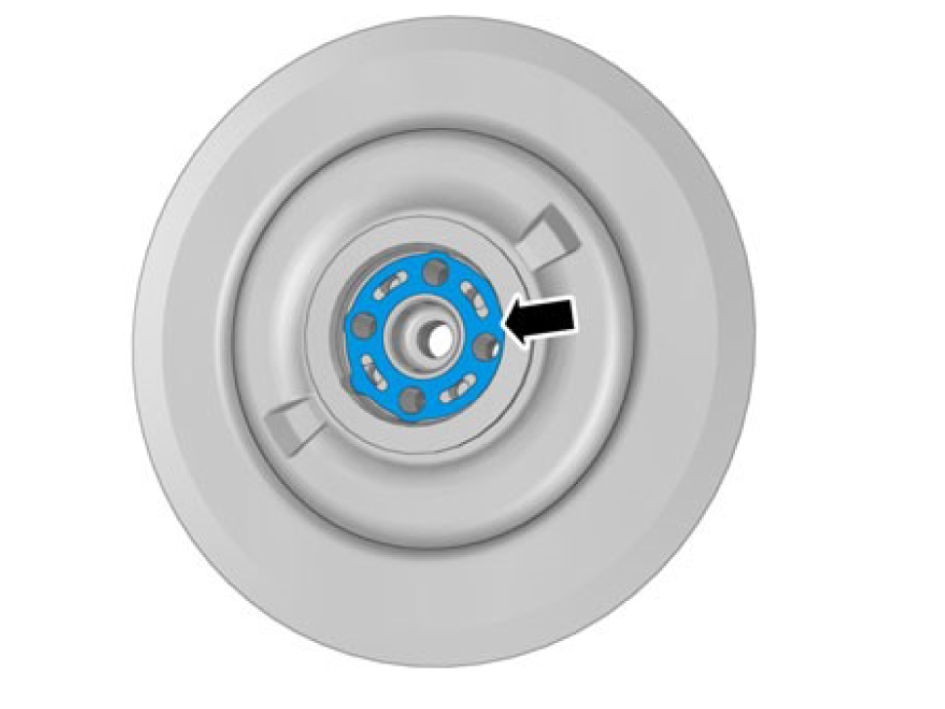
Make sure that a new component is installed.
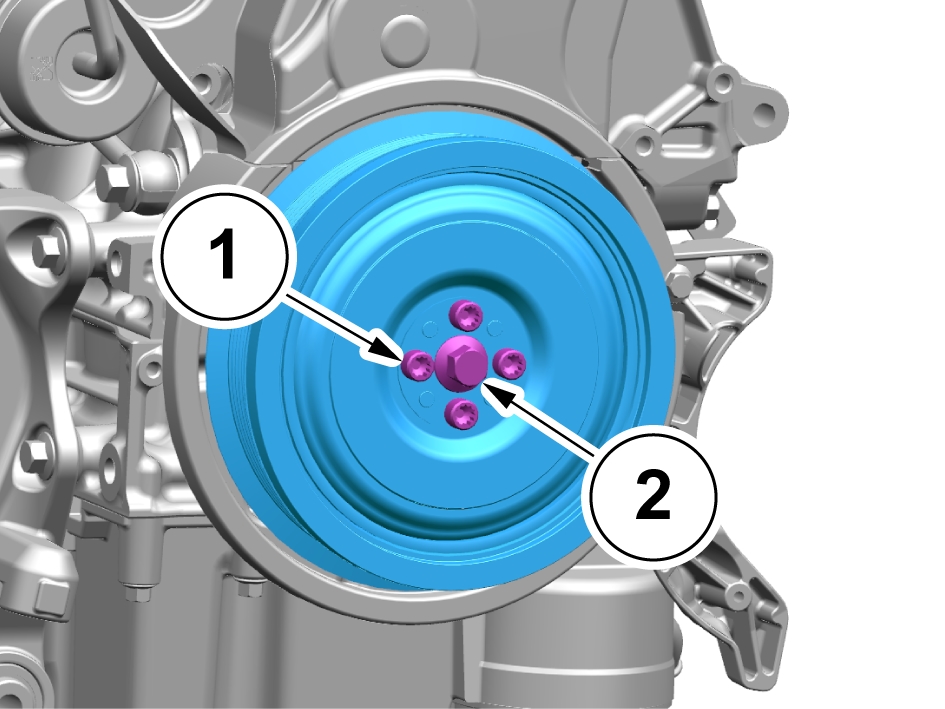
Install the vibration damper.
Install 1, the Oscillation damper (screw) to crankshaft.
Stage 1: 25 Nm
Stage 2: 90 °
Install 2, the central screw oscillation damper (crankshaft).
Stage 1: 110 Nm
Stage 2: 90 °
Use special tool 999 7495.
Timing belt, replace
Remove the vibration damper, refer to:
Vibration damper, replace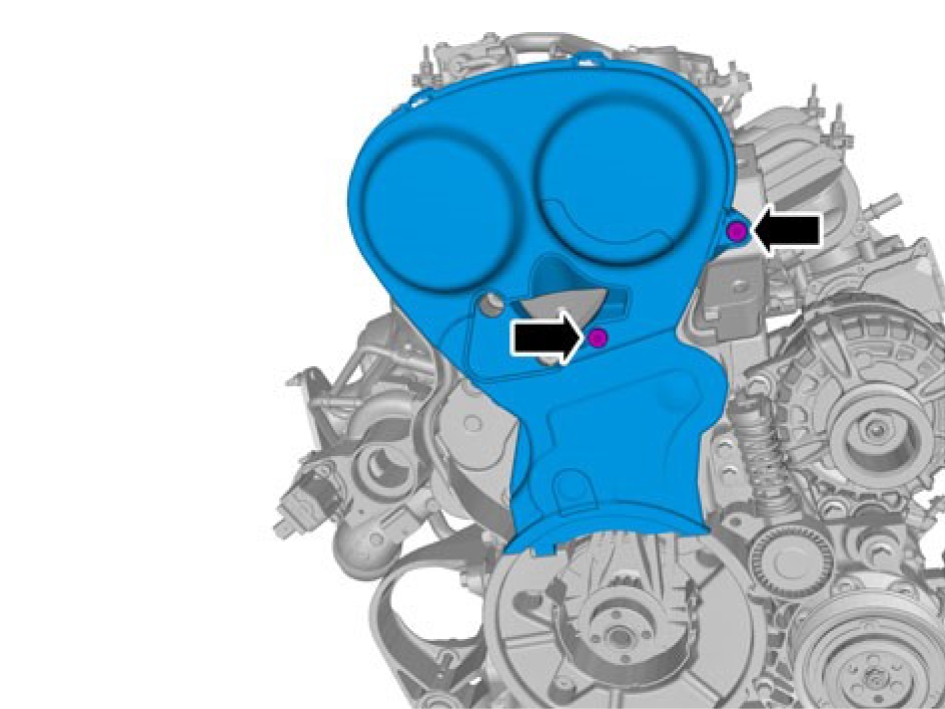
Remove the screws.
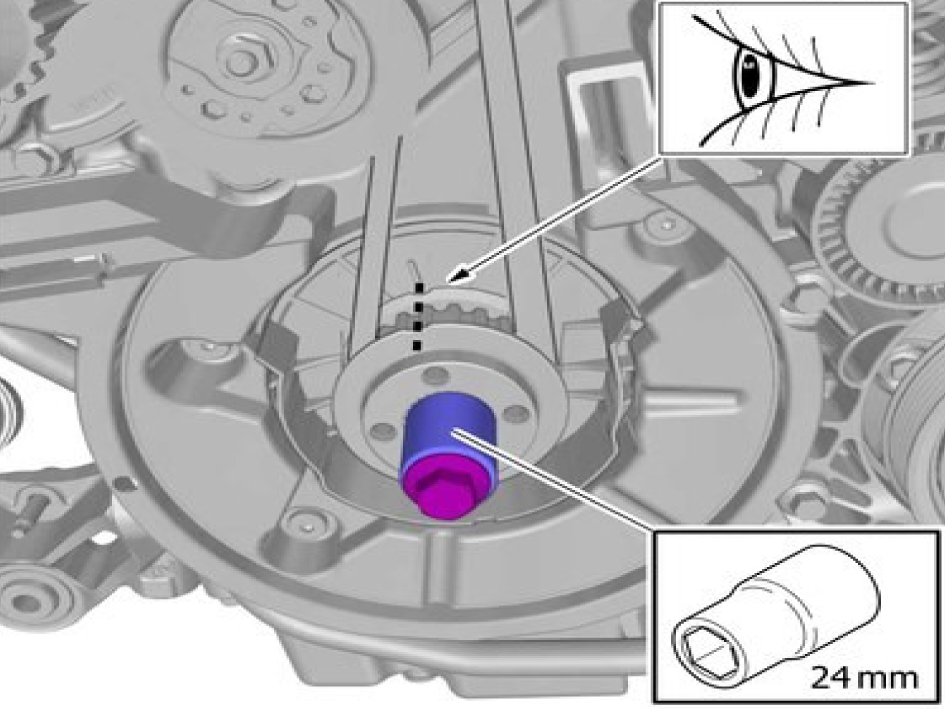
Make sure that the component is positioned correctly.
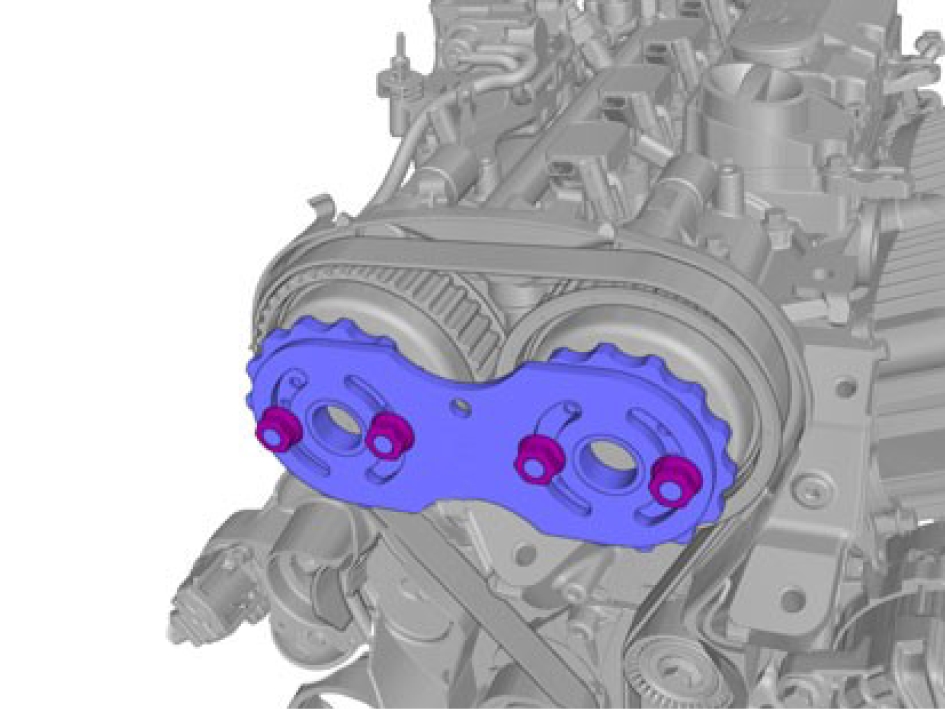
Install special tool :999 7497
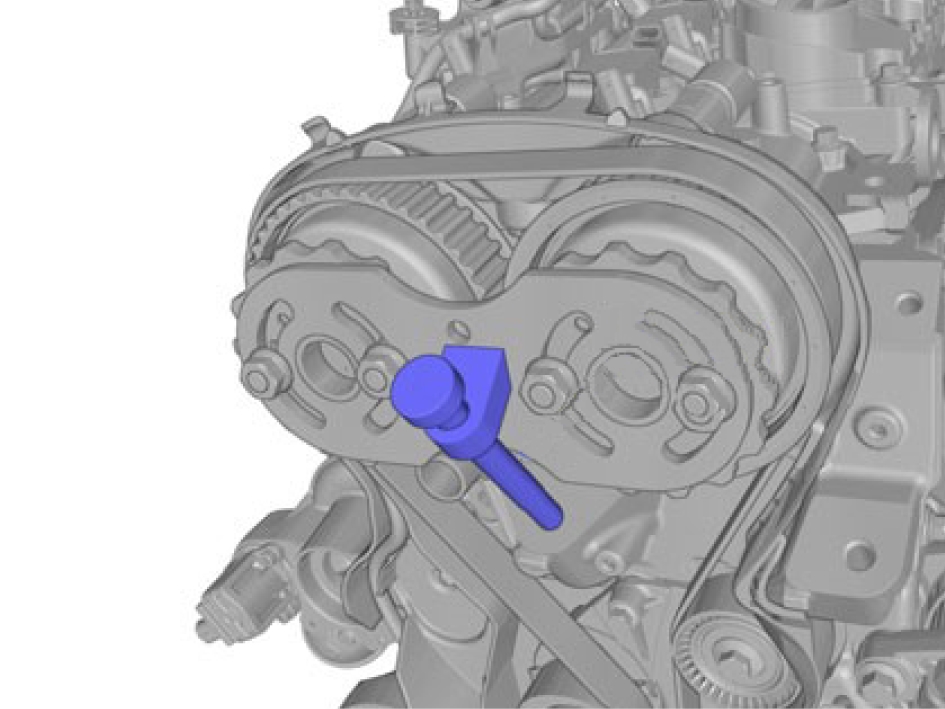
Install special tool: 999 7497
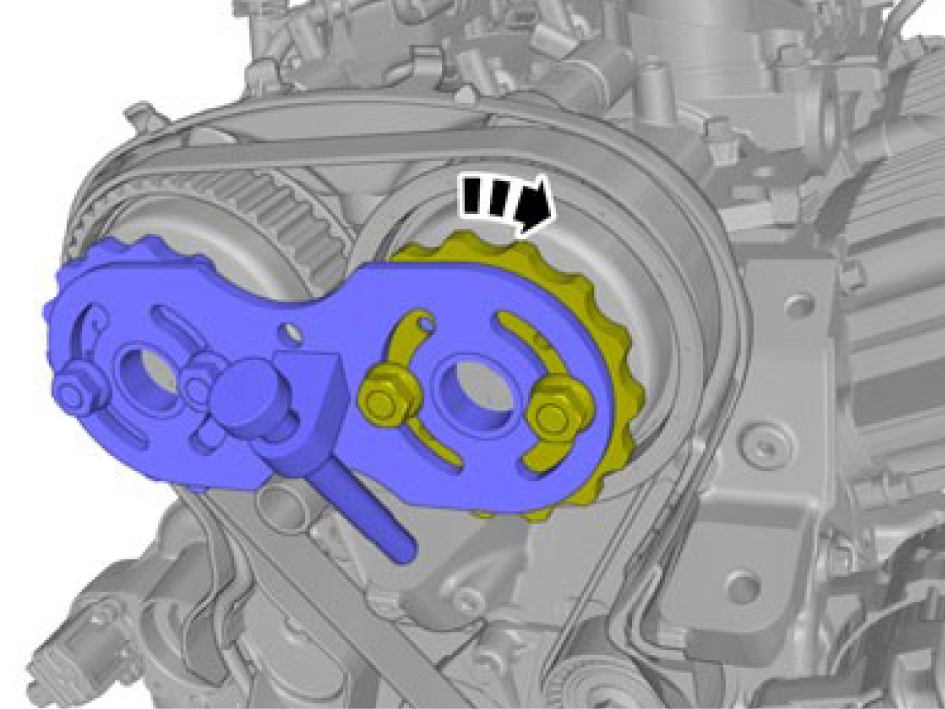
Make sure to turn the component until stop.
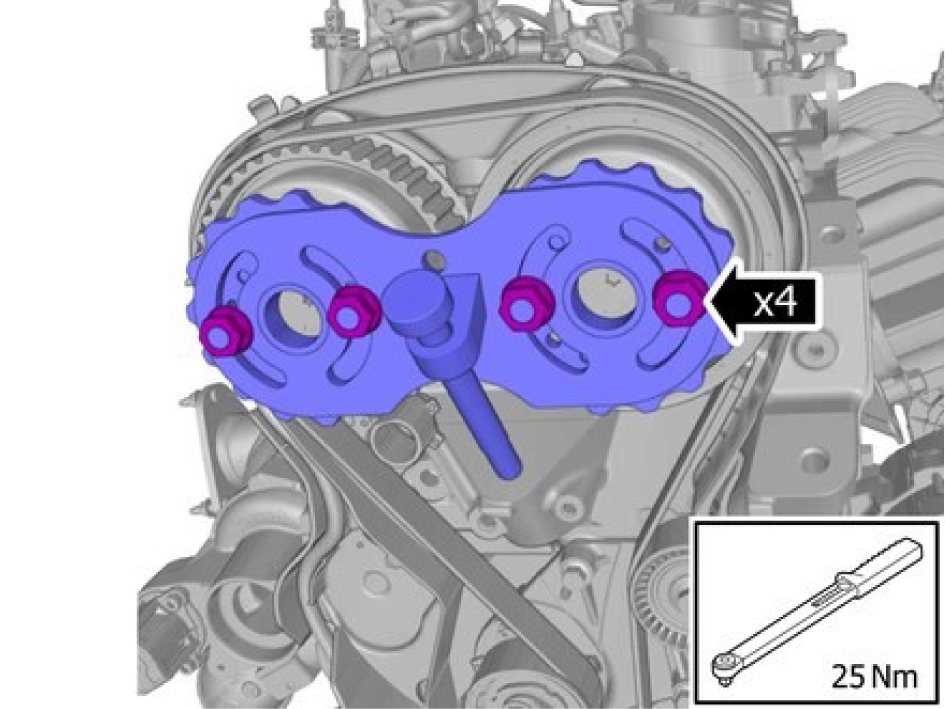
Tighten the nuts.
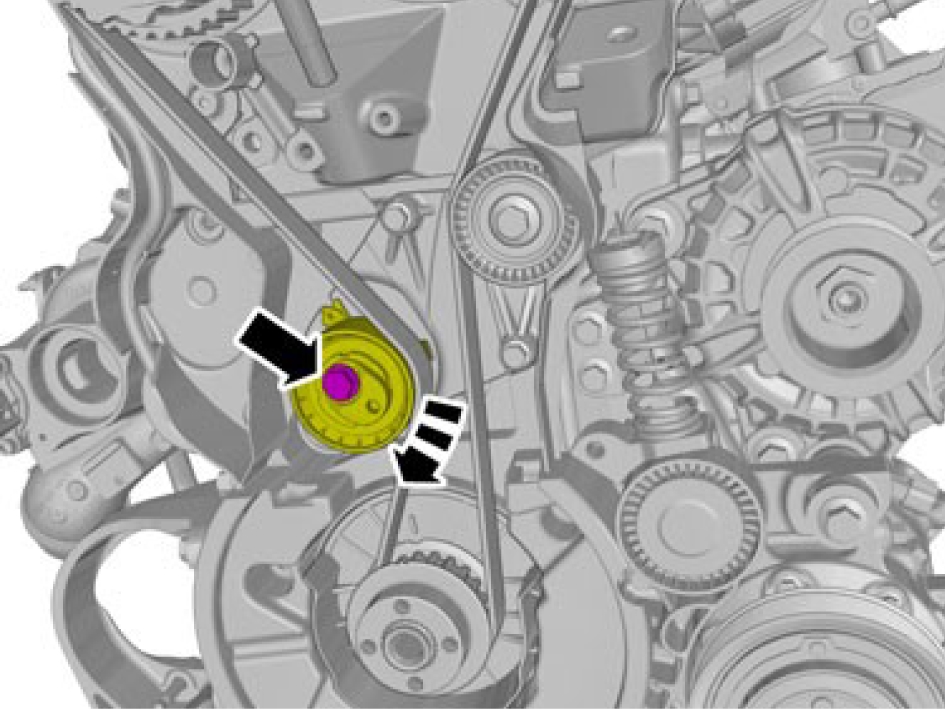
Loosen the screw.
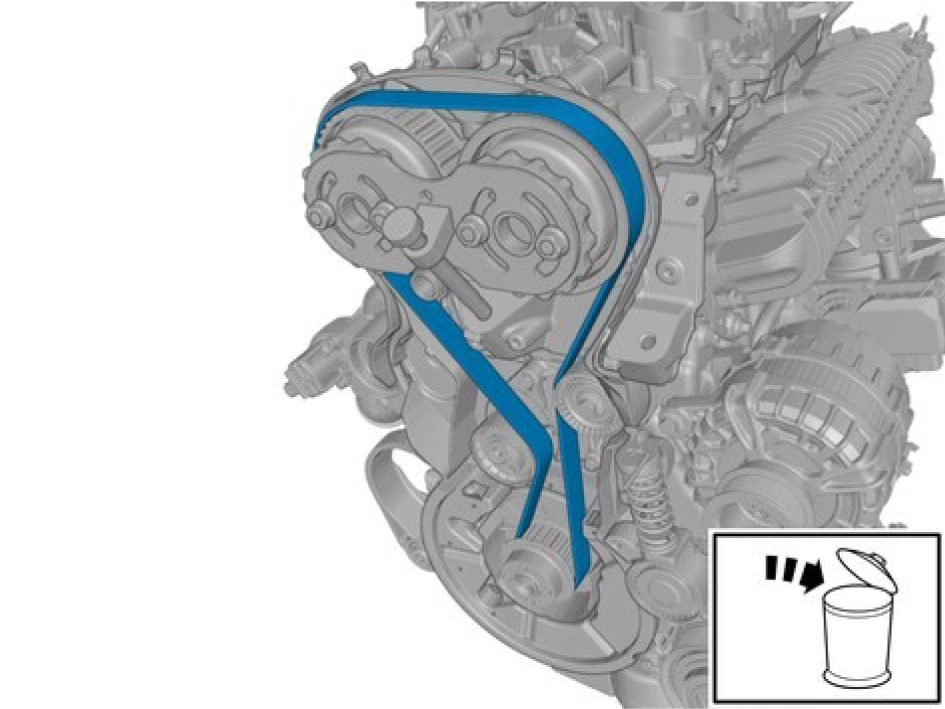
The component is not to be reused.
Remove the marked component.
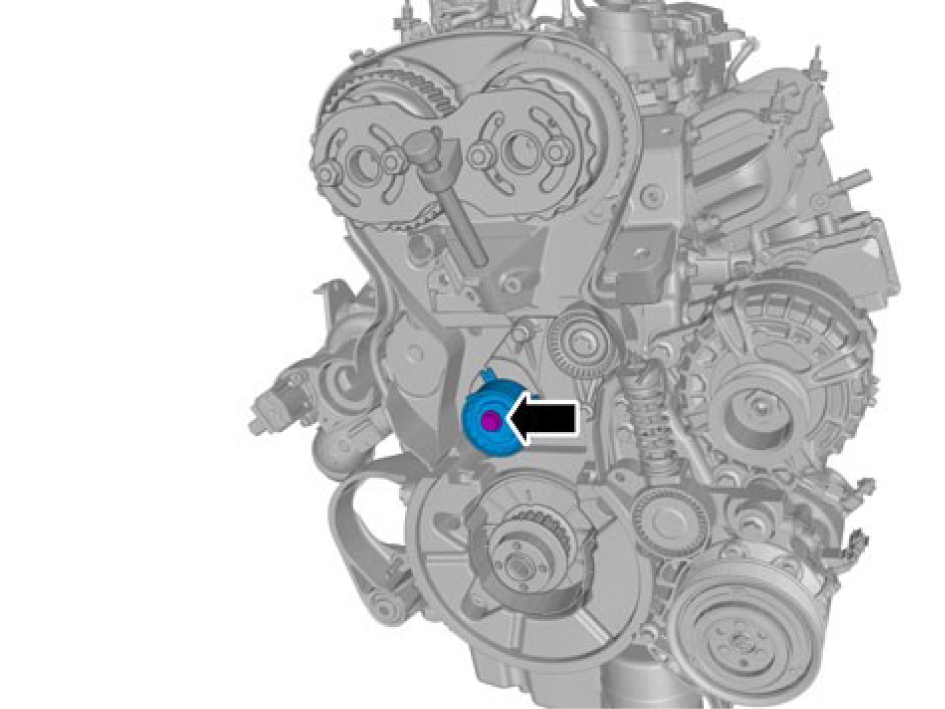
Remove the screw.
Remove the marked component.
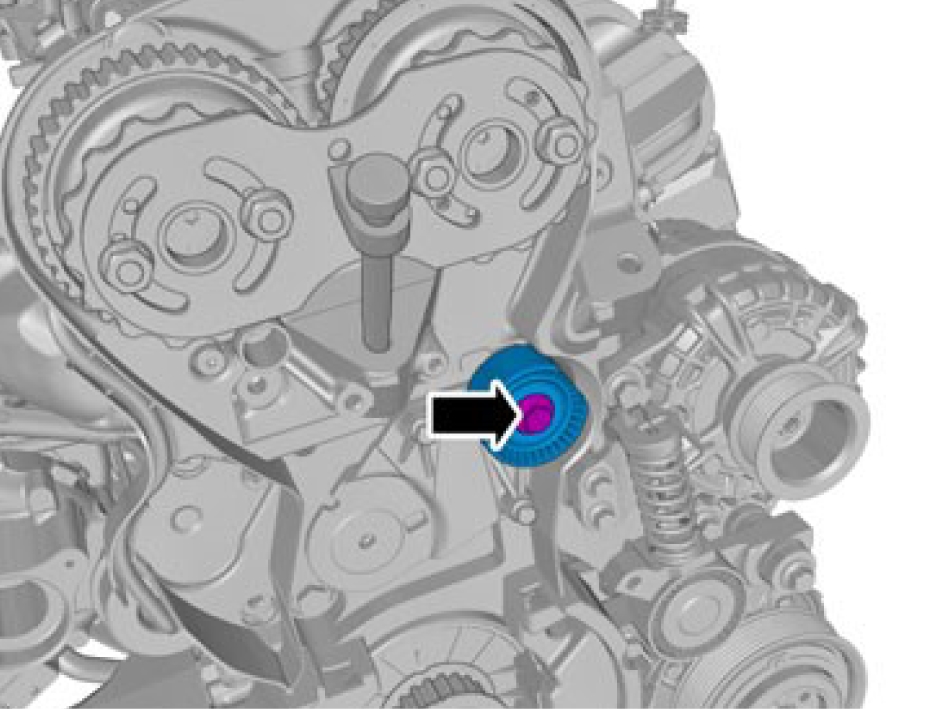
Remove the screw.
Remove the marked component.
Make sure that the component is clean and free of foreign material.
Blow clean using compressed air.
Check the surfaces for abrasion.
Installation
Make sure that the component is positioned correctly.
Make sure that the crankshaft is not rotated.
Make sure that a new component is installed.
Tighten the screw M8, torque: 24 Nm
Make sure that the component is positioned correctly.
Make sure that a new component is installed.
Make sure that a new component is installed.
Install the screw, only tighten the bolt finger tight at this stage.

Make sure that a new component is installed.
Make sure to follow the sequence indicated.
Make sure that the marked component has been removed.
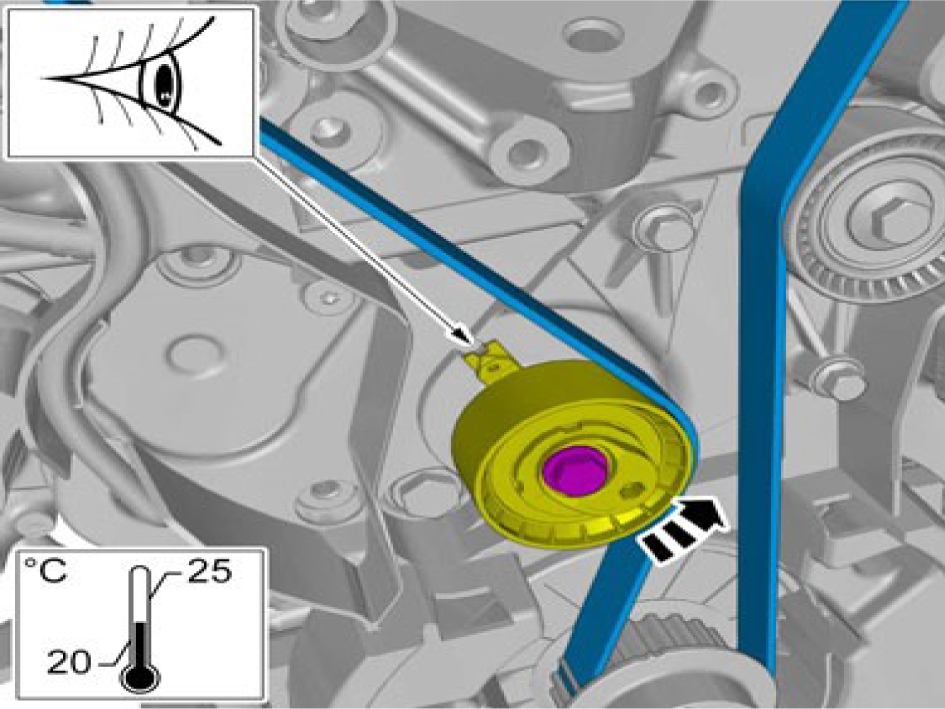
The timing belt tensioner setting is dependent on the engine temperature.
Make sure that the belt tensioner is aligned to the belt tensioner bracket.
Adjust to the specified value with Allen key.
Tighten the screw M8, torque: 24 Nm
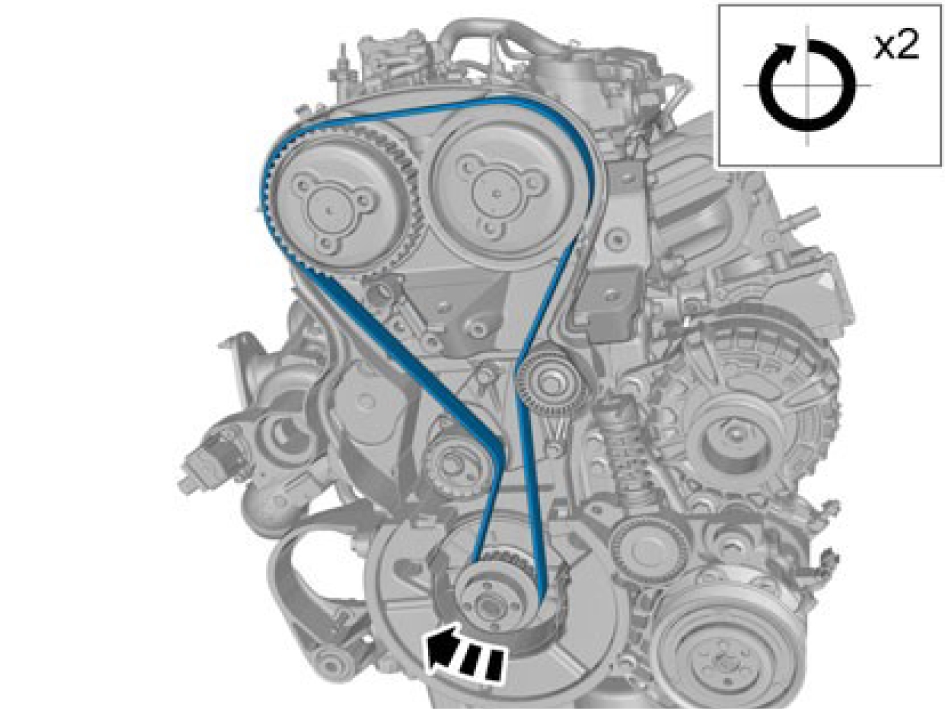
The engine is rotated so that the belt assumes its correct position.
Turn the engine two laps.
If the measured value is greater or less than the specified range, all steps in the Adjustment section must be carried out again.
Make sure that the belt tensioner is aligned to the belt tensioner bracket.
Adjust to the specified value.
Remove the socket.
Install the vibration damper, refer to:
Install marked component.
Actuator turbo pressure (vacuum), replace
Removal
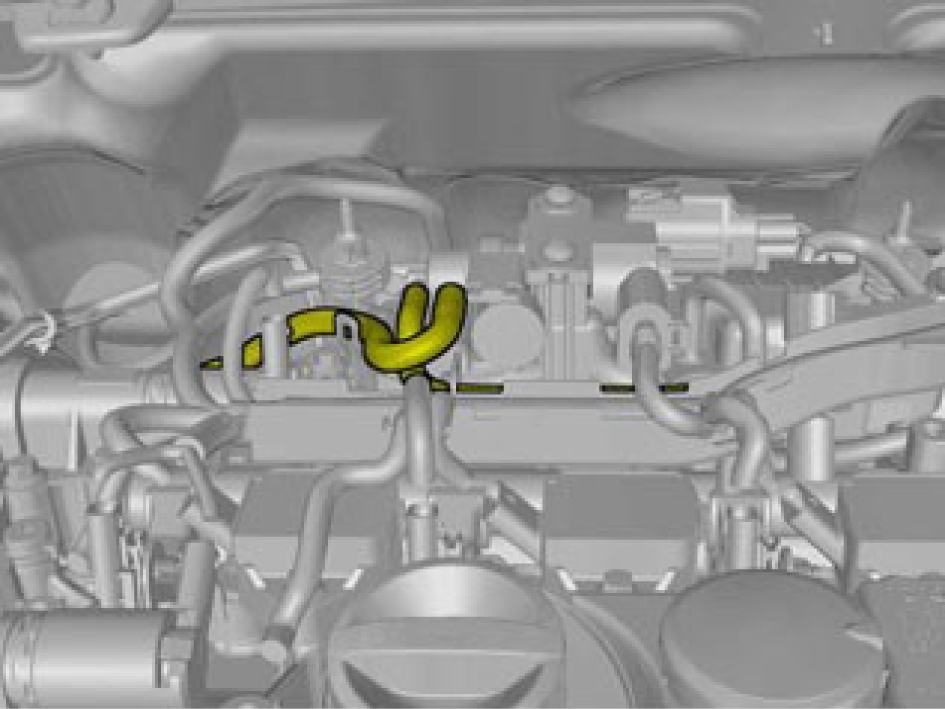
Undo the hoses from the connections.
Disconnect the connector.
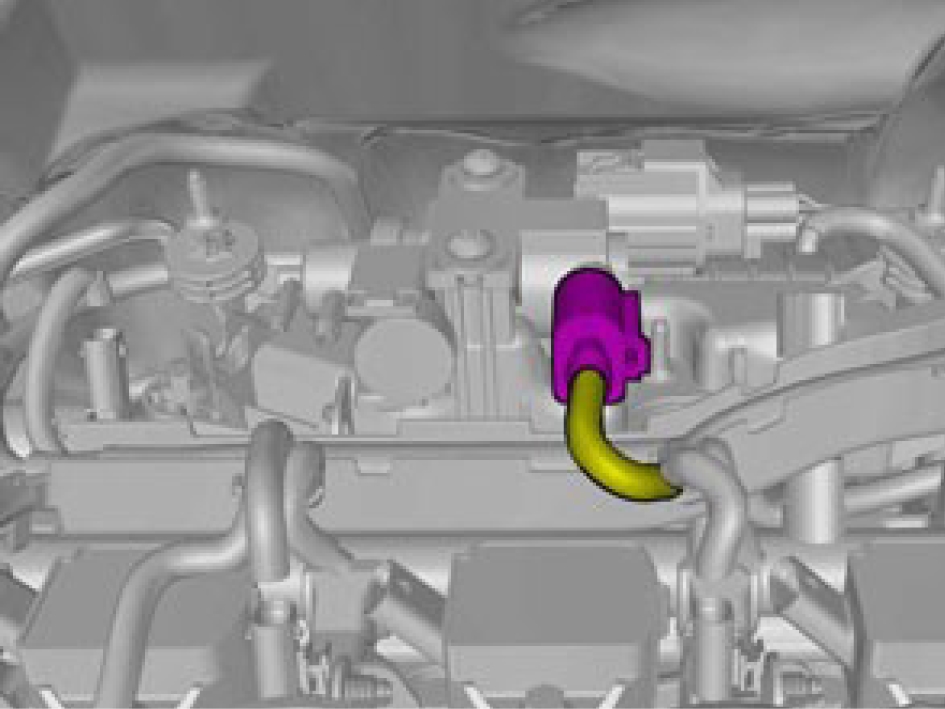
Loosen the screws.
Installation

Install marked component.
Install the screws.
Install the pipes.
Camshaft position sensor, exhaust side, replace
Removal
Remove the screws.
Release the connector's catch.
Disconnect the connector.
Remove the screw.
Installation
Install the sensor.
Install the screw M6, torque: 10 Nm
Install the connector.
Fold back and fasten the cabling.
M6, torque: 10 Nm
Camshaft position sensor, inlet side, replace
Removal
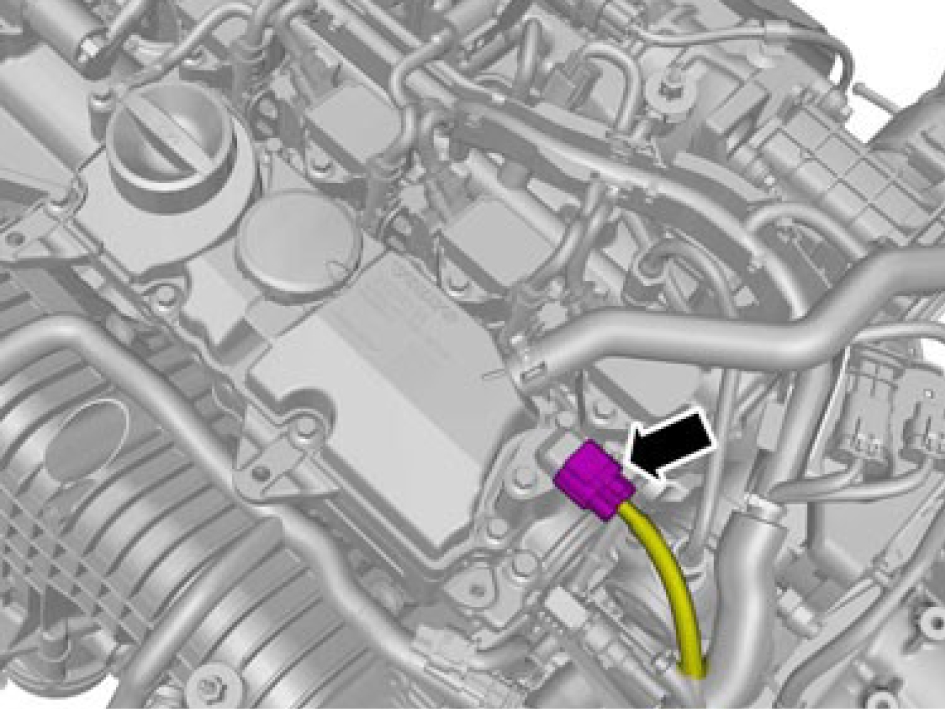
Remove the connector.
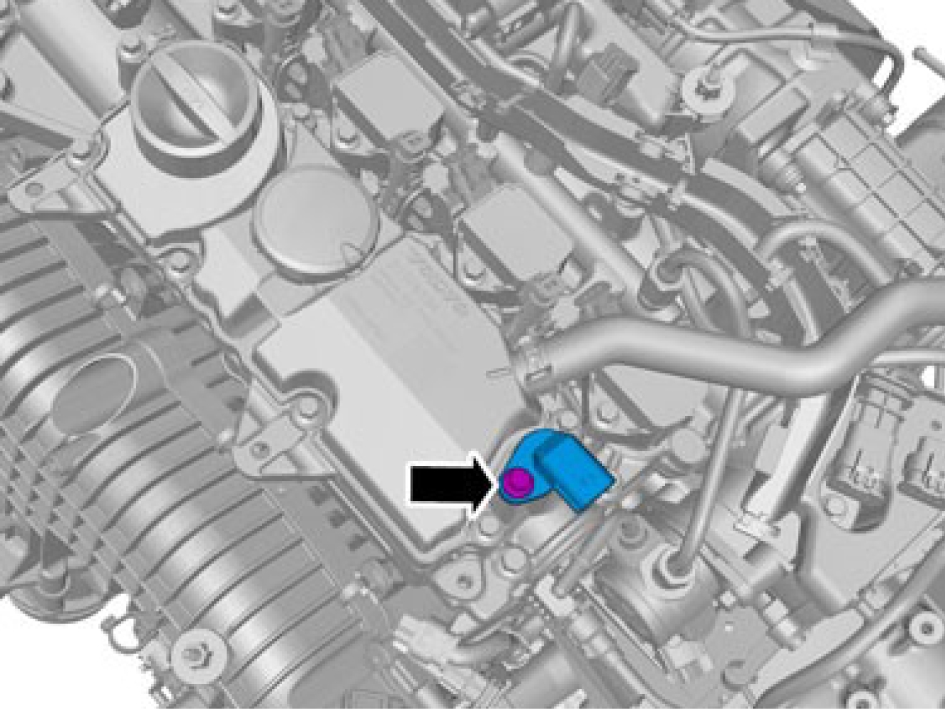
Remove the marked component.
Remove the screw.
Installation
Install the sensor.
Install the screw M6, torque: 10 Nm
Install the connector.
Camshaft seal, replace
Removal
Remove the VVT unit, replace, refer to:
VVT unit, replace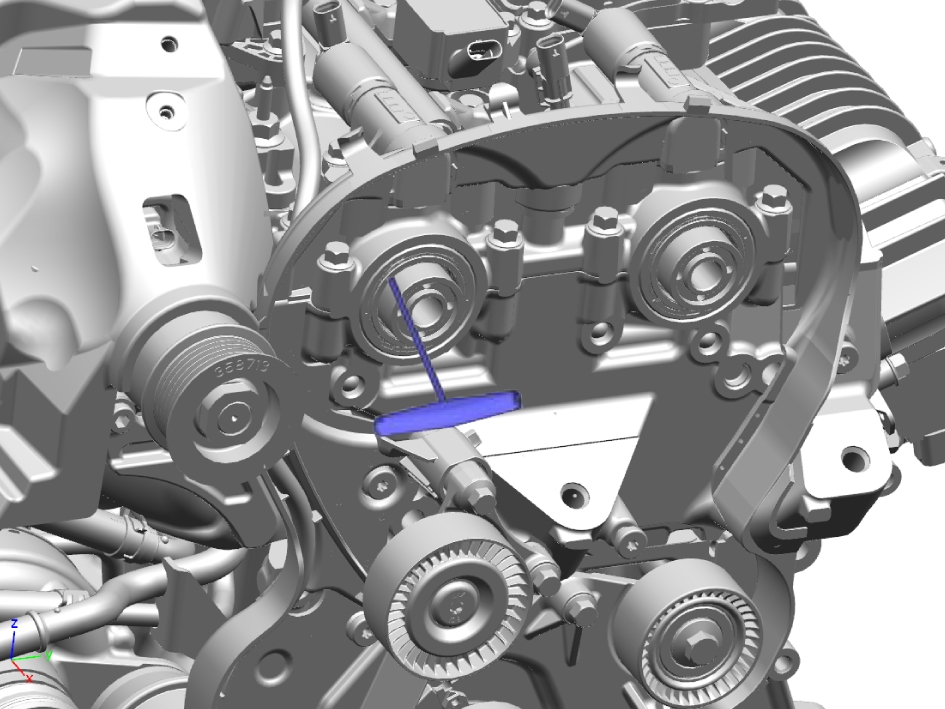
Make sure that the area around the component is clean and free of foreign material.
Make sure that the sharp edge does not damage the surrounding component.
Remove the camshaft seal using special tool: 951 2943
Installation
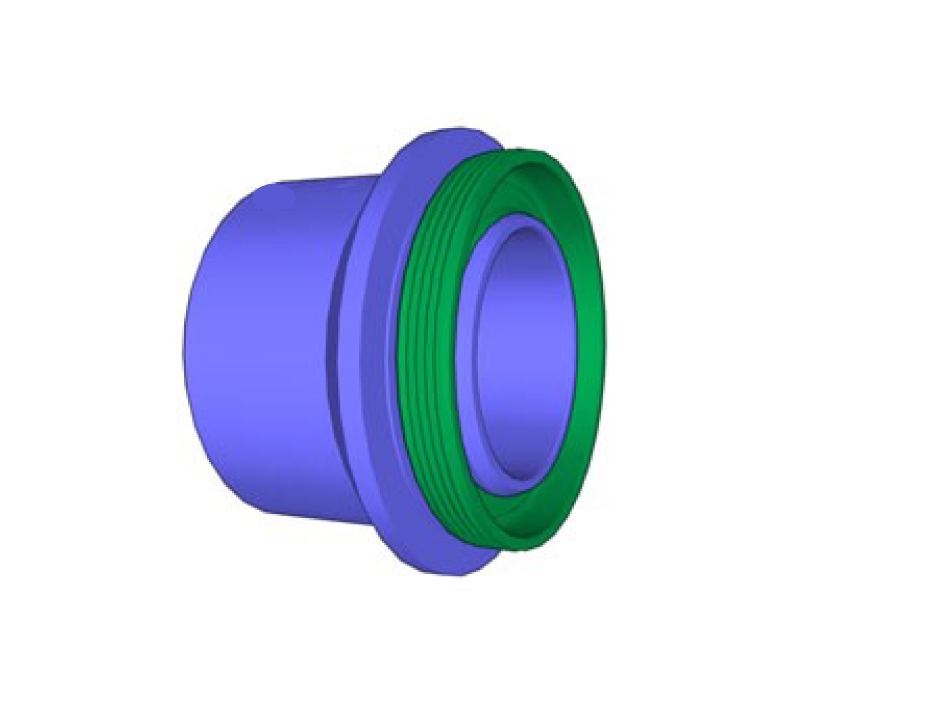
Take extra care not to damage the seal.
Instal the seal use special tool: 999 7496
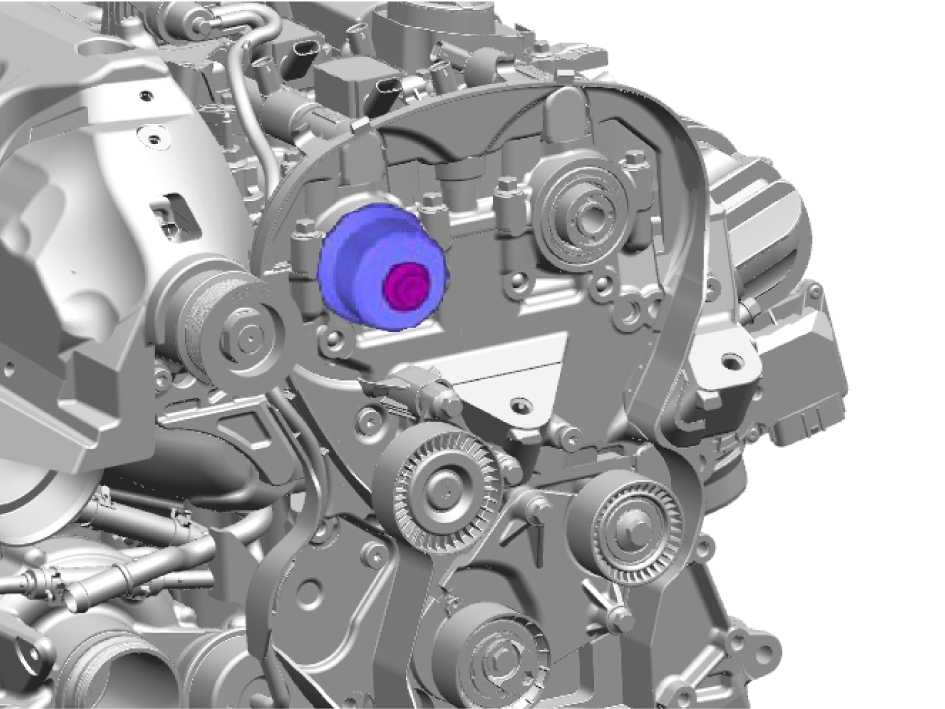
Make sure to turn the component until stop.
Install the VVT unit, replace, refer to:
VVT unit, replaceTemplate

Template
Supercharger clutch - V311
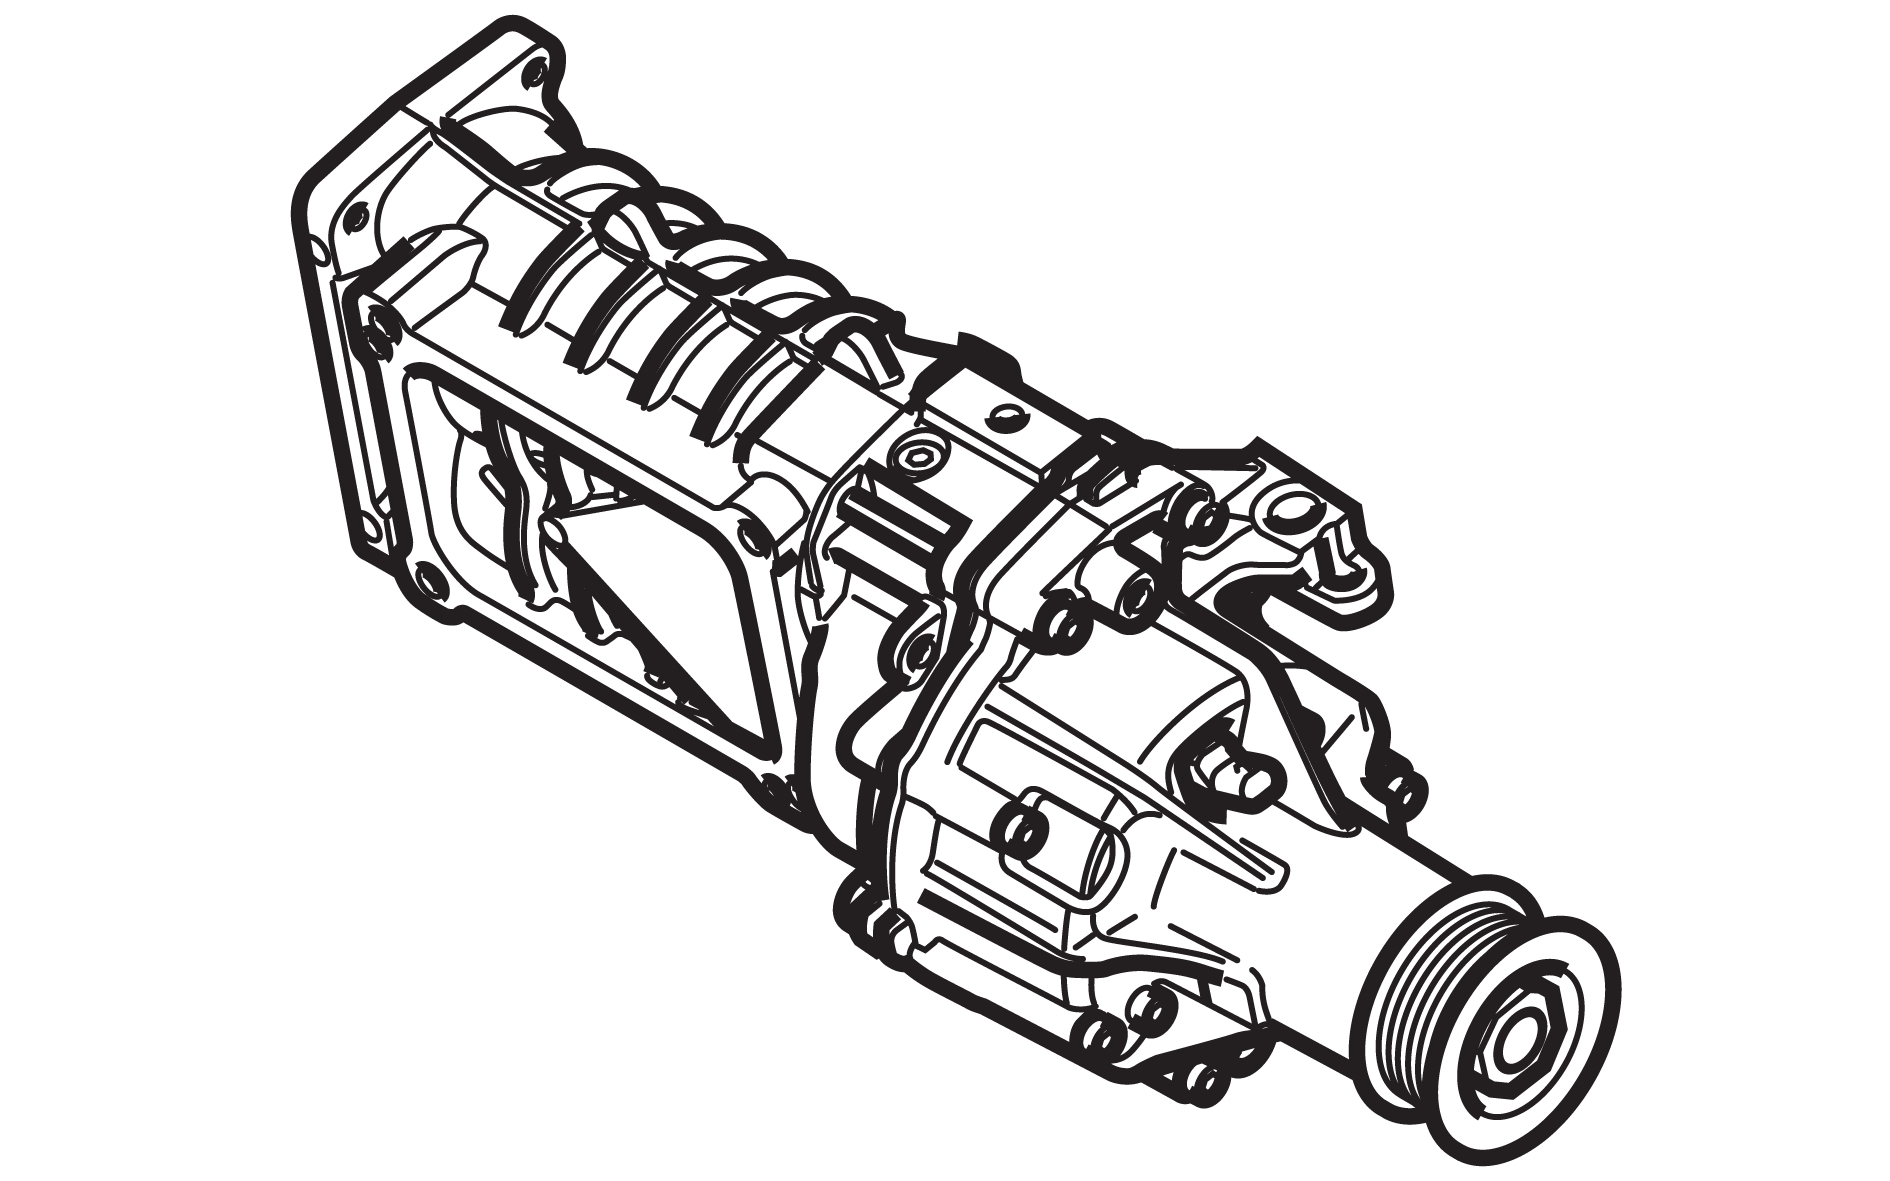
Description
The supercharger clutch disengages the supercharger from the crankshaft. It is made of a solenoid clutch. When the supercharger clutch is not power supplied, the clutch is disengaged by the return springs.
The control signal initially gives a strong signal to quickly move the solenoid clutch to the engaged position. Thereafter, the signal strength is reduced to allow the clutch to slip easily during the action.
Diagnostic information
The supercharger clutch does not have a built-in diagnostic system. The Engine Control Module (ECM) monitors the clutch, sets DTCs and has readable parameters for it.
Connection and communication
The supercharger clutch is directly connected to the Engine Control Module (ECM).
Component location
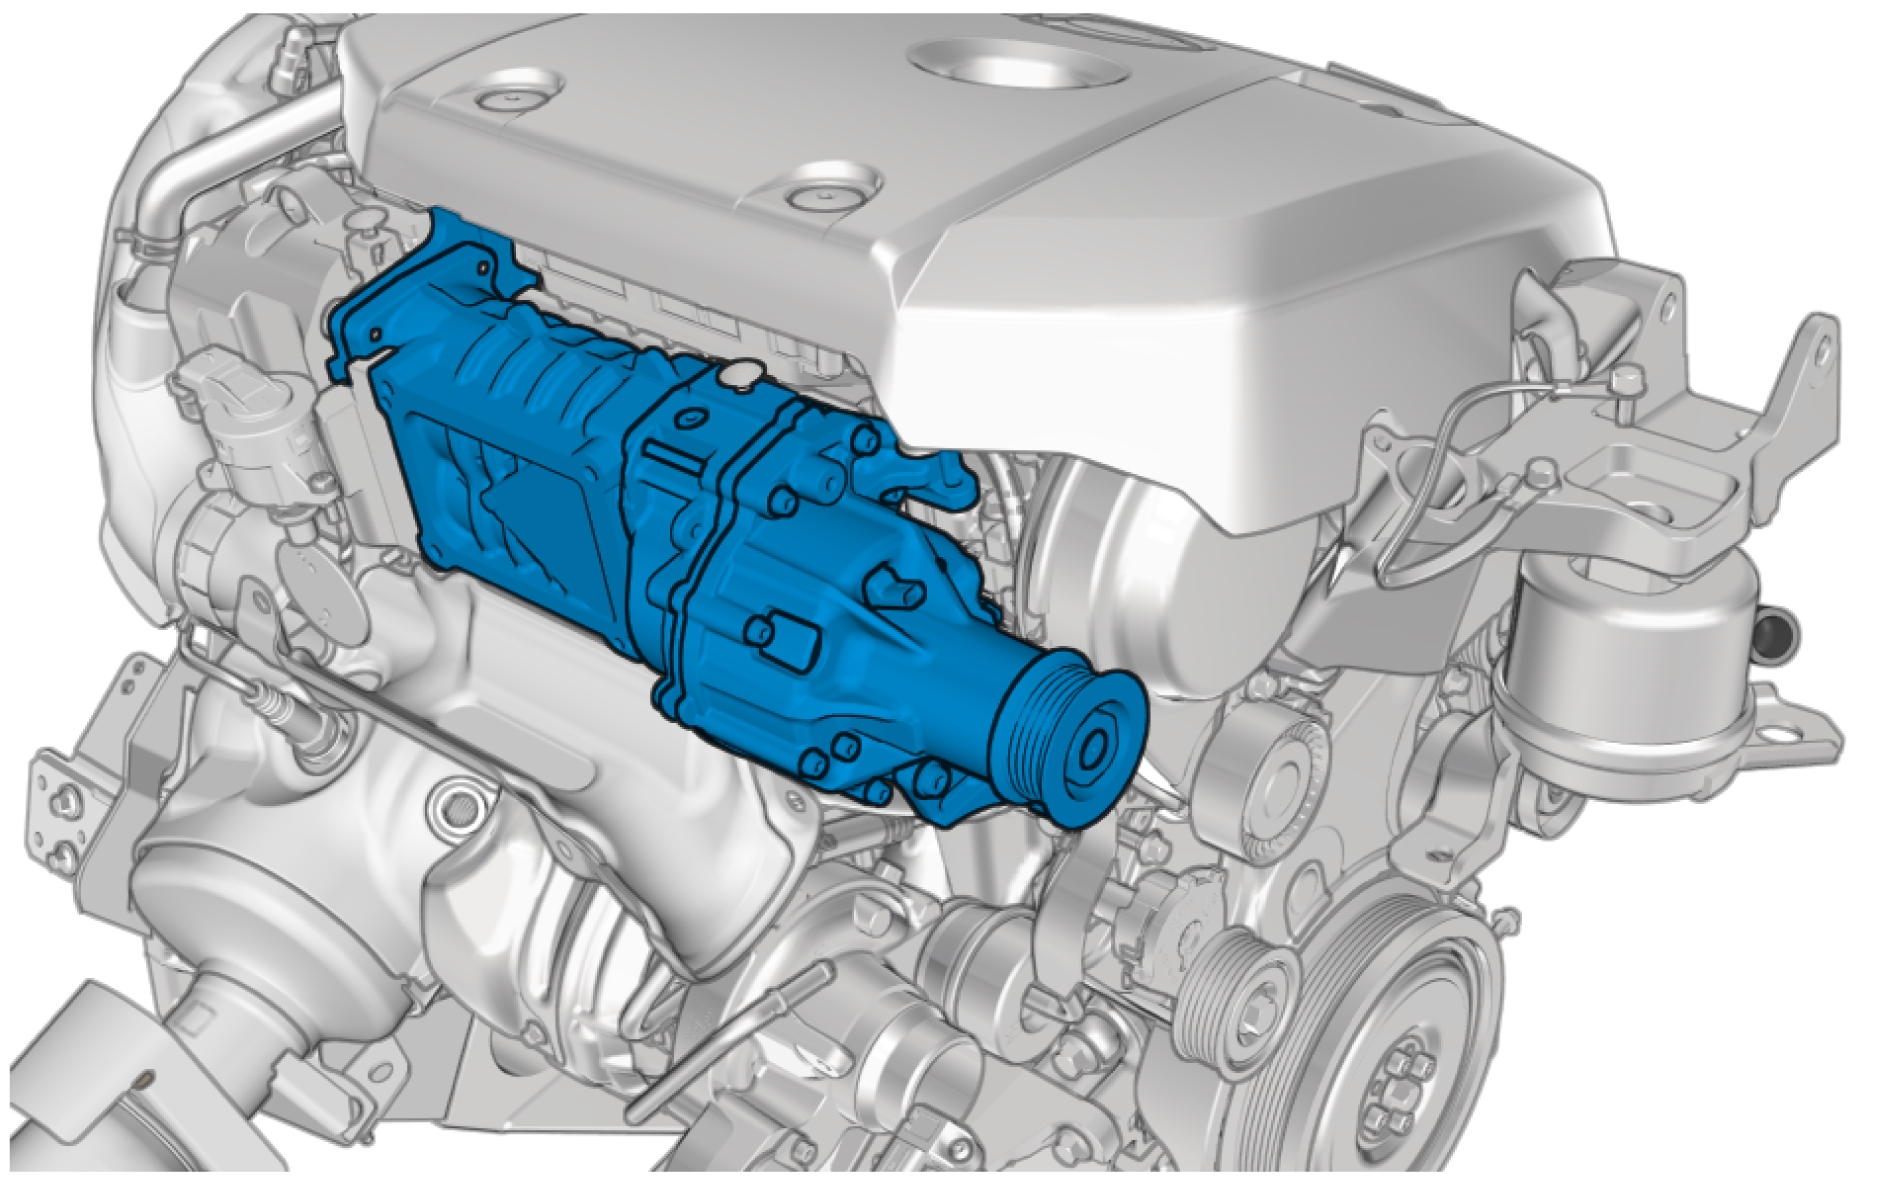
Pin-out
Pump, water cooled charge air cooler - M401
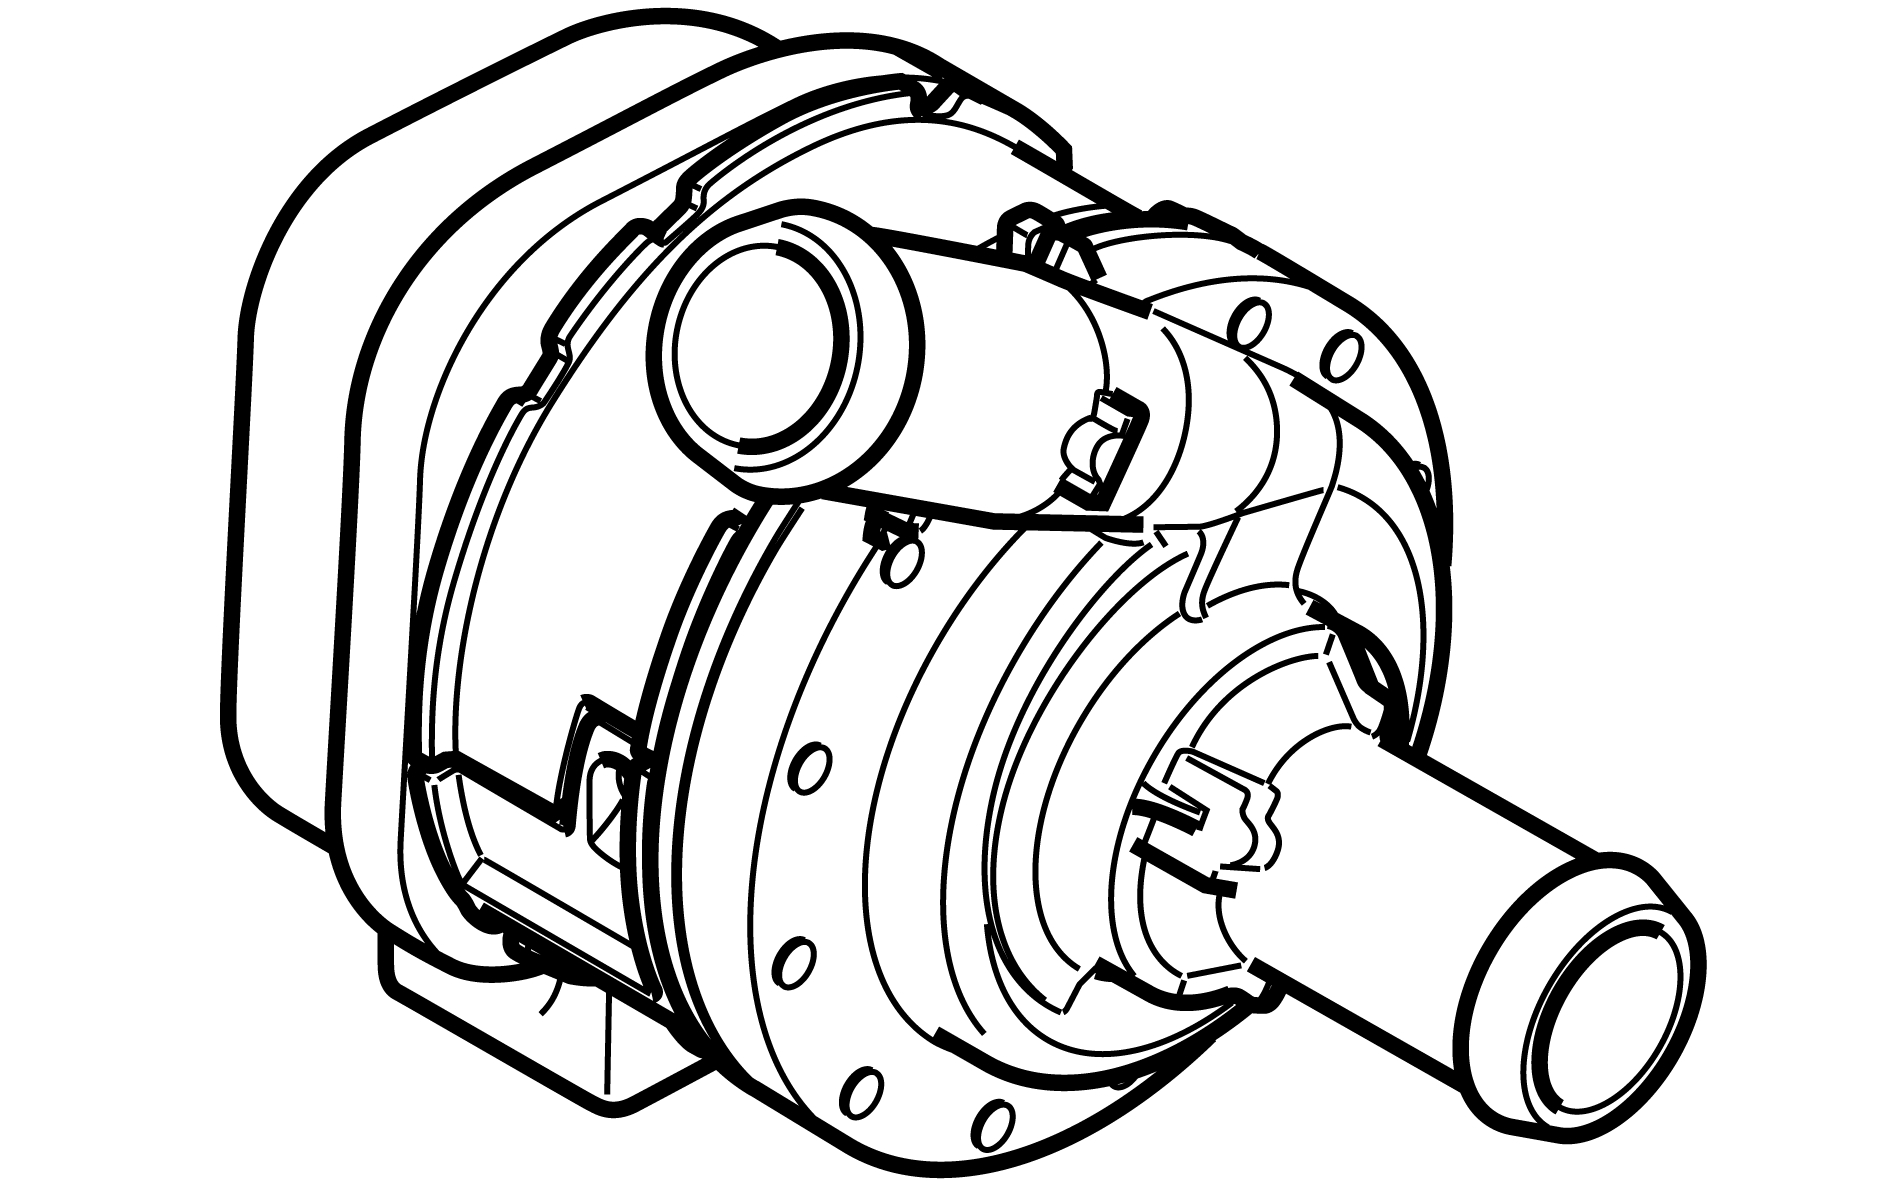
Description
The pump, water cooled charge air cooler, pumps the coolant through the low-temperature engine coolant circuit.
Diagnostic information
The pump, water cooled charge air cooler, does not have a built-in diagnostic system. The Engine Control Module (ECM) controls the pump, sets DTCs and has readable parameters for it.
Connection and communication
The pump, water cooled charge air cooler, is directly connected to the Engine Control Module (ECM).
Component location
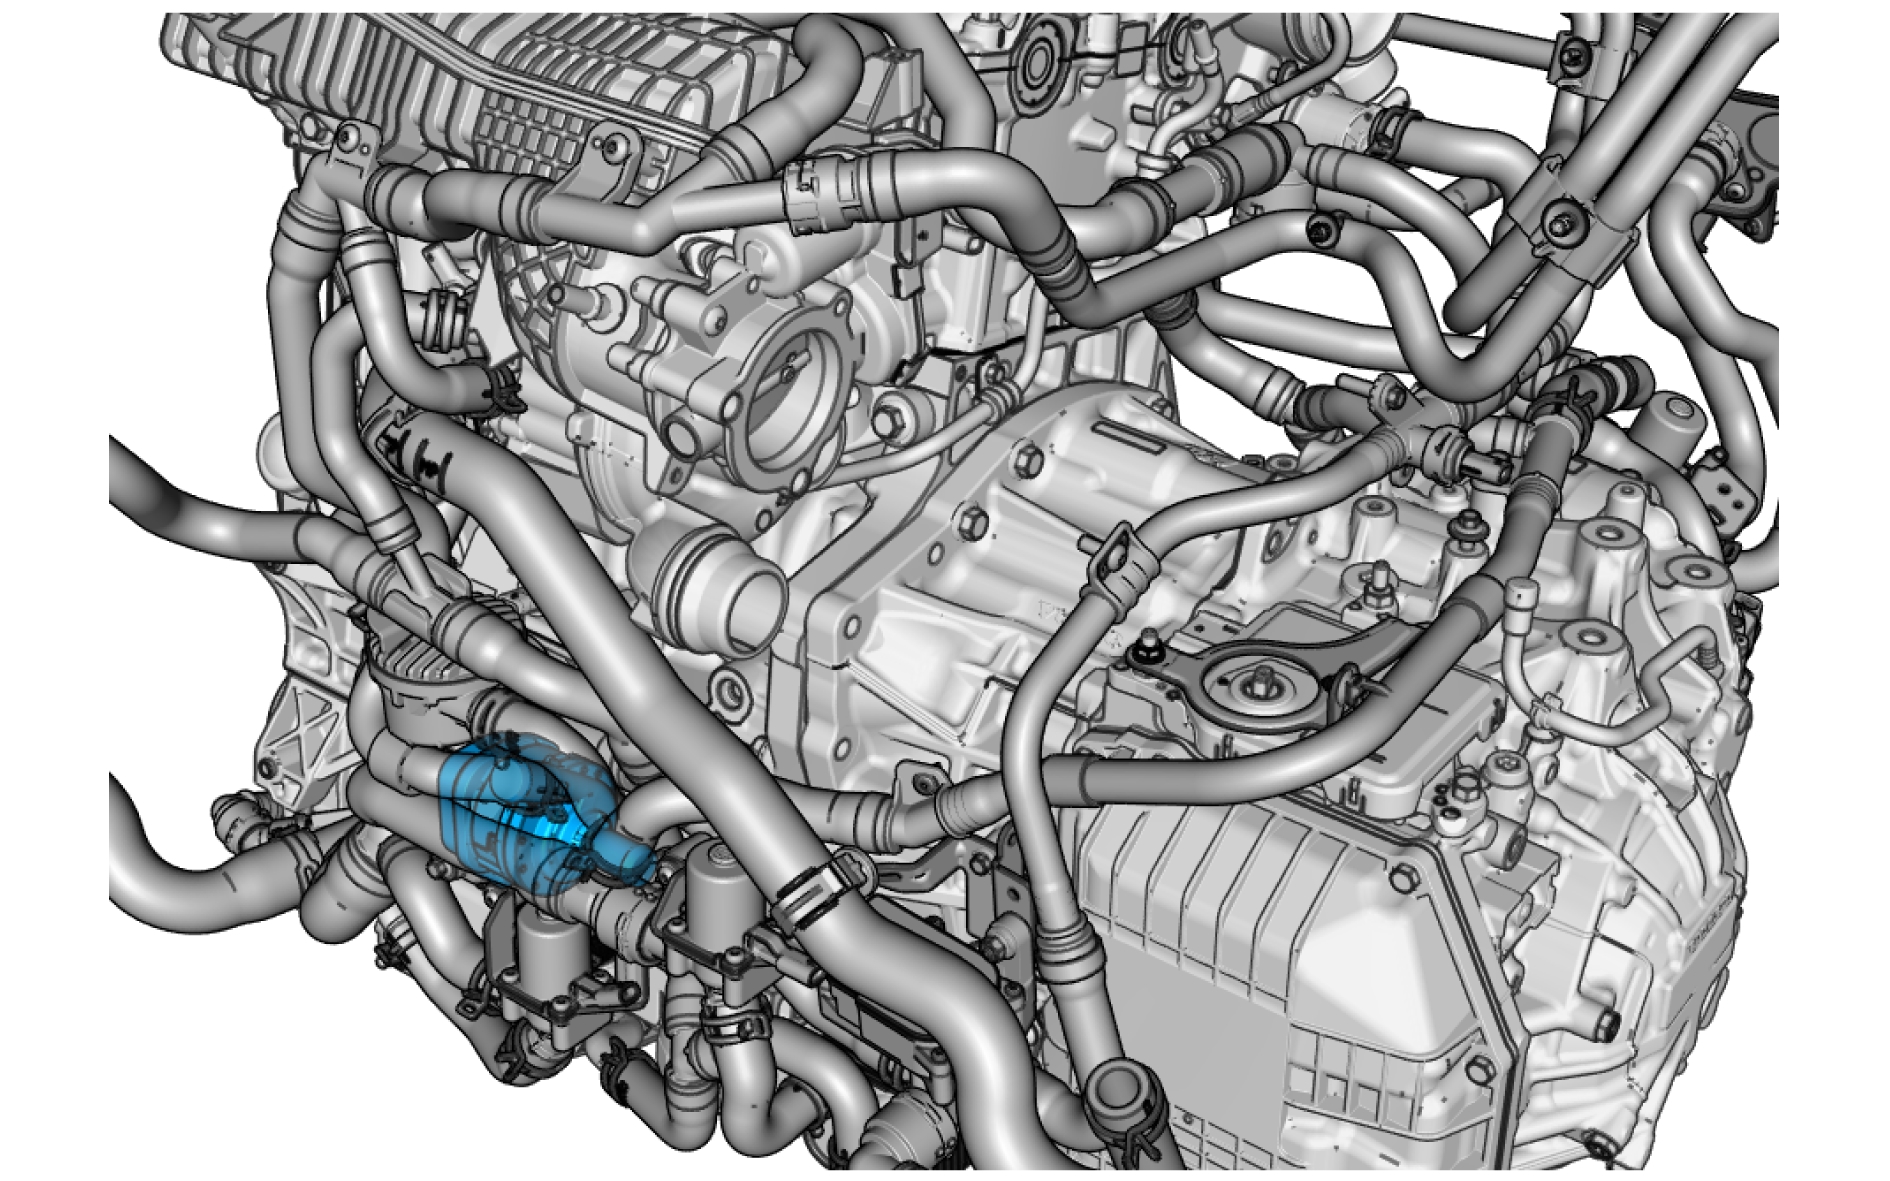
Pin-out
Coolant temperature sensor, water-cooled charge air cooler - S404
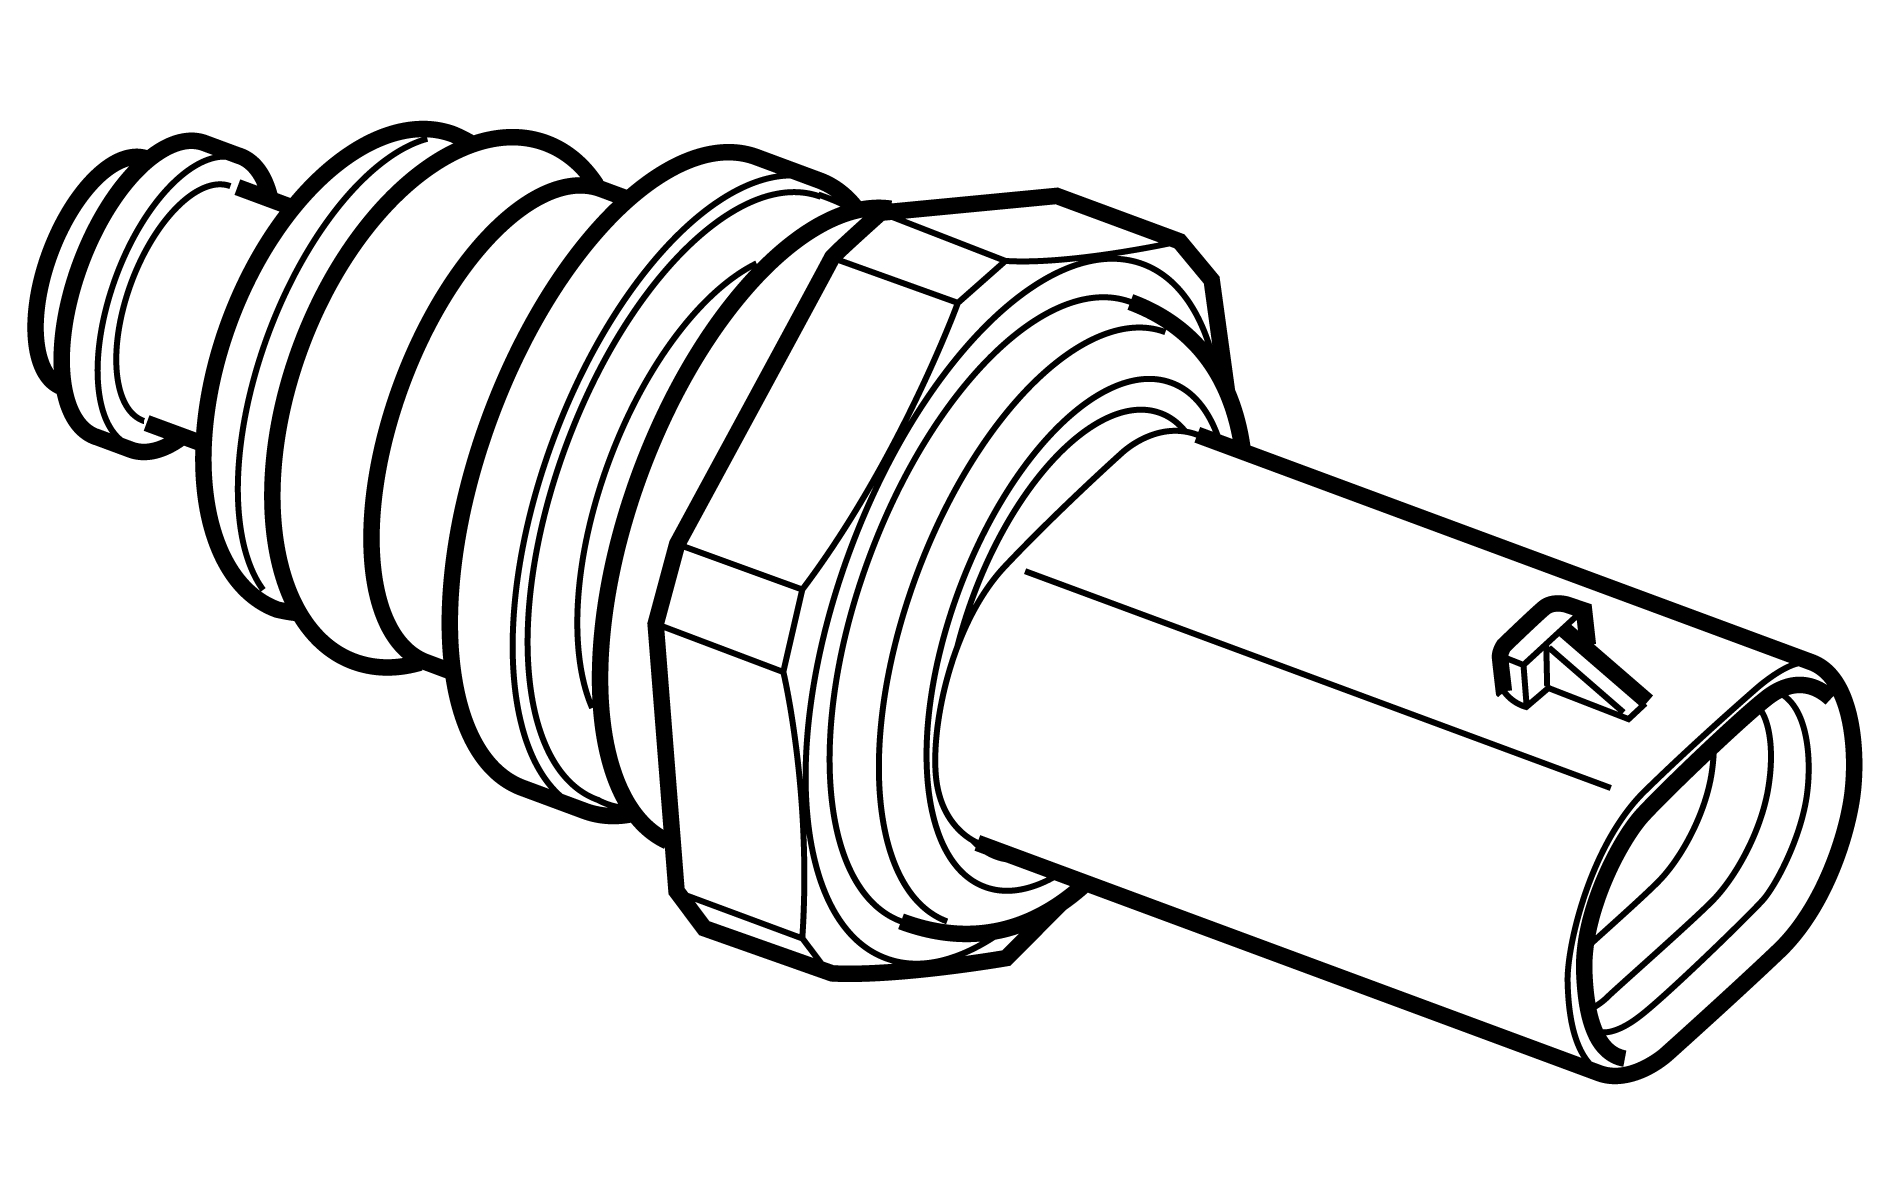
Description
The coolant temperature sensor, water-cooled charge air cooler, measures the coolant temperature in the low-temperature engine coolant circuit before the water-cooled charge air cooler.
Diagnostic information
The coolant temperature sensor, water-cooled charge air cooler, does not have a built-in diagnostic system. The Engine Control Module (ECM) controls the sensor, sets DTCs and has readable parameters for it.
Connection and communication
The coolant temperature sensor, water-cooled charge air cooler, is directly connected to the Engine Control Module (ECM).
Component location
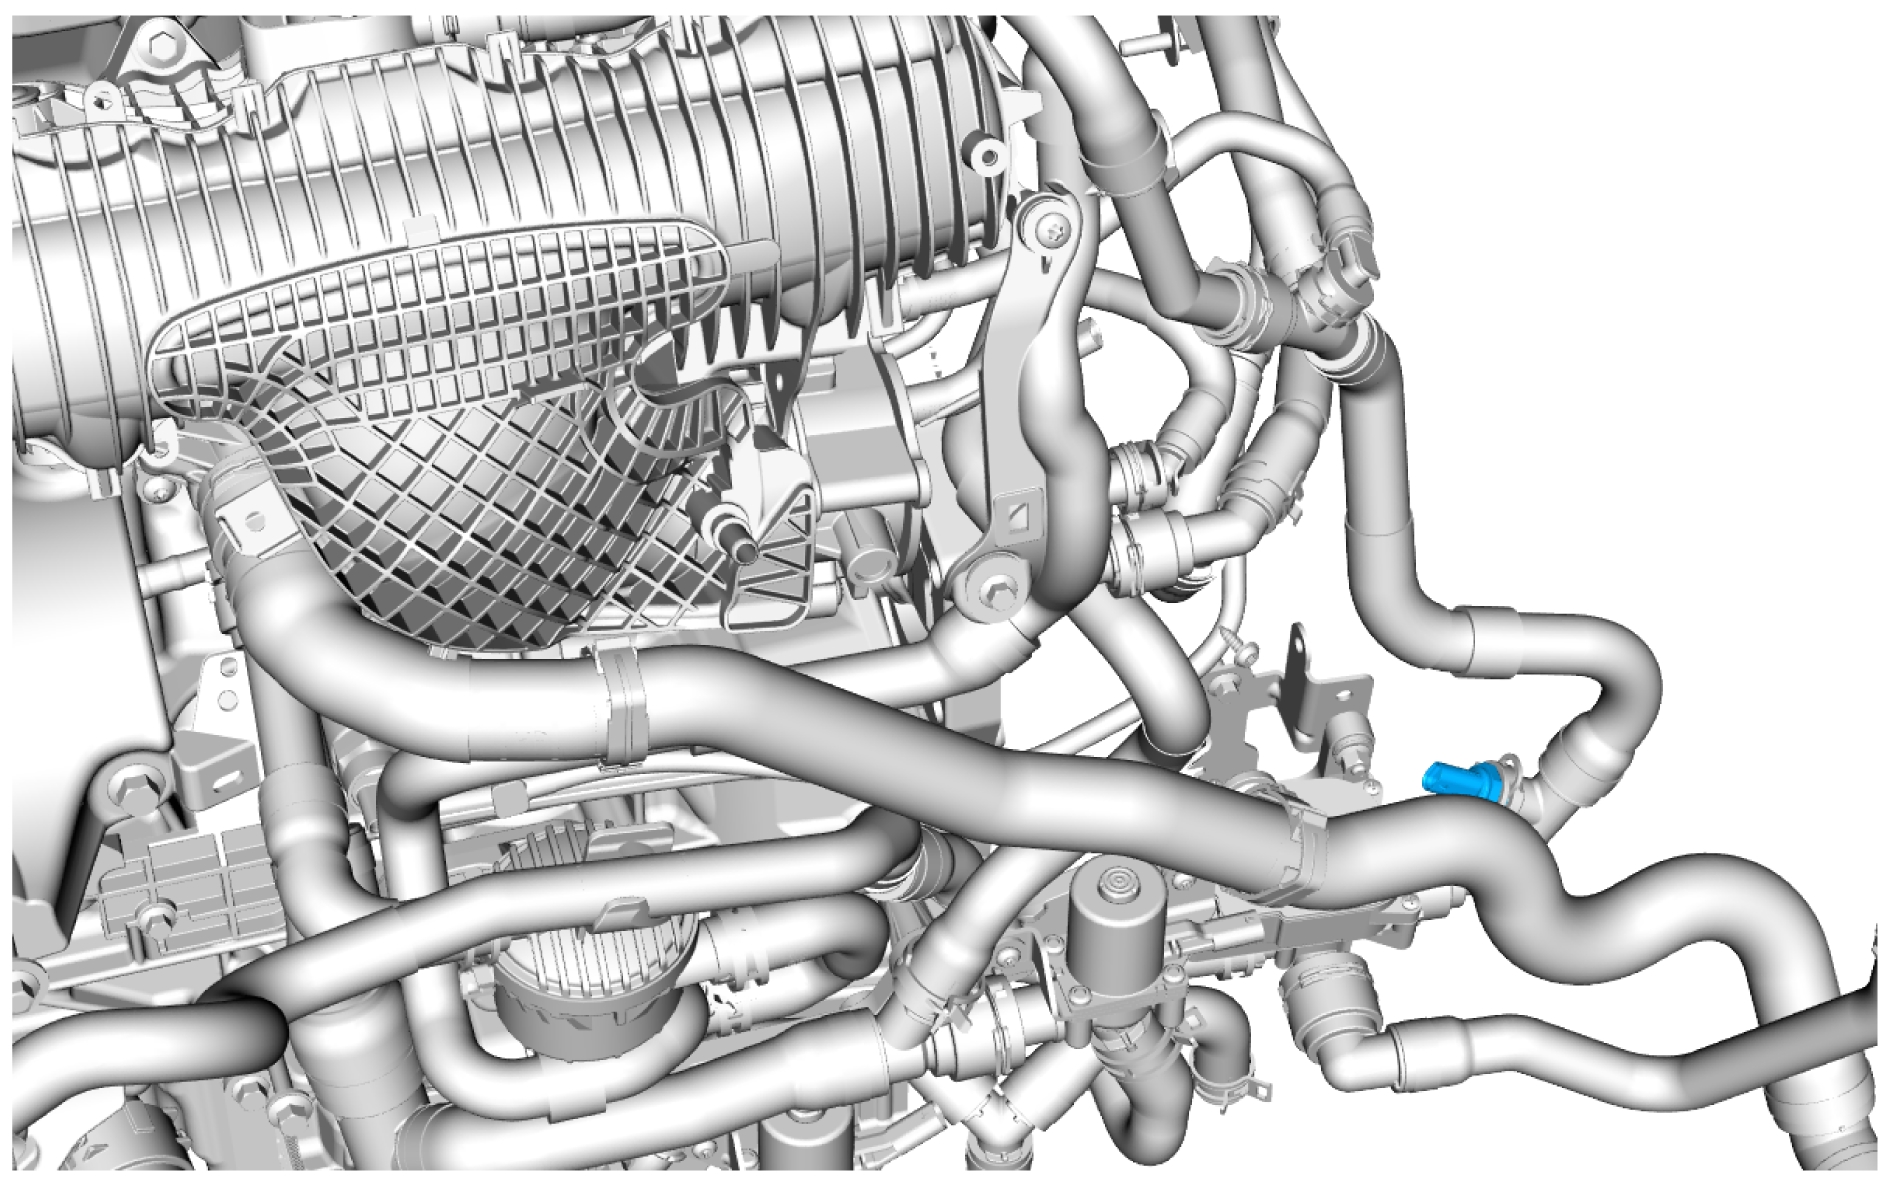
Pin-out
Main battery - A800
Description
The main battery converts chemical energy to electrical energy and can be recharged repeatedly. It consists of several cells connected in series to accumulate an appropriate voltage. Schematically, the battery contains a positive and a negative electrode.
The electrodes are made of different materials. The electrodes are placed in an electrolyte, referred to as battery acid. The chemical reaction between the different materials produces the electrical energy.
The main battery is a sealed Absorbed Glass Mat (AGM) battery. The battery does not use liquid, but instead uses a fiber glass mat, which contains the electrolyte. The electrolyte is kept in place by a separator paper that consists of fiberglass mat. The batteries can be built with very thin separators, which keep the internal resistance at a low level. The small amount of electrolyte makes the battery sensitive to dehydration, which may be caused by an overcharge resulting in gas generation.
The state of charge (SoC) is expressed as the amount of electrical energy that is stored in the battery at any given time, in relation to how much energy can be stored in a fully charged battery. The SoC is listed as a percentage of full charge.
Battery and cells
The battery is placed in a plastic container and has six internal chambers, one for each cell. The chambers are not connected to each other.
The maximum terminal voltage of a fully charged battery is 12.93 V, each cell generating 2.155 V.
Too high pressure can occur in case of incorrect charging, with too high voltage. If the safety valve is activated the battery is damaged.
Charging and discharging
Cycling is the process of charging and discharging the battery. A battery is always cycling. Cycling can have various degrees of depth. Deep cycles are more damaging than shallow cycles. Each cycle causes stress in the plates. Ultimately some material will separate from the plates, which reduces their capacity. A lead battery cannot tolerate infinite cycling. Deep cycles should be avoided in order to maintain a long service life.
Charging
During charging, energy is supplied to the battery. The lead sulfate (PbSO4) in the negative plate is converted back to pure porous lead (Pb) and the lead sulfate (PbSO4) in the positive plate is converted to lead dioxide (PbO2). Water (H2O) is consumed during the charging process and sulfuric acid (H2SO4) is formed. The density of the electrolyte increases as the amount of sulfuric acid increases.
The battery is charged with a maximum voltage and current as shown in the table below.
| Battery capacity (Ah) | Max. current (A) | Max. voltage (V) | Max. charging time (h) |
|---|---|---|---|
| 100 Ah | 25 A | 14.5 V | 5-24 h |
| 90 Ah | 22.5 A | 14.5 V | 5-24 h |
| 80 Ah | 20 A | 14.5 V | 5-24 h |
| 70 Ah | 17.5 A | 14.5 V | 5-24 h |
| 60 Ah | 15 A | 14.5 V | 5-24 h |
| 50 Ah | 12.5 A | 14.5 V | 5-24 h |
| 40 Ah | 10 A | 14.5 V | 5-24 h |
Only use chargers that are both current- and voltage controlled. The battery is sensitive to overcharging and must be charged with an adapted charger. A battery that is charged with too high voltage or current does not absorb all the energy and the excess is converted to heat. When the battery becomes overheated, the electrolyte evaporates.
In-car discharging
The self-discharge of a battery is insignificant compared to the quiescent current draw. The quiescent current draw may be significant depending on how the vehicle is stored. Battery SoC level should be 85 % or higher to ensure the battery’s longevity. The storage temperature affects the battery self-discharge.
-
Vehicles stored in normal mode must be charged every 14 days.
-
Vehicles stored in transport mode must be charged every 30 days.
Deep cycling
If the battery is poorly charged, the risk of damaging the battery beyond repair is significantly higher, even at relatively mild temperatures. The table below shows the freezing points of the electrolyte in relation to the state of charge (SoC) of the battery.
| State of charge (SoC) | Freezing point |
|---|---|
| 100% | Approximately -70 °C |
| 40% | Approximately -25 °C |
| 10% | Approximately -10 °C |
If the discharge is extremely deep, all sulfuric acid would ultimately be consumed and only water will remain in the electrolyte. As lead sulfate is more soluble in water than in sulfuric acid, some of the lead sulfate in the plates will end up in the electrolyte. When the battery is charged, the lead will fall on to the negative plates and separators and gather in small spots on the surface. This is known as hydrogenation and is a cause of short circuits in the battery.
Self-discharge
There is always self-discharge in a battery. If a battery is not in use for a long period, there will be a considerable self-discharge. The acid density drops and the active material in the plates is converted to lead sulfate. The speed of discharge depends on the temperature, age, condition, and construction of the battery. The temperature is particularly influential. The rate of self-discharge is faster at higher temperatures. Batteries should be stored for prolonged periods in a dry, cold place, preferably below freezing point. Ensure that the battery is fully charged if it is to be left unused for a long period. No further charging is required if the battery is in good condition and stored in a dry, cold place.
Capacity
The capacity of a fully charged battery is its ability to give a constant current during a certain time and is stated in the unit ampere-hours (Ah). This gives a higher cold-start current value (CCA = Cold Cranking Amperes).
The capacity of a battery is not only dependent on the size and construction of the battery, but also varies considerably based on the size of the discharge current. The lower the discharge current, the higher the capacity and vice versa. The capacity of the battery is also affected by the temperature and the age of the battery. The nominal value is given at 25 °C.
The table shows the difference in capacity of a battery at 25 °C and -18 °C.
Differences in capacity at 25 °C and -18 °C
| Capacity at 25 °C | Corresponding capacity at -18 °C |
|---|---|
| 100% | 55% |
| 70% | 35% |
| 40% | 25% |
Service life
The service life of a battery can be impacted by different conditions. A high ambient temperature speeds up the chemical processes in the battery during charging and discharging. For every 10 °C increase in temperature, the reaction speed of the processes doubles. At high temperatures, the battery service life can be reduced due to:
-
Corrosion
-
Self-discharge
-
Sulfation
The service life of a battery improves in lower temperature surroundings.
Sulfation
During normal driving, small sulfate crystals are formed. They are not harmful at first, but during extensive charge deprivation the lead sulfate converts to stable a crystalline that sets on the negative plates. When these develops to larger crystals, it reduces the battery's active material and therefore the direct performance. If the SoC decreases below 70 % for more than a few weeks without any re-charging, the damage to the battery due to sulfation may be irreversible.
Diagnostic information
The main battery does not have a built-in diagnostic system. The Battery Monitoring Sensor (BMS) monitors the battery and sends diagnostic data to the Central Electronic Module (CEM), which stores the DTCs and the readable parameters.
Connection and communication
-
The main battery is directly connected to the Battery Monitoring Sensor (BMS).
-
The main battery is directly connected to the Battery Control Switch Module (BCSM).
Component location
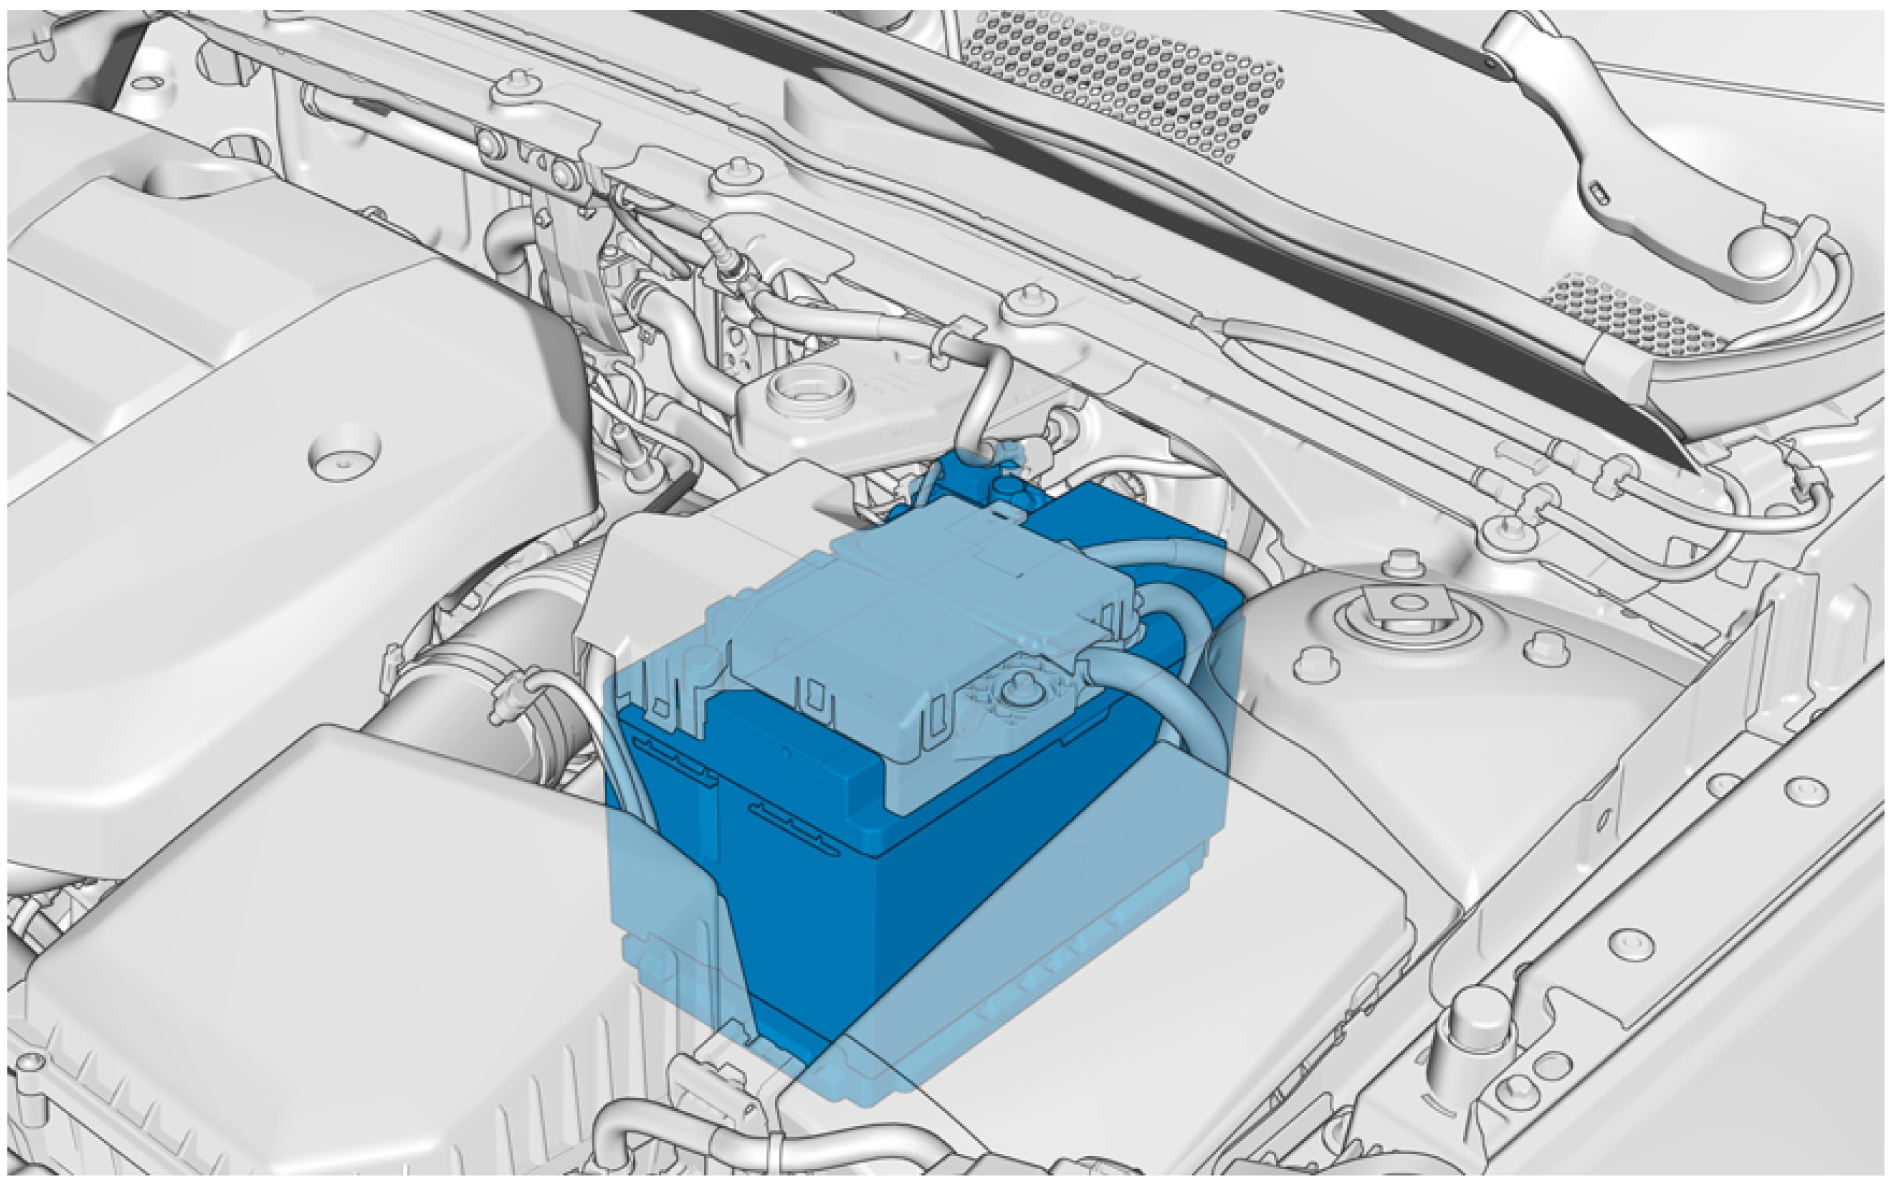
Pin-out
VVT unit, replace
Removal
Remove vacuum pump, refer to:
Vacuum pump, replaceRemove the vibration damper, refer to:
Vibration damper, replaceRemove the screws.
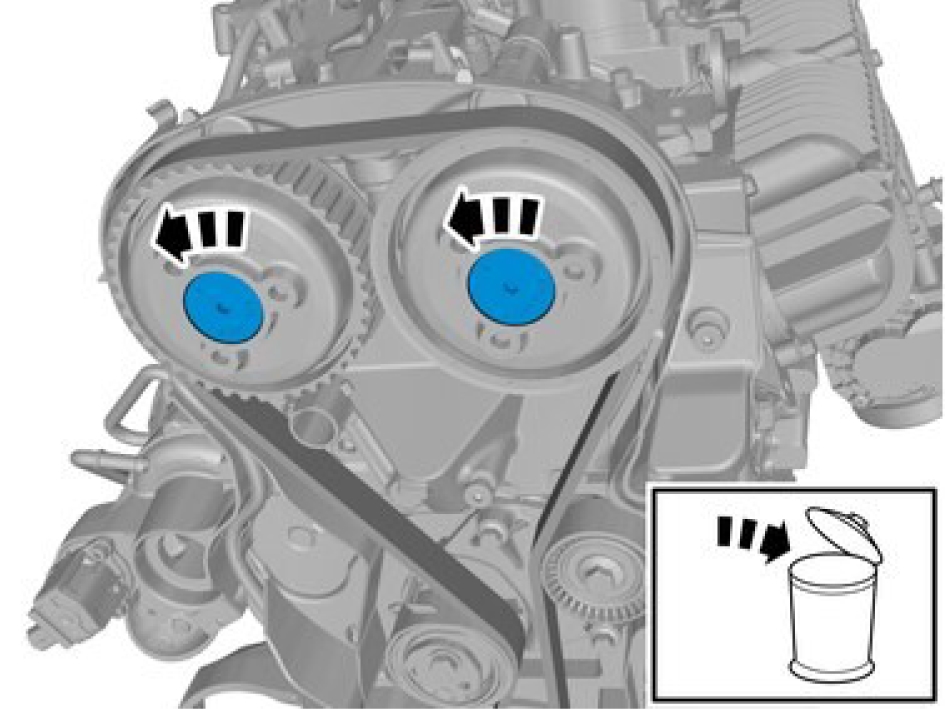
Be prepared to collect escaping fluid.
The components are not to be reused.
Loosen the marked details.
Remove timing belt, refer to:
Timing belt, replace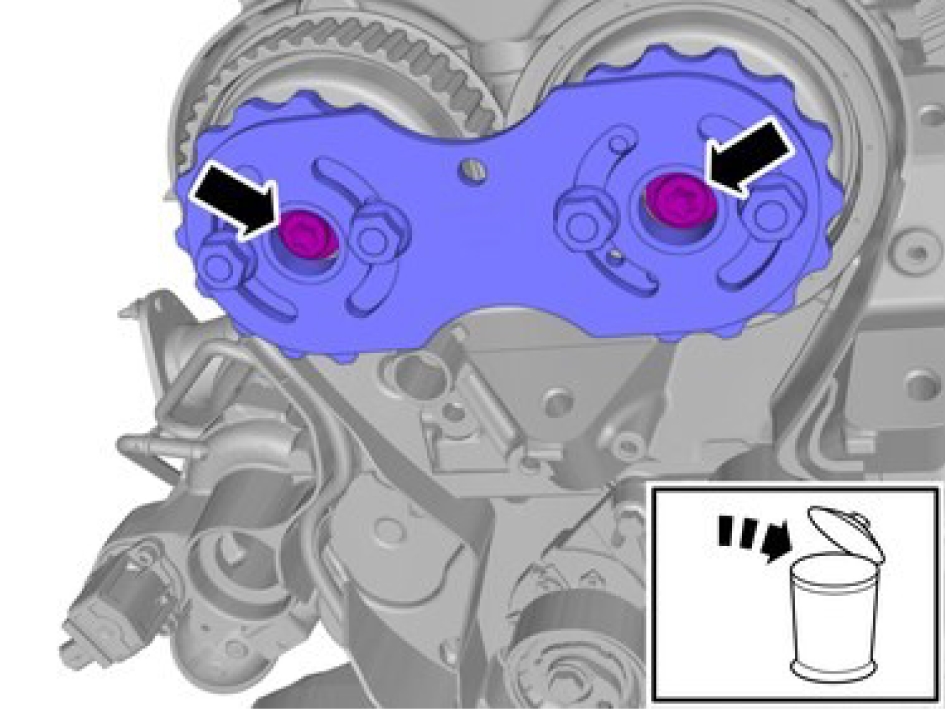
The components are not to be reused.
Remove the screws.
Make sure that the marked component has been removed.
Be prepared to collect escaping fluid.
Make sure that the component is positioned correctly.
Install special tool 999 7490
Install special tool 999 7490 second component.
Installation
Clean marked area with isopropanol and apply engine oil.
Only tighten the bolts finger tight at this stage.
Only tighten the nuts finger tight at this stage.
Make sure to follow the sequence indicated.
The timing belt tensioner setting is dependent on the engine temperature.
Make sure that the belt tensioner is aligned to the belt tensioner bracket.
Adjust to the specified value.
Tighten the screw M8, torque: 24 Nm
Tighten the nuts.
Tighten the center screws, torque: 90 Nm
Make sure that the marked component has been removed.
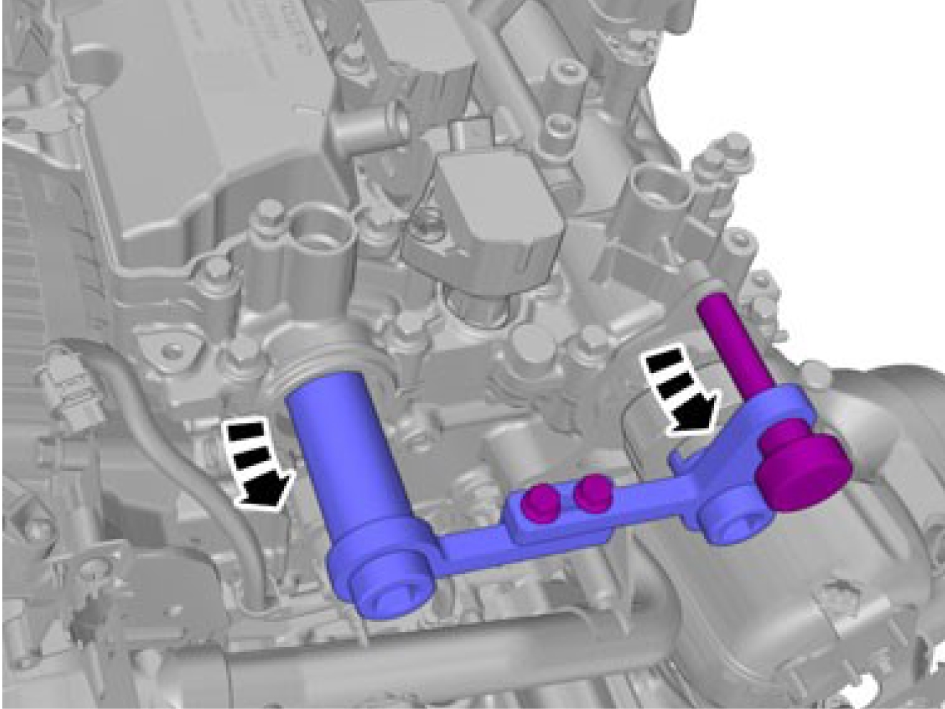
Make sure that the marked component has been removed.
The engine is rotated so that the belt assumes its correct position.
Turn the engine.
Make sure that the belt tensioner is aligned to the belt tensioner bracket.
Adjust to the specified value.
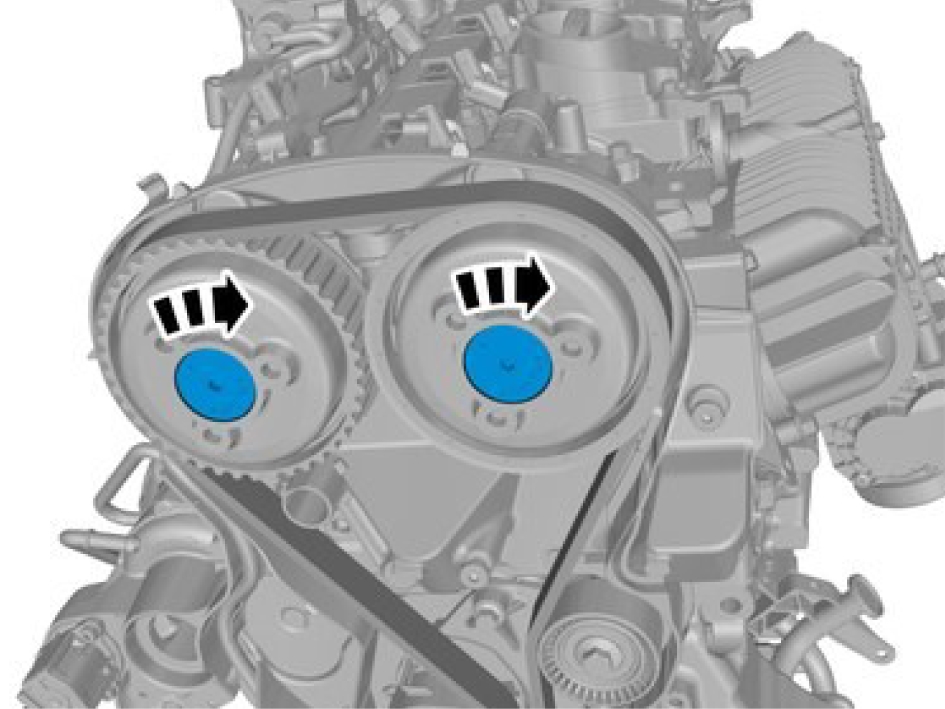
Install the plug, torque: 5 Nm
Install the vacuum pump, refer to:
Vacuum pump, replaceInstall the vibration damper, refer to:
Vibration damper, replaceFuel system pressure release
When working on the high-pressure part of the fuel system, the system must be depressurized before work begins.
Disconnect the electric high-pressure pump.
Start the engine and run the engine until the engine stops.
Fuel pump, replace
Removal
Perform depressurizing fuel system refer to:
Fuel system pressure release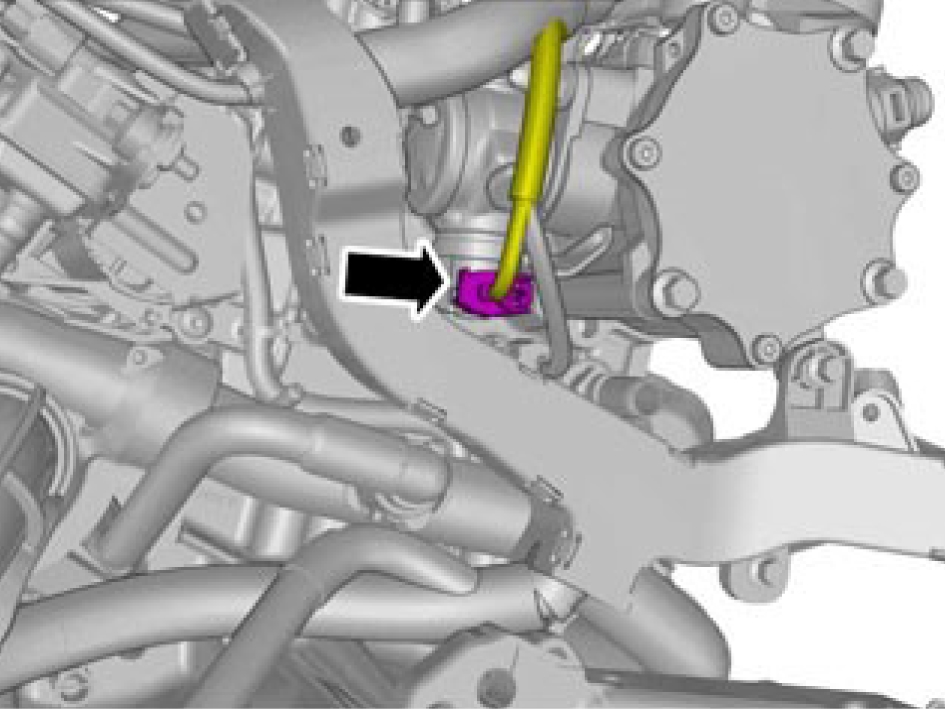
Release the connector's catch.
Disconnect the connector.
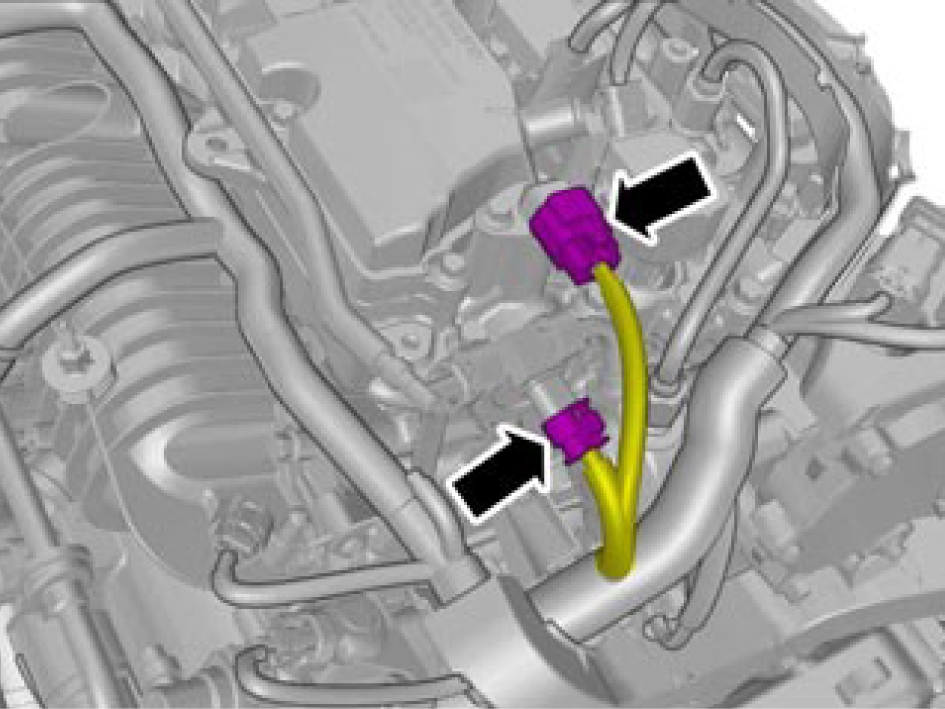
Release the connector catches.
Disconnect the connectors.
Remove the screws.
Remove the hose.
Remove the screw.
Remove the screw.
See information about safety information fuel system refer to:
Safety information fuel system
Be prepared to collect escaping fluid.
Release the lock.
Remove the hose.
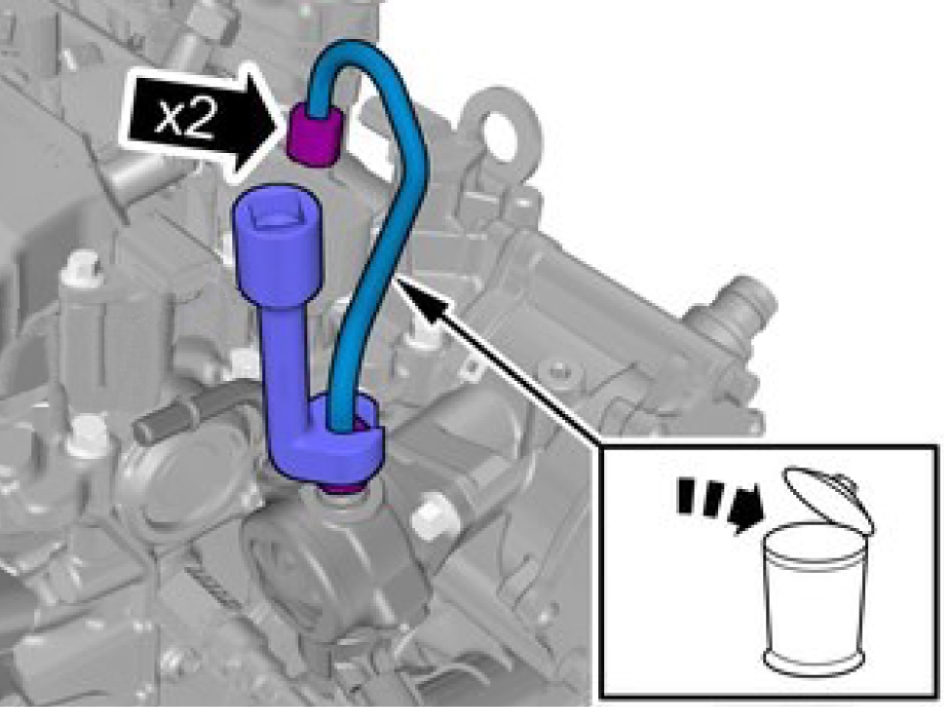
Make sure that all openings are sealed.
Remove the pipe use special tool 981 4198
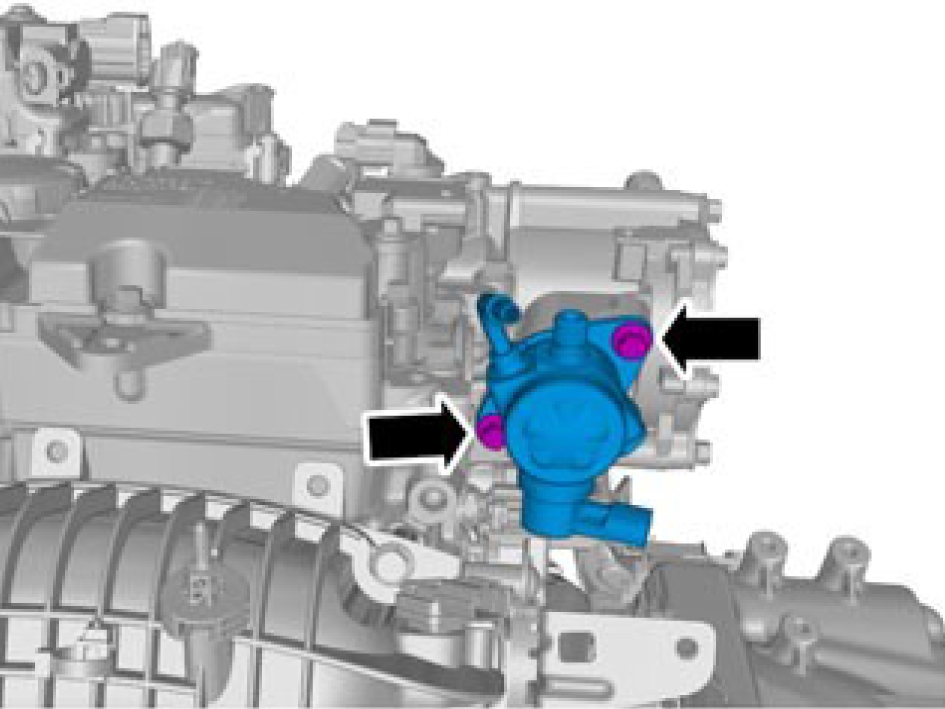
This component is sensitive to "mechanical stresses". If the component has been dropped onto the floor, for example, it must not be installed in a vehicle.
Remove the screws.
Remove the marked component.
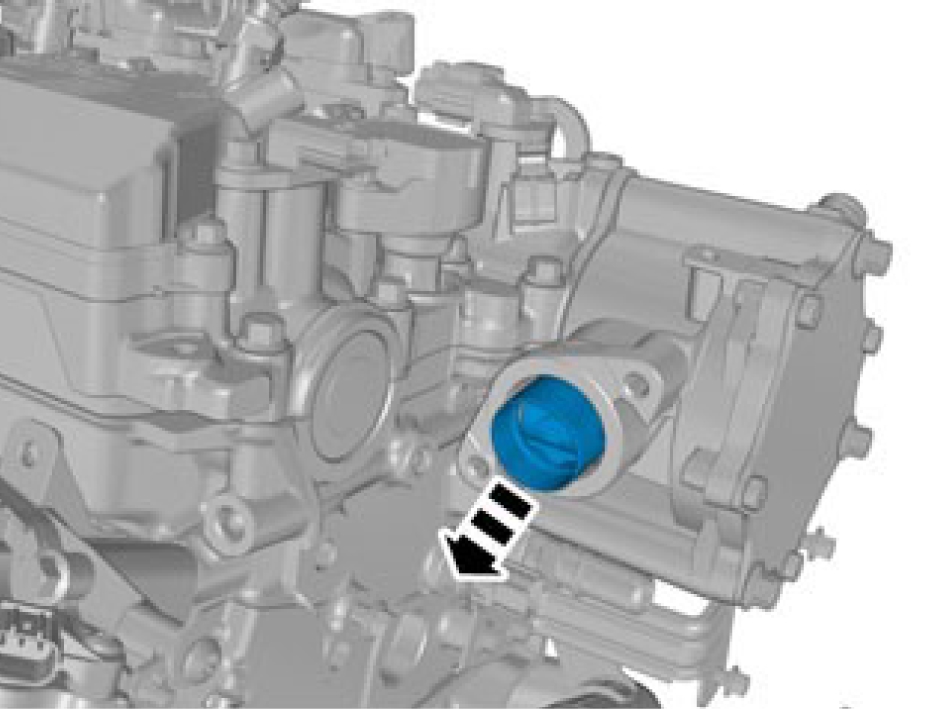
Make sure that no component falls off during removal.
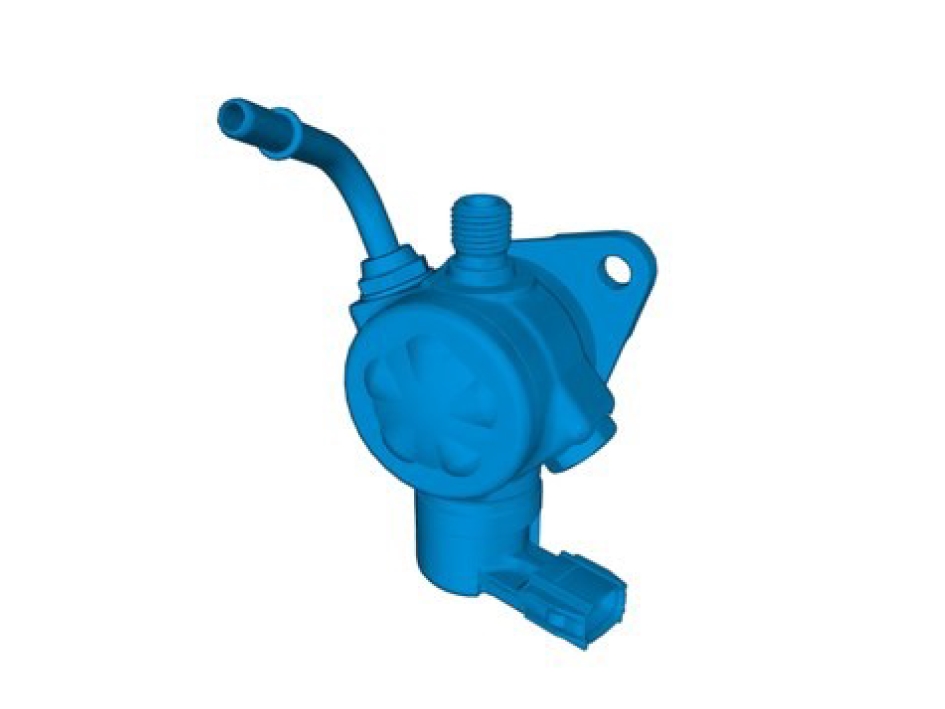
This component is sensitive to "mechanical stresses". If the component has been dropped onto the floor, for example, it must not be installed in a vehicle.
Installation
Make sure that the component is positioned correctly.
Make sure that the components are positioned correctly.
Install the marked component.
install the screws M8, torque: 24 Nm
Install the pipe use special tool 981 4198
High-Pressure Fuel Line to Fuel Pump.
Step 1, torque: 12 Nm
Step 2, torque: 25 Nm
Install the hose and lock.
Install the screw M6, torque: 10 Nm
Install the screw.
Install the hose.
Install the screws M6, torque: 10 Nm
Connect the connectors.
Fasten the connector catches.
Connect the connector.
Fasten the connector catches.
Make sure that there are no leaks.
Start the engine and run it for five minutes.
Safety for service test
Description
Variants
Operation
Operating modes
Signals
Activation and deactivation
Settings
Reduced function under fault conditions
Related functions
new service safety
The is about service safety
Vacuum pump, replace
Removal
Remove the fuel pump, refer to:
Fuel pump, replace
Remove the hose.
Remove the screws.
Remove the vacuum pump.
Installation
Clean the marked area.
Apply sealing compound.
Install the vacuum pump.
Install the screws M8, torque: 24 Nm
Install the vacuum hose.
Install the fuel pump, refer to:
Fuel pump, replaceSensor- COPY


Valve, piston cooling, replace
Removal
Remove the vibration damper refer to:
Vibration damper, replaceRemove the screws and the marked component.
Use suitable paper to absorb any escaping fluid.
Remove the piston cooling nozzle.

Make sure that a new component is installed.
Installation
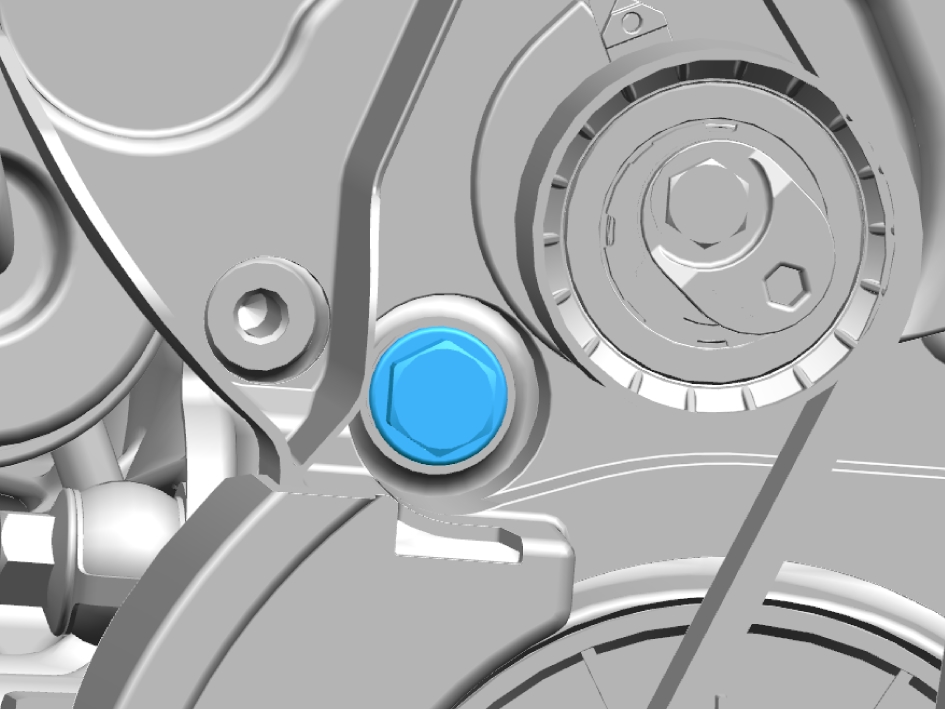
Install new seal.
Install the piston cooling nozzle, torque:41 Nm
Install the vibration damper refer to:
Vibration damper, replaceRelay check
test
test info
bla
tänk på
General Test Information
The resistance in switches, wires and terminals should be 0 Ω. There is sometimes resistance in the connections due to oxidation. If the resistance is too great there will be performance problems. The resistance at which malfunction occurs depends on the circuit load. Malfunction starts at a few ohms. Other possible reasons for performance issues could be an open or a short circuit, damaged wires or a poor connection.
When measuring, use the wiring diagram to get information regarding values and measurement data.
Before replacing control modules or components, the following parts of the circuit must be checked:
-
Terminals on the control module and on the components.
-
Connectors on the harness side.
-
Wires and harness.
-
Splices in the harness.
The most likely root cause for performance issues depends on the type of fault. A short circuit to ground or to other wires is more likely to occur in the cable harness than in a connector. An open circuit can be caused by connectors as well as wires. Voltage drops are most likely caused by connectors. A good rule of thumb is to perform the fault tracing procedure as follows:
-
Start by checking the connectors visually. Use the related method for Removal, replacement and installation in order to expose the connector. Use the images in the wiring diagram to get more detailed information regarding component locations and pin outs in connectors.
-
If no damage or fault can be found in any connector, continue to fault trace the wires. Use a break out box (if available). Use the signal information in the wiring diagrams in order to get information regarding values and measurement data. Use the cable harness images to get information about the location of wires, splices and connectors.
An intermittent electrical fault can be caused by faults in the wiring, the components or the connectors. Possible causes for intermittent electrical faults are:
-
Damaged terminal pins in the connector.
-
Loose connections in the connectors.
-
Poor ground connection (due to oxidation).
-
Moisture, poor connections in the connector.
-
Damaged or defect components.
-
Strong magnetic or other interference that affects the control modules.
In case the circuit is monitored with On Board Diagnostic tests, check the DTCs related to the circuit and use the fault detection counter in order to see if the fault is detected by the control module while twisting and shaking the connector/cable whilst the function is active. For more information regarding how to use DTC related data during fault tracing, see DTC Extended Information.
Important precautions during fault tracing
Under no circumstances should an ohmmeter or any other live measuring instrument be used to take readings towards an airbag or pyrotechnical actuator, neither directly on the airbag nor from another connection point in the wiring harness. This could cause a deployment of the airbag or pyrotechnical actuator. Make sure always to measure on the correct wires in the multiple connectors, since some wires may go to pyrotechnical actuators.
Avoid touching the control module connector pins and the corresponding cable harness connectors. When available, always use a break out box when measuring signals in order not to damage connectors. In case a break out box is not available, it is important to position a replacement part between the female connector and the measuring instrument when taking readings from the female connector. The replacement part consists of a piece of cable with a cable terminal at one end. There is a risk of electrostatic discharge, which could damage the control module. Before starting the fault tracing, discharge yourself and the tools to be used from static electricity by holding the metal part of the tool and touching the vehicle body or chassis.
Terminals: check for fretting corrosion
Open the connectors and check the terminals visually for fretting corrosion.
Fretting corrosion can be recognized as dark smudges on electrical terminals. In less severe cases it may be difficult to see.
Fretting is caused by two electrical surfaces in a connector chafing each other. The chafing movement causes oxidized debris to build up between the pin and the connector. The debris is nonconductive and will act as an insulation, thus causing an increased resistance in the connector.
The chafing movement may be caused by any of the following conditions:
-
Not properly secured connectors, components or wiring harness.
-
Poor connection or mechanical retention.
-
Thermal cycling.
-
Vibration
In severe cases, the chafed part of the pins and connectors may become heavily eroded.
Actions:
-
Check that the components, the connectors and the wiring harness are properly secured.
-
Check that the pins and terminals are securely inserted into the connector.
-
Clean the connector from the fretting corrosion.
-
Apply dielectric lubricant to both the component/control module side and the harness side.
Terminals: check for corrosion
Check the terminals visually for corrosion. Corrosion can be recognized as a white/green coating. Corrosion is mostly caused by moisture. Oxidation is most likely to cause a poor connection but may also cause short circuits.
Actions:
-
Clean the connector from the corrosion.
-
Apply dielectric lubricant to both the component/control module side and the harness side.
Terminals: general check of pins and terminals
-
Check for damage to pins and terminals.
-
Check that pins and terminals are properly inserted into the connector.
-
Check that the wire is properly connected to the pin or terminal. Loose connections in terminals may be caused by a faulty connection between a cable and its cable terminal. Loose connections produce the same faults as an intermittent open circuit in a wire.
If no visual damage is detected, use a loose male connector to test the drag. Make sure that the female connector provides a good contact and that the pin remains in place when the male connector is lightly pulled.
In order to locate damage, shake the cable lightly and pull on the connectors during measurement.
Wiring and harness: open circuit
An open circuit in a wire is indicated by performance problems. Chafed and broken leads are common causes of faults.
Connect an ohmmeter between the ends of the cable. The ohmmeter should read approximately 0 Ω if there is no open circuit in the wire.
Wiring and harness: short circuit to ground
A short circuit between a live wire and ground is often indicated by performance problems or a fuse blowing when a current is passed through the wire.
-
Activate all switches and sensors in the circuit. Check whether the fuse blows.
-
Disconnect the connectors in the circuit to ensure that they do not affect the readings.
-
Connect an ohmmeter between the wire and ground. The ohmmeter should read infinite resistance if no components are connected.
Wiring and harness: short circuit to supply voltage
A short circuit between a wire and the supply voltage is often indicated by performance problems or a fuse blowing when a current is passed through the wire.
-
Use a voltmeter to take readings at various points in the circuit while operating switches and sensors. The voltmeter reading depends on the circuit being tested and the positions of switches and sensors. Use the wiring diagram to determine the correct voltage in the circuit.
-
Use an ohmmeter between likely problematic cables to detect short circuits between them. The ohmmeter should read infinite resistance between cables that are not connected to each other in the circuit.
Oil trap, replace
Removal
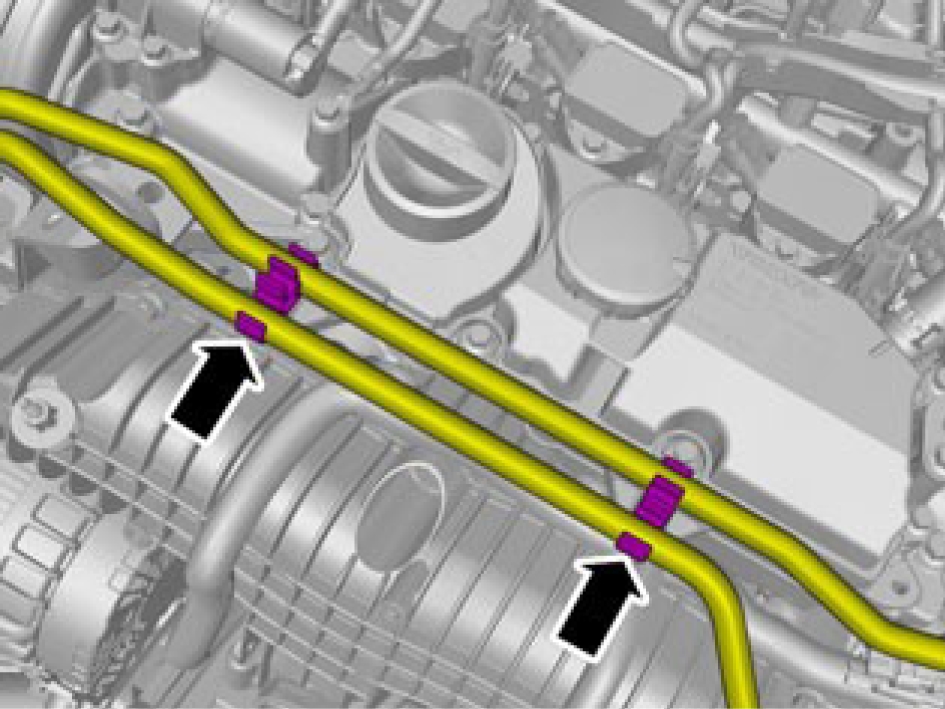
Loosen the clips.
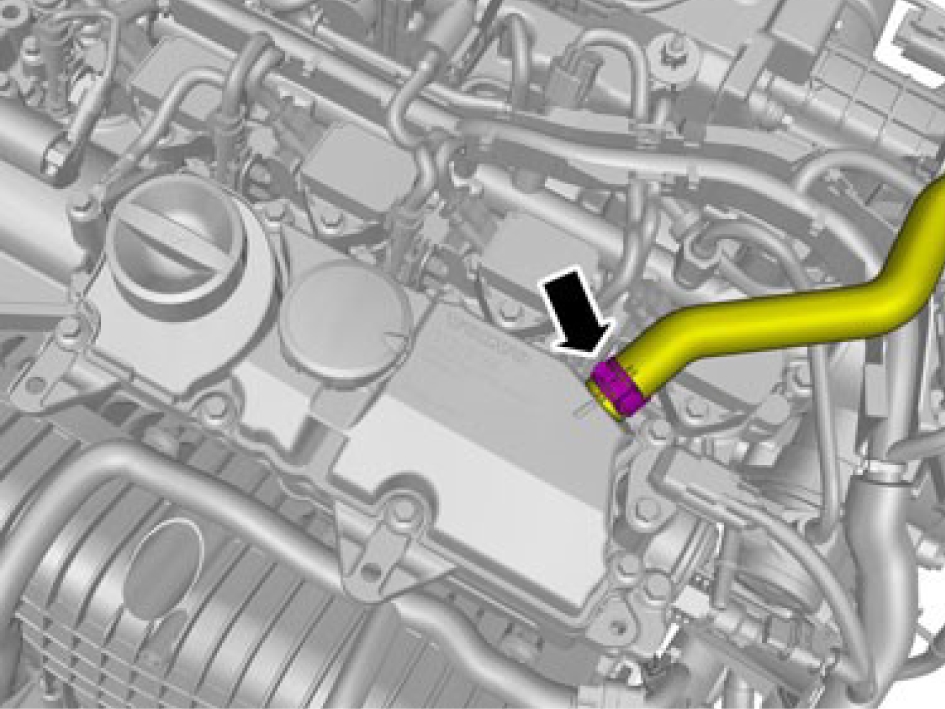
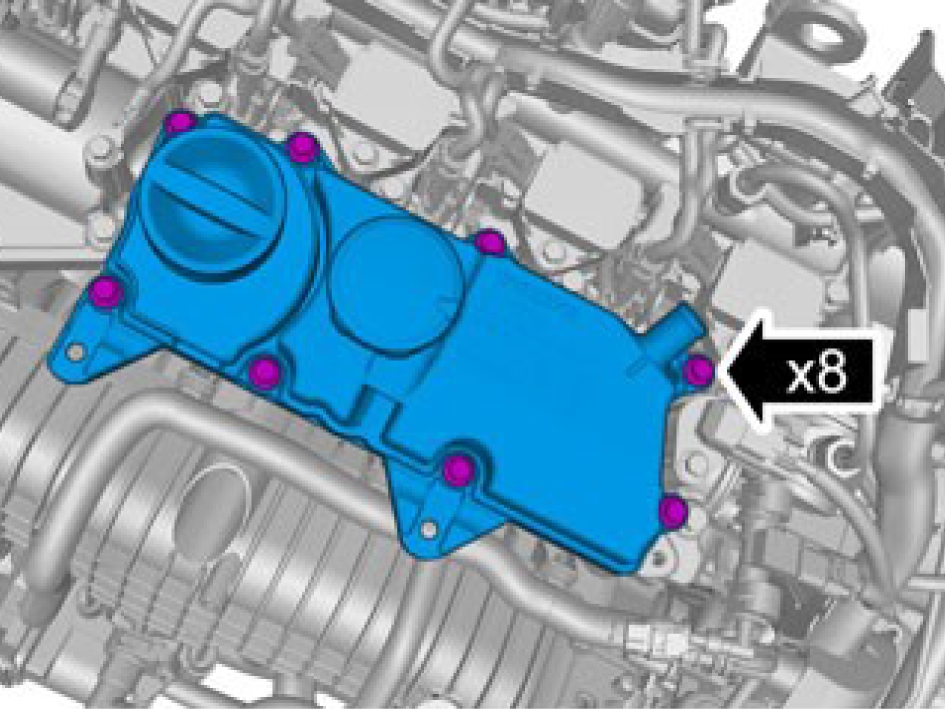
Make sure that the area around the component is clean and free of foreign material.
Remove the marked component.
Installation
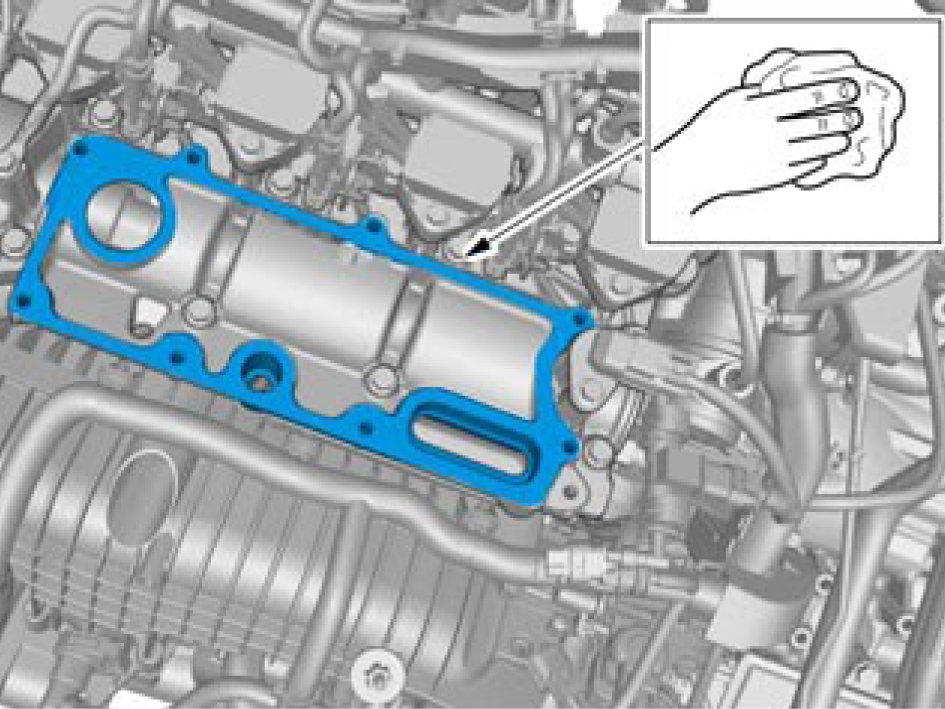
Make sure that the mating faces are clean and free of foreign material.
Clean the area with isopropanol.
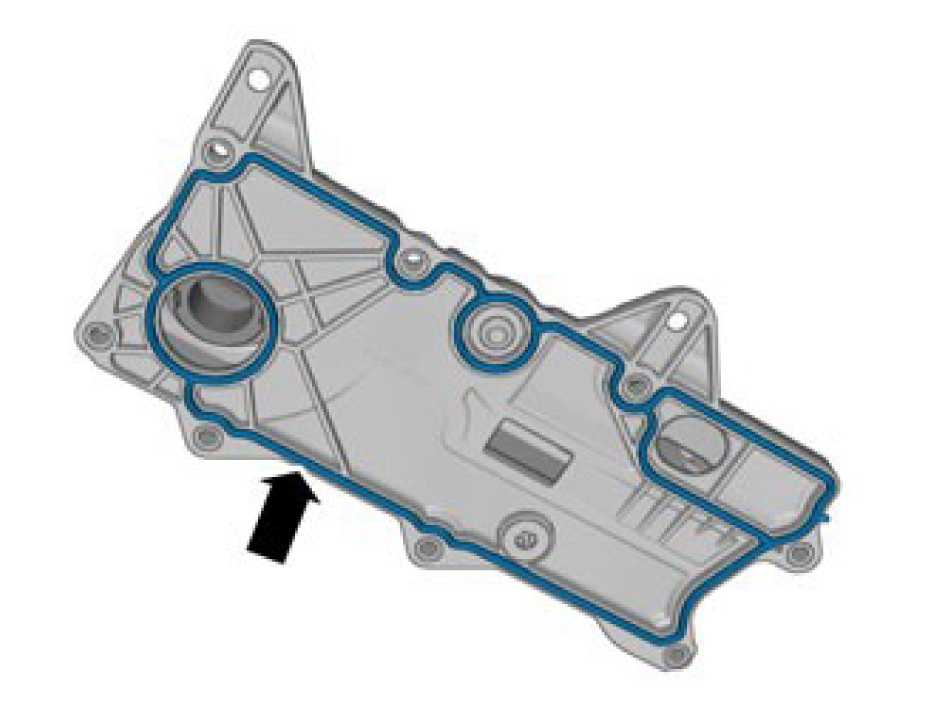
Make sure that the surface is clean and free of foreign material.
Make sure that a new component is installed.
Make sure that the seal is correctly located.
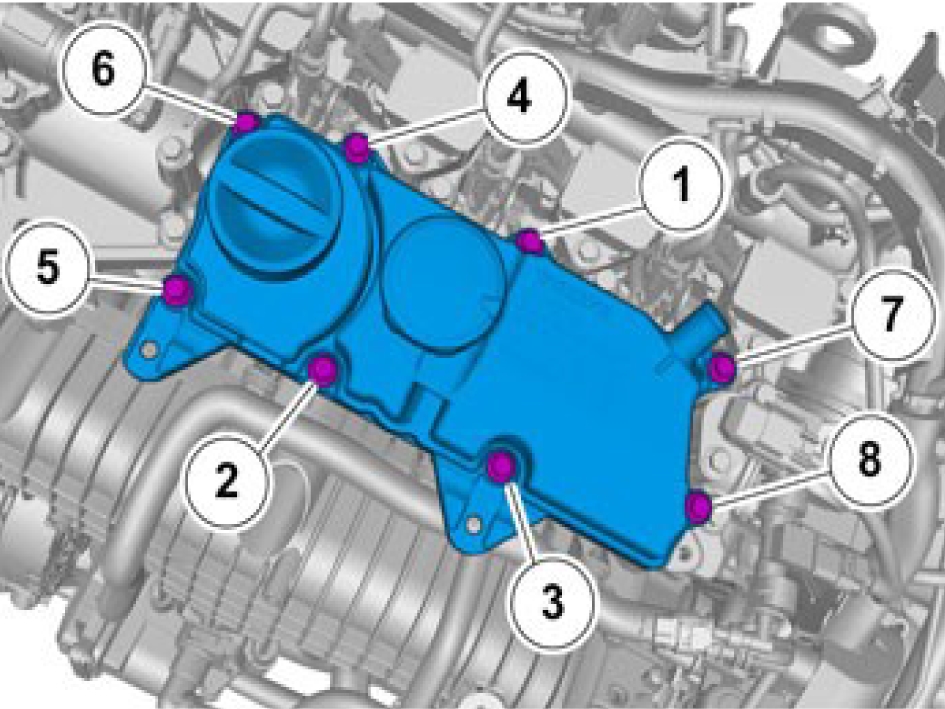
Make sure to follow the sequence indicated.
Install the screws M6, torque: 10 Nm
Induction pipe, replace
Remove
Remove the clips.
Disconnect the connector.
Disconnect the connector.
Remove the screws.
Undo the hose from the connection.
Fold marked component aside.
Disconnect the connector.
Remove the screws.
Fold marked component aside.
Remove the screw.
Remove the component carefully.
Remove the screws.
Loosen the clip use special tool: 951 2943
Undo the hose from the connection.
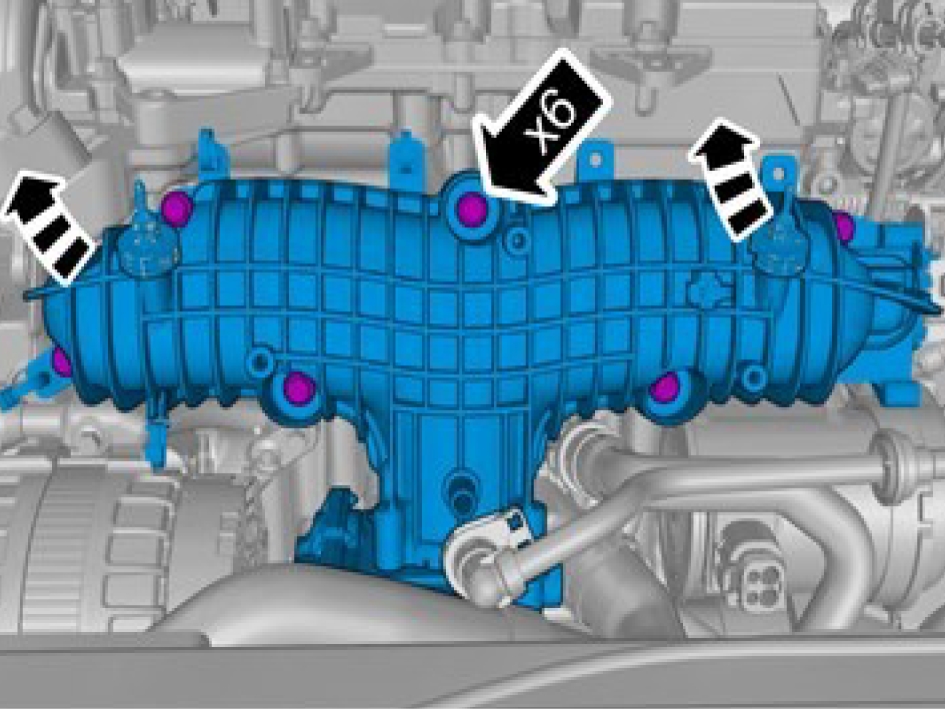
Remove the screws.
Installation
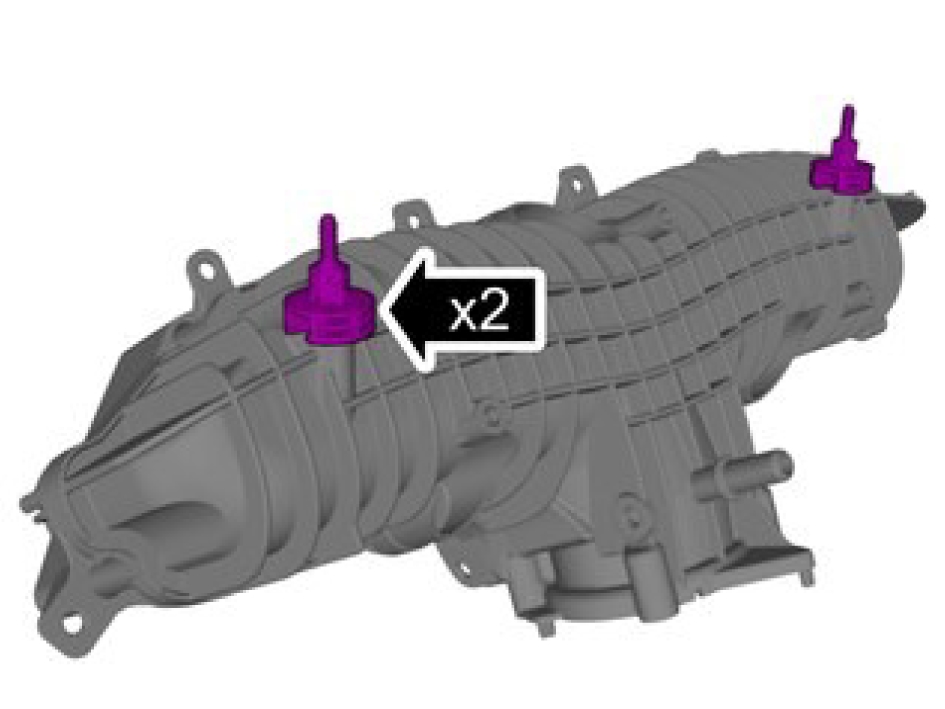
Transfer the screw nipples to the new induction pipe, torque: 6 Nm
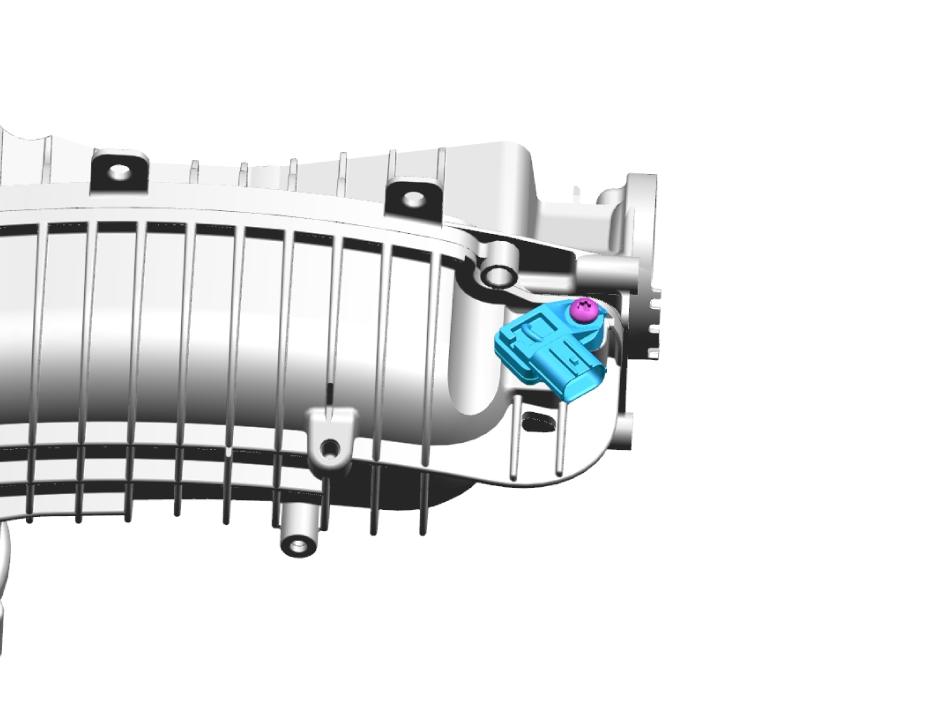
Transfer the TMap sensor to the new induction pipe.
Replace the o-ring.
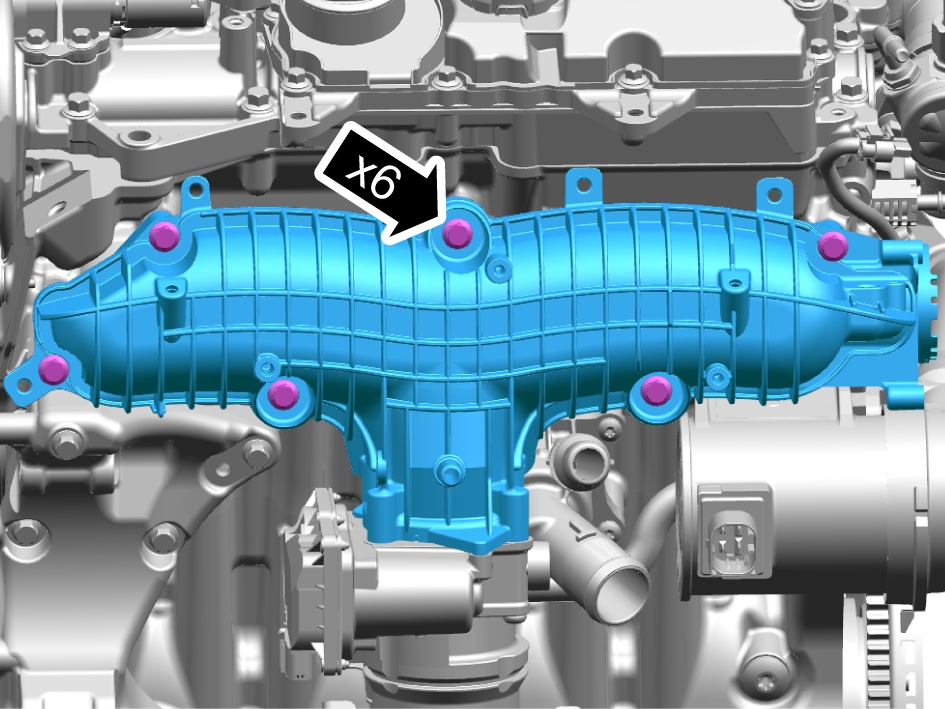
Install the induction pipe.
Screws M6, torque:
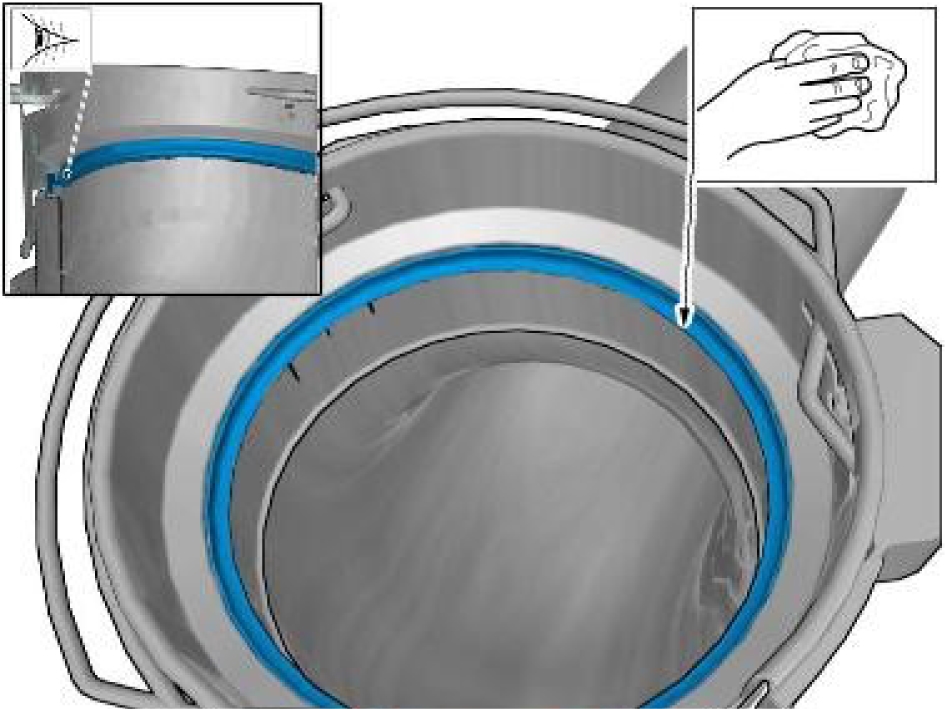
Clean the area.
Make sure the sealing is correct paced.
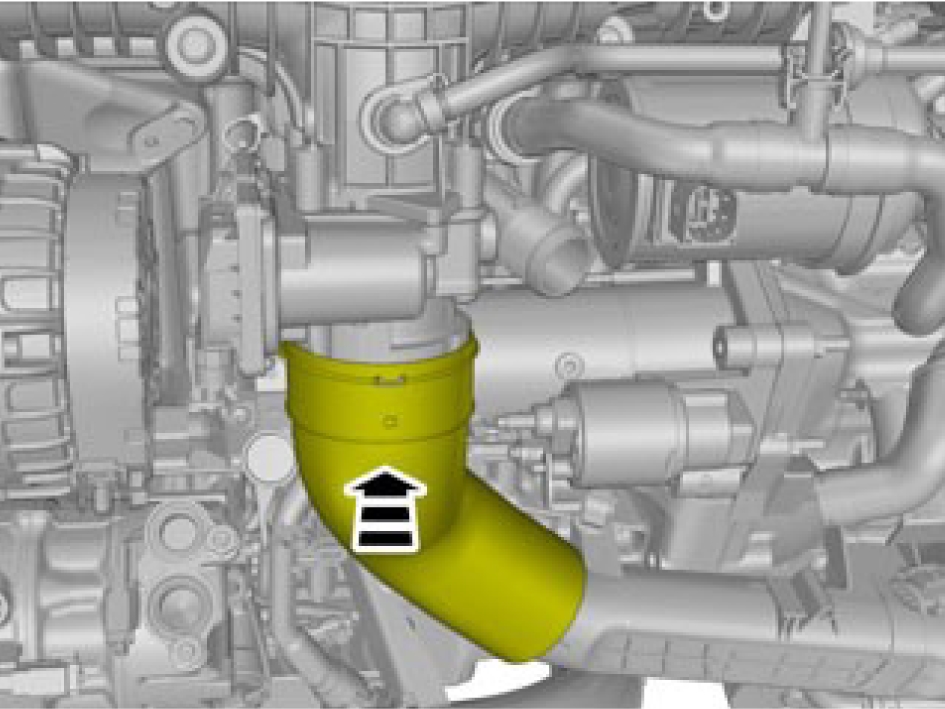
Install the pipe.
Install the EVAP valve bracket, to Inlet manifold, torque: 5 Nm

Install the MAP sensor, torque: 4 Nm
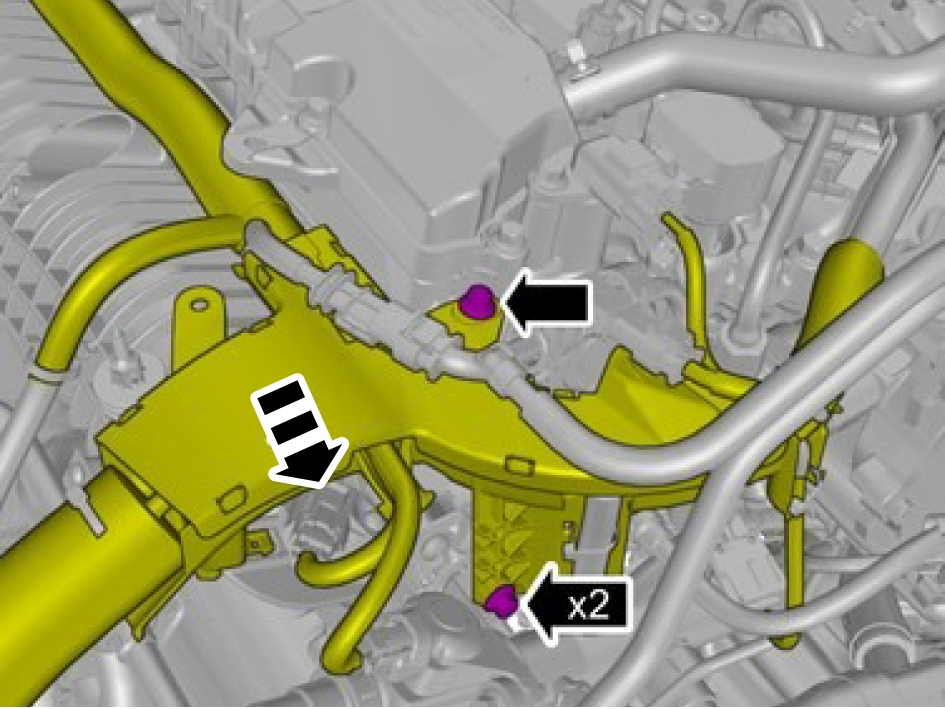
Fold marked component back.
Install the screws M6, torque: 10 Nm
Connect the connector.
Install the EVAP pipe, torque: 3 Nm
Install the connector.
Install the connector.
Install the clips.
Template
Template
Turbocharger, replace
Removal
Drain cooling system, draining, filling, and bleeding, refer to:
Cooling system - draining, charging and bleeding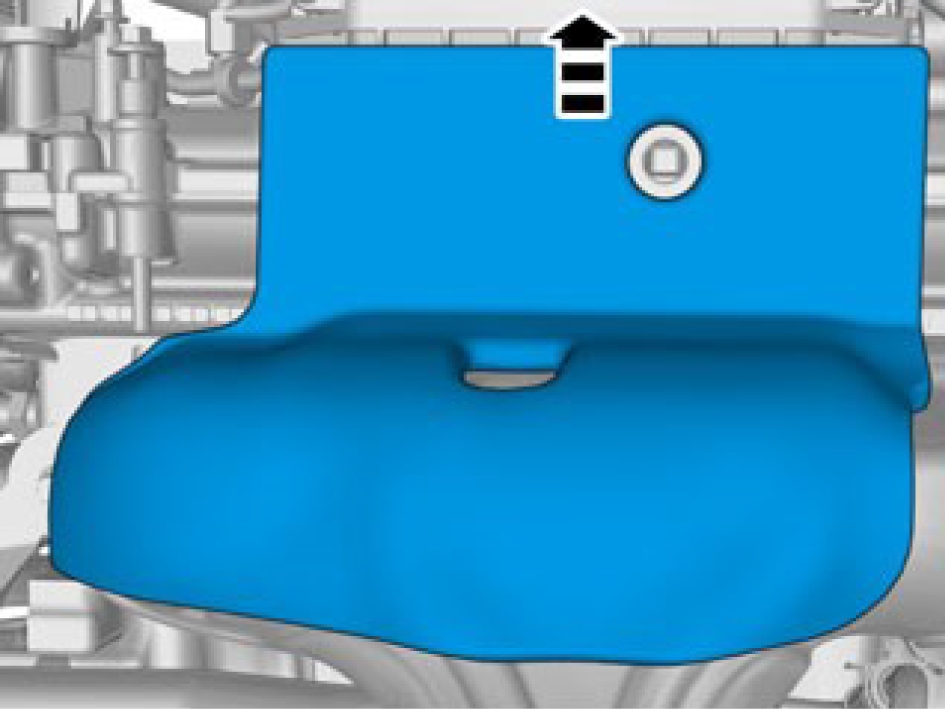
Remove the panel.
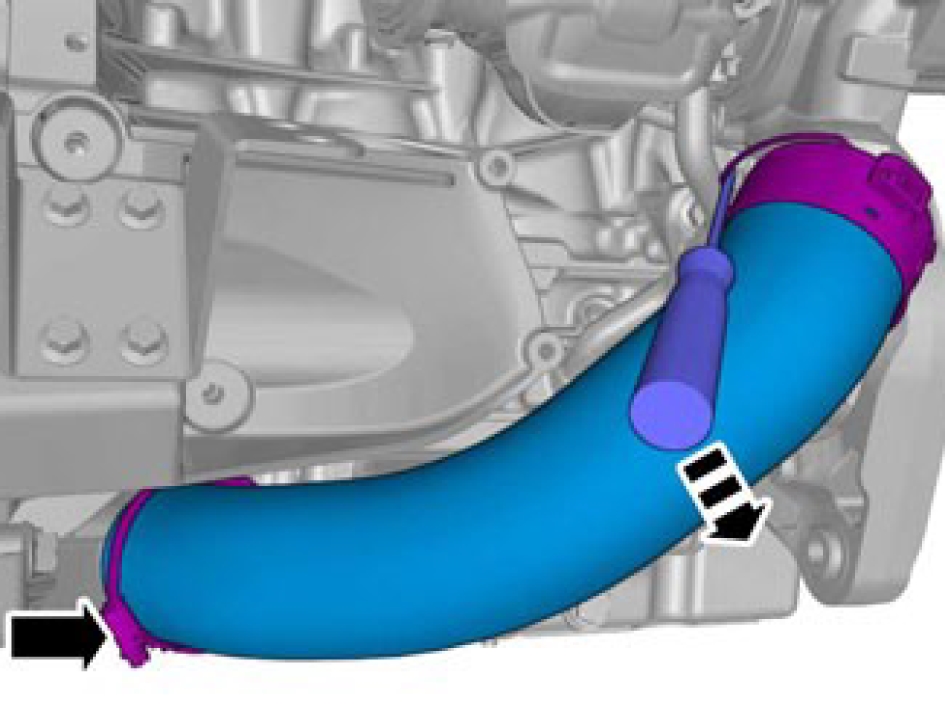
Loosen the hose clamp.
Release the lock.
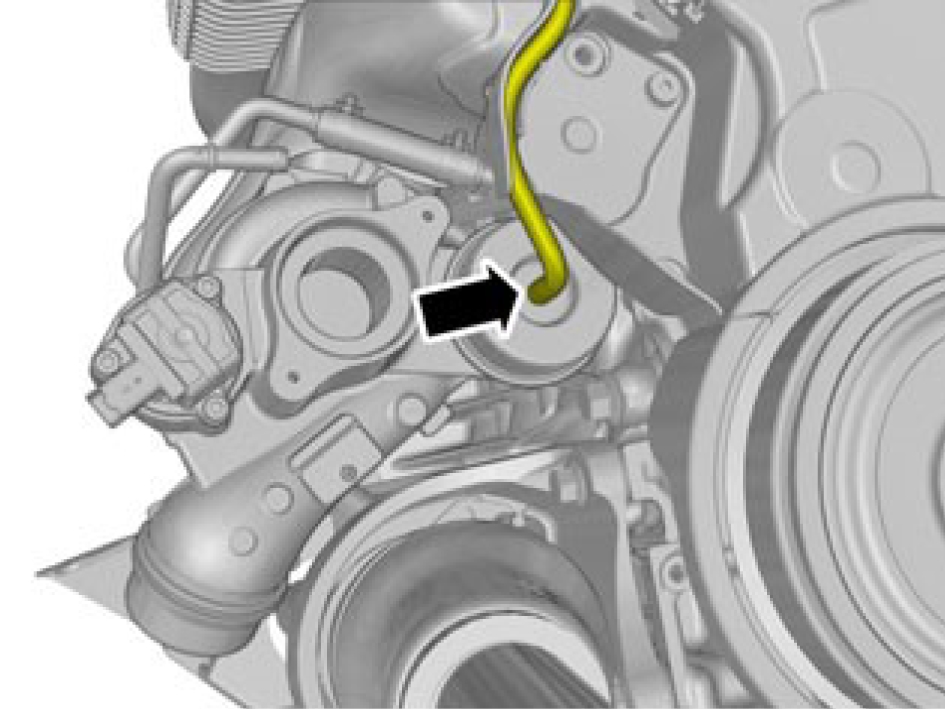
Remove the hose.
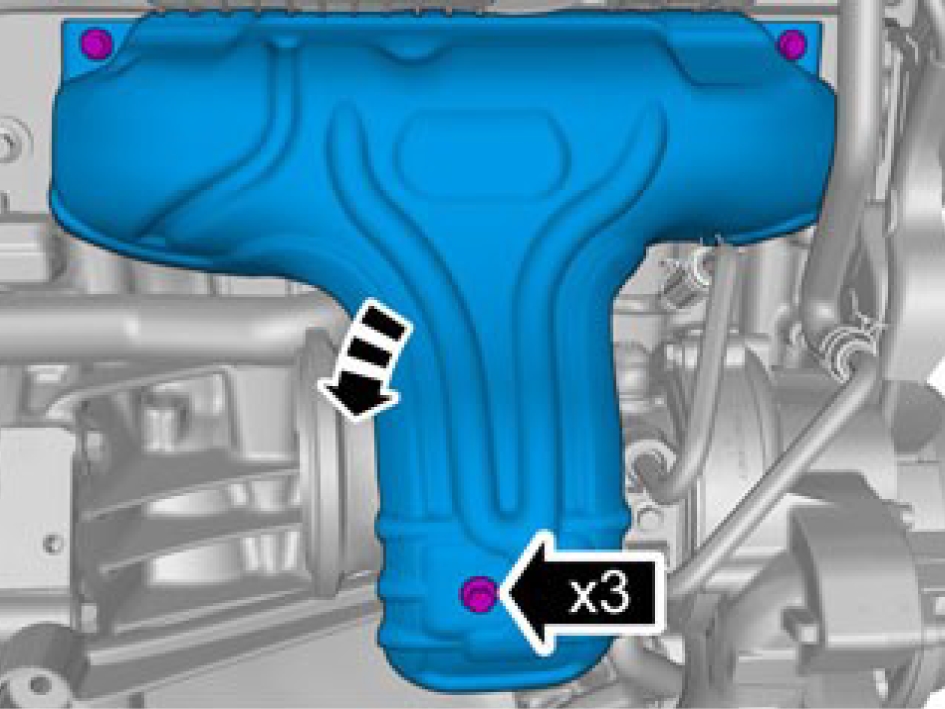
Remove the marked component.
Remove the screws.
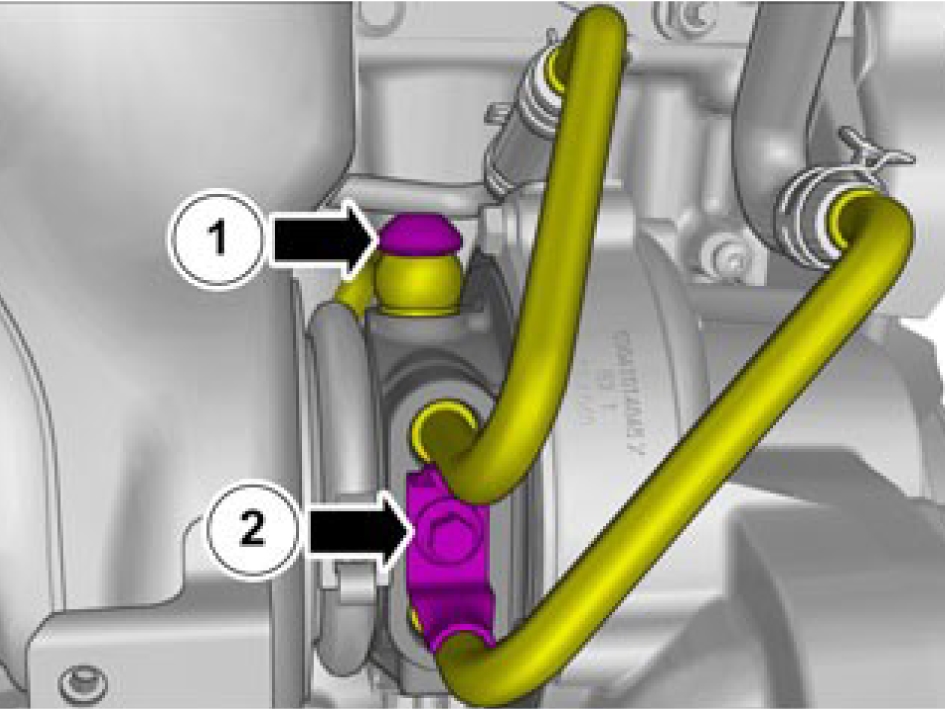
Remove the oil pressure pipe to the turbocharger.
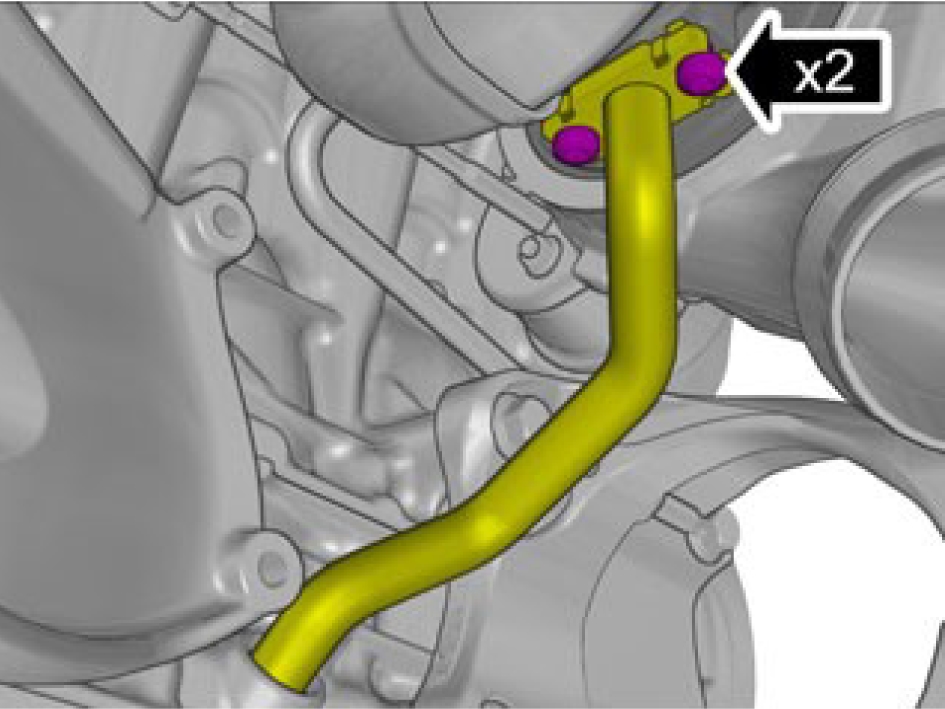
Remove the screws.
Remove the pipe.

Remove the nuts.
Remove the marked component.
Installation
1. Torque: Exhaust manifold to cylinder head, nut
Stage 1: 20 Nm
Stage 2: 20 Nm
2. Torque: Exhaust manifold to cylinder head, bolt.
Stage 1: 20 Nm
Stage 2: 20 Nm
Install the pipe.
Install the screws M6, torque: 10 Nm
Install the screws M6, torque: 10 Nm
install the oil pressure pipe to the turbocharger, torque: 26 Nm
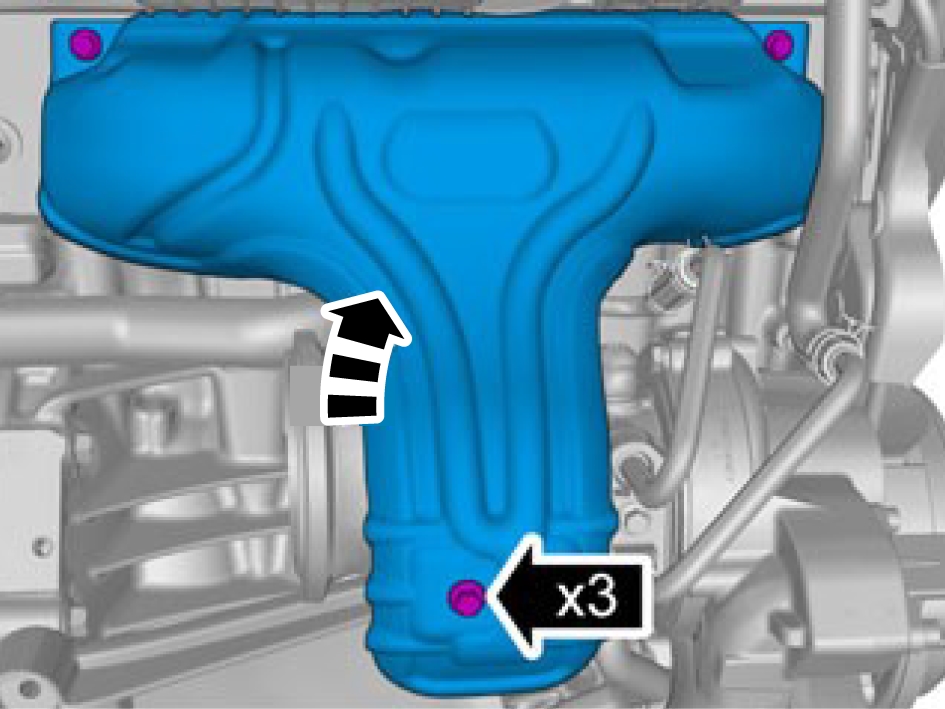
Install the marked component.
install the screw M6, torque: 10 Nm
Install the hose.
Make sure that the mating faces are clean and free of foreign material.
Make sure that the seal is correctly located.

Install the hose a click confirms that the component is in the correct position.
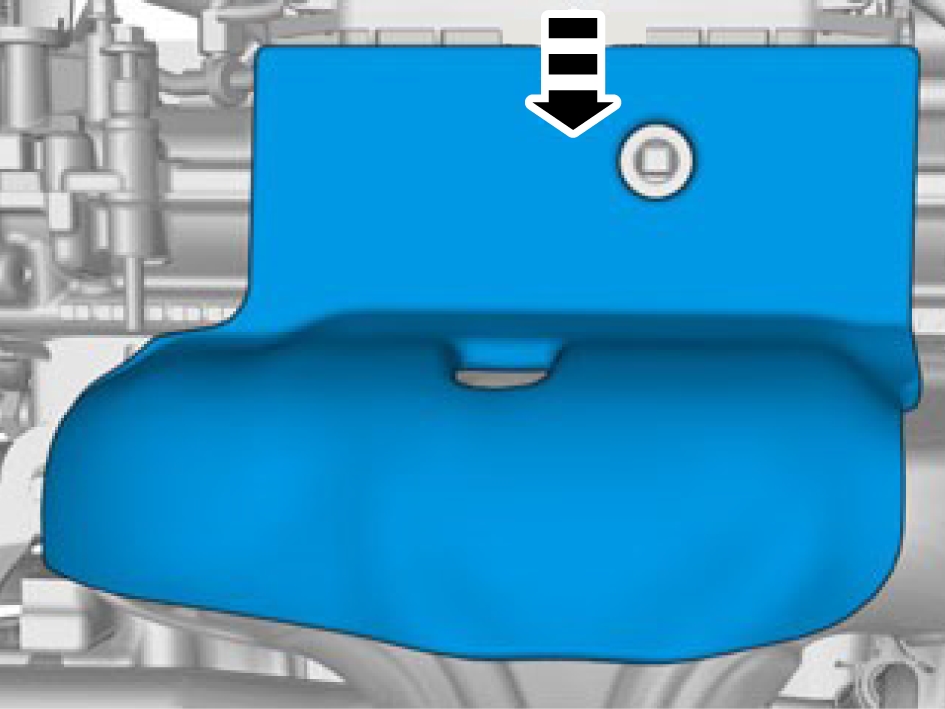
Install the panel.
Fill the cooling system, draining, filling, and bleeding, refer to:
Cooling system - draining, charging and bleedingCarrier plate, replace
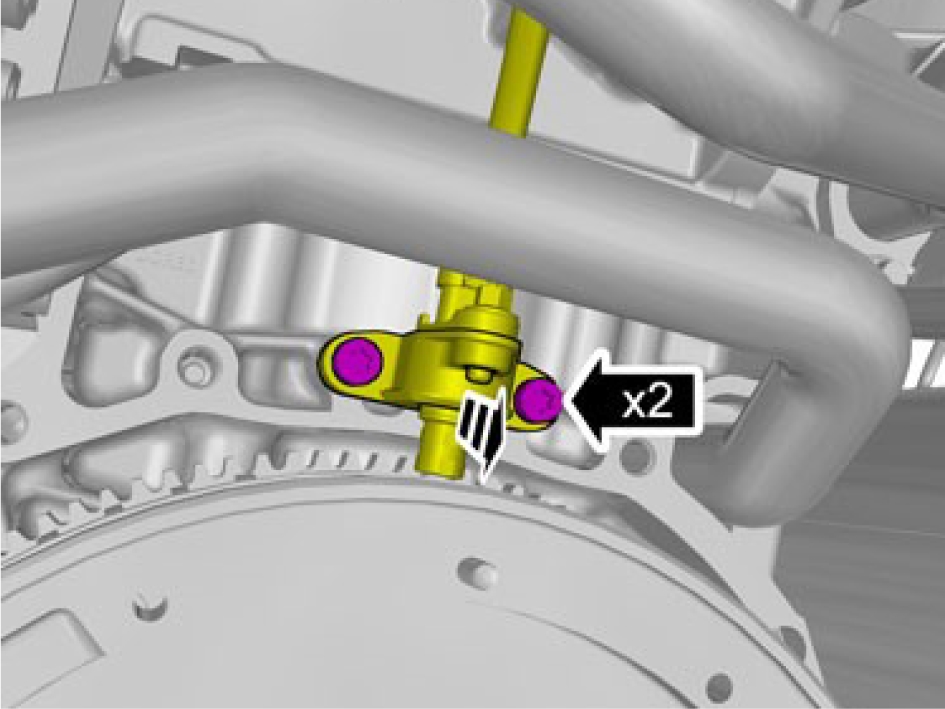
Remove the screws.
Move aside the sensor.
Install the special tool: 999 7120
Use a screw M10 x 50 mm and a nut M10
Remove the screws.
Remove the marked component.
Installation
Make sure that the mating faces are clean and free of foreign material.
Make sure that the flywheel/flexplate is in full contact with the crankshaft flange before installing the flywheel/flexplate screws.
Make sure that the locating pin on the crankshaft is aligned with the guide hole in the flywheel/flexplate.
Install the marked component.
Install special tool: 999 5678
Install the screws.
Stage 1, torque: 45 Nm.
Stage 2, angle: 50 °
Remove the special tool.
Install the screws.
Stage 1, torque: 45 Nm.
Stage 2, angle: 50 °
Remove the special tool: 999 7120
Crankshaft front seal, replace
Removal
Remove the timing belt, refer to:
Timing belt, replace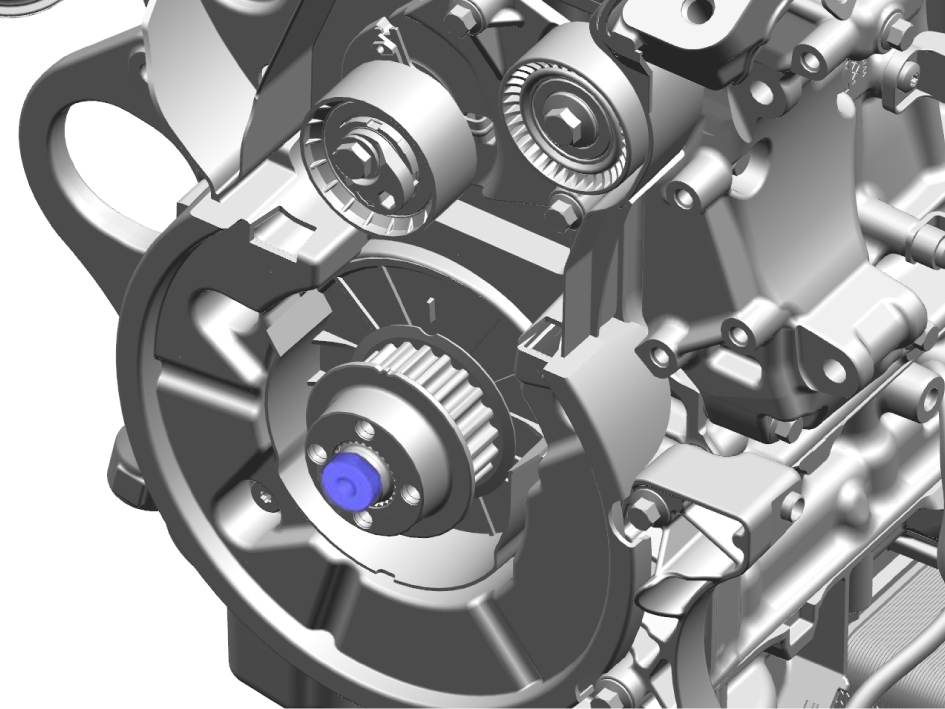
Install special tool: 999 7493
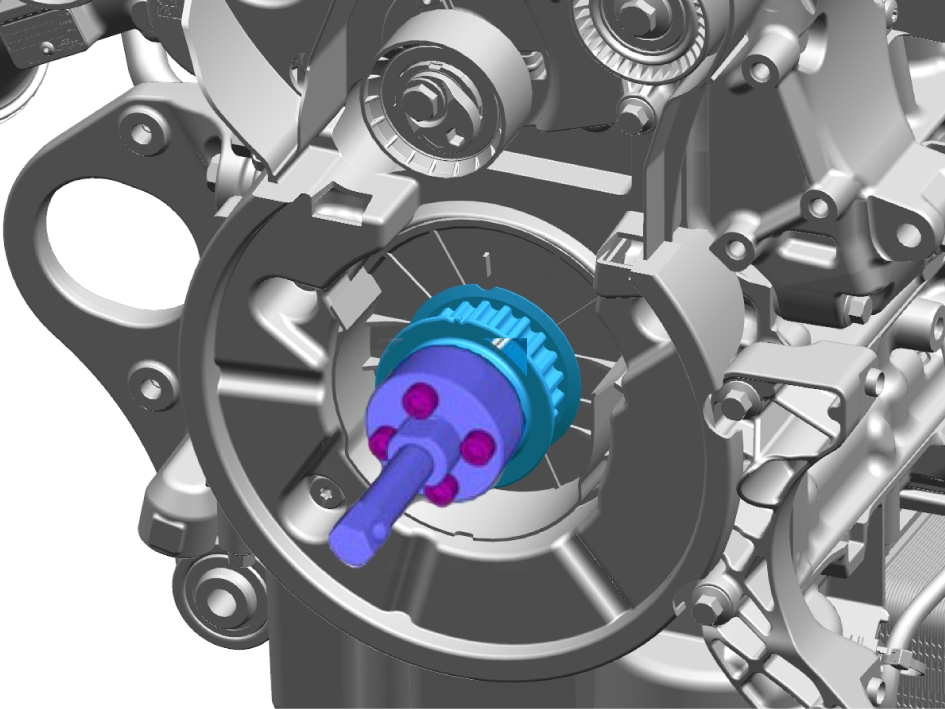
Install special tool: 999 7493
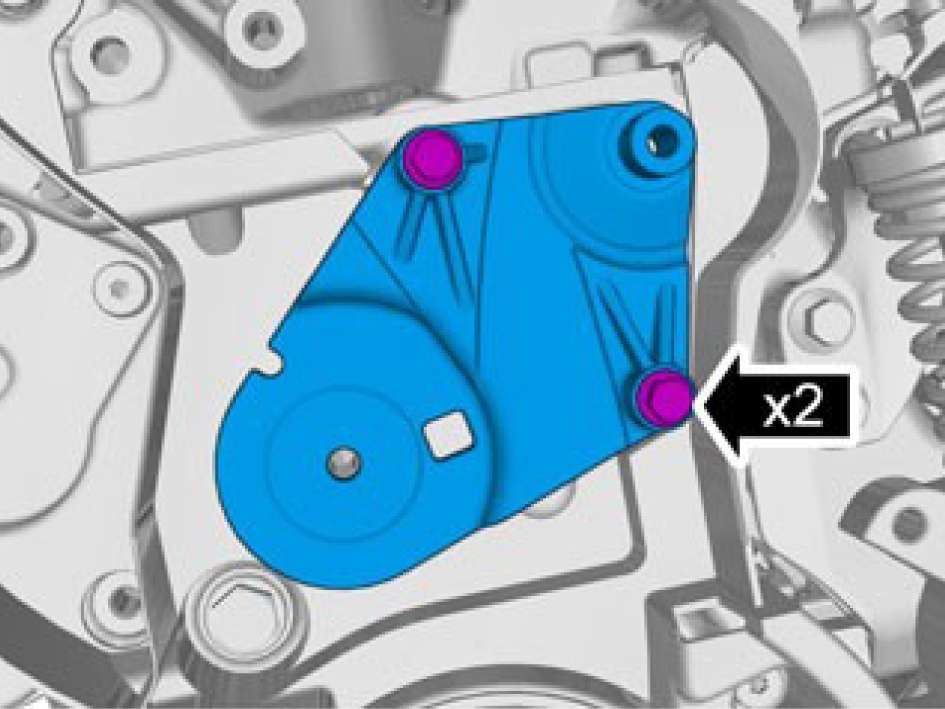
Remove the screws.
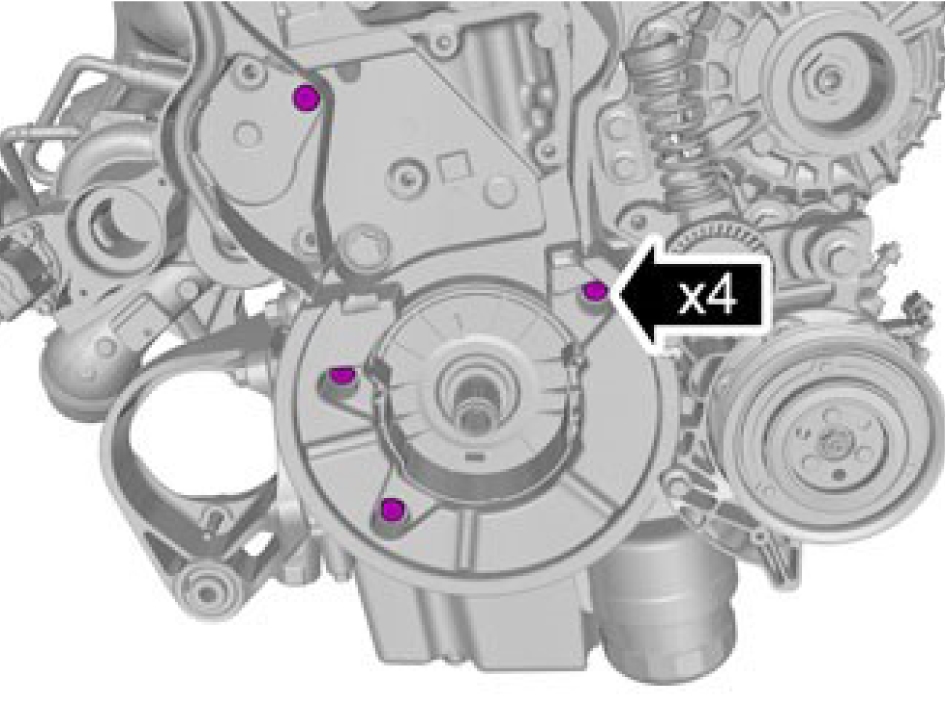
Remove the screws.
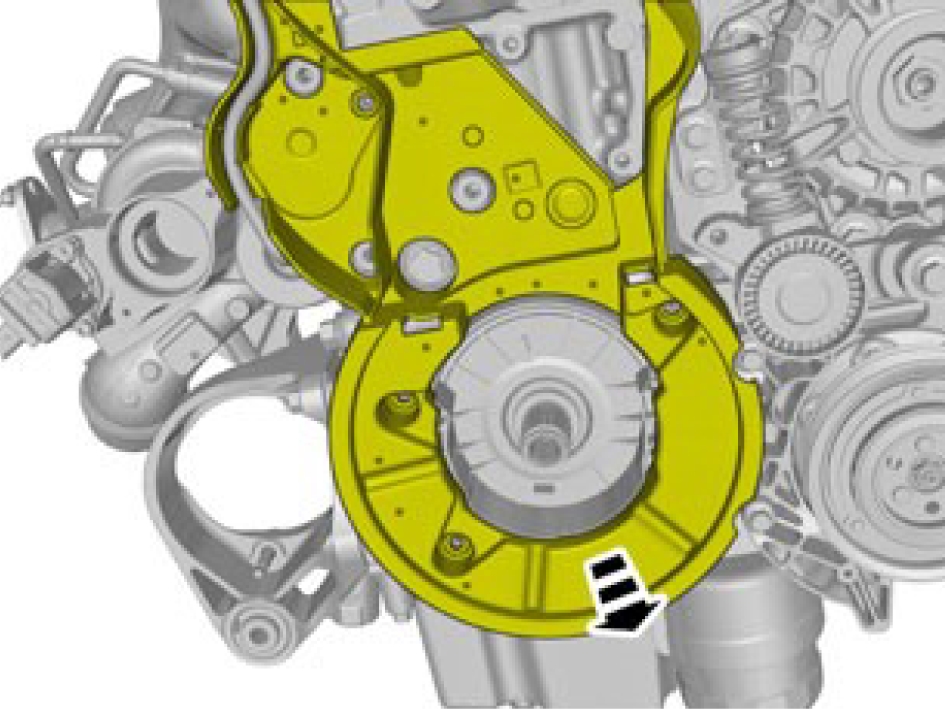
Make sure that the components are not forcibly bent.
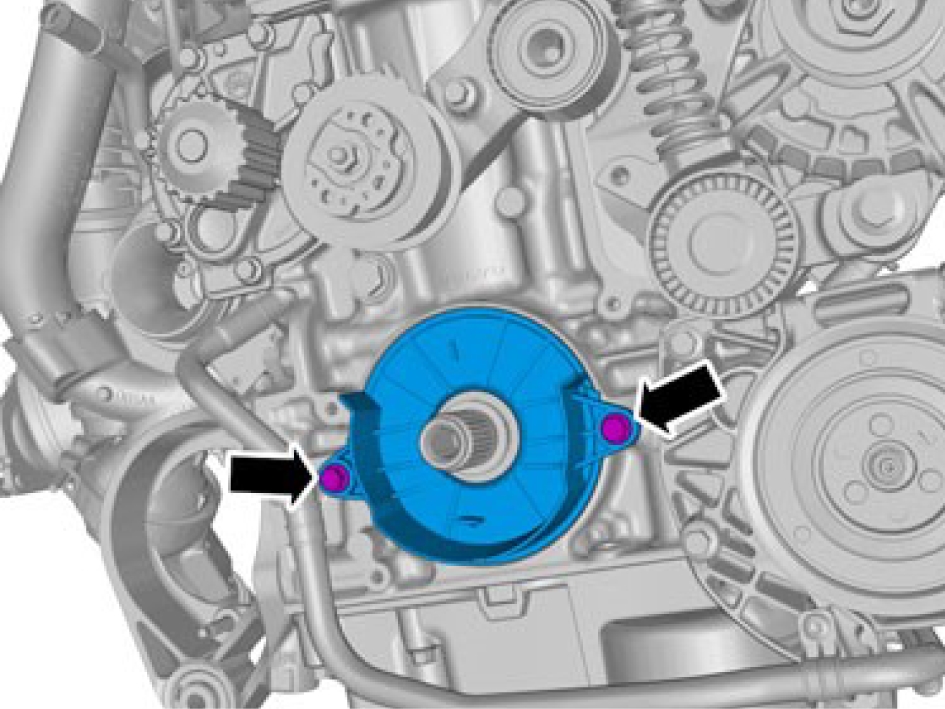
Make sure that the area around the component is clean and free of foreign material.
Remove the screws.
Installation
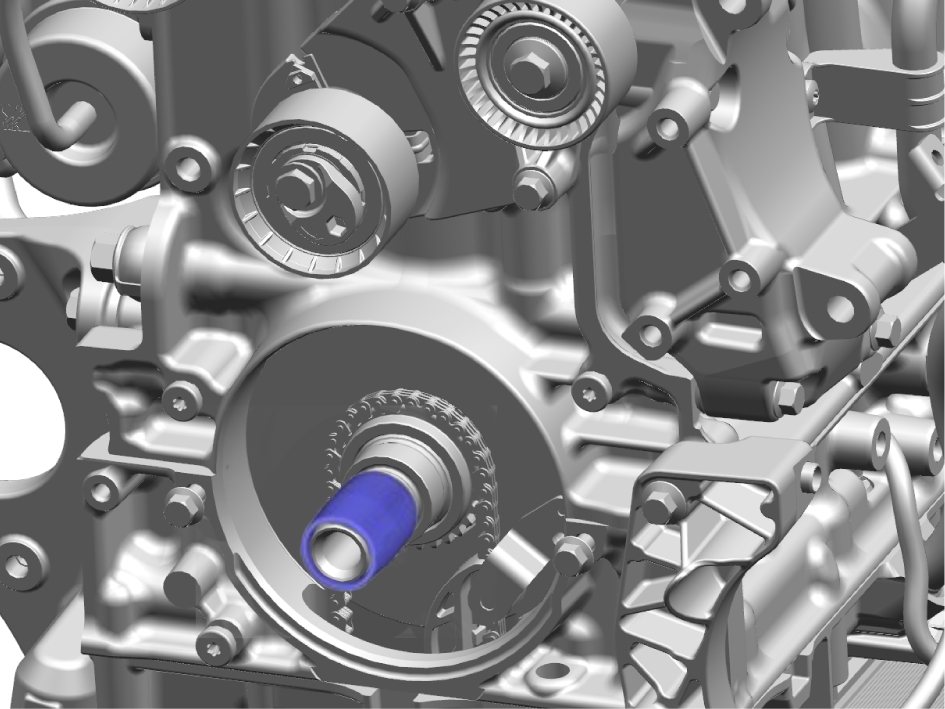
Install special tool: 999 7532
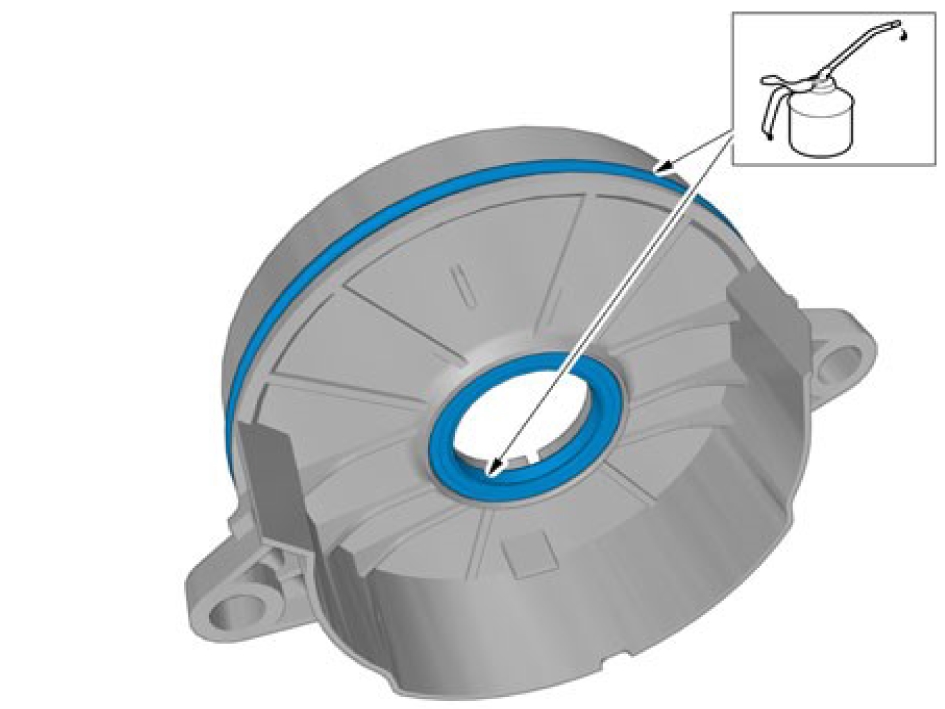
Apply engine oil.
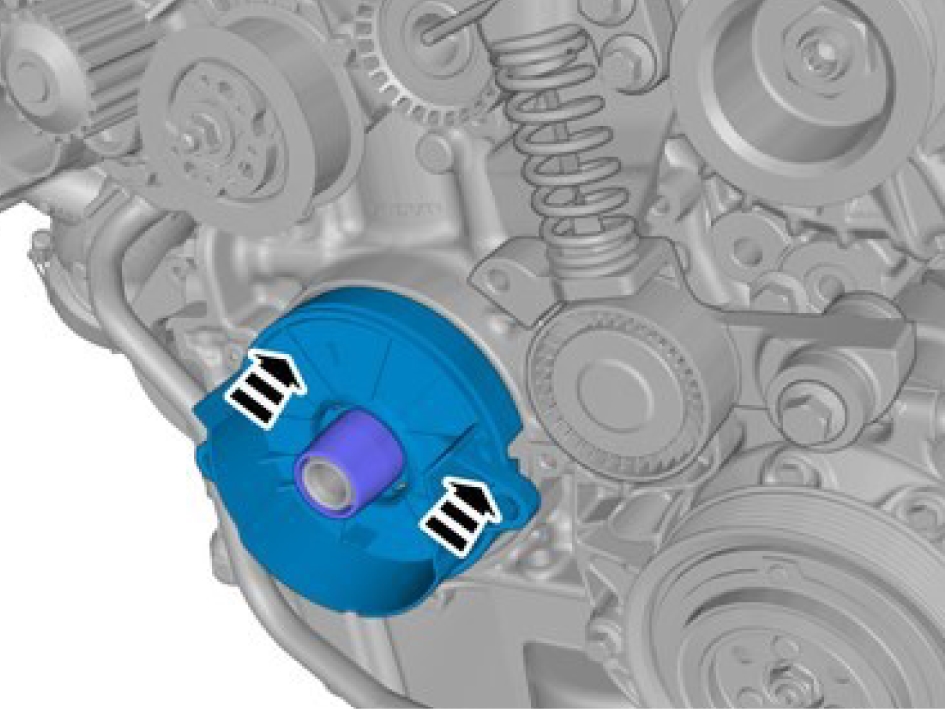
Take extra care not to damage the seal.
Make sure that the seal is correctly located.
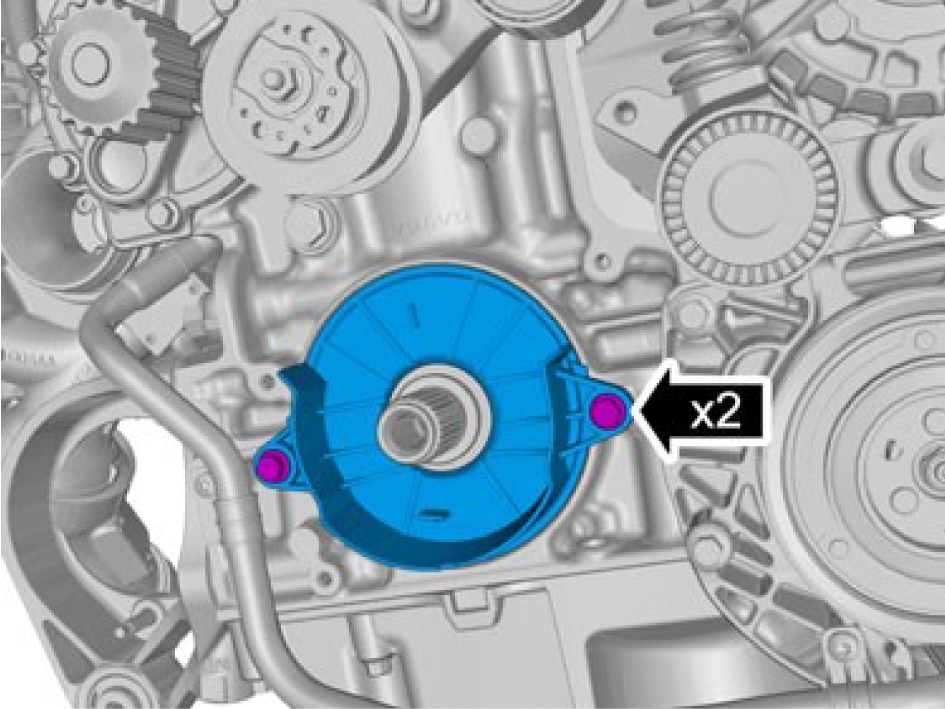
Install screws M6, torque: 10 Nm
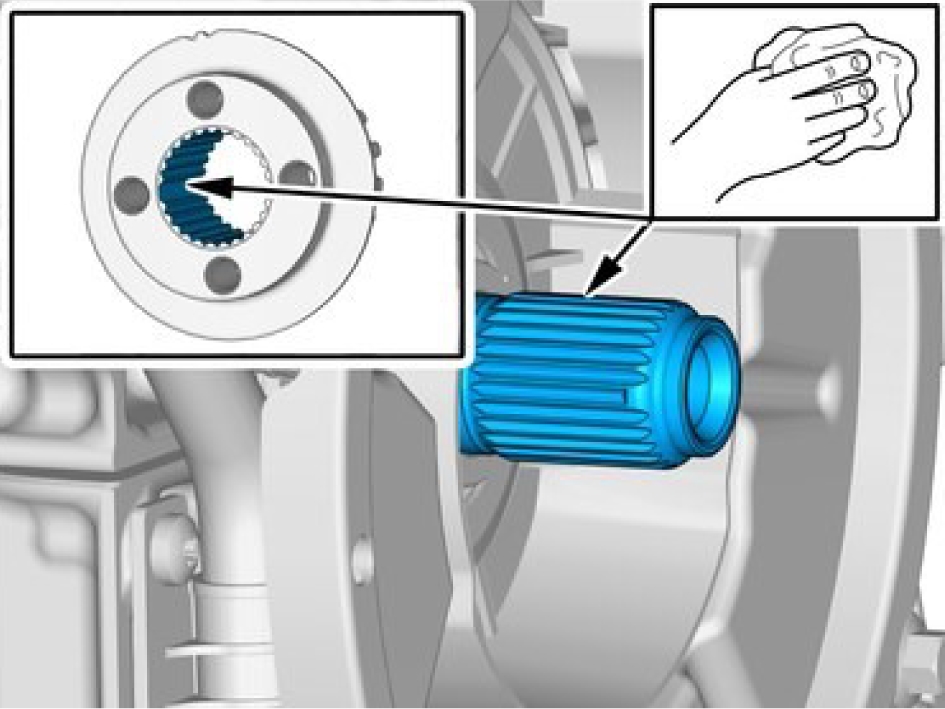
Make sure that the mating faces are clean and free of foreign material.
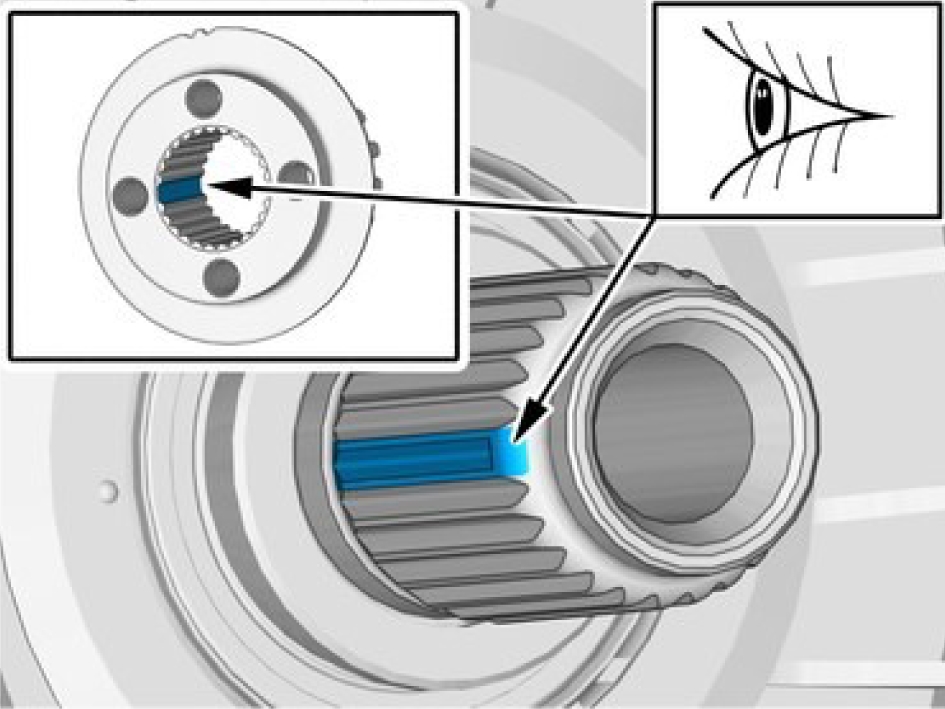
Note position of components.
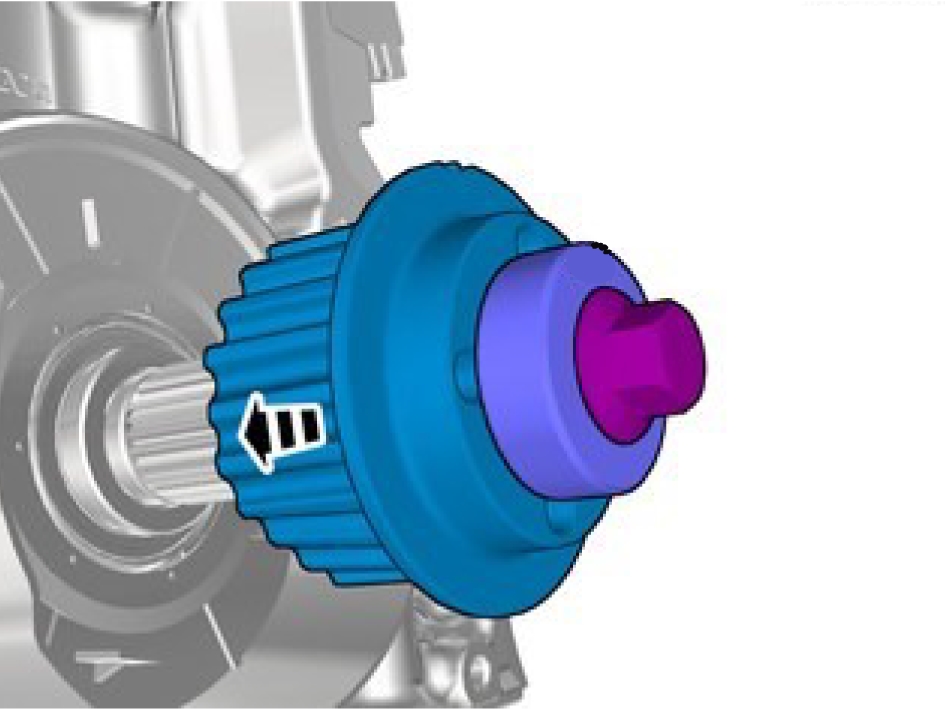
Install the crankshaft pulley use special tool 999 7047
Install the timing belt, refer to:
Timing belt, replaceCrankshaft position sensor, replace
Removal
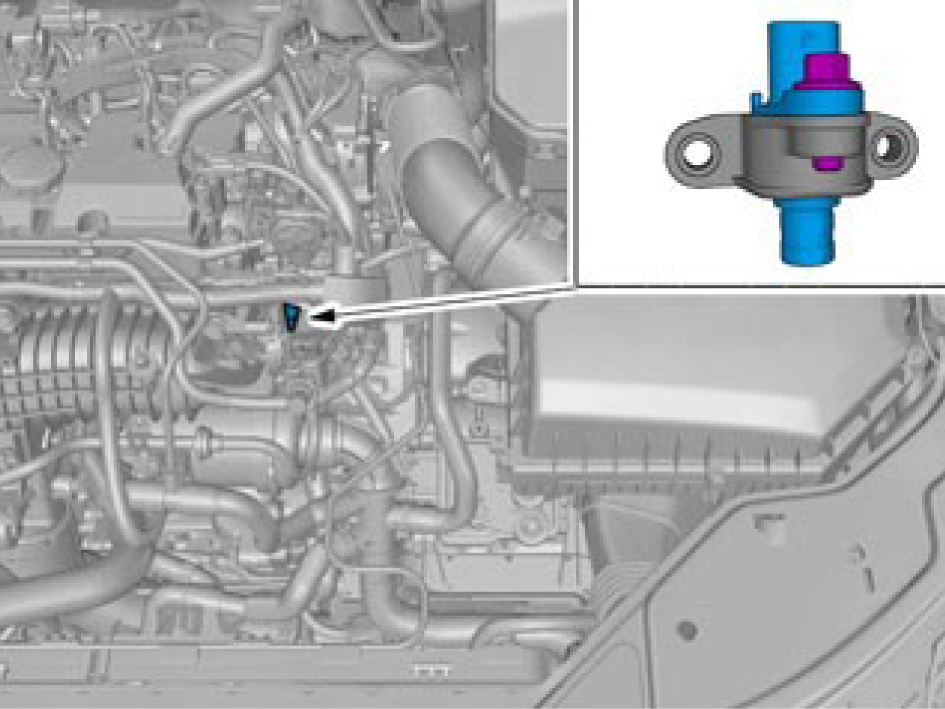
Orientation view

Loosen the hose clamp.

Note the routing of the lines and hoses.
Remove the screws.
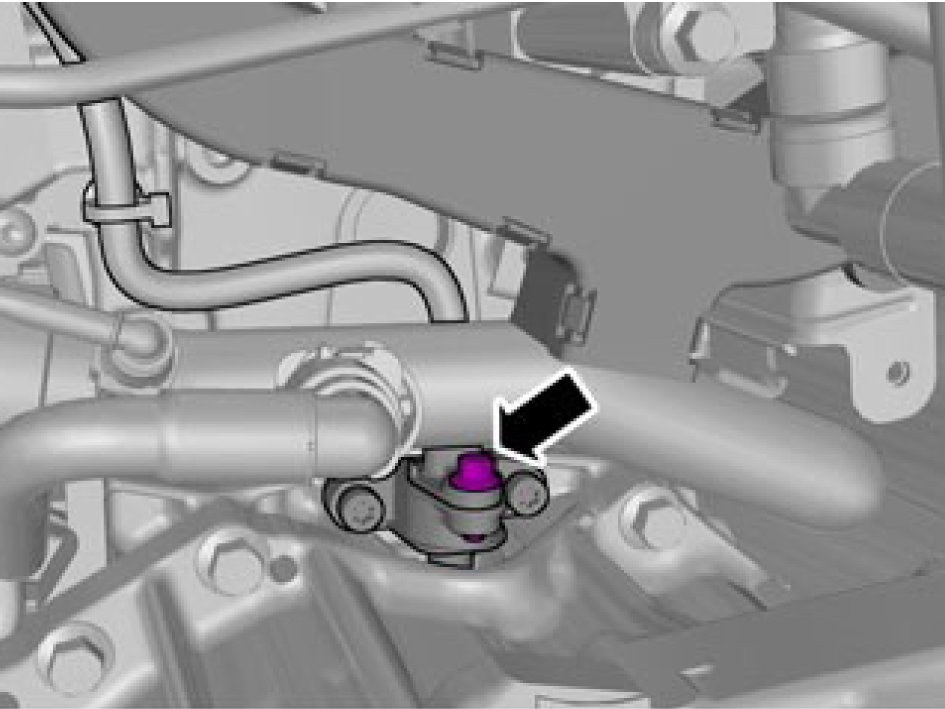
Loosen the screw.
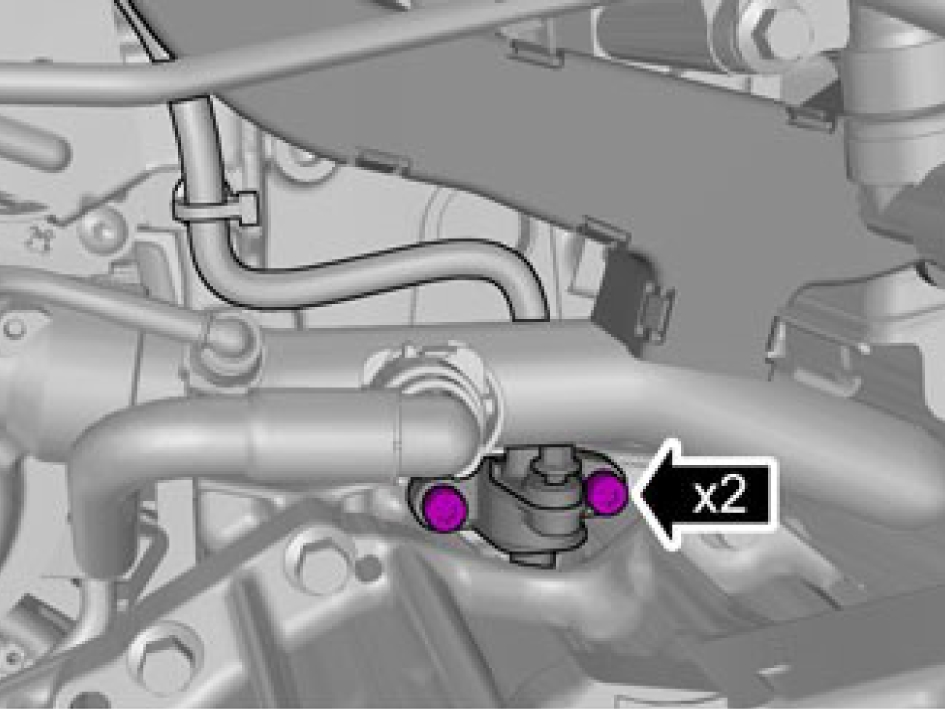
Remove the screws.

Make sure that the sensor is correctly installed.
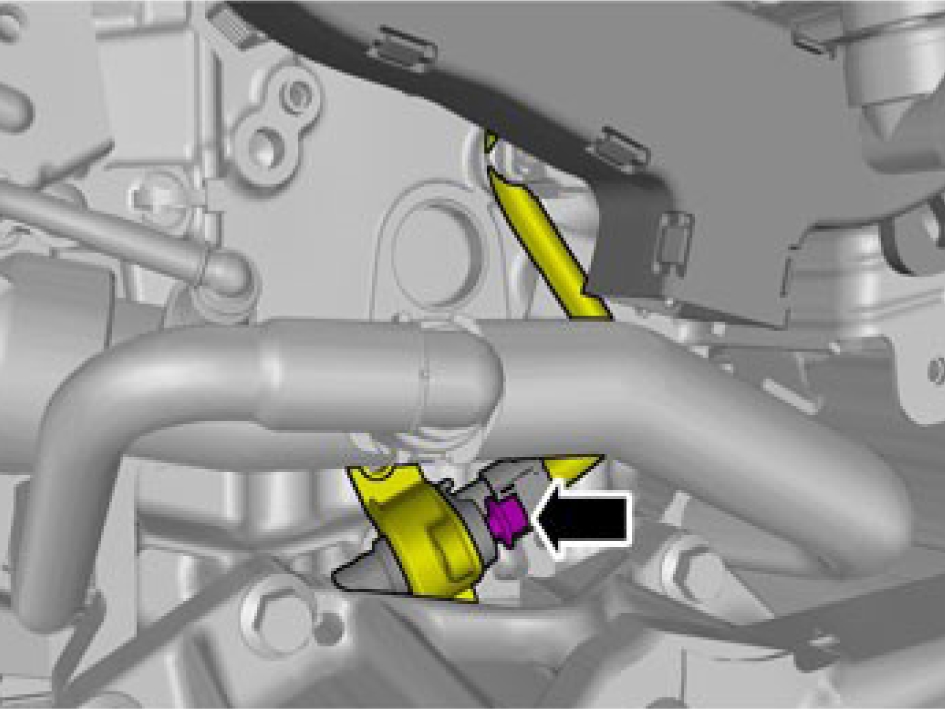
Remove the screw.

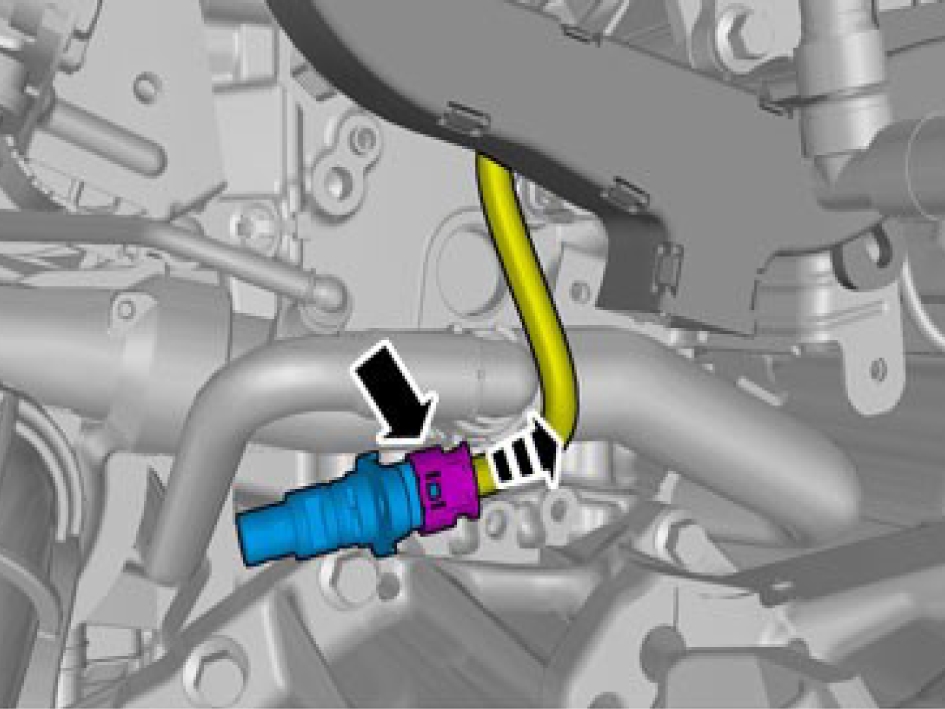
Disconnect the connector.
Installation
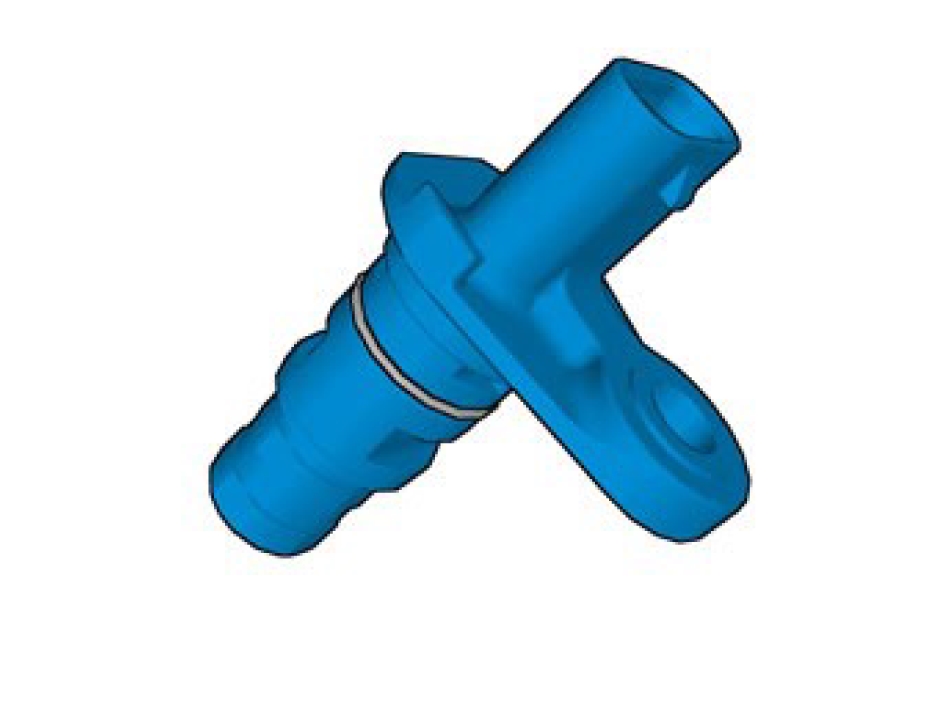
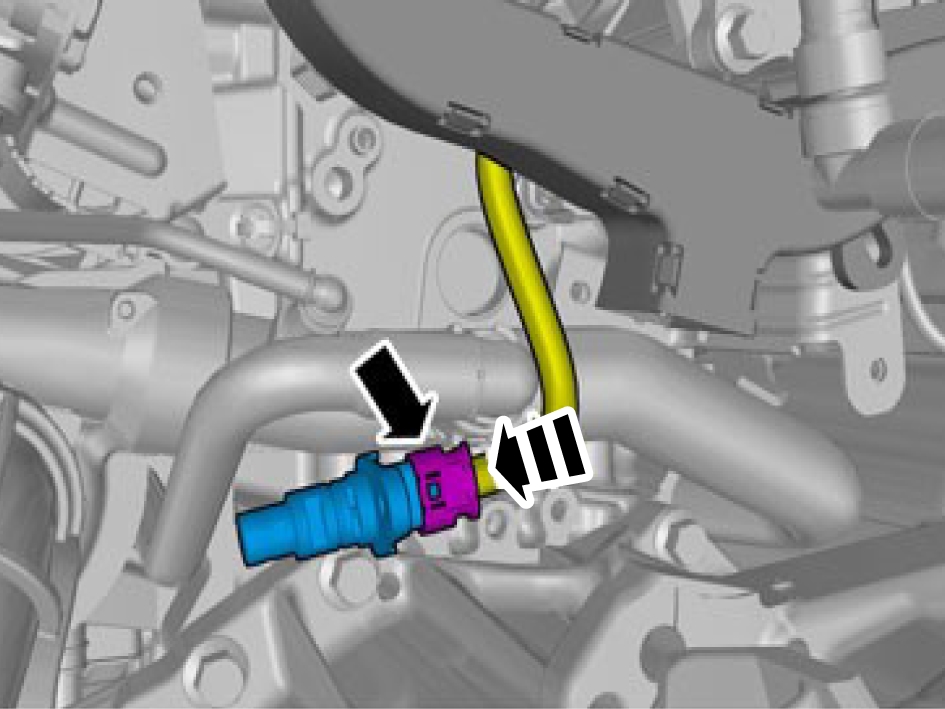
Connect the cable
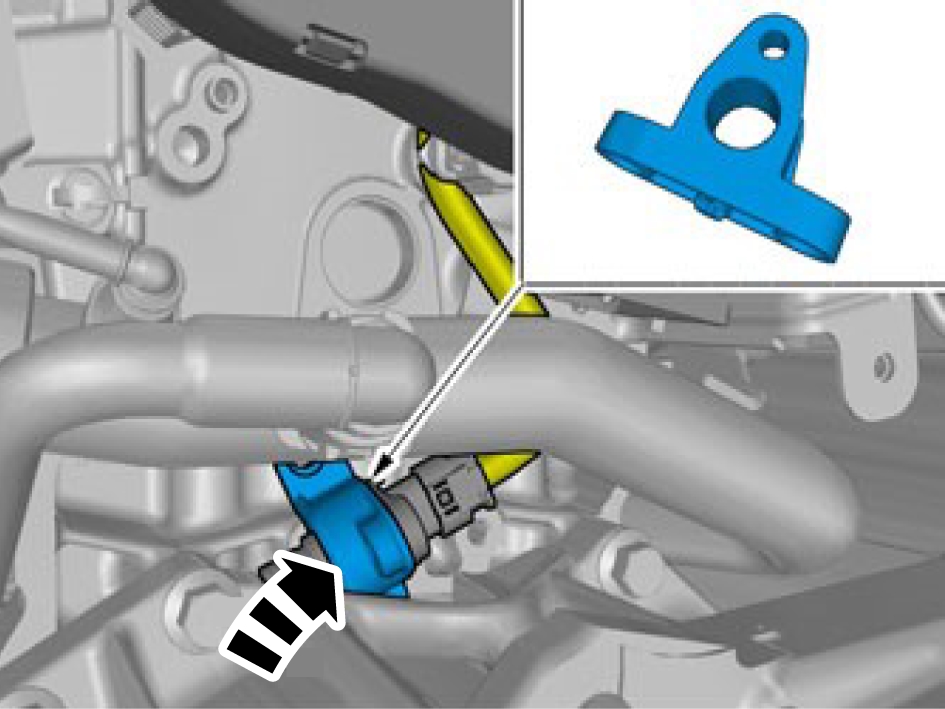
Install the screw.
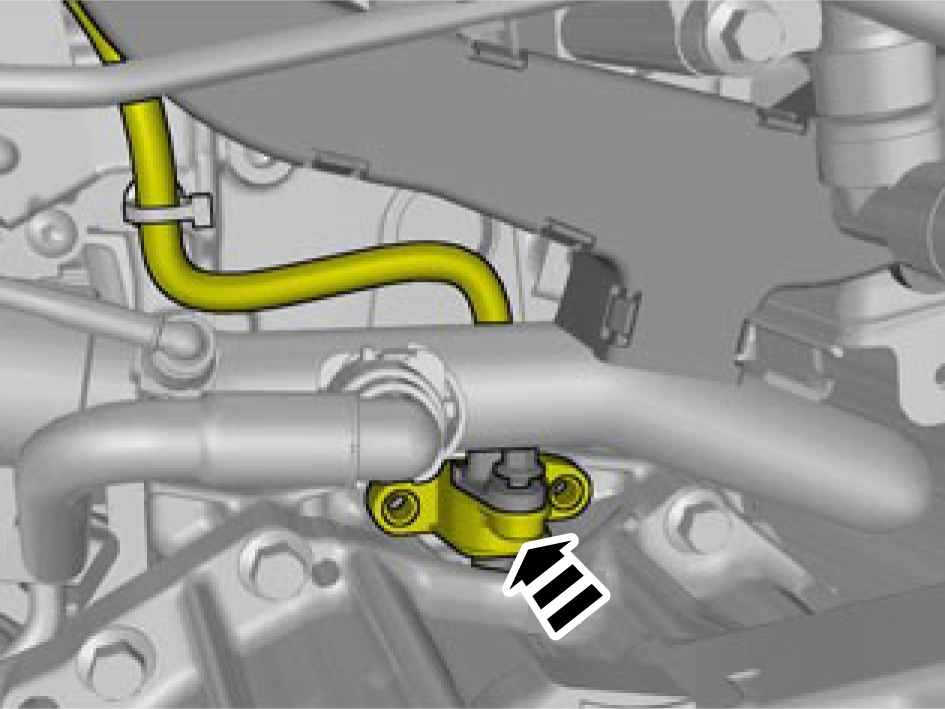
Make sure that the sensor is correctly installed.
Install the flywheel sensor bracket to the engine, torque: 10 Nm
Sensor screw M6, torque:10 Nm
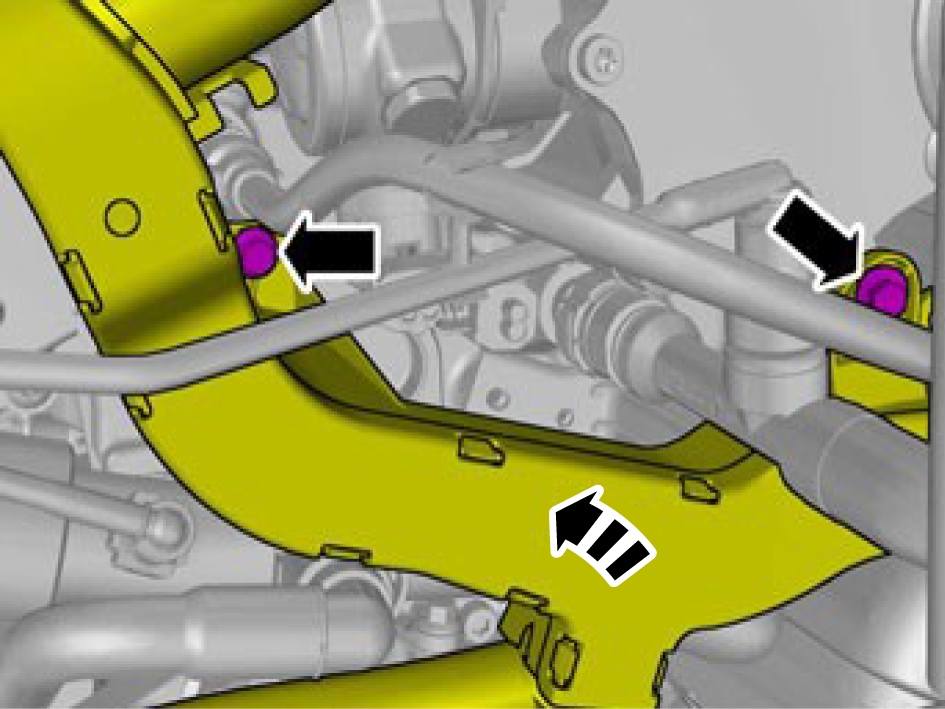
Install the screws M6, torque: 10 Nm
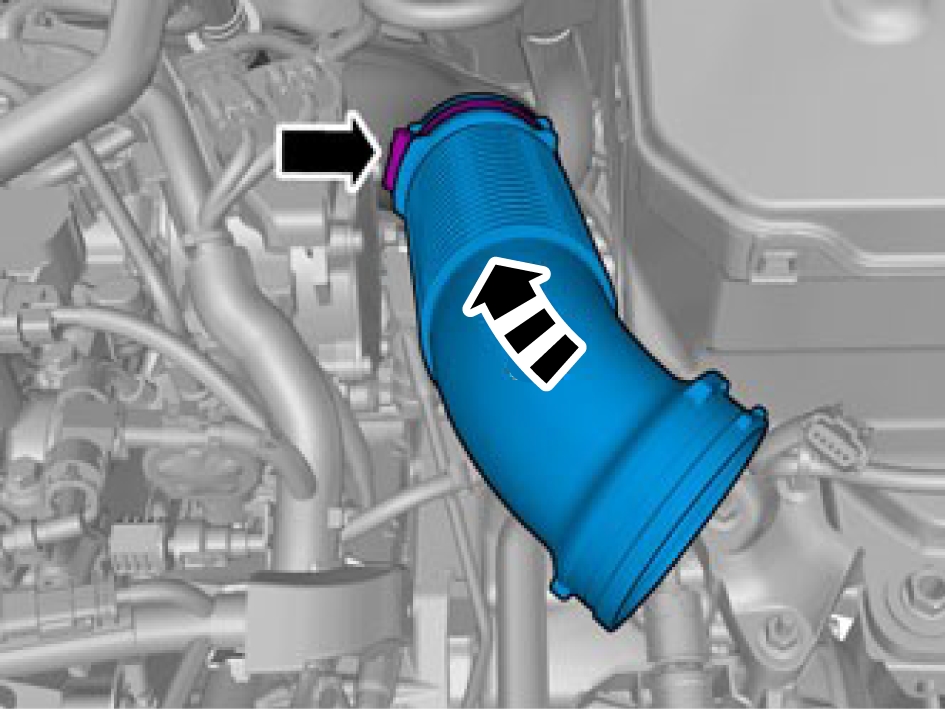
Install marked component.
Crankshaft seal, rear, replace
Removal
Remove the carrier plate, refer to:
Carrier plate, replace
Take extra care not to damage the mating faces.
Use special tool: 999 5651
Installation

Make sure that the mating faces are clean and free of foreign material.
Apply engine oil on the sealing.
Install the sealing use special tool: 999 7174
Install the carrier plate, refer to:
Carrier plate, replaceEngine coolant temperature sensor, replace
Removal
Drain cooling system, draining, filling, and bleeding, refer to:
Cooling system - draining, charging and bleeding
Remove the marked components.
Release the lock.
Disconnect the connector.
Be prepared to collect escaping fluid.
Remove the sensor use special tool: 951 2885
Make sure that a new seal is installed.
Install the temperature sensor coolant, torque: 22 Nm
Use special tool: 951 2885
Connect the cable.
Install the hose clamps.
Fuel injector - V102
Engine coolant temperature sensor - S403
Cylinder head, replace
Removal
Perform fuel system pressure release, refer to:
Fuel system pressure releaseRemove the supercharger, refer to:
Supercharger, replaceRemove the panel.
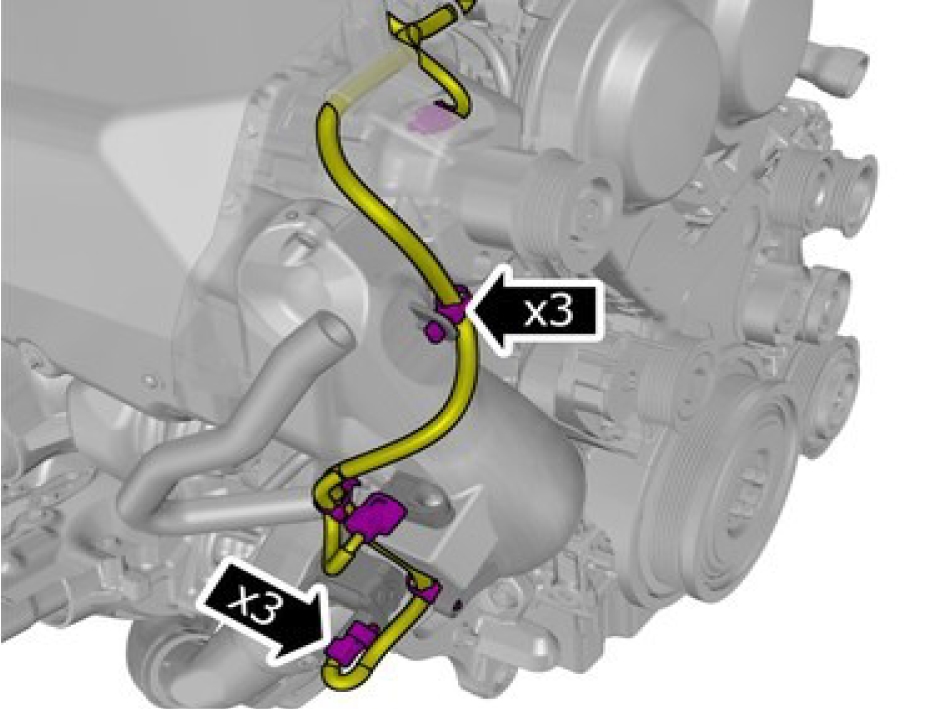
Loosen the clips.
Disconnect the connectors.
Fold marked component aside
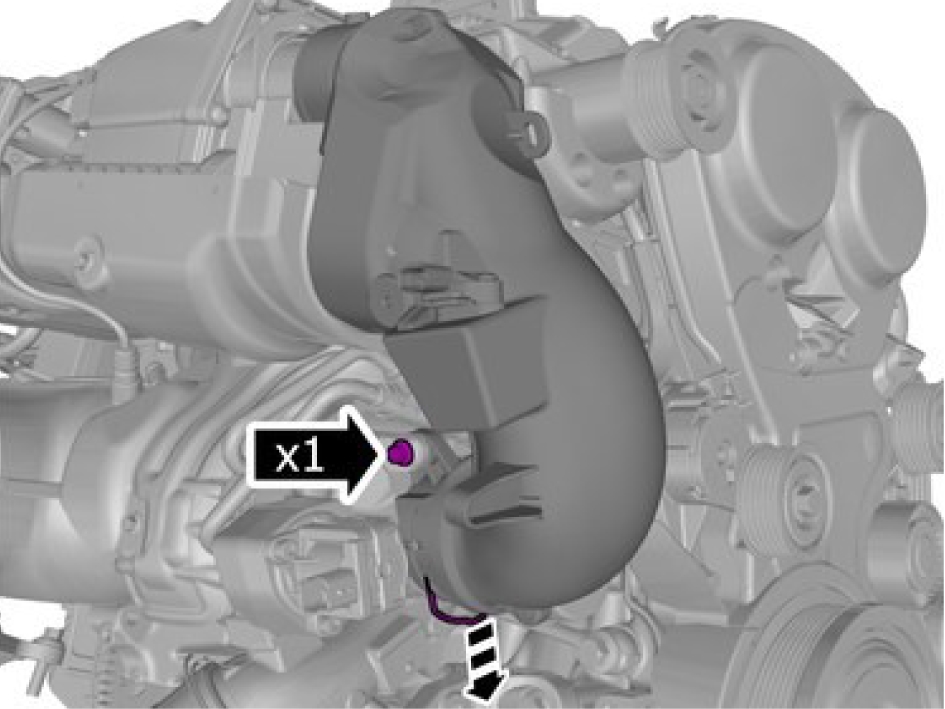
Remove the screw.
Release the lock.
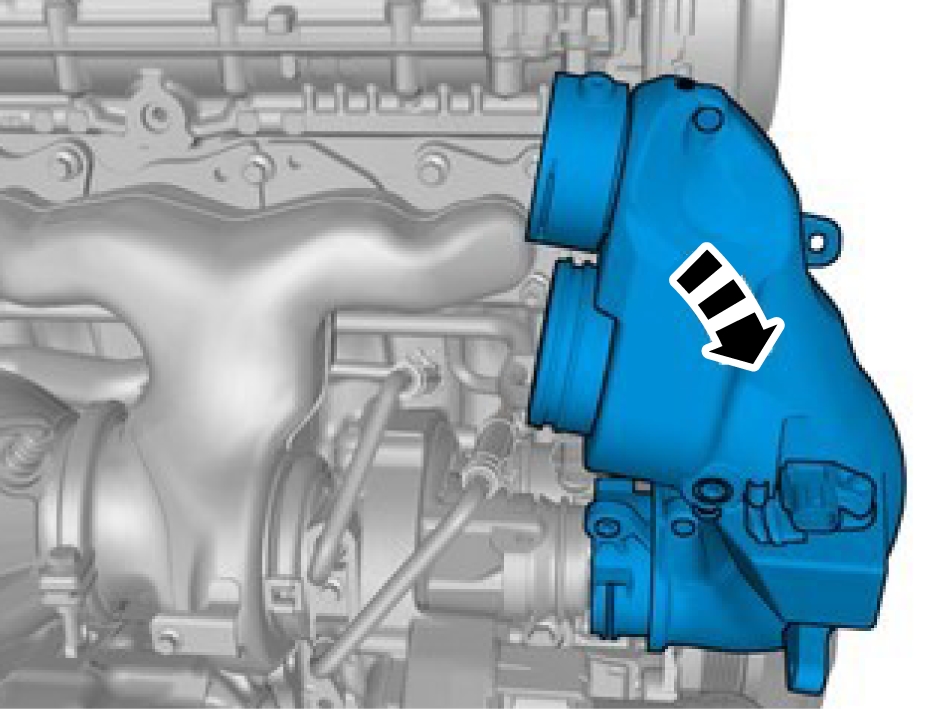
Remove the marked component.
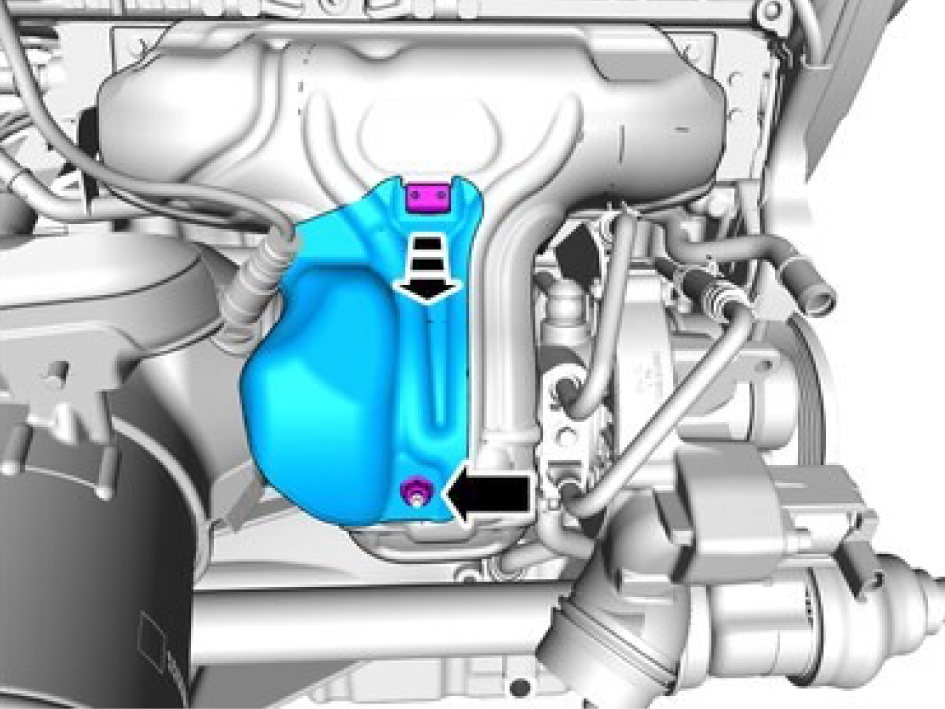
Remove the nut.
Remove the marked component.
Remove the screws.
Remove the marked component.
Remove the fasteners.
Remove the marked components.
Remove the studs.
Remove the screw.

Remove the marked component.
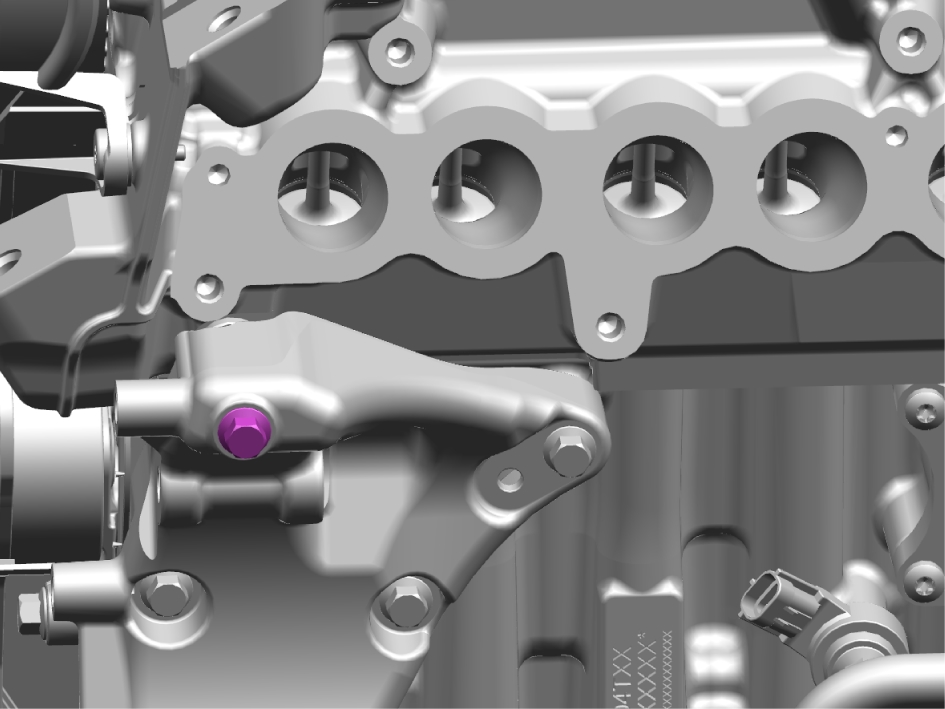
Remove the screw.
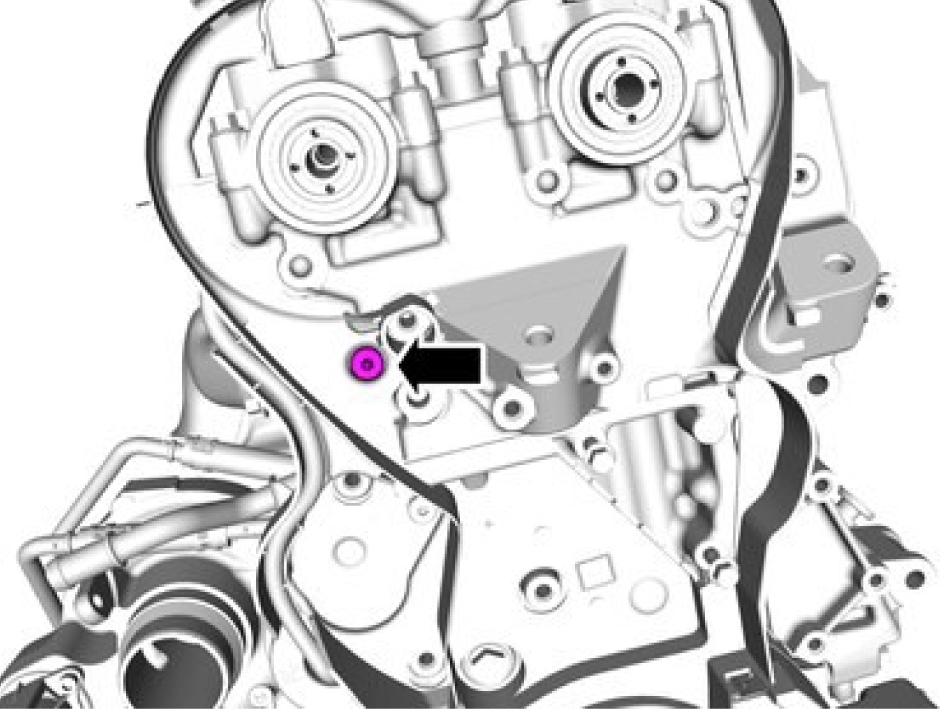
Remove the screw.
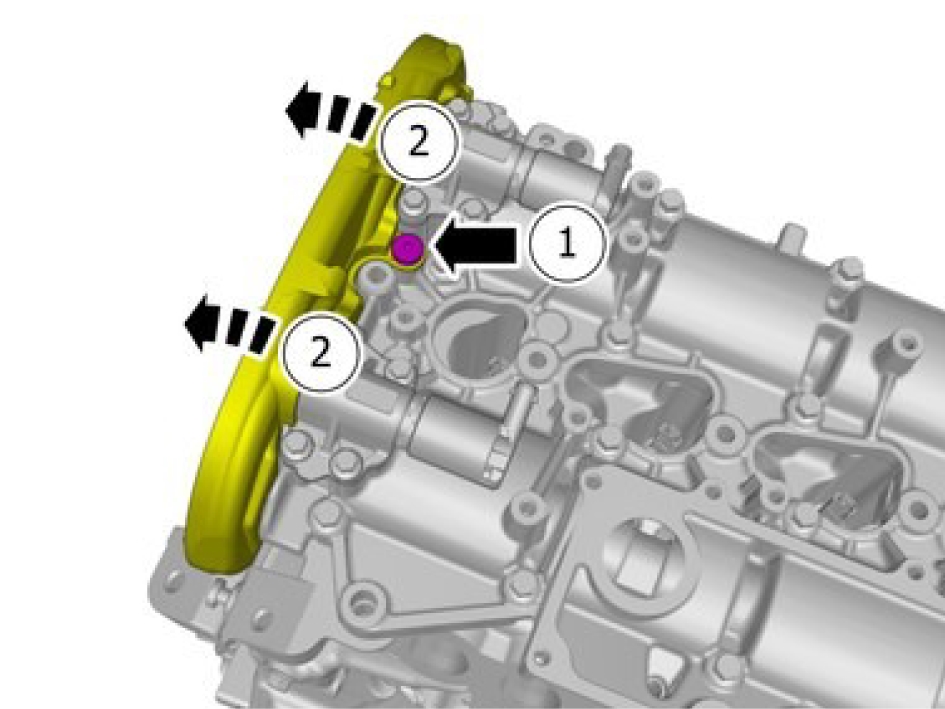
Remove the screw.
Fold marked component aside.
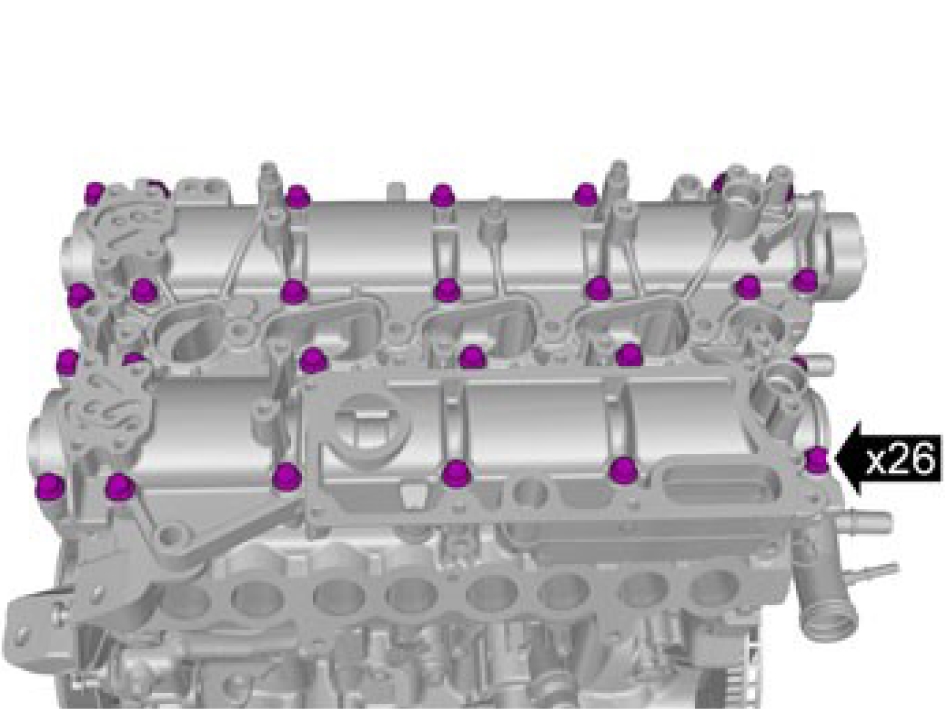
Remove the screws.
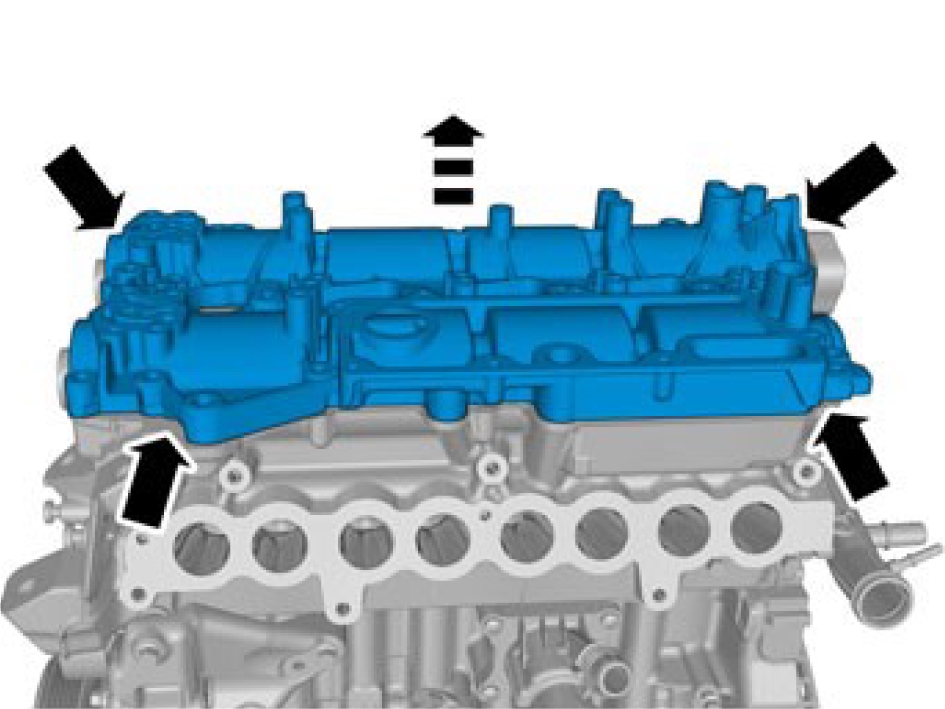
Take extra care when handling the component.
Remove the component carefully.
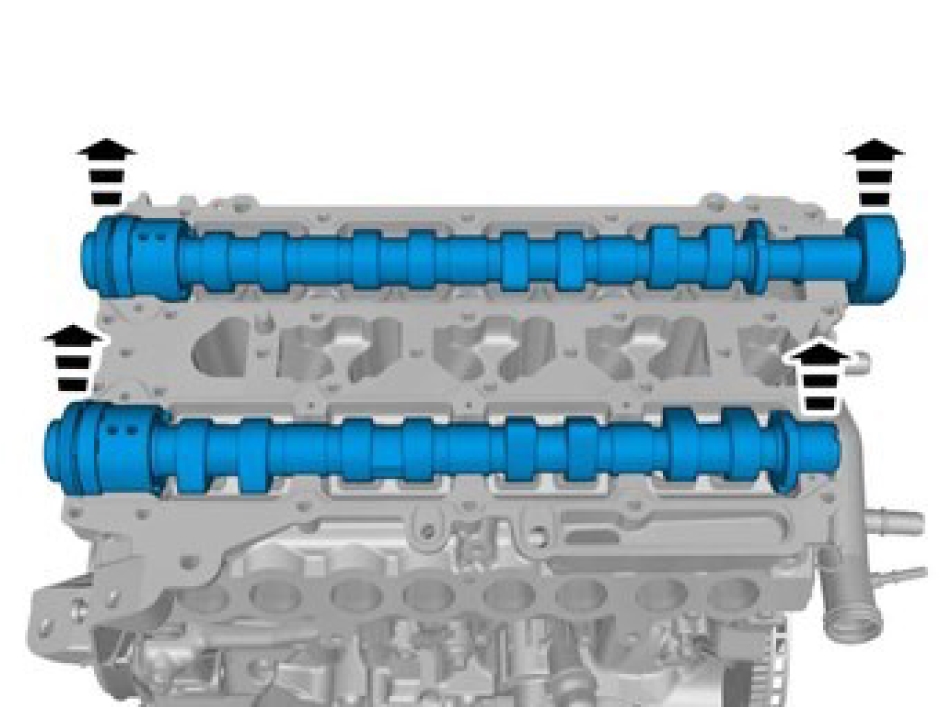
Take extra care when handling the components.
Remove the marked components.
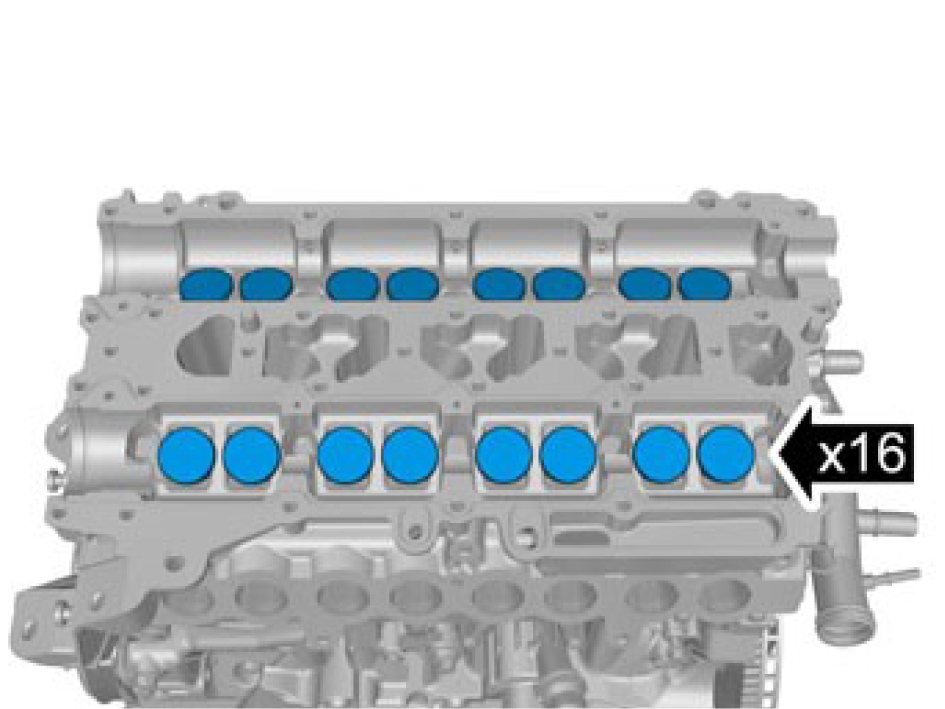
Note the position of the components before removal.
Take extra care when handling the components.
Remove the marked components.
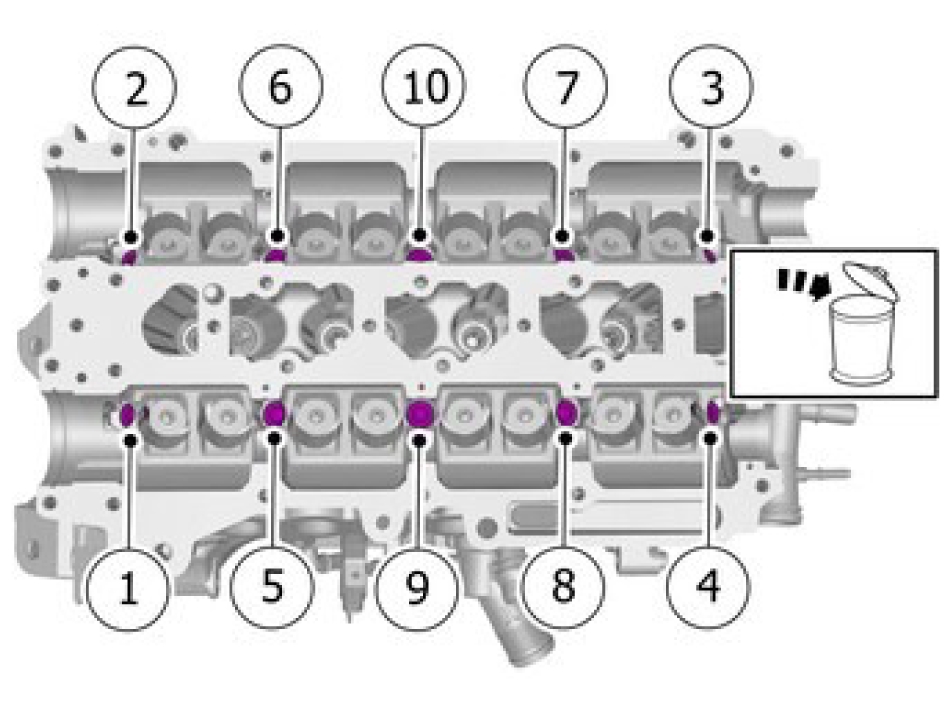
The components are not to be reused.
Make sure to follow the sequence indicated.
Remove the screws.

Take extra care when handling the component.
Remove the marked component.
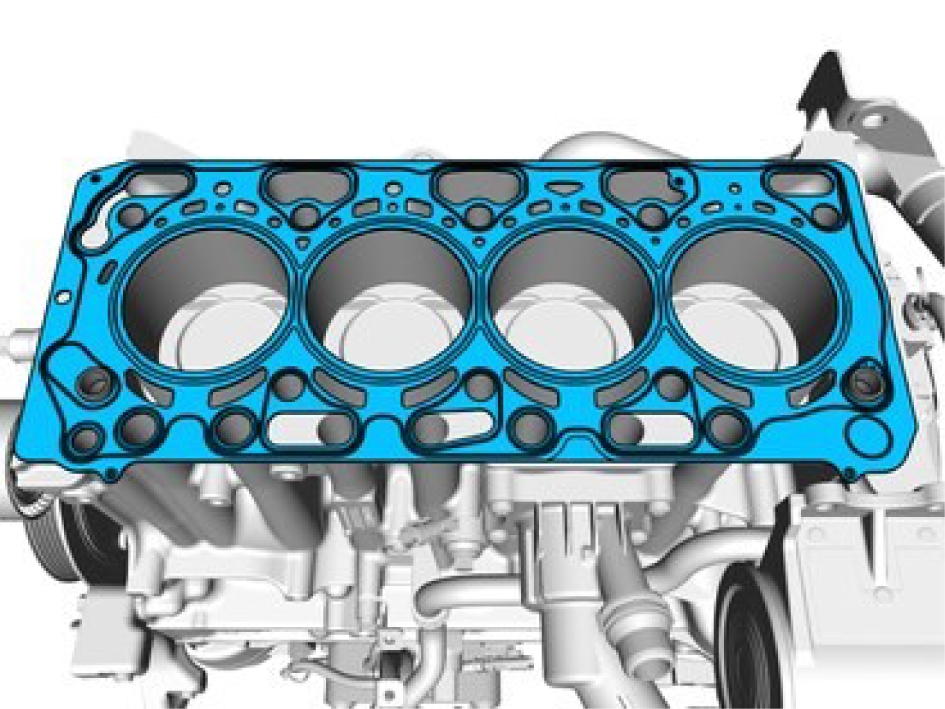
Remove the marked component.
Installation
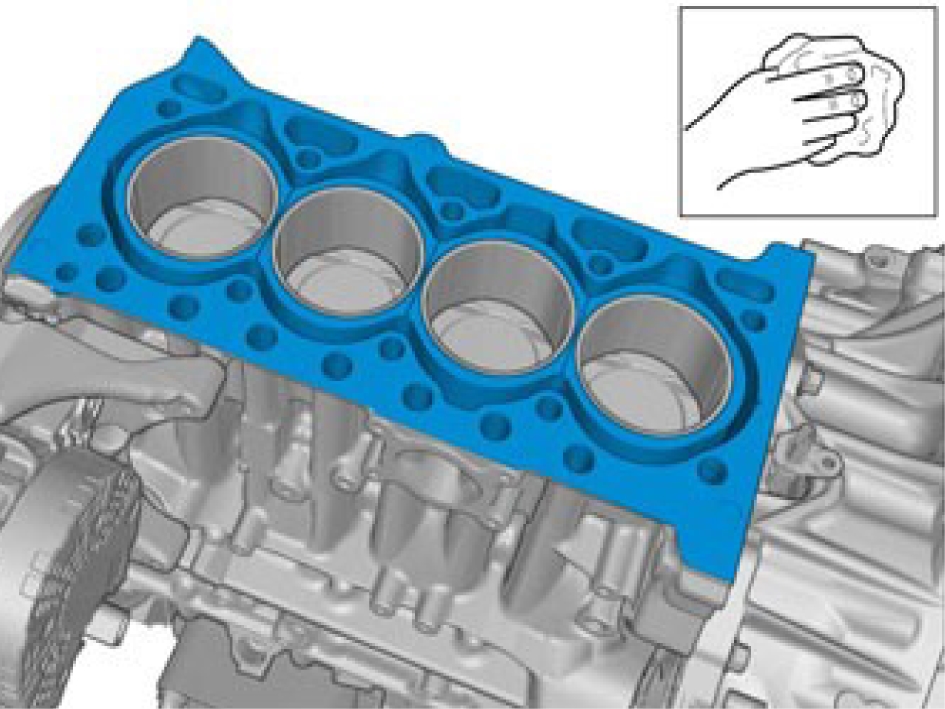
Take extra care not to damage the mating faces.
Make sure that the mating faces are clean and free of foreign material.
Make sure that the oil galleries are clean and free of foreign material.
Clean the area.
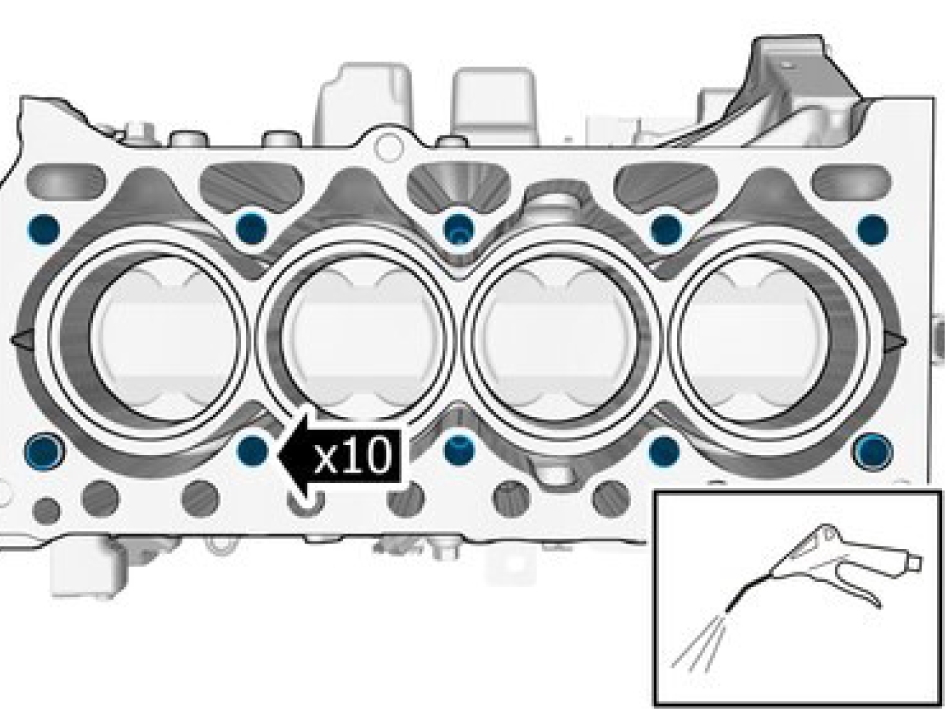
Make sure that no fluids are present in the cylinder head bolt threaded bores.
Blow clean using compressed air
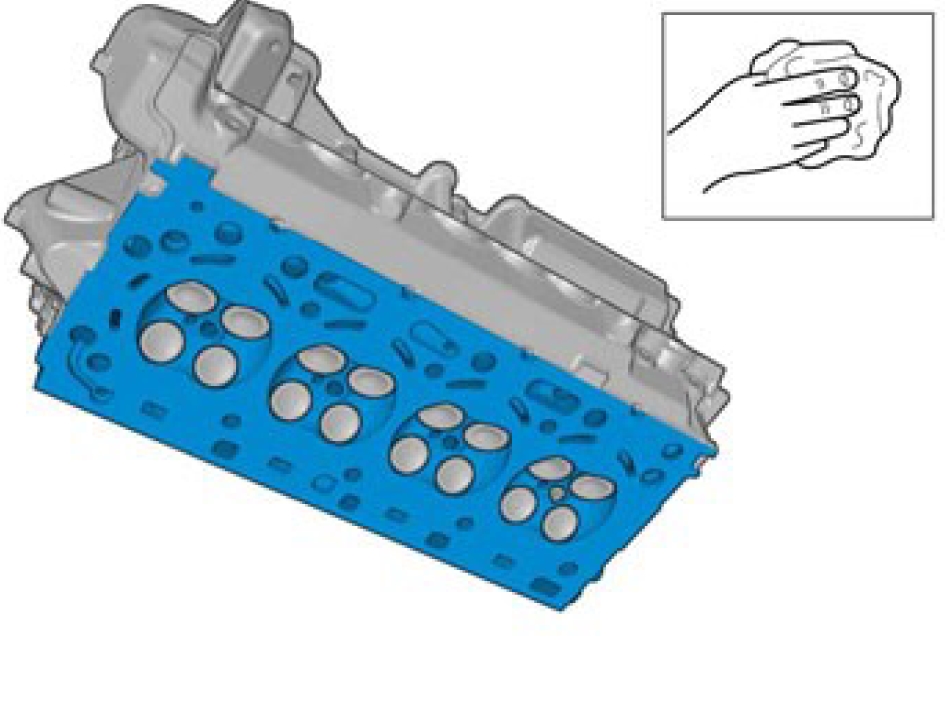
Take extra care not to damage the mating faces.
Make sure that the mating faces are clean and free of foreign material.
Make sure that the oil galleries are clean and free of foreign material.
Clean the surface using isopropanol.
Take extra care not to damage the mating faces.
Make sure that the mating faces are clean and free of foreign material.
Make sure that the oil galleries are clean and free of foreign material.
Clean the surface using isopropanol.
Take extra care not to damage the mating faces.
Make sure that the mating faces are clean and free of foreign material.
Make sure that the oil galleries are clean and free of foreign material.
Clean the surface using isopropanol.
The component has a left-hand thread.
Check the value.
Remove marked component.
Take extra care when handling the component.
Install the marked component.
Make sure to follow the sequence indicated.
Make sure that new components are installed.
Tighten the screws.
Stage 1, torque: 40 Nm
Stage 2, torque: 40 Nm
Stage 3, 120 °
Stage 4, 120 °
Perform valve clearance, refer to:
Valve clearance, adjustmentMake sure that these components are installed to the noted removal position.
Install the marked components.
Apply a thin and even layer engine oil.
Make sure that the components are positioned correctly.
Rotate marked component according to image.
Make sure that the components are positioned correctly.
Rotate marked component according to image.
Make sure that the components are positioned correctly.
Install the marked components.
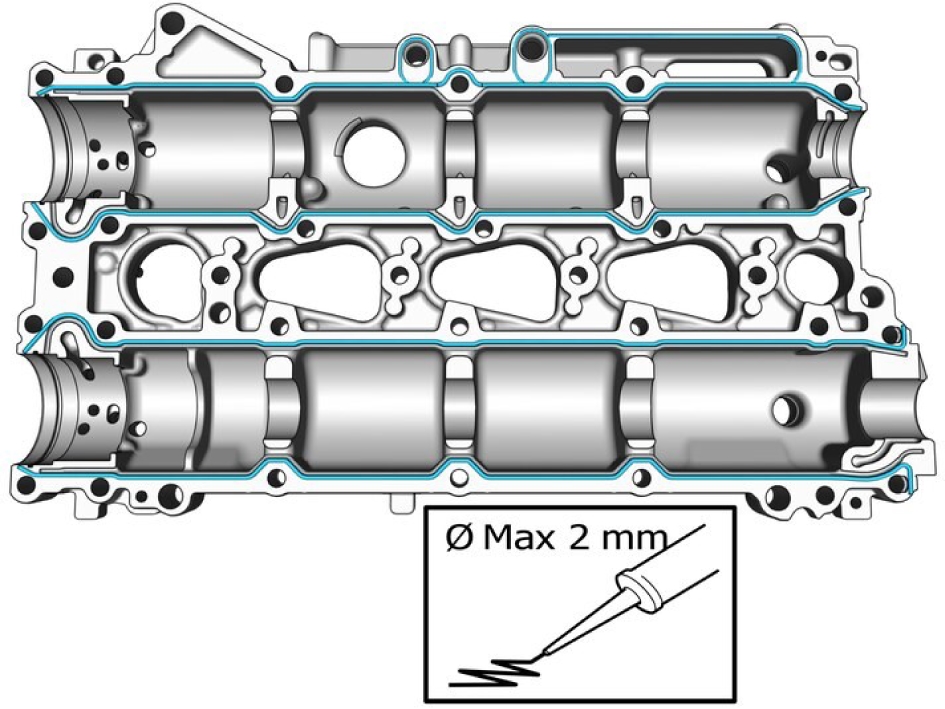
Wipe off any excess sealant.
The component must be installed within 5 minutes of applying the sealant.
After applying the sealant, wait for a minimum of 2 hours before starting the engine.
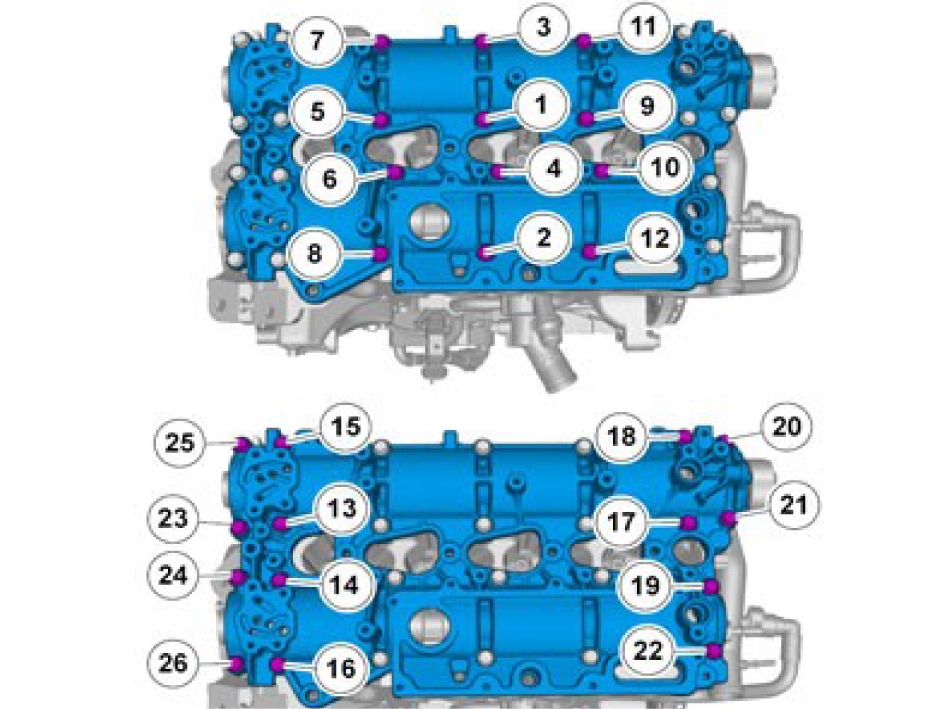
Make sure that equal pressure is applied to the full length of the component.
Make sure to follow the sequence indicated.
Install the marked component.
Install the screws M7, torque: 17 Nm
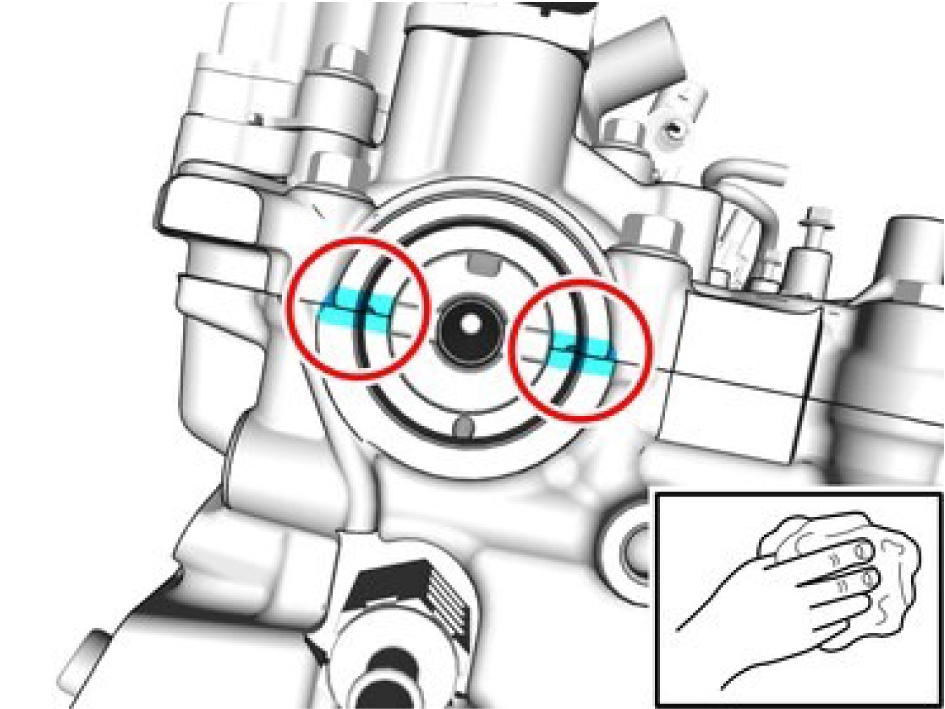
Wipe off any excess sealant.
Clean the marked area.
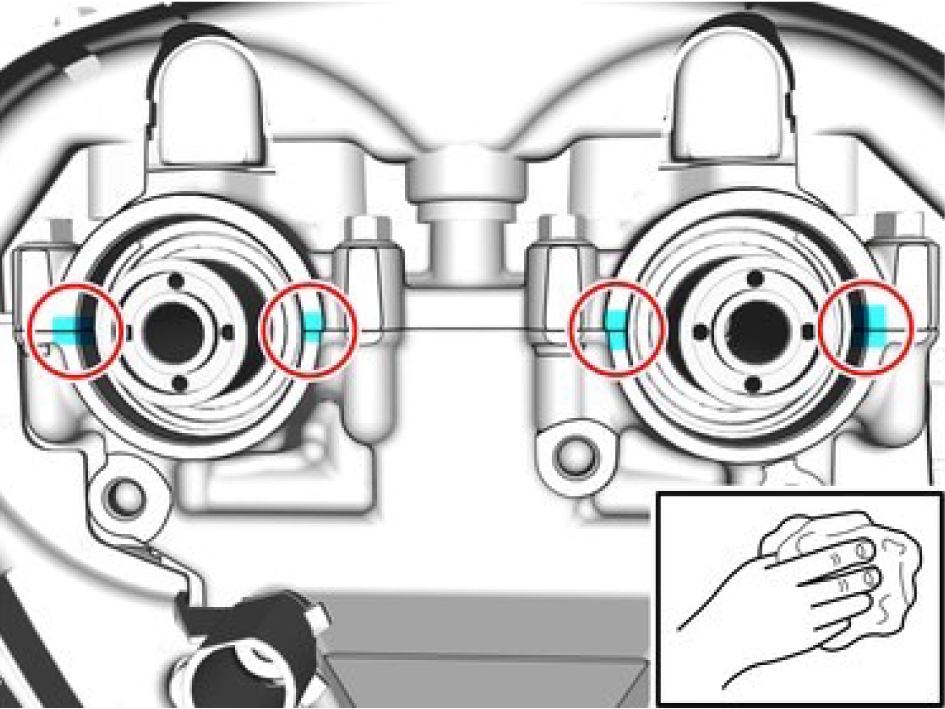
Wipe off any excess sealant.
Clean the marked area.
Install the screw M7, torque: 17 Nm
Install the screw M8, torque: 24 Nm
Install the marked components.
Install the studs, torque: 20 Nm

Install the marked component.
Exhaust manifold to cylinder head, bolt:
Stage 1: torque: 20 Nm
Stage 2: torque: 20 Nm
Exhaust manifold to cylinder head, nut:
Stage 1: torque: 20 Nm
Stage 2: torque: 20 Nm

Install the marked component.
Install the screws M6, torque: 10 Nm

Install the marked component.
Install the screw M6, torque: 10 Nm
Install marked component.

Install the lock.
Install the screw M6, torque: 10 Nm
Fold marked component back.
Install the connectors.
Install the clips.
Install the panel.
Install the supercharger, refer to:
Supercharger, replaceIntake manifold air temperature sensor - S303
Sensor, oil level - S503
My technical specification- COPY
Control valve, fuel quantity - V103
Supercharger, replace
Removal
Remove marked component.

Remove the cable harness clips.
Release the connector catches.
Disconnect the connectors.
Release the connector catches.
Disconnect the connectors.
Undo the hoses from the connections.
Remove the screws.
Loosen the hose clamp.
Remove the hose.
Release the lock.
Remove the hose.
Remove the cable harness clips.
Release the lock.
Disconnect the connector.
Remove the screws.
Loosen the hose clamp.
Remove the hose.
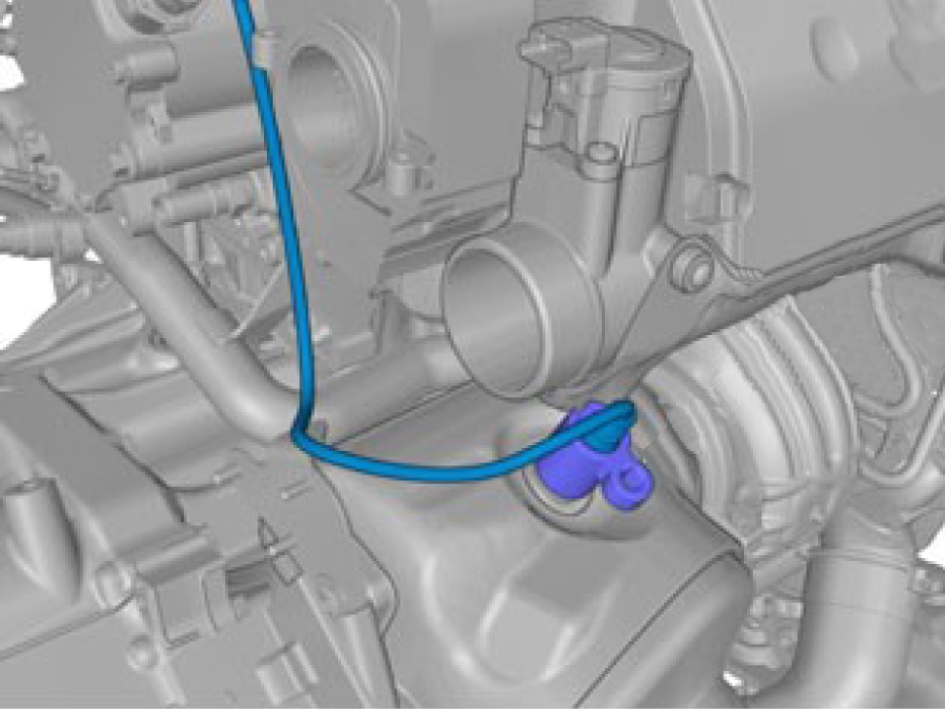
Note the position of each cable.
Removed the marked component use special tool: 999 5543
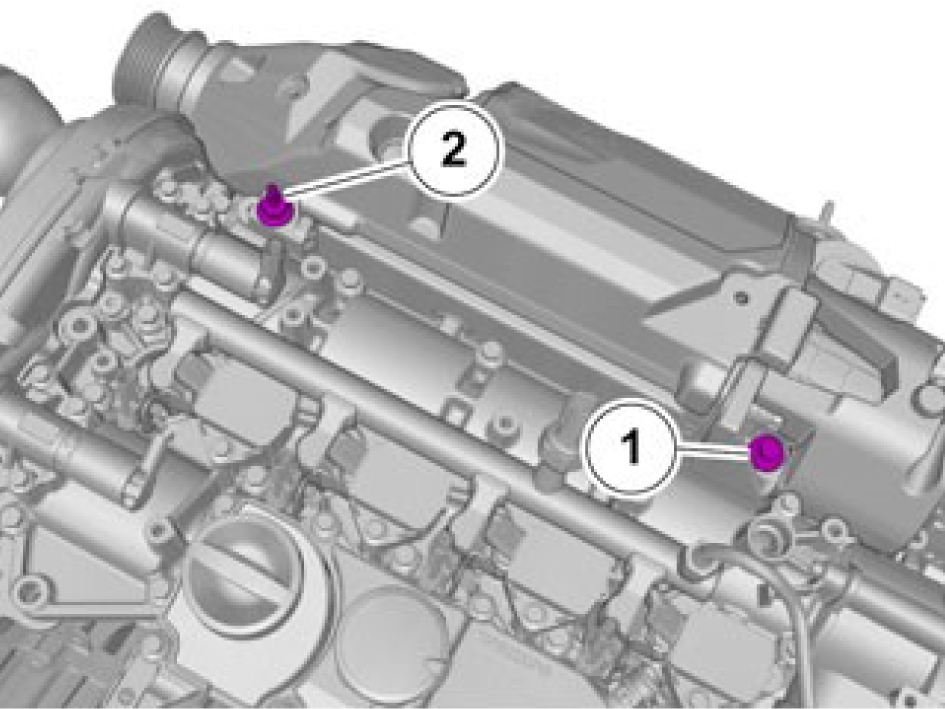
Remove the screws.
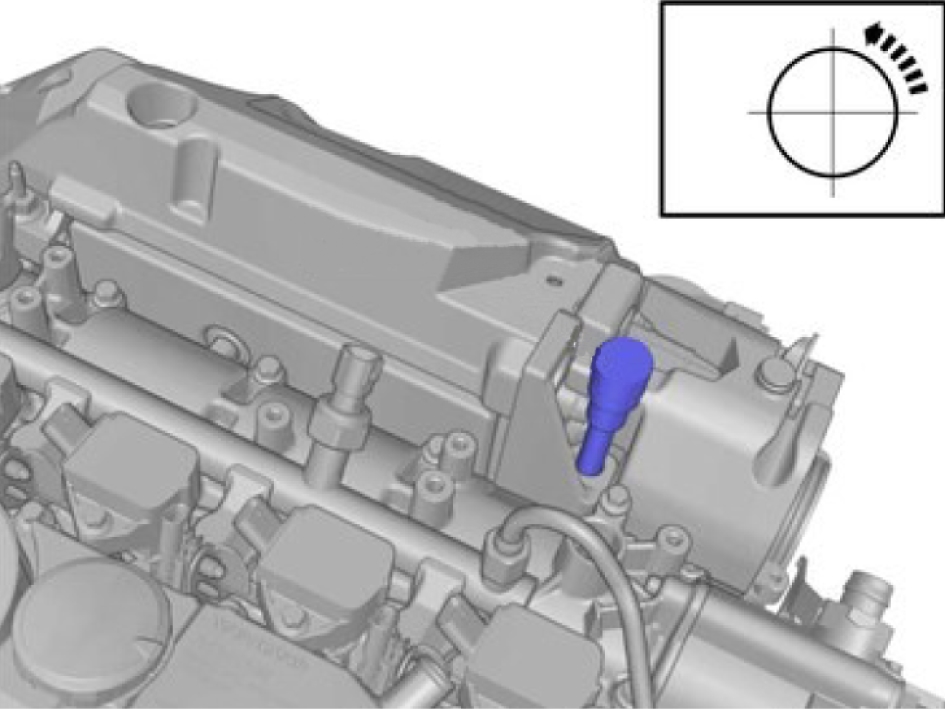
Make sure to turn the tool until stop.
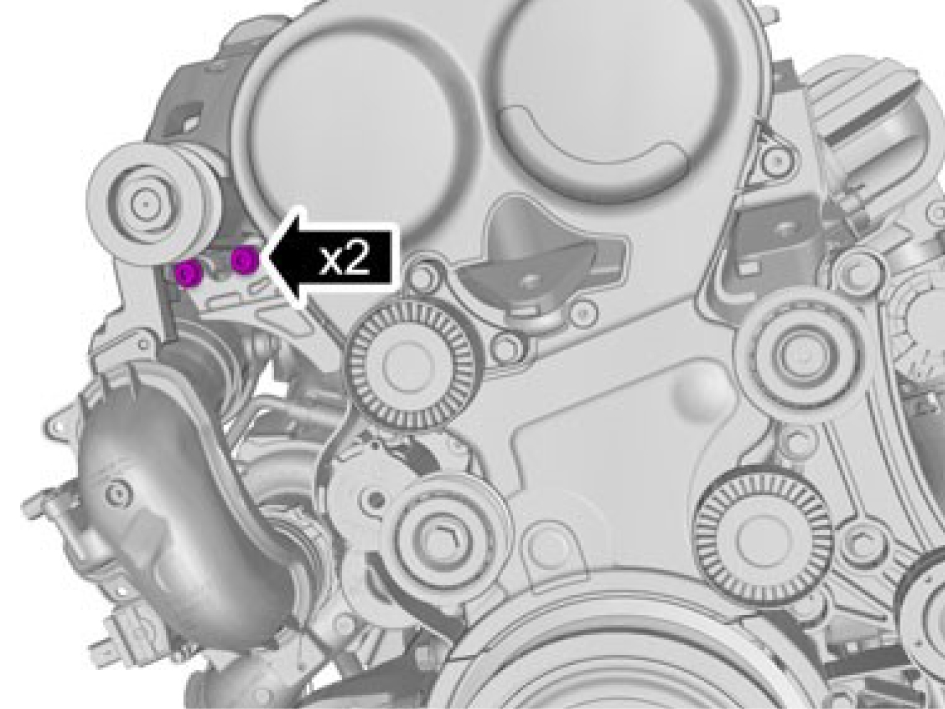
Remove the screws.
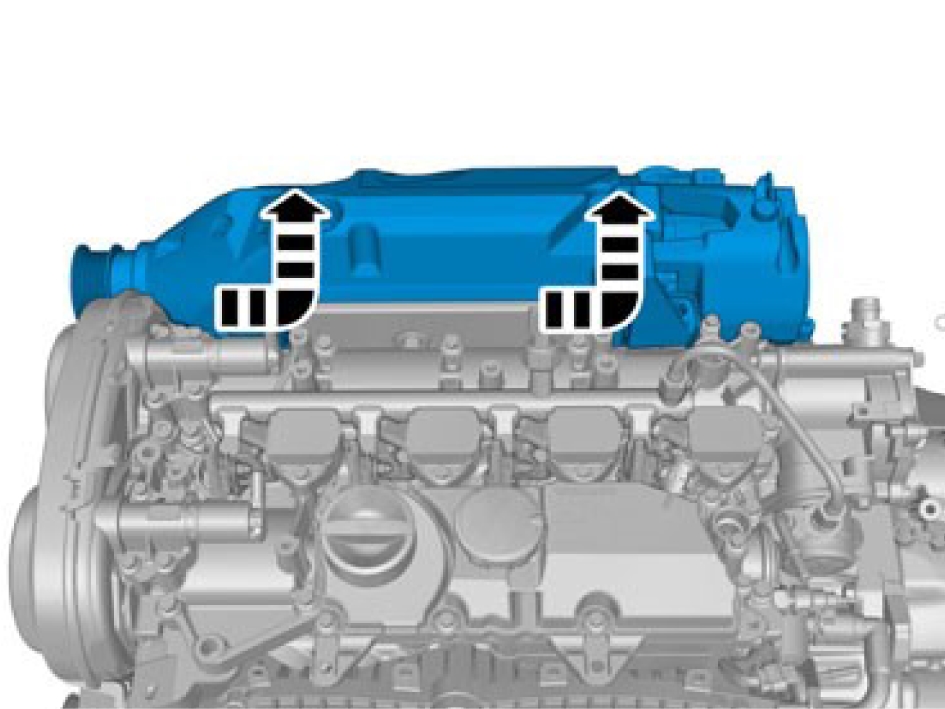
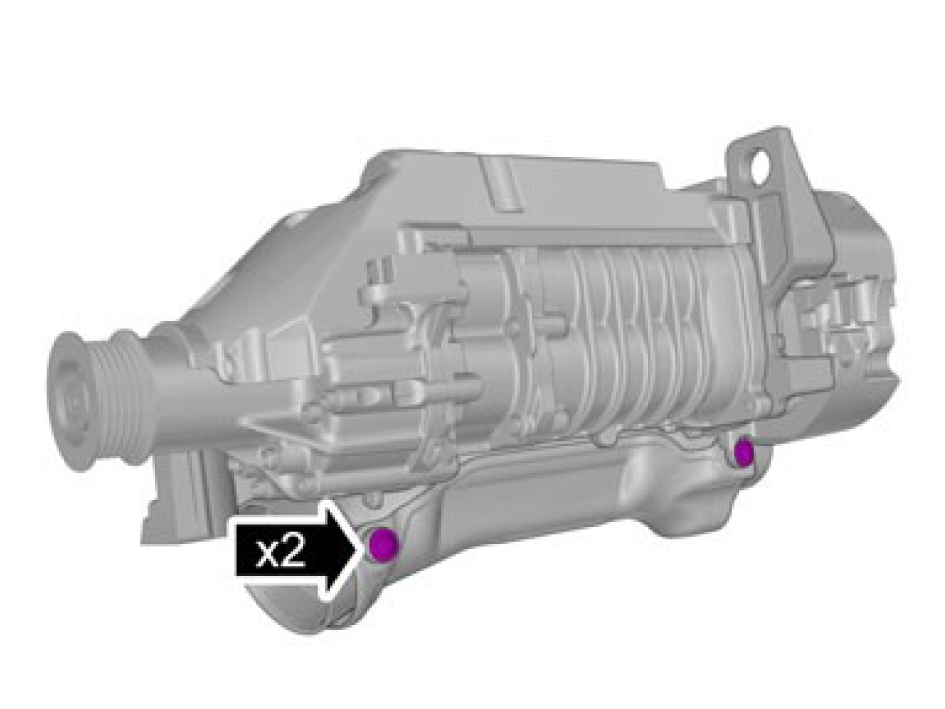
Remove the screws.
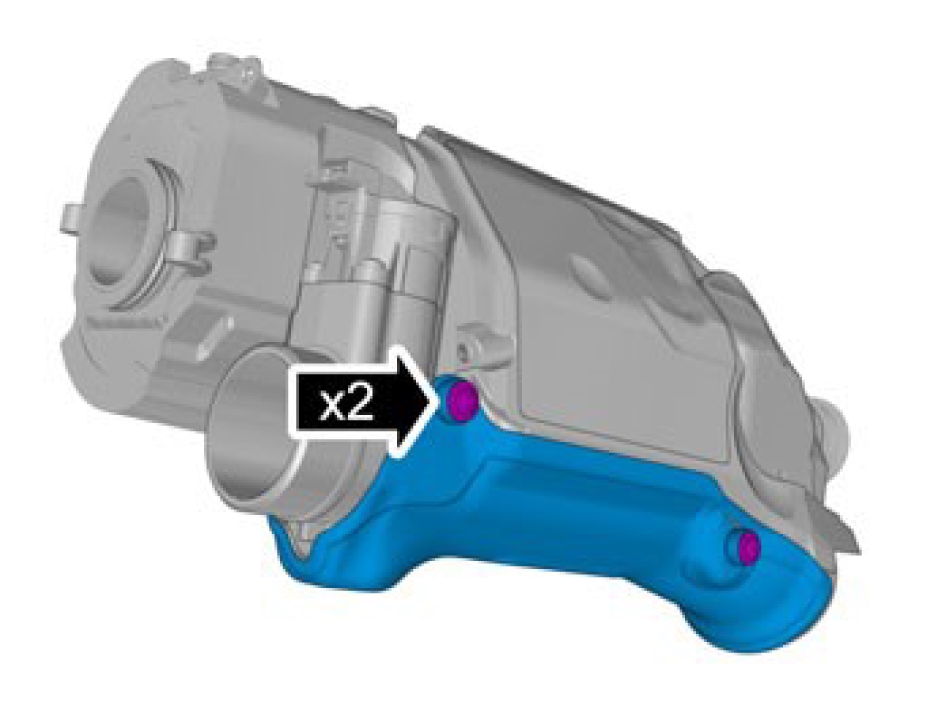
Remove the screws.
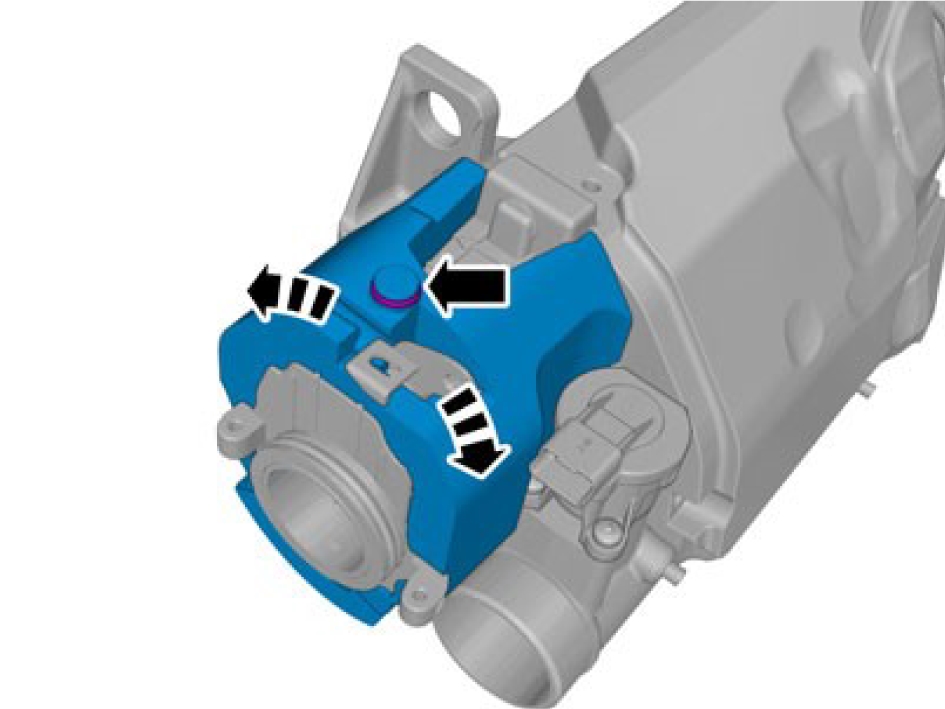
Fold the insulation aside.
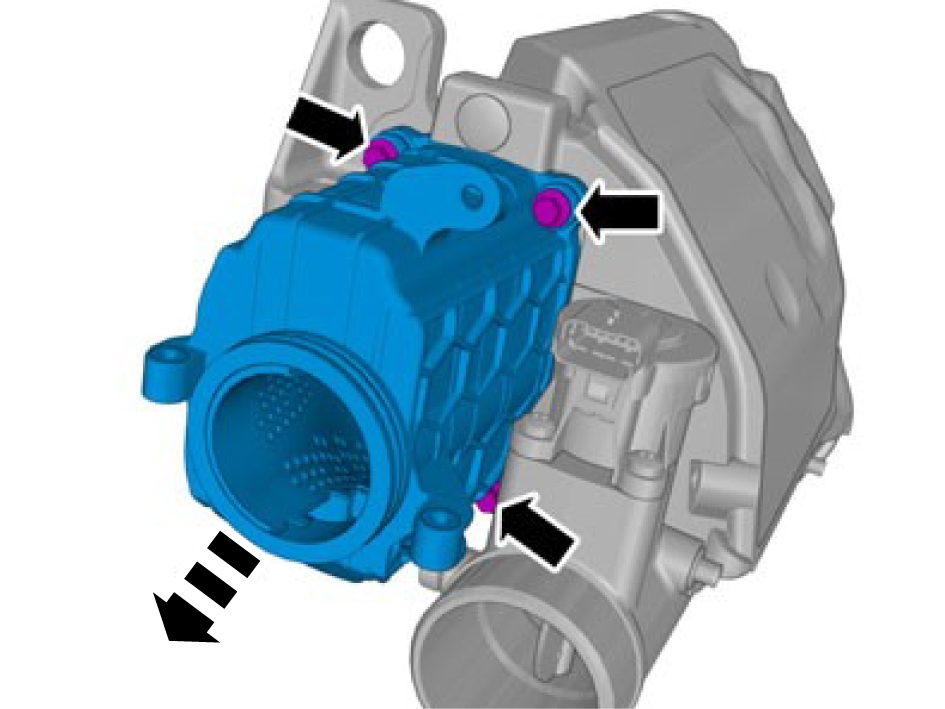
Remove the screws.
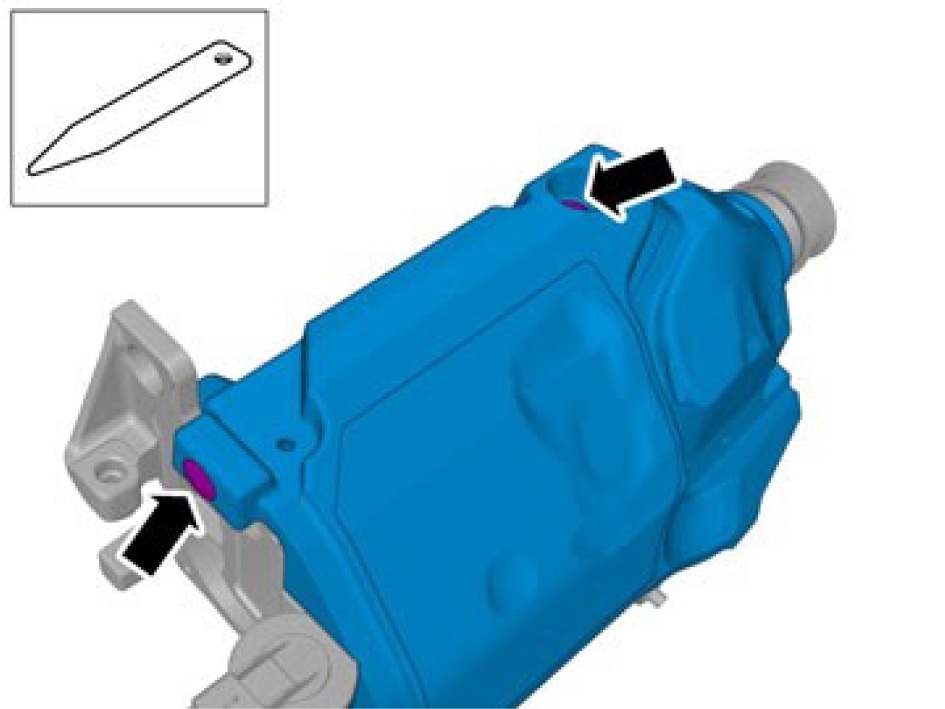
Remove the clips.
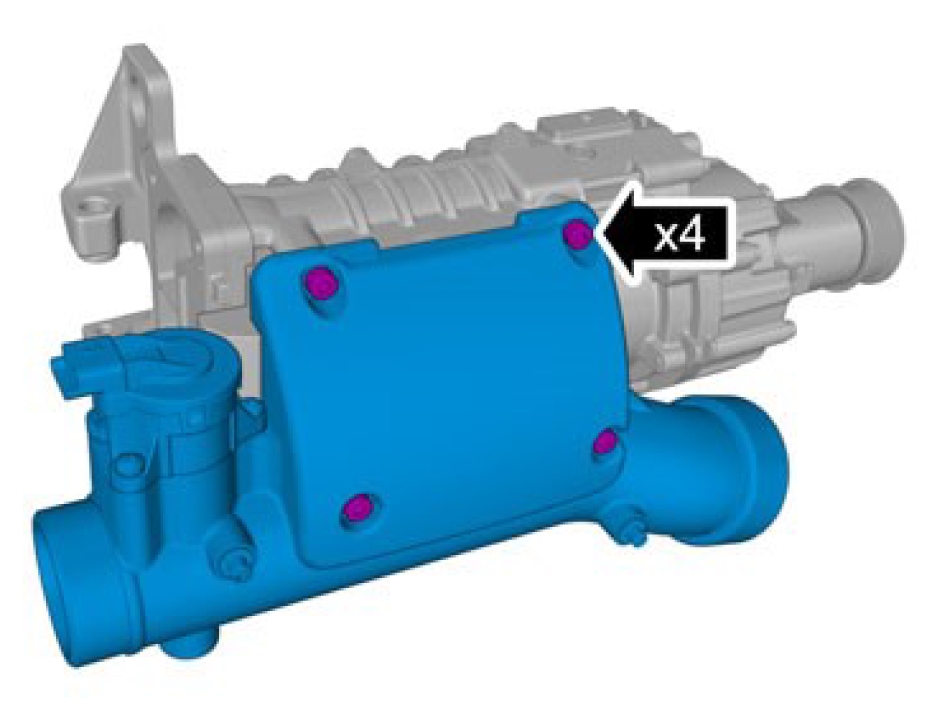
Remove the screws.
Installation
Install the screws M8, torque: 24 Nm
Install the panel.
Press the clip into position.
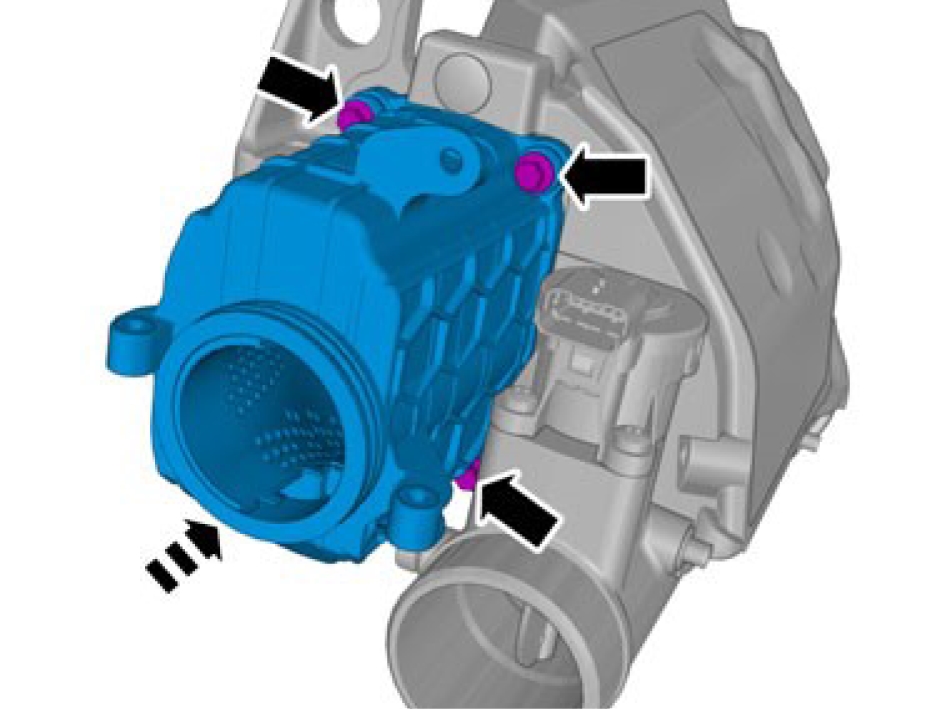
Install the screws M6, torque: 10 Nm
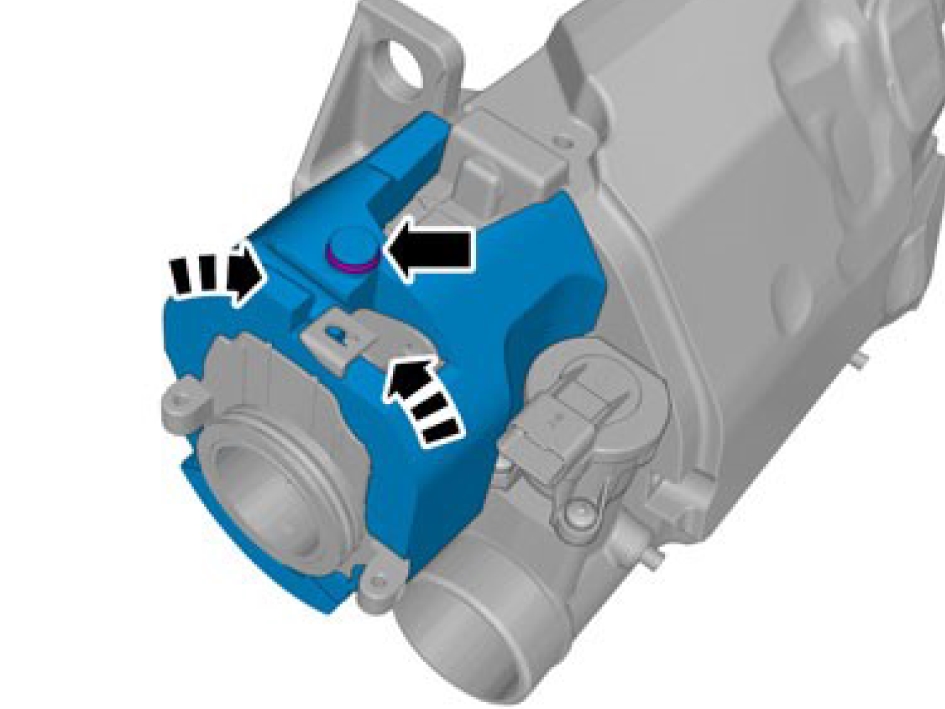
Install the screws M6, torque: 10 Nm
Install the screws M6, torque: 10 Nm
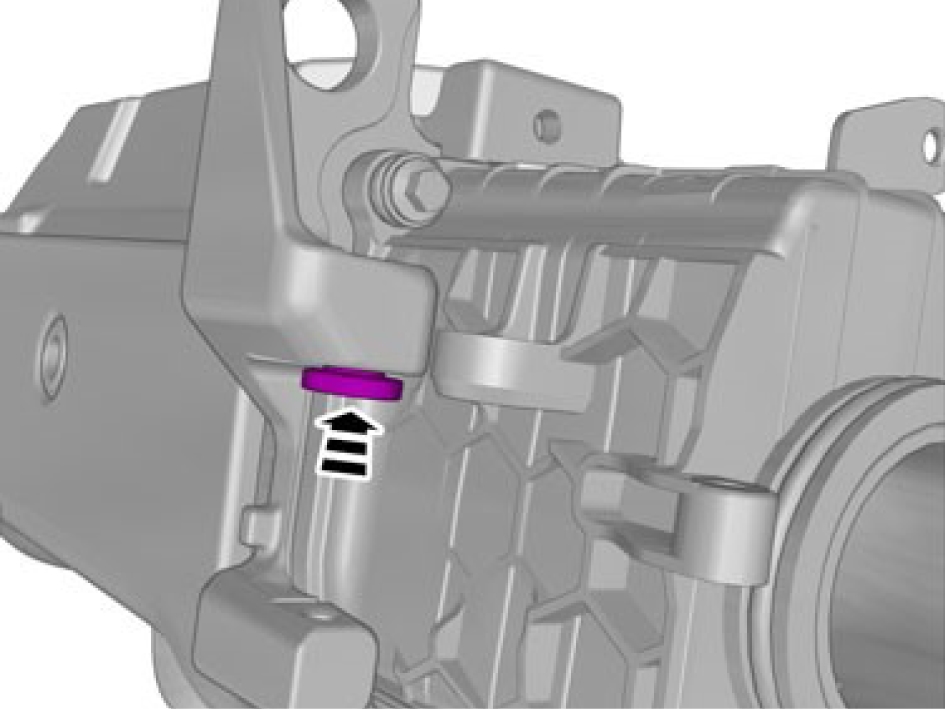
Make sure to turn the component until stop.
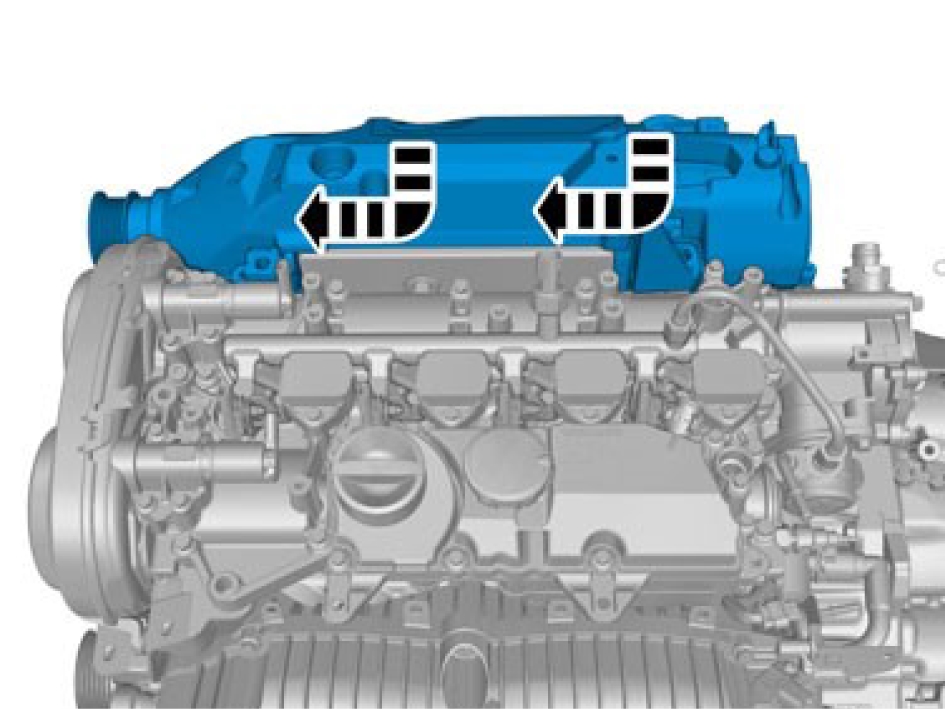
Make sure that the component is positioned correctly.
Make sure that the component is positioned correctly.
Only tighten the bolts finger tight at this stage.
Install the screws M8, torque: 24 Nm
Tighten the screw M10, torque: 50 Nm
Remove the screw.
Make sure to turn the component until stop.
Turn the screw until stop, use: 999 7508
Install the screw M7, torque: 17 Nm
Install the catalyst monitor sensor, torque: 45 Nm
Install the clamp.
Install the screws M6, torque: 10 Nm
Install the cable harness and clips.
Install the hose and fasten the locks.
Install the hose and fasten the clamp.
Install the marked component screws M6, torque: 10 Nm
Install the hoses.
Install the connectors.
Install the connector catches and the connectors.
1. Screw M12, torque: 80 Nm
2. Bracket engine mounting to cylinder head M12,
Step 1, torque: 90 Nm
Step 2, 120 °
3. Bracket to cylinder head, stud bolt, torque: 60 Nm
Valve clearance, adjustment
Remove camshafts, refer to:
Camshafts, replace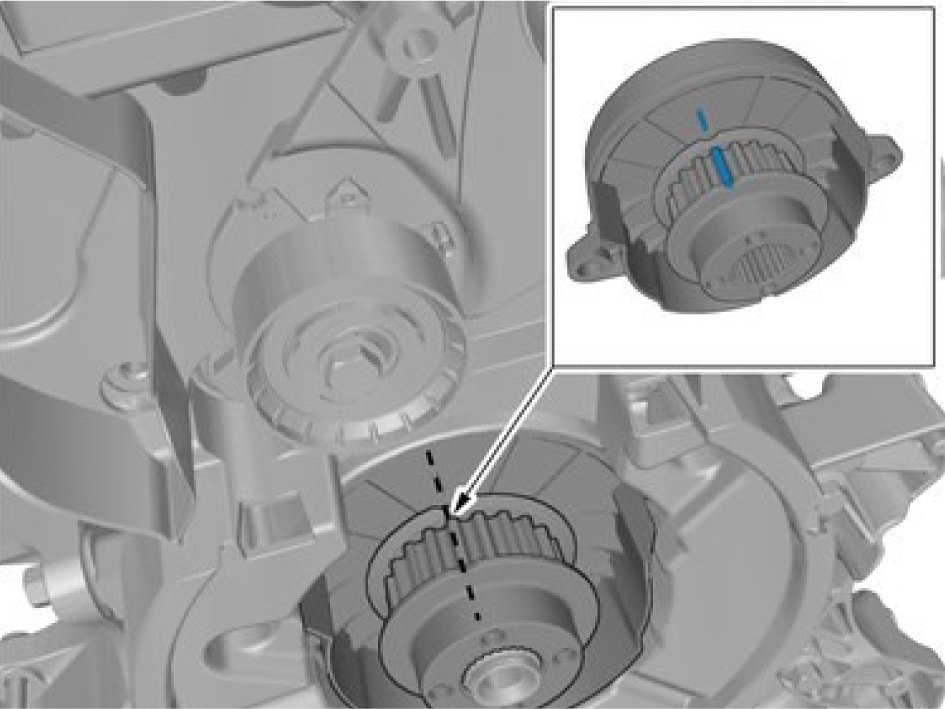
Make sure that the component is positioned correctly.
Measure the actual clearance between cam lobe and tappet by installing the tappet with the lowest height.
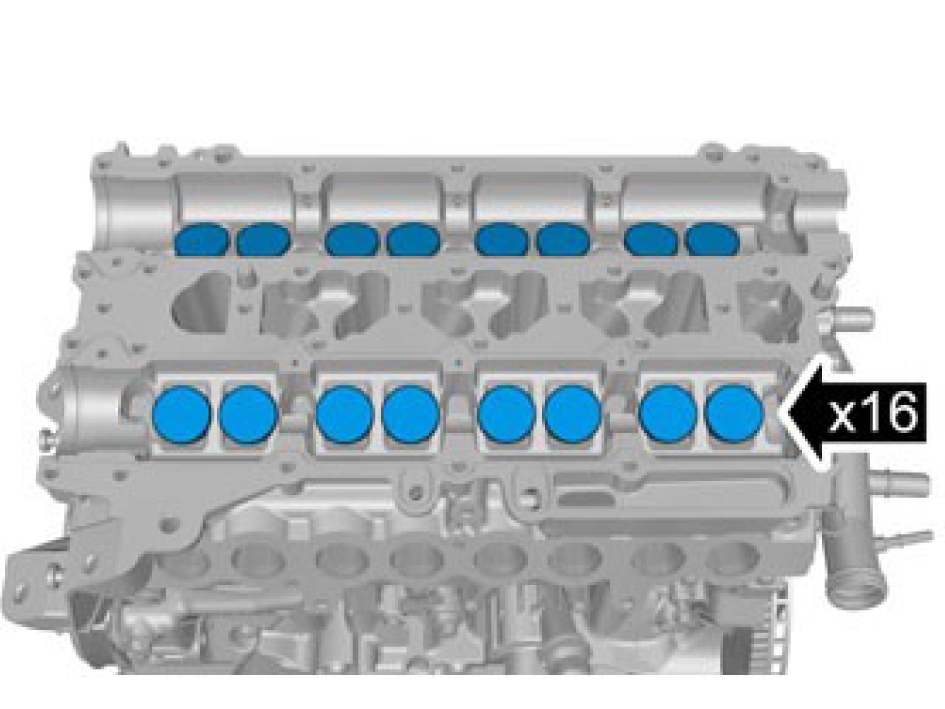
Install the marked components.

Apply a thin and even layer.
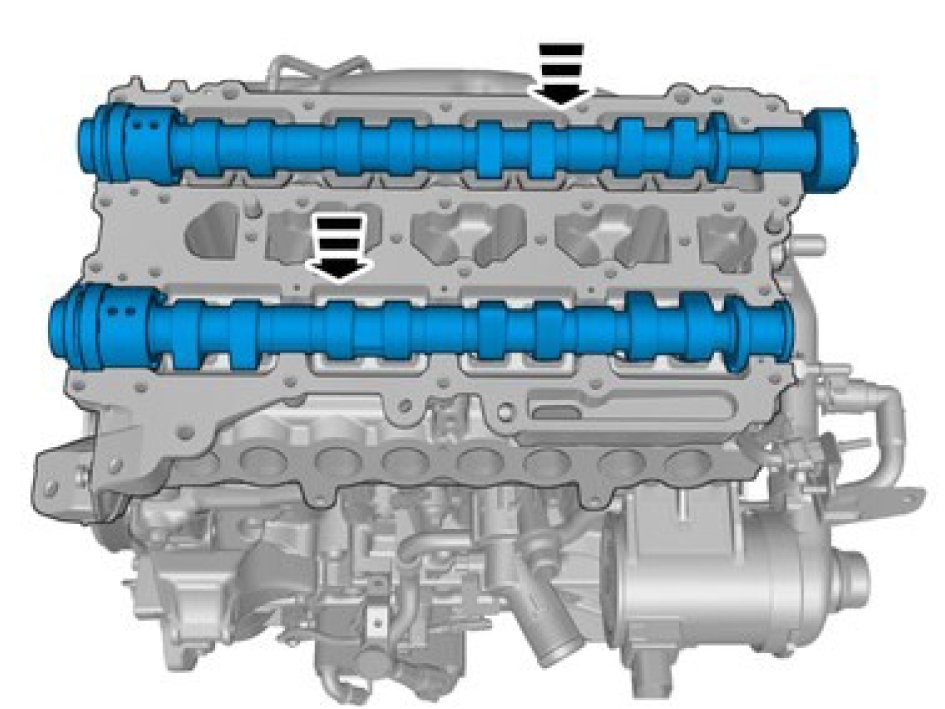
Install the marked components.
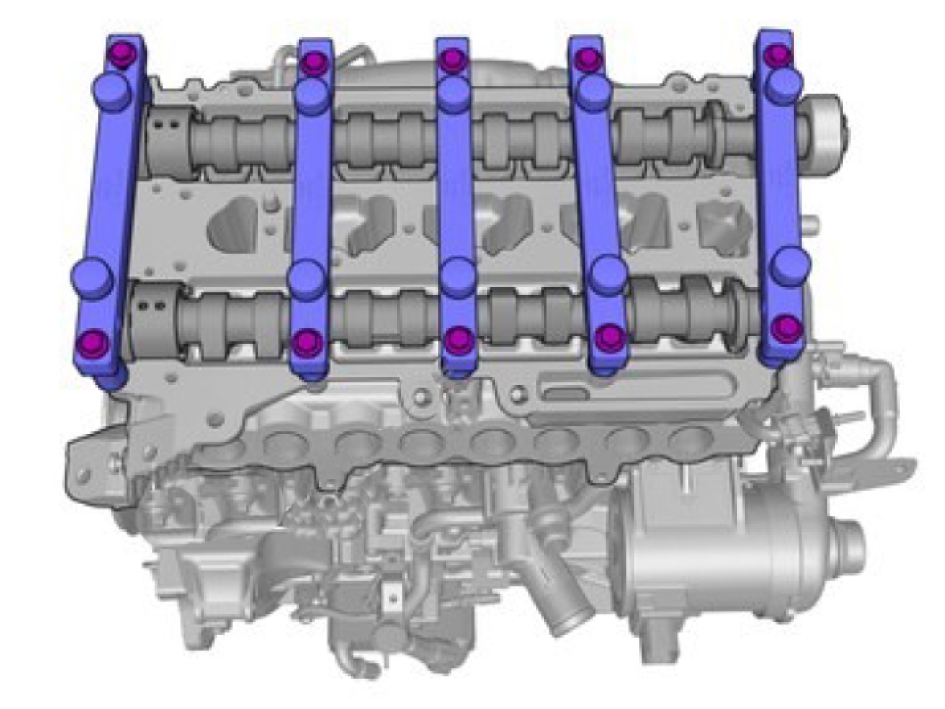
Install the Special tool 999 7578
Screws M7, torque: 17 Nm
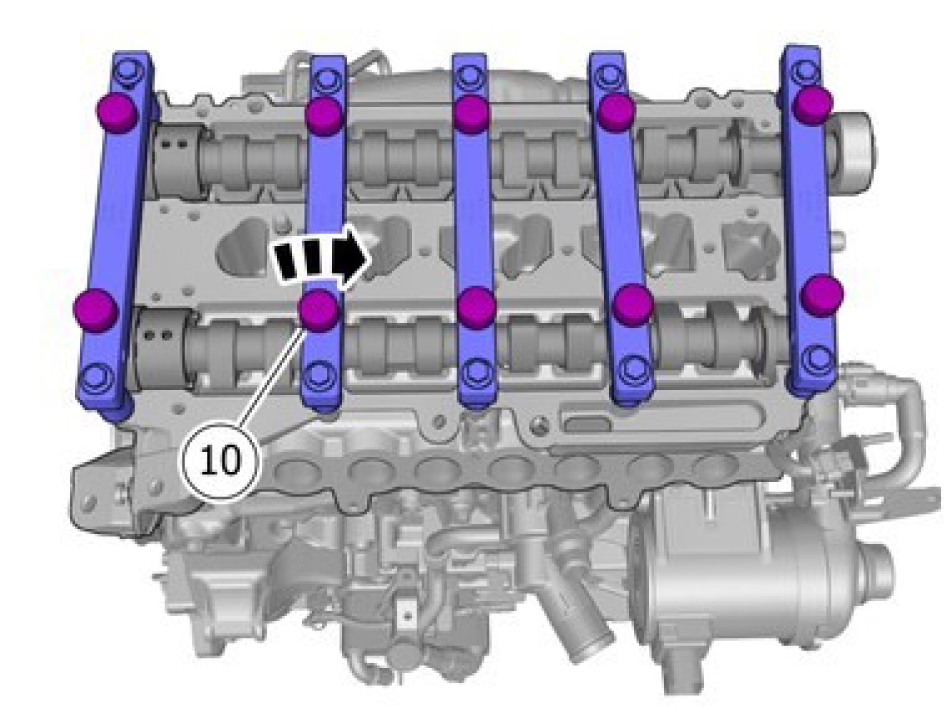
Only tighten the bolts finger tight at this stage.
Tighten the bolts.
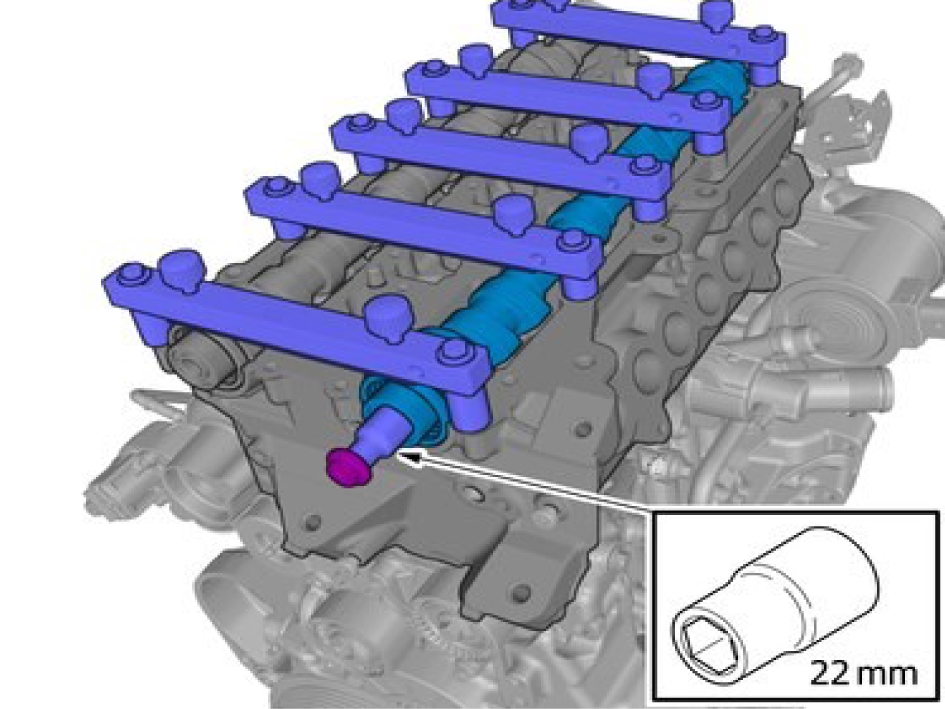
Install the screw.
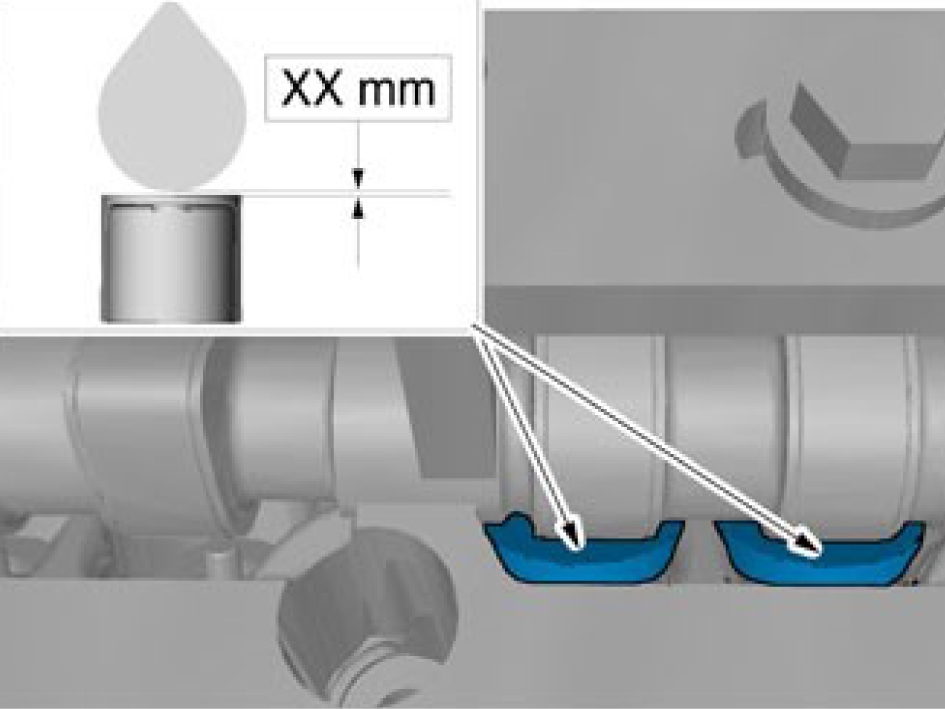
Measure and note the valve clearance values.
See information about engine, refer to:
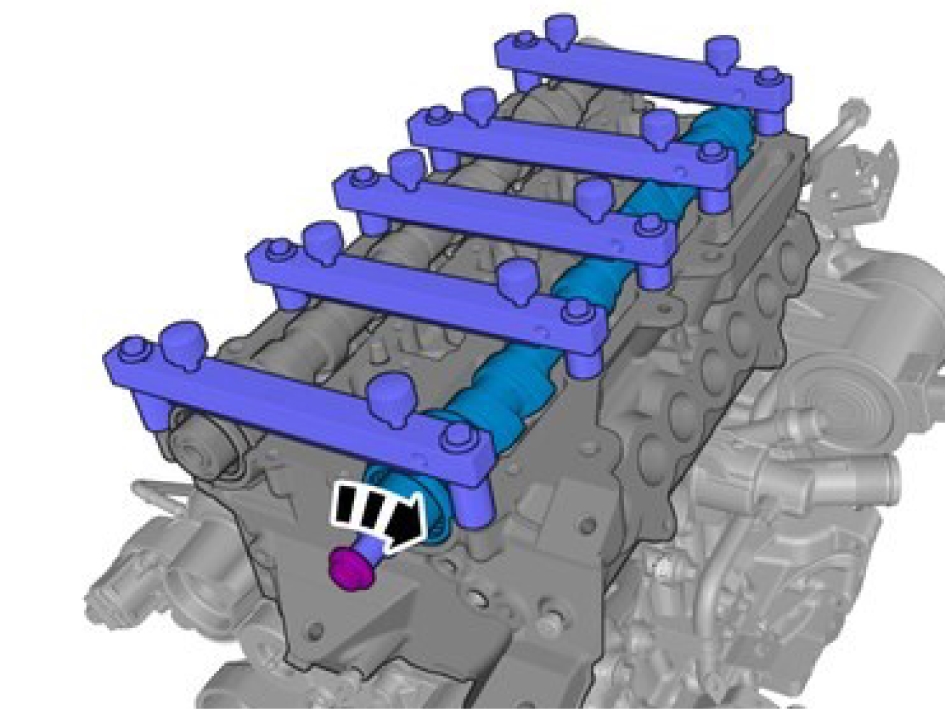
Only rotate the camshaft clockwise.
Repeat the measurement for all cylinders.
Oil filter, replace
Removal
Hot fluid.
Remove the marked component.
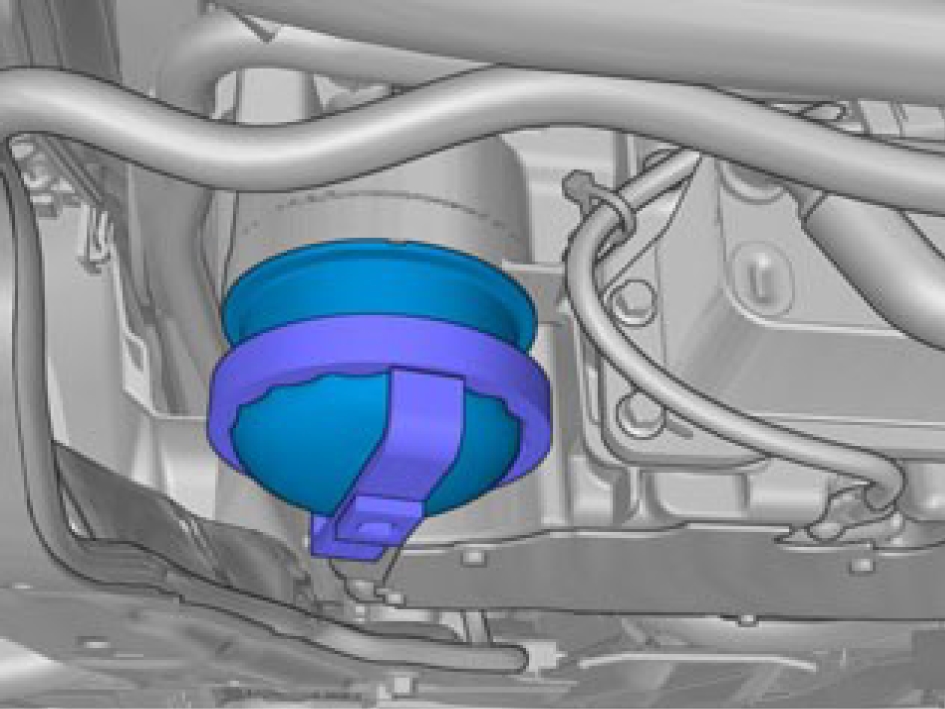
Hot fluid.
Make sure that the area around the component is clean and free of foreign material.
Remove the marked component.
Special tool: 999 7499
Use a new seal.
Remove the marked component.
Installation
Install the oil plug, torque: 38 Nm
Install the oil filter, use special tool 999 5679, torque: 25 Nm
Fill the oil according to specification.
Fuel injector, replace
Removal
Remove the fuel rail, refer to:
Fuel rail, replace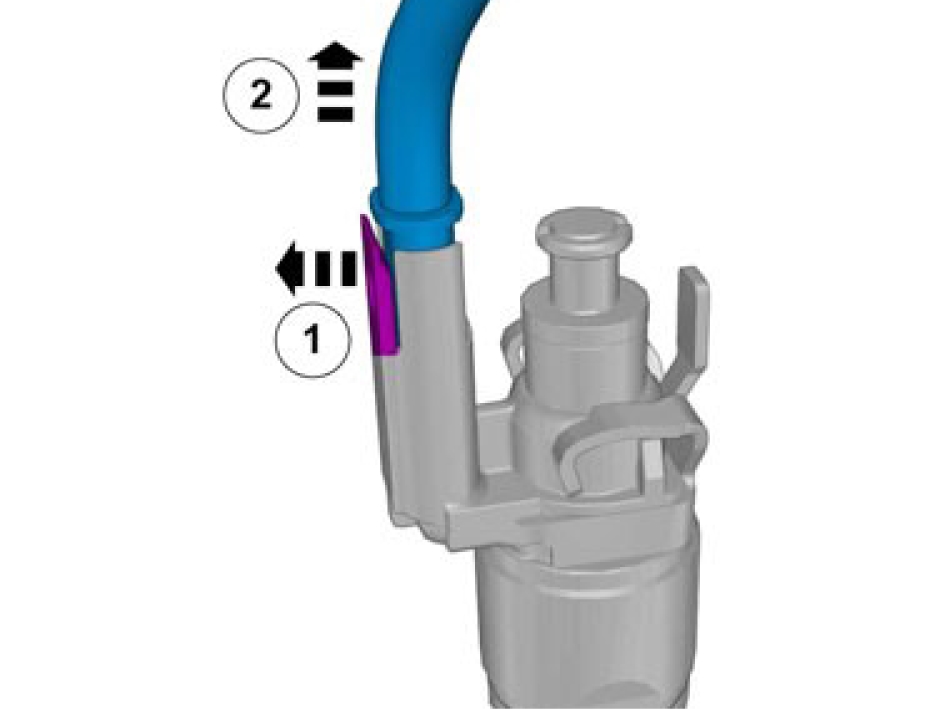
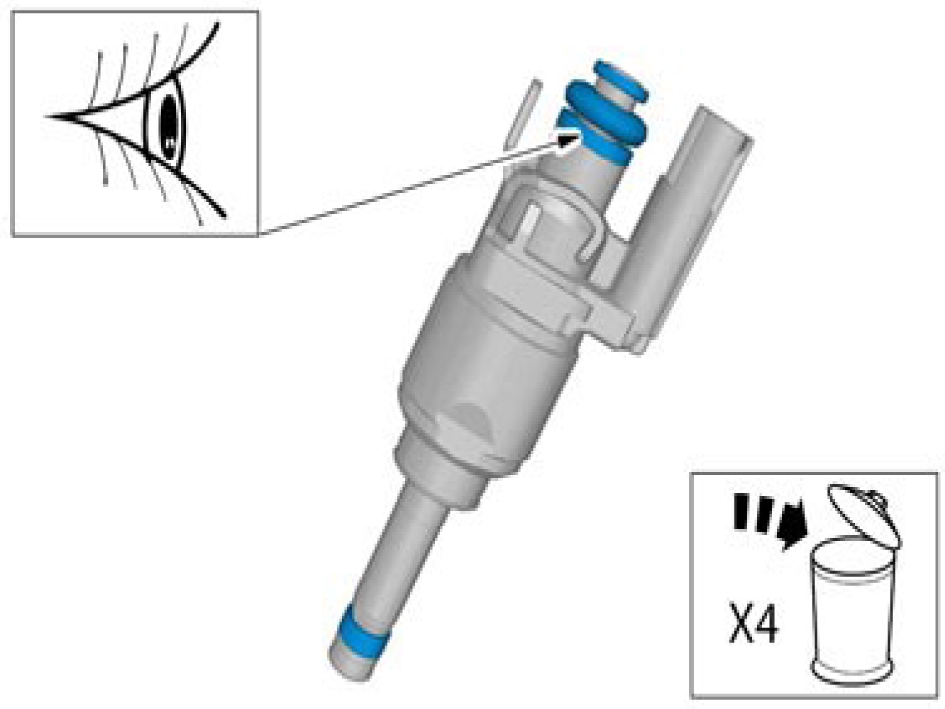
Note the position.
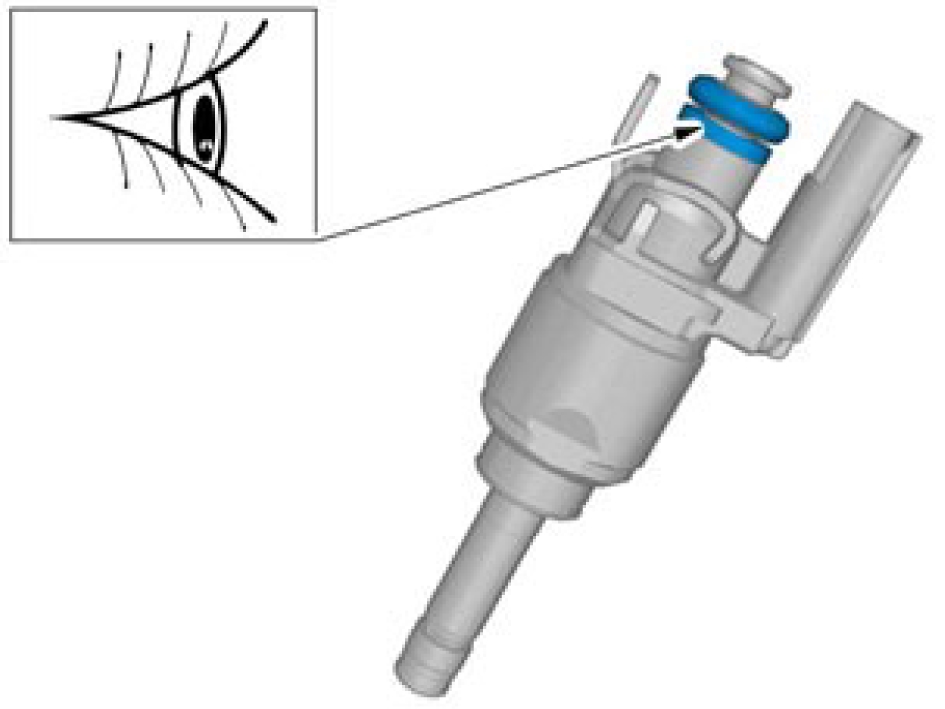
Make sure that the components are positioned correctly.
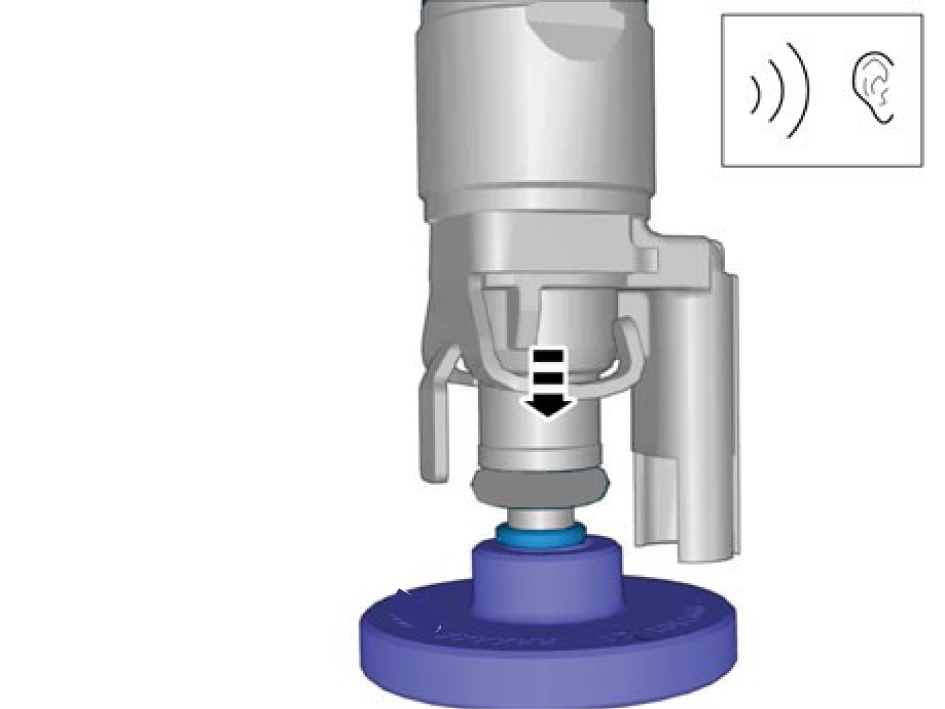
A click confirms that the component is in the correct position.
Use special tool: 999 7501
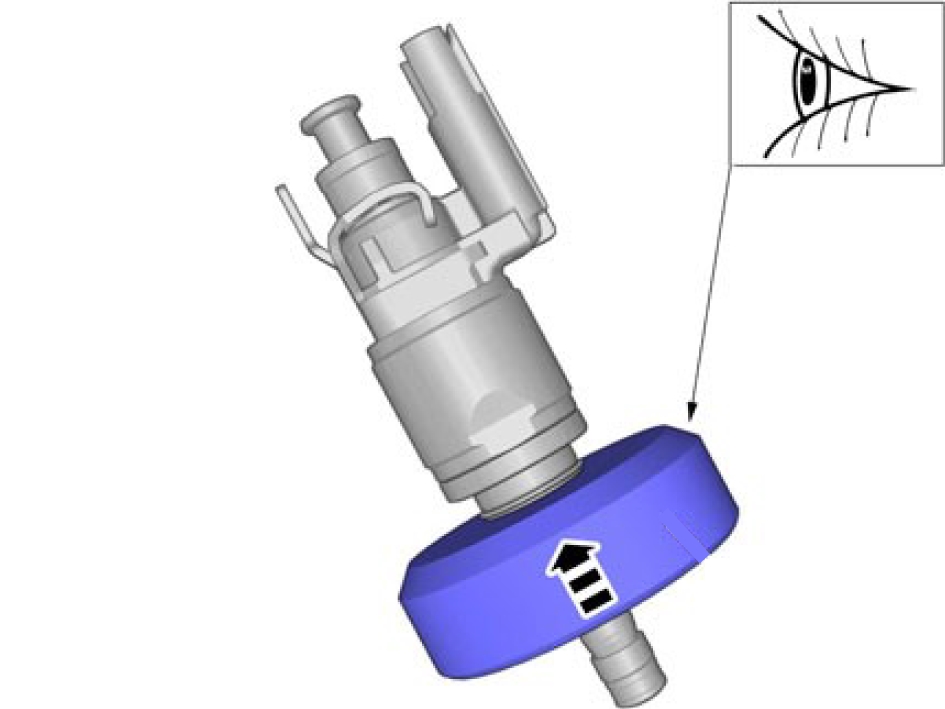
Note the placing of the tool.
Use special tool: 999 7502
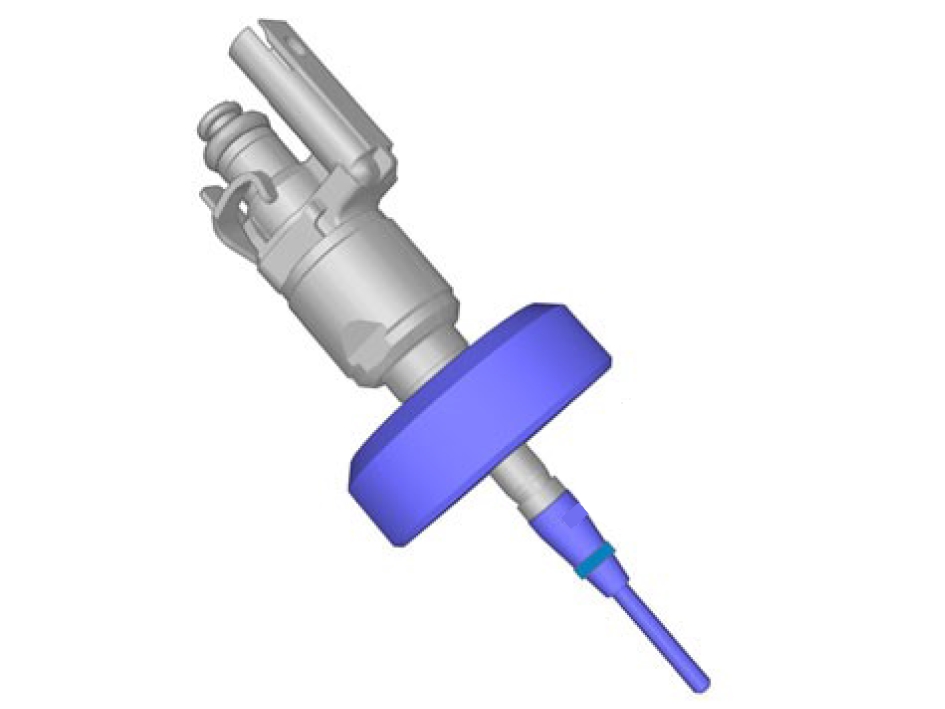
Use special tool: 999 7502
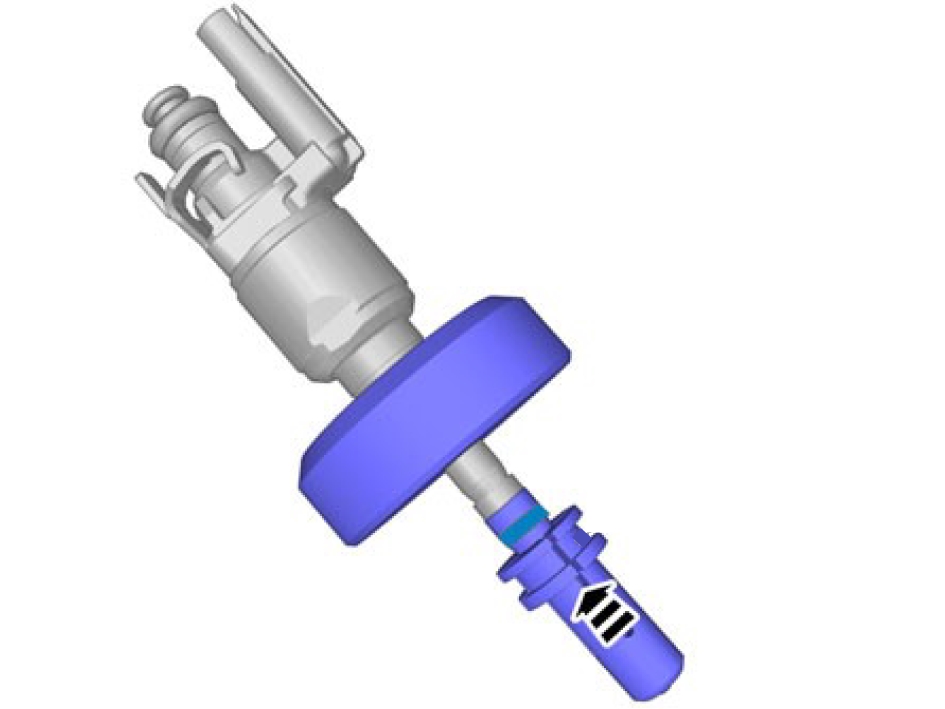
Use special tool: 999 7502-2
Pull carefully.
This step requires considerable force.
Wait for the time specified.
Note the placing of the tool.
Make sure that the marked component has been removed.
This step requires considerable force.
Installation
All seals shall be replaced.
Connect the connector.
Install the fuel rail, refer to:
Fuel rail, replaceFuel rail, replace
Removal
Exposure to fuel can be harmful and can cause severe health damage or death.
To avoid that dirt can cause damage during disassembly, the area should be cleaned both at the start and if needed after components are disassembled.
Relieve the fuel pressure, refer to:
Fuel system pressure releaseRemove the ignition coil, refer to:
Ignition coil, replace
Remove the screws.
Remove the screw.
Remove the screws.
Release the connector catches.
Disconnect the connectors.
Loosen the screws.
Fold marked components aside.
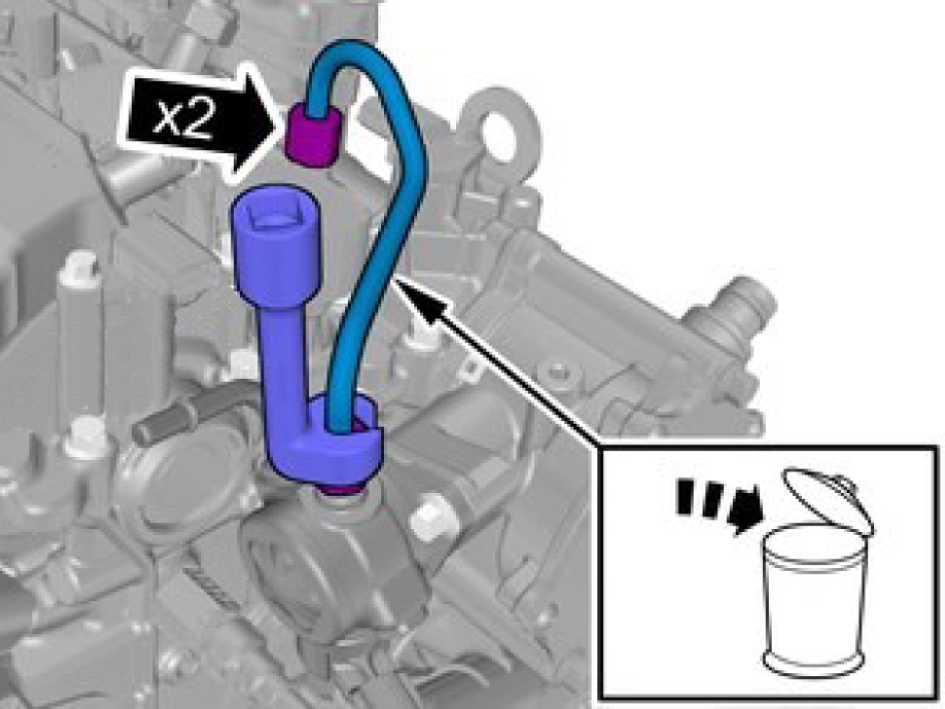
Be prepared to collect escaping fluid.
Make sure that the area around the component is clean and free of foreign material.
Extreme cleanliness must be exercised when handling these components.
Remove the nuts, use special tool: 981 4198
Release the locks.
Be prepared to collect escaping fluid.
Remove the screws.
Remove the marked component.
Observe caution when carrying out this step.
Install the Special tool.
Rotate marked component according to image.
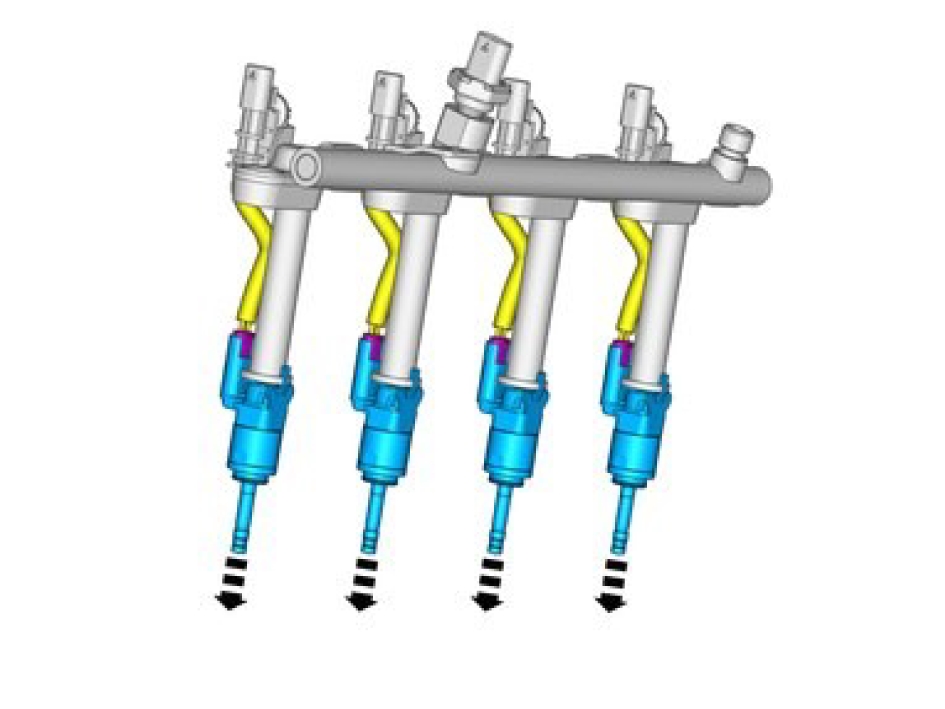
Note the placing of the tool.
Remove the screws and lift the component carefully.
Remove the clips.
Orientation view
Installation
Install new clips.
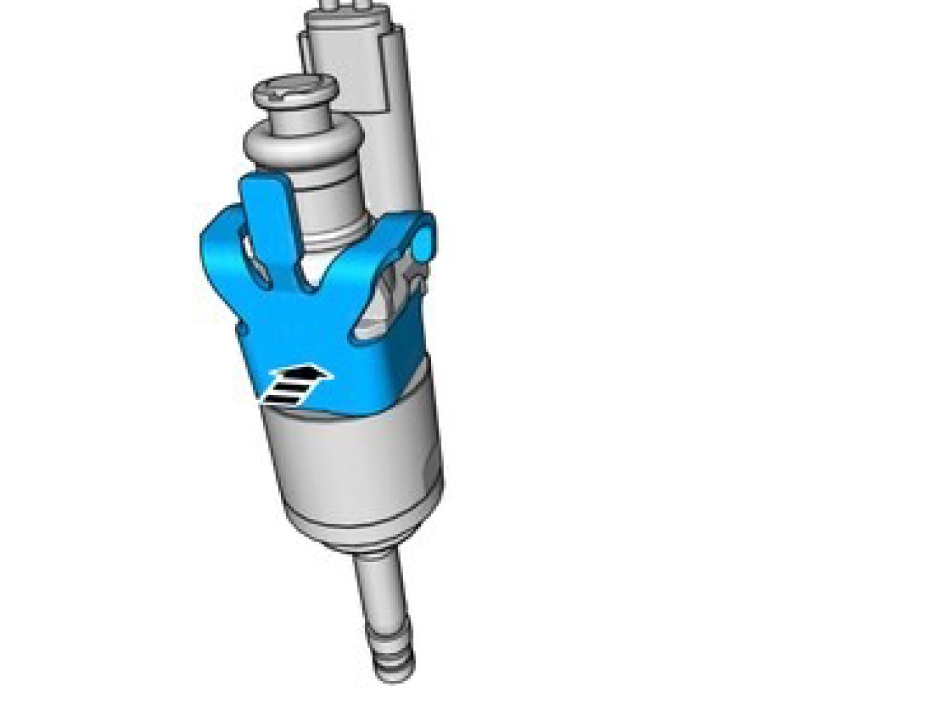
Clean carefully, using compressed air before installing.
Special tool: 999 7505
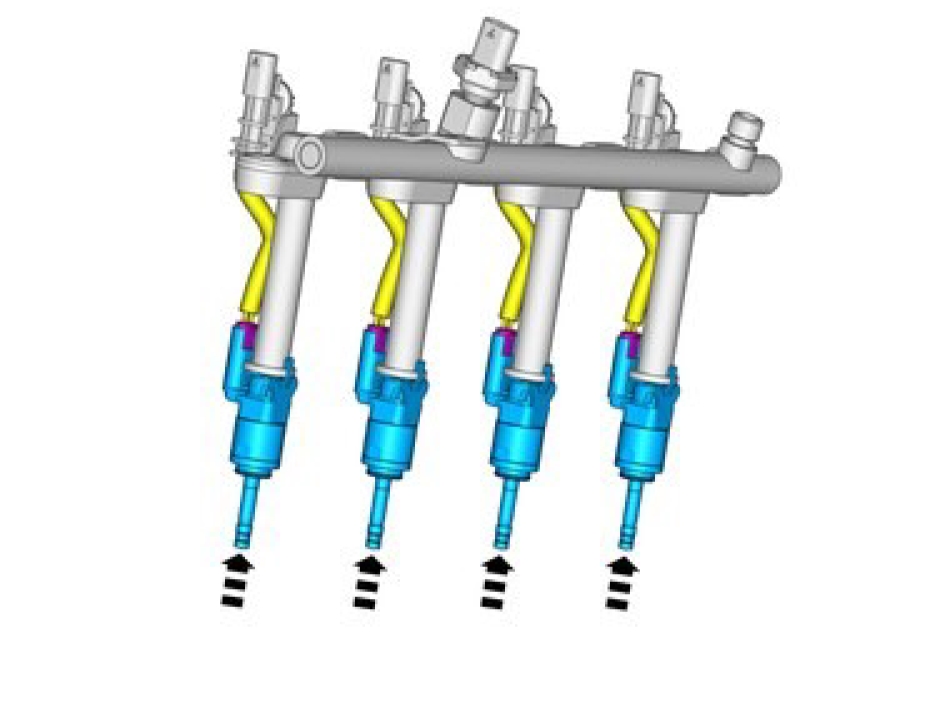
Be extra careful when installing this component.
Install the marked components.
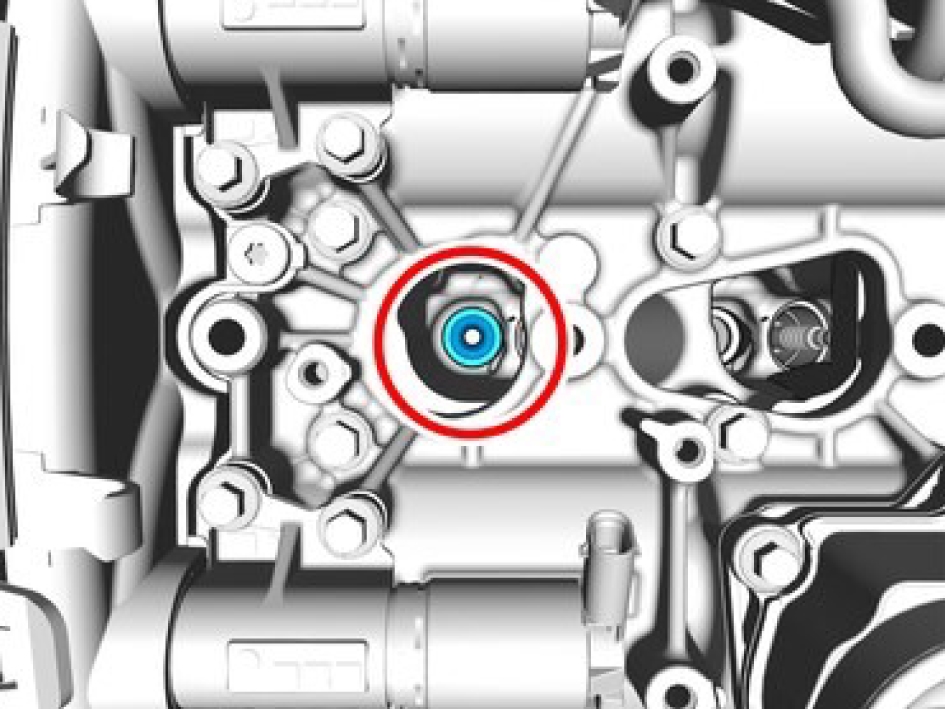
Make sure that the mating faces are clean and free of foreign material.
Clean carefully, using compressed air and special tool: 999 7505
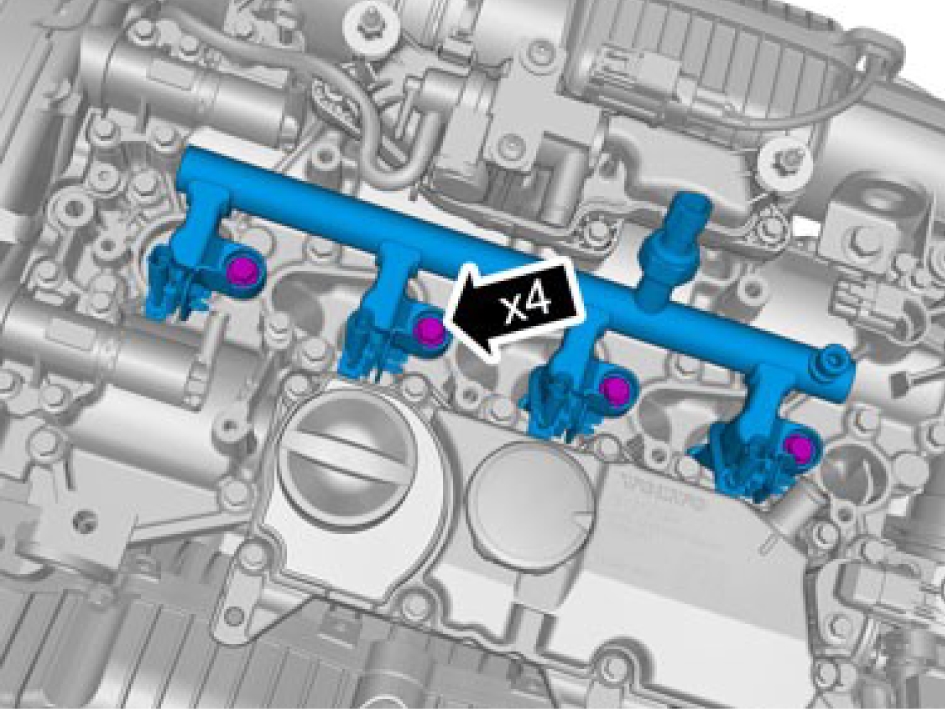
Install the fuel rail.
Install screws. torque: 20 Nm
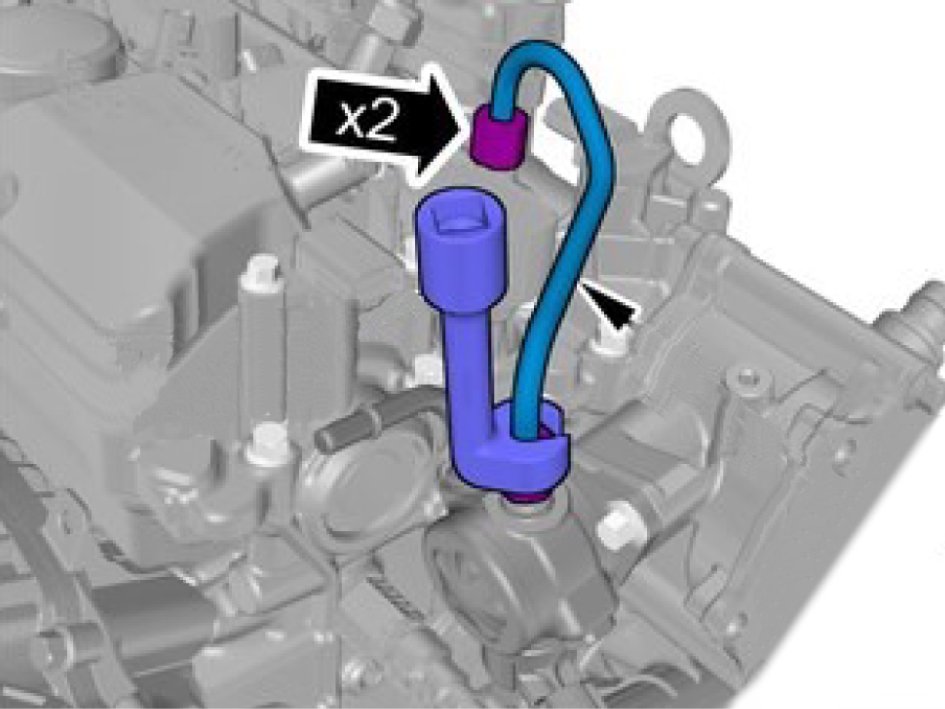
Make sure that a new component is installed.
Install the fuel line, use special tool: 981 4198
Stage 1, torque: 12 Nm
Stage 2, torque: 25 Nm
Fold marked component back.
Install screws M6, torque: 10 Nm
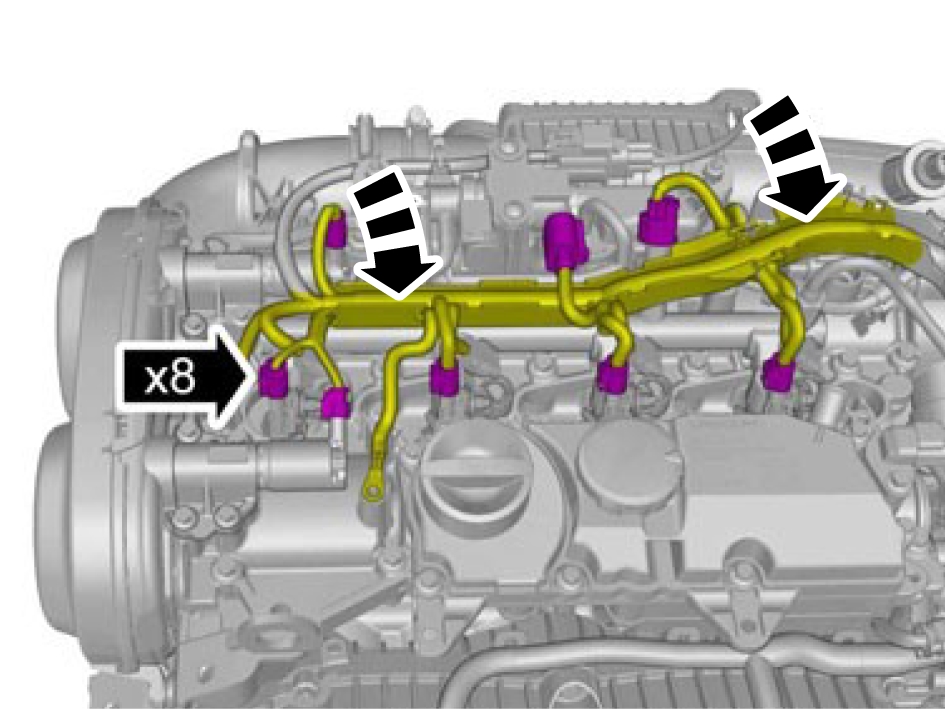
Connect the connectors.
Release the connector catches.
Connect the connectors.
Fasten the connector catches.
Install the screws M6, torque: 10 Nm
Install the screw M6, torque: 10 Nm
Fasten the cables M6, torque: 10 Nm
Install the ignition coil, refer to:
Ignition coil, replaceIgnition coil, replace
Removal
Remove the hose.
Undo the hose from the connection and fold aside.
Remove the screws and the marked component.
Installation

Apply grease on the area indicated.
Install the component.
M6, torque: 10 Nm
Fasten the connector catches.
Connect the connectors.
Install the hose.
Manifold absolute pressure MAP sensor, replace
Removal
Disconnect the connector.
Disconnect the connector.
Remove the screw.
Remove the marked component.
Installation
Install the sensor.
Install the connector.
Install screw, torque:5 Nm
Oil cooler, engine, replace
Remove
Drain the engine oil, refer to:
Oil filter, replaceDrain the cooling system, refer to:
Cooling system - draining, charging and bleeding
Be prepared to collect escaping fluid.
Remove the hoses.
Remove the marked component.
Installation

Replace the seals.
Be prepared to collect escaping fluid.
Install the marked component.
Install the hoses.
Install the screws M7, torque: 17 Nm
Fill the engine oil, refer to:
Oil filter, replaceFill the cooling system, refer to:
Cooling system - draining, charging and bleedingOil pump, replace
Removal
Remove oil pan, refer to:
Oil pan, replace
Only use moderate force.
1, Press moderate.
2, Lock with a pin 3mm.
Remove the marked component.
Remove the screw.
Fold marked component aside.
Remove the screws.
Remove marked component.
Installation
Install the pump.
Install screws M7, torque: 17 Nm
Install the cable.
Install the screw M7, torque:
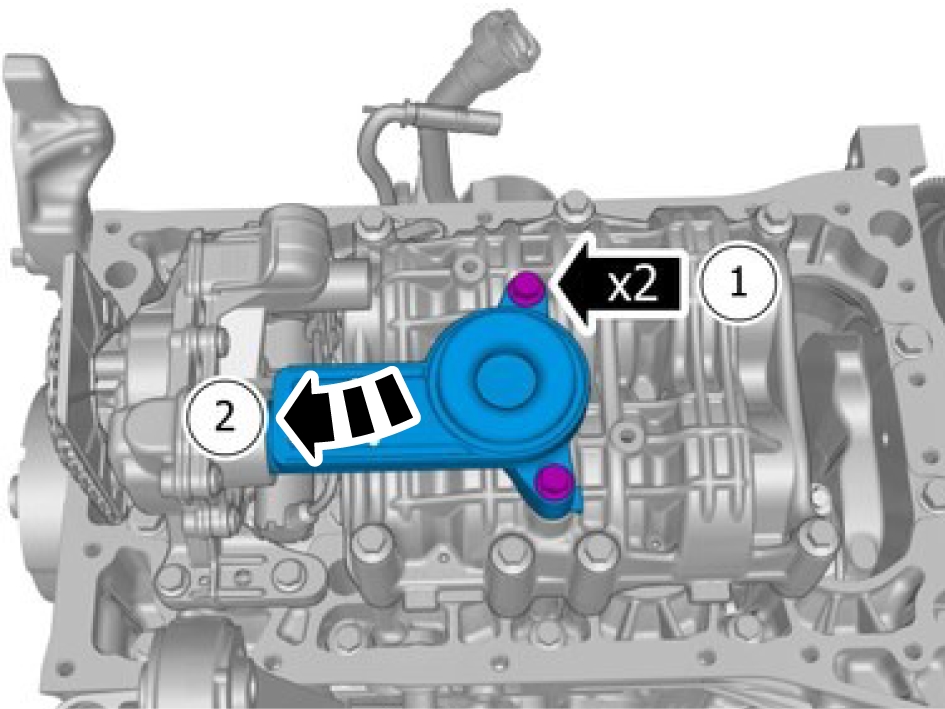
Install marked component M6, torque: 10 Nm
Push gently and remove the pin.
Install the oil pan, refer to:
Oil pan, replaceOil pan, replace
Removal
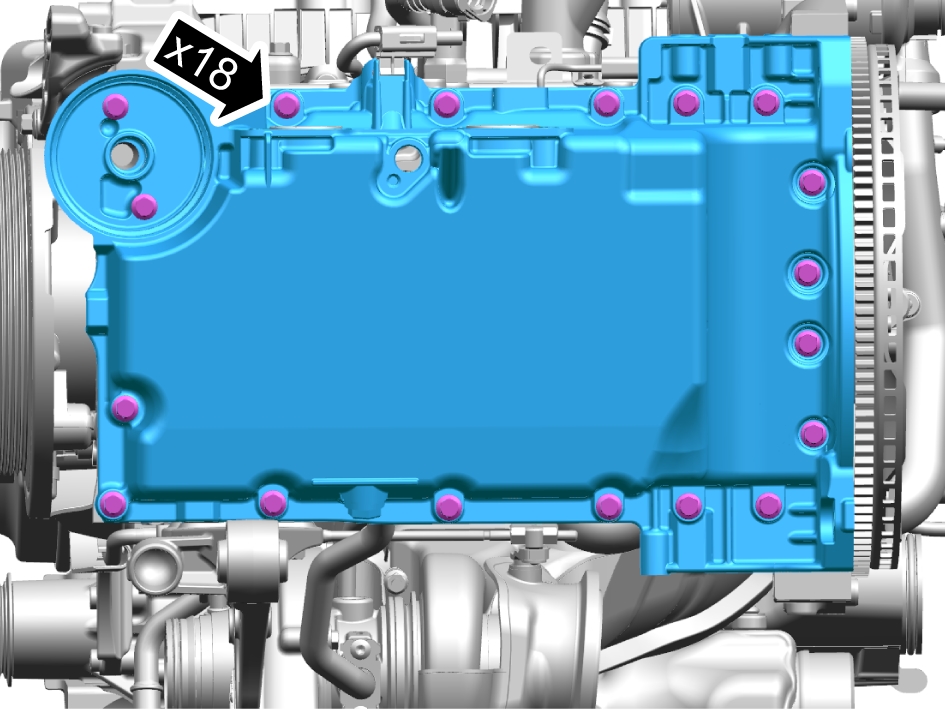
Remove the screws.
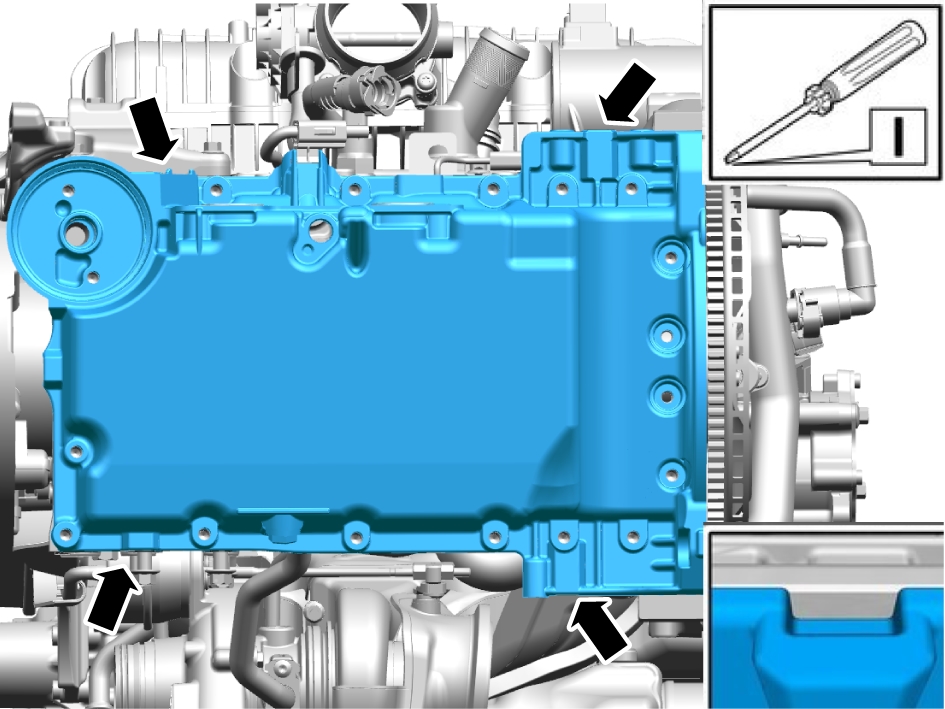
Remove the marked component.
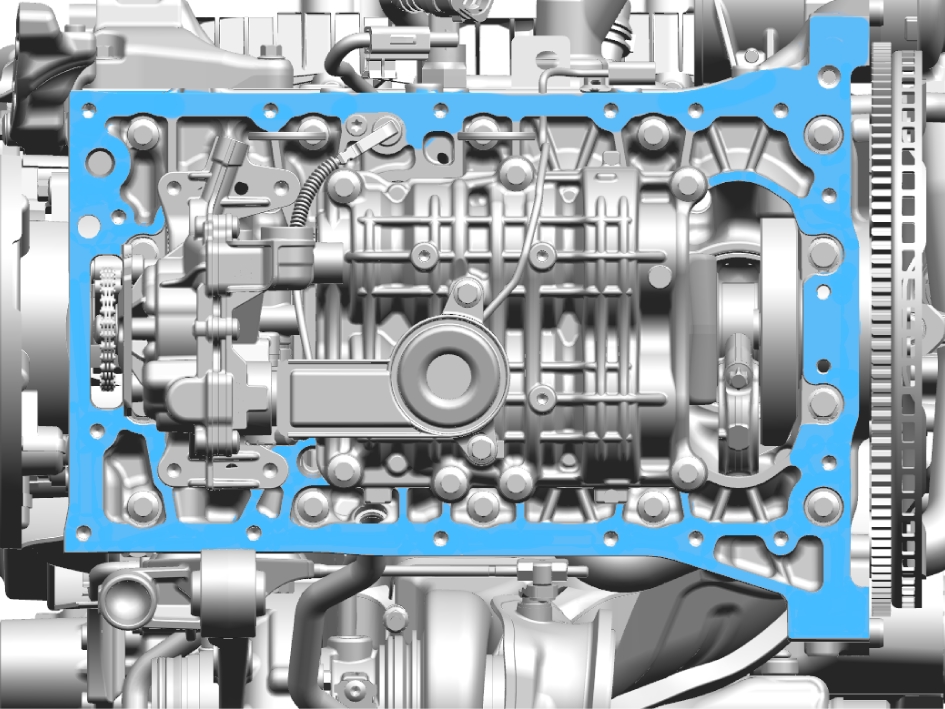
Clean marked area, use isopropanol.
Clean marked area, use isopropanol.
Installation
The component must be installed within 5 minutes of applying the sealant.
Apply a 1,5mm line of chemical gasket.
Install the screws M7, torque: 17 Nm
Install the following components, refer to:
Oil cooler, engine, replaceLevel sensor engine oil, replacePressure sensor, fuel rail, replace
Removal
Perform depressurizing fuel system, refer to:
Fuel system pressure release
Disconnect the connector.
Fold marked components aside.
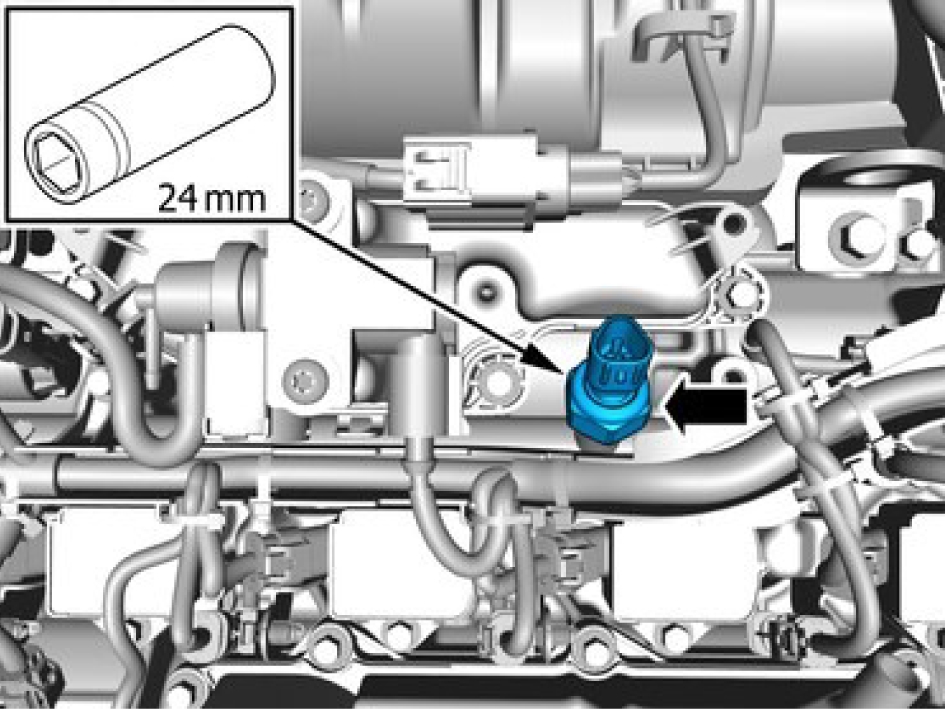
Be prepared to collect escaping fluid.
Make sure that the area around the component is clean and free of foreign material.
Remove the marked component.
Installation
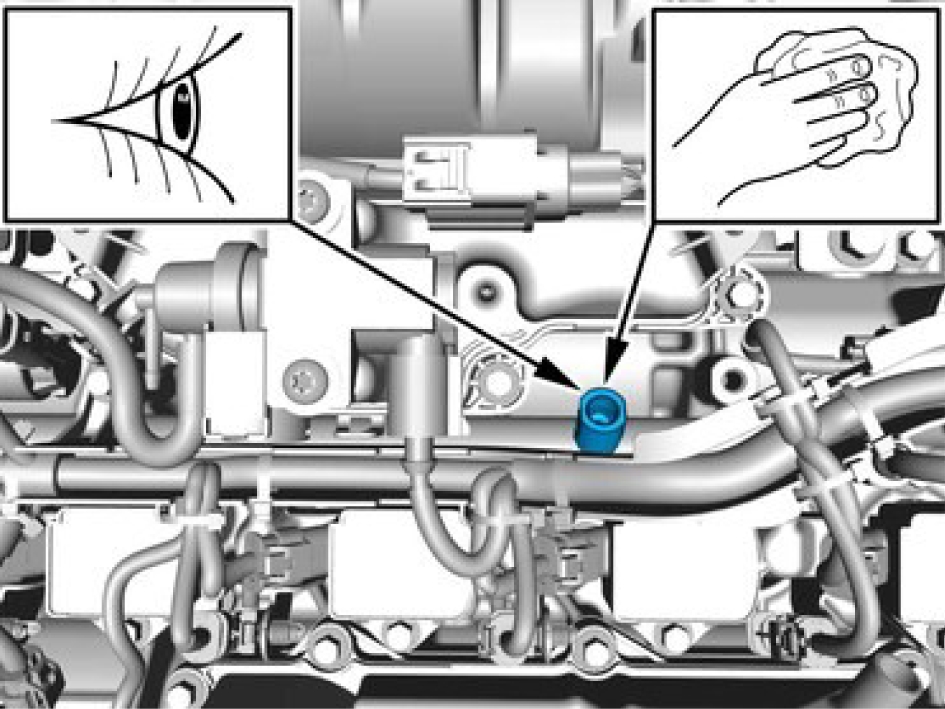
Clean the marked area.
Install the pressure sensor, fuel rail (FRP), torque: 40 Nm
Connect the connector.
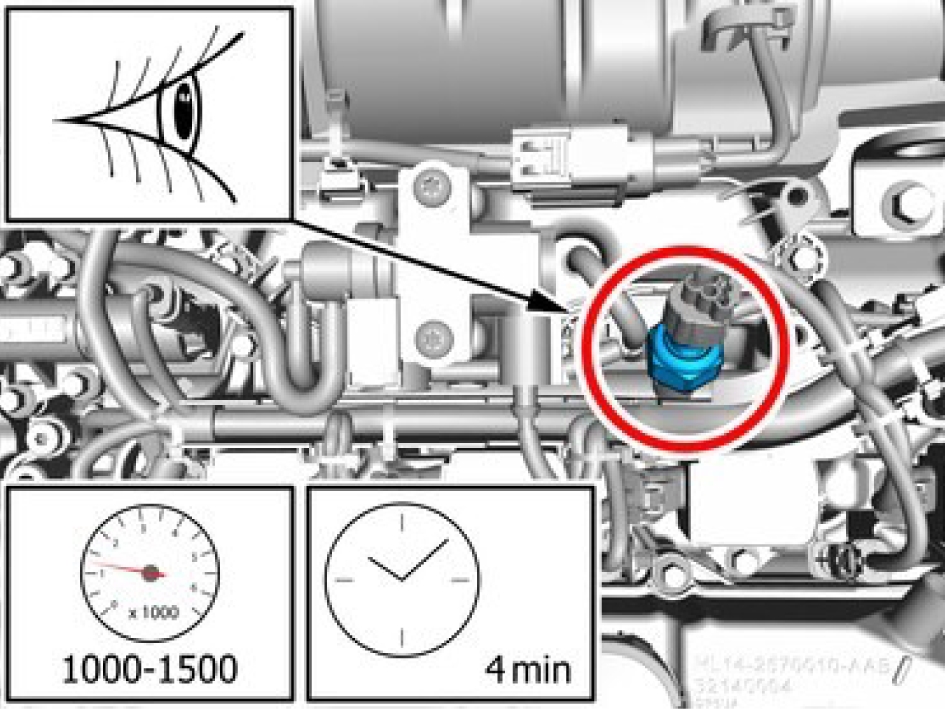
Make sure there is no leakage at the marked area.
Throttle body, replace
Removal

Remove the hose clamp.
Remove the hose.
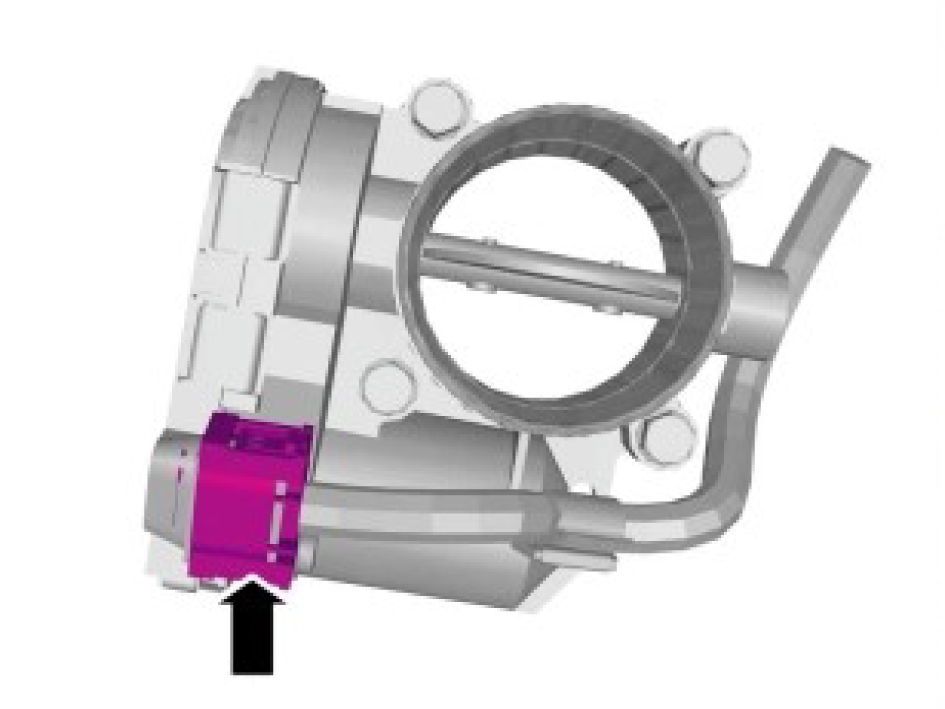
Remove the connector.
Remove the screws.
Remove the marked component.
Installation
Install the marked component.
Install the screws M6, torque: 10 Nm
Install the connector.
Install the hose.
Install the hose clamp.
Throttle body, replace
Empty cooling system - draining, charging and bleeding, refer to:
Cooling system - draining, charging and bleeding
Orientation view
Be prepared to collect escaping fluid.
Release the locks.
Undo the hoses from the connections.
Fold marked components aside.
Disconnect the connector.
Be prepared to collect escaping fluid.
Release the locks.
Undo the hoses from the connections.
Fold marked components aside.
Remove the screws.
Fold marked components aside.
Loosen the hose clamp.
Remove the marked component.
Observe caution when carrying out this step.
Release the lock.
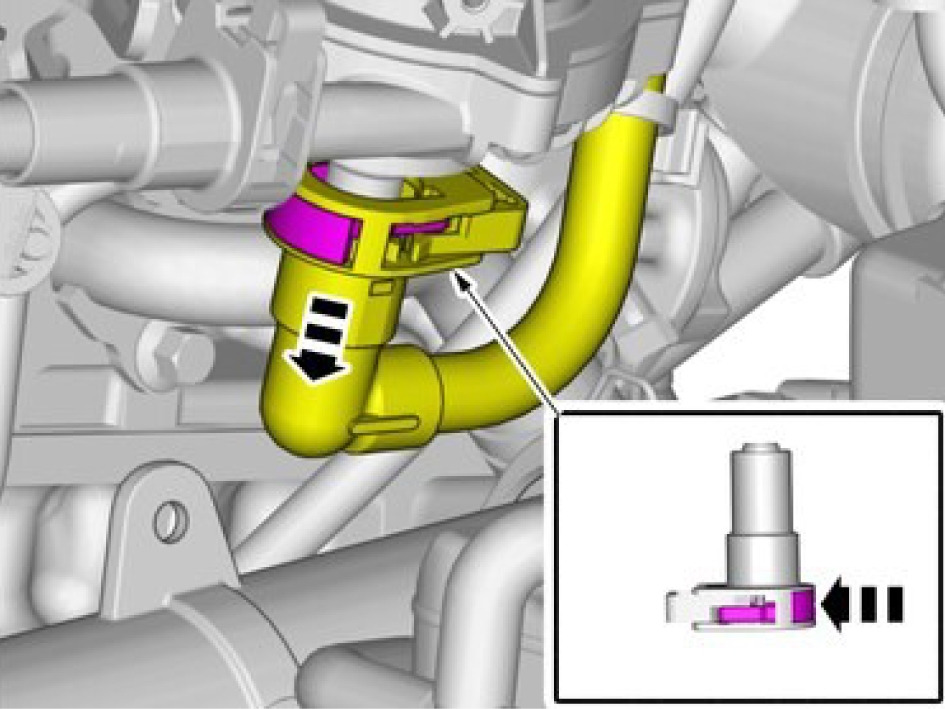
Observe caution when carrying out this step.
Depress the locking device.
Undo the hose from the connection.
Fold marked component aside.
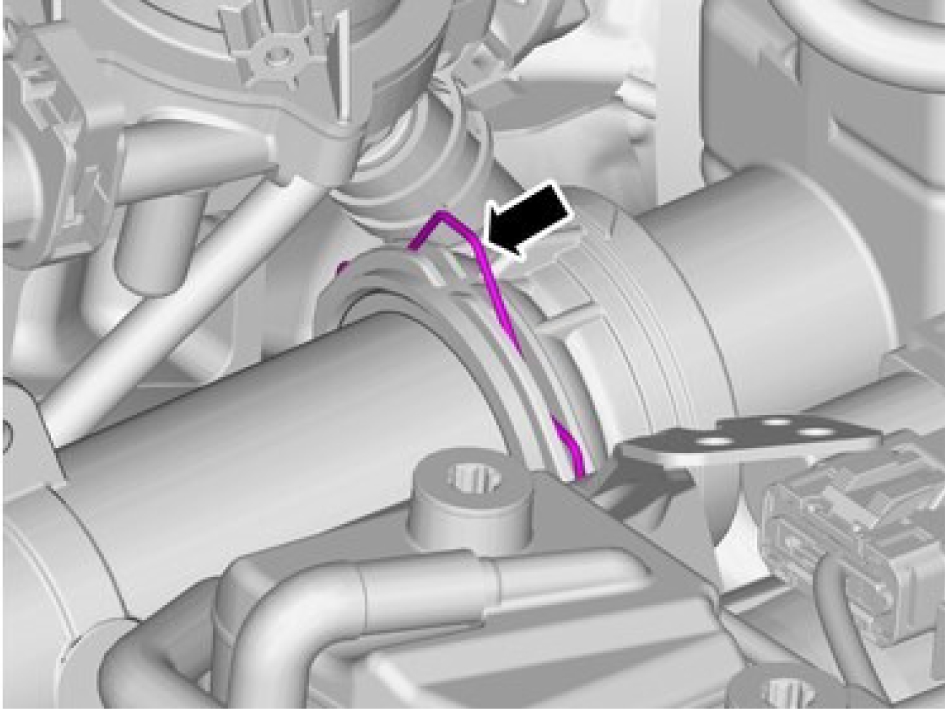
Release the lock.
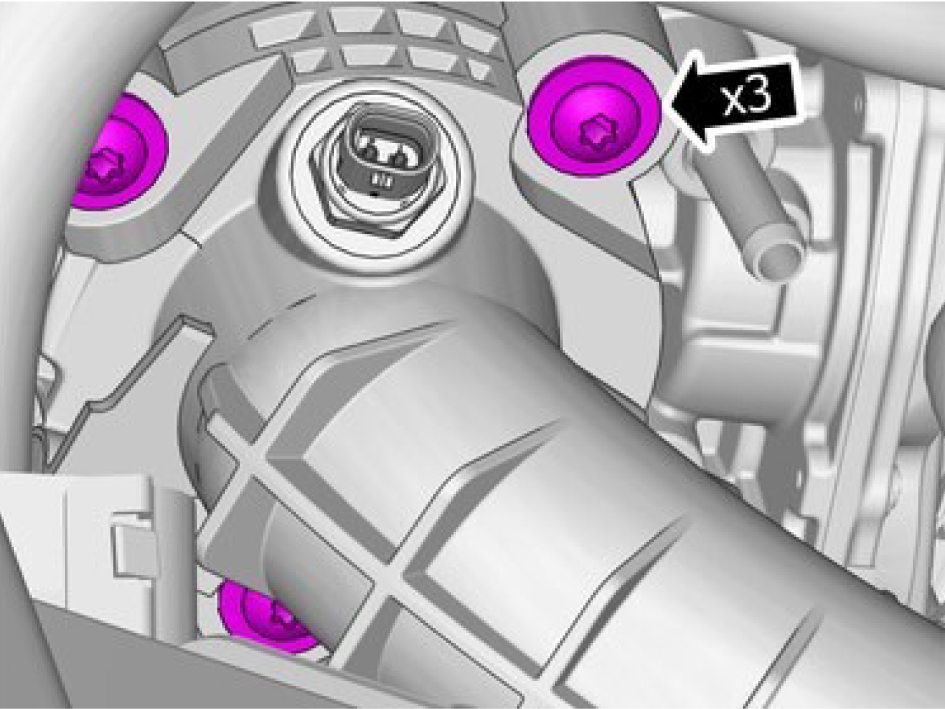
Remove the screws.
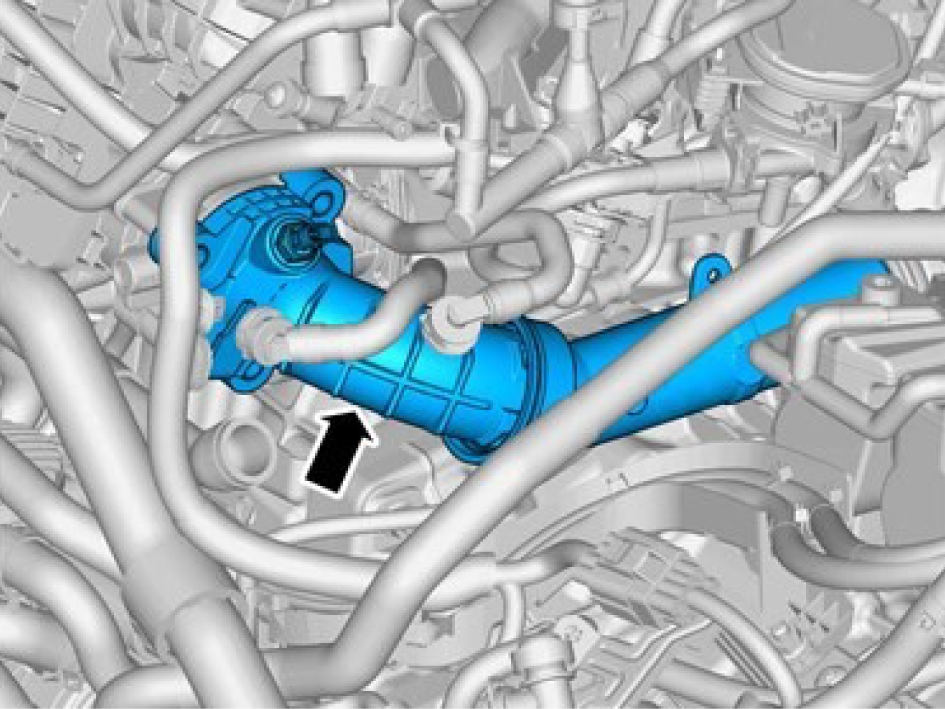
Remove the marked component.
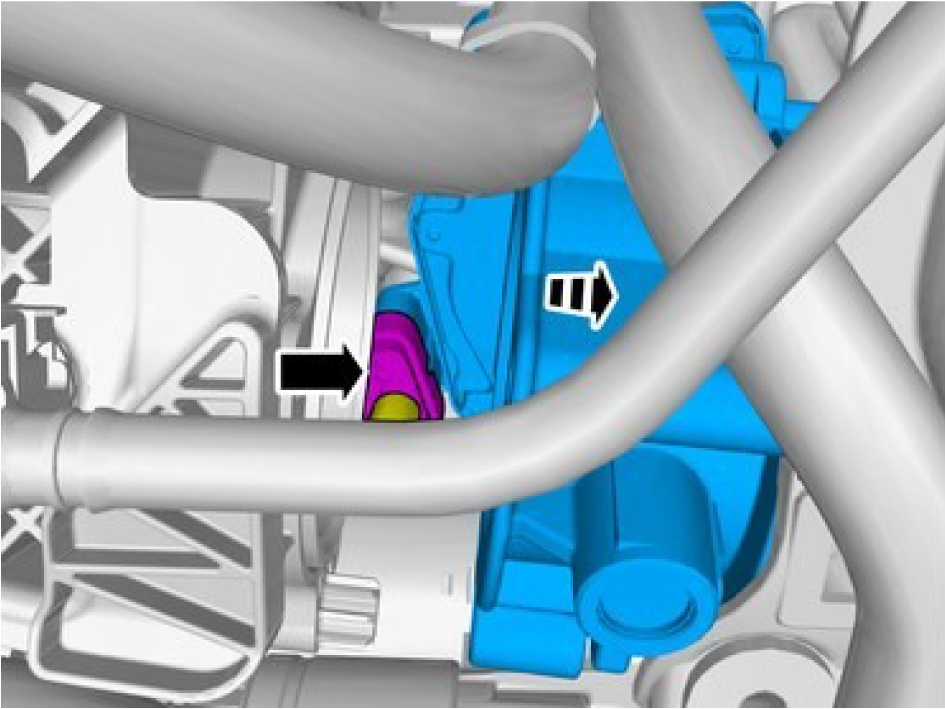
Disconnect the connector.
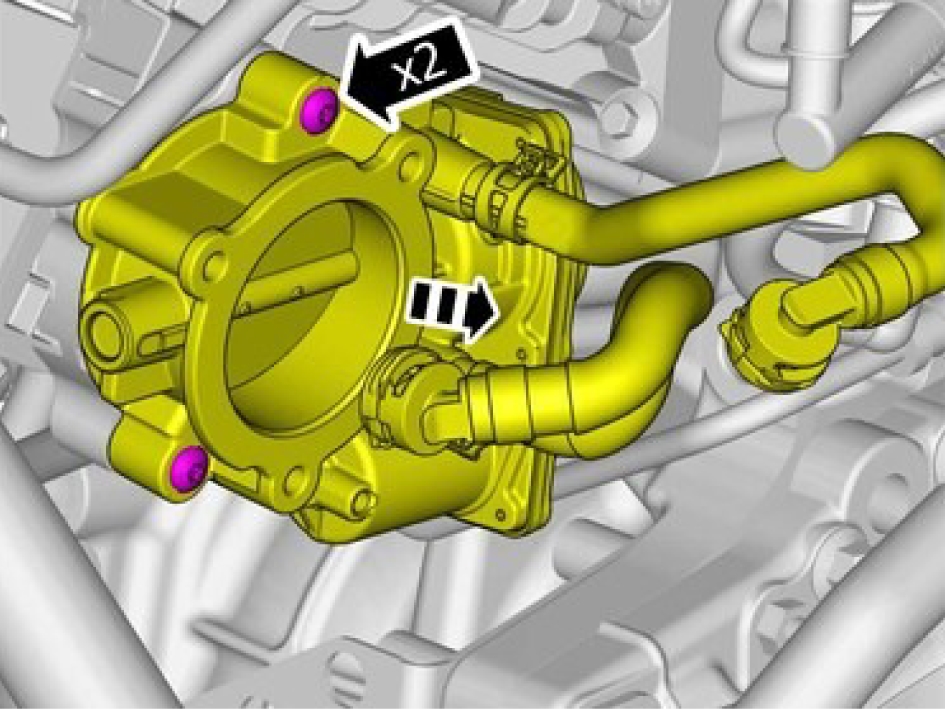
Observe caution when carrying out this step.
Remove the screws.
Lift the marked component forward.
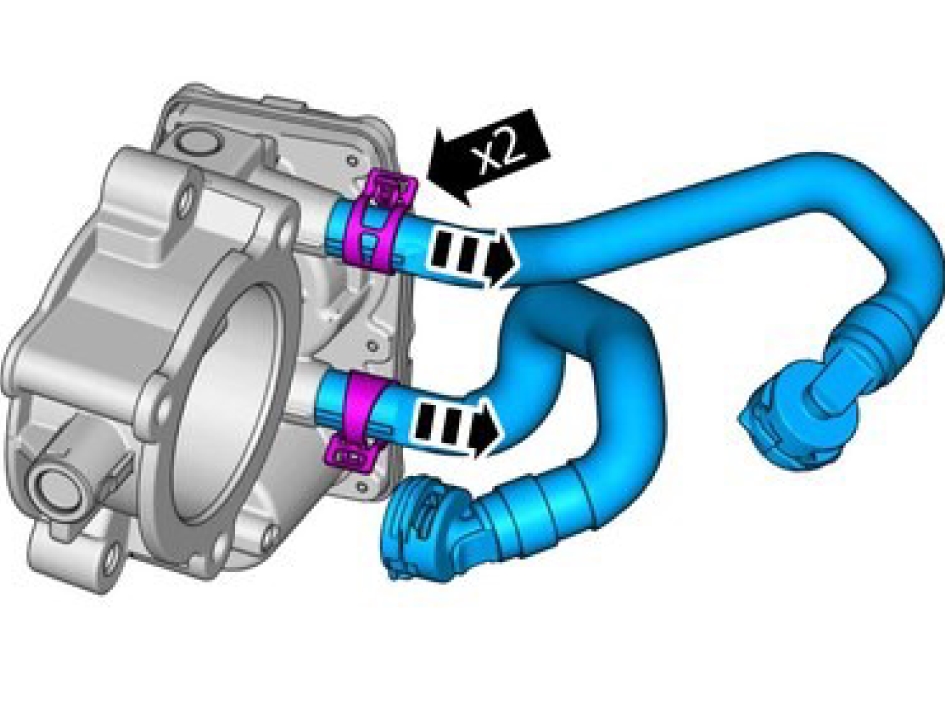
Loosen the hose clamps.
Undo the hoses from the connections.
Remove the marked components.
Installation
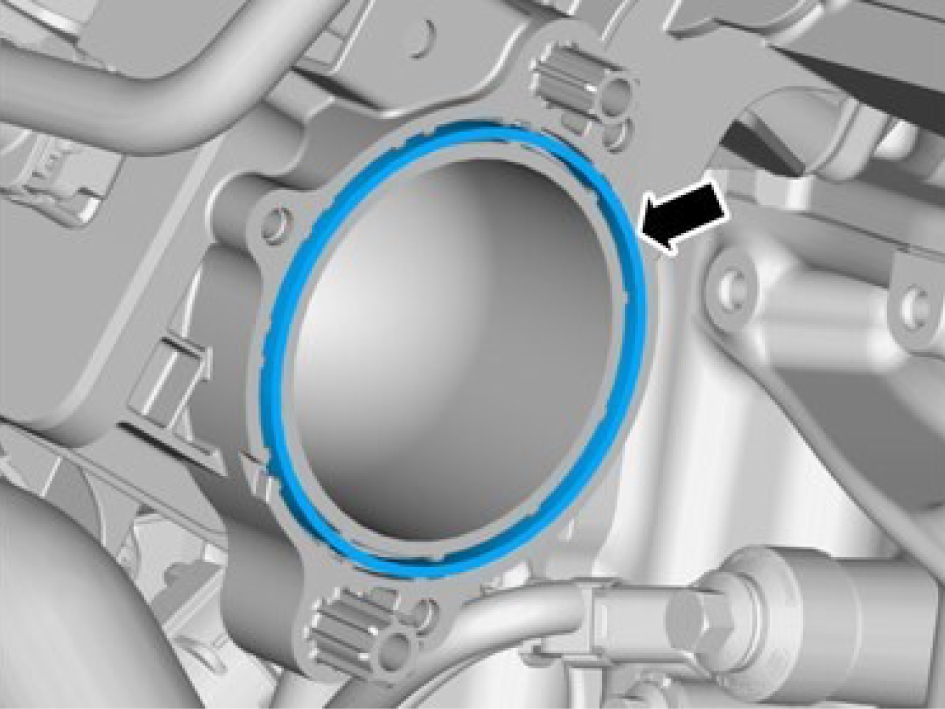
Use a new seal.
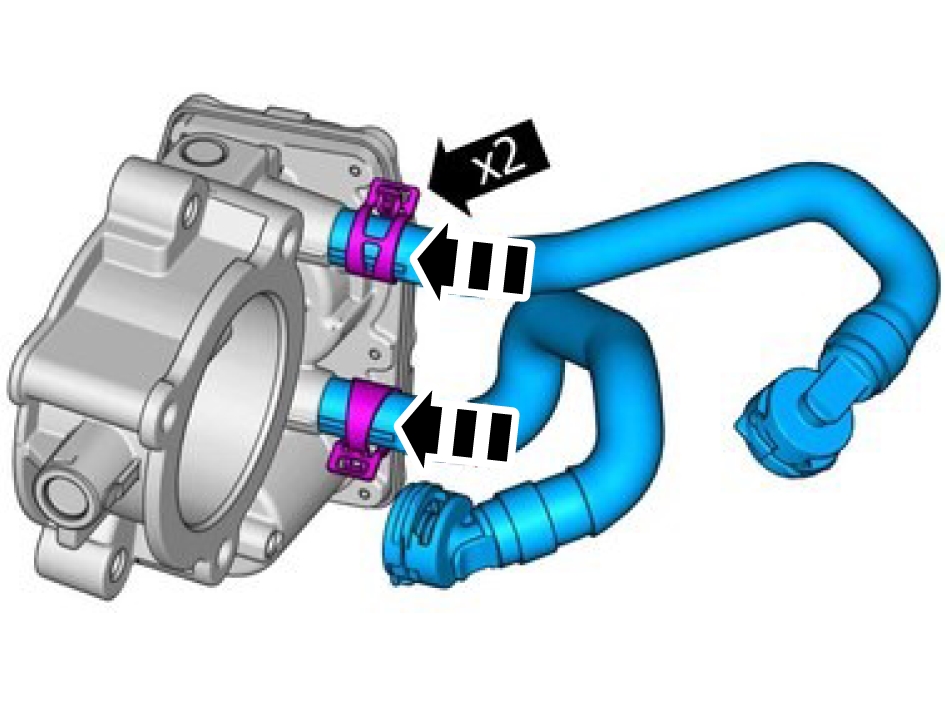
Install the marked components.
Fasten the hoses from the connections.
Install the hose clamps.

install marked component.
Install screws, torque: 7 Nm
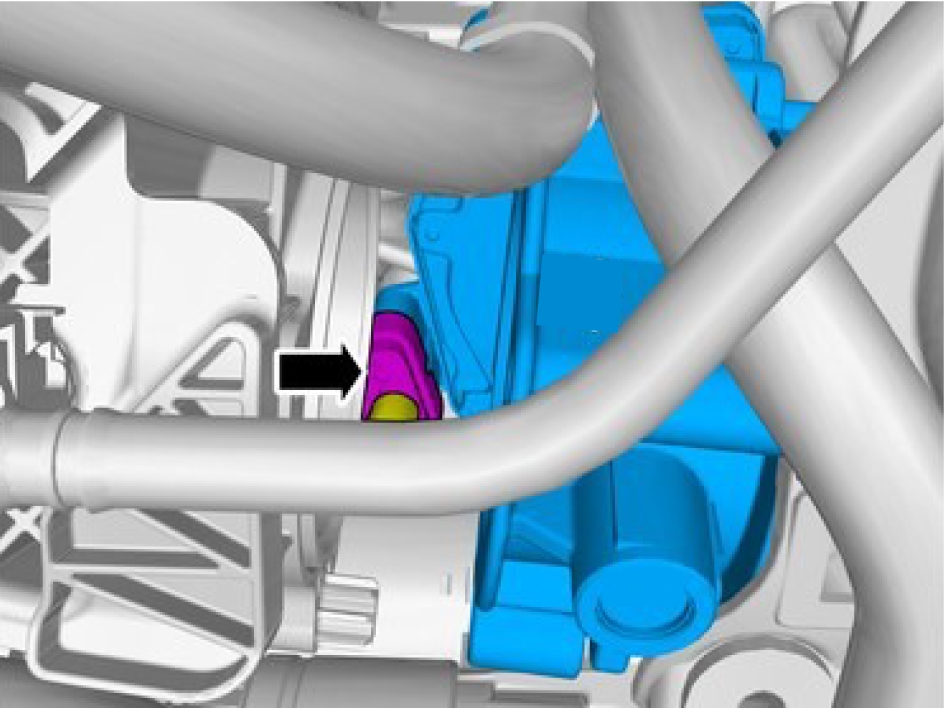
Install the connector.
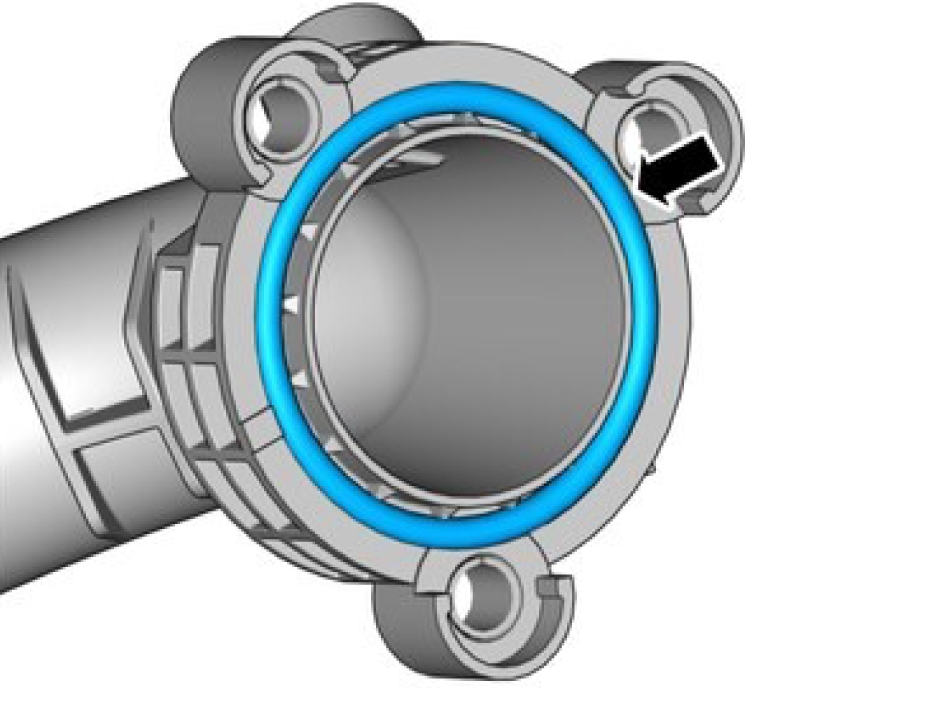
Use a new seal.
Install the marked component.
Install the screws, torque: 7 Nm
Install the lock.

Install the marked component.
Lock the clamp.
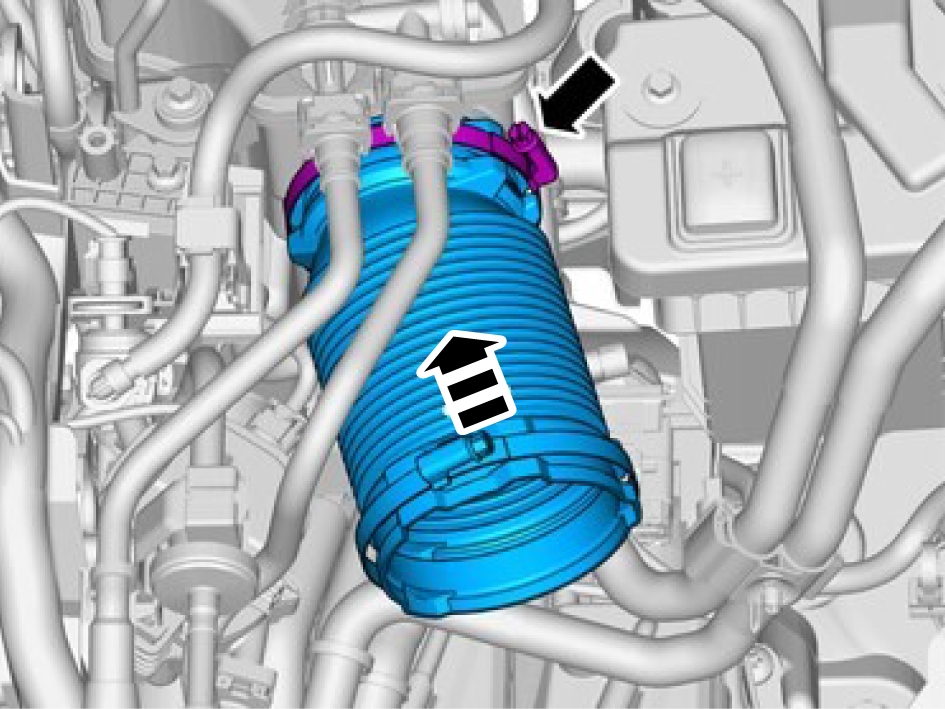
Install the marked component.
Install the clamp.
Install screws M6, torque: 10 Nm
Install the pipes.
Install screws M6, torque: 10 Nm
Install marked components.
Fill the cooling system - draining, charging and bleeding, refer to:
Cooling system - draining, charging and bleedingCamshaft position sensor - S601
Crankshaft position sensor S602
Fuel pressure sensor high-pressure side - S105
Induction pipe, replace
Removal
Remove the throttle body, refer to:
Throttle body, replace
Be prepared to collect escaping fluid.
Release the locks.
Undo the hoses from the connections.
Fold marked components aside.
Release the lock.
Undo the hose from the connection.
Fold marked component aside.
Disconnect the connector.
Fold marked component aside.
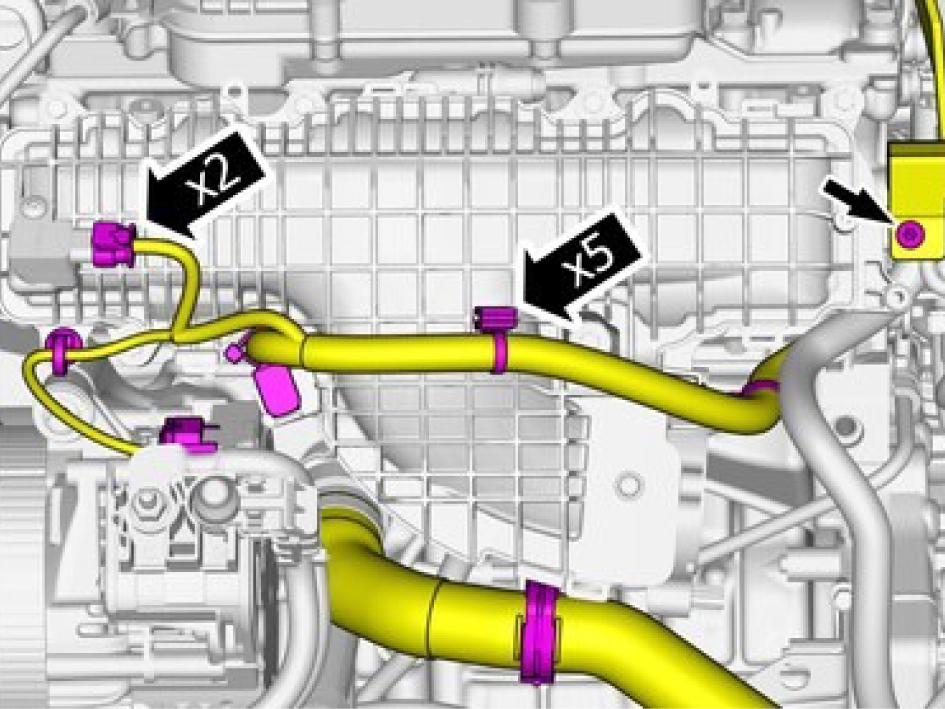
Remove the screw.
Disconnect the connectors.
Remove the cable harness clips.
Fold marked components aside.
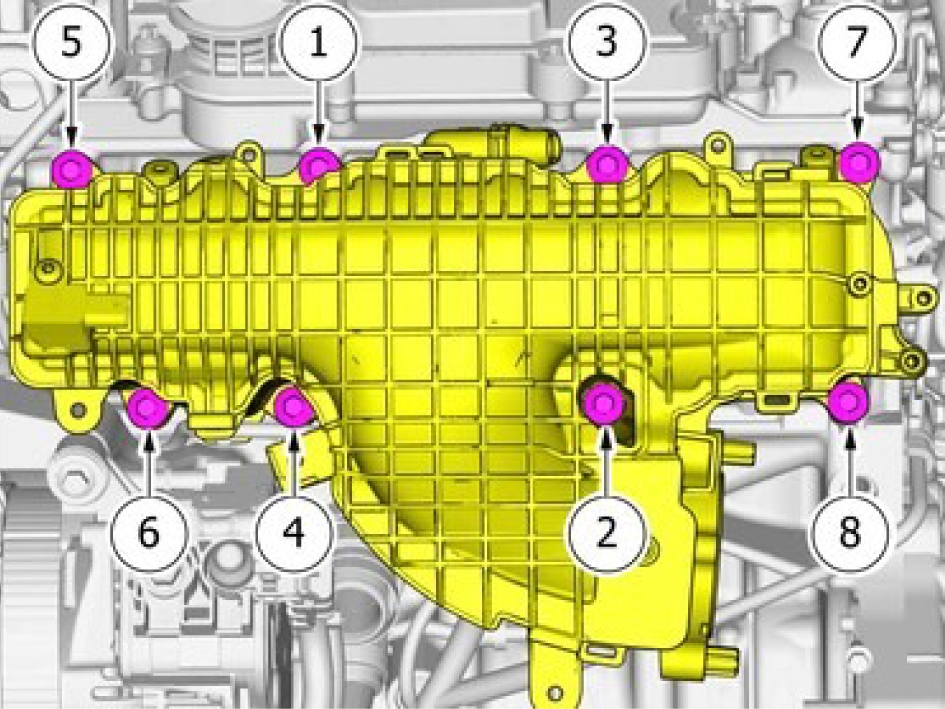
Remove the screws.
Fold marked components aside.
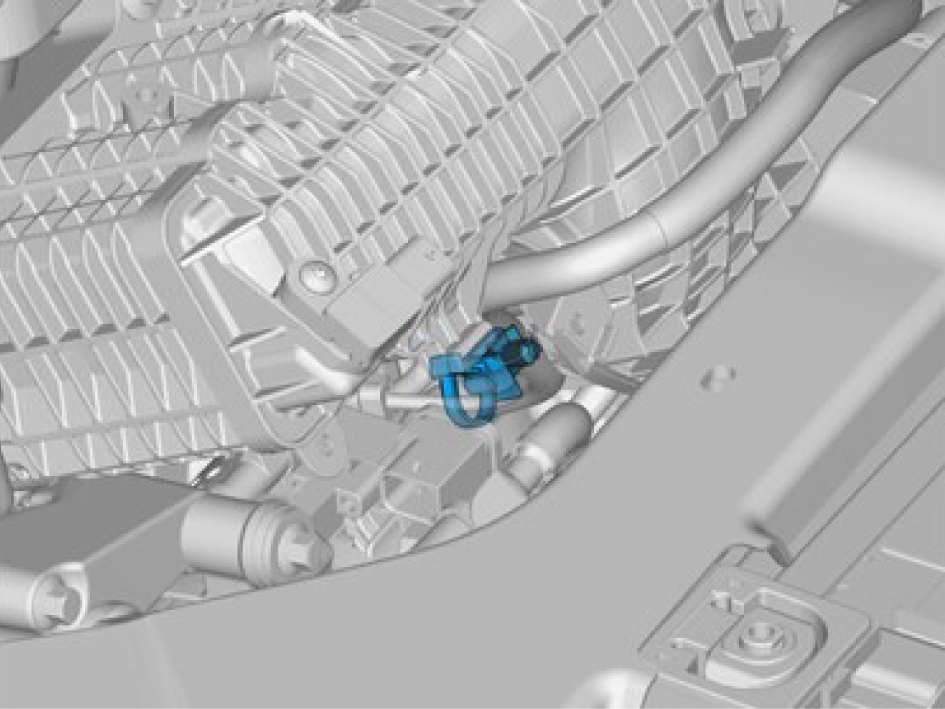
Orientation view, The graphic shows the back of the component before removal.
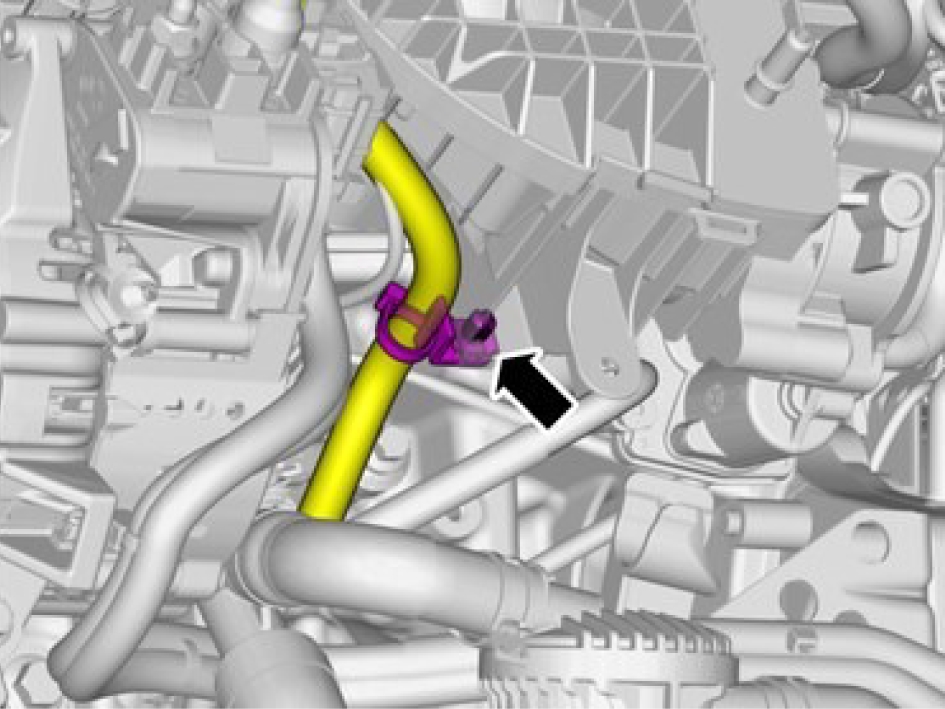
Remove the cable harness clips.
Fold marked component aside.
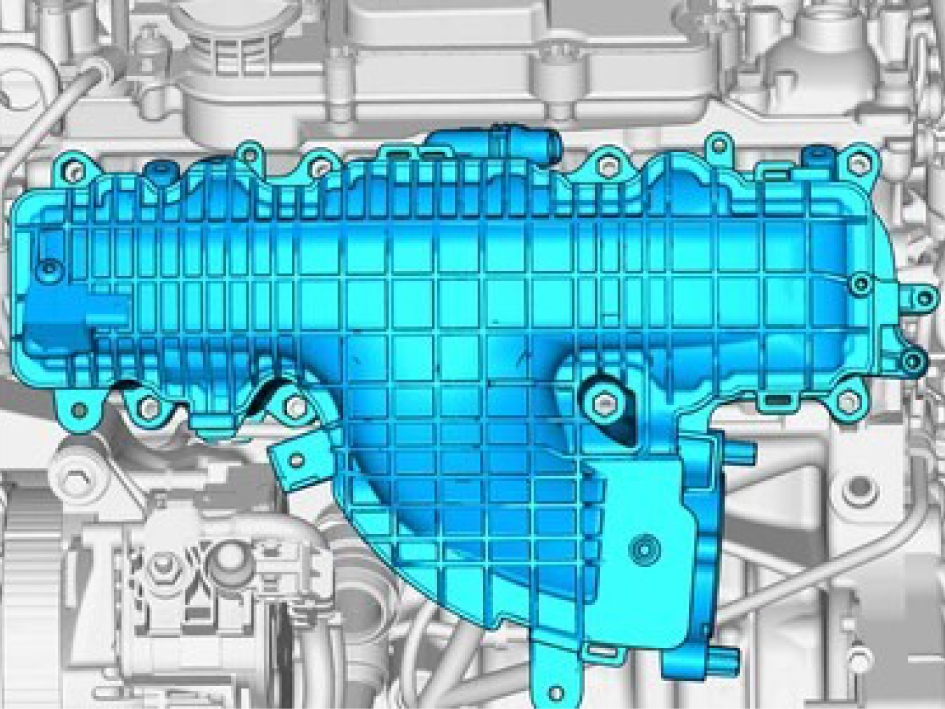
Remove the marked component.
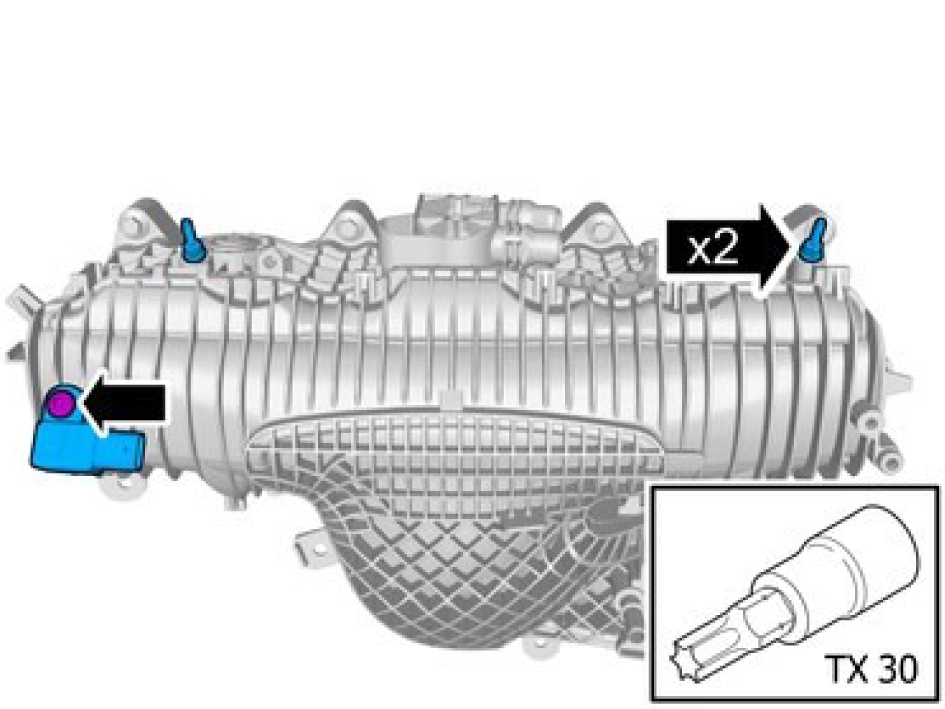
Remove the screws.
Remove the marked component.
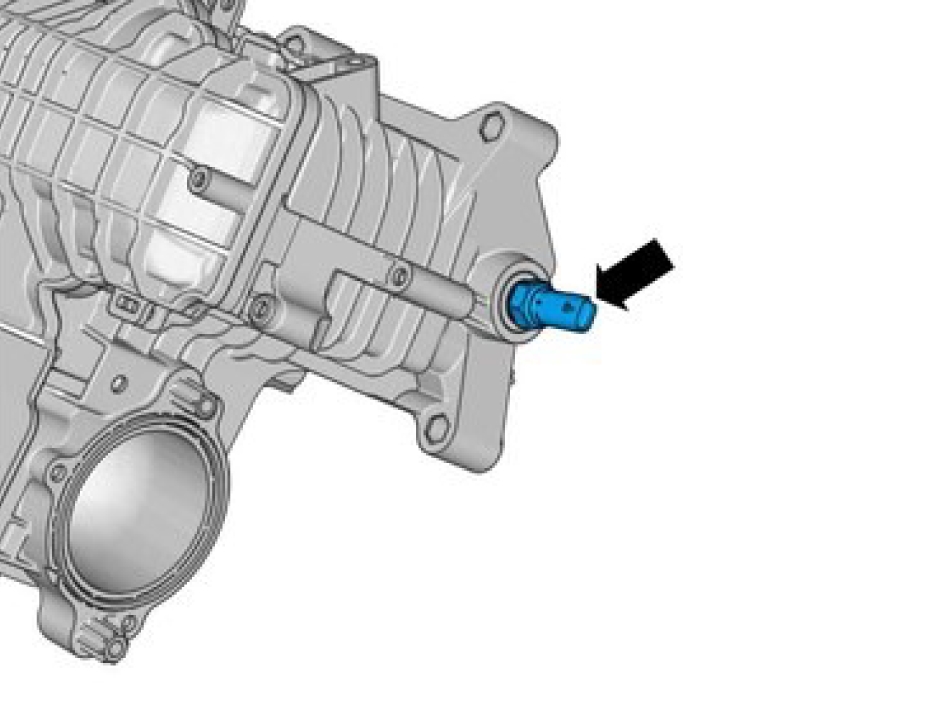
Remove the marked component.
Installation
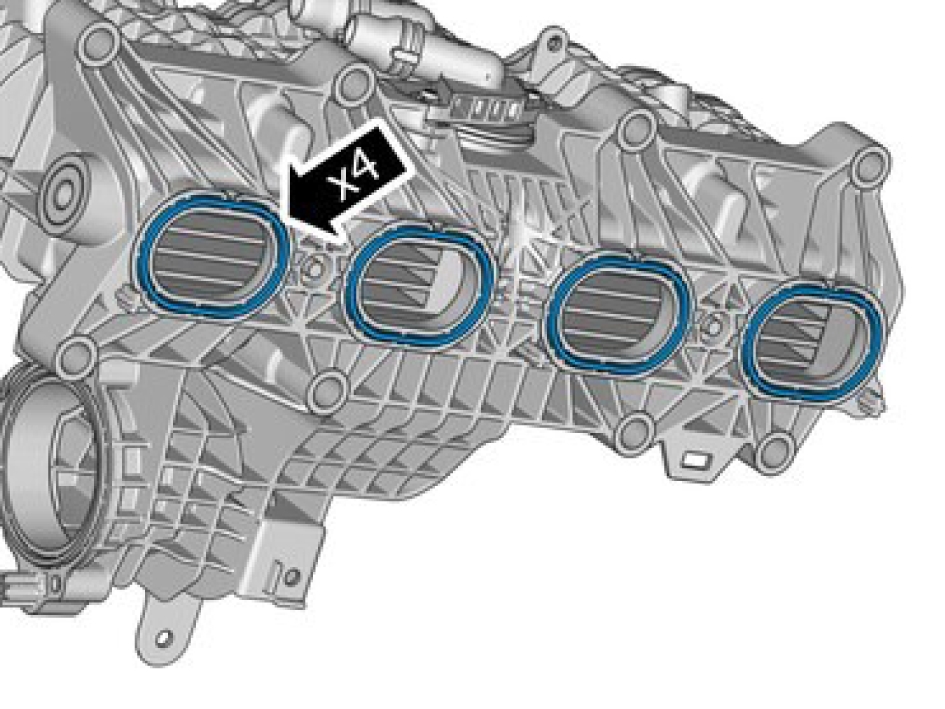
Use new seals.
Install the sensor, torque: 22 Nm
Install the screws
Install the sensor, torque: 5 Nm
Install the marked component.
Install the cable harness clips.
Install the screws M6, torque: 10 Nm
Install the cables and connectors.
Install the screw M5, torque: 5 Nm
Install the connector.
Install the hose and lock.
Install and lock the hoses.
Install the throttle body, refer to:
Throttle body, replaceManifold Pressure Sensor (MAP) - S302
Coolant temperature sensor, charge air cooler, replace
Perform cooling system draining, charging and bleeding, refer to:
Cooling system - draining, charging and bleeding
Loosen the clip.
Fold marked component aside.
Disconnect the connector.

Be prepared to collect escaping fluid.
Release the lock.
Remove the marked component.
Remove the marked component.
Connect the connector.
Install the hose with the clip.
Perform cooling system draining, charging and bleeding, refer to:
Cooling system - draining, charging and bleedingTurbocharger, replace
Removal
Drain cooling system, draining, filling, and bleeding, refer to:
Cooling system - draining, charging and bleedingLoosen the hose clamp.
Remove the marked component.
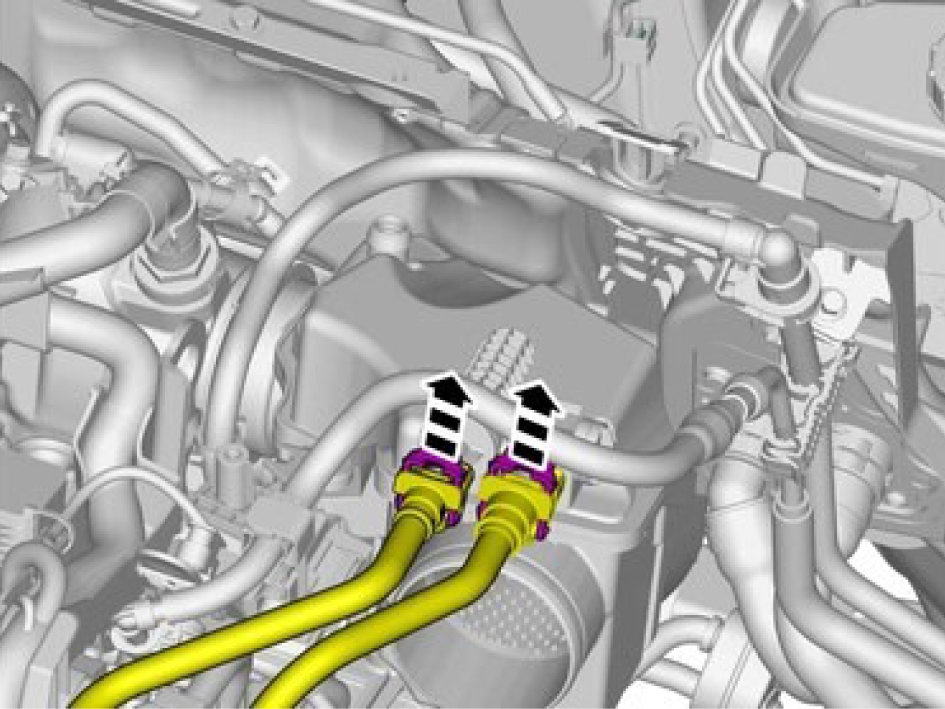
Release the locks.
Undo the hoses from the connections.
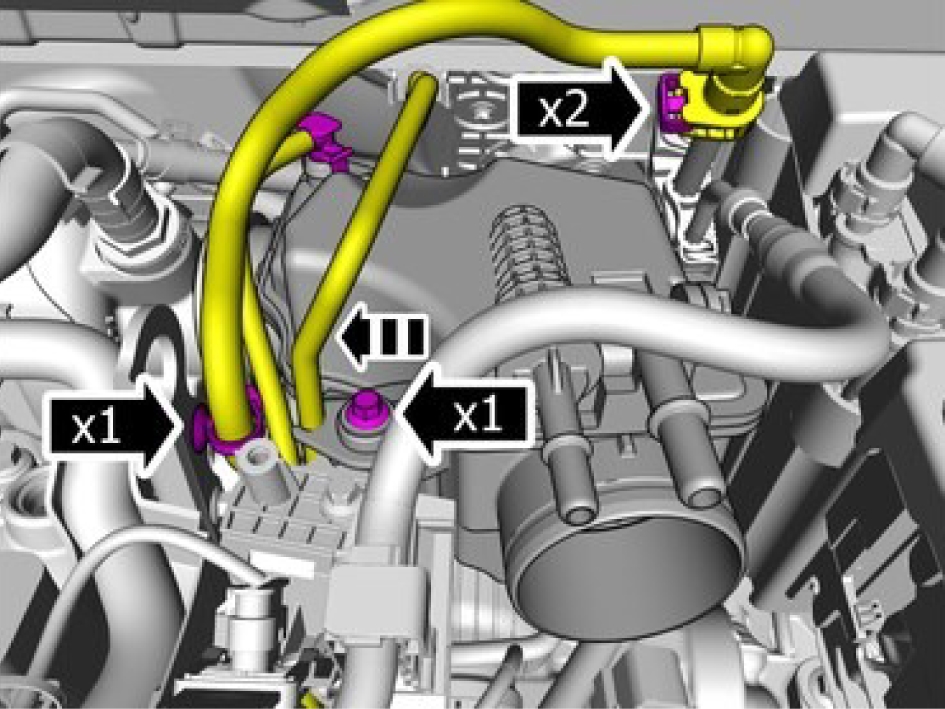
Release the locks.
Undo the hoses from the connections.
Loosen the clip.
Remove the screw.
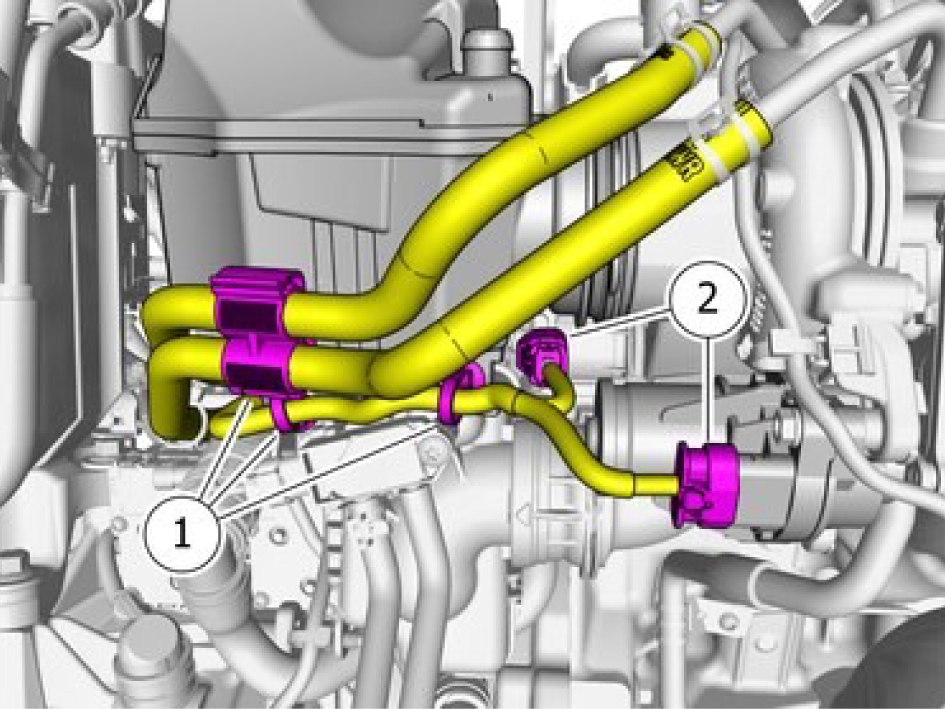
Loosen the clips.
Disconnect the connectors.
Release the lock.
Remove the marked component.
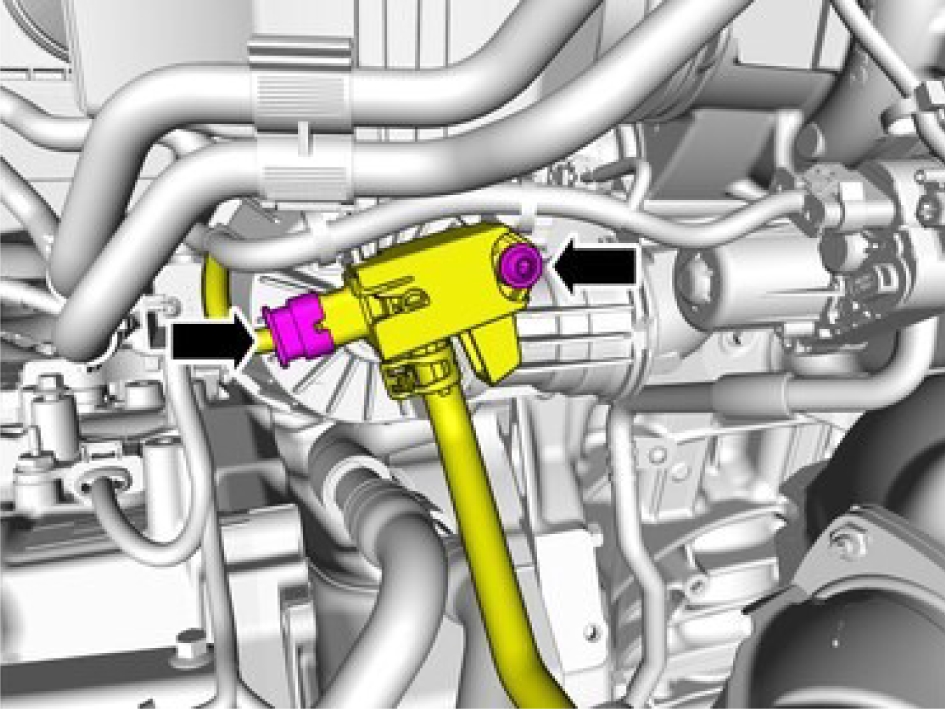
Disconnect the connector.
Remove the screw.
Fold marked components aside.
Disconnect the connectors.
Loosen the clips.
Fold the cable harness aside.
Remove the screw.
Loosen the clip.
Release the catches.
Remove the marked component.
Disconnect the connectors.
Remove the cable harness clips.
Remove the marked component.
Use special tool: 999 5543
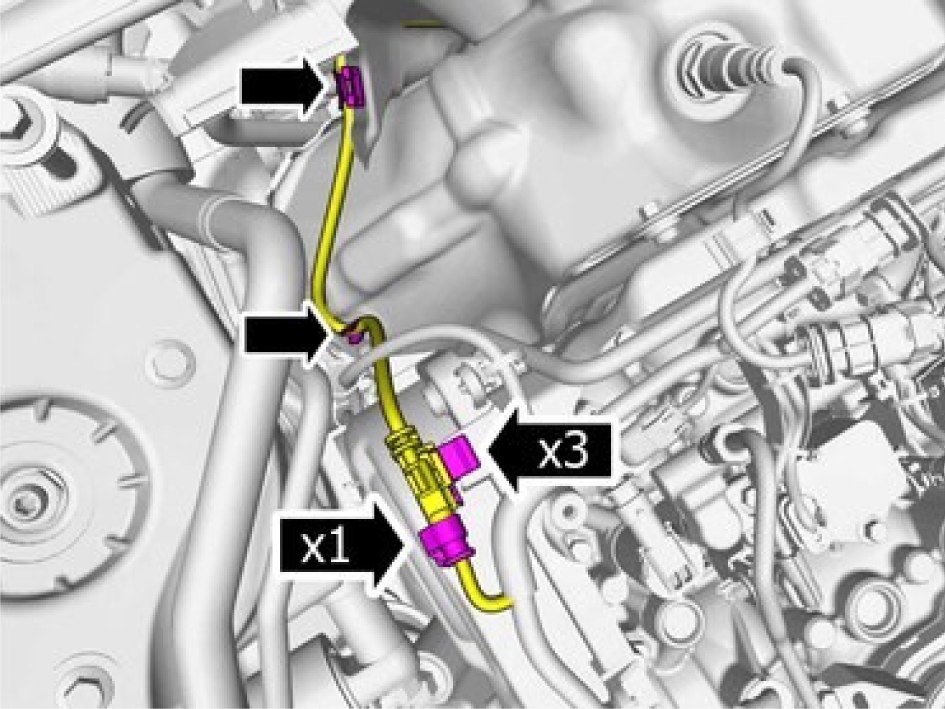
Loosen the marked details from the clip/clips.
Disconnect the connector.
Fold the cable harness aside.
Remove the screws.
Release the catches.
Remove the marked component.
Remove the screws.
Remove the marked component.
Remove the screws.
Remove the nuts.
Remove the marked component.
Remove the nuts.
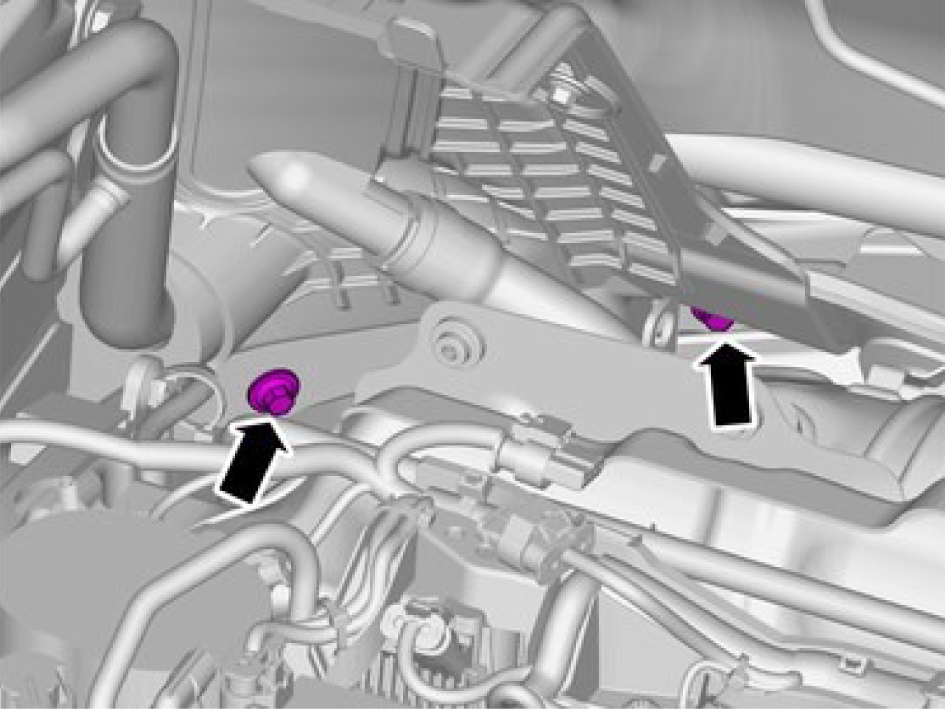
Remove the screws.
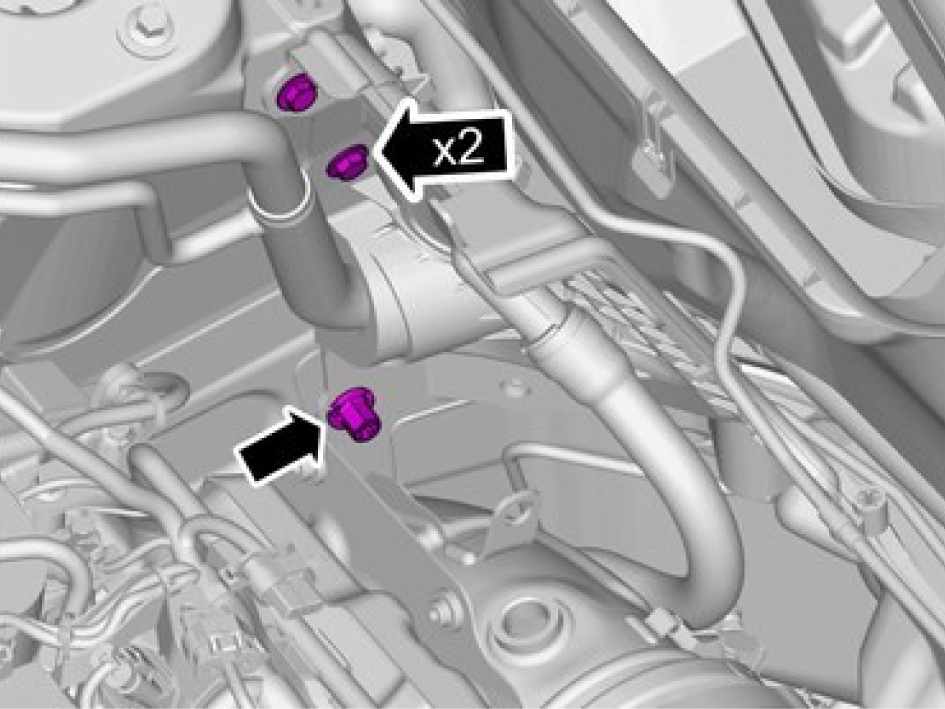
Remove the screws.
Remove the nut.
Remove the marked component.
Remove the screw.
Remove the clamp.
Fold marked component aside.
Lift the marked component up
It may be necessary to twist or turn the component.
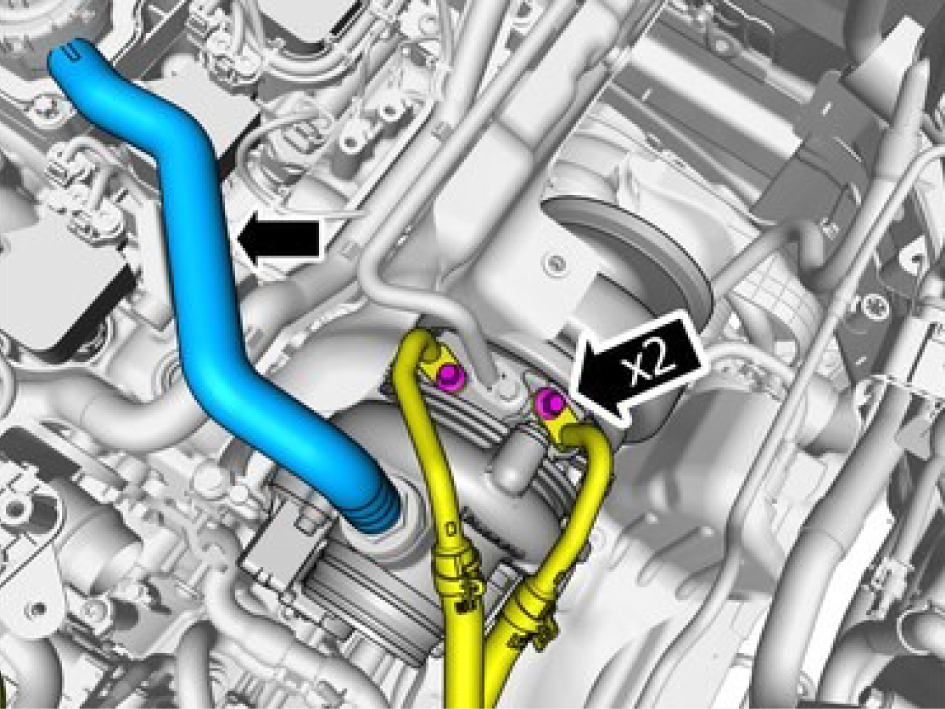
Be prepared to collect escaping fluid.
Remove the screws.
Fold marked components aside.
Remove the hose.
Remove the screws.
Fold the cable harness aside.
Loosen the screws.
Remove the marked component.
Remove the screws.
Fold marked component aside.
Remove the screws.
Remove the marked component.
Remove the screw.
Remove the marked component.
Install the marked component.
Install the screw M6, torque: 10 Nm
Only tighten the bolts finger tight at this stage.
Install the fasteners.
1, Torque: Exhaust manifold to cylinder head, nut.
Stage 1: 5 Nm
Stage 2: 18 Nm
Stage 3: 20 Nm
2, Torque: Exhaust manifold to cylinder head, bolt
Stage 1: 5 Nm
Stage 2: 16 Nm
Stage 3: 18 Nm
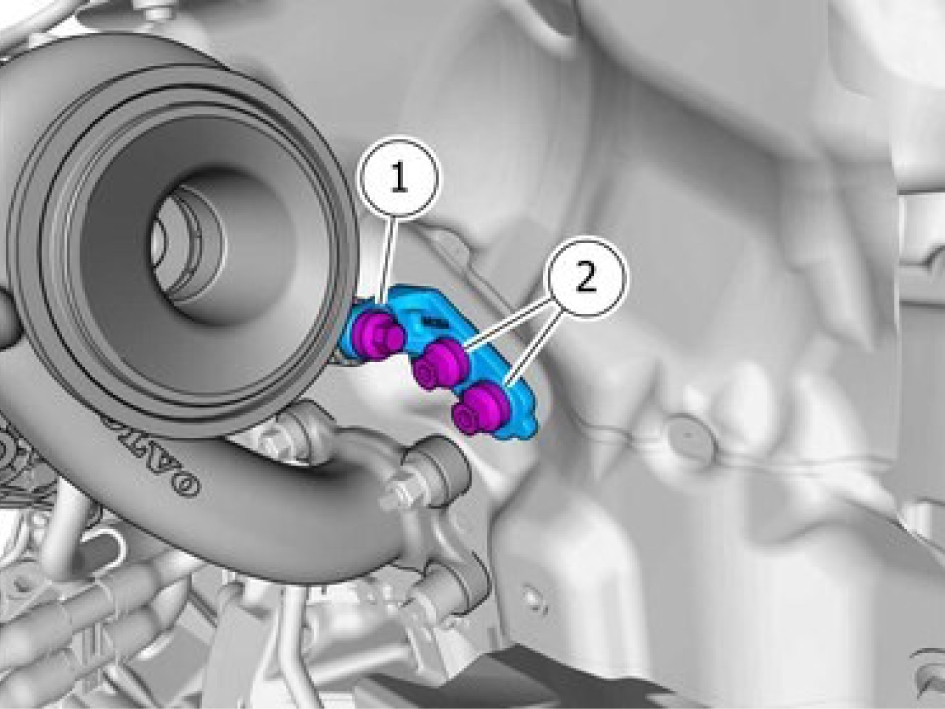
Tighten the bolts and screws M8, torque: 24 Nm
Install the screws.
Install the marked component.
Install the screws M6, torque: 10 Nm
Fold the cable harness back.
Install the screws.
Use new seals.
Fold marked components back.
Install the screws M6, torque: 10 Nm
Install the hose.
Twist the component back in position.
Install the clamp, torque: 20 Nm
Install the screws M6, torque: 10 Nm
Install the screws M5, torque: 5 Nm
Install the nuts M8, torqe: 24 Nm
Install the marked component.
Install nuts and screws M8, torque: 24 Nm
Install the marked componen.
Install the screws M6, torque: 10 Nm
Install the marked component.
Install the screws M6, torque: 10 Nm
Connect the connector and fasten the cables.
Install the lambda probe, torque: 45 Nm
Use special tool: 999 5543
Install the connectors and fasten the cables.
Install the marked component.
Install the screw.
Install the hose.
Fasten the cable
Install the connector.
Install the screw.
Install the marked component.
Install the connectors.
Fasten the clips.
Install the hoses.
Install the screw.
Install the hoses.
Install the hose.
Install the hose clamp.
Drain cooling system, draining, filling, and bleeding, refer to:
Cooling system - draining, charging and bleedingKnock sensor, replace
Removal
Remove the induction pipe, refer to:
Induction pipe, replace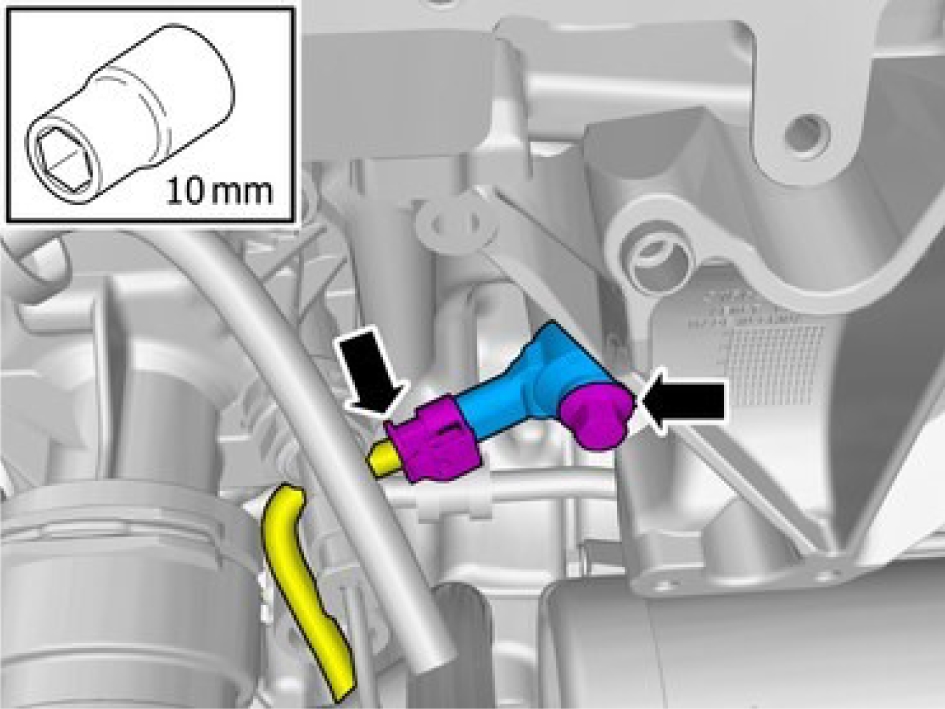
Disconnect the connector.
Remove the screw.
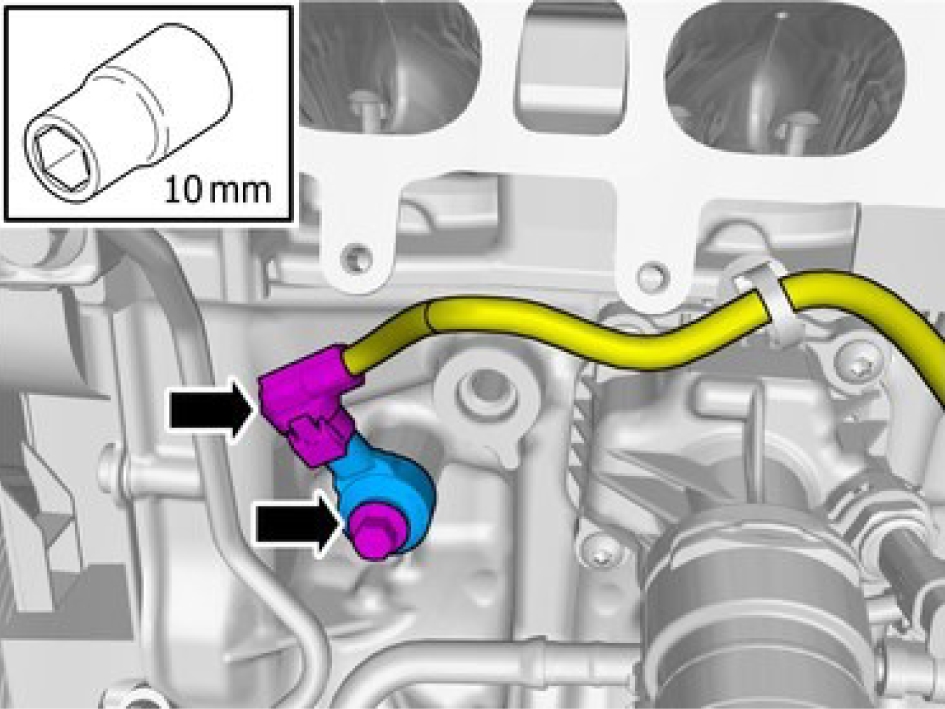
Disconnect the connector.
Remove the screw.
Installation
Install marked component, torque: 20 Nm
Install the connector.
Install marked component, torque: 20 Nm
Install the connector.
Install the induction pipe, refer to:
Induction pipe, replaceCrankshaft position sensor, replace
Removal
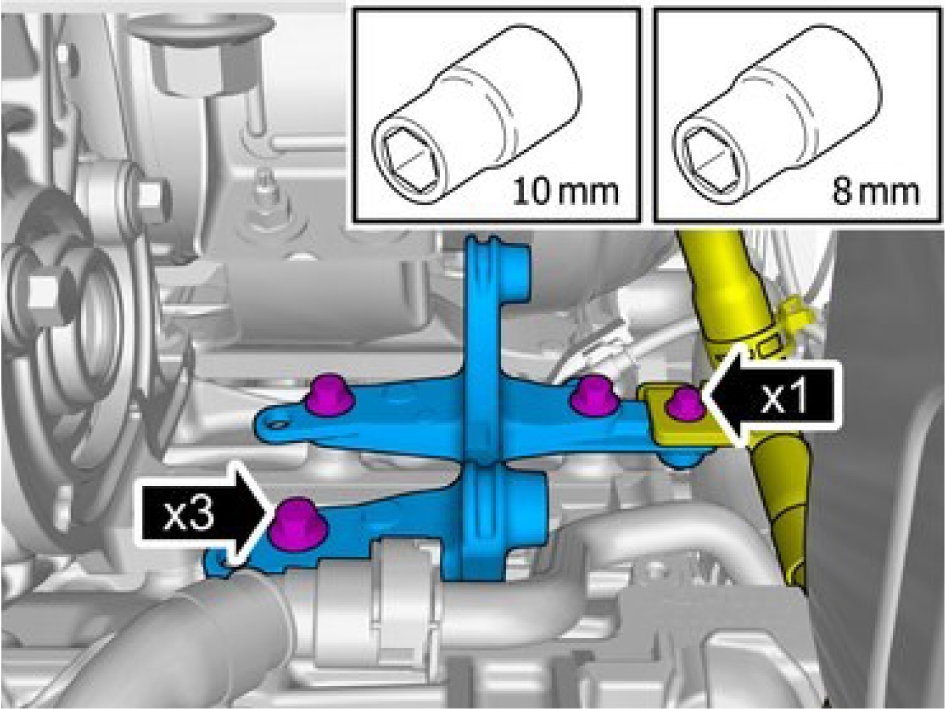
Remove the screws.
Remove the marked component.
Remove the nut.
Remove the marked component.
Disconnect the connector.
Use a new seal.
Remove the screw.
Remove the marked component.
Installation
Use a new seal.
Install the marked component.
Install the screw M6, torque: 10 Nm
Connect the connector.
Install the marked component.
Install the nut M6, torque: 10 Nm
Install the marked component.
Install the screws M6, torque: 10 Nm
Install the screws M8, torque: 24 Nm
Engine coolant temperature sensor, replace
Removal
Remove intake manifold, refer to:
Induction pipe, replace
Disconnect the connector.

Be prepared to collect escaping fluid.
Release the lock.
Remove the marked component.
Installation
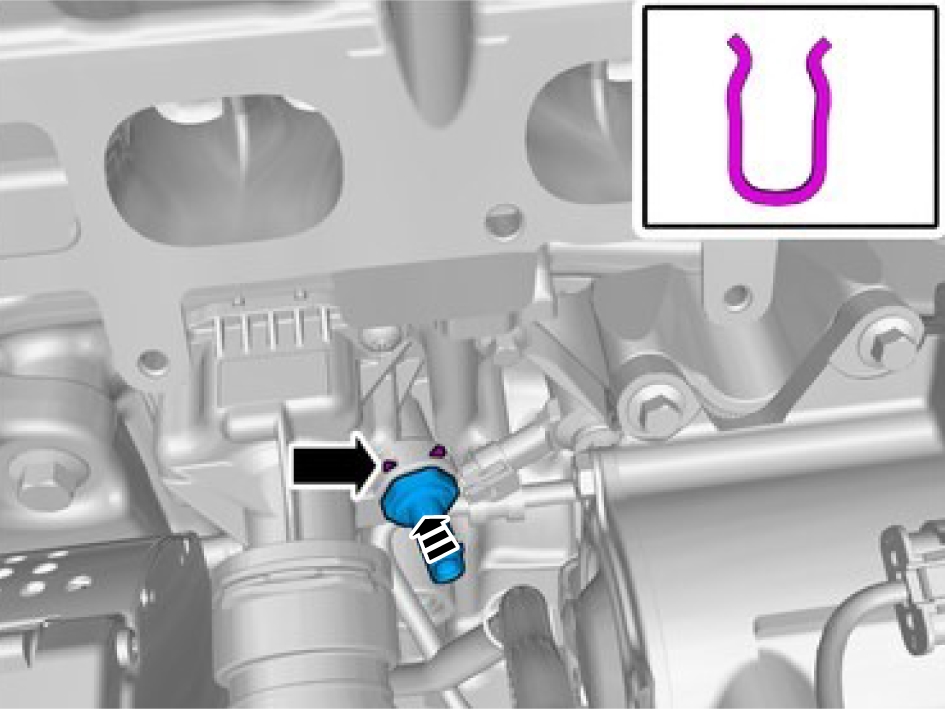
Install the marked component.
Install the lock.
Connect the connector.
Install intake manifold, refer to:
Induction pipe, replaceVVT unit, replace
Removal
Remove the Timing belt, refer to:
Timing belt, replaceRemove the special tool.
Be prepared to collect escaping fluid.
Note the location of the component before removal.
Remove the marked component.
Remove the marked component.
Do not use impact screwdriver/wrench
1. Special tool: 999 7684
2. Special tool: 999 7761
Loosen the screws.
Remove the screws.
Be prepared to collect escaping fluid.
Remove the marked component.
Make sure that marked component is not rotated relative to the VVT unit, and that the oil galleries are at the center of each other.
Check the component. If it displays any type of damage, it must be replaced.
Installation
Make sure that the component is not loose
Check the component. If it displays any type of damage, it must be replaced.
Make sure that the area around the component is clean and free of foreign material.
Apply oil to the marked surface.
Make sure that the area around the component is clean and free of foreign material.
The graphic shows the back of the component.
Note the position.
Install the marked component.
Install new screws and tighten finger tight at this stage.
Install the screws.
Install the tool and tighten the screws.
VVT unit, center screw, torque: 90 Nm
Special tool: 999 7760
Release the locks.
Note the placing of the tool.
Install the tool.
A click confirms that the component is in the correct position.
A click confirms that the component is in the correct position.
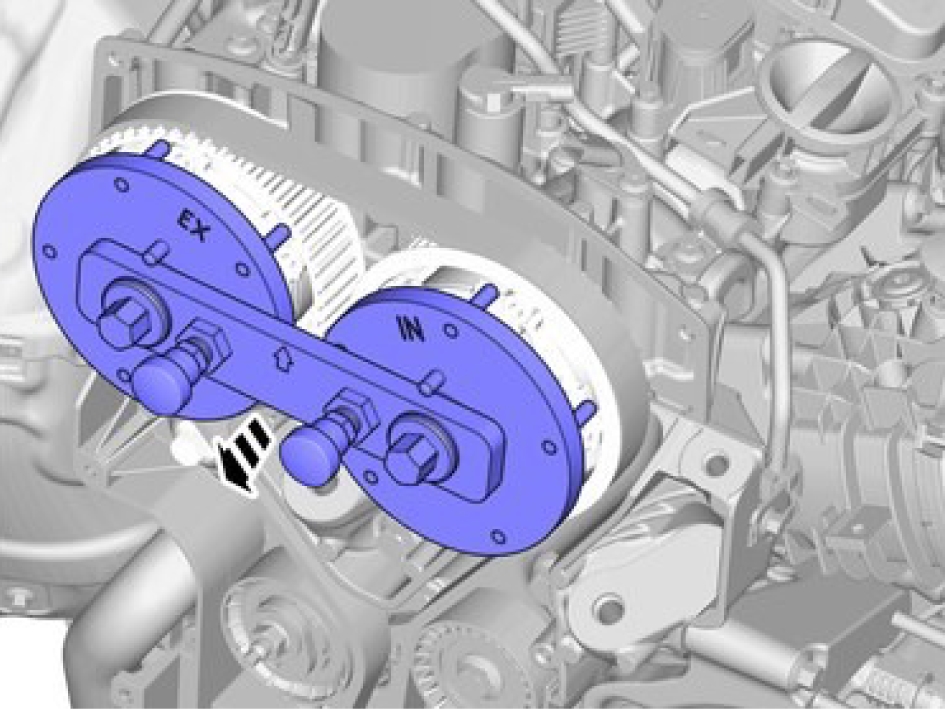
Remove the Special Tool.
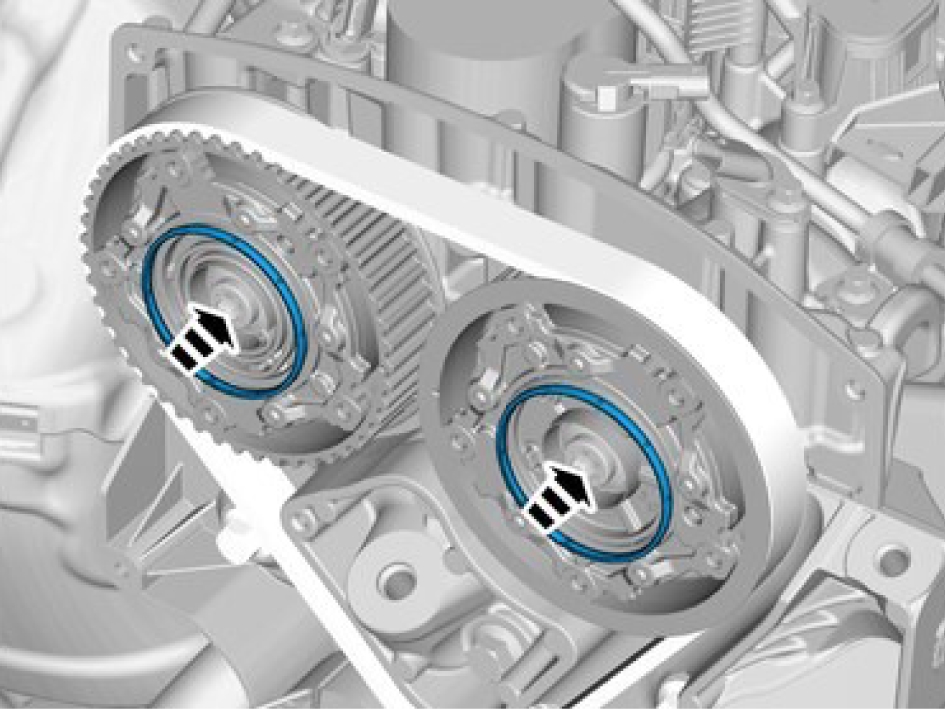
Use new seals.
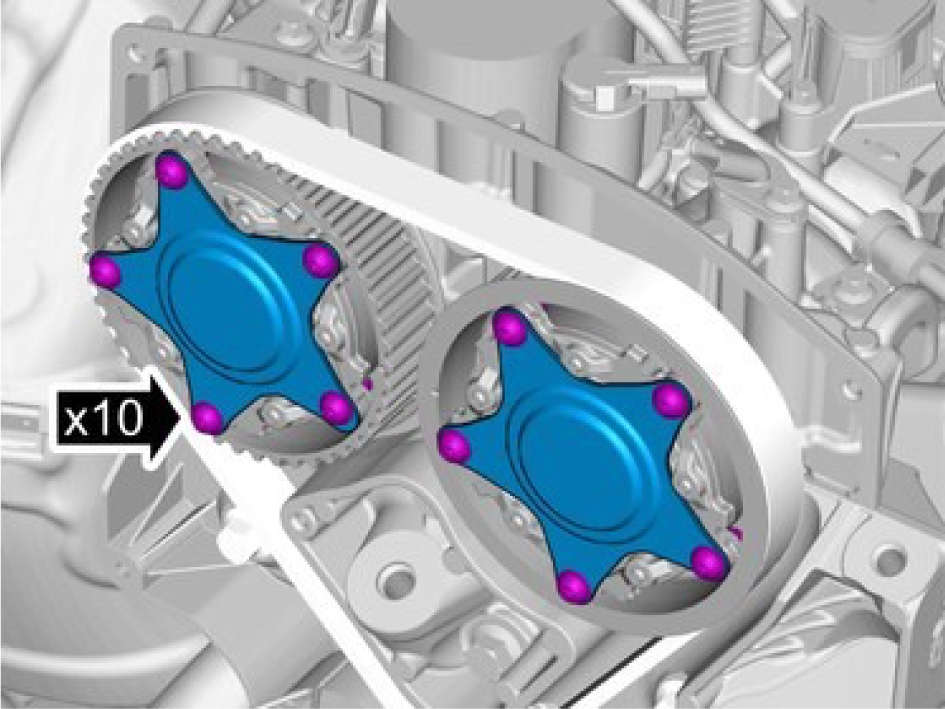
Only tighten the bolts finger tight at this stage.
Install the marked component.
Tighten the screws M6, torque: 10 Nm
Install the Timing belt, refer to:
Timing belt, replaceOil pressure- and oil temperature sensor - S502
Oil pan bushing, replace
Removal
Press out the bushing using special tool: 999 7741
Tighten the nuts.
Remove the marked component.
Remove the Special Tool.
Installation
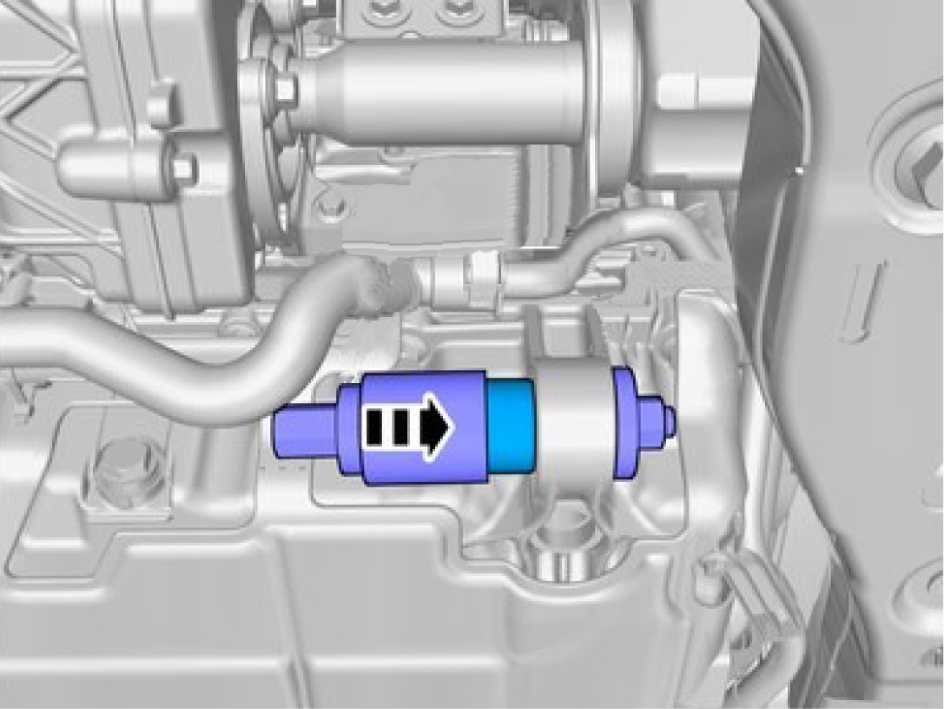
Install the marked component.
Tighten the nuts, use special tool: 999 7741
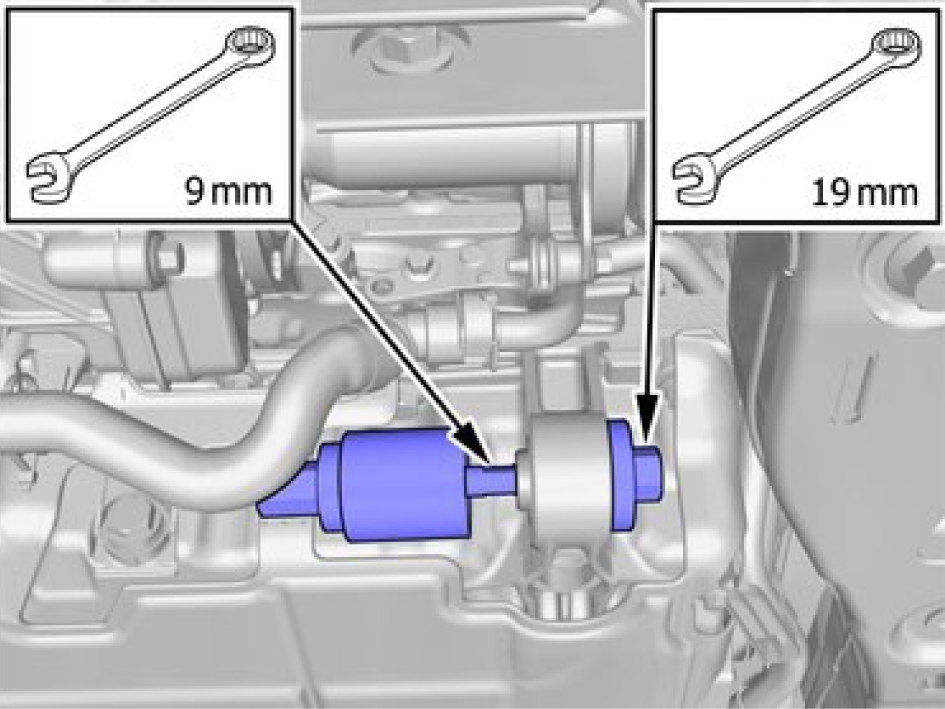
Remove the Special Tool.
Charge air duct pressure sensor - S305
Template
Template
Engine coolant temperature sensor, replace
Removal
Remove the intake manifold, refer to:
Induction pipe, replaceInduction pipe, replaceInduction pipe, replace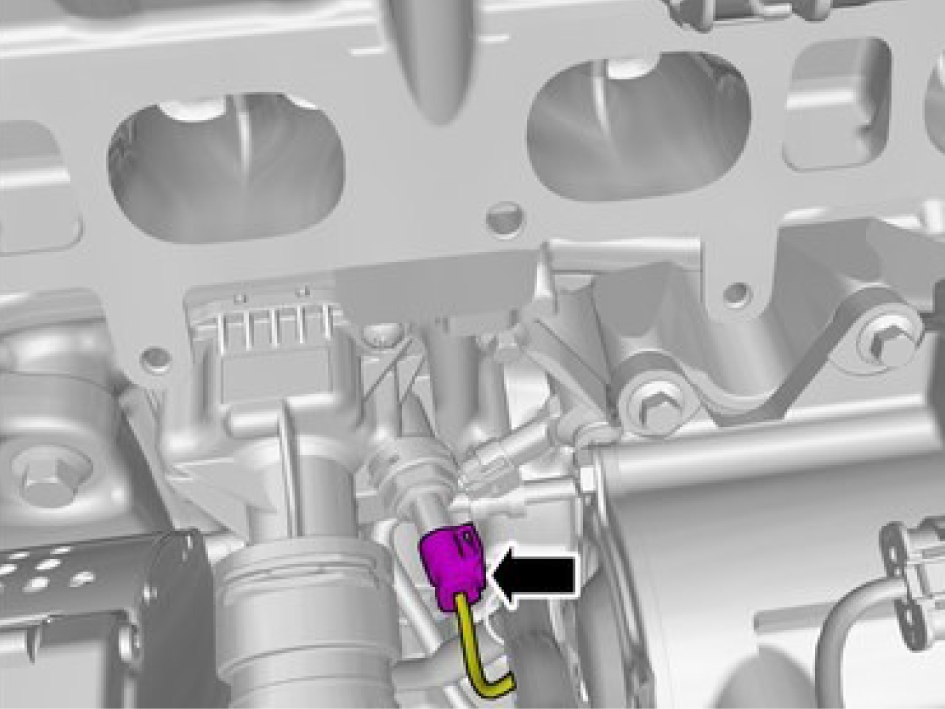
Disconnect the connector.

Be prepared to collect escaping fluid.
Release the lock.
Remove the marked component.
Installation
Replace the sensor o-ring.
Install the sensor.
Lock the sensor with the locking pin.
Install the intake manifold, refer to:
Induction pipe, replaceInduction pipe, replaceInduction pipe, replaceLevel sensor engine oil, replace
Removal
Drain engine oil, refer to:
Oil filter, replace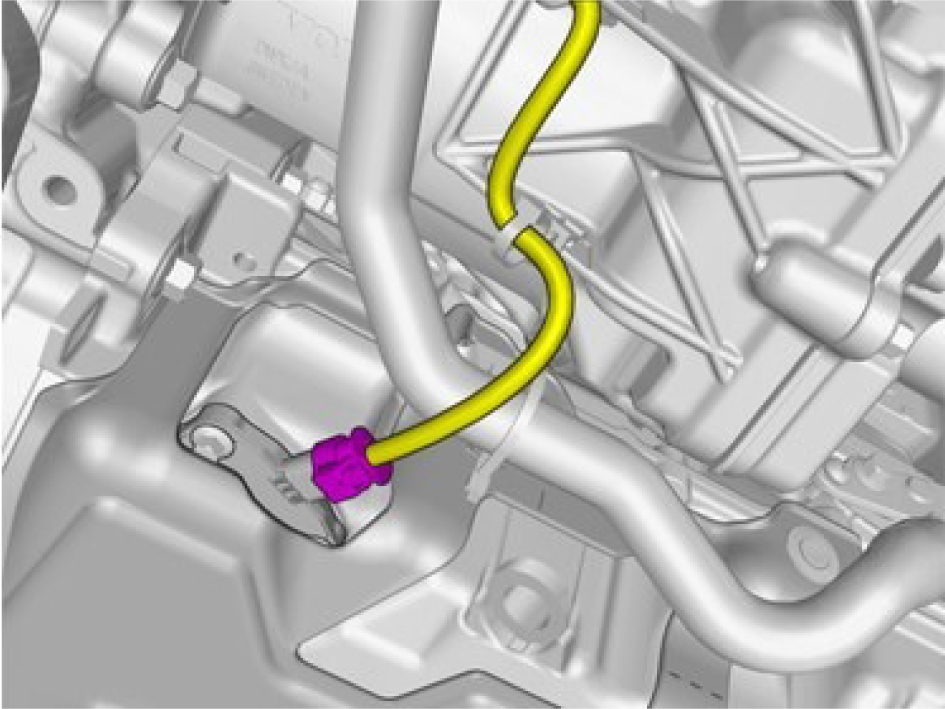
Disconnect the connector.
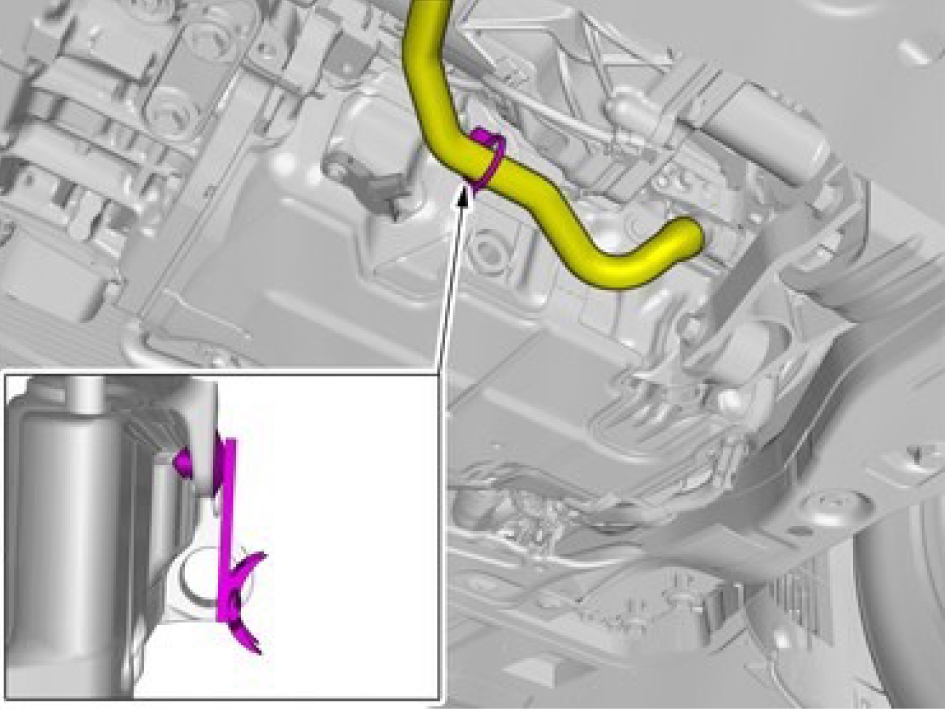
Loosen the fastener.
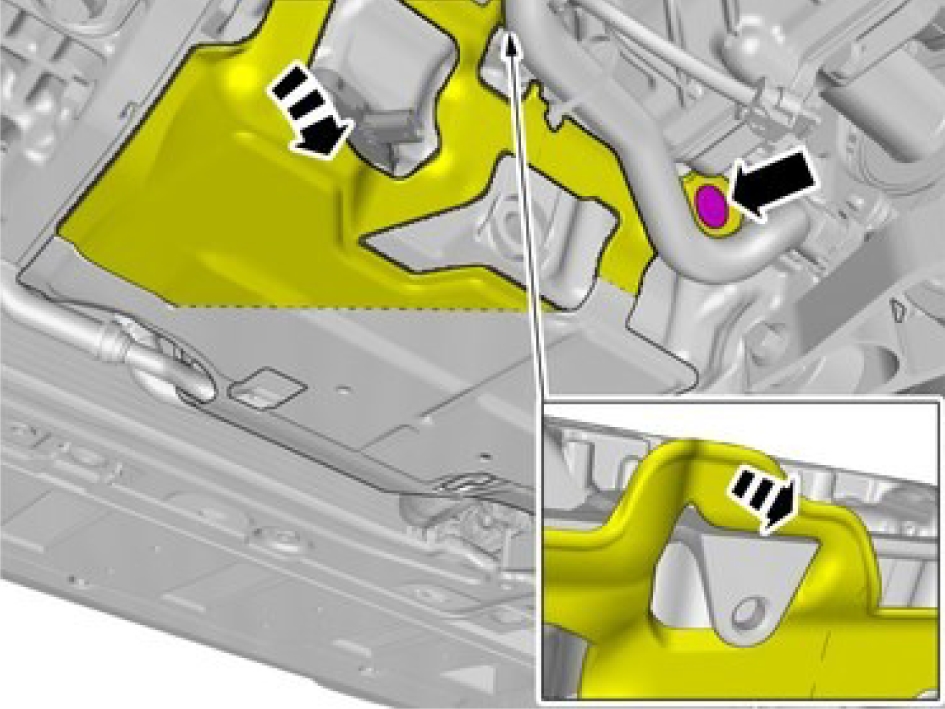
Loosen the clip.
Fold marked part aside.

Remove the screws.
Remove the marked component.
Installation
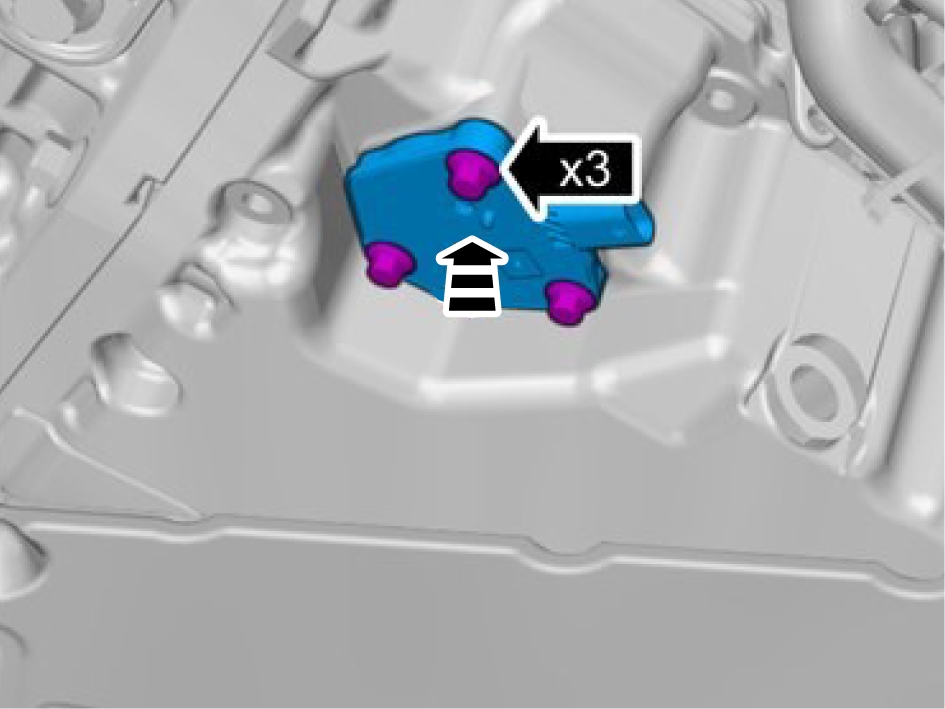
Install the sensor.
Install the screws, torque: 9 Nm
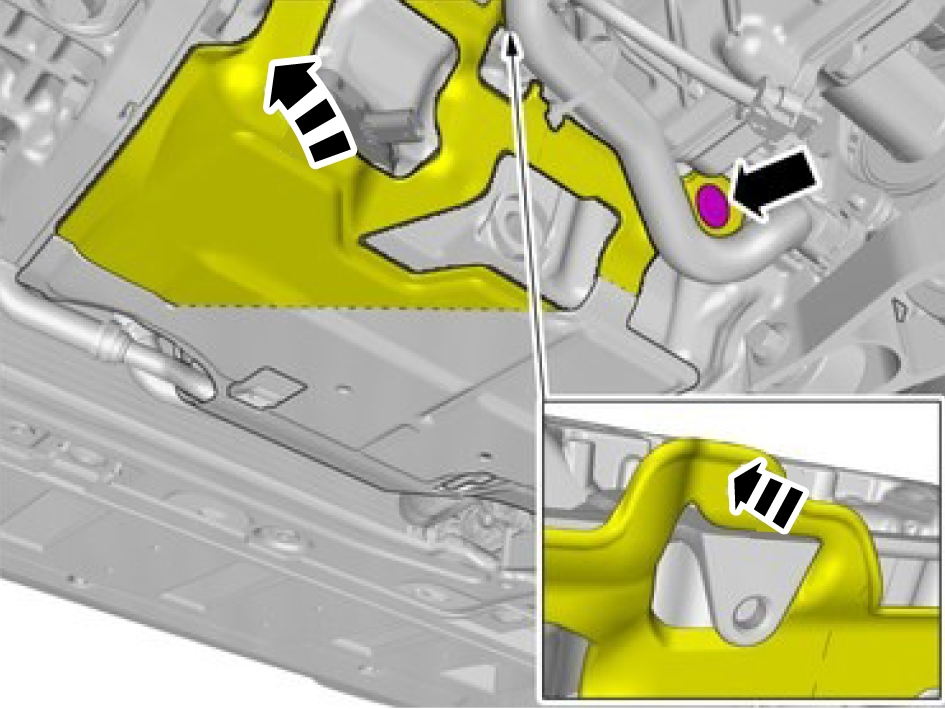
Install marked component.
Install the fastener.
Connect the connector.
Fill the engine oil, refer to:
Oil filter, replaceLevel sensor engine oil, replace
Removal
Drain engine oil, refer to:
Oil filter, replace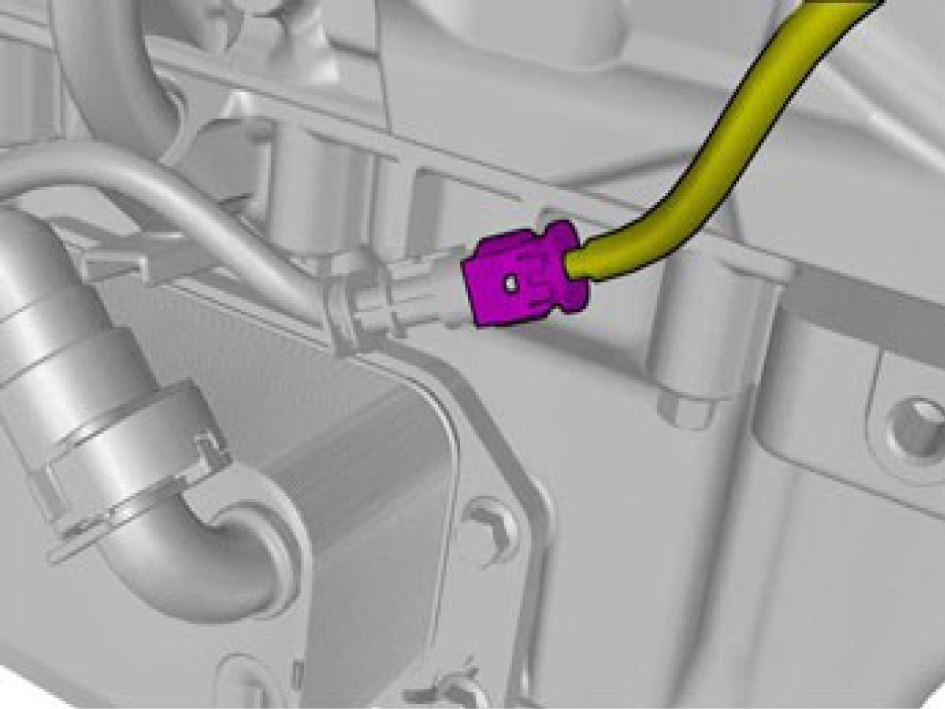
Release the lock.
Disconnect the connector.
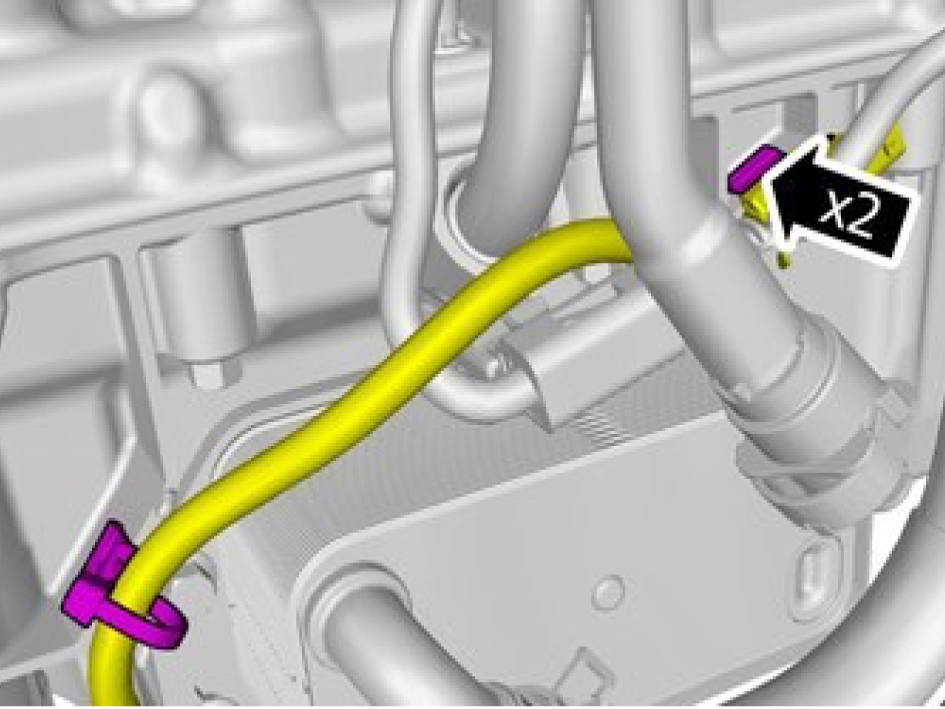
Loosen the clips.
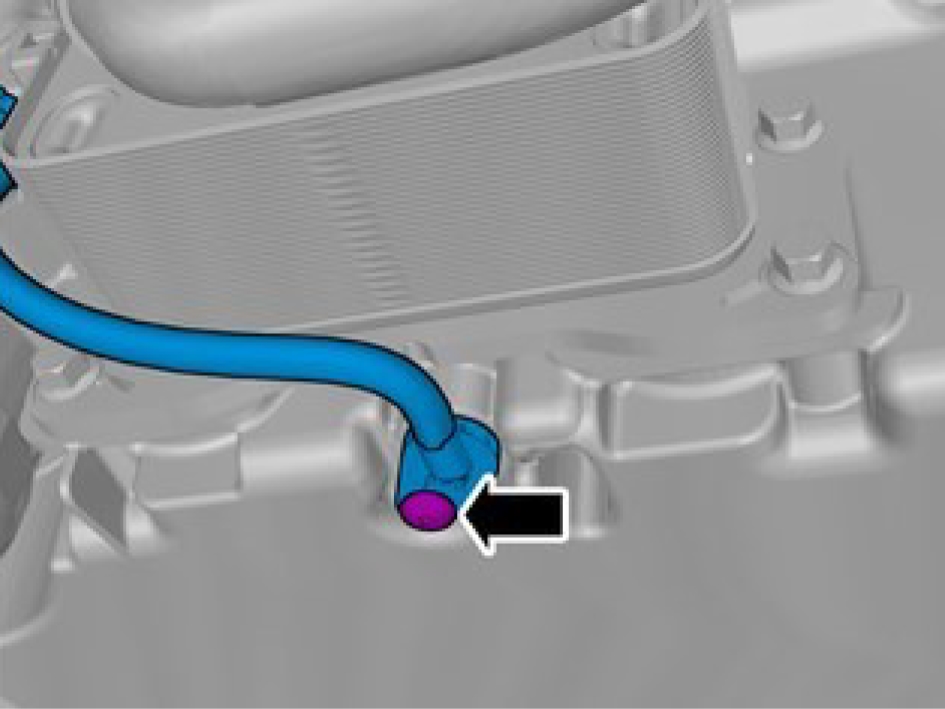
Remove the screw.
Remove the sensor.
Installation
Replace the o-rings.
Install the sensor.
Install the screw M6, torque: 10 Nm
Install the clips.
Connect the connector.
Install the lock.
Fill the engine oil, refer to:
Oil filter, replaceControl valve, engine oil cooling - V405
Engine oil pump solenoid - V500
EVAP purge valve - V109
Turbo bypass valve - V308
Turbo control valve, wastegate - V306
VVT solenoid - V603
Battery disconnecting and connecting
Removal
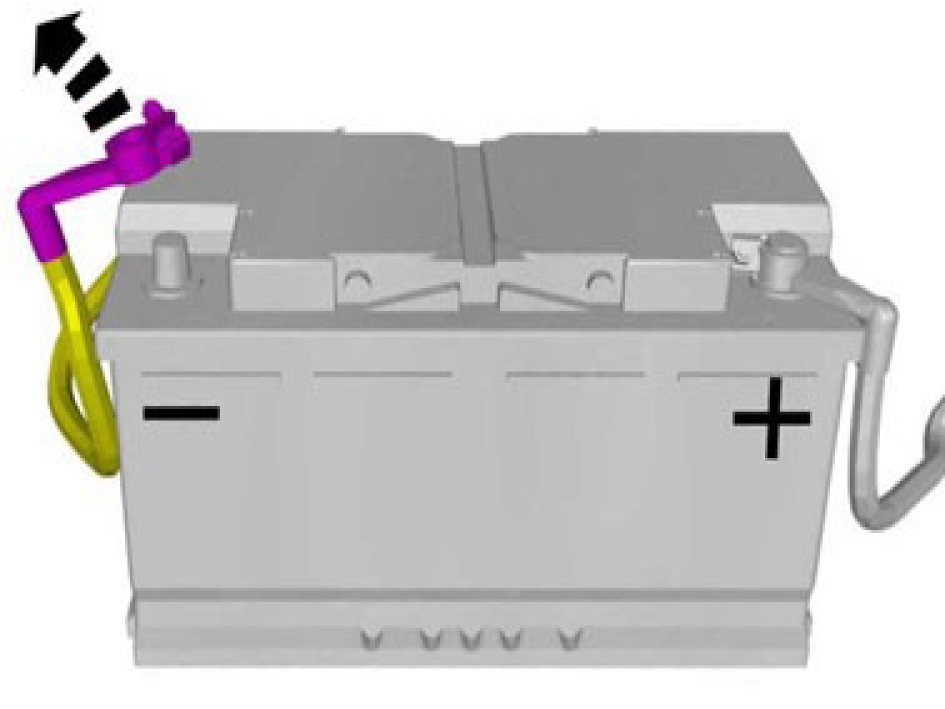
Before disconnecting the battery, ensure that all preparation, reading and resetting needs have been completed.
Remove the negative cable.
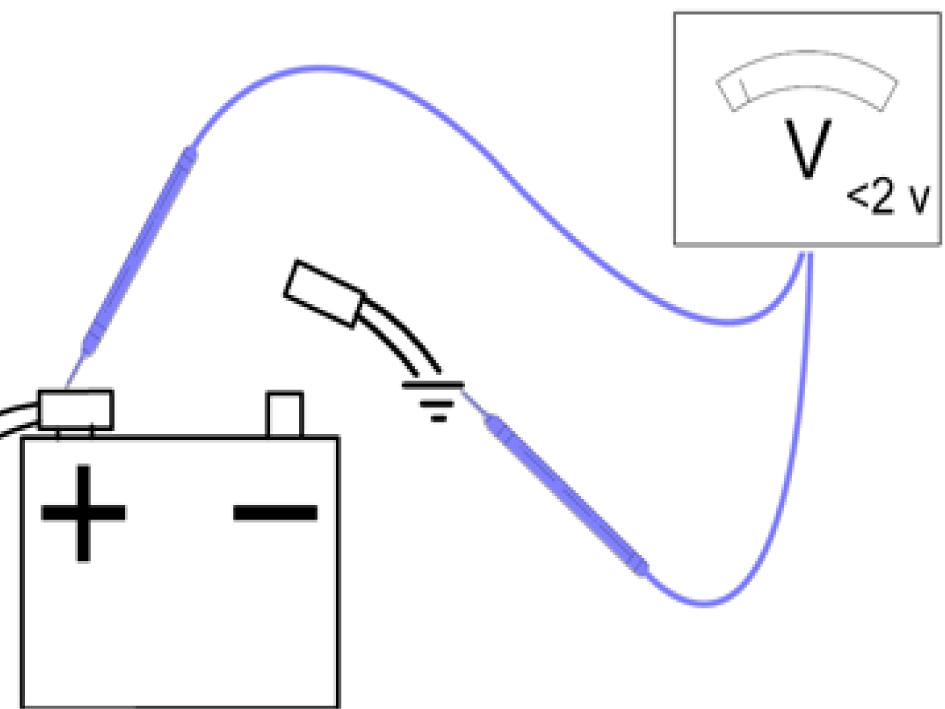
Make sure that the vehicle electrical system is fully depowered and no other power source is connected.
Pressure sensor engine oil, replace
Removal
Perform the following steps for removal:
Battery disconnecting and connectingElectric Charge Air Compressor, replace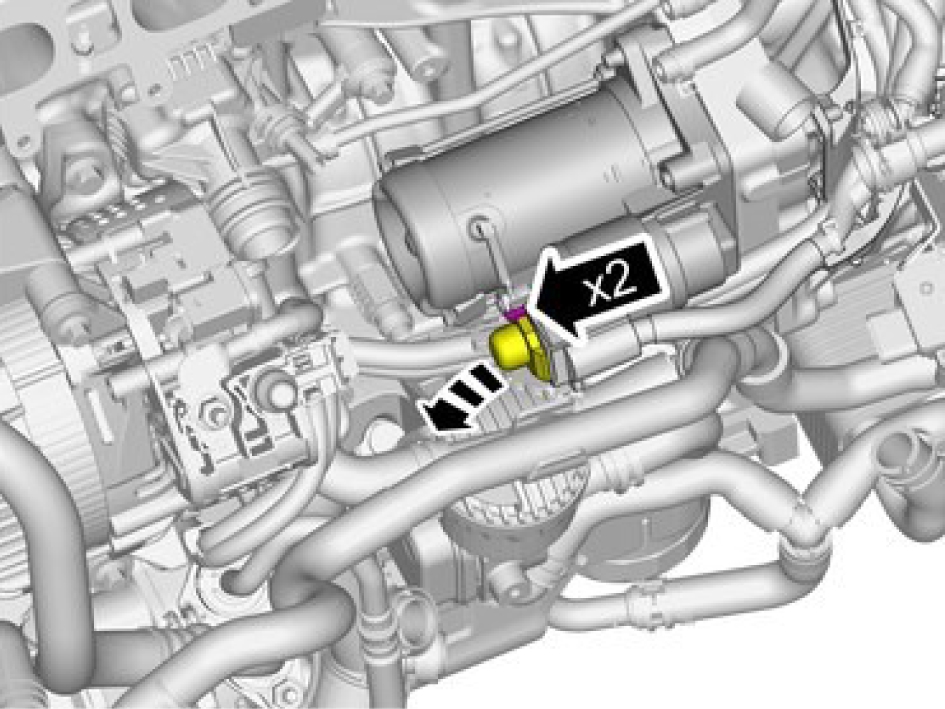
Release the catches.
Fold marked component aside.
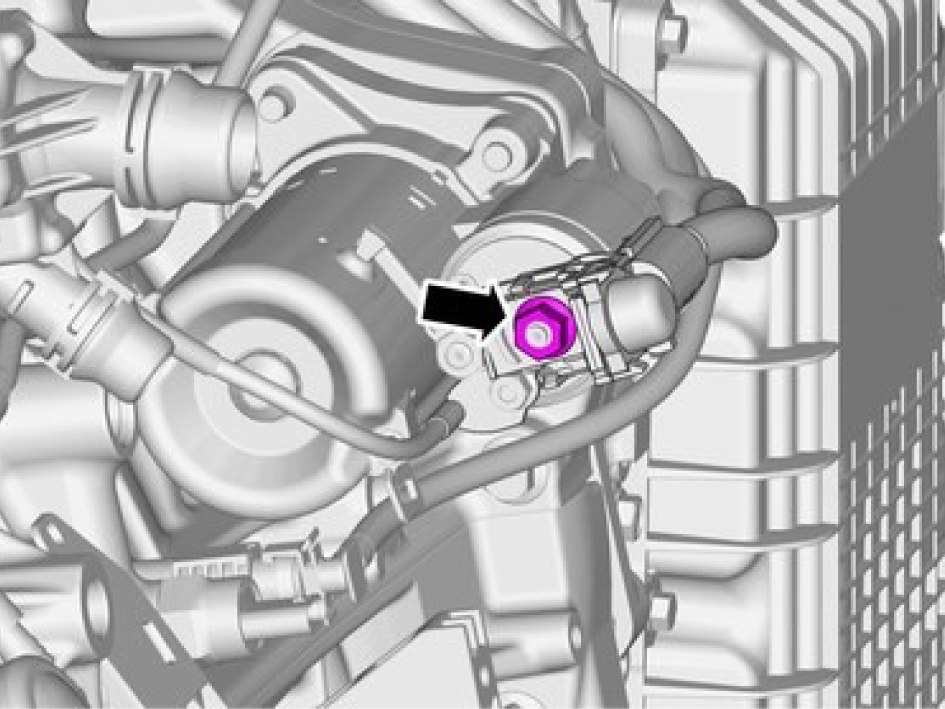
Remove the nut.
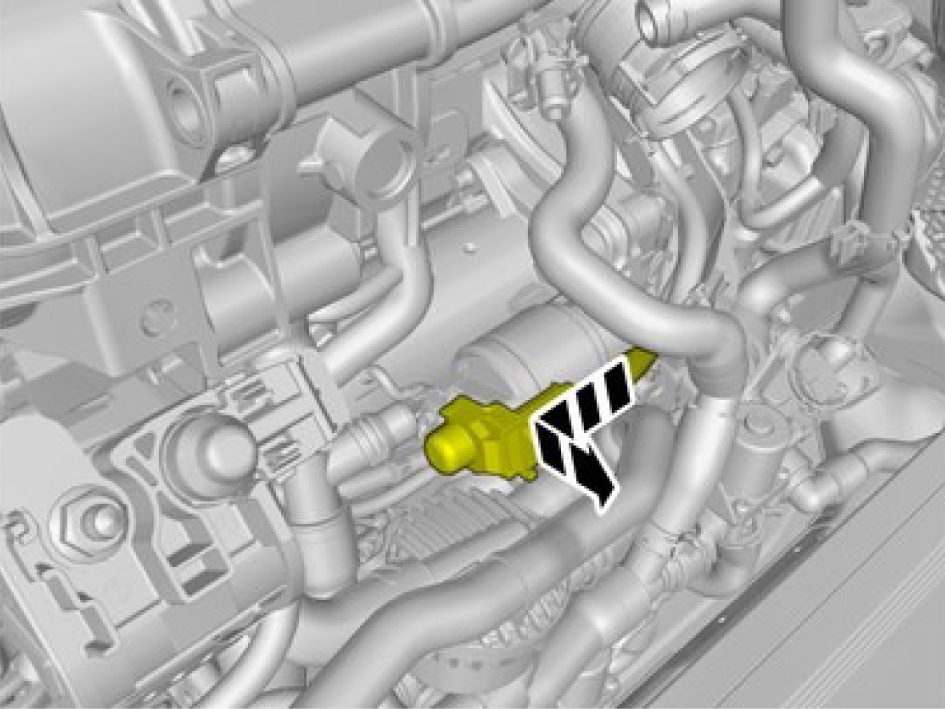
Loosen the wiring harness or move it to the side.
Remove the nut.
Loosen the wiring harness or move it to the side.
Remove the cable tie(s).
Remove the screw.
Loosen the wiring harness or move it to the side.
Remove the nut.
Loosen the wiring harness or move it to the side.
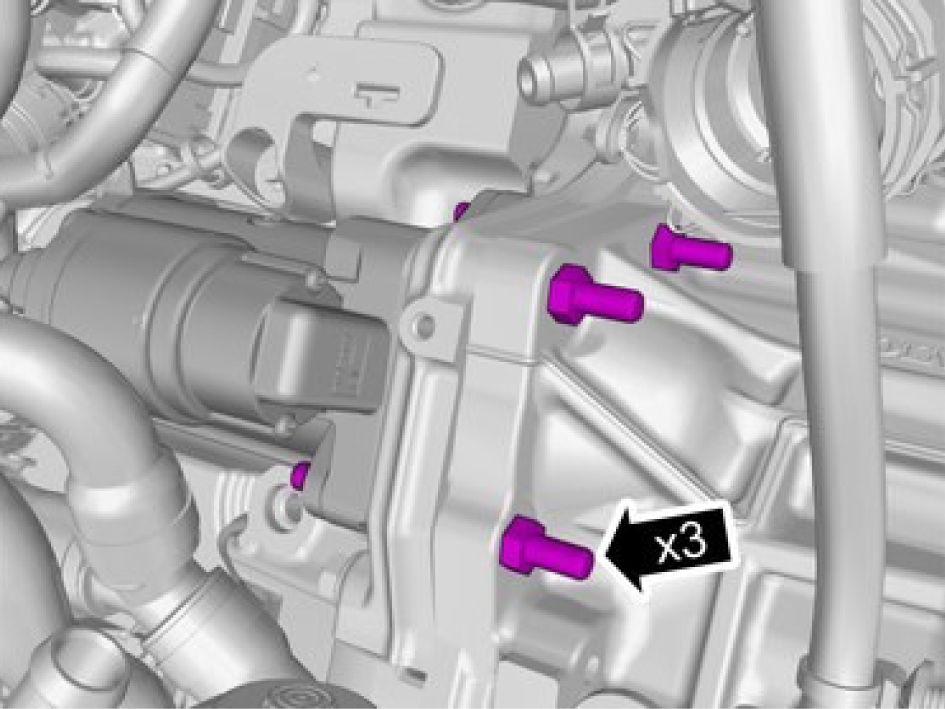
Remove the screws.
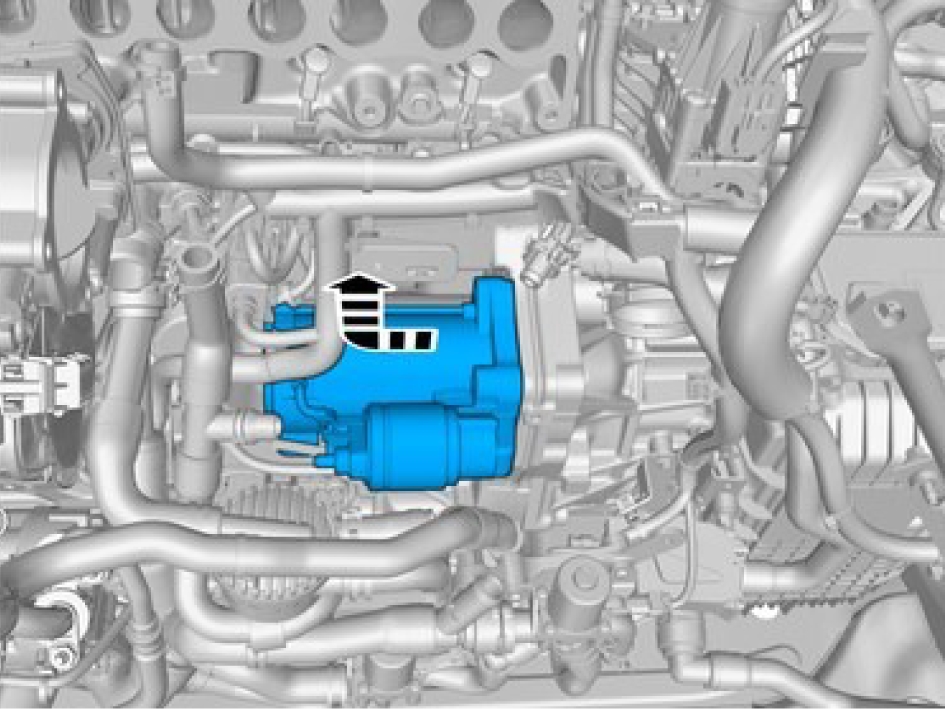
Remove the marked component.
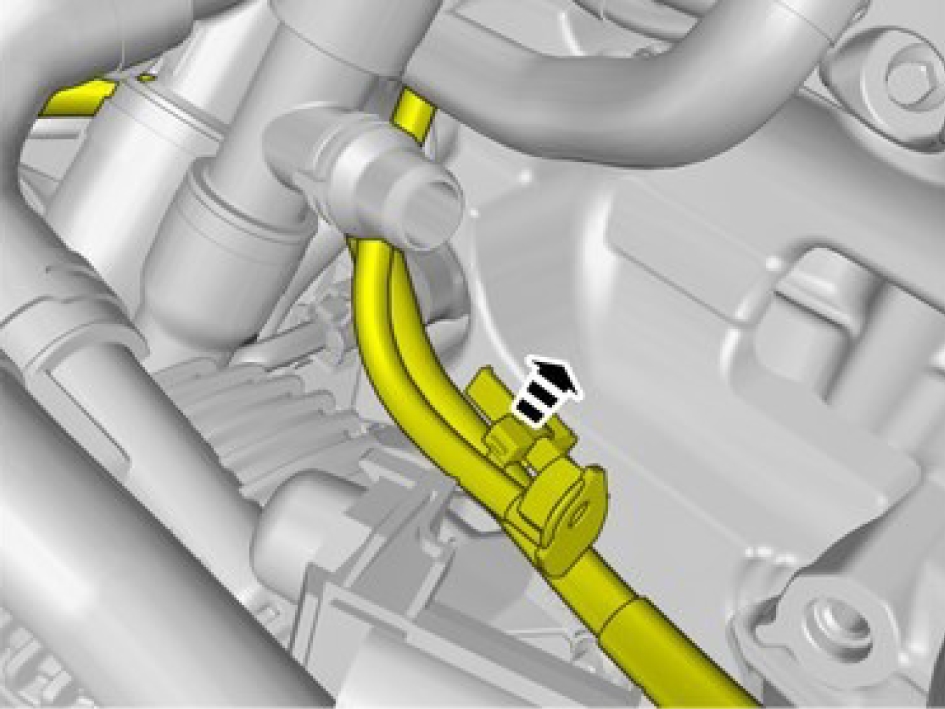
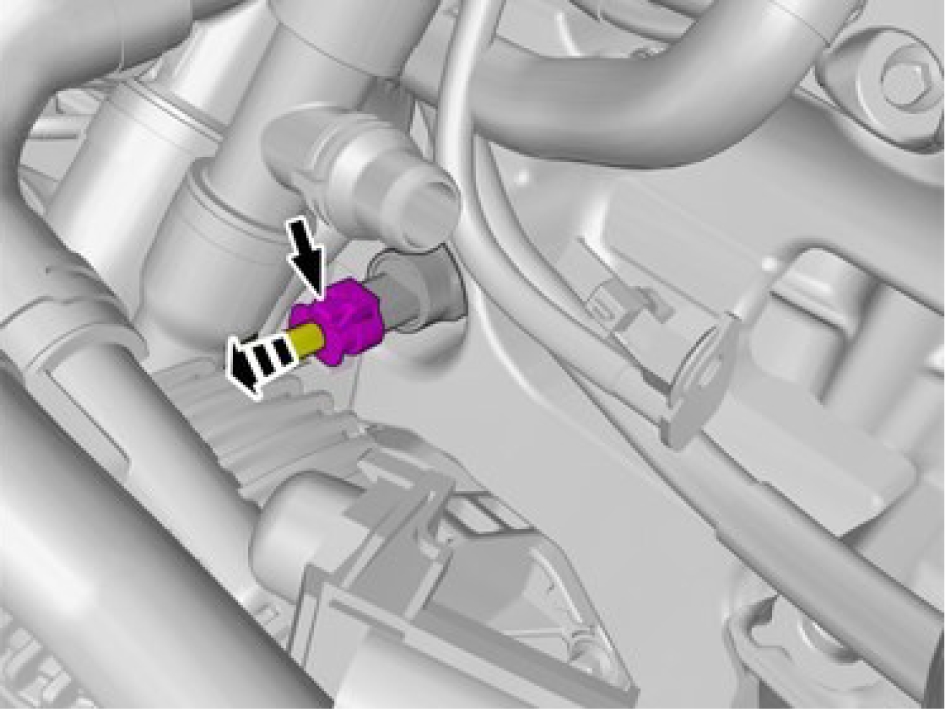
Disconnect the connector.
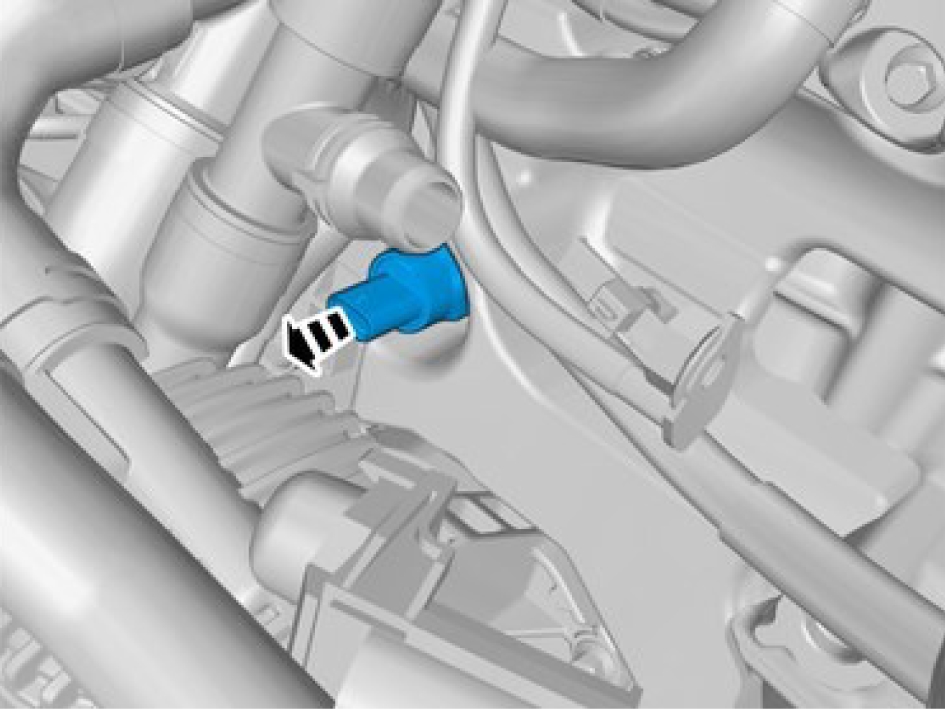
Use suitable paper to absorb any escaping fluid.
Remove the marked component.
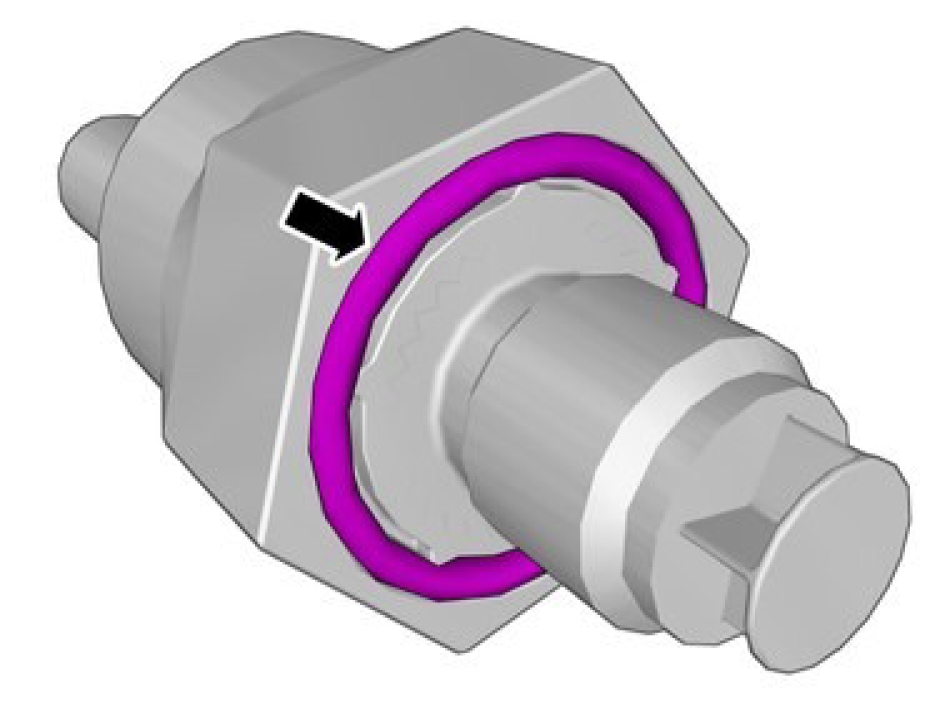
Check the component. If it displays any type of damage, it must be replaced.
Make sure that the seal is correctly located.
Installation
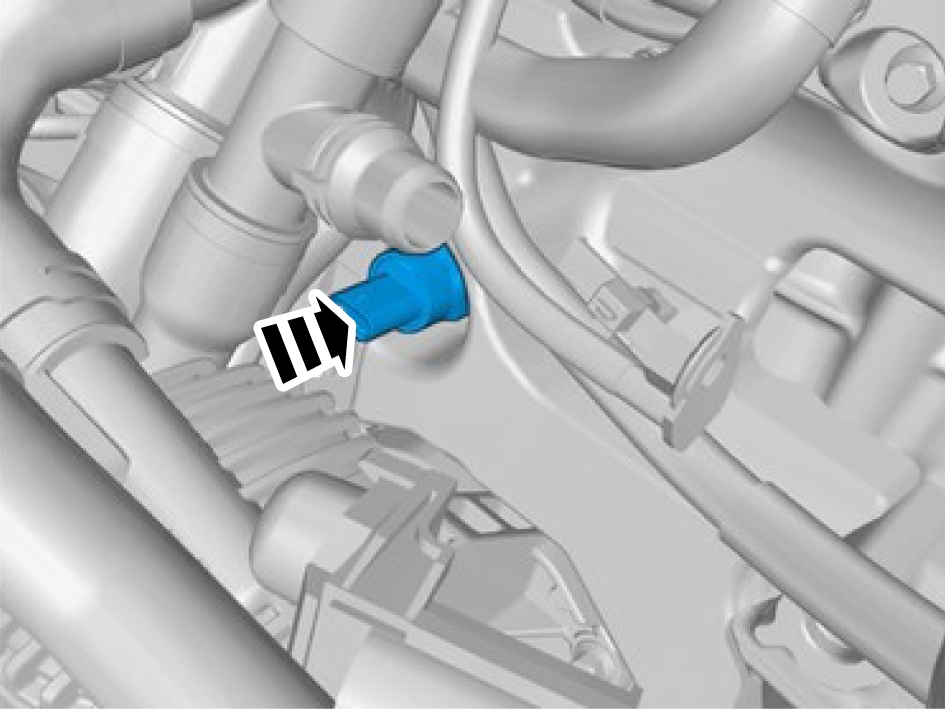
Install the marked component, torque: 15 Nm

Install the connector.
Fold back the cable.
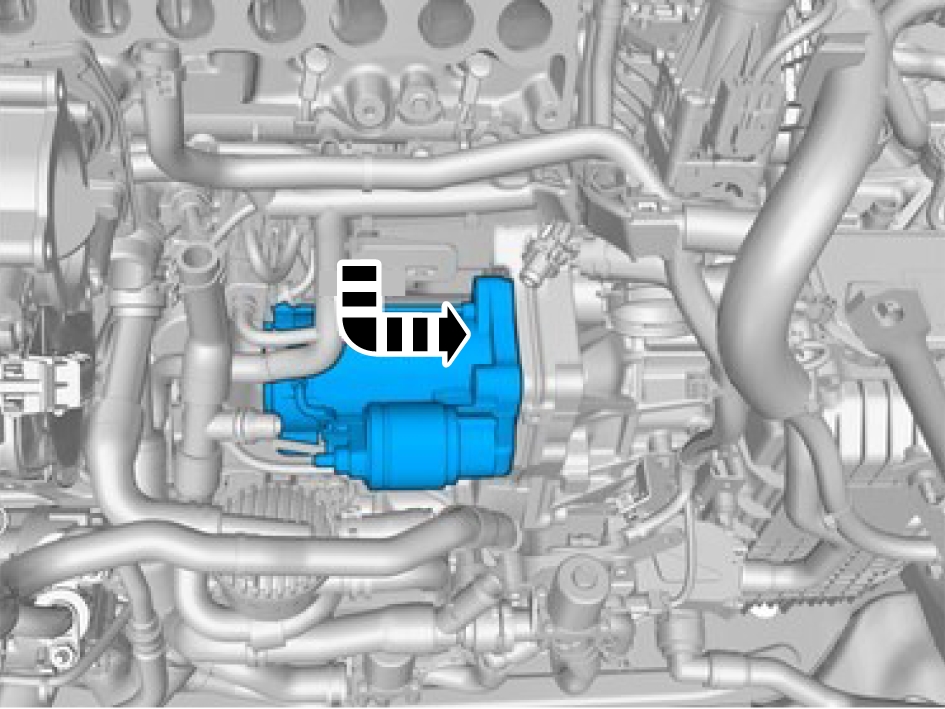
Install the screws, torque: 50 Nm
Fold back the cables.
Install the nut M8, torque: 24 Nm
Install the cables.
Install the nut M8, torque: 24 Nm
Install the cable tie(s).
Install the cable for start impulse lead, torque: 6.5 Nm
Install the wiring harness.
Install the nut starter motor B+ terminal, torque: 11 Nm
Perform the following steps for installation:
Electric Charge Air Compressor, replaceBattery disconnecting and connectingPressure sensor engine oil, replace
Removal
Release the catches.
Fold marked component aside.
Remove the nut.
Loosen the wiring harness or move it to the side.
Remove the nut.
Loosen the wiring harness or move it to the side.
Remove the cable tie(s).
Remove the screw.
Loosen the wiring harness or move it to the side.
Remove the nut.
Loosen the wiring harness or move it to the side.
Remove the screws.
Remove the marked component.
Disconnect the connector.
Use suitable paper to absorb any escaping fluid.
Remove the marked component.
Check the component. If it displays any type of damage, it must be replaced.
Make sure that the seal is correctly located.
Installation
Install the marked component, torque: 15 Nm
Install the connector.
Fold back the cable.
Install the screws, torque: 50 Nm
Fold back the cables.
Install the nut M8, torque: 24 Nm
Install the cables.
Install the nut M8, torque: 24 Nm
Install the cable tie(s).
Install the cable for start impulse lead, torque: 6.5 Nm
Install the wiring harness.
Install the nut starter motor B+ terminal, torque: 11 Nm
Perform the following steps for installation:
Induction pipe, replaceBattery disconnecting and connectingStarter motor, replace
Removal
Perform battery disconnecting and connecting, refer to:
Battery disconnecting and connectingPerform cooling system draining, charging and bleeding, refer to:
Cooling system - draining, charging and bleeding
Remove the screw.
Remove induction pipe, refer to:
Induction pipe, replace
Be prepared to collect escaping fluid.
Remove the clip.
Fold marked component aside.

Remove the clips.

Remove the screw.
Remove the nuts.
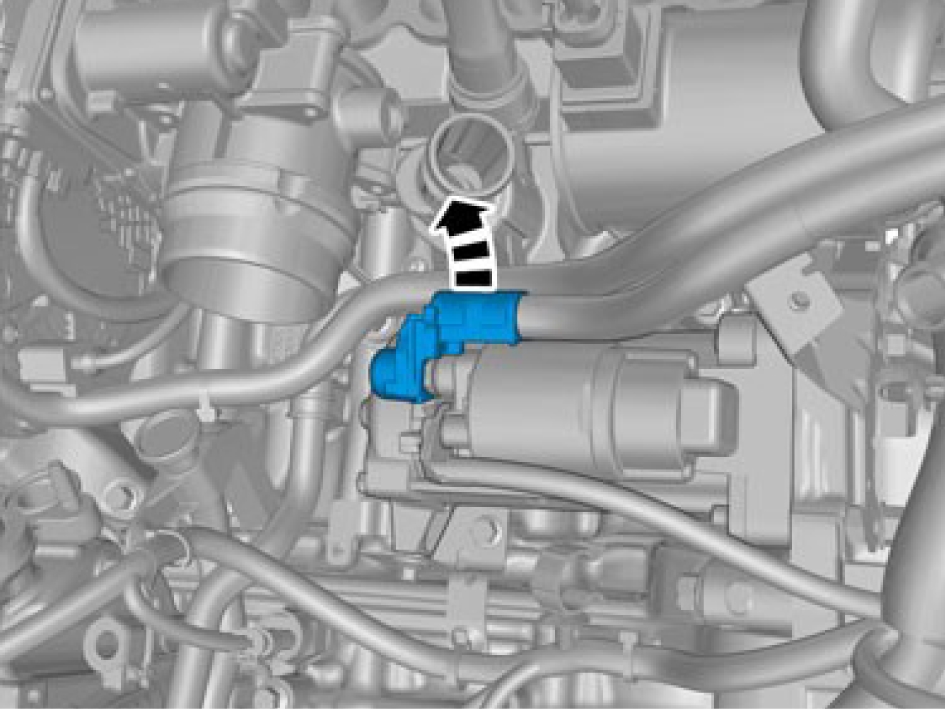
Fold marked component aside.
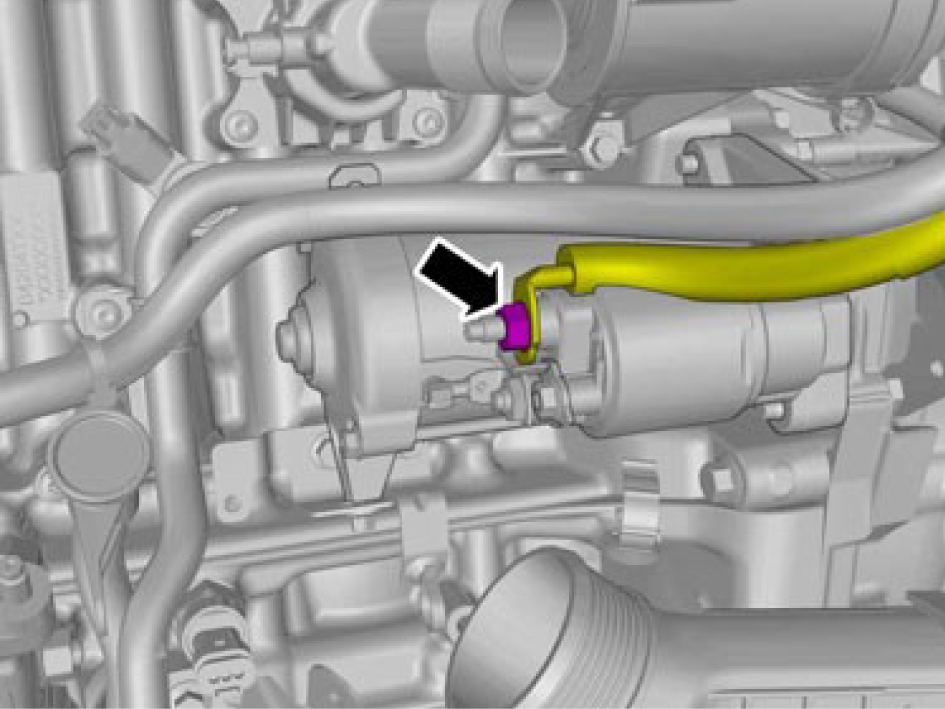
Remove the nut.
Fold marked component aside.
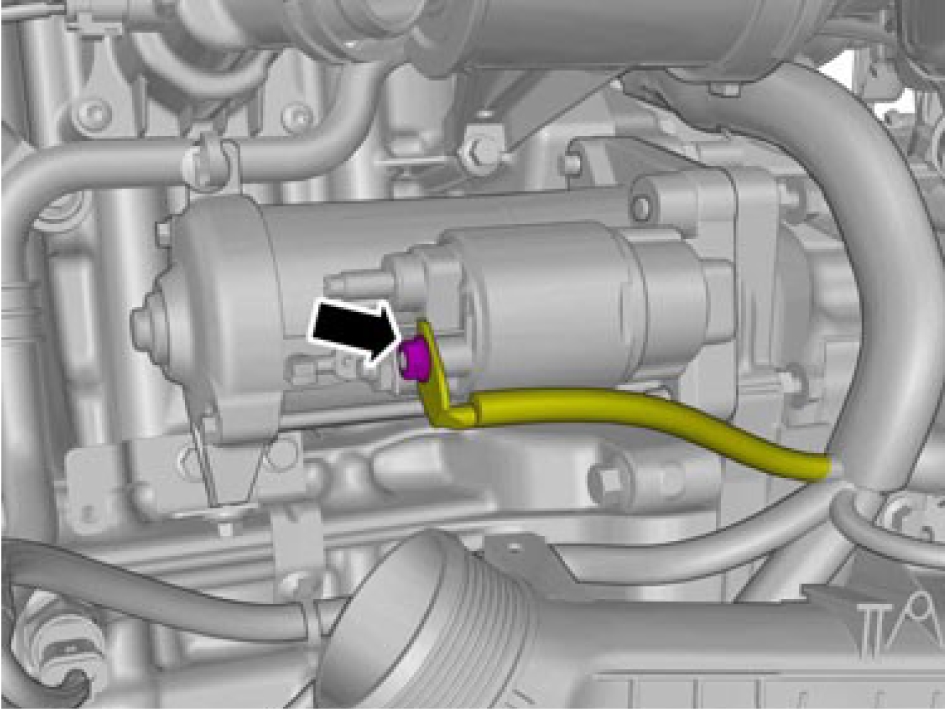
Remove the nut.
Fold marked component aside.
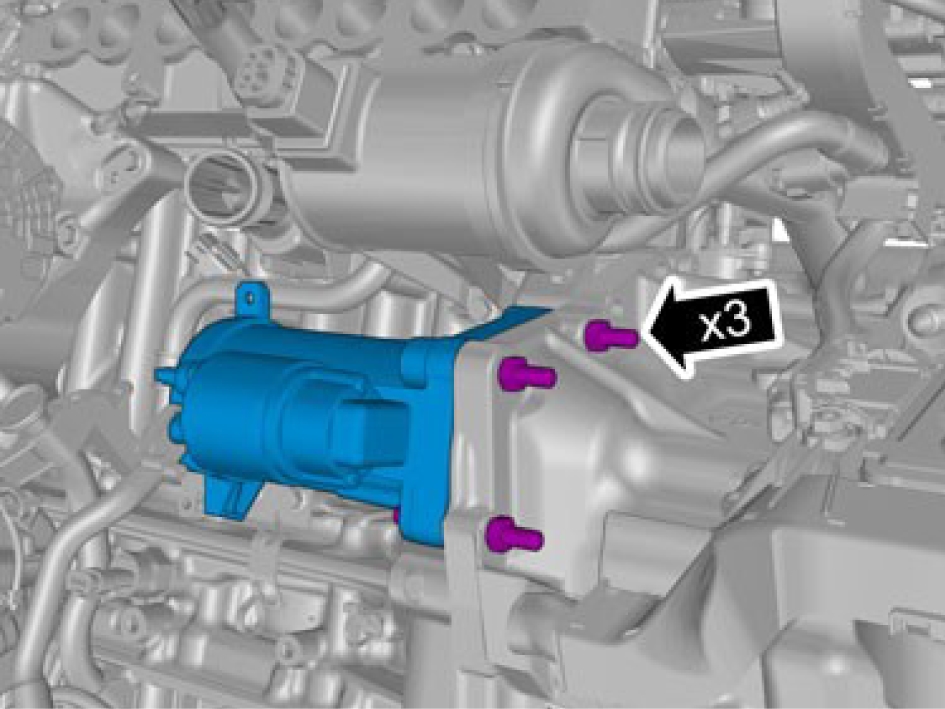
Remove the screws.
Remove the marked component.
Installation
Install the marked component.
Install the screws M10, torque: 10 Nm
Fold marked component back.
Install the nut start impulse lead, torque: 7 Nm
Fold marked component back.
Install the nut starter motor B+ terminal, torque: 11 Nm
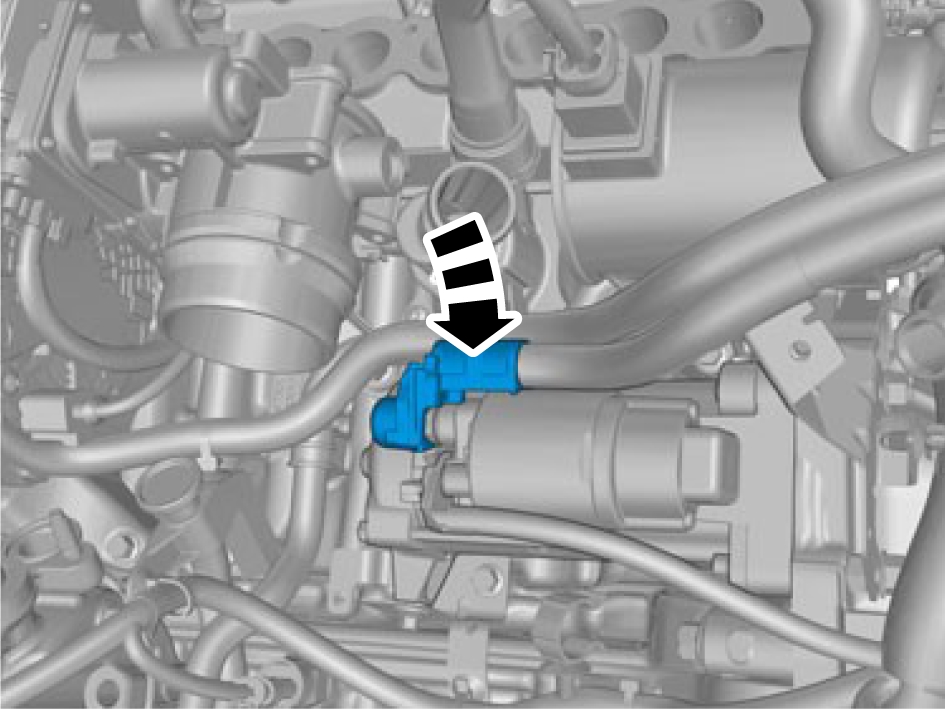
Install marked component.
Install marked component.
Install the nuts M8, torque: 24 Nm
Install the screw M5, torque: 5 Nm
Install the clips.

Install the pipe.
Lock the pipe with the clips.
Install the screw M6, torque: 10 Nm
Remove induction pipe, refer to:
Induction pipe, replacePerform cooling system draining, charging and bleeding, refer to:
Cooling system - draining, charging and bleedingPerform battery disconnecting and connecting, refer to:
Battery disconnecting and connectingPressure sensor engine oil, replace
Removal
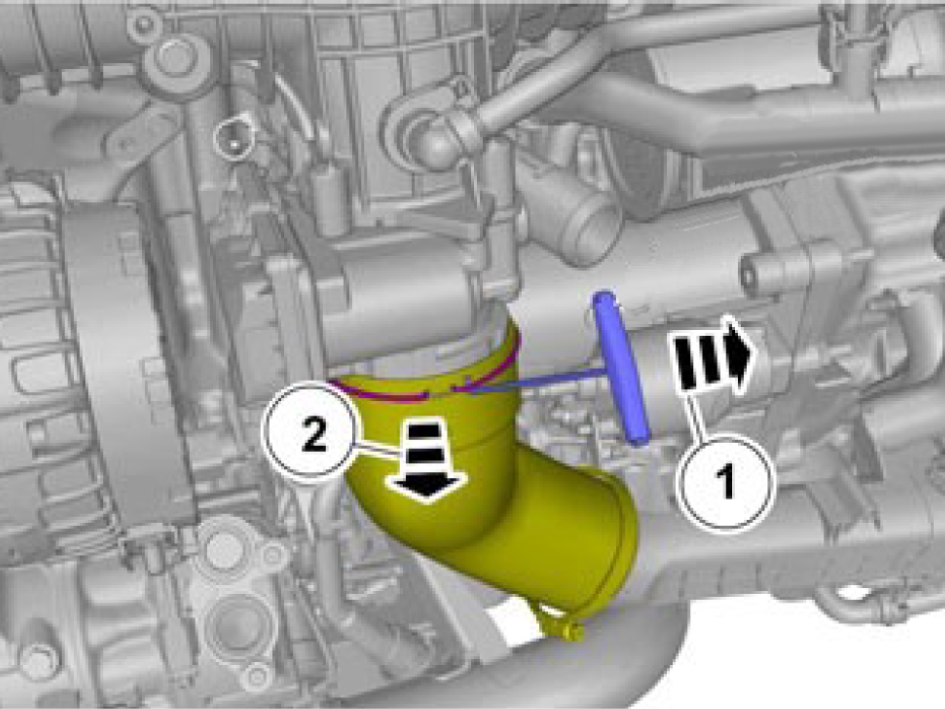
Release the lock use special tool: 951 2943
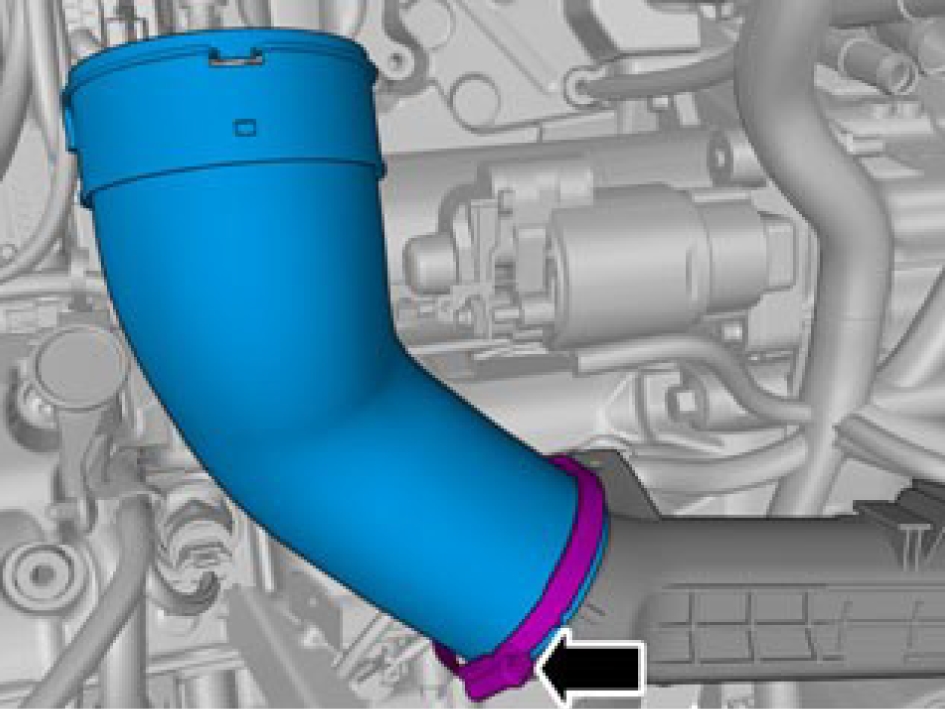
Loosen the hose clamp.
Remove the hose.
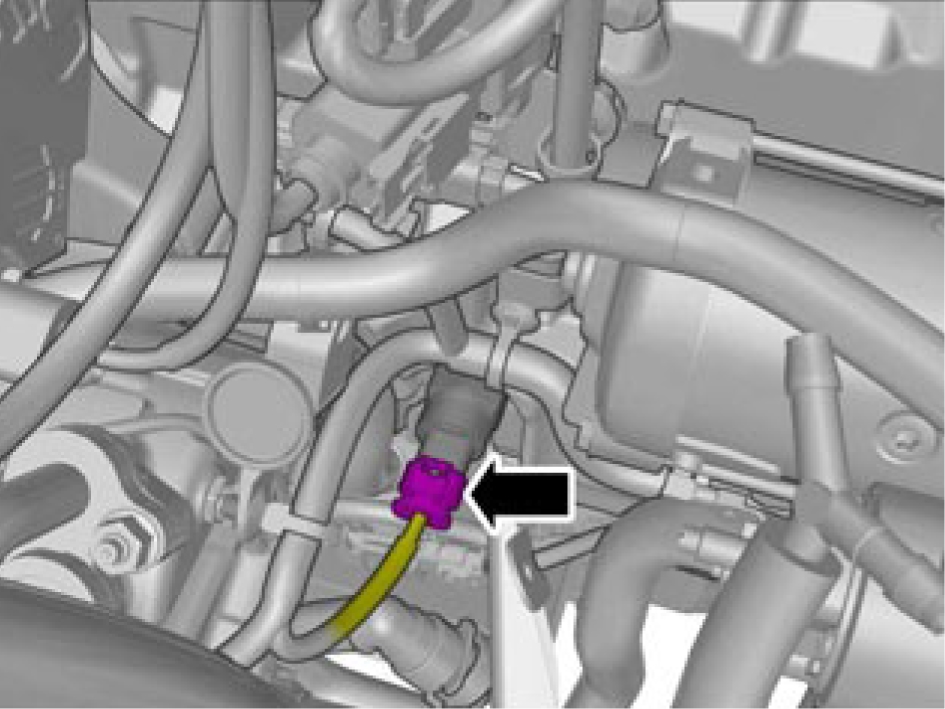
Disconnect the connector.
Be prepared to collect escaping fluid.
Remove marked component.
Installation
Install the oil pressure sensor, torque: 15 Nm
Connect the connector.
Install the hose.
Tighten the clamp
Lock the upper end.
EGR differential pressure sensor - S704
EVAP purge pressure sensor - S108
Exhaust gas temperature sensor - S703
Fuel pressure sensor low-pressure side - S104
Pressure sensor, particulate filter - S701
Coolant temperature sensor, water-cooled charge air cooler - S404
Supercharger clutch - V311
EVAP valve, replace
Removal
Disconnect the connector.
Observe caution when carrying out this step.
Release the locks.
Loosen the marked detail.
Observe caution when carrying out this step.
Release the locks.
Loosen the marked detail.

Loosen the clips.
Remove the marked part.
Installation
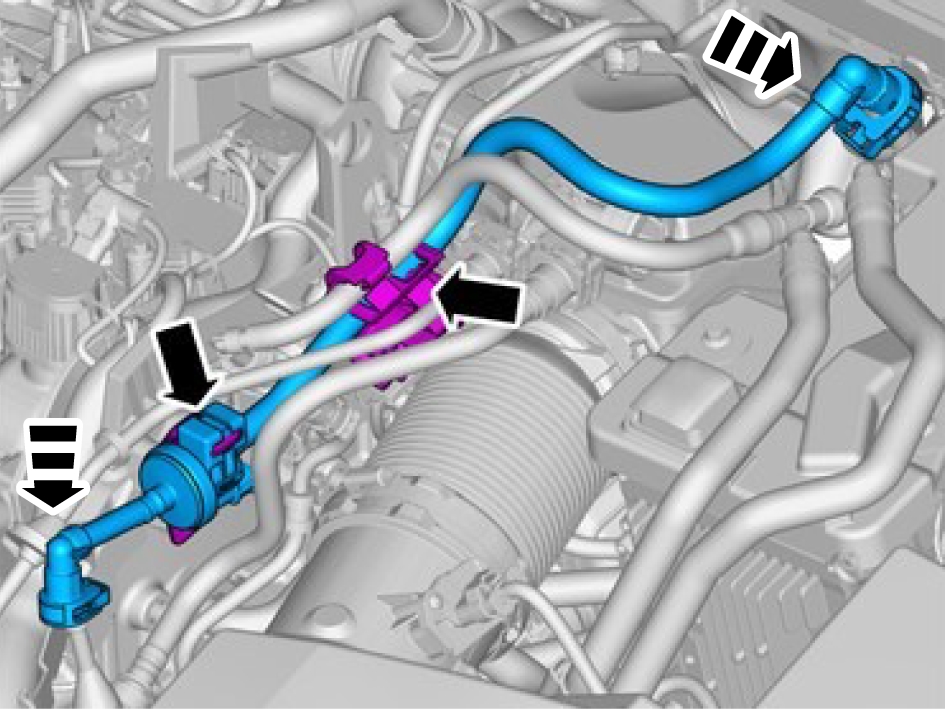
Install the marked component.
Secure the clips and push in the end connections carefully.
Install the connectors.
Knock sensor - S604
Air pressure and temperature sensor 1 - S304-1
Fuel pressure- and temperature sensor, low-pressure side - S106
Fuel pump module - P101
Ignition coil and spark plug, 1 - T200-1
VVT-solenoid - exhaust, replace
Removal
Make sure that the area around the component is clean and free of foreign material before removal.
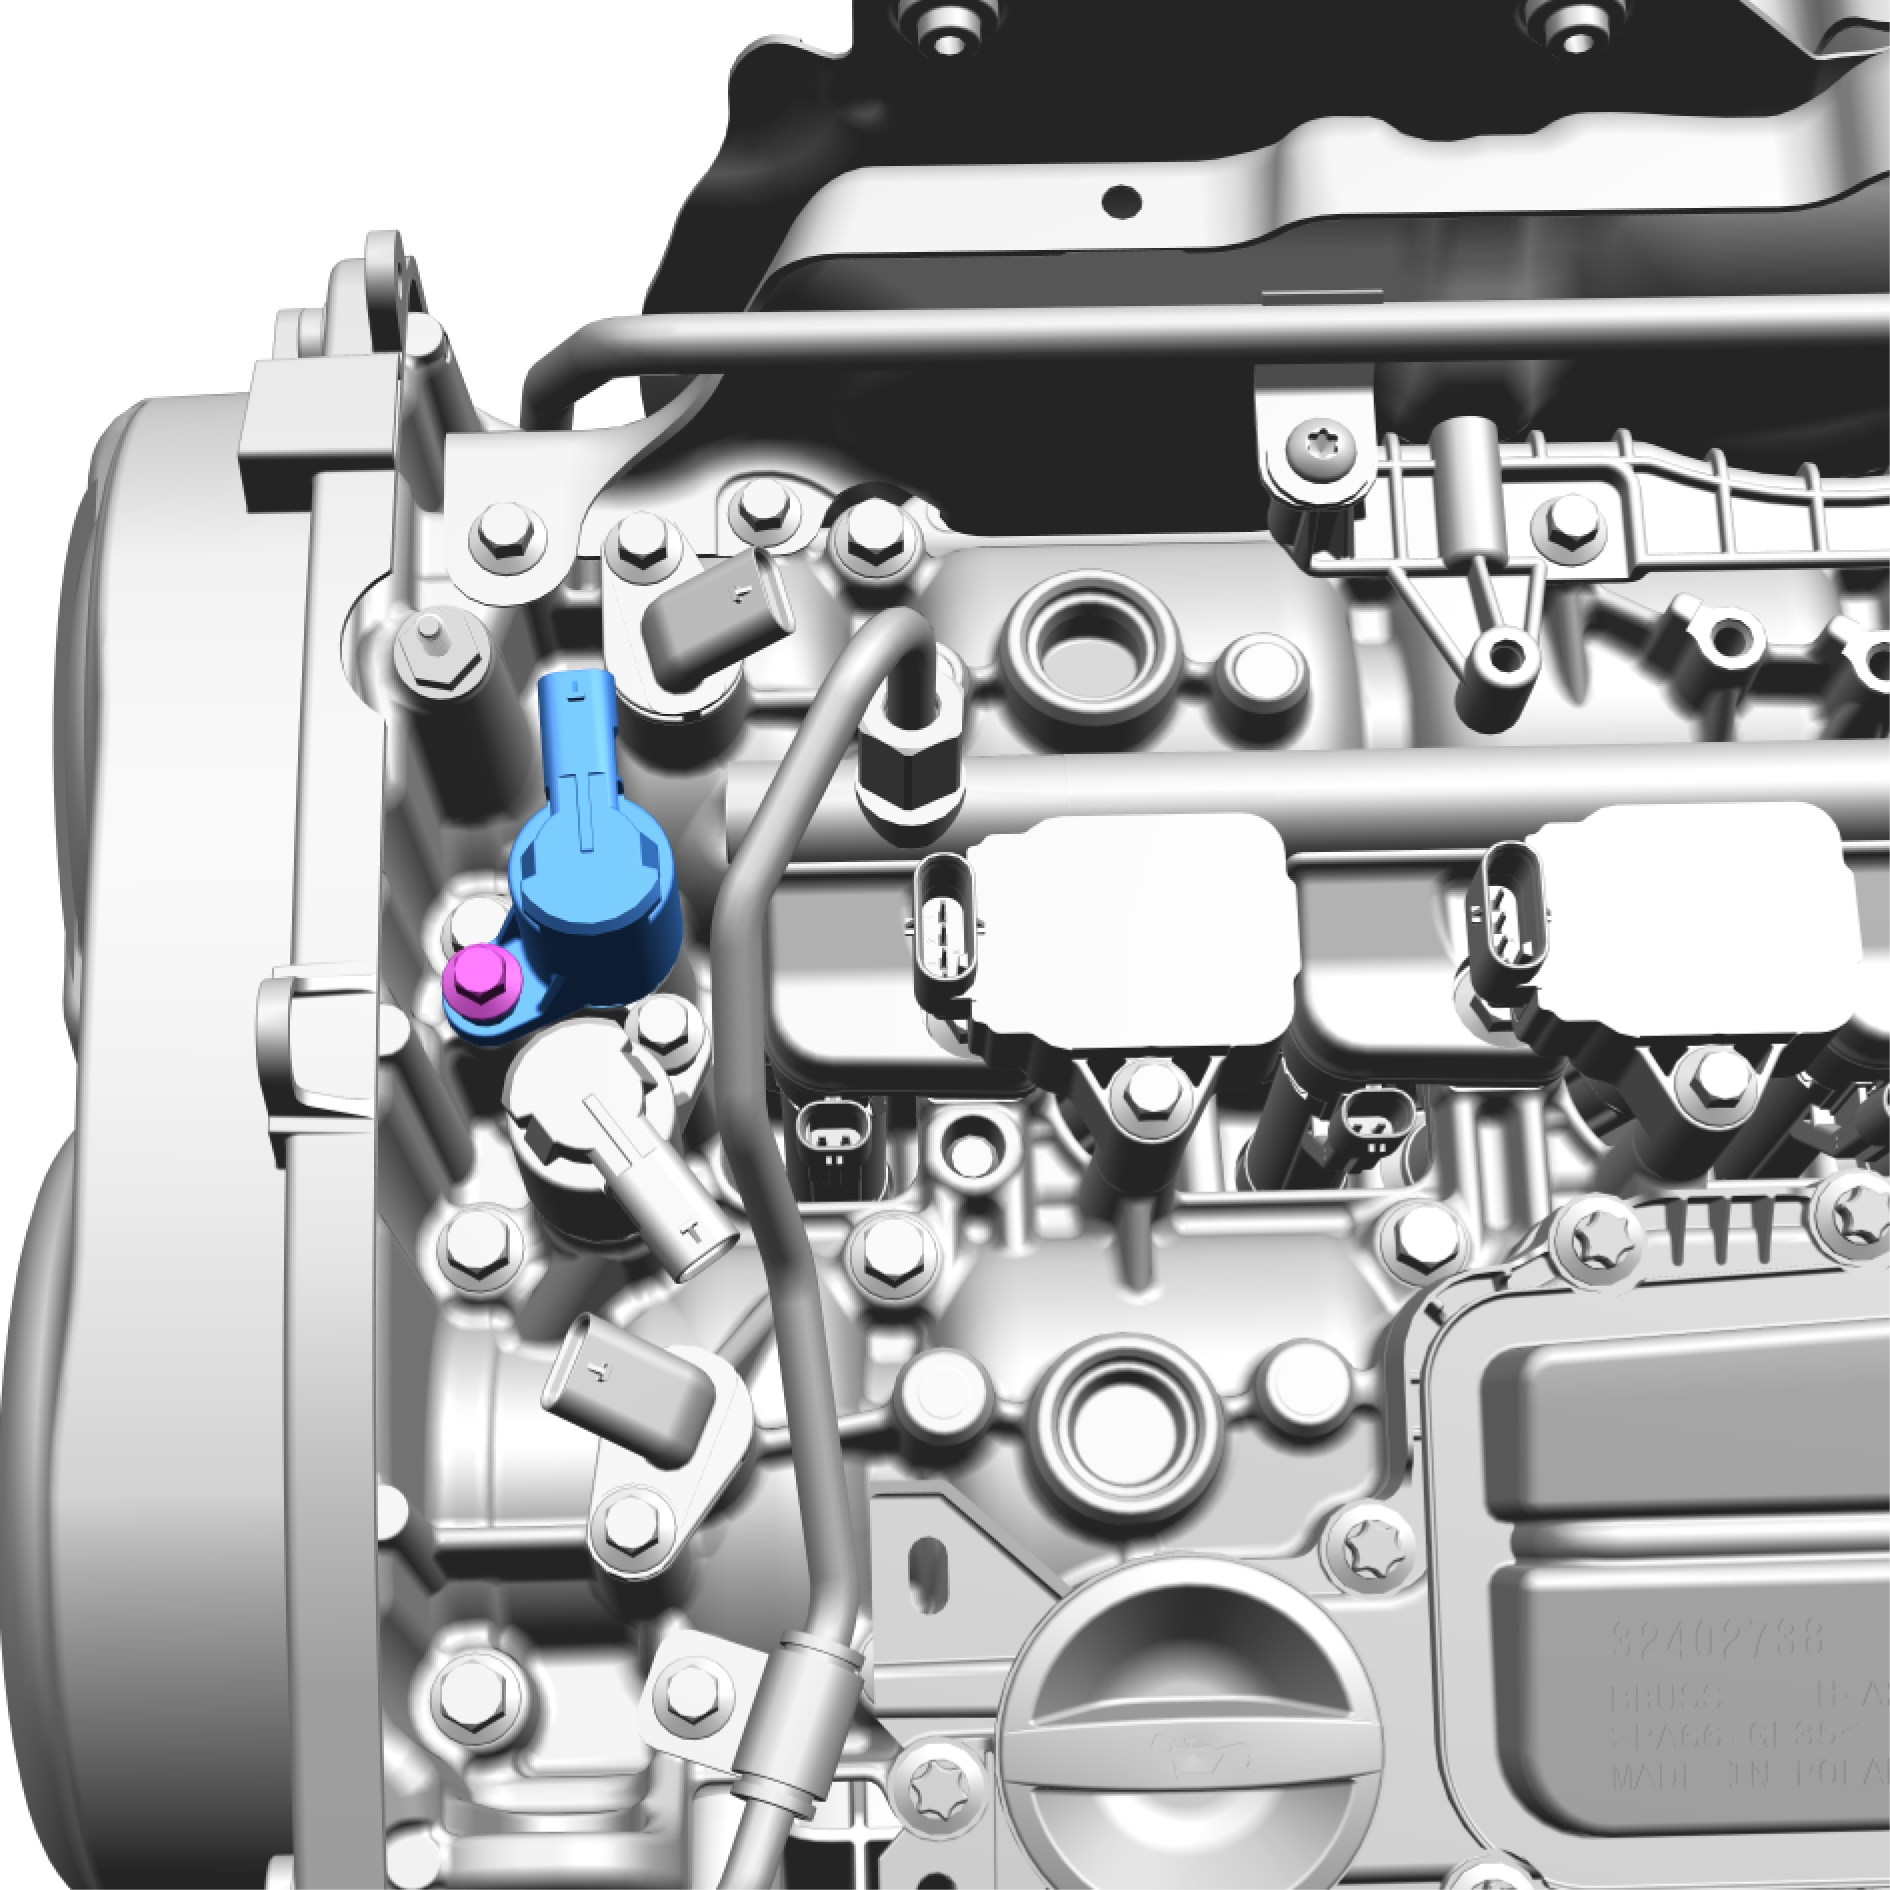
Remove the screw.
Torque: 10 Nm
Remove the marked component.
Installation
Install in reverse order.
VVT-solenoid - intake, replace
Removal
Make sure that the area around the component is clean and free of foreign material before removal.
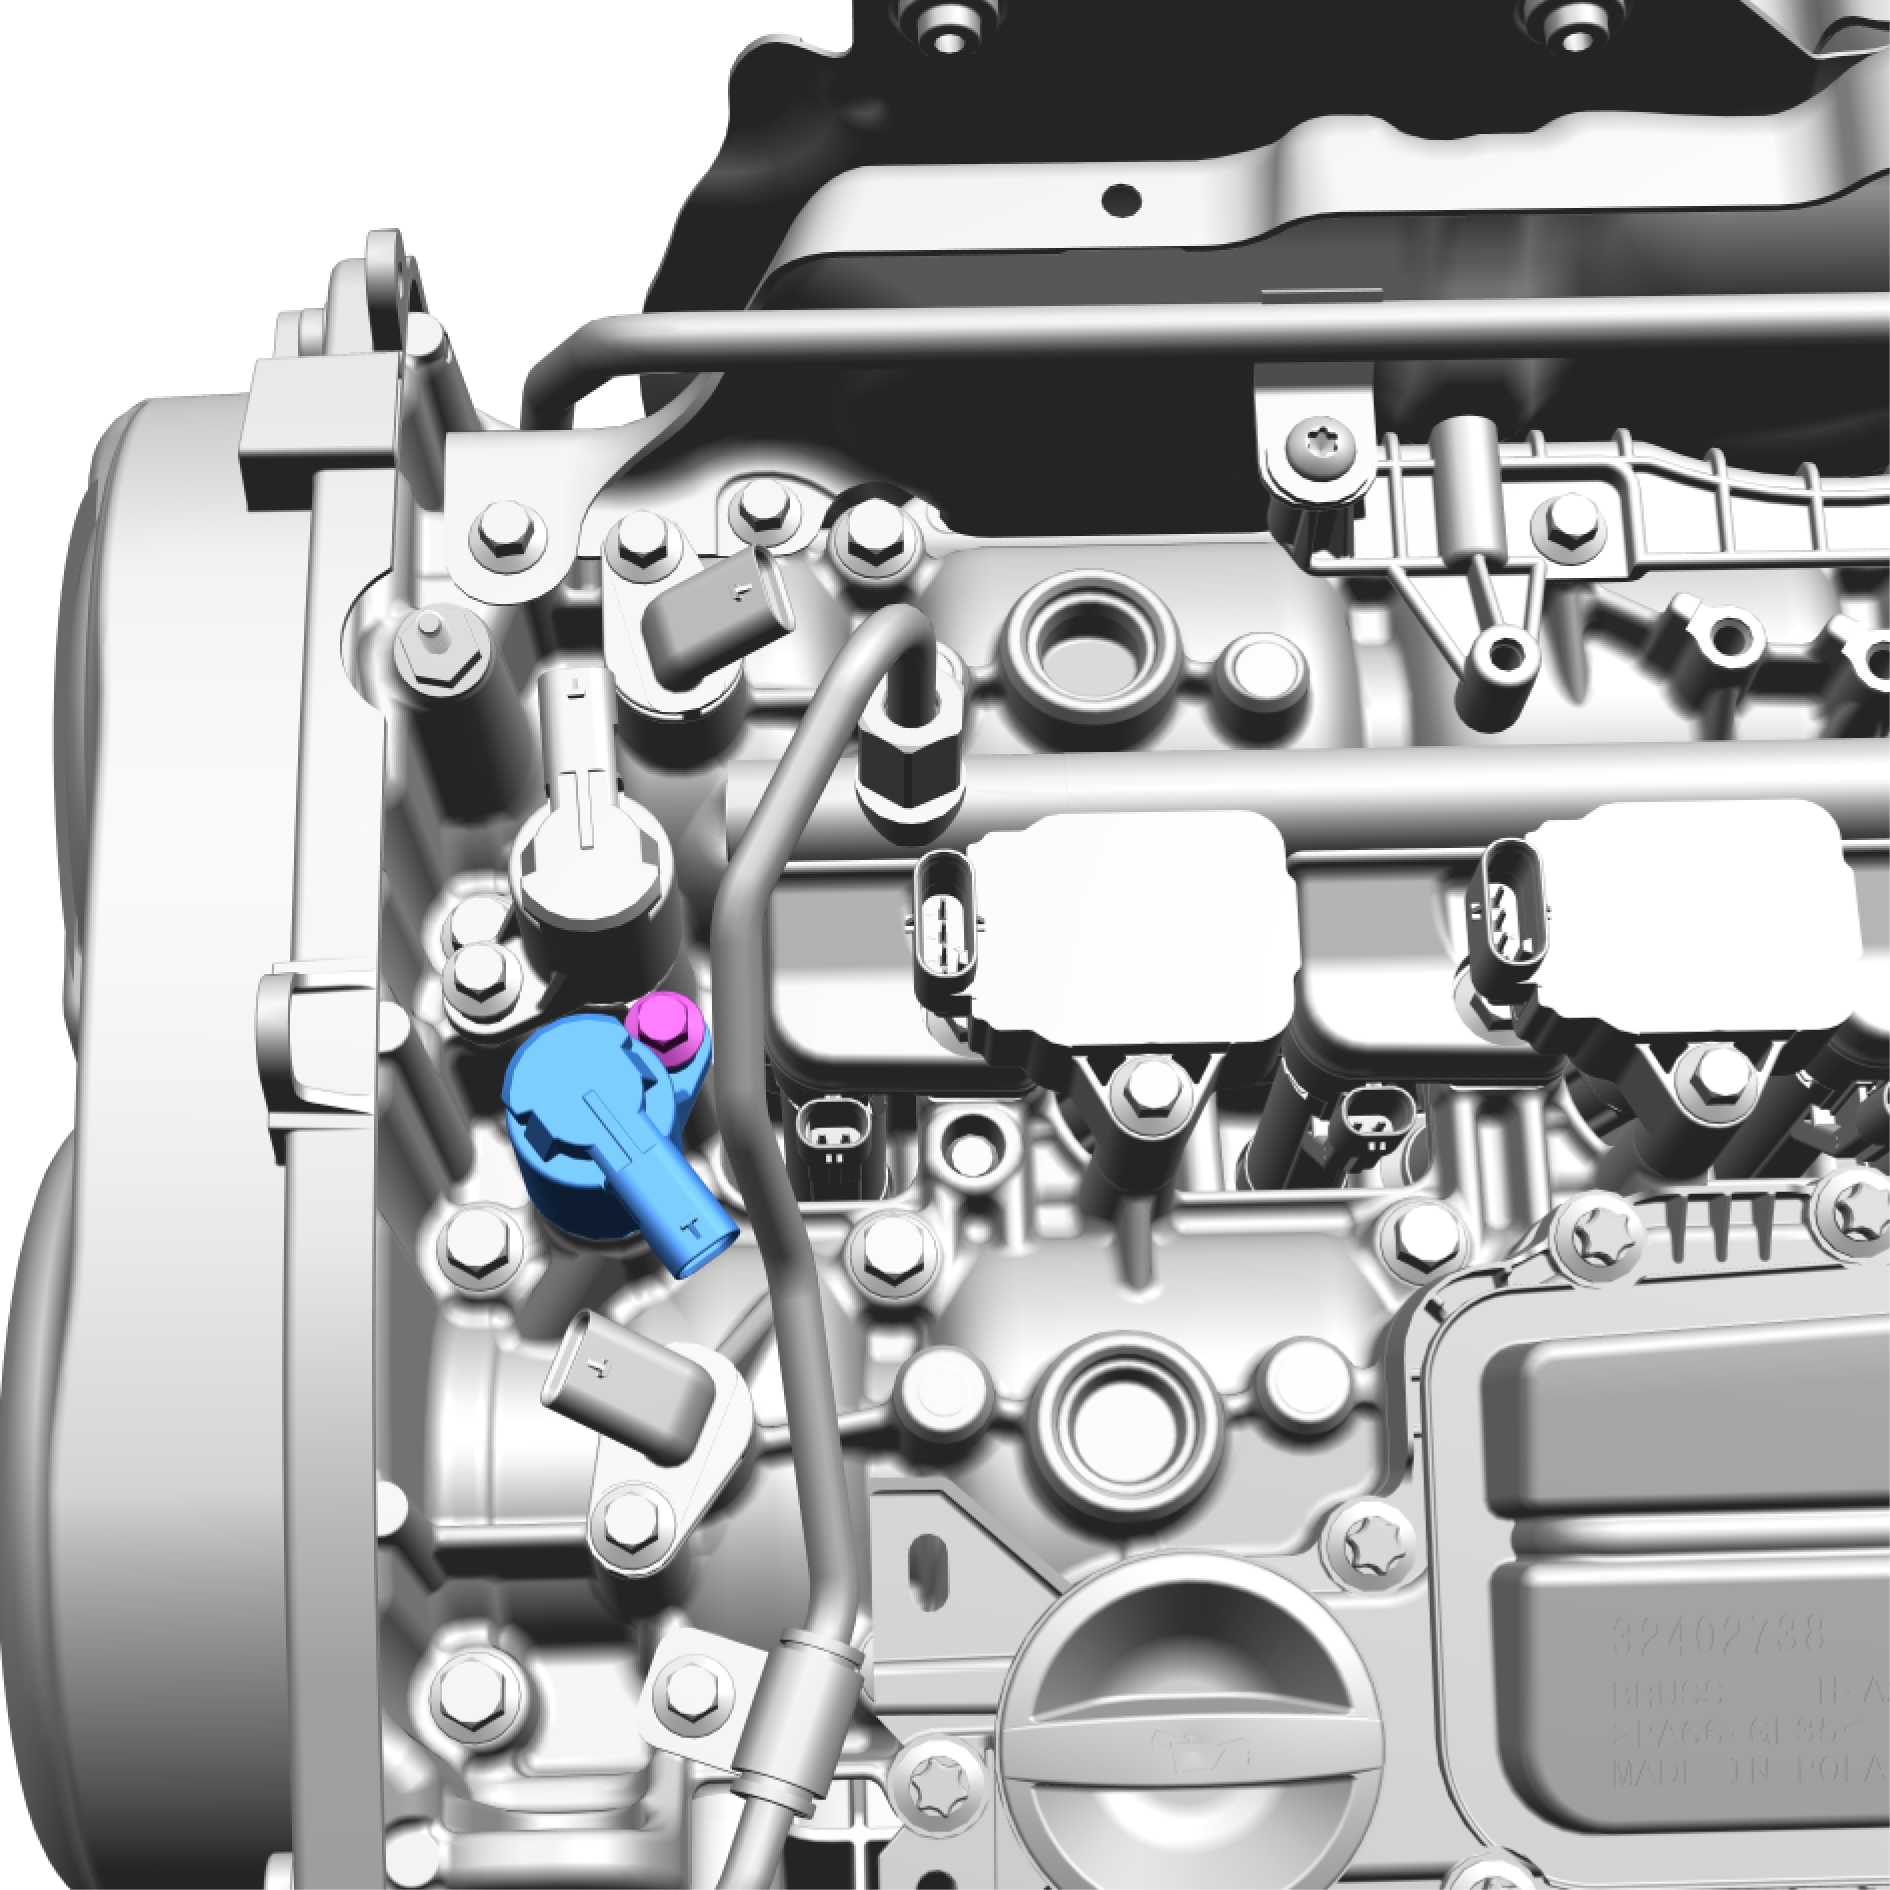
Remove the screw.
Torque: 10 Nm
Remove the marked component.
Installation
Install in reverse order.
Vibration damper, replace
Removal
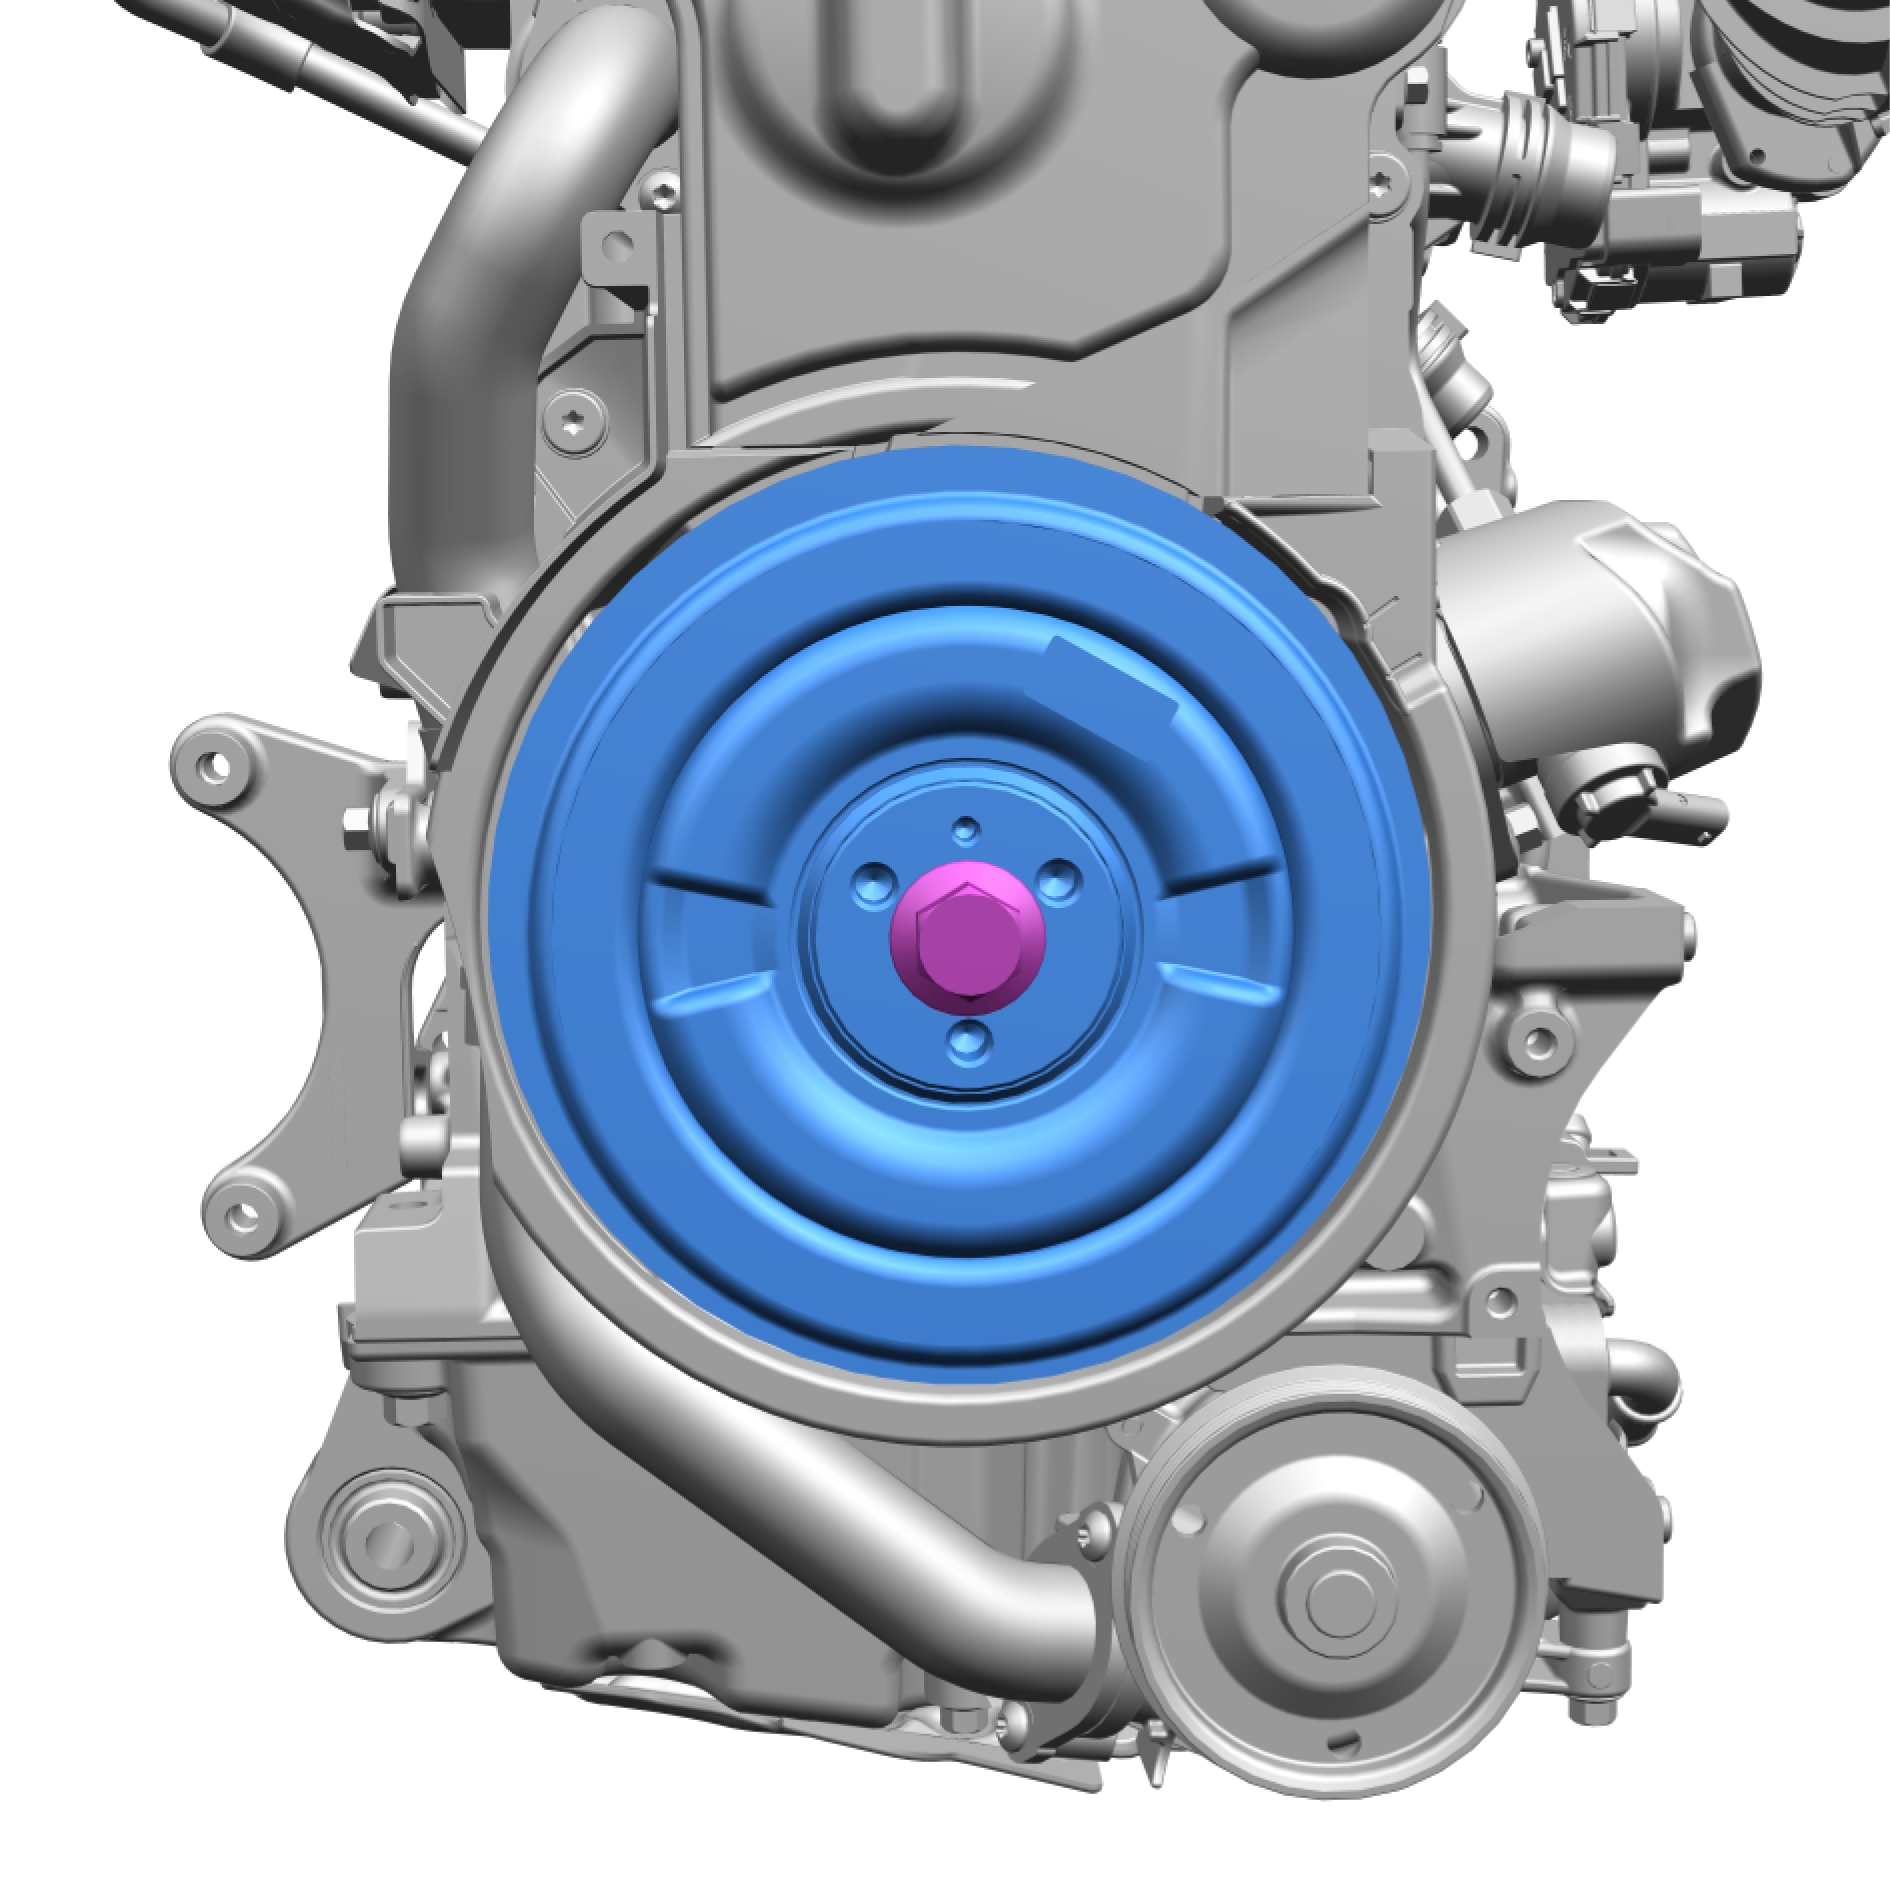
Remove the screw.
Remove the tool and the marked component.
Installation
Install the marked component.
Install the screw and tighten fingertight.
Install special tool: Counterhold 999 7719
Tighten the screw.
Torque: 10 Nm
Tighten the screw.
Torque: 90 Nm Angle
Loosen the screw.
Remove special tool: Counterhold 999 7719
Camshaft position sensor - exhaust, replace
Make sure that the area around the component is clean and free of foreign material before removal.
Remove the screw.
Torque: 10 Nm
Remove the marked component.
Installation
Install in reverse order.
Camshaft position sensor - intake, replace
Make sure that the area around the component is clean and free of foreign material before removal.
Remove the screw.
Torque: 10 Nm
Remove the marked component.
Installation
Install in reverse order.
Crankshaft position sensor, replace
Removal
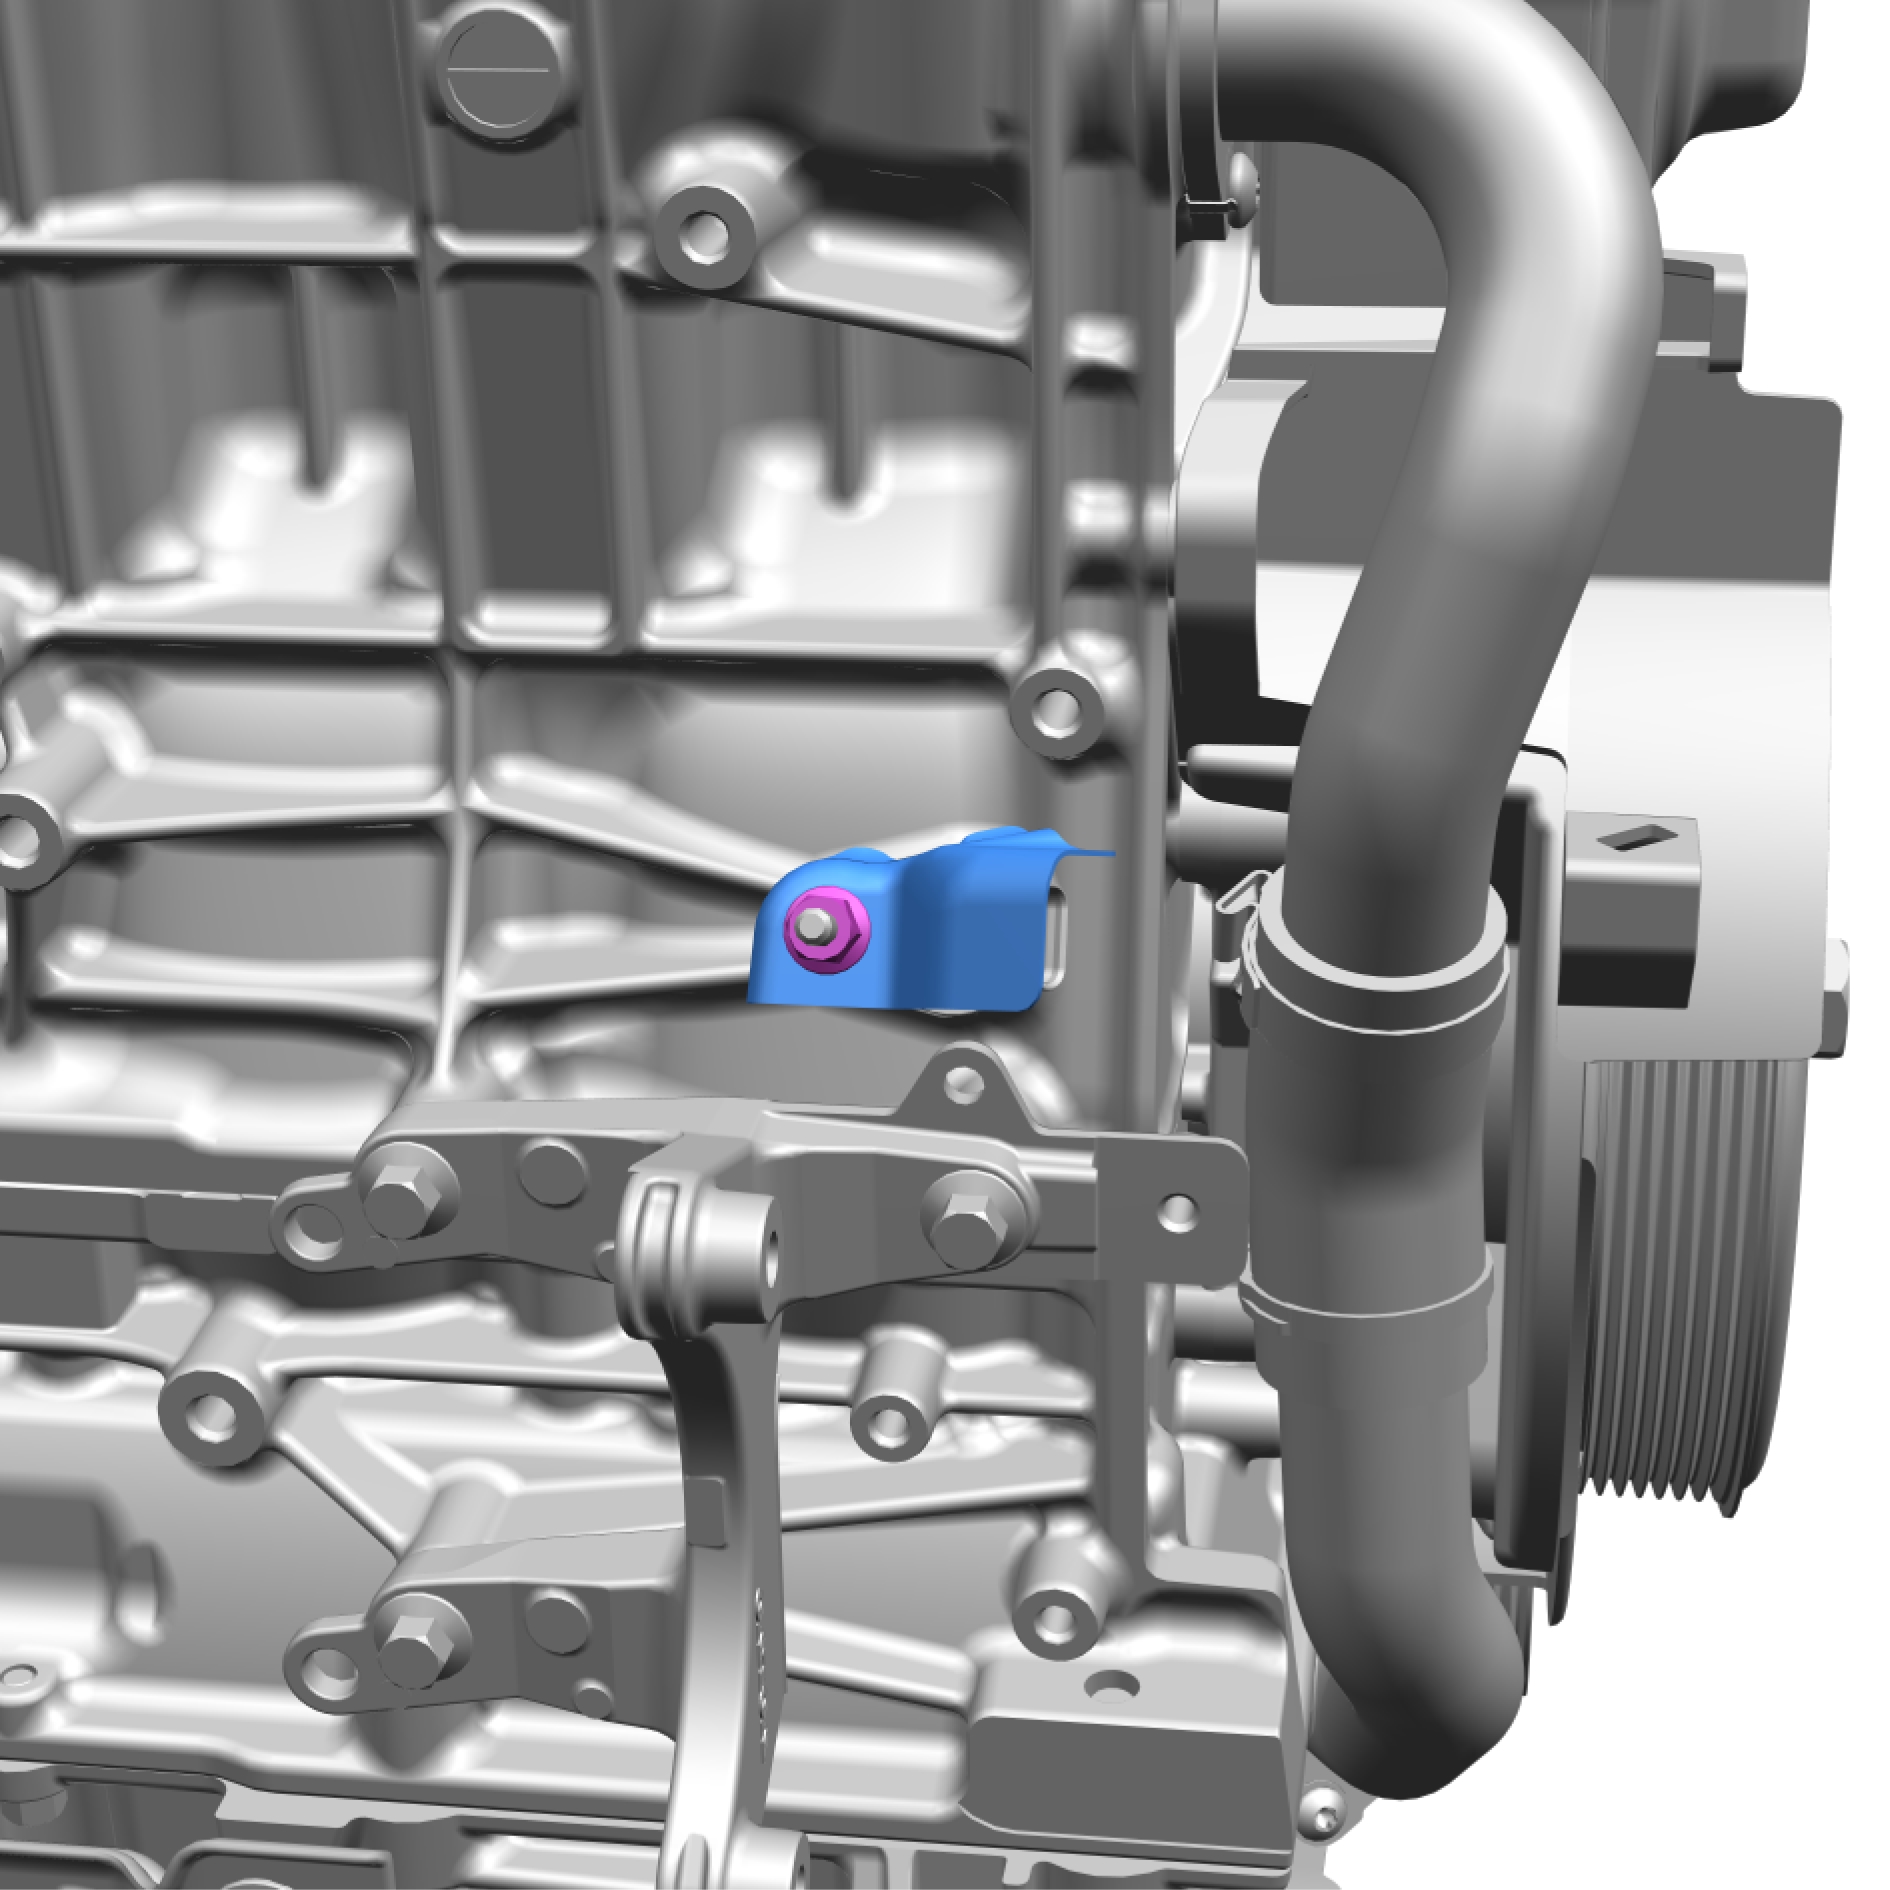
Remove the nut.
Torque: 10 Nm
Remove the marked component.
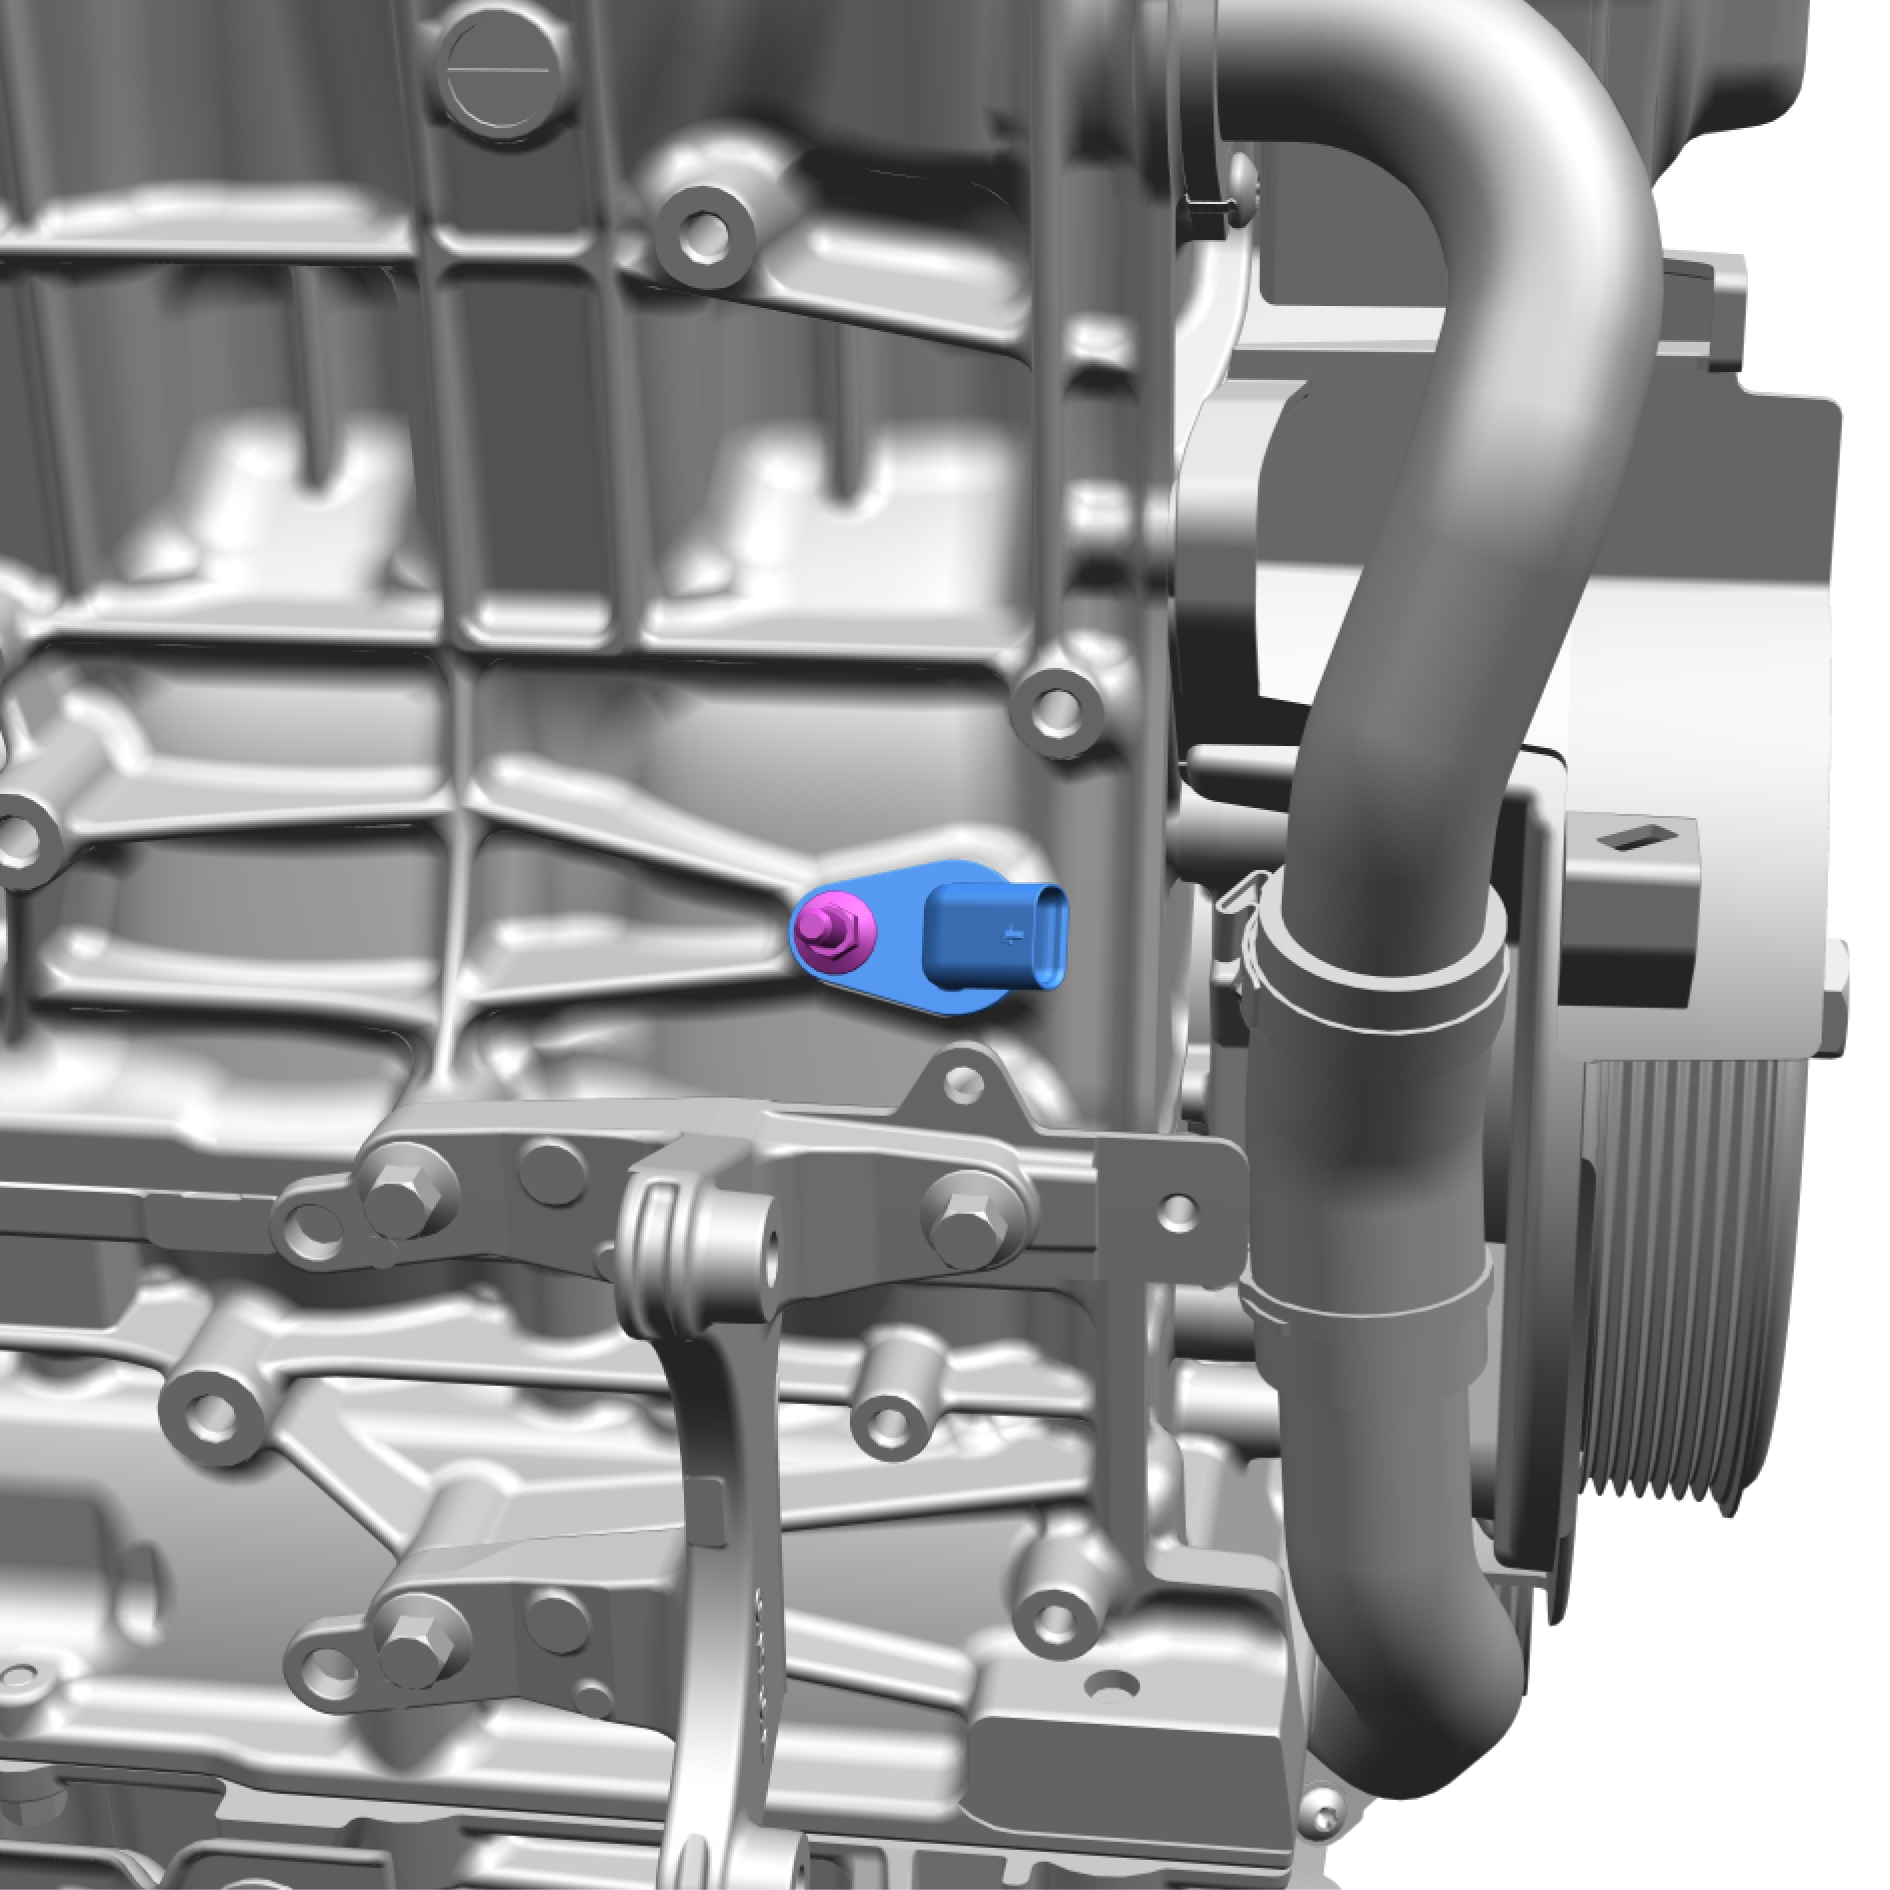
Remove the screw.
Torque: 10 Nm
Remove the marked component.
Installation
Install in reverse order.
Engine coolant temperature sensor, replace
Removal
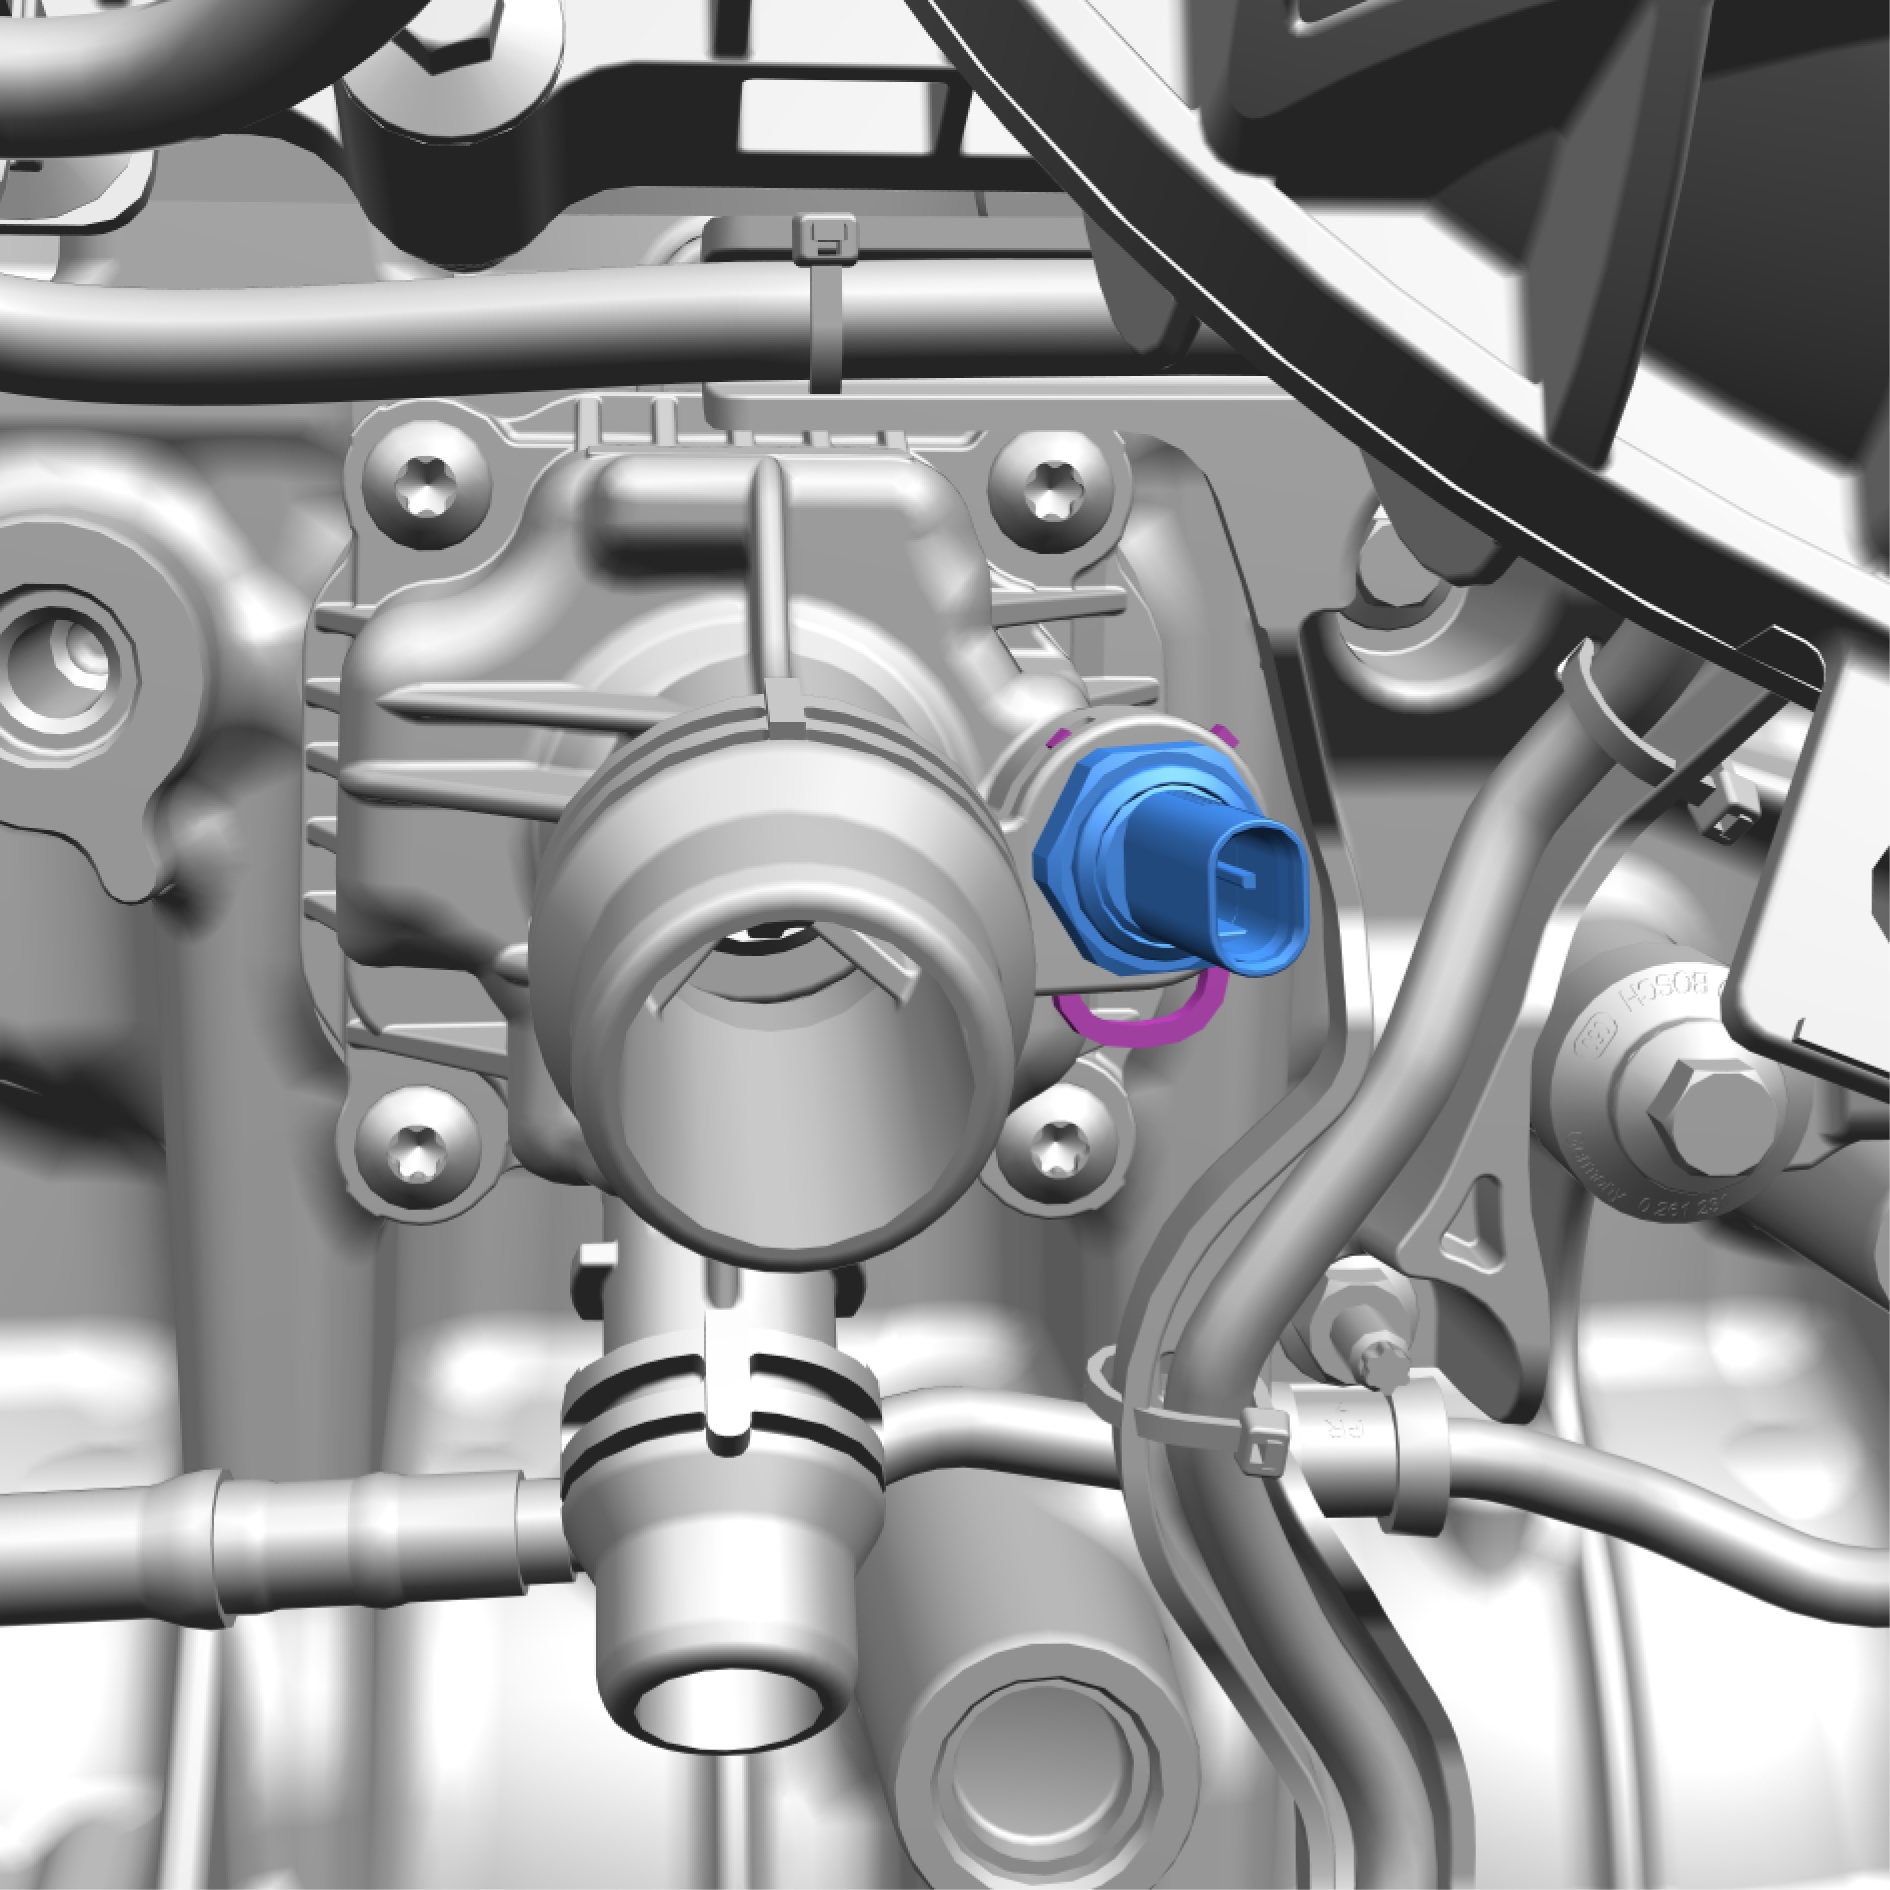
Be prepared to collect escaping fluid.
Release the clip.
Remove the marked component.
Installation
Install in reverse order.
Manifold absolute pressure MAP sensor, replace
Removal
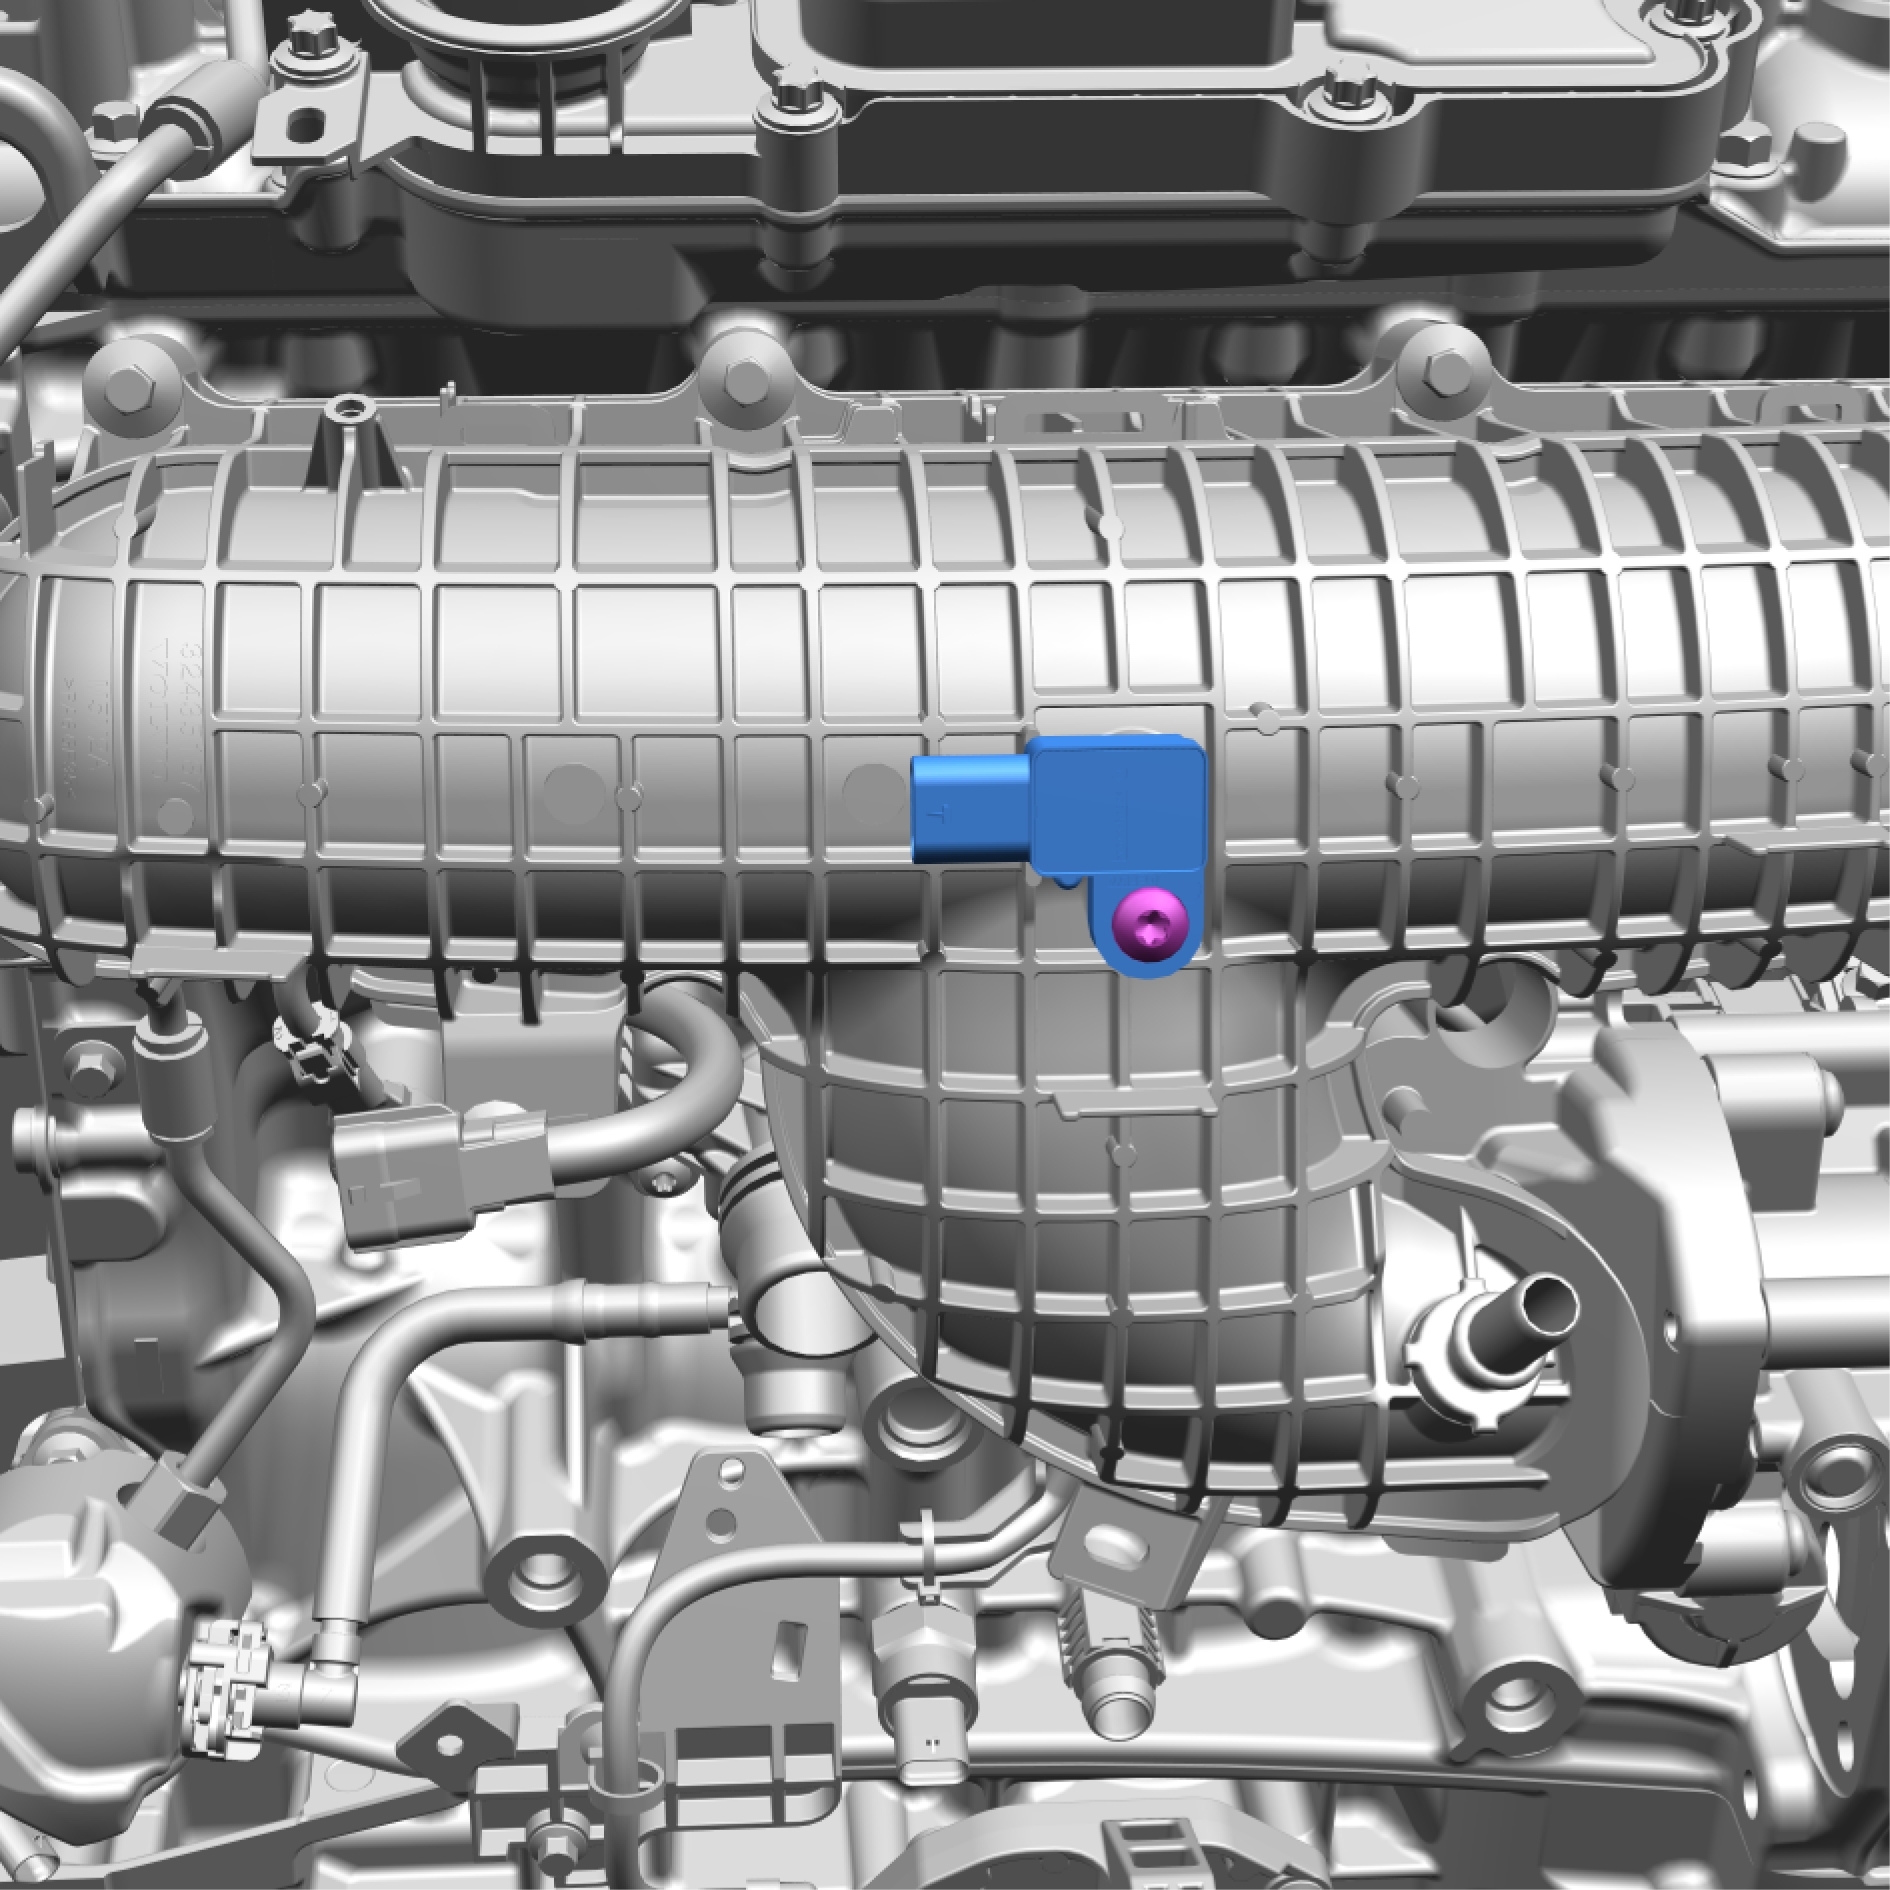
Remove the screw.
Torque: 5 Nm
Remove the marked component.
Installation
Install in reverse order.
Knock sensor, replace
Removal
Disconnect the connectors.
Note the position of the component before removal.
Remove the screw.
Torque: 20 Nm
Remove the marked component.
Installation
Install in reverse order.
Intake manifold, replace
Removal

Release the clip.
Release the clip.
Fold marked component aside.
Remove the screws.
Torque: 5 Nm
Remove the marked component.
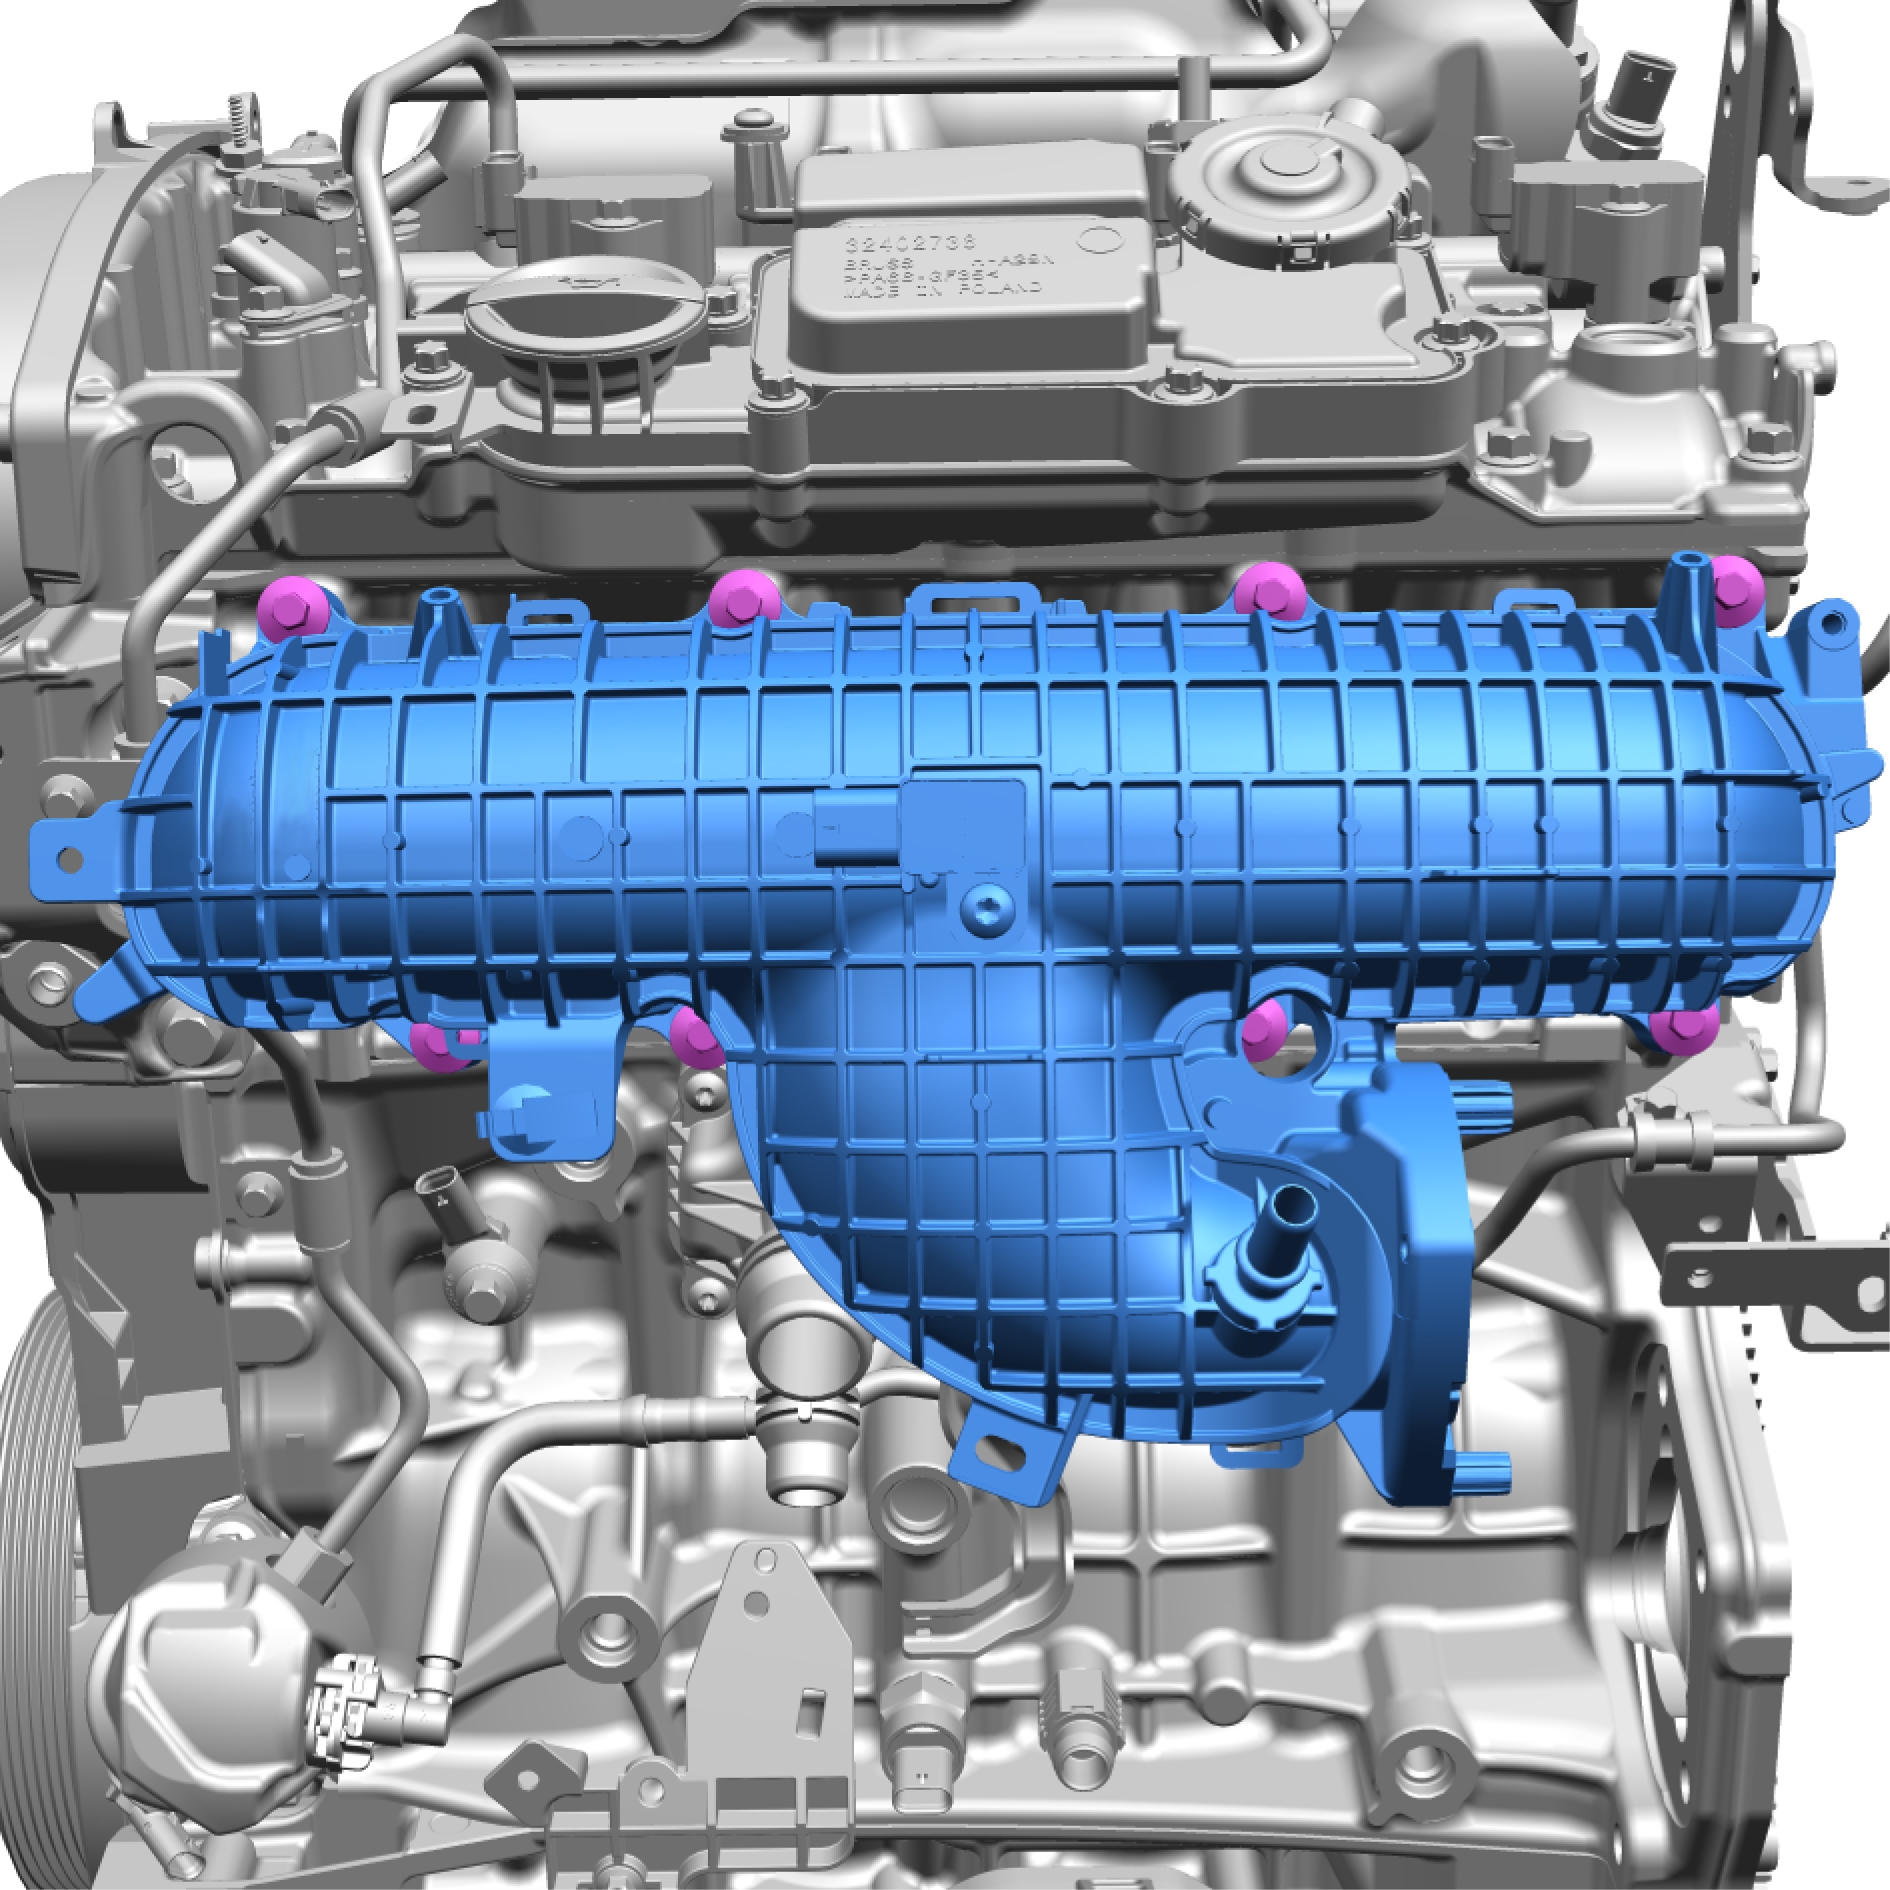
Remove the screws.
Torque: 10 Nm
Remove the marked component.
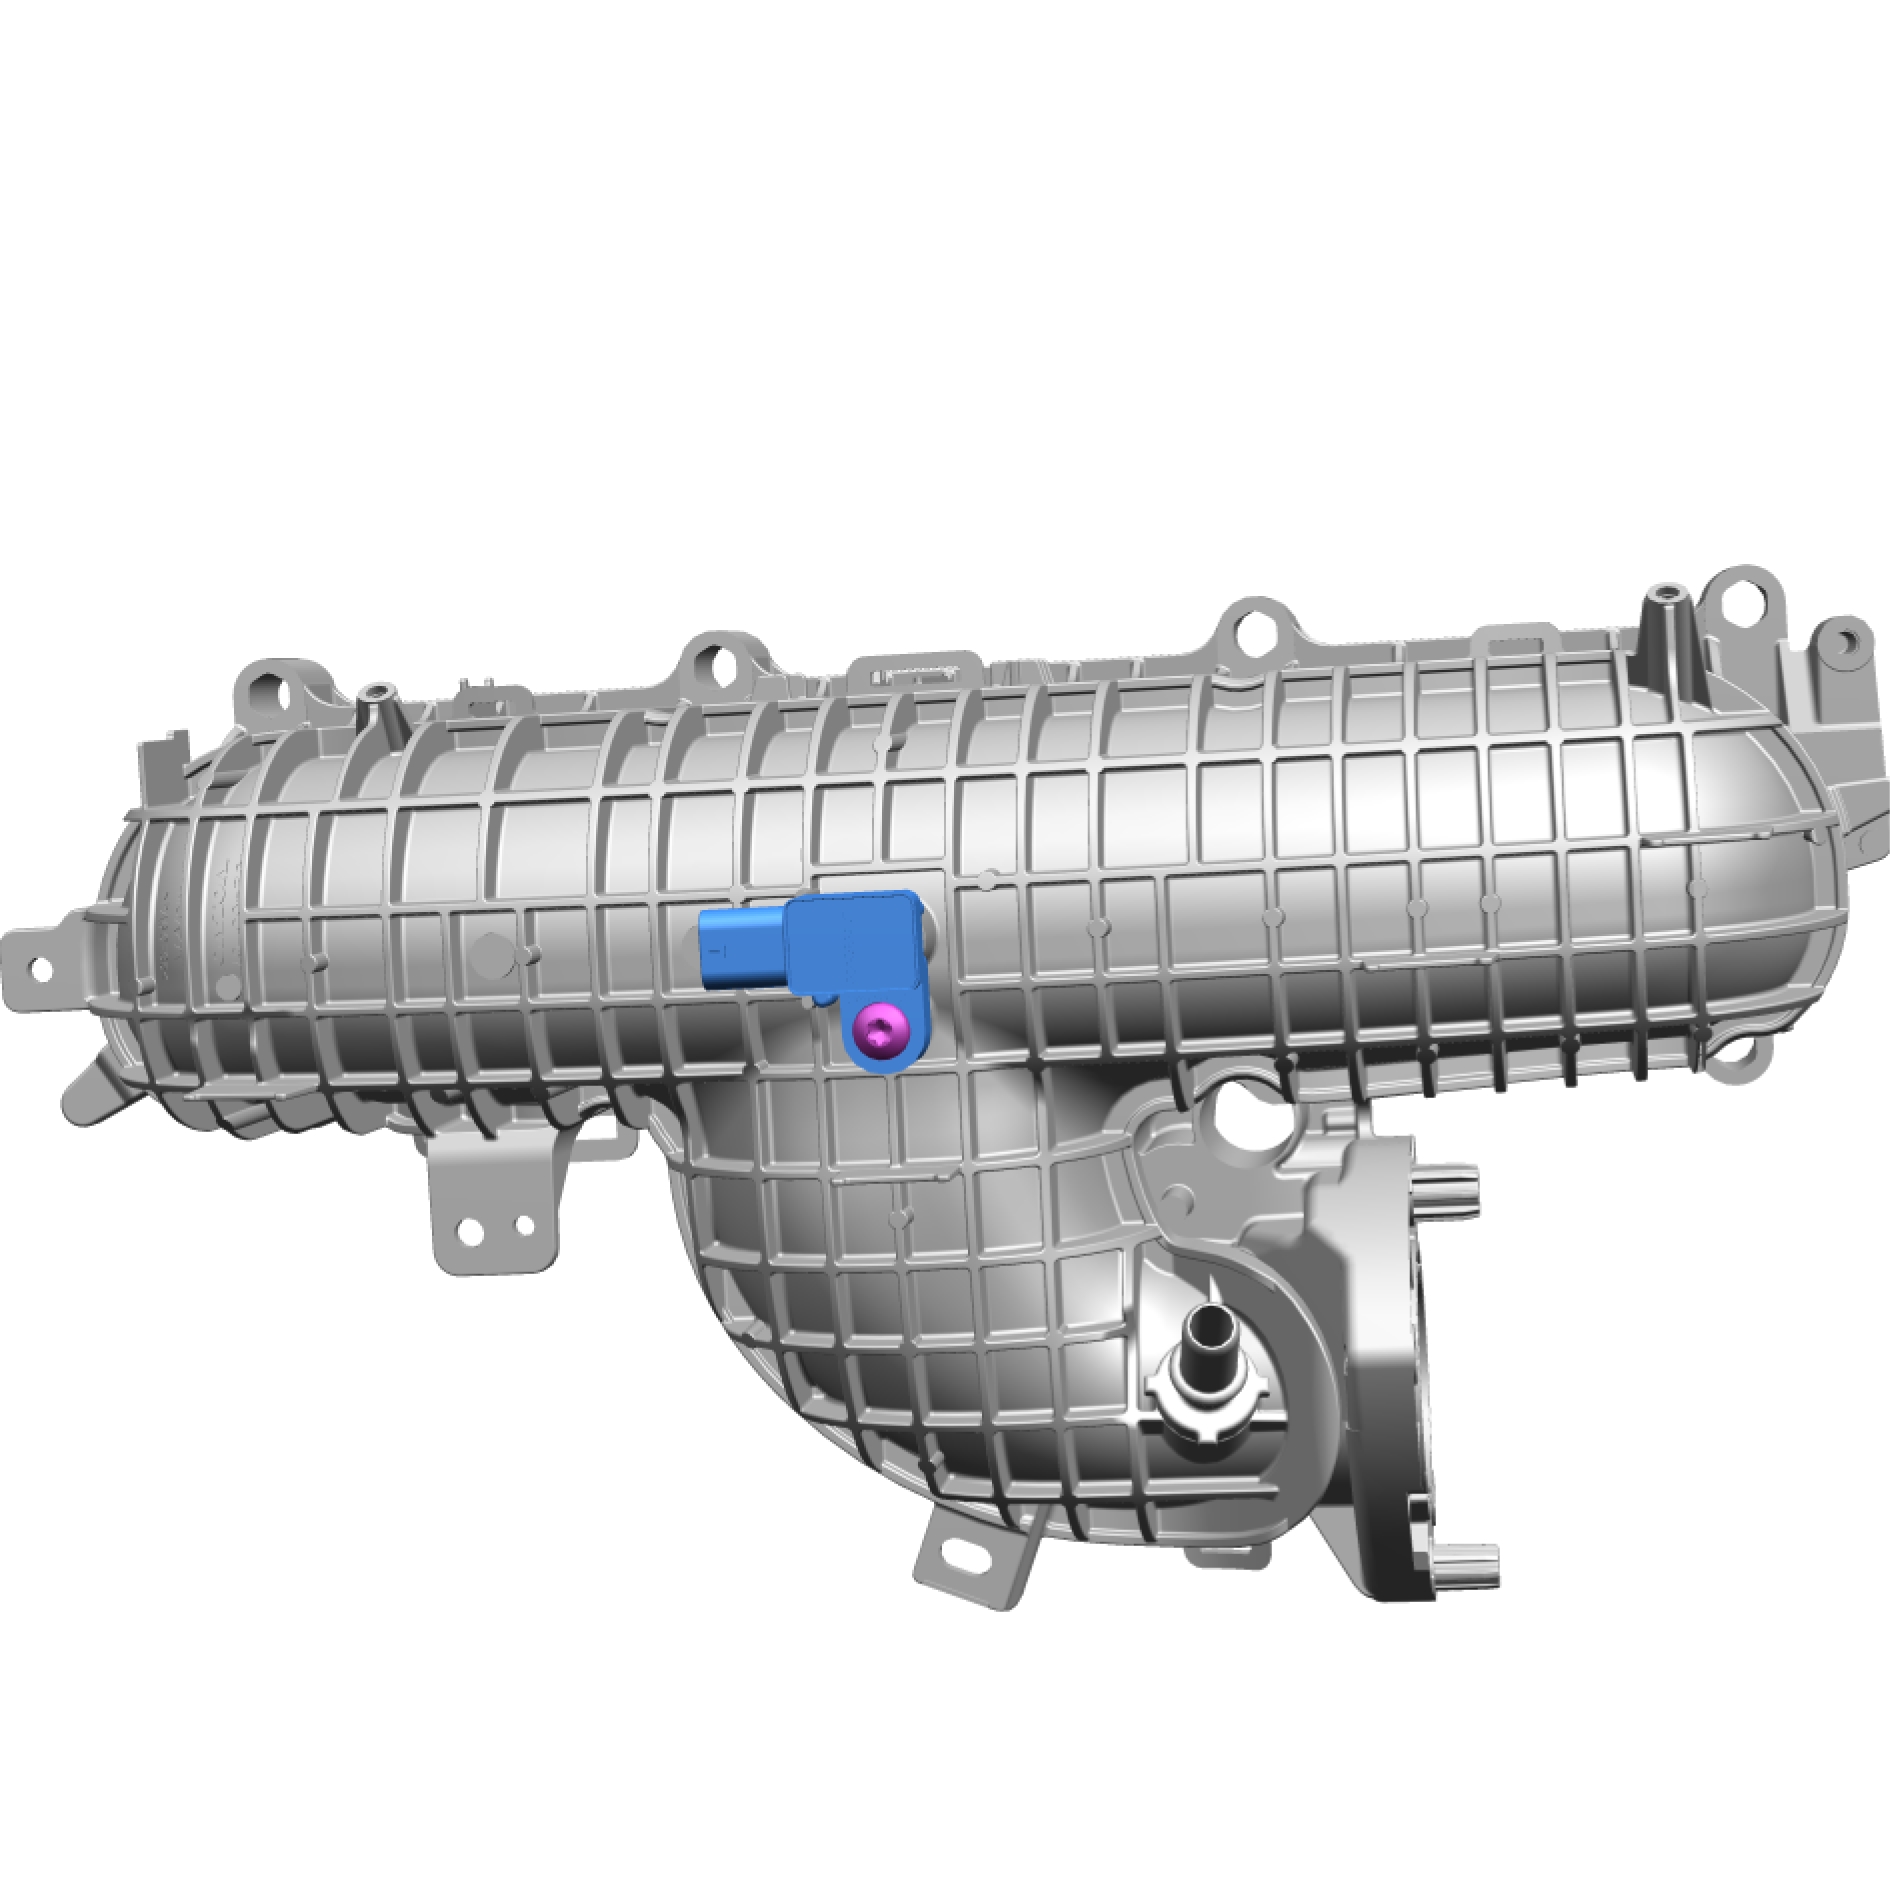
Remove the screw.
Torque: 5 Nm
Remove the marked component.
Installation
Install in reverse order.
Thermostat, replace
Removal
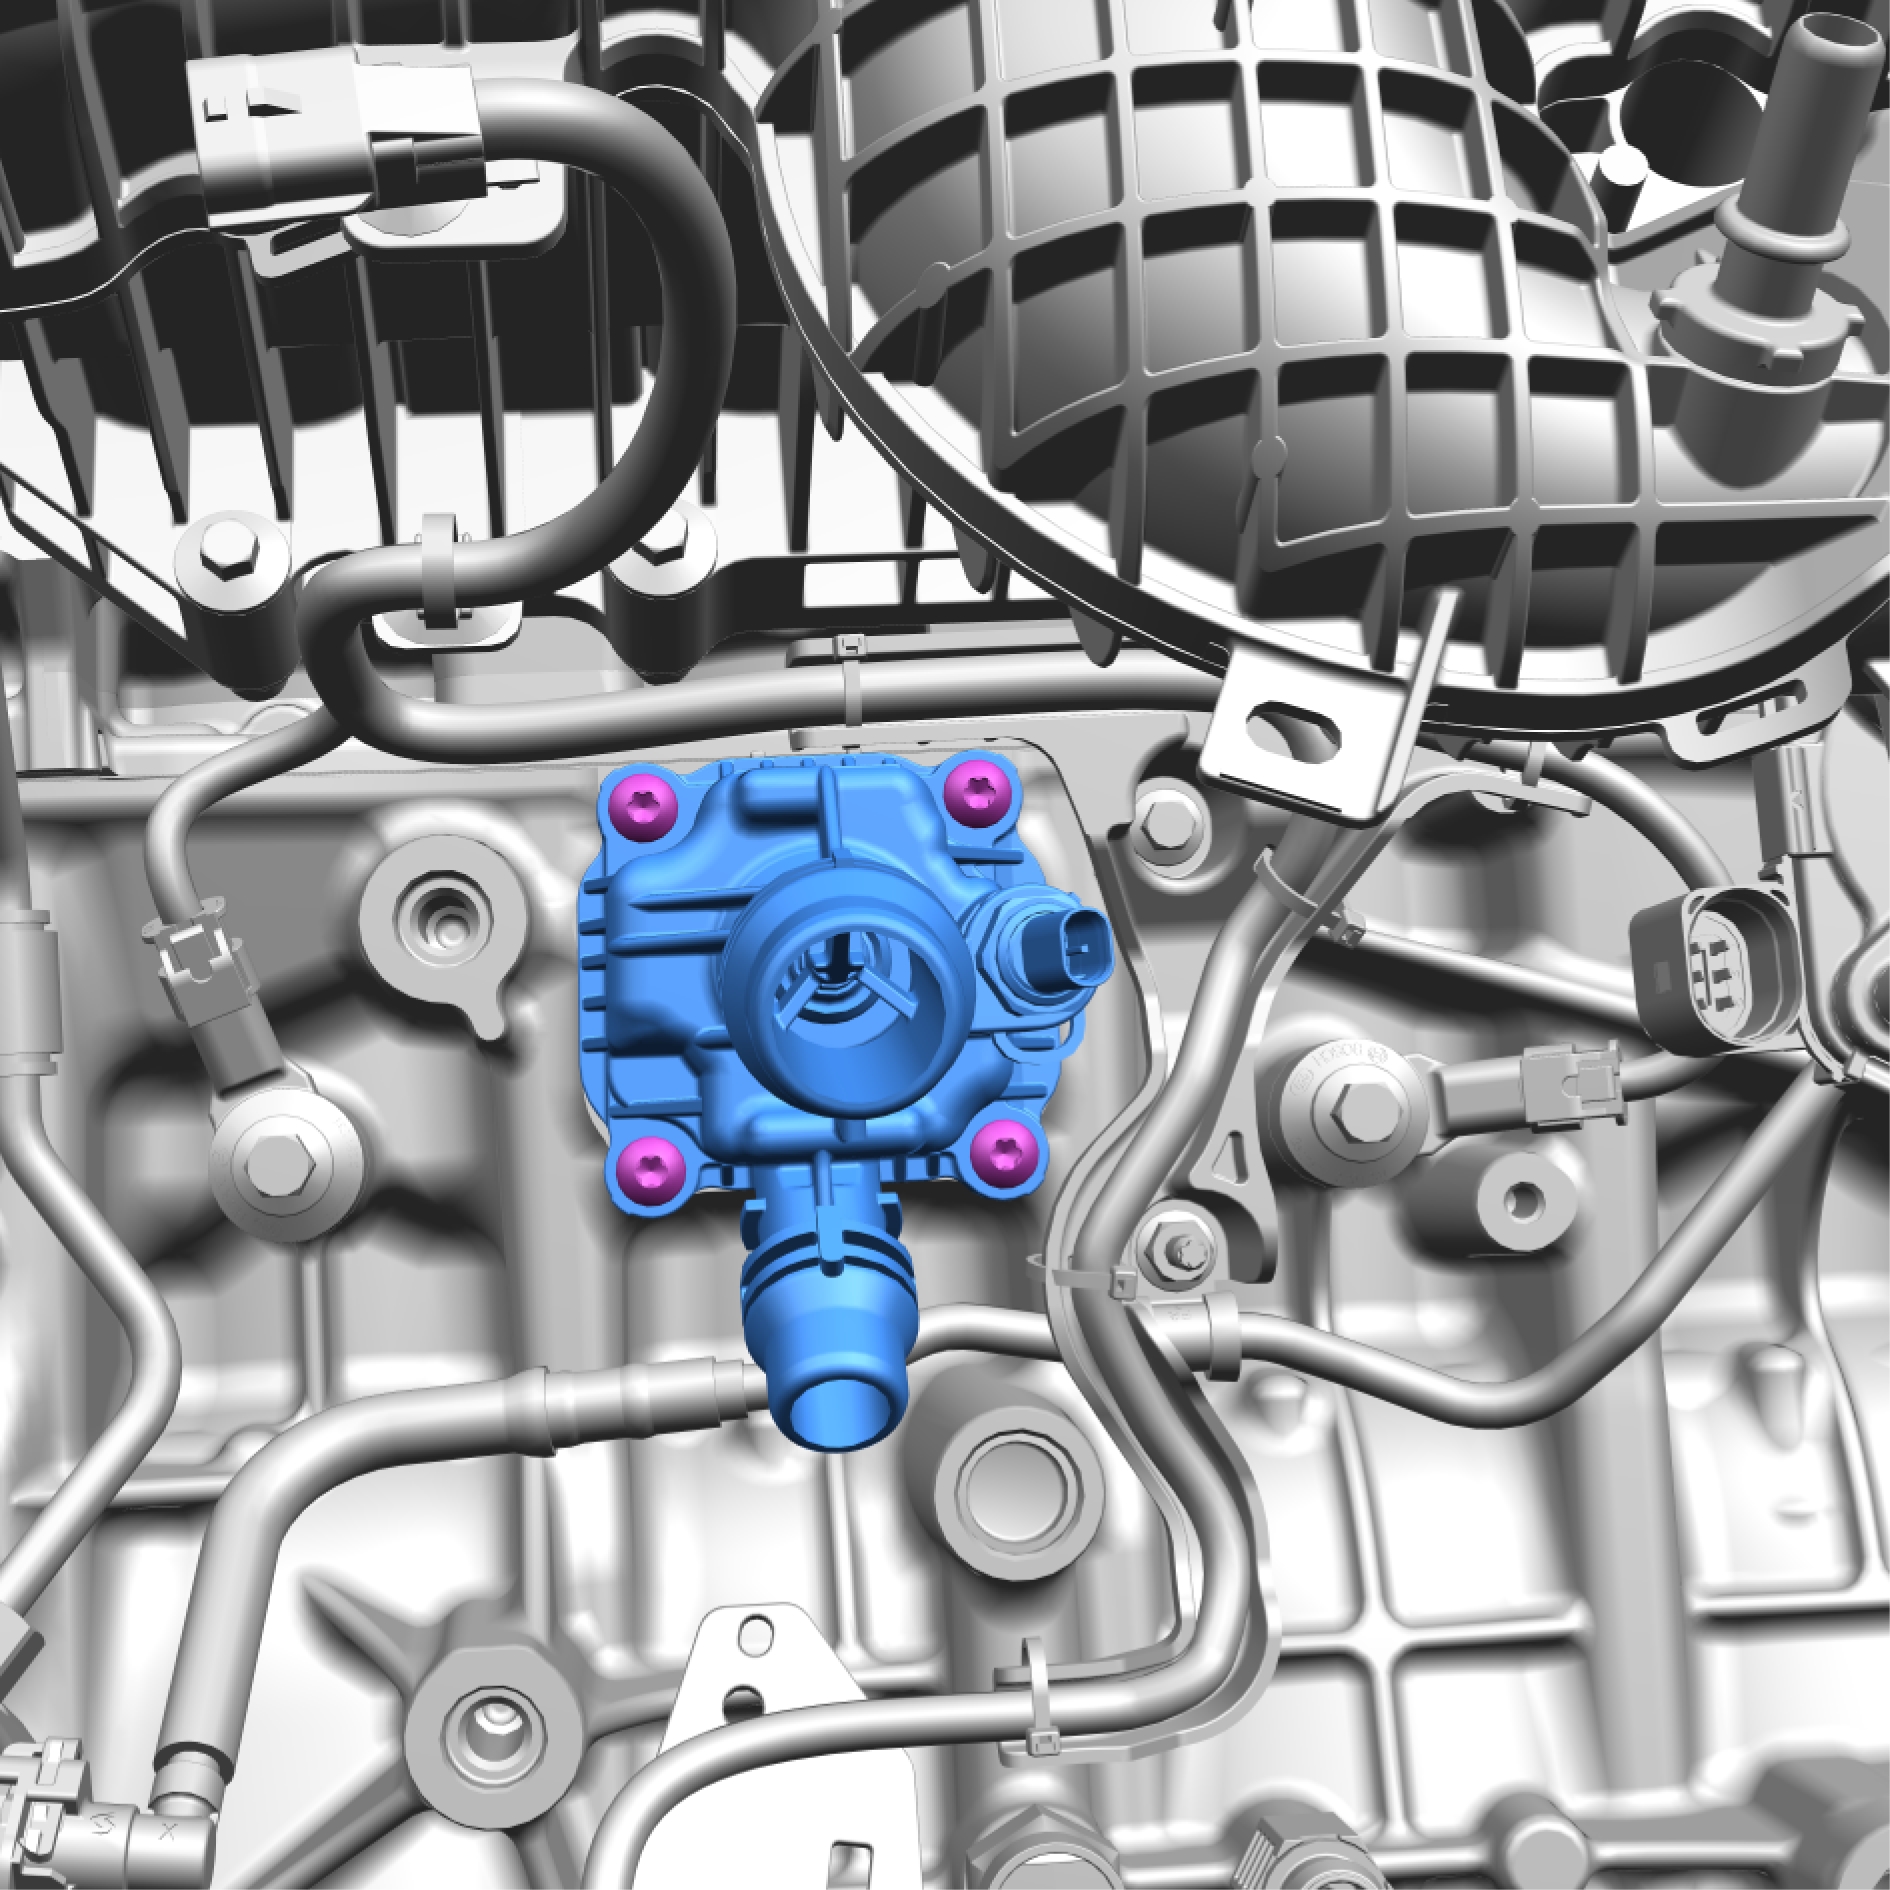
Remove the screws.
Torque: 10 Nm
Remove the marked component.
Installation
Install in reverse order.
Coolant pump - engine, replace
Removal
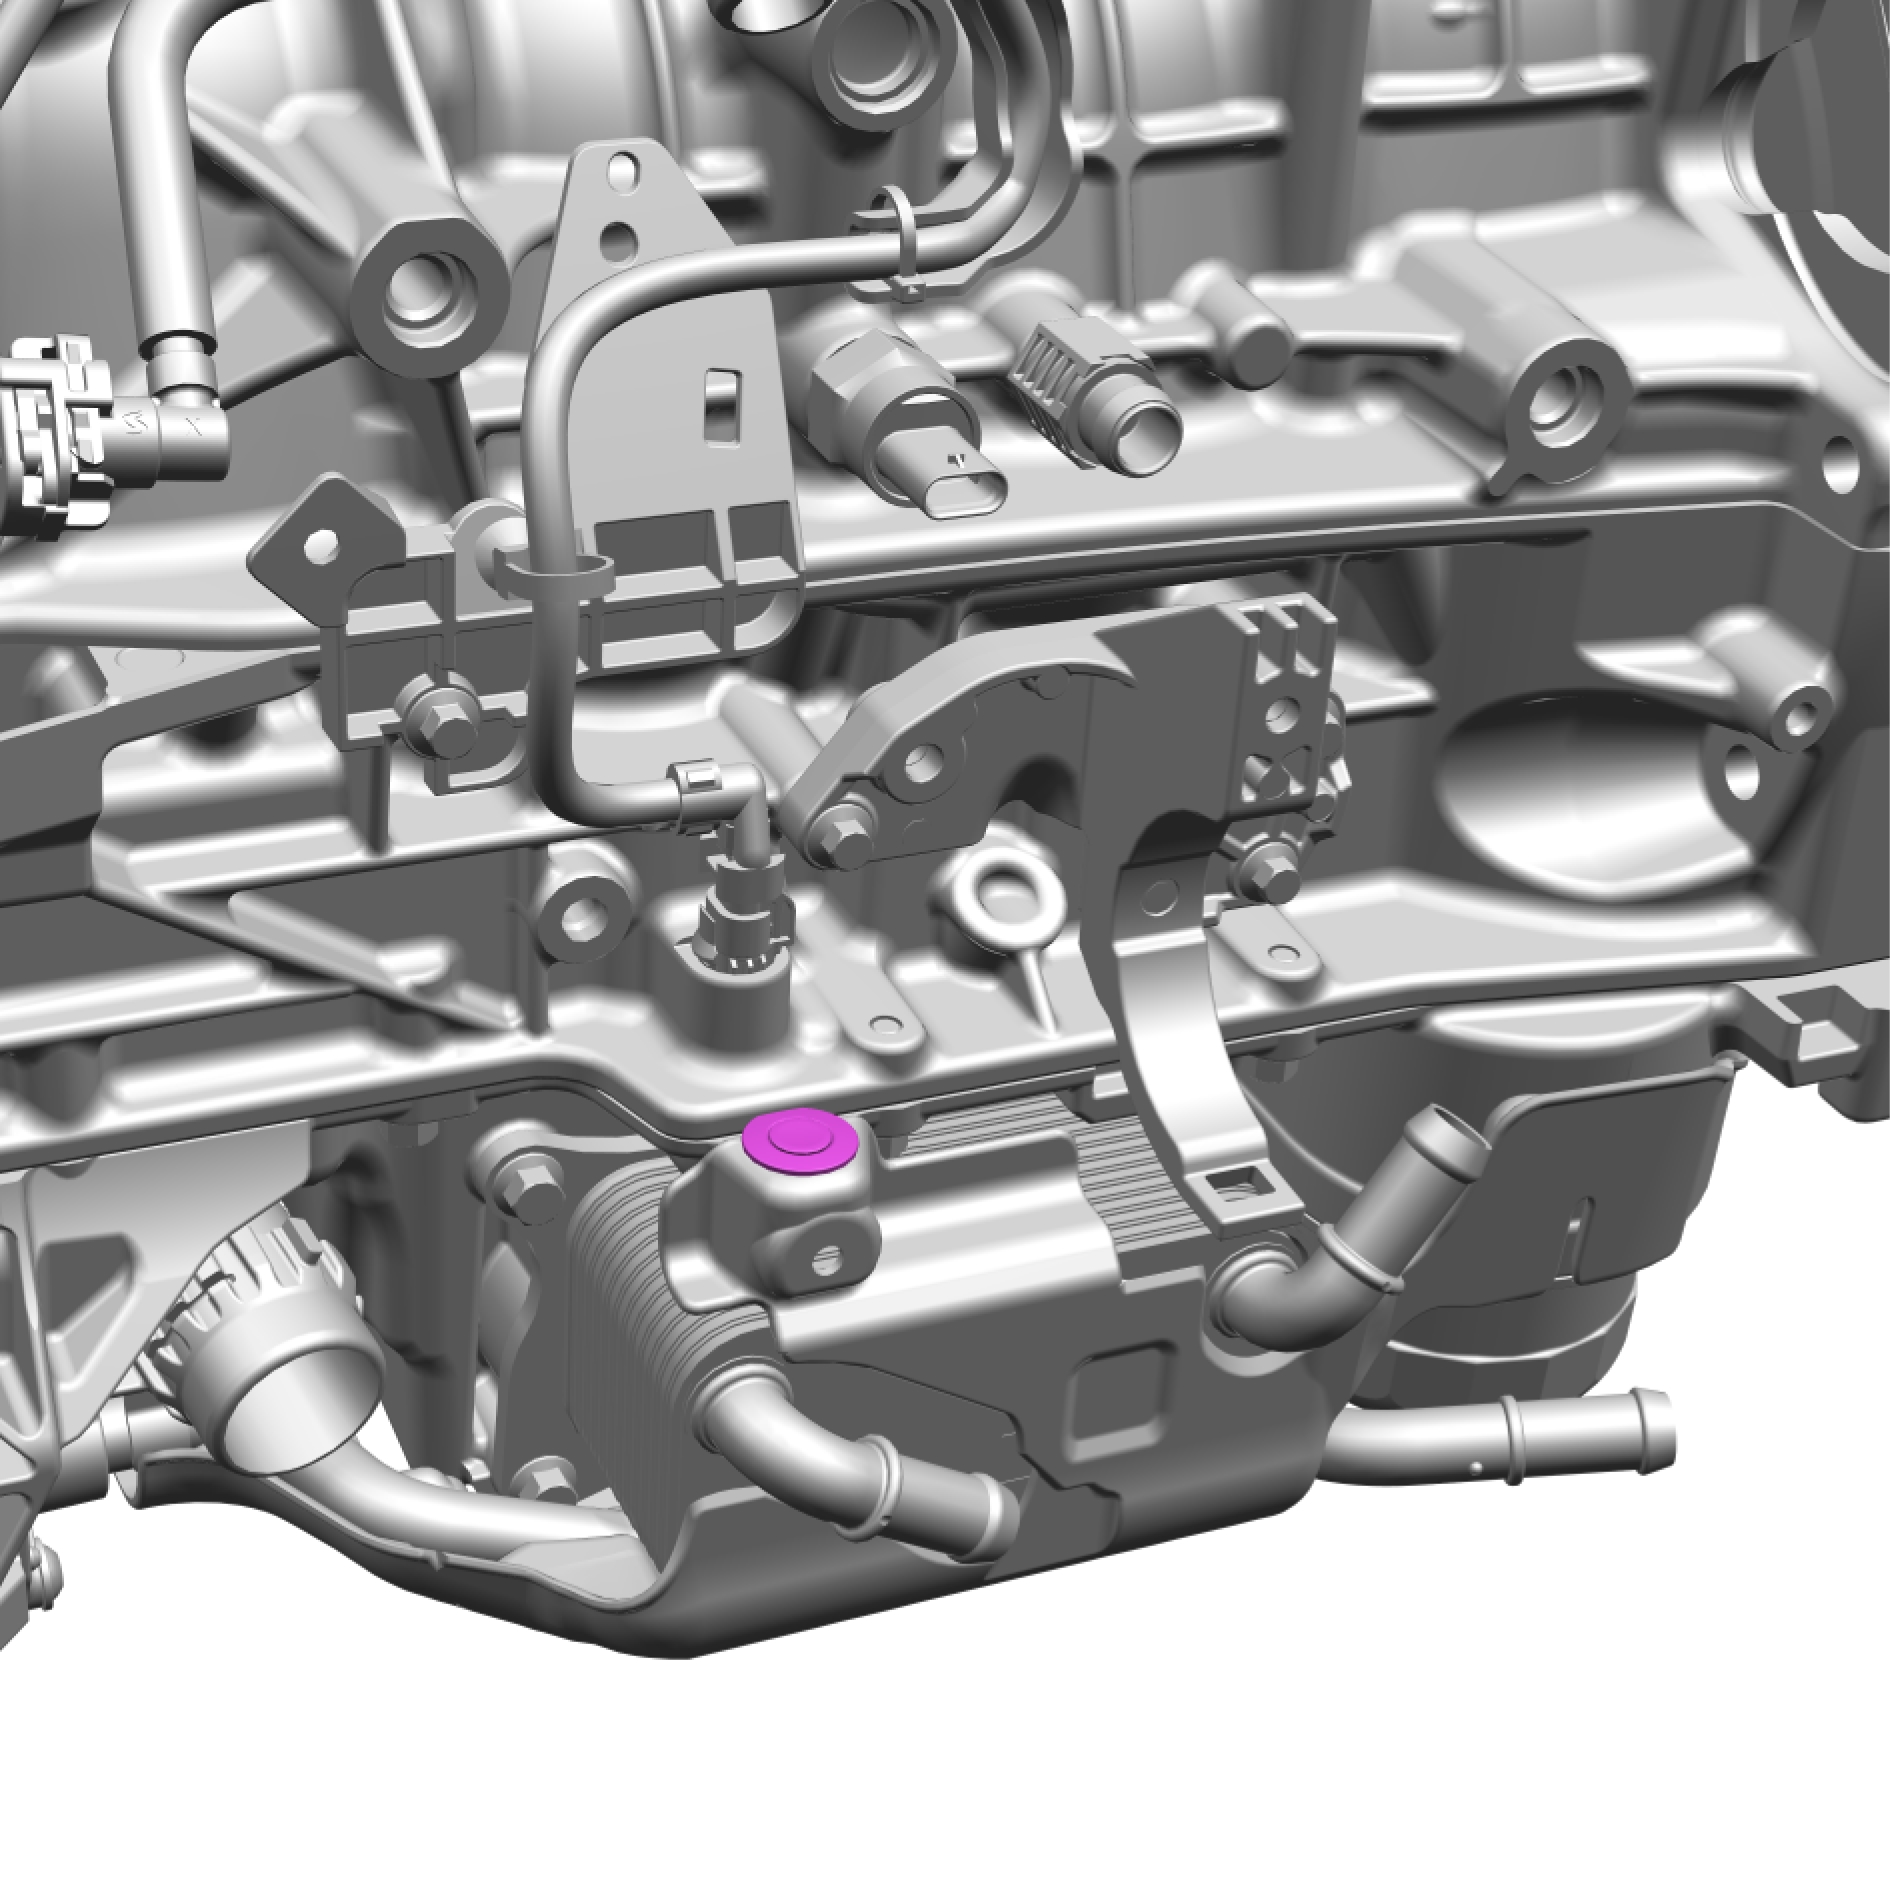
Remove the clip.
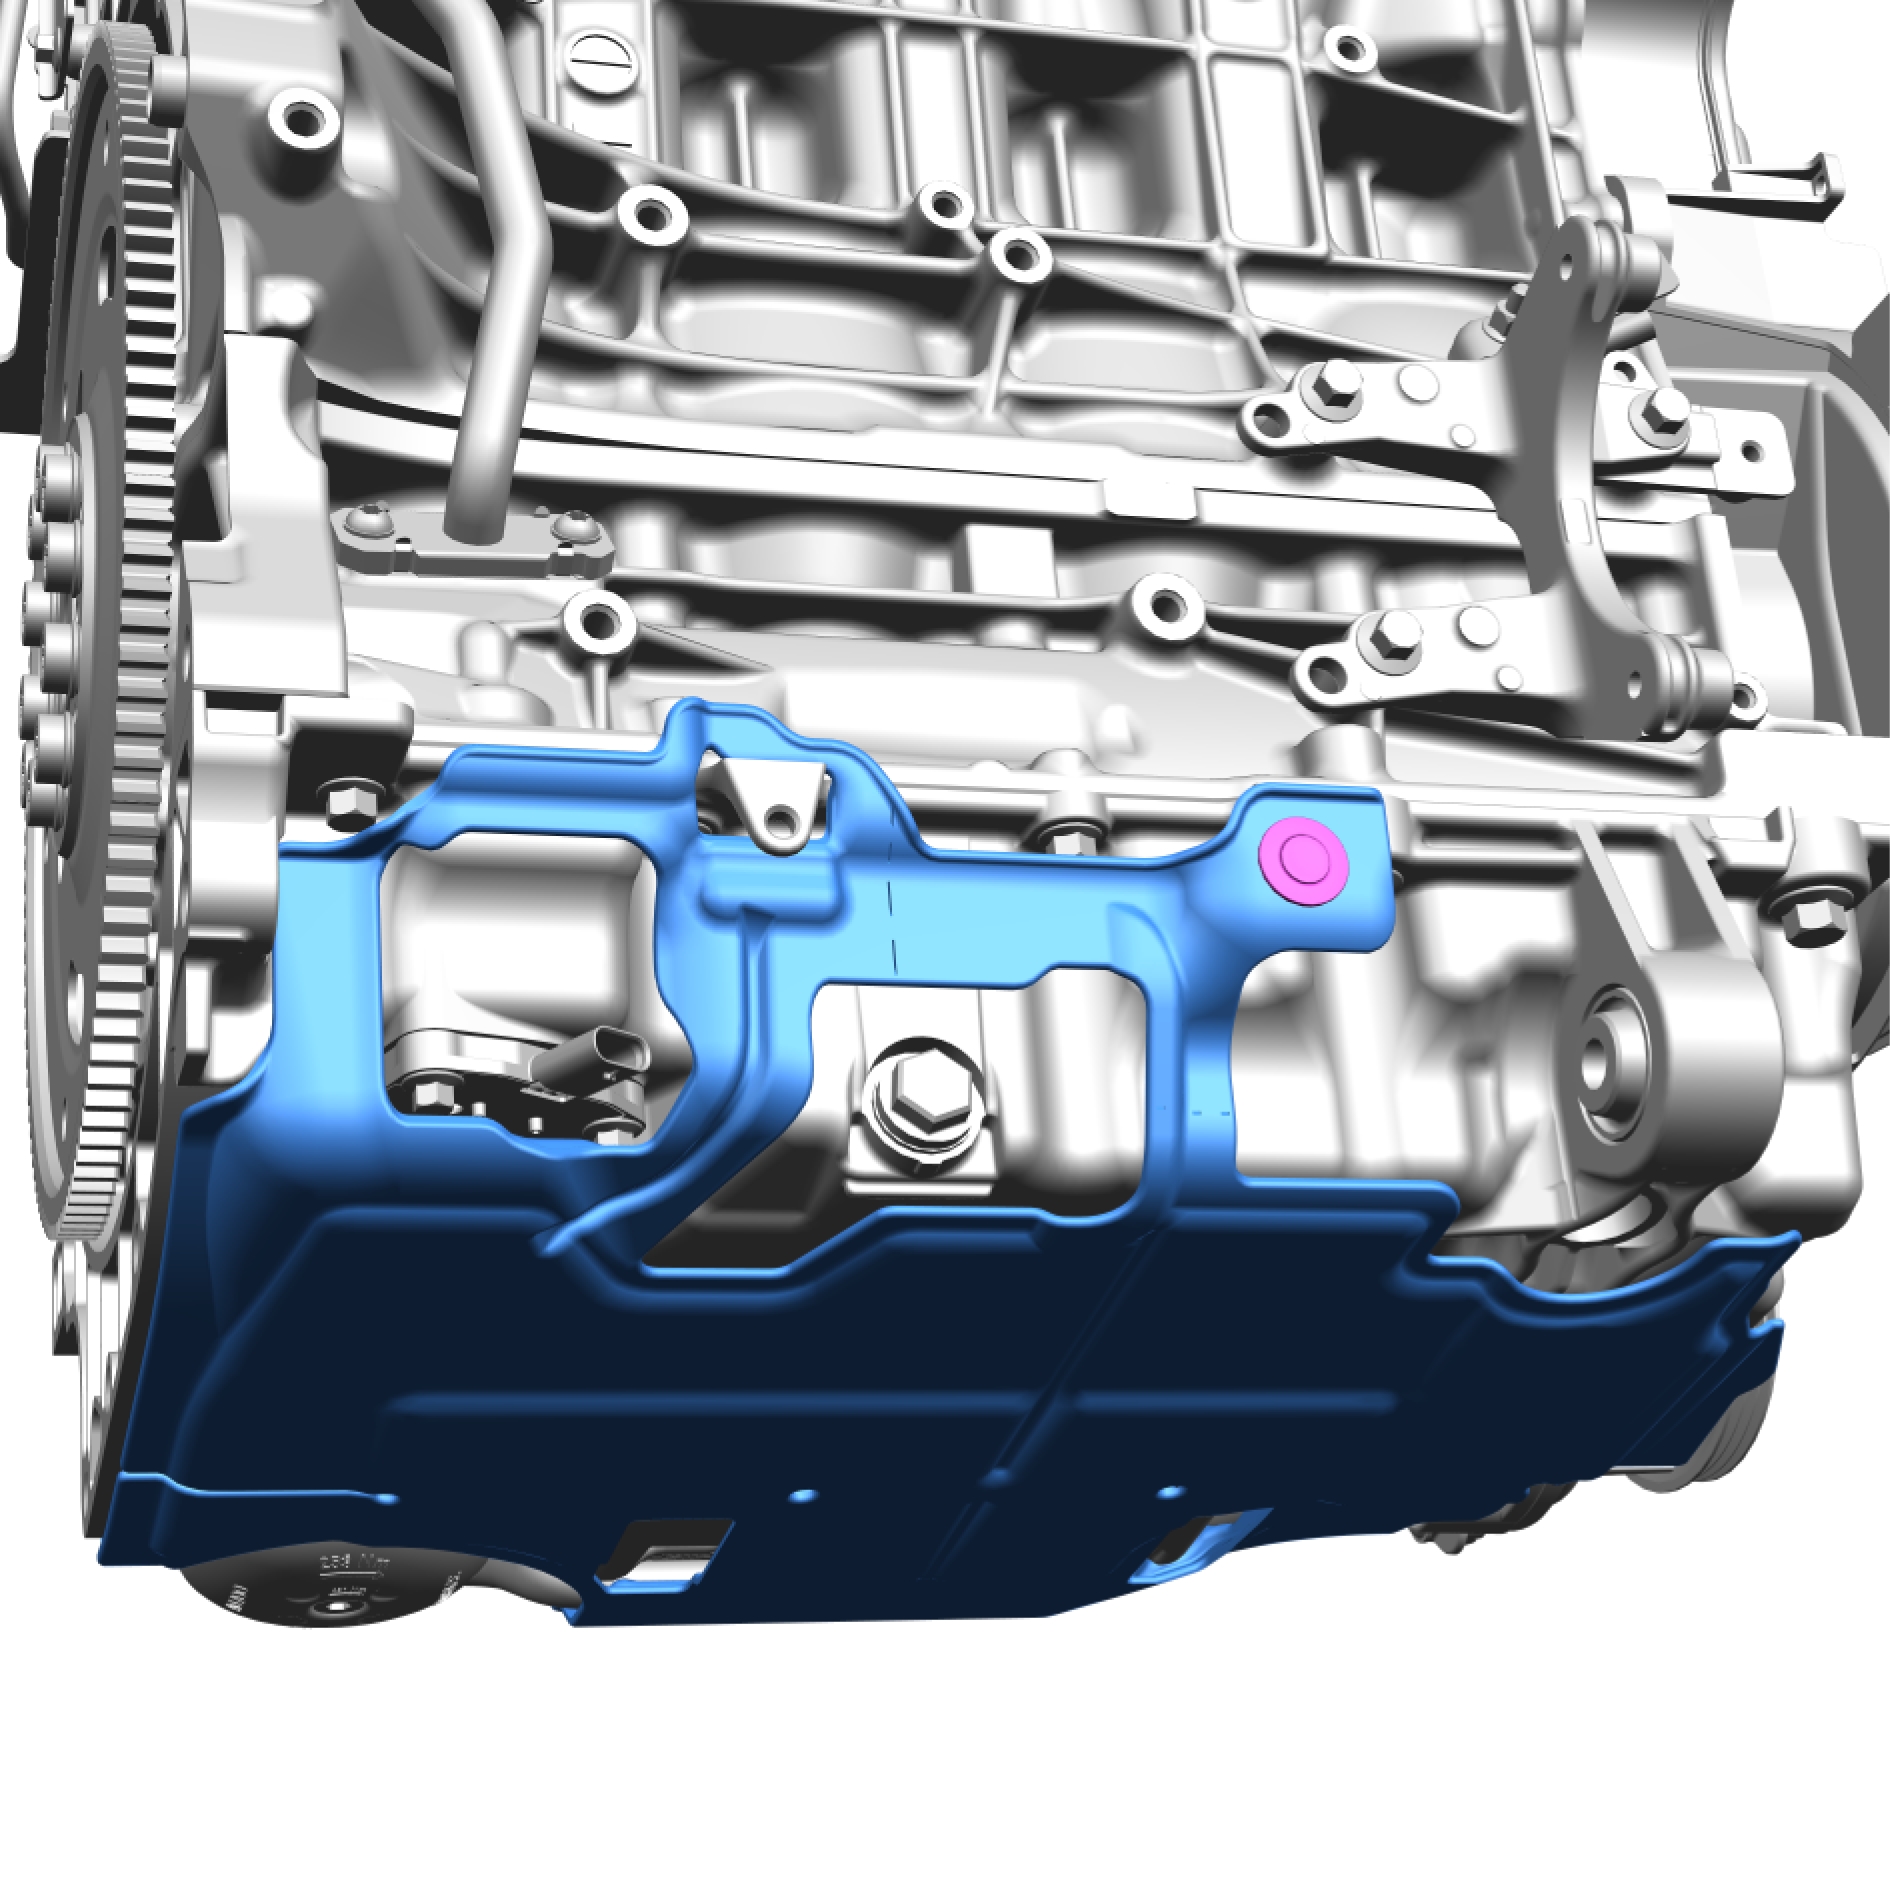
Remove the clip.
Remove the marked component.
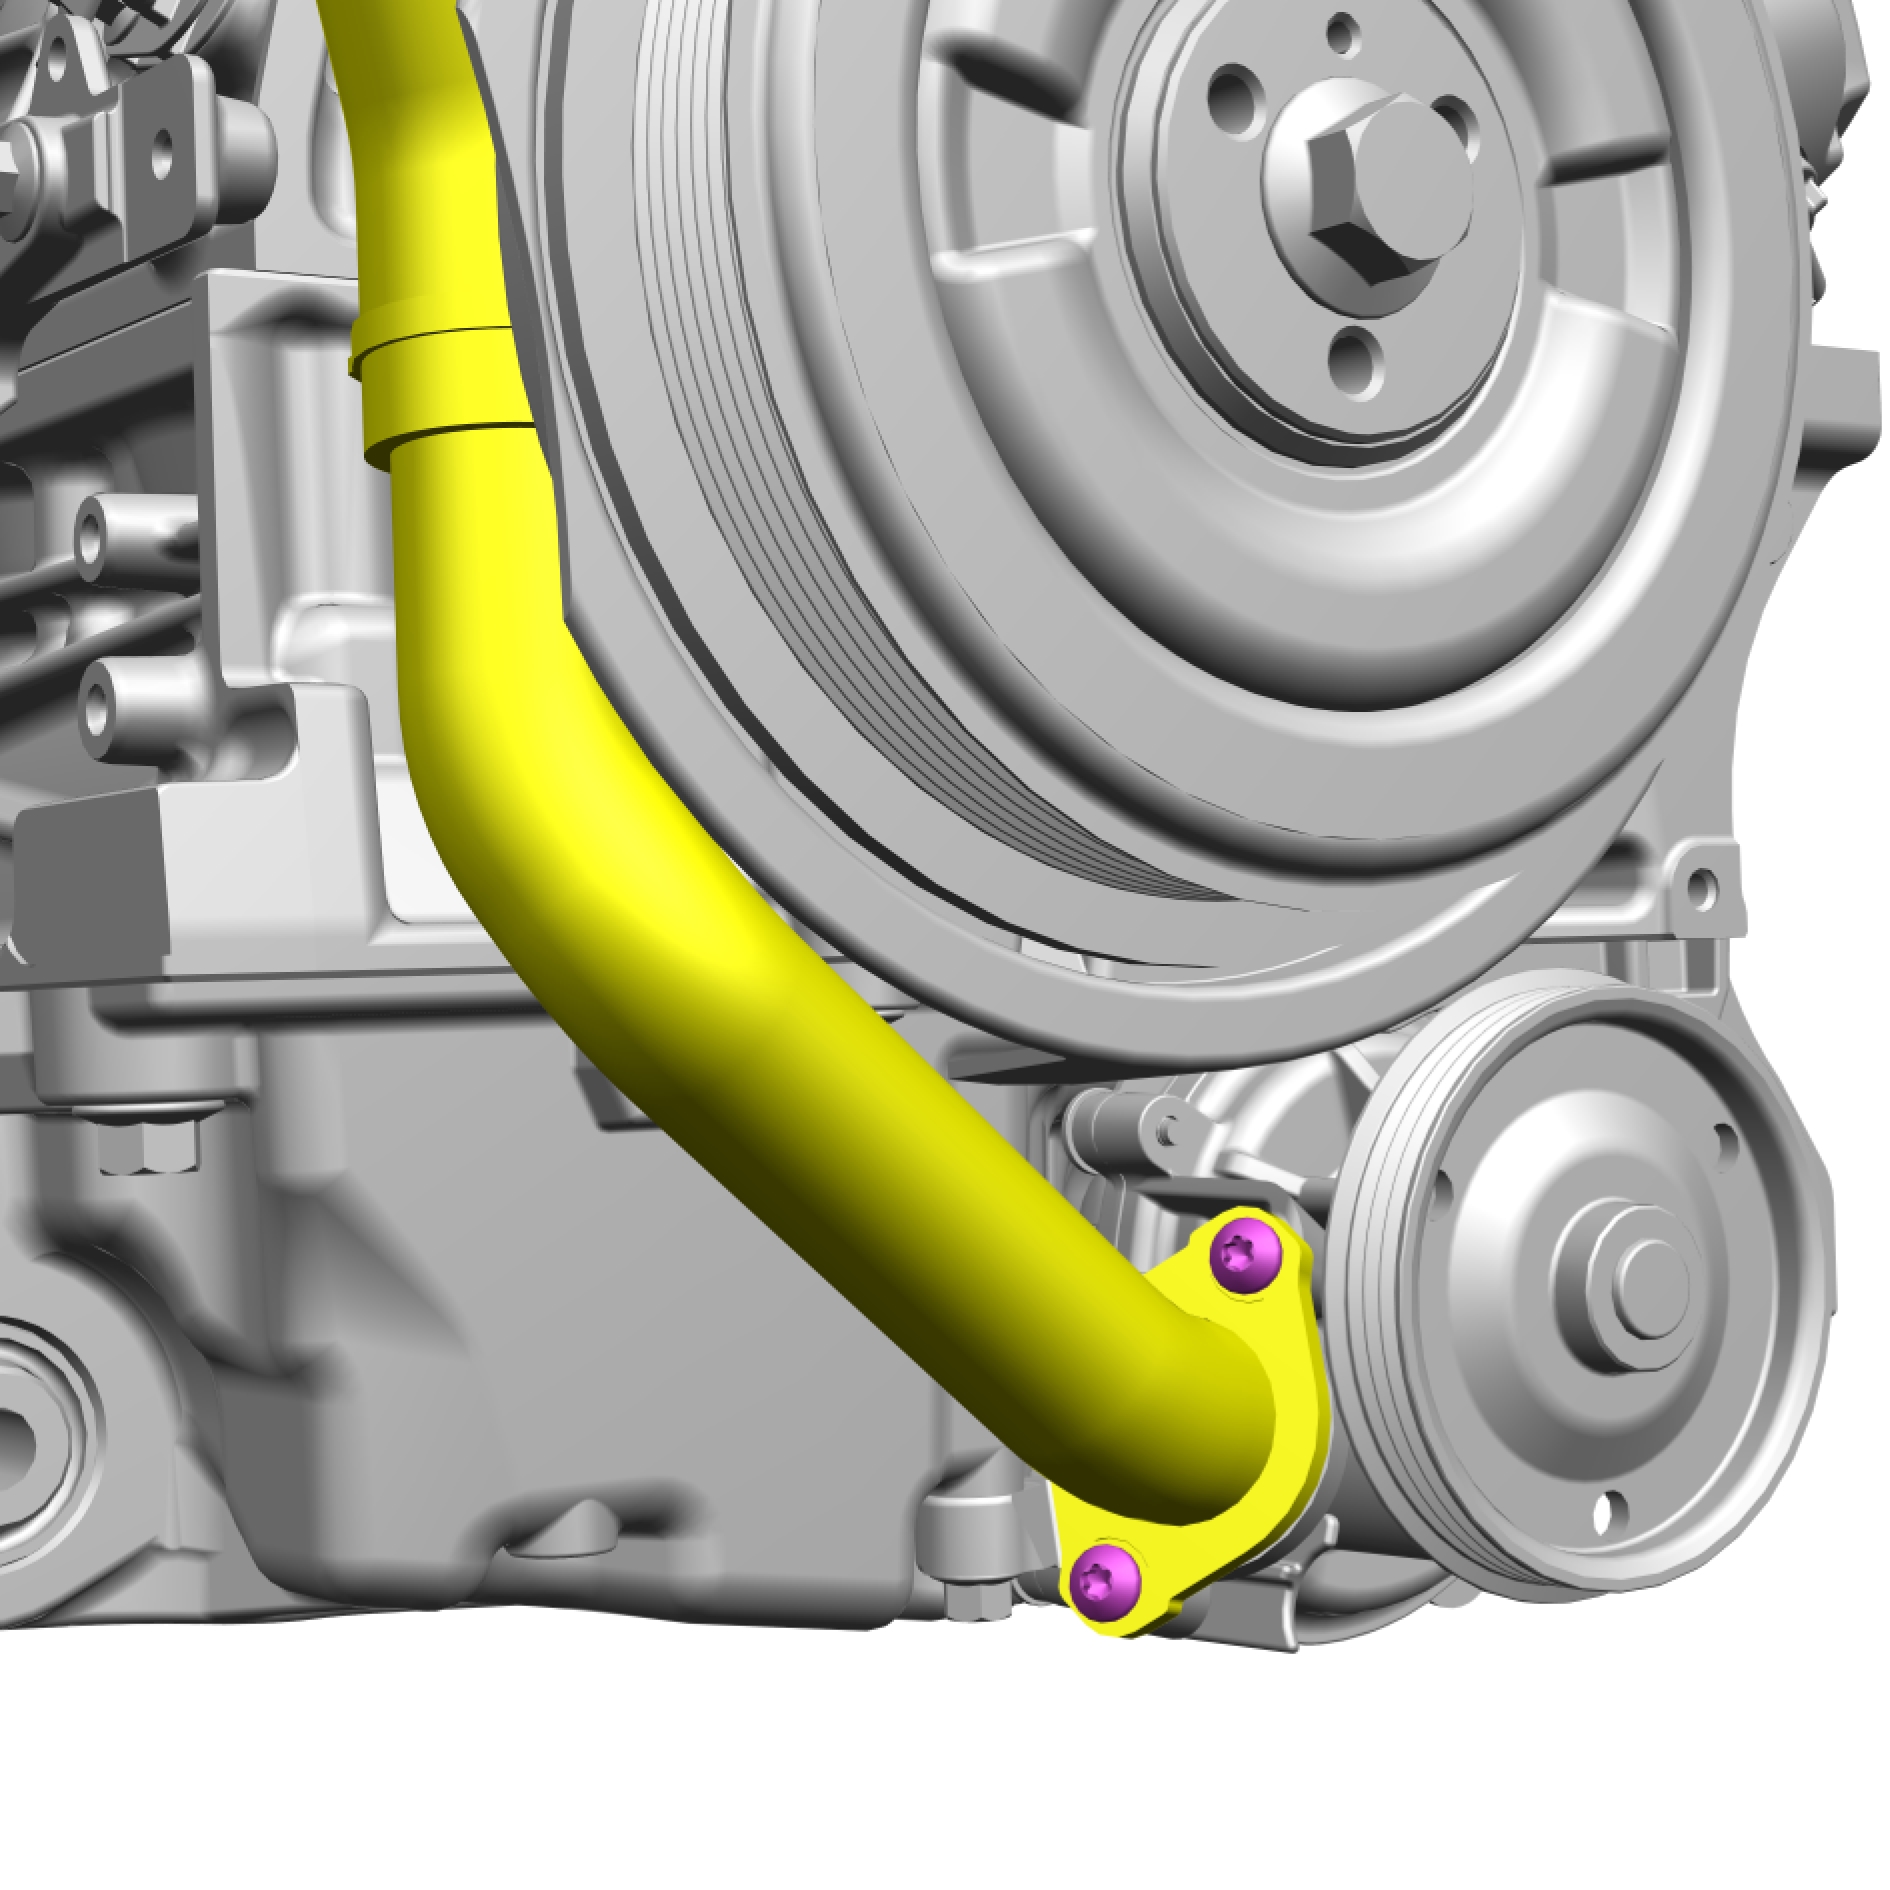
Remove the screws.
Fold away the marked component.
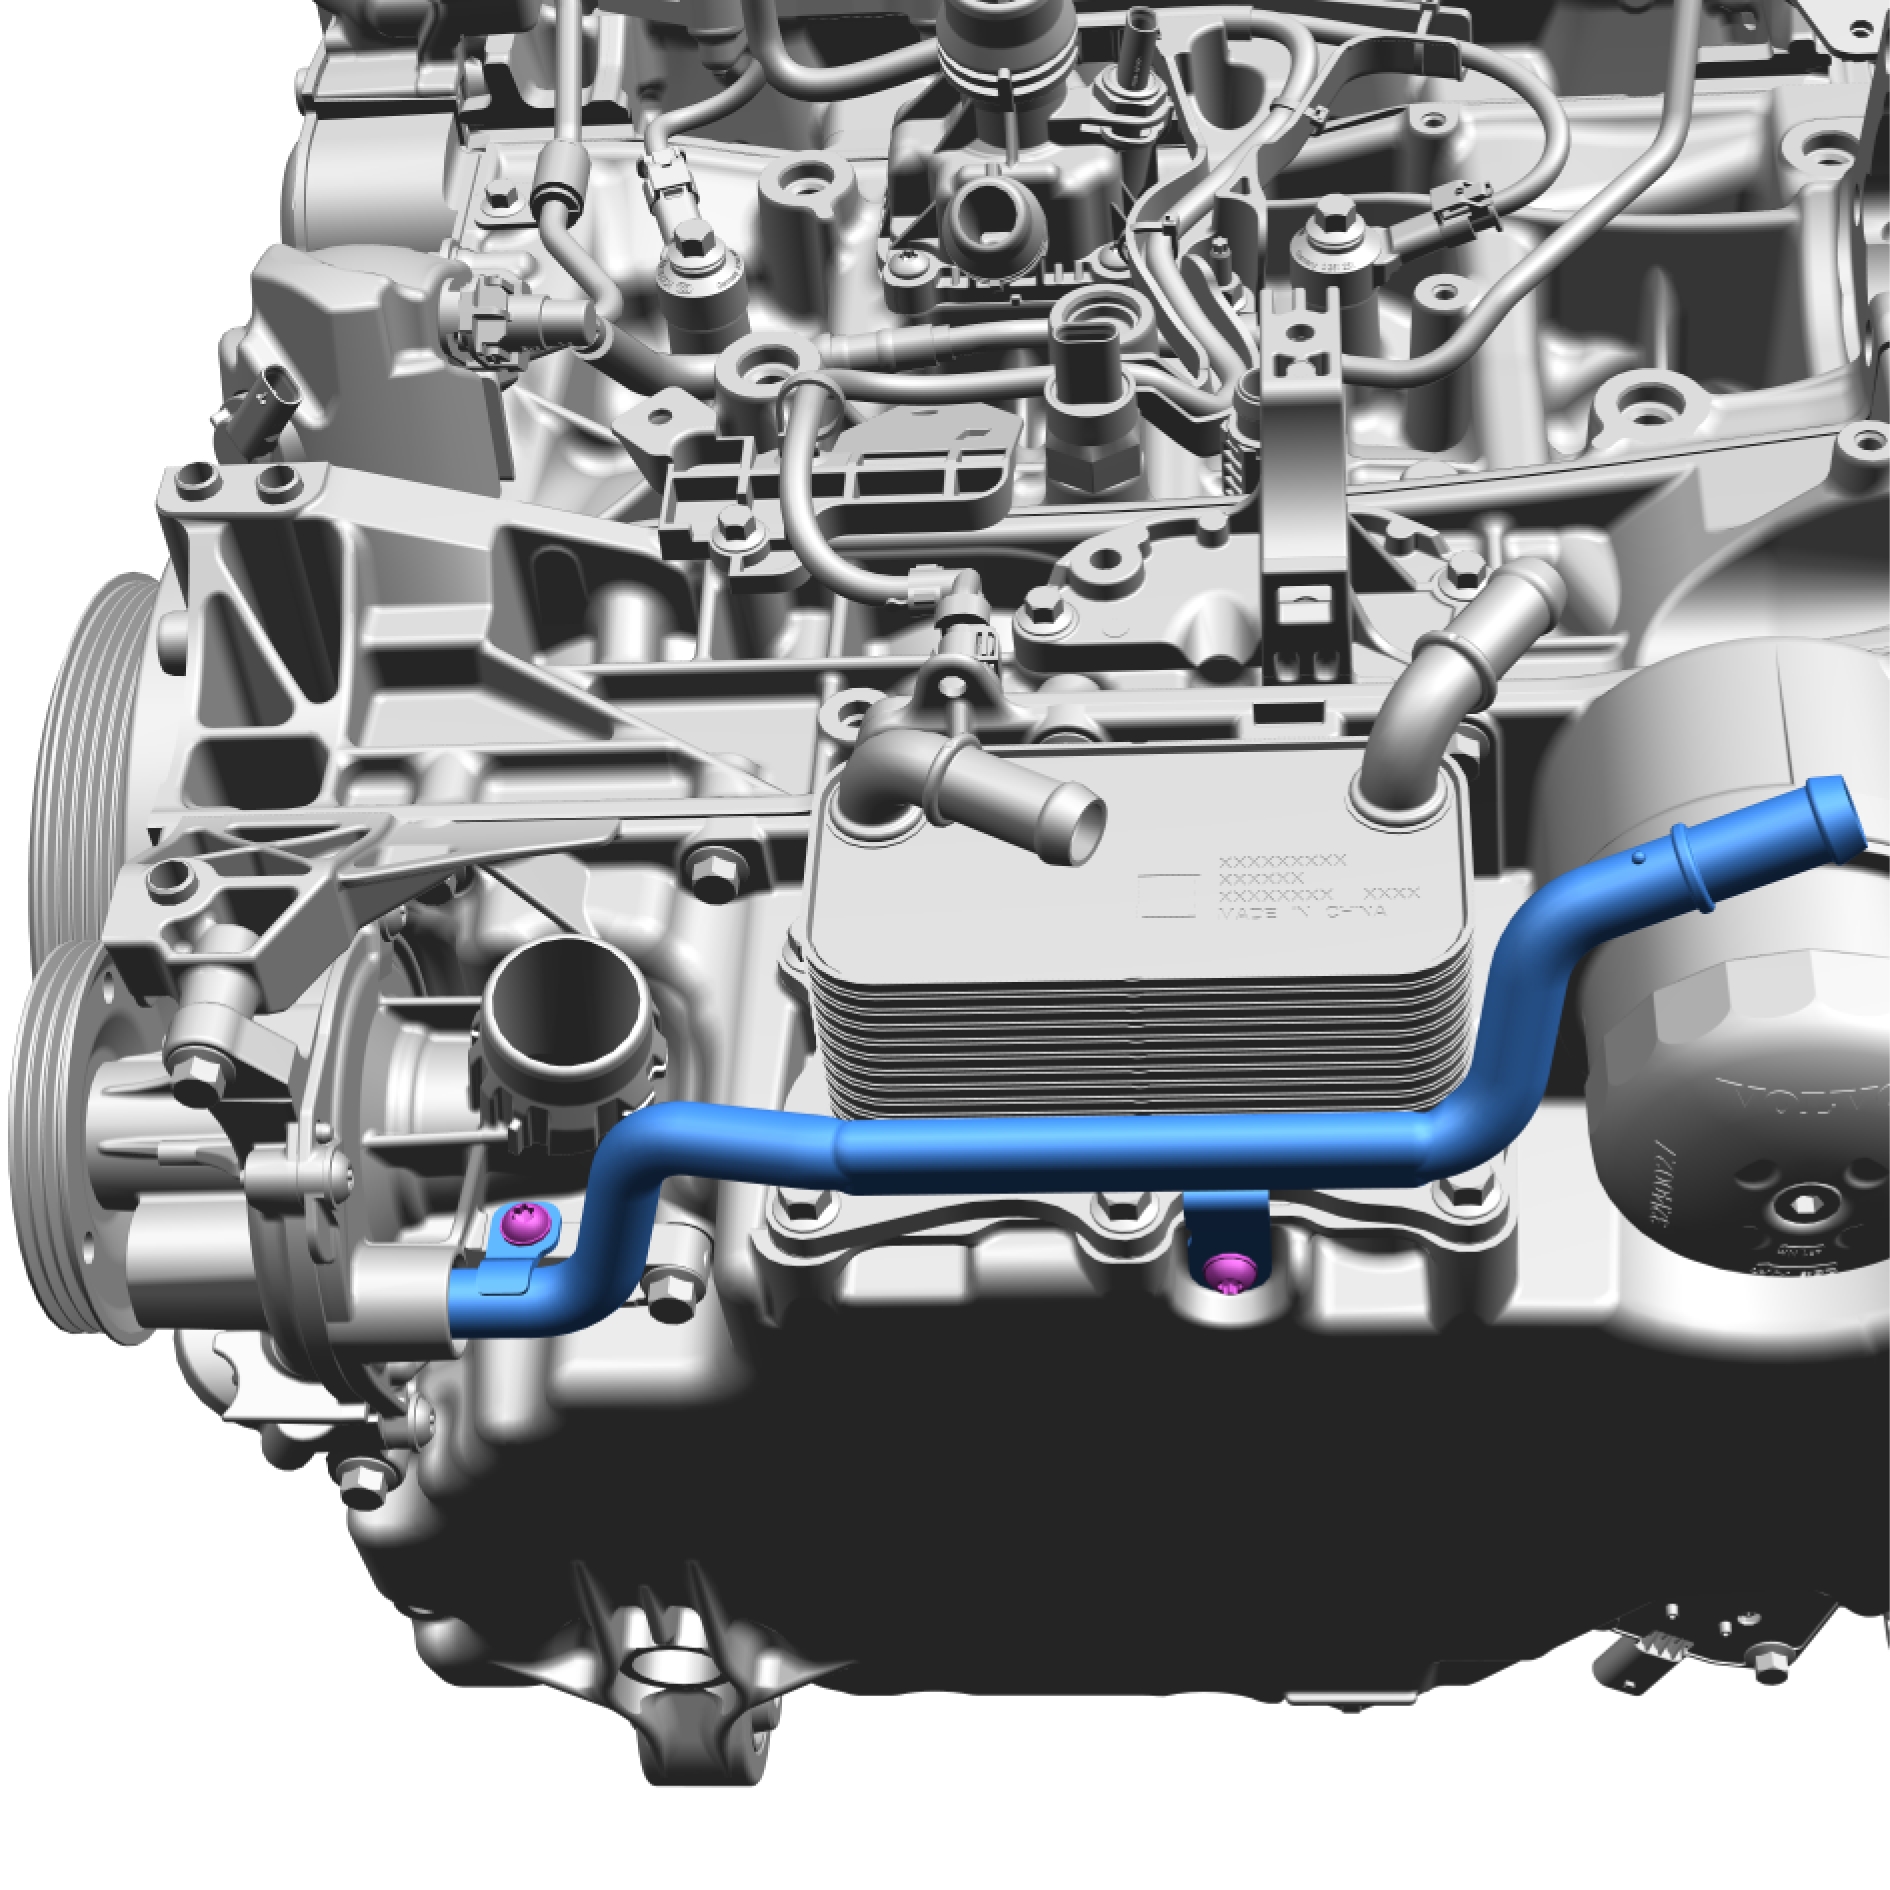
Remove the screws.
Torque: 10 Nm
Remove the marked component.
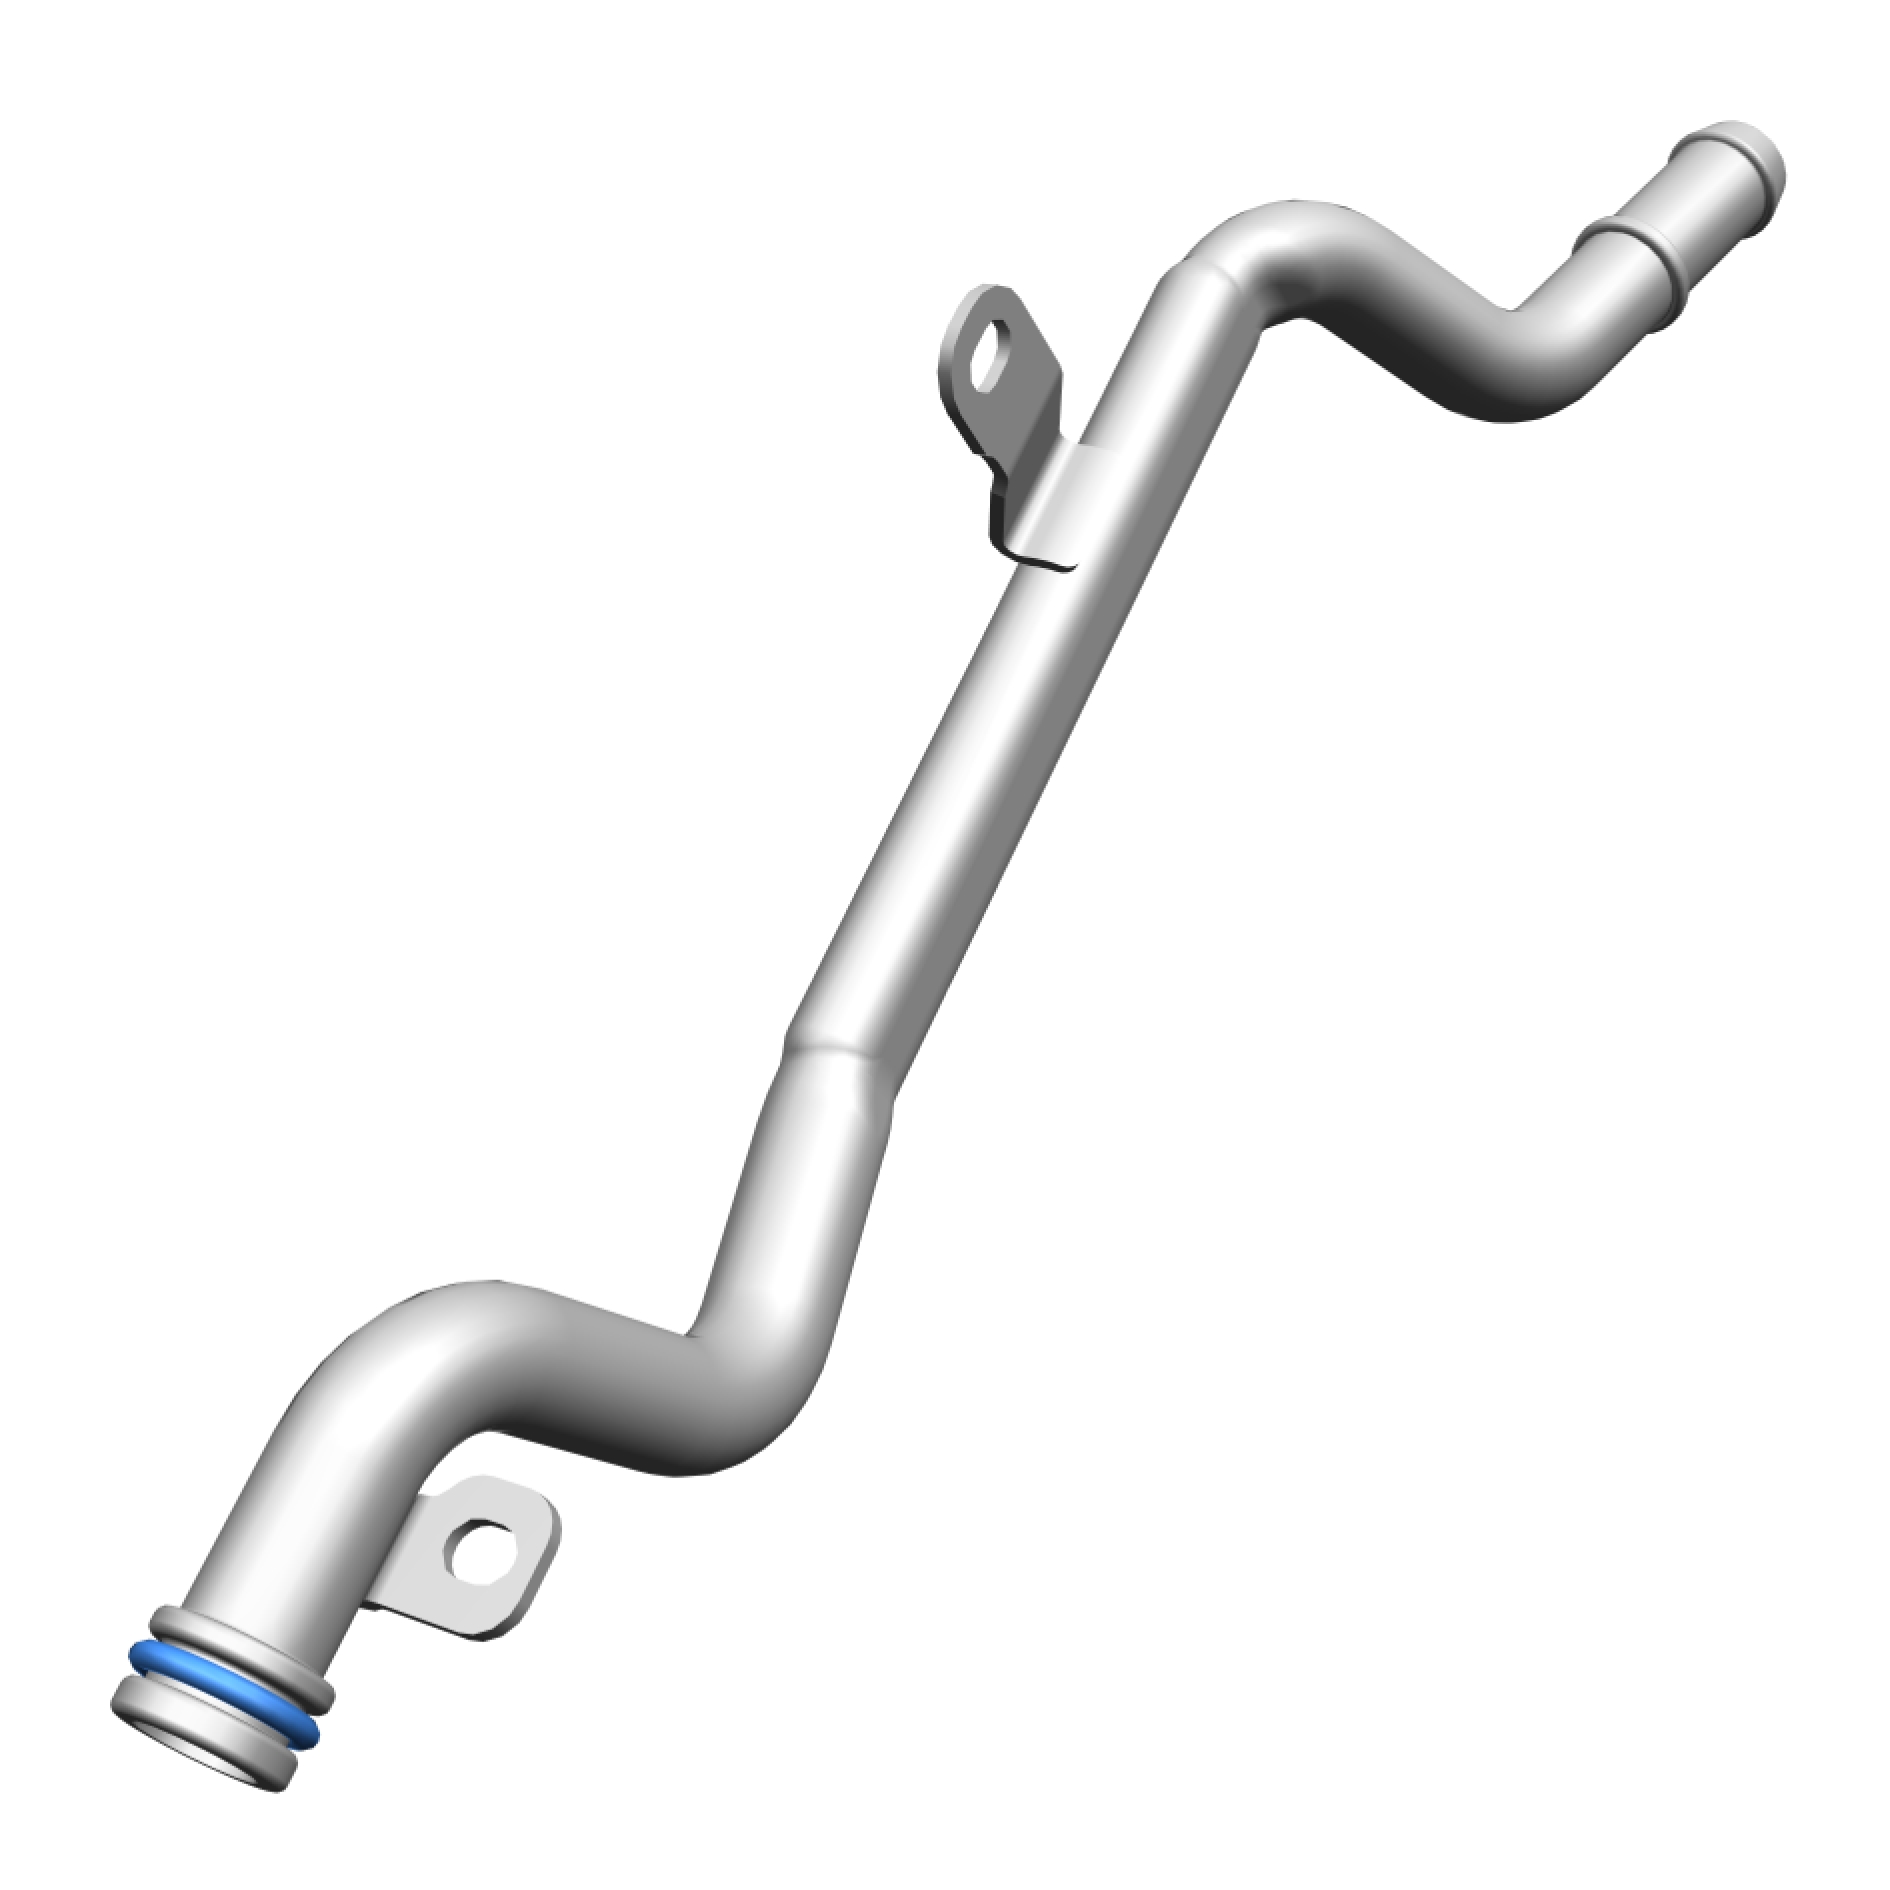
Remove and discard the marked component.
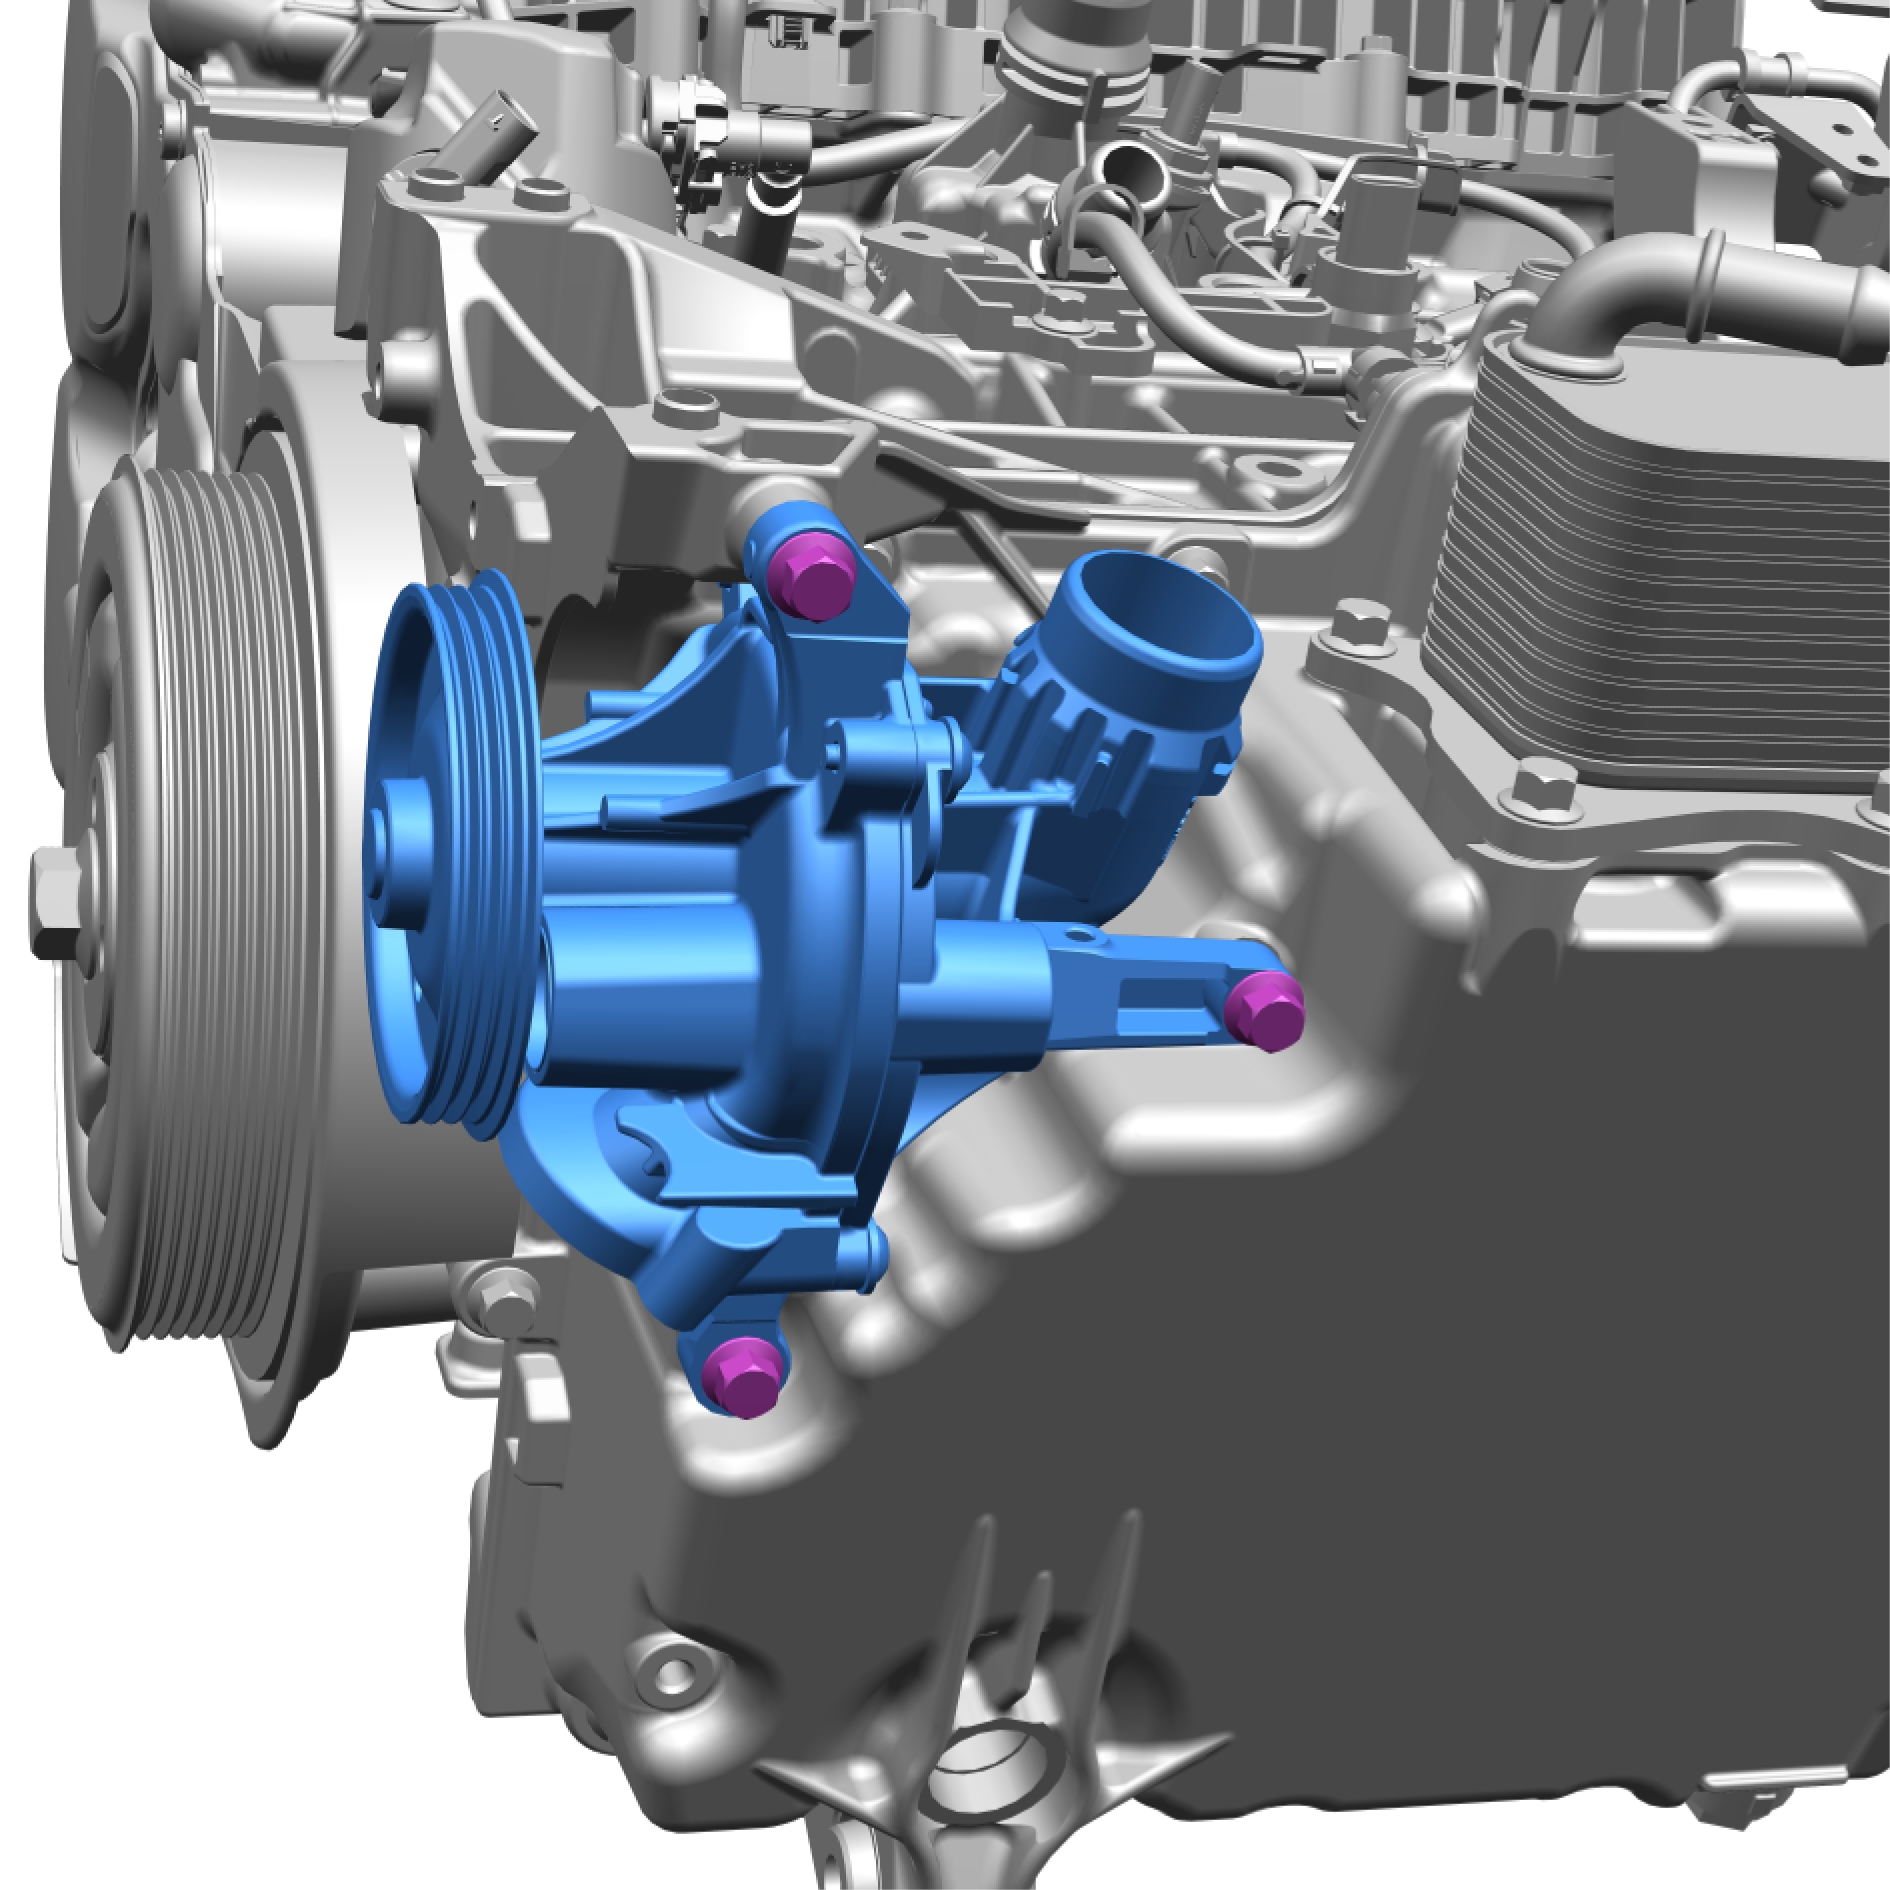
Remove the screws.
Torque: 17 Nm
Remove the marked component.
Installation
Install in reverse order.
Thermostat, replace
Removal
Release the clip.
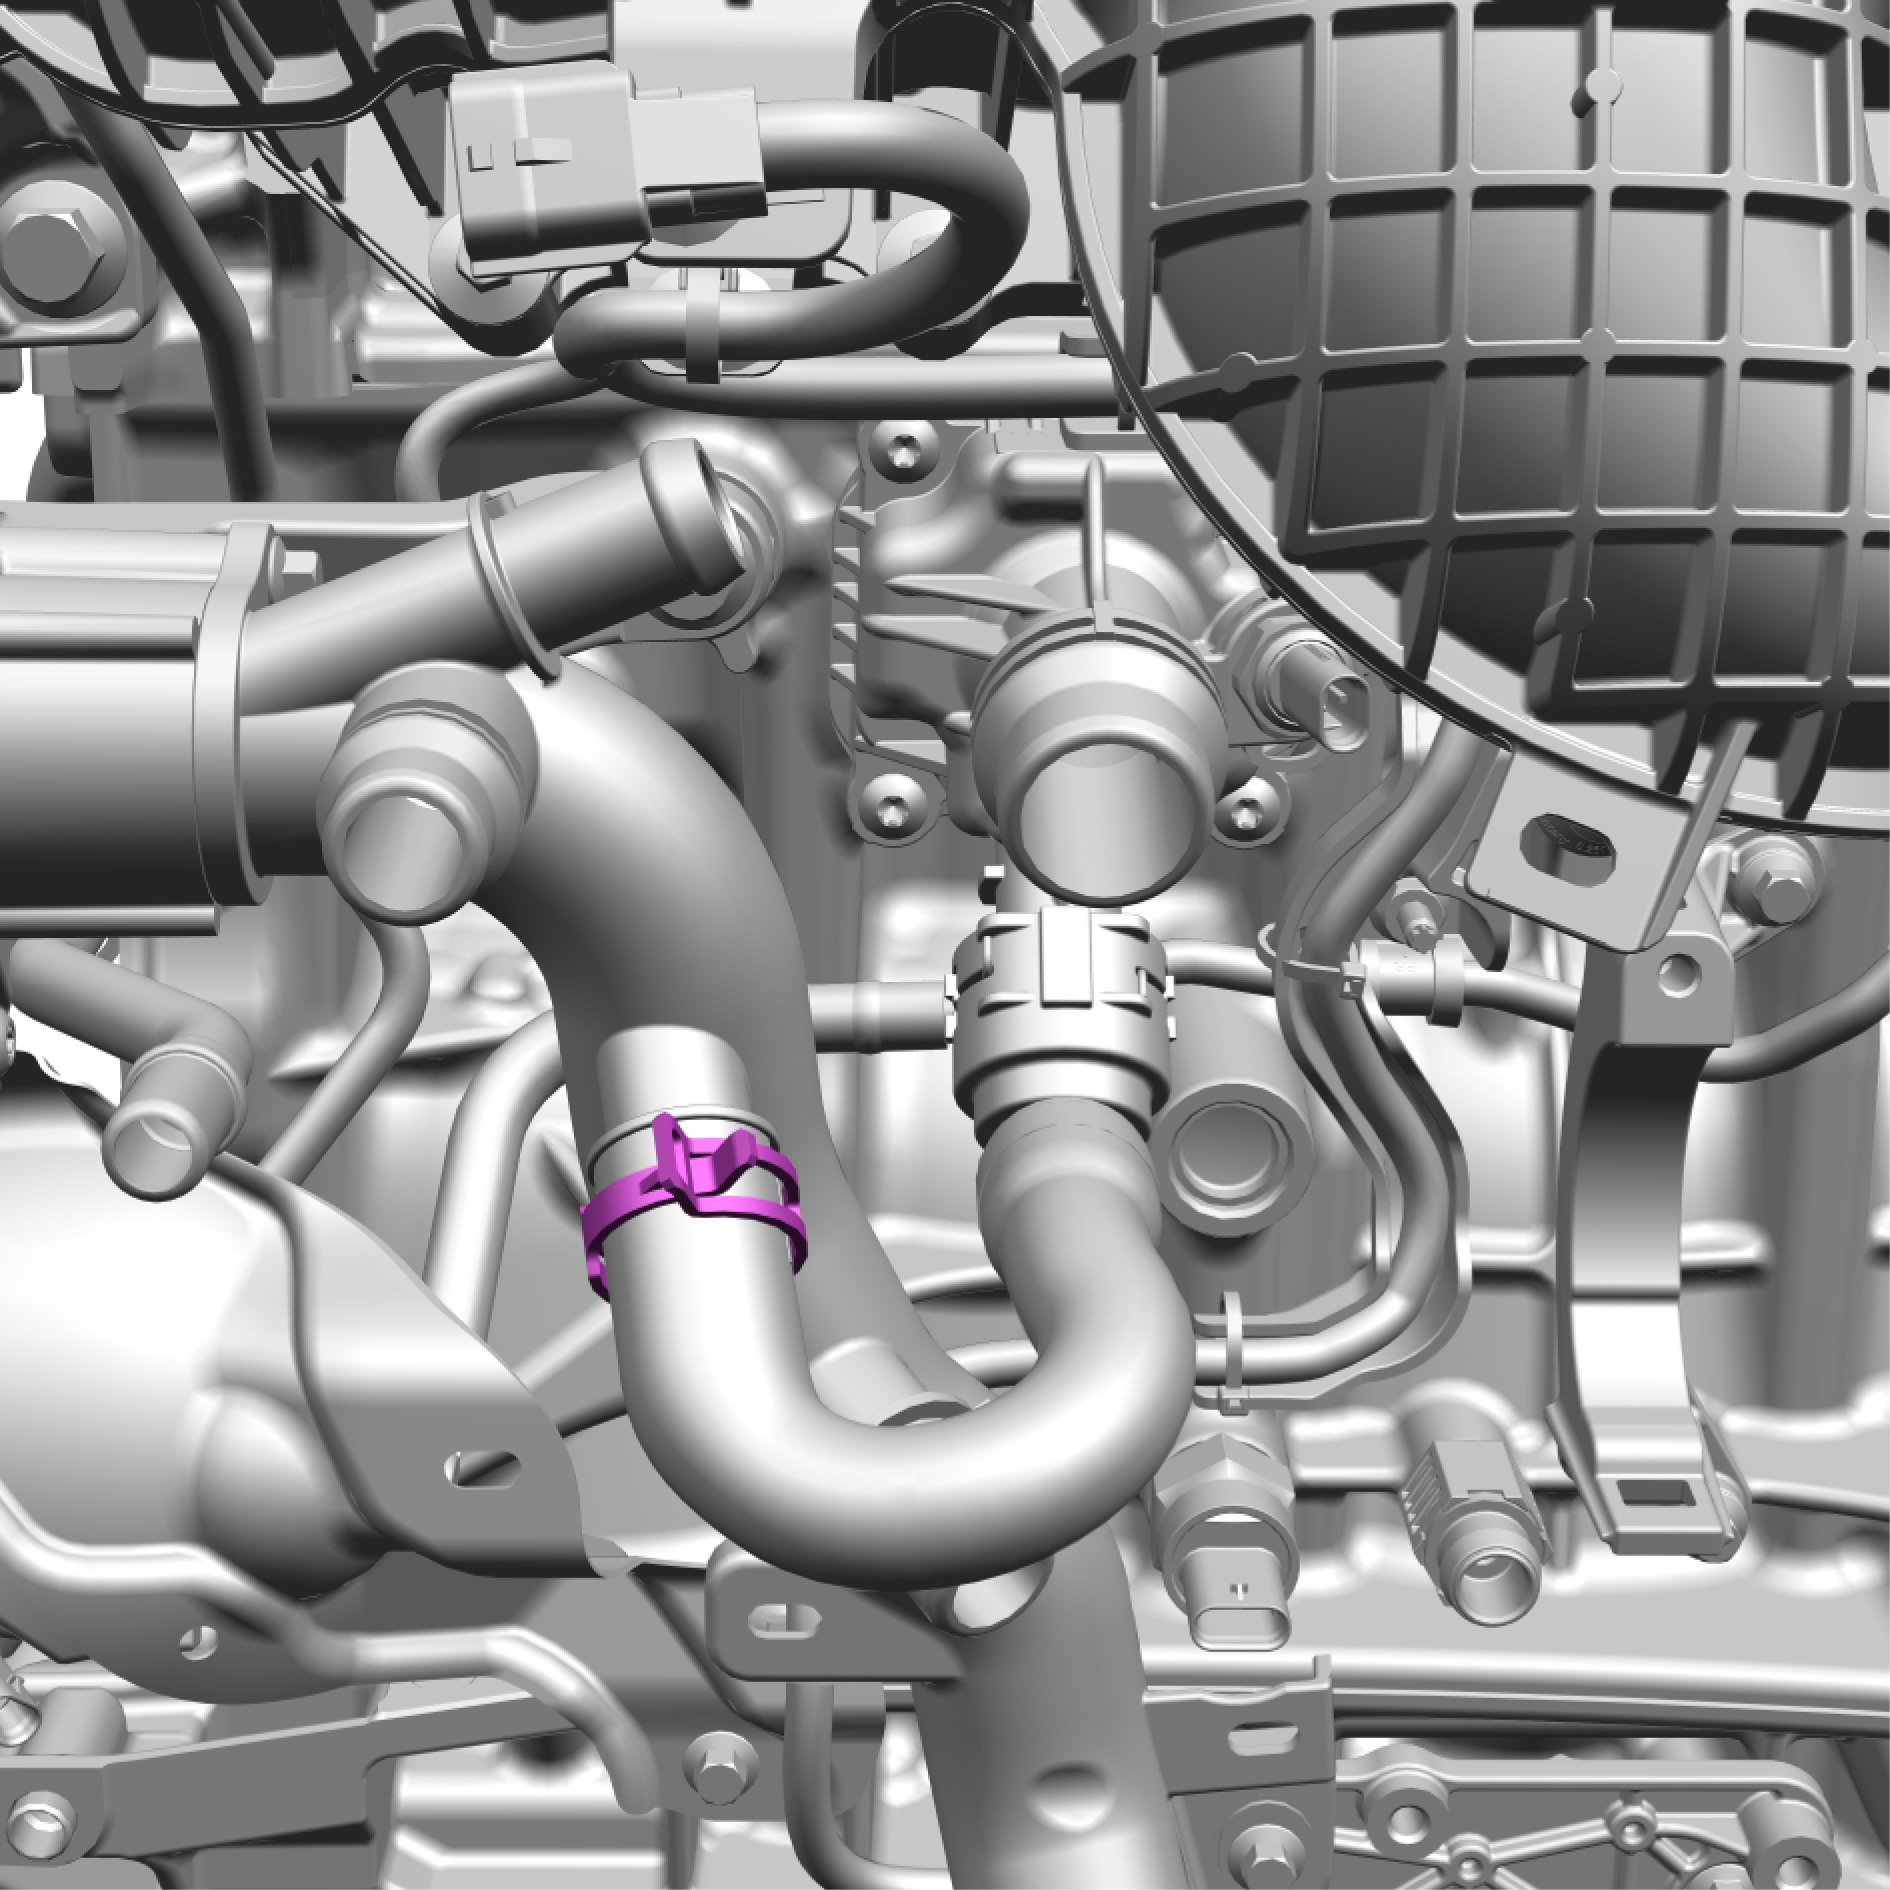
Release the clamp.
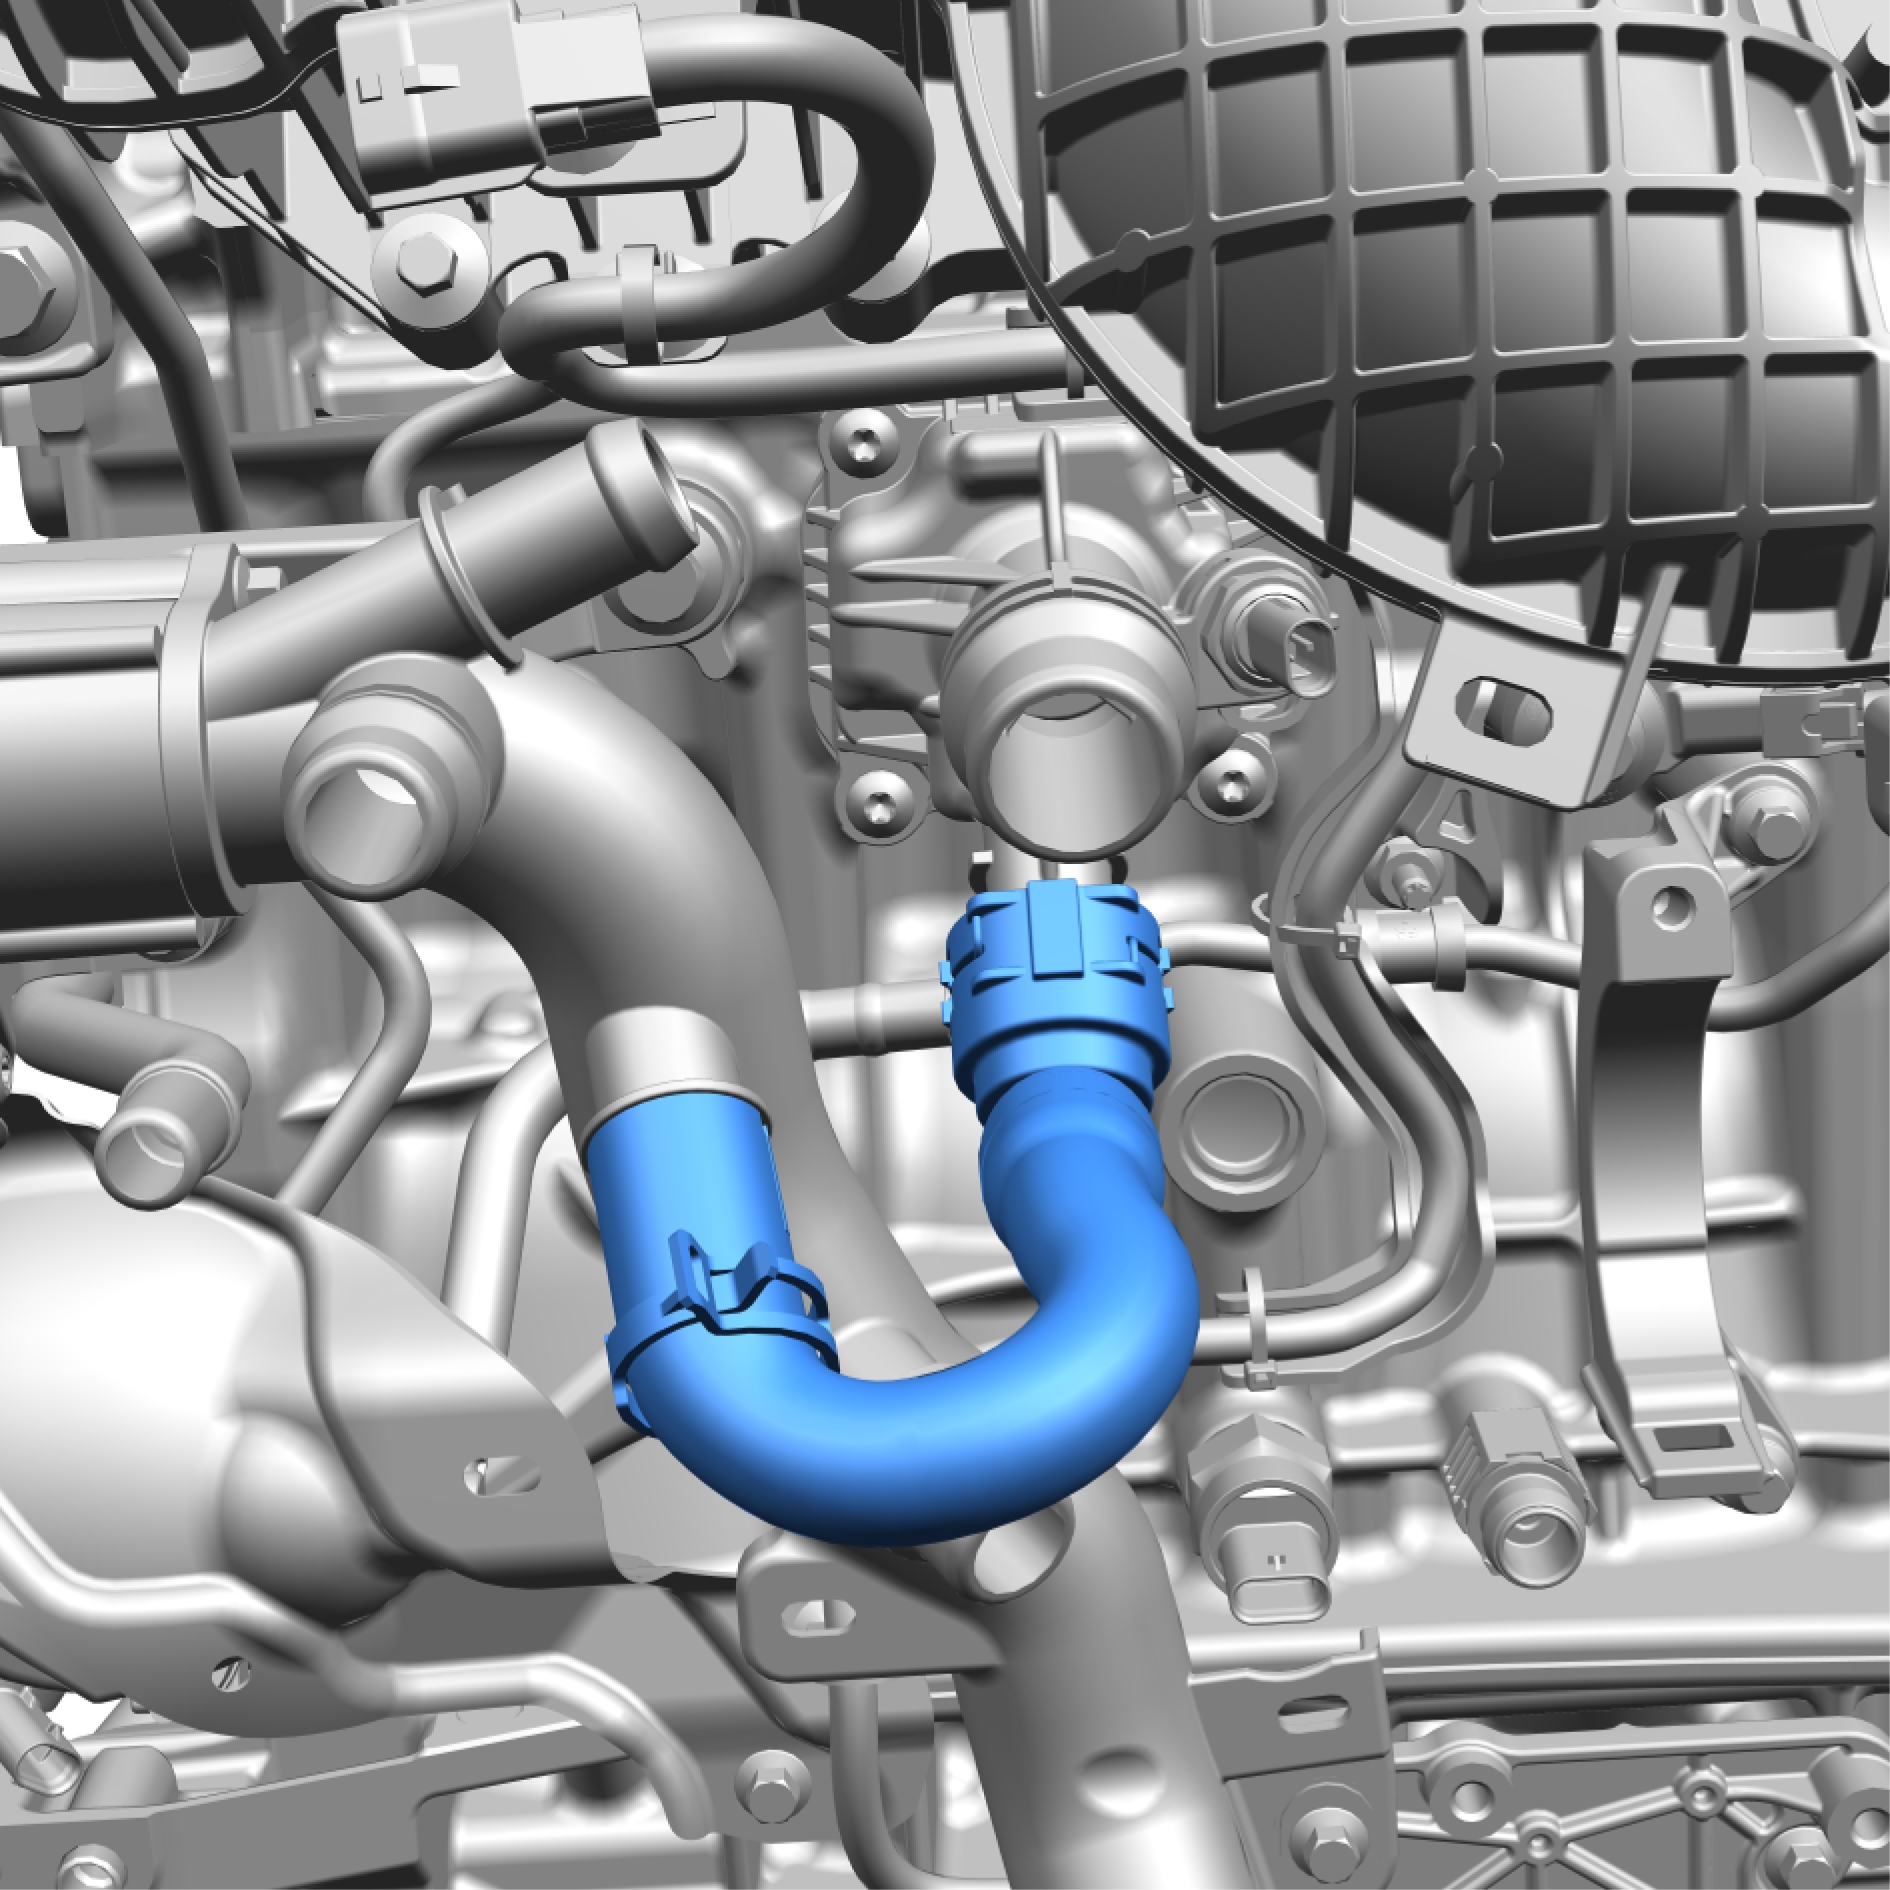
Remove the marked component.
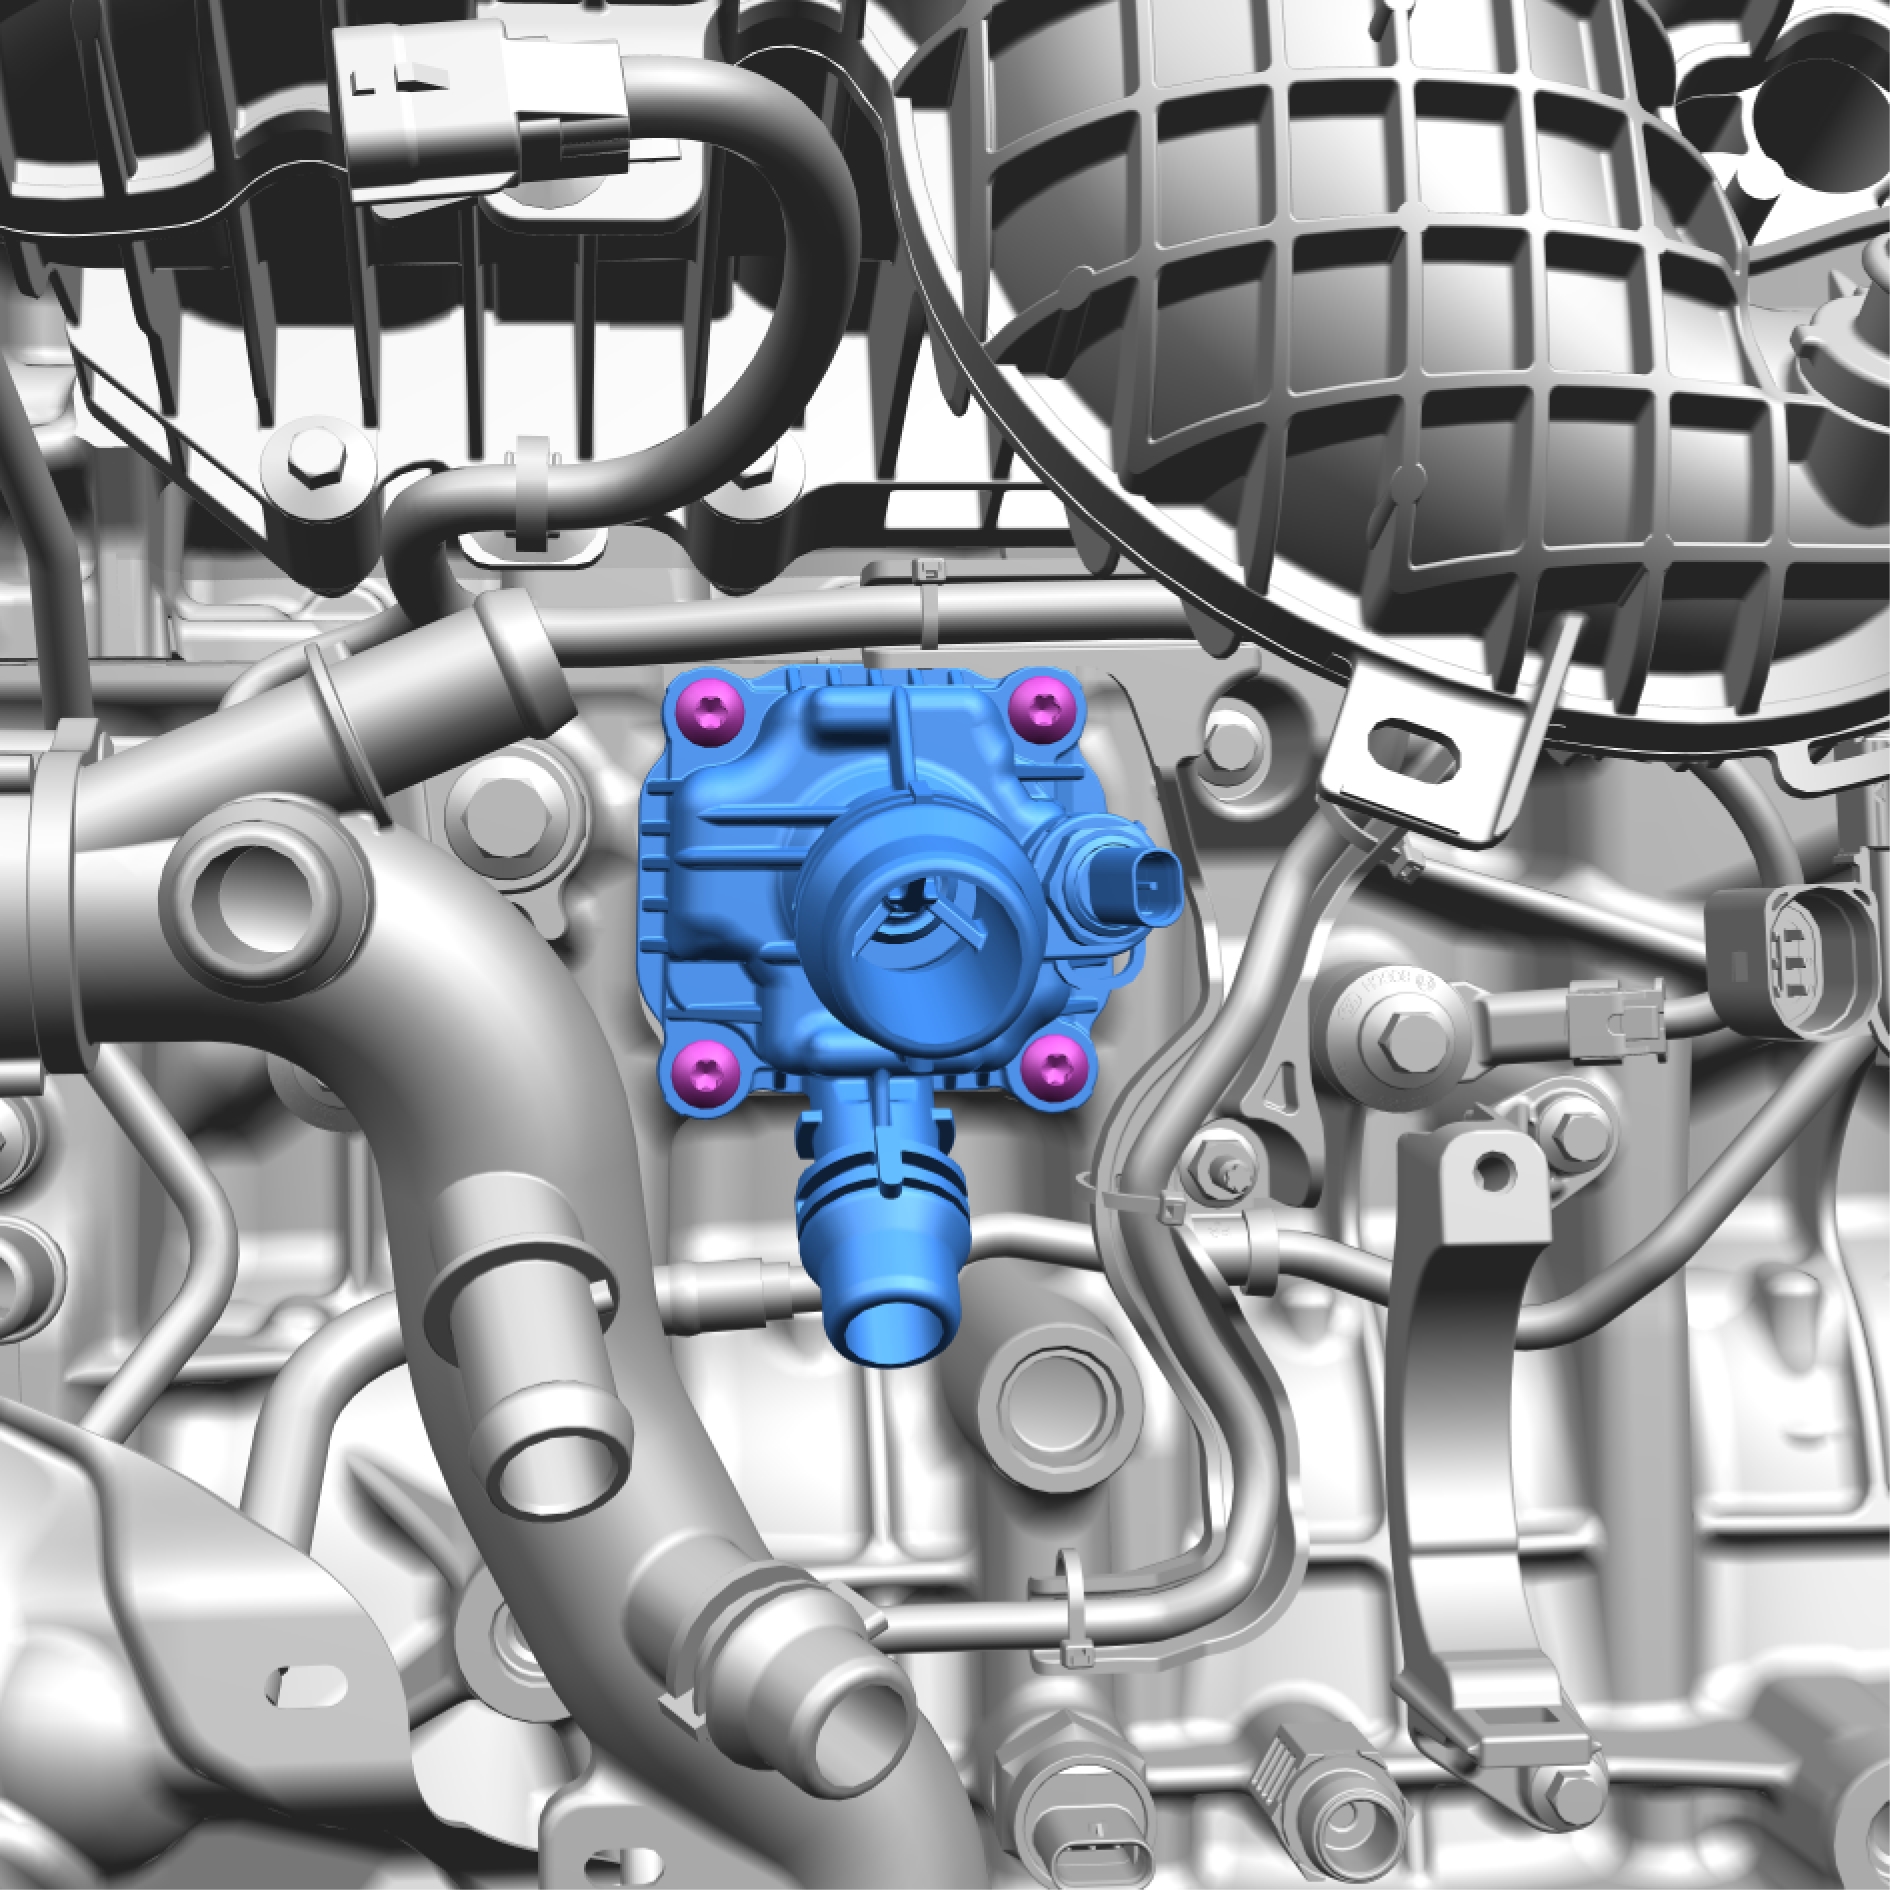
Remove the screws.
Torque: 10 Nm
Remove the marked component.
Installation
Install in reverse order.
Throttle body, replace
Remove the screws.
Torque: 7 Nm
Remove the marked component.
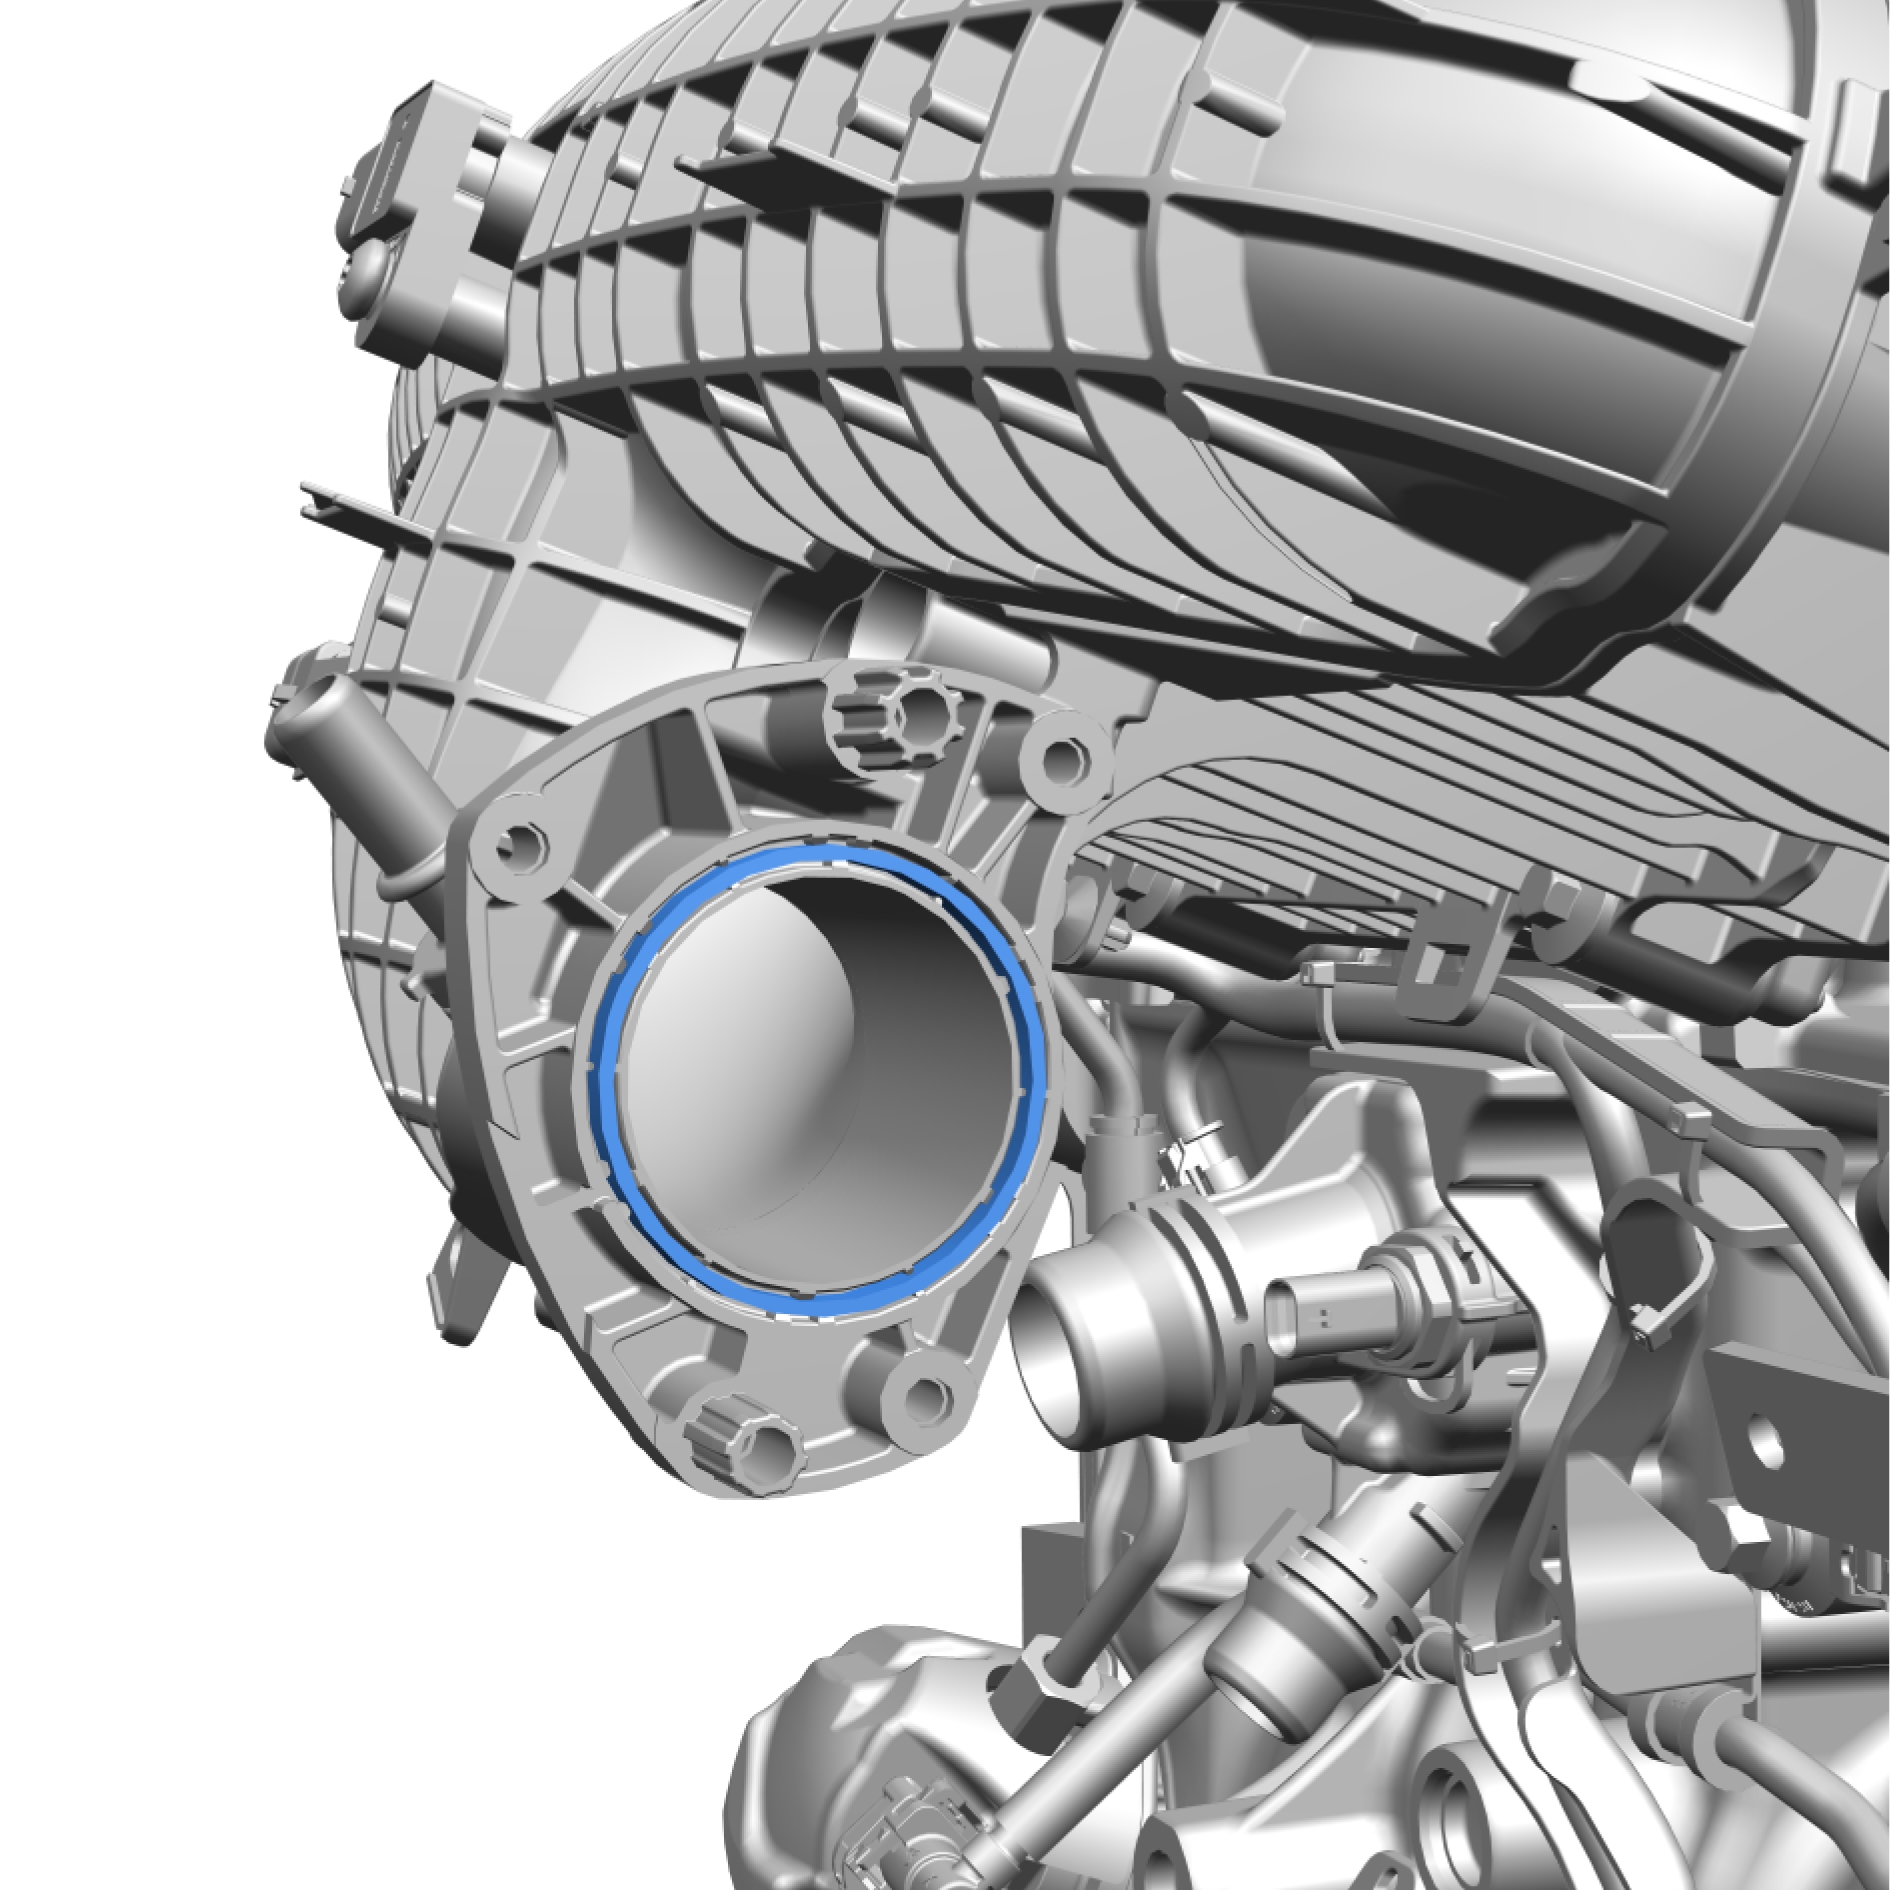
Remove and discard the marked component.
Installation
Install in reverse order.
Level sensor engine oil, replace
Removal
Remove the clip.
Remove the clip.
Remove the marked component.
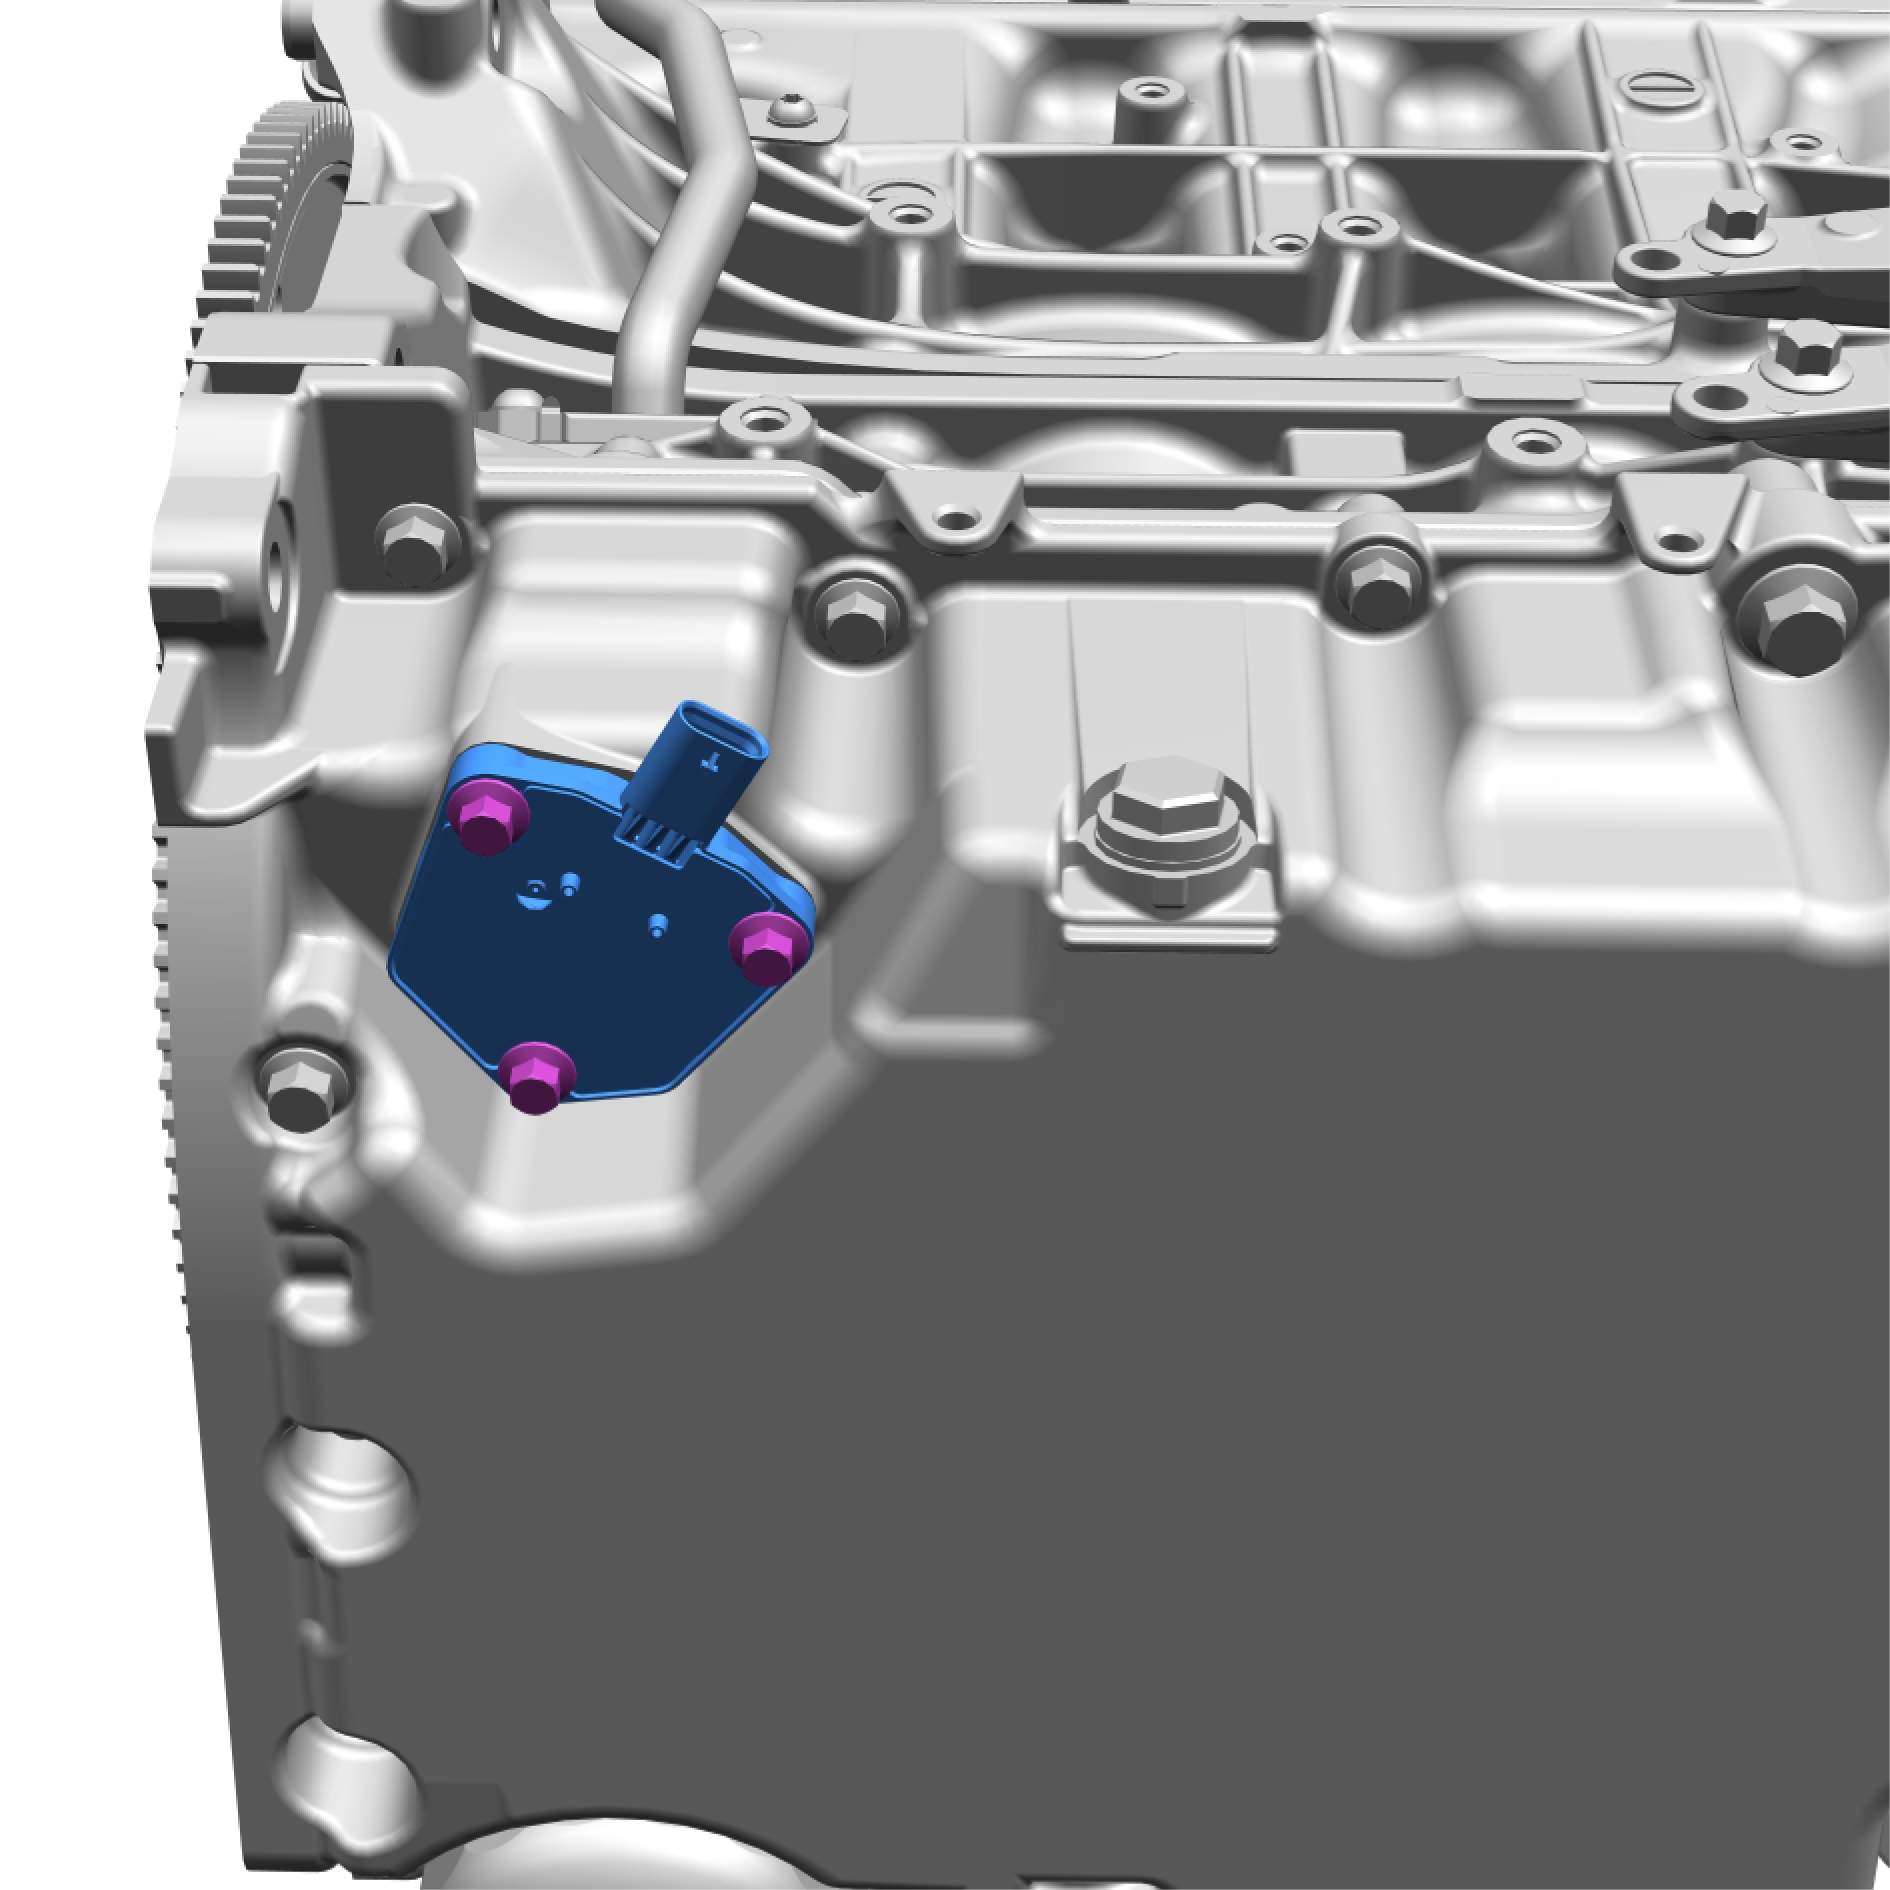
Remove the screws.
Torque: 9 Nm
Remove the marked component.
Installation
Install in reverse order.
Oil filter, replace
Removal

Remove the screw.
Torque: 5 Nm
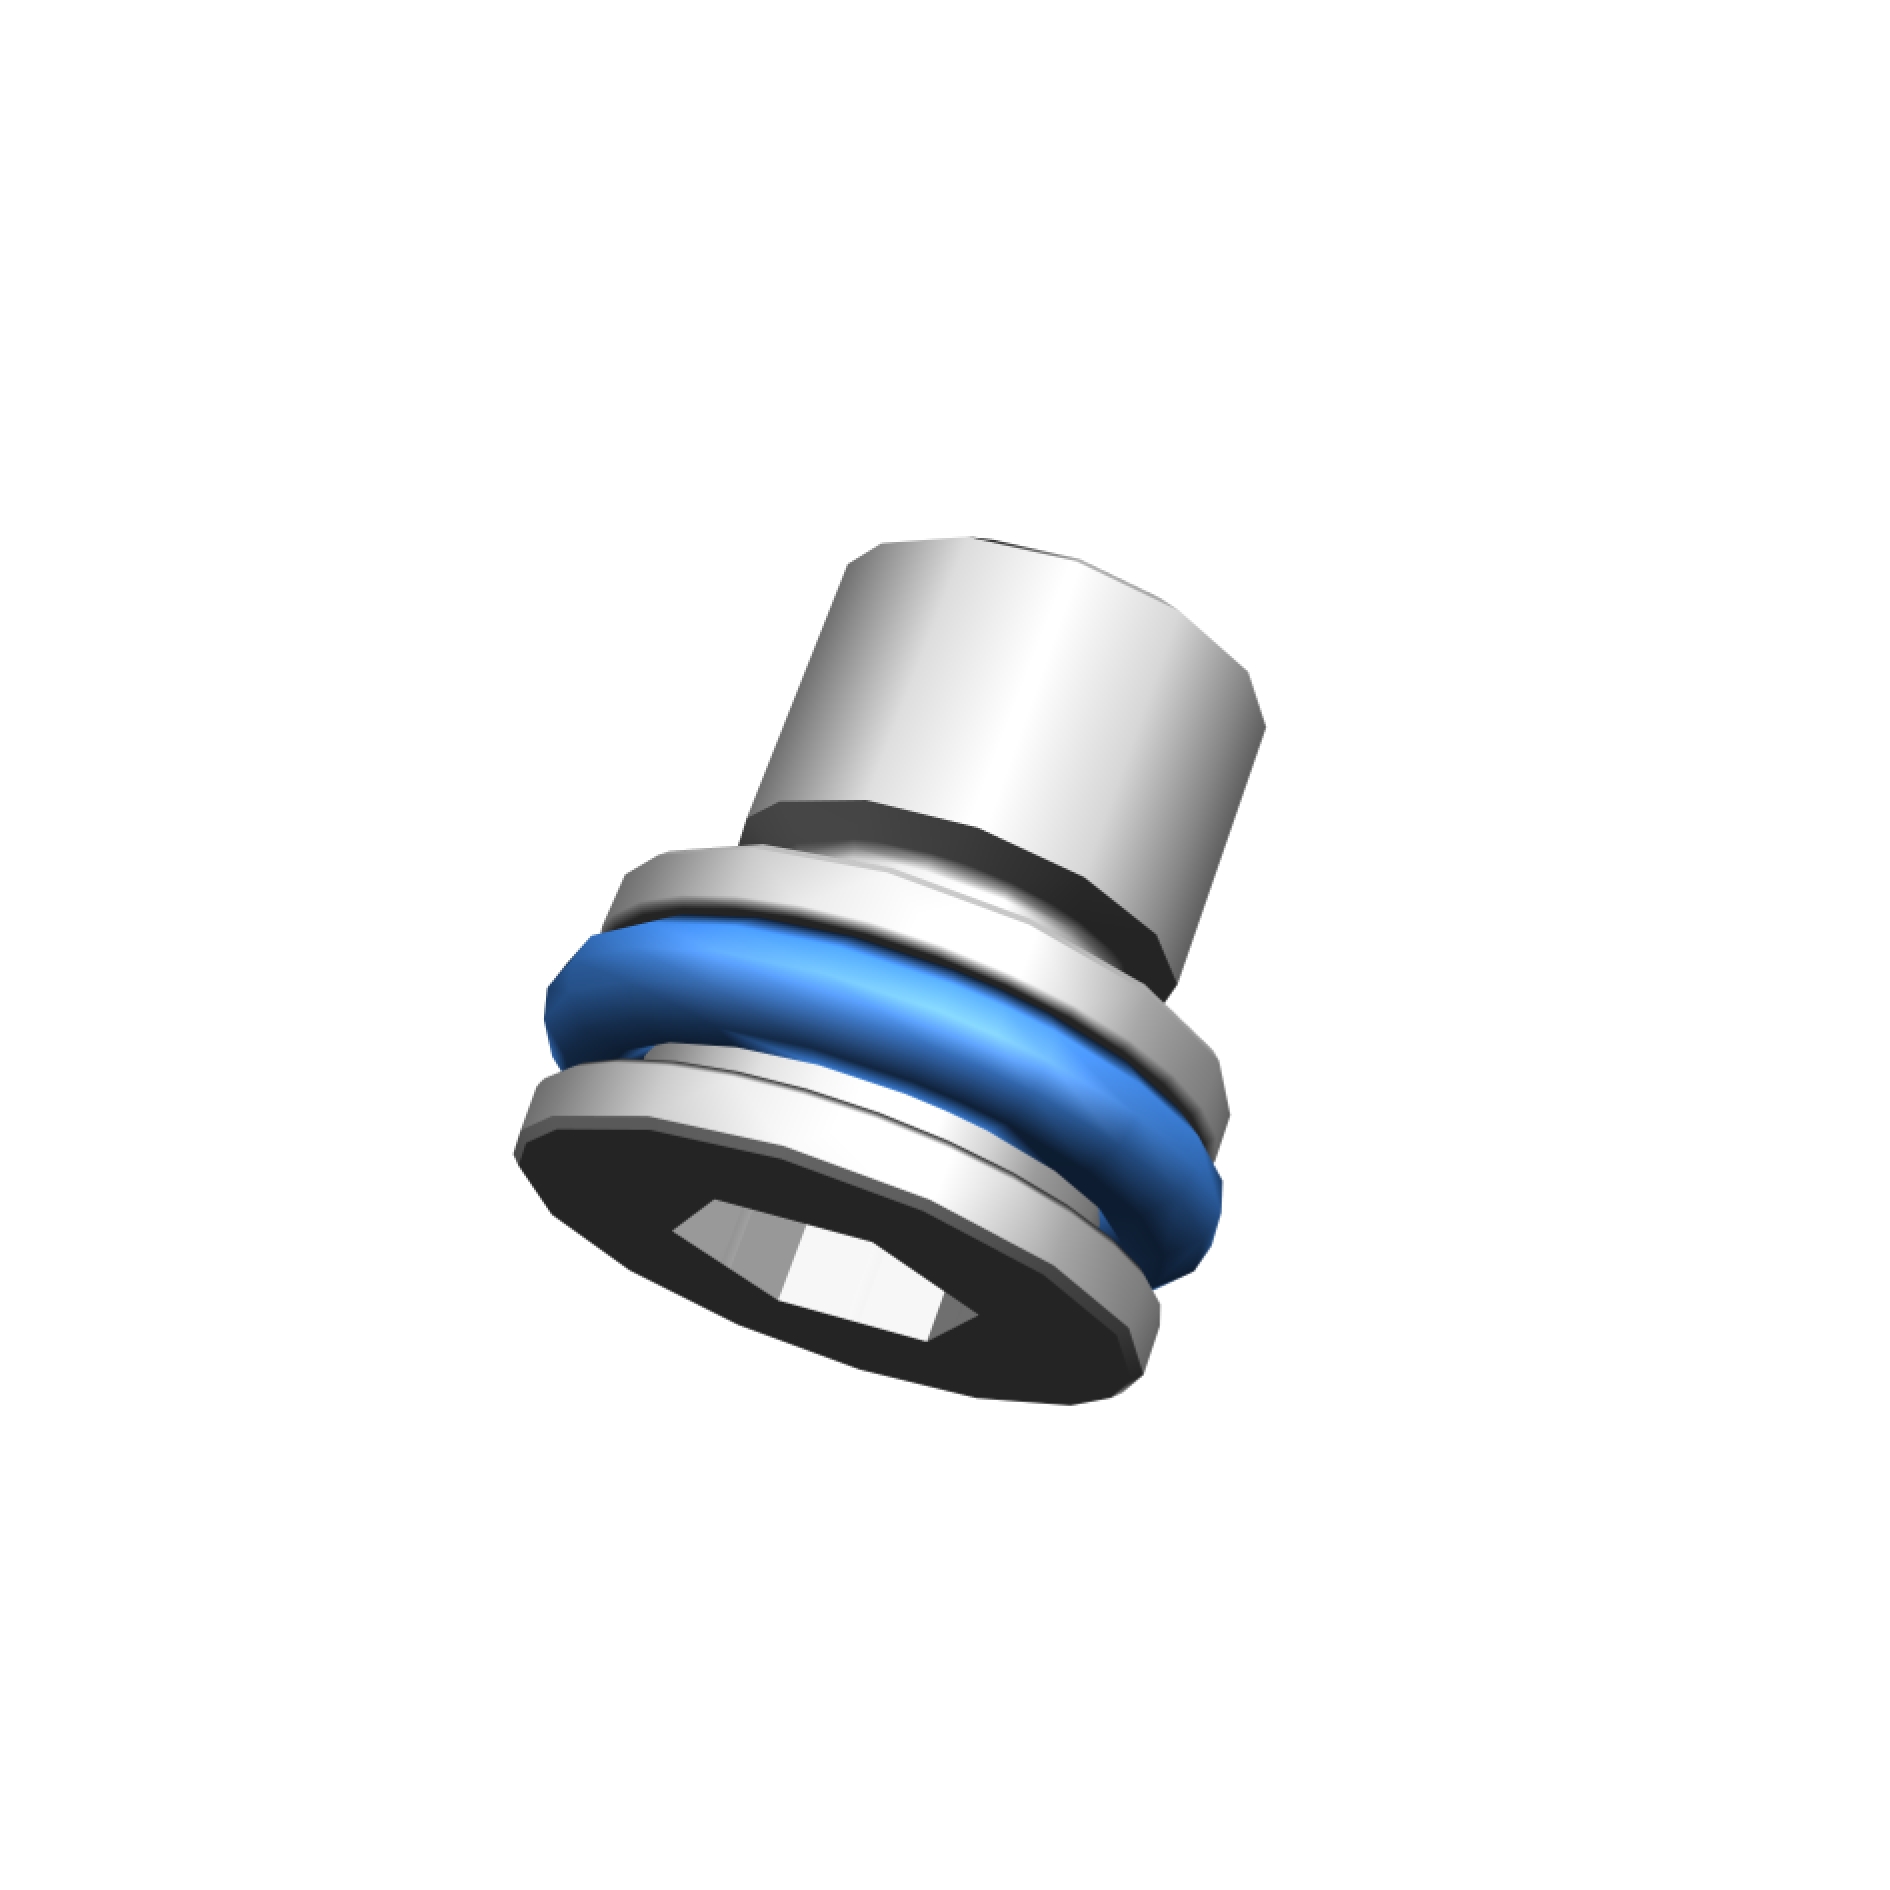
Remove and discard the marked component.
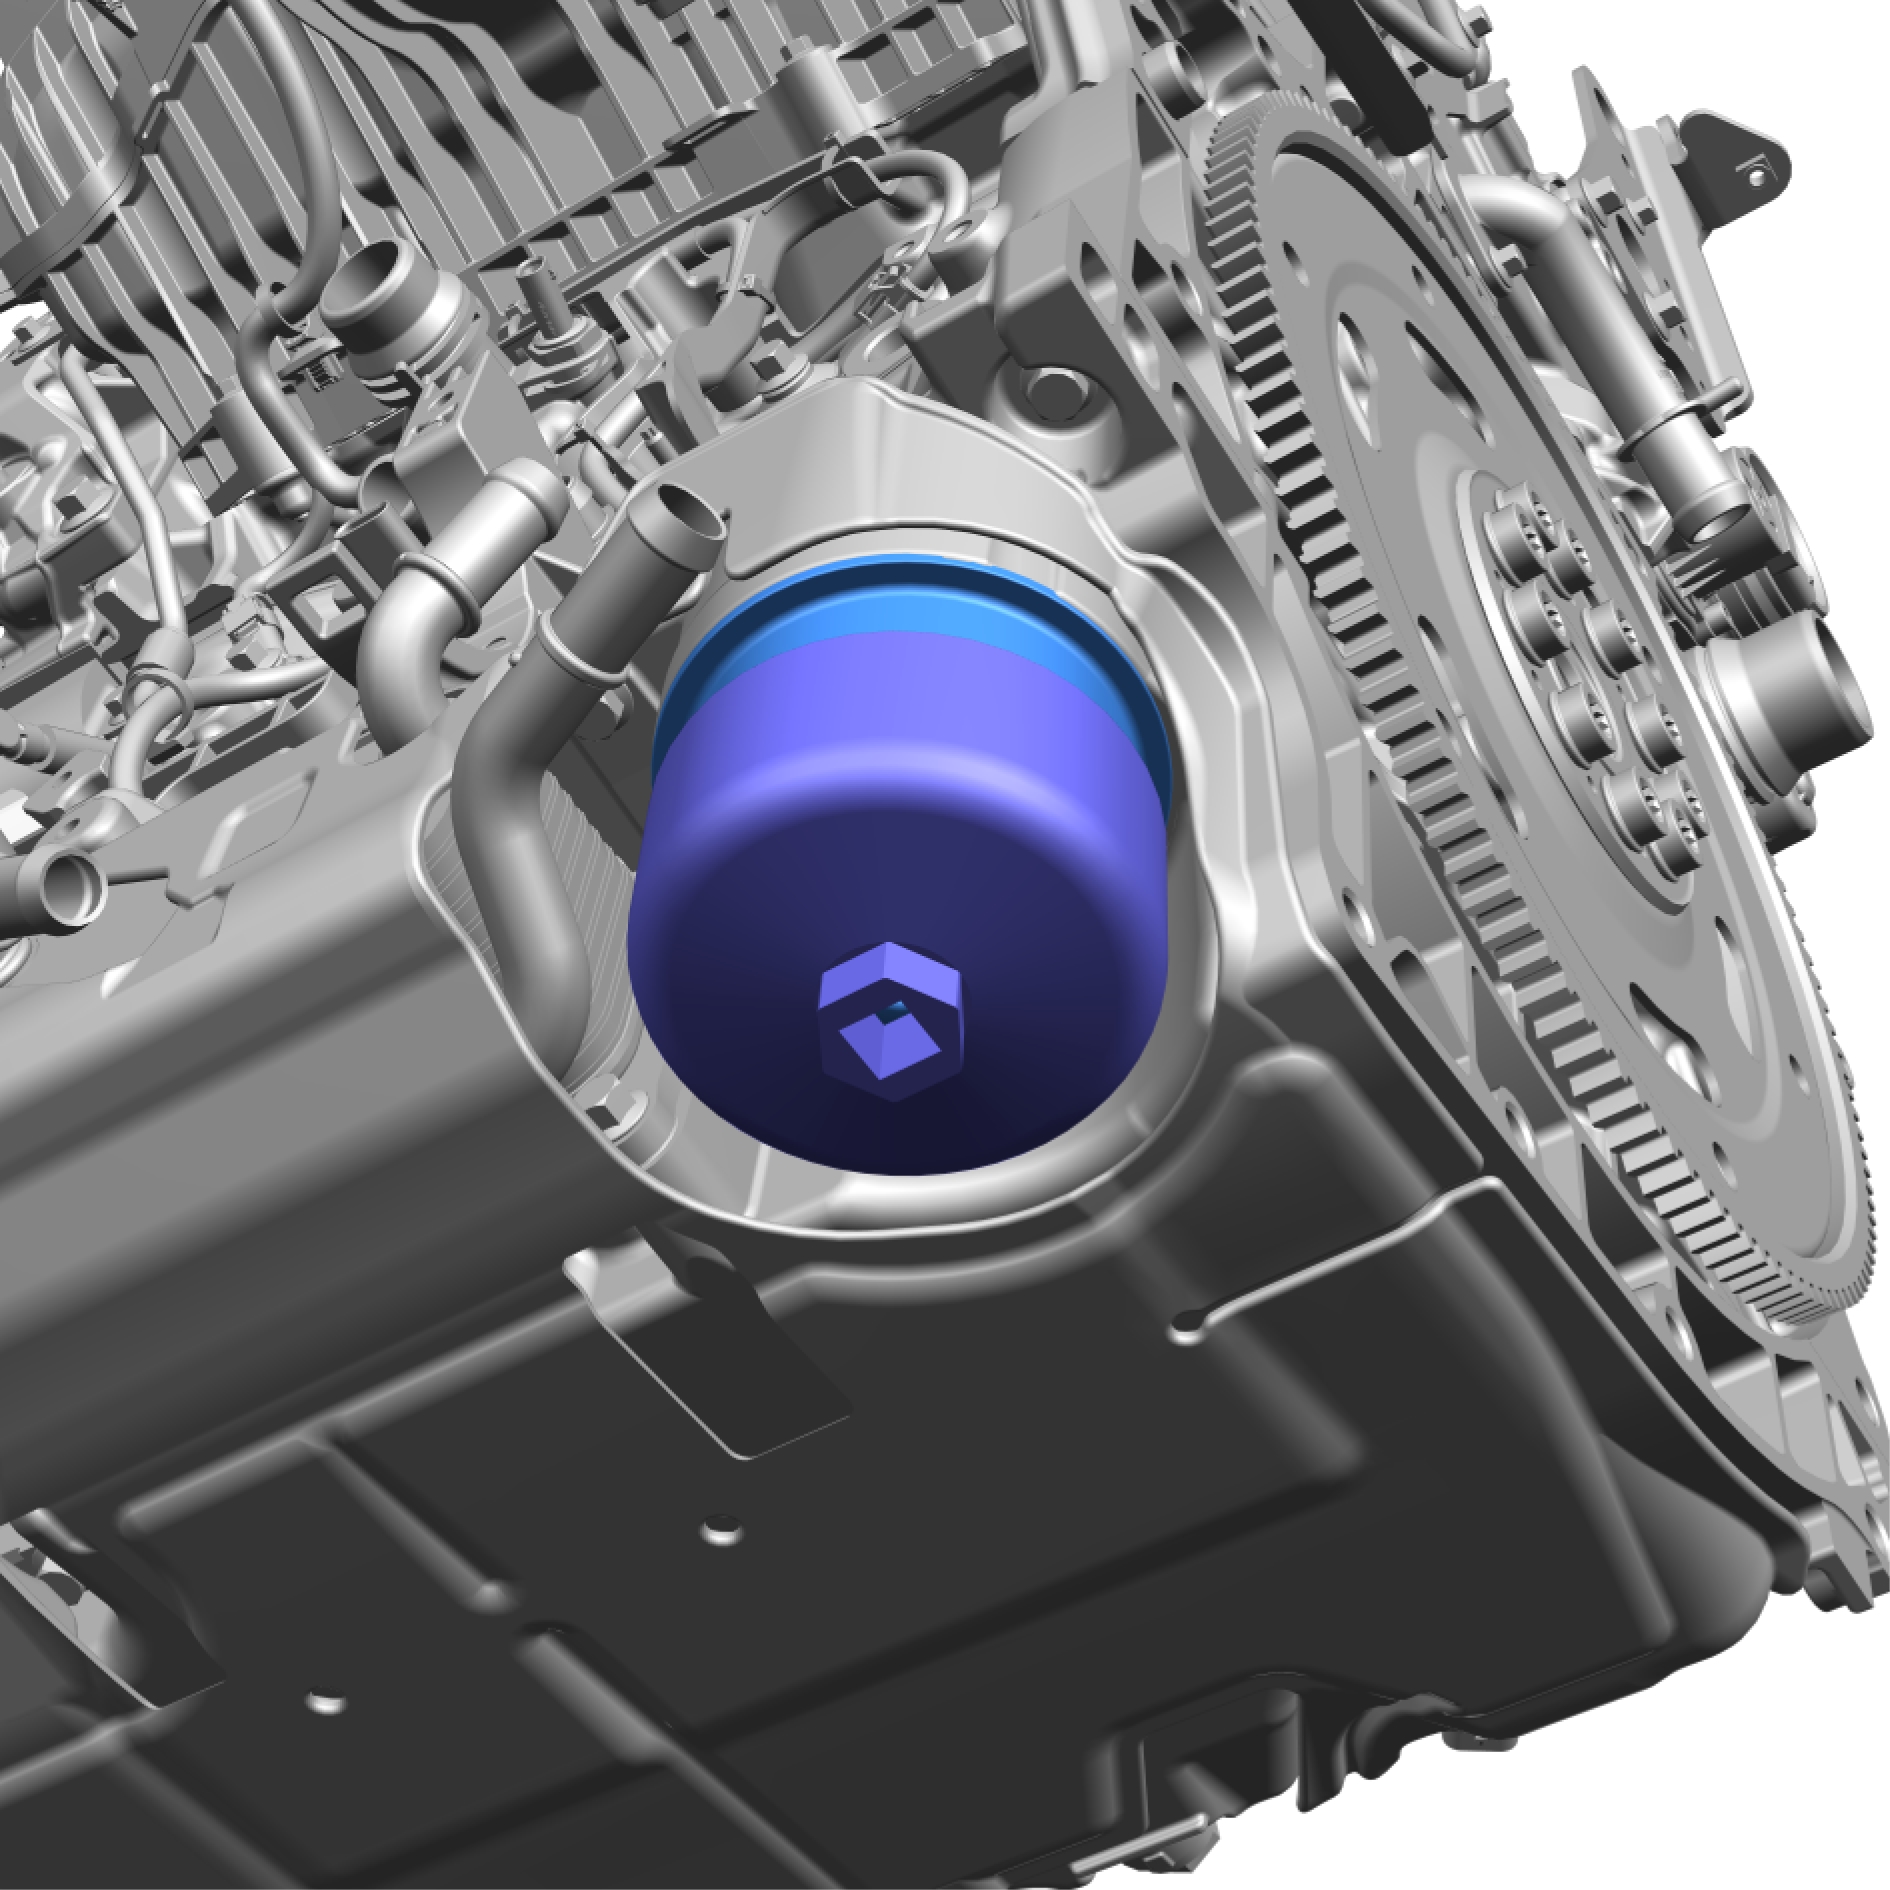
Make sure that the area around the component is clean and free of foreign material before removal.
Install special tool: 999 5679
Remove the marked component.
Torque: 25 Nm
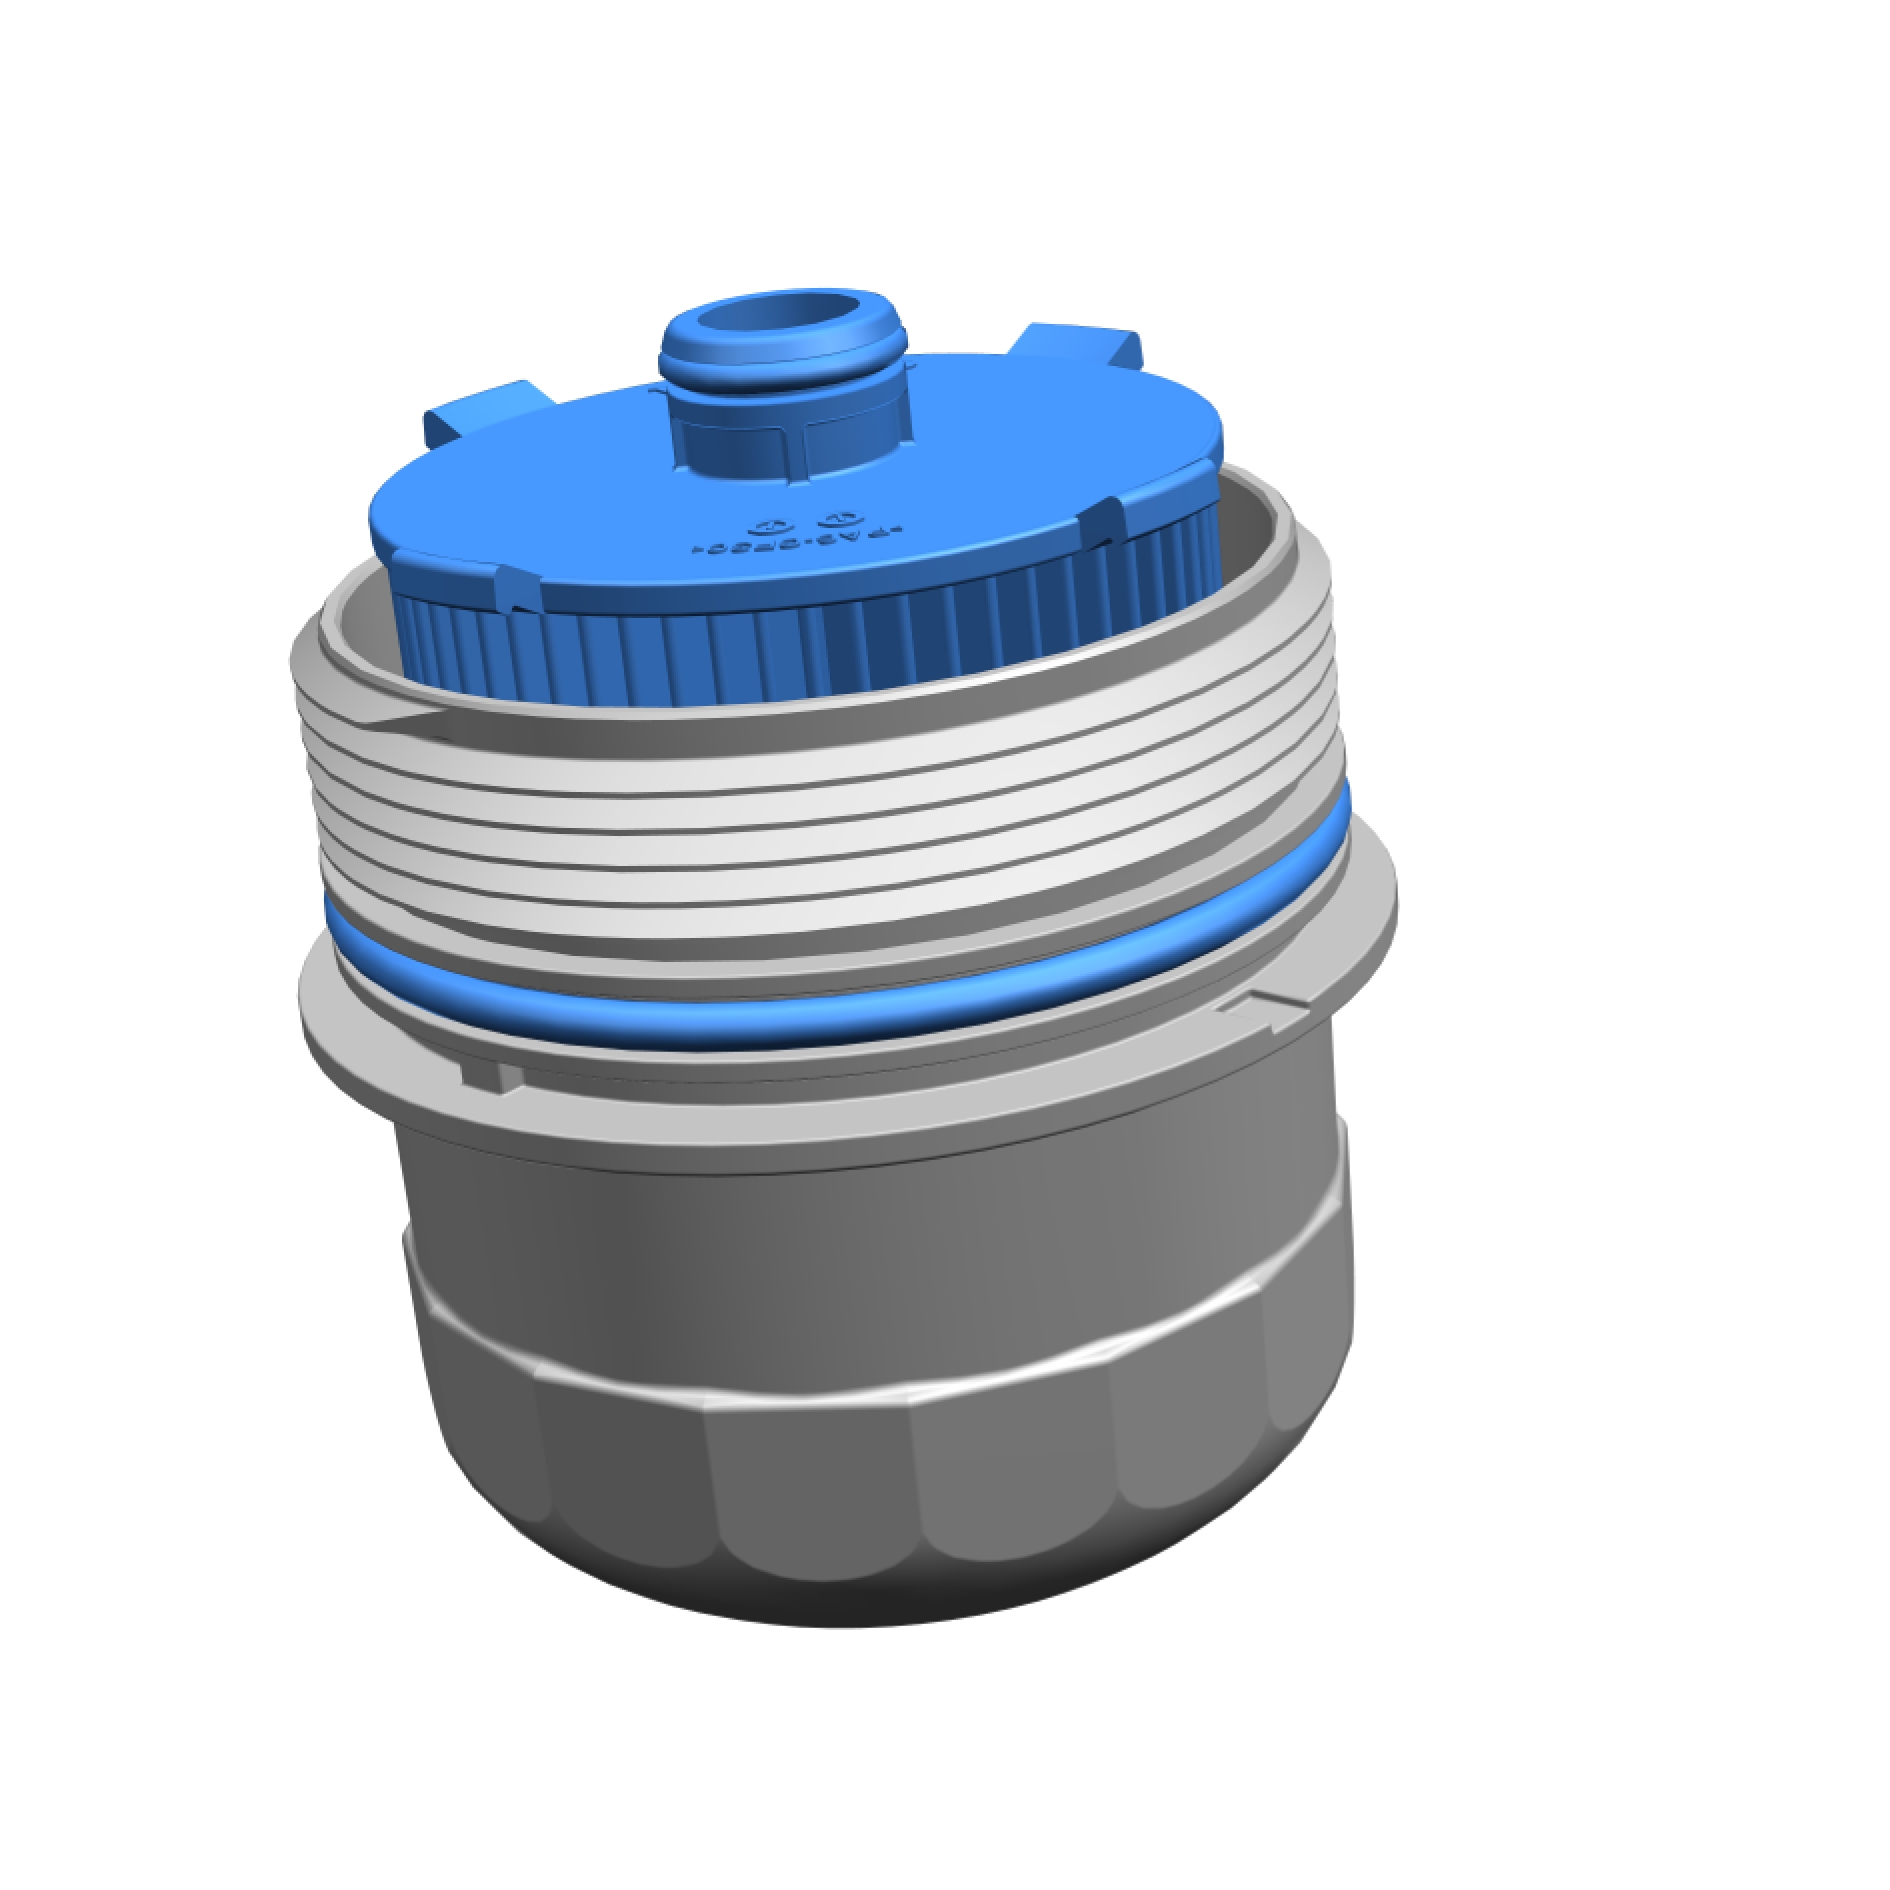
Remove and discard the marked components.
Installation
Install in reverse order.
Ignition coil, replace
Removal
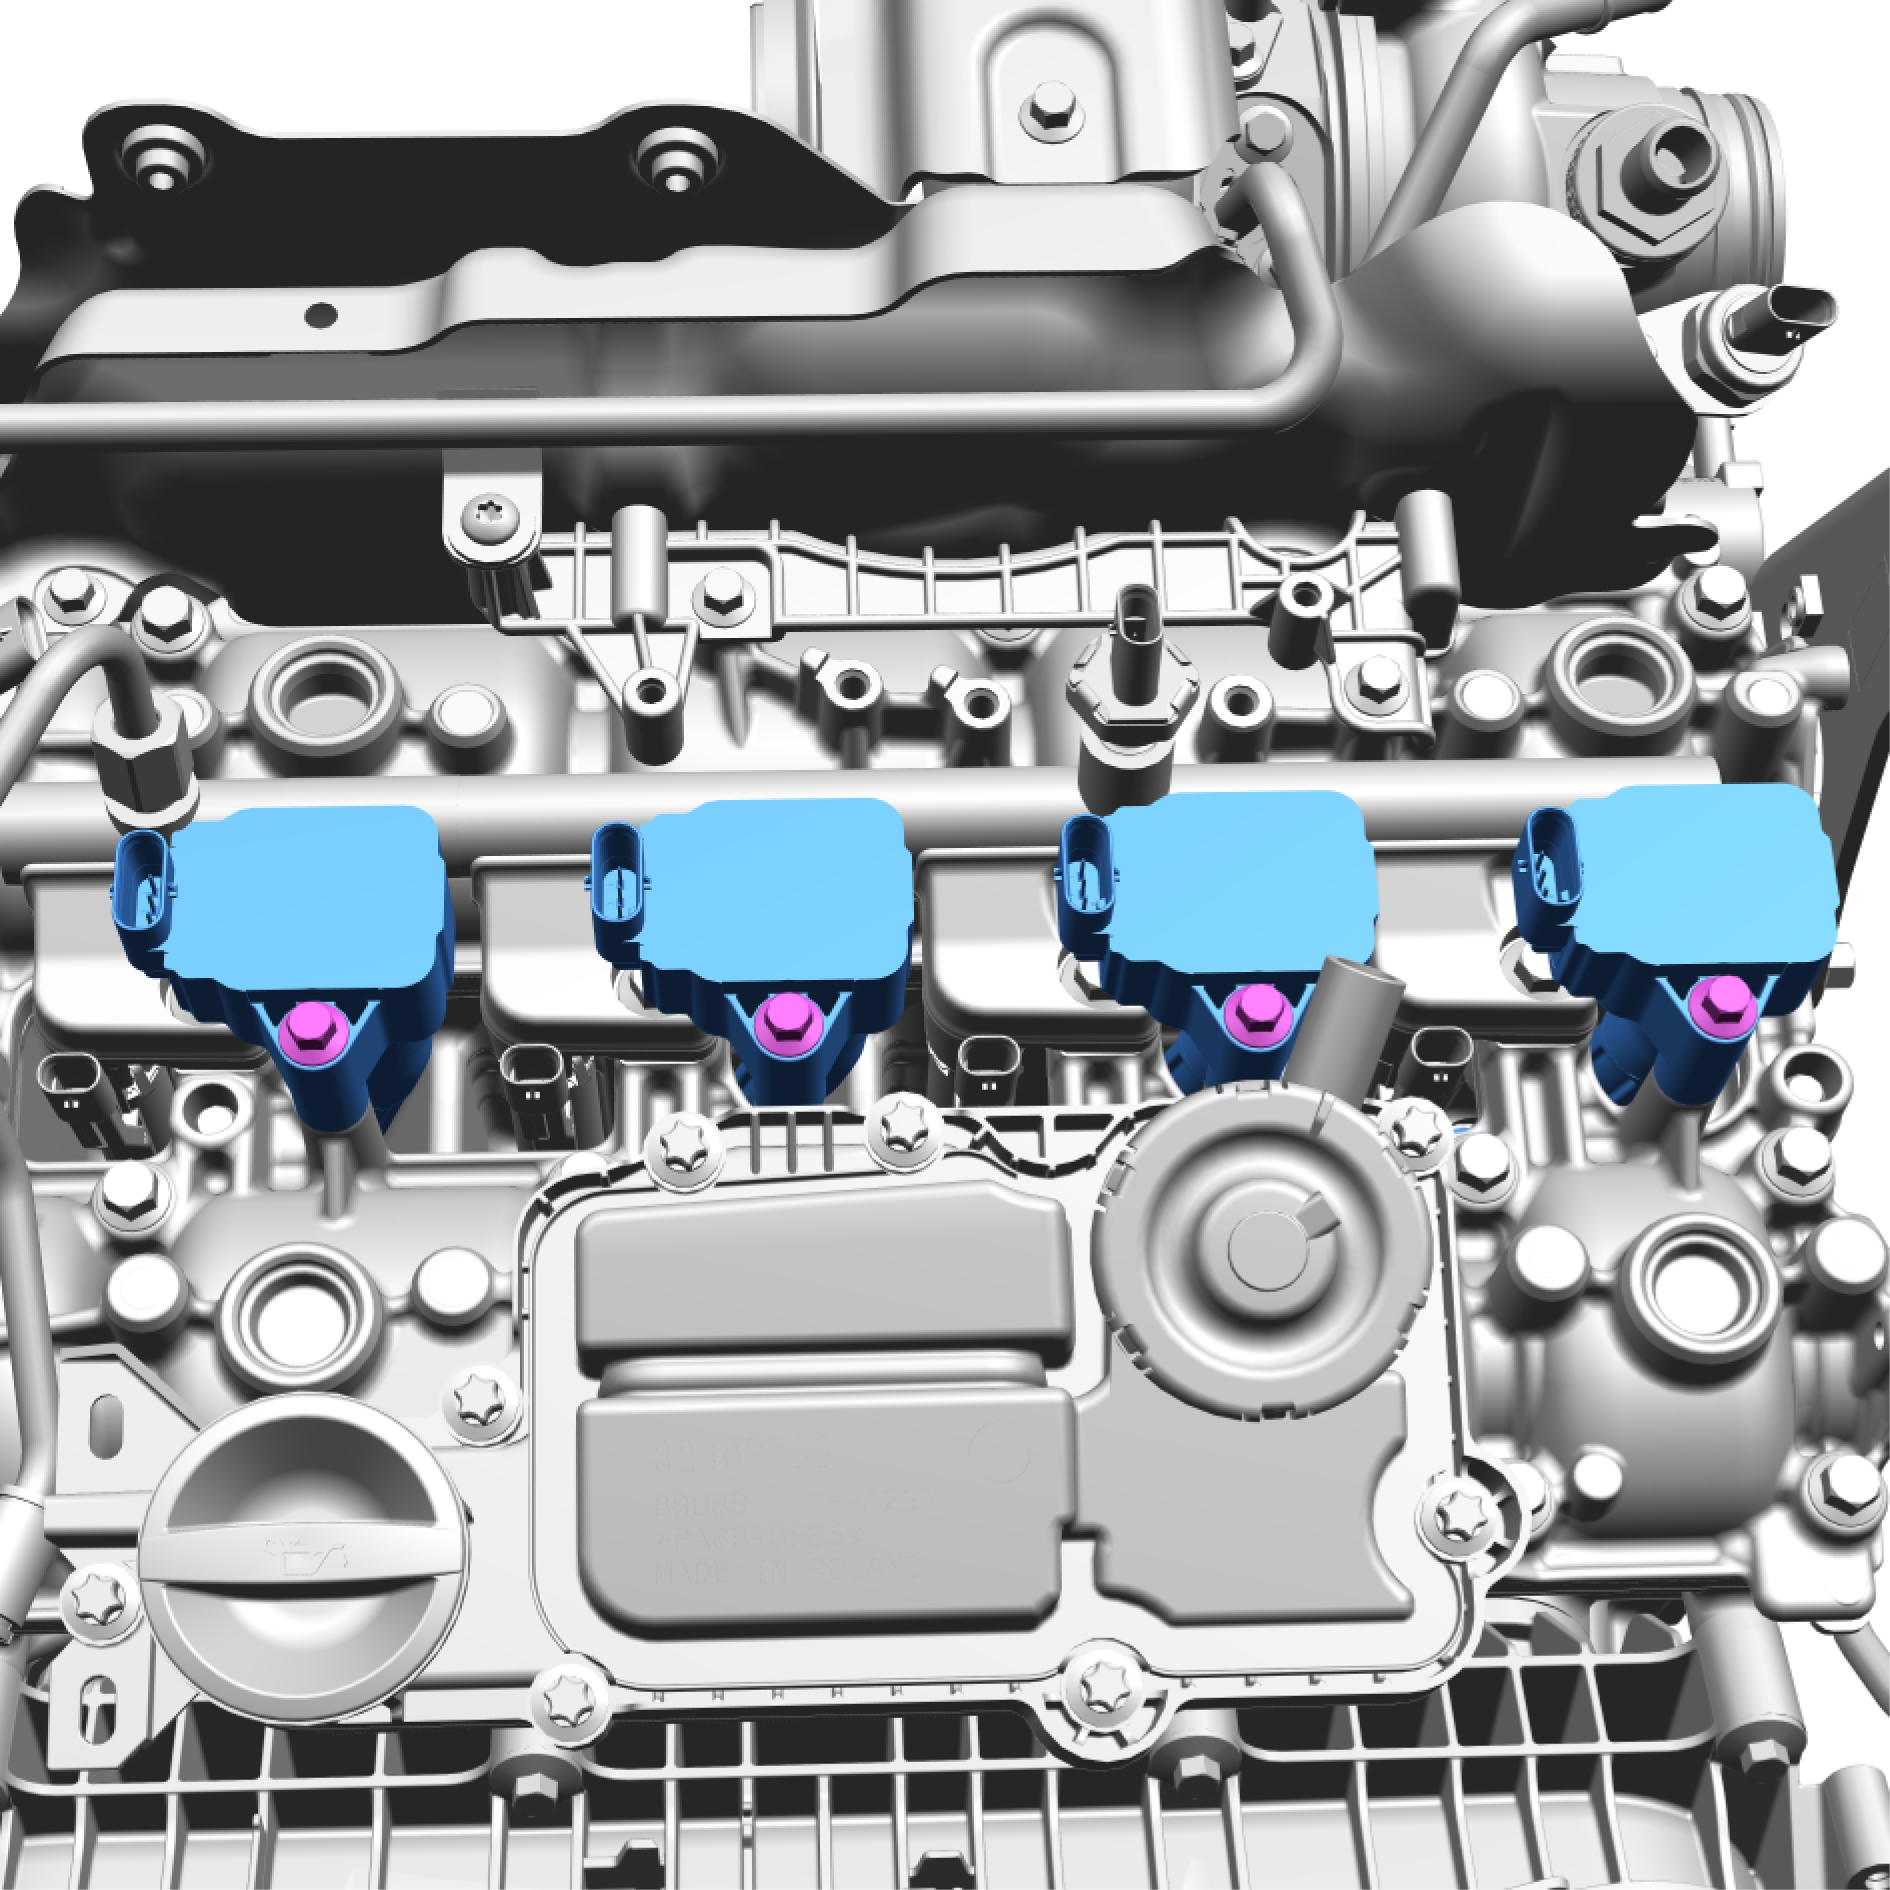
Remove the screws.
Torque: 10 Nm
Remove the marked components.
Apply grease on the indicated area.
Installation
Install in reverse order.
Spark plug, replace
Removal
Remove the screws.
Torque: 10 Nm
Remove the marked components.
Apply grease on the indicated area.
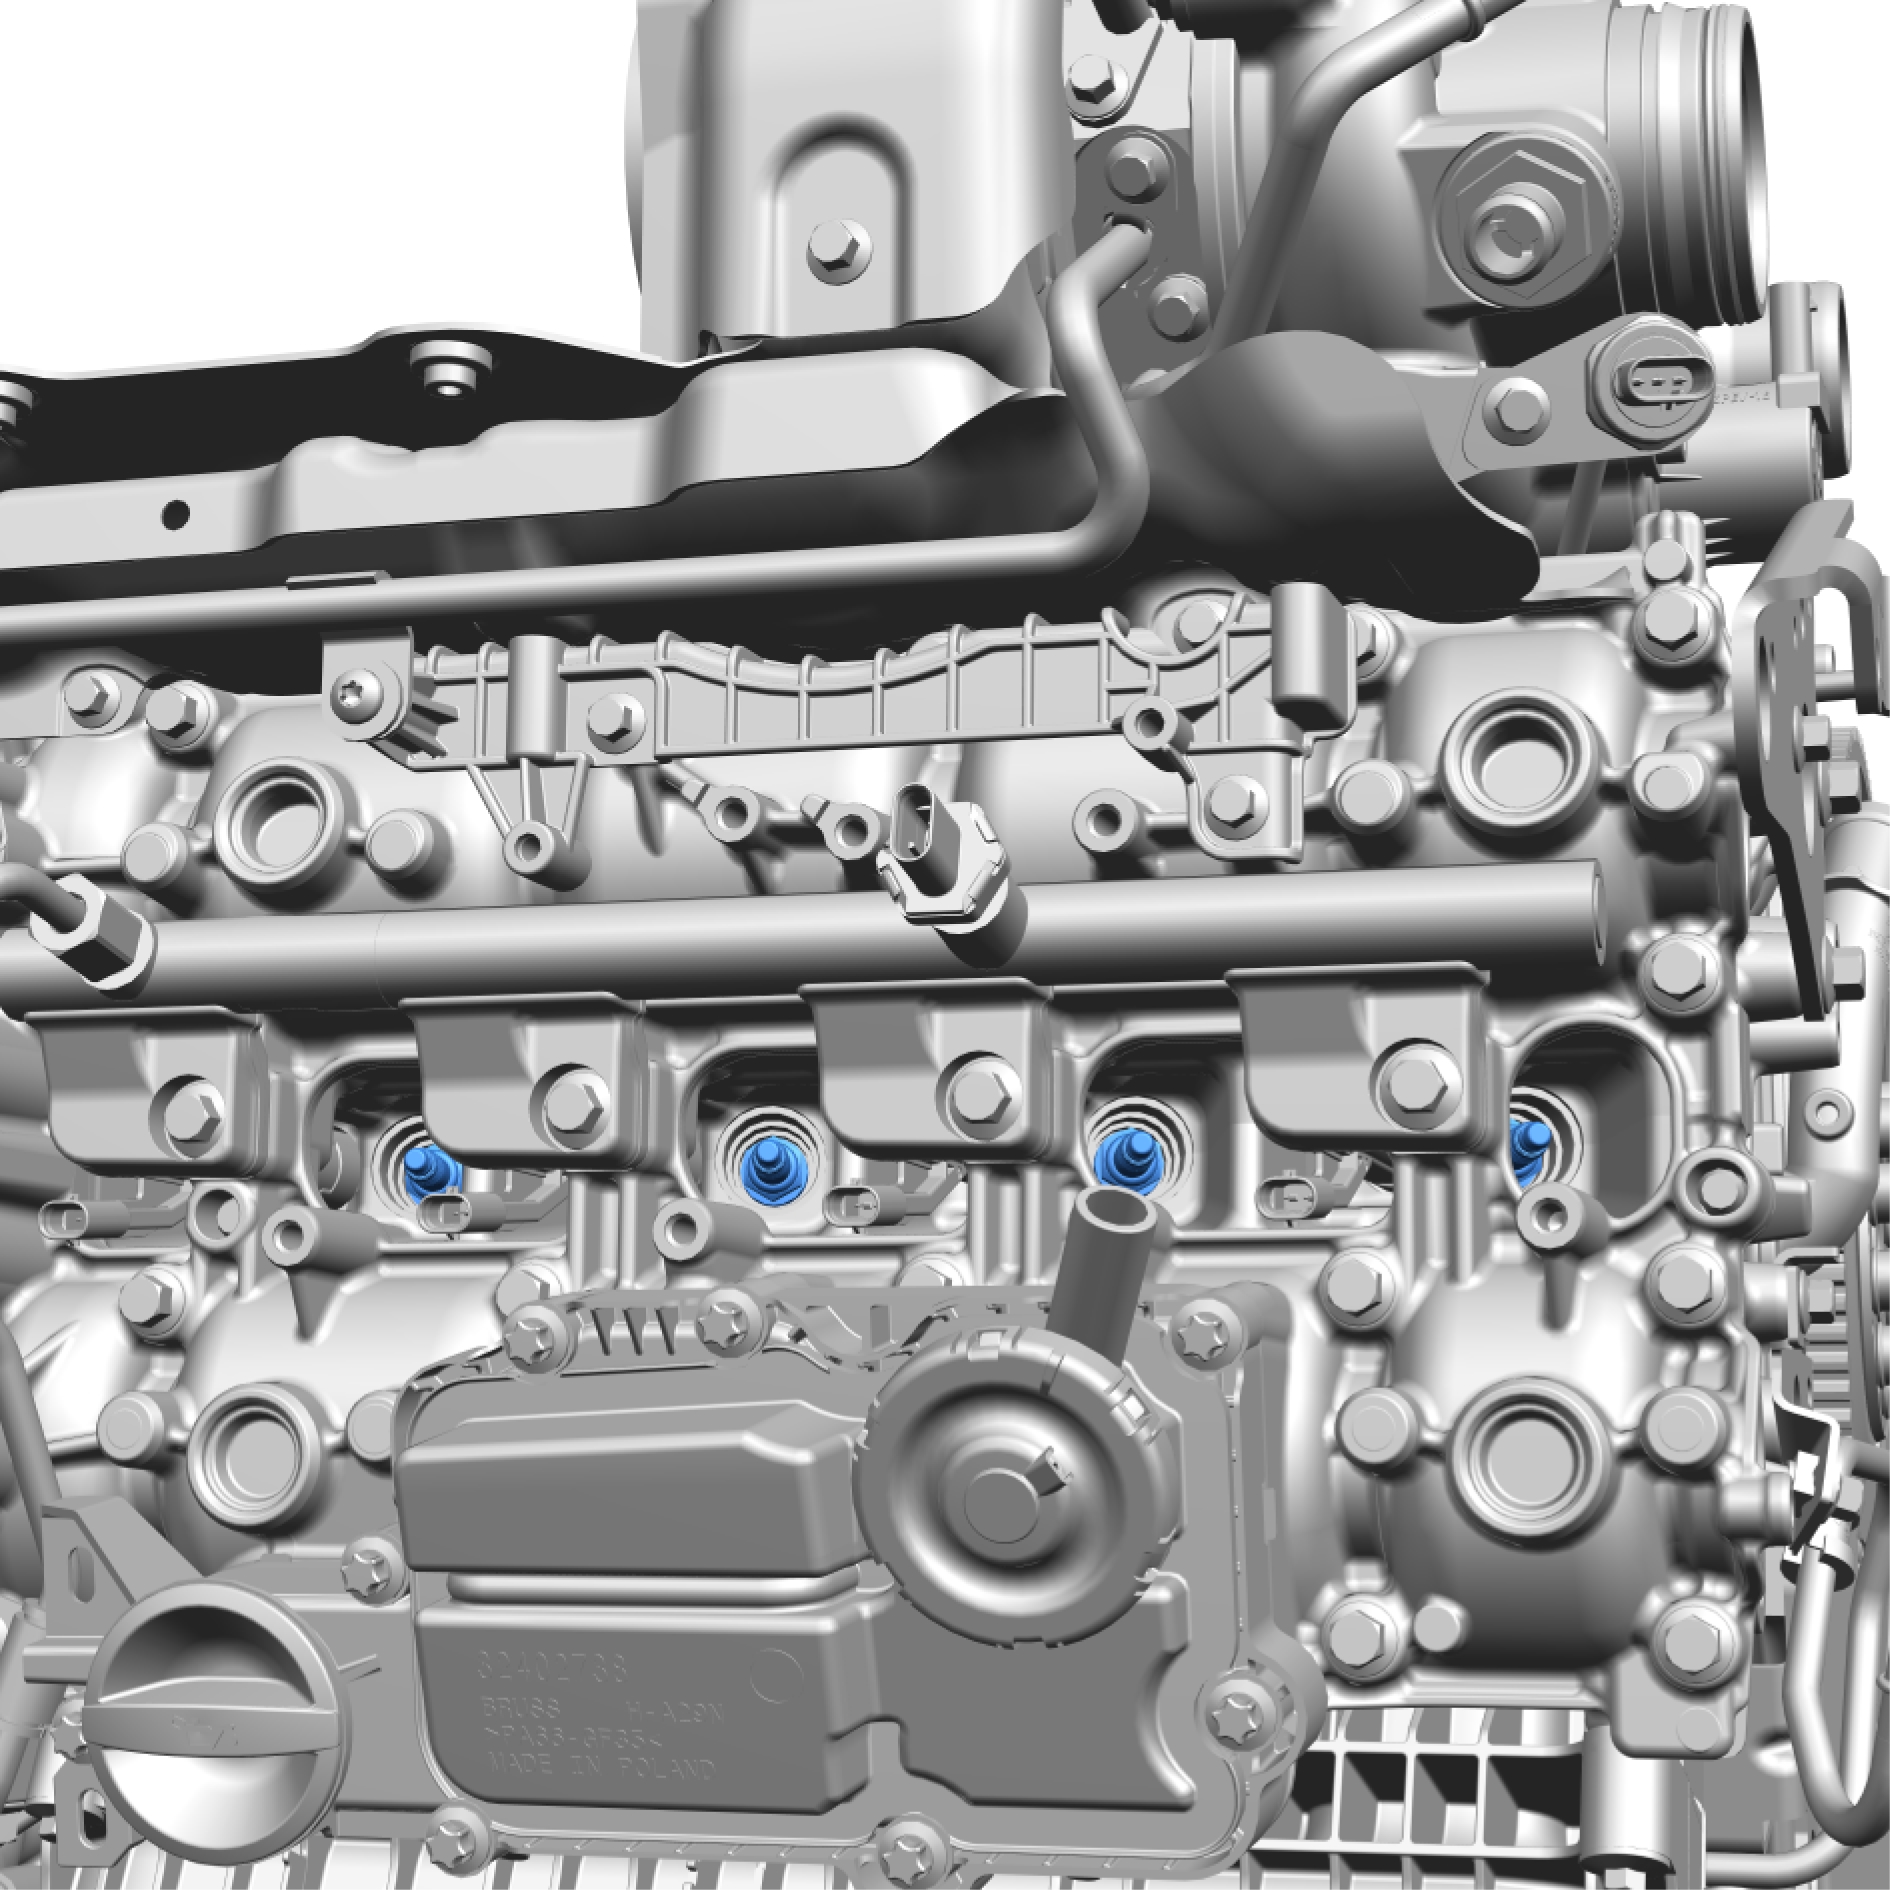
Remove the marked components.
Torque: 18 Nm
Installation
Install in reverse order.
Oil cooler engine, replace
Removal
Remove the clip.
Remove the clip.
Remove the marked component.
Remove the screws.
Torque: 10 Nm
Remove the marked component.
Remove and discard the marked component.
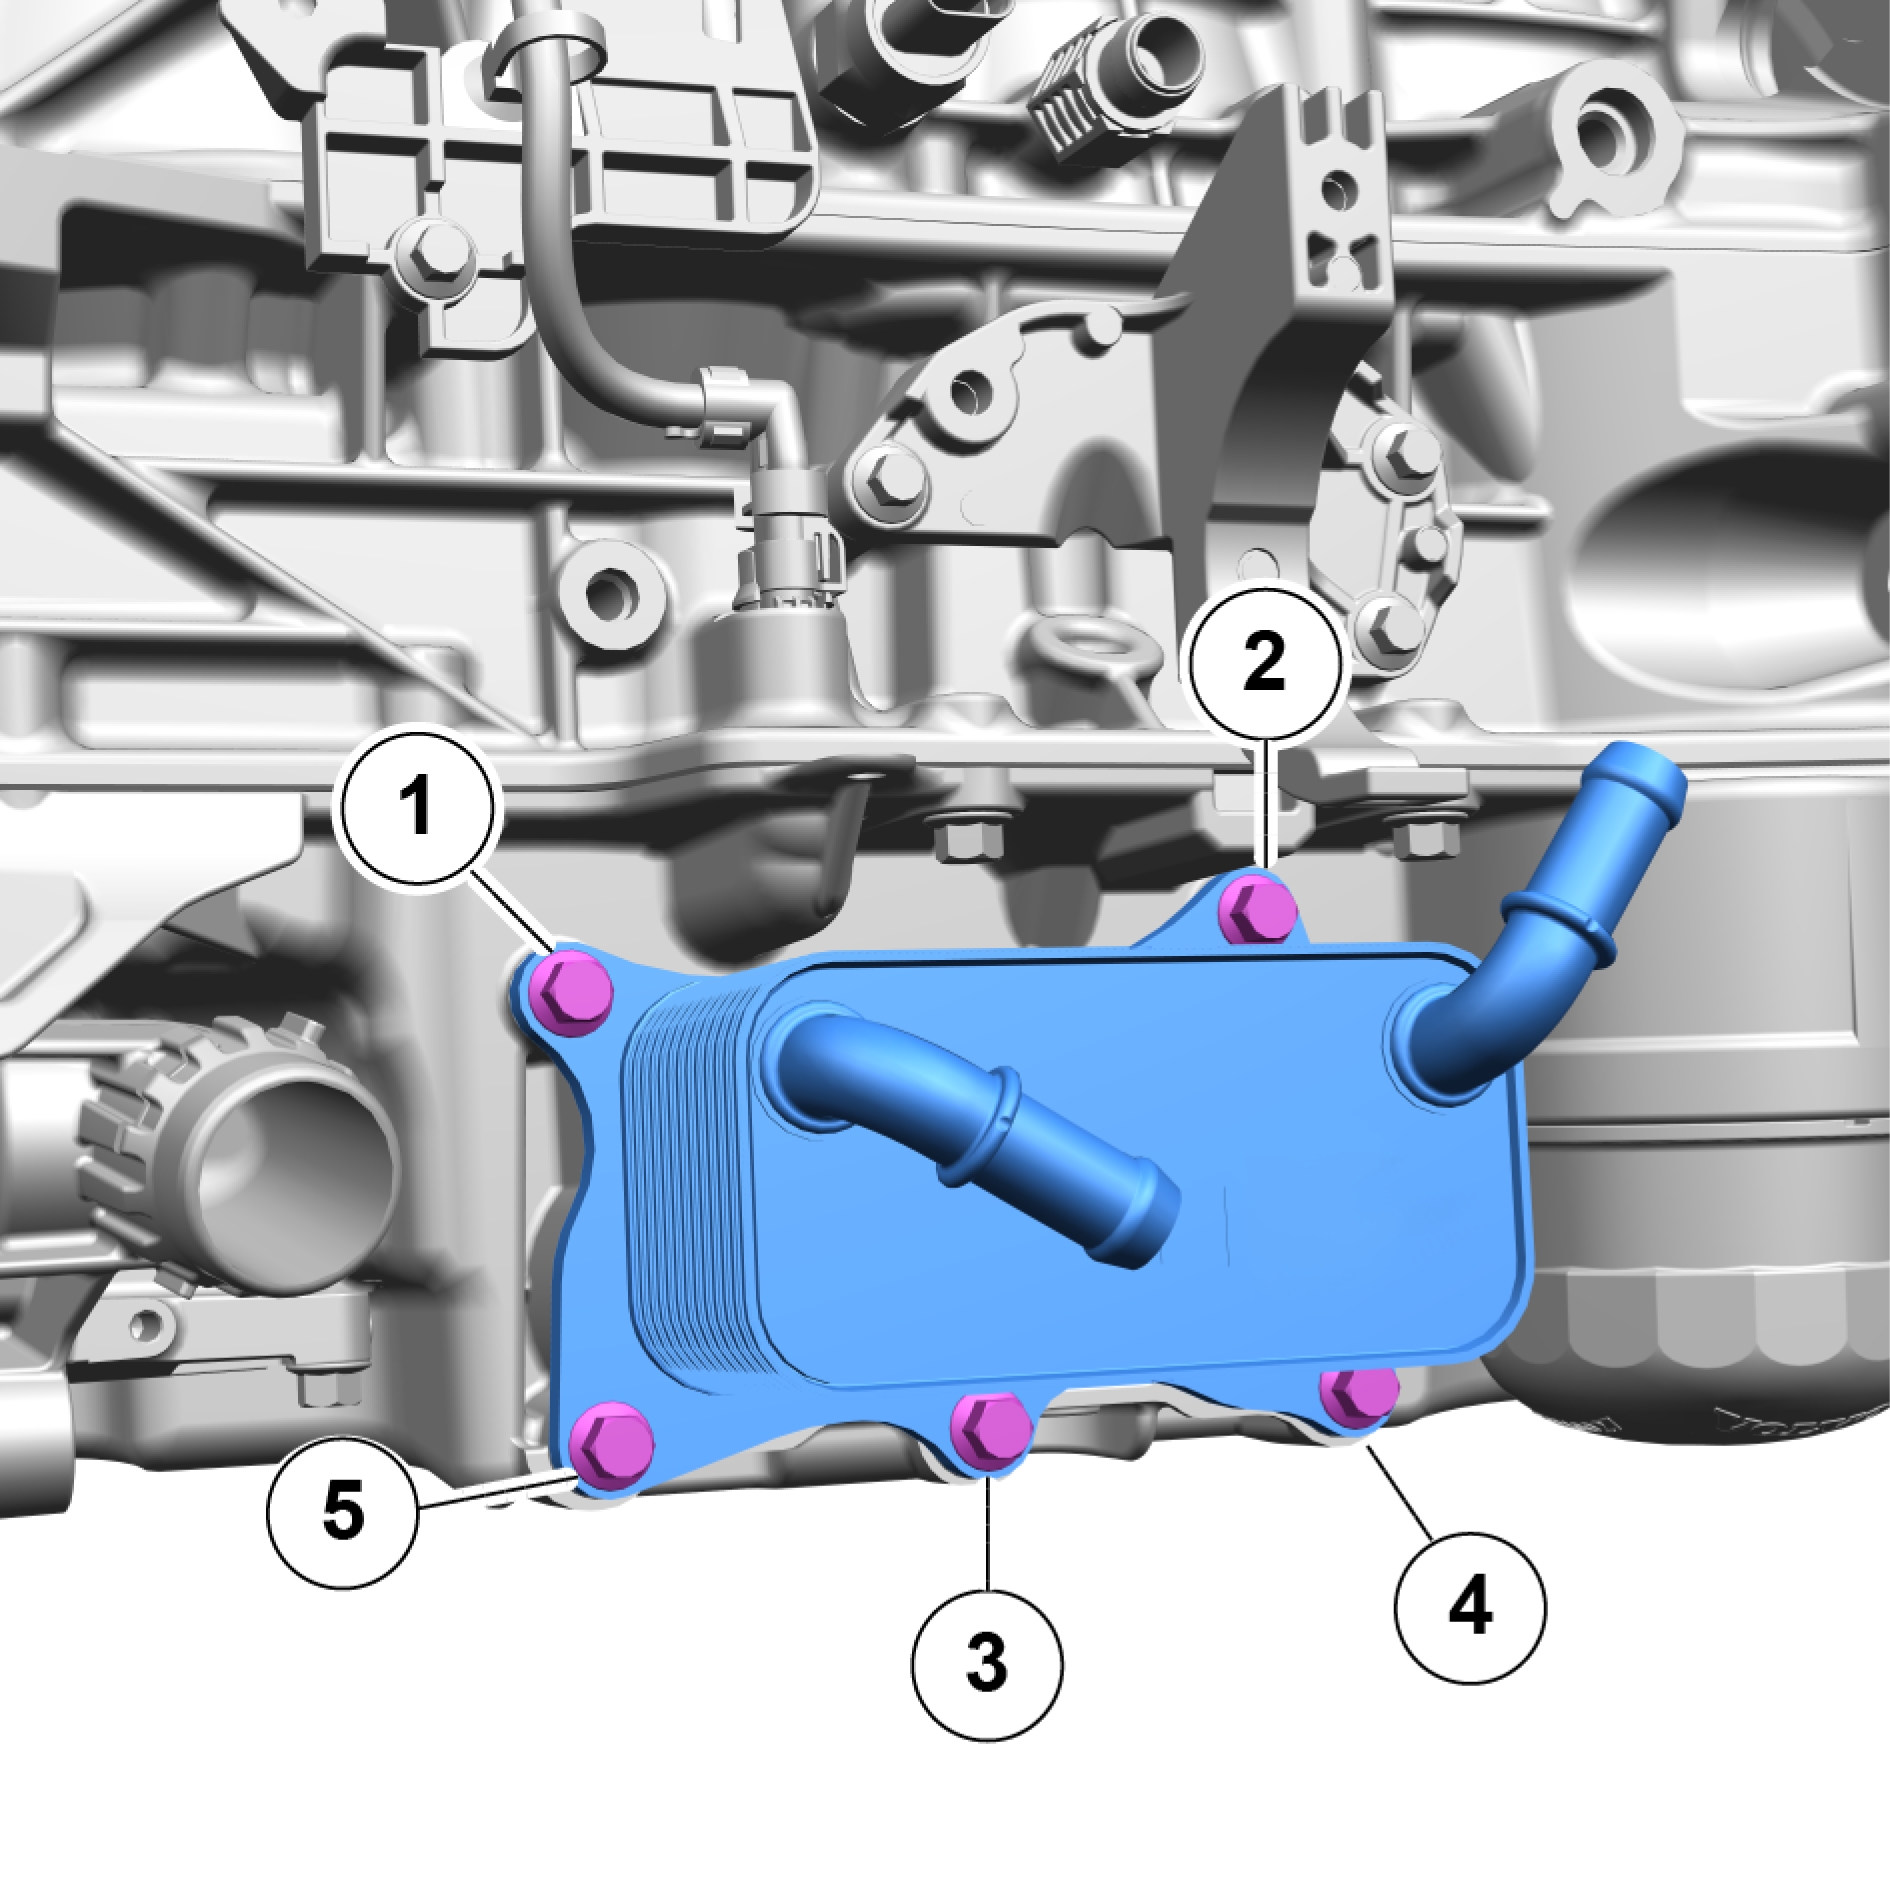
Tightening schedule for the installation.
Remove the screws.
Torque: 16 Nm
Remove the marked component.
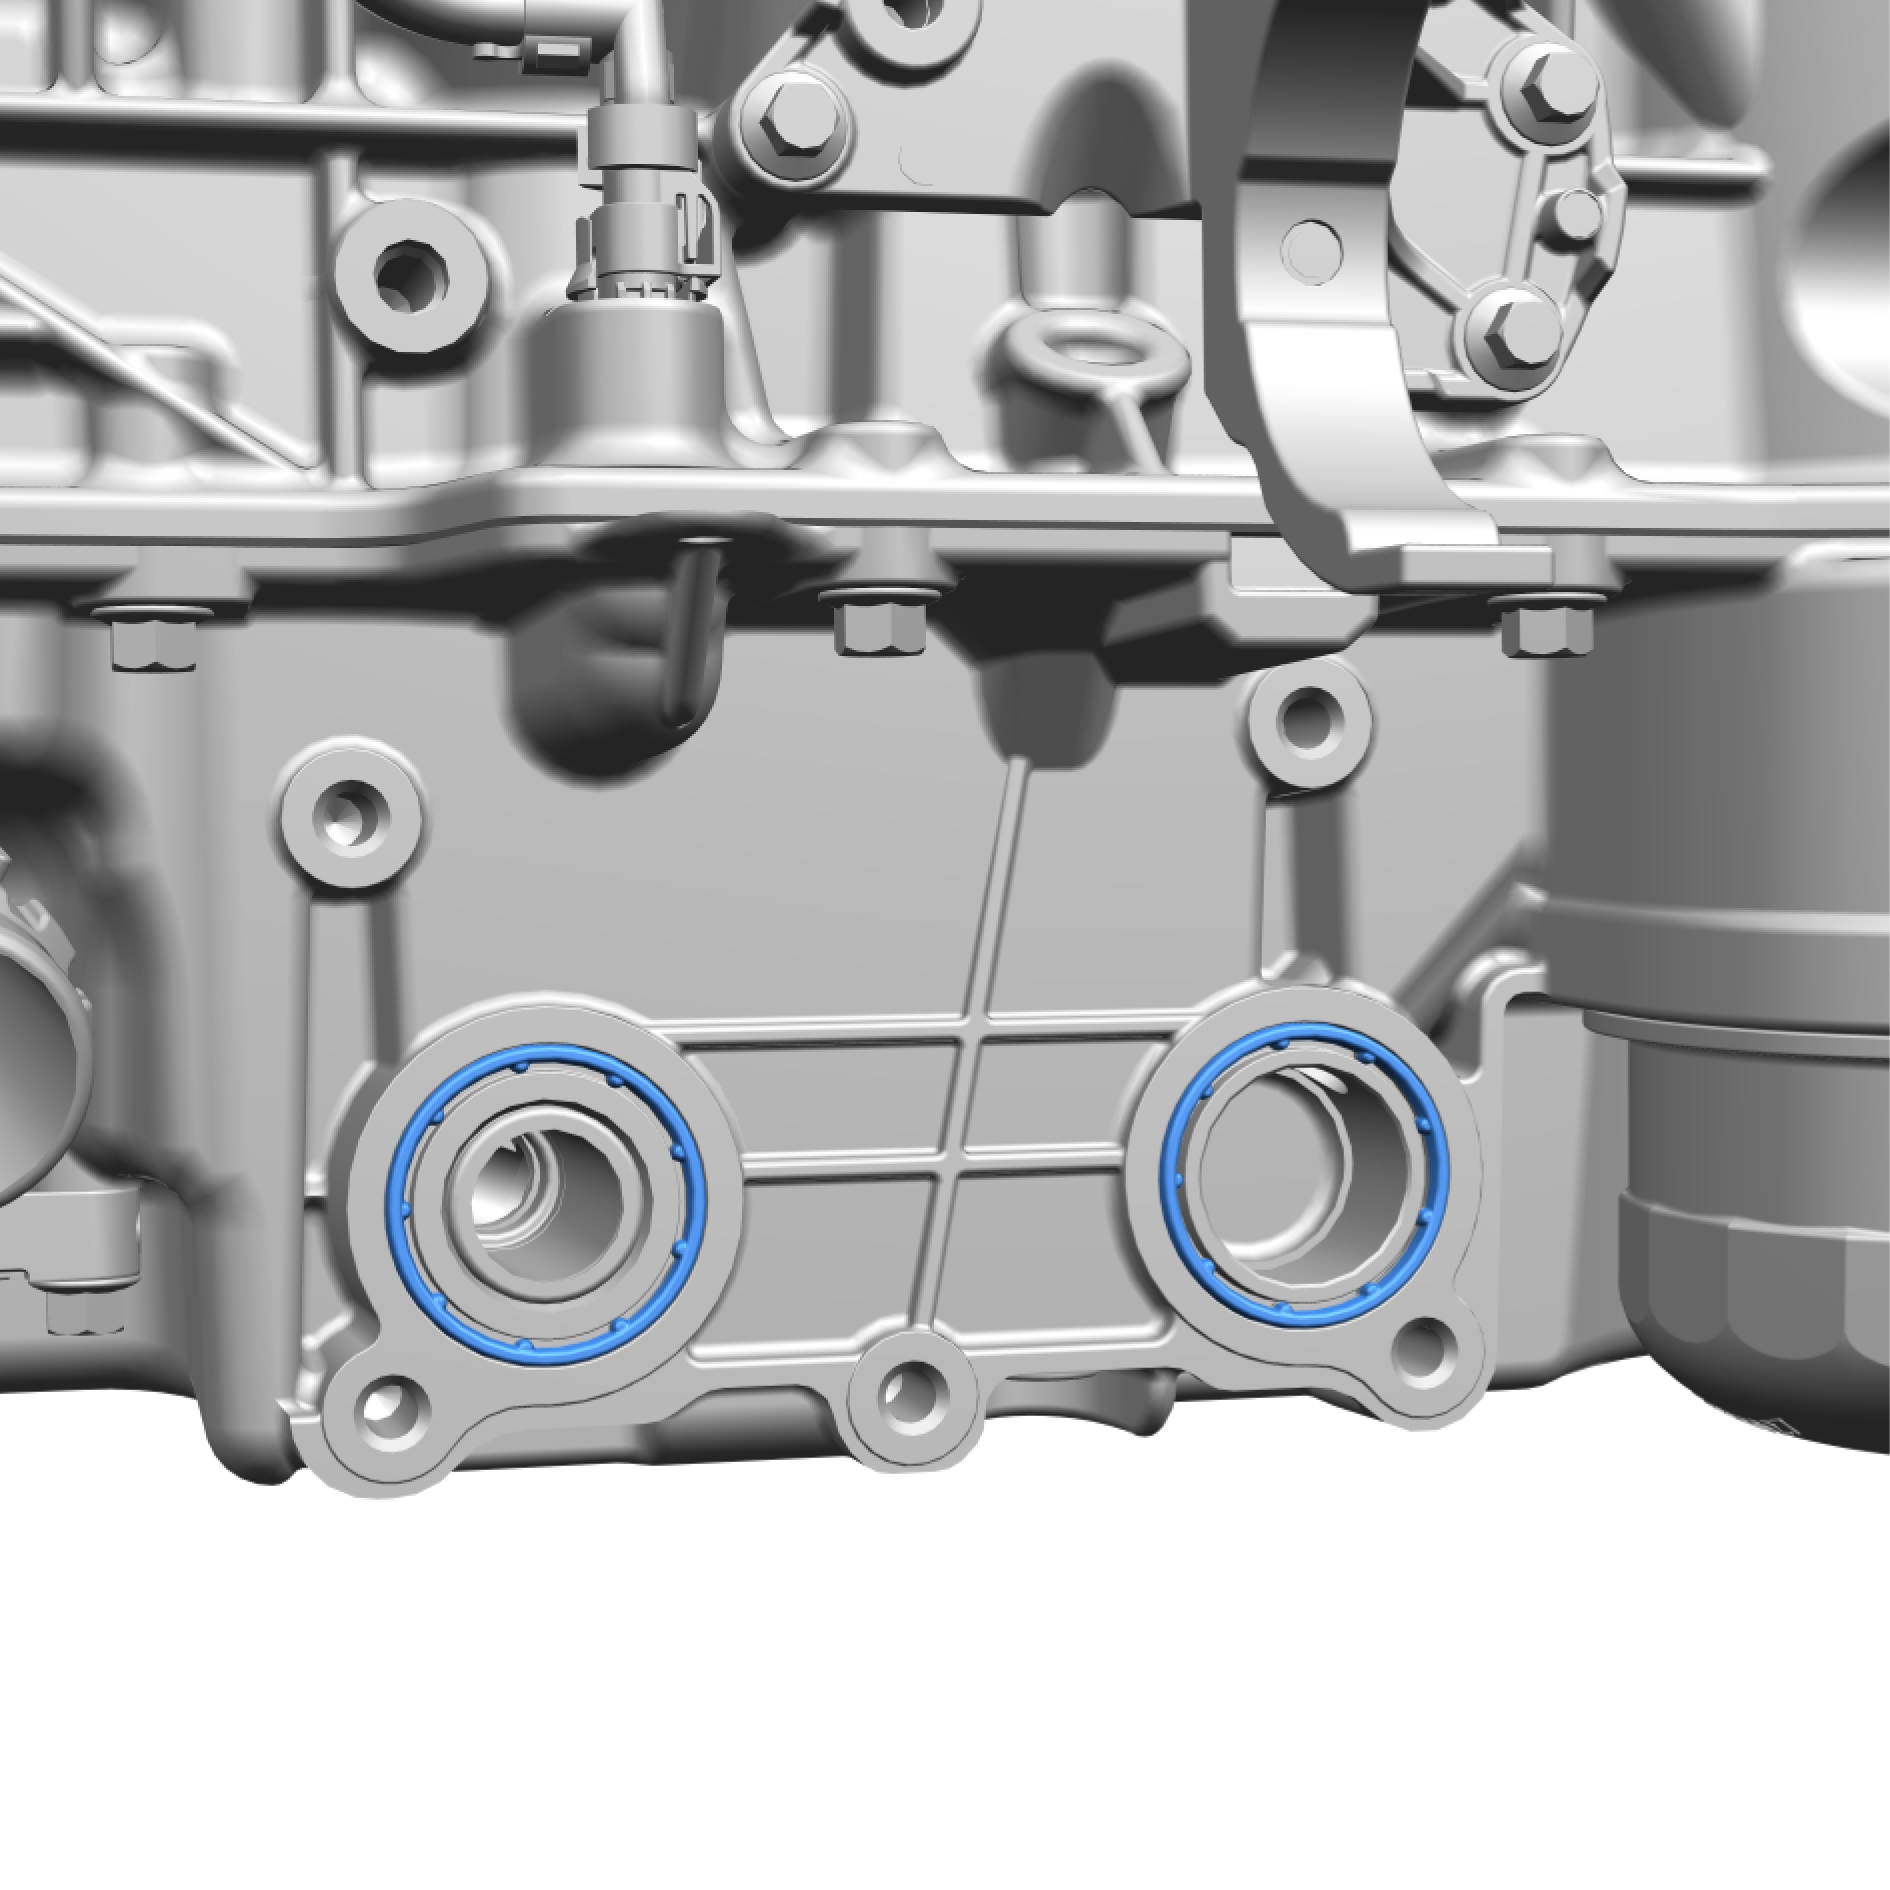
Remove and discard the marked components.
Installation
Install in reverse order.
Oil cooler engine, replace
Removal
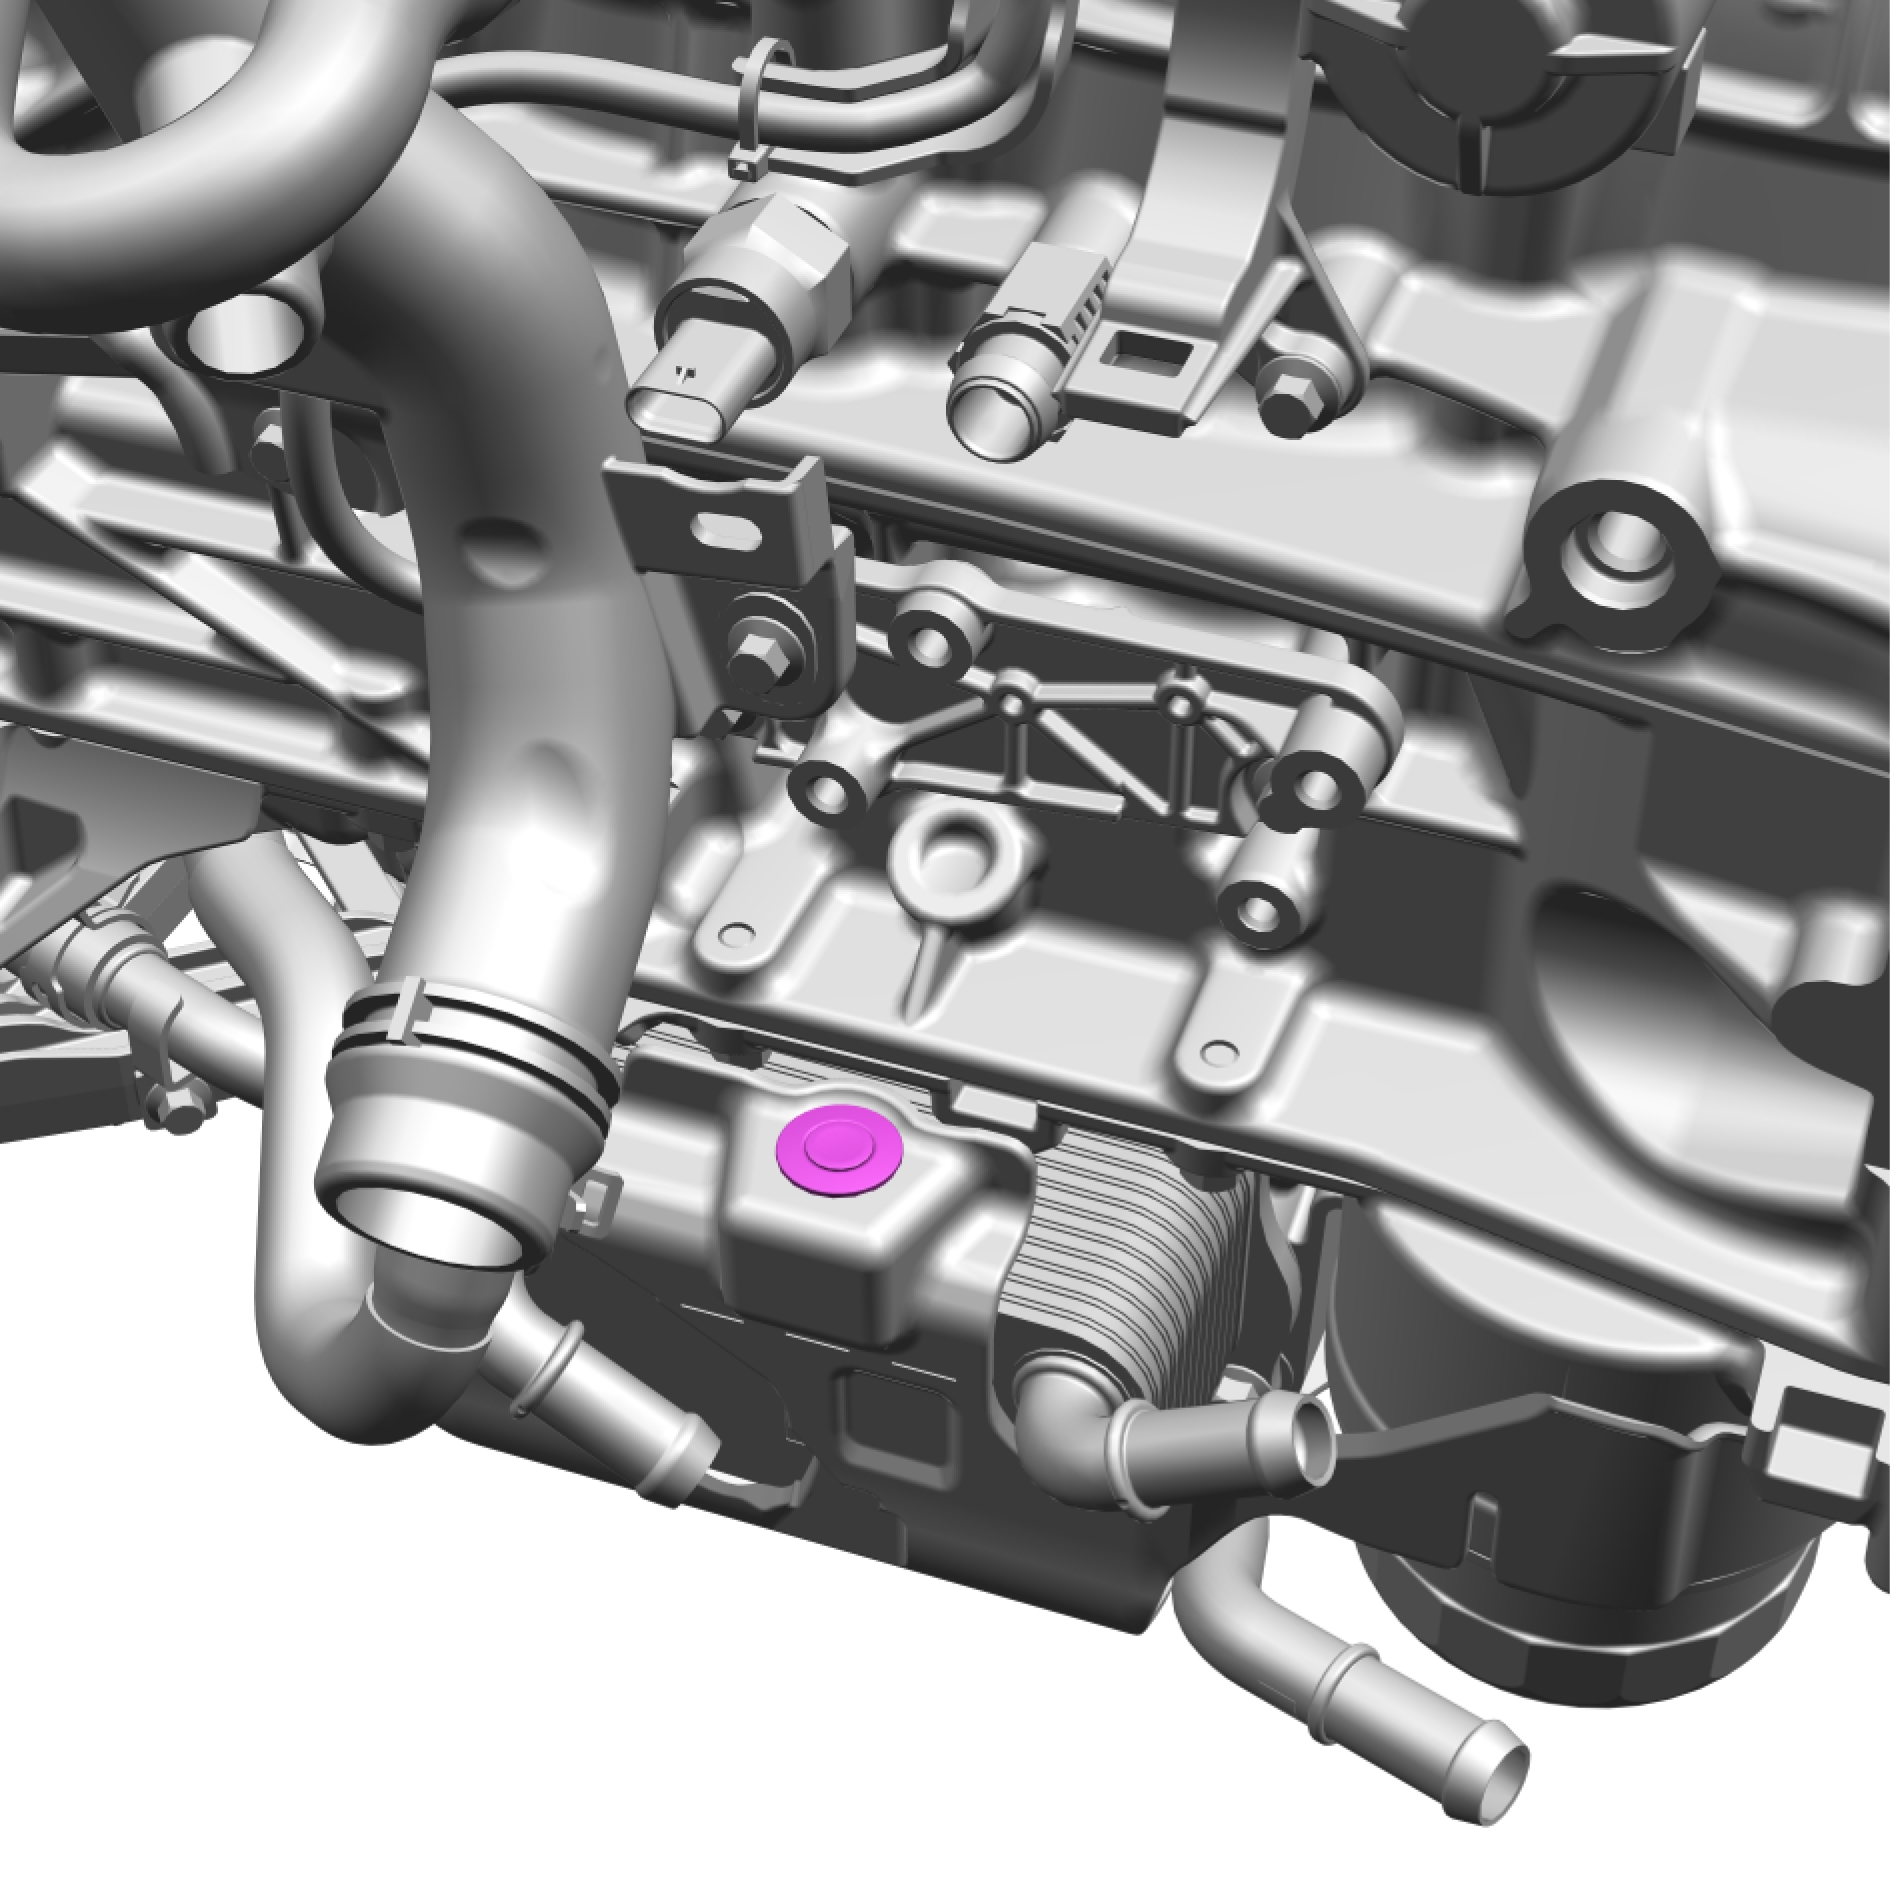
Remove the clip.
Remove the clip.
Remove the marked component.

Release the clamp.

Remove the screws.
Torque: 10 Nm
Remove the marked component.
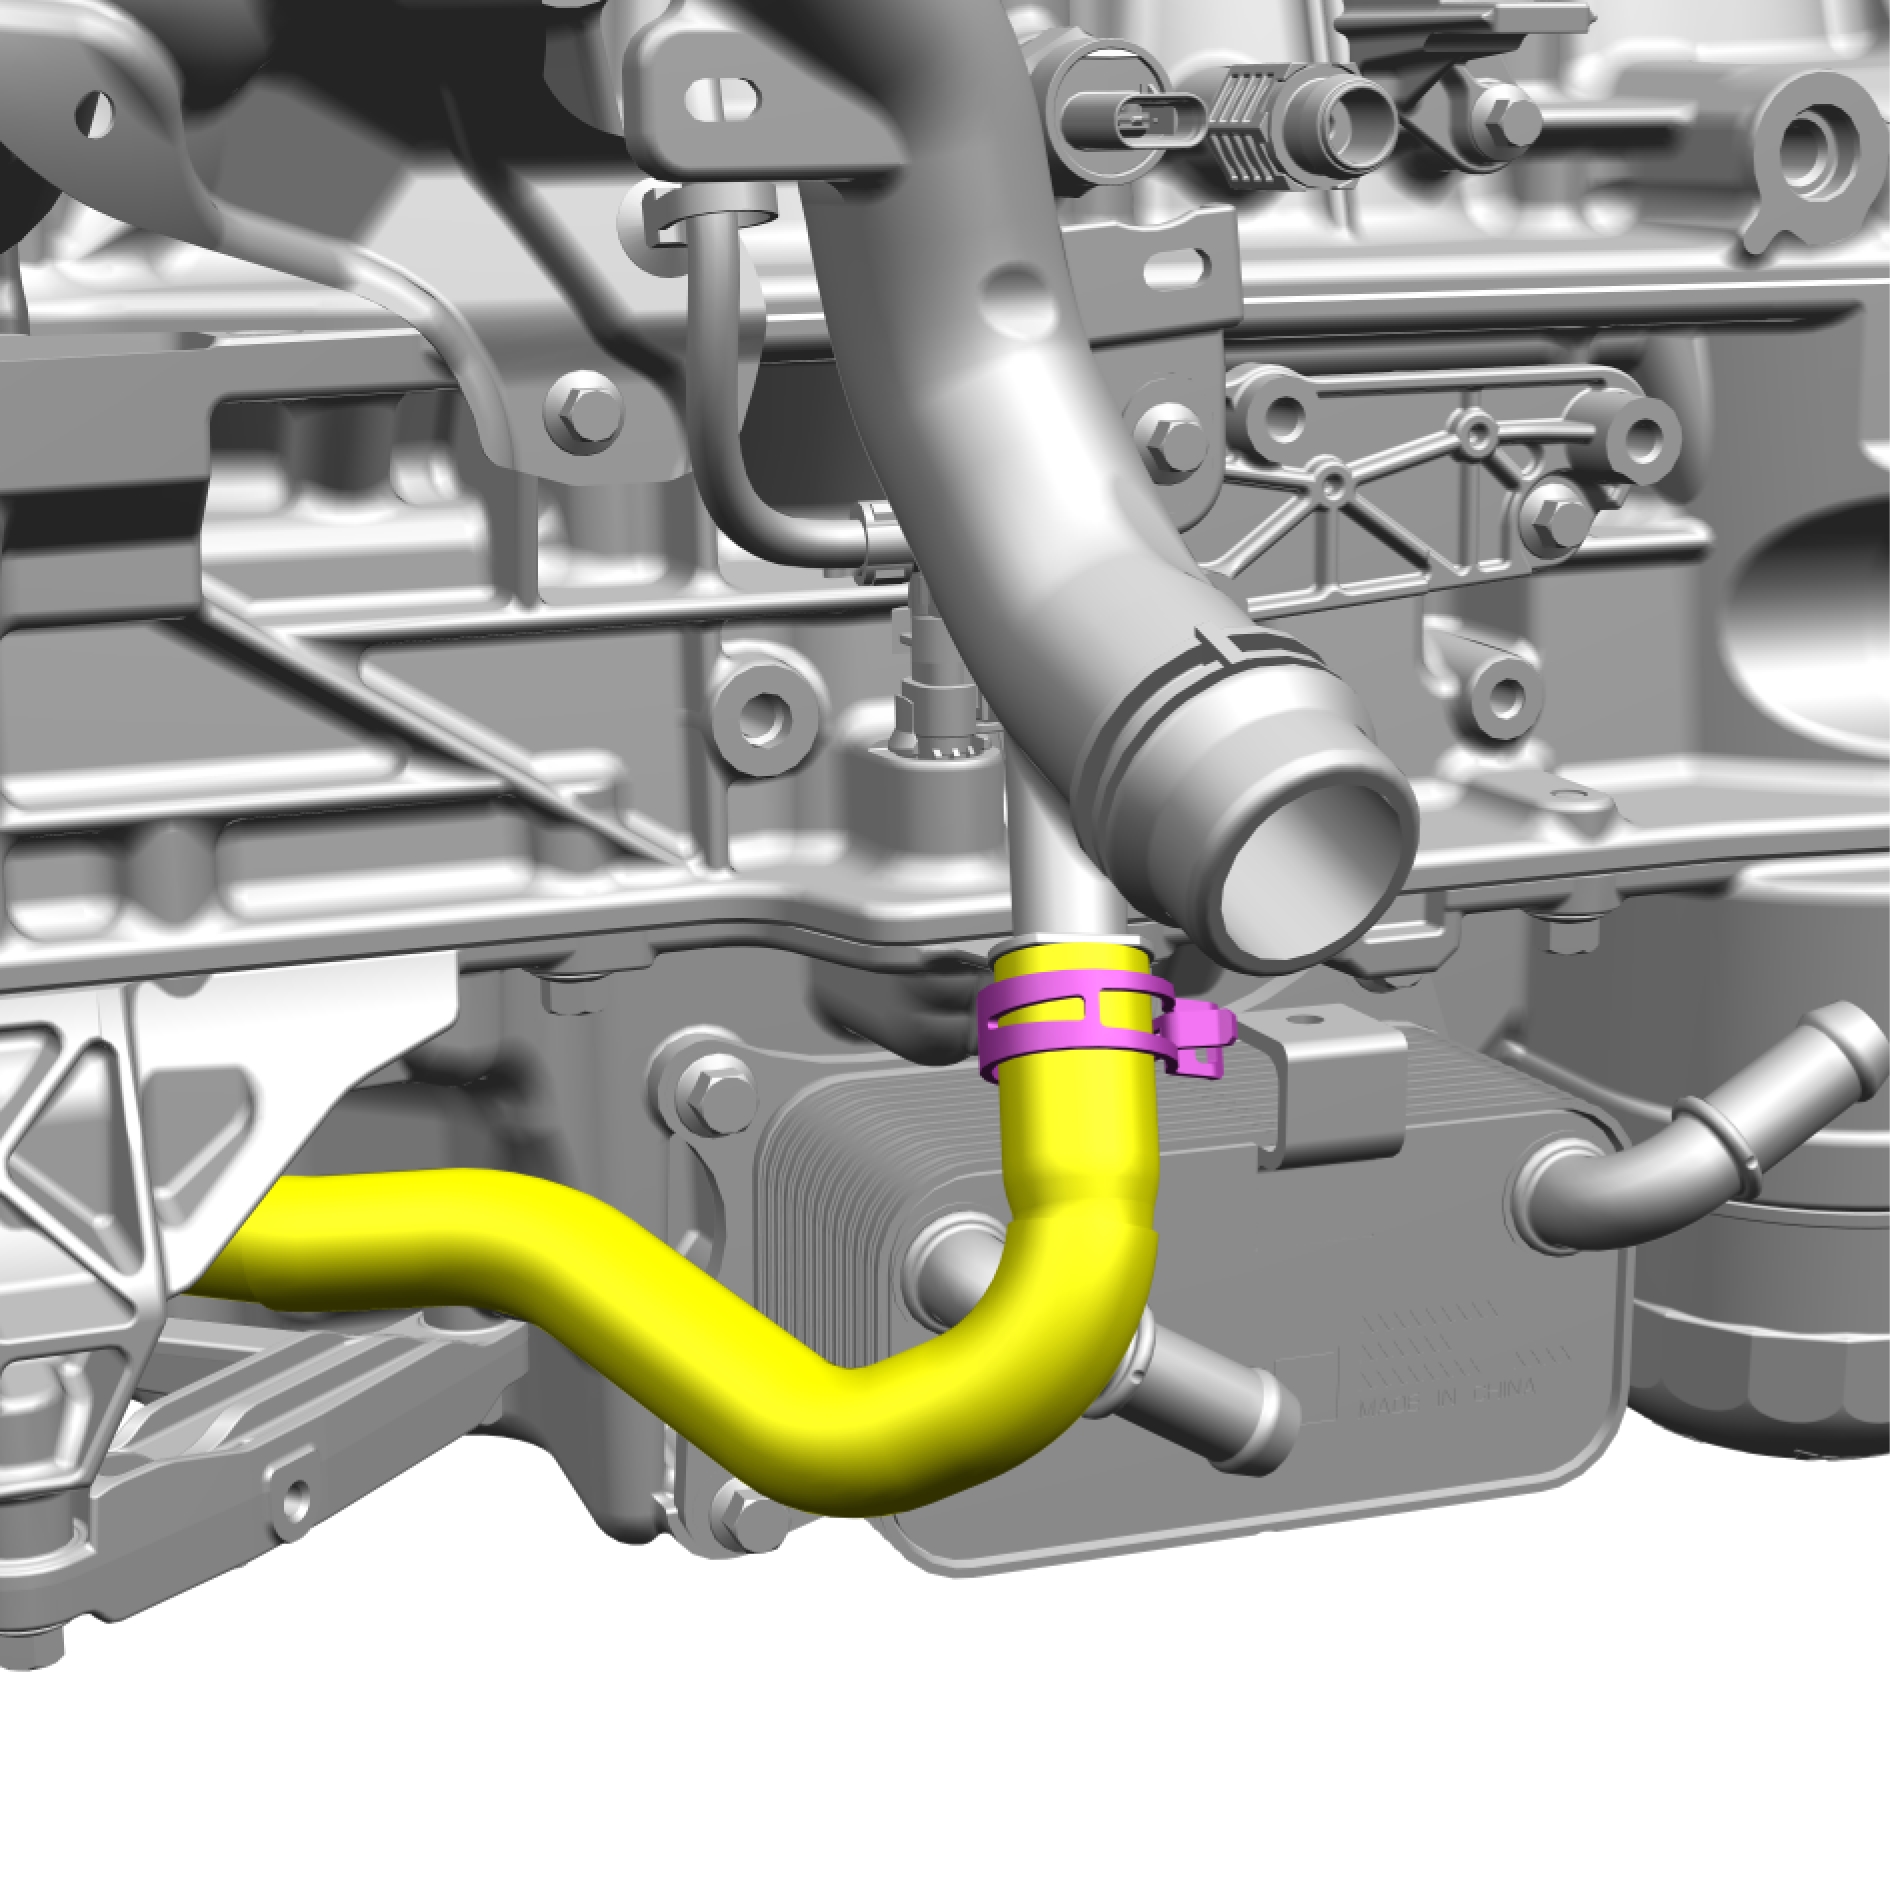
Release the clamp.
Fold away the marked component.
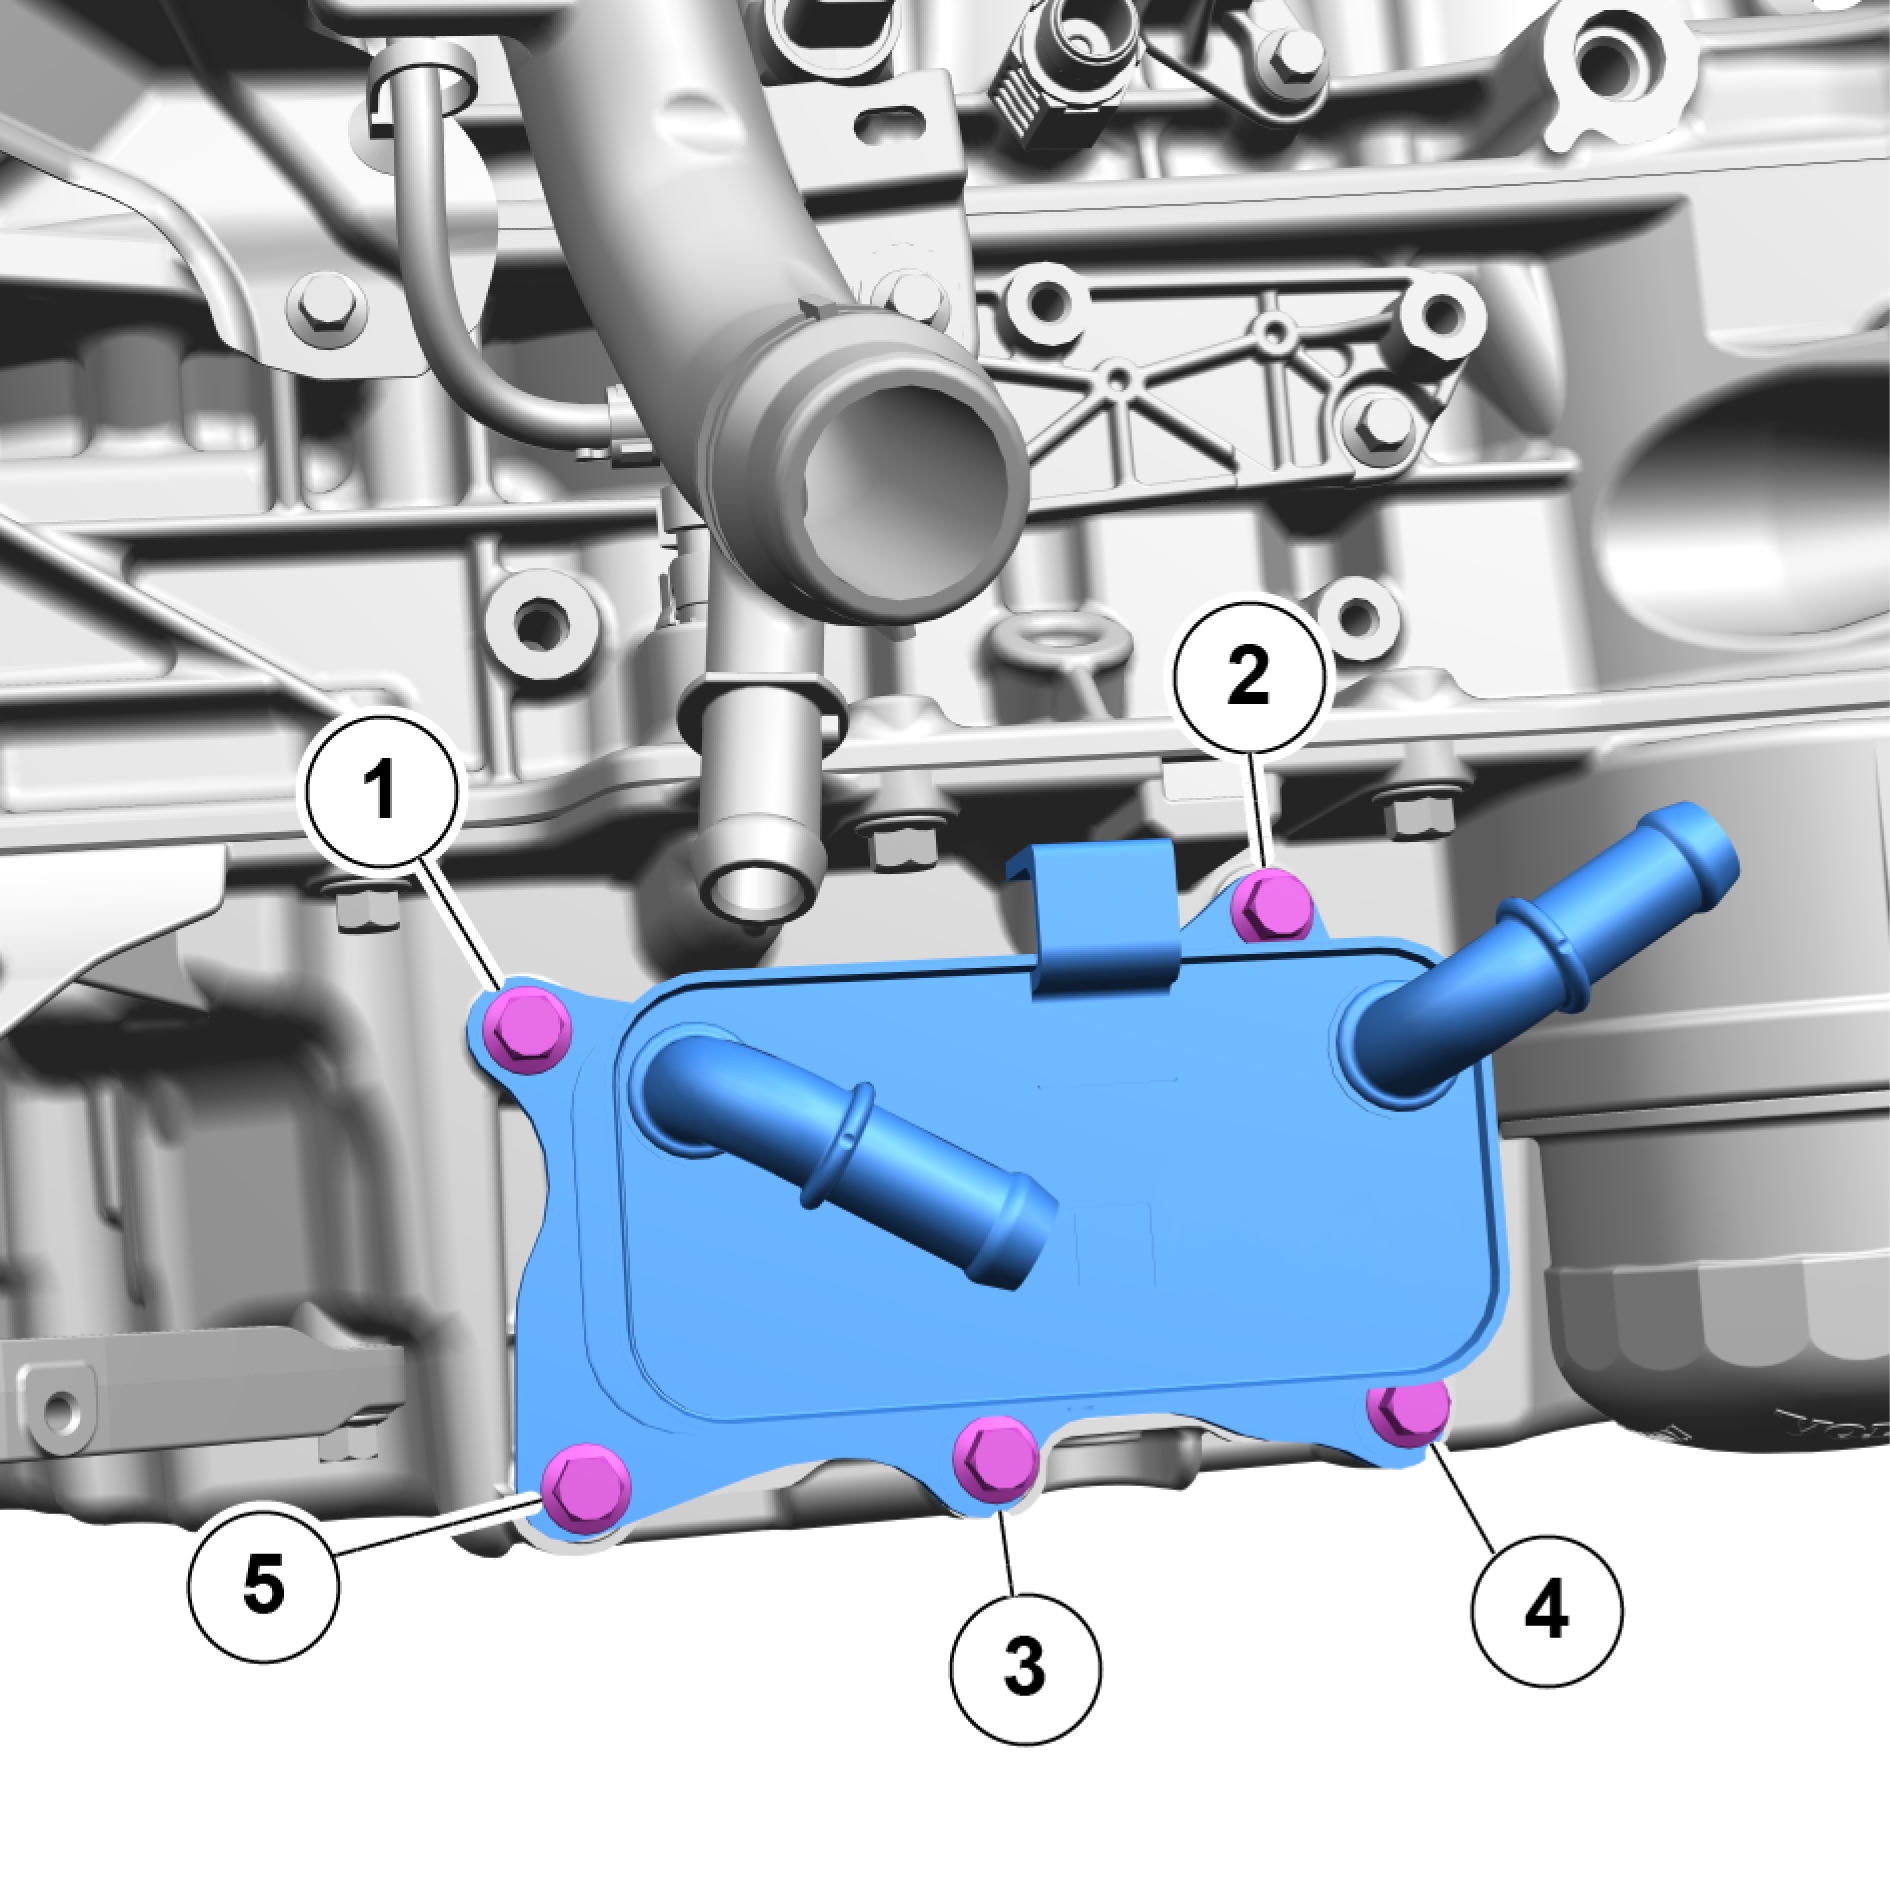
Tightening schedule for the installation.
Remove the screws.
Torque: 16 Nm
Remove the marked component.
Remove and discard the marked components.
Installation
Install in reverse order.
Pressure sensor - fuel rail, replace
Removal
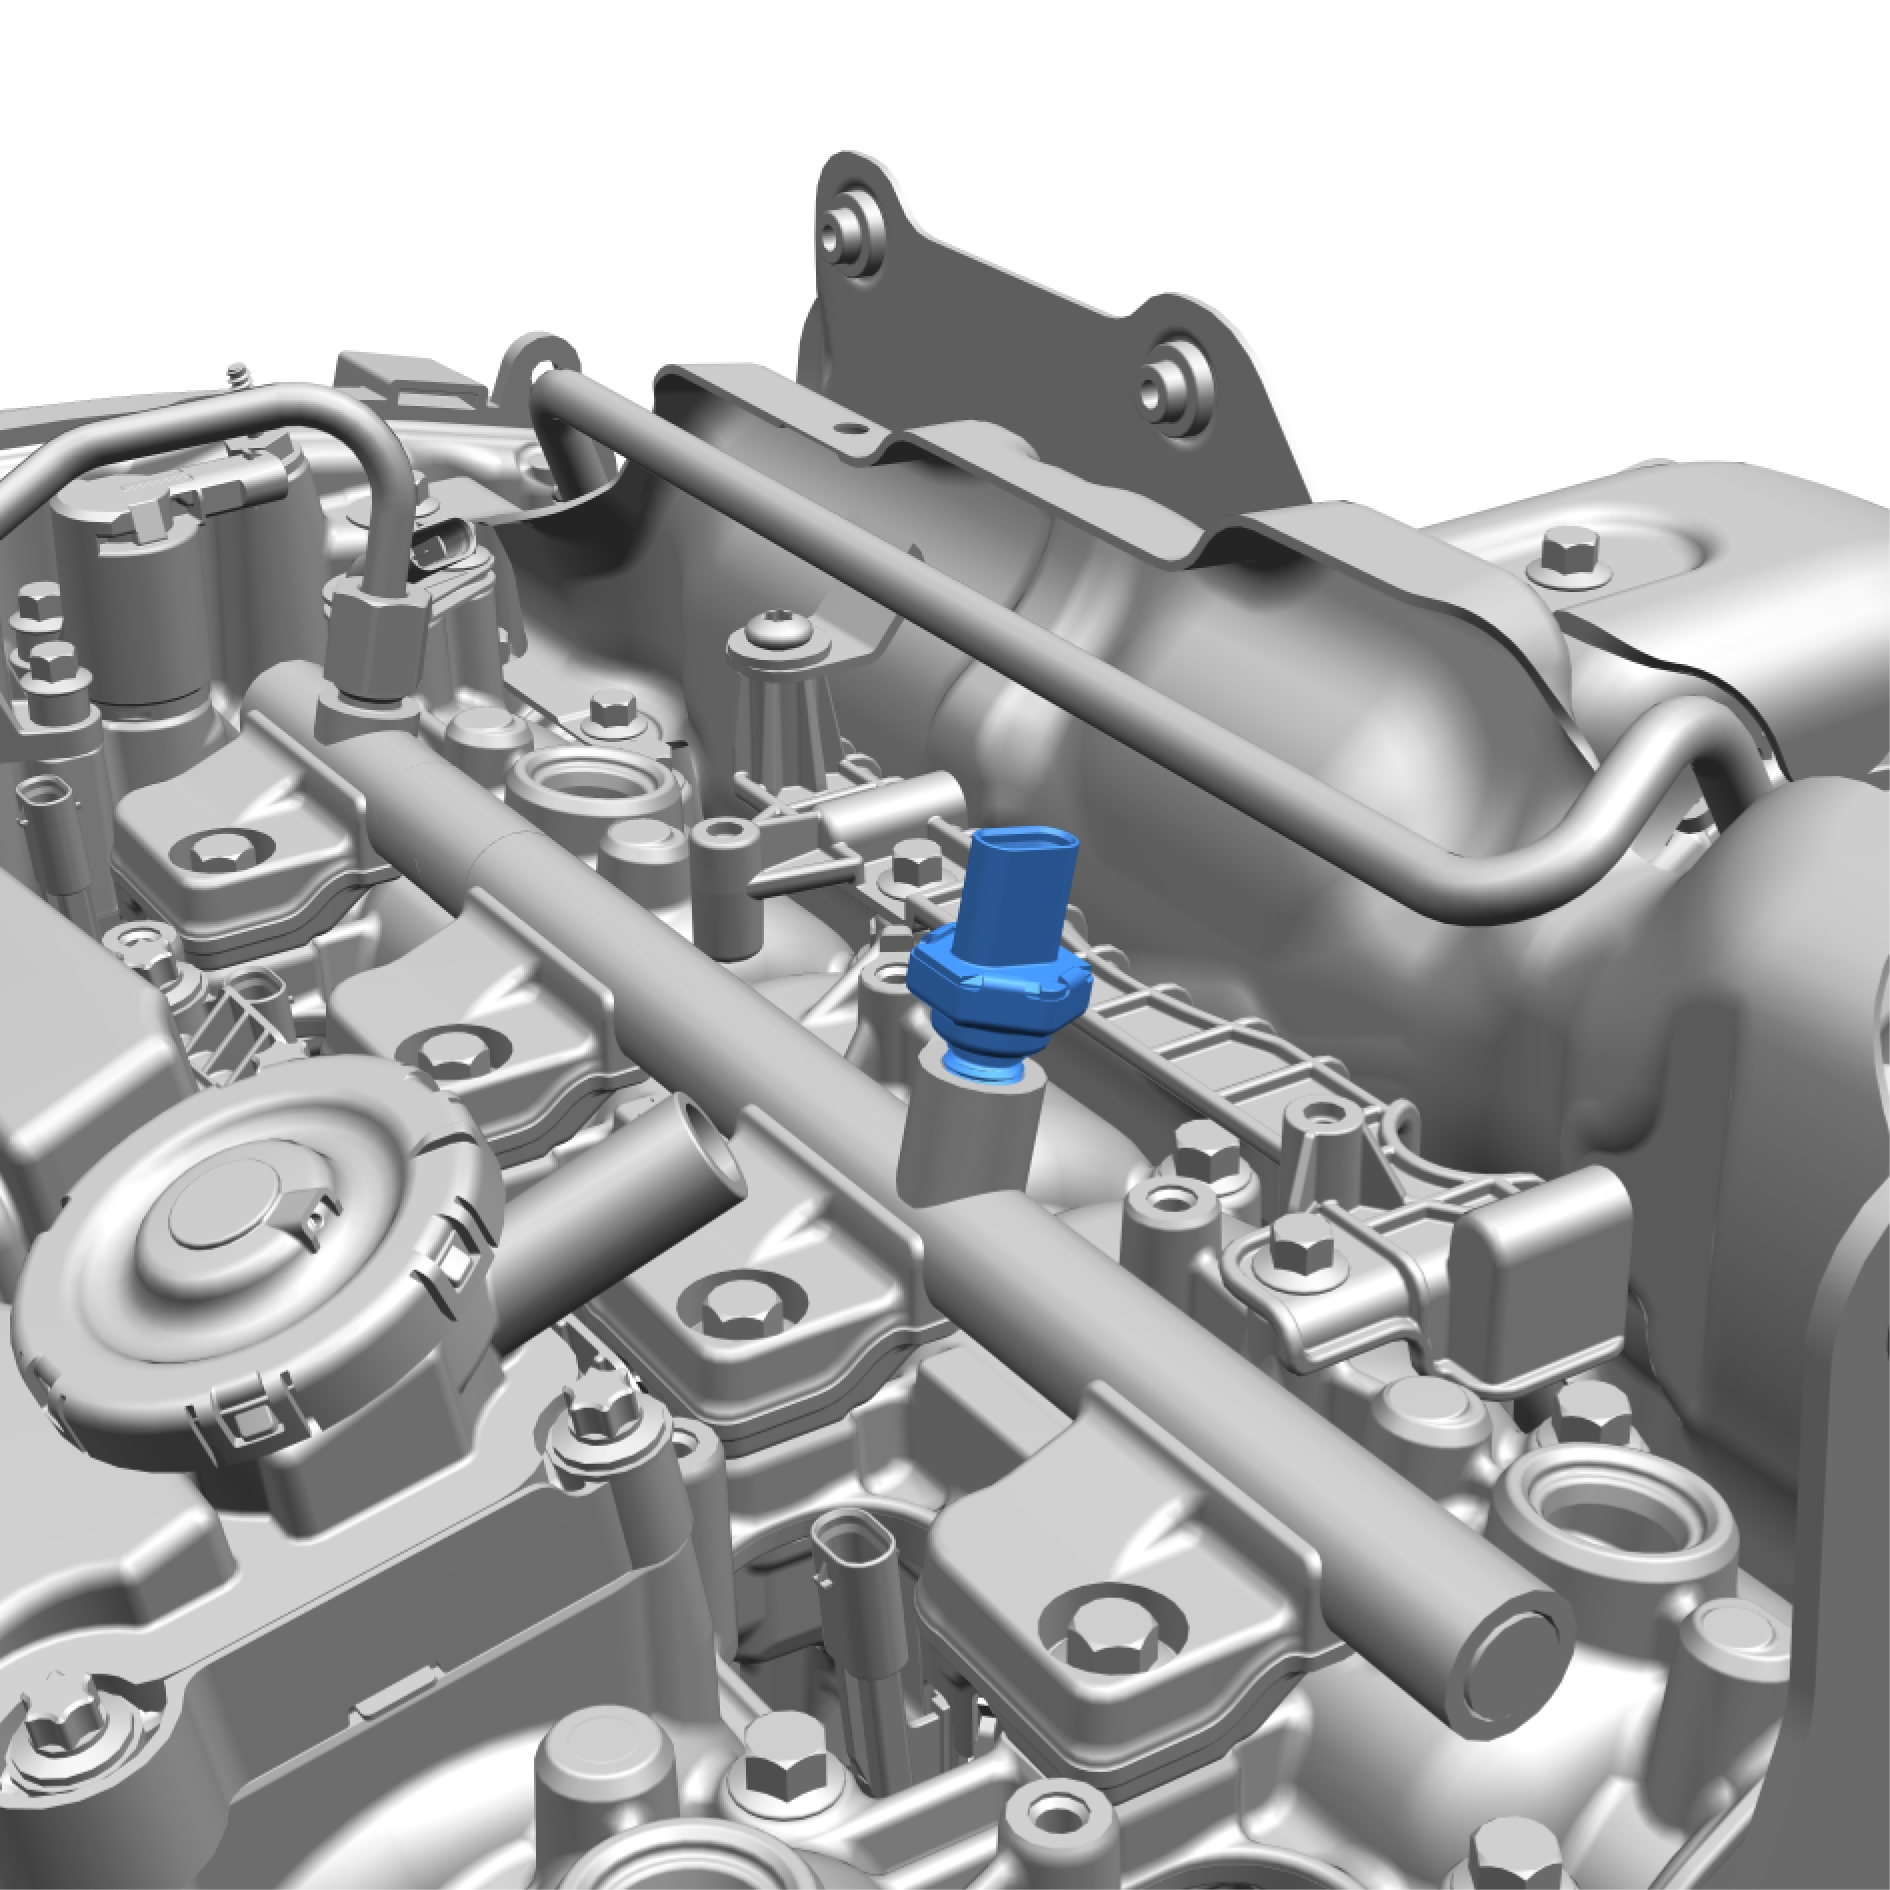
Remove the marked component.
Installation
Install in reverse order.
Fuel rail, replace
Removal
Remove the screws.
Torque: 10 Nm
Remove the marked components.
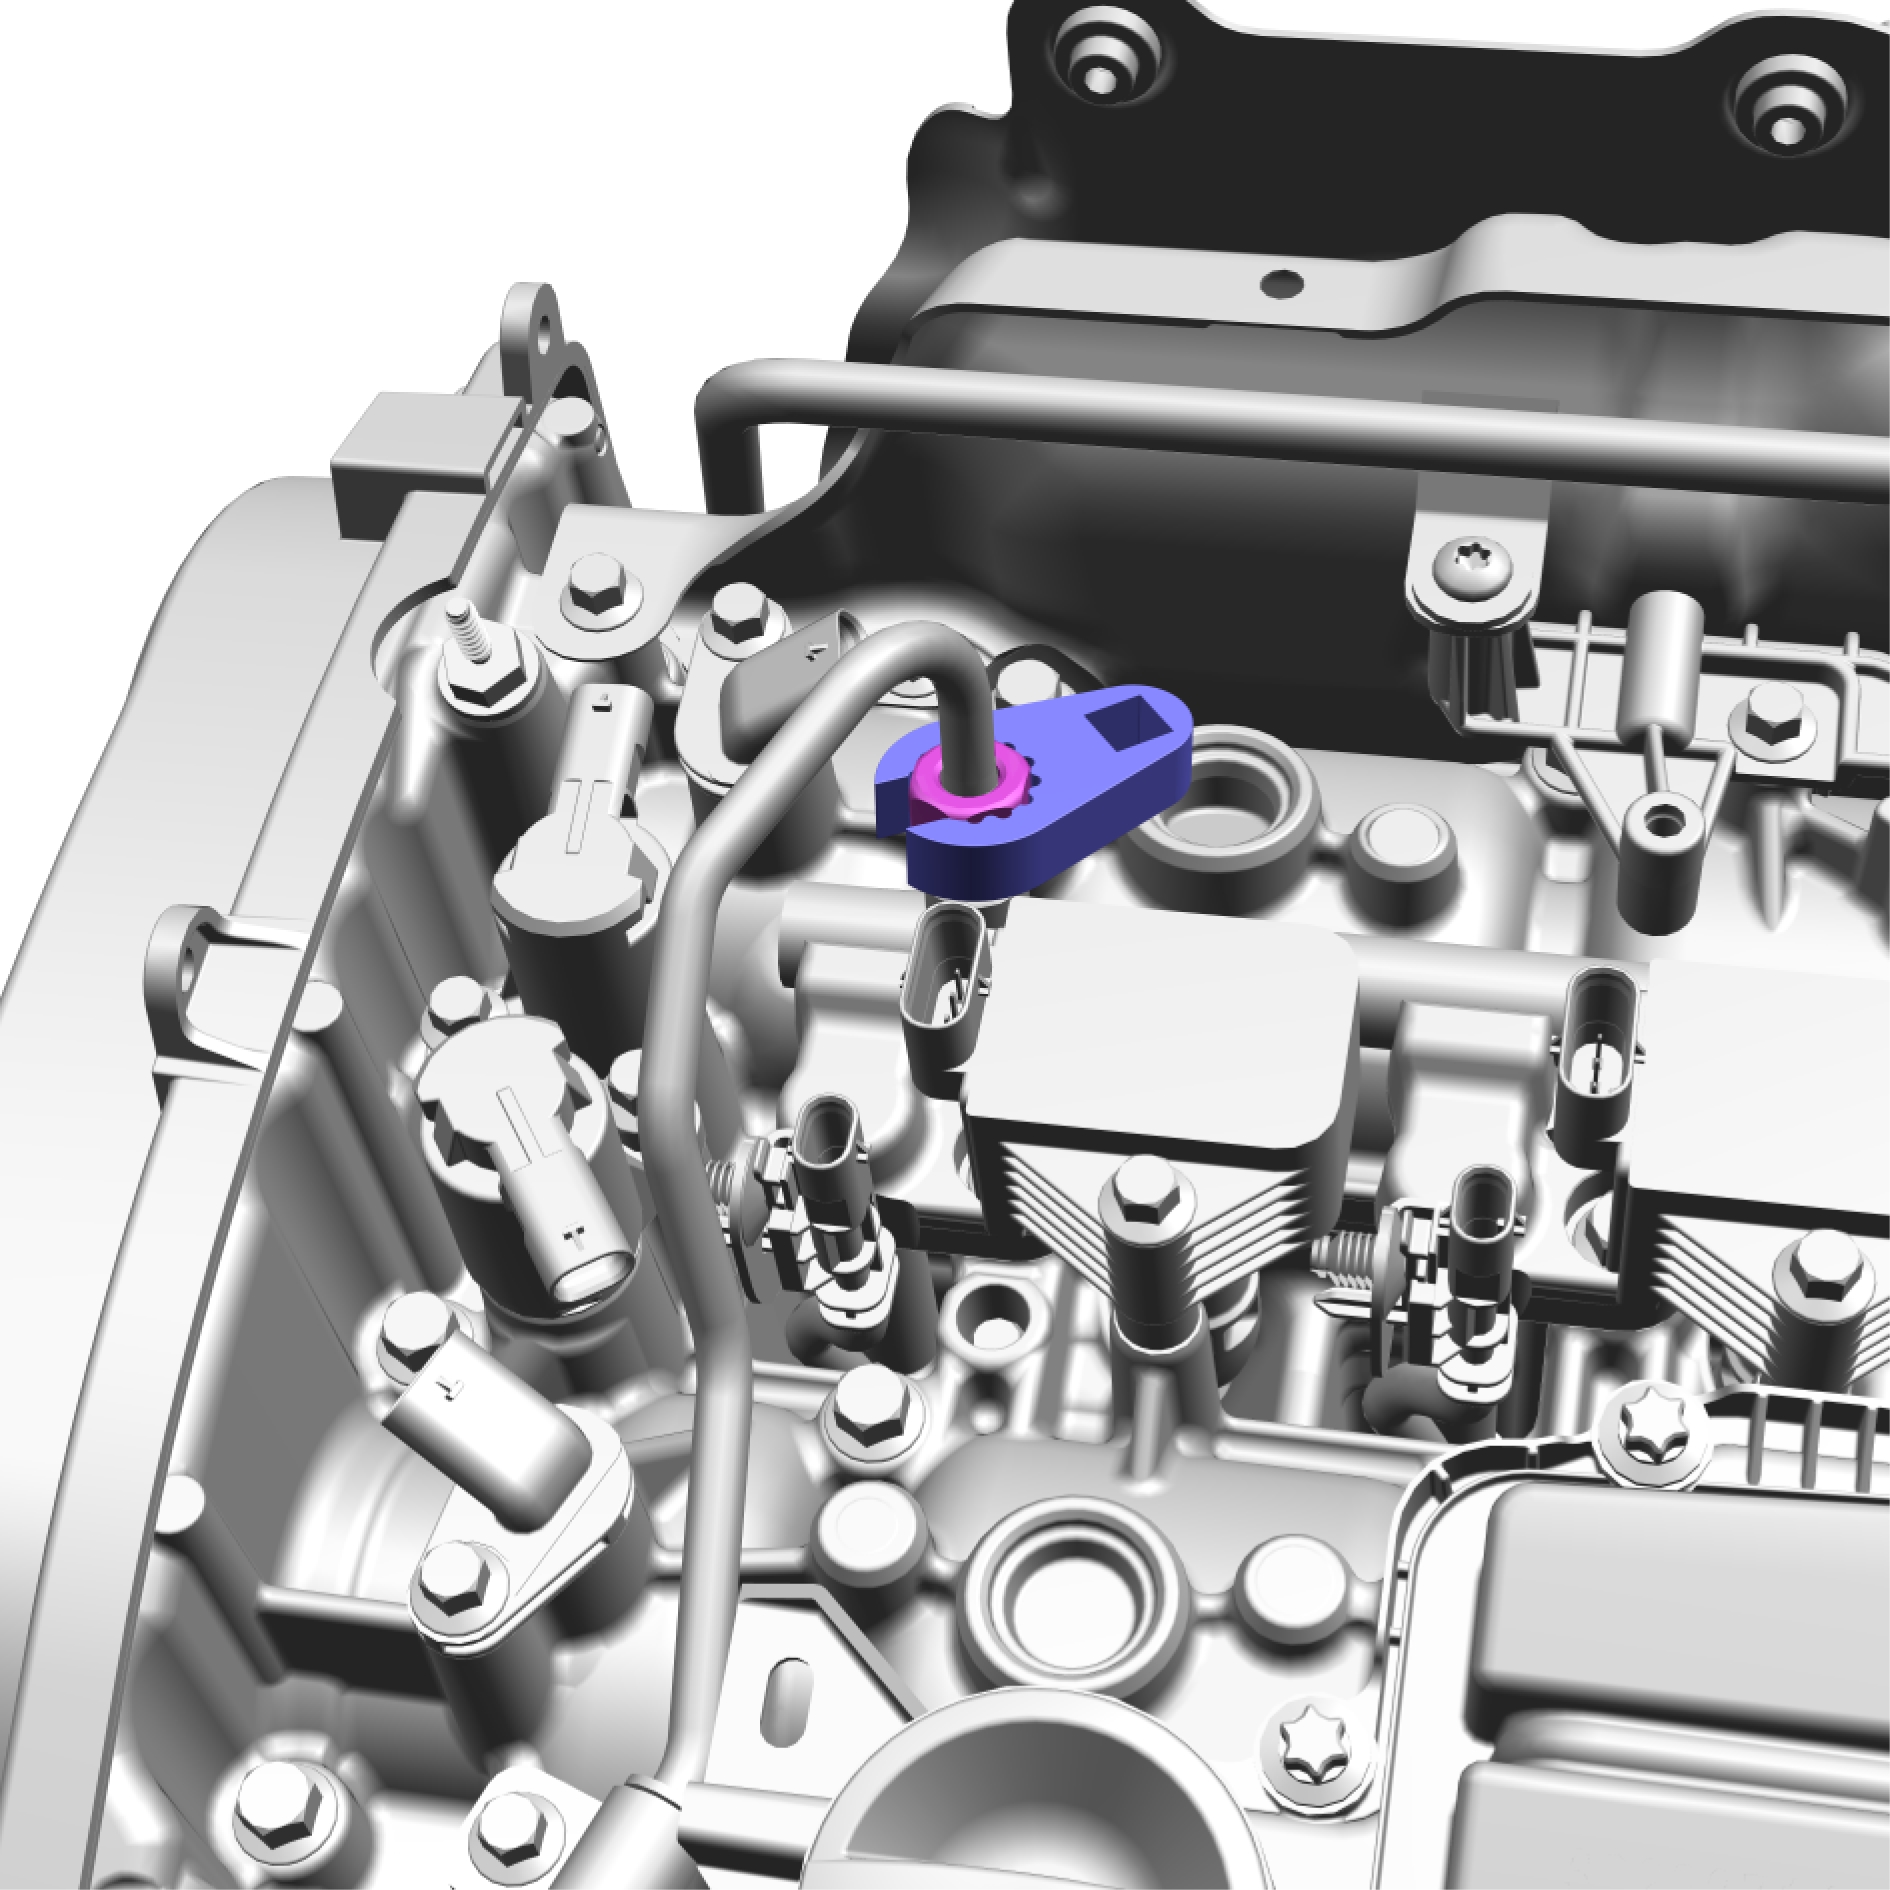
Install special tool: 981 4129
Loosen the nut.
Torque, Step 1: 18 Nm Step 2: 30 Nm
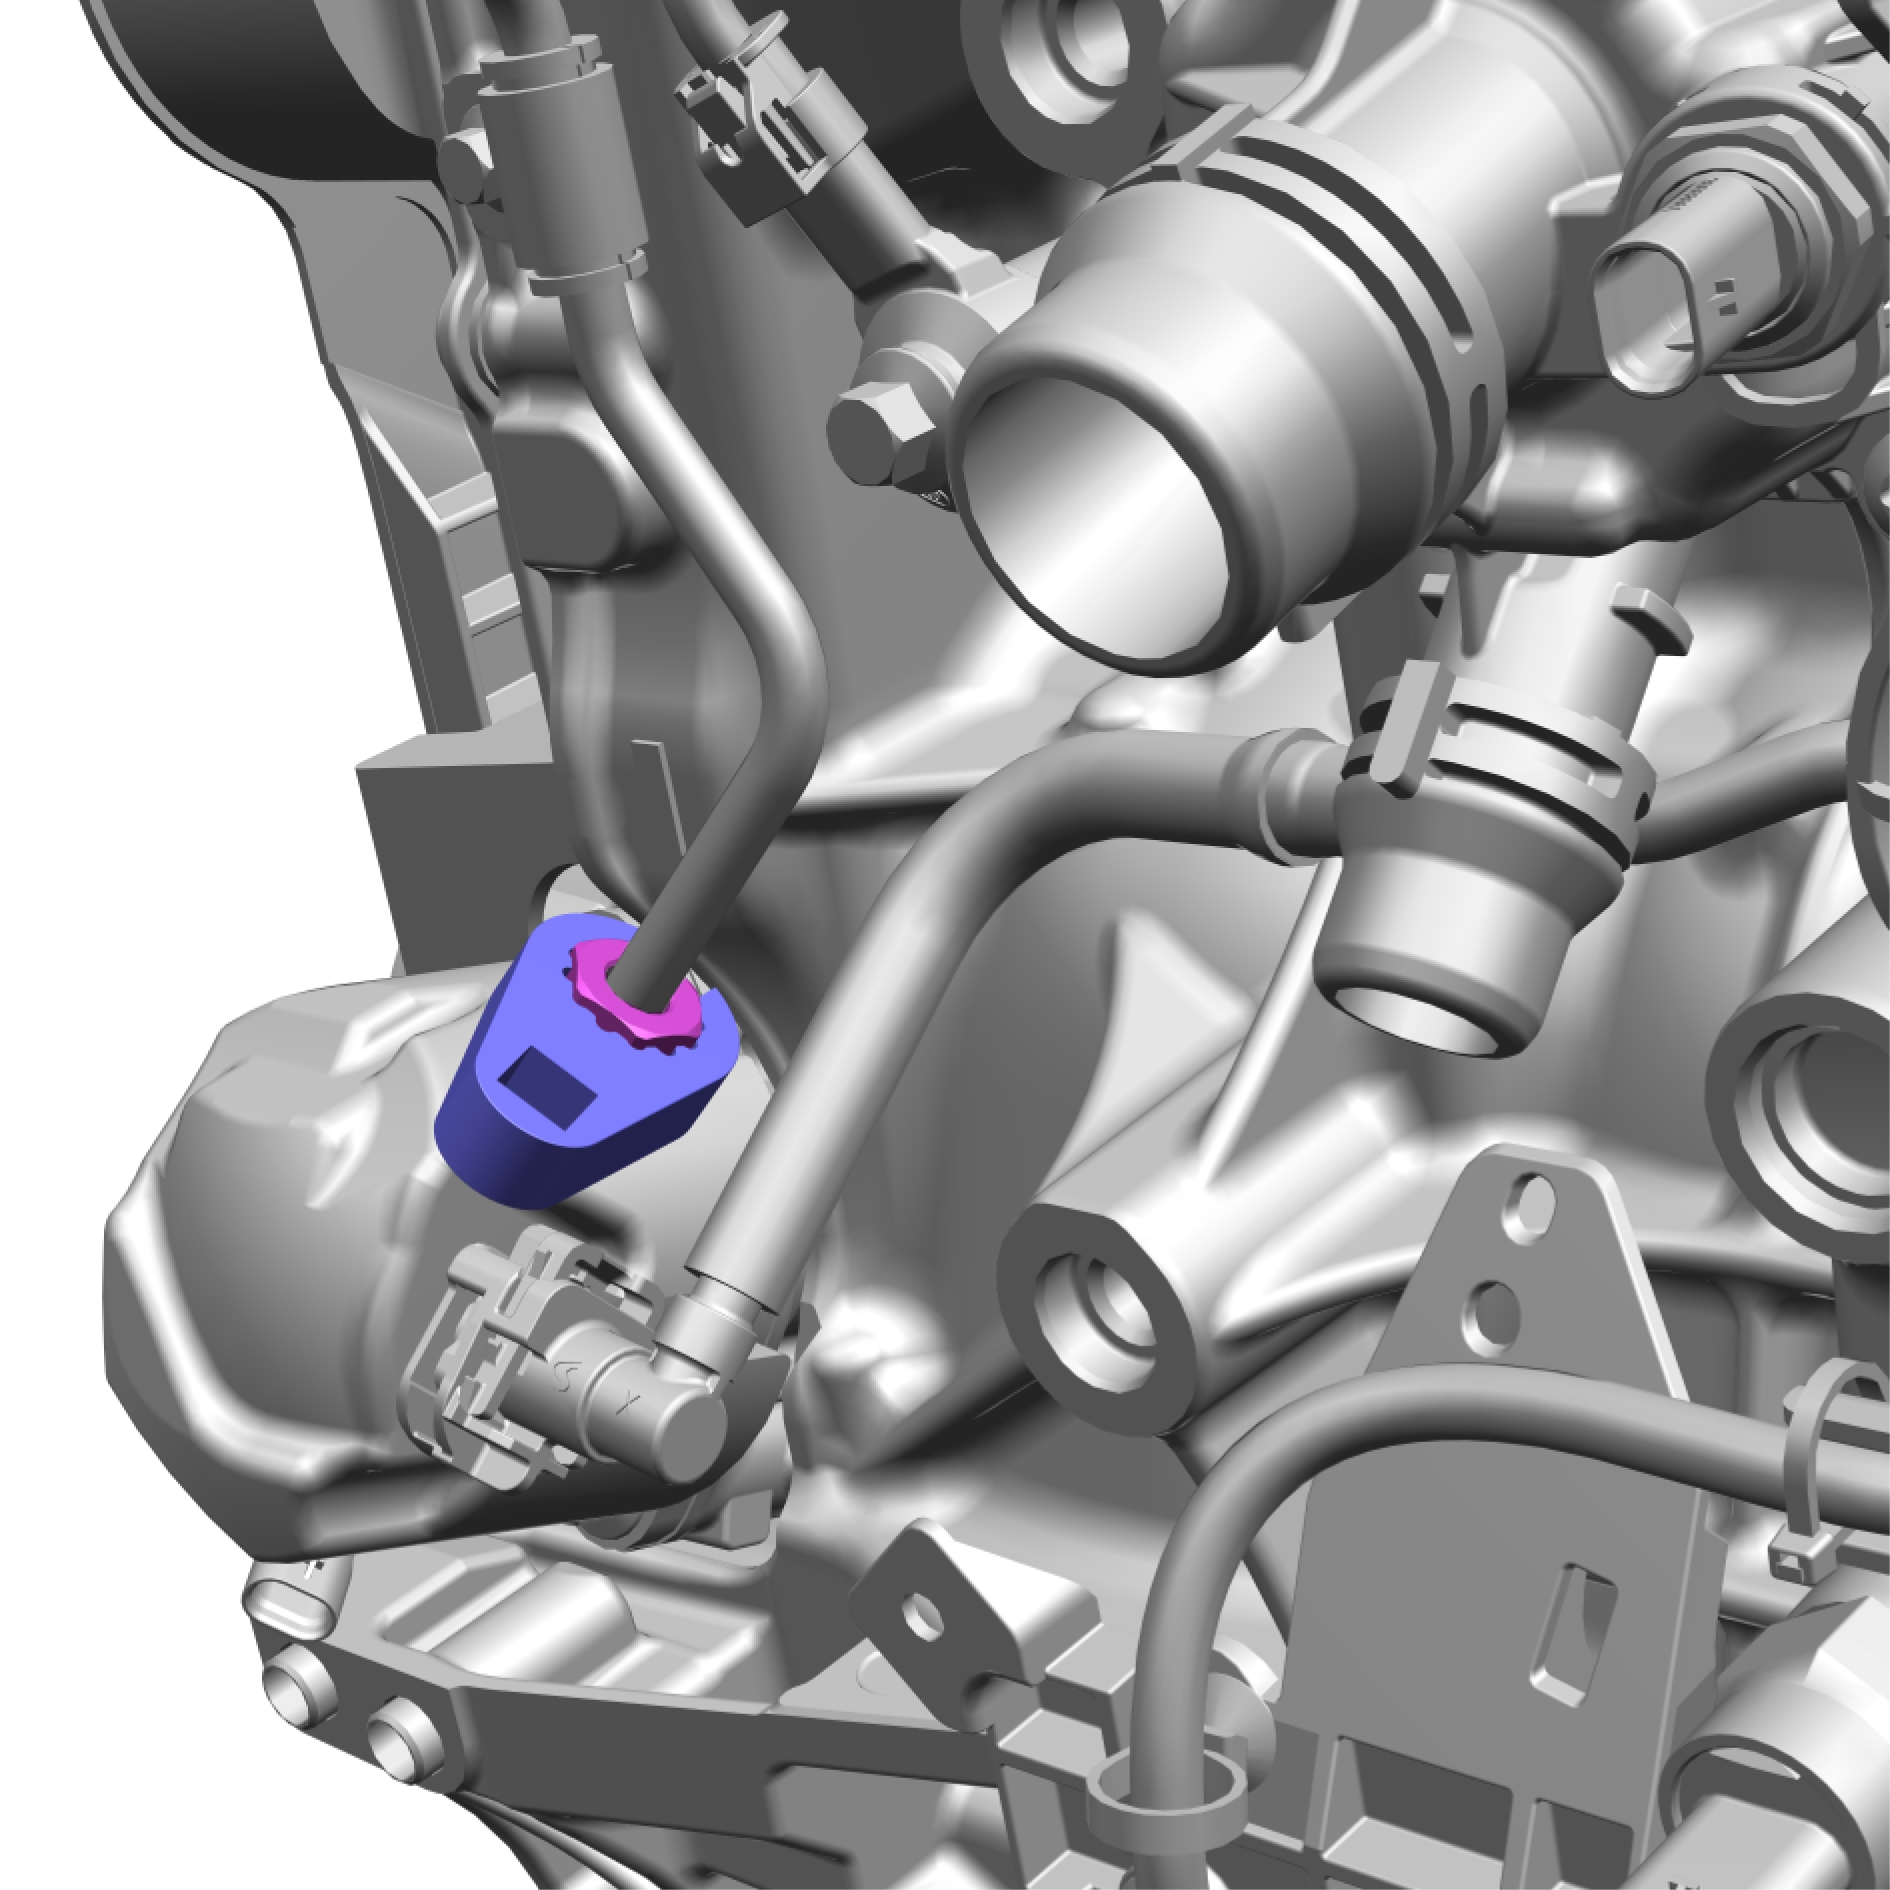
Install special tool: 981 4129
Loosen the nut.
Torque, Step 1: 18 Nm Step 2: 30 Nm
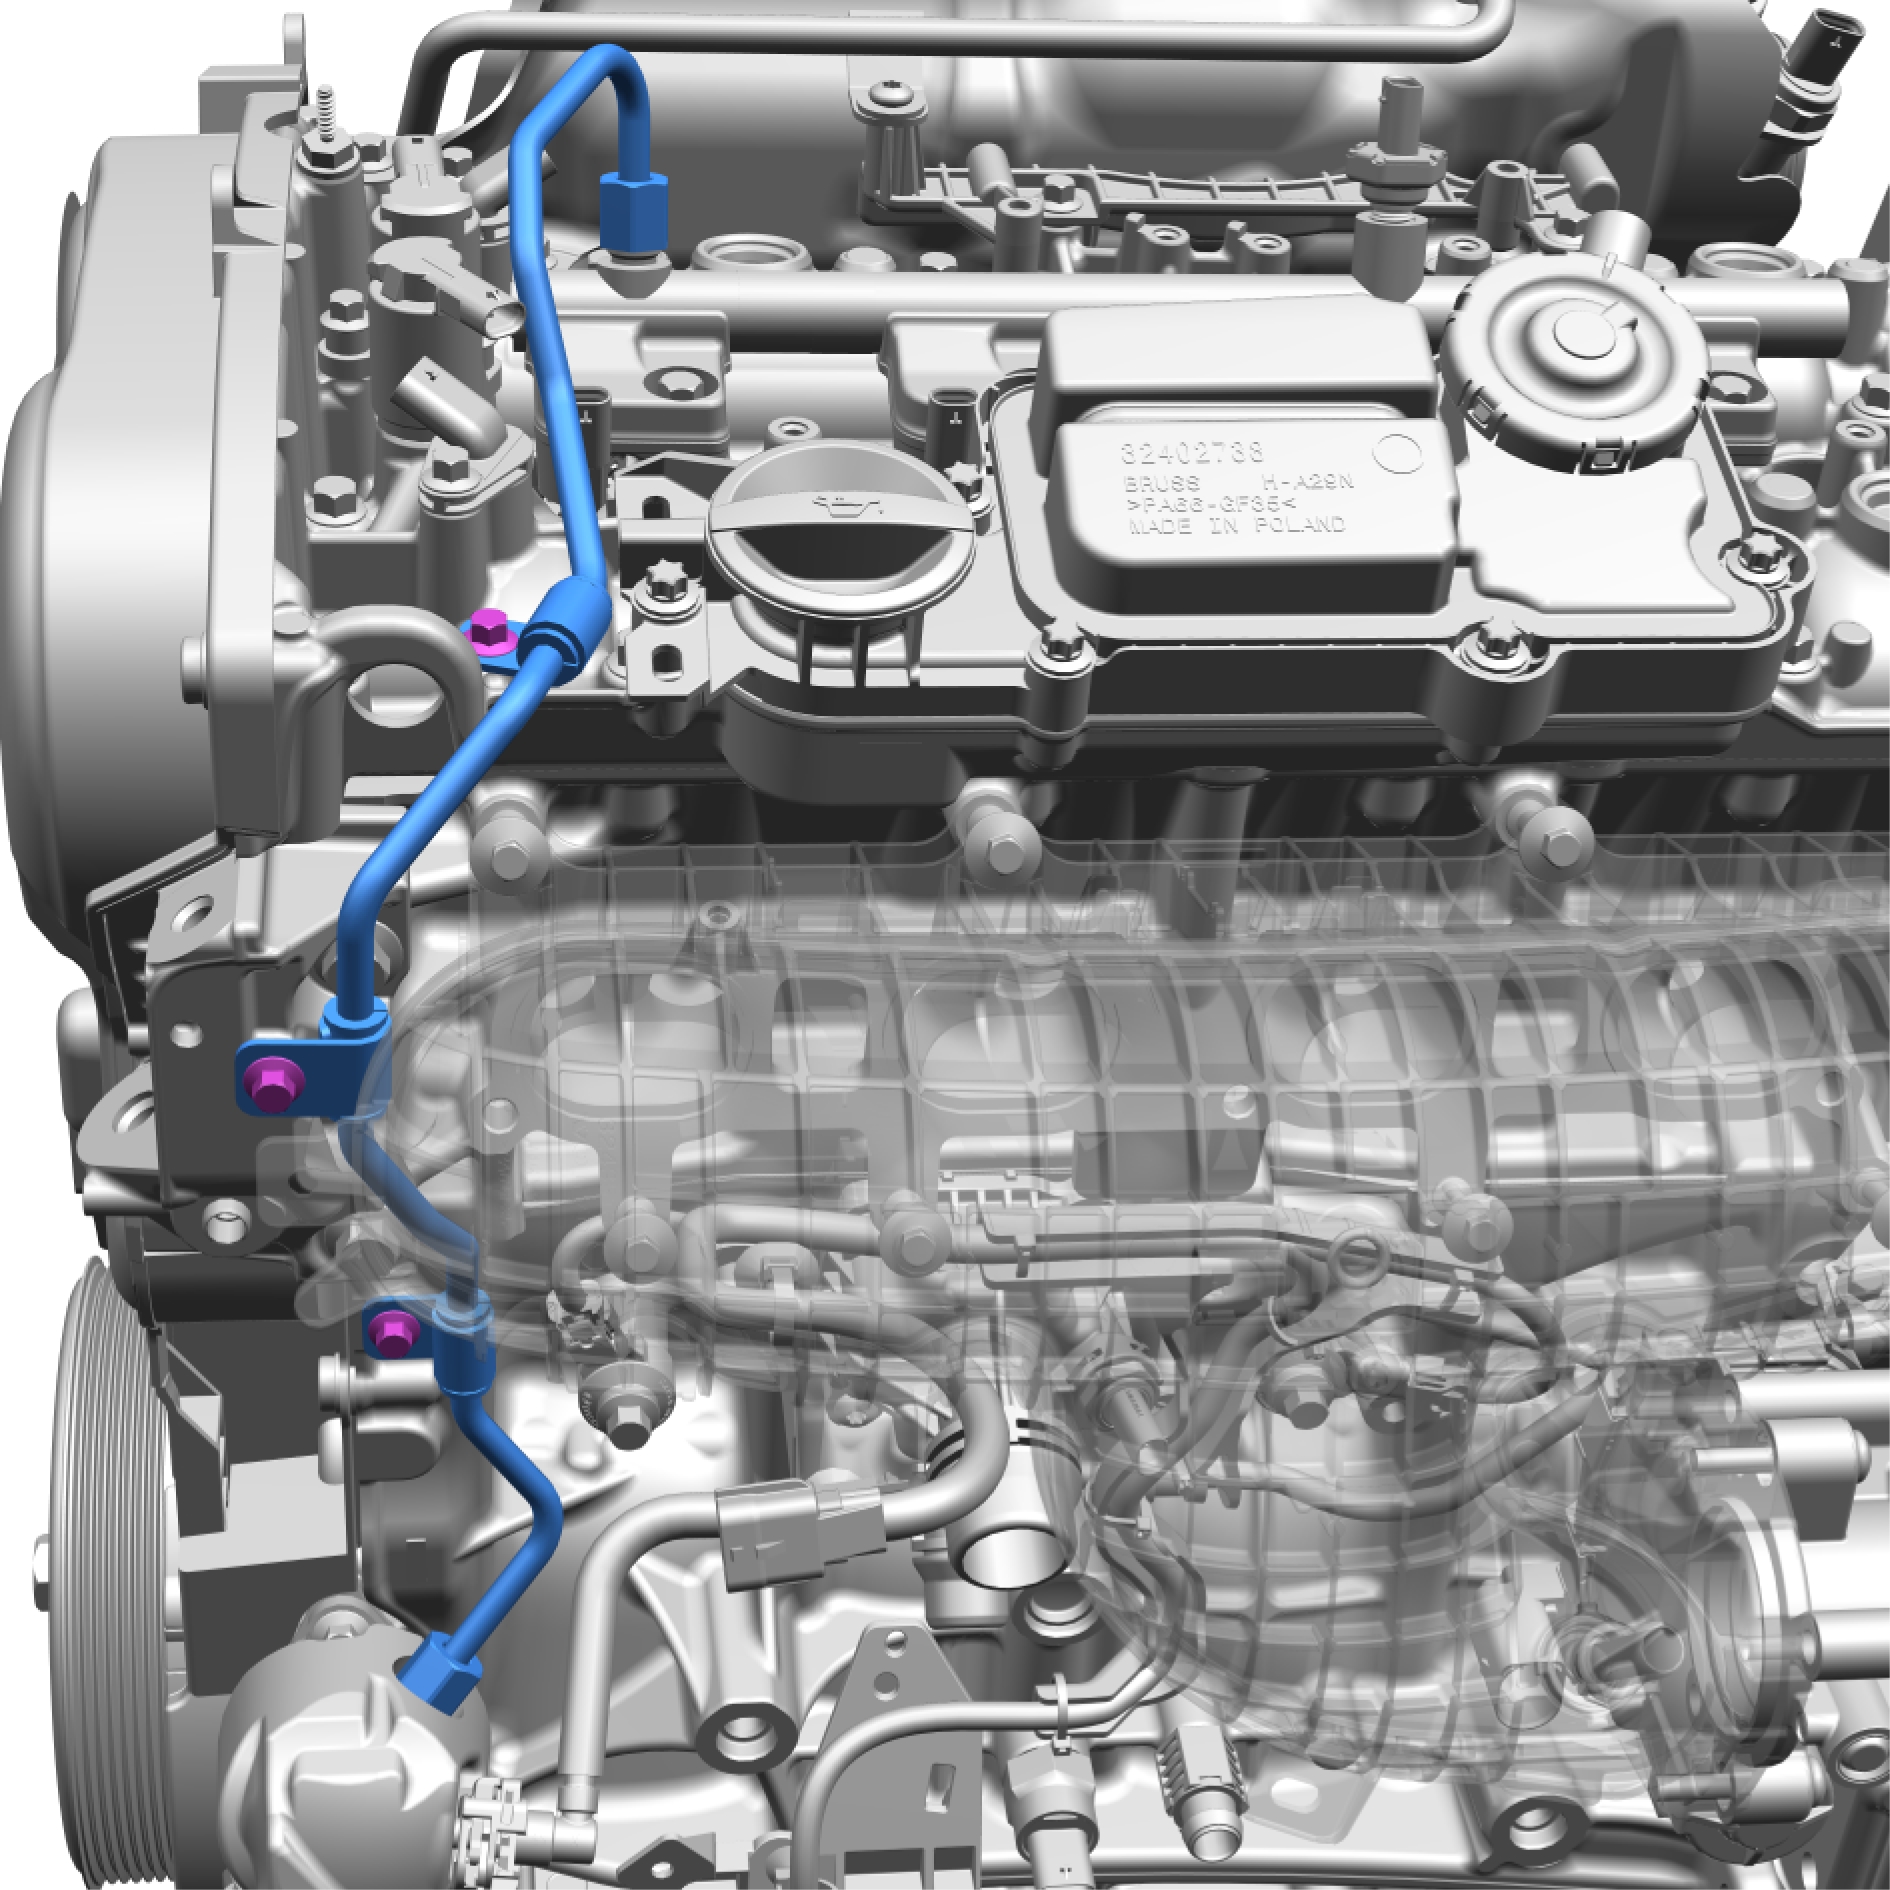
Remove the screws.
Torque: 10 Nm
Remove the marked component.
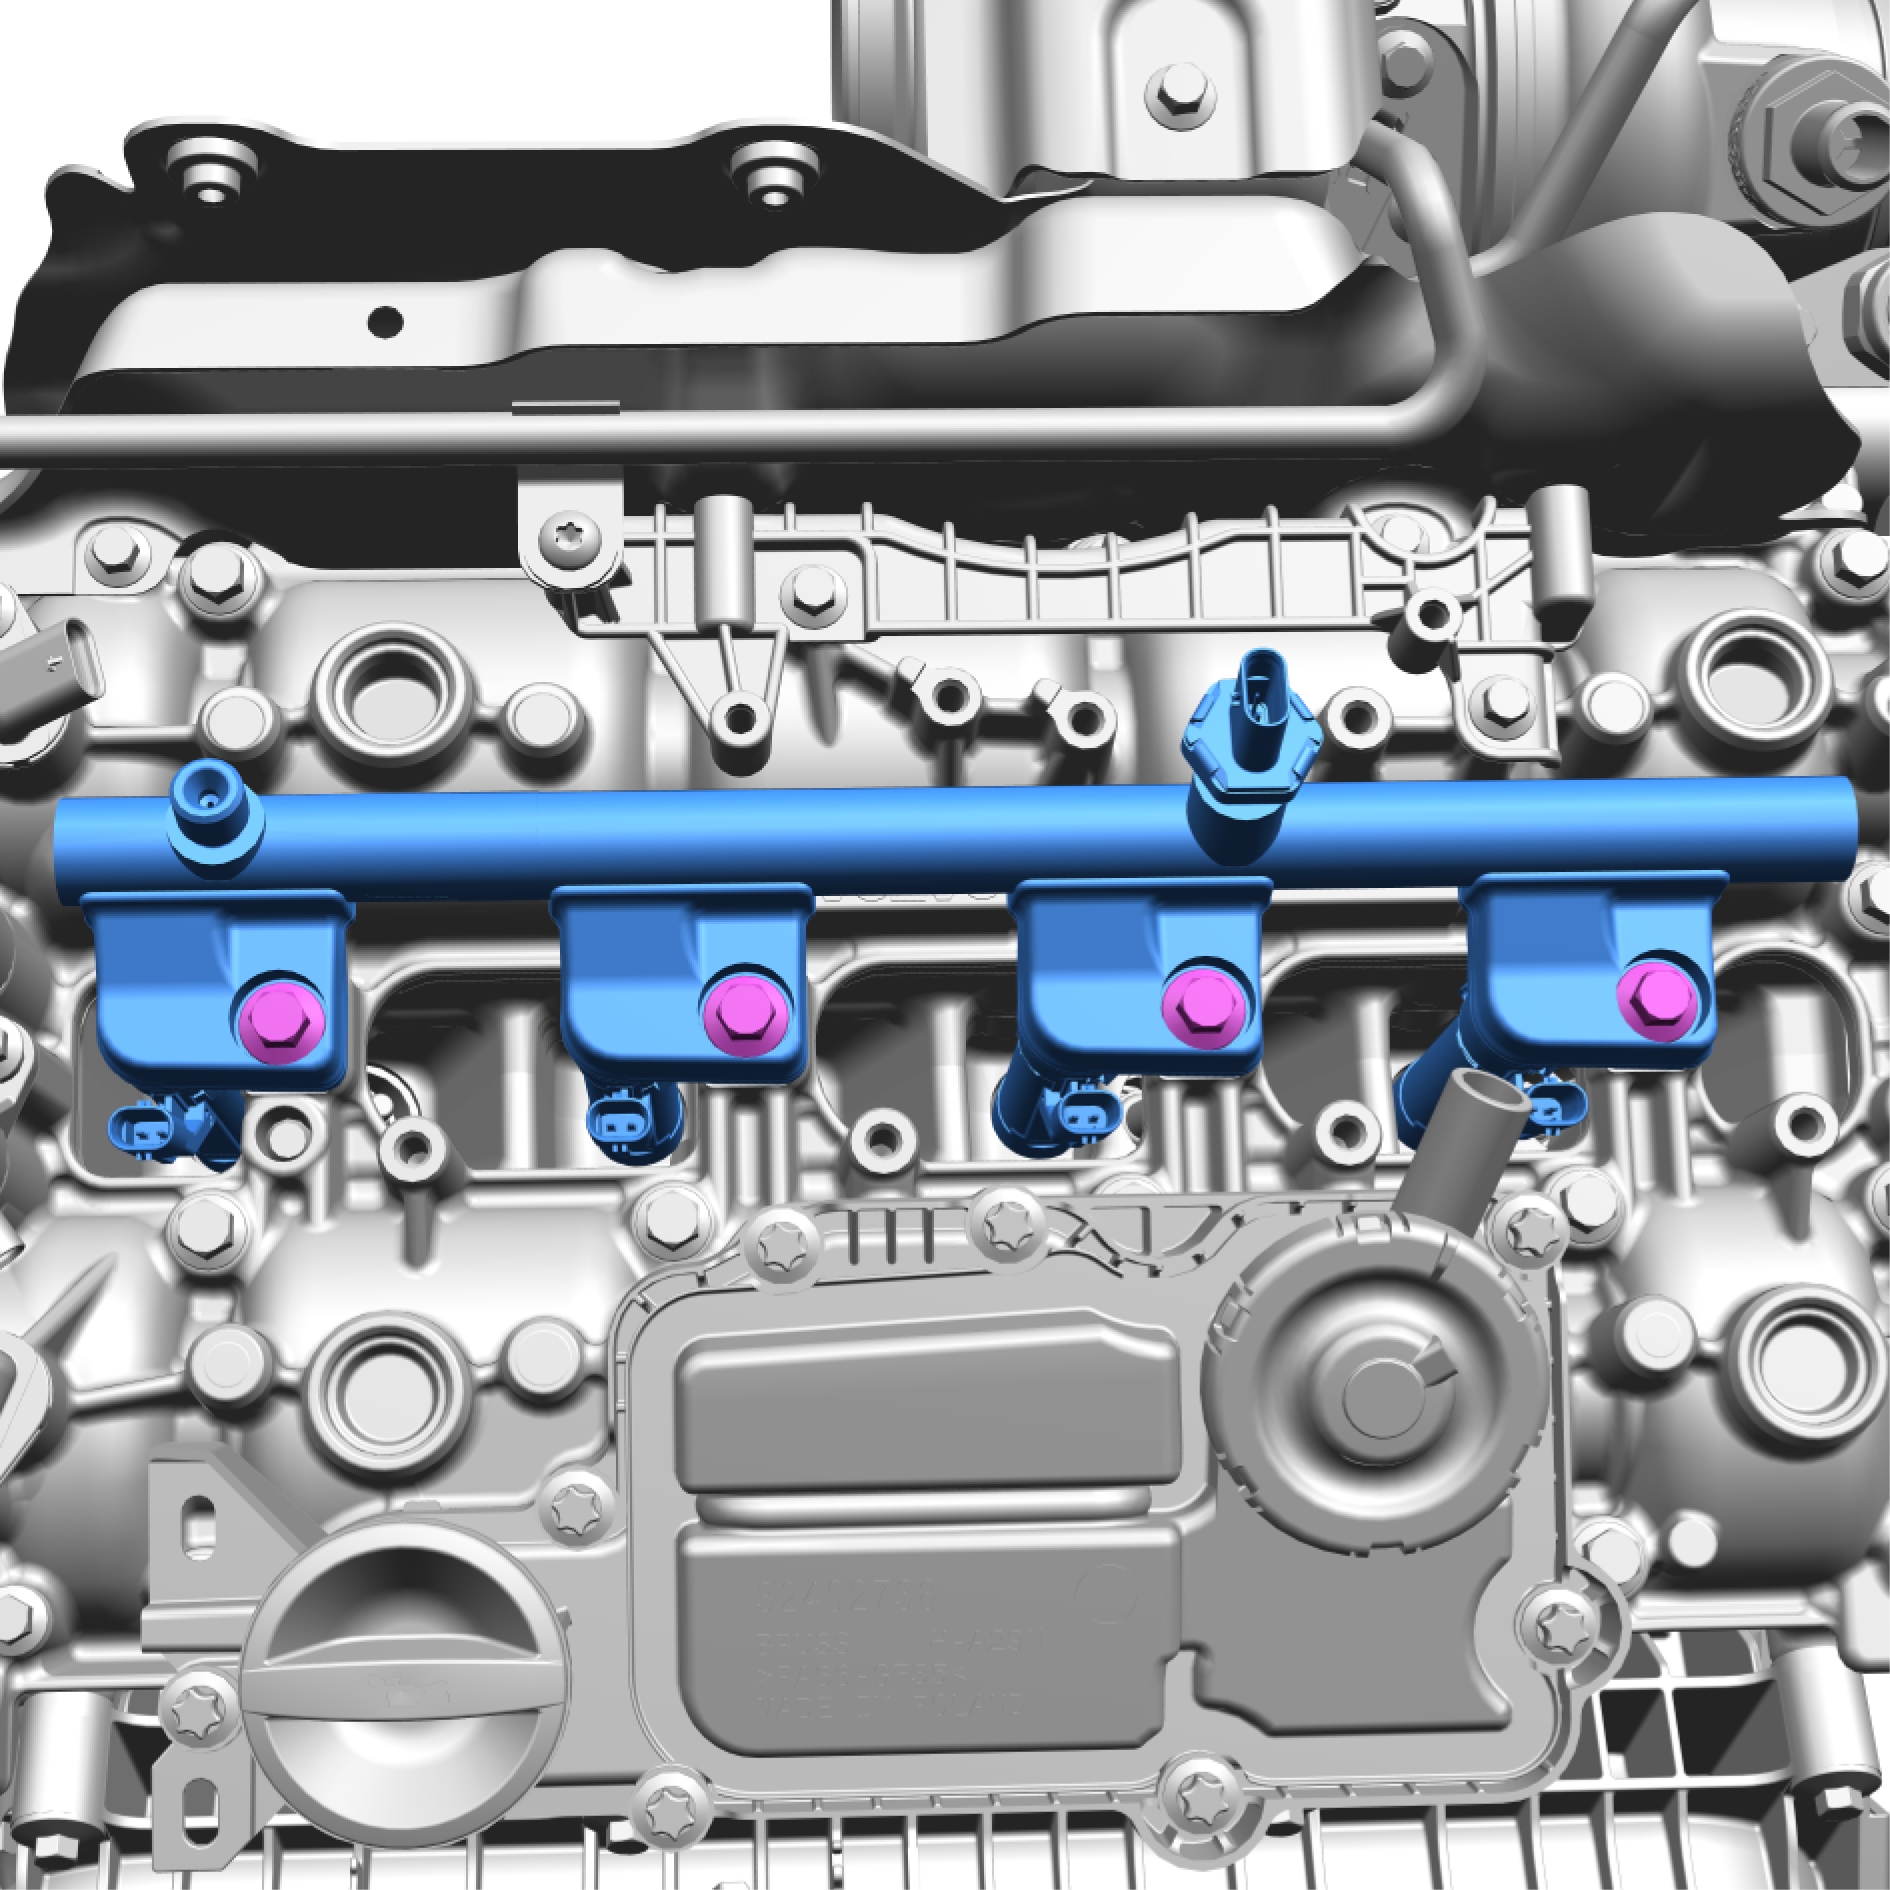
Remove the screws.
Torque: 22 Nm
Remove the marked component.
Installation
Install in reverse order.
Oil trap, replace
Removal
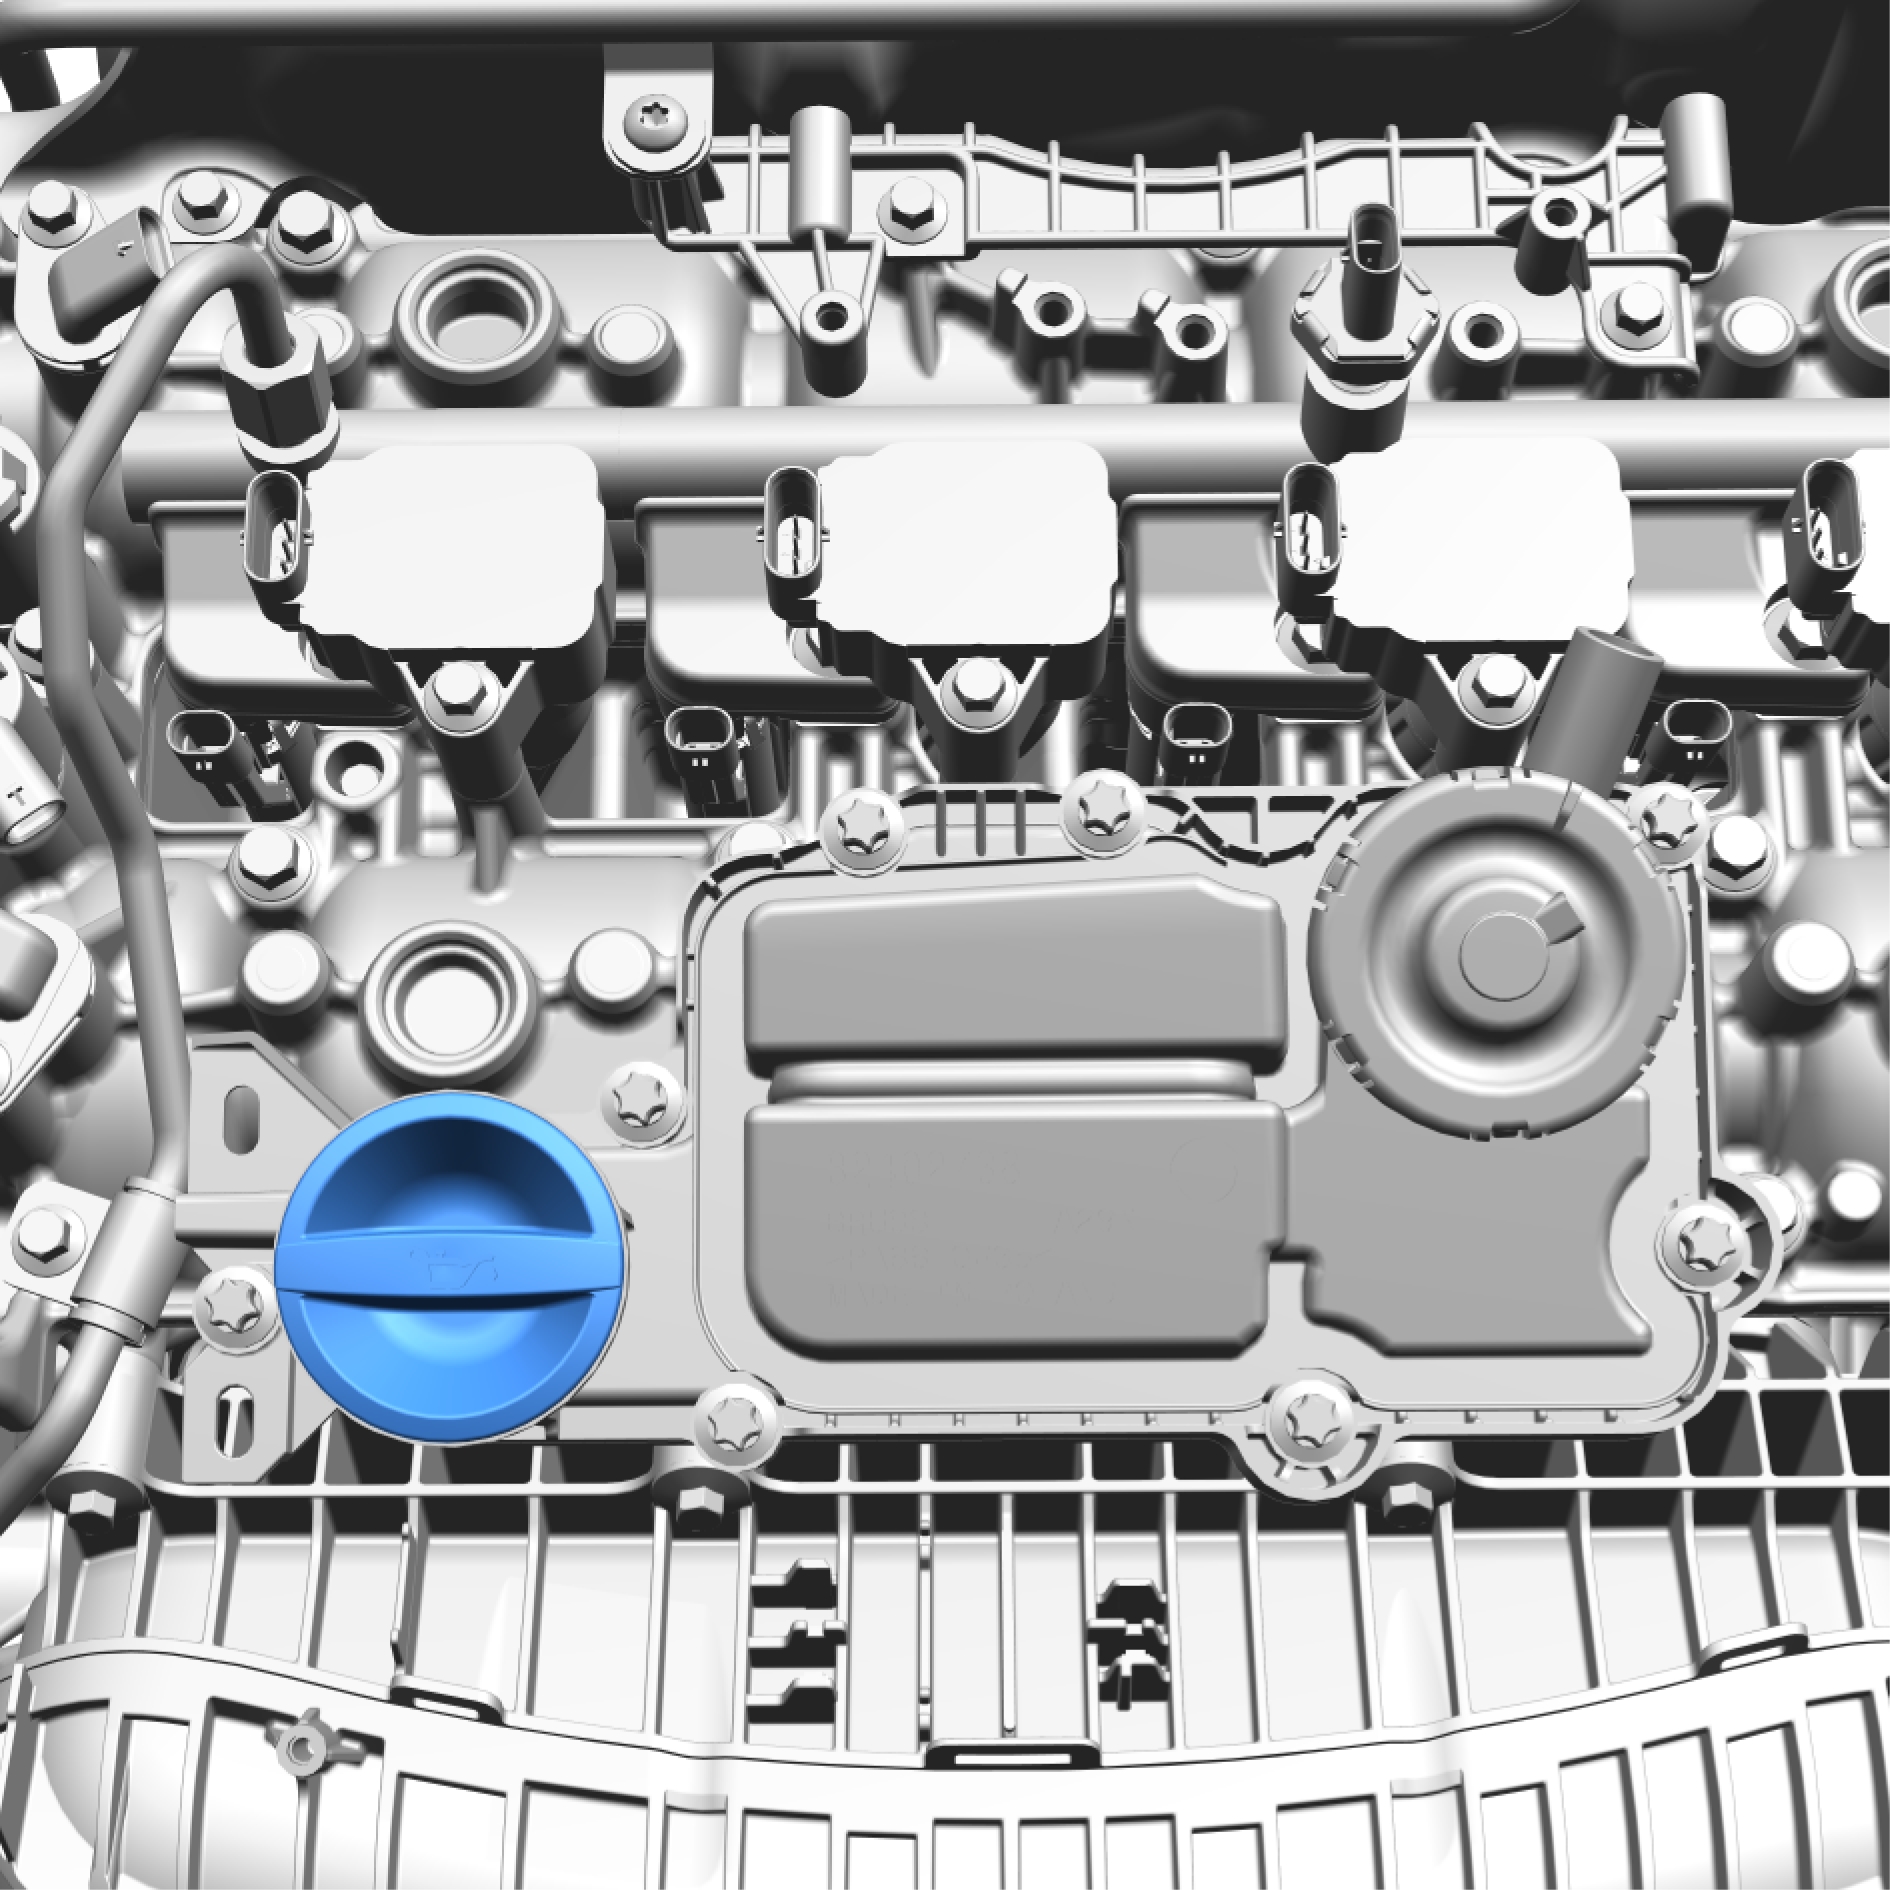
Remove the marked component.
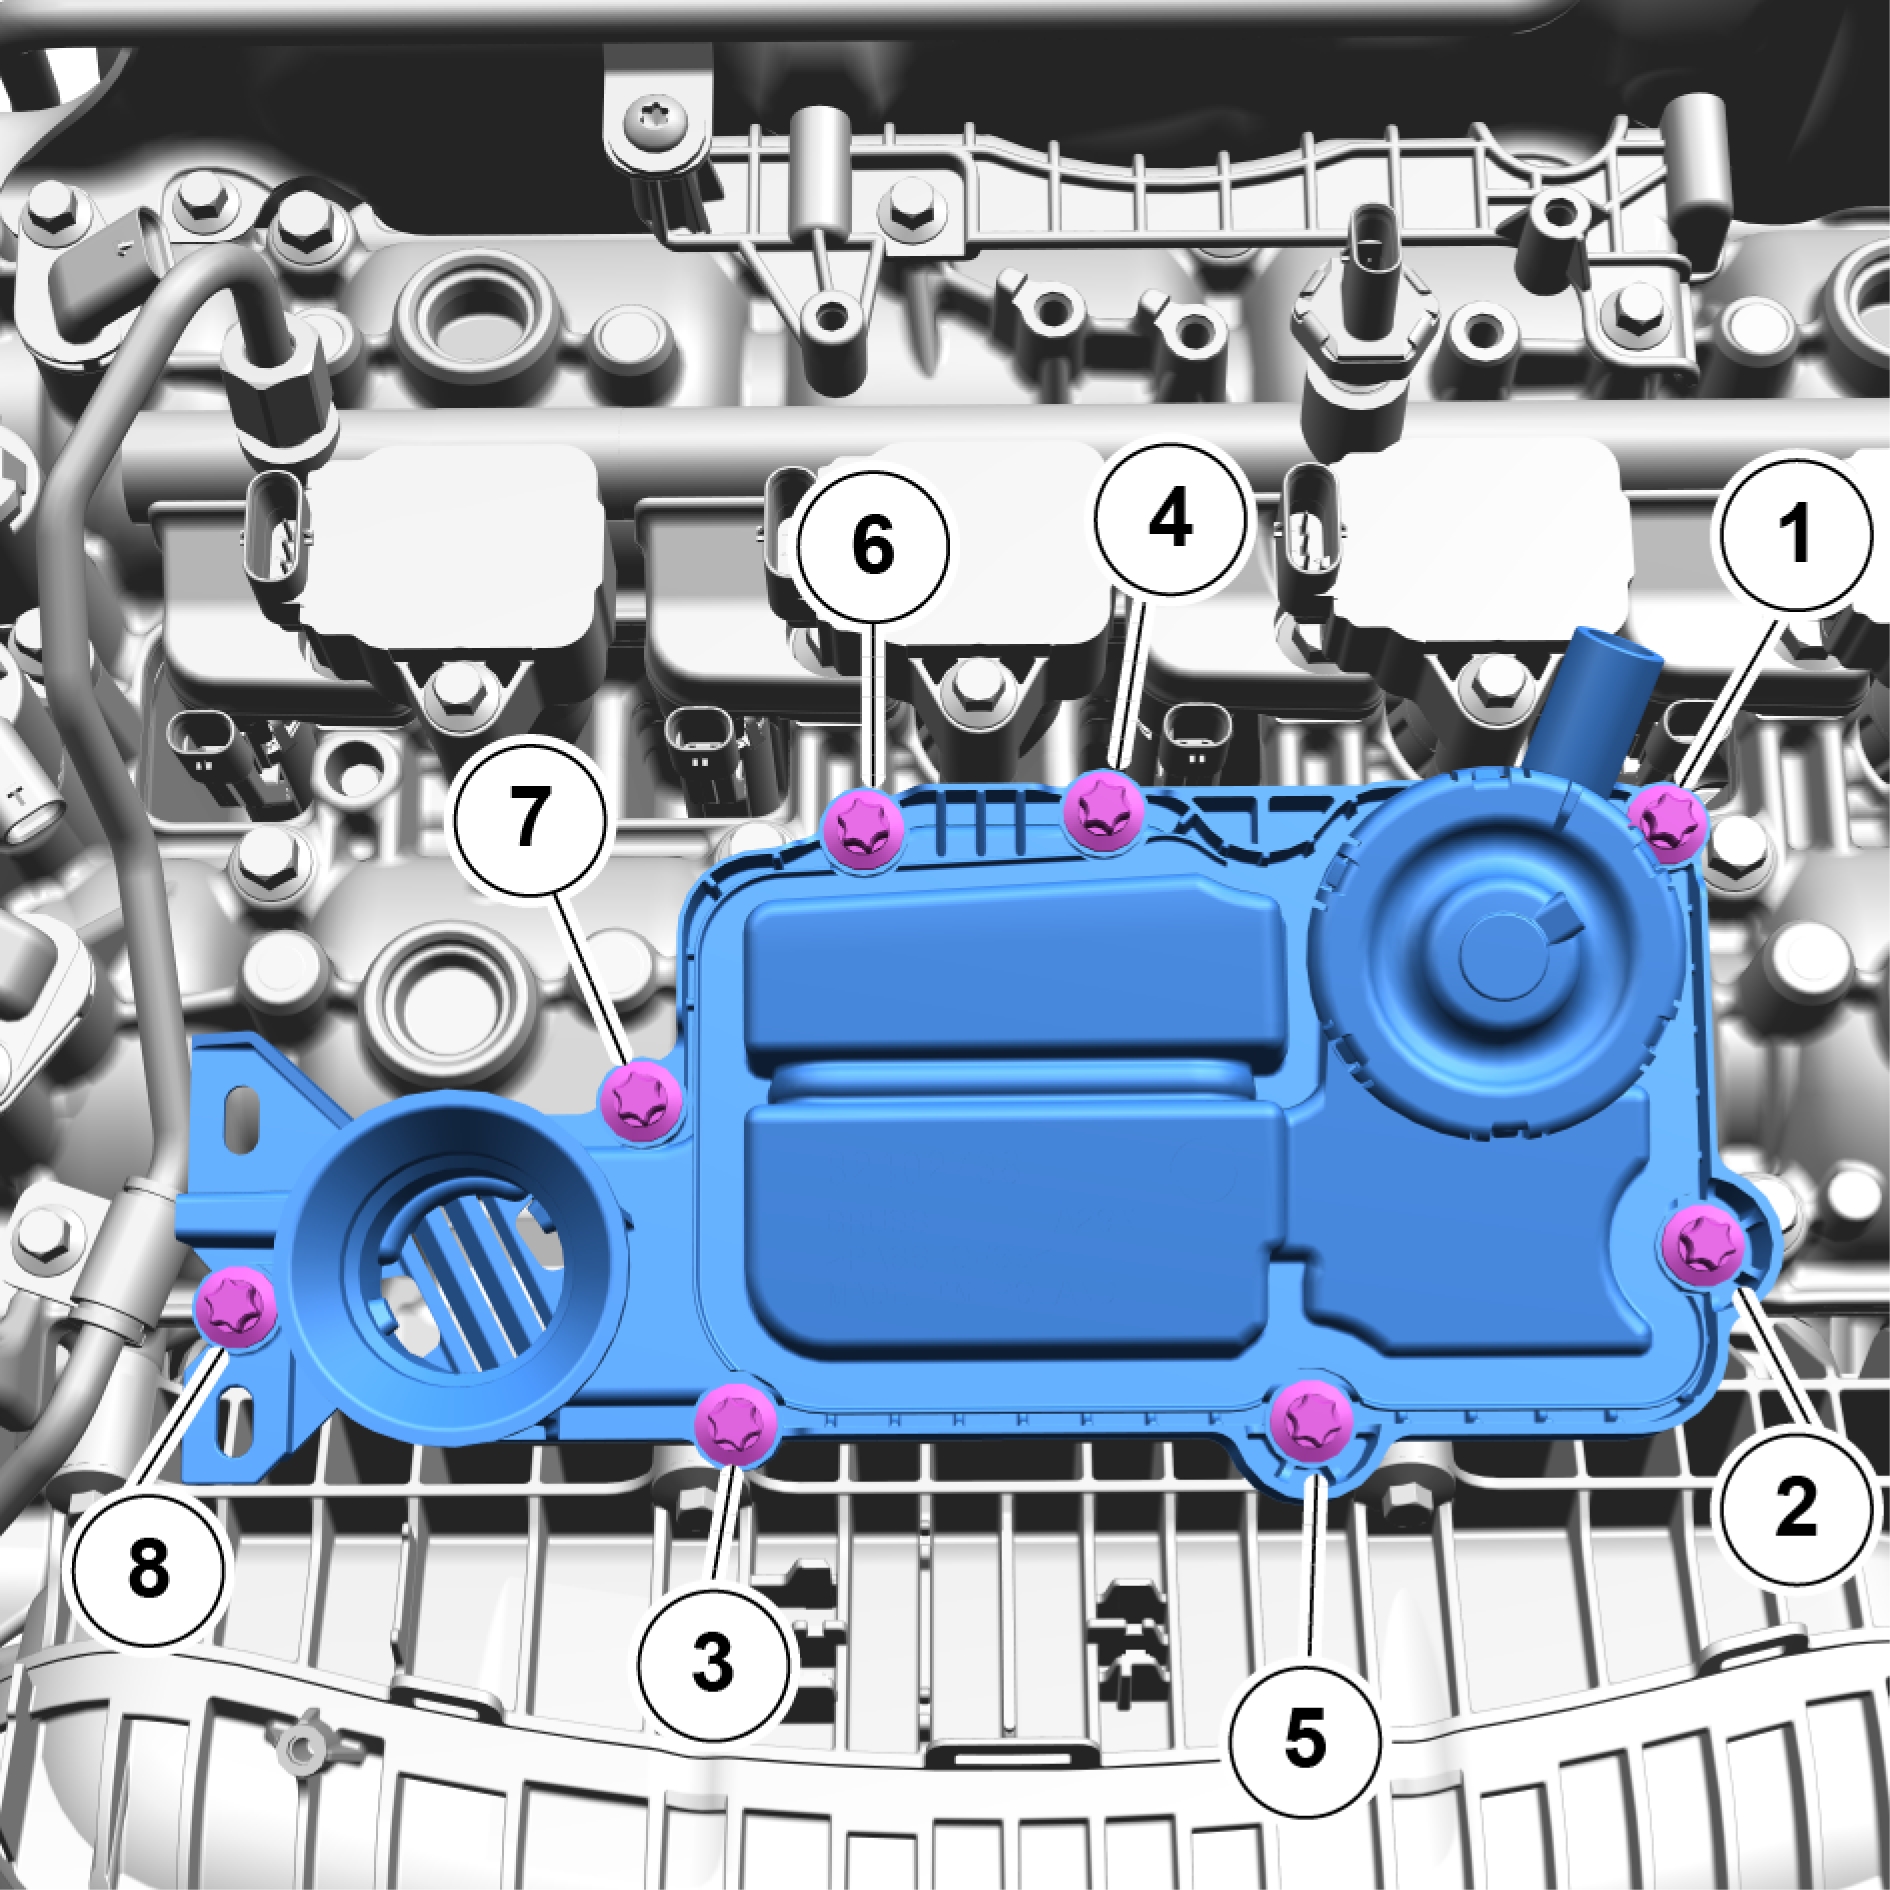
The tightening schedule for installation.
Remove the screws.
Torque: 10 Nm
Remove the marked component.
Installation
Install in reverse order.
Oil pan, replace
Removal
Remove the clip.
Remove the clip.
Remove the marked component.
Remove the screws.
Fold away the marked component.
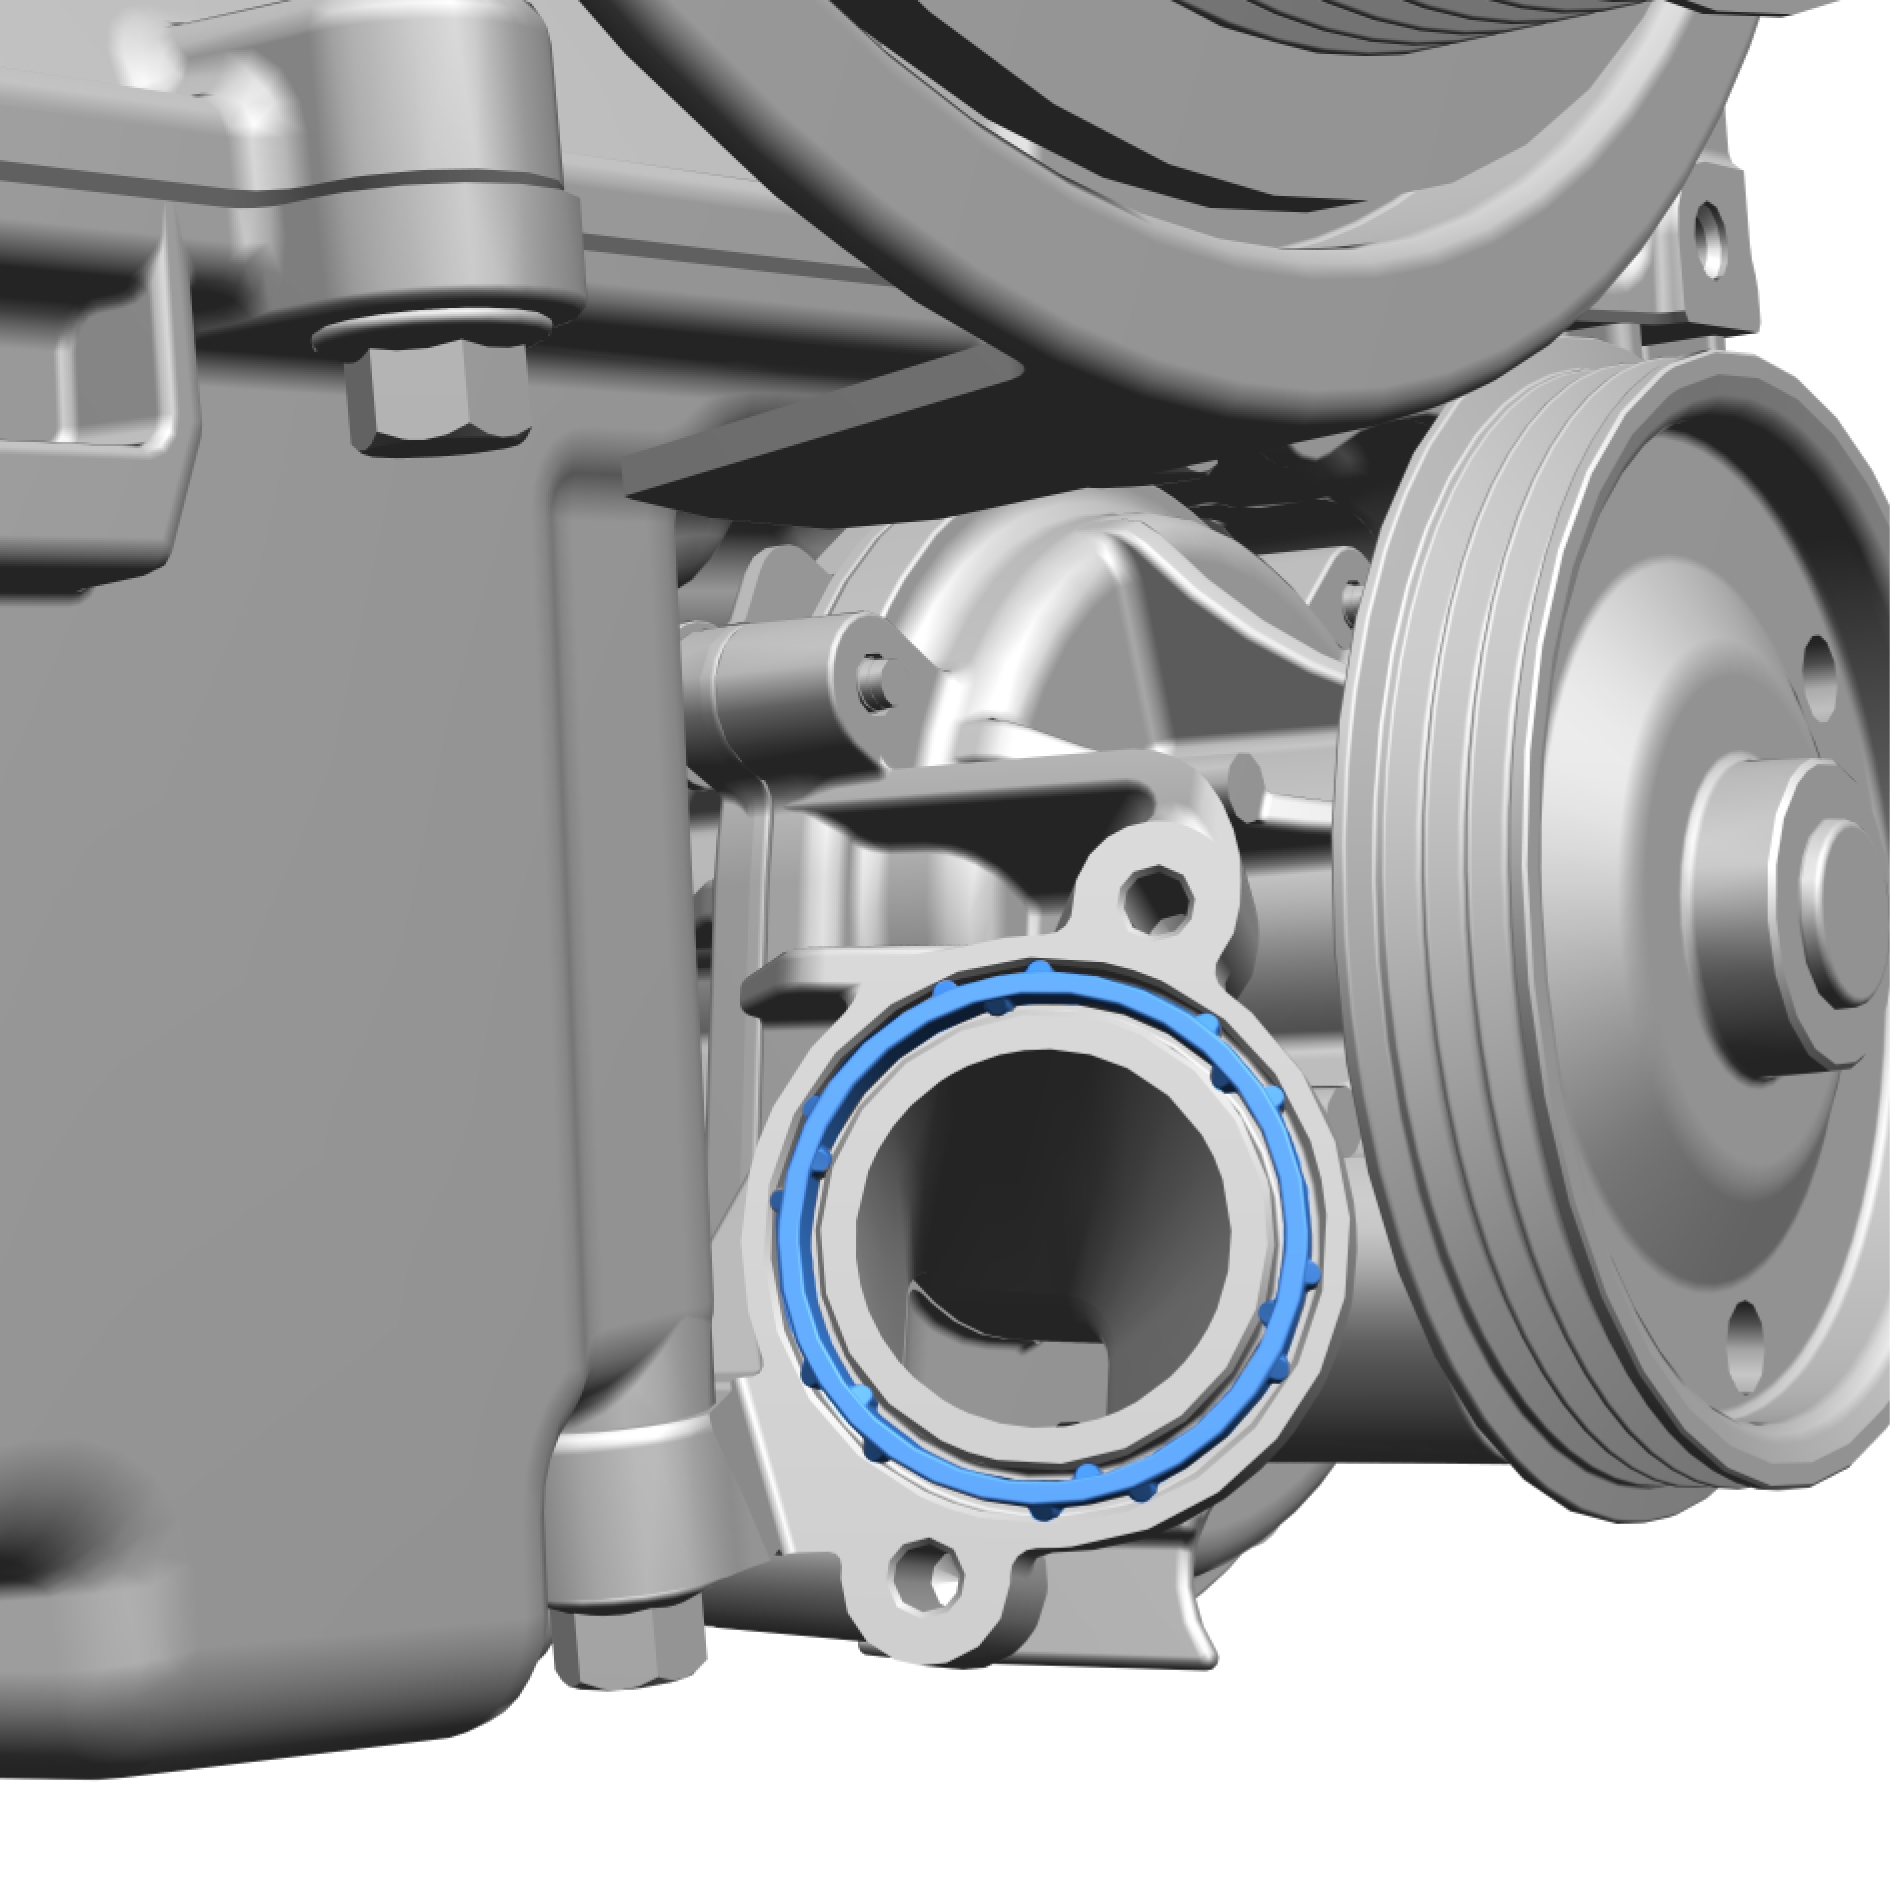
Remove and discard the marked component.
Remove the screws.
Torque: 10 Nm
Remove the marked component.
Remove and discard the marked component.
Remove the screws.
Torque: 17 Nm
Remove the marked component.
Tightening schedule for the installation.
Remove the screws.
Torque: 16 Nm
Remove the marked component.
Remove and the discard the marked components.
Remove the marked component.
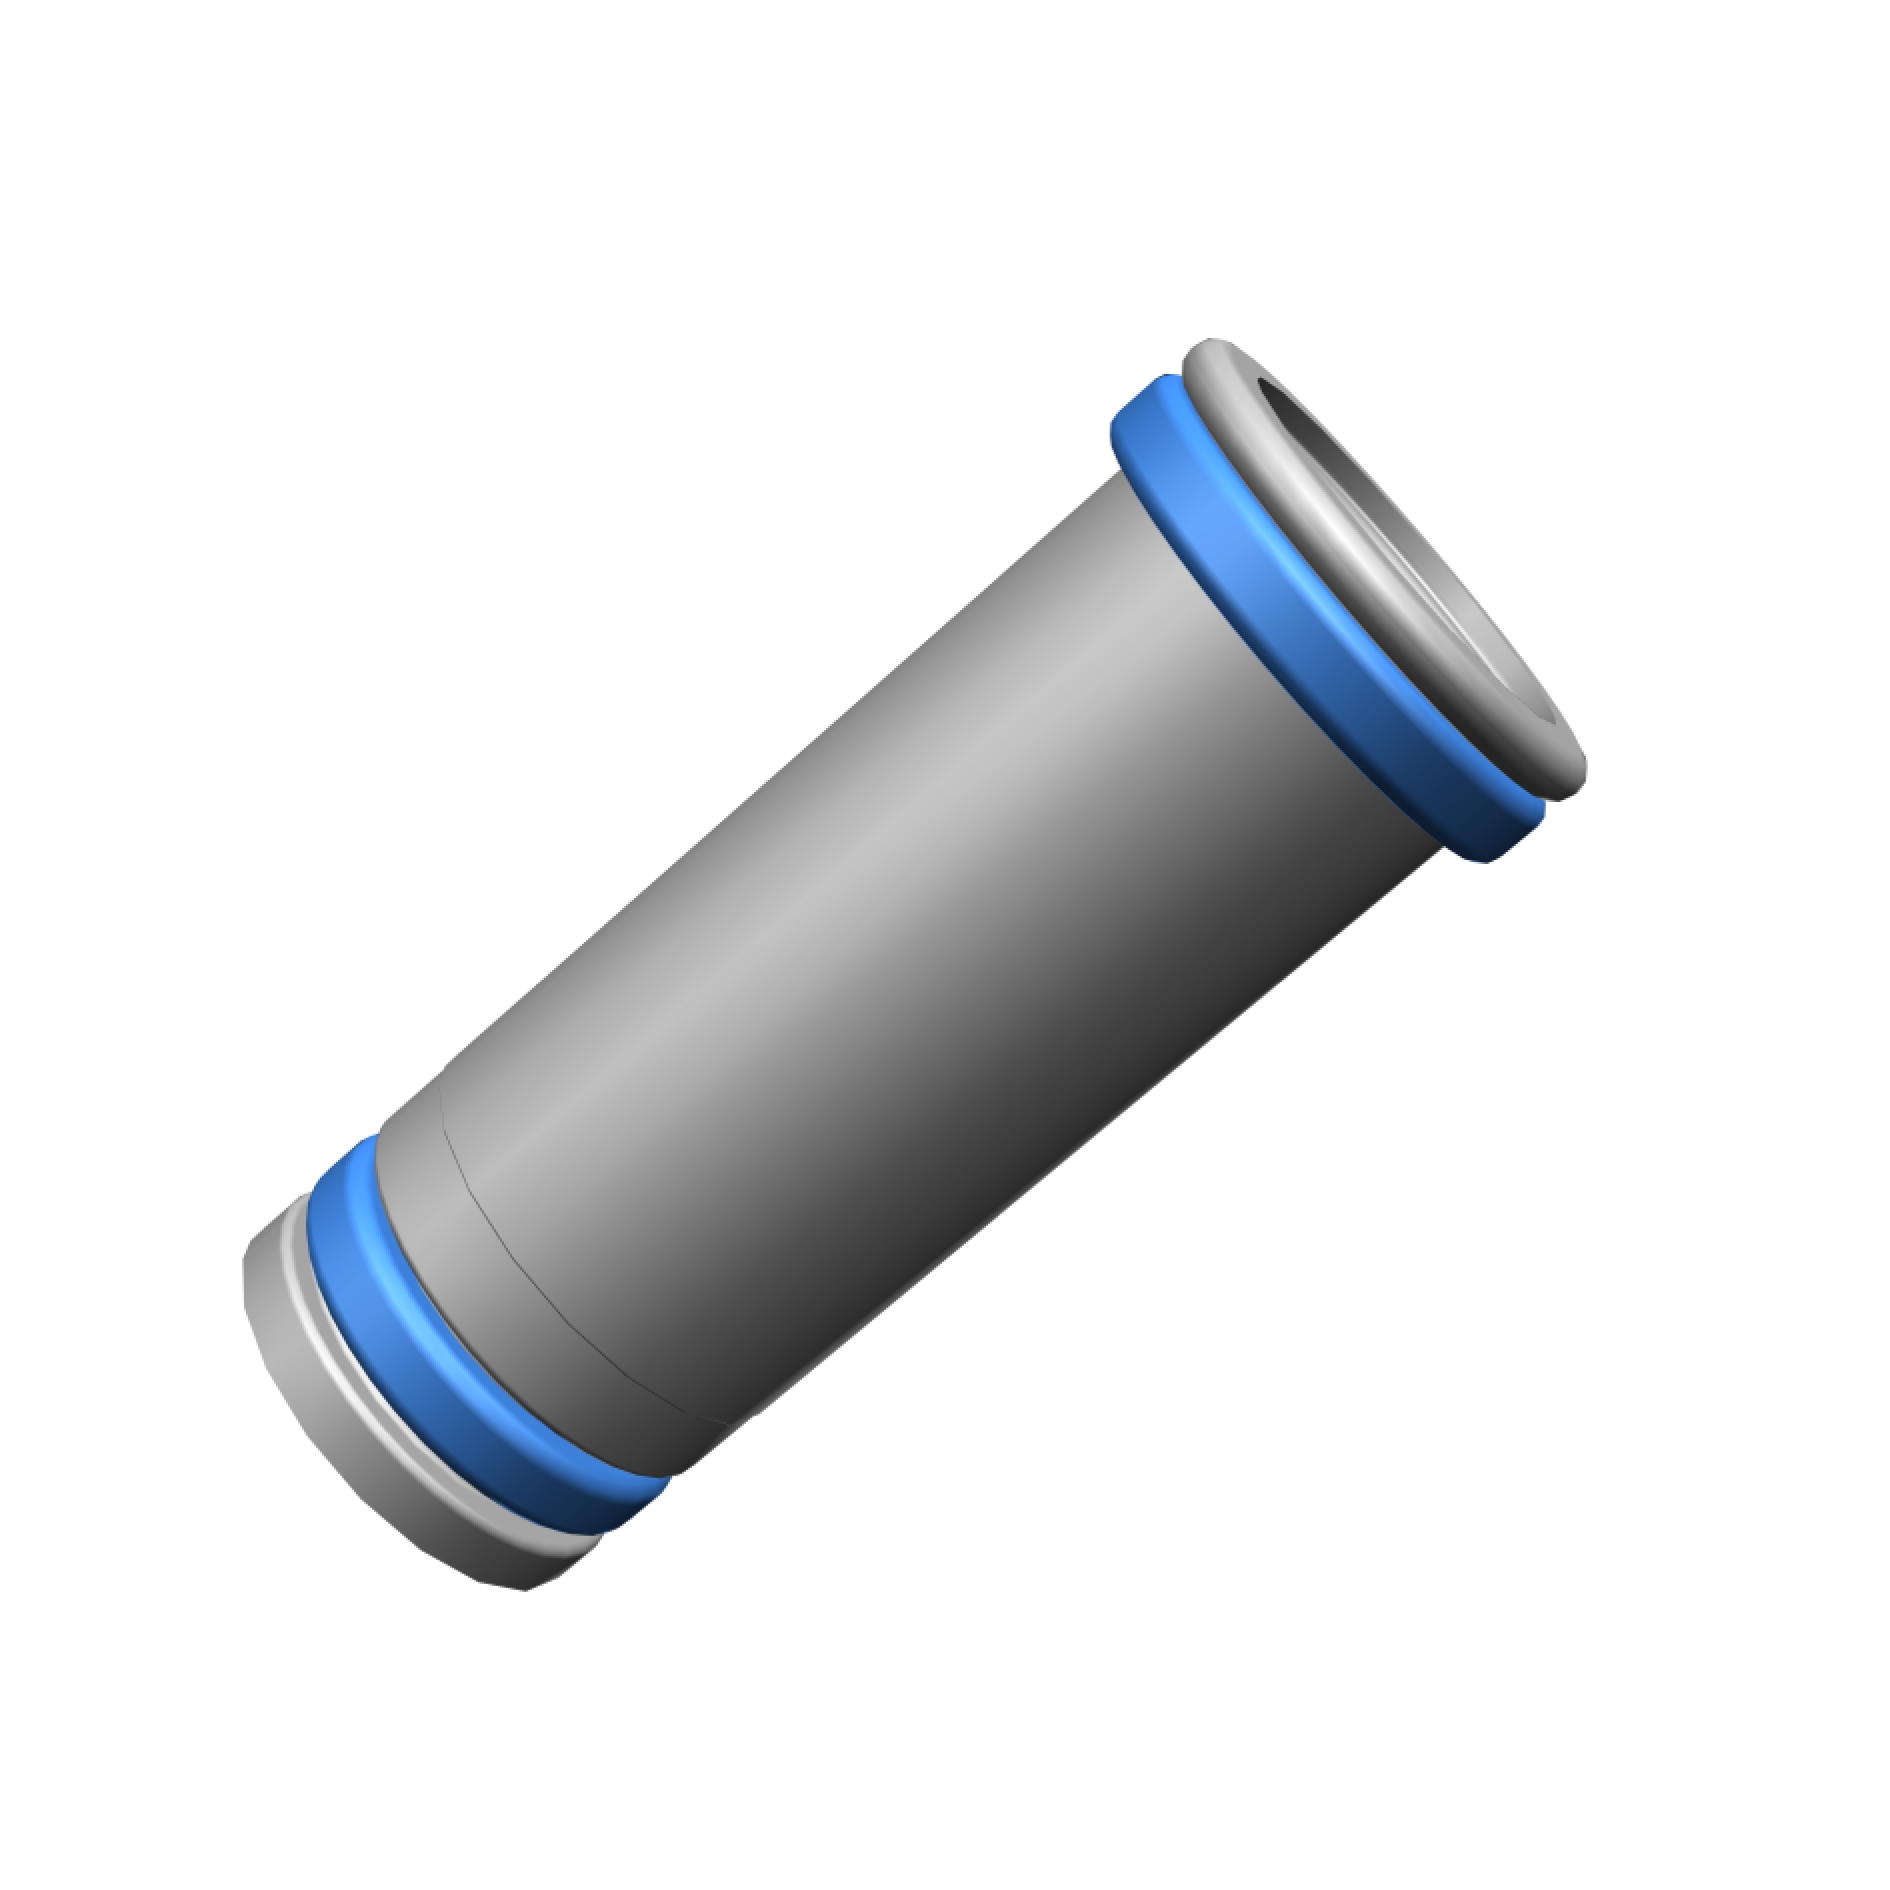
Remove and discard the marked components.
Remove the screws.
Torque: 9 Nm
Remove the marked component.
Remove the screw.
Torque: 5 Nm
Remove and discard the marked component.
Install special tool 999 5679.
Remove the marked component.
Torque: 25 Nm
Remove and discard the marked components.
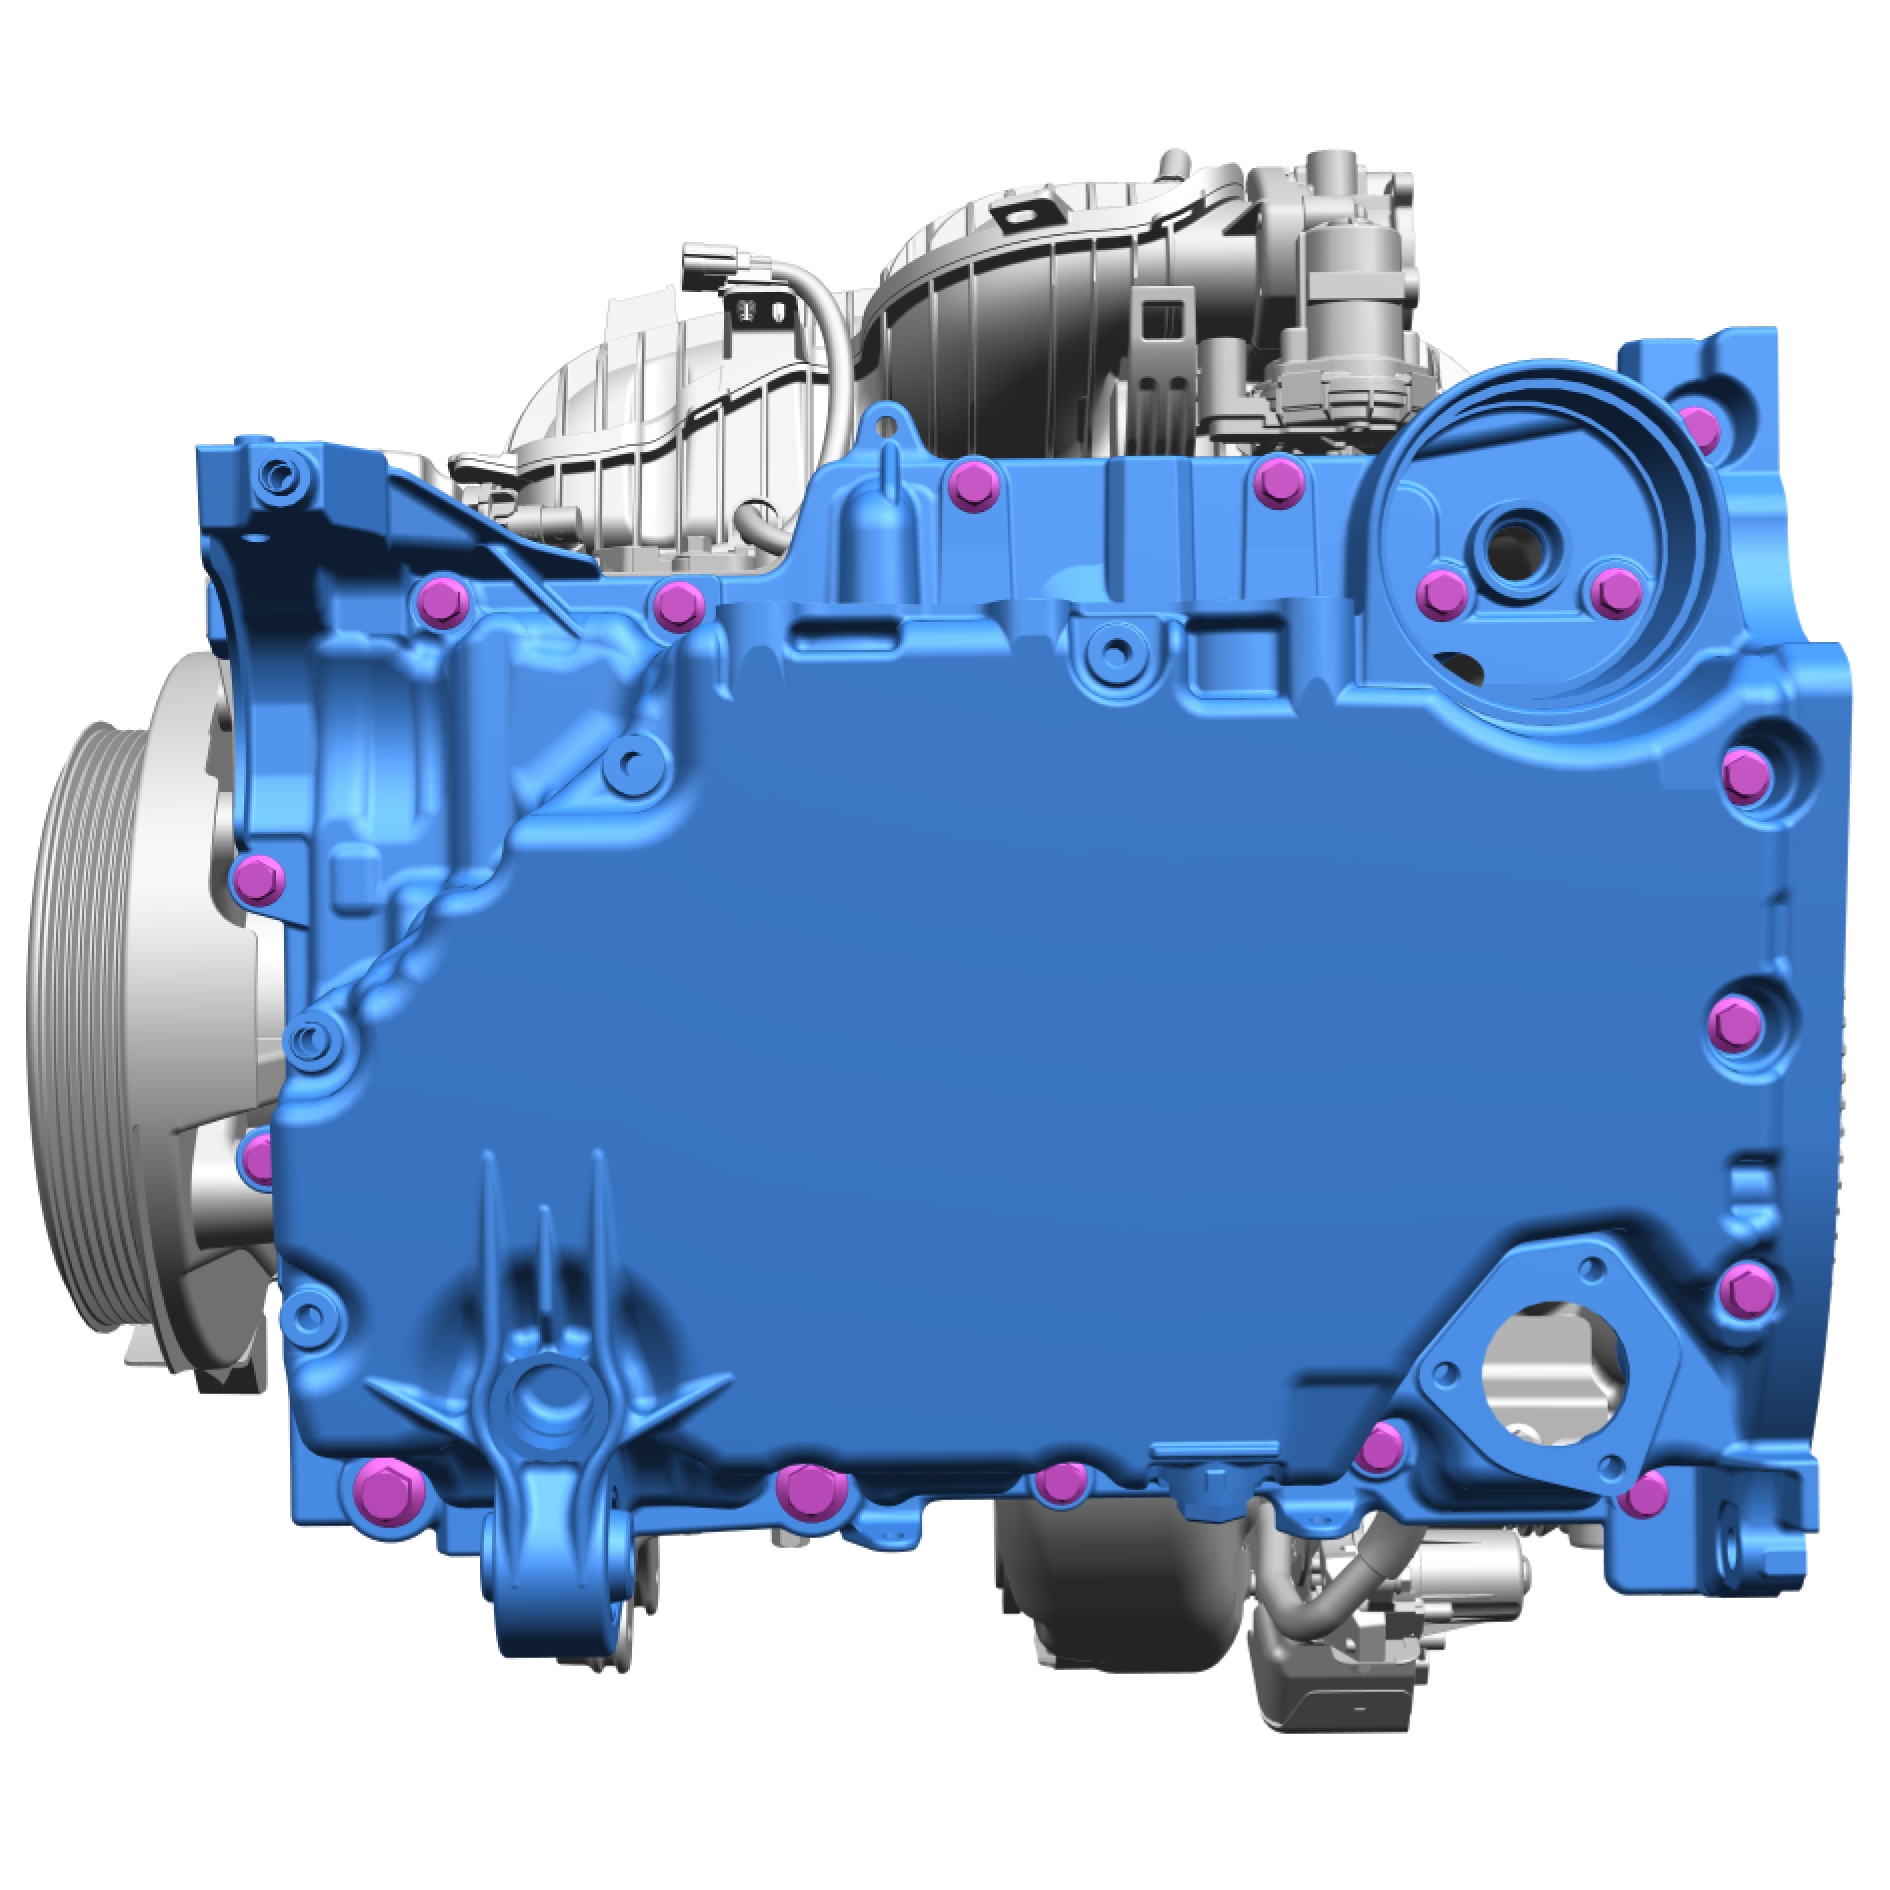
Remove the screws.
Remove the marked component.
Installation
Make sure that the mating faces are clean and free of foreign material.
Clean the marked area.
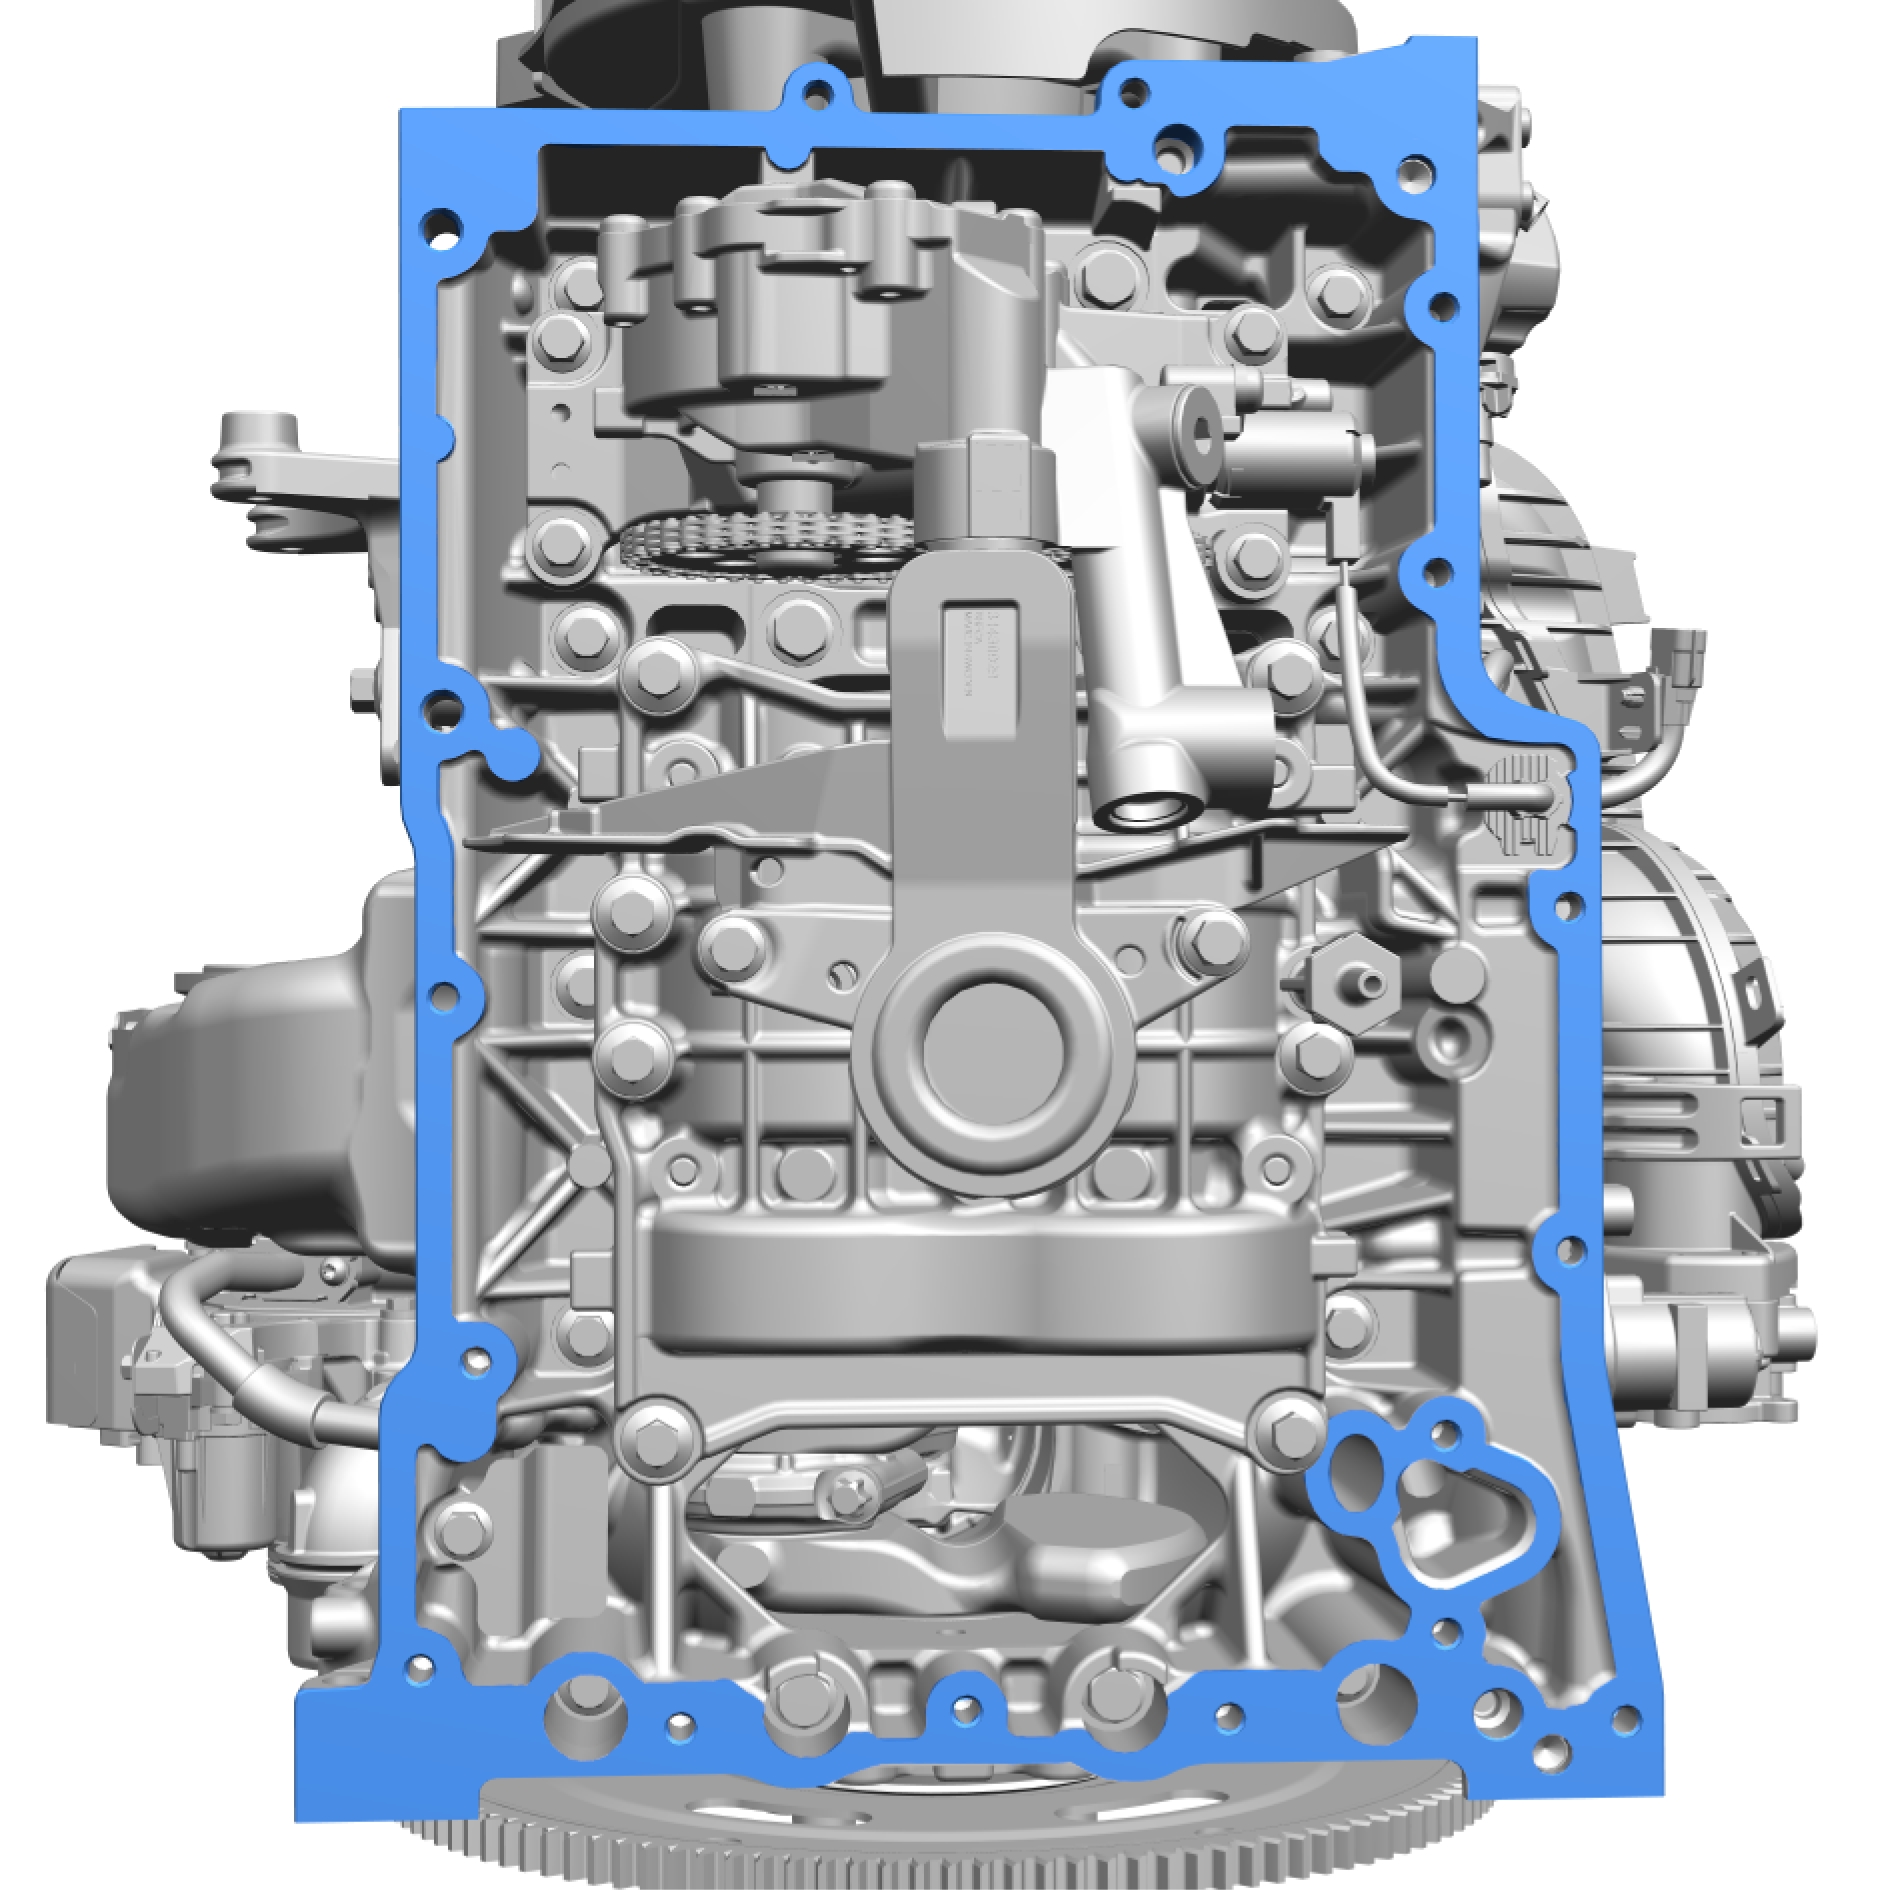
Make sure that the mating faces are clean and free of foreign material.
Clean the marked area.
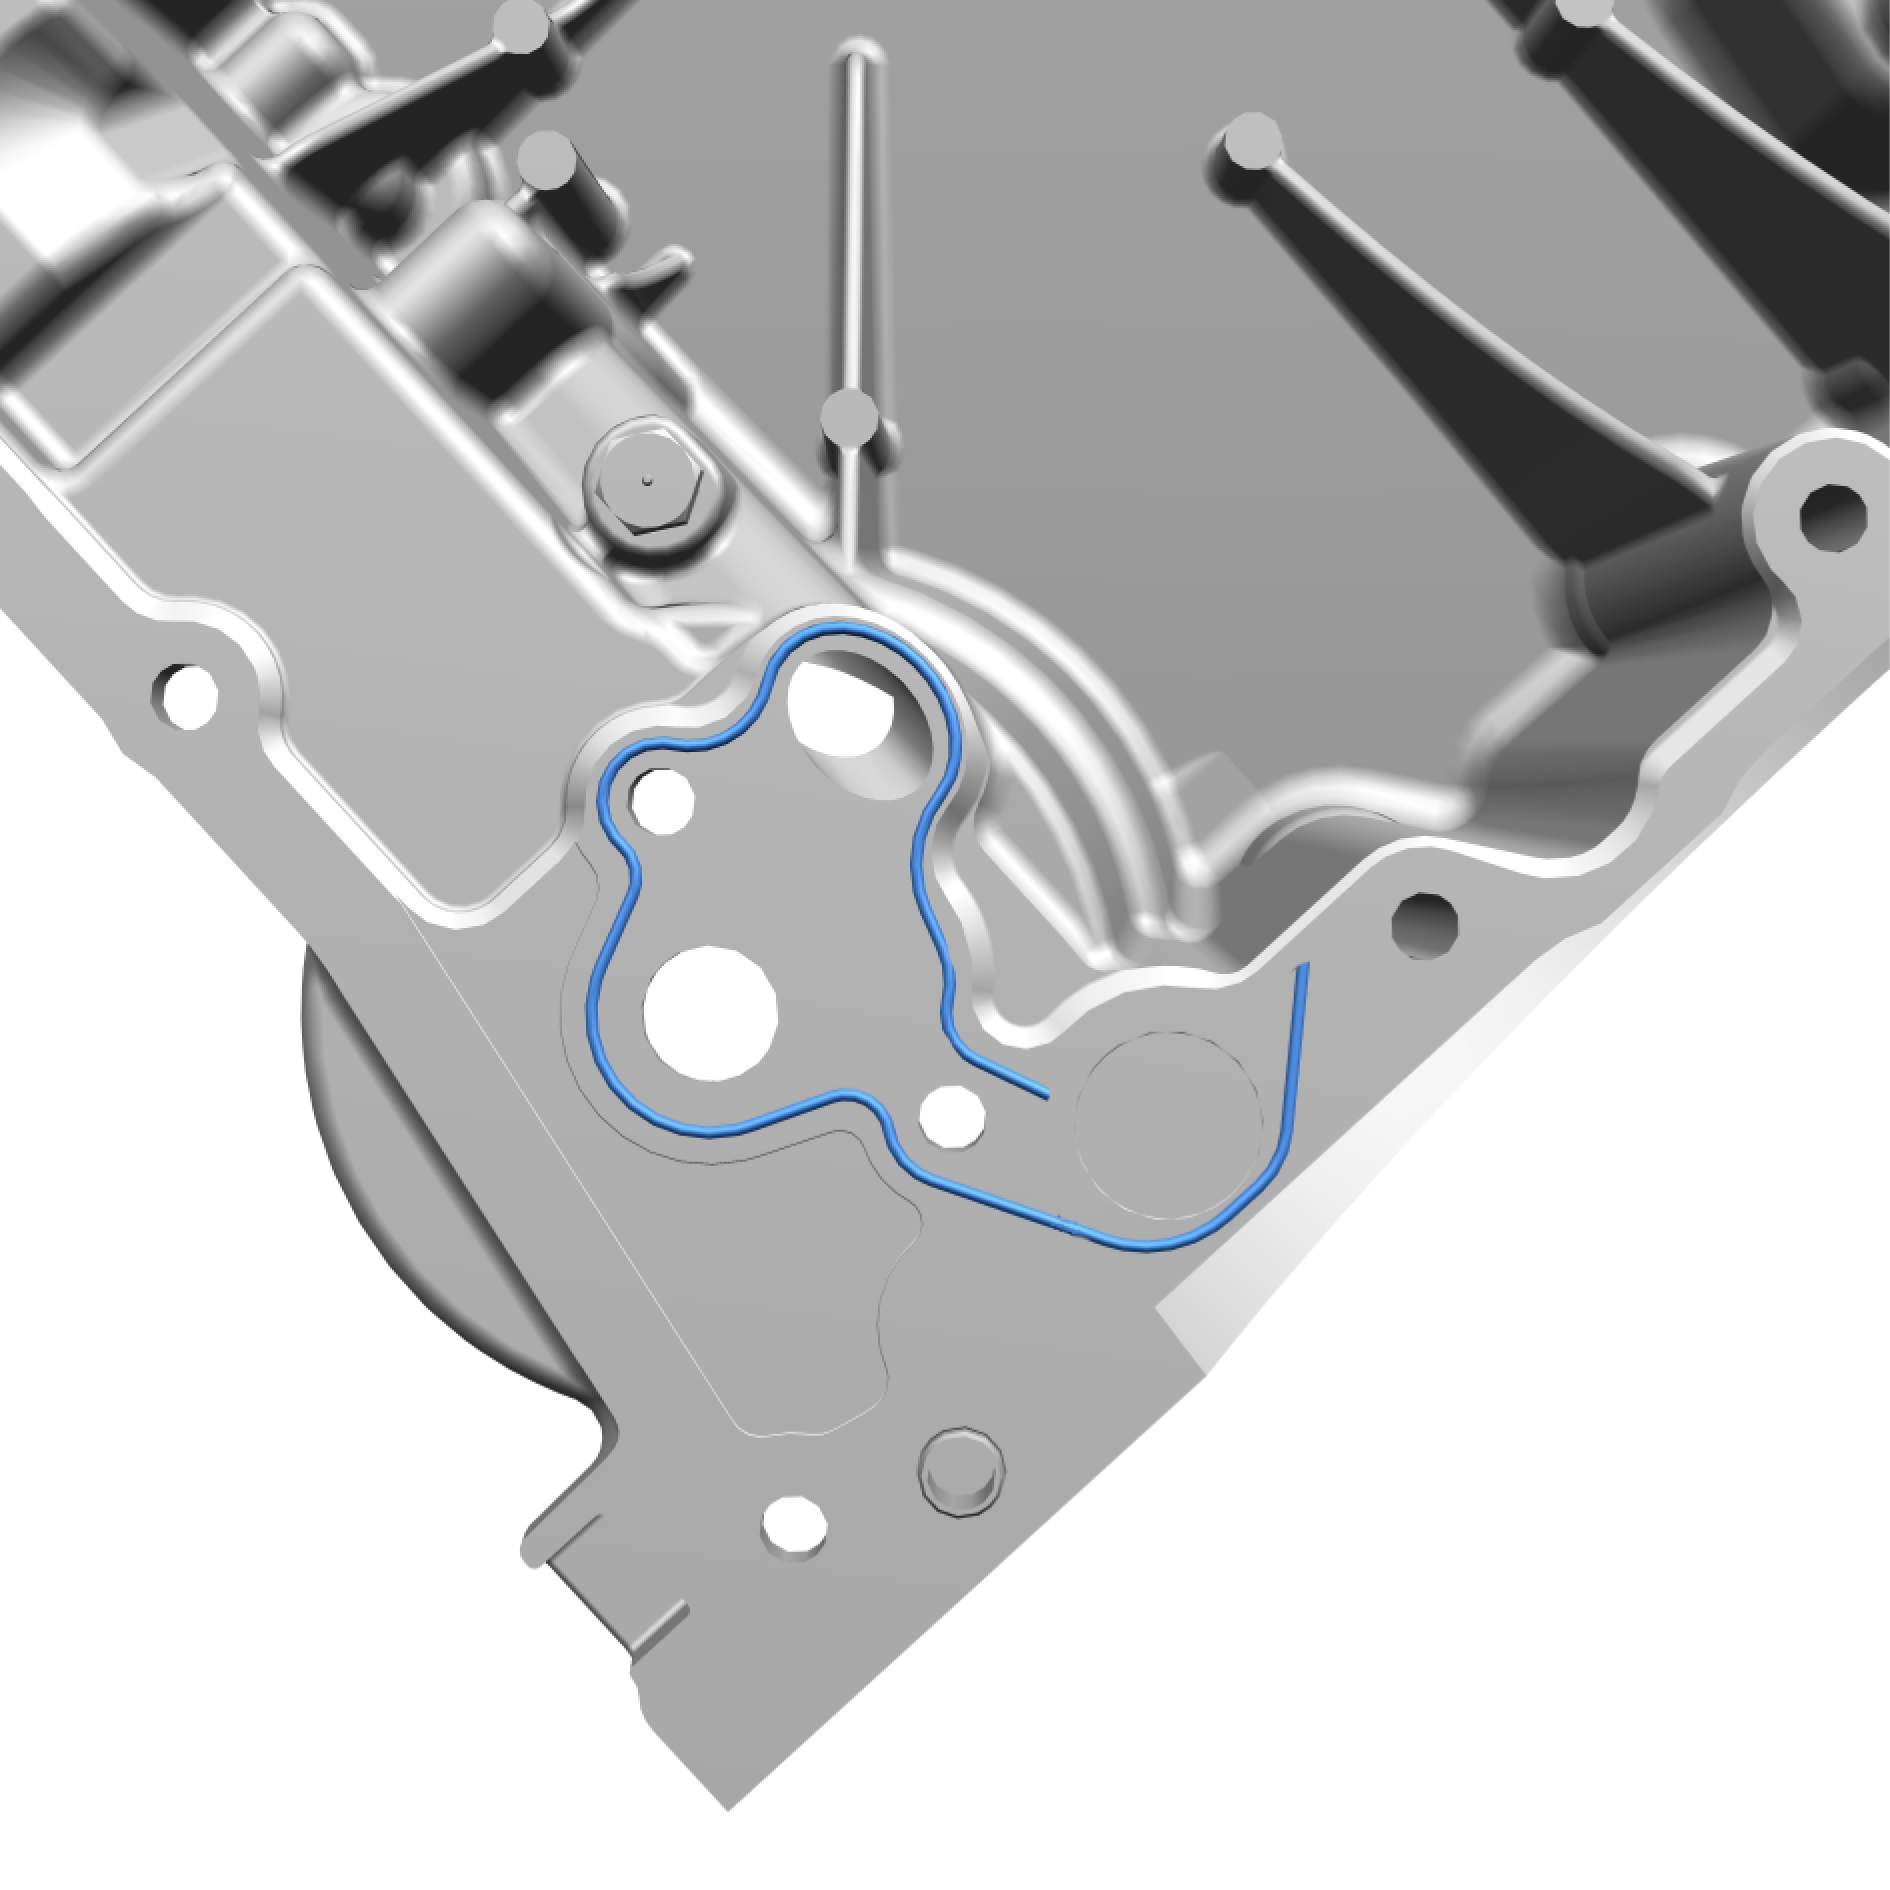
The component must be installed within 5 minutes of applying the sealant.
Apply chemical gasket.
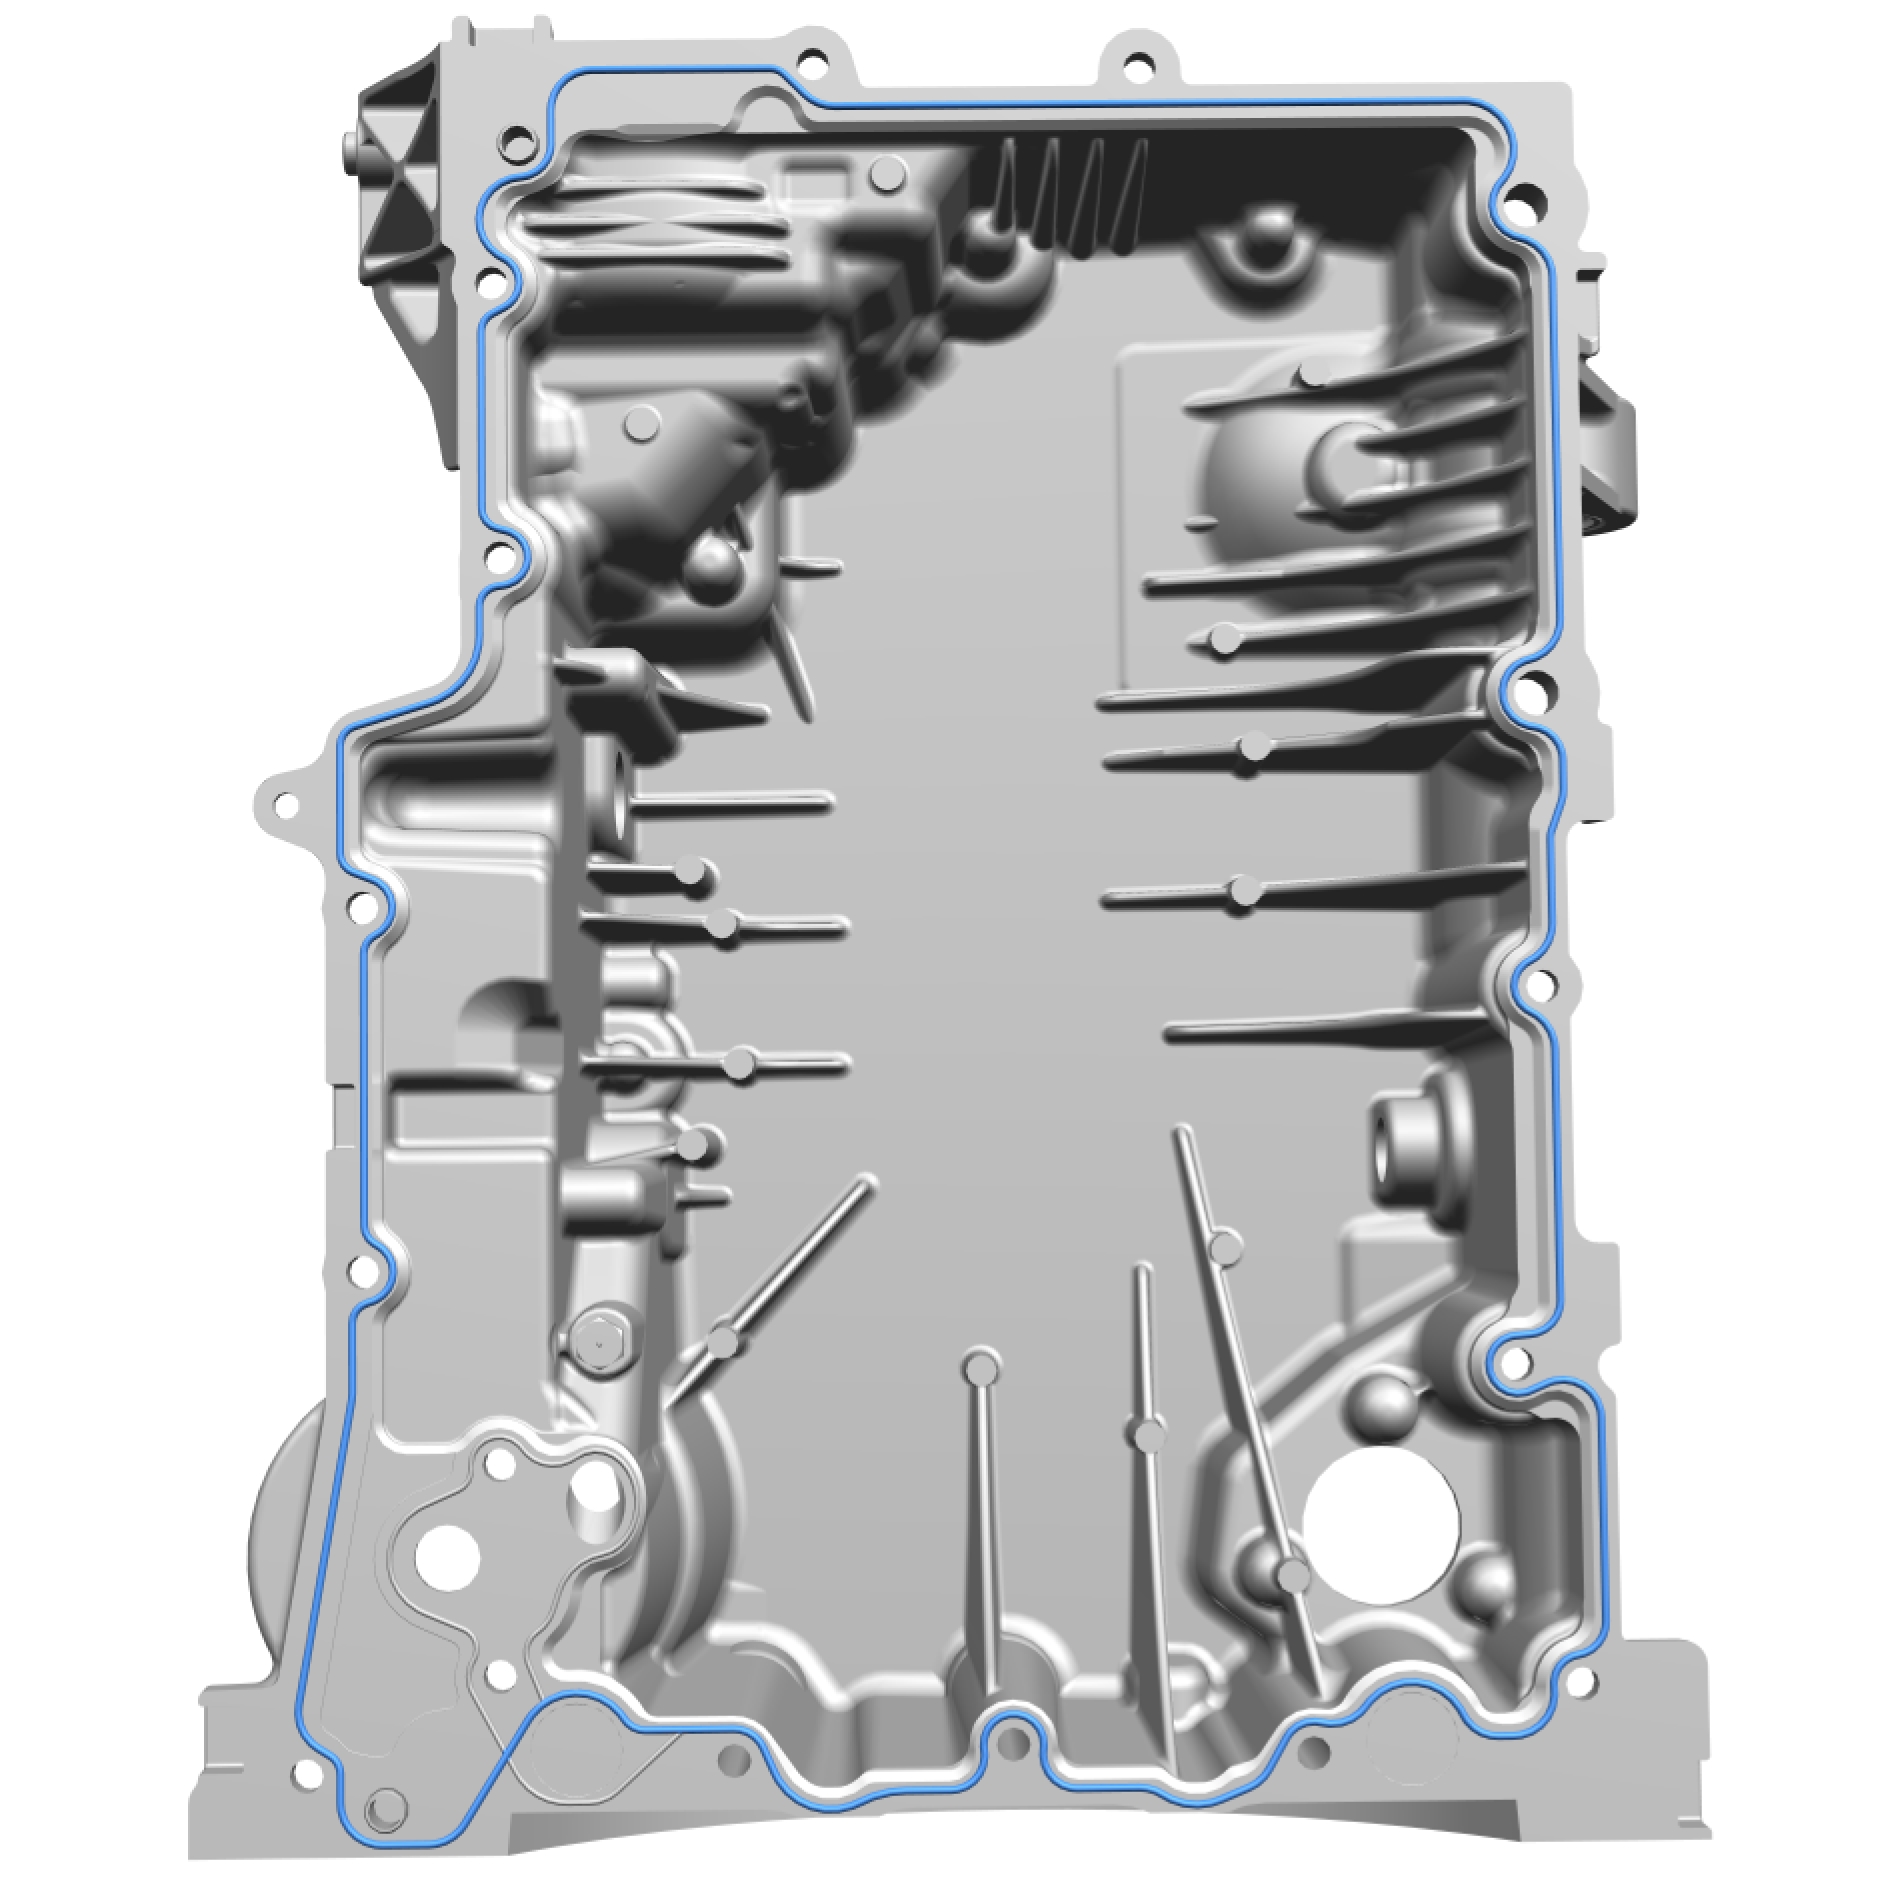
The component must be installed within 5 minutes of applying the sealant.
Apply chemical gasket.
Take extra care not to damage the seal.
Install the marked component.
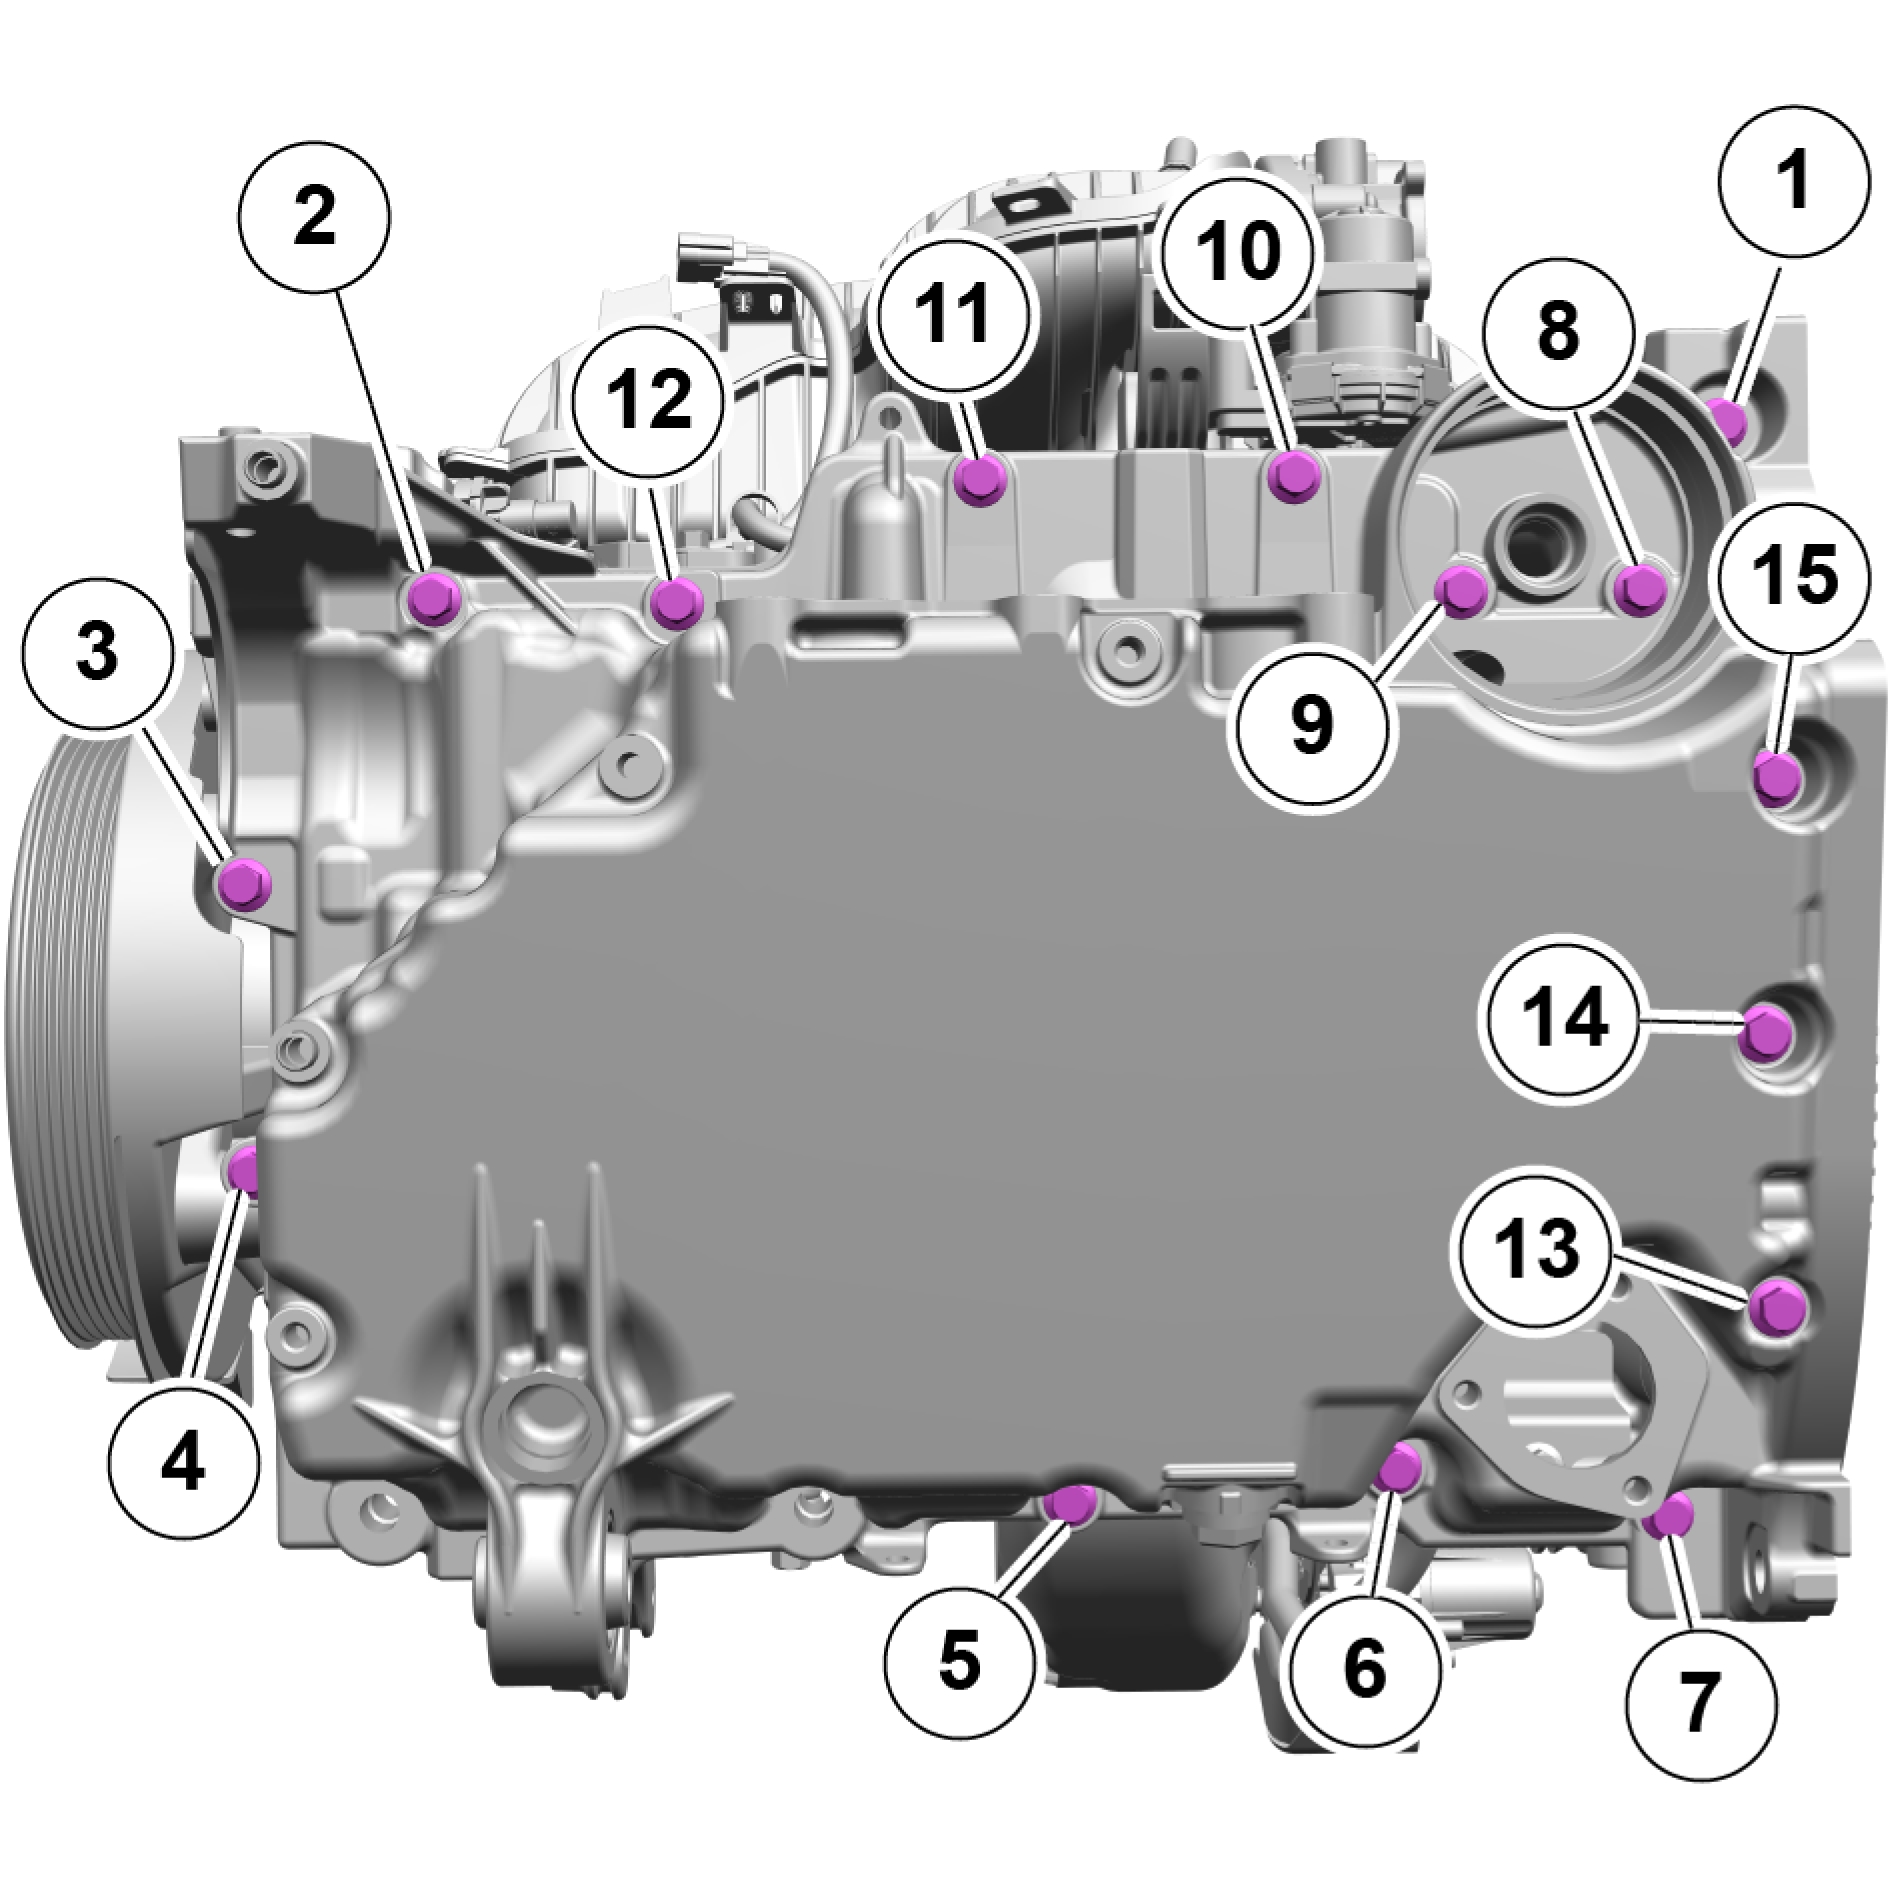
Tighten the screws.
Torque: 17 Nm
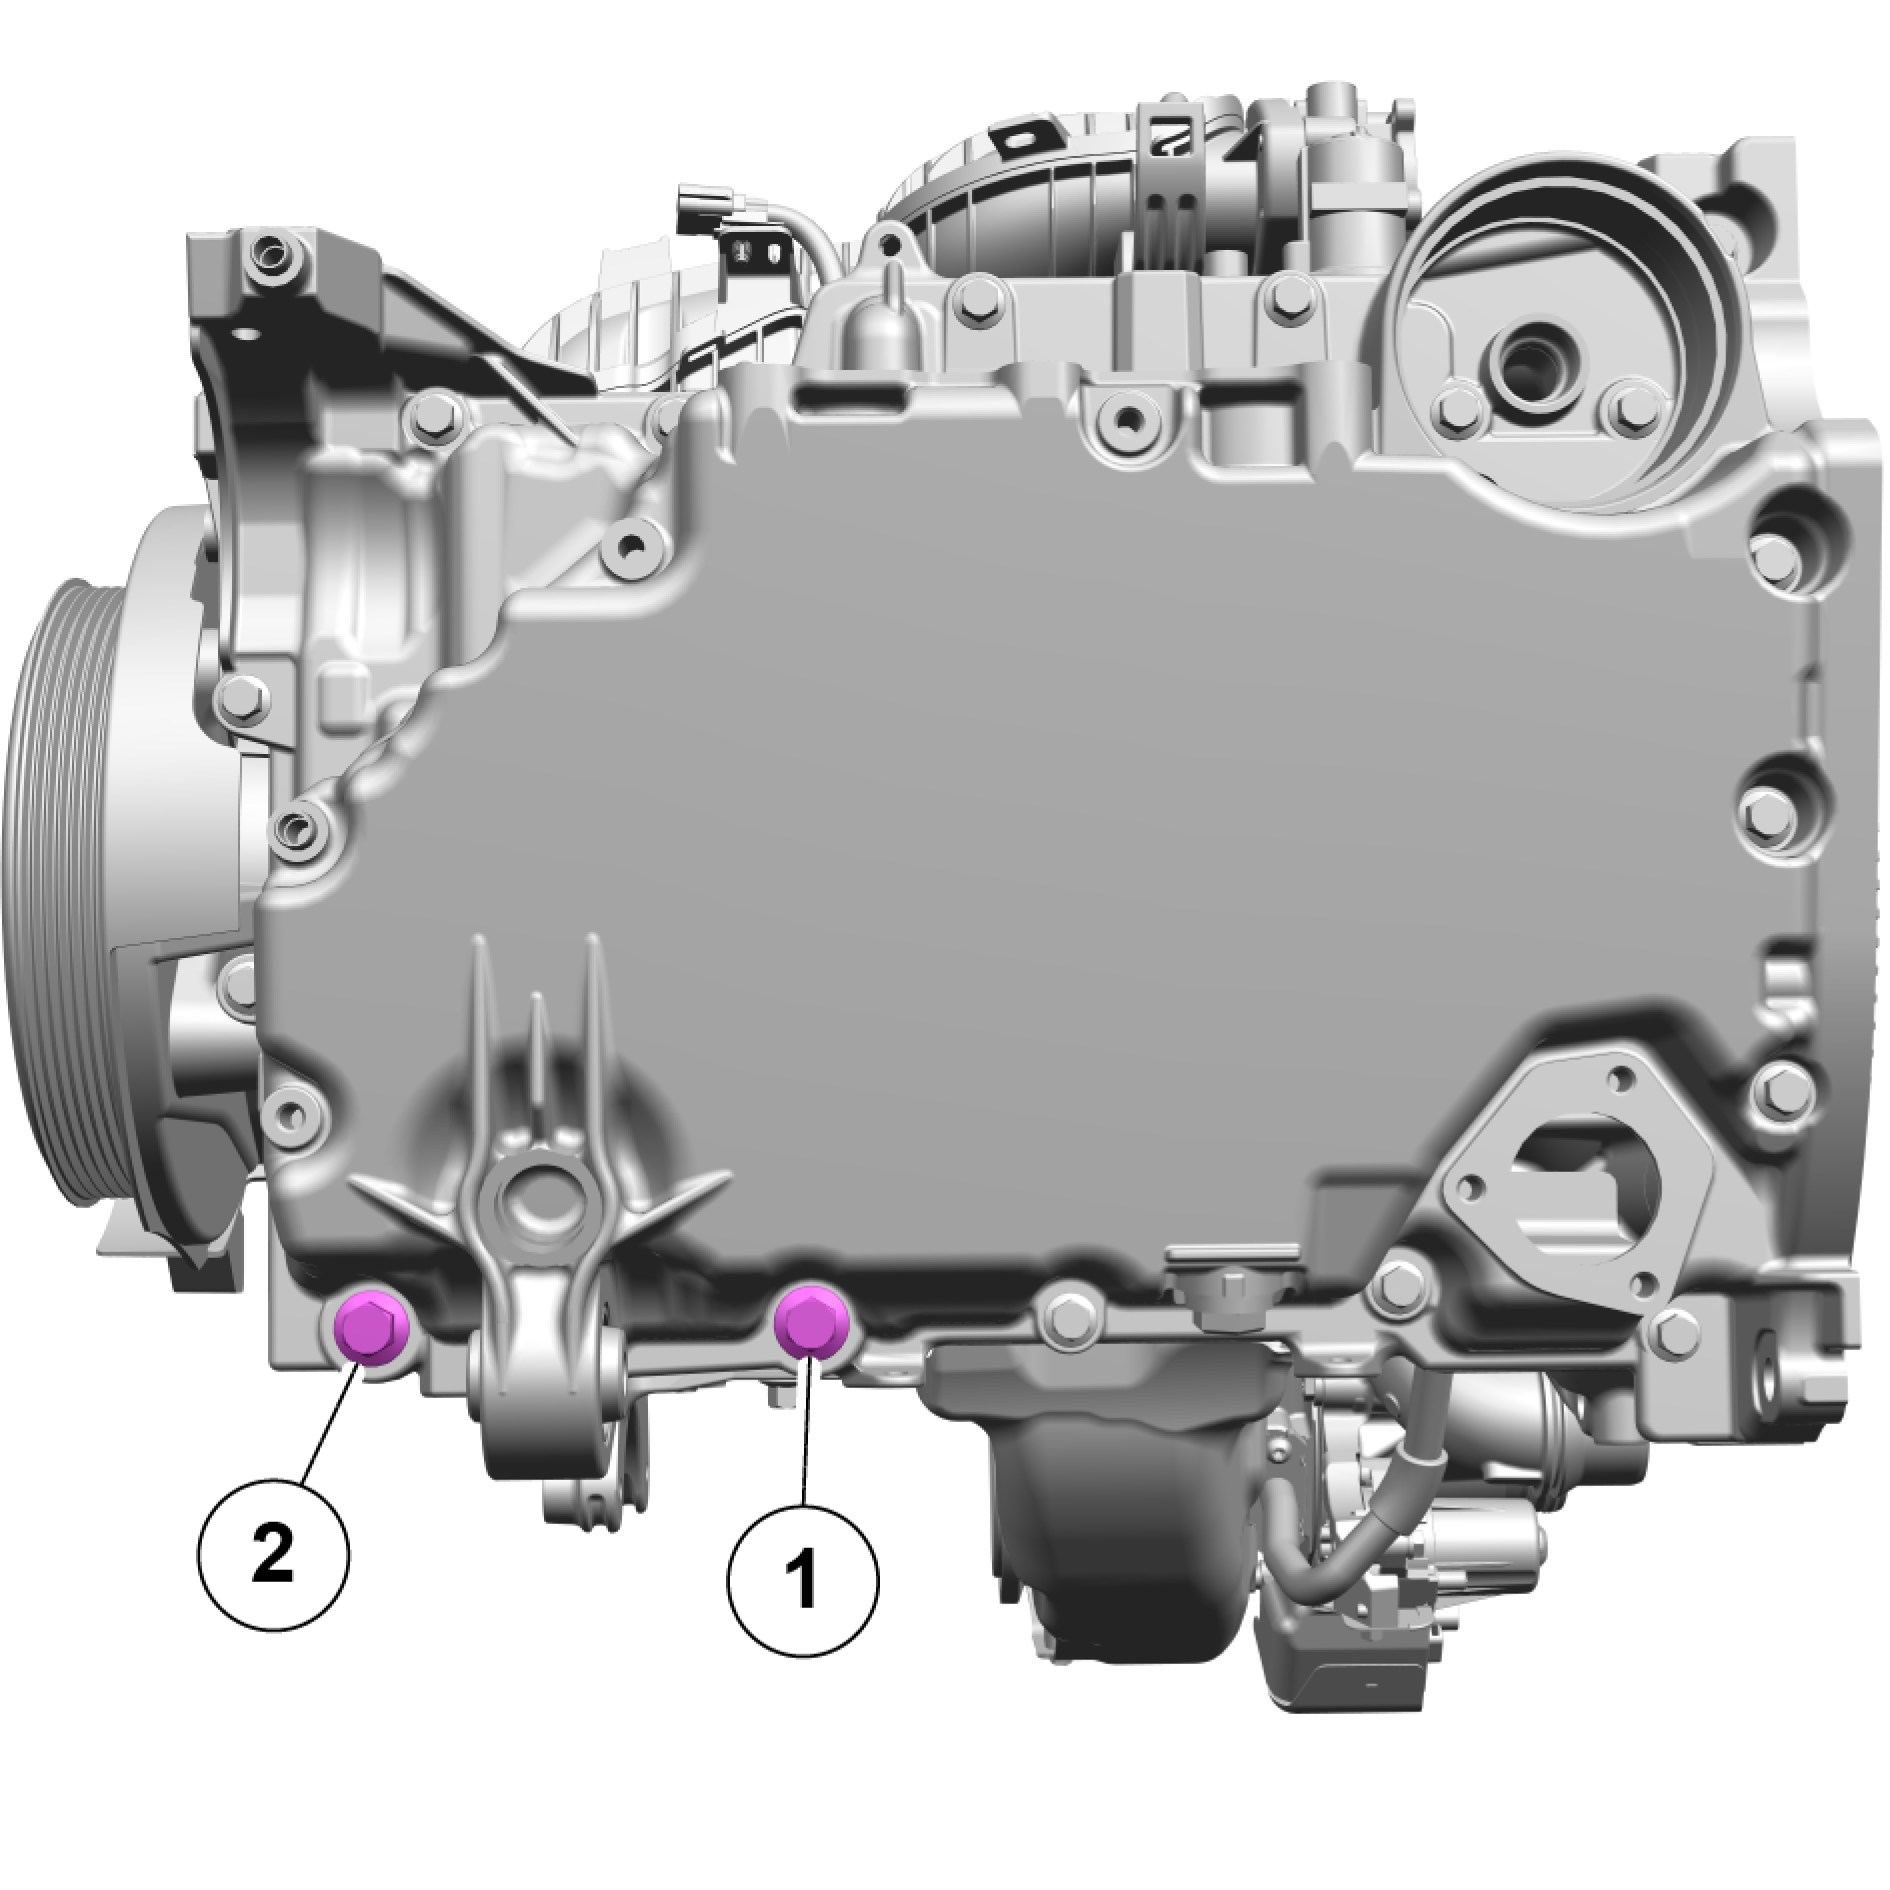
Tighten the screws.
Torque: 50 Nm
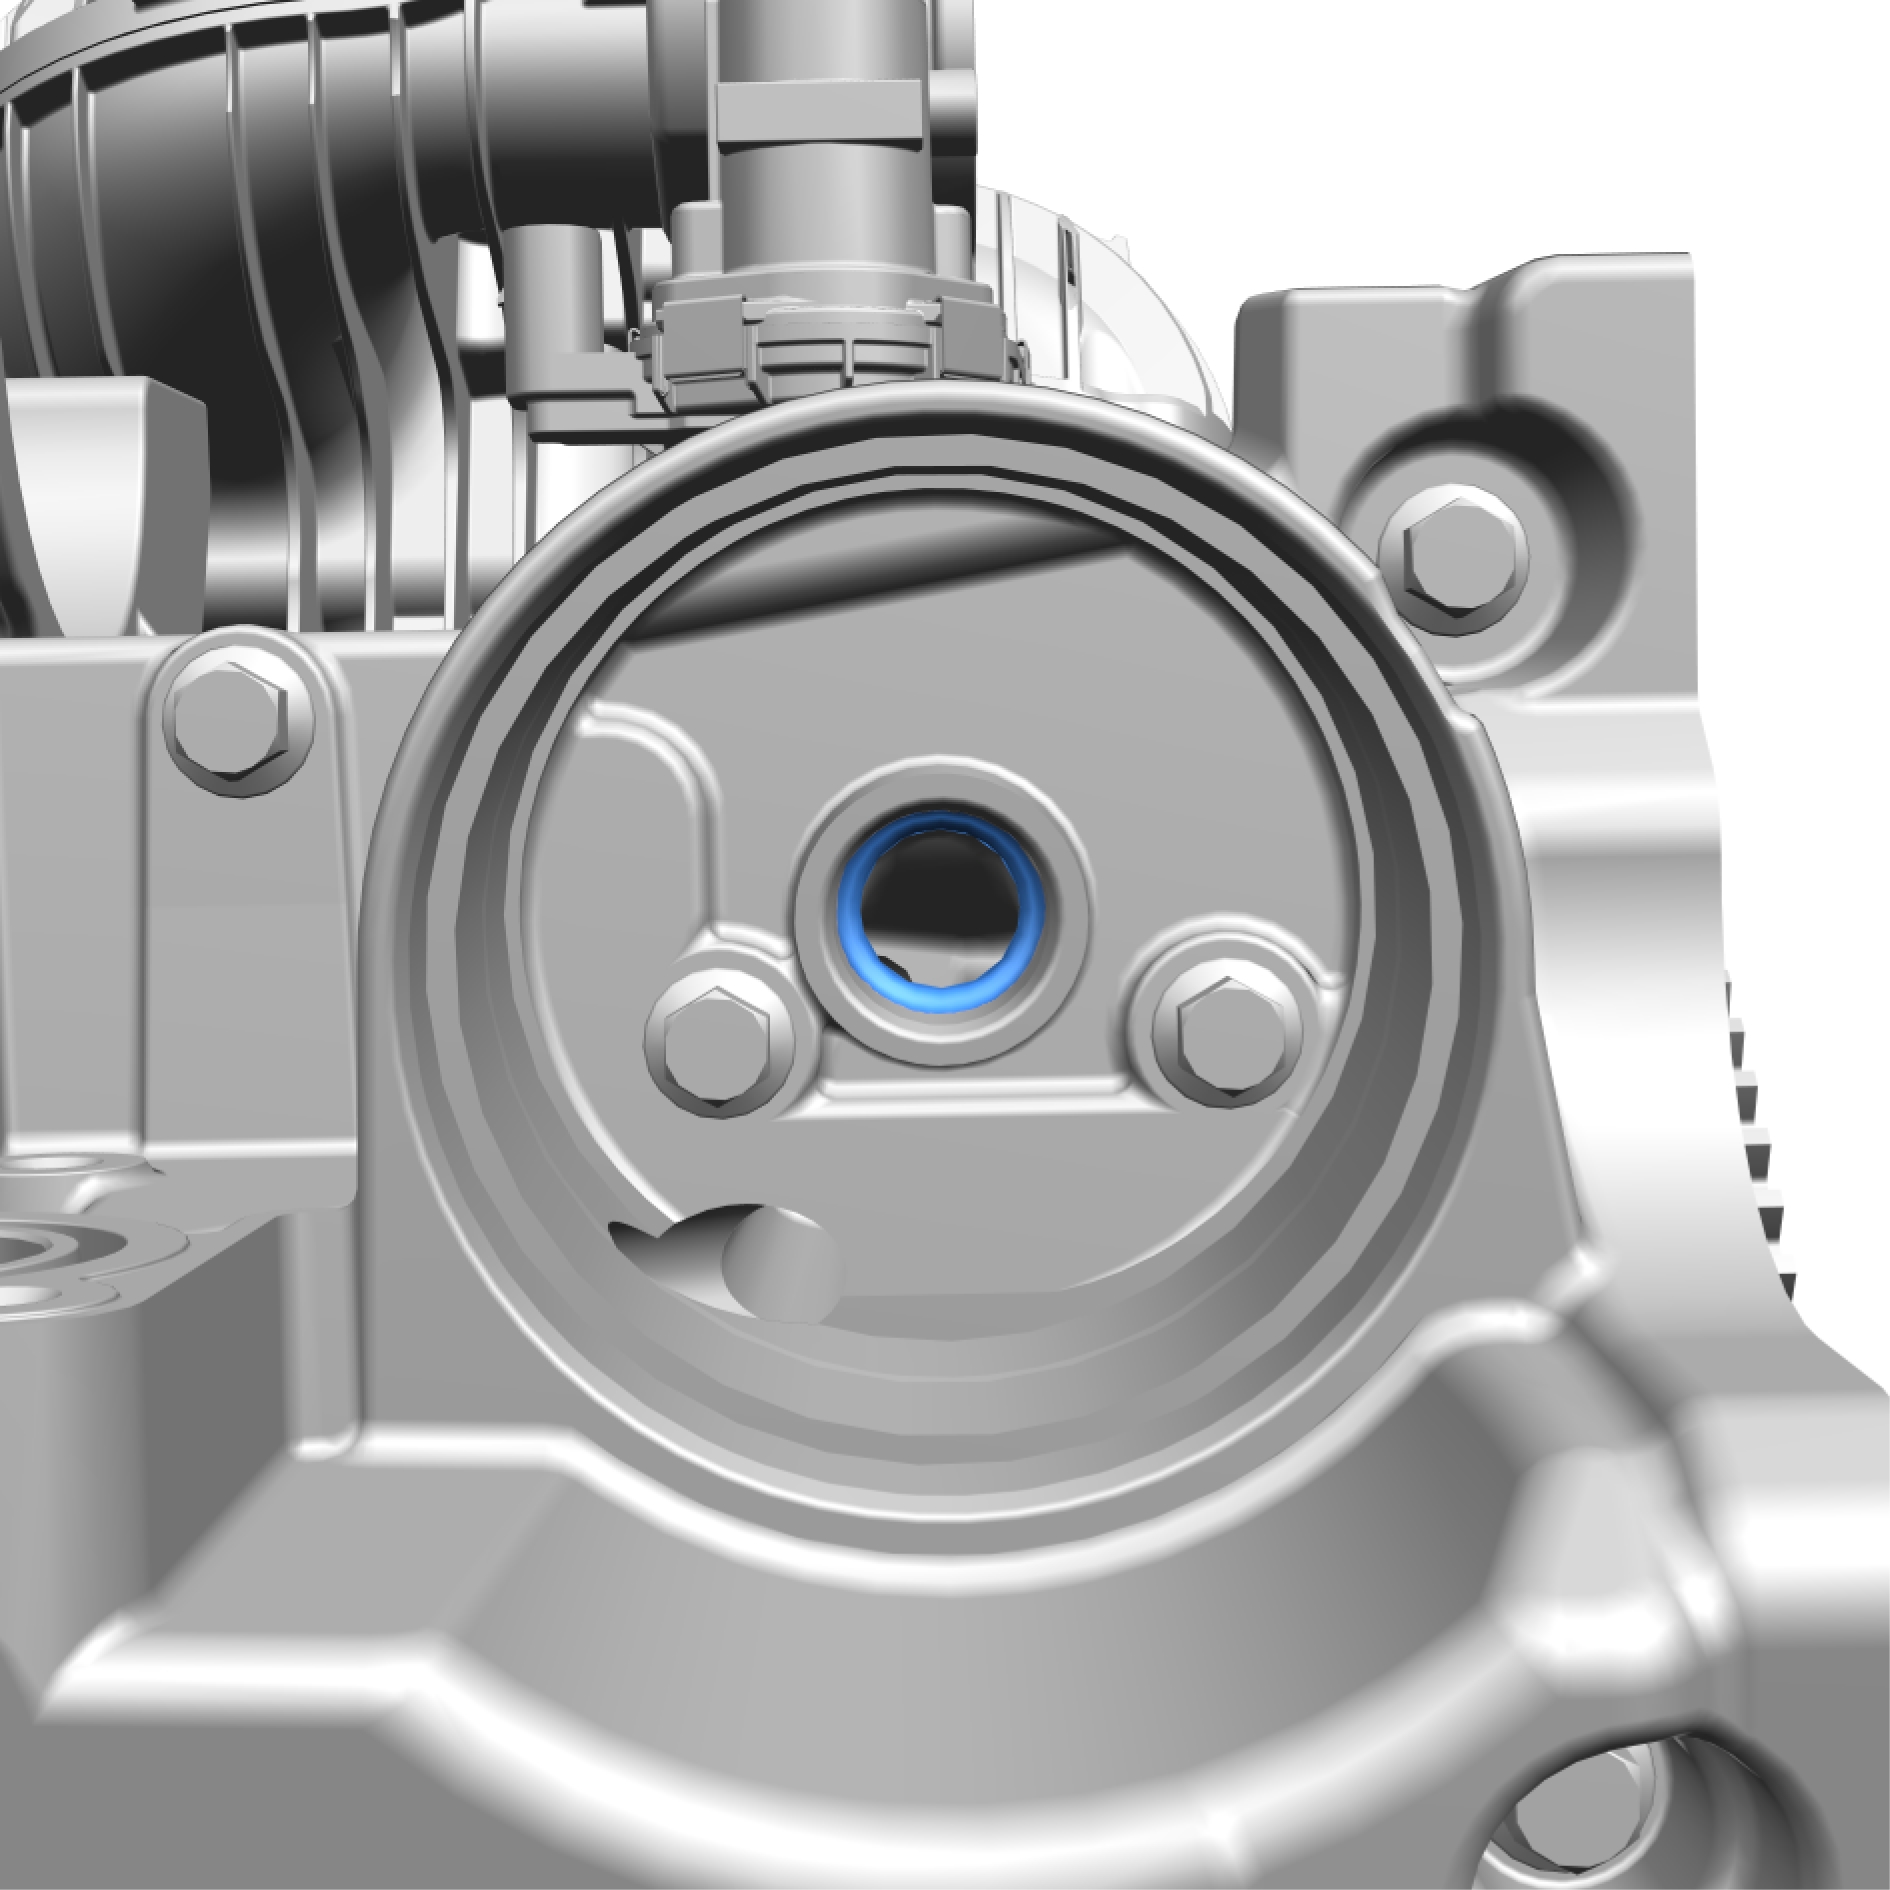
Make sure that no excess sealant residue is evident.
Install in reverse order.
Oil pan, replace
Removal
Remove the clip.
Remove the clip.
Remove the marked component.
Release the clamp.
Remove the screws.
Torque: 10 Nm
Remove the marked component.
Release the clamp.
Fold away the marked component.
Remove the screws.
Torque: 16 Nm
Remove the marked component.
Remove and discard the marked components.
Remove the marked component.
Remove and discard the marked components.
Remove the screws.
Torque: 9 Nm
Remove the marked component.
Remove the screw.
Remove and discard the marked component.
Install special tool: 999 5679
Remove the marked component.
Torque: 25 Nm
Remove and discard the marked components.
Remove the screws.
Remove the marked component.
Installation
Make sure that the mating faces are clean and free of foreign material.
Clean the marked area.
Make sure that the mating faces are clean and free of foreign material.
Clean the marked area.
The component must be installed within 5 minutes of applying the sealant.
Apply chemical gasket.
The component must be installed within 5 minutes of applying the sealant.
Apply chemical gasket.
Take extra care not to damage the seal.
Install the marked component.
Install the screws fingertight.
Tighten the screws.
Torque: 17 Nm
Tighten the screws.
Torque: 50 Nm
Make sure that no excess sealant residue is evident.
Install in reverse order.
Timing belt, replace
Removal
Remove the screw.
Remove the marked component.
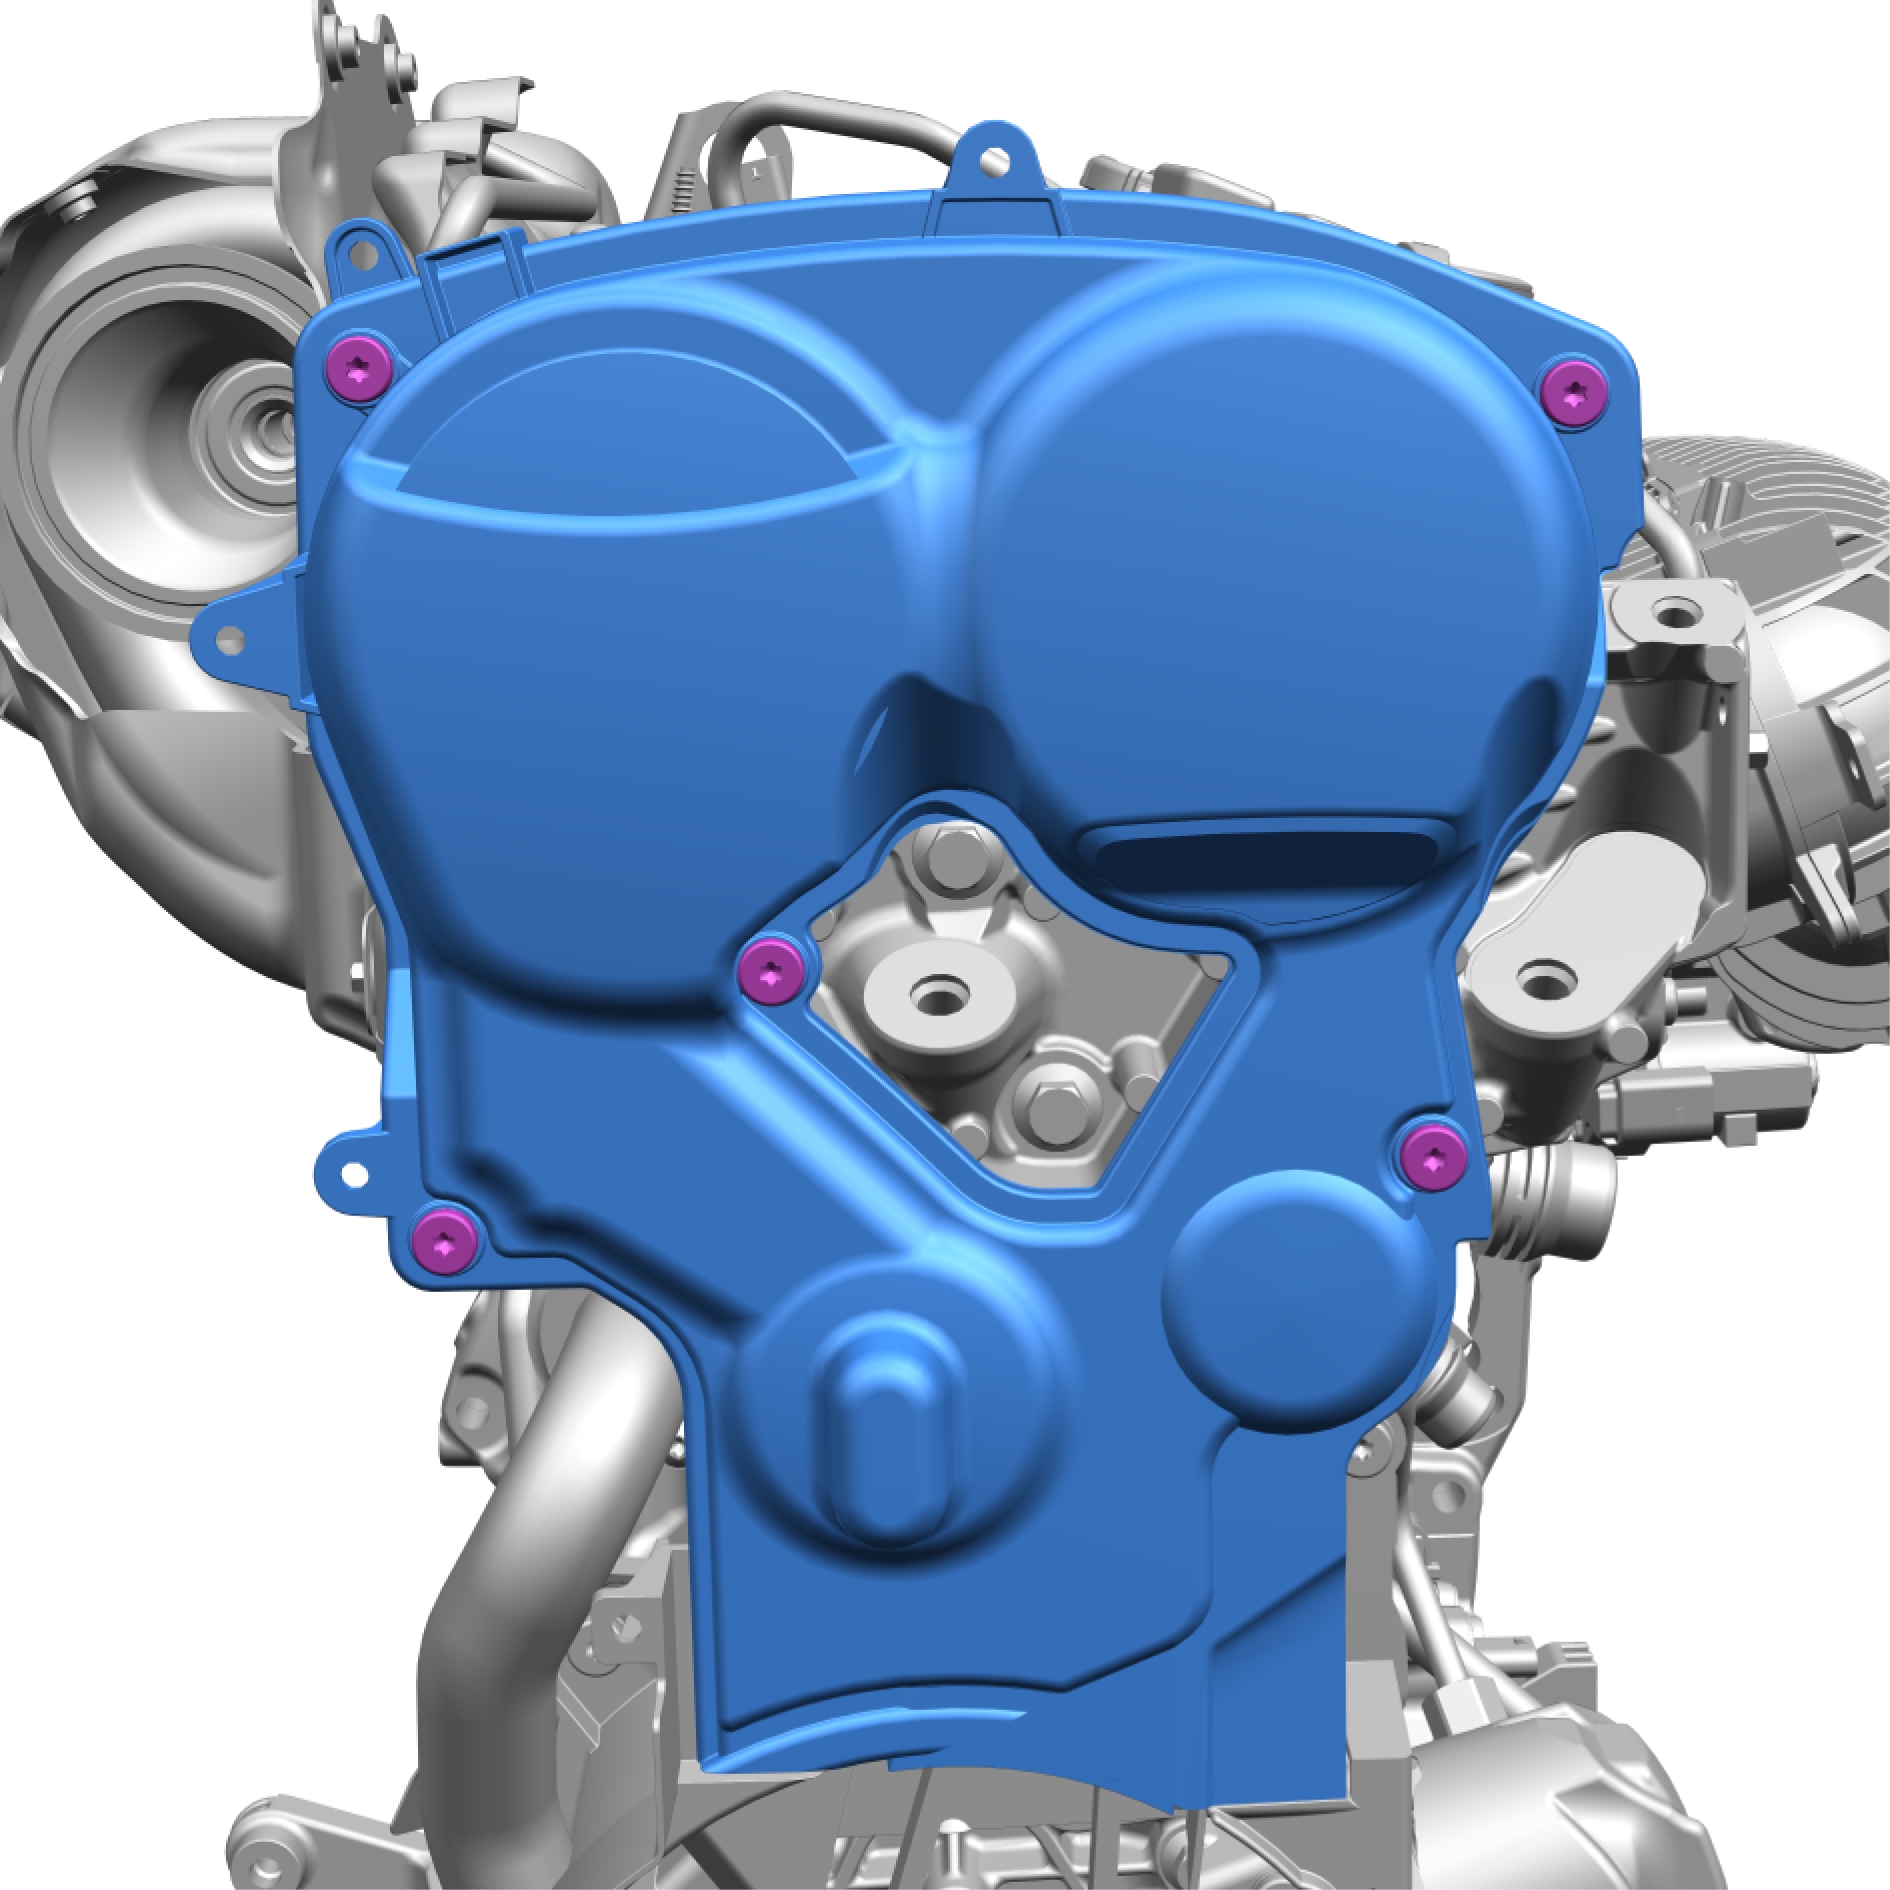
Remove the screws.
Remove the marked component.
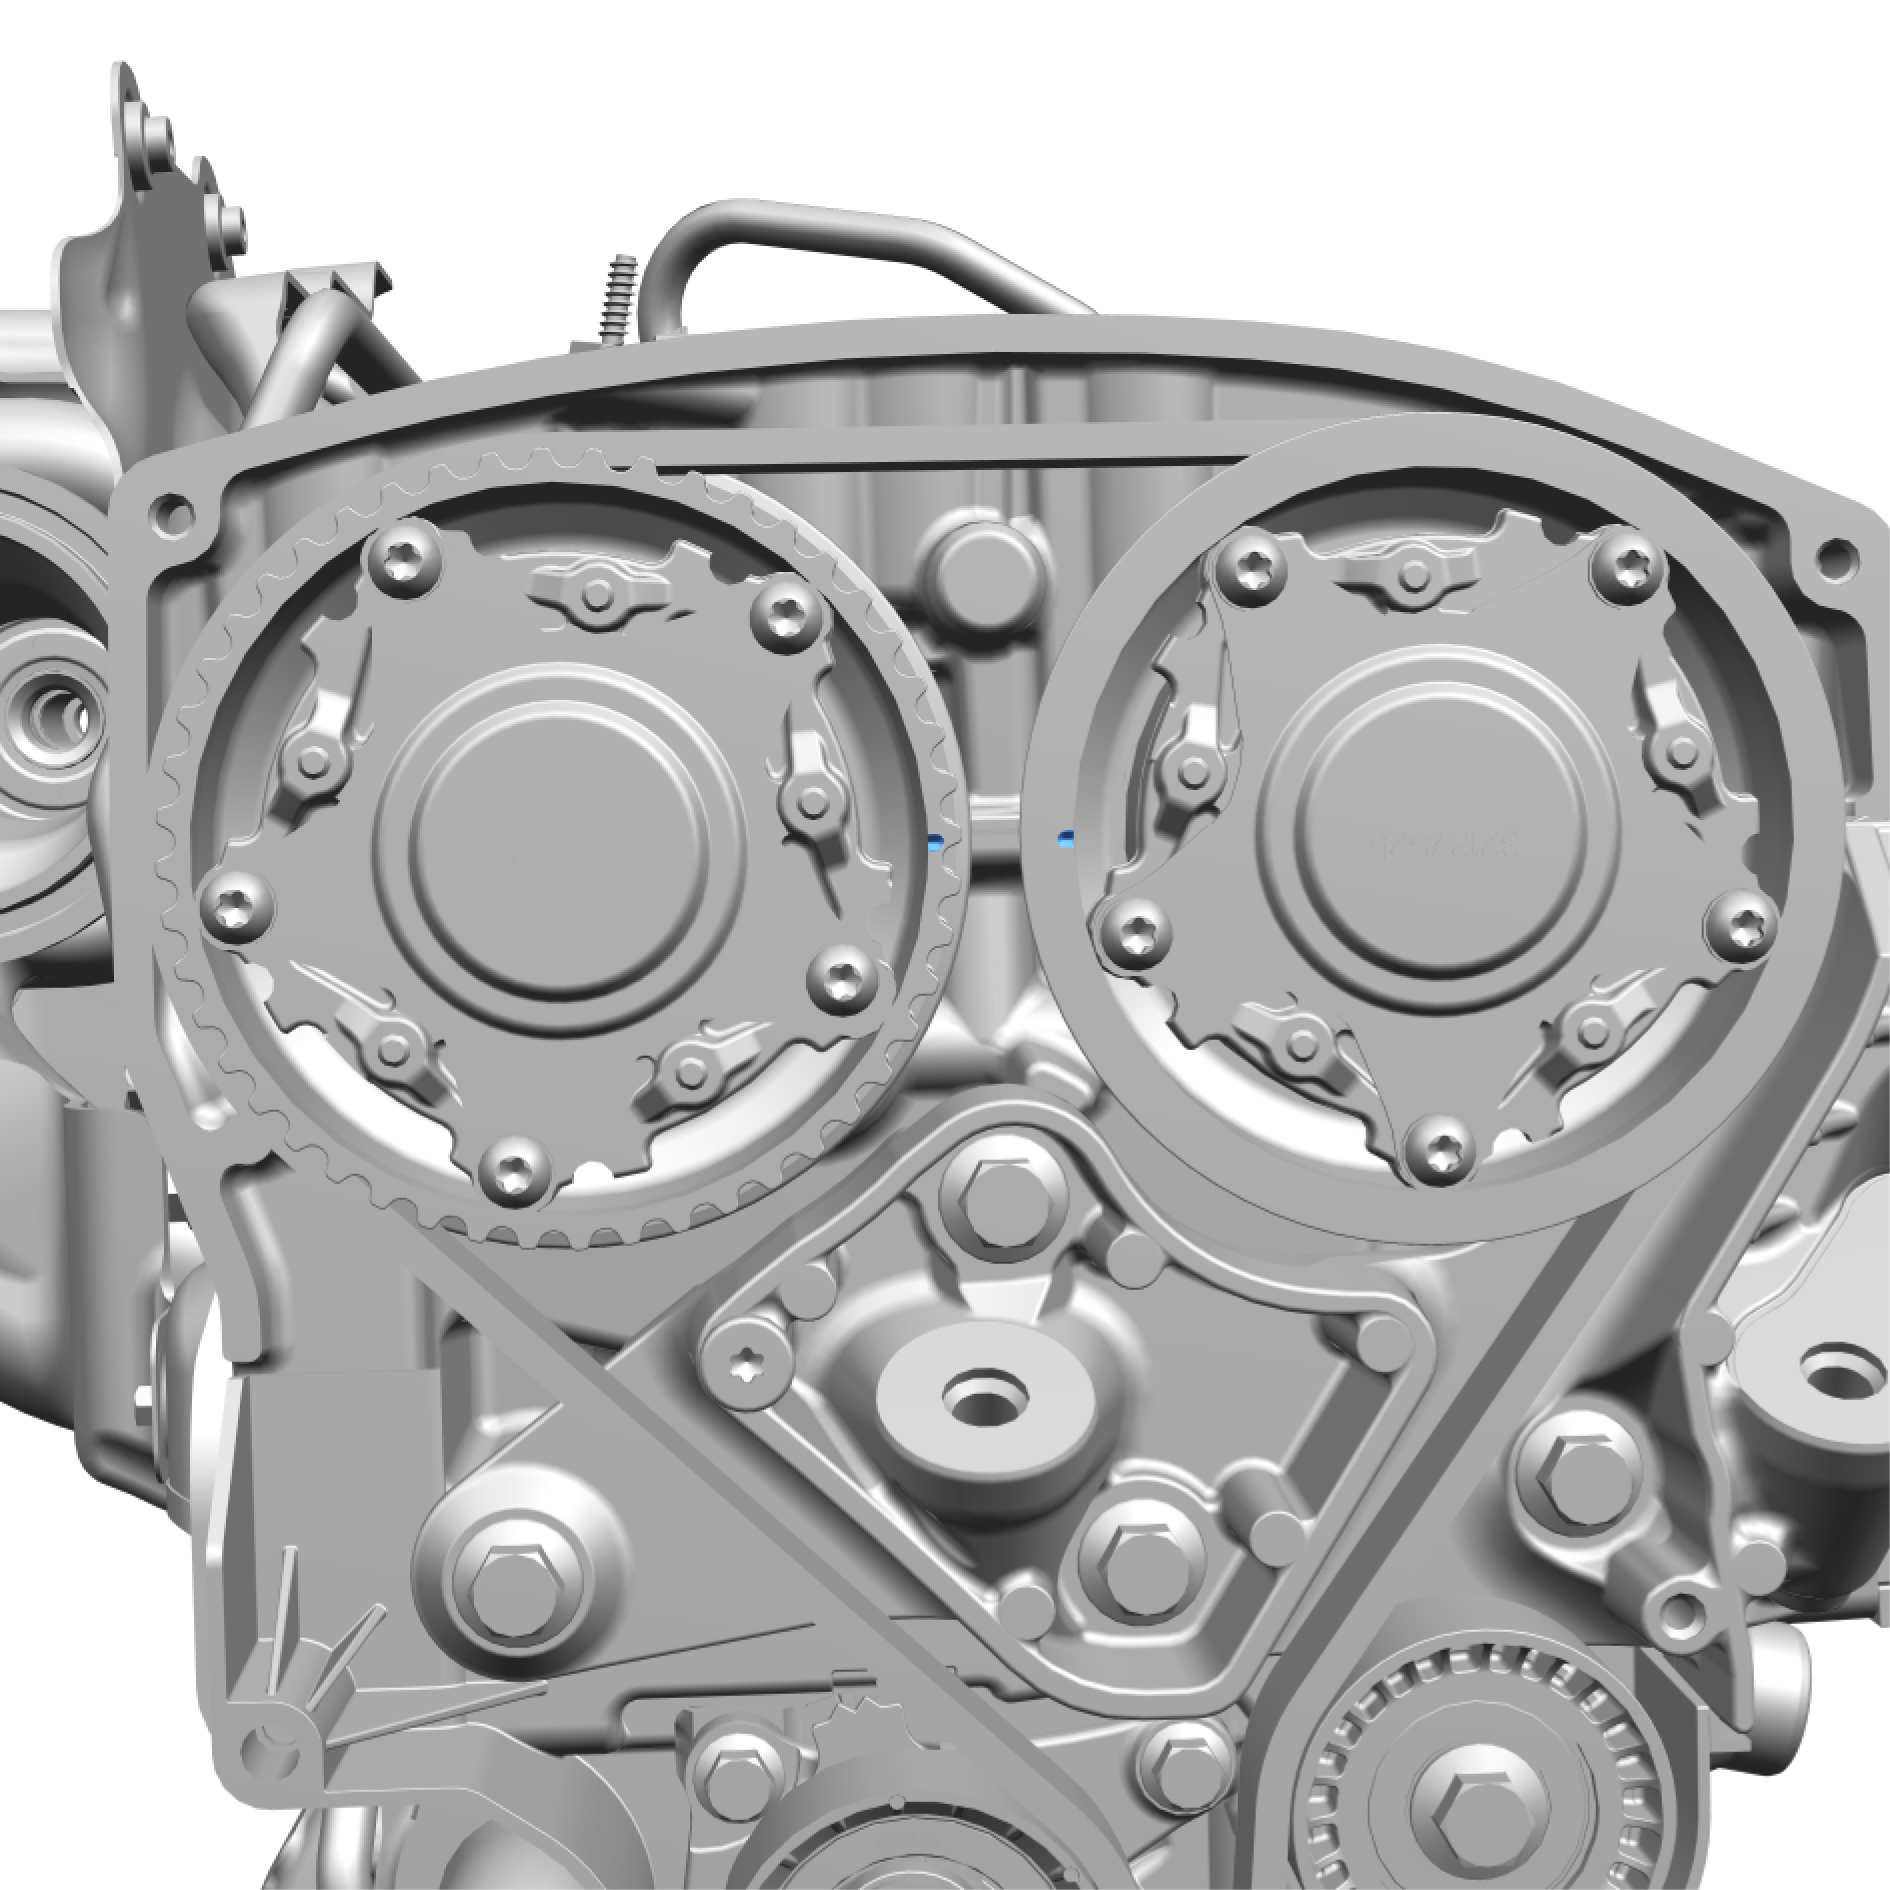
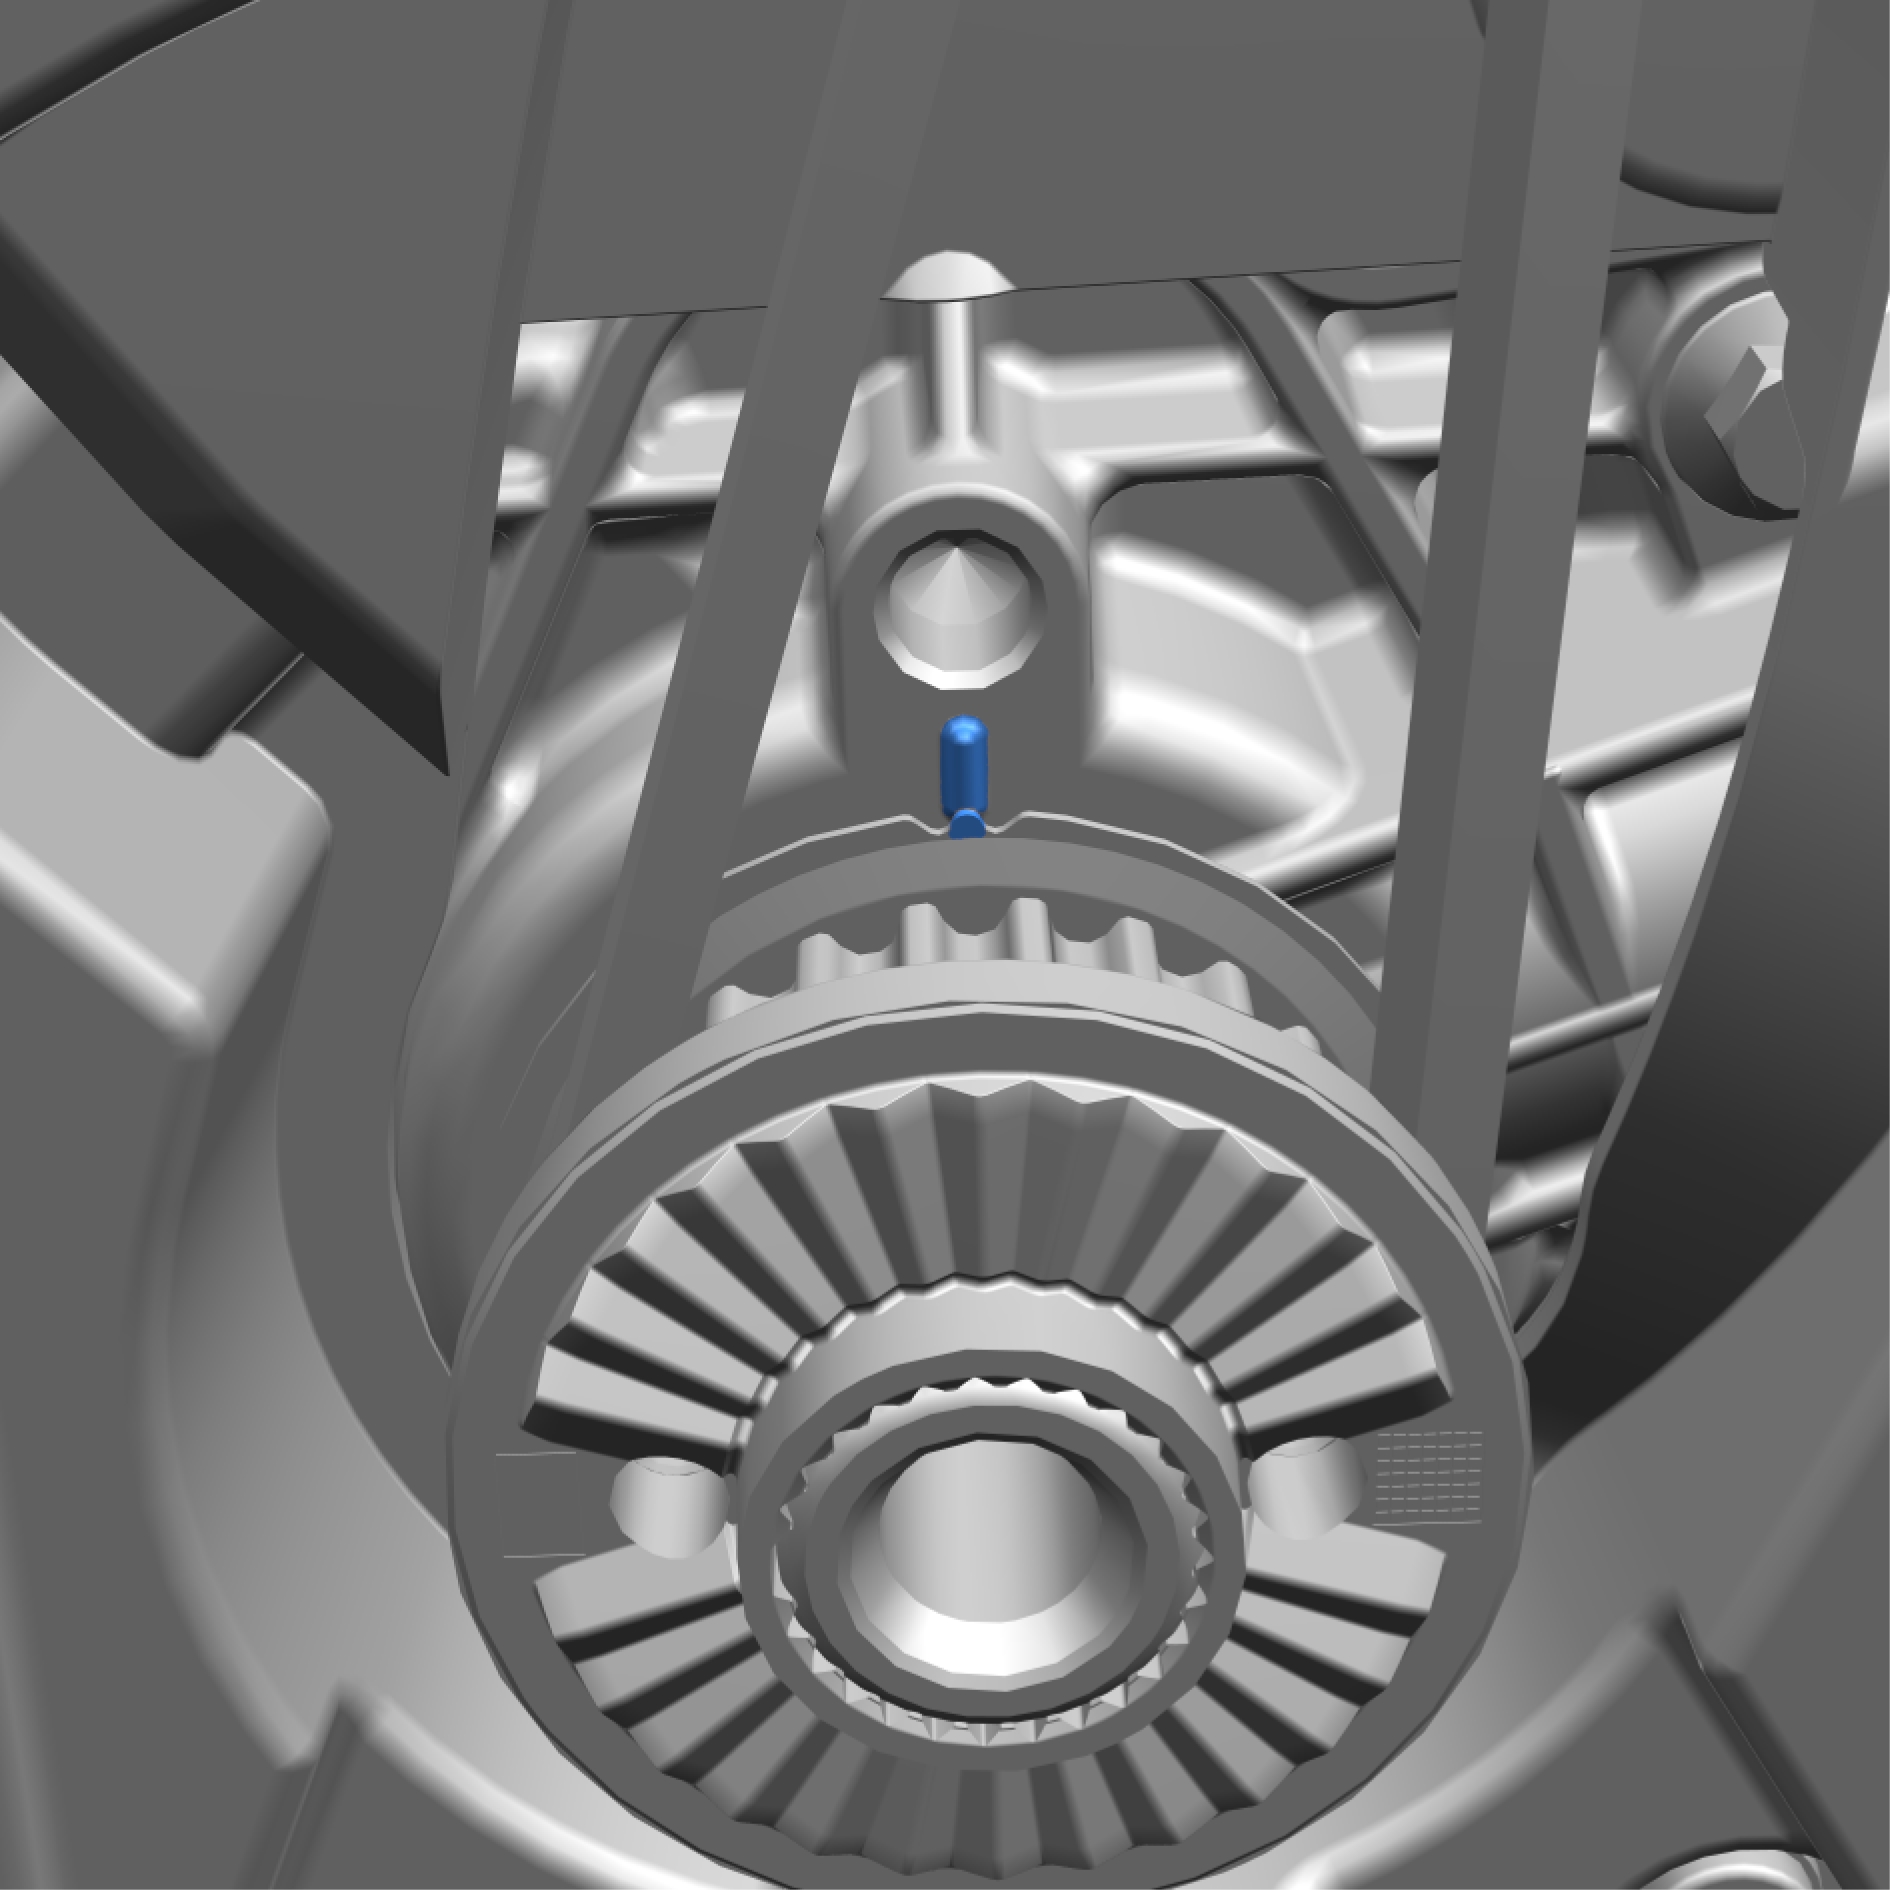
Rotate the engine clock wise to the zero position.
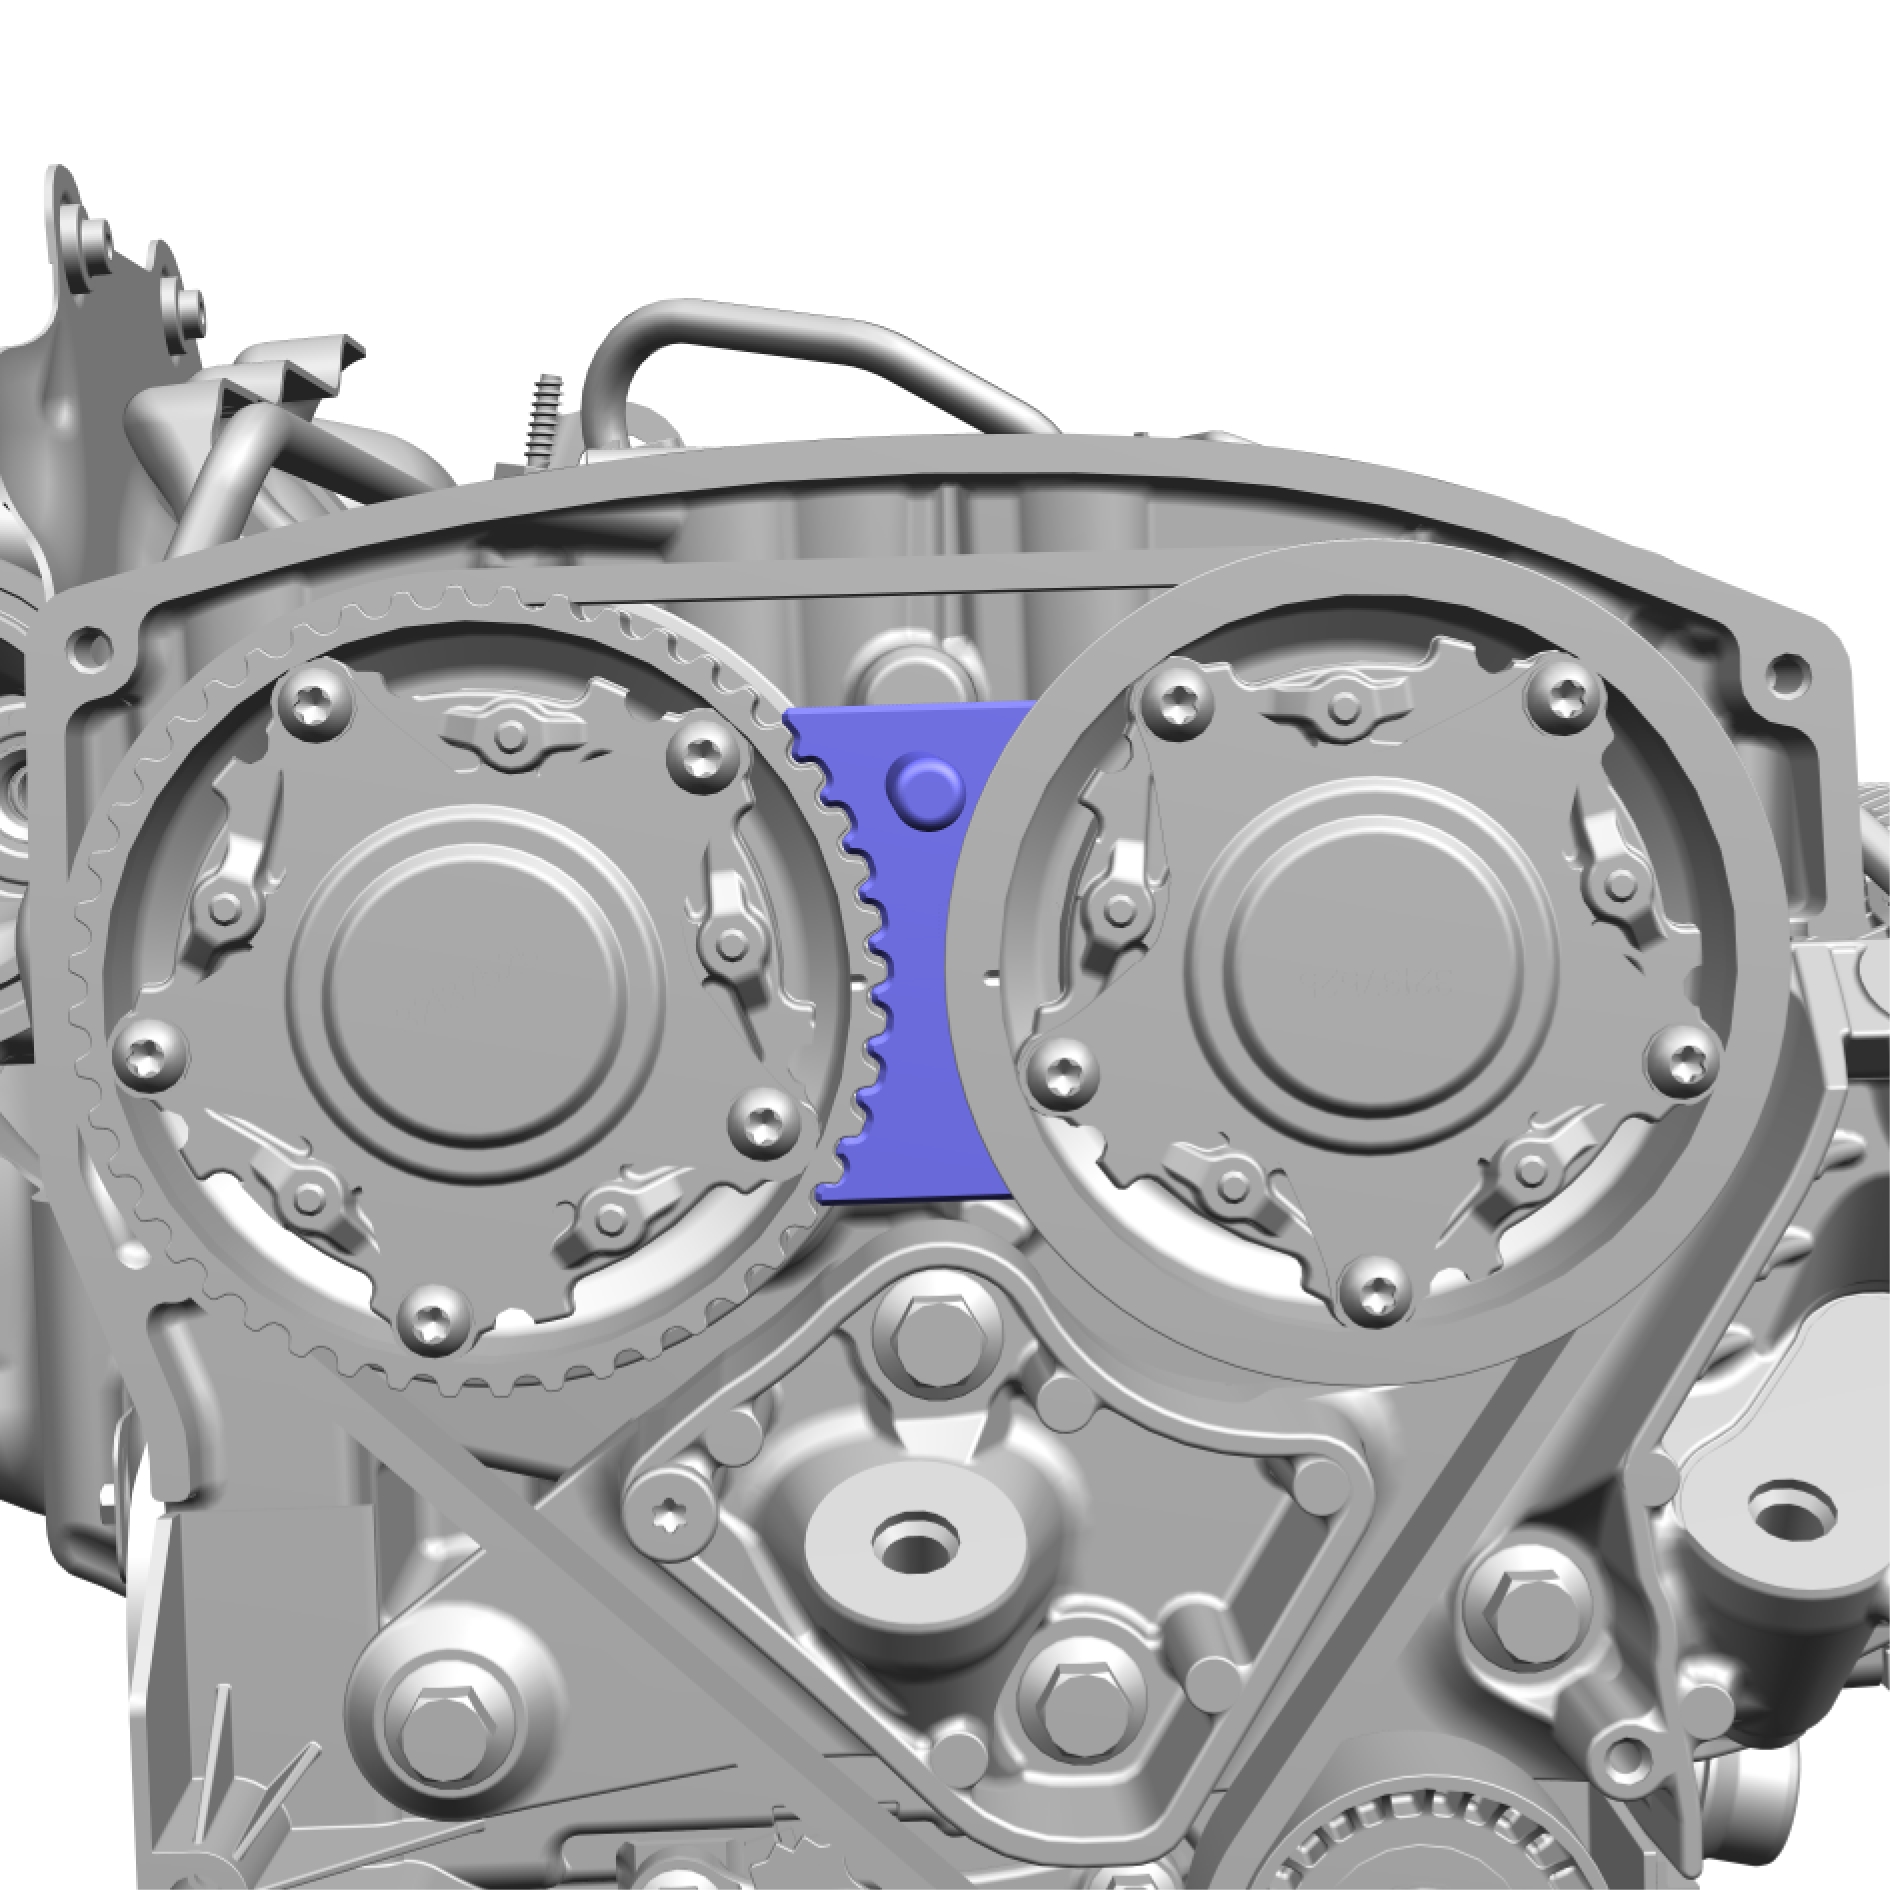
Install the special tool: 999 7768
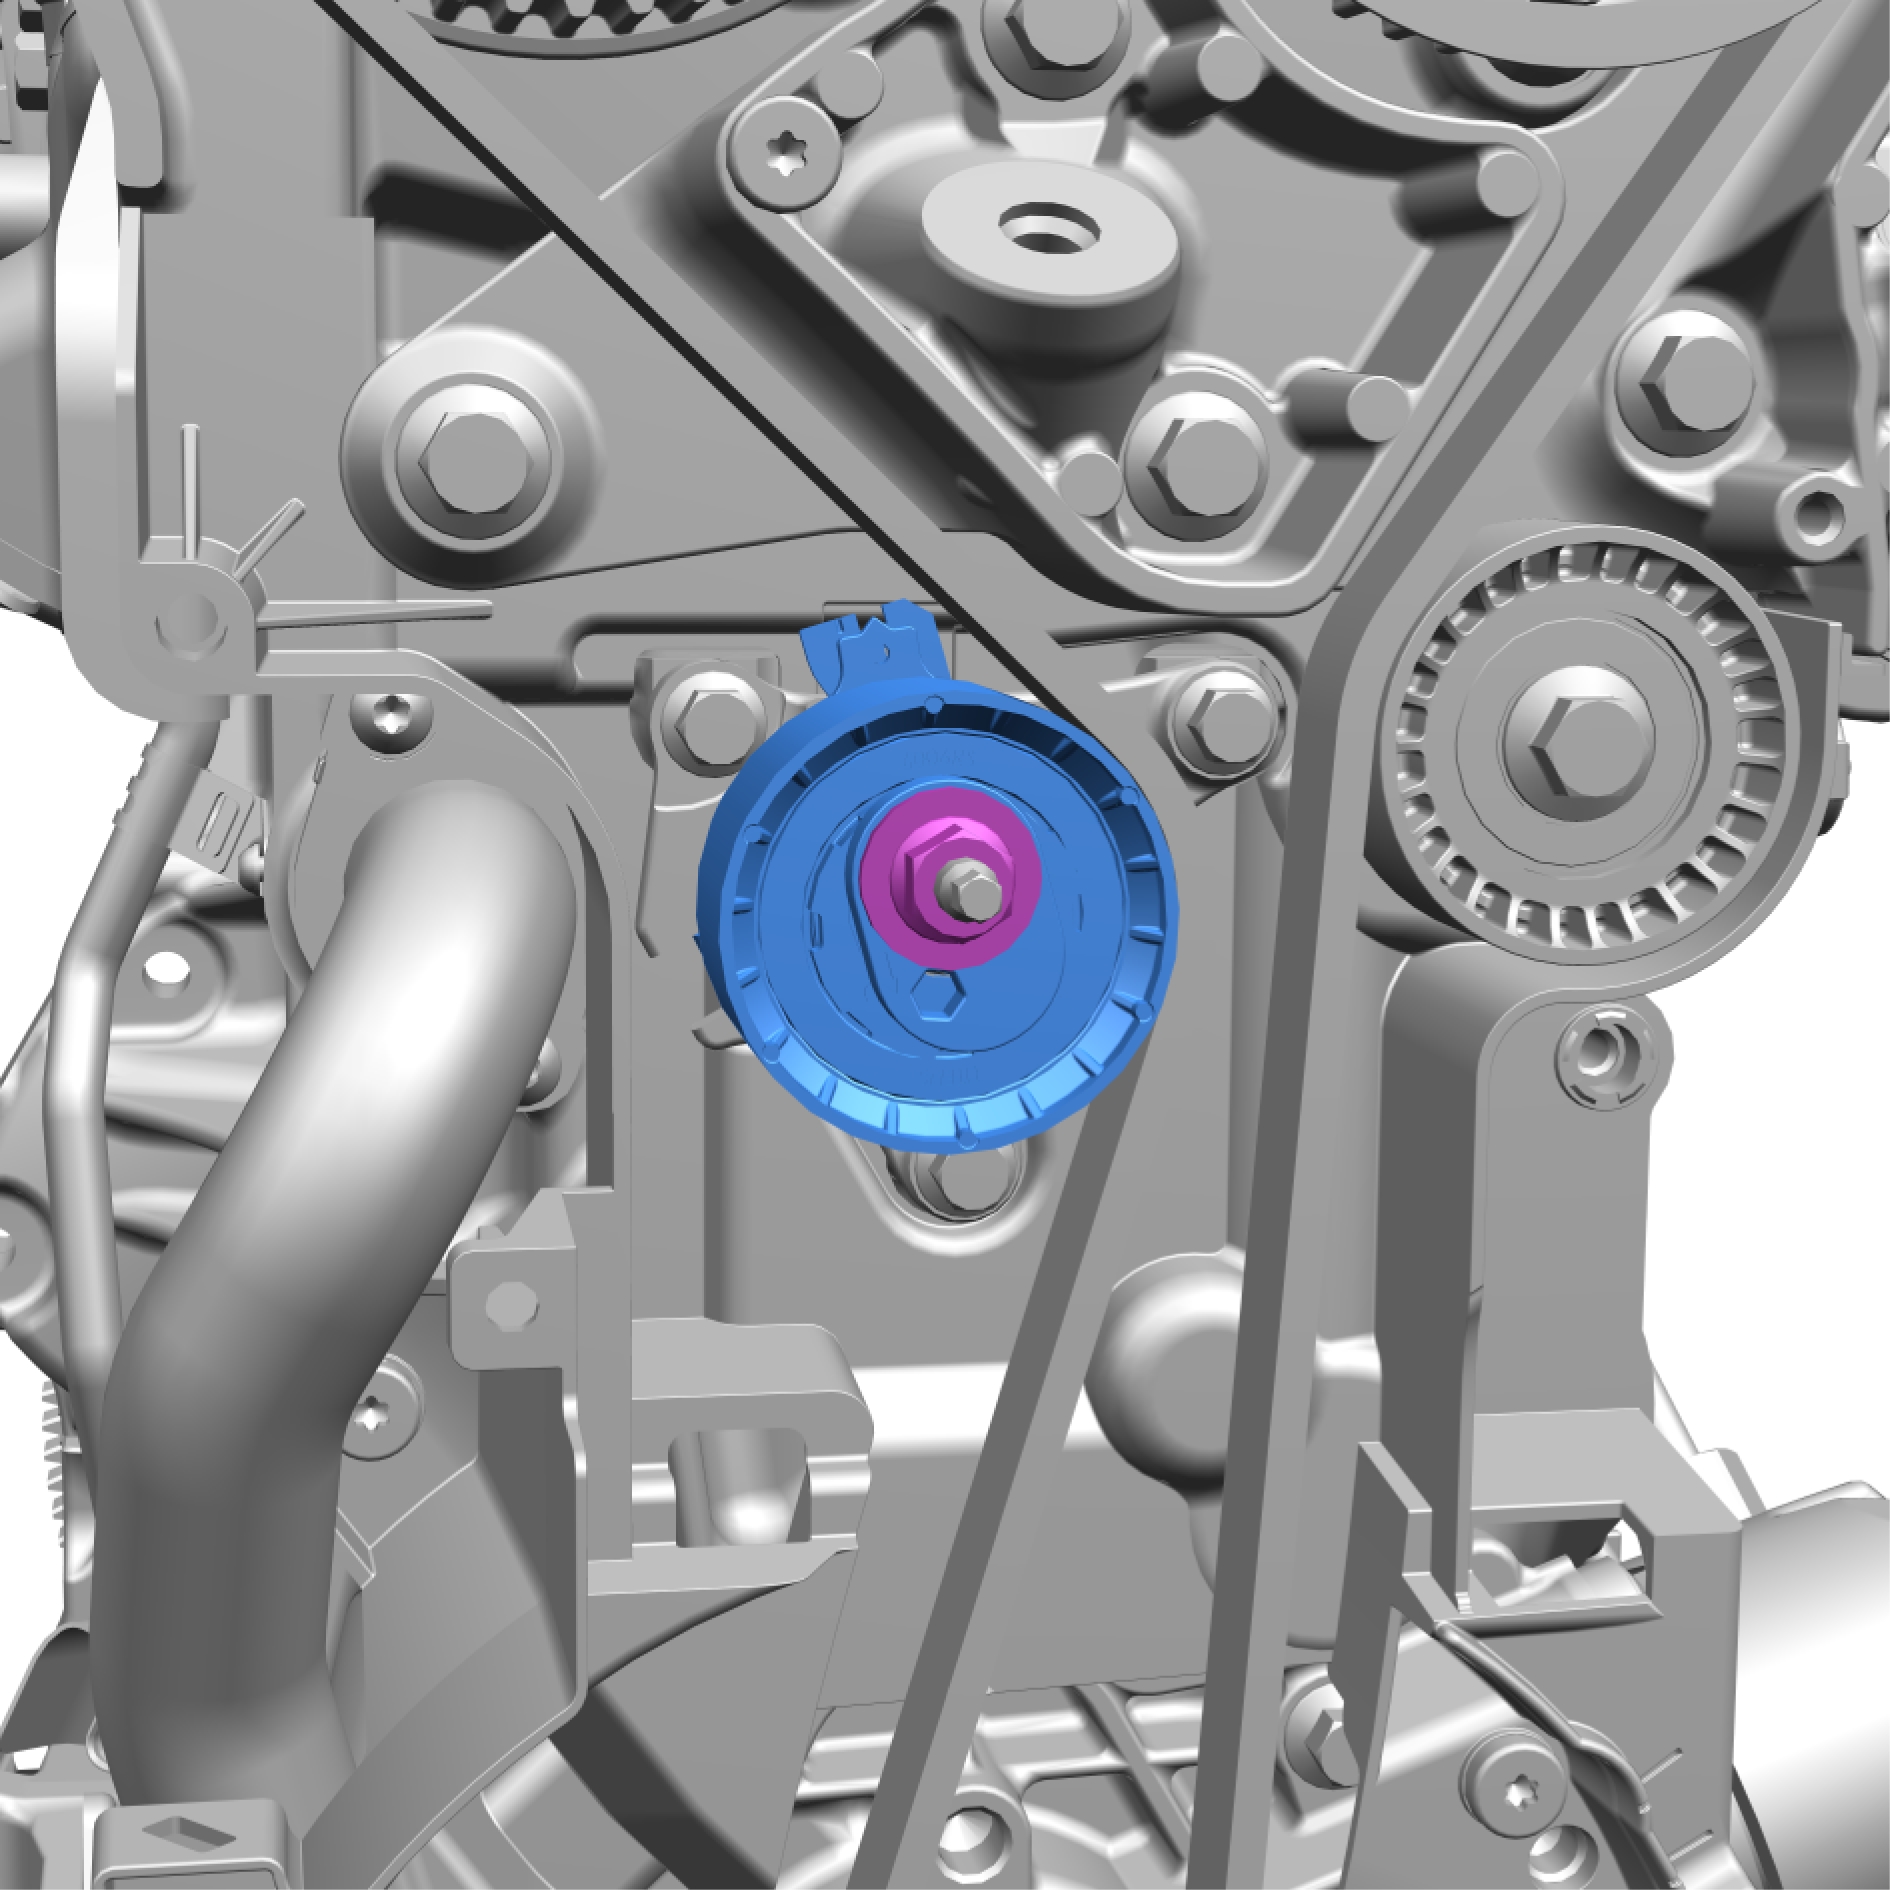
Remove the nut.
Remove and discard the marked component.
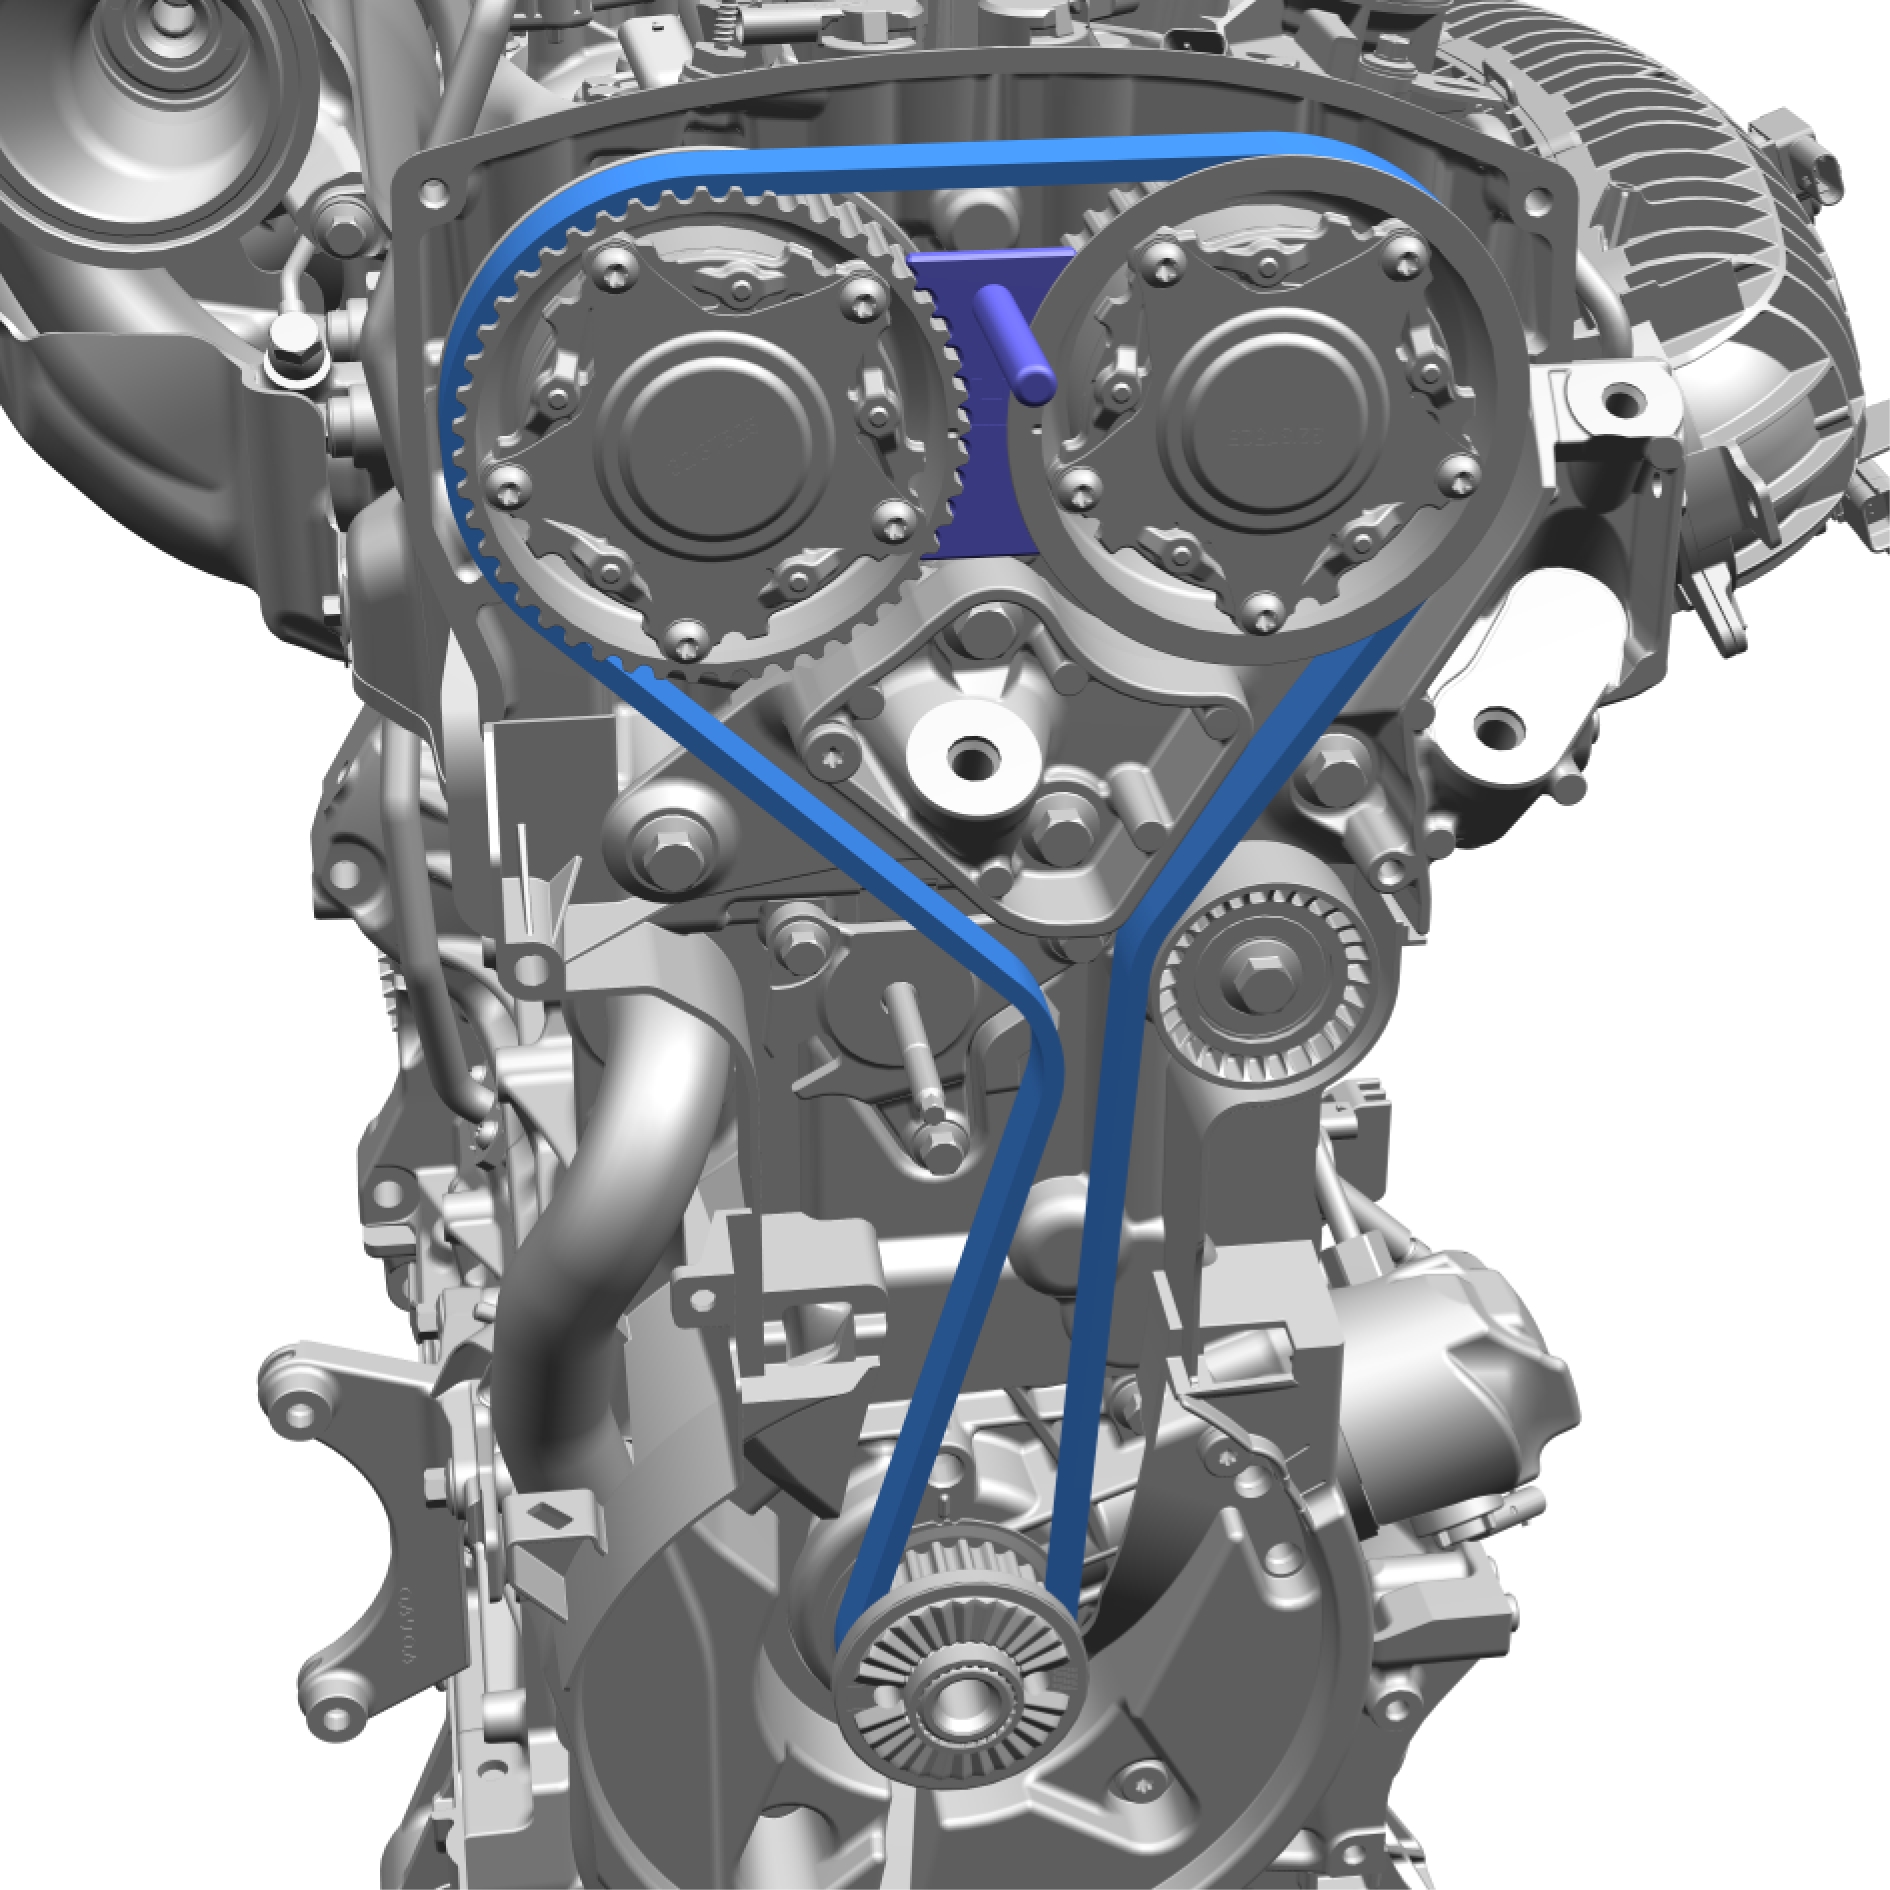
Remove and discard the marked component.
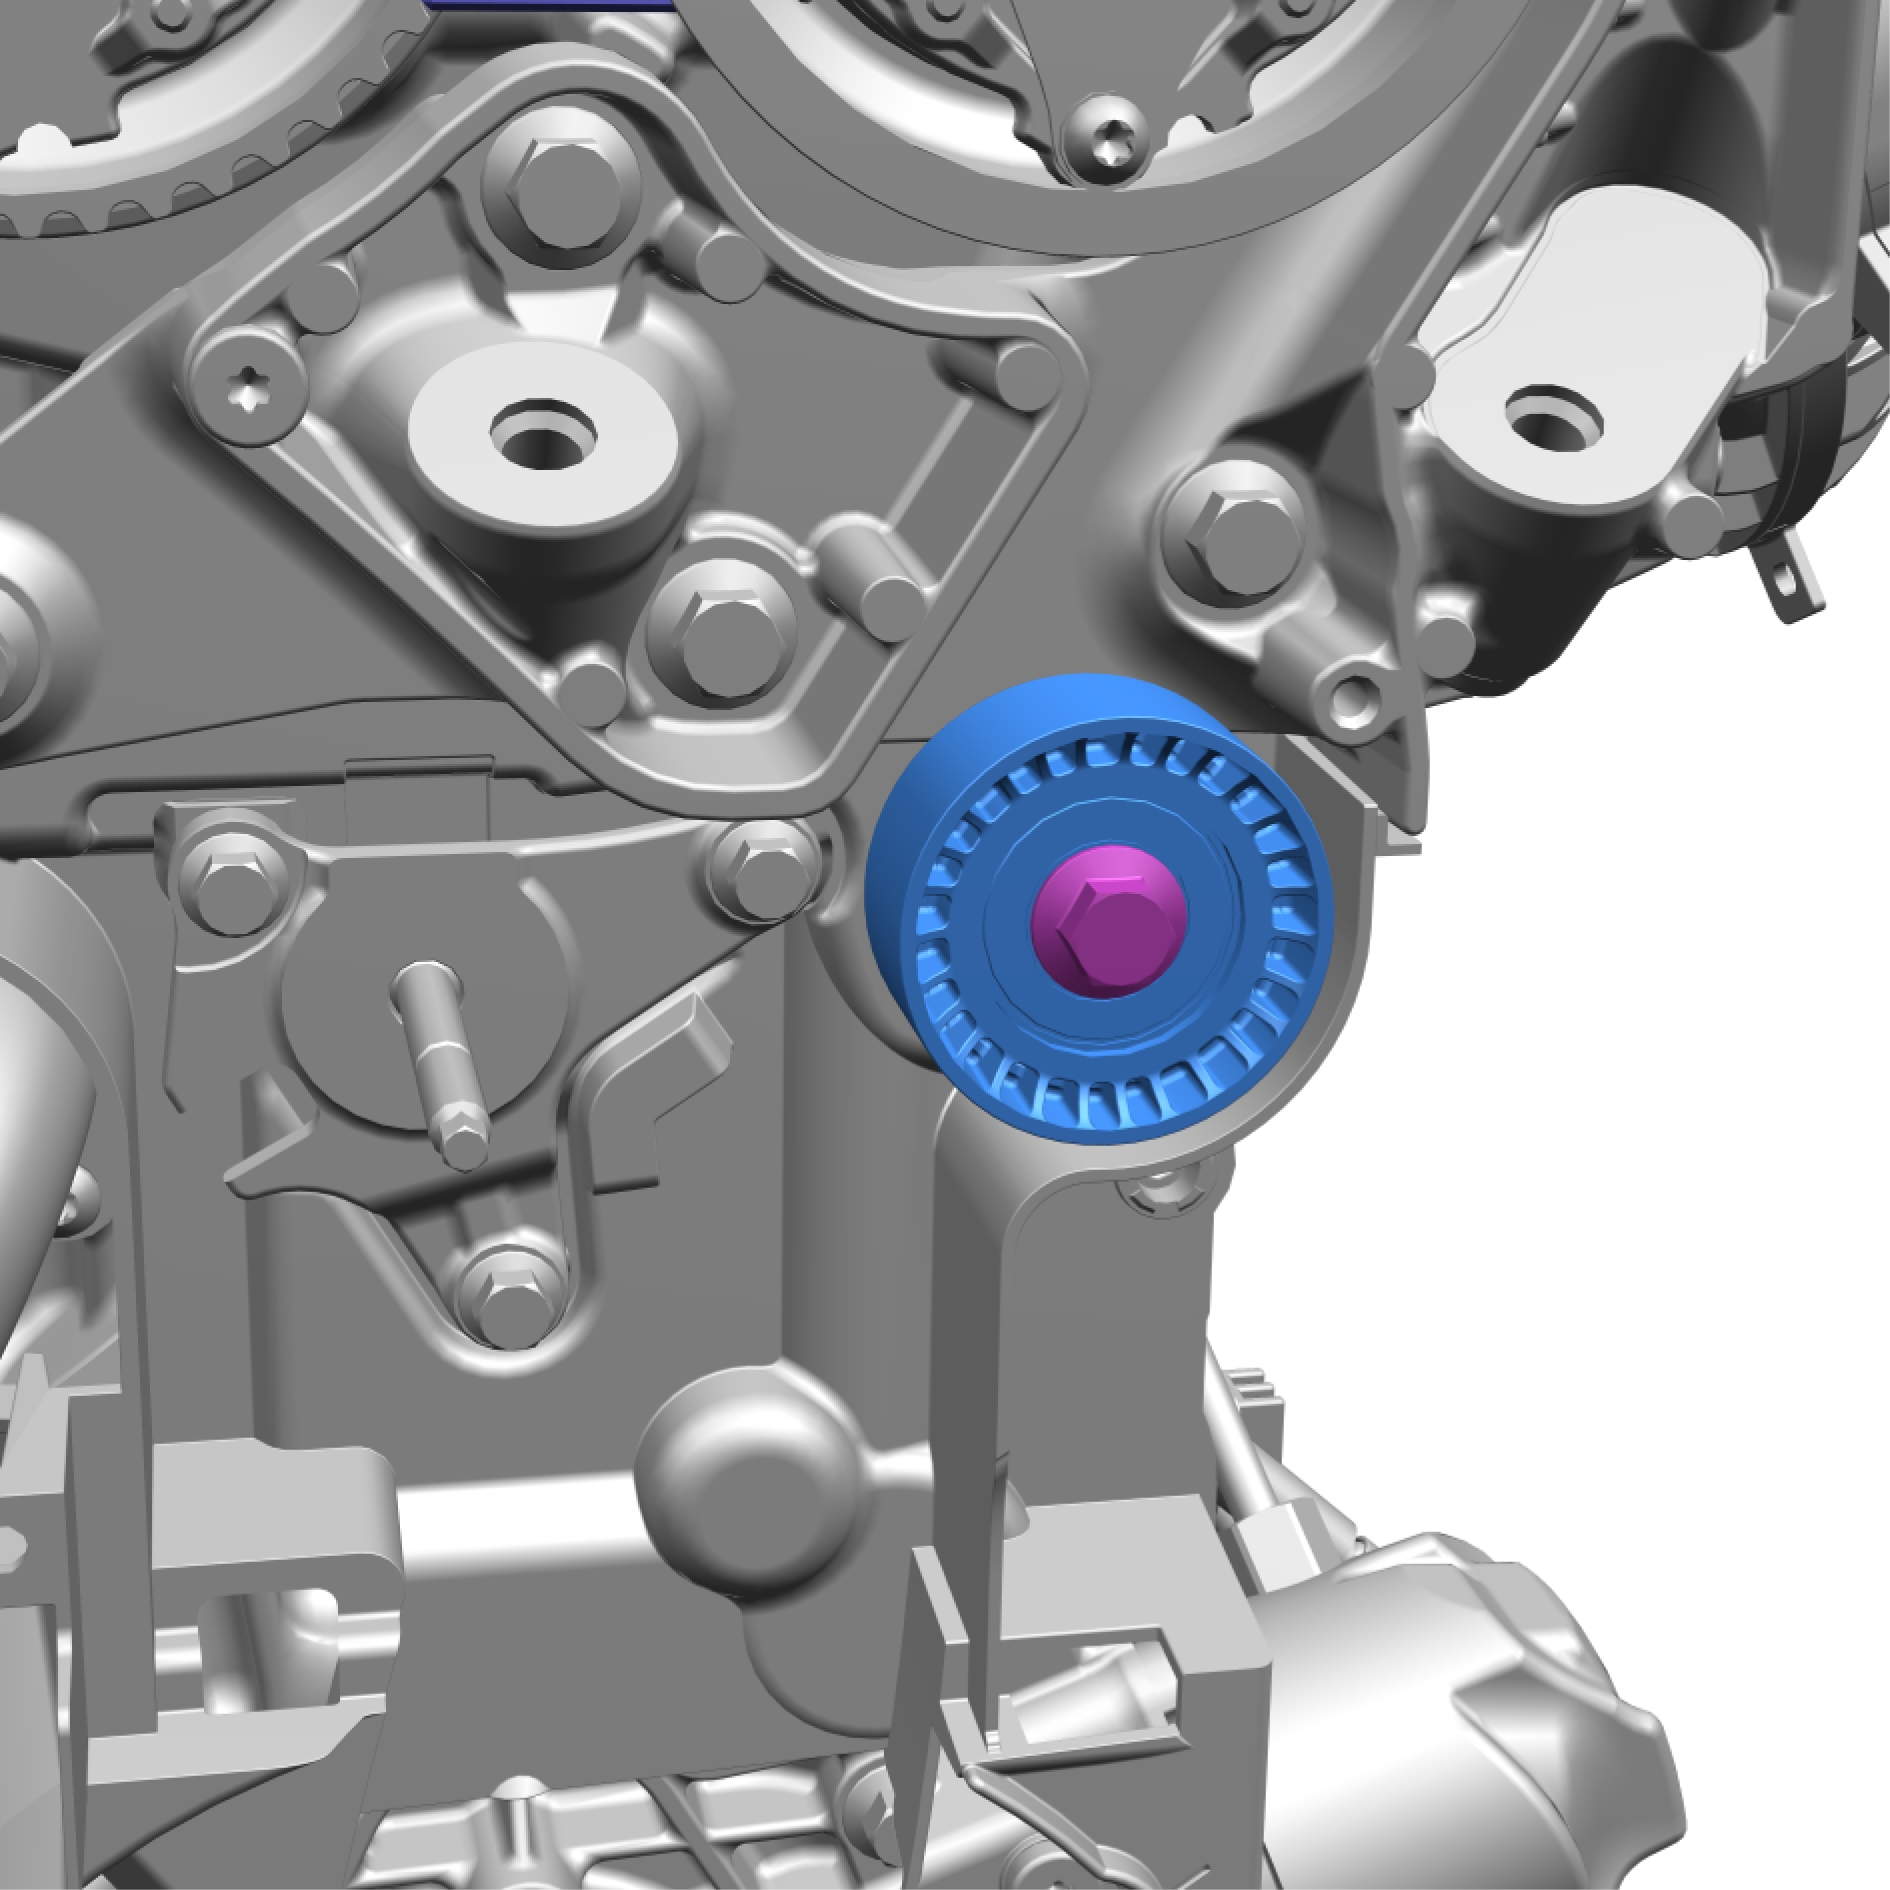
Remove and discard the marked component.
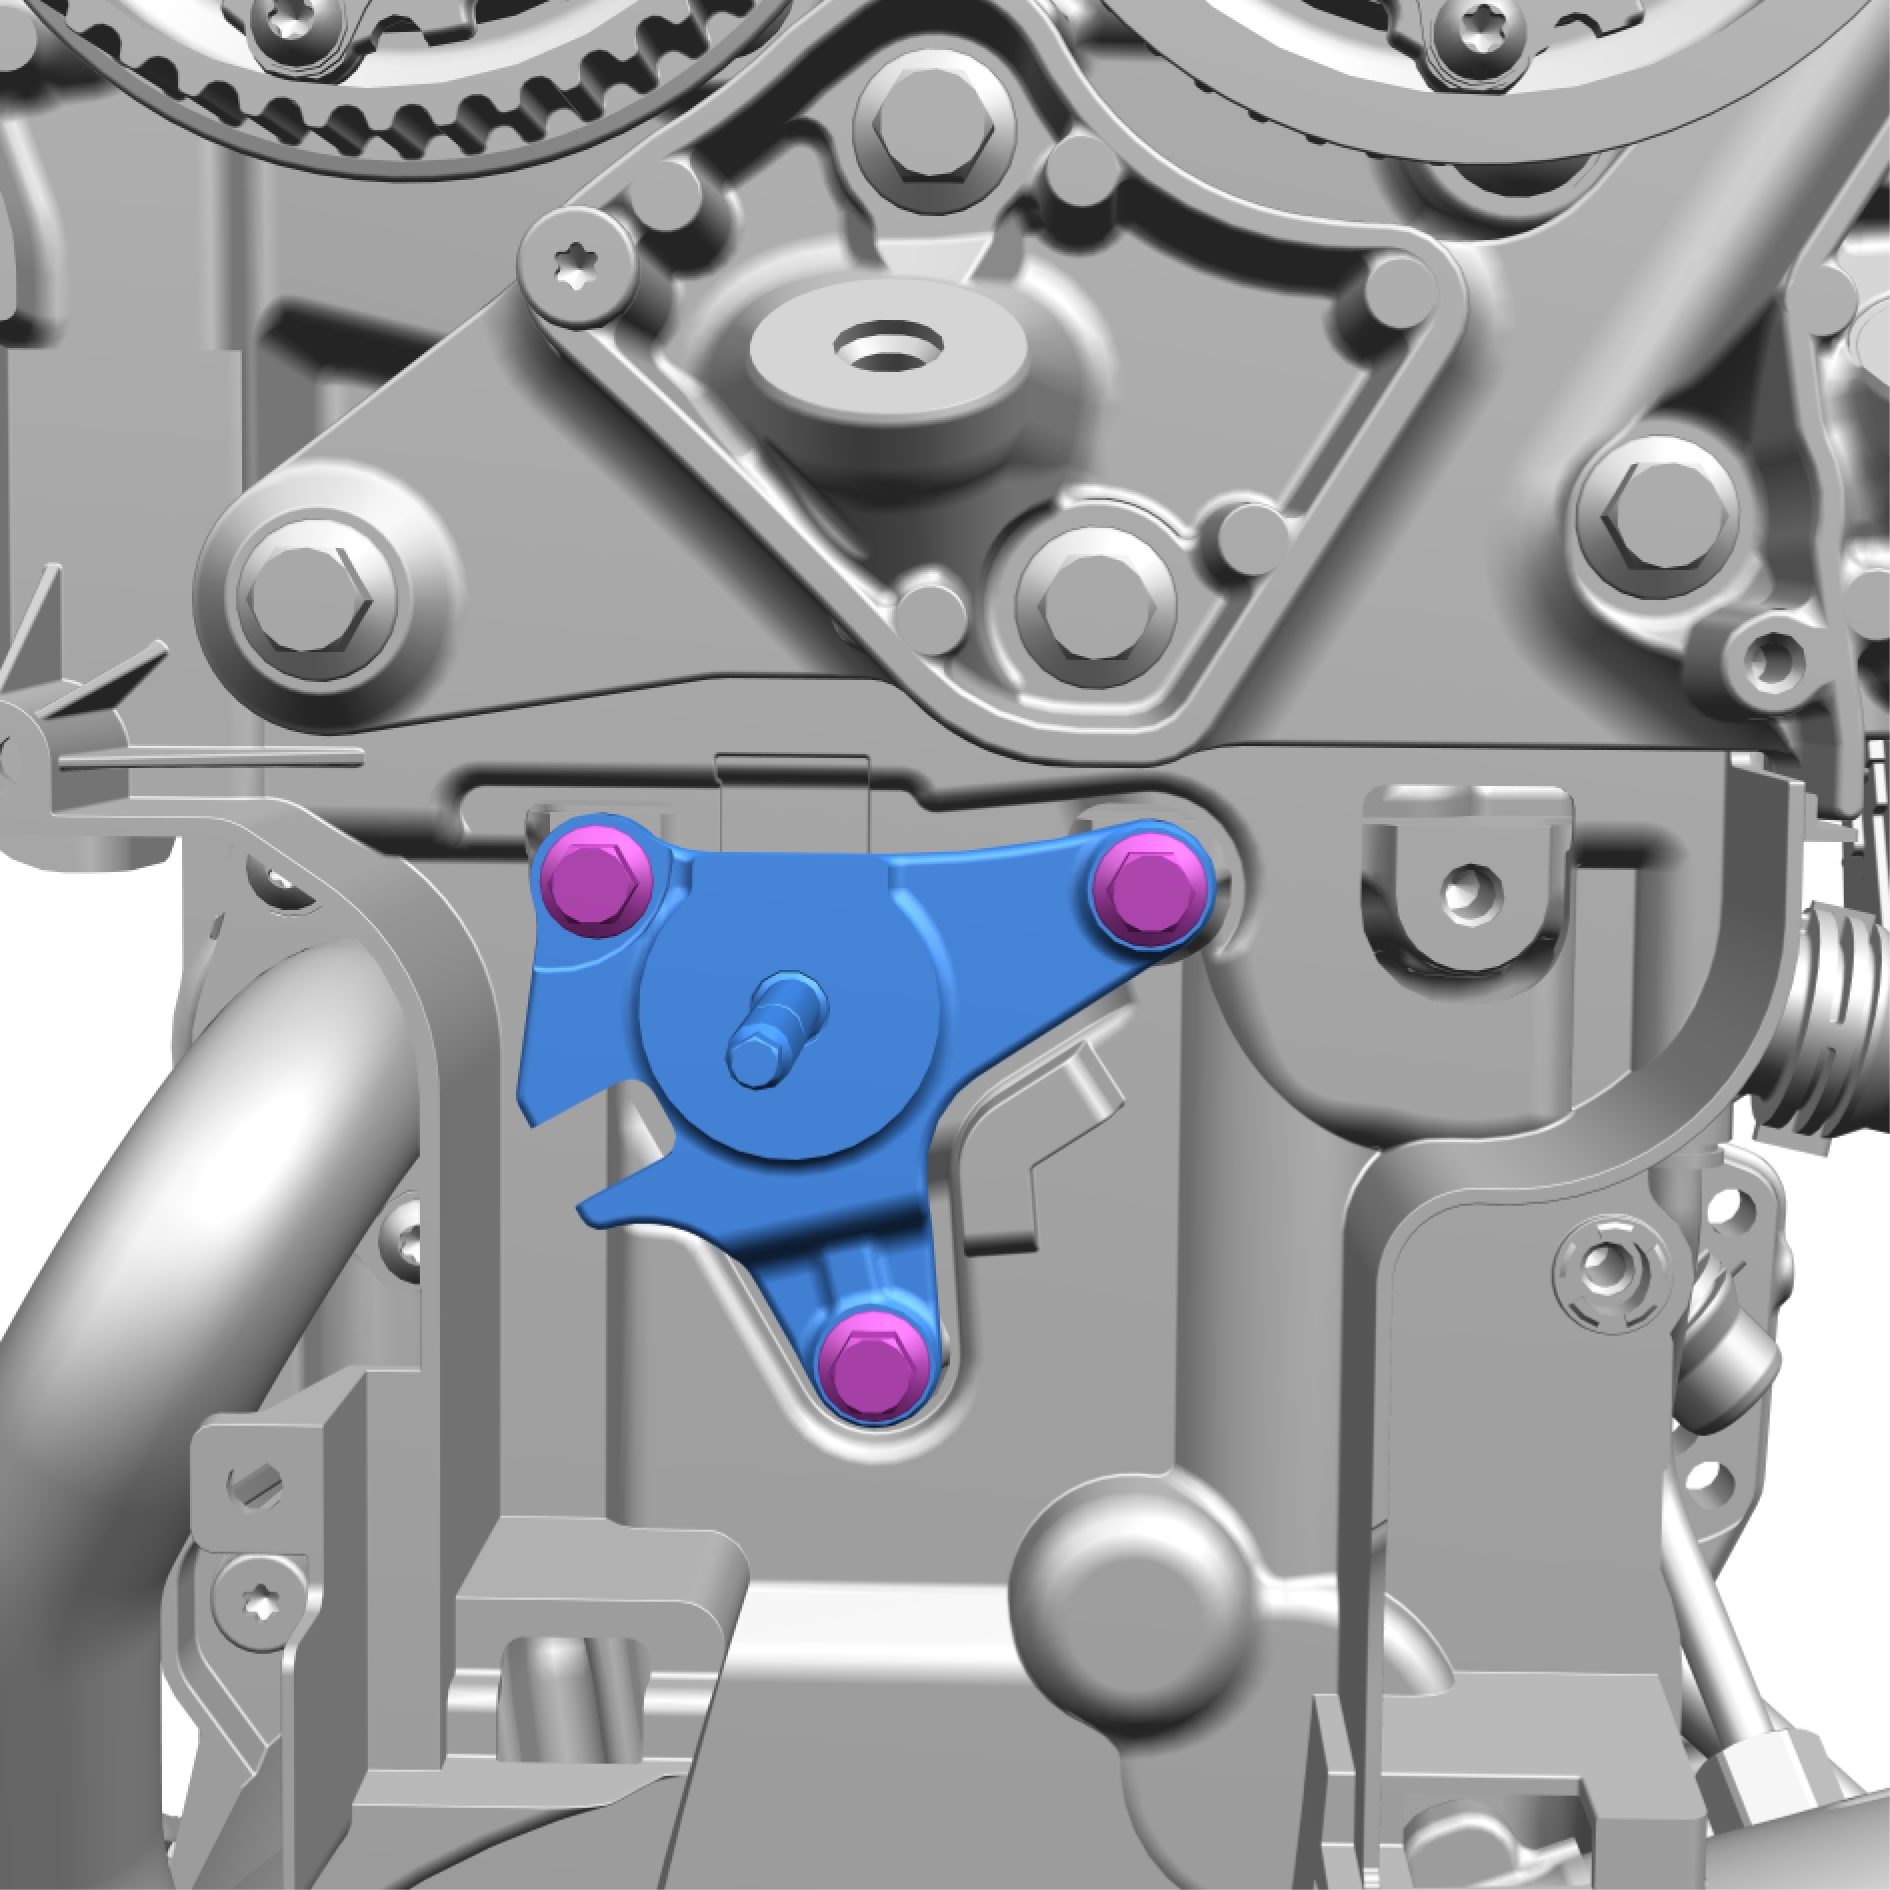
Remove the screws.
Remove and discard the marked component.
Installation
Install the marked component.
Torque: 17 Nm
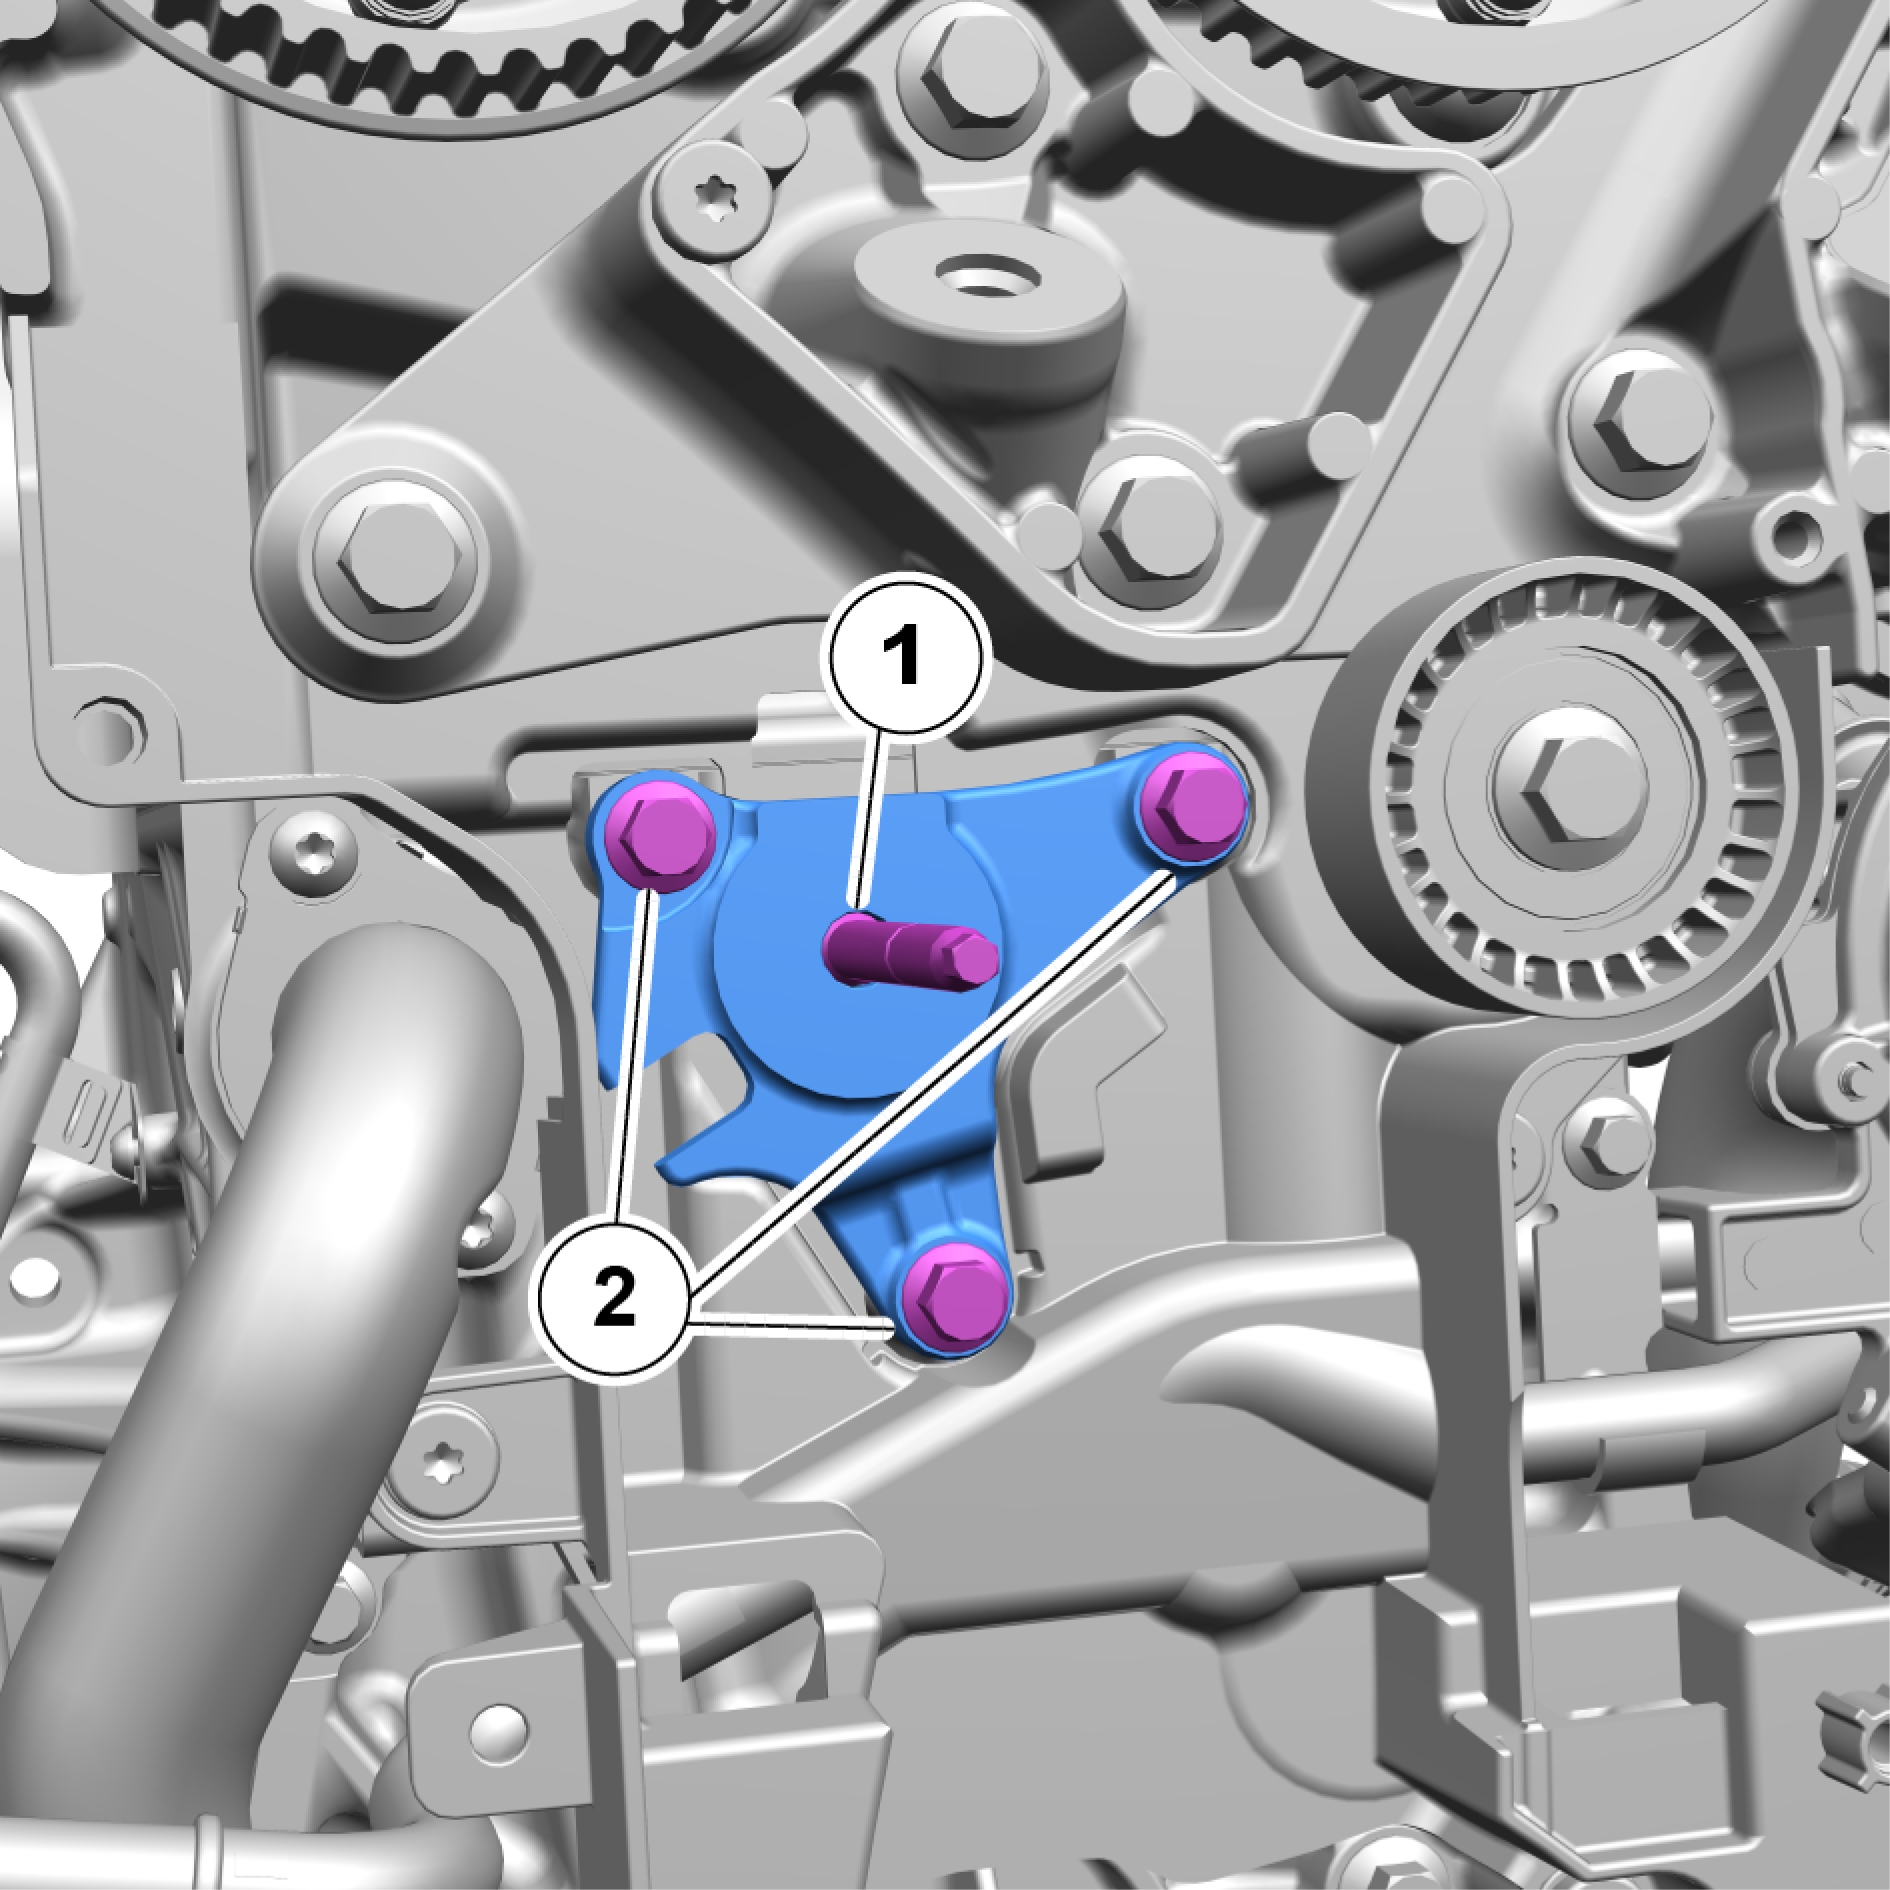
Install the marked component.
1. Torque: 13 Nm
2. Torque: 17 Nm
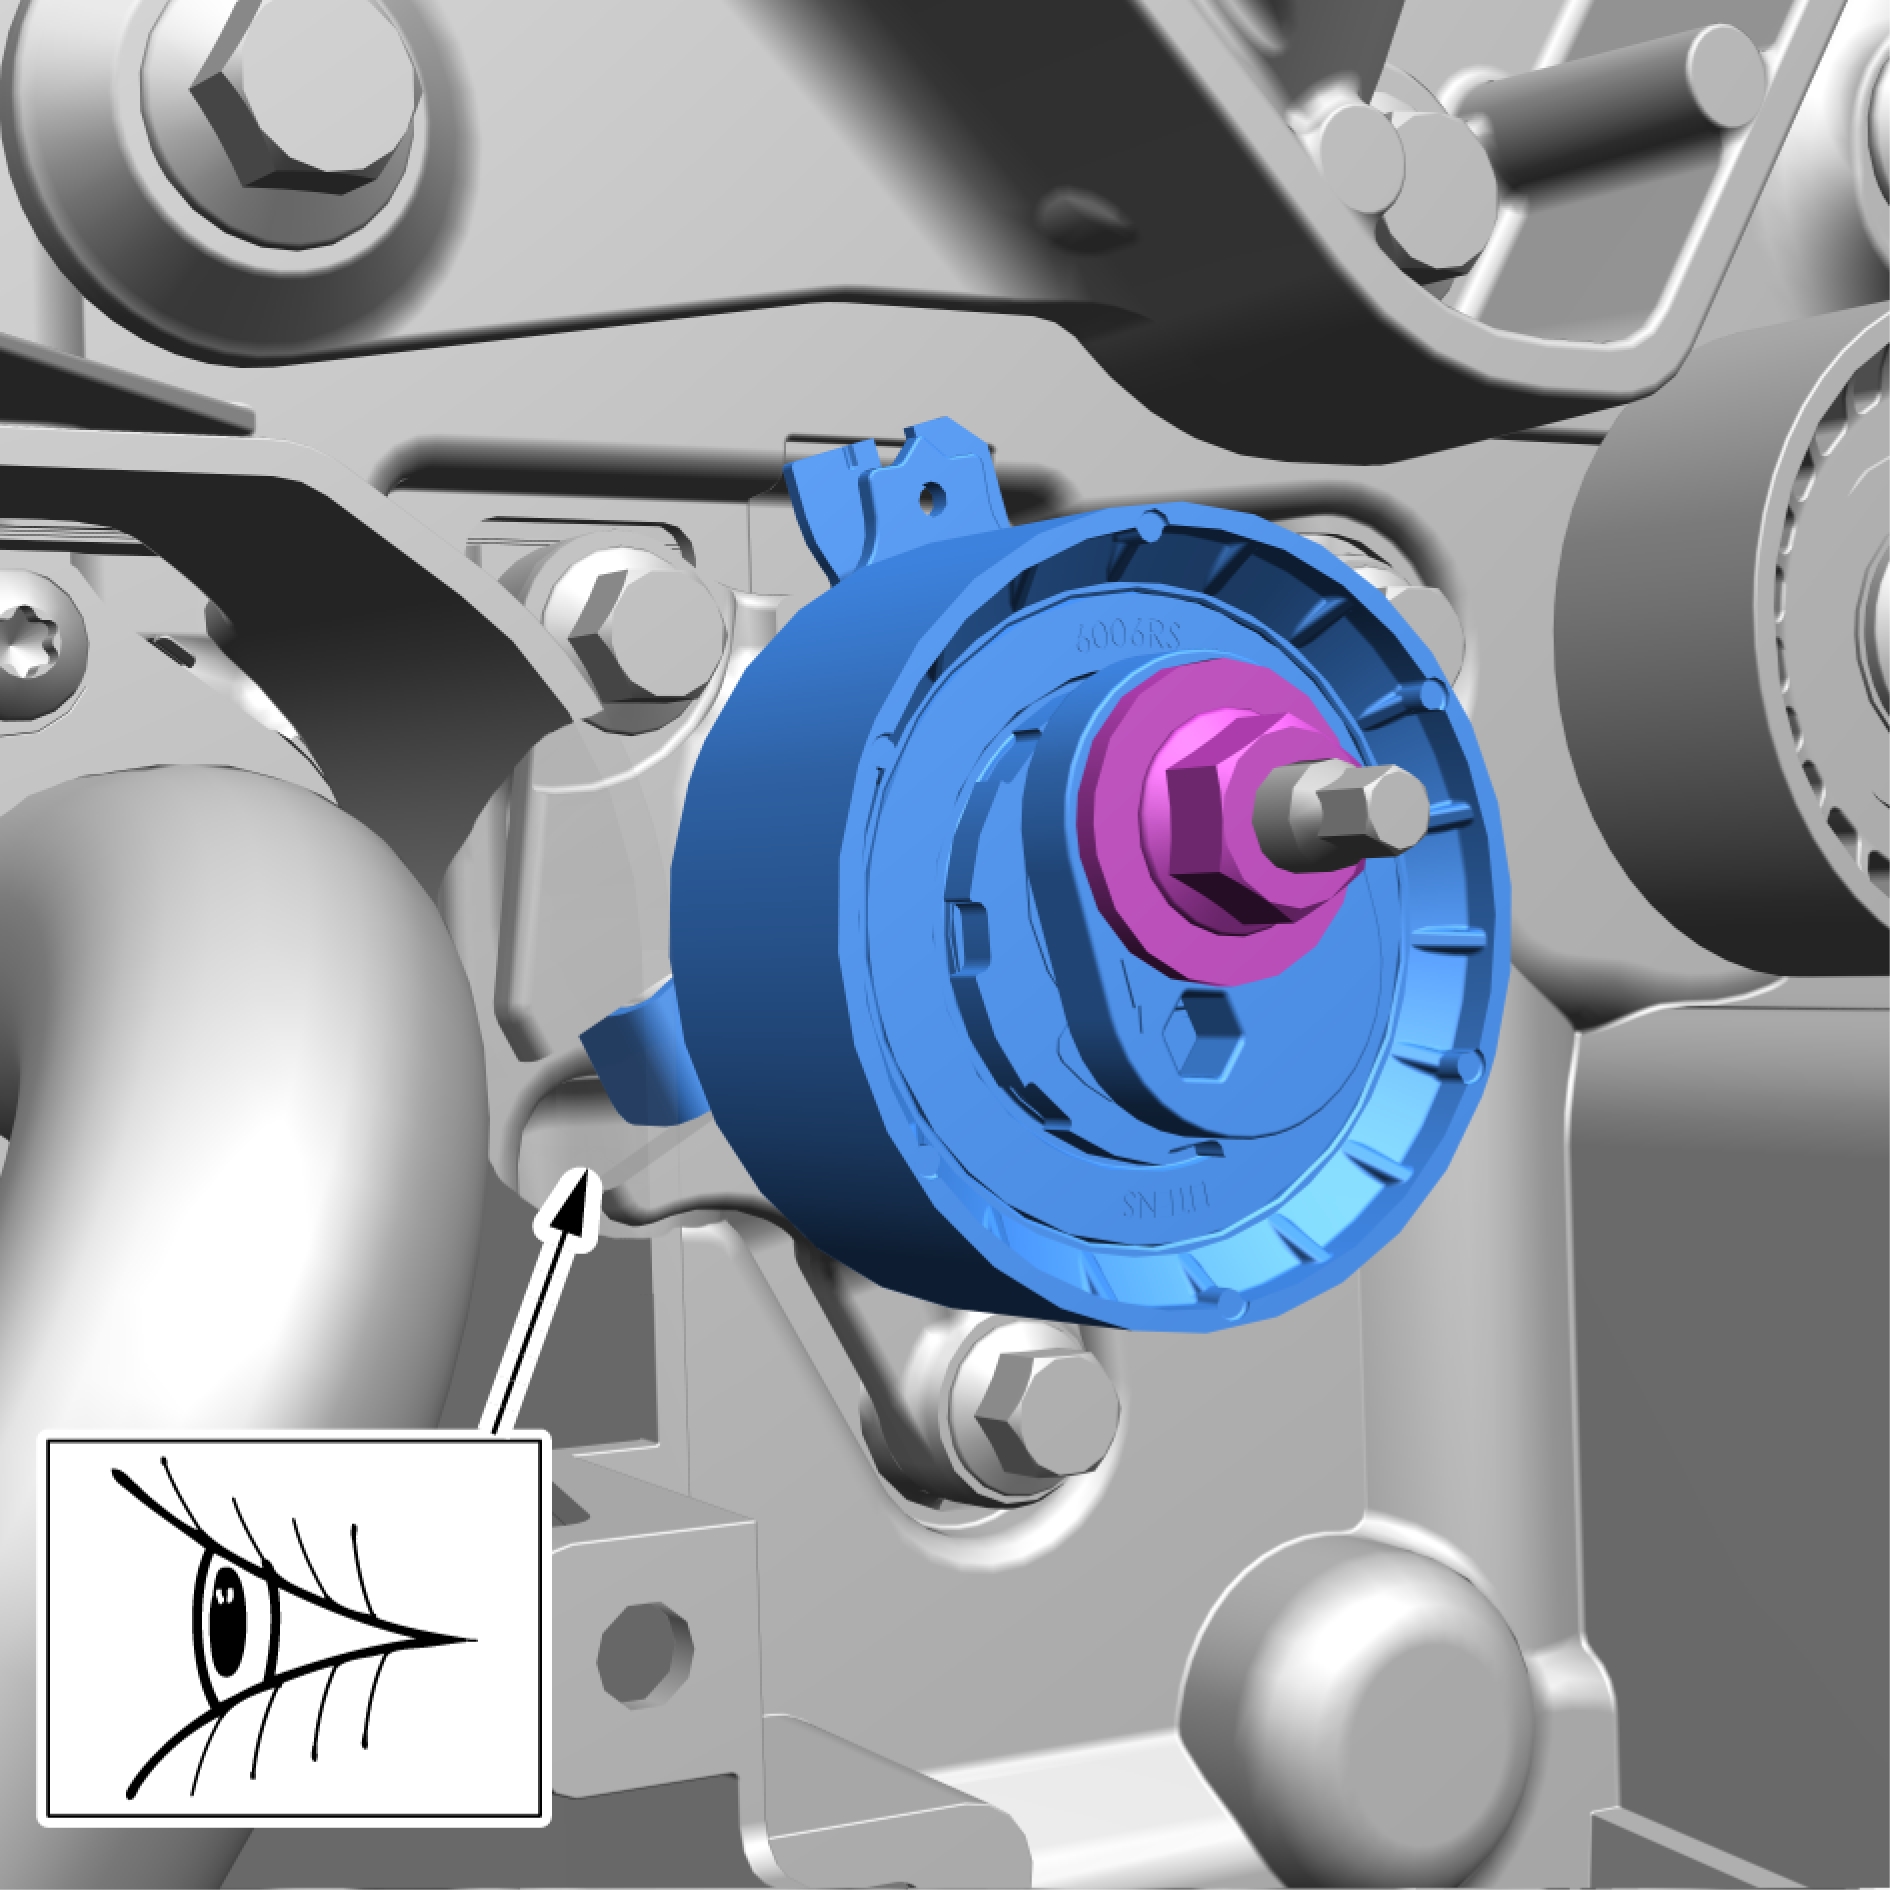
Make sure to install the component in correct position.
Install the marked components.
Tighten the nut finger tight.
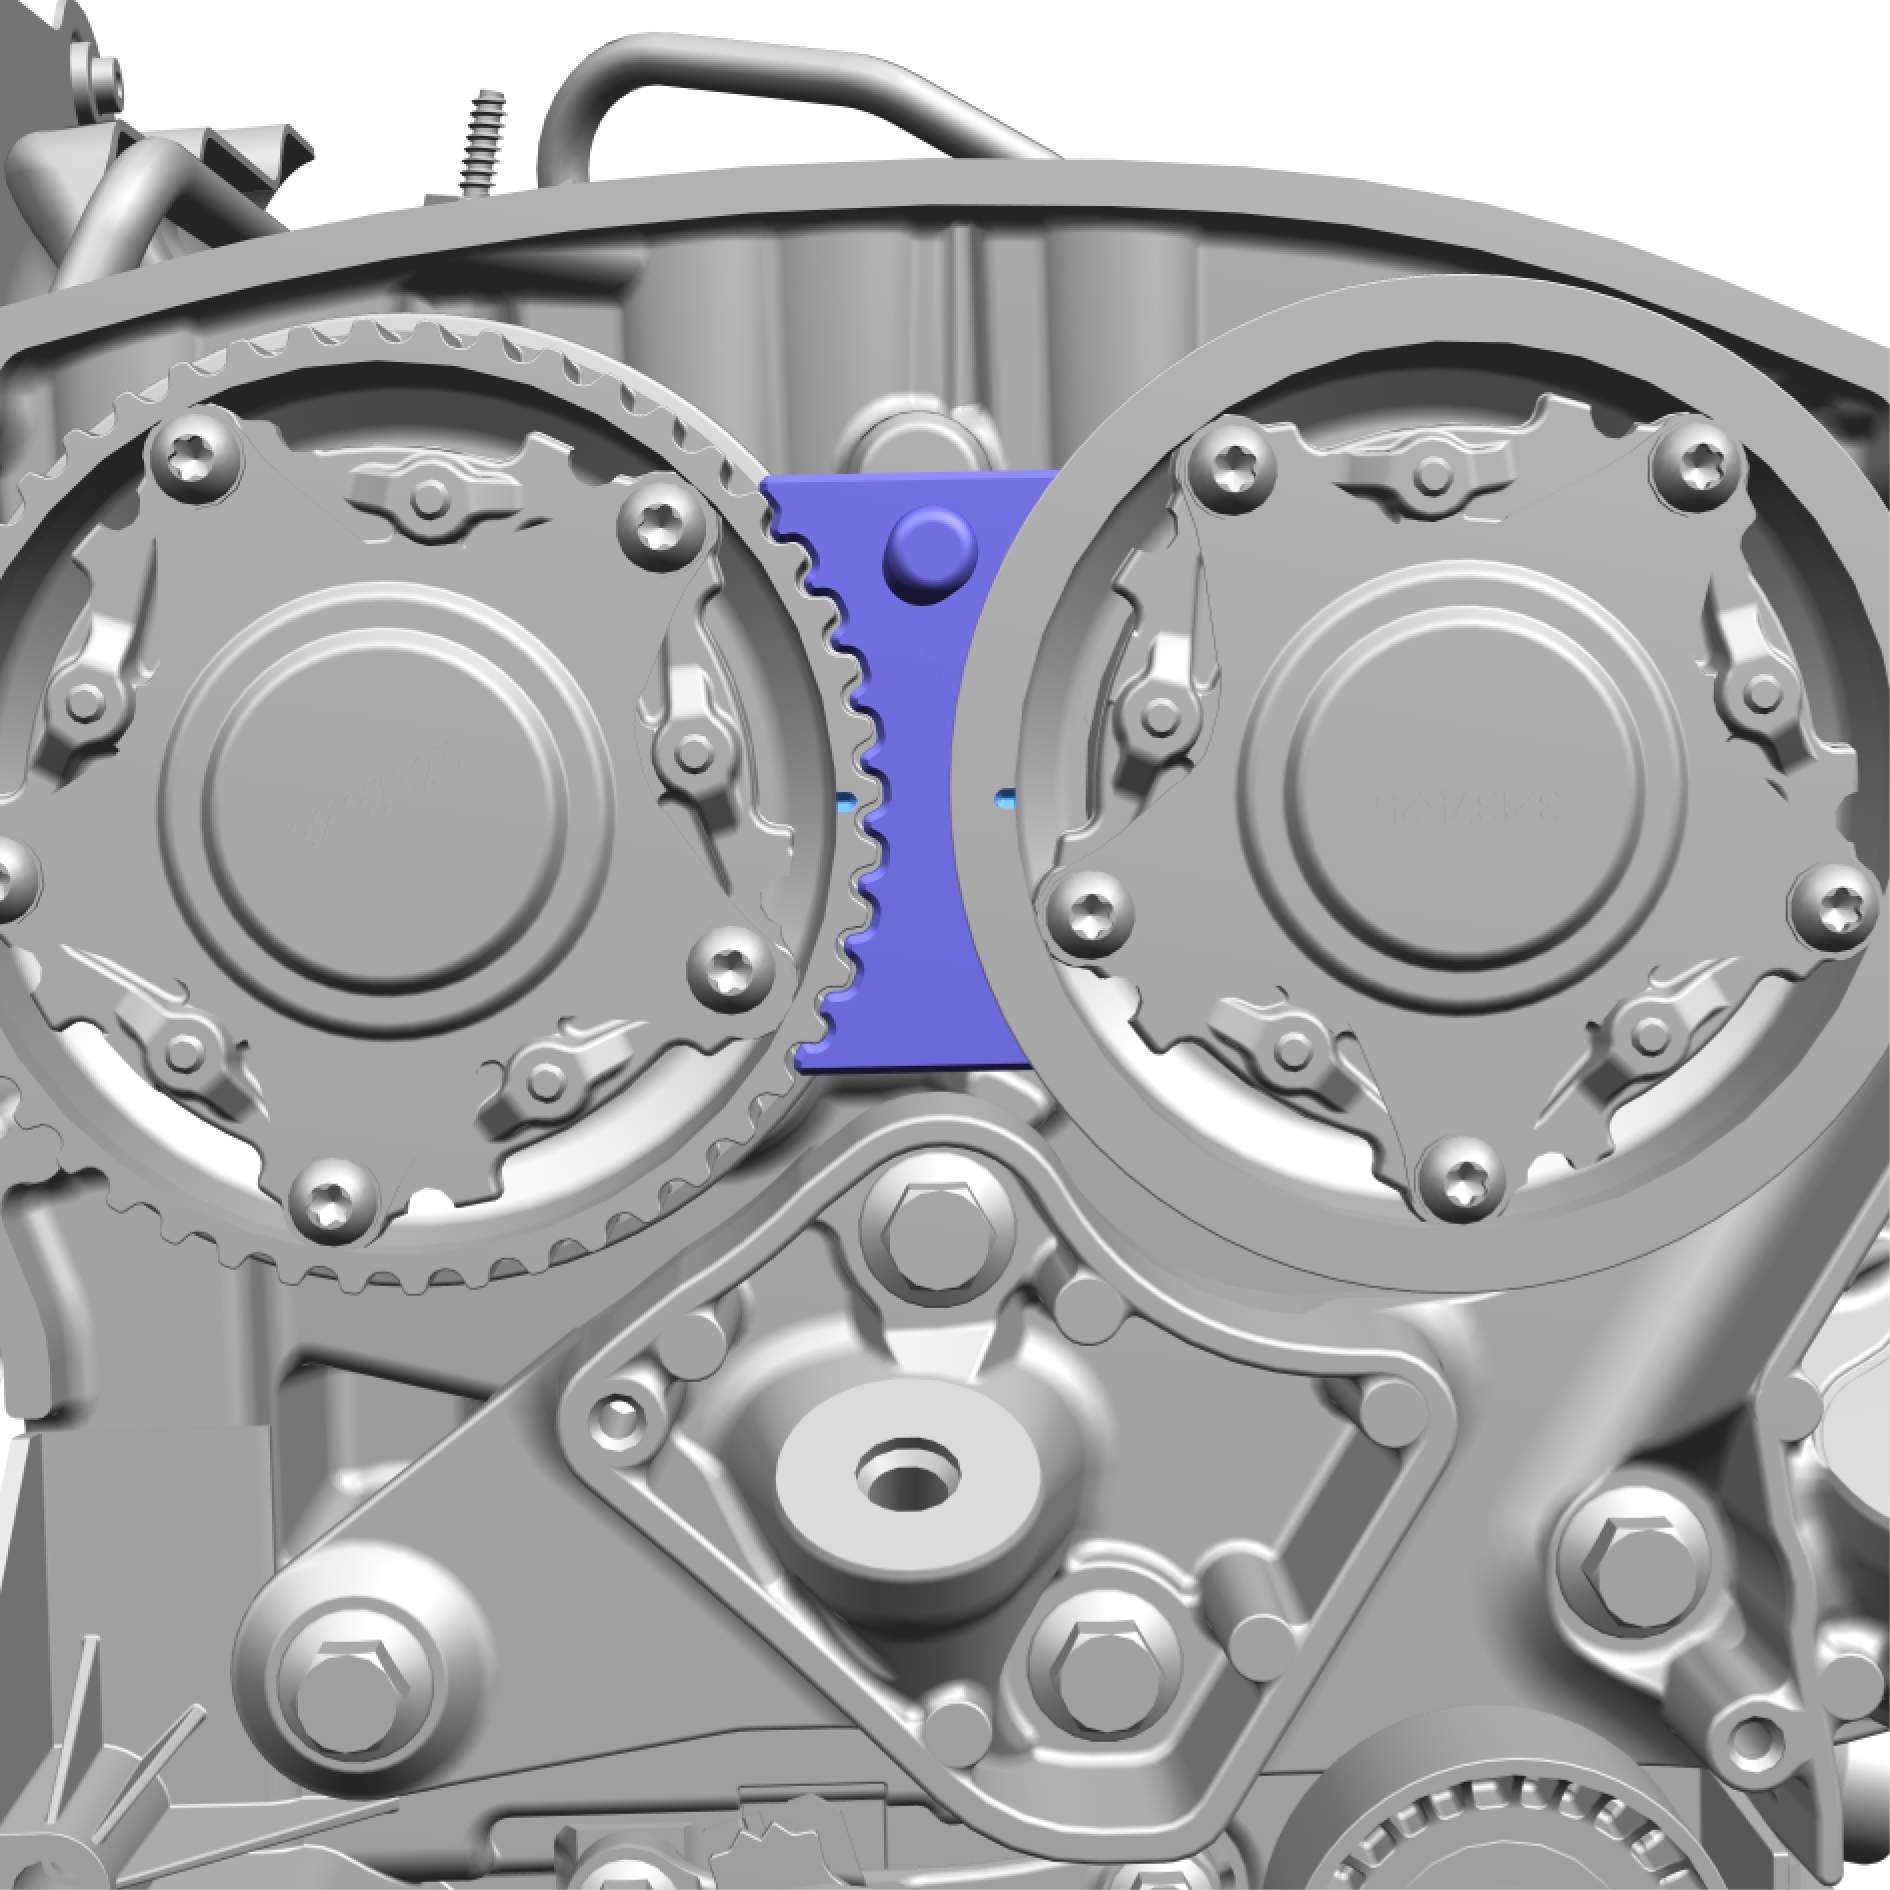

Make sure that the components are positioned correctly.
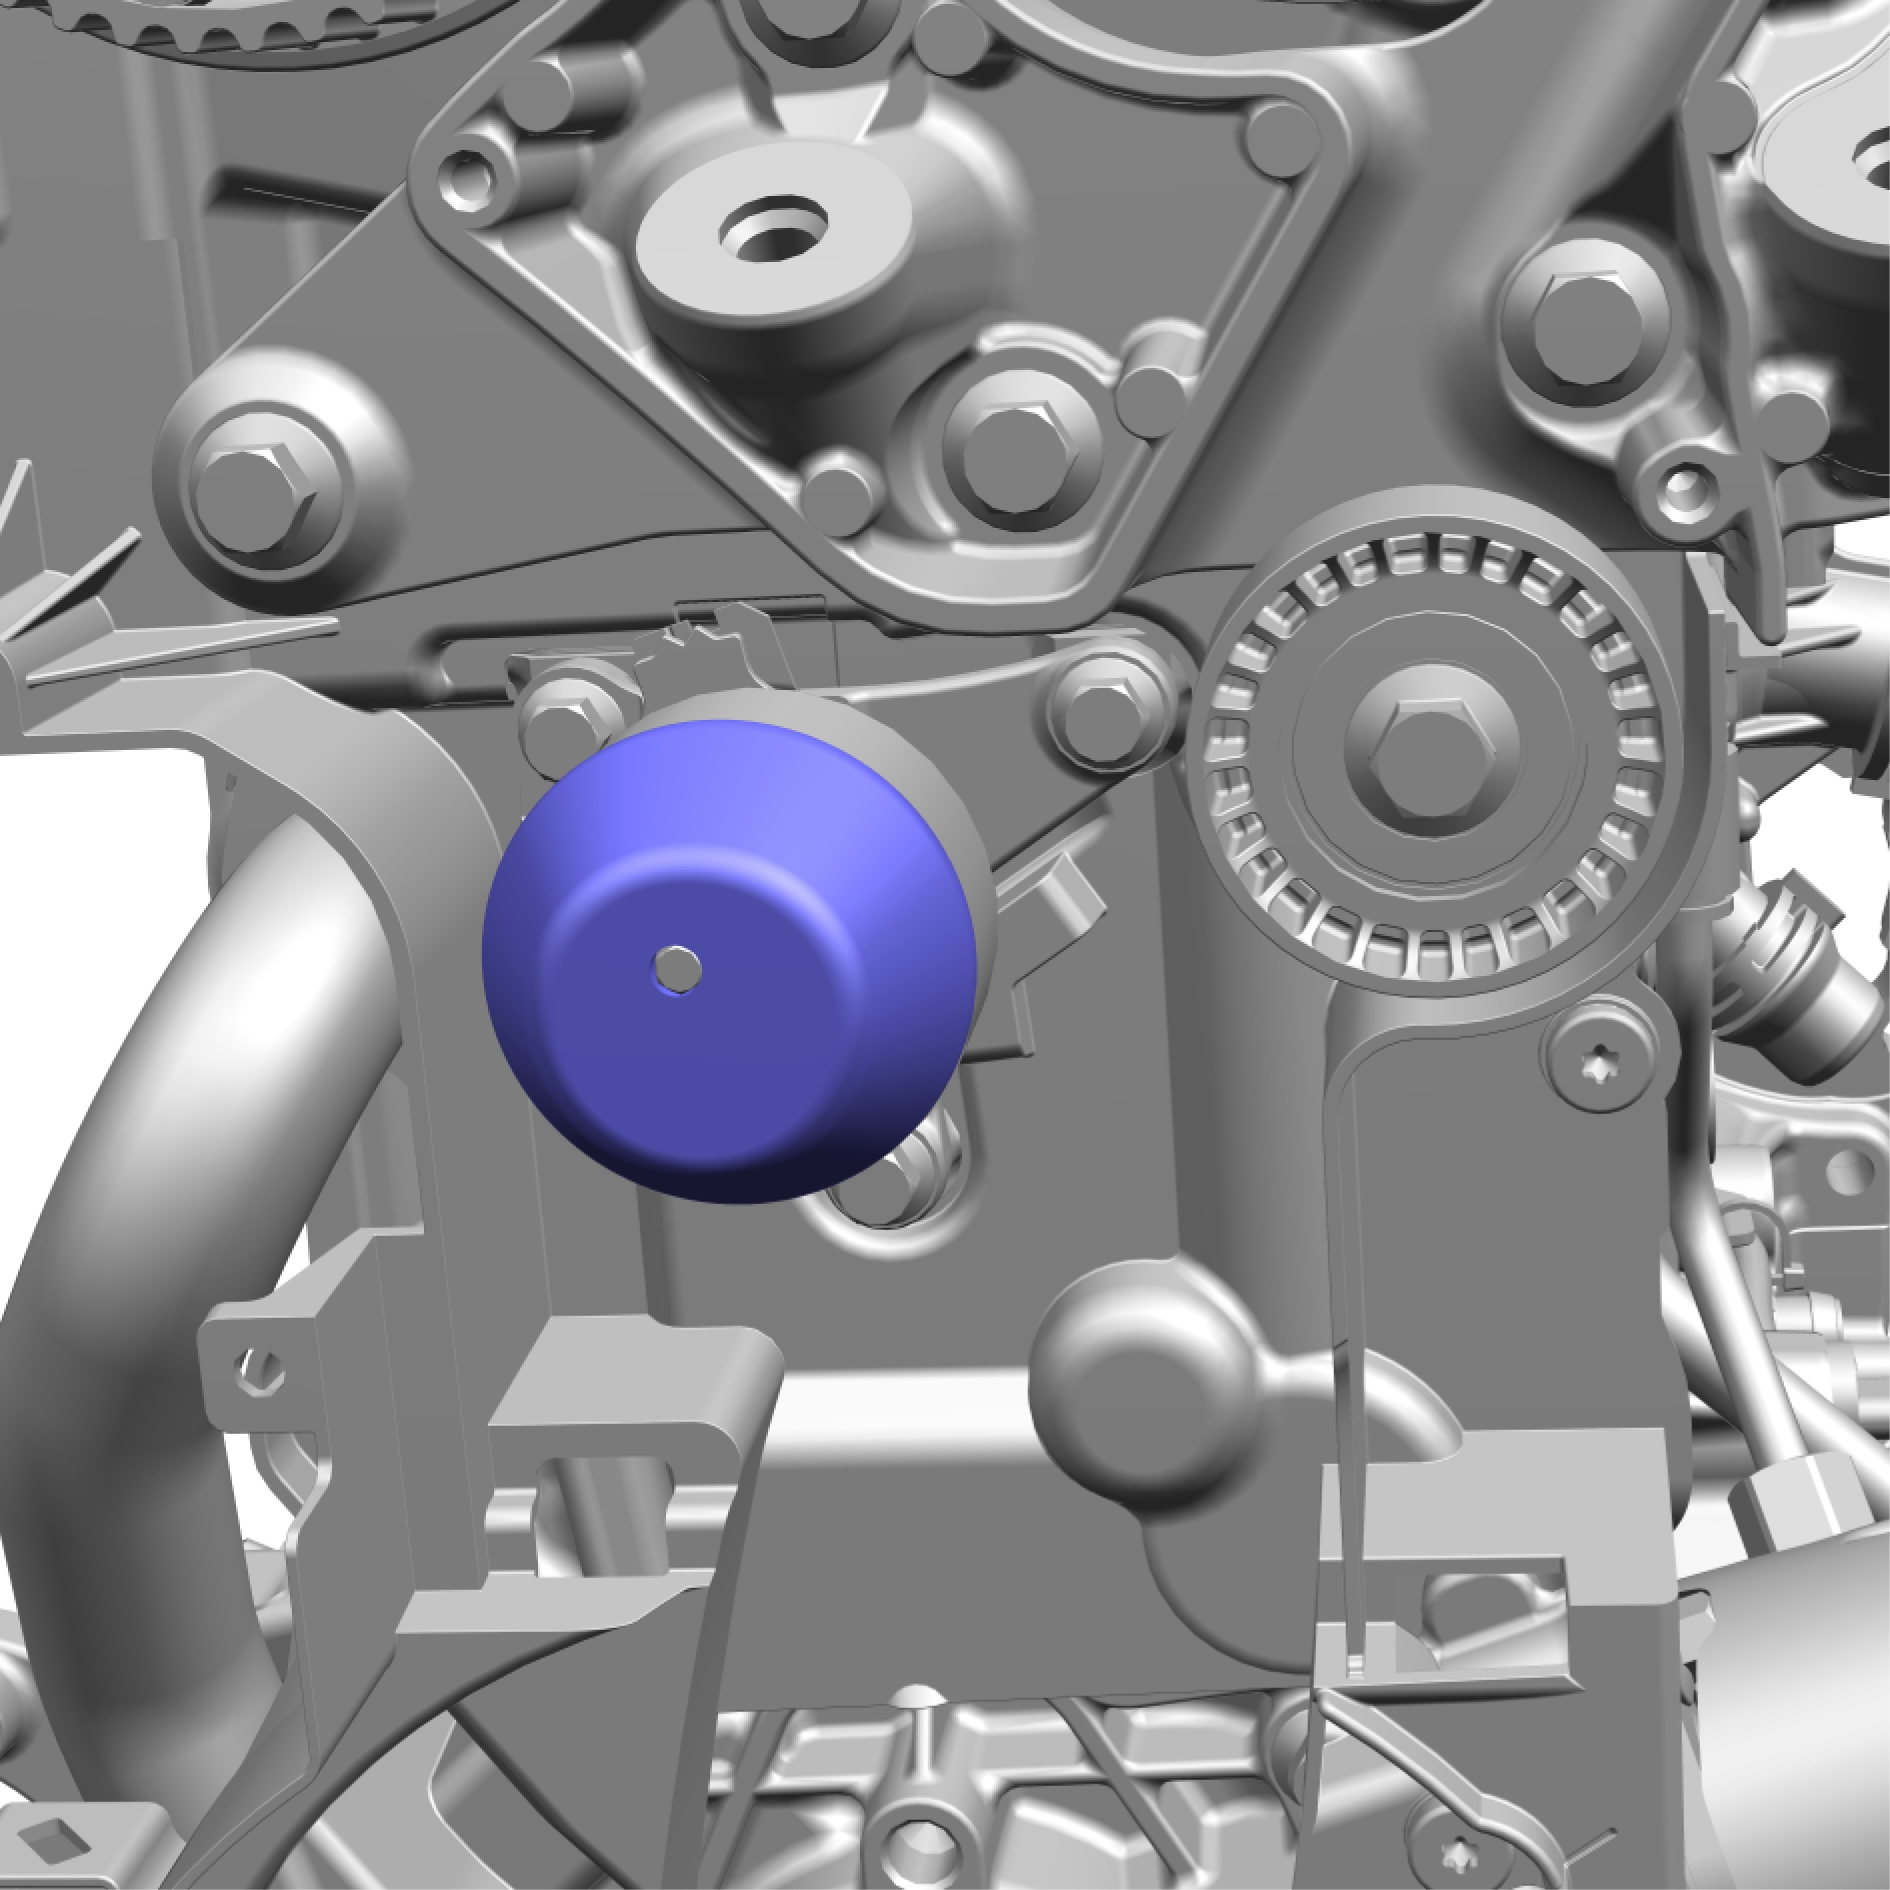
Install the special tool: 999 7791
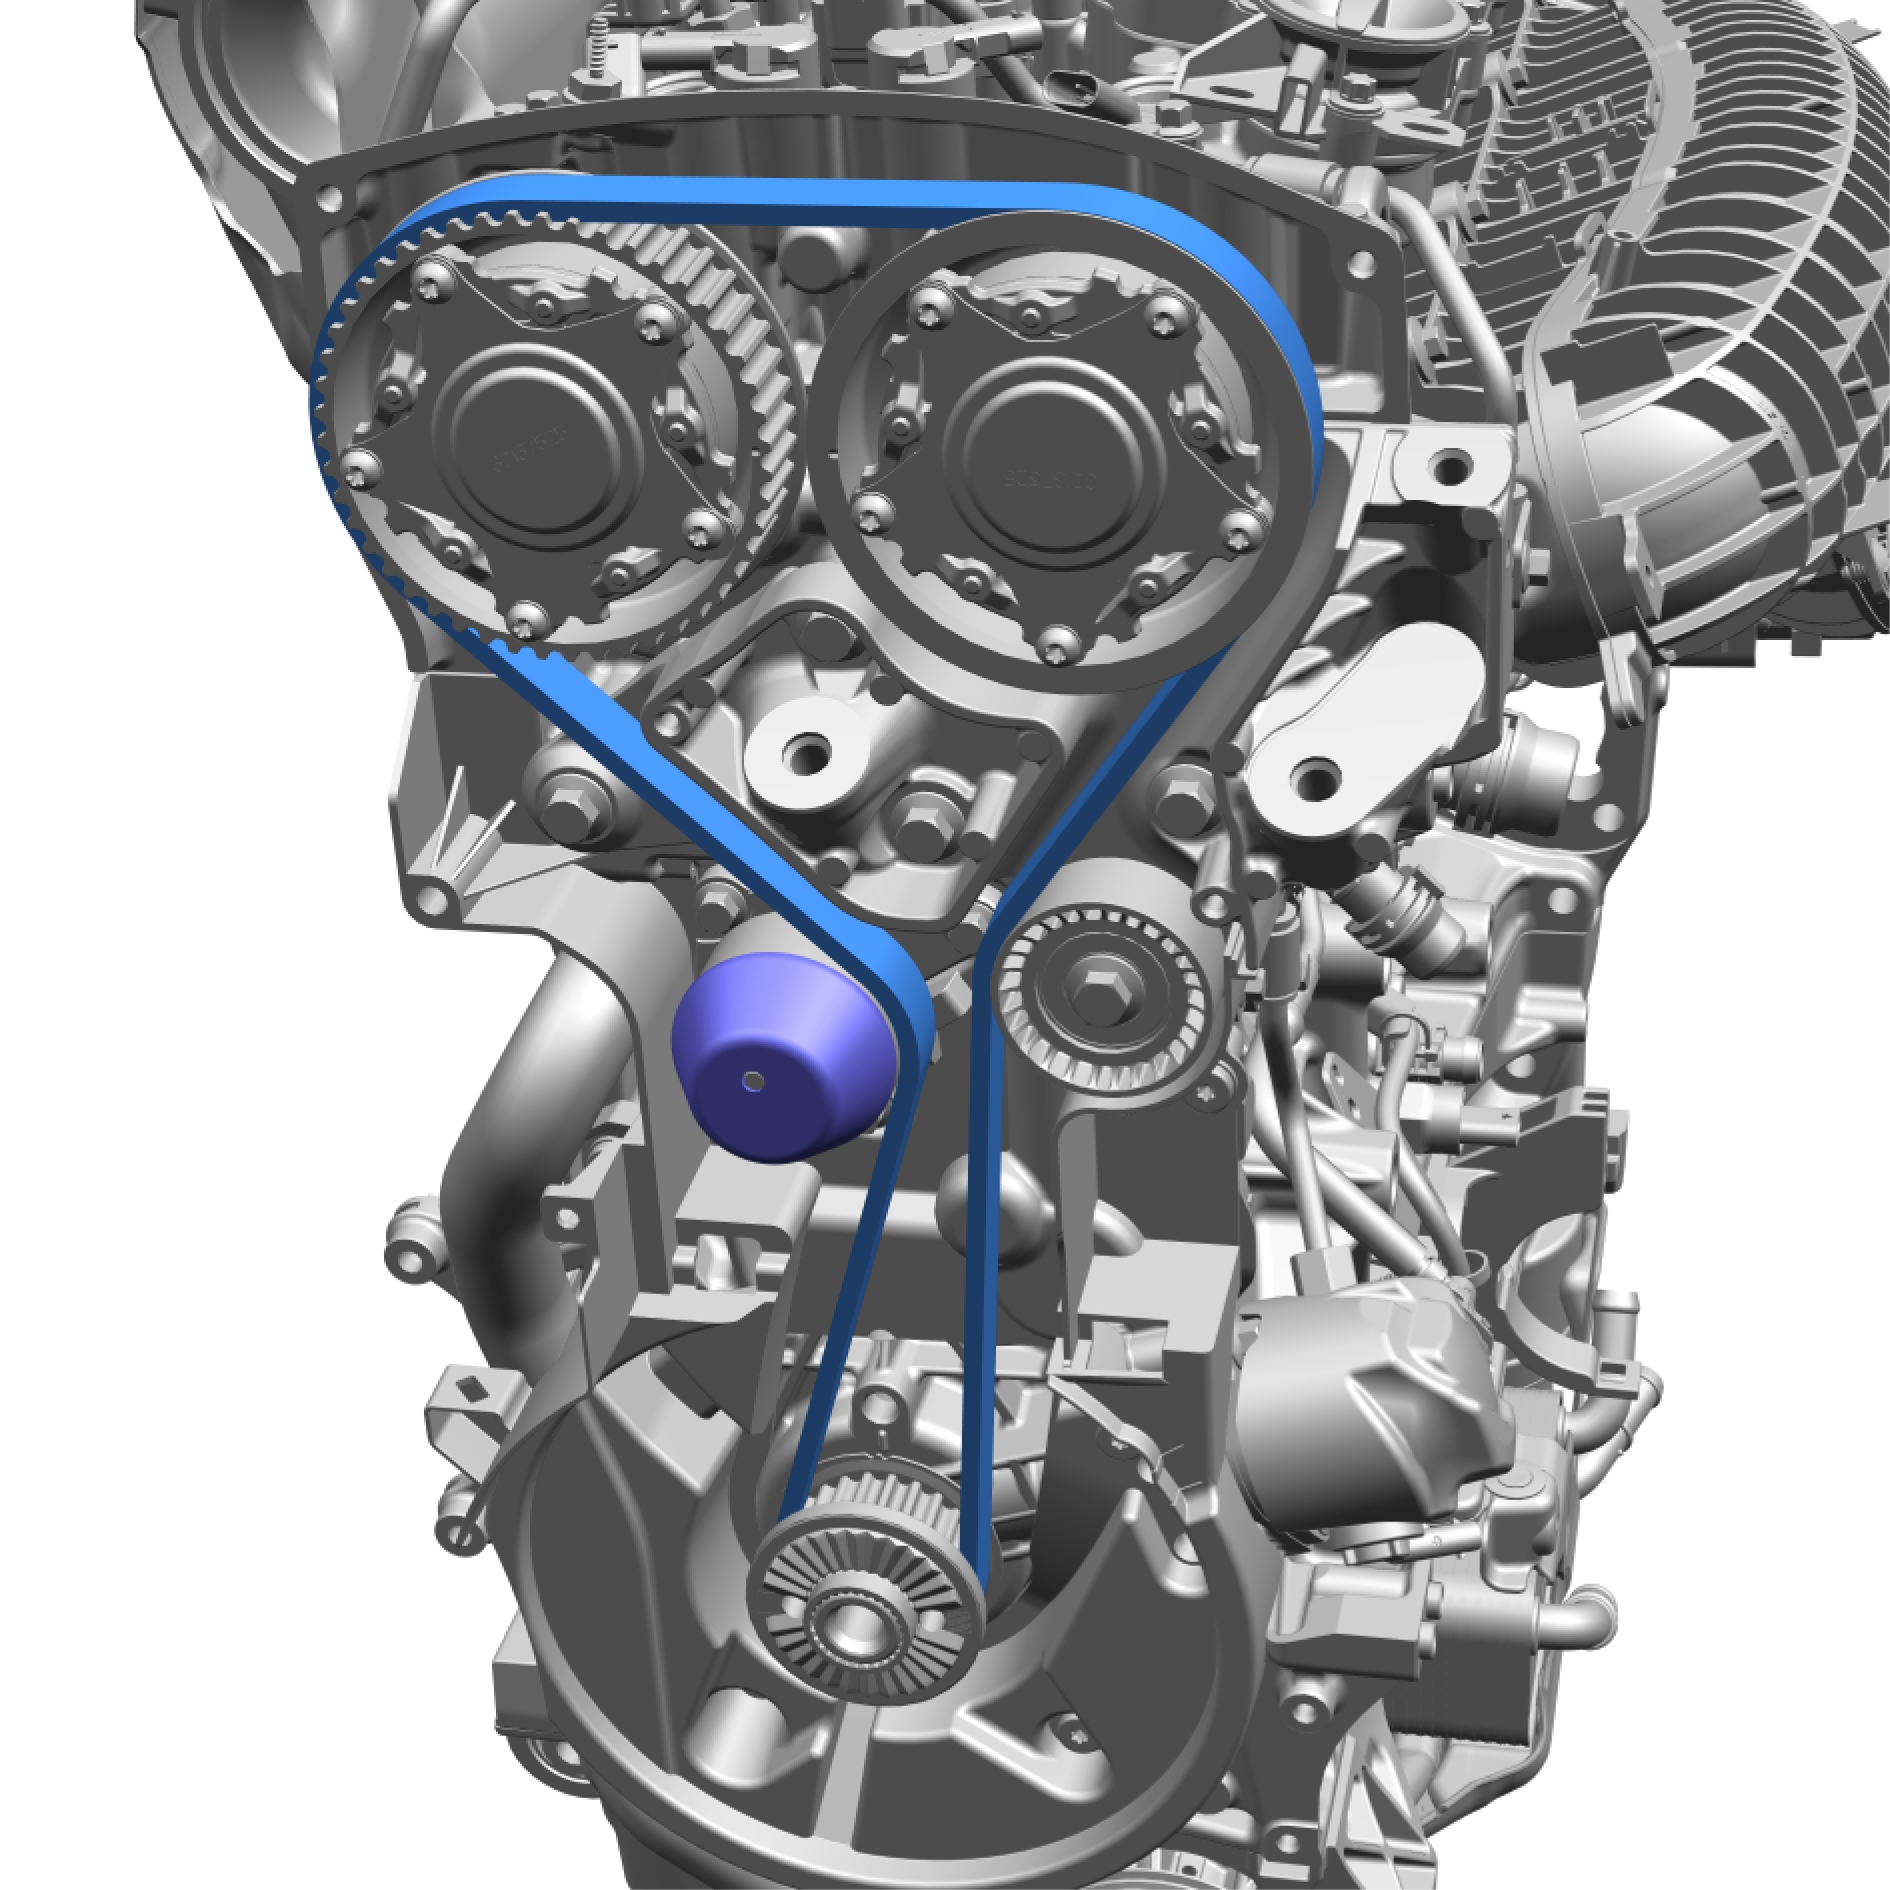
Make sure to follow the correct sequence during installation.
Install the marked component.
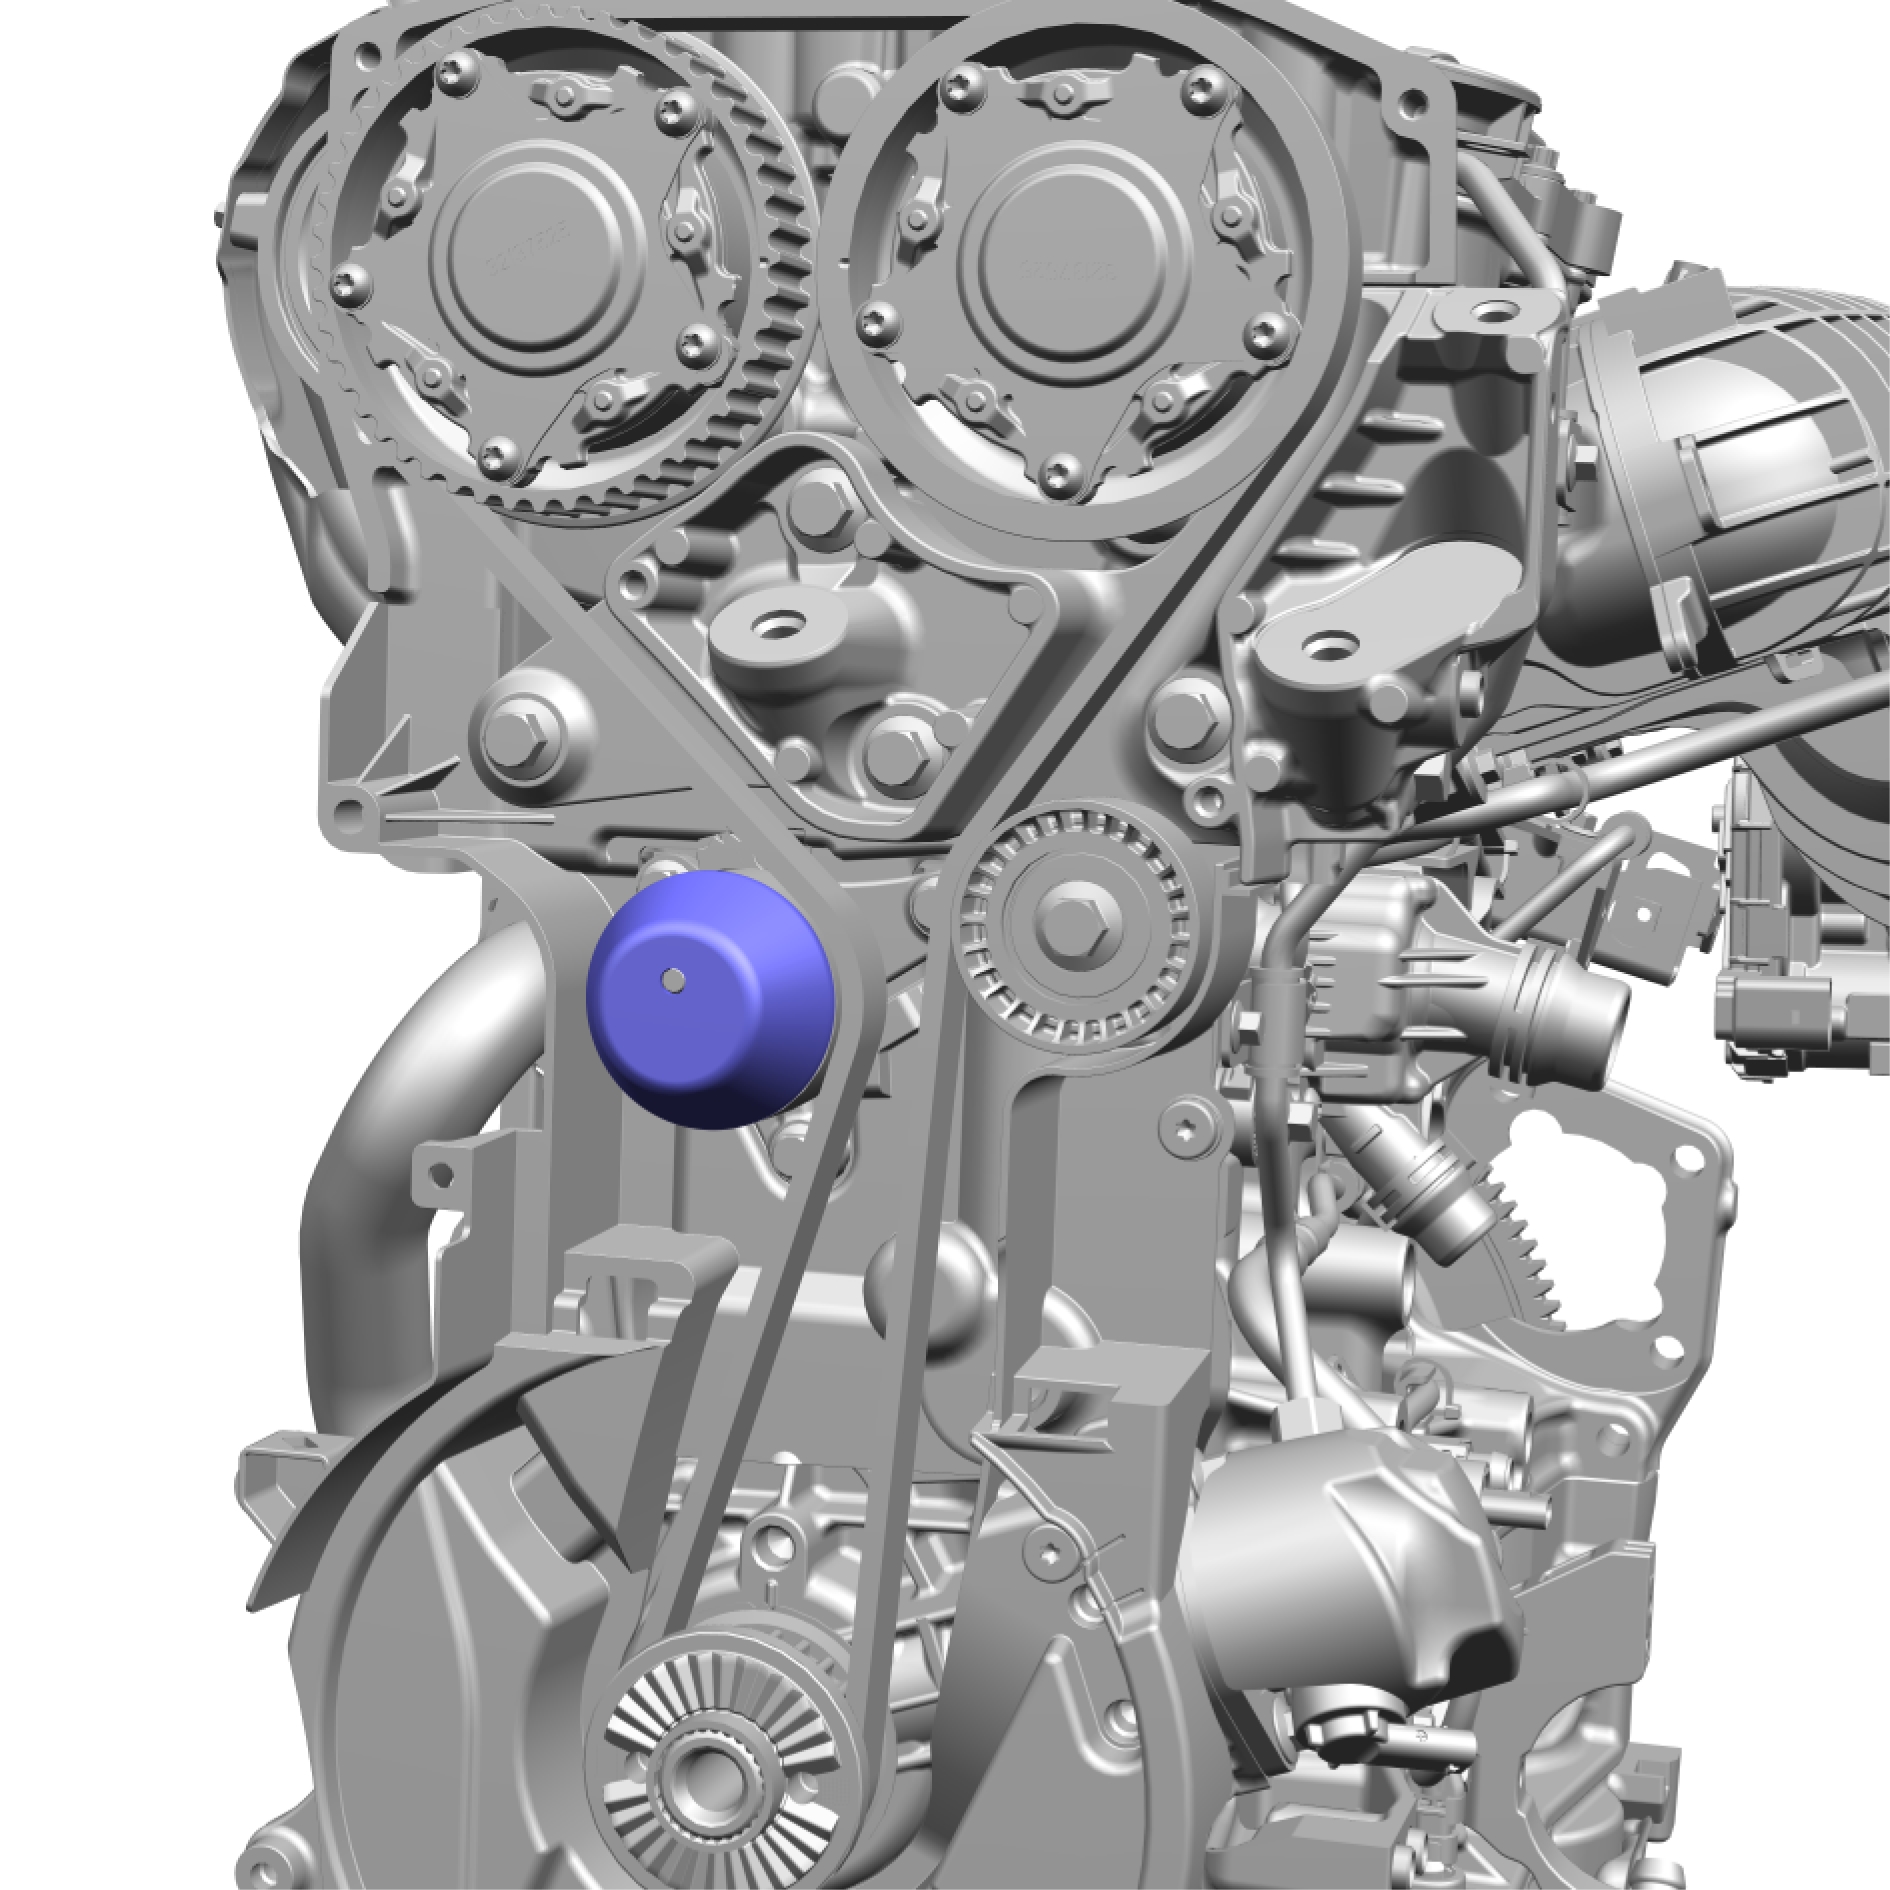
Remove the special tool.
Remove the special tool.

Adjust the position of the component according to image.
Tighten the nut tensioner, timing belt, torque: 30 Nm
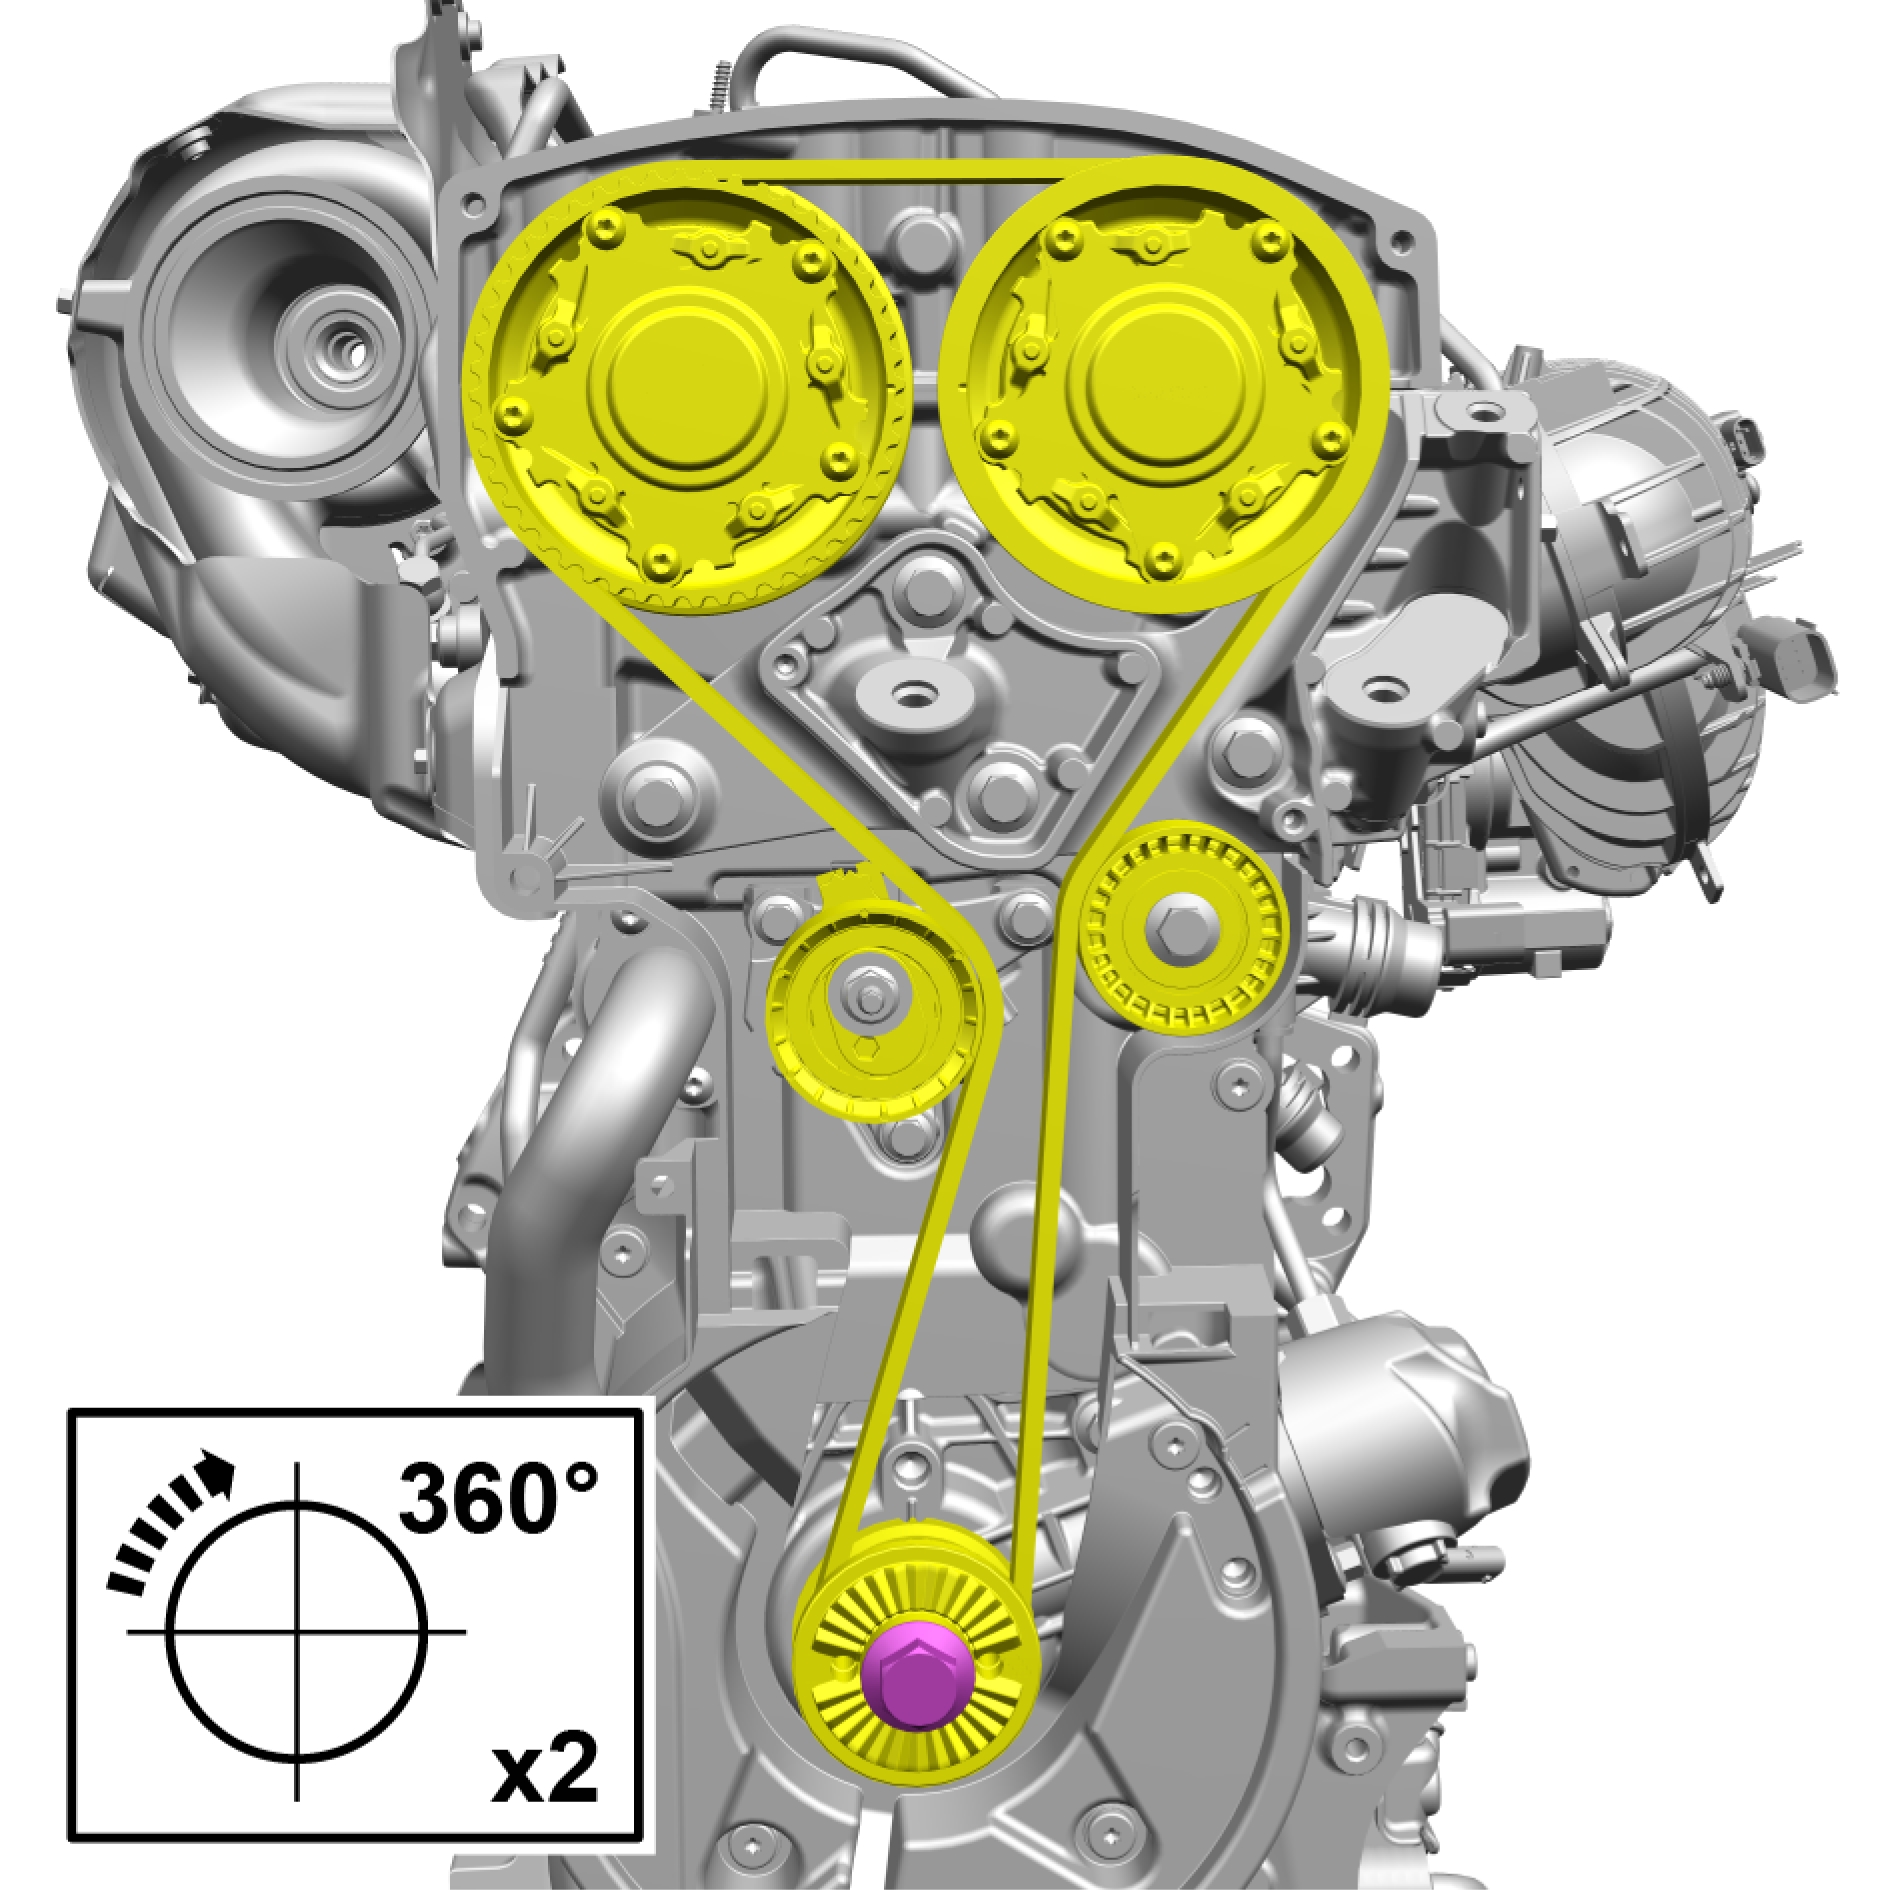
The engine is rotated so that the belt assumes its correct position.
Turn the engine.
If the measured value is greater or less than the specified range, all steps in the adjustment section must be carried out again.
Install the marked component.
Install the screws.
Torque: 10 Nm
Install the marked component.
Install the screw finger tight.
Install special tool: 999 7719
Torque: 10 Nm
Tigthen the screw.
Torque: 90 Nm Angle
Loosen the screw.
Remove the special tool.
Water pump belt, replace
Removal
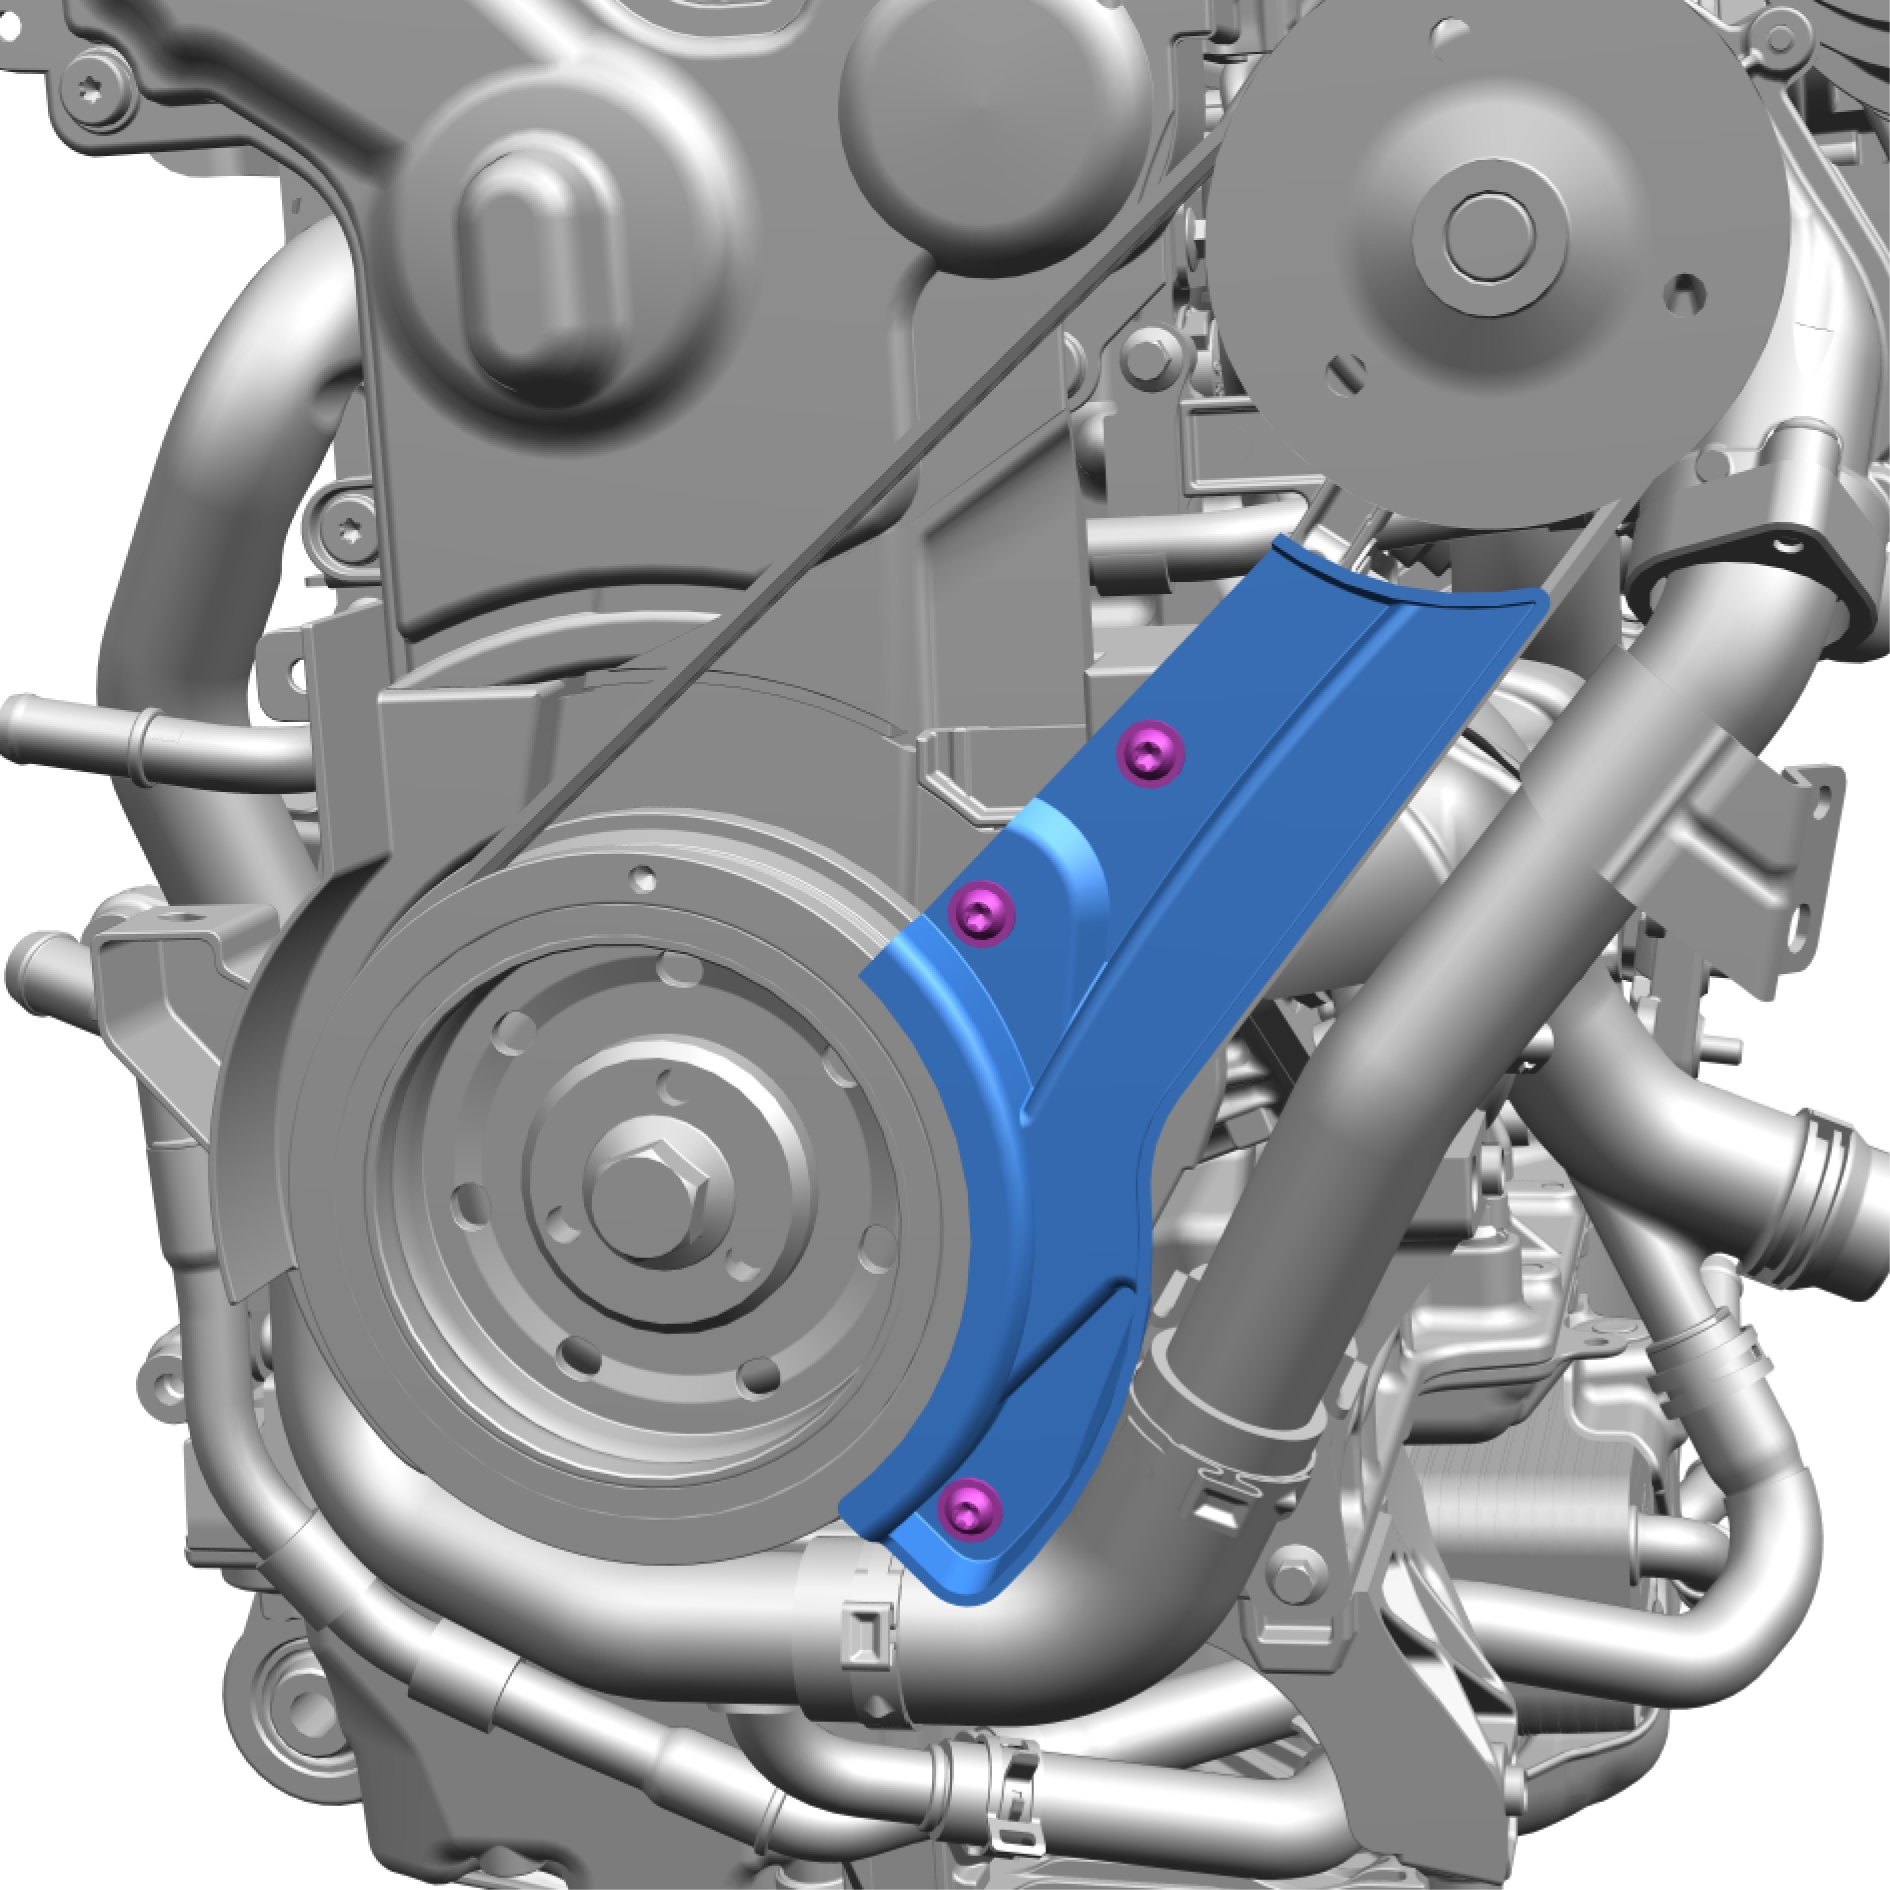
Remove the screws.
Remove the marked component.
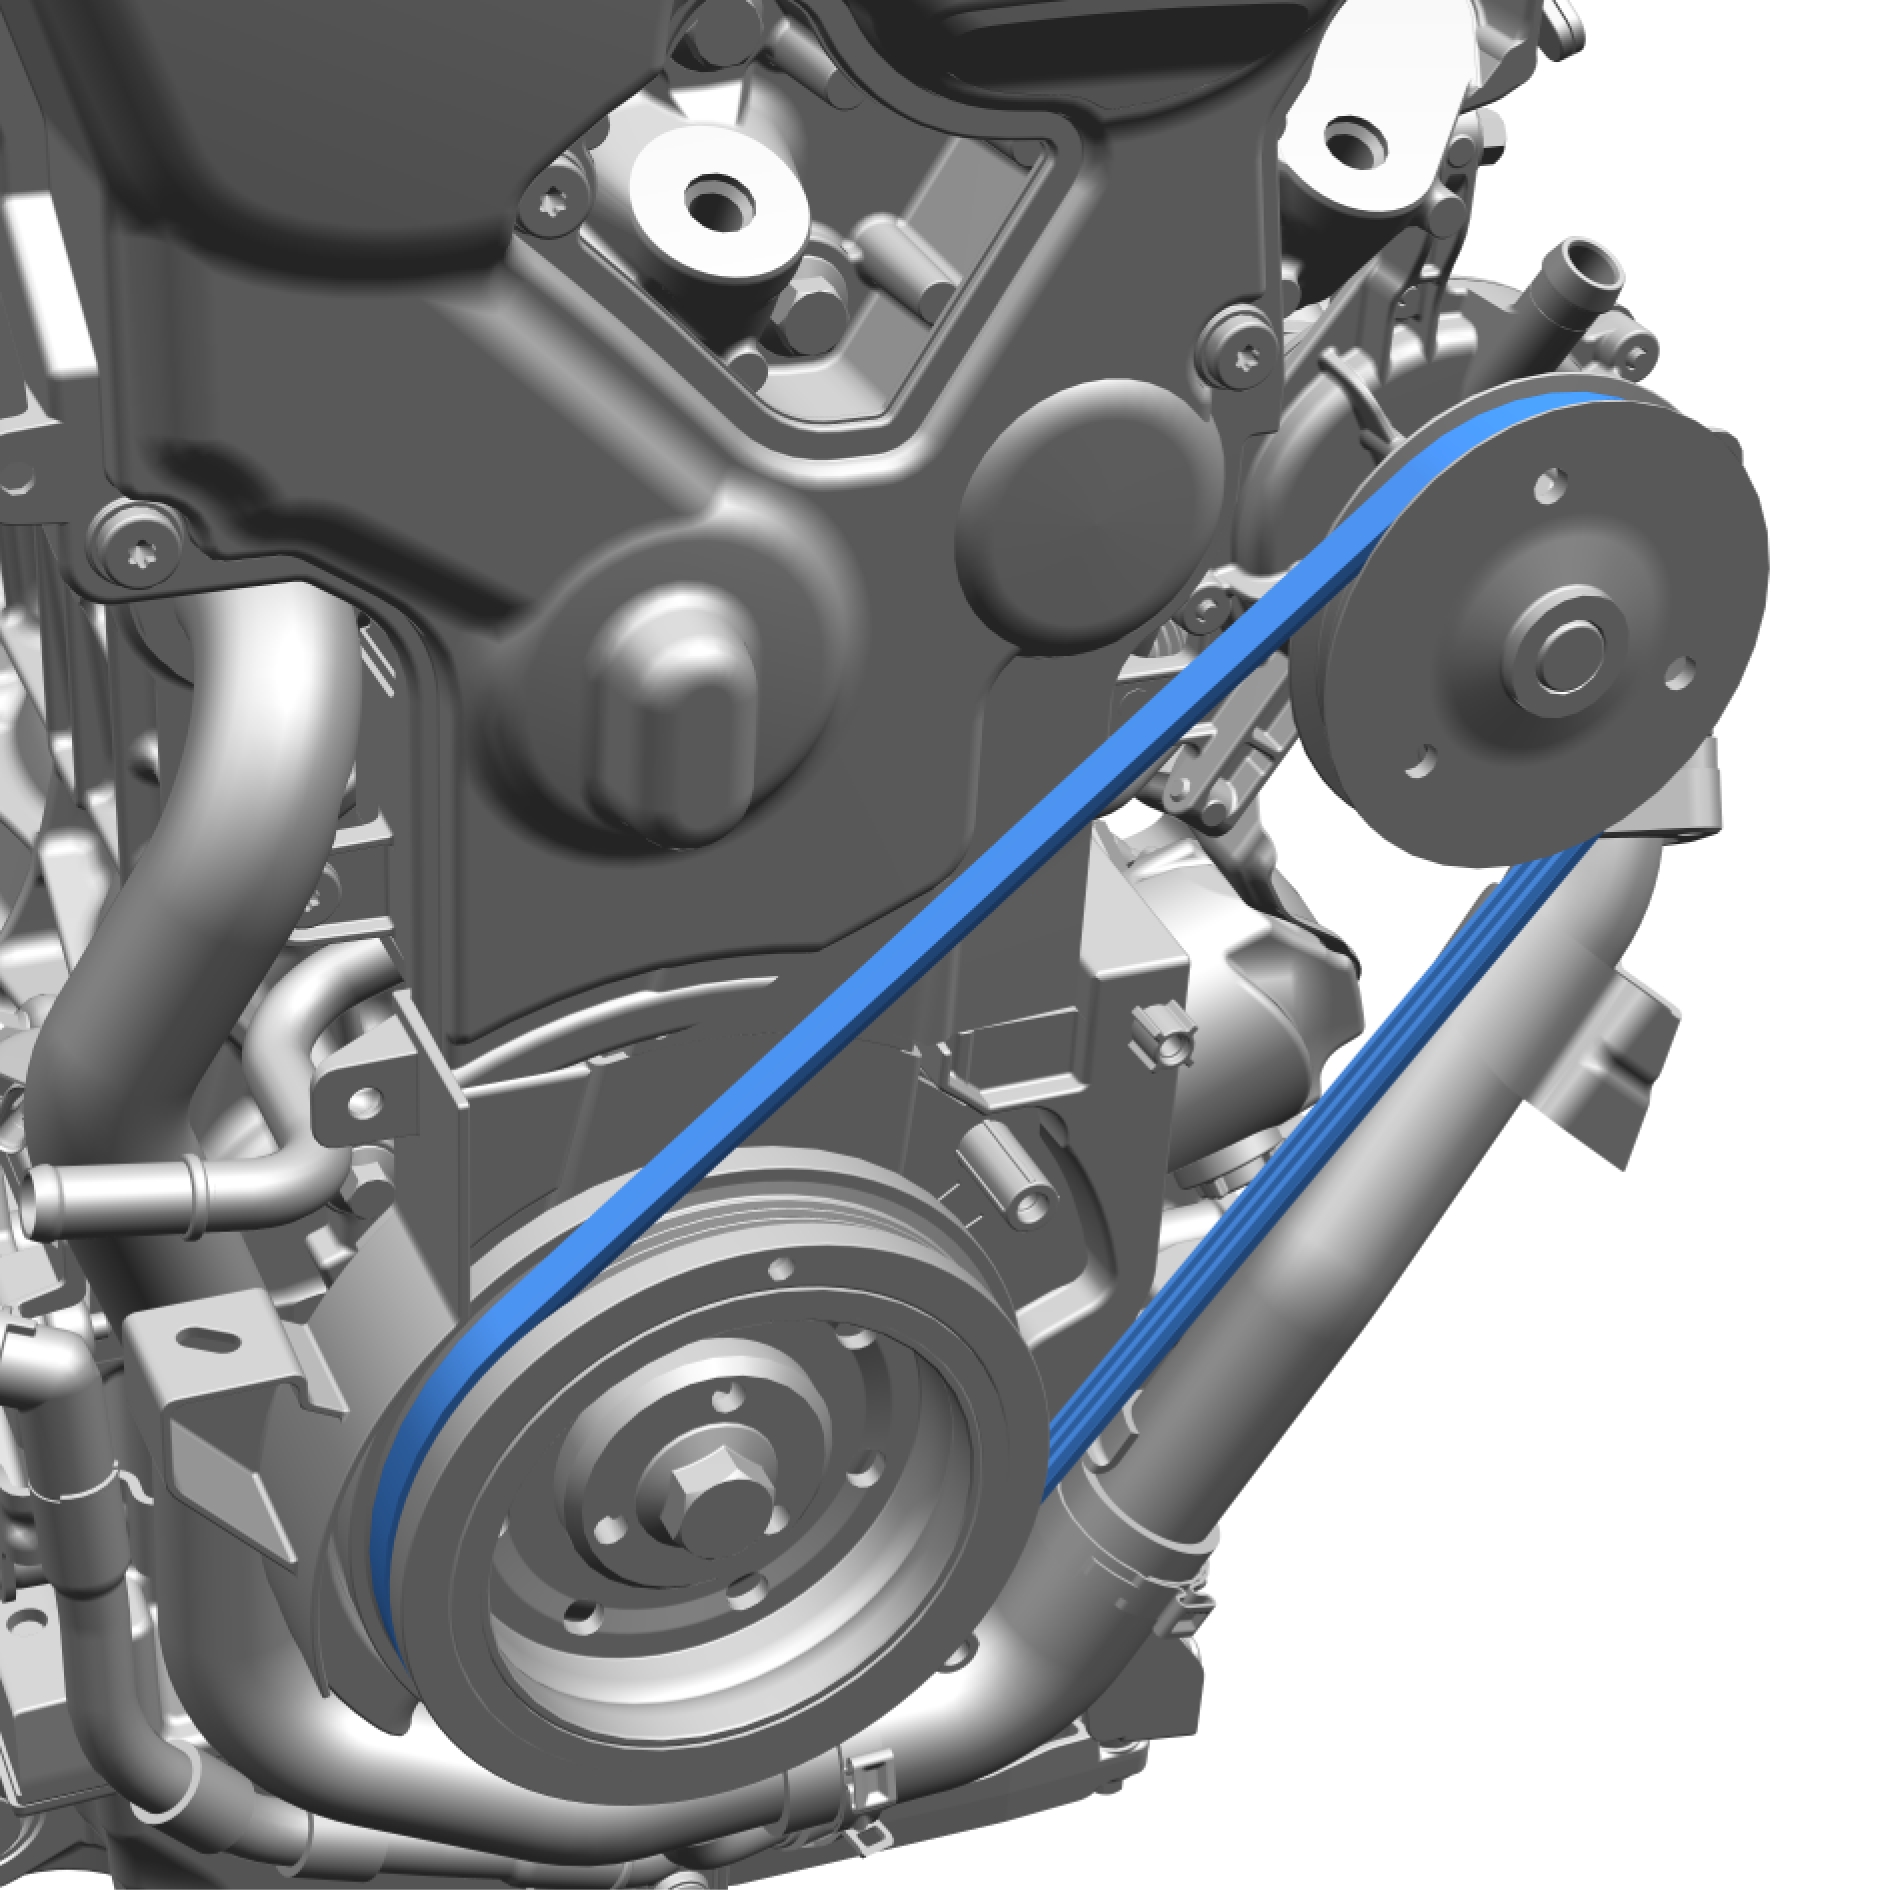
Remove and discard the marked component.
Installation
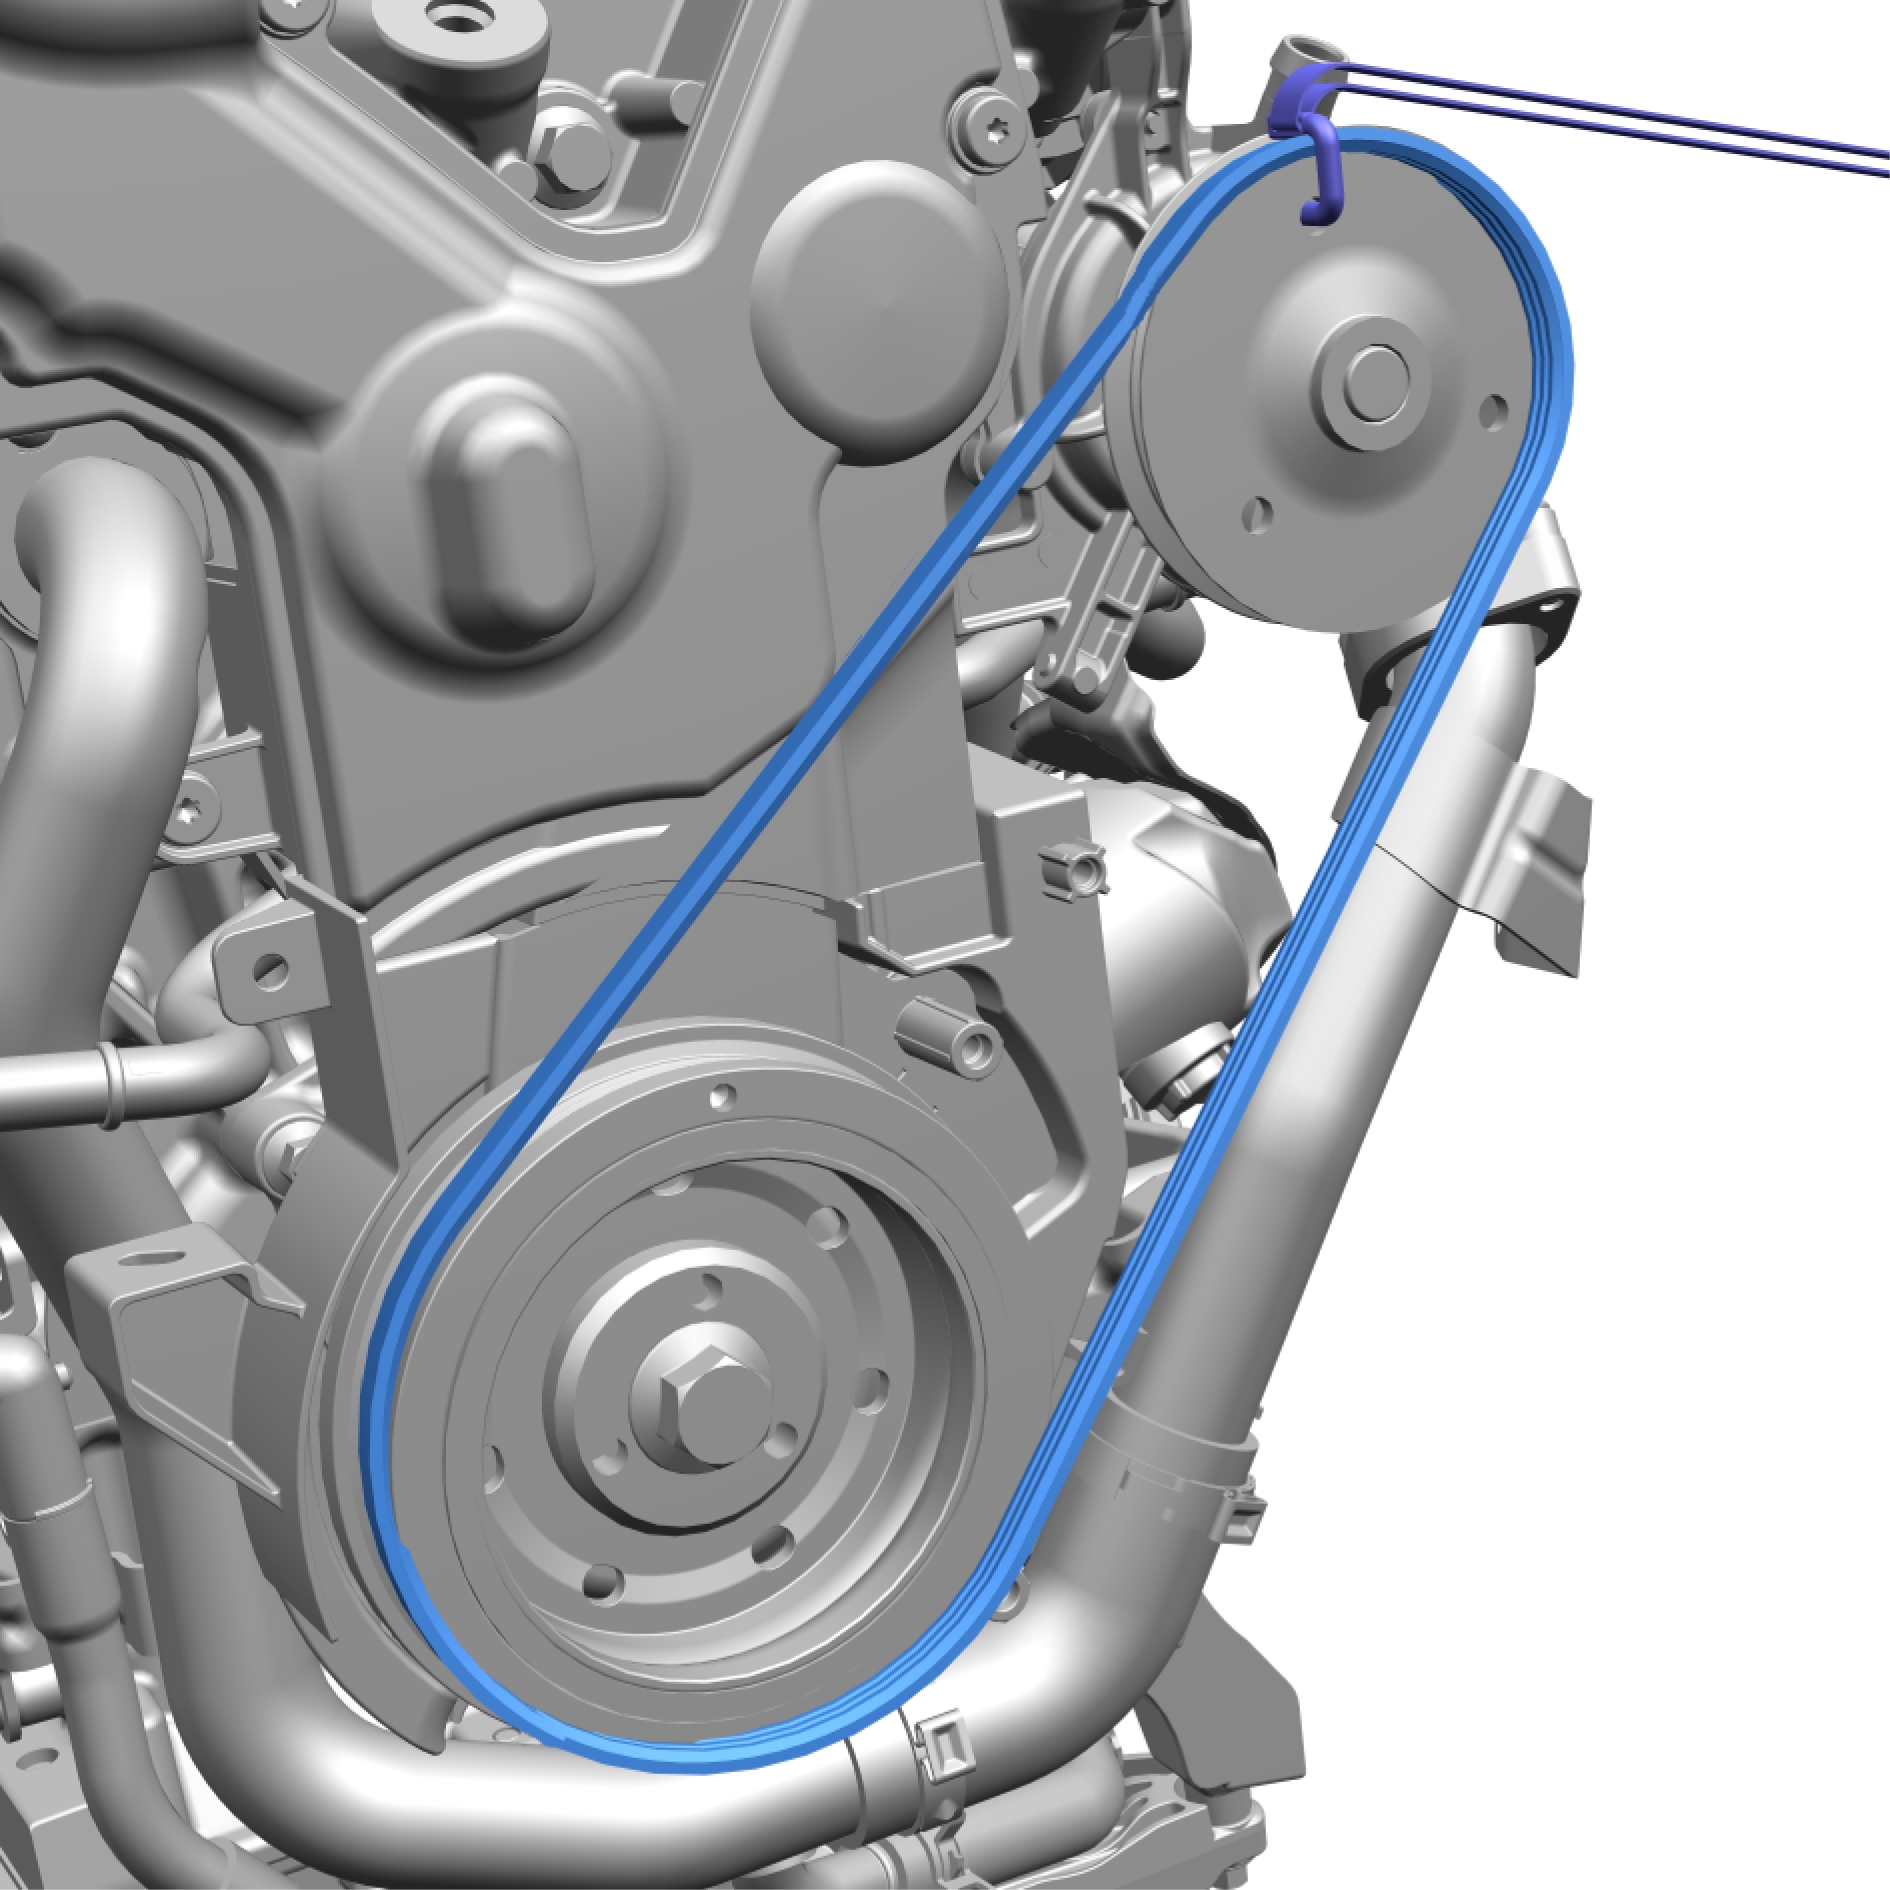
Install the belt around the crankshaft pulley and the top of the pump pulley. Turn the pump pulley around with tool 9997717 counterhold to fit the belt.
Rotate engine clockwise for the belt to locate its correct posiotion.
Install marked component.
Install the screws.
Torque: 10 Nm
Timing belt, replace
Removal
Remove the screws.
Remove the marked component.
Remove the marked component.
Remove the screw.
Remove the marked component.
Remove the screws.
Remove the marked component.
Remove the screws.
Remove the marked component.
Rotate the engine clock wise to the zero position.
Install the special tool: 999 7768
Remove the nut.
Remove and discard the marked component.
Remove and discard the marked component.
Remove and discard the marked component.
Remove the screws.
Remove and discard the marked component.
Installation
Install the marked component.
Torque: 17 Nm
Install the marked component.
1. Torque: 13 Nm
2. Torque: 17 Nm
Make sure to install the component in correct position.
Install the marked components.
Tighten the nut finger tight.
Make sure that the components are positioned correctly.
Install the special tool: 999 7791
Make sure to follow the correct sequence during installation.
Install the marked component.
Remove the special tool.
Remove the special tool.
Adjust the position of the component according to image.
Tighten the nut tensioner, timing belt, torque: 30 Nm
The engine is rotated so that the belt assumes its correct position.
Turn the engine.
If the measured value is greater or less than the specified range, all steps in the adjustment section must be carried out again.
Install the marked component.
Install the screws.
Torque: 10 Nm
Install the marked component.
Install the screws.
Torque: 10 Nm
Install the marked component.
Install the screw.
Torque:
Install the marked component.
Install special tool: 999 xxx
Rotate engine clockwise for the belt to locate its correct posiotion.
Install the marked component.
Install the screws.
Turbocharger, replace
Removal
Remove the screws.
Torque: 10 Nm
Remove the marked component.
Remove the screws.
Torque: 10 Nm
Remove the marked component.
Remove the screw.
Remove the screws.
Torque: 10 Nm
Remove the marked component.
Remove and discard the marked components.
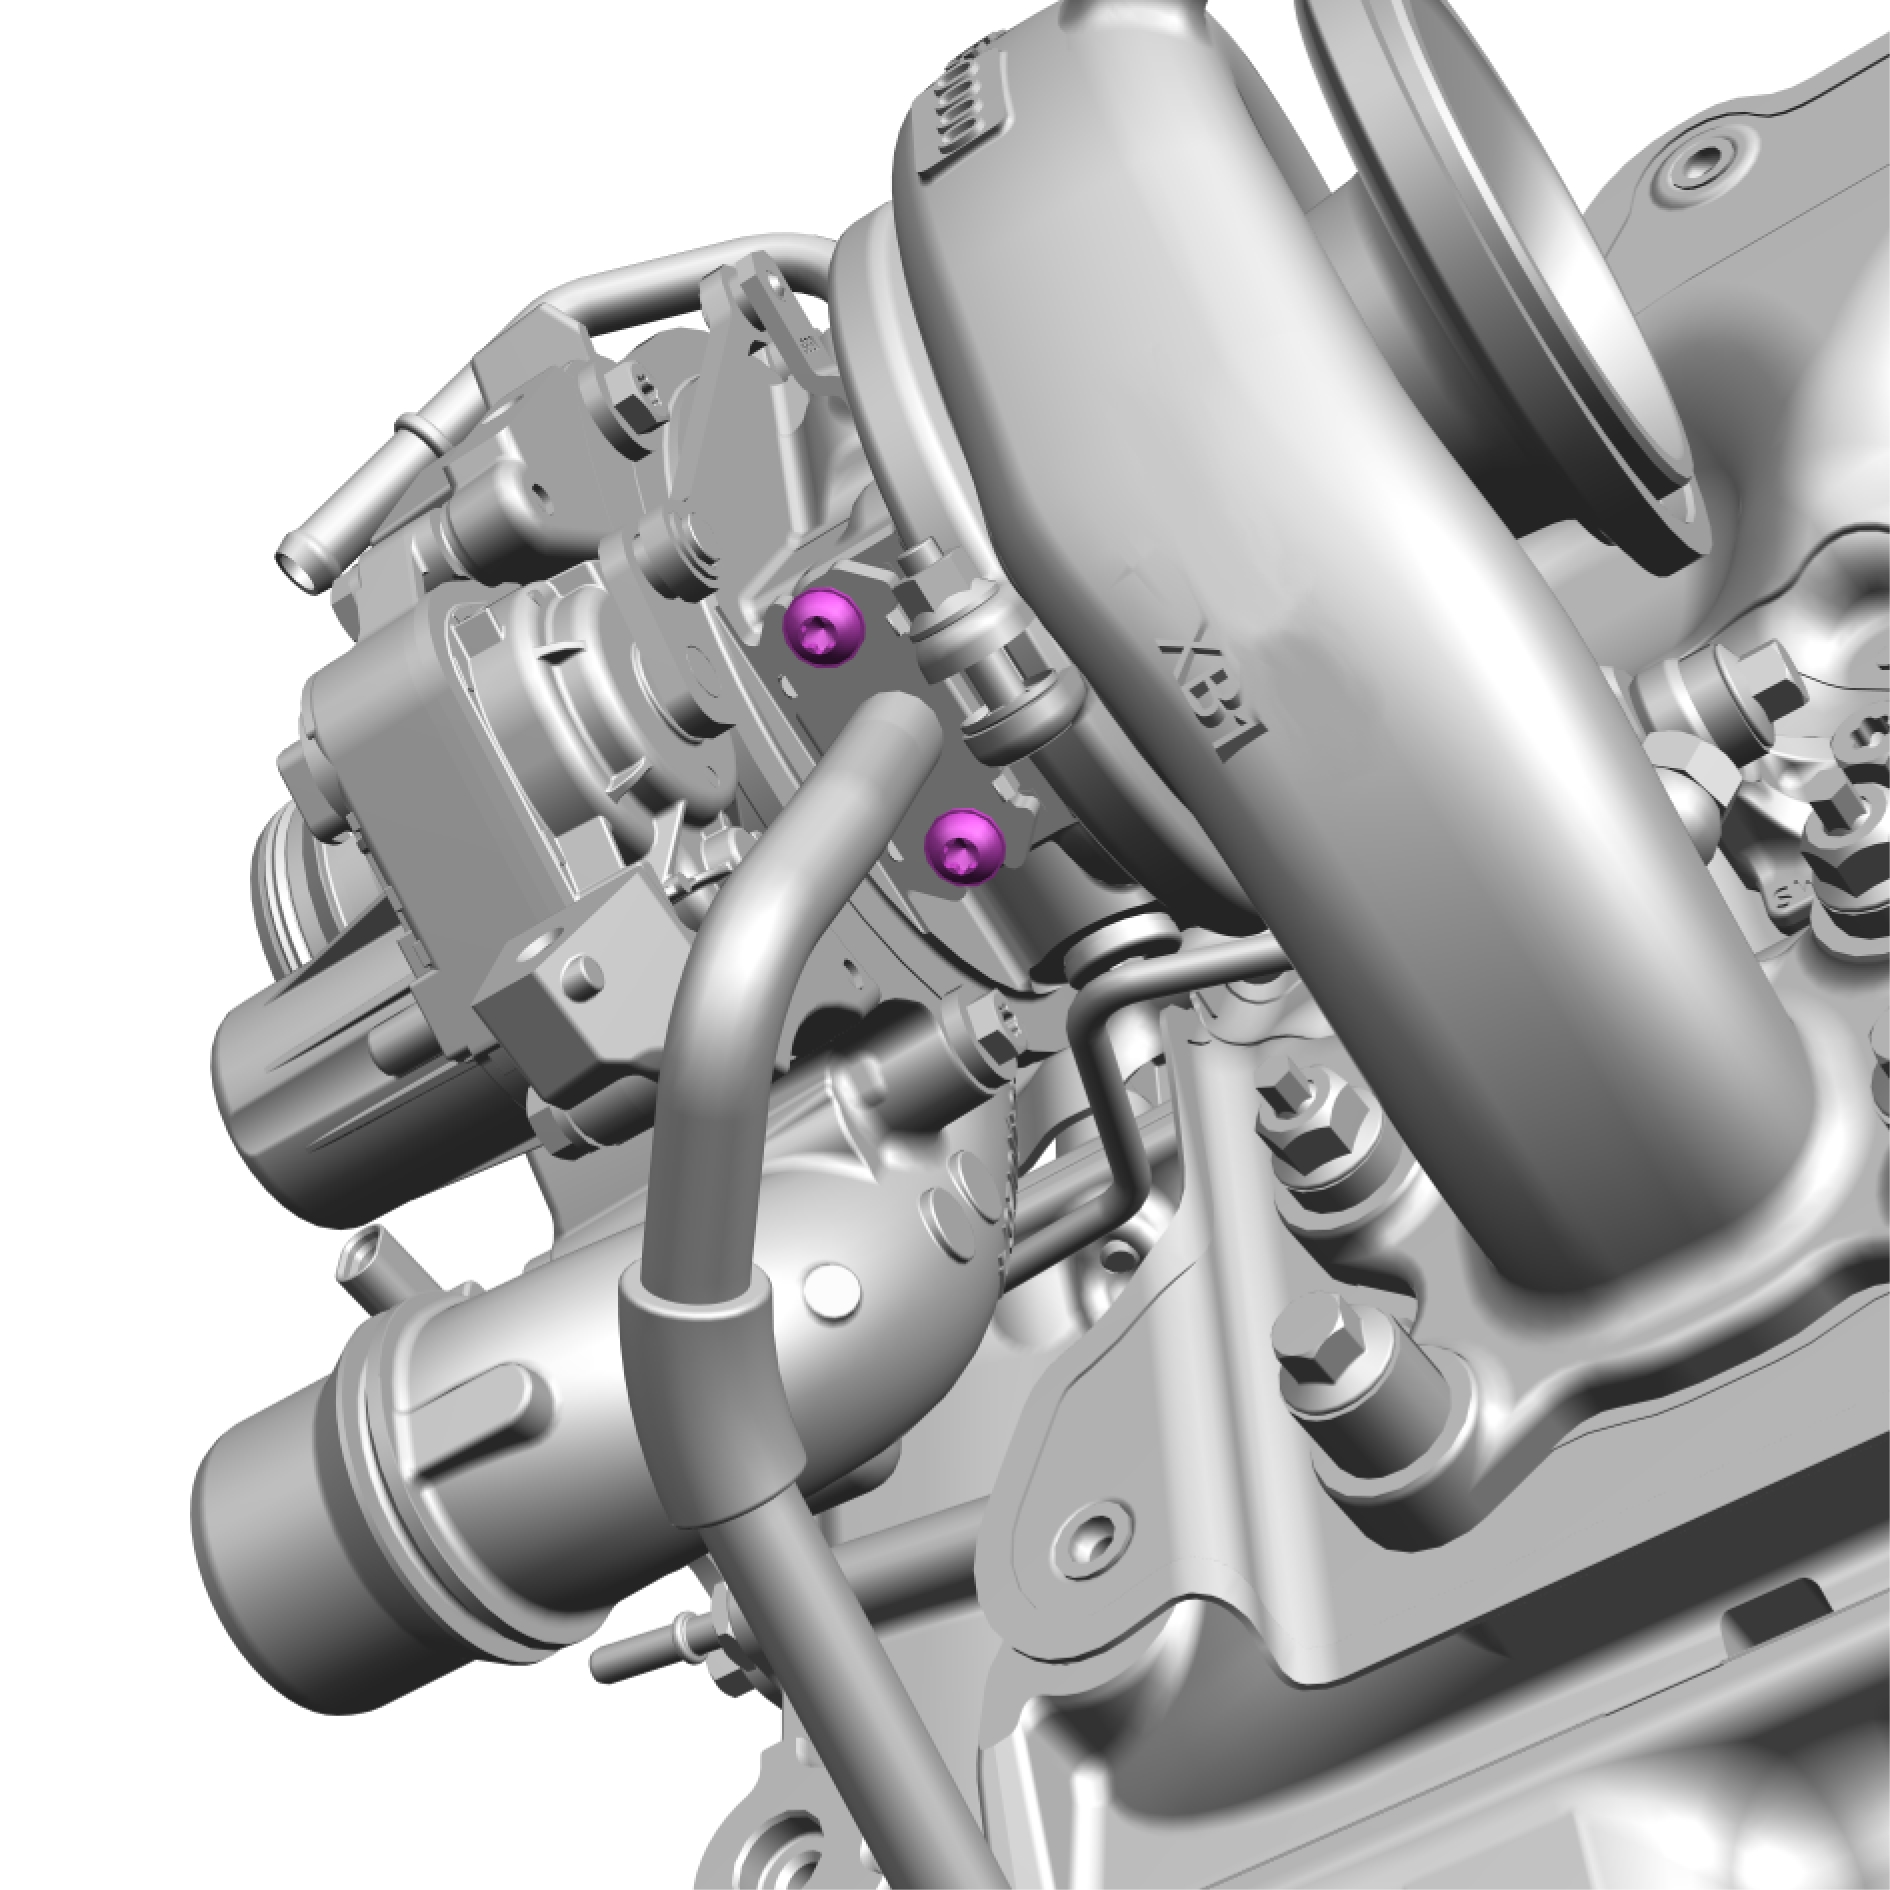
Remove the screws.
Torque: 10 Nm
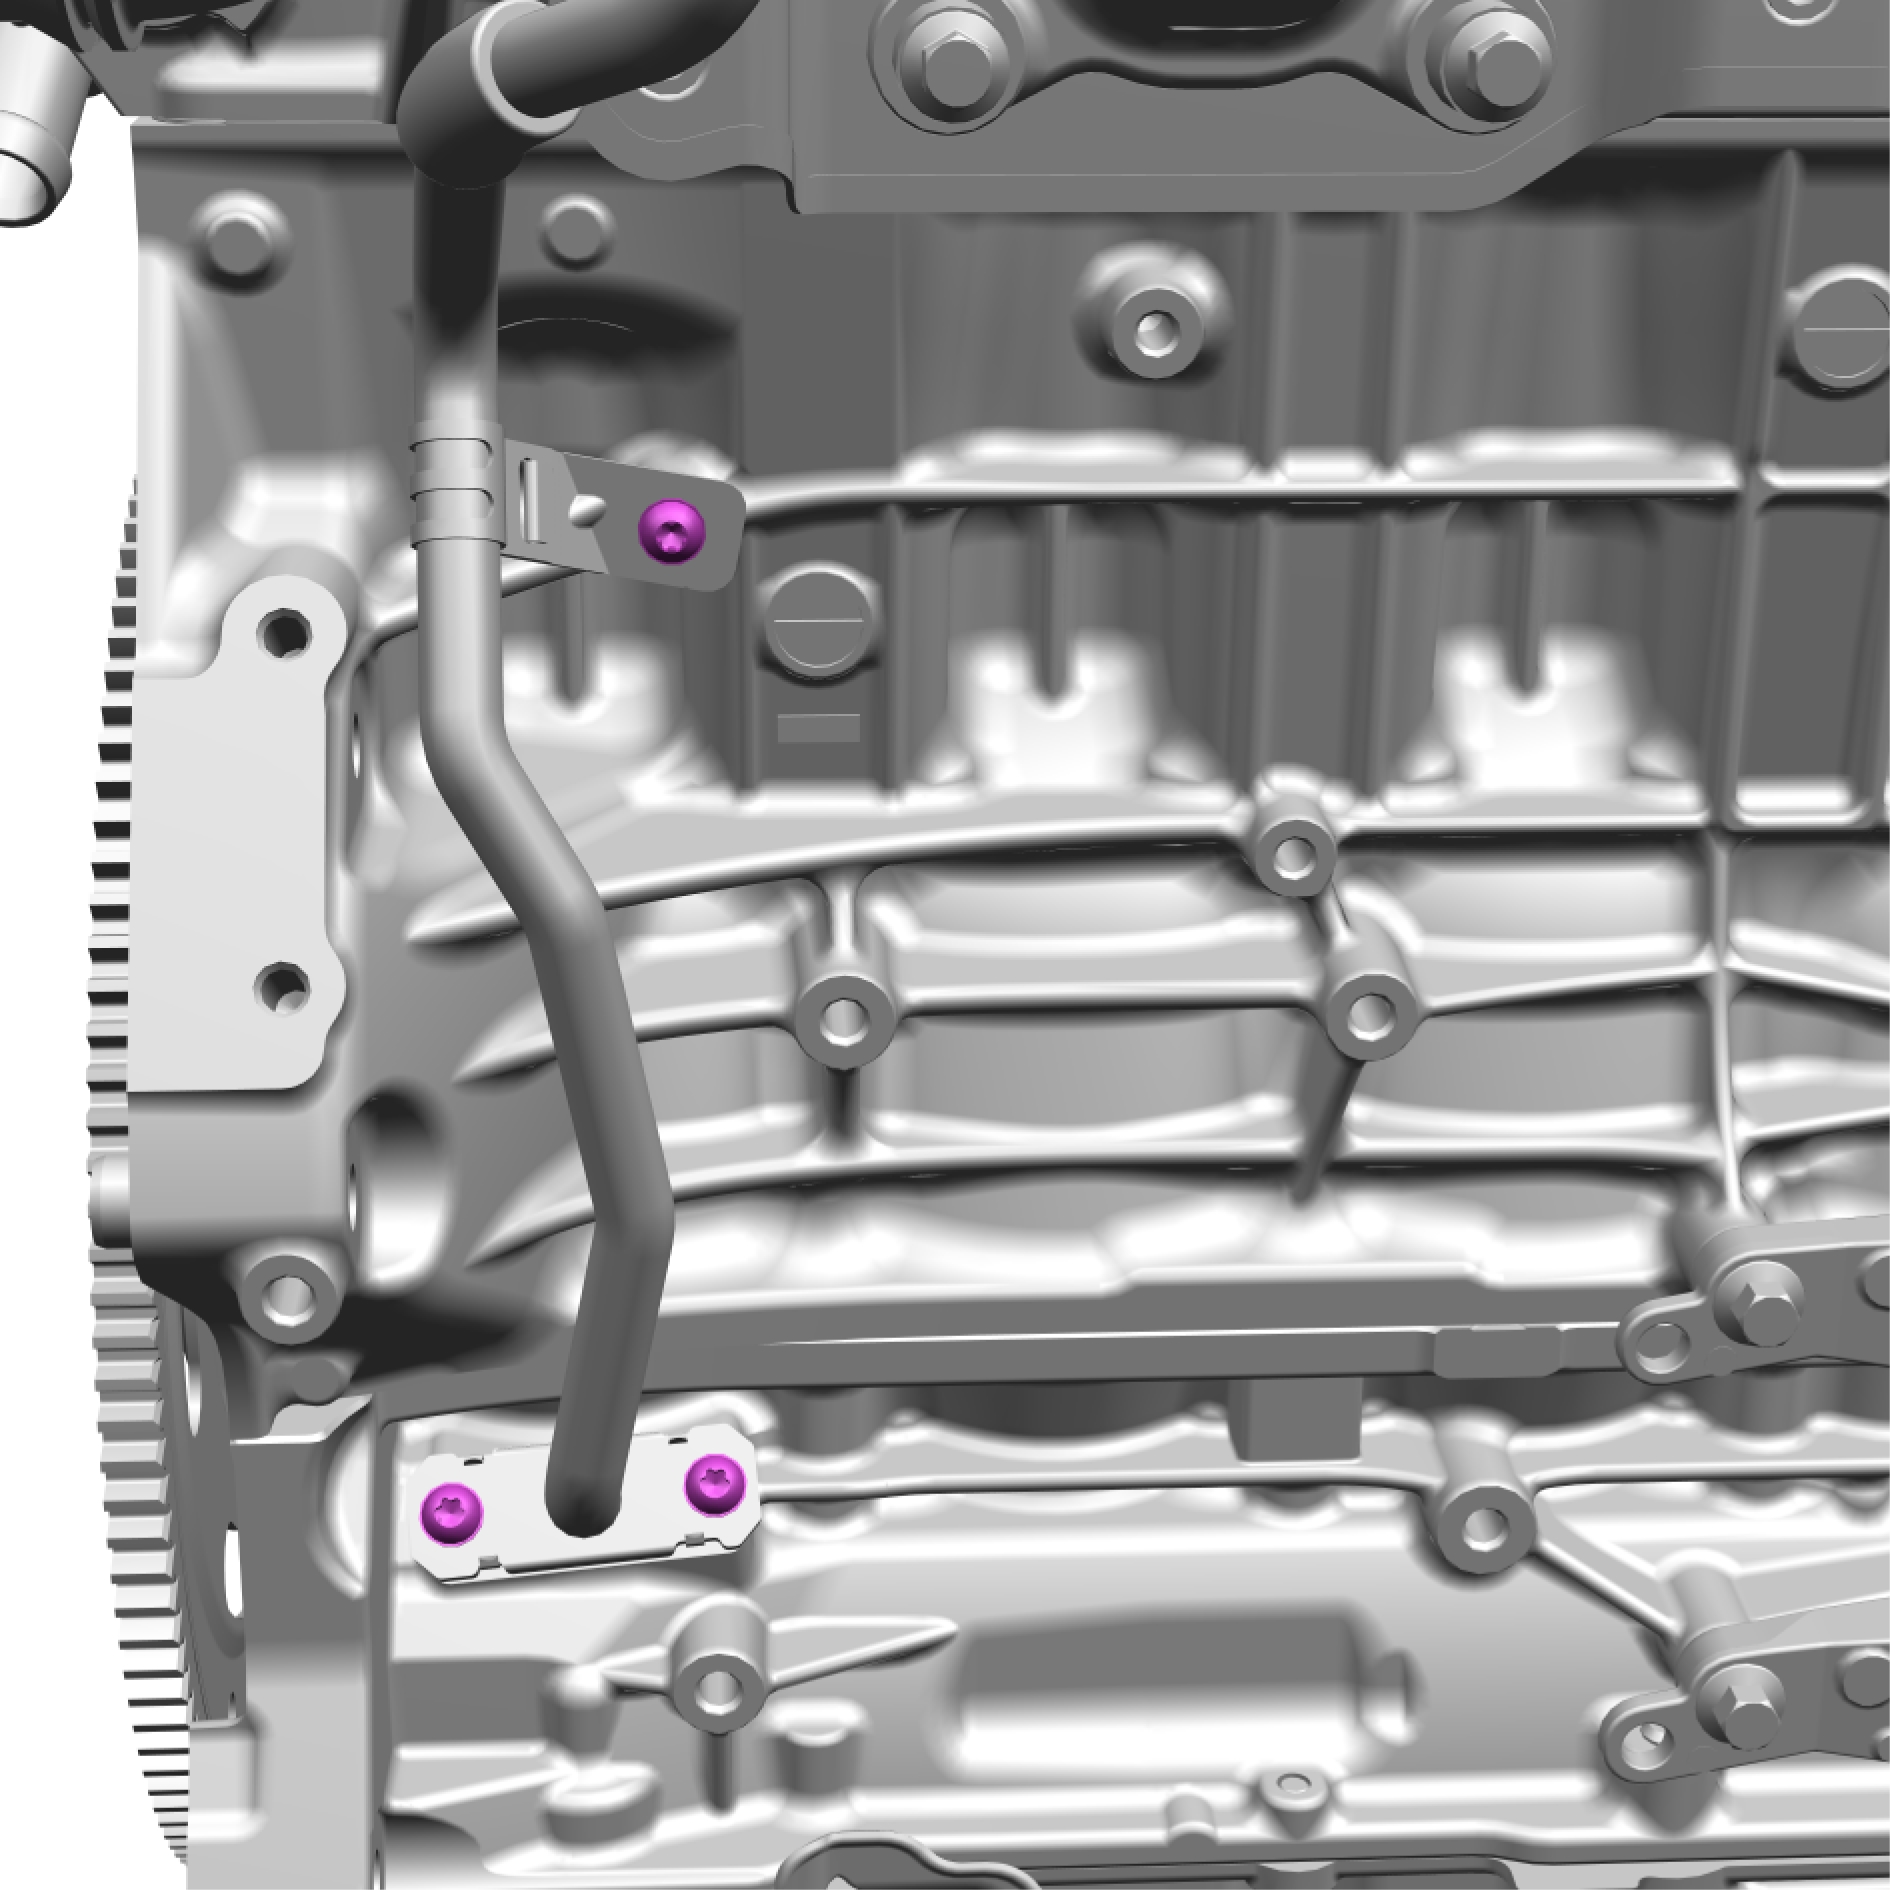
Remove the screws.
Torque: 10 Nm
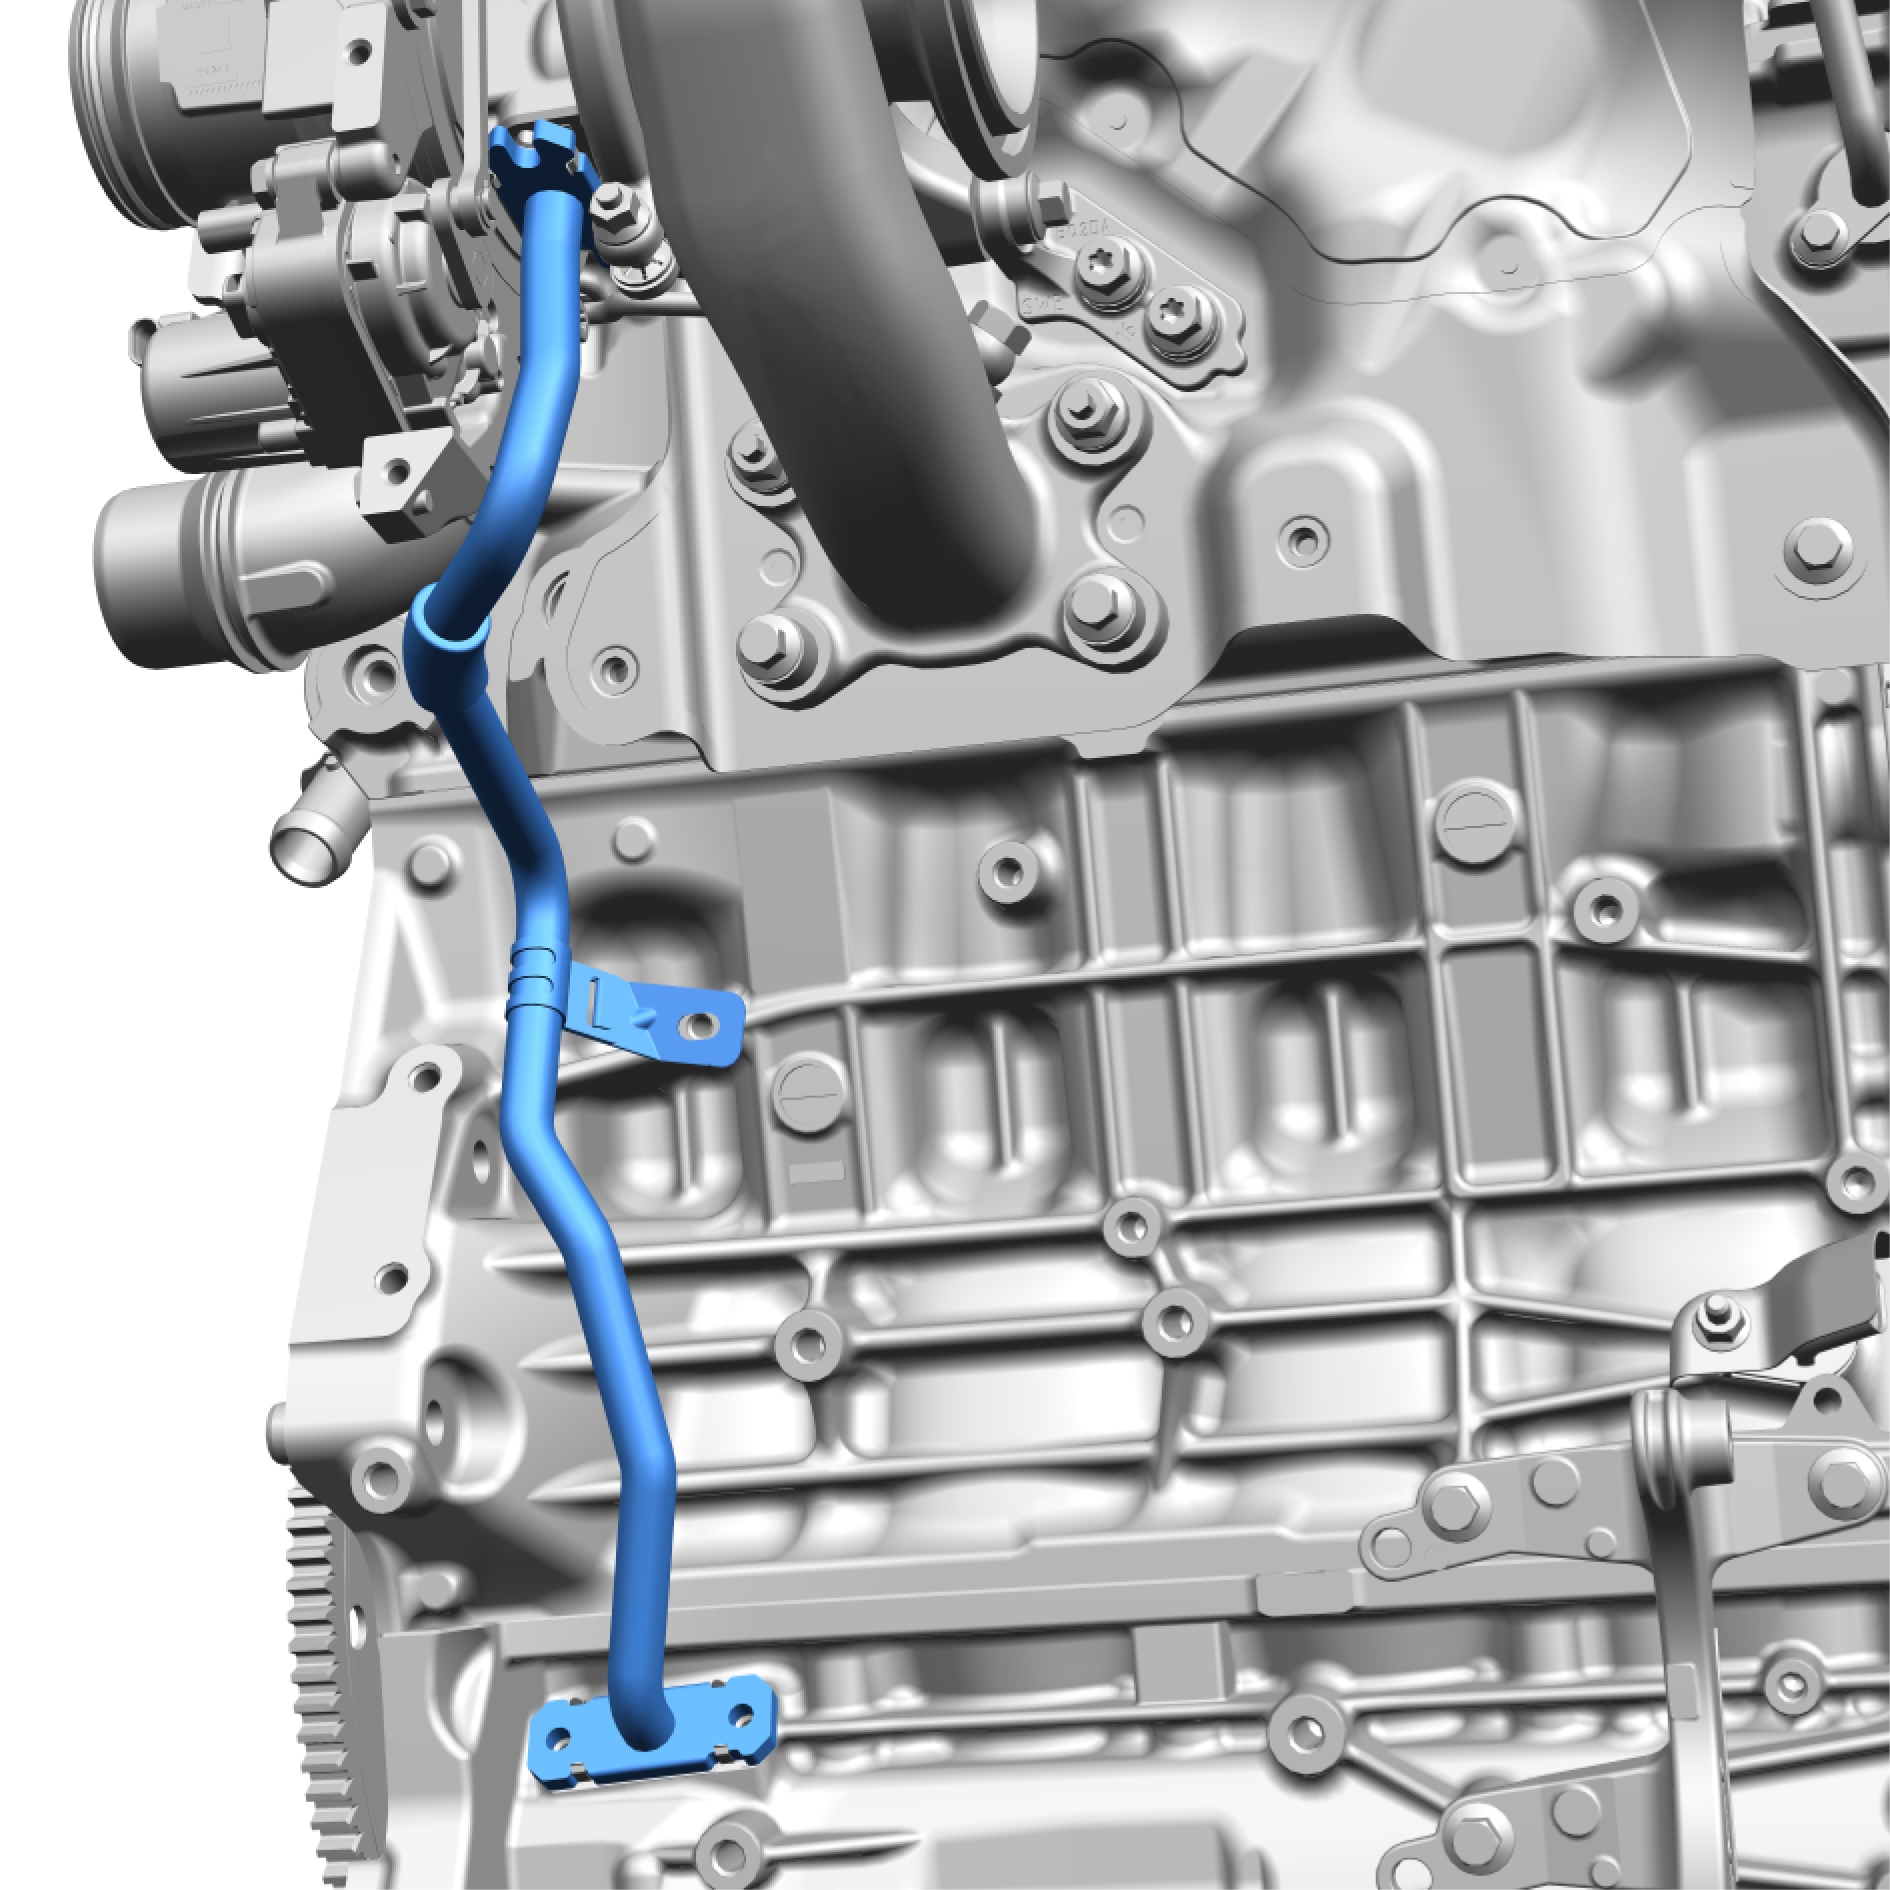
Remove the marked component.

Remove and discard the marked components.
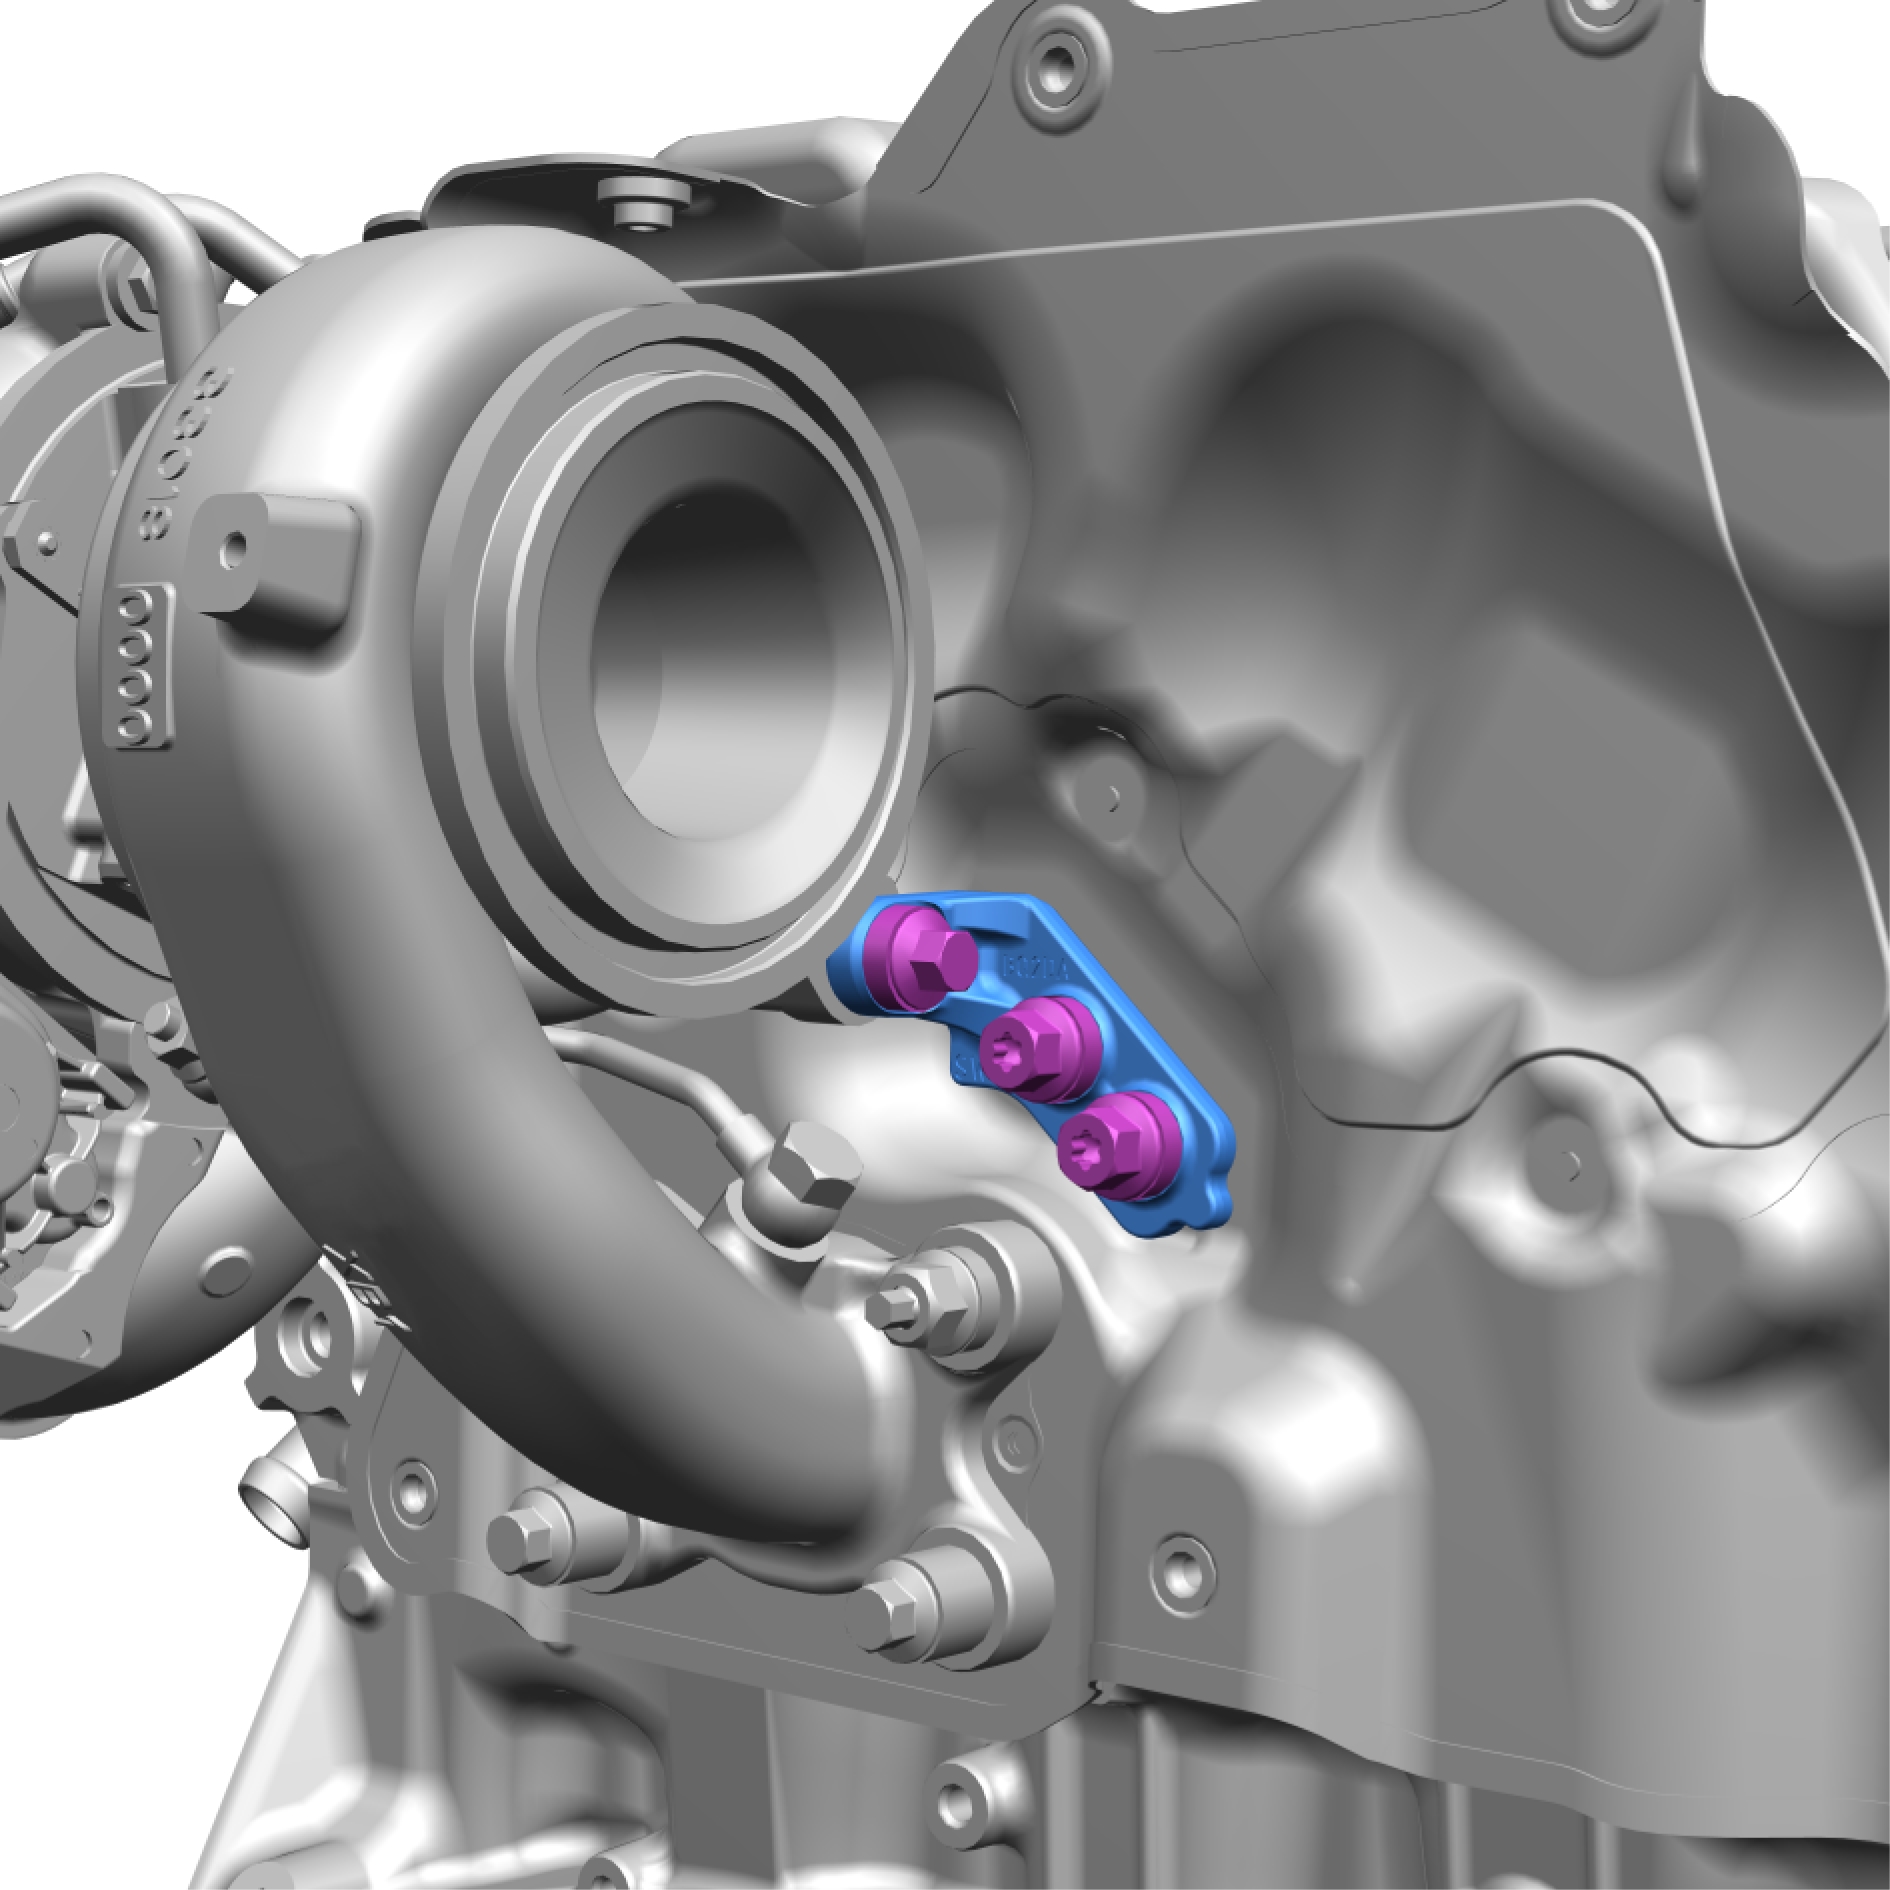
Remove the screws.
Torque: 24 Nm
Remove the marked component.

Remove the nuts.
Remove the screws.
Remove the screw.
Torque: 24 Nm
Remove and discard the marked component.
Transferring components
Remove the screws.
Torque: 10 Nm
Remove the marked components.
Remove and discard the marked components.
Remove the screws.
1, Torque: 24 Nm
2, Torque: 10 Nm
Remove the marked component.
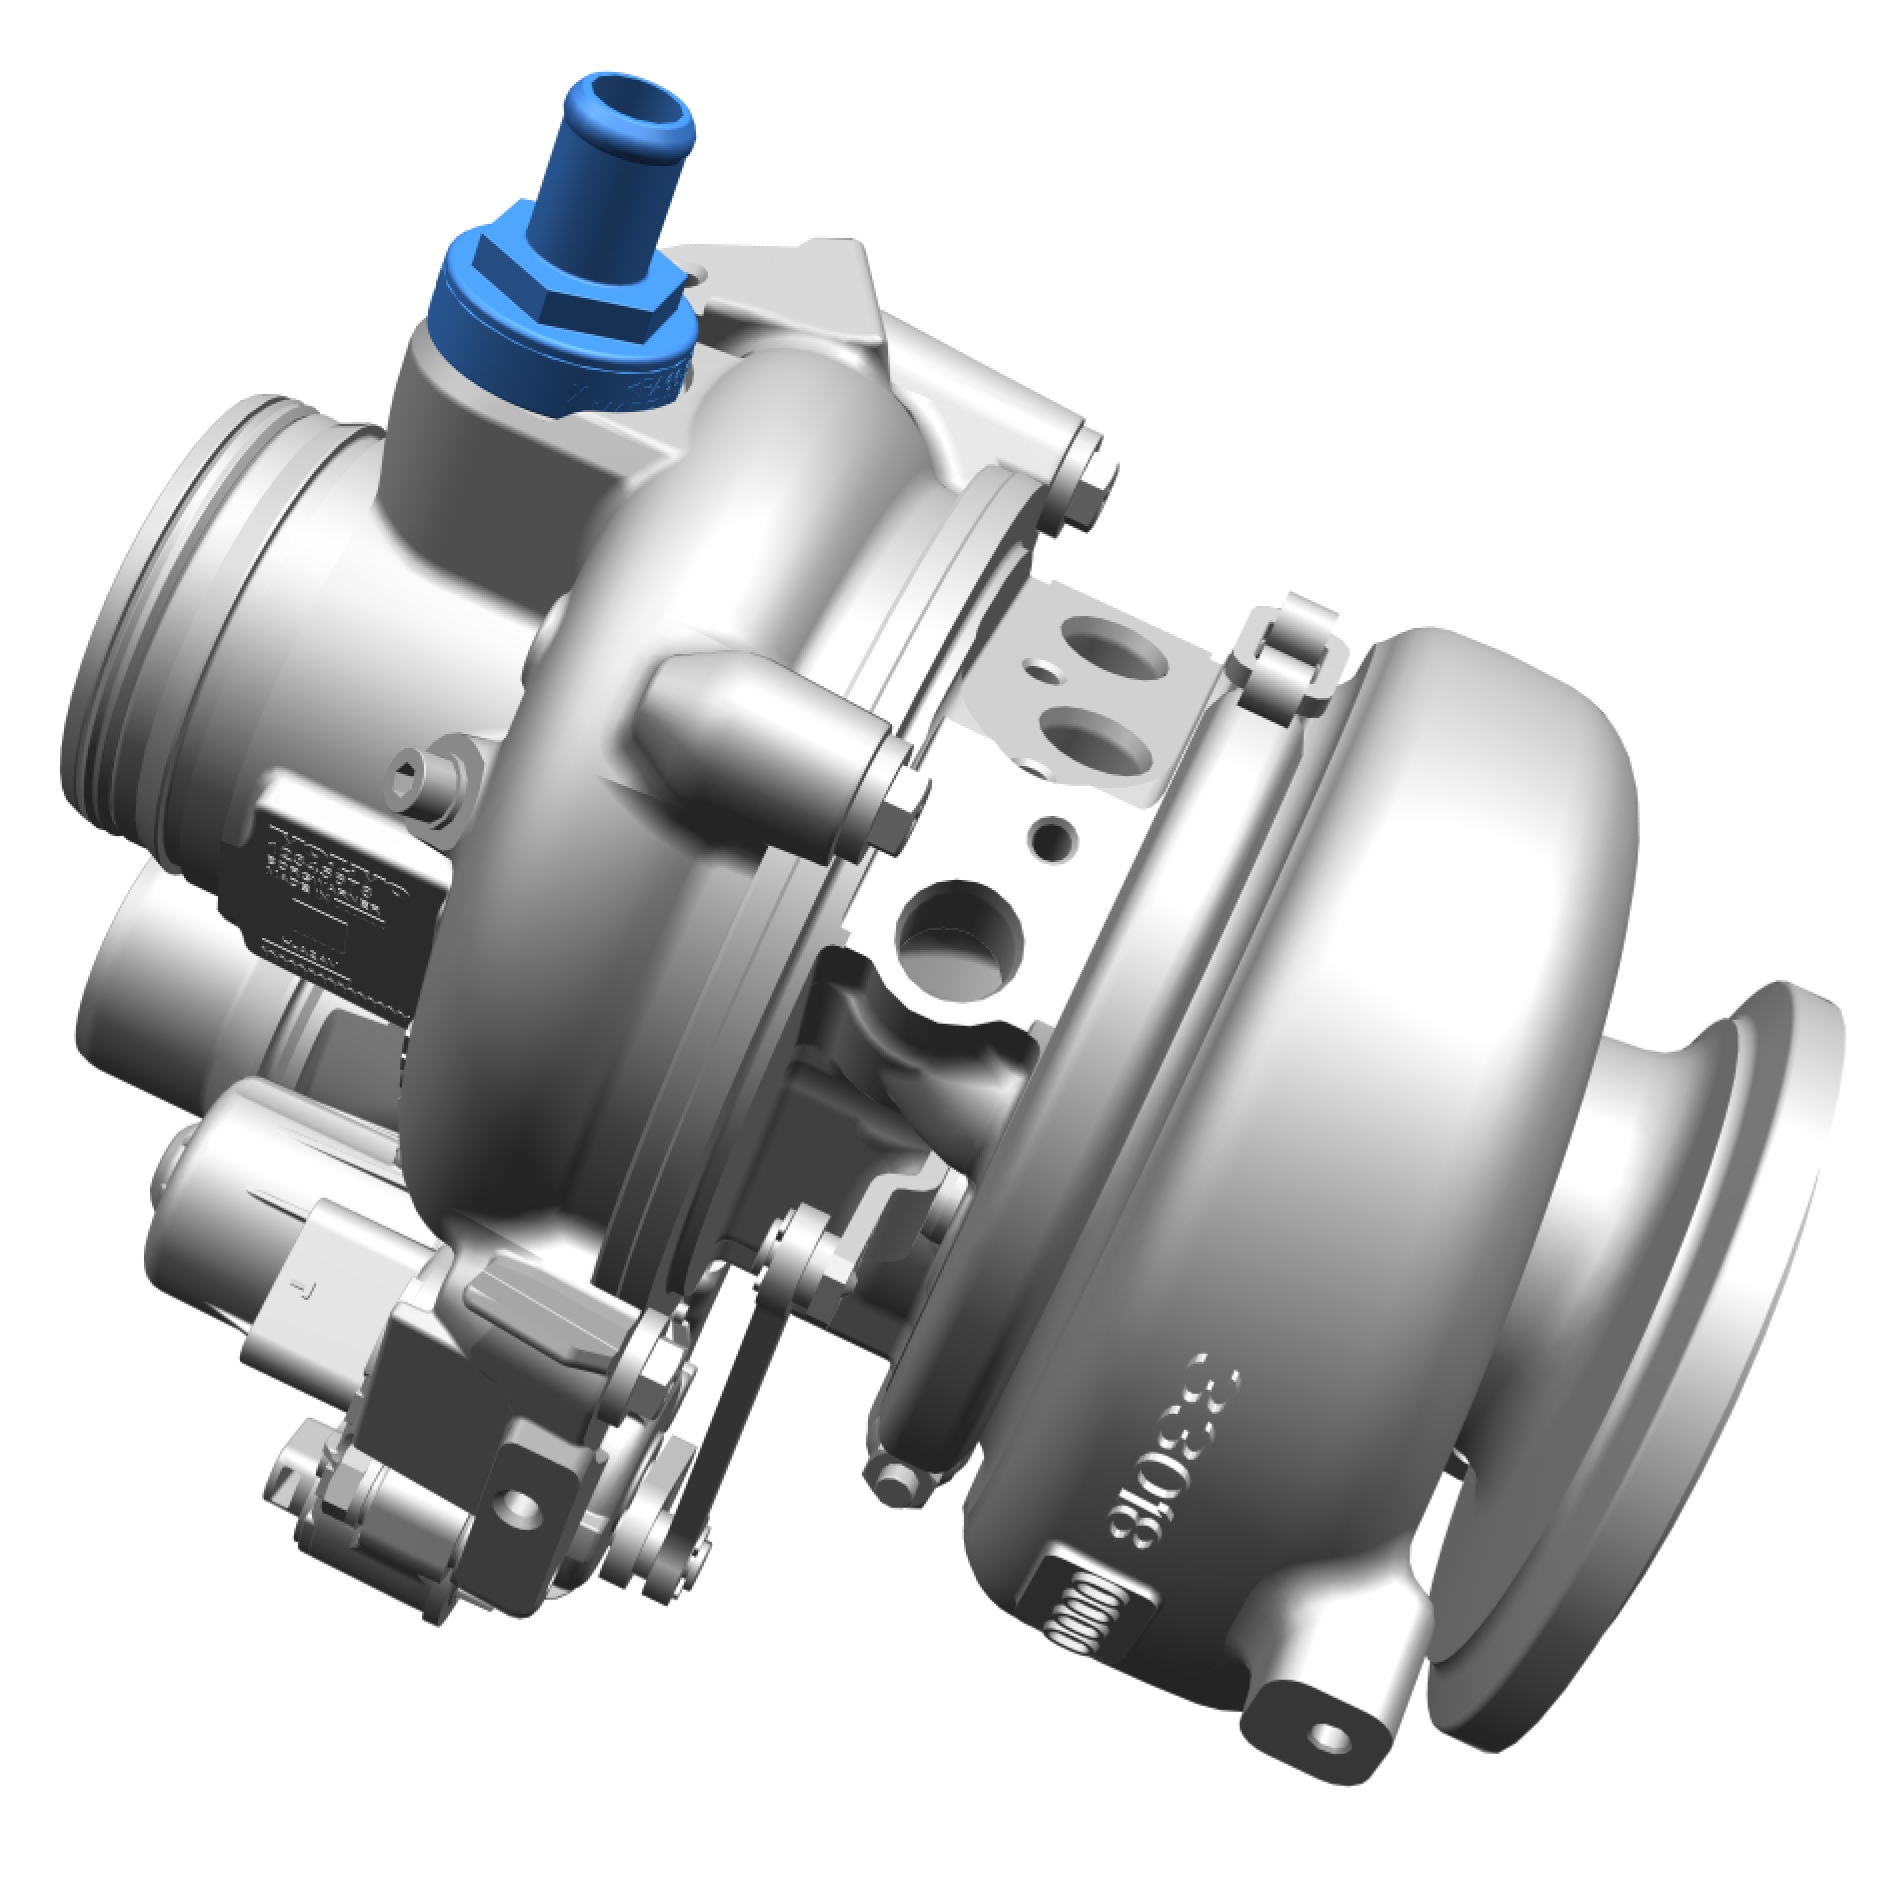
Remove the marked component.
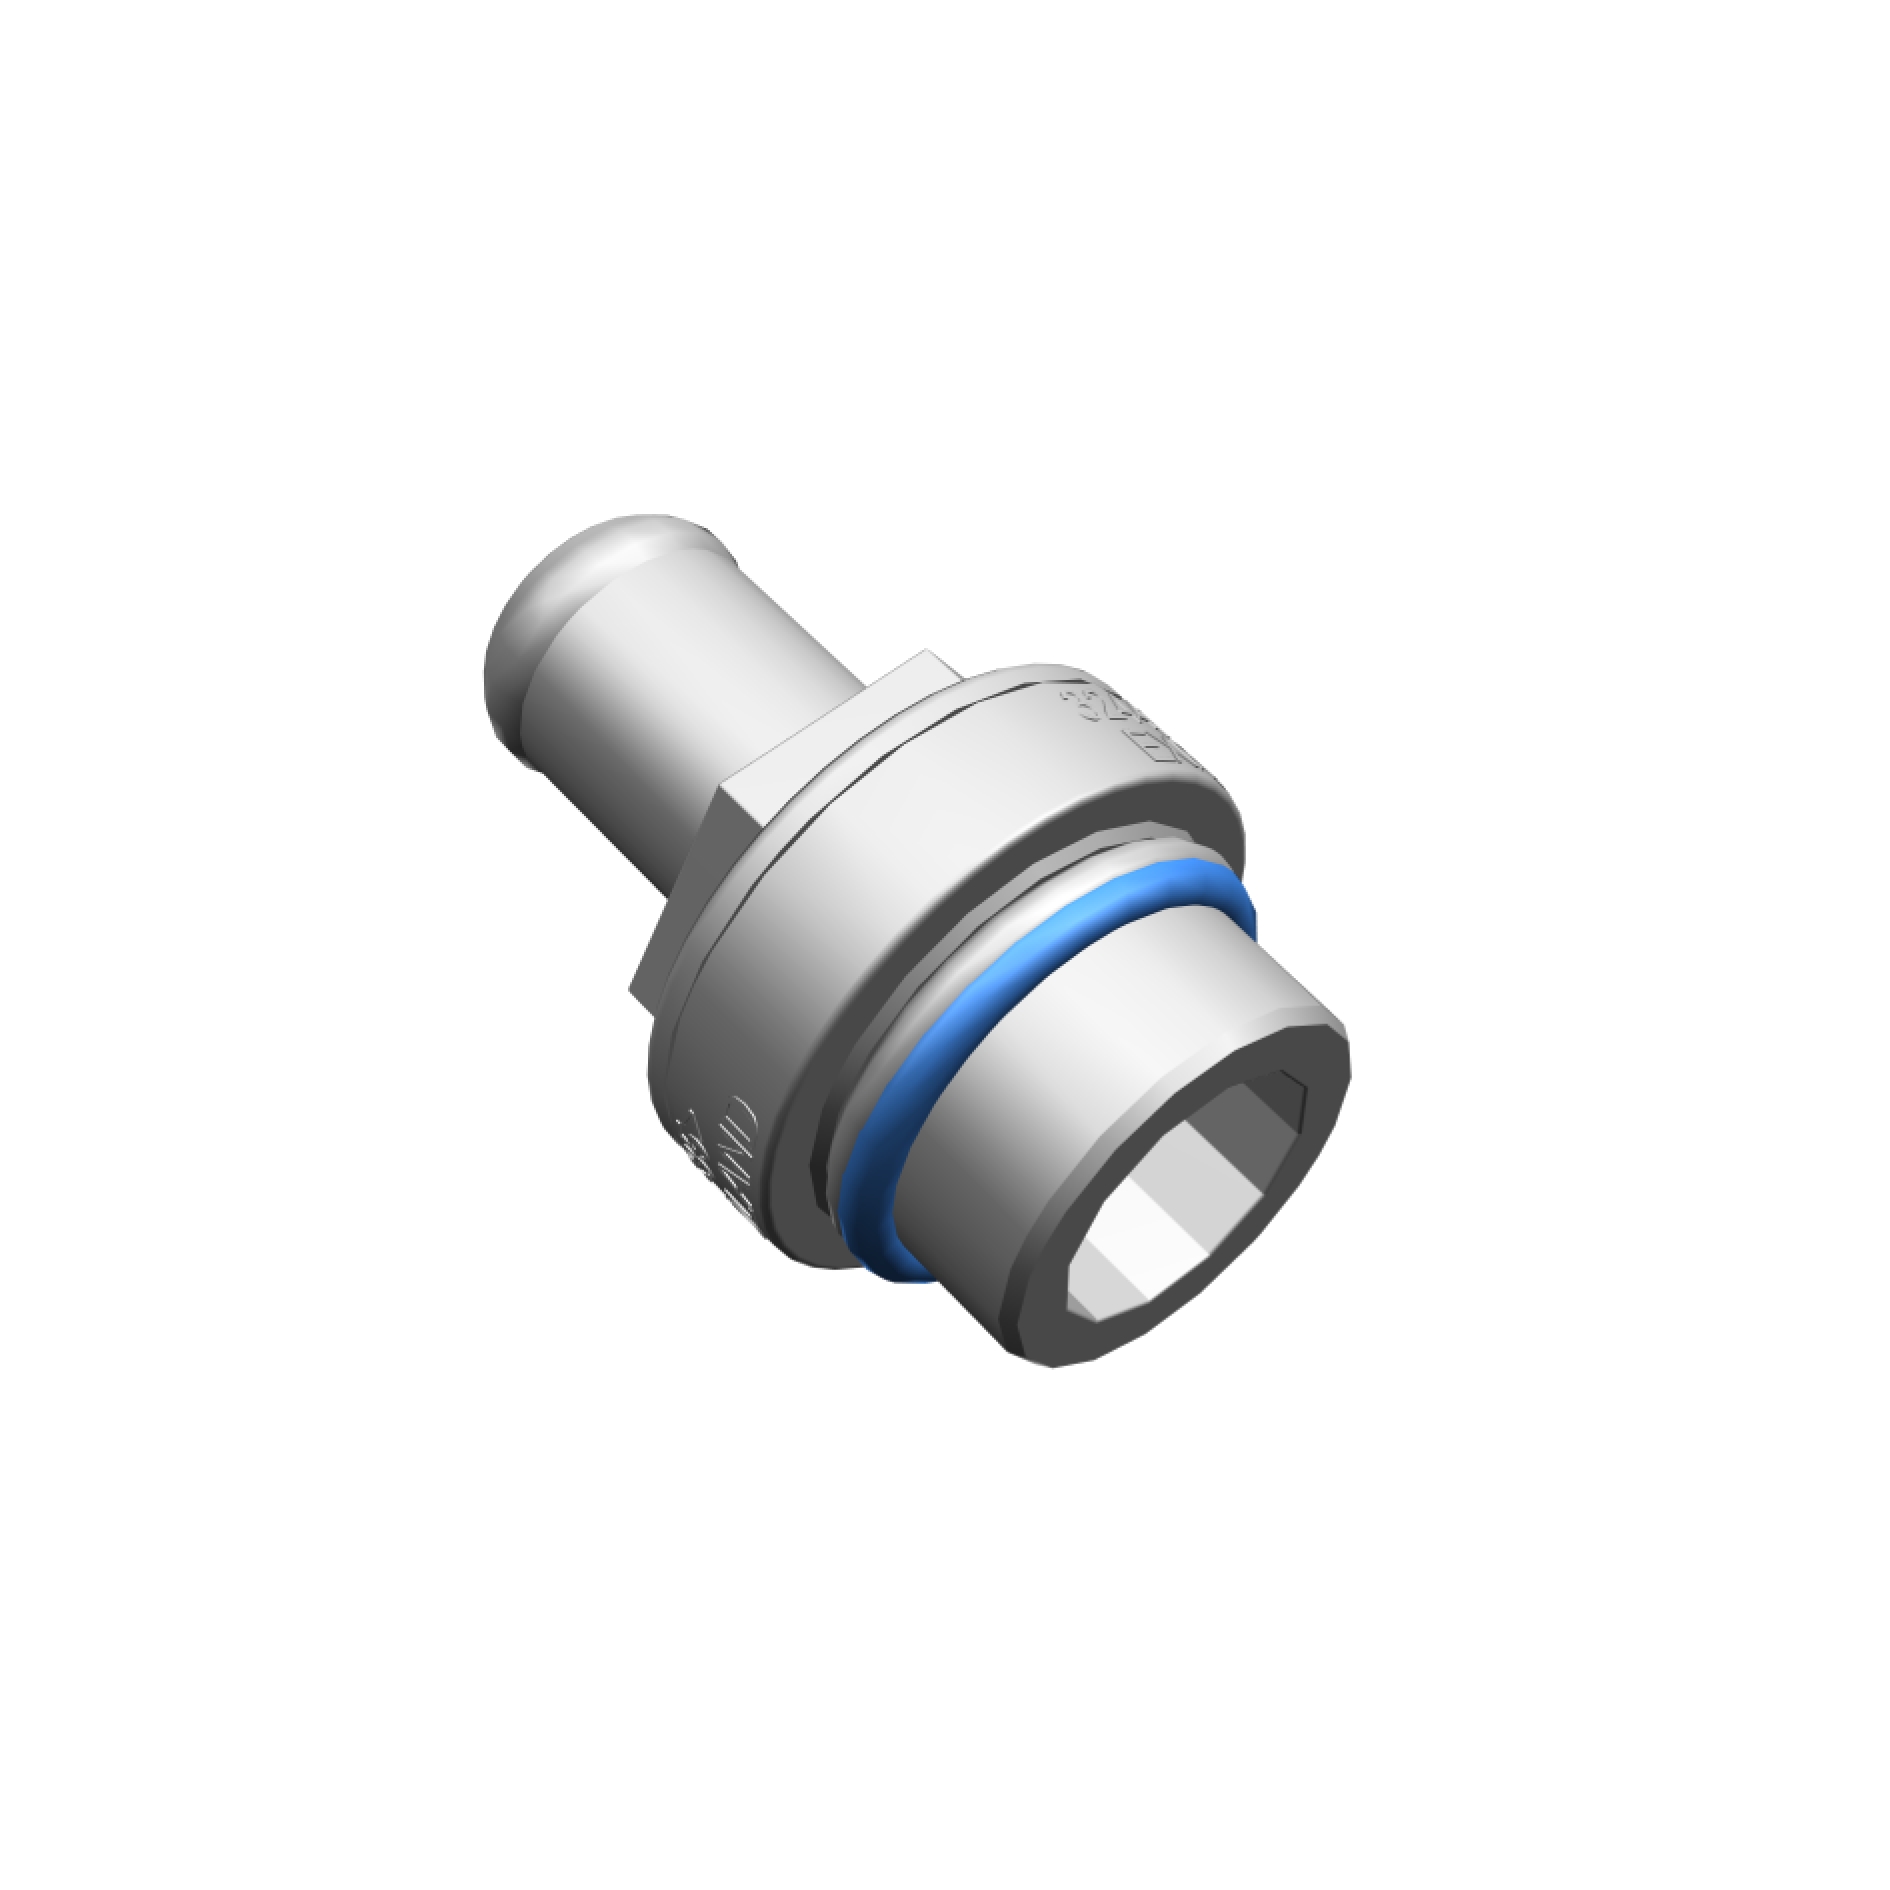
Remove and discard the marked component.
Installation
Install in reverse order.
Install the fasteners.
1, Torque: Exhaust manifold to cylinder head, nut.
Stage 1: 5 Nm
Stage 2: 18 Nm
Stage 3: 20 Nm
2, Torque: Exhaust manifold to cylinder head, bolt
Stage 1: 5 Nm
Stage 2: 16 Nm
Stage 3: 18 Nm
Fuel pump, replace
Removal
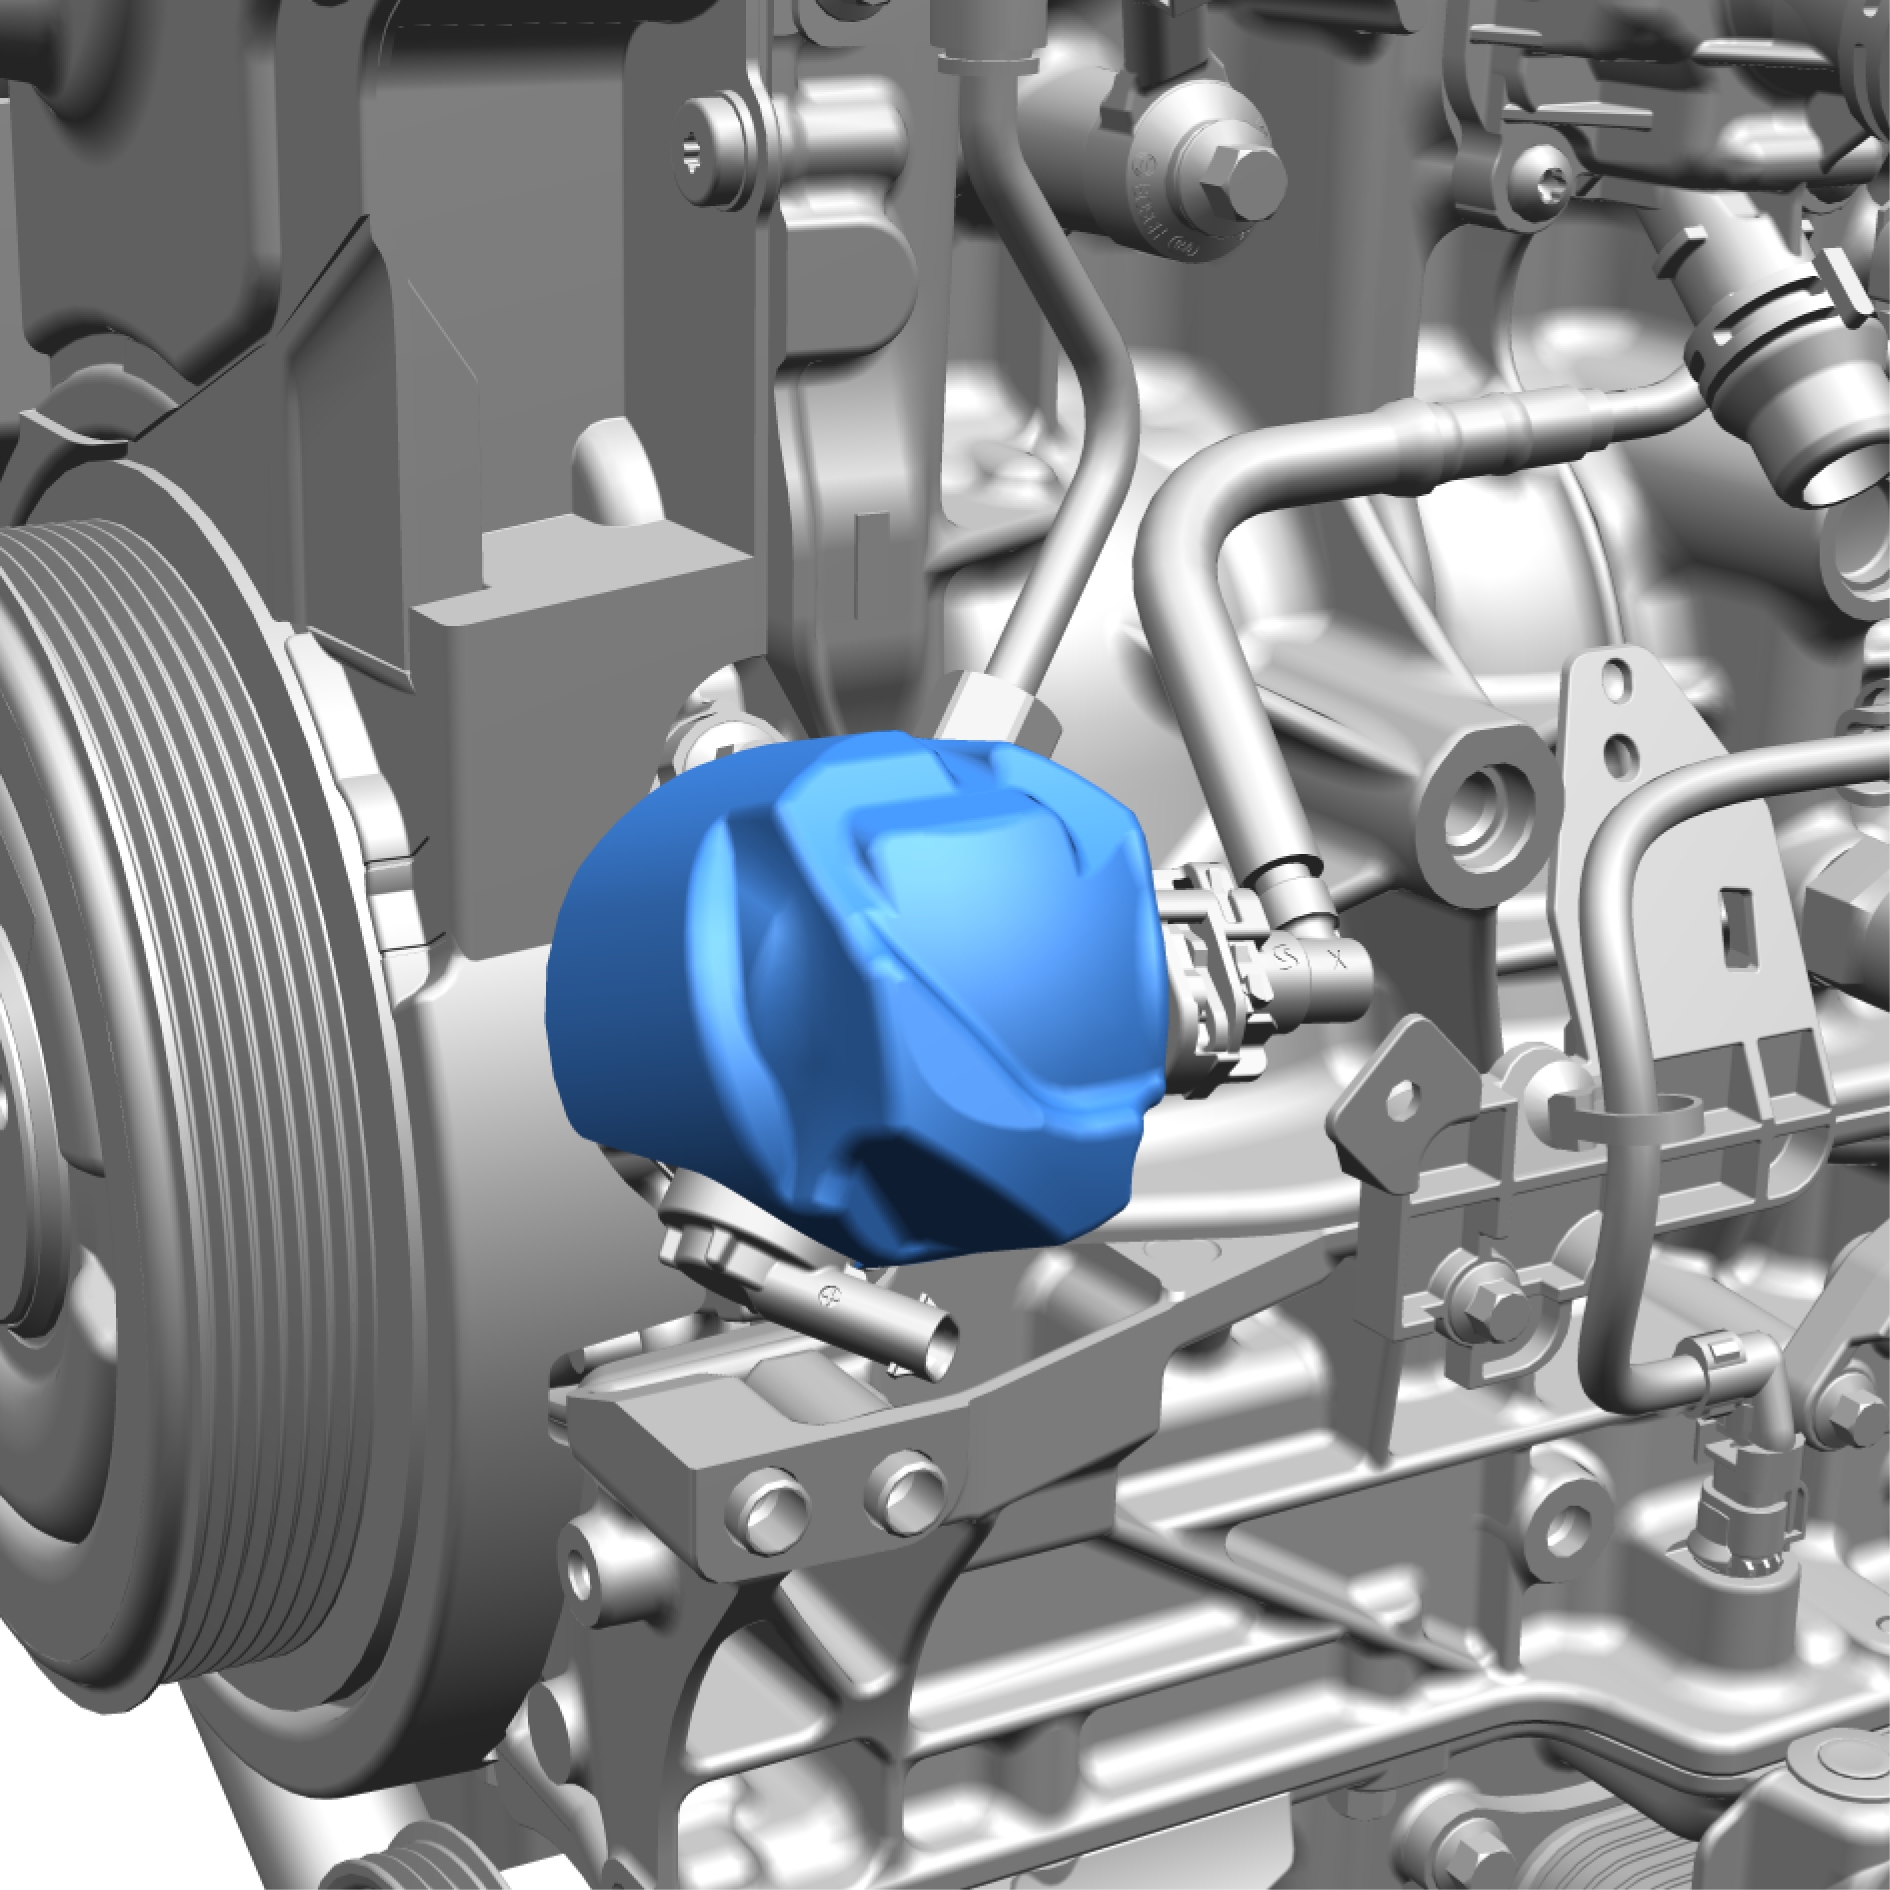
Remove the marked component.
Install special tool: 981 4129
Loosen the nut.
Torque, Step 1: 18 Nm Step 2: 30 Nm
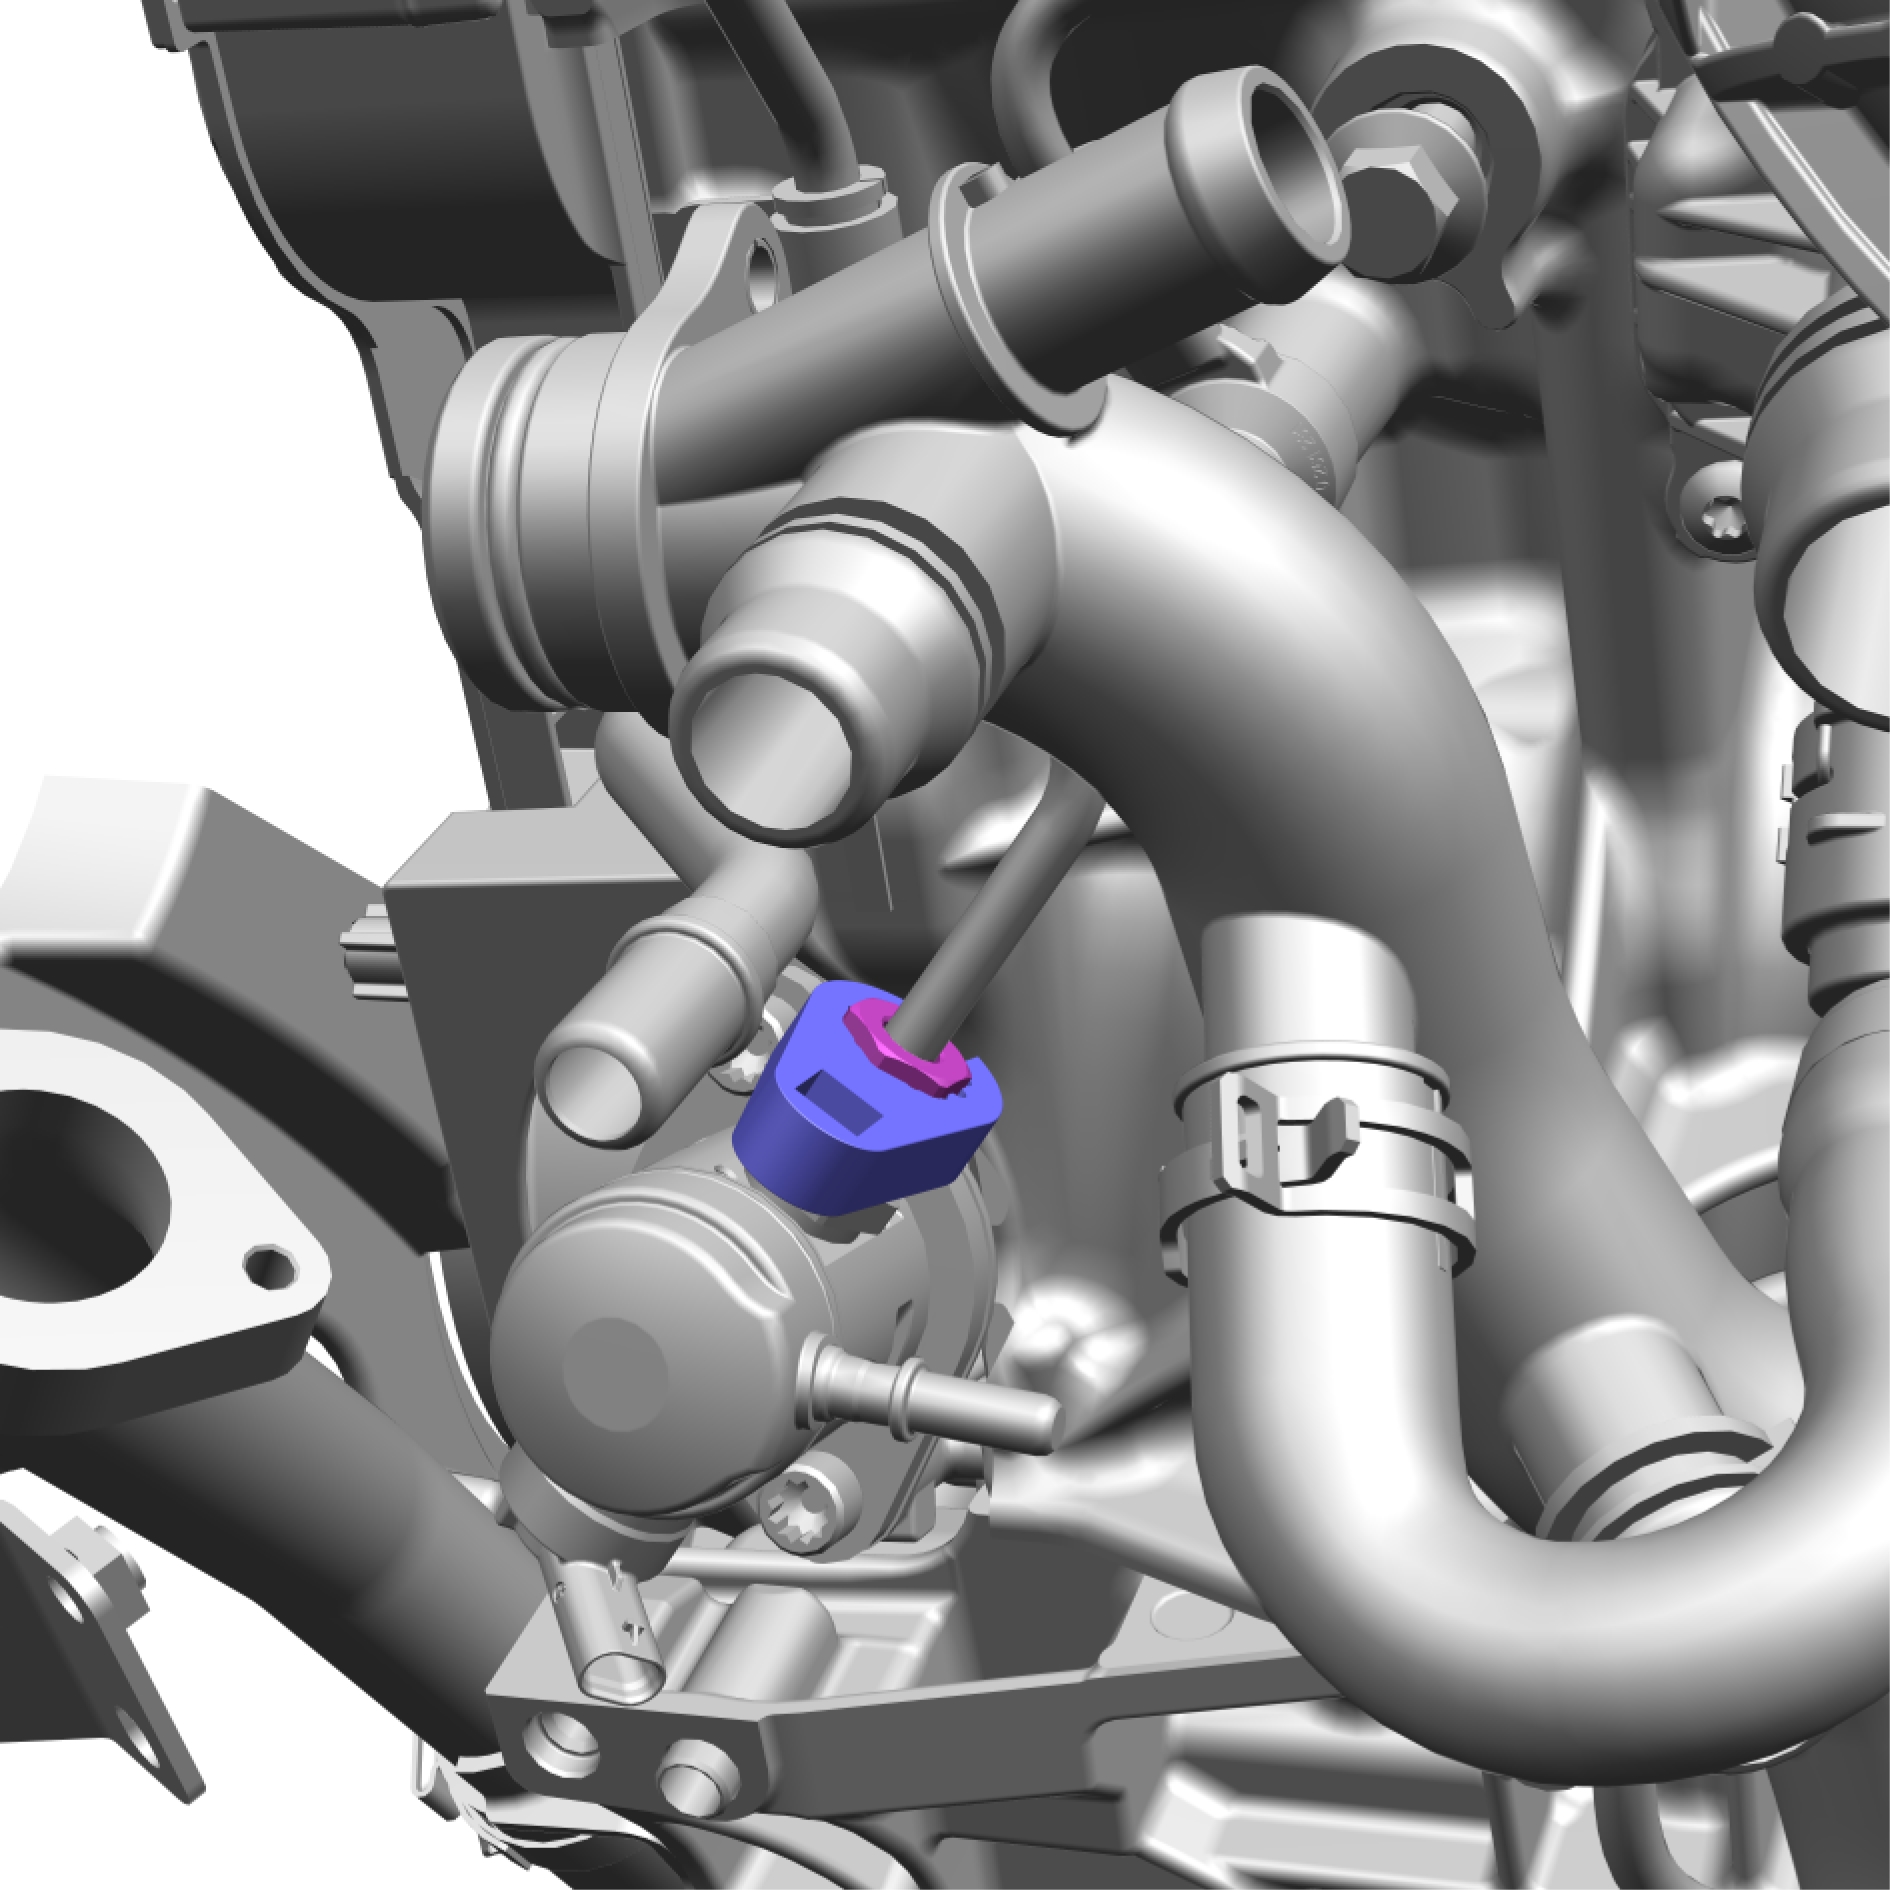
Install special tool: 981 4129
Loosen the nut.
Torque, Step 1: 18 Nm Step 2: 30 Nm
Remove the screws.
Torque: 10 Nm
Remove and discard the marked component.
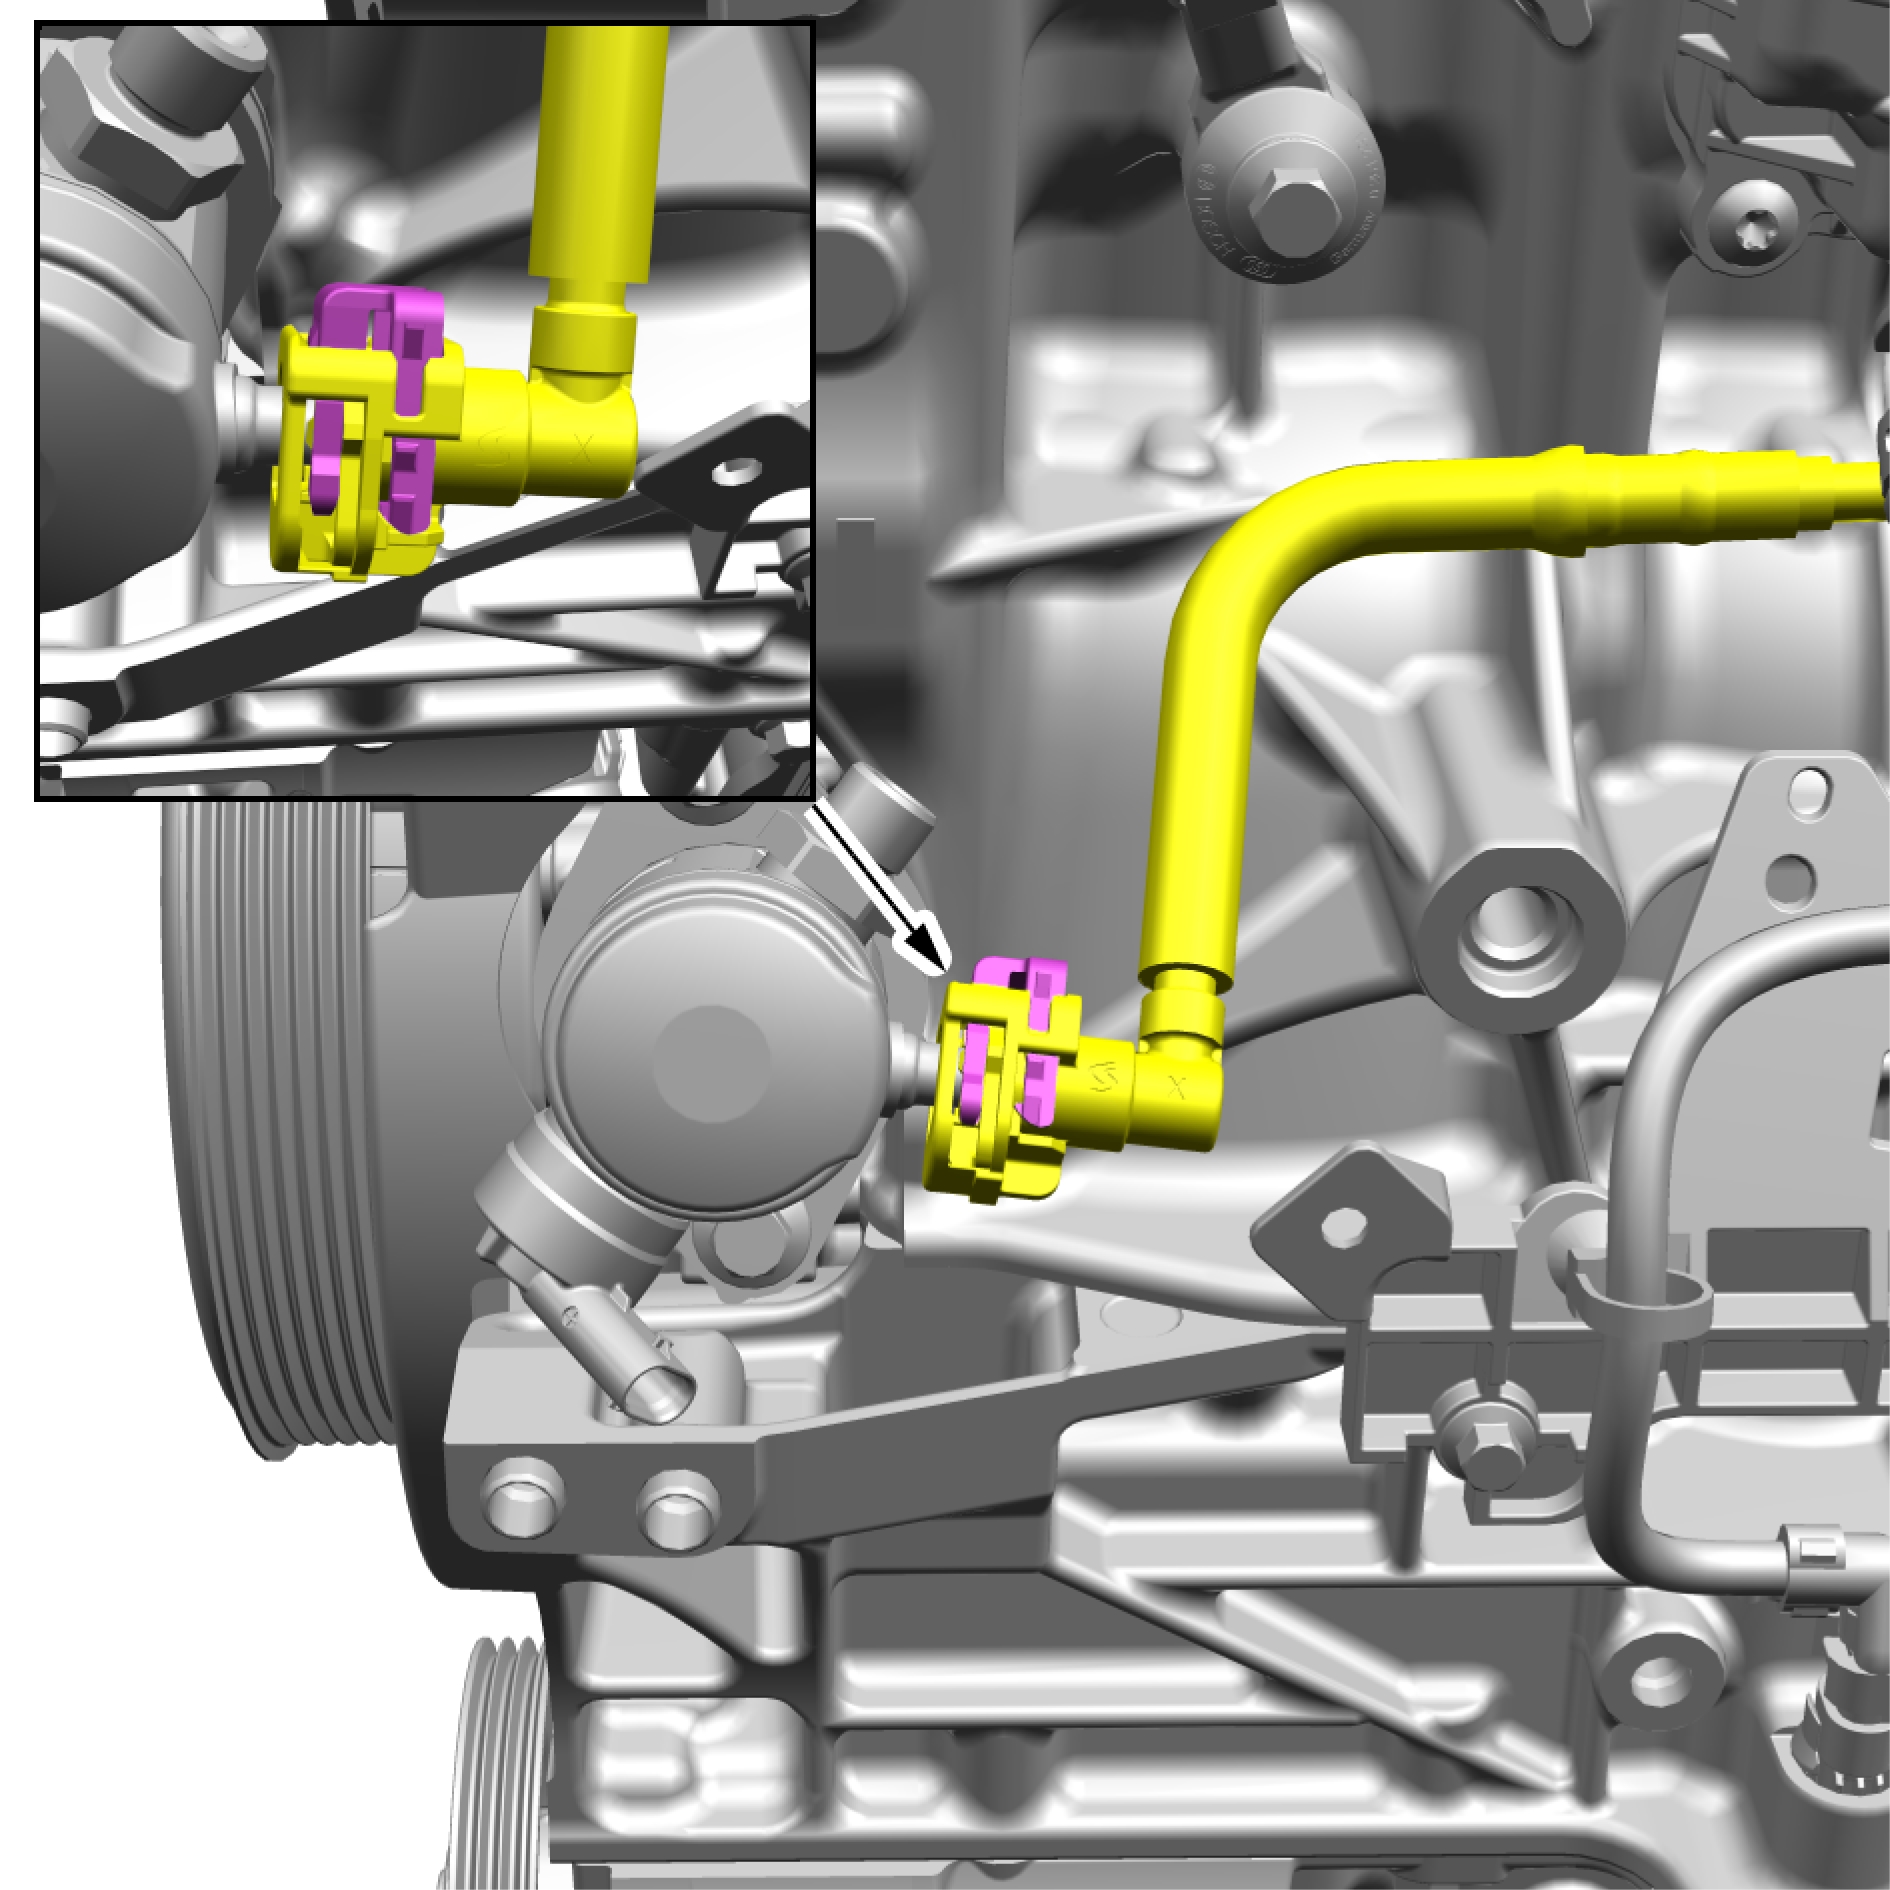
Disconnect the hose.
Turn the engine to correct position. KOLLA UPP OM DETTA BEHÖVS!

When installing, tighten by rotating each screw 1 turn at a time.
Remove the screws.
Torque: 30 Nm
Remove the marked component.
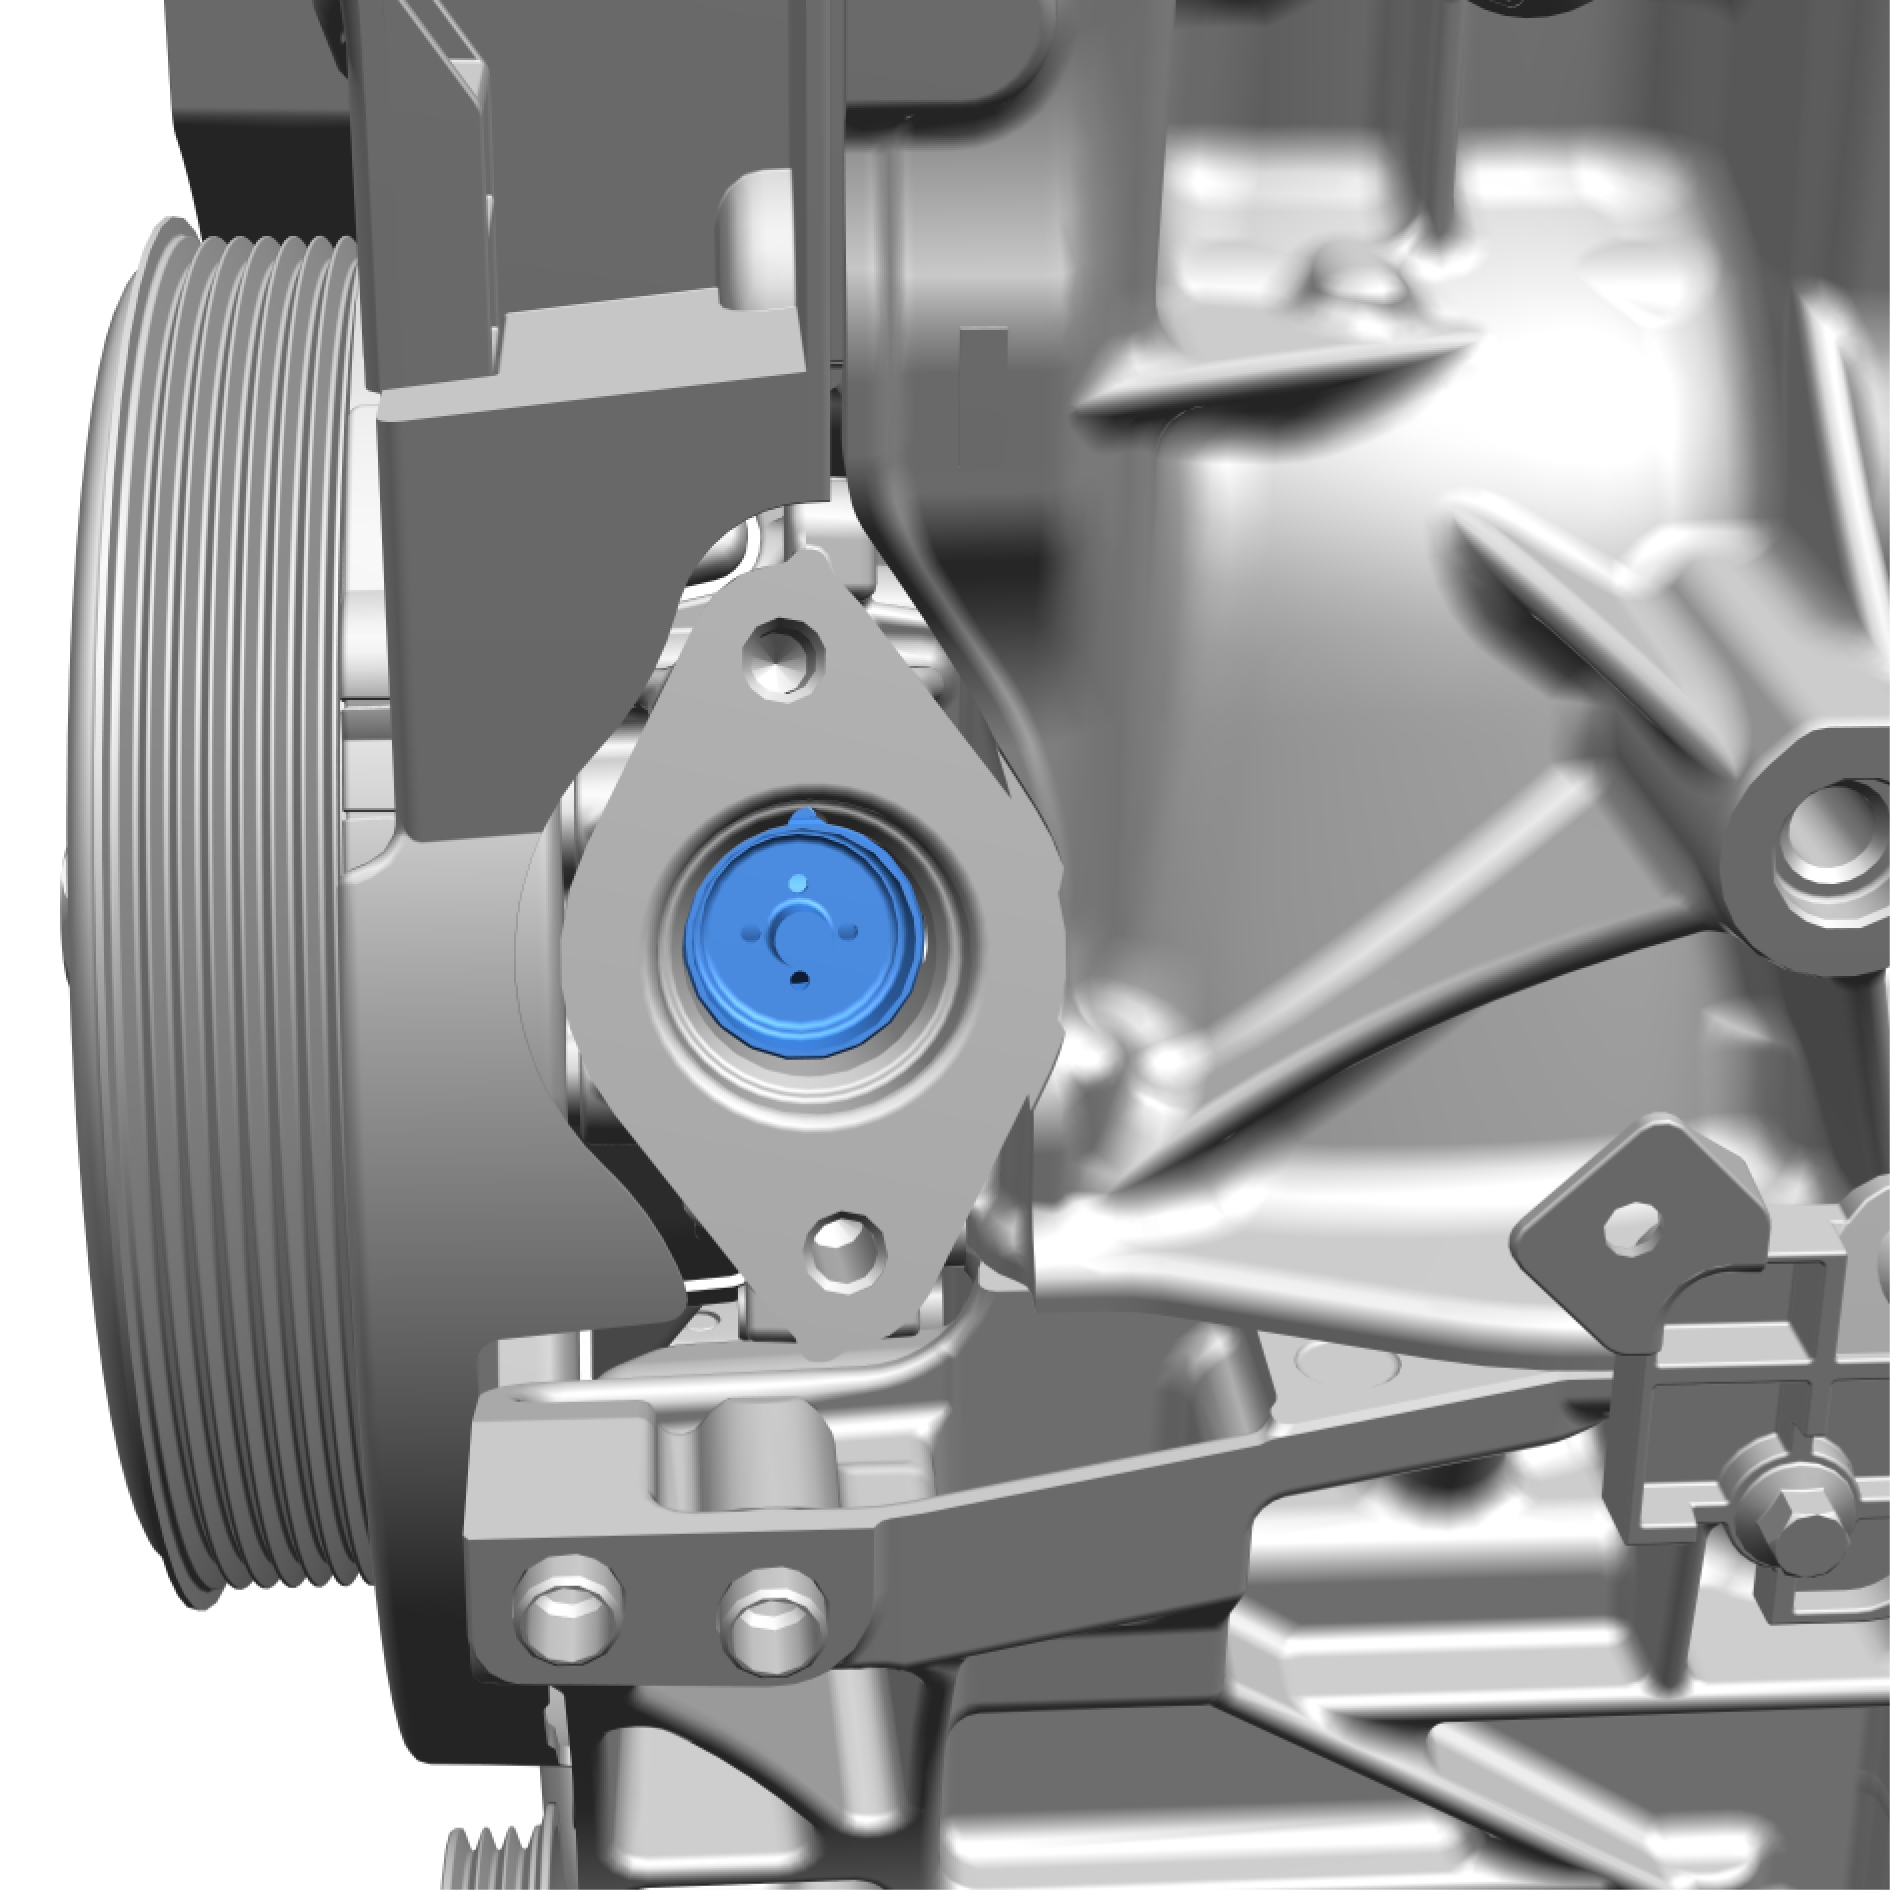
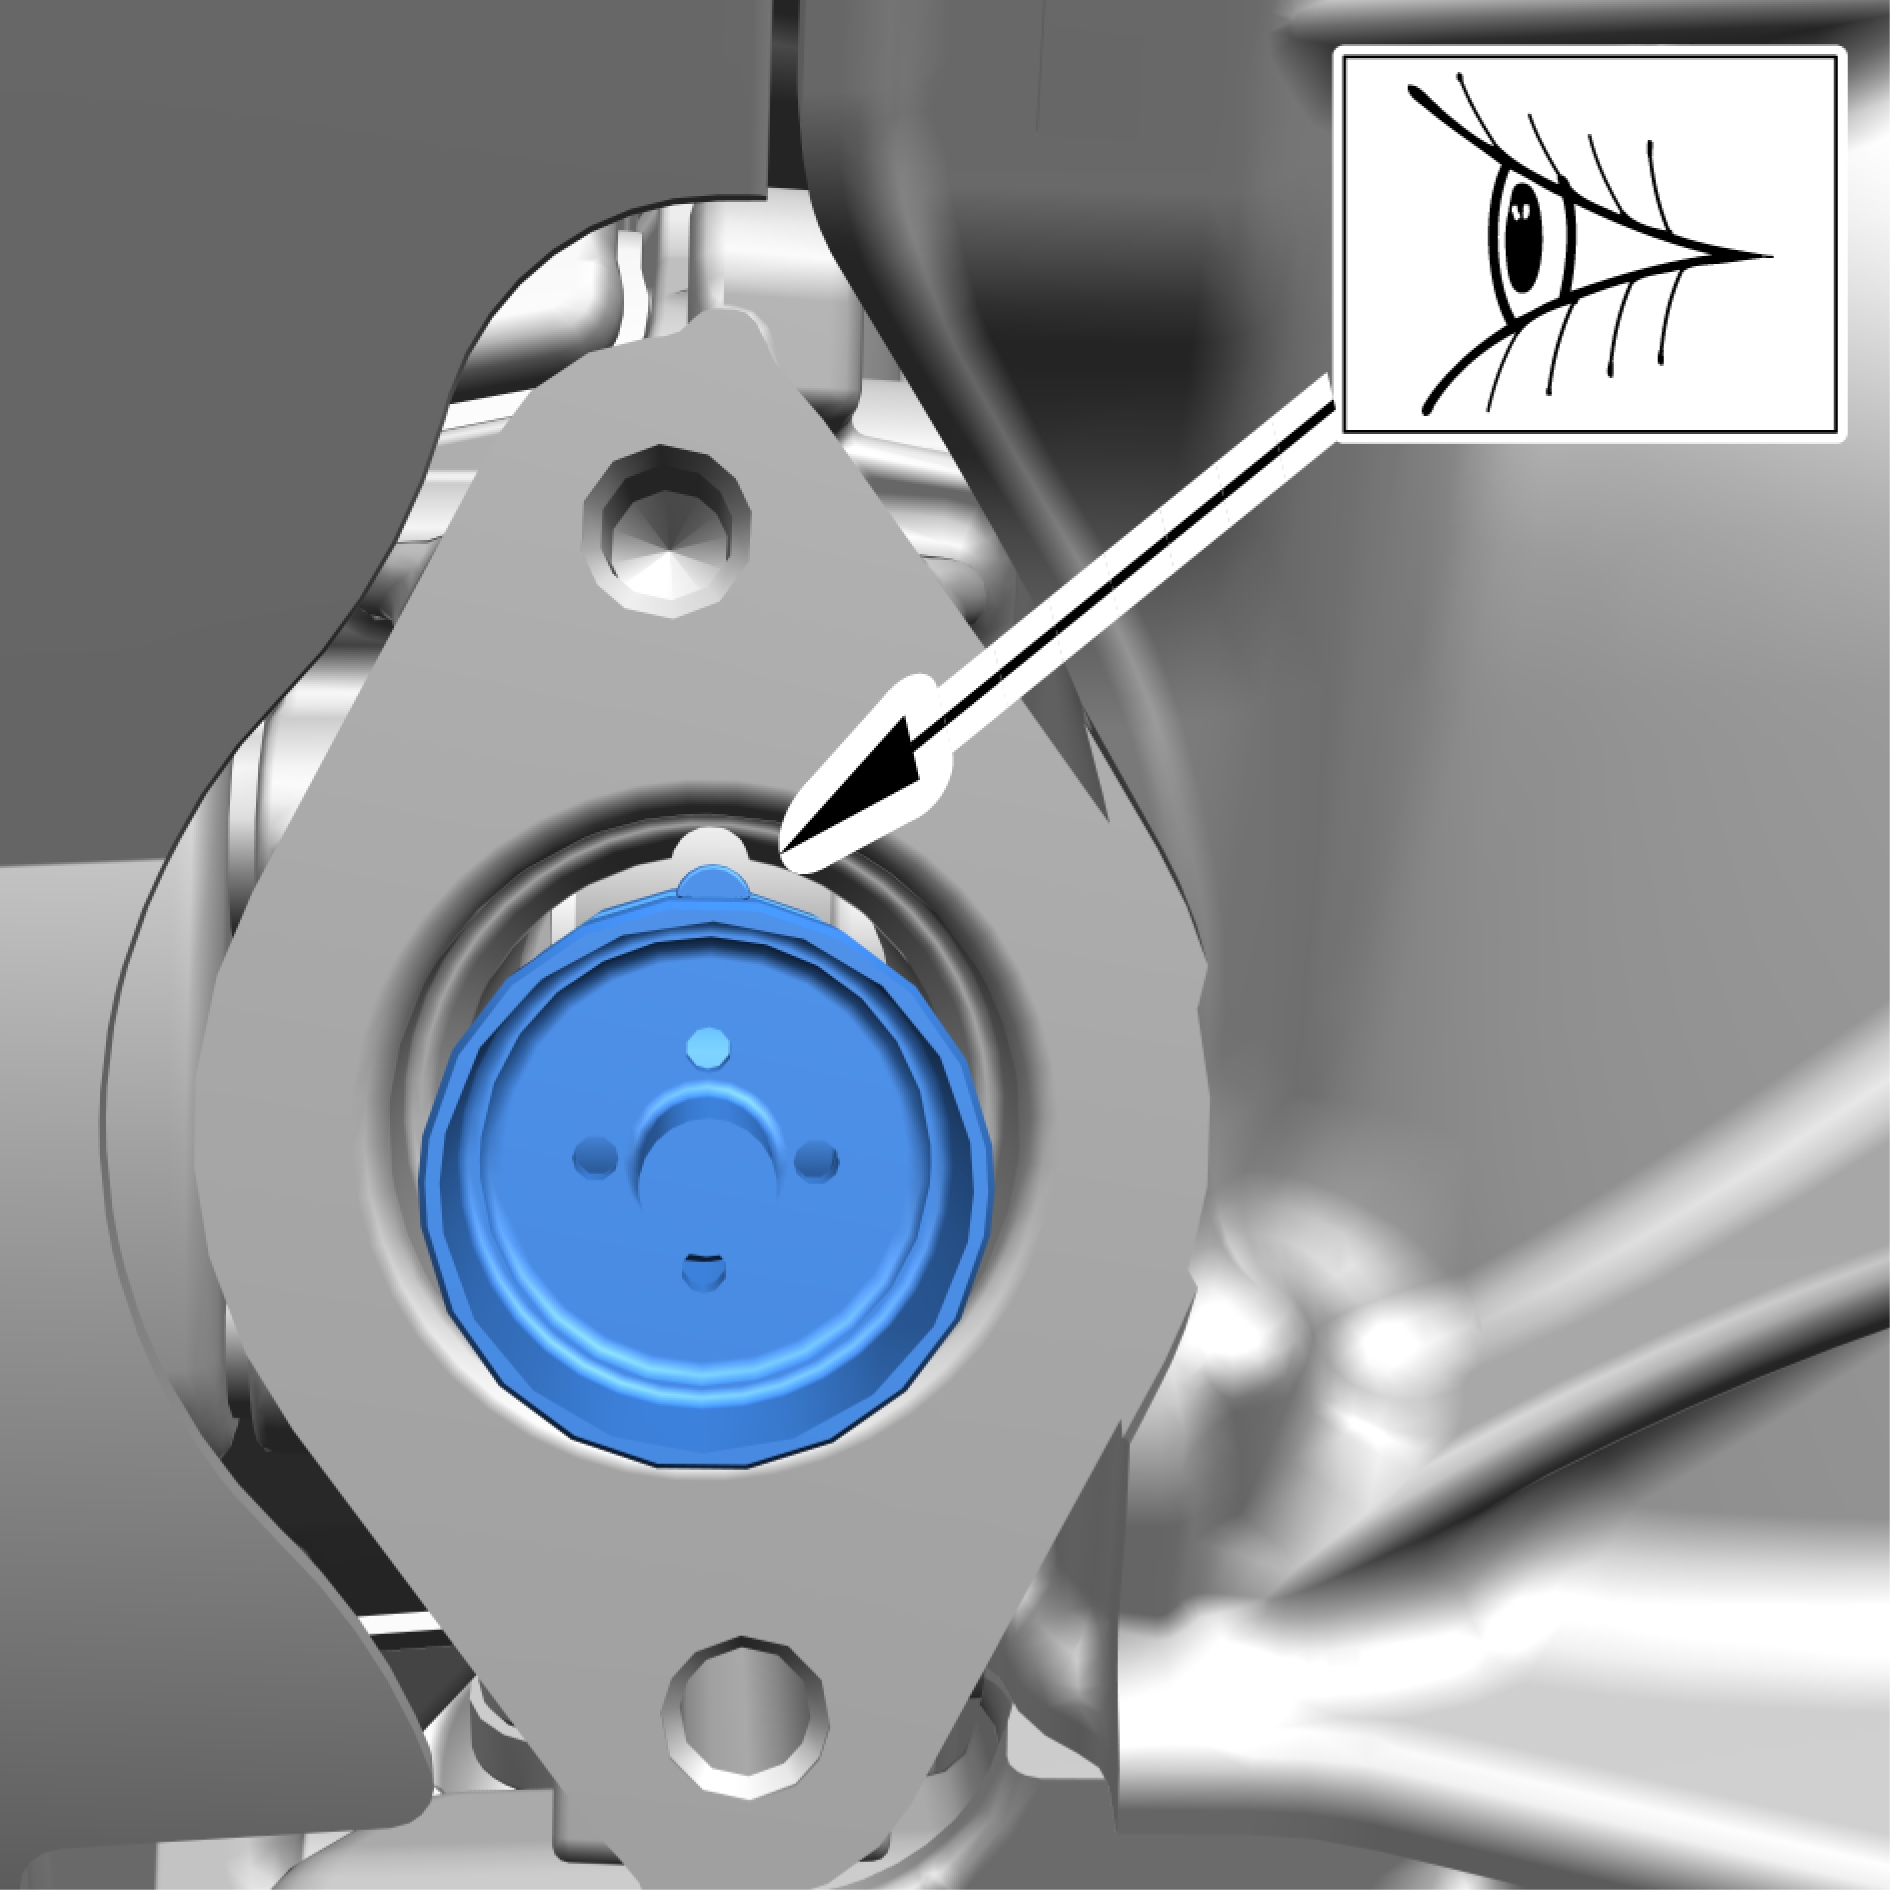
When installing, make sure that the component is positioned correctly.
Remove the marked component.
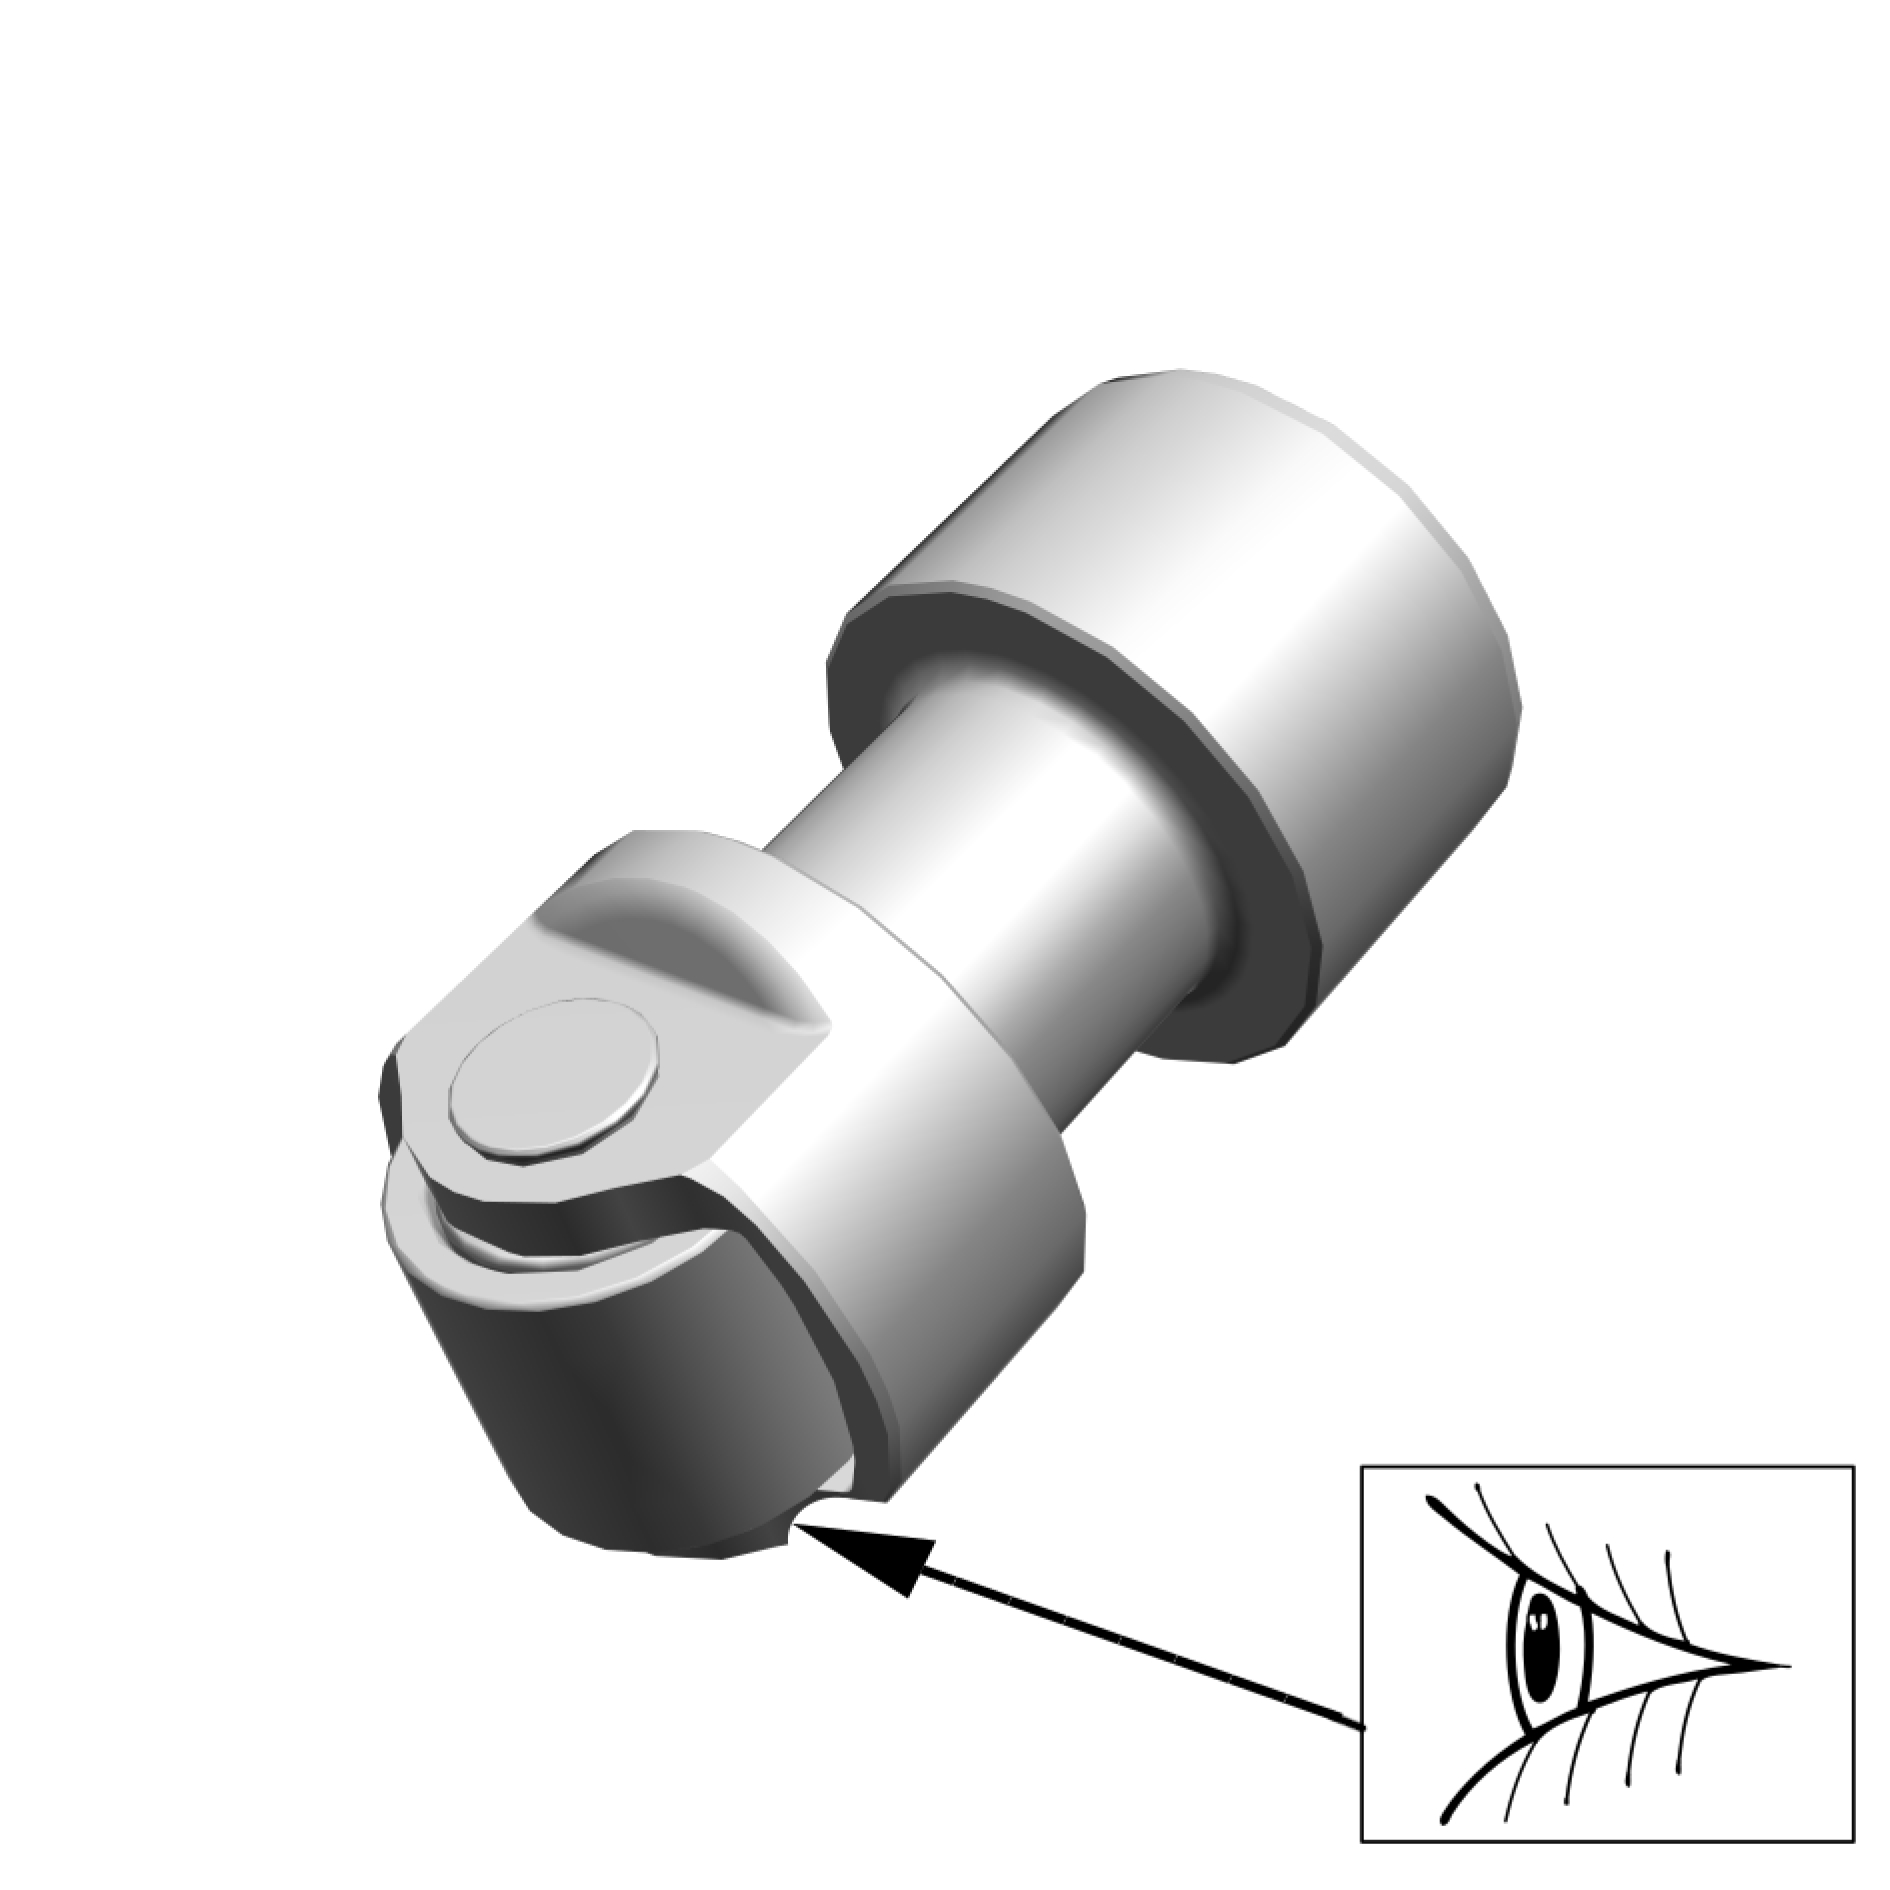
Check the component. If it displays any type of damage, it must be replaced.
Check the surfaces for abrasion.
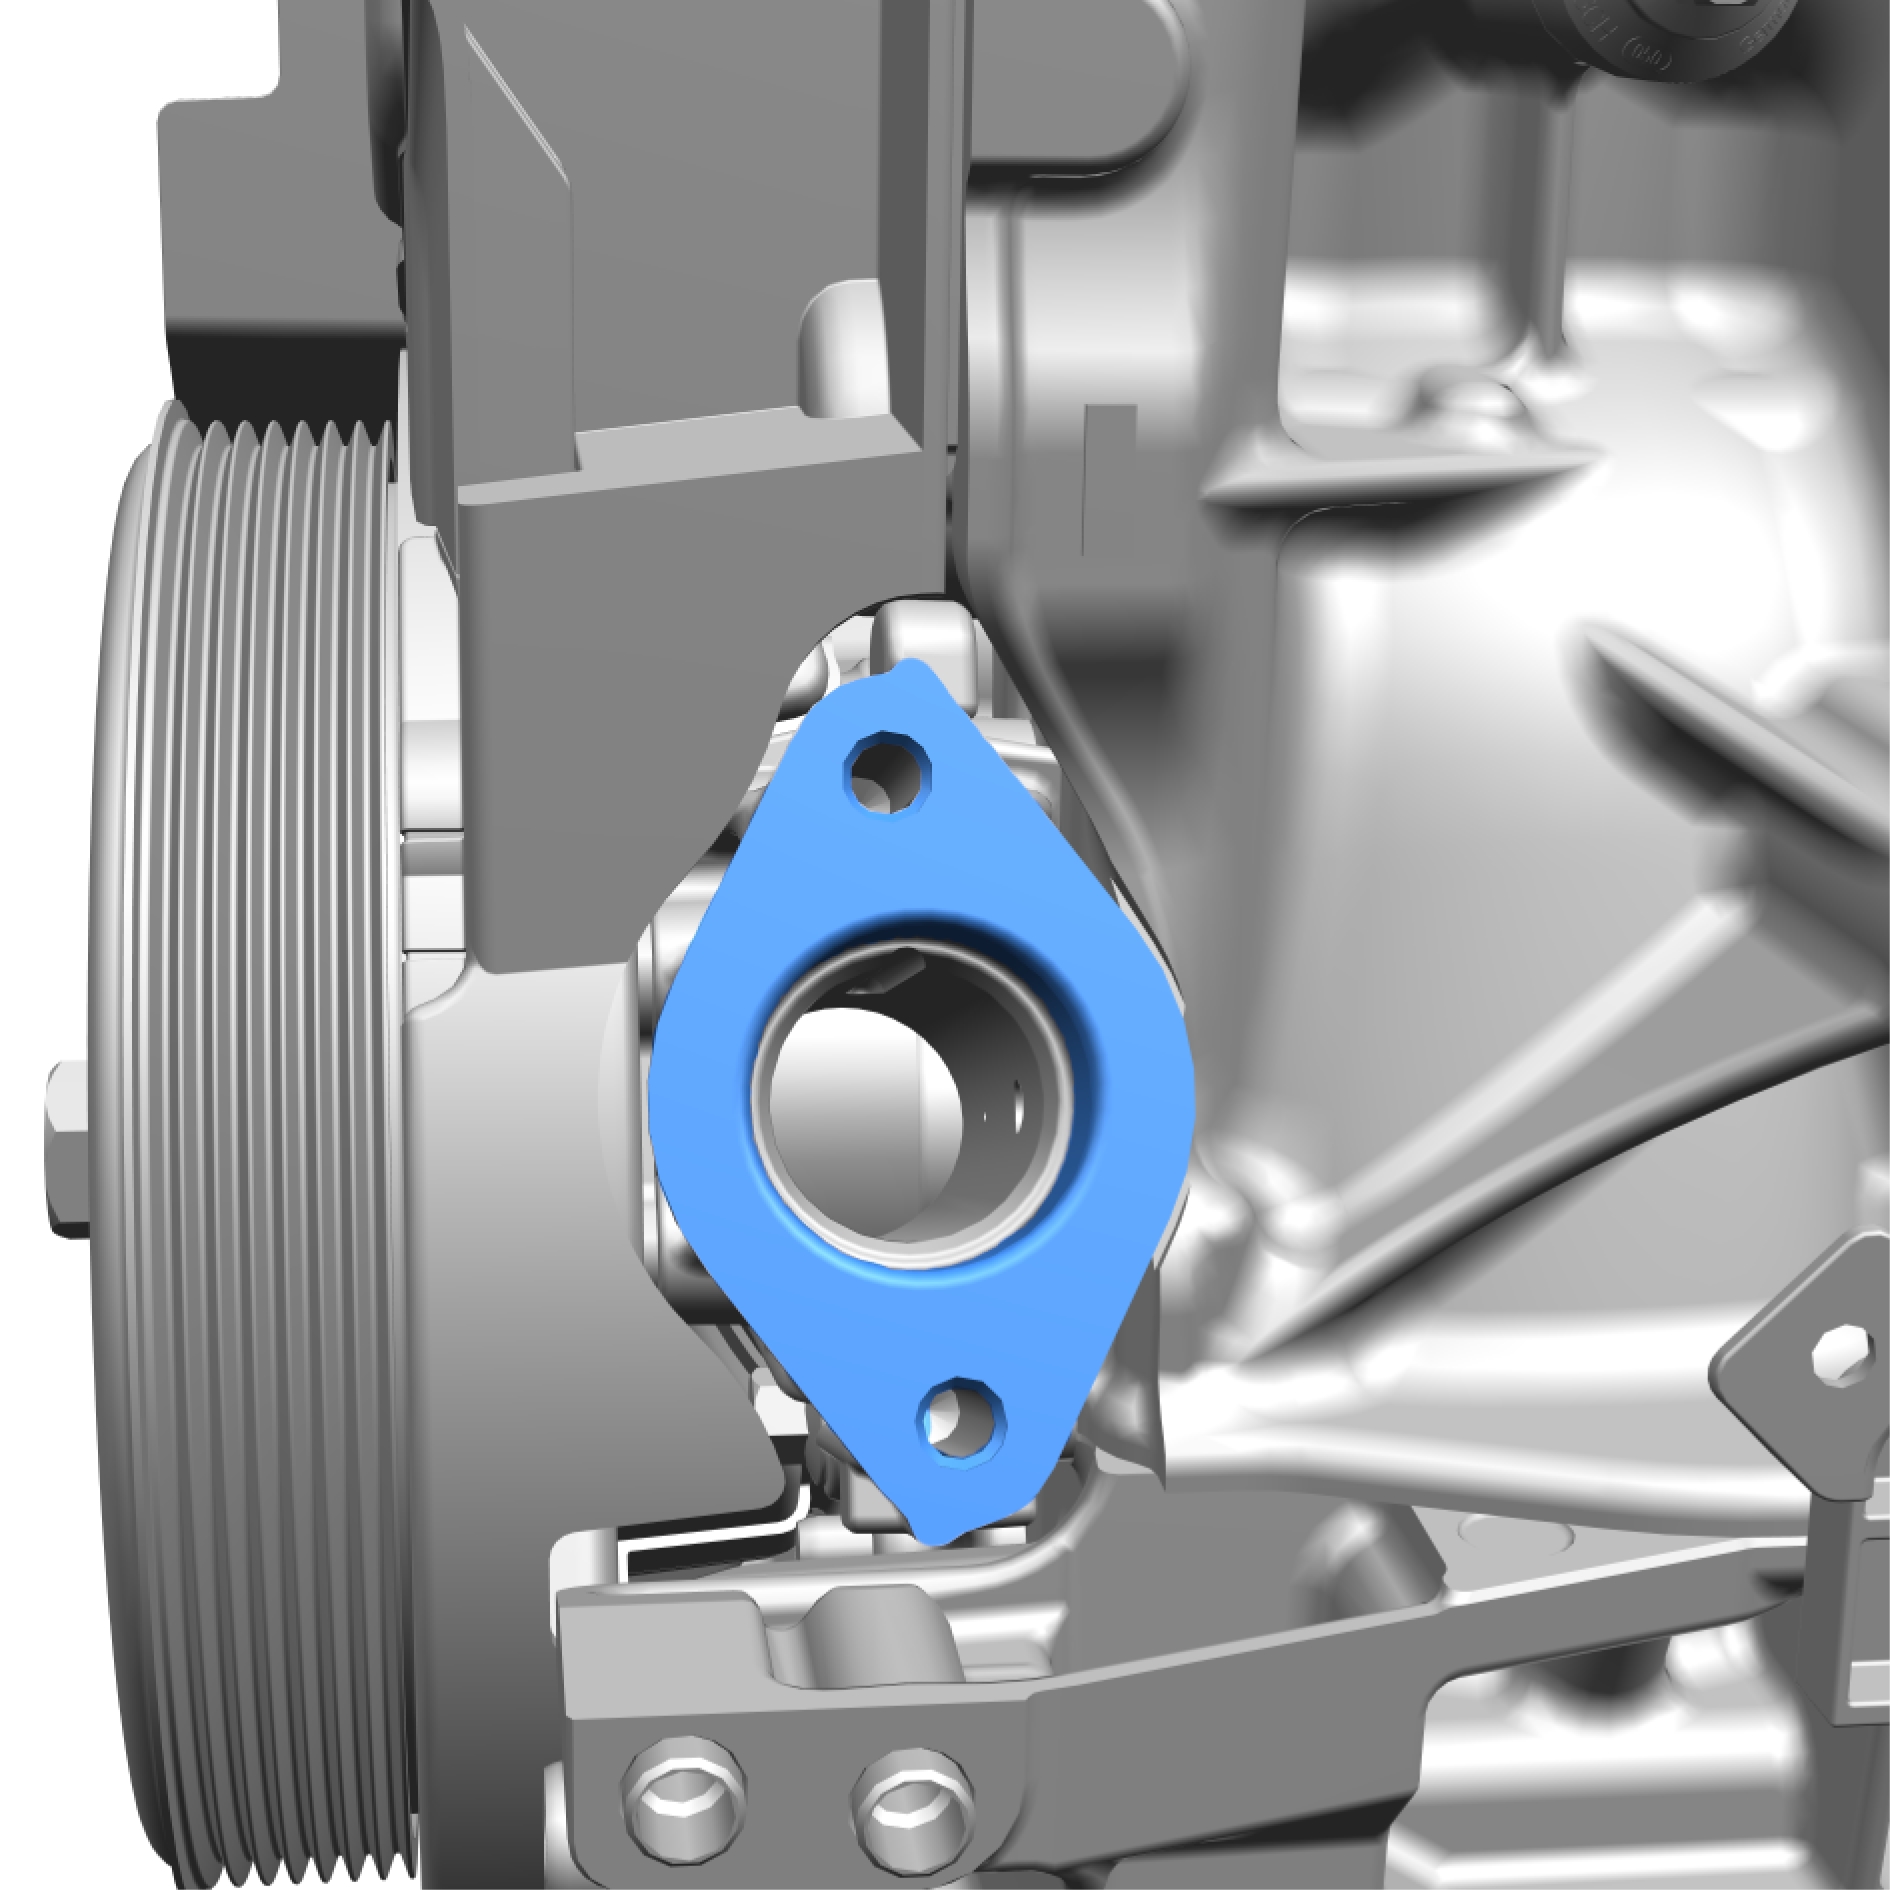
Clean the surface.
Installation
Install in reverse order.
Measure with a vernier caliper. KOLLA UPP OM DETTA BEHÖVS!
Fuel pump, replace
Removal
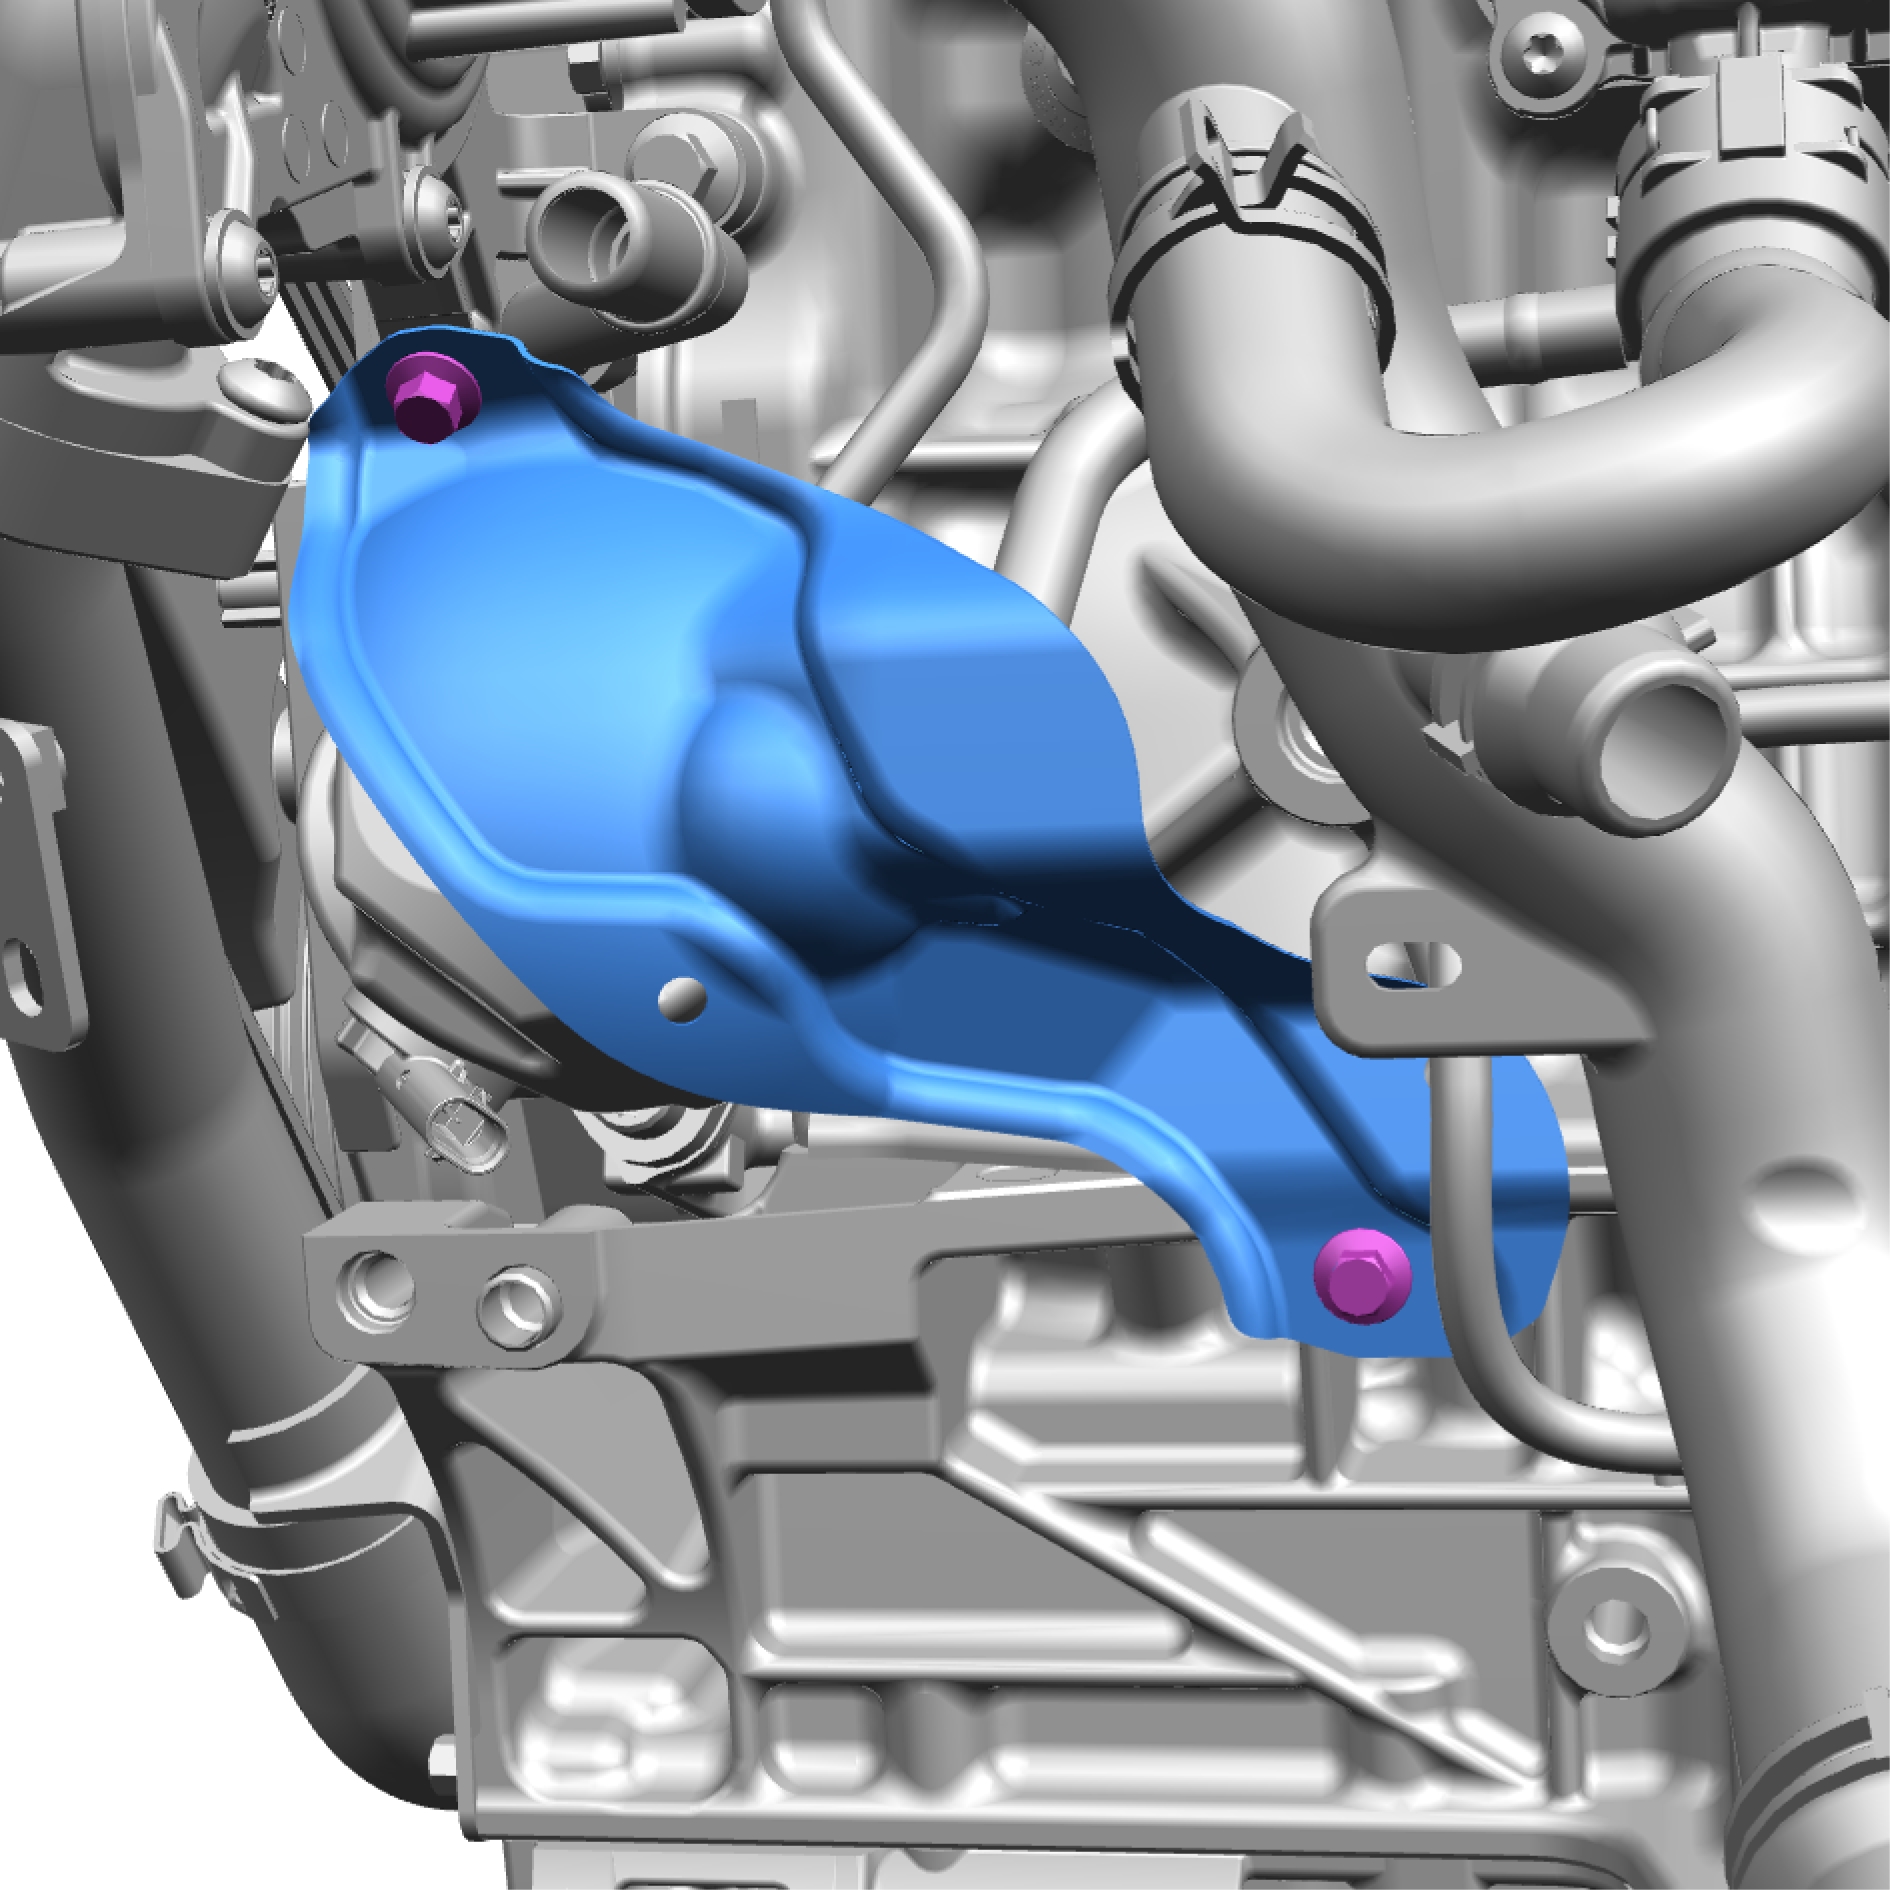
Remove the screws.
Torque: 10 Nm
Remove the marked component.
Remove the screw.
Torque: 10 Nm
Remove the screw.
Torque: 24 Nm
Release the clip.
Move marked component aside.
Remove the screws.
Torque: 24 Nm
Remove the screw.
Torque: 50 Nm
Remove the screws.
Torque: 24 Nm
Remove the marked component.
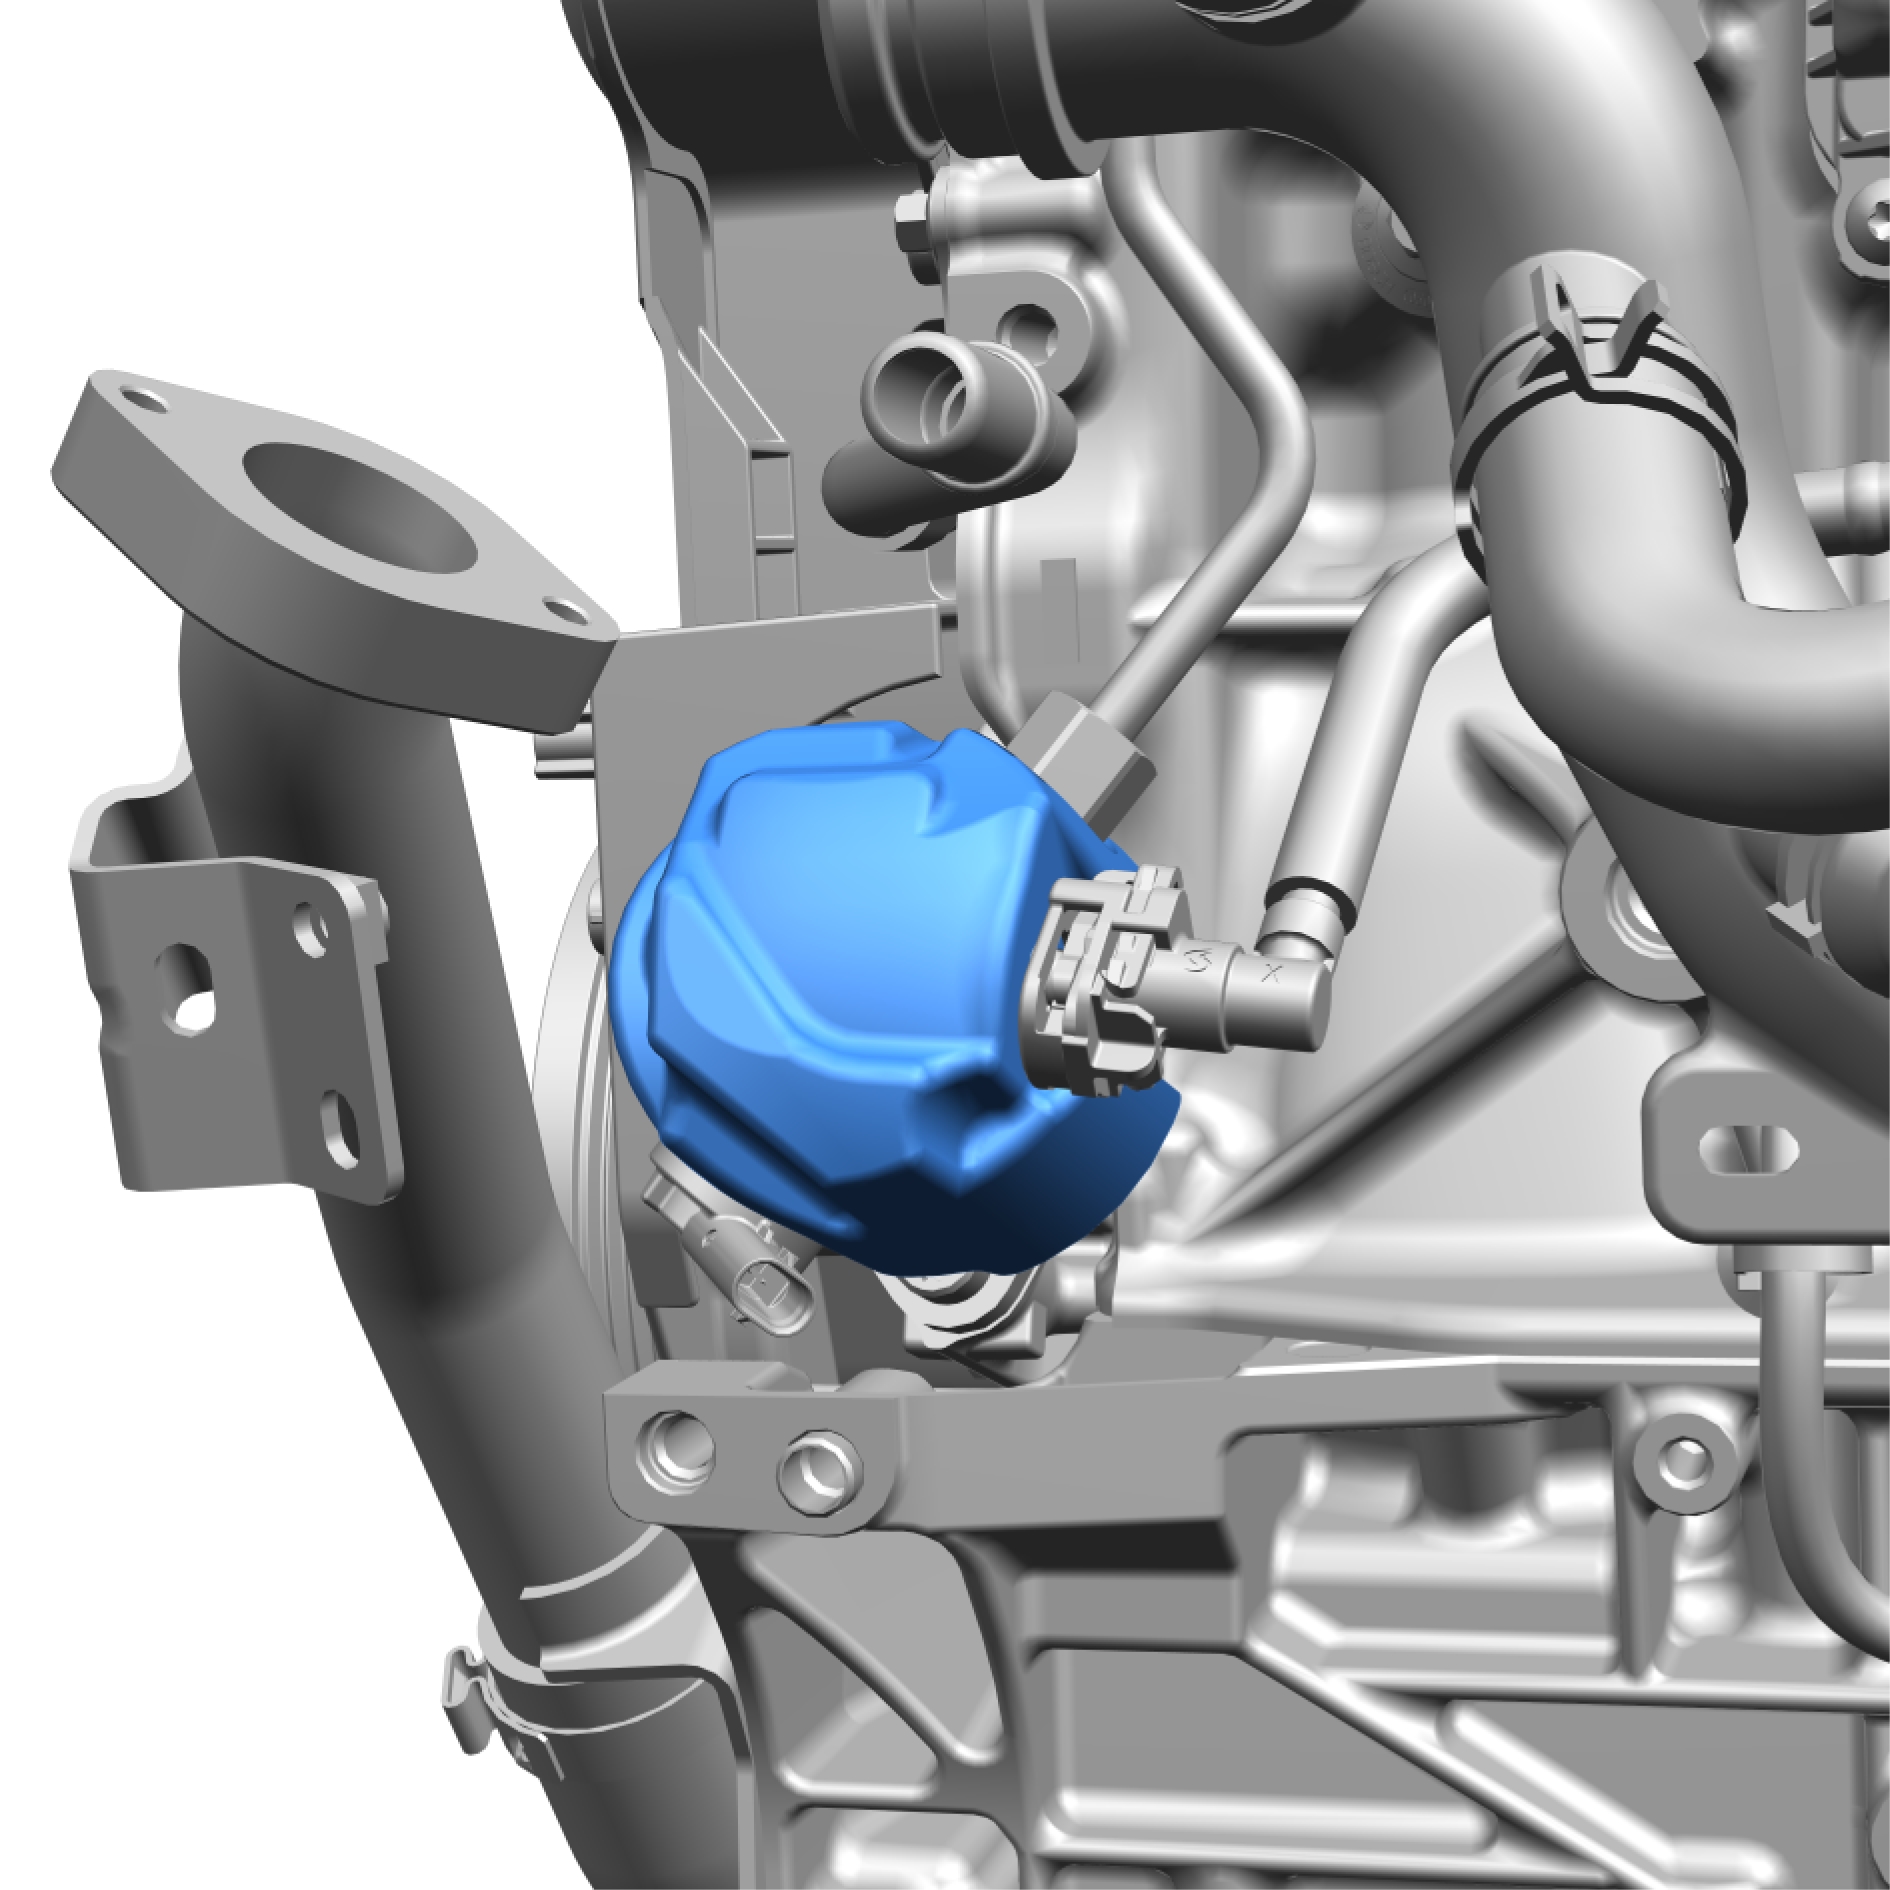
Remove the marked component.
Turn the engine to correct position.
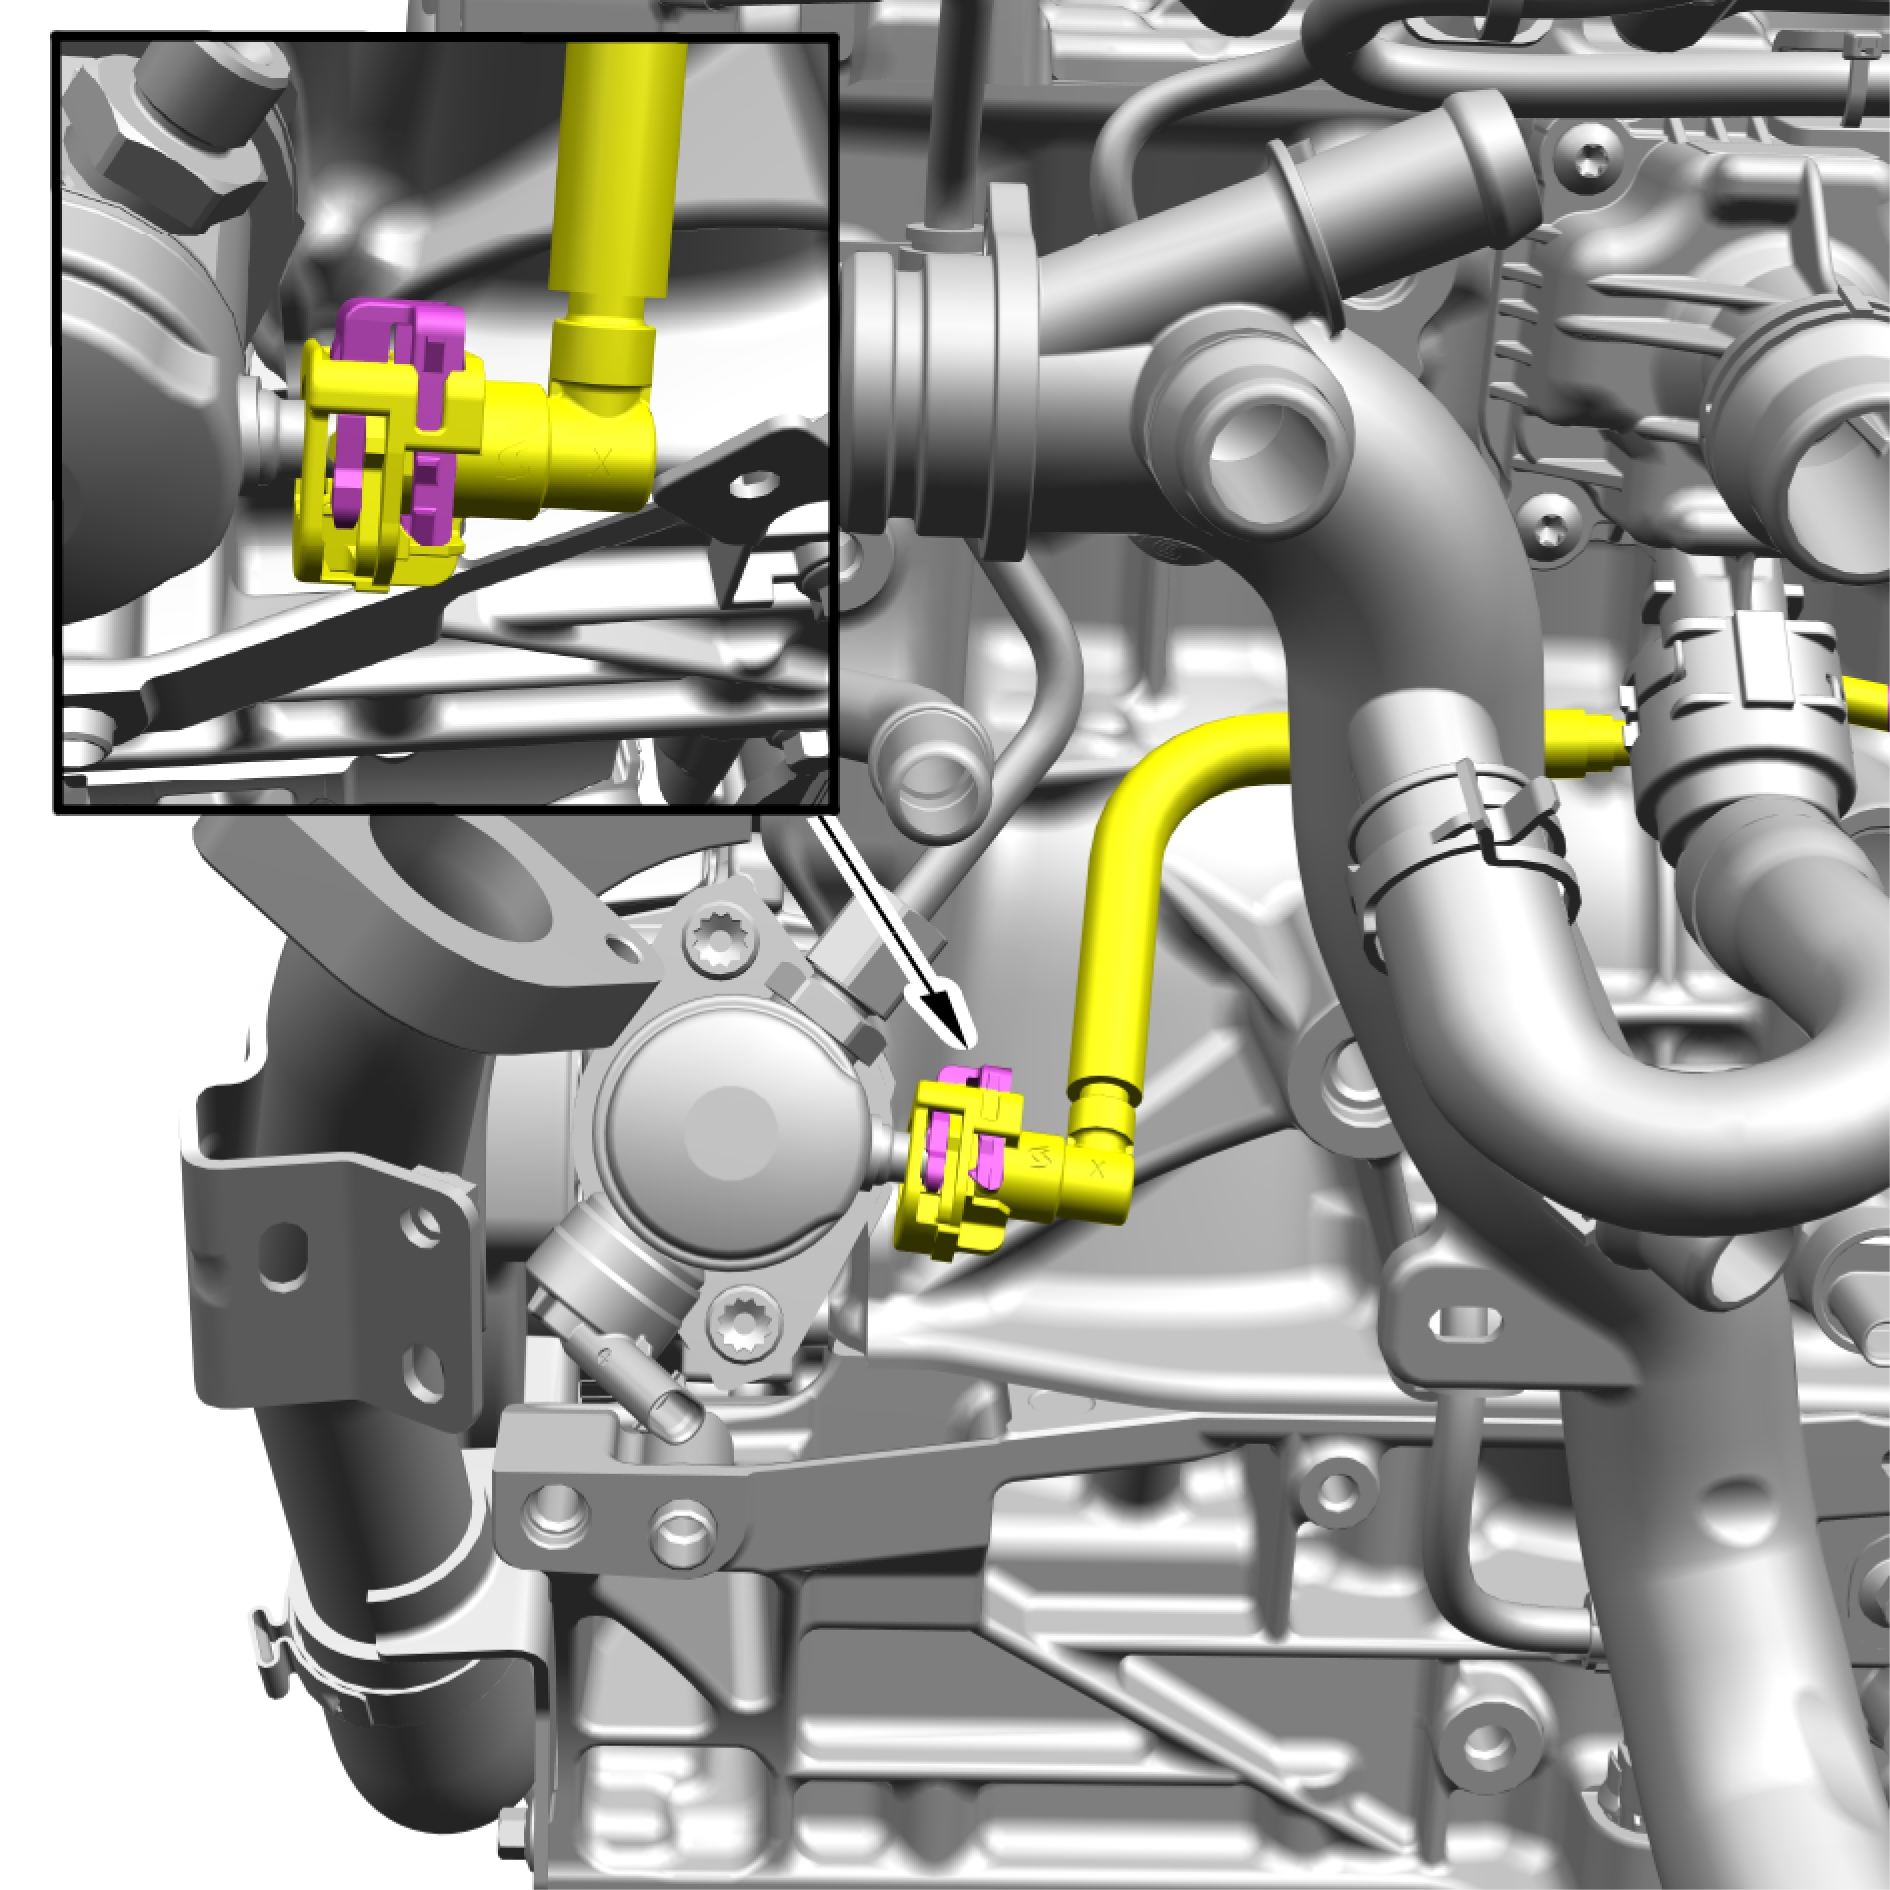
Disconnect the hose.
Install special tool: 981 4129
Loosen the nut.
Torque, Step 1: 18 Nm Step 2: 30 Nm

Install special tool: 981 4129
Loosen the nut.
Torque, Step 1: 18 Nm Step 2: 30 Nm
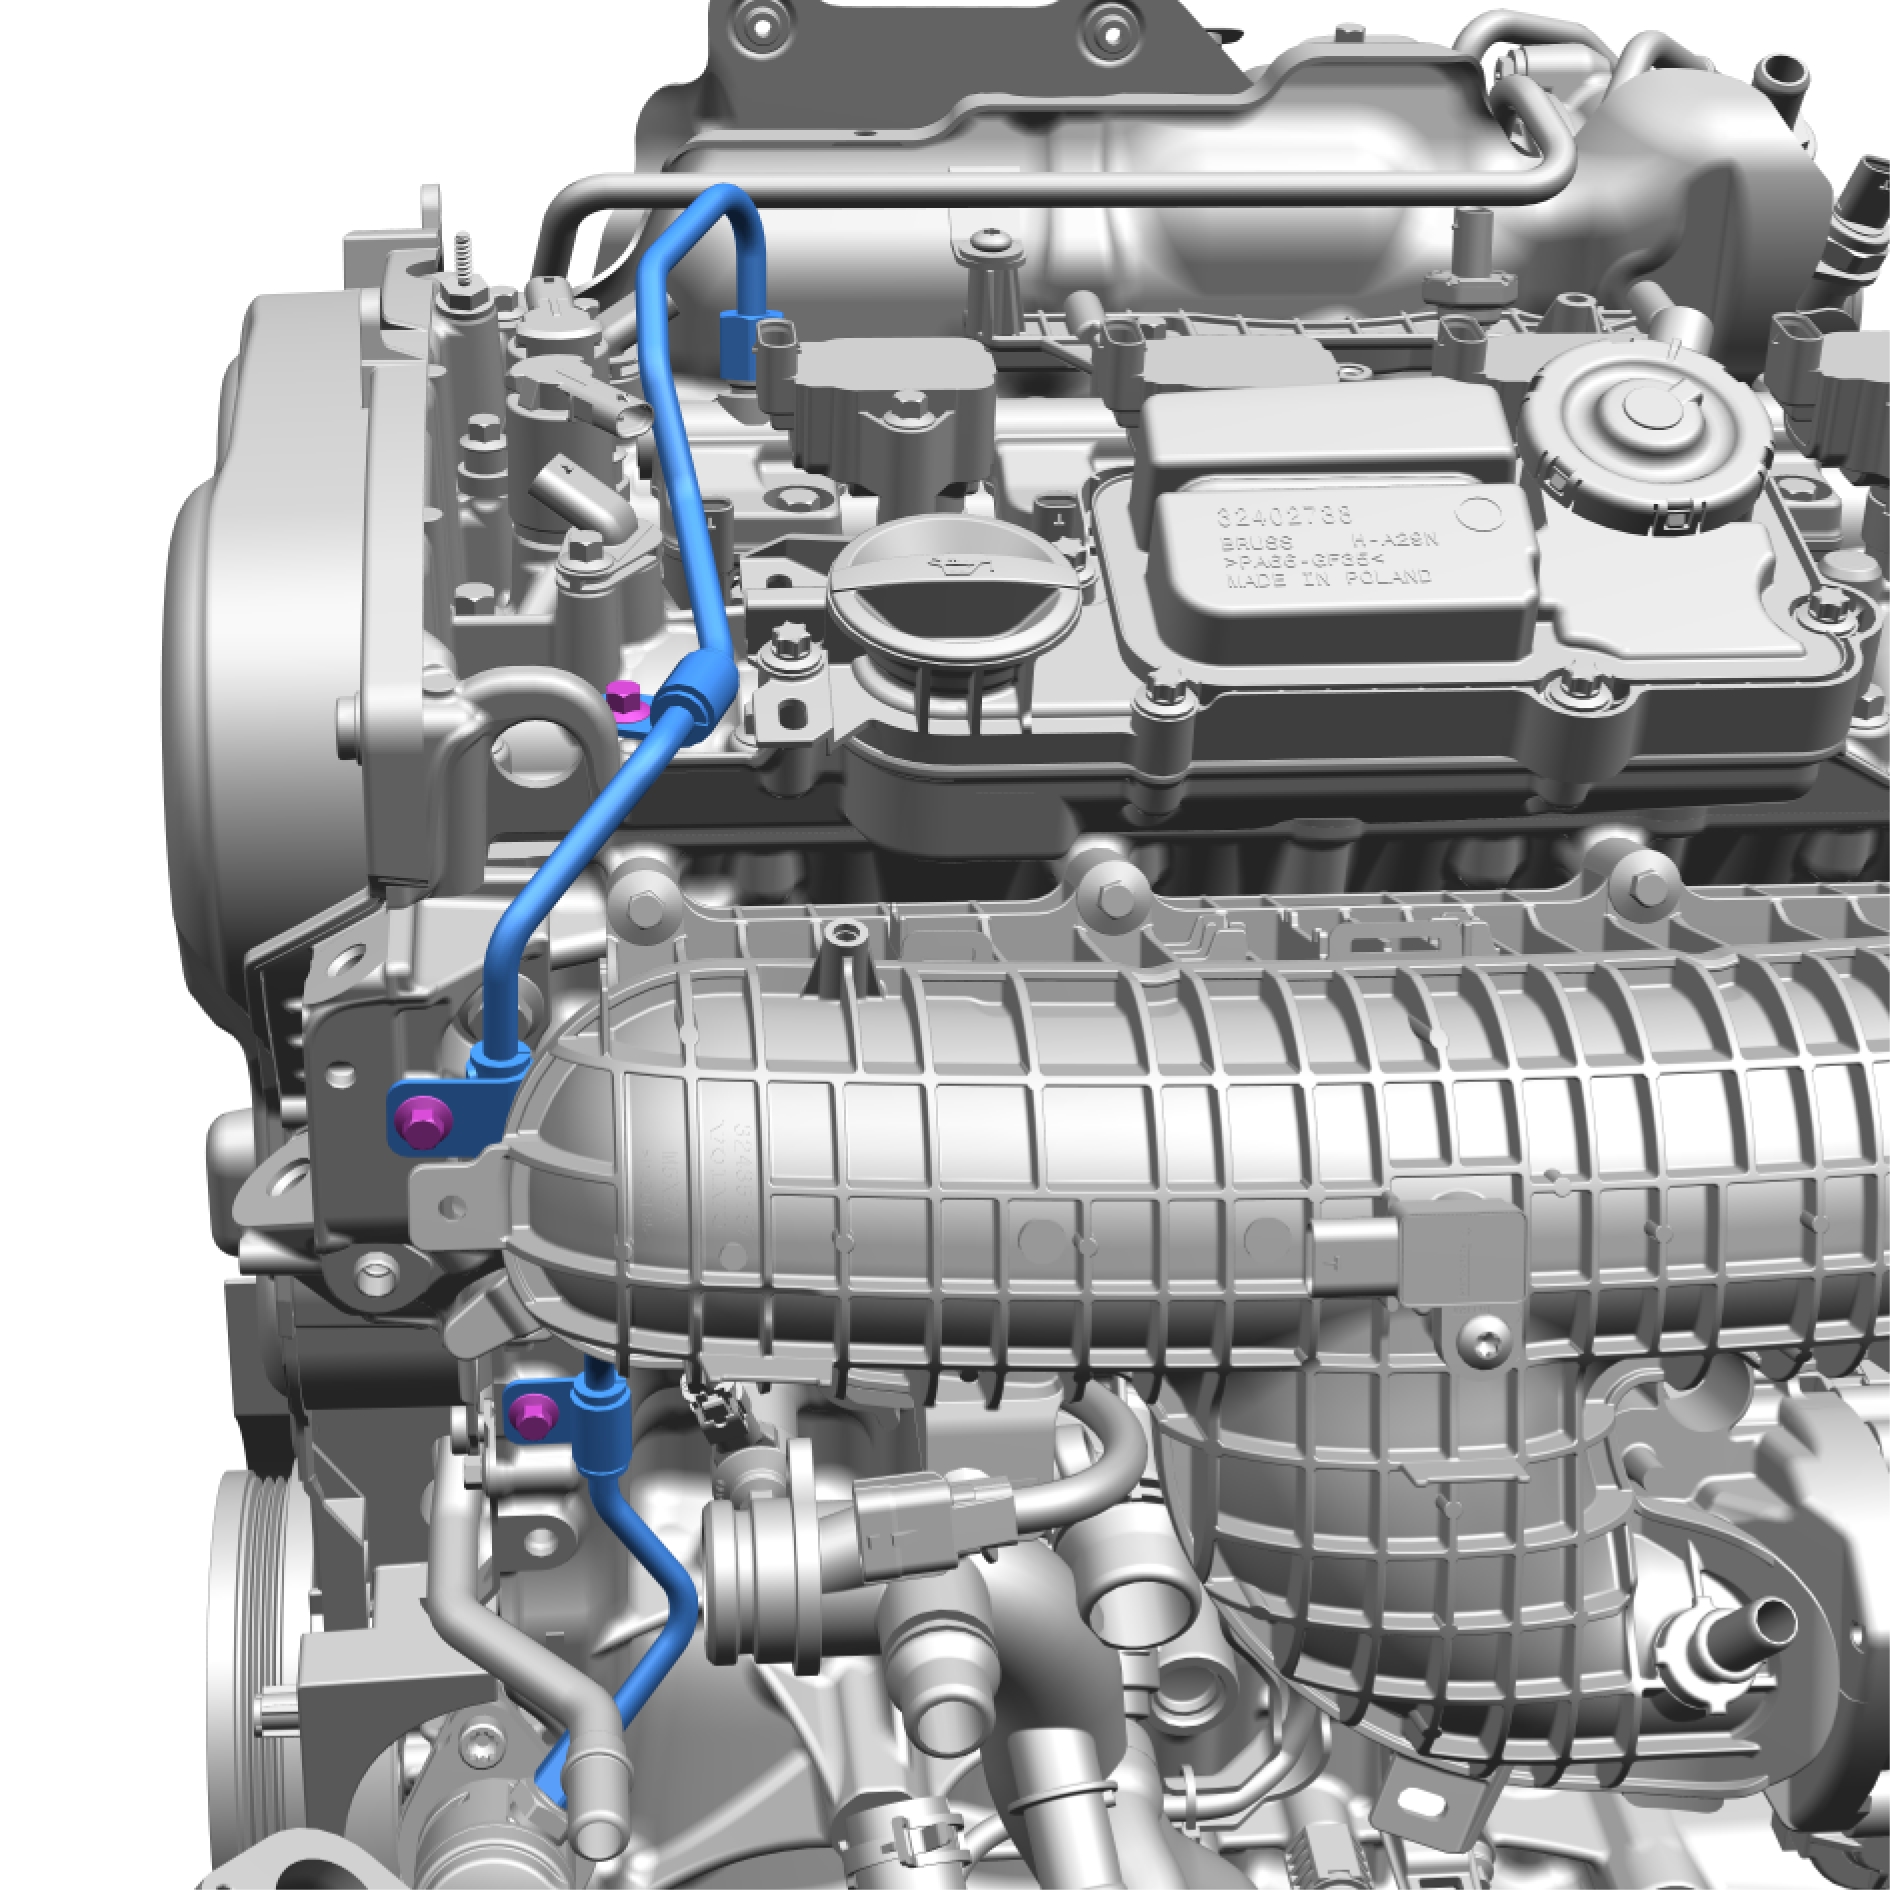
Remove the screws.
Torque: 10 Nm
Remove and discard the marked component.
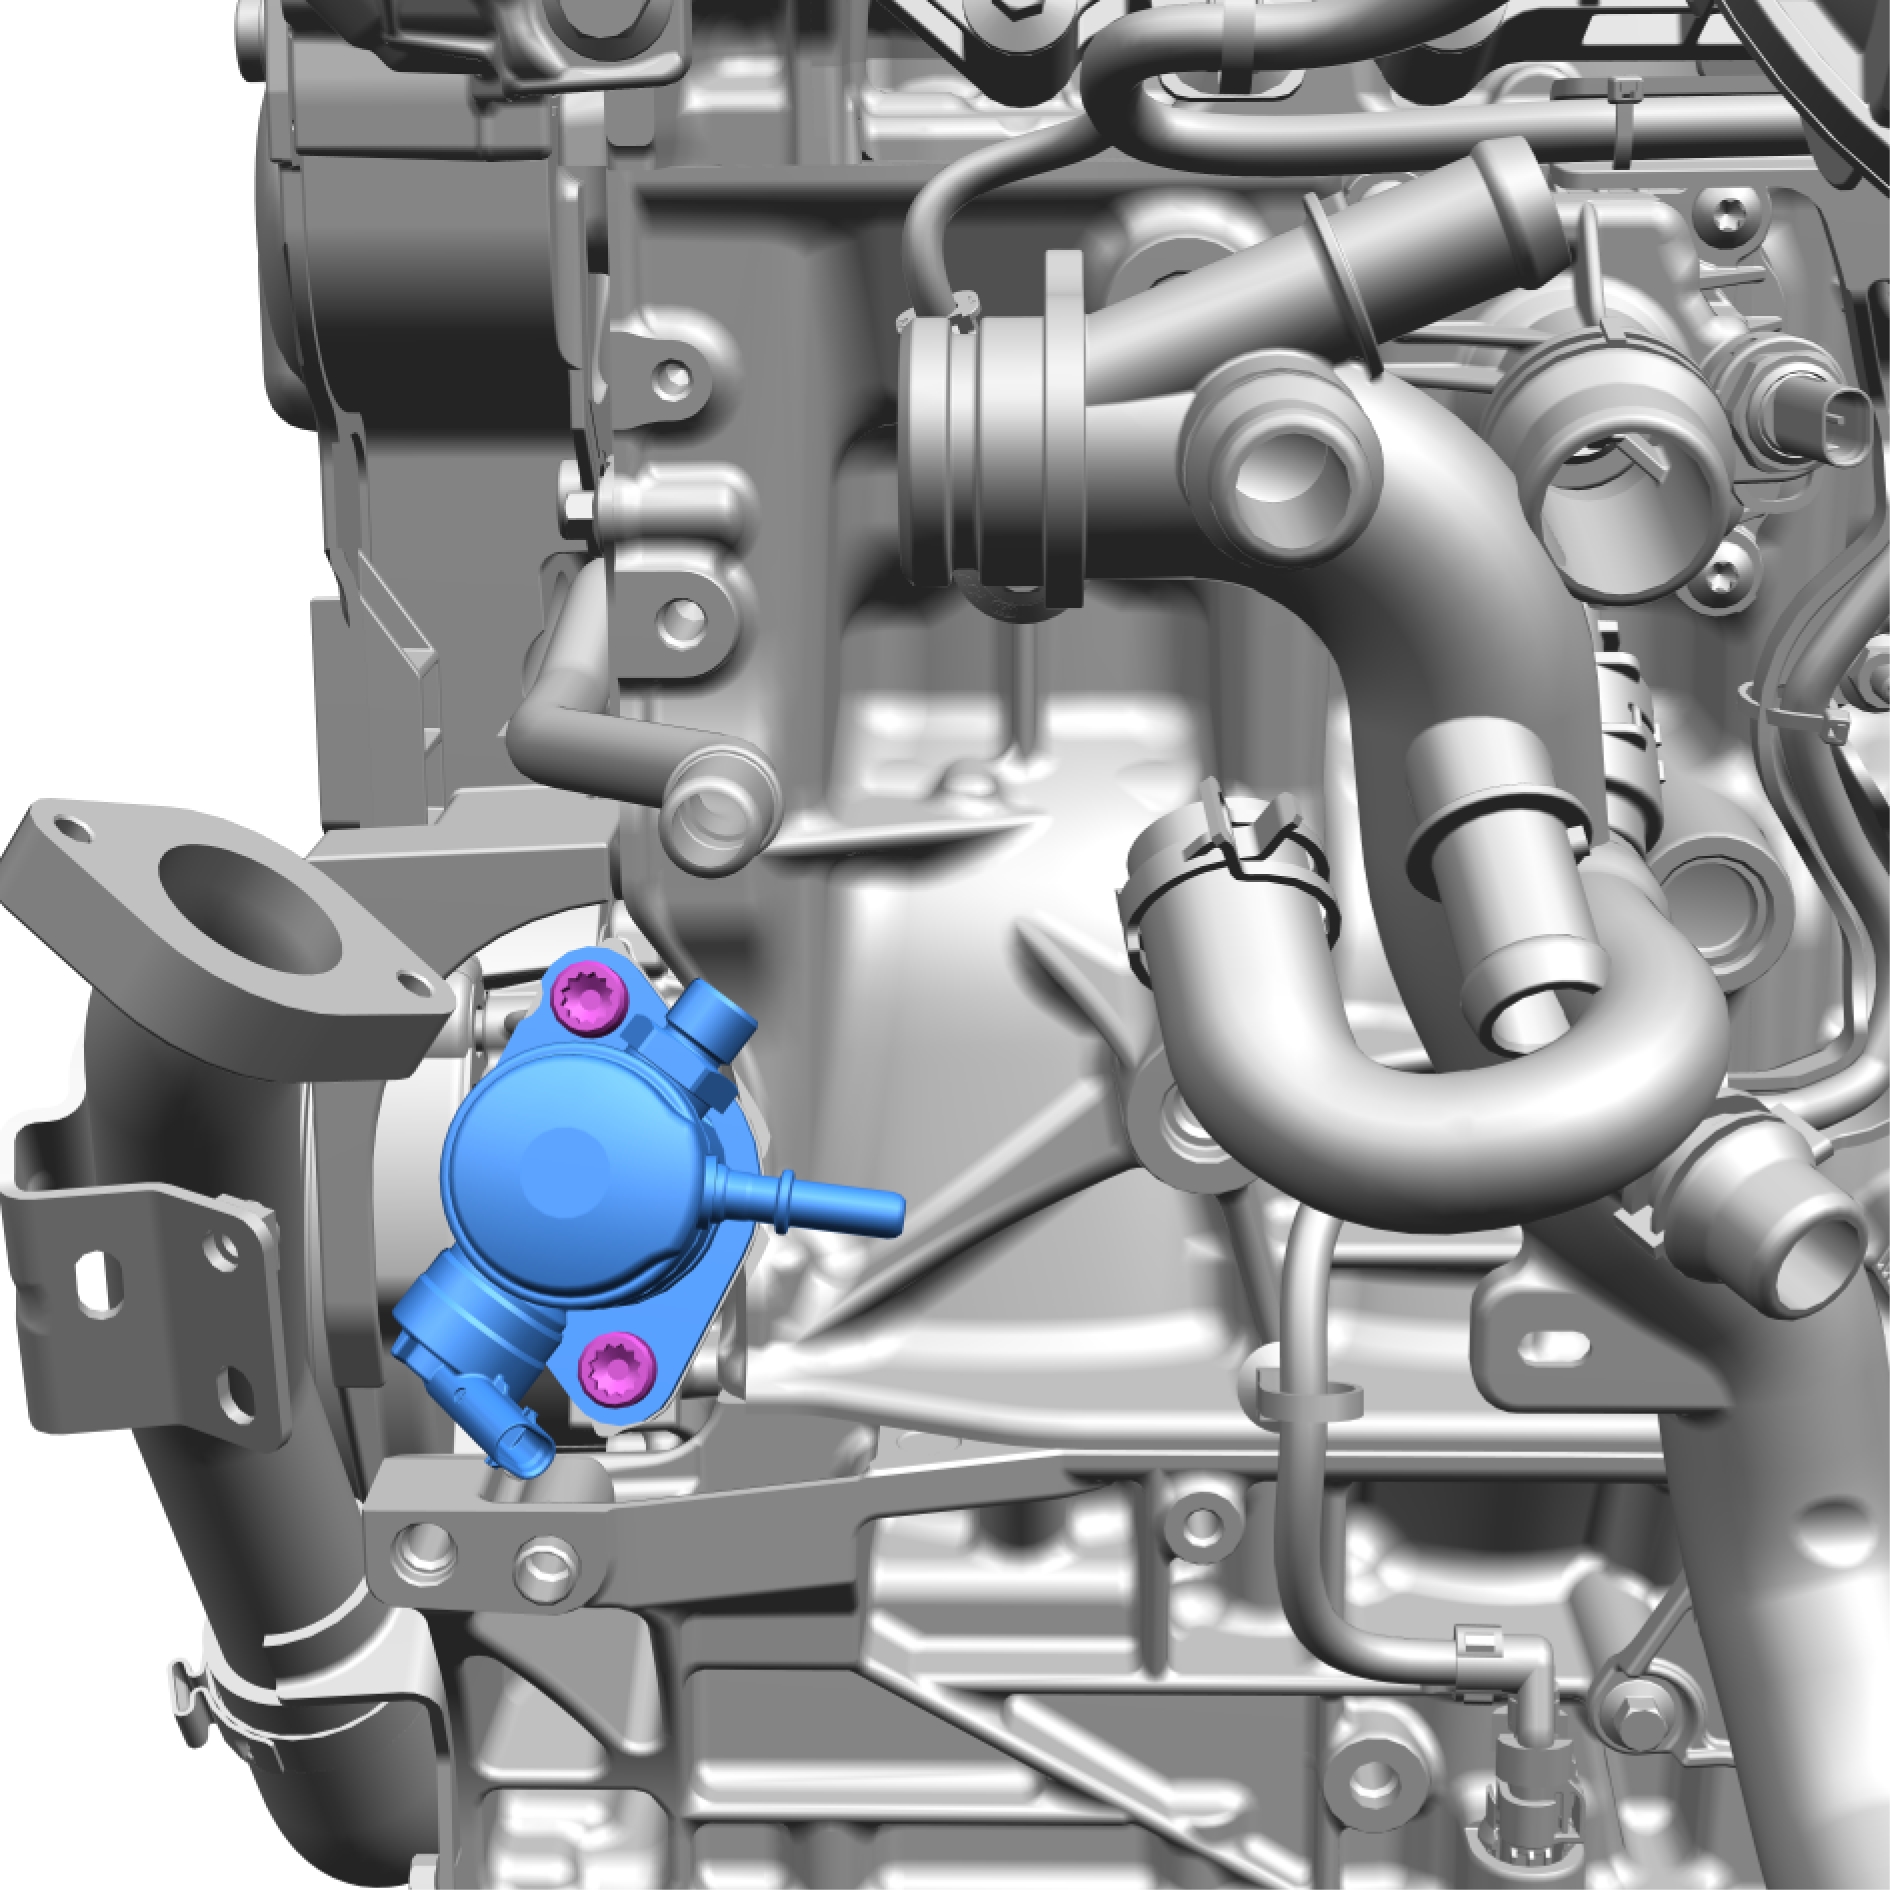
When installing, tighten by rotating each screw 1 turn at a time.
Remove the screws.
Torque: 30 Nm
Remove the marked component.
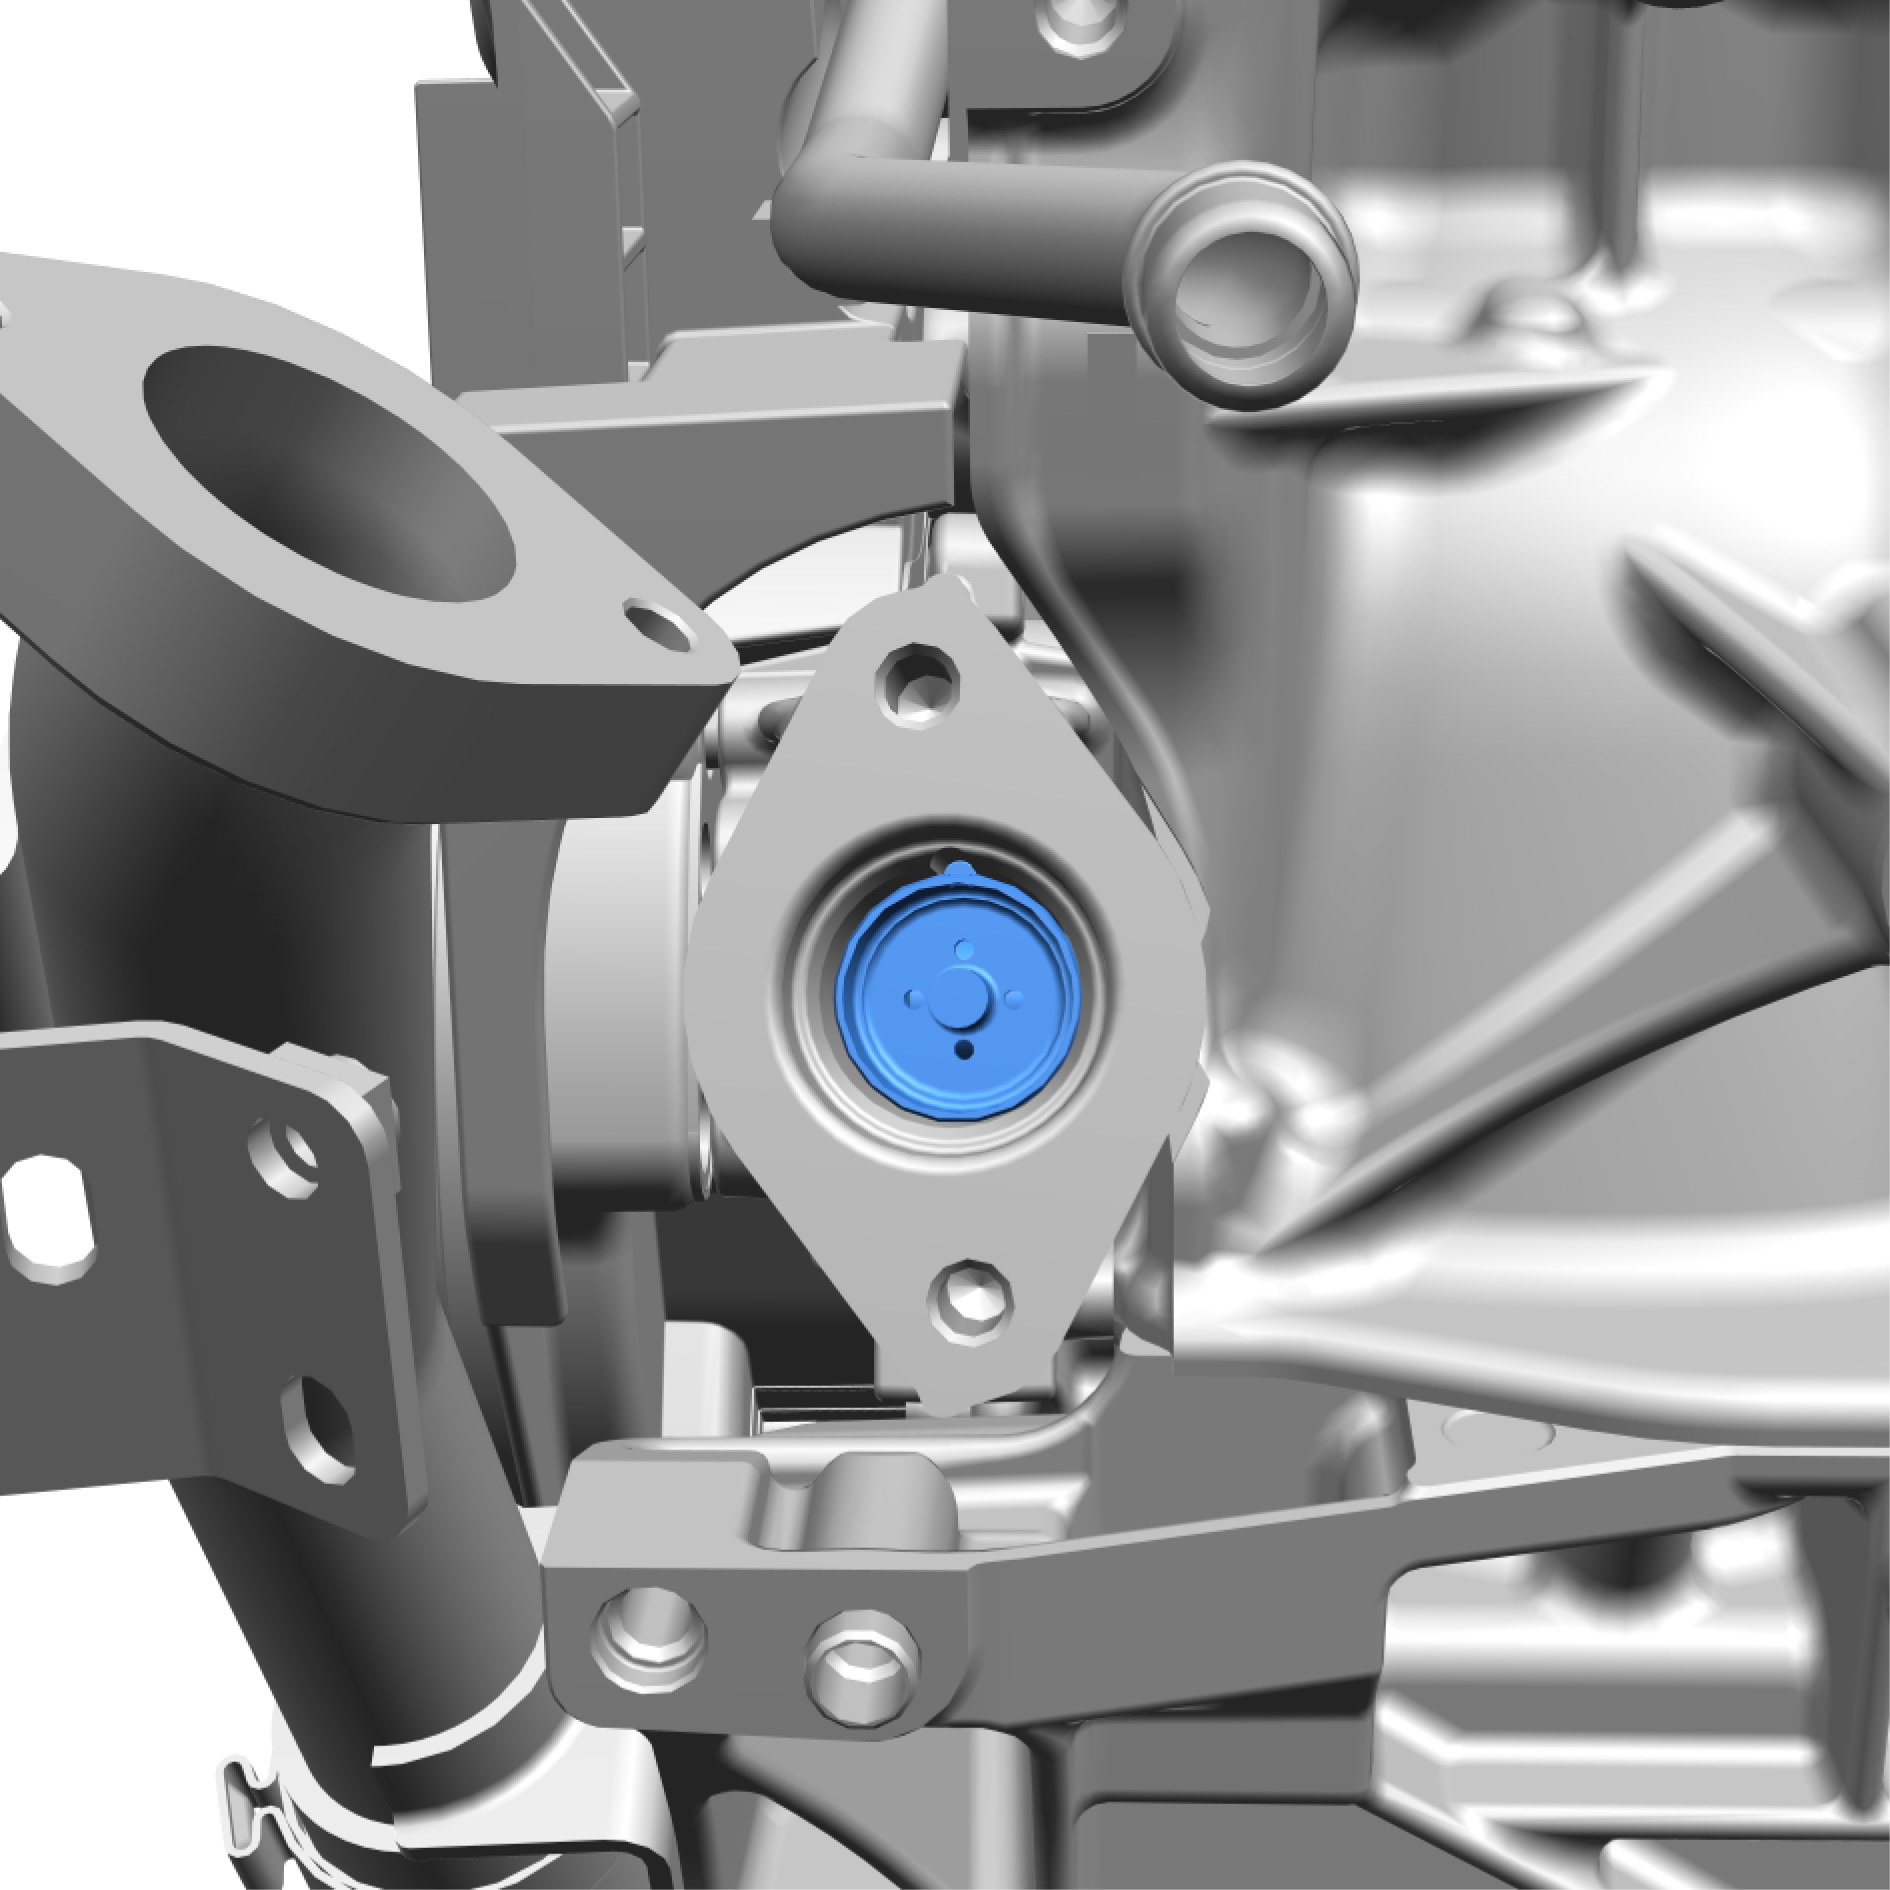
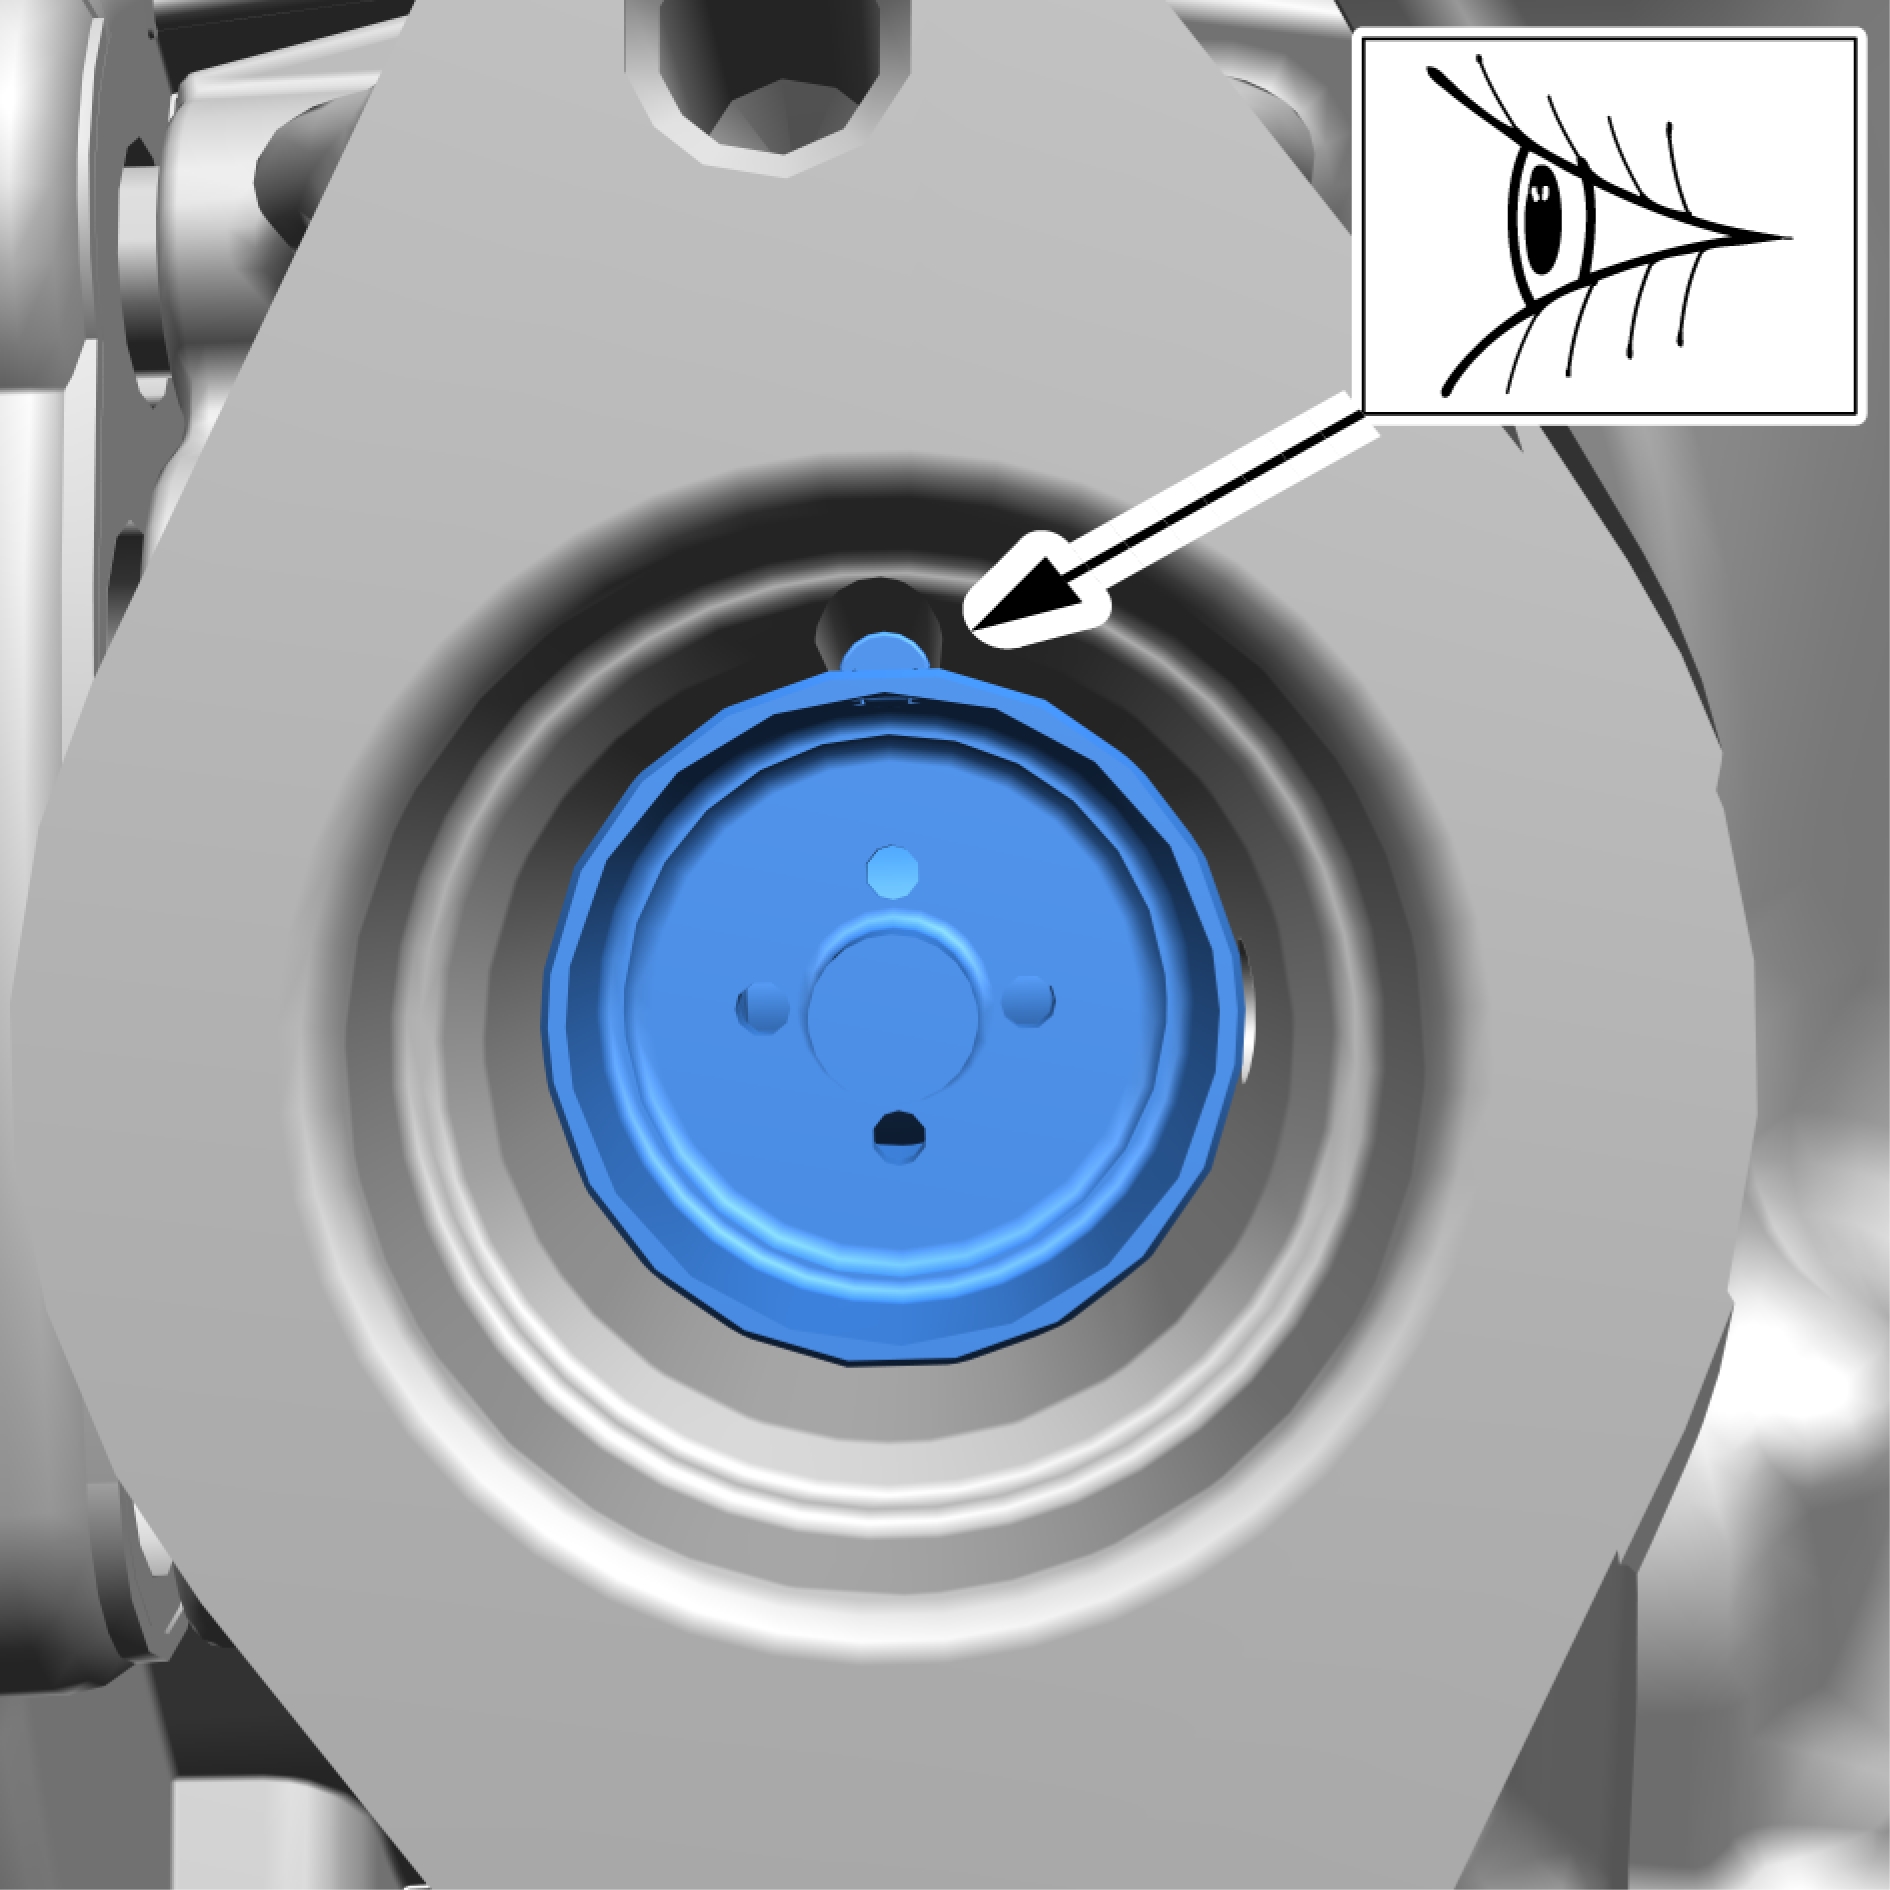
When installing, make sure that the component is positioned correctly.
Remove the marked component.
Check the component. If it displays any type of damage, it must be replaced.
Check the surfaces for abrasion.
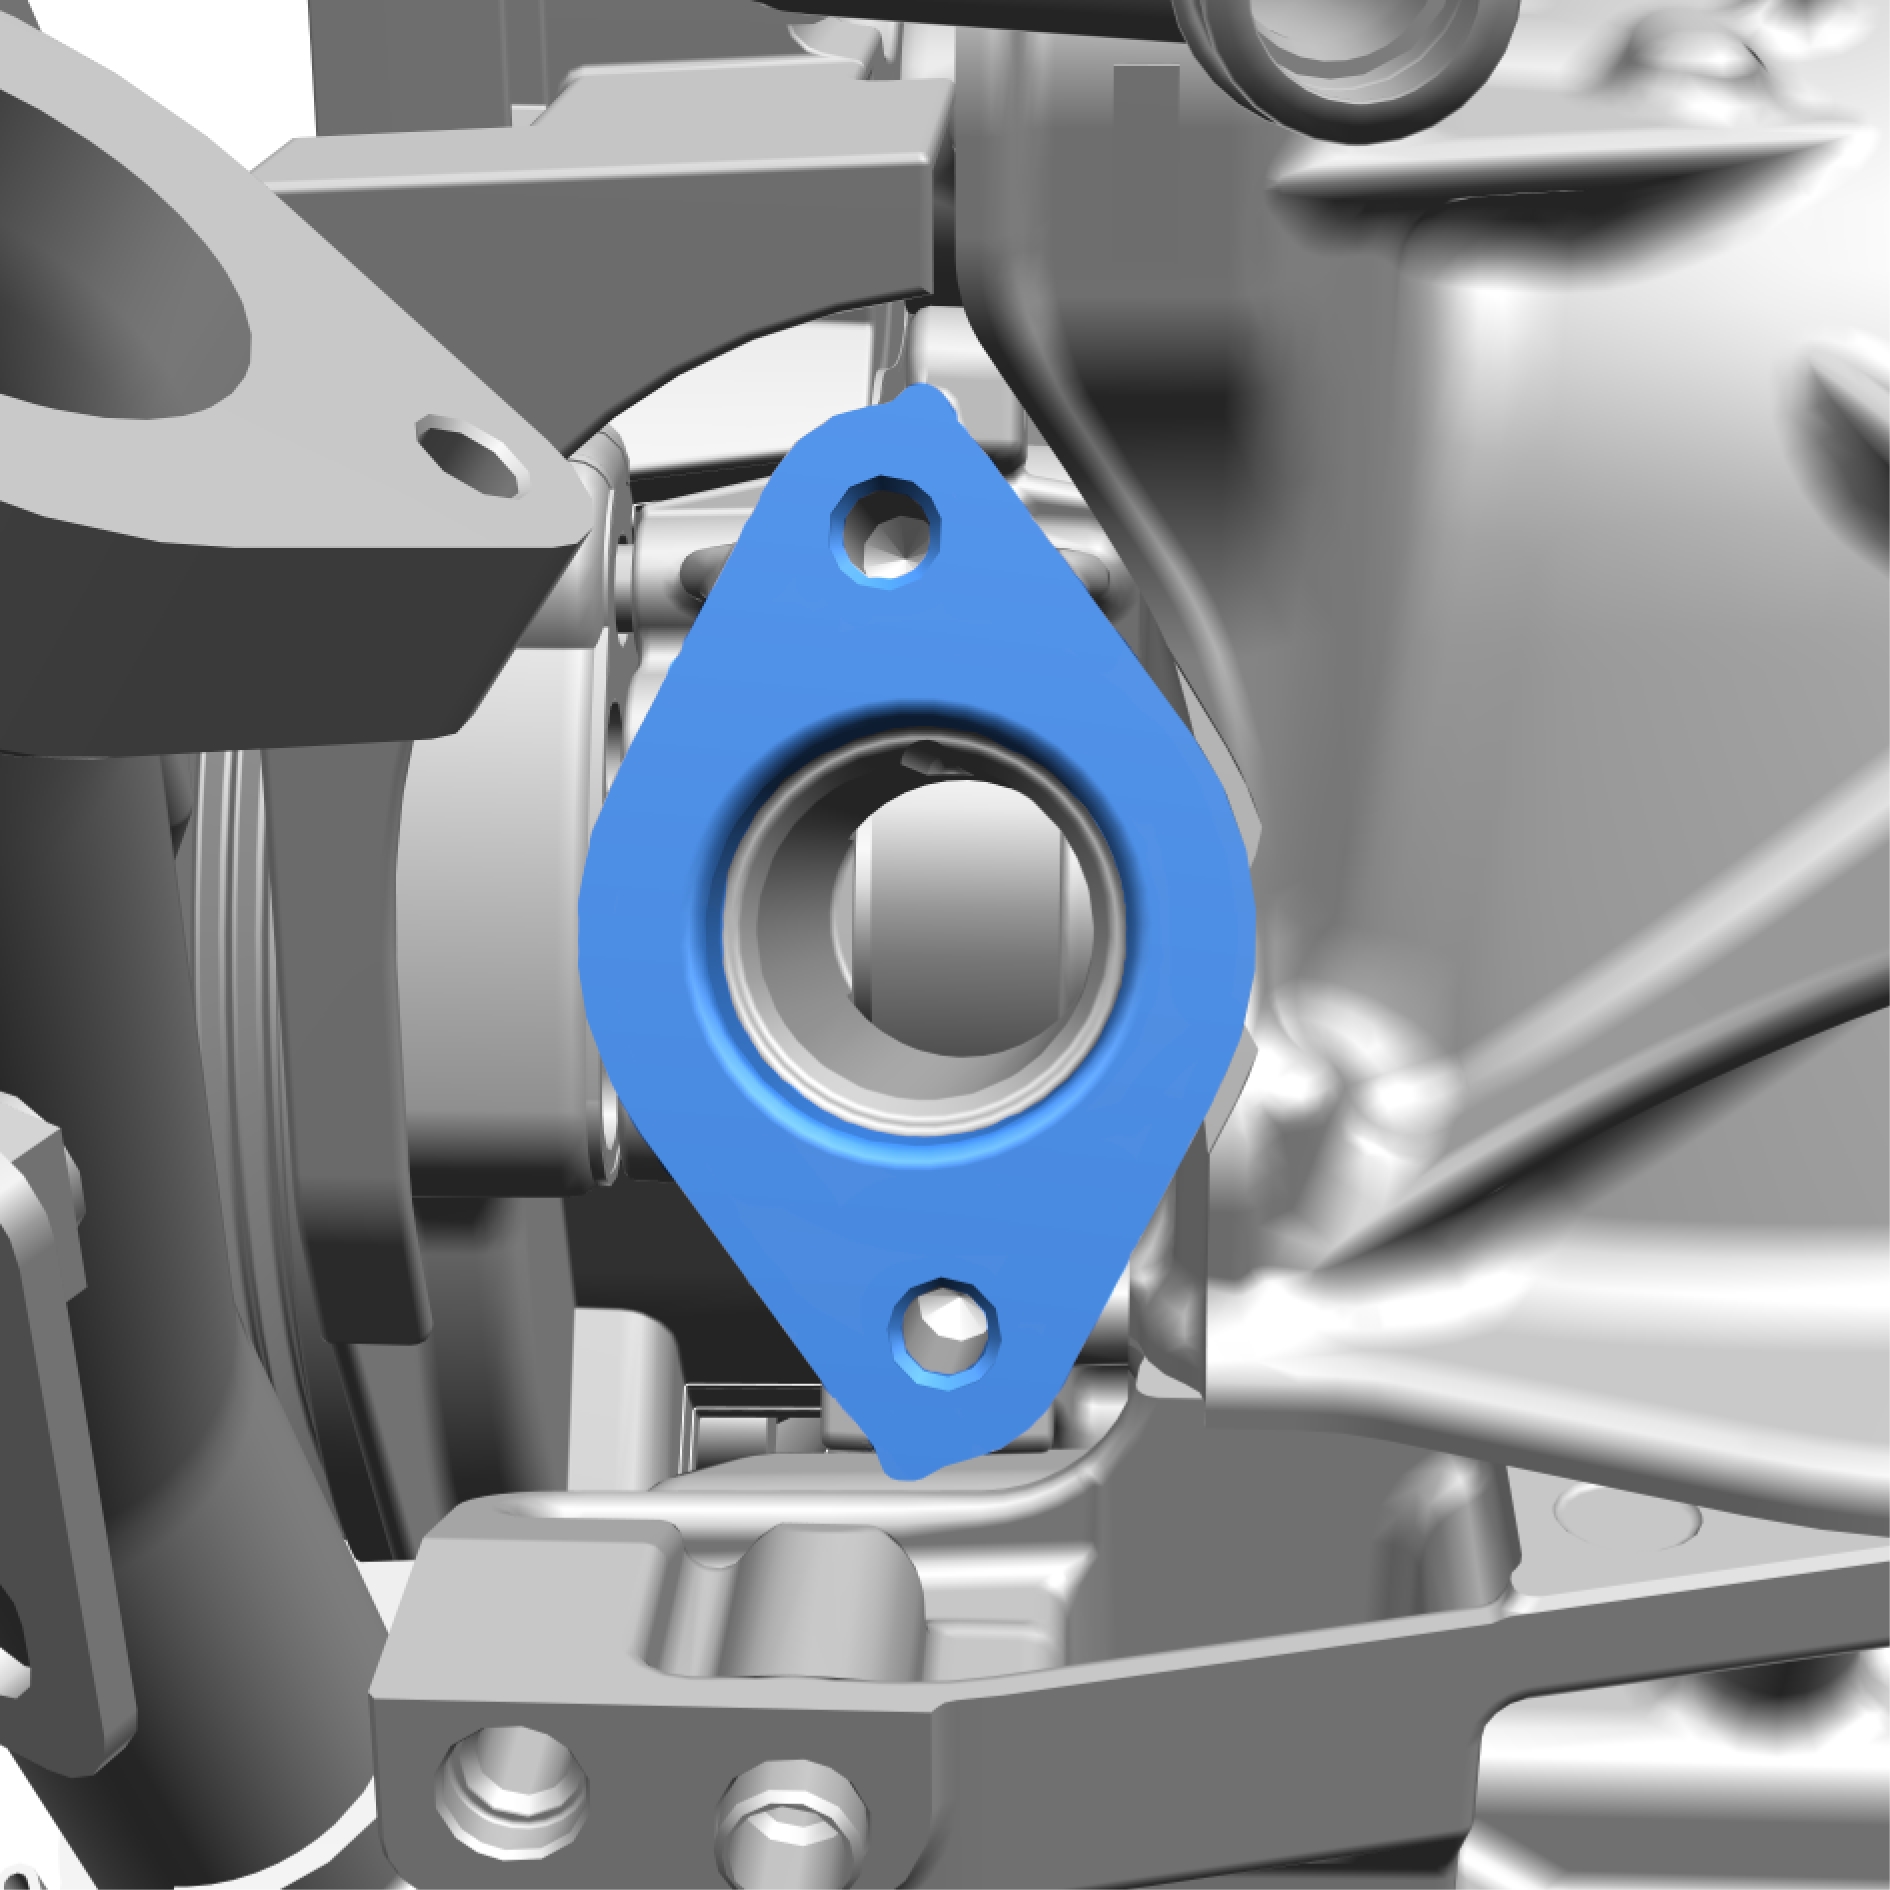
Clean the surface.
Installation
Install in reverse order.
Fuel rail, replace
Removal
Remove the screws.
Torque: 10 Nm
Remove the marked component.
Remove the screw.
Torque: 10 Nm
Remove the screw.
Torque: 24 Nm
Release the clip.
Move marked component aside.
Remove the screws.
Torque: 24 Nm
Remove the screw.
Torque: 50 Nm
Remove the screws.
Torque: 24 Nm
Remove the marked component.
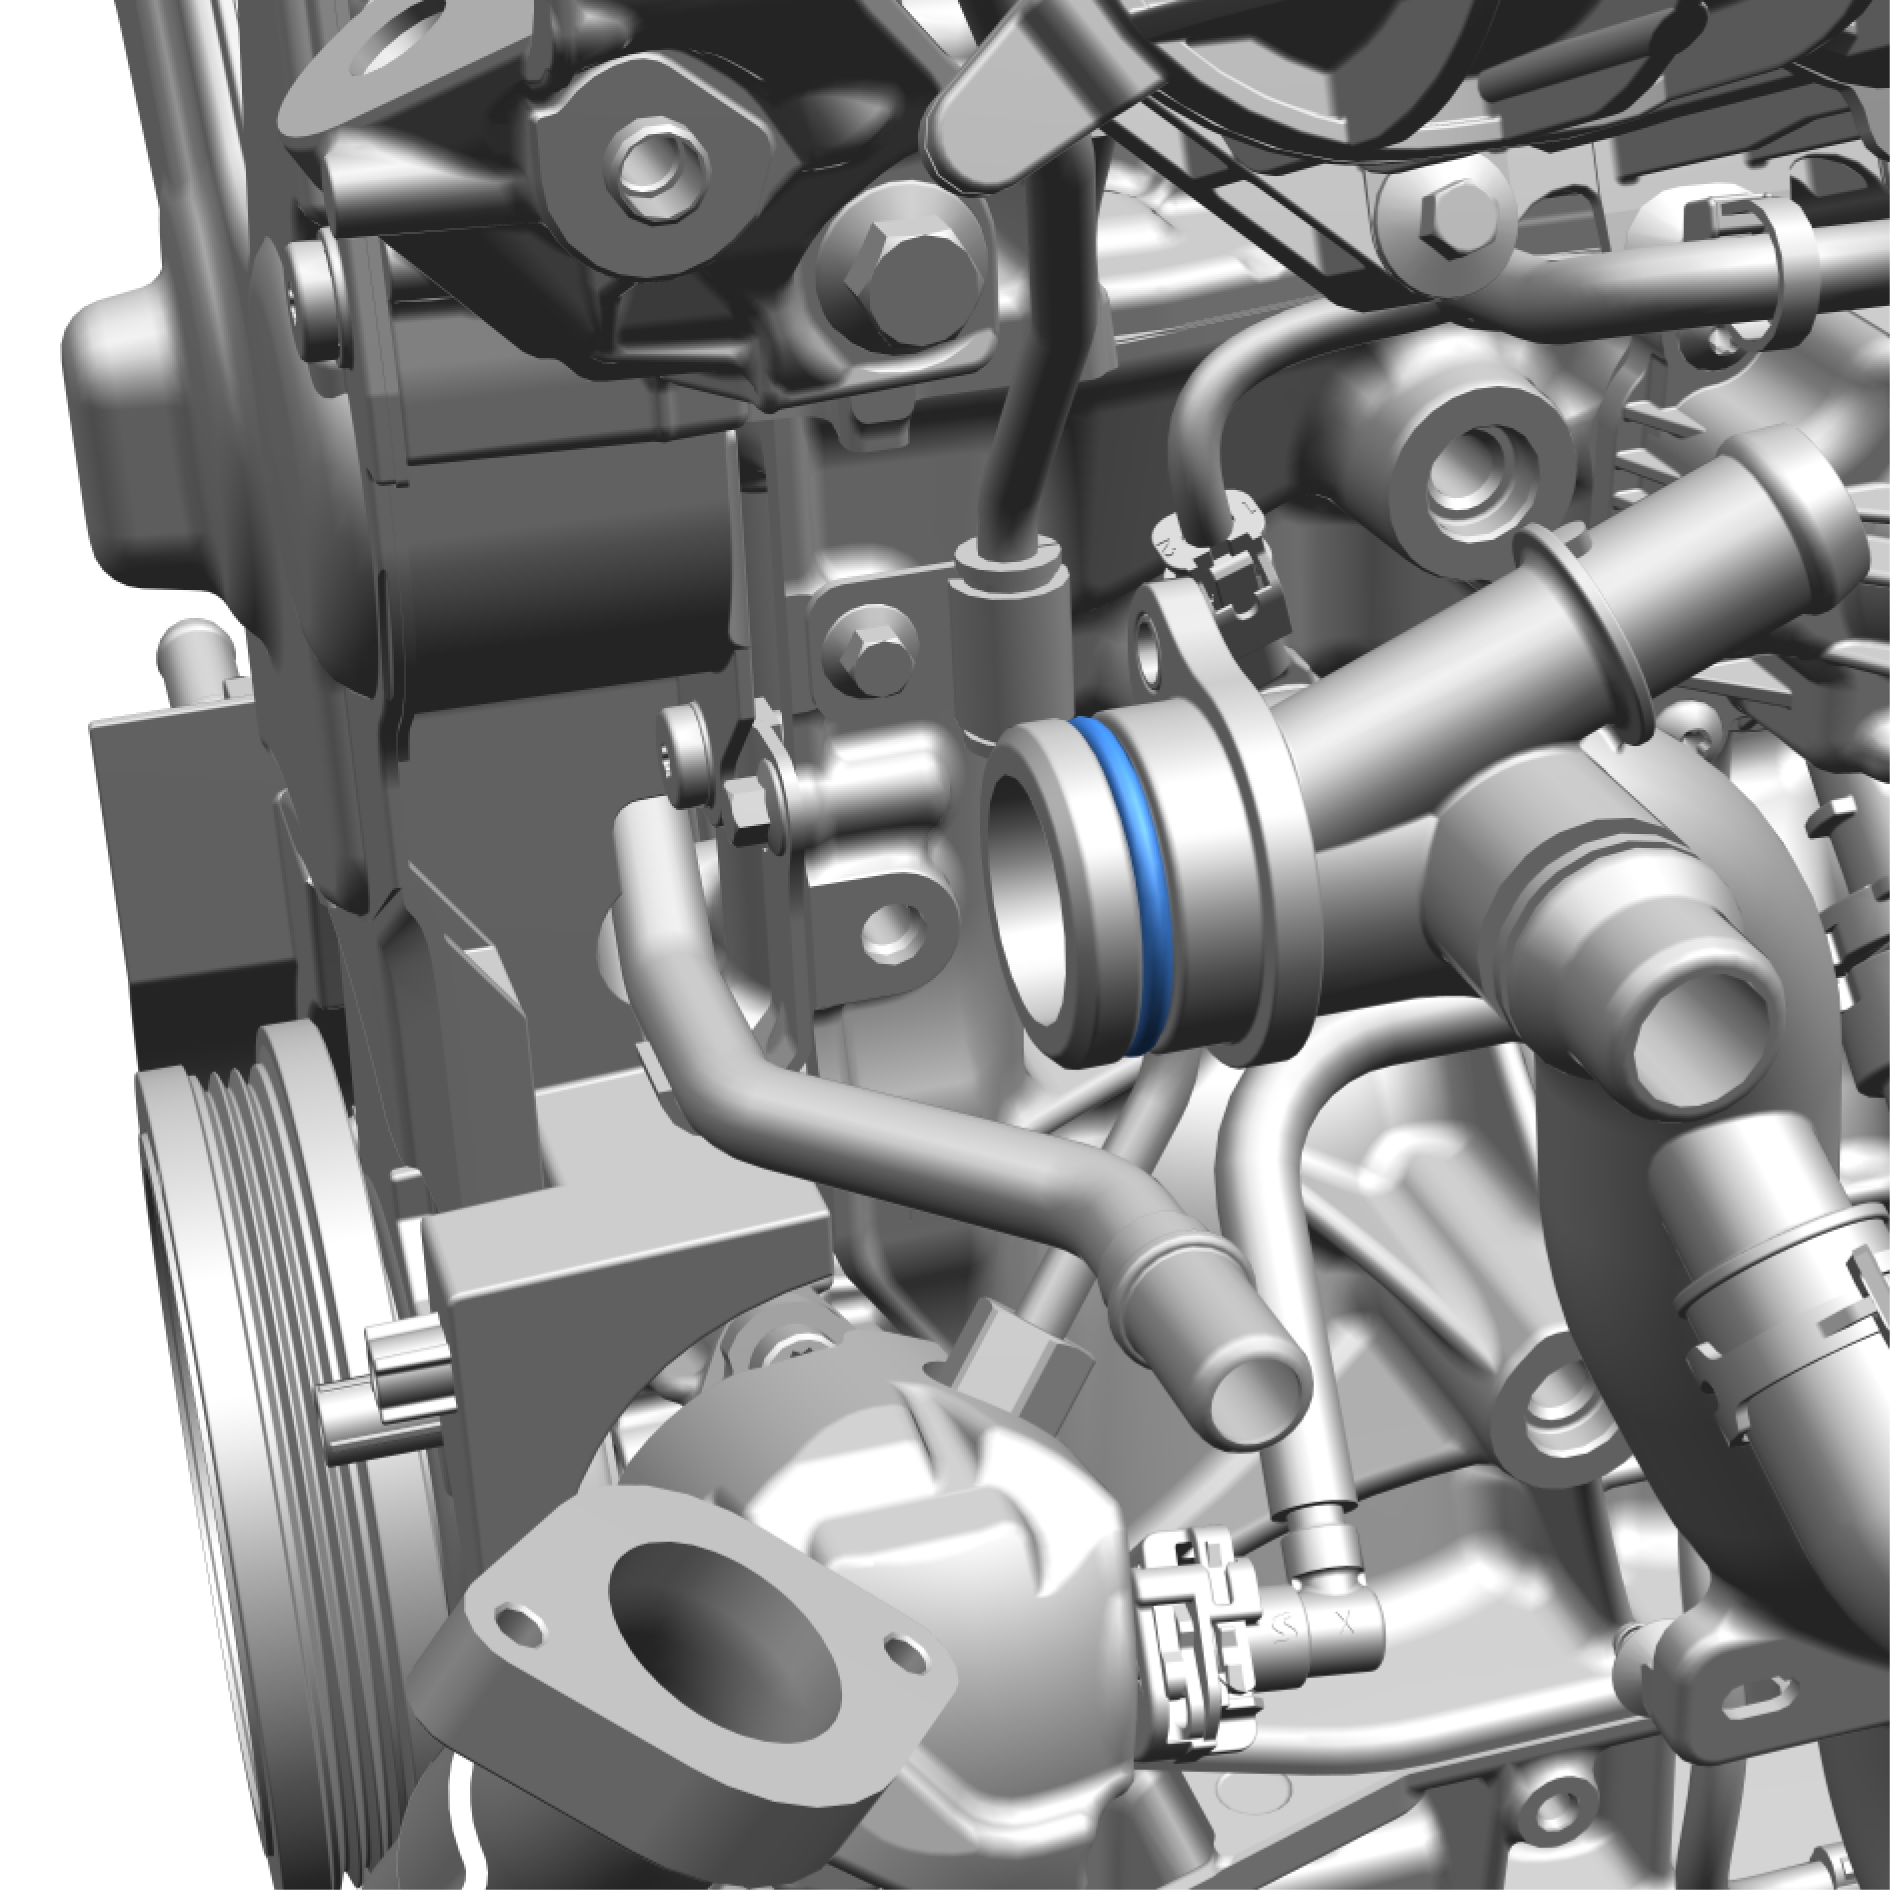
Remove and discard the marked component.
Remove the marked component.
Remove the screws.
Torque: 10 Nm
Remove the marked components.
Install special tool: 981 4129
Loosen the nut.
Torque, Step 1: 18 Nm Step 2: 30 Nm
Install special tool: 981 4129
Loosen the nut.
Torque, Step 1: 18 Nm Step 2: 30 Nm
Remove the screws.
Torque: 10 Nm
Remove and discard the marked component.
Remove the screws.
Torque: 22 Nm
Remove the marked component.
Installation
Install in reverse order.
Specifications Engine-
General data
|
Engine |
B420T14 |
B420T16/T18 |
|---|---|---|
|
Engine code |
06 |
L1 |
|
Power, engine (kw/rps) |
220/90 |
184/90–95 |
|
Power, electric motor ISG (kw/rps) |
10/50 |
10/50 |
|
Max torque, engine (Nm/rps) |
420/35–80 |
350/30–80 |
|
Max. torque, electric motor ISG (Nm/rps) |
40/38 |
40/38 |
|
Max rpm |
6600 (3s) /6300 |
6500 (3s) /6200 |
|
Idling (rpm) |
750±50 |
750±50 |
|
Cylinder bore (mm) |
82 |
82 |
|
Stroke (mm) |
93.2 |
93.2 |
|
Swept volume (litres) |
1,969 |
1,969 |
|
Firing sequence |
1-3-4-2 |
1-3-4-2 |
|
Weight, complete, including oil (kg) |
131,6 |
131,6 |
Engine manufacture number, engine serial number and type
The engine manufacture number and type are stamped in the cylinder block. There is also a decal on the timing cover with the engine type, serial number and manufacture number.
Classification of main bearings
Cylinder block
Cylinder bore (D)
| Standard........mm | 82 |
Cooling duct, engine block
| Length ........mm | 0,8-1,1 |
Piston running clearance
| Tolerance piston/cylinder - top ........mm | 0,065 |
Piston rings
|
Top ring ........mm |
1.2 |
|
1st ring ........mm |
1.2 |
|
Oil ring ........mm |
2 |
Piston pin
|
Engine |
Engine |
B420T2 |
|---|---|---|
|
Diameter ........mm |
23 |
21 |
|
Length ........mm |
62 |
54 |
Pistons
|
Standard |
The diameter is measured 20 mm from the bottom of the piston |
|---|---|
|
D-marked¹ .........mm |
81.95 |
|
¹The pistons are not classified |
Valves
|
Intake |
|
|---|---|
|
Length (A) ........mm |
112,91 |
|
Diameter on crown (B) ........mm |
30,5 |
|
Diameter on shaft (C) ........mm |
5.97 |
|
Valve angle (D) ........° |
60,5 |
|
Clearance in guide ........μm |
30 |
|
Exhaust |
|
|---|---|
|
Length (A) ........mm |
106,97 |
|
Diameter on crown (B) ........mm |
26.5 |
|
Diameter on shaft (C) ........mm |
5,94 |
|
Valve angle (D) ........° |
60,5 |
|
Clearance in guide ........μm |
58 |
Valve seats
|
Seat angle ........° |
30 |
Cylinder head
|
Maximum distortion, longitudinal ..........mm |
0.05 |
|
Maximum distortion, transverse ..........mm |
0.02 |
|
NOTE
Surface grinding of the cylinder head is not permitted. It shall be replaced in case of excessive distortion |
|
Crankshaft
|
Radial run-out main bearing journal ........mm |
max. 0.040 |
|
Axial play (measured in the engine with the intermediate section tightened) ........mm |
0,07-0,27 |
|
Main bearing journal, radial runout ........mm |
0,022-0,035 |
Big end journals
|
Diameter, standard¹ ...........mm |
50 +0/-0.019 |
|
Bearing recess width ........mm |
24 ±0.1 |
|
Maximum out-of-round ........mm |
0.004 |
|
Max. straightness deviation ........mm |
0.004 |
|
¹The variation in diameter for each bearing journal must not exceed 0.008 mm. |
|
Main bearing journals
|
Diameter, standard¹ ...........mm |
60 +0,003/-0,016 |
|
Axial bearing width ........mm |
26+0/-0,04 |
|
Maximum out-of-round ........mm |
0.004 |
|
Max. straightness deviation ........mm |
0.004 |
|
¹The variation in diameter for each bearing journal must not exceed 0.008 mm. |
|
Connecting rods
|
Diameter, bearing recesses |
|
|---|---|
|
Big end ........mm |
53 +0,013/0 |
|
Small-end ........mm |
29 +0,028/+0,033 |
|
Maximum ovality in the bearing recesses ........mm |
0.006 |
|
Length |
|
|---|---|
|
Big end - Small end ........mm |
147,08 |
Oil pressure
|
Rotation speed |
Oil pressure (min.) |
|---|---|
|
825 (rpm |
1.6 bar |
|
3000 (rpm) |
4.2 bar |
| ¹The oil pressure that is given is for an oil temperature of 80° C, which is achieved after 10-15 minutes of driving |
Thermostat
|
Begins to open at |
90°C |
|
Fully open at |
105°C |
VVT-solenoid - exhaust, replace
Removal
Make sure that the area around the component is clean and free of foreign material before removal.
Remove the screw.
Torque: 10 Nm
Remove the marked component.
Installation
Install in reverse order.
VVT-solenoid - intake, replace
Removal
Make sure that the area around the component is clean and free of foreign material before removal.
Remove the screw.
Torque: 10 Nm
Remove the marked component.
Installation
Install in reverse order.
Vibration damper, replace
Removal
Remove the screw.
Remove the tool and the marked component.
Installation
Install the marked component.
Install the screw and tighten fingertight.
Install special tool: Counterhold 999 7719
Tighten the screw.
Torque: 10 Nm
Tighten the screw.
Torque: 90 Nm Angle
Loosen the screw.
Remove special tool: Counterhold 999 7719
Timing belt, replace
Removal
Remove the screw.
Remove the marked component.
Remove the screws.
Remove the marked component.
Rotate the engine clock wise to the zero position.
Install the special tool: 999 7768
Remove the nut.
Remove and discard the marked component.
Remove and discard the marked component.
Remove and discard the marked component.
Remove the screws.
Remove and discard the marked component.
Installation
Install the marked component.
Torque: 17 Nm
Install the marked component.
1. Torque: 13 Nm
2. Torque: 17 Nm
Make sure to install the component in correct position.
Install the marked components.
Tighten the nut finger tight.
Make sure that the components are positioned correctly.
Install the special tool: 999 7791
Make sure to follow the correct sequence during installation.
Install the marked component.
Remove the special tool.
Remove the special tool.
Adjust the position of the component according to image.
Tighten the nut tensioner, timing belt, torque: 30 Nm
The engine is rotated so that the belt assumes its correct position.
Turn the engine.
If the measured value is greater or less than the specified range, all steps in the adjustment section must be carried out again.
Install the marked component.
Install the screws.
Torque: 10 Nm
Install the marked component.
Install the screw finger tight.
Install special tool: 999 7719
Torque: 10 Nm
Tigthen the screw.
Torque: 90 Nm Angle
Loosen the screw.
Remove the special tool.
Oil pan, replace
Removal
Remove the clip.
Remove the clip.
Remove the marked component.
Remove the screws.
Torque: 10 Nm
Fold away the marked component.
Remove and discard the marked component.
Remove the screws.
Torque: 10 Nm
Remove the marked component.
Remove and discard the marked component.
Remove the screws.
Torque: 17 Nm
Remove the marked component.
Tightening schedule for the installation.
Remove the screws.
Torque: 16 Nm
Remove the marked component.
Remove and the discard the marked components.
Remove the marked component.
Remove and discard the marked components.
Remove the screws.
Torque: 9 Nm
Remove the marked component.
Remove the screw.
Torque: 5 Nm
Remove and discard the marked component.
Install special tool 999 5679.
Remove the marked component.
Torque: 25 Nm
Remove and discard the marked components.
Remove the screws.
Remove the marked component.
Installation
Make sure that the mating faces are clean and free of foreign material.
Clean the marked area.
Make sure that the mating faces are clean and free of foreign material.
Clean the marked area.
The component must be installed within 5 minutes of applying the sealant.
Apply chemical gasket.
The component must be installed within 5 minutes of applying the sealant.
Apply chemical gasket.
Take extra care not to damage the seal.
Install the marked component.
Tighten the screws.
Torque: 17 Nm
Tighten the screws.
Torque: 50 Nm
Make sure that no excess sealant residue is evident.
Install in reverse order.
Fuel pump, replace
Removal
Install special tool: 981 4129
Loosen the nut.
Torque, Step 1: 18 Nm Step 2: 30 Nm
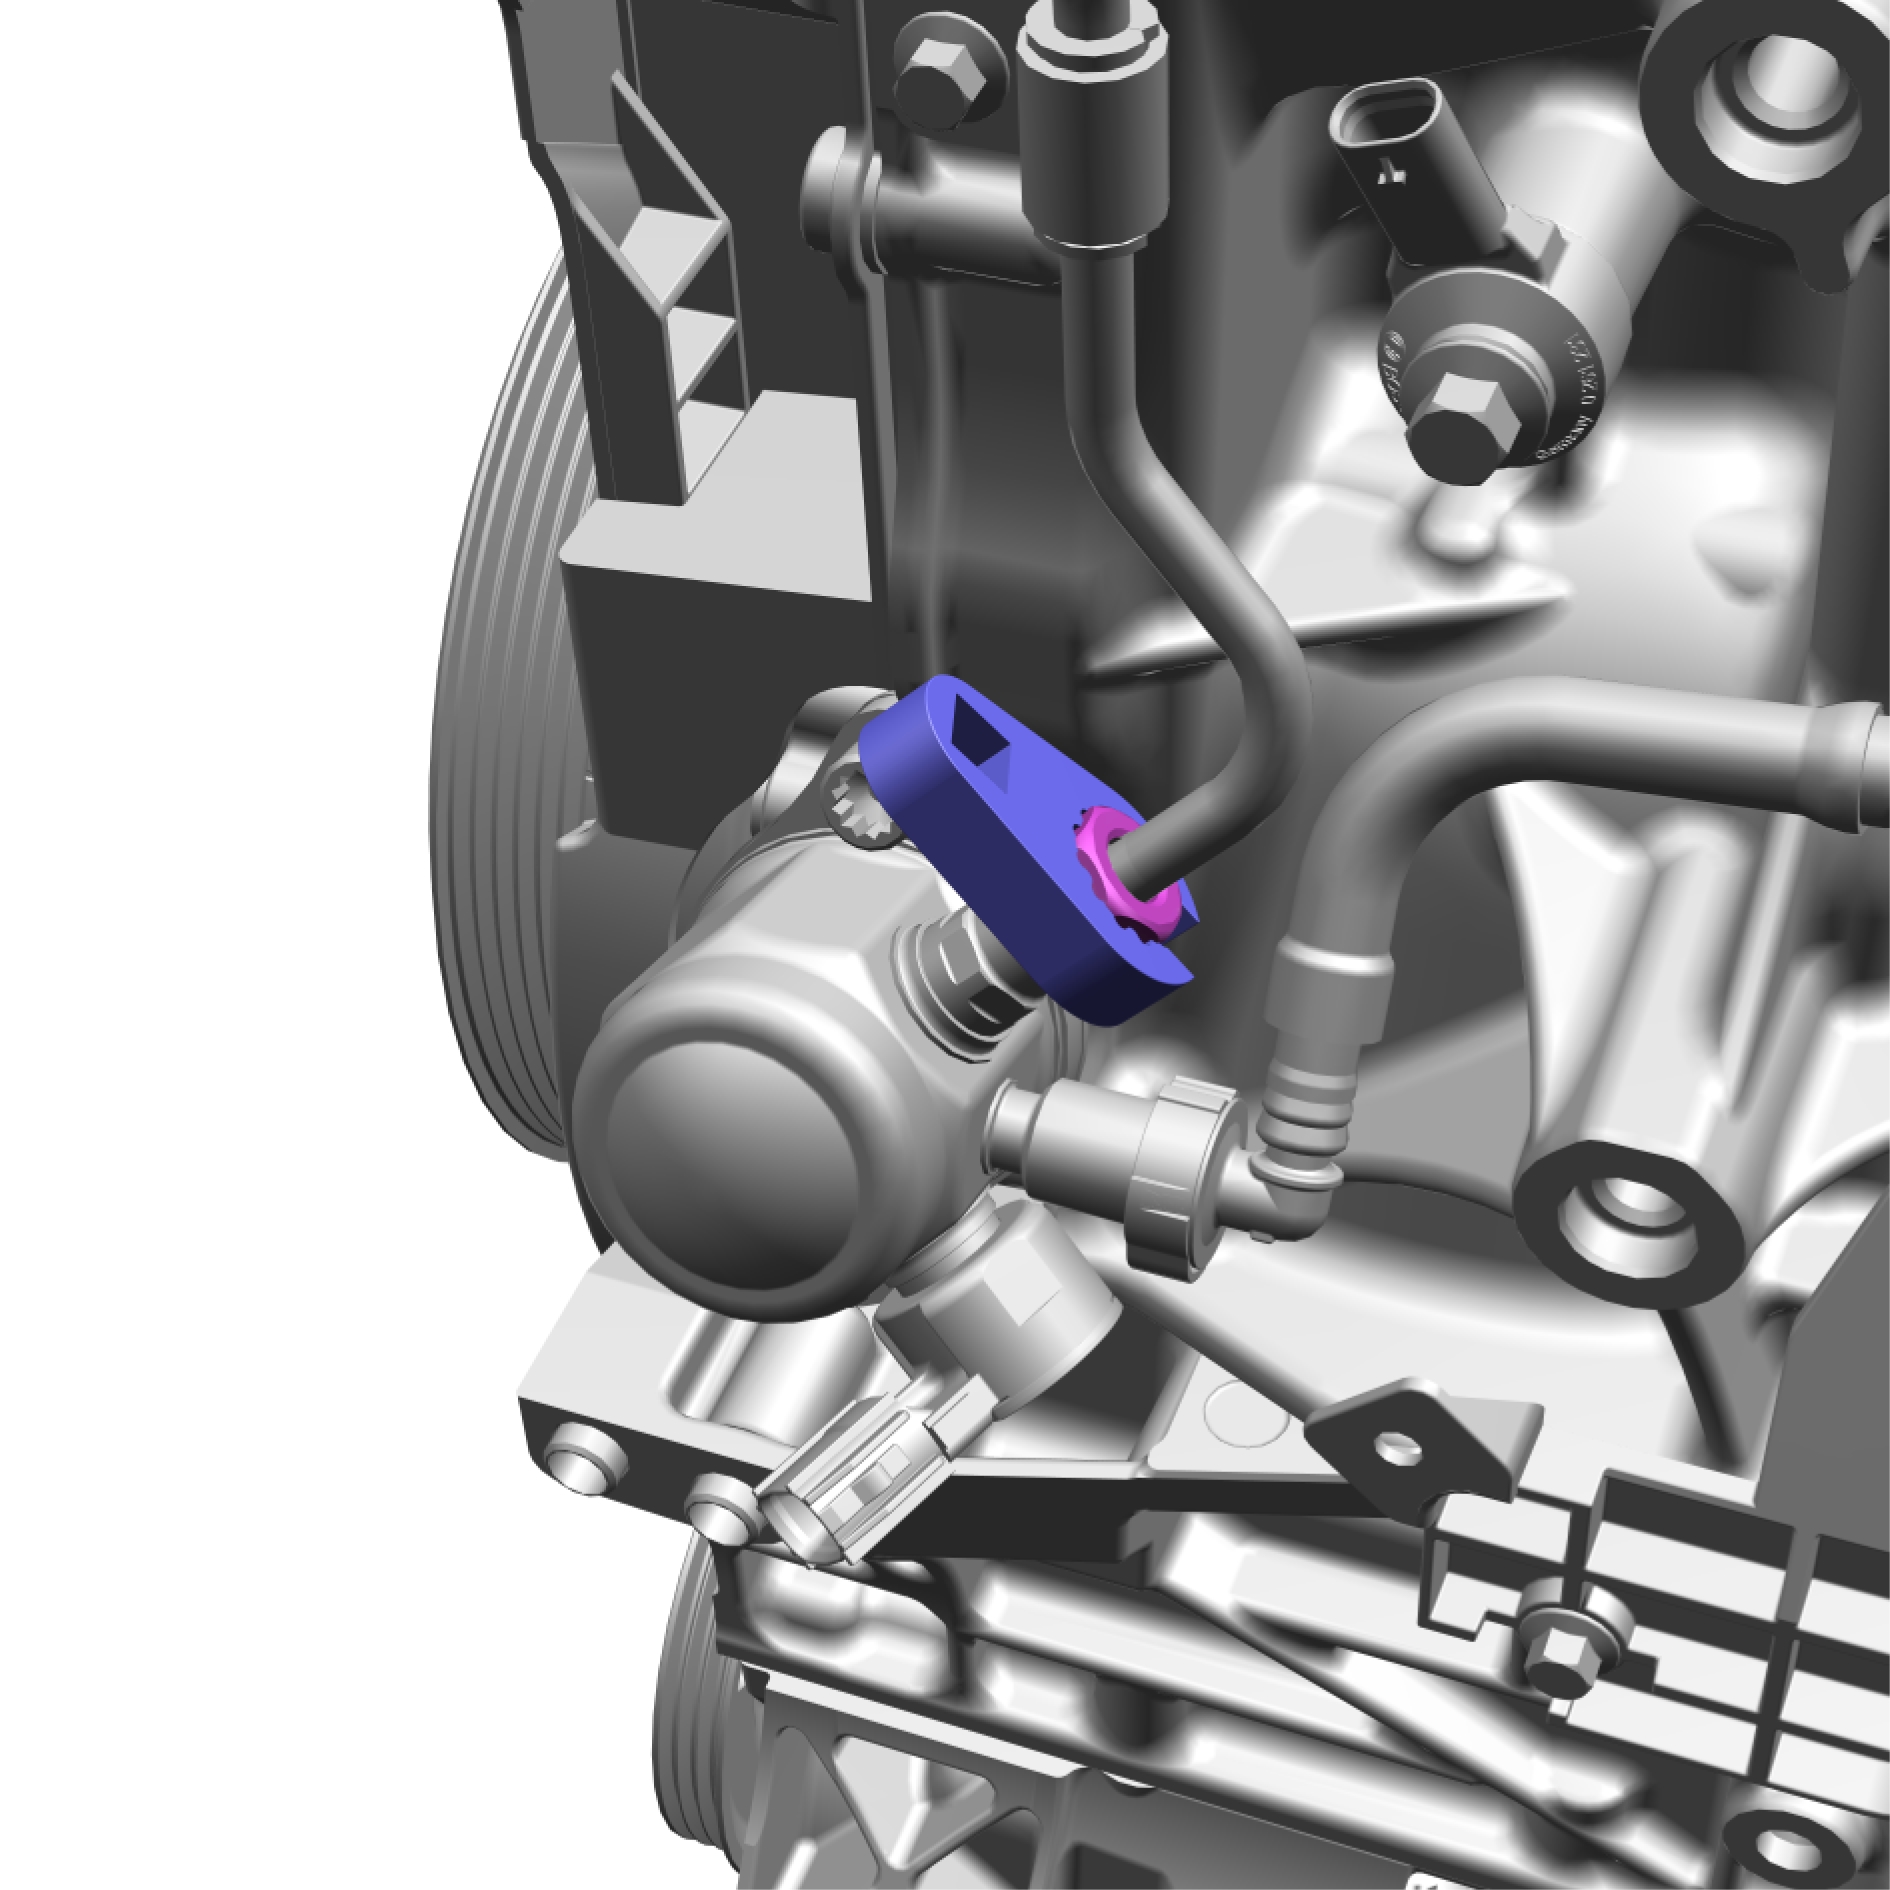
Install special tool: 981 4129
Loosen the nut.
Torque, Step 1: 18 Nm Step 2: 30 Nm
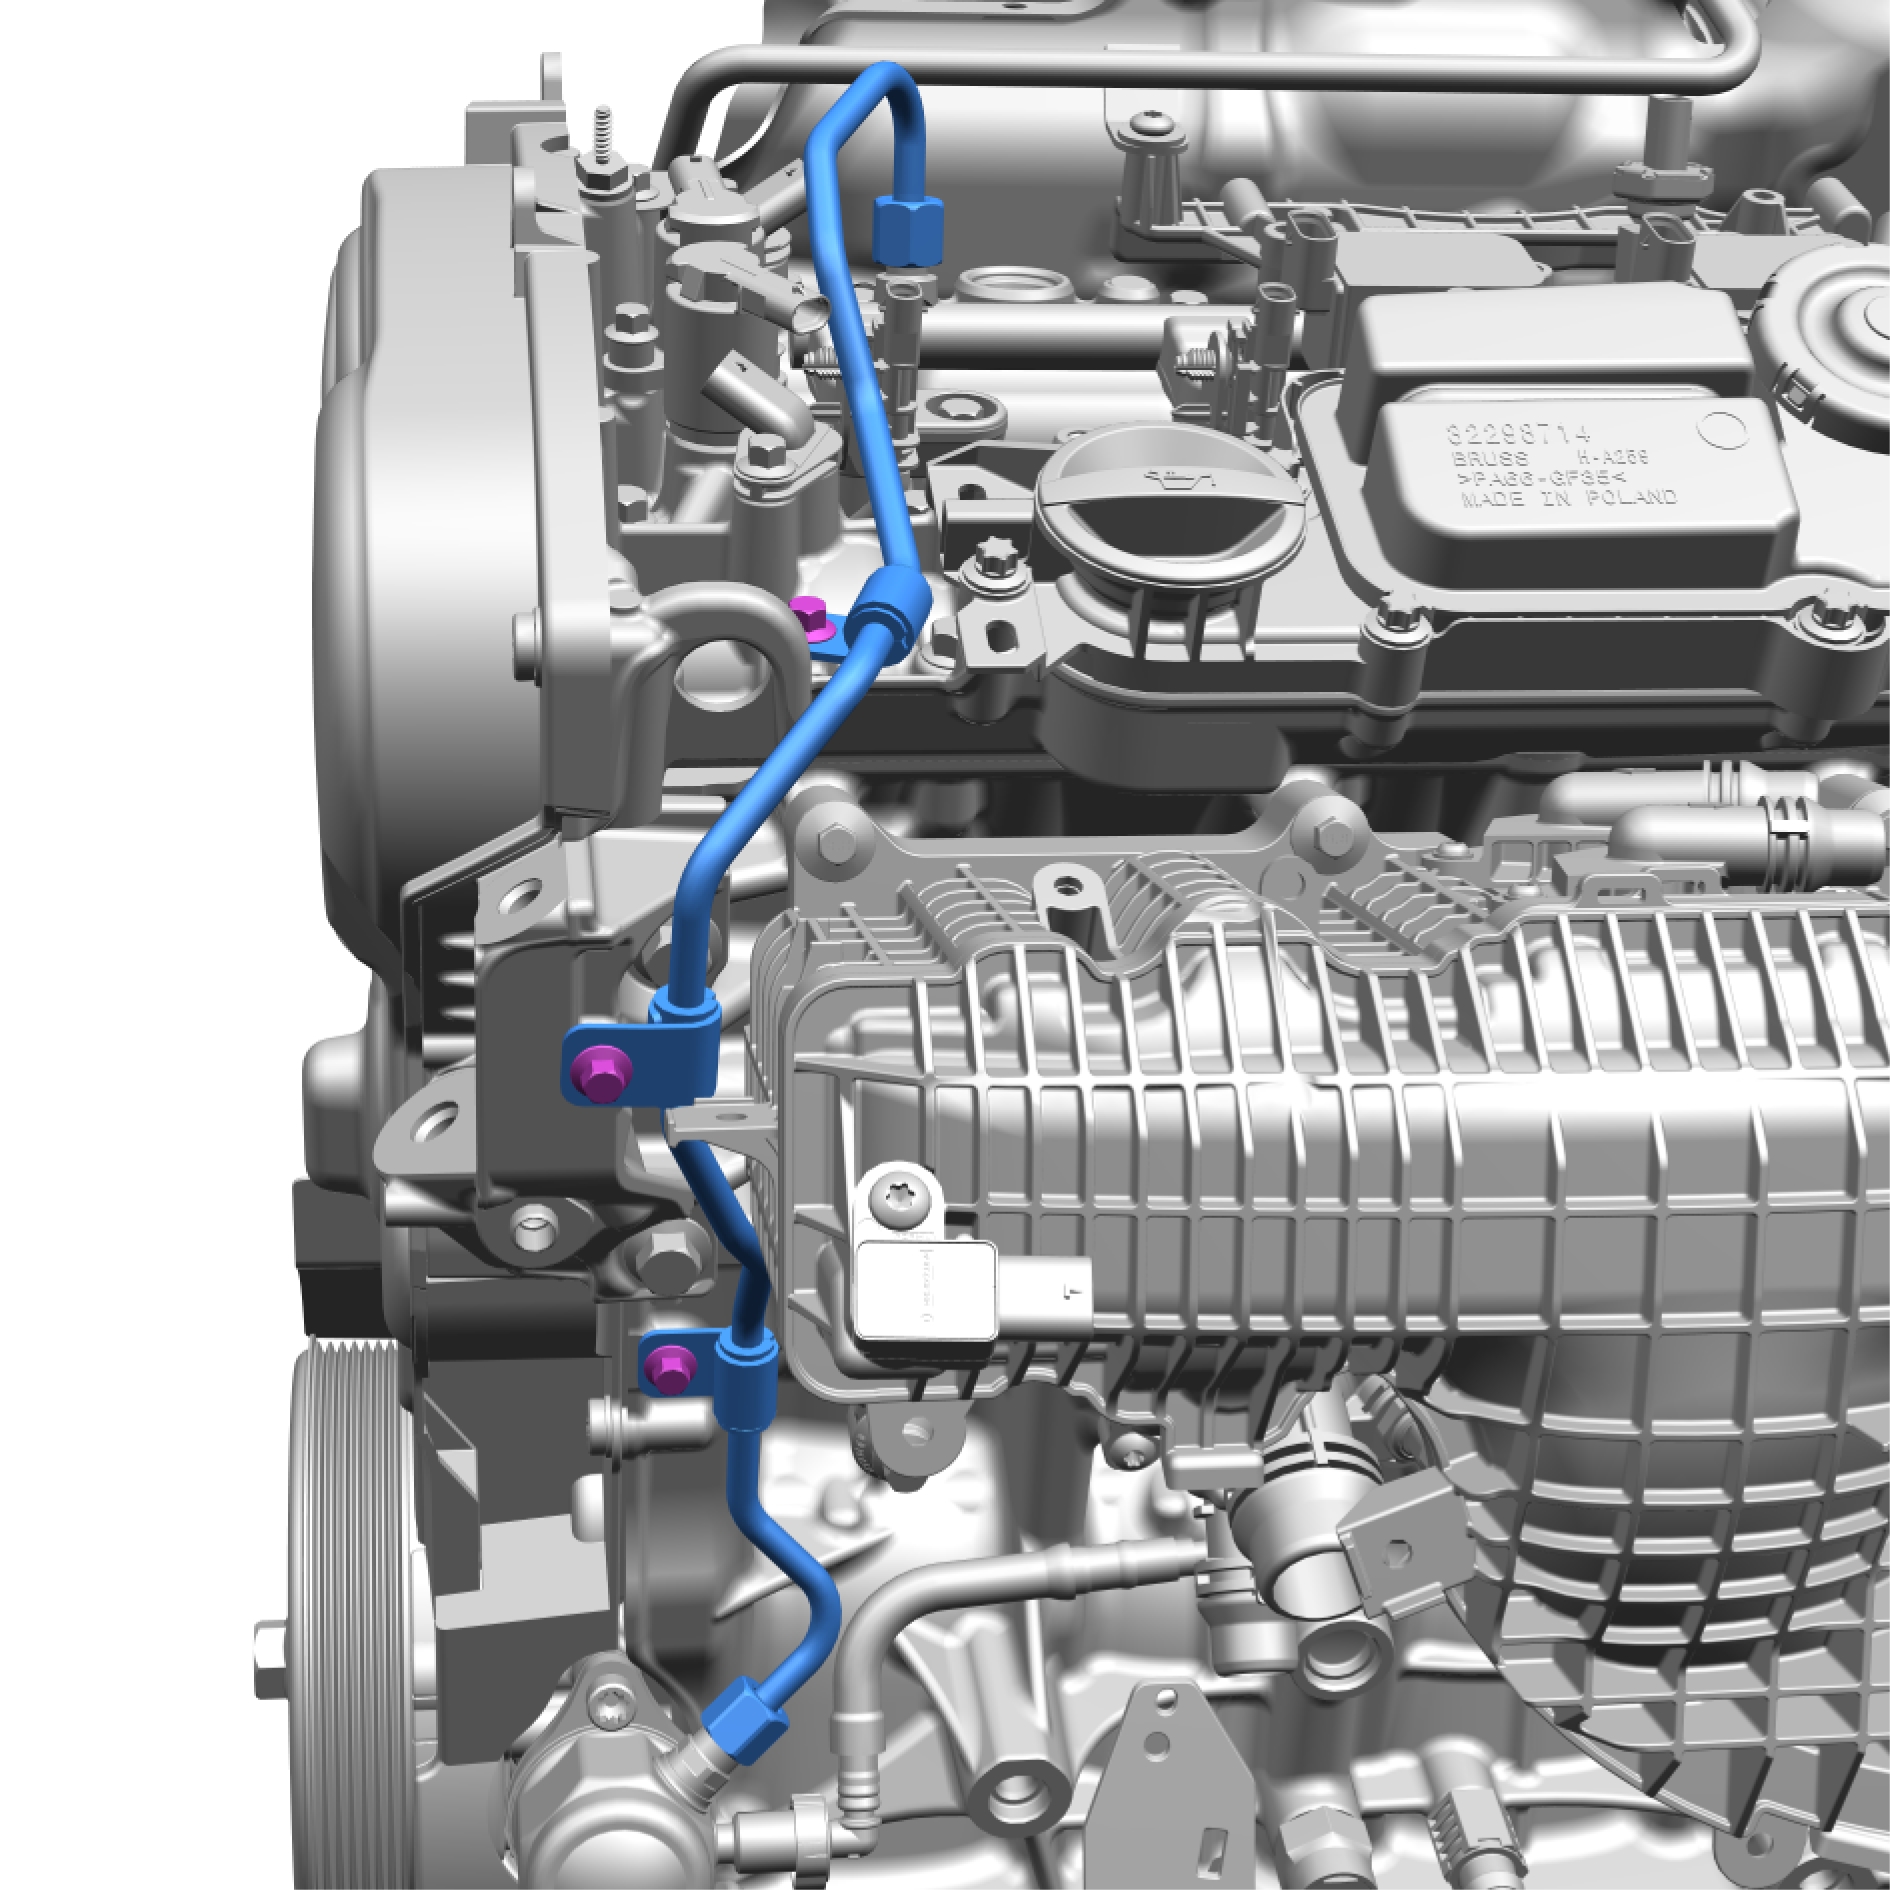
Remove the screws.
Torque: 10 Nm
Remove and discard the marked component.

Disconnect the hose.
Turn the engine to correct position. KOLLA UPP OM DETTA BEHÖVS!
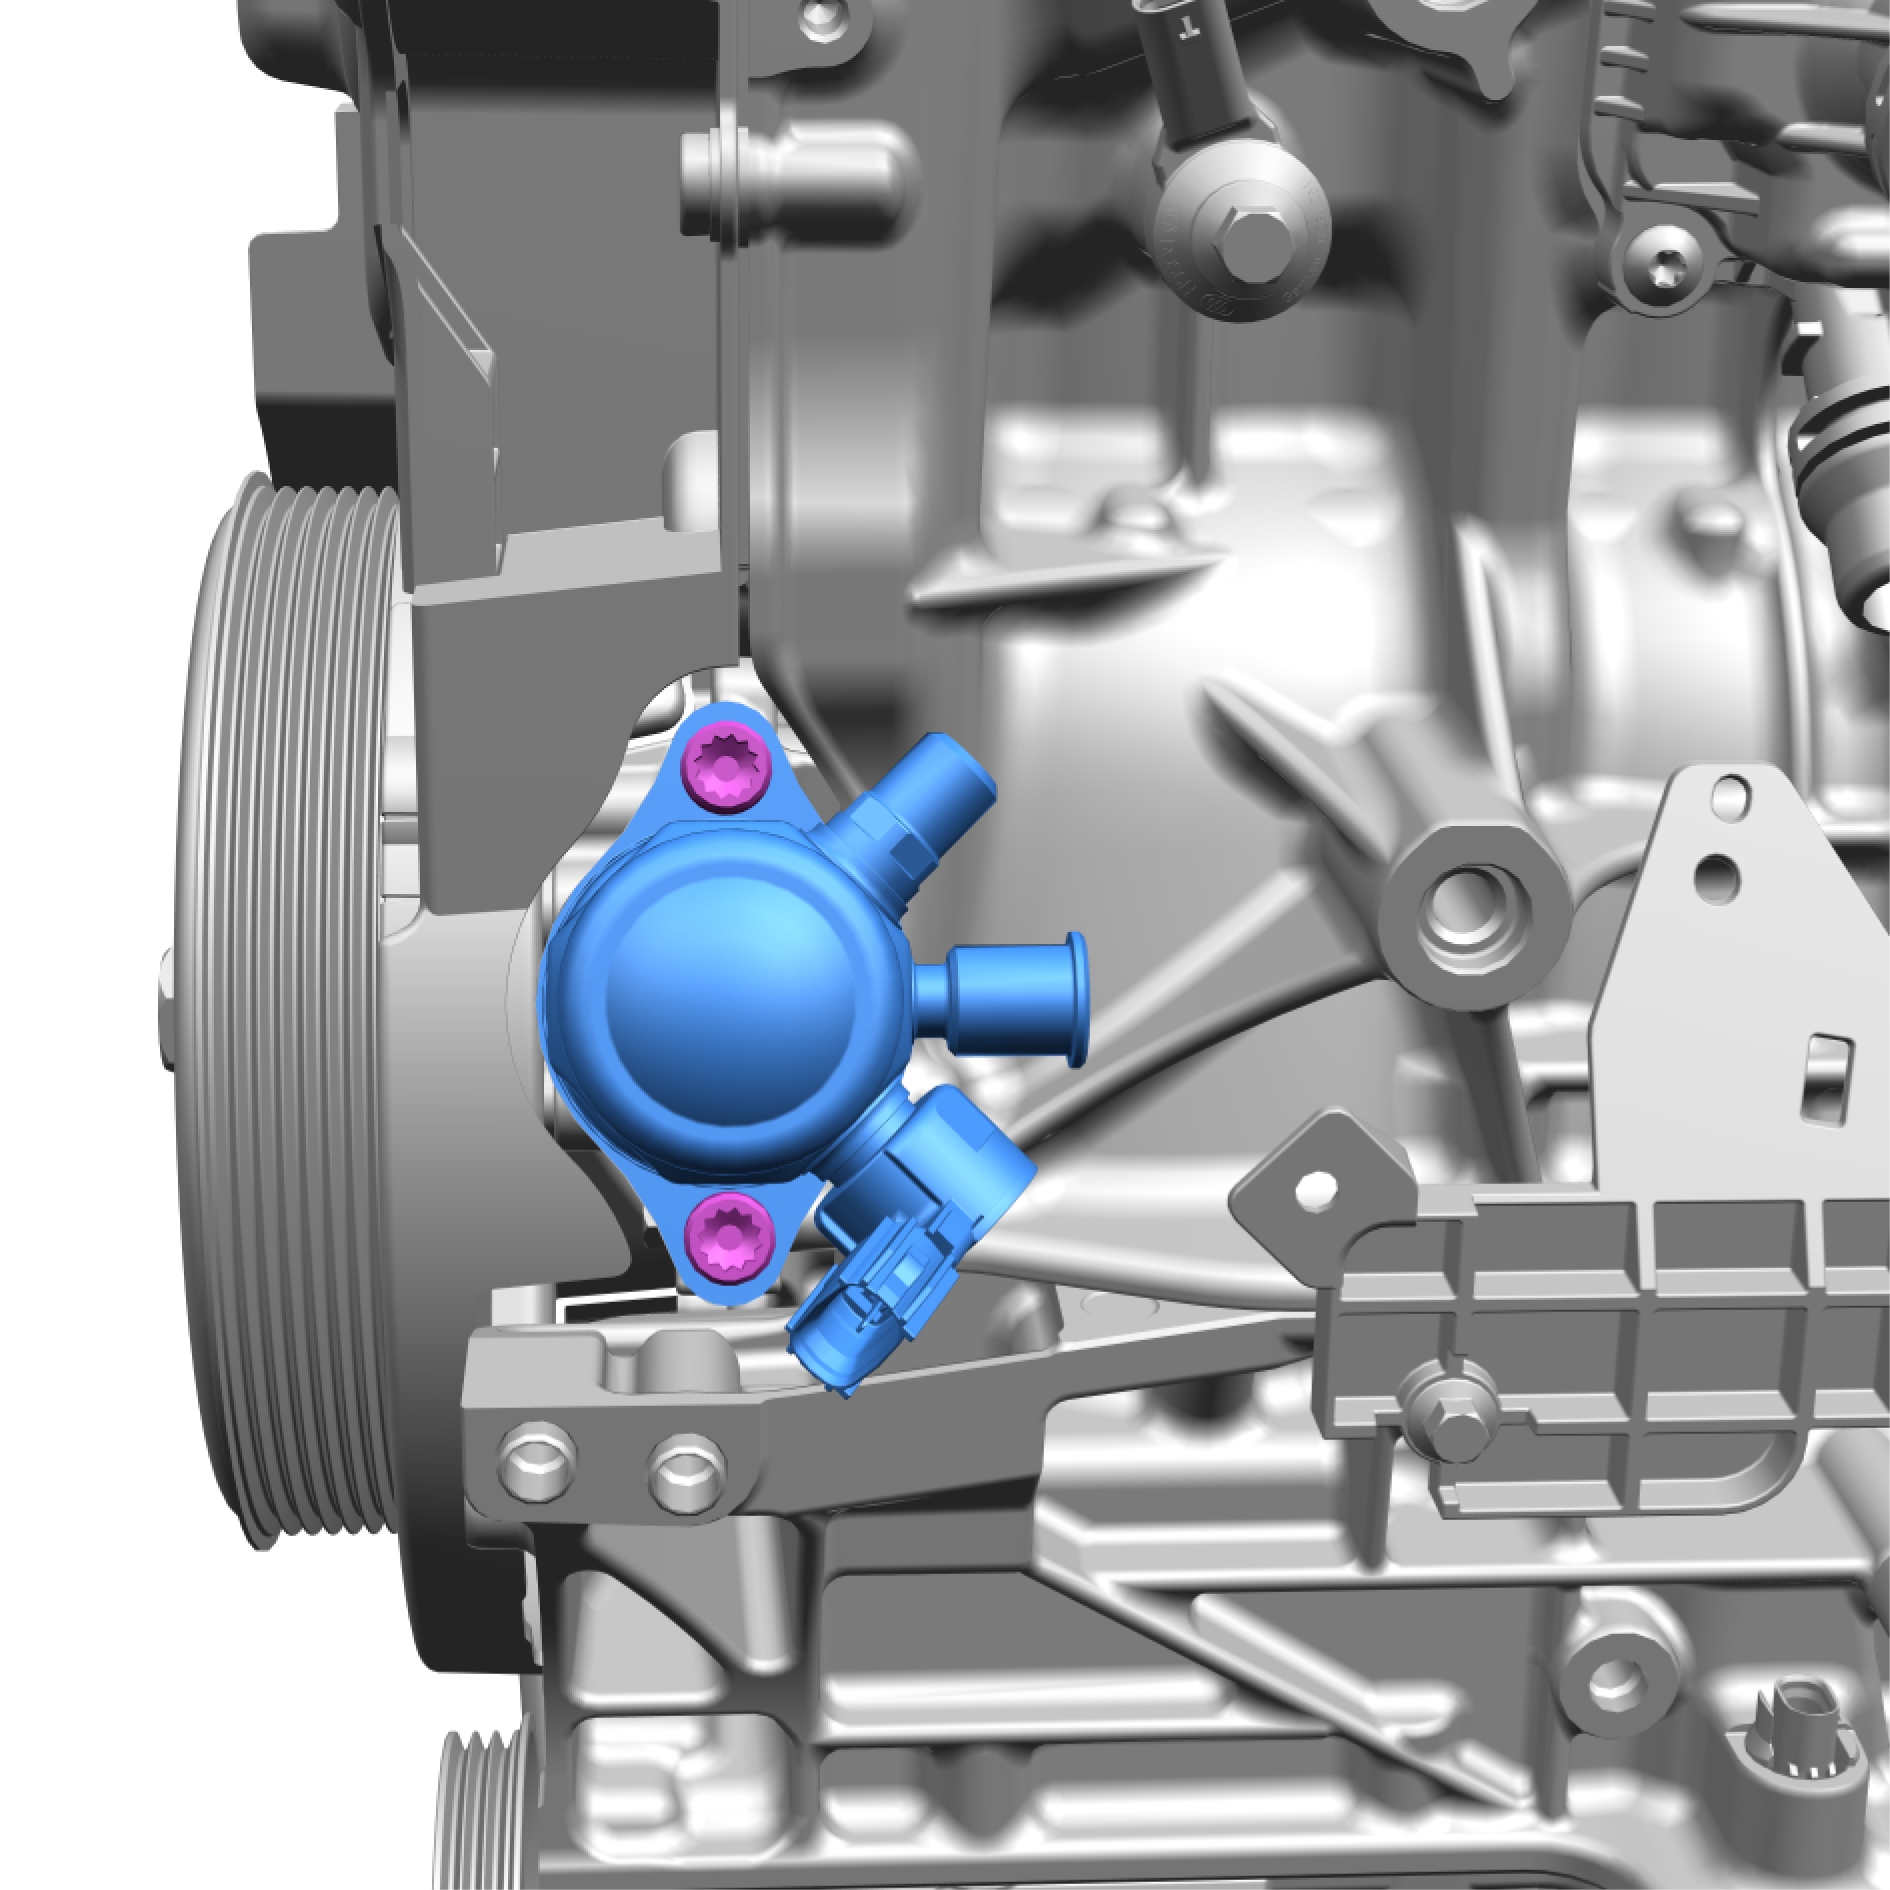
When installing, tighten by rotating each screw 1 turn at a time.
Remove the screws.
Torque: 30 Nm
Remove the marked component.
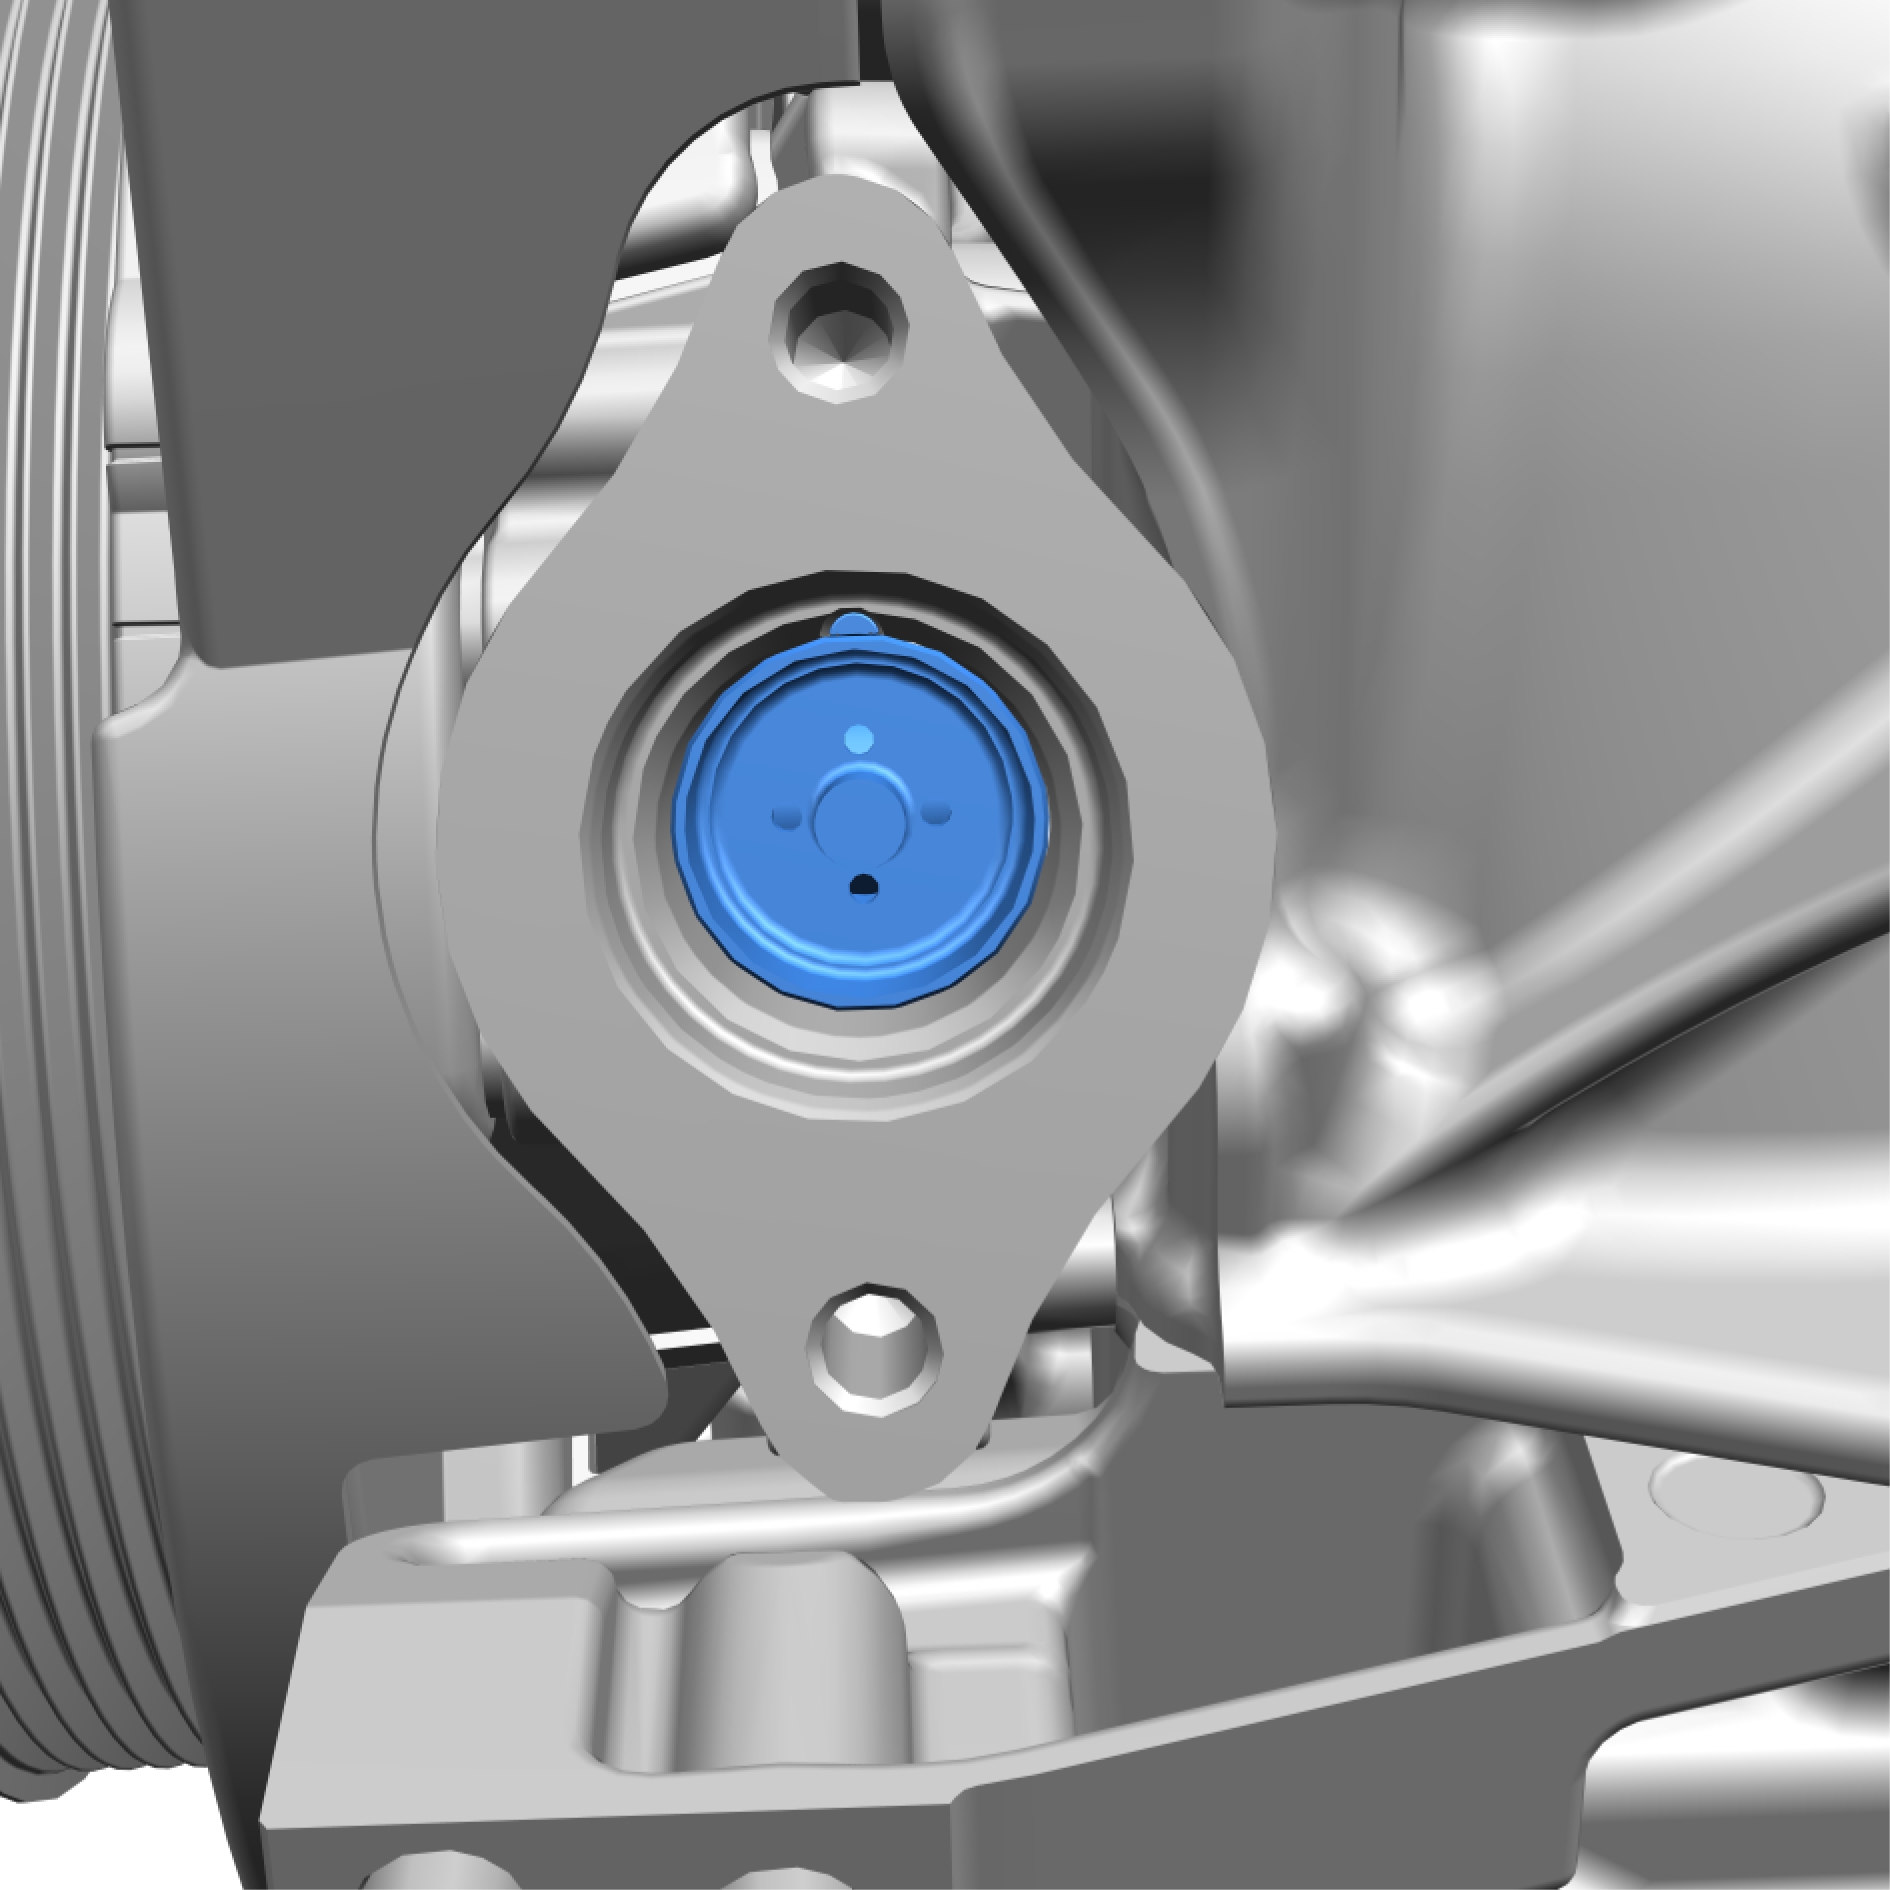
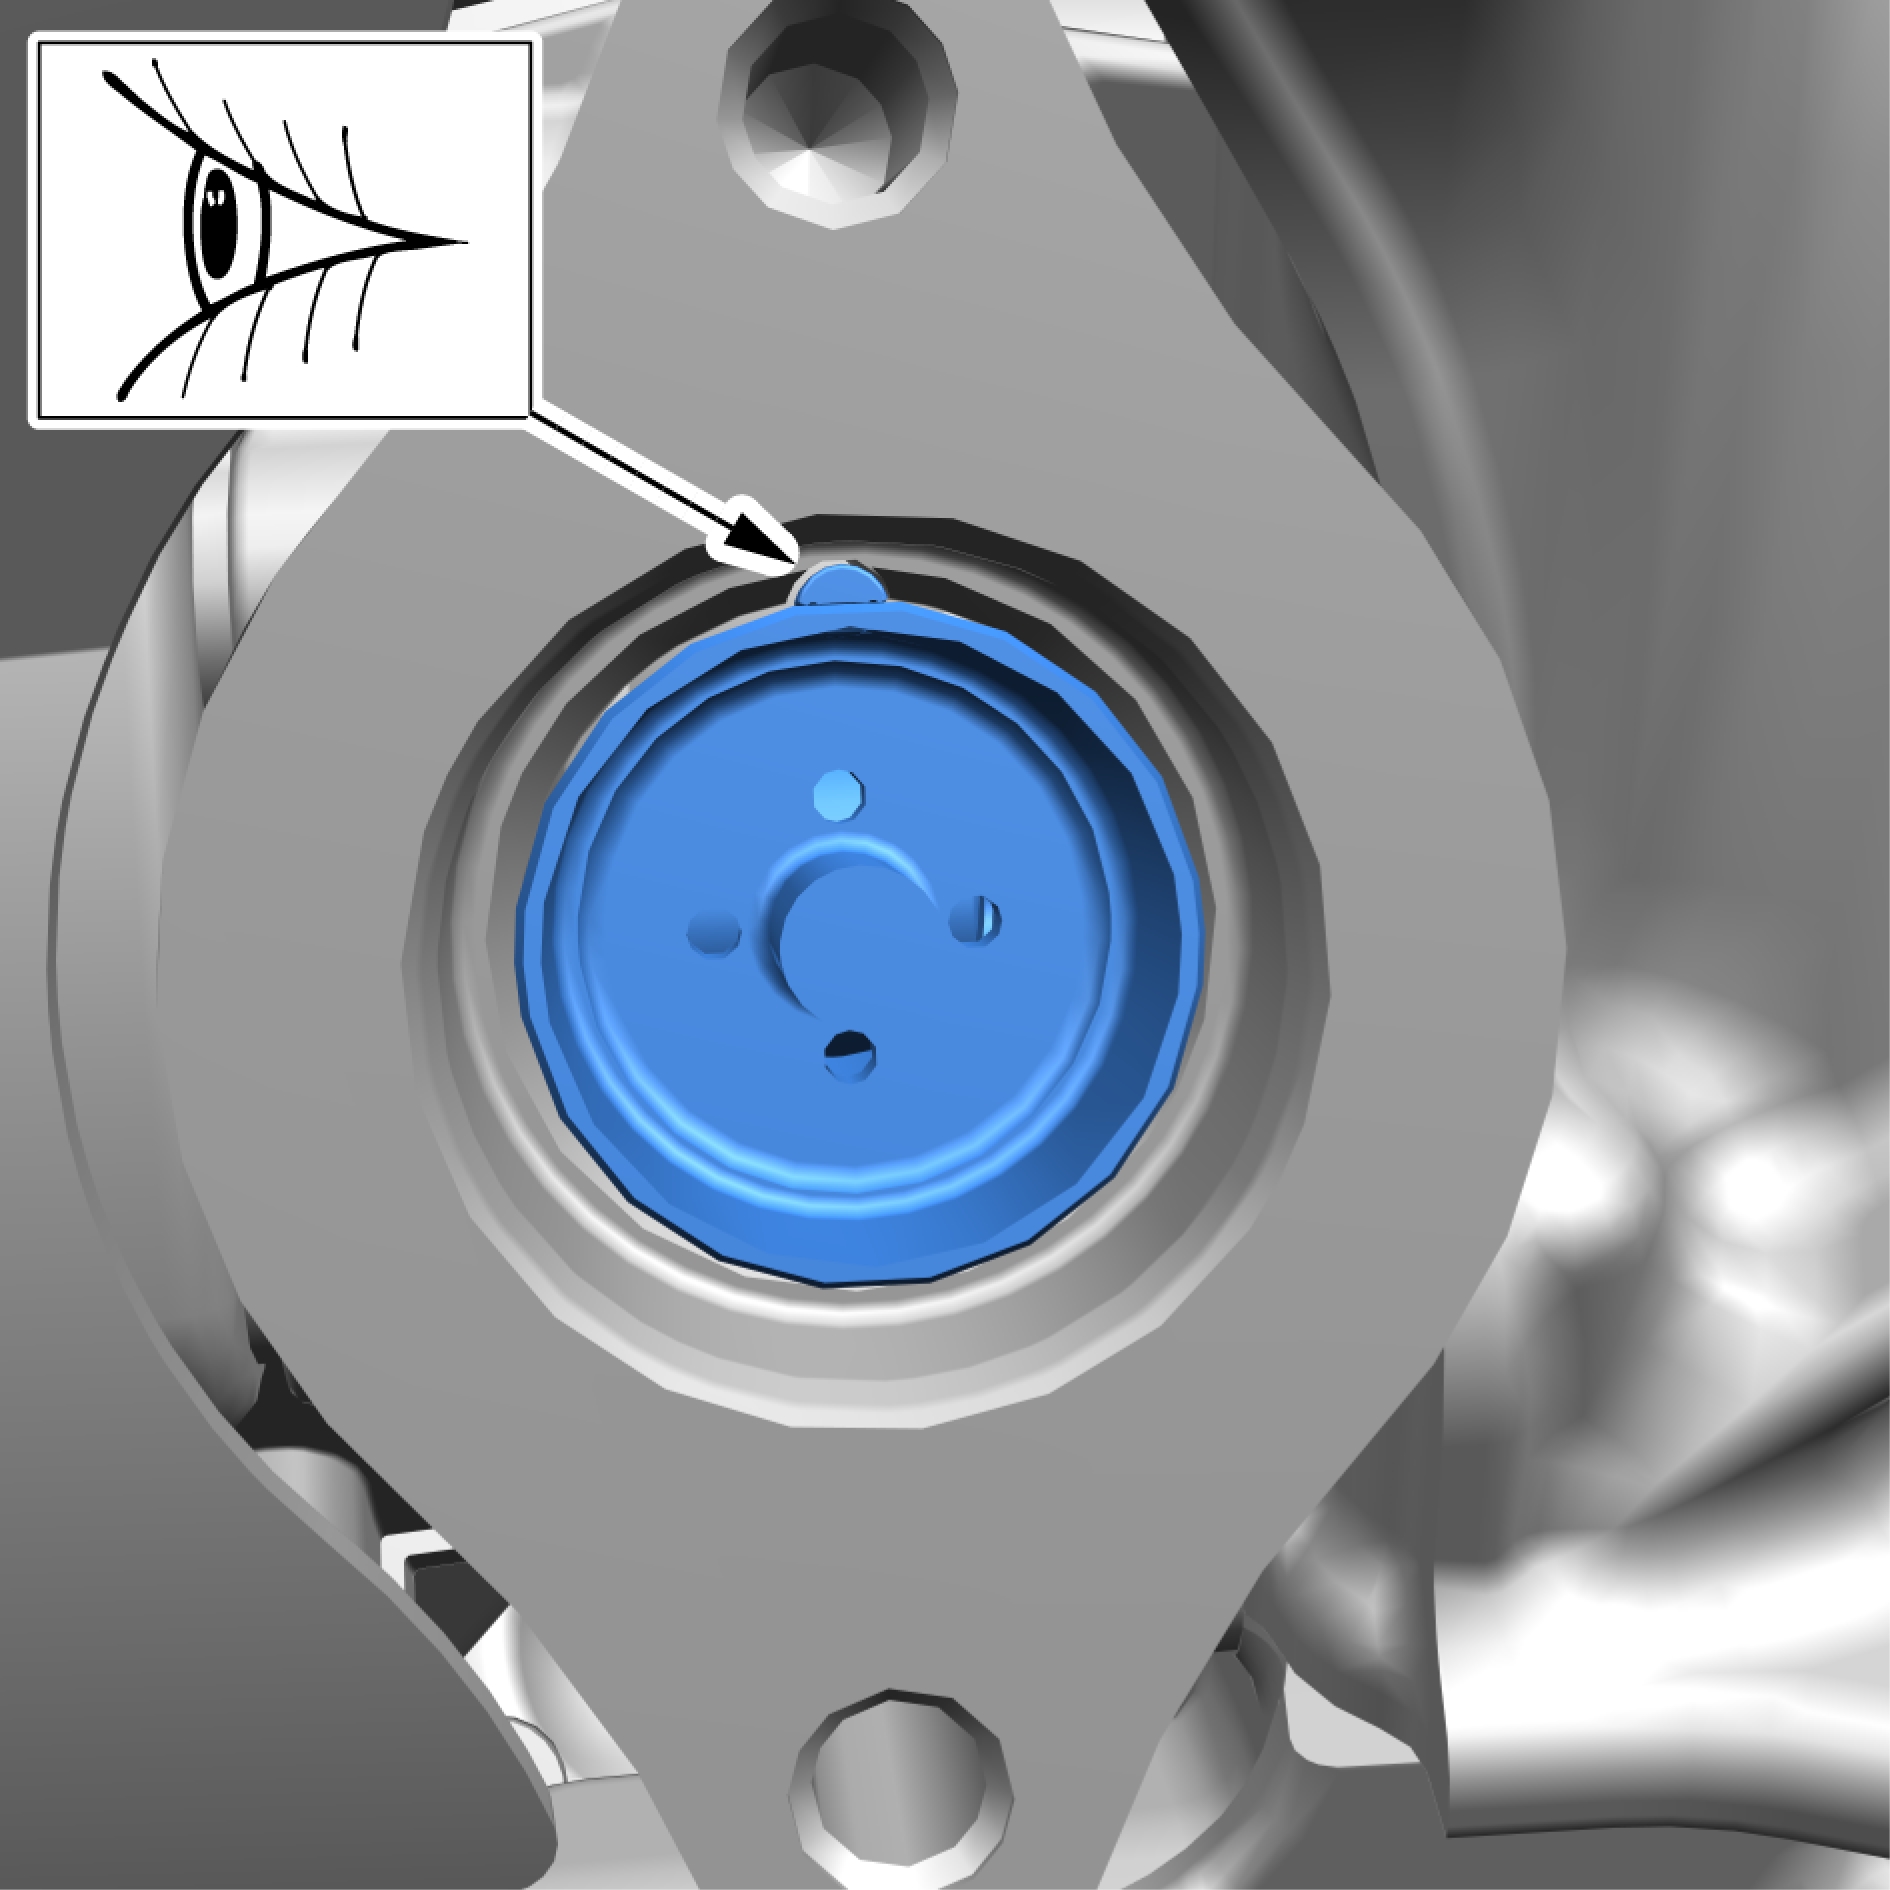
When installing, make sure that the component is positioned correctly.
Remove the marked component.
Check the component. If it displays any type of damage, it must be replaced.
Check the surfaces for abrasion.
Clean the surface.
Installation
Install in reverse order.
Measure with a vernier caliper. KOLLA UPP OM DETTA BEHÖVS!
Fuel rail, replace
Removal
Remove the screws.
Torque: 10 Nm
Remove the marked components.
Install special tool: 981 4129
Loosen the nut.
Torque, Step 1: 18 Nm Step 2: 30 Nm
Install special tool: 981 4129
Loosen the nut.
Torque, Step 1: 18 Nm Step 2: 30 Nm
Remove the screws.
Torque: 10 Nm
Remove the marked component.
Remove the screws.
Torque: 22 Nm
Remove the marked component.
Installation
Install in reverse order.
Pressure sensor - fuel rail, replace- COPY
Remove the marked component.
Torque:
Installation
Install in reverse order.
Fuel injector, replace
Removal
Remove the screws.
Torque: 10 Nm
Remove the marked components.
Install special tool: 981 4129
Loosen the nut.
Torque, Step 1: 18 Nm Step 2: 30 Nm
Install special tool: 981 4129
Loosen the nut.
Torque, Step 1: 18 Nm Step 2: 30 Nm
Remove the screws.
Torque: 10 Nm
Remove the marked component.
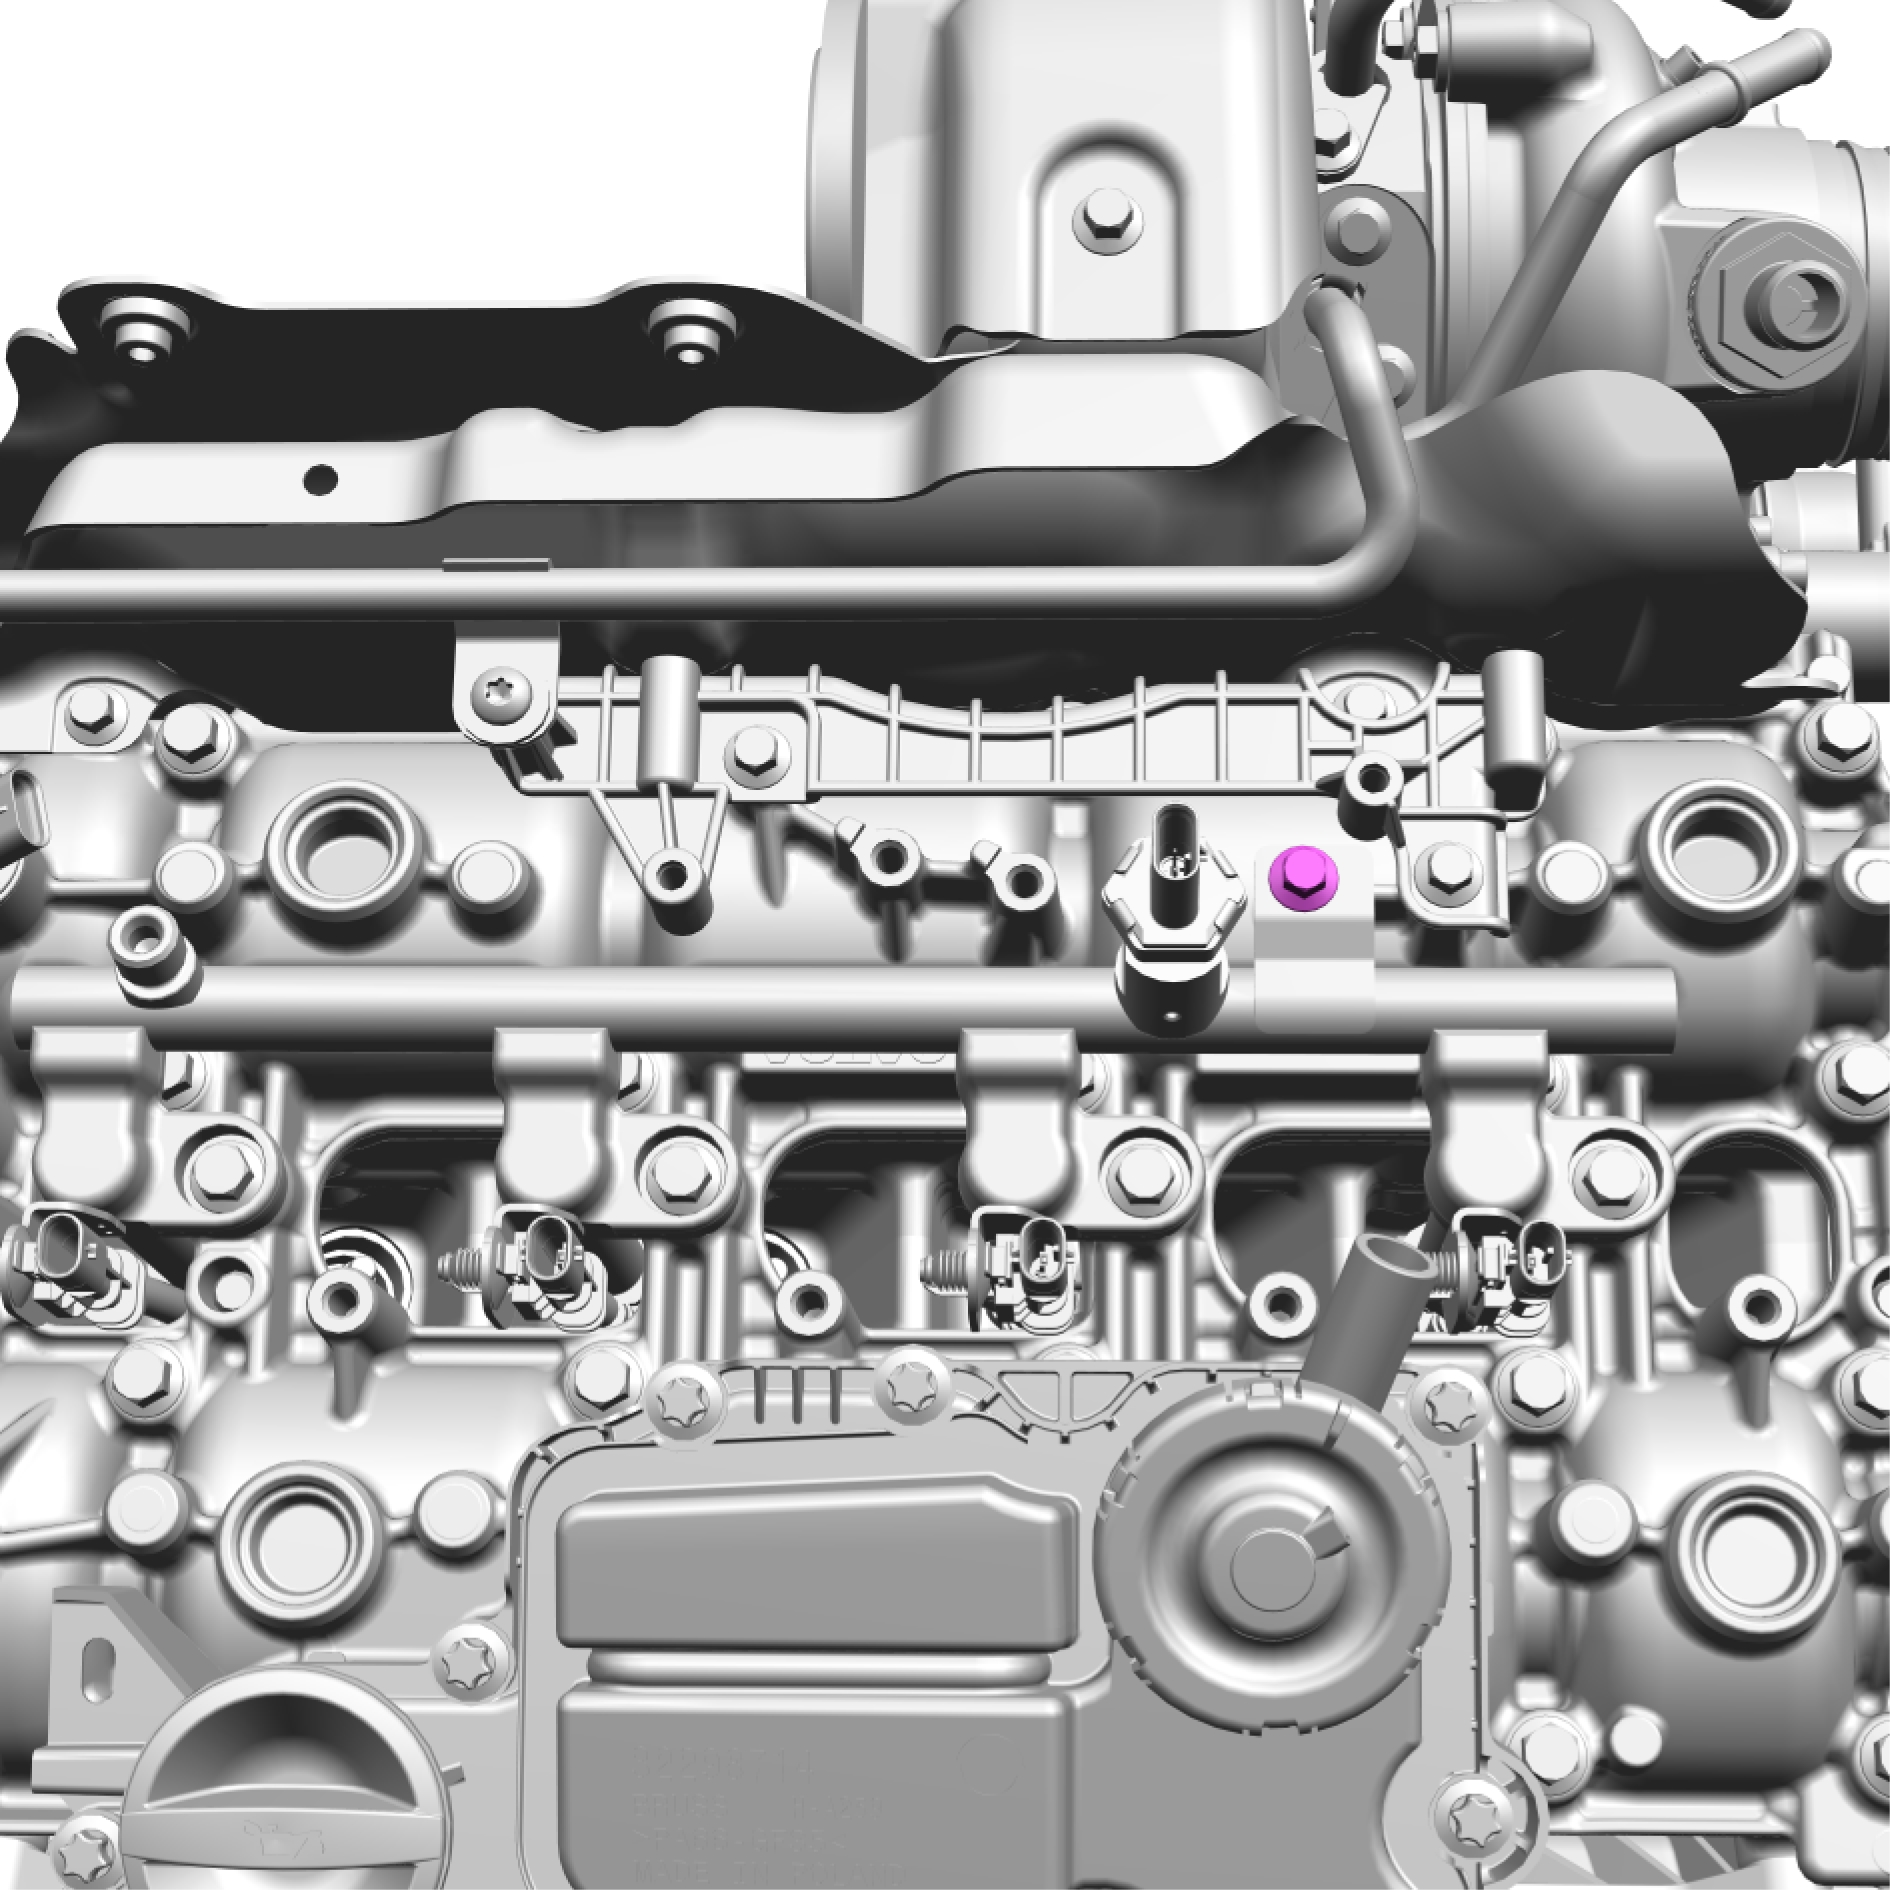
Remove the screw.
Torque: 10 Nm

Remove the screws.
Torque: 22 Nm
Remove the marked component.
Installation
Install in reverse order.
Turbocharger, replace
Removal
Remove the screws.
Torque: 10 Nm
Remove the marked component.
Remove the screw.
Remove the screws.
Torque: 10 Nm
Remove the marked component.
Remove and discard the marked components.
Remove the screws.
Torque: 10 Nm
Remove the screws.
Torque: 10 Nm
Remove the marked component.
Remove and discard the marked components.
Remove the screws.
Torque: 24 Nm
Remove the marked component.
Remove the nuts.
Remove the screws.
Remove the screw.
Torque: 24 Nm
Remove and discard the marked component.
Transferring components
Remove the screws.
Torque: 10 Nm
Remove the marked components.
Remove and discard the marked components.
Remove the marked component.
Remove and discard the marked component.
Installation
Install in reverse order.
Install the fasteners.
1, Torque: Exhaust manifold to cylinder head, nut.
Stage 1: 5 Nm
Stage 2: 18 Nm
Stage 3: 20 Nm
2, Torque: Exhaust manifold to cylinder head, bolt
Stage 1: 5 Nm
Stage 2: 16 Nm
Stage 3: 18 Nm
Oil trap, replace
Removal
Remove the marked component.
The tightening schedule for installation.
Remove the screws.
Torque: 10 Nm
Remove the marked component.
Installation
Install in reverse order.
Coolant pump - engine, replace
Removal
Remove the clip.
Remove the clip.
Remove the marked component.
Remove the screws.
Fold away the marked component.
Remove the screws.
Torque: 10 Nm
Remove the marked component.
Remove and discard the marked component.
Remove the screws.
Torque: 17 Nm
Remove the marked component.
Installation
Install in reverse order.
Thermostat, replace
Removal
Remove the screws.
Torque: 10 Nm
Remove the marked component.
Installation
Install in reverse order.
Ignition coil, replace
Removal
Remove the screws.
Torque: 10 Nm
Remove the marked components.
Apply grease on the indicated area.
Installation
Install in reverse order.
Spark plug, replace
Removal
Remove the screws.
Torque: 10 Nm
Remove the marked components.
Apply grease on the indicated area.
Remove the marked components.
Torque: 18 Nm
Installation
Install in reverse order.
Camshaft position sensor - exhaust, replace
Make sure that the area around the component is clean and free of foreign material before removal.
Remove the screw.
Torque: 10 Nm
Remove the marked component.
Installation
Install in reverse order.
Camshaft position sensor - intake, replace
Make sure that the area around the component is clean and free of foreign material before removal.
Remove the screw.
Torque: 10 Nm
Remove the marked component.
Installation
Install in reverse order.
Crankshaft position sensor, replace
Removal
Remove the nut.
Torque: 10 Nm
Remove the marked component.
Remove the screw.
Torque: 10 Nm
Remove the marked component.
Installation
Install in reverse order.
Engine coolant temperature sensor, replace
Removal
Be prepared to collect escaping fluid.
Release the clip.
Remove the marked component.
Installation
Install in reverse order.
Manifold absolute pressure MAP sensor, replace
Removal

Remove the screw.
Torque: 5 Nm
Remove the marked component.
Installation
Install in reverse order.
Knock sensor, replace
Removal
Note the position of the component before removal.
Remove the screw.
Torque: 20 Nm
Remove the marked component.
Installation
Install in reverse order.
Cylinder head, replace
Removal
Remove and discard the screws.
Torque: 50 Nm and
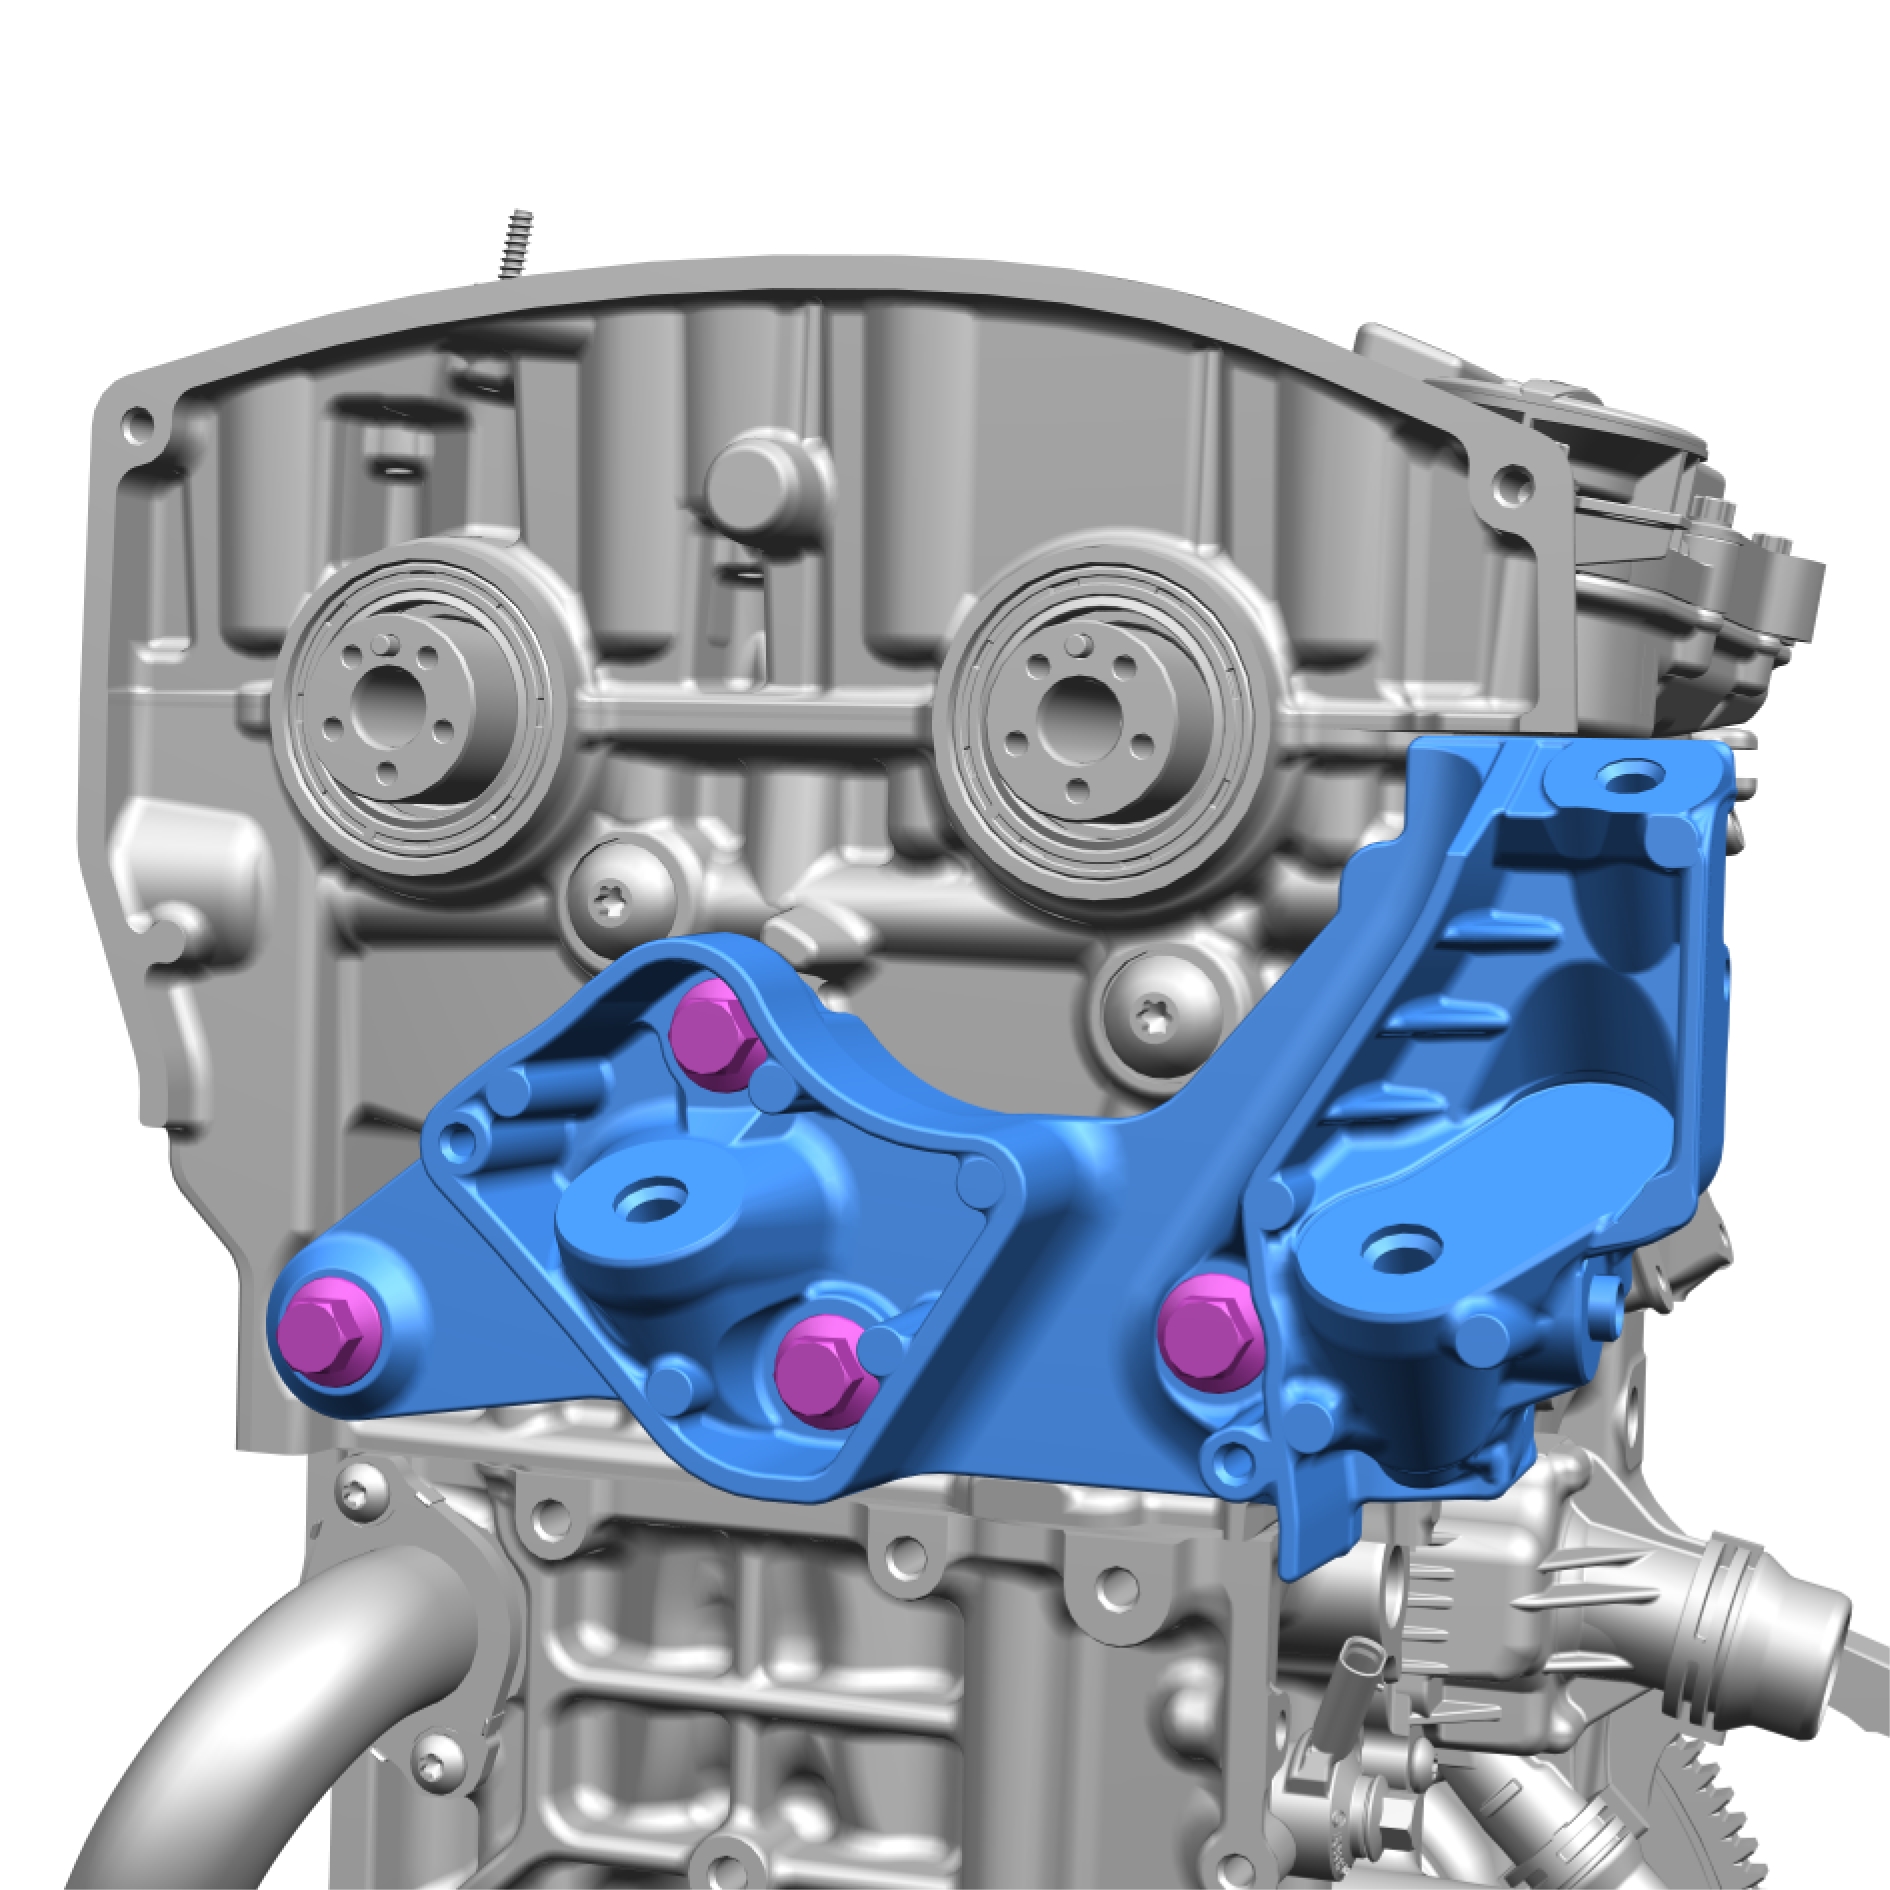
The screws are not to be reused.
Remove and discard the screws.
Torque: 50 Nm and
Remove the marked component.
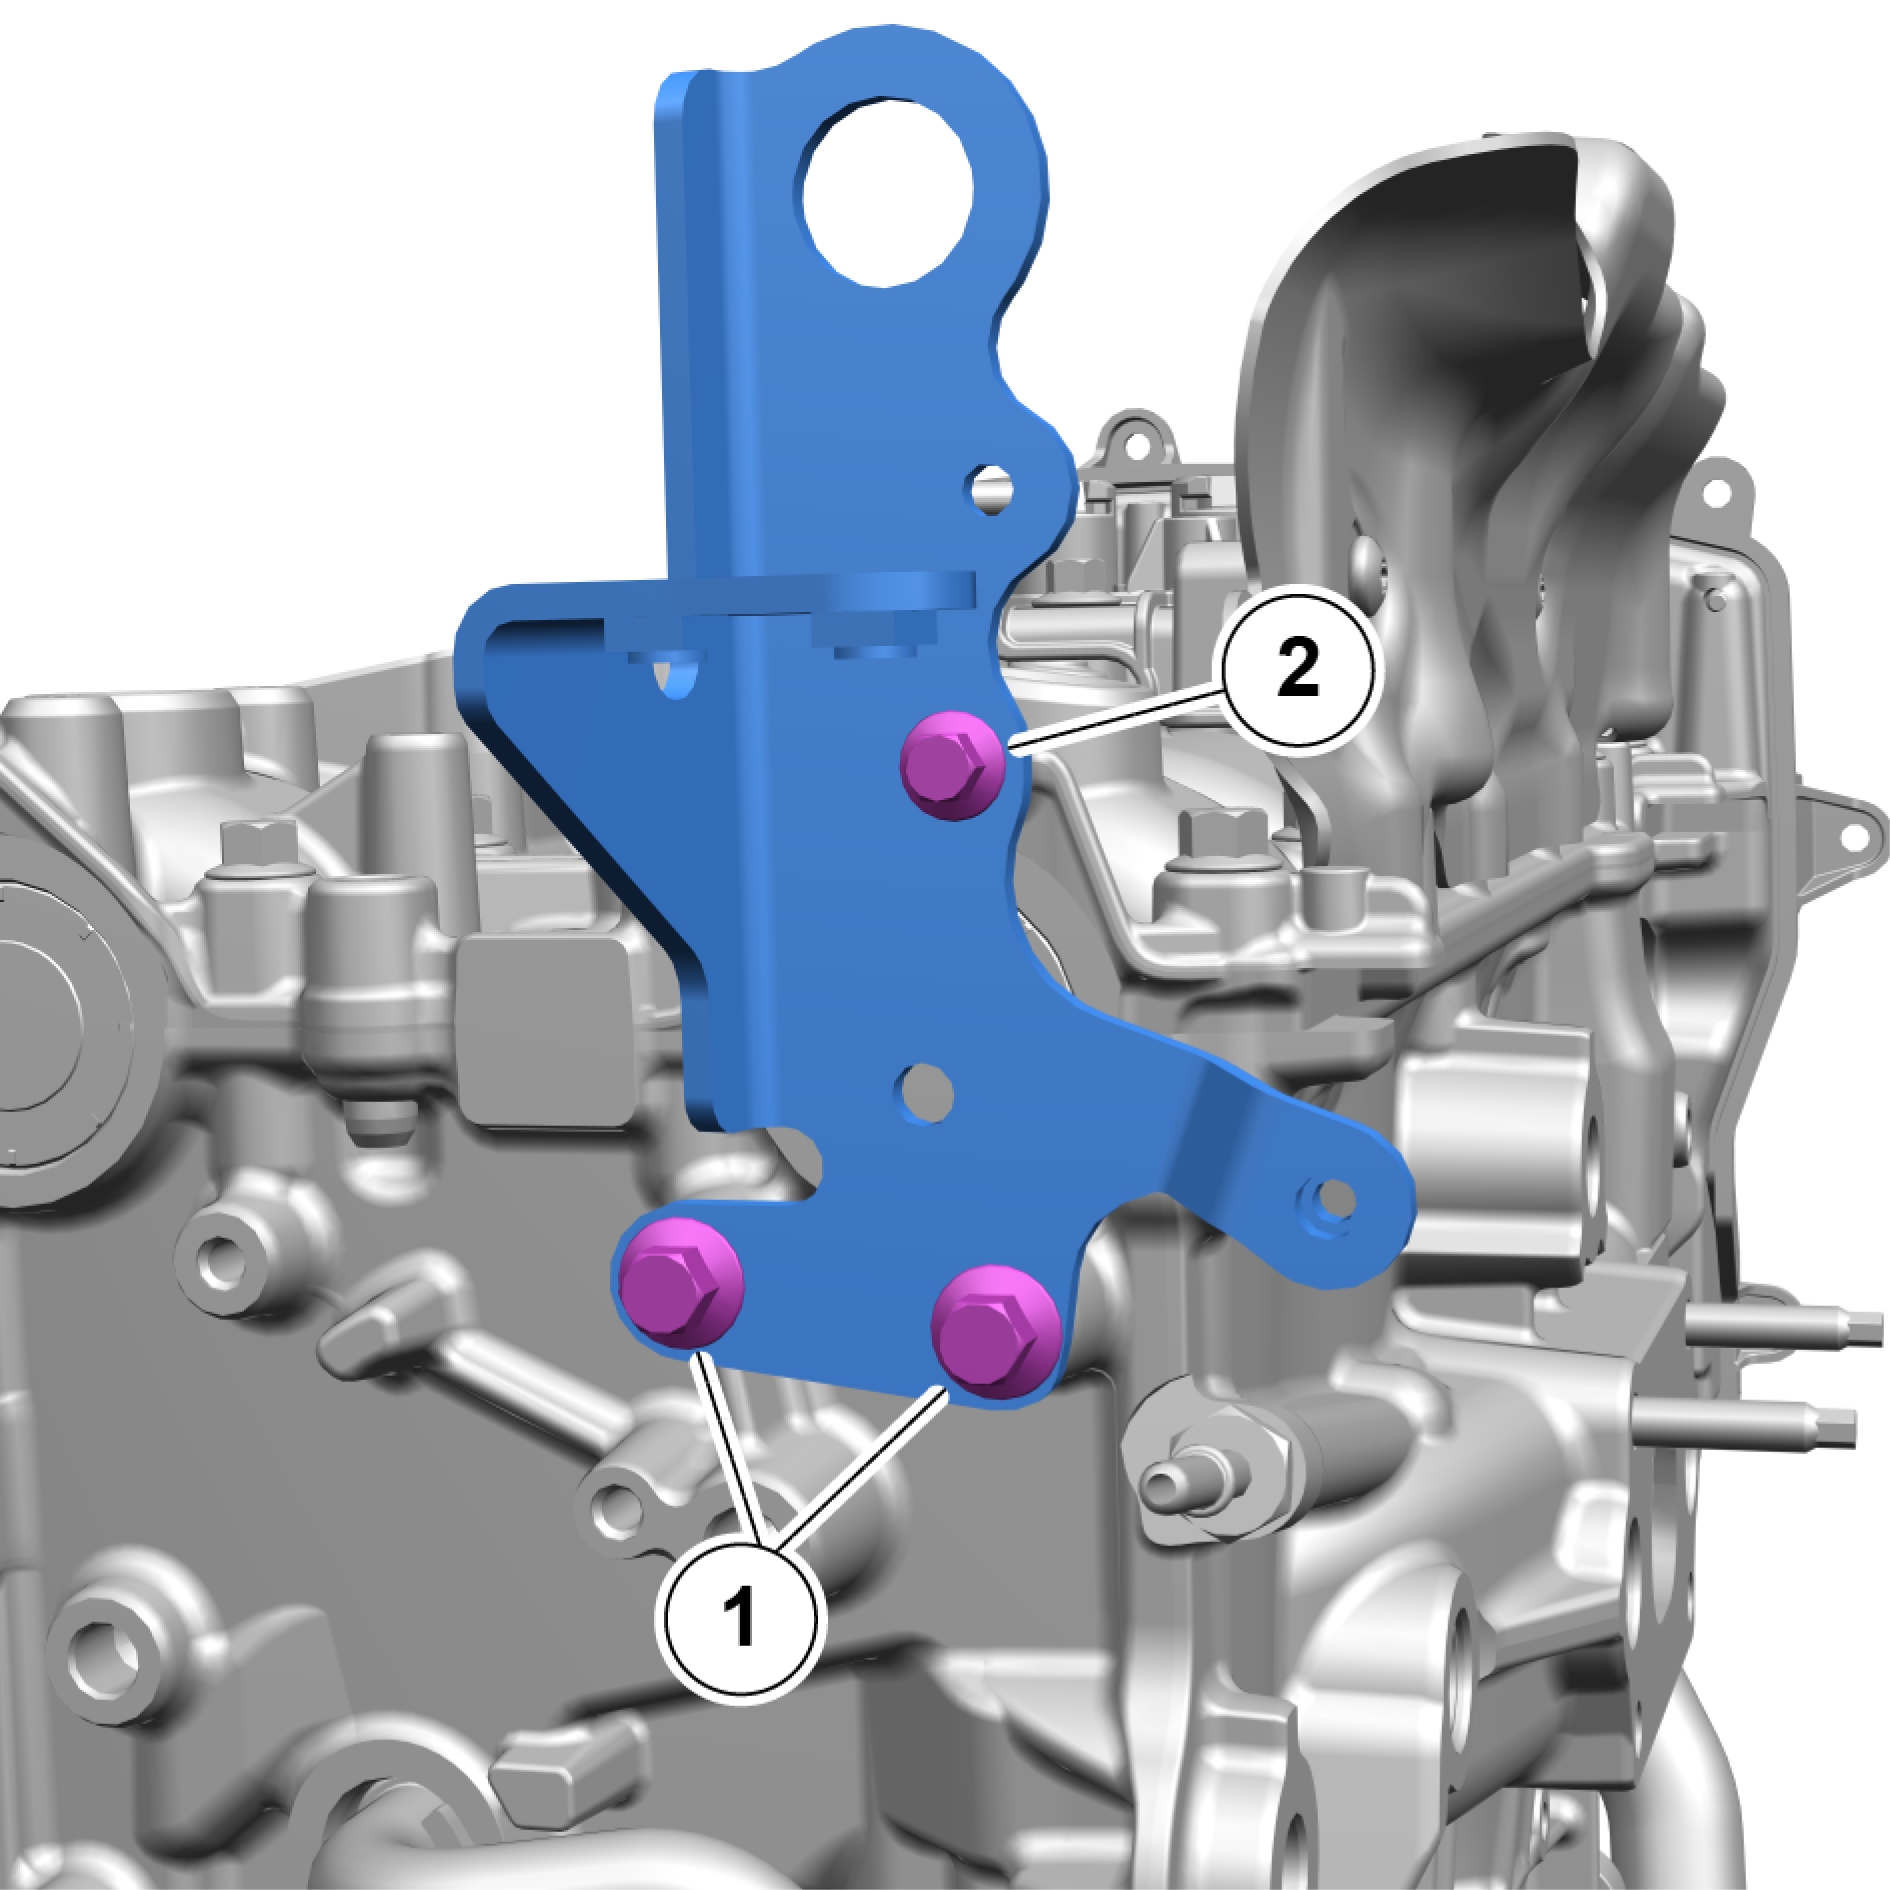
Remove the marked component.
Torque:
1, 24 Nm
2, 10 Nm
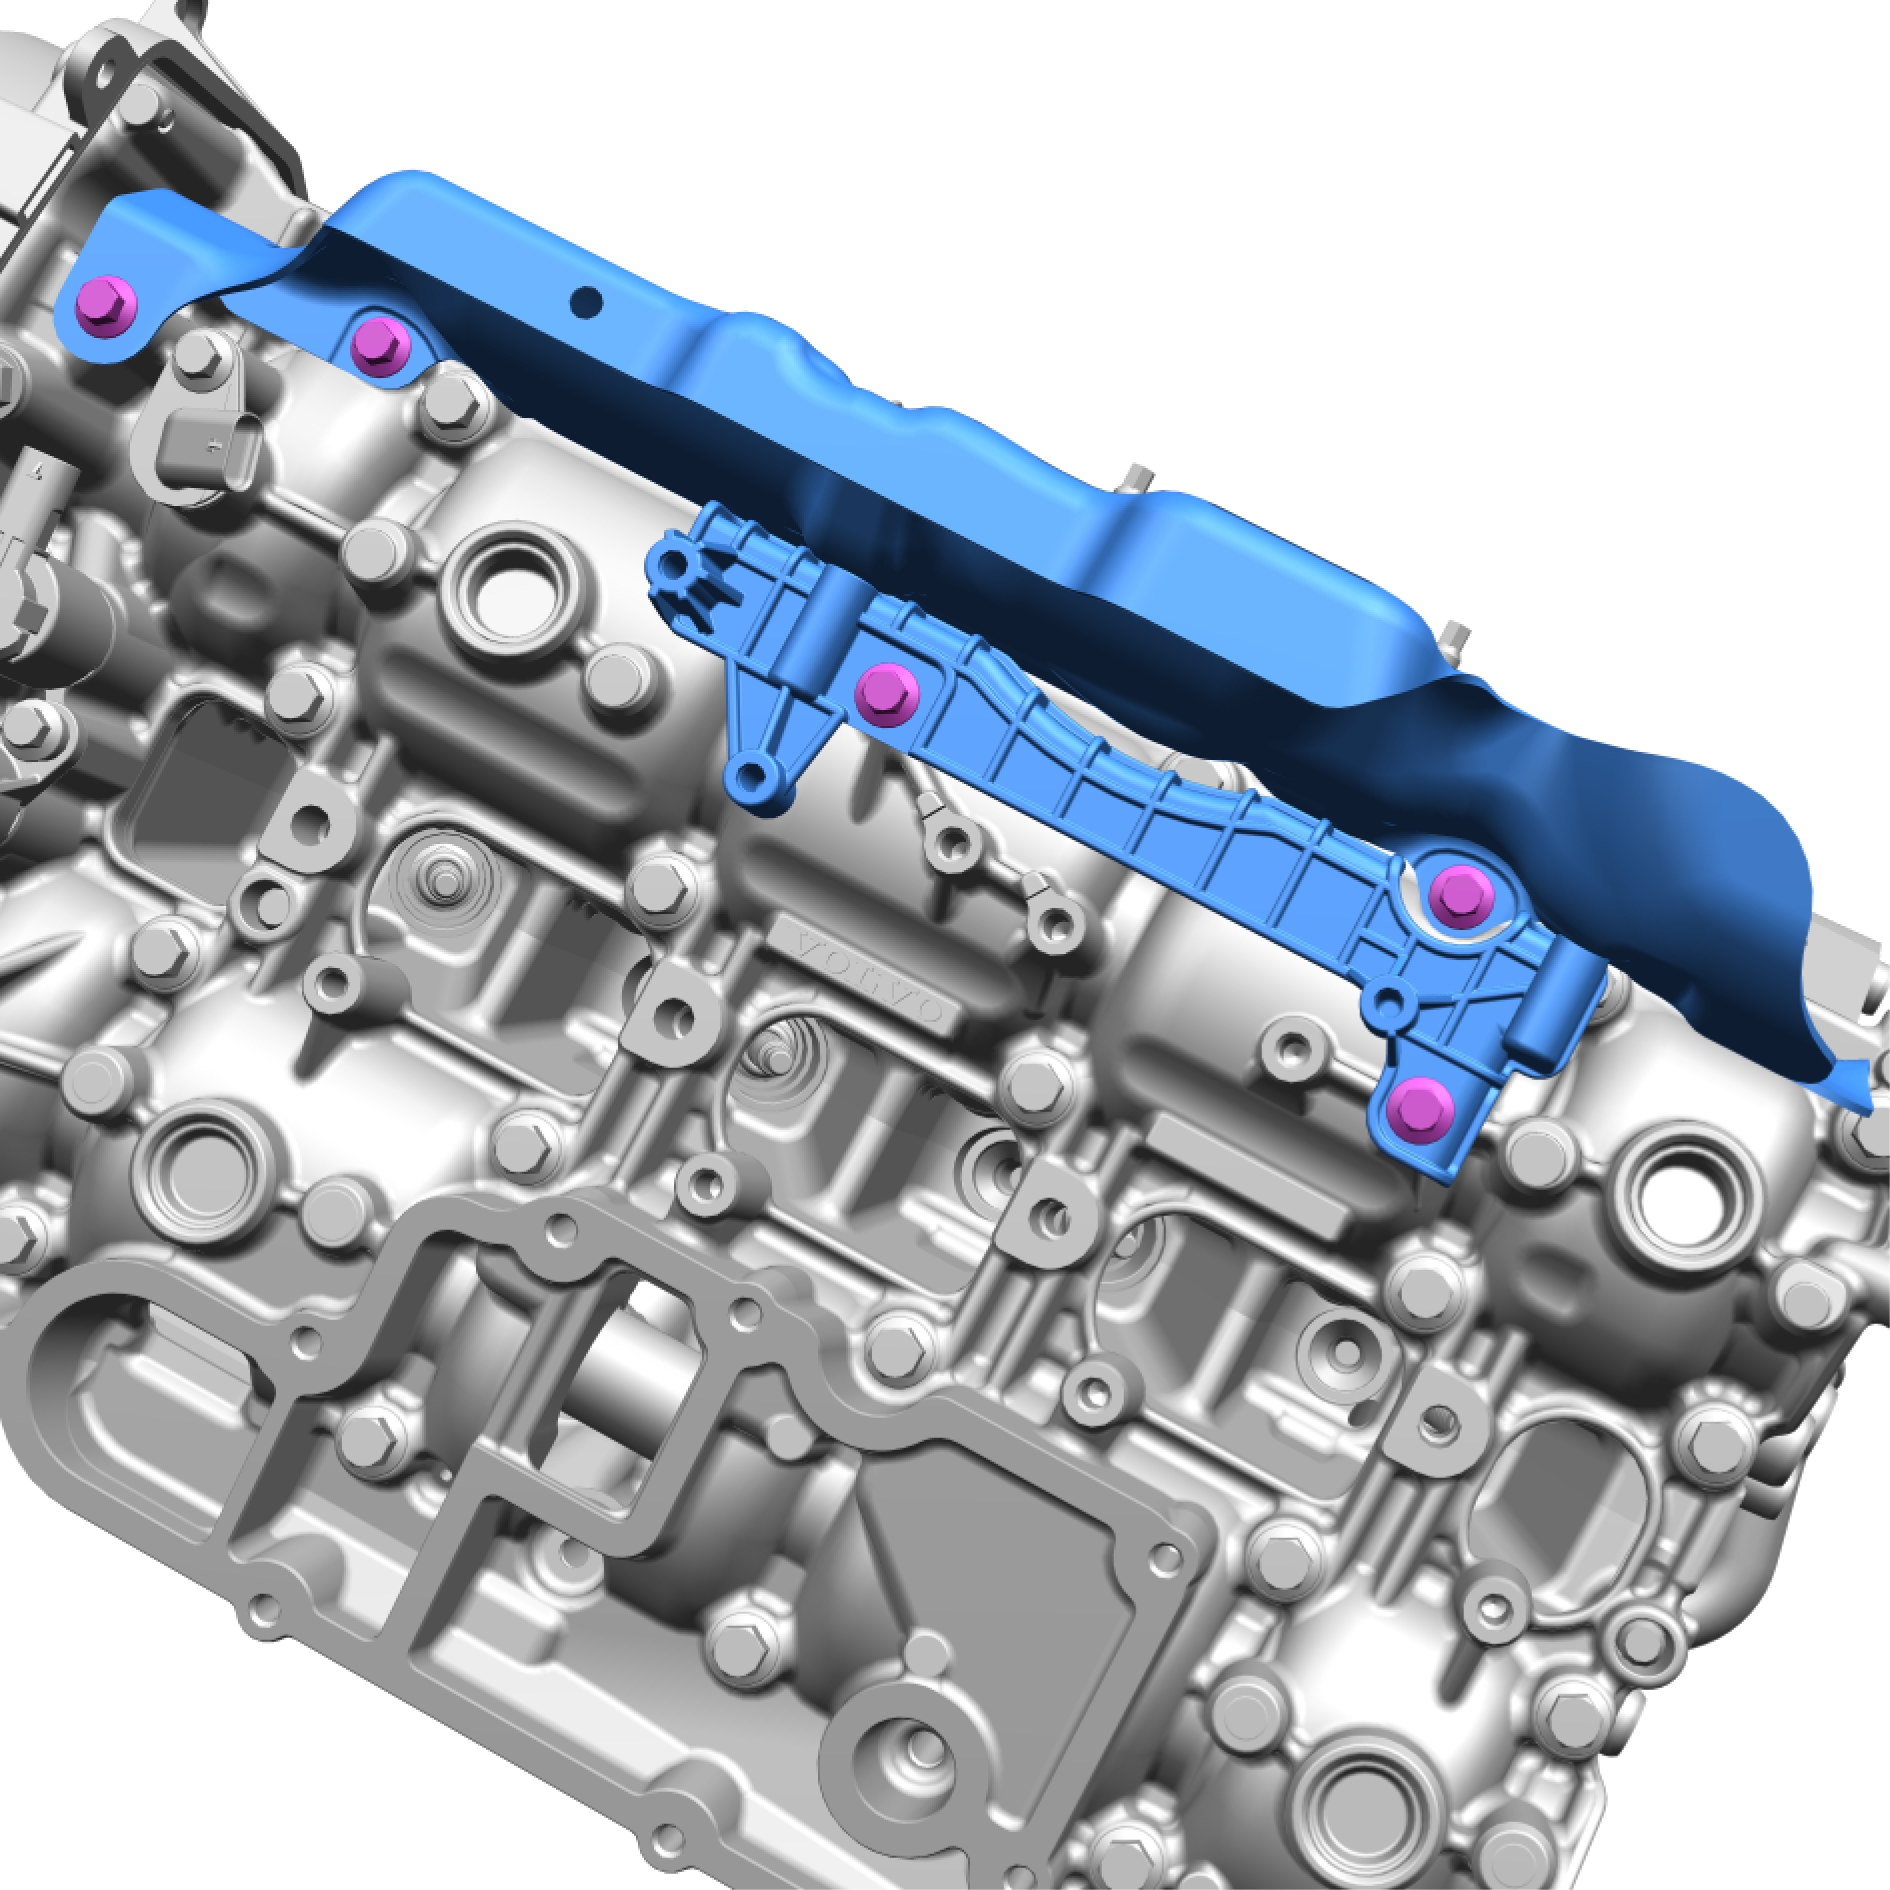
Remove the screws.
Torque: 10 Nm
Remove the marked component.
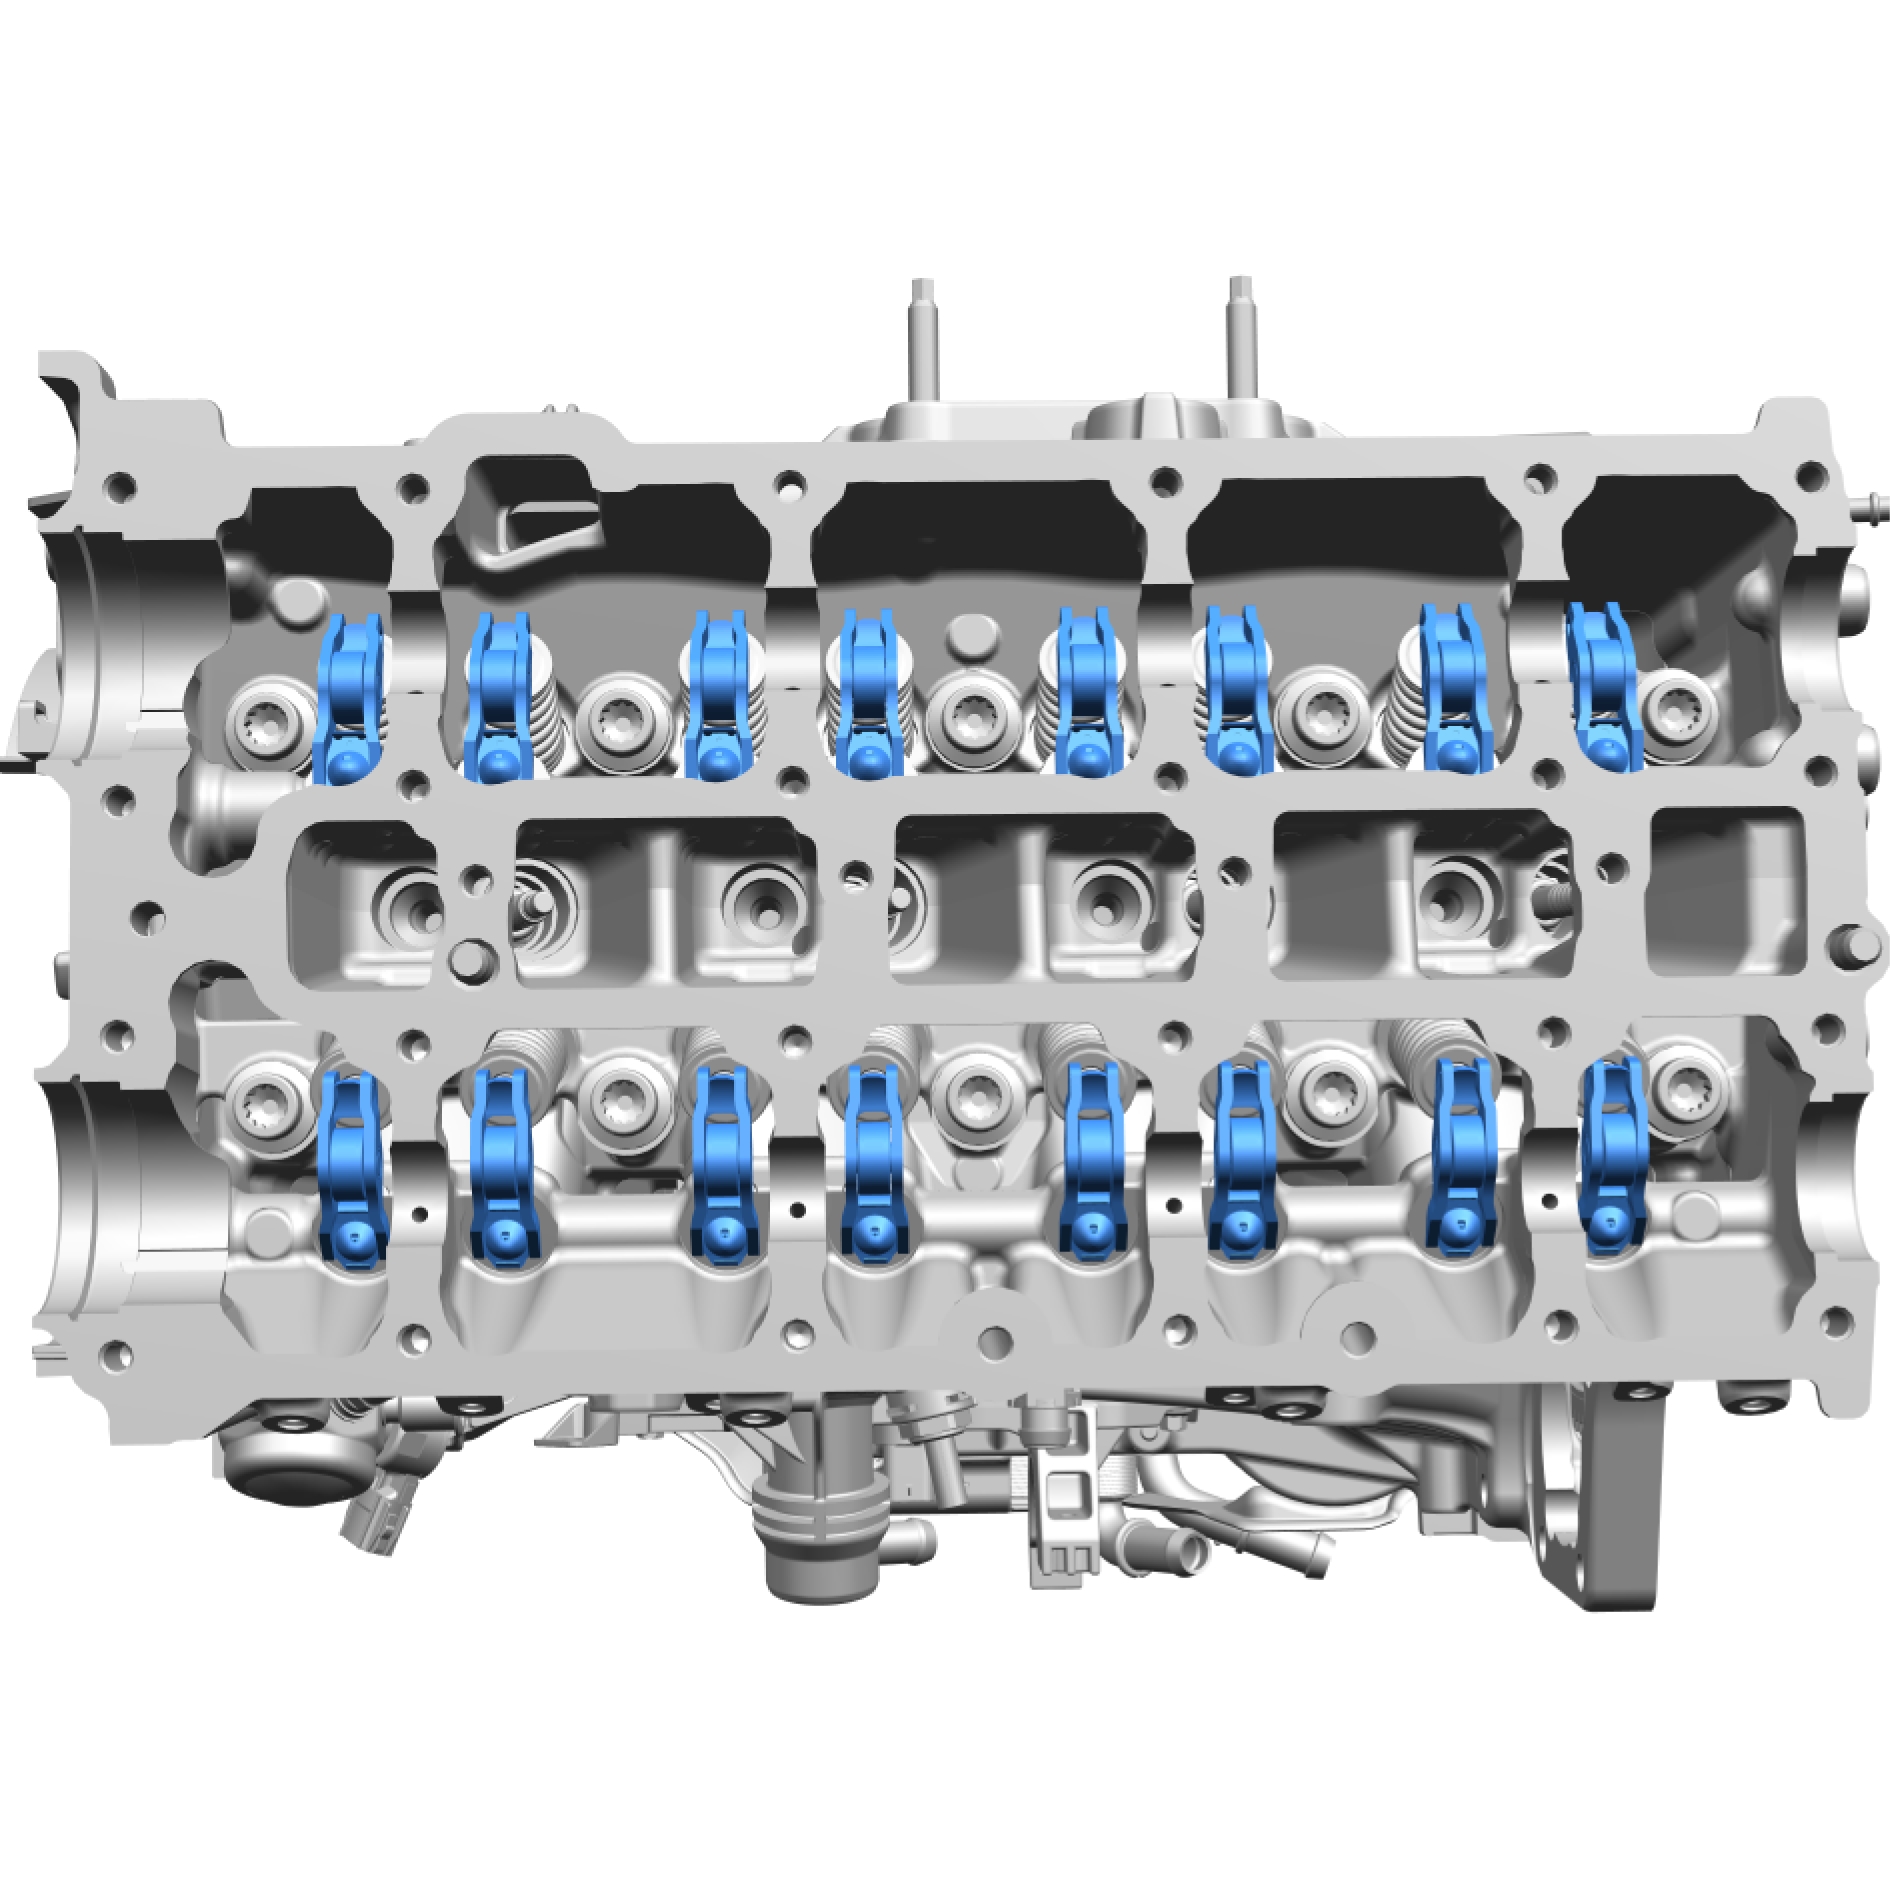
Note the position of each component before removal.
Remove the marked components.
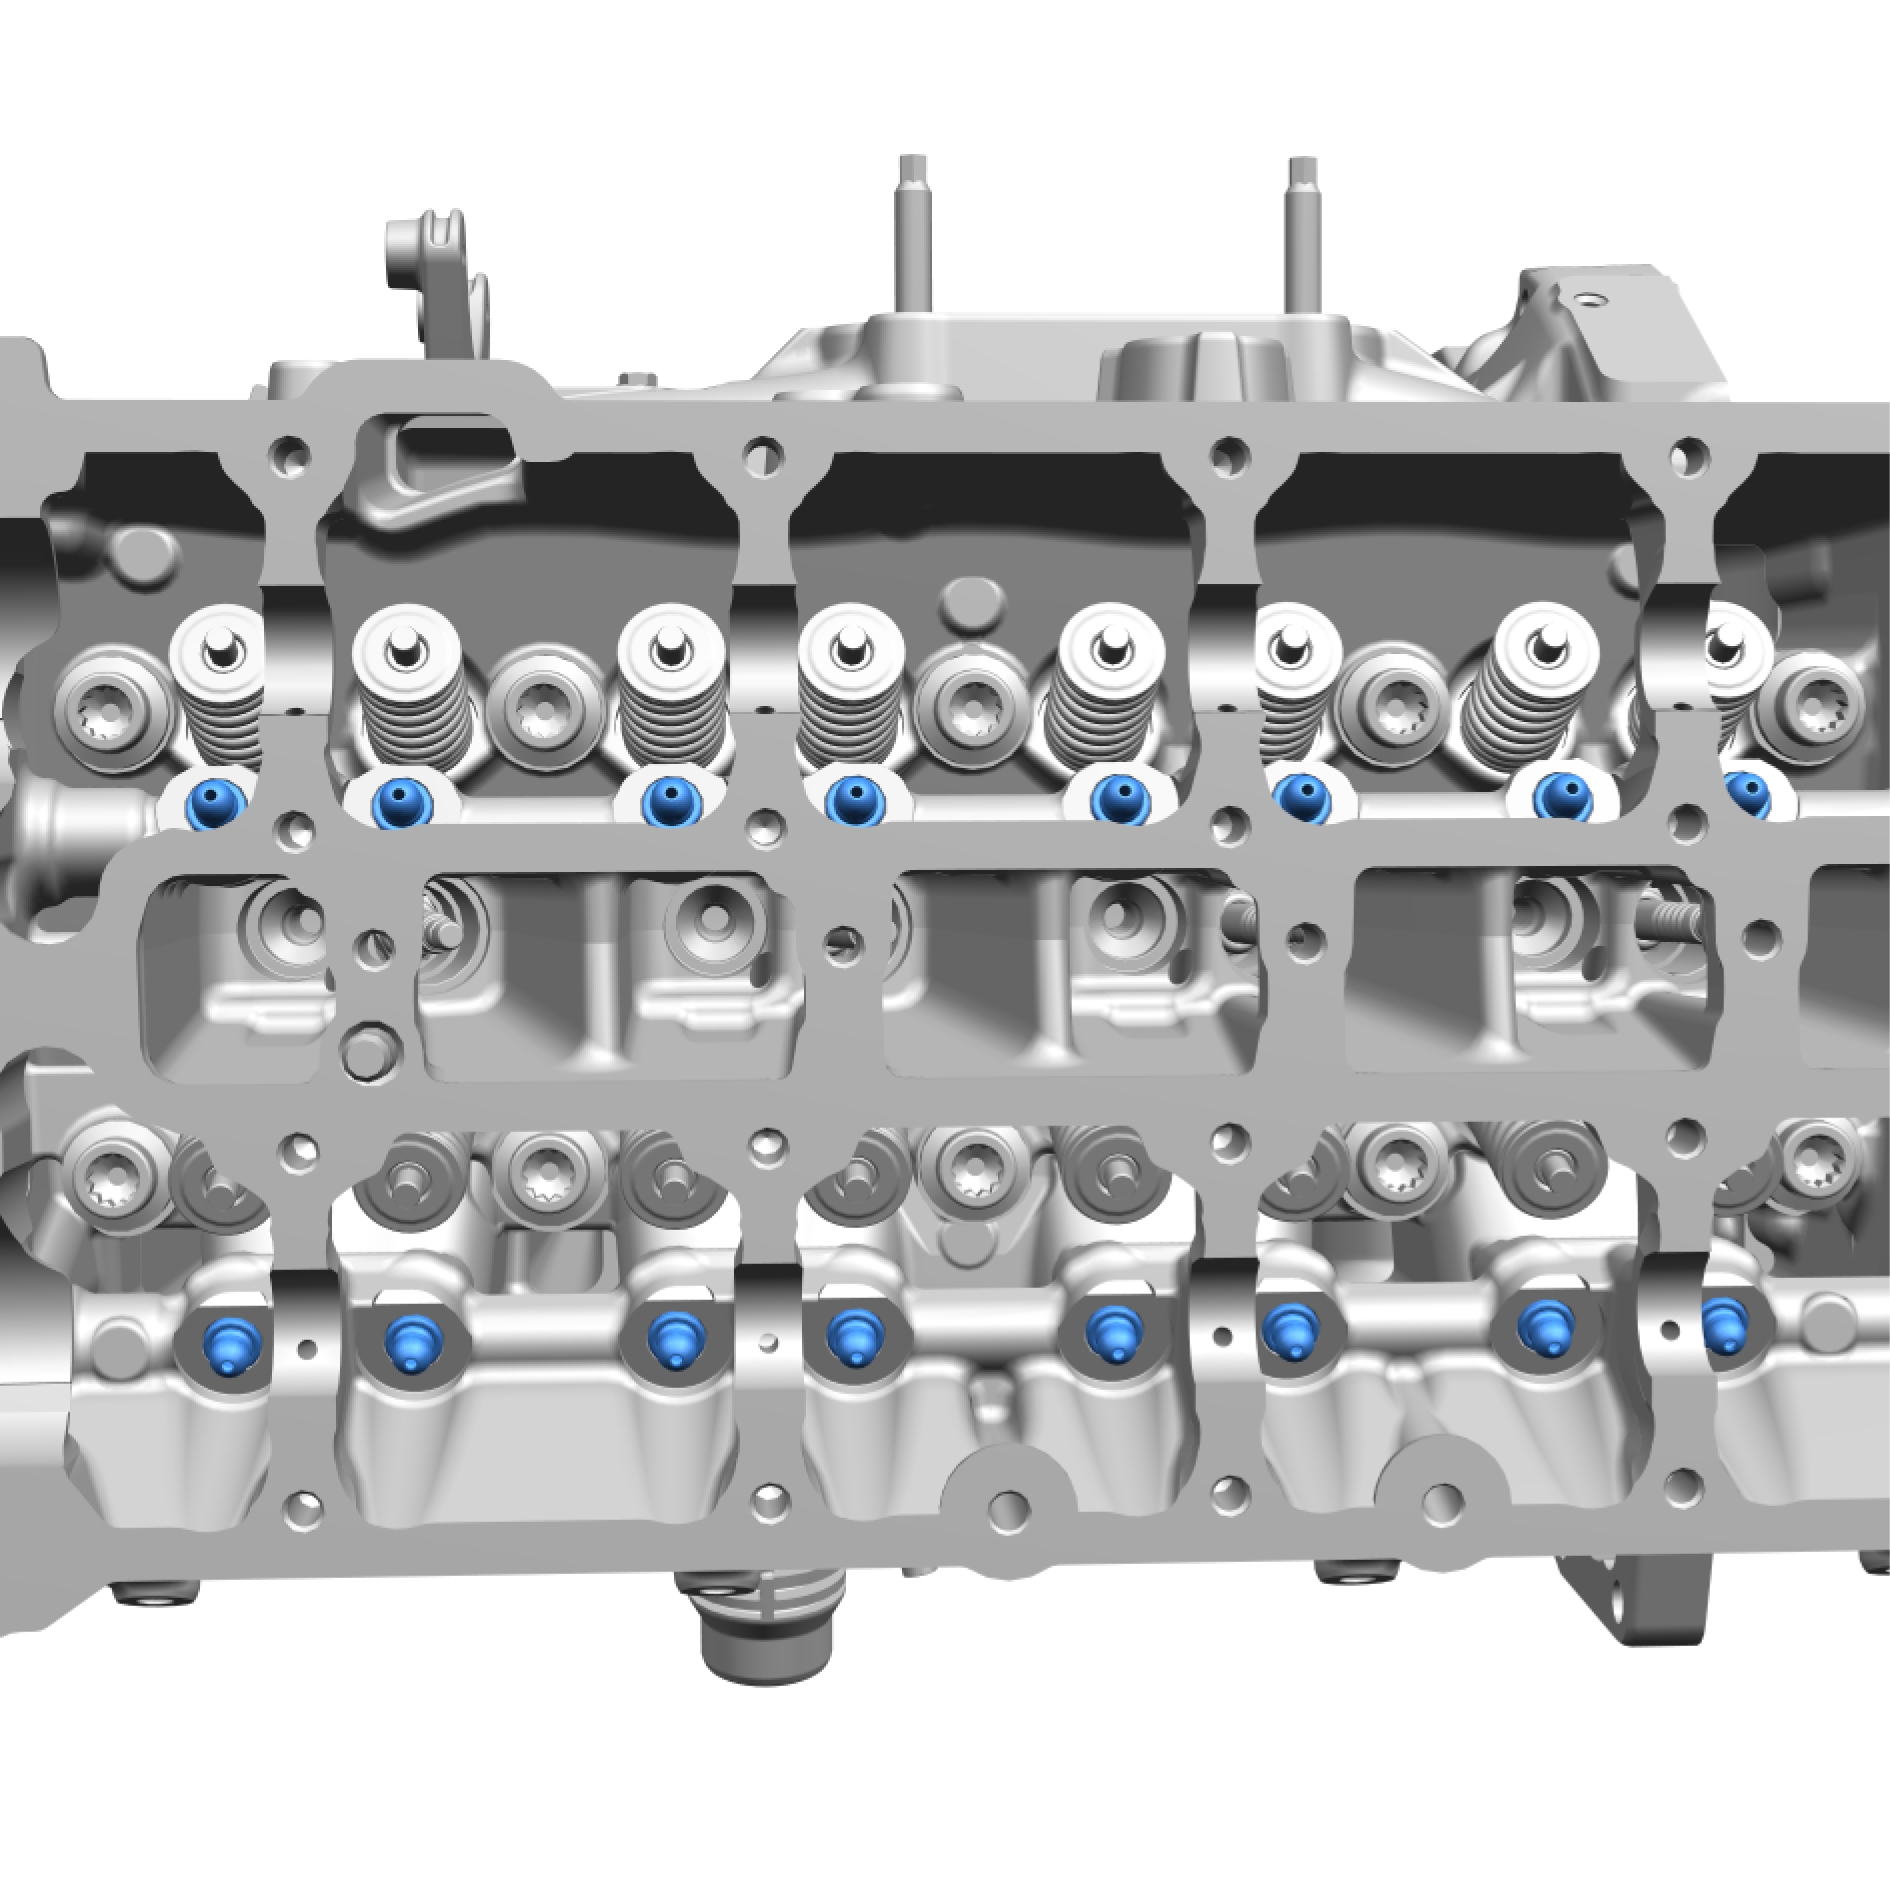
Note the position of each component before removal.
Remove the marked components.
Remove the screw.
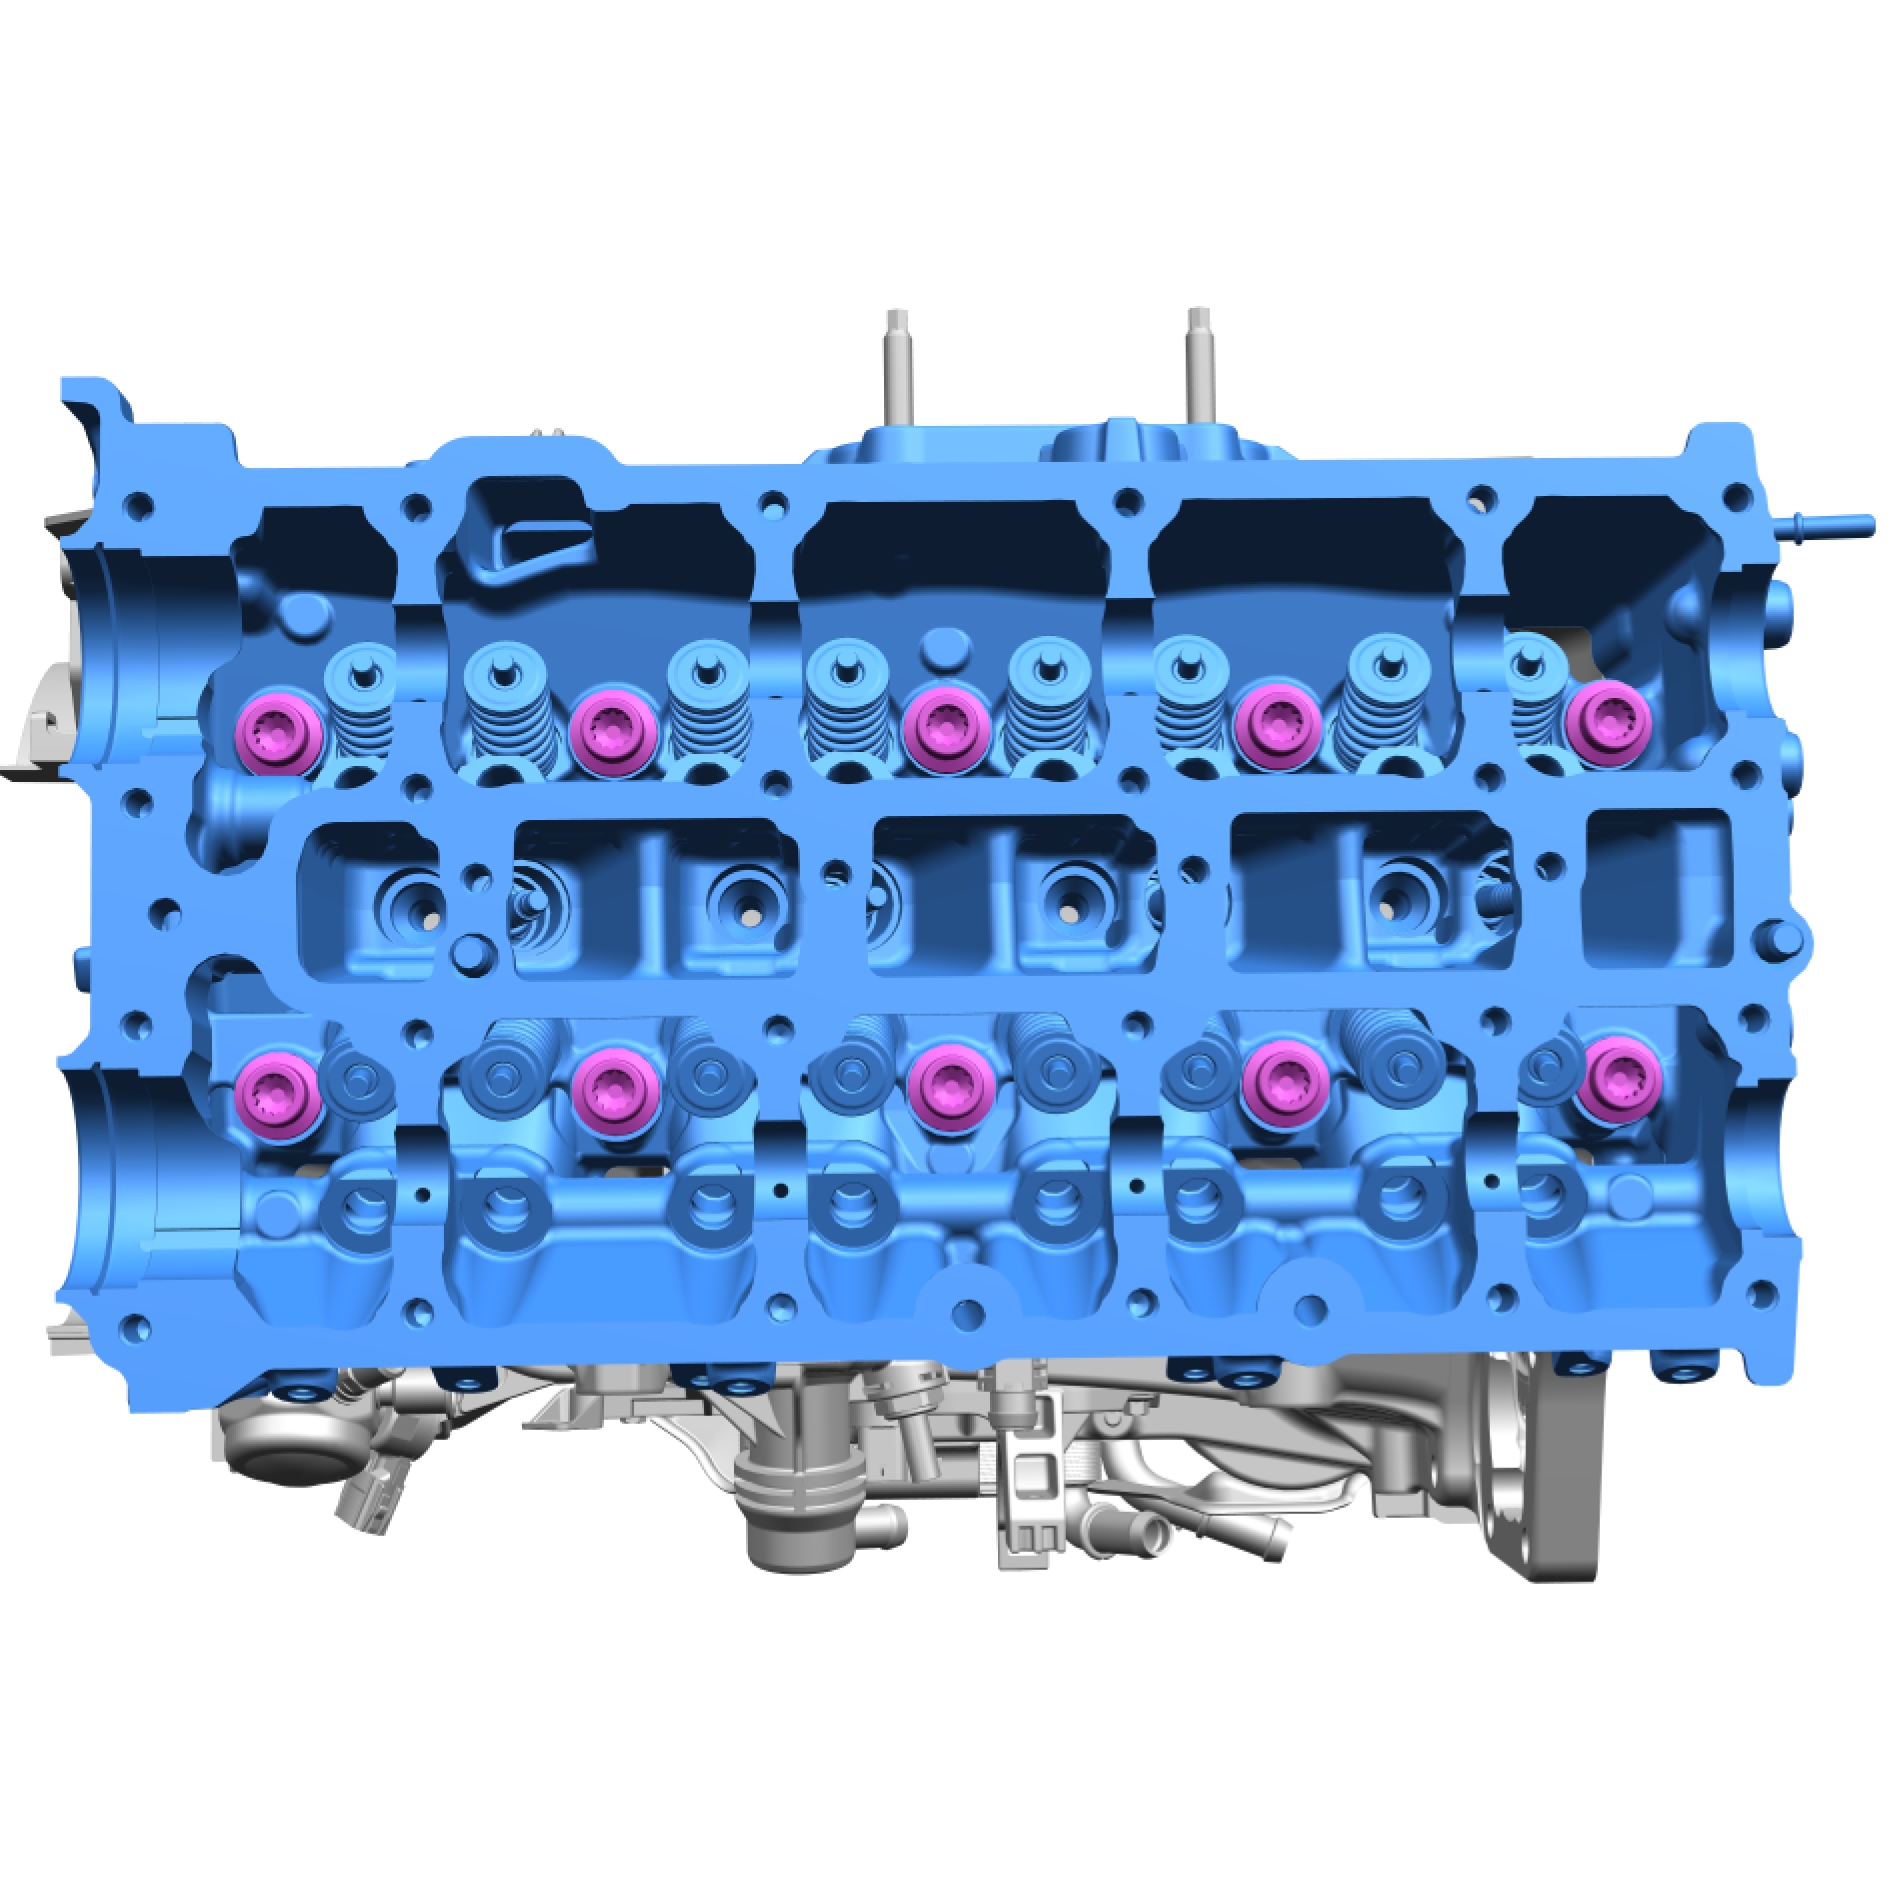
Place the component on a suitable underlay or support.
Take extra care when handling the component.
Remove the marked component.
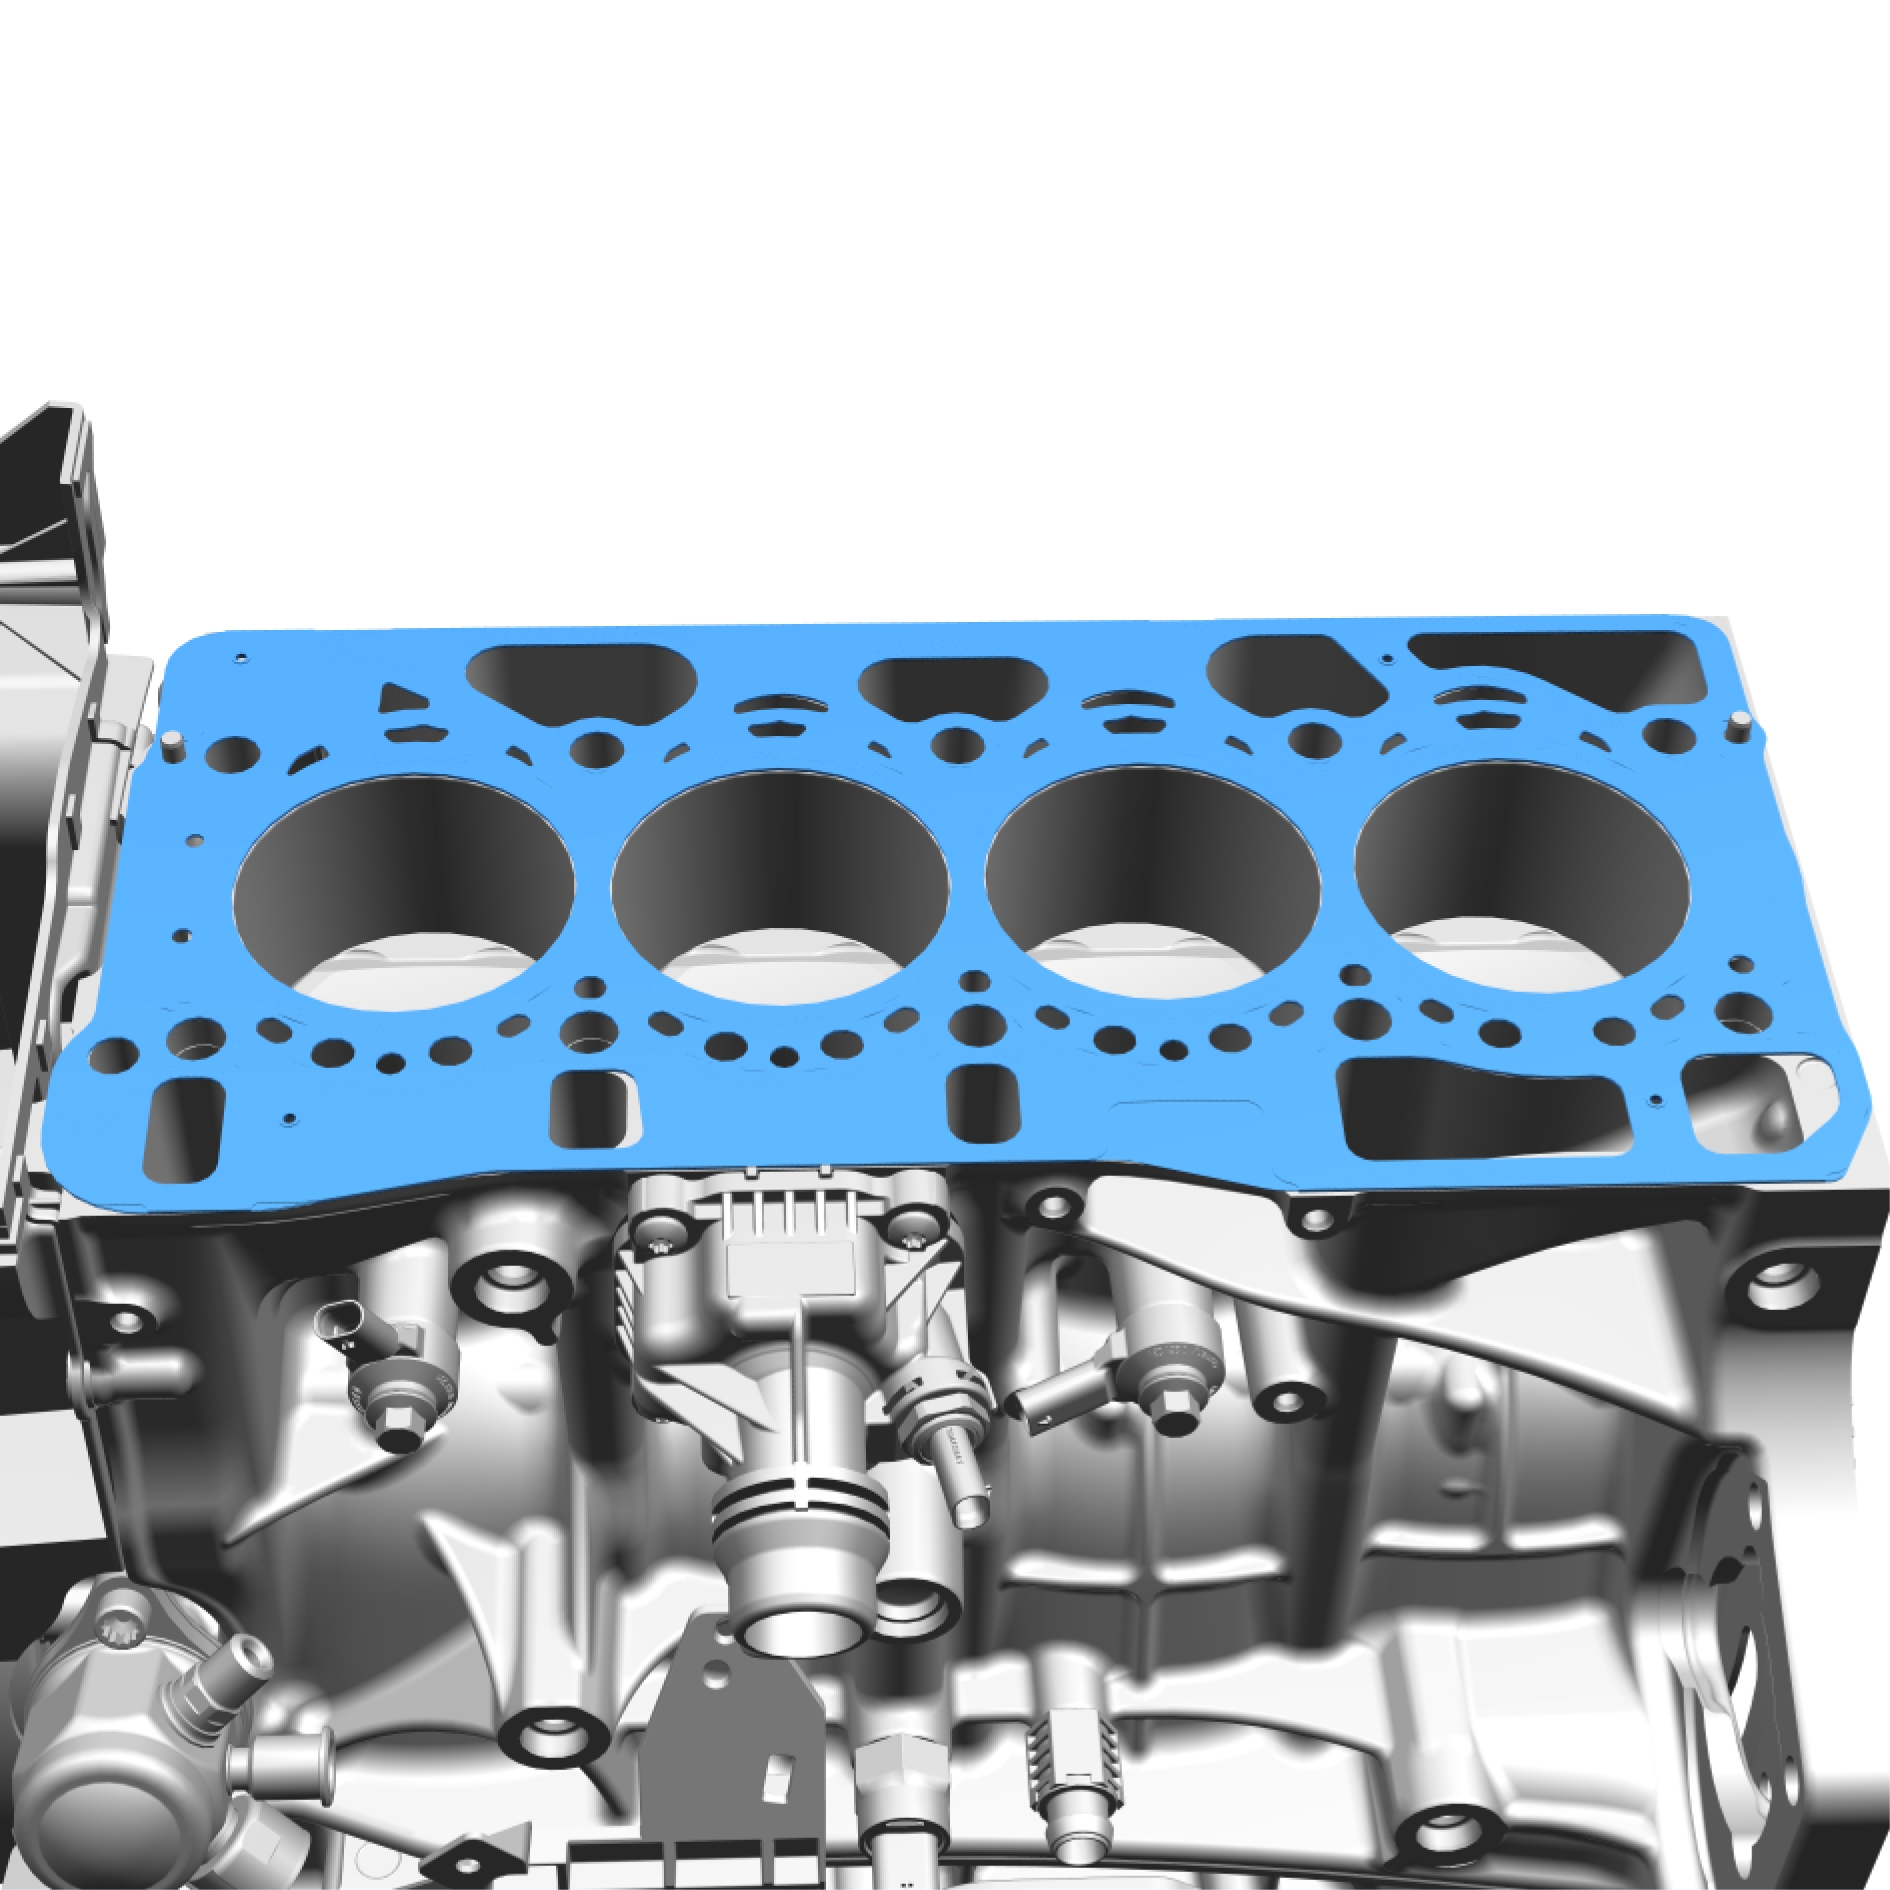
Remove the marked component.
Use a new seal.
Remove the screw.
Remove the marked component.
Always follow the instruction for tightening torque value.
Remove the marked component.
Always follow the instruction for tightening torque value.

Take extra care not to damage the mating faces.
Make sure that the mating faces are clean and free of foreign material.
Clean the marked area with isopropanol.
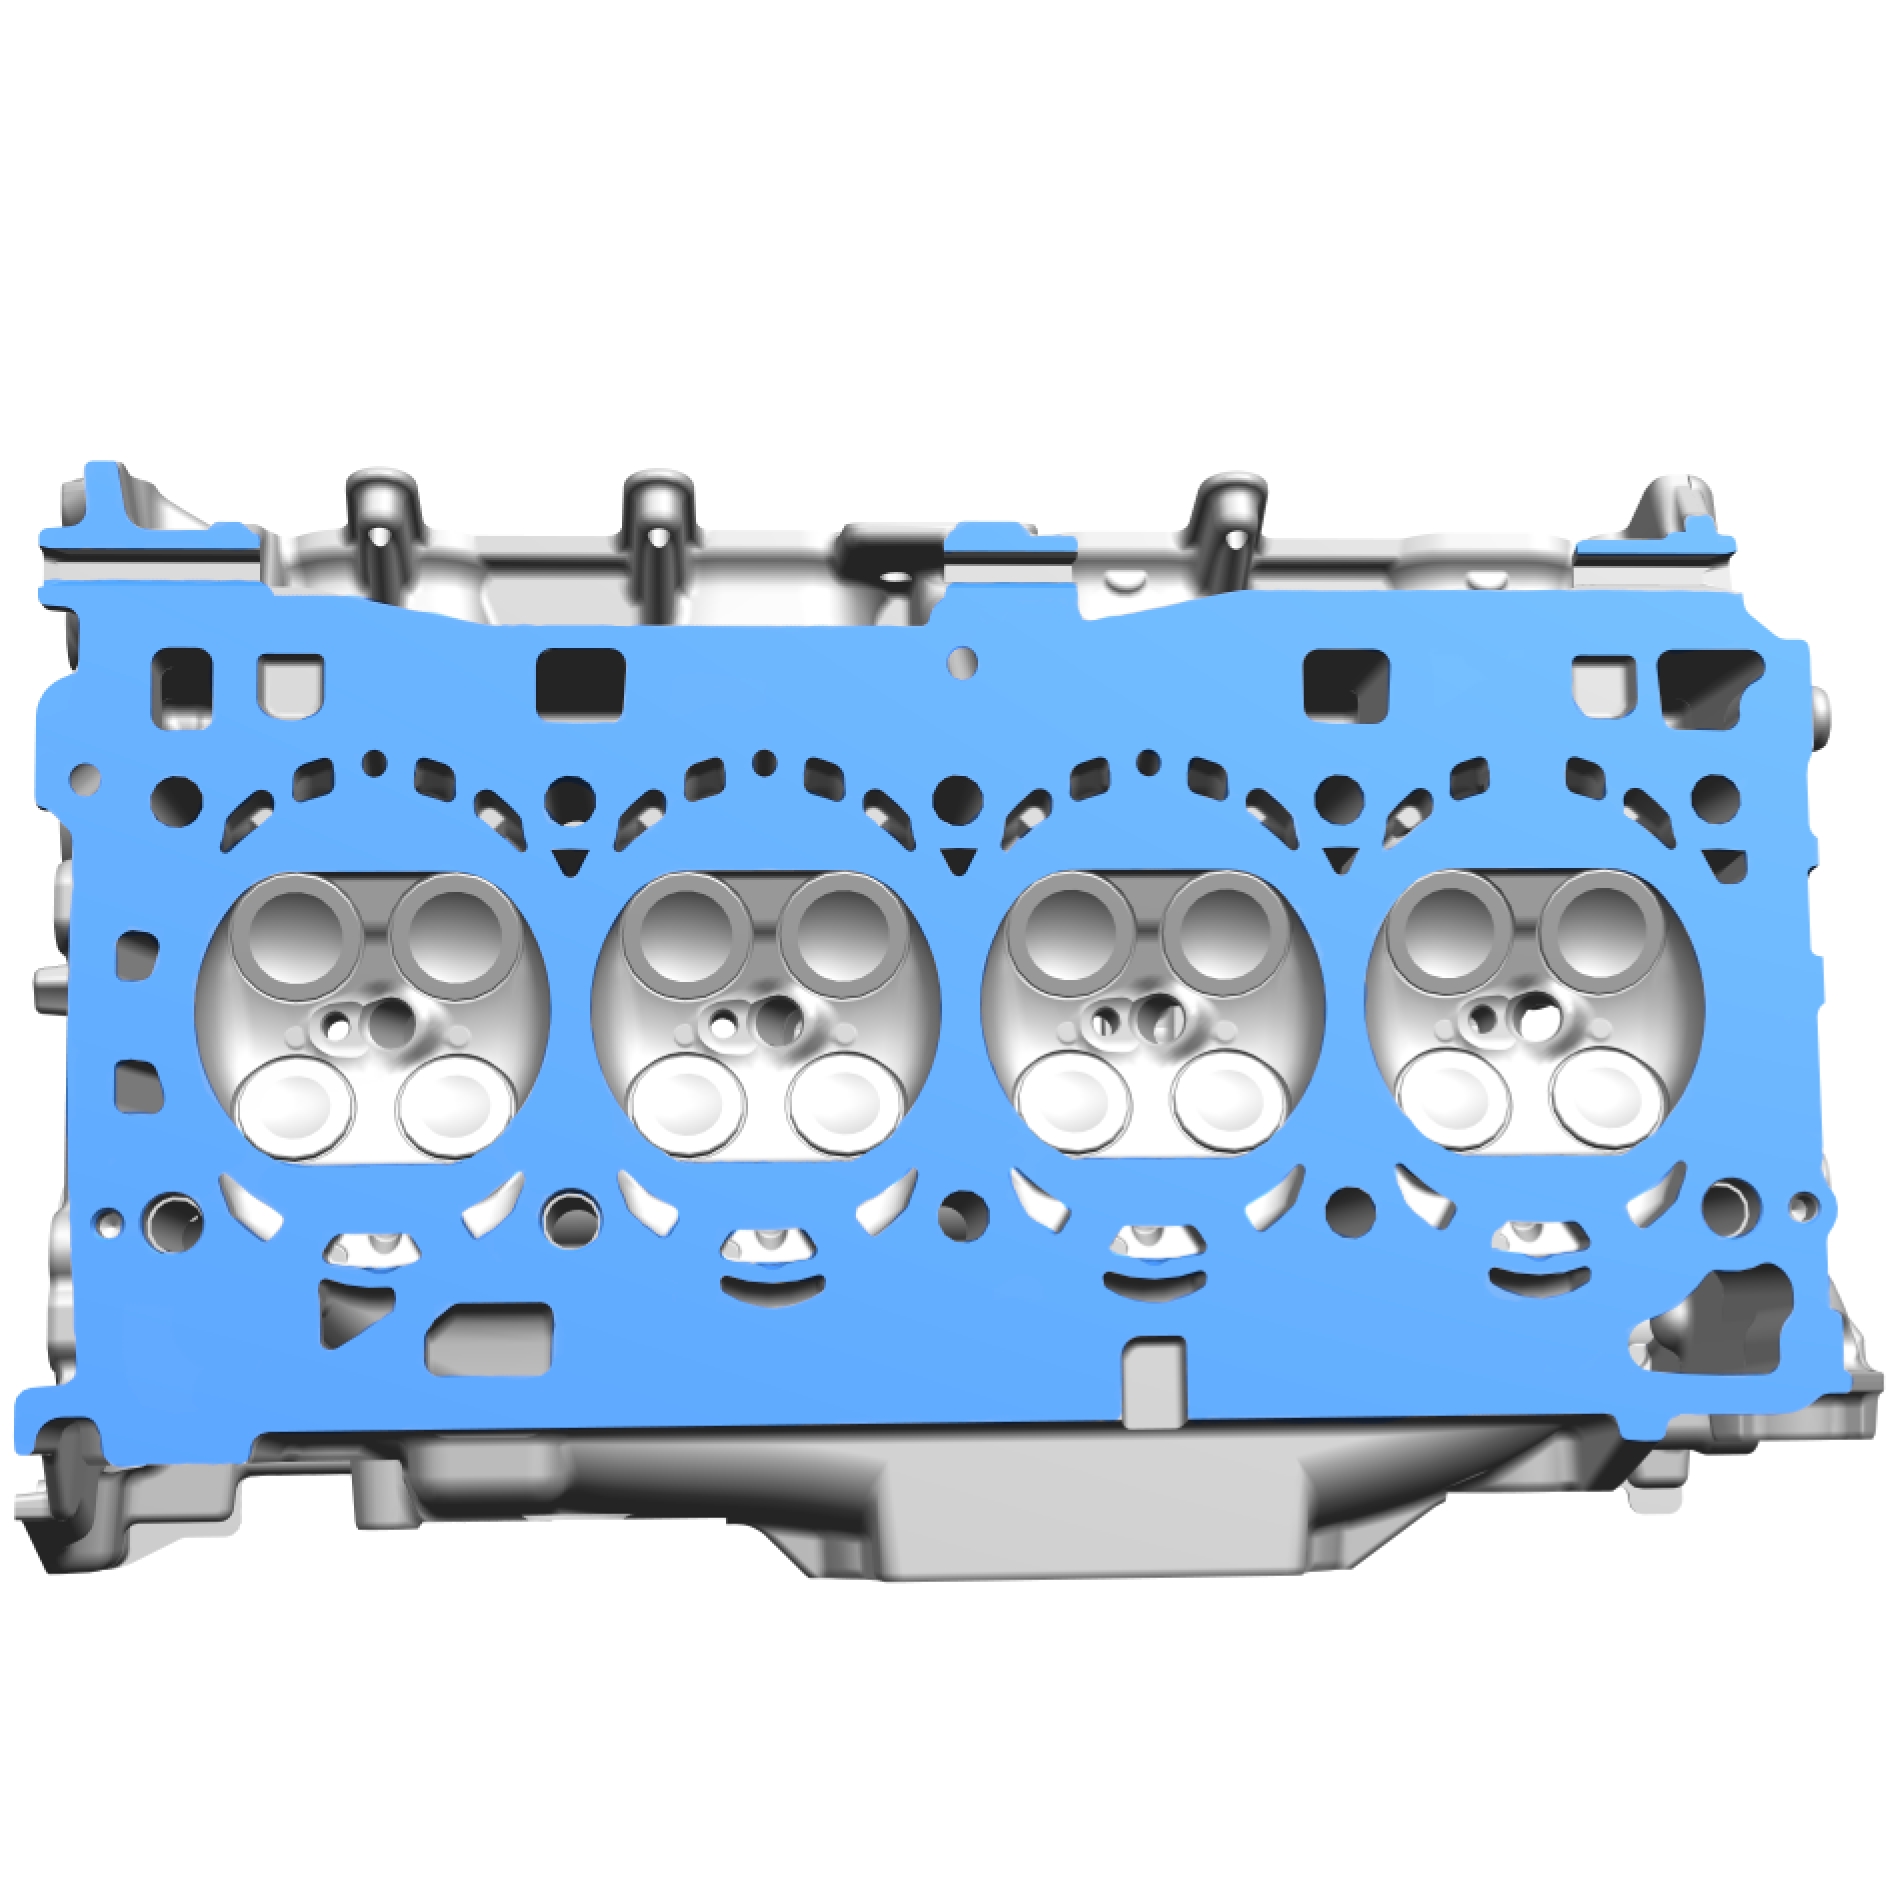
Take extra care not to damage the mating faces.
Make sure that the mating faces are clean and free of foreign material.
Clean the marked area with isopropanol.
Make sure that the mating faces are clean and free of foreign material.
Make sure that no fluids are present in the cylinder head screw threaded bores.
Installation
Make sure that the component is correctly located on the locating dowels.
Make sure that a new component is installed.
Install the marked component.

Make sure that the component is correctly located on the locating dowels.
Install the marked component.
Make sure that new screws are installed.
Tightening sequence and torque.
Stage 1: 40 Nm
Stage 2: 40 Nm
Stage 3: 120 °
Stage 4: 120 °
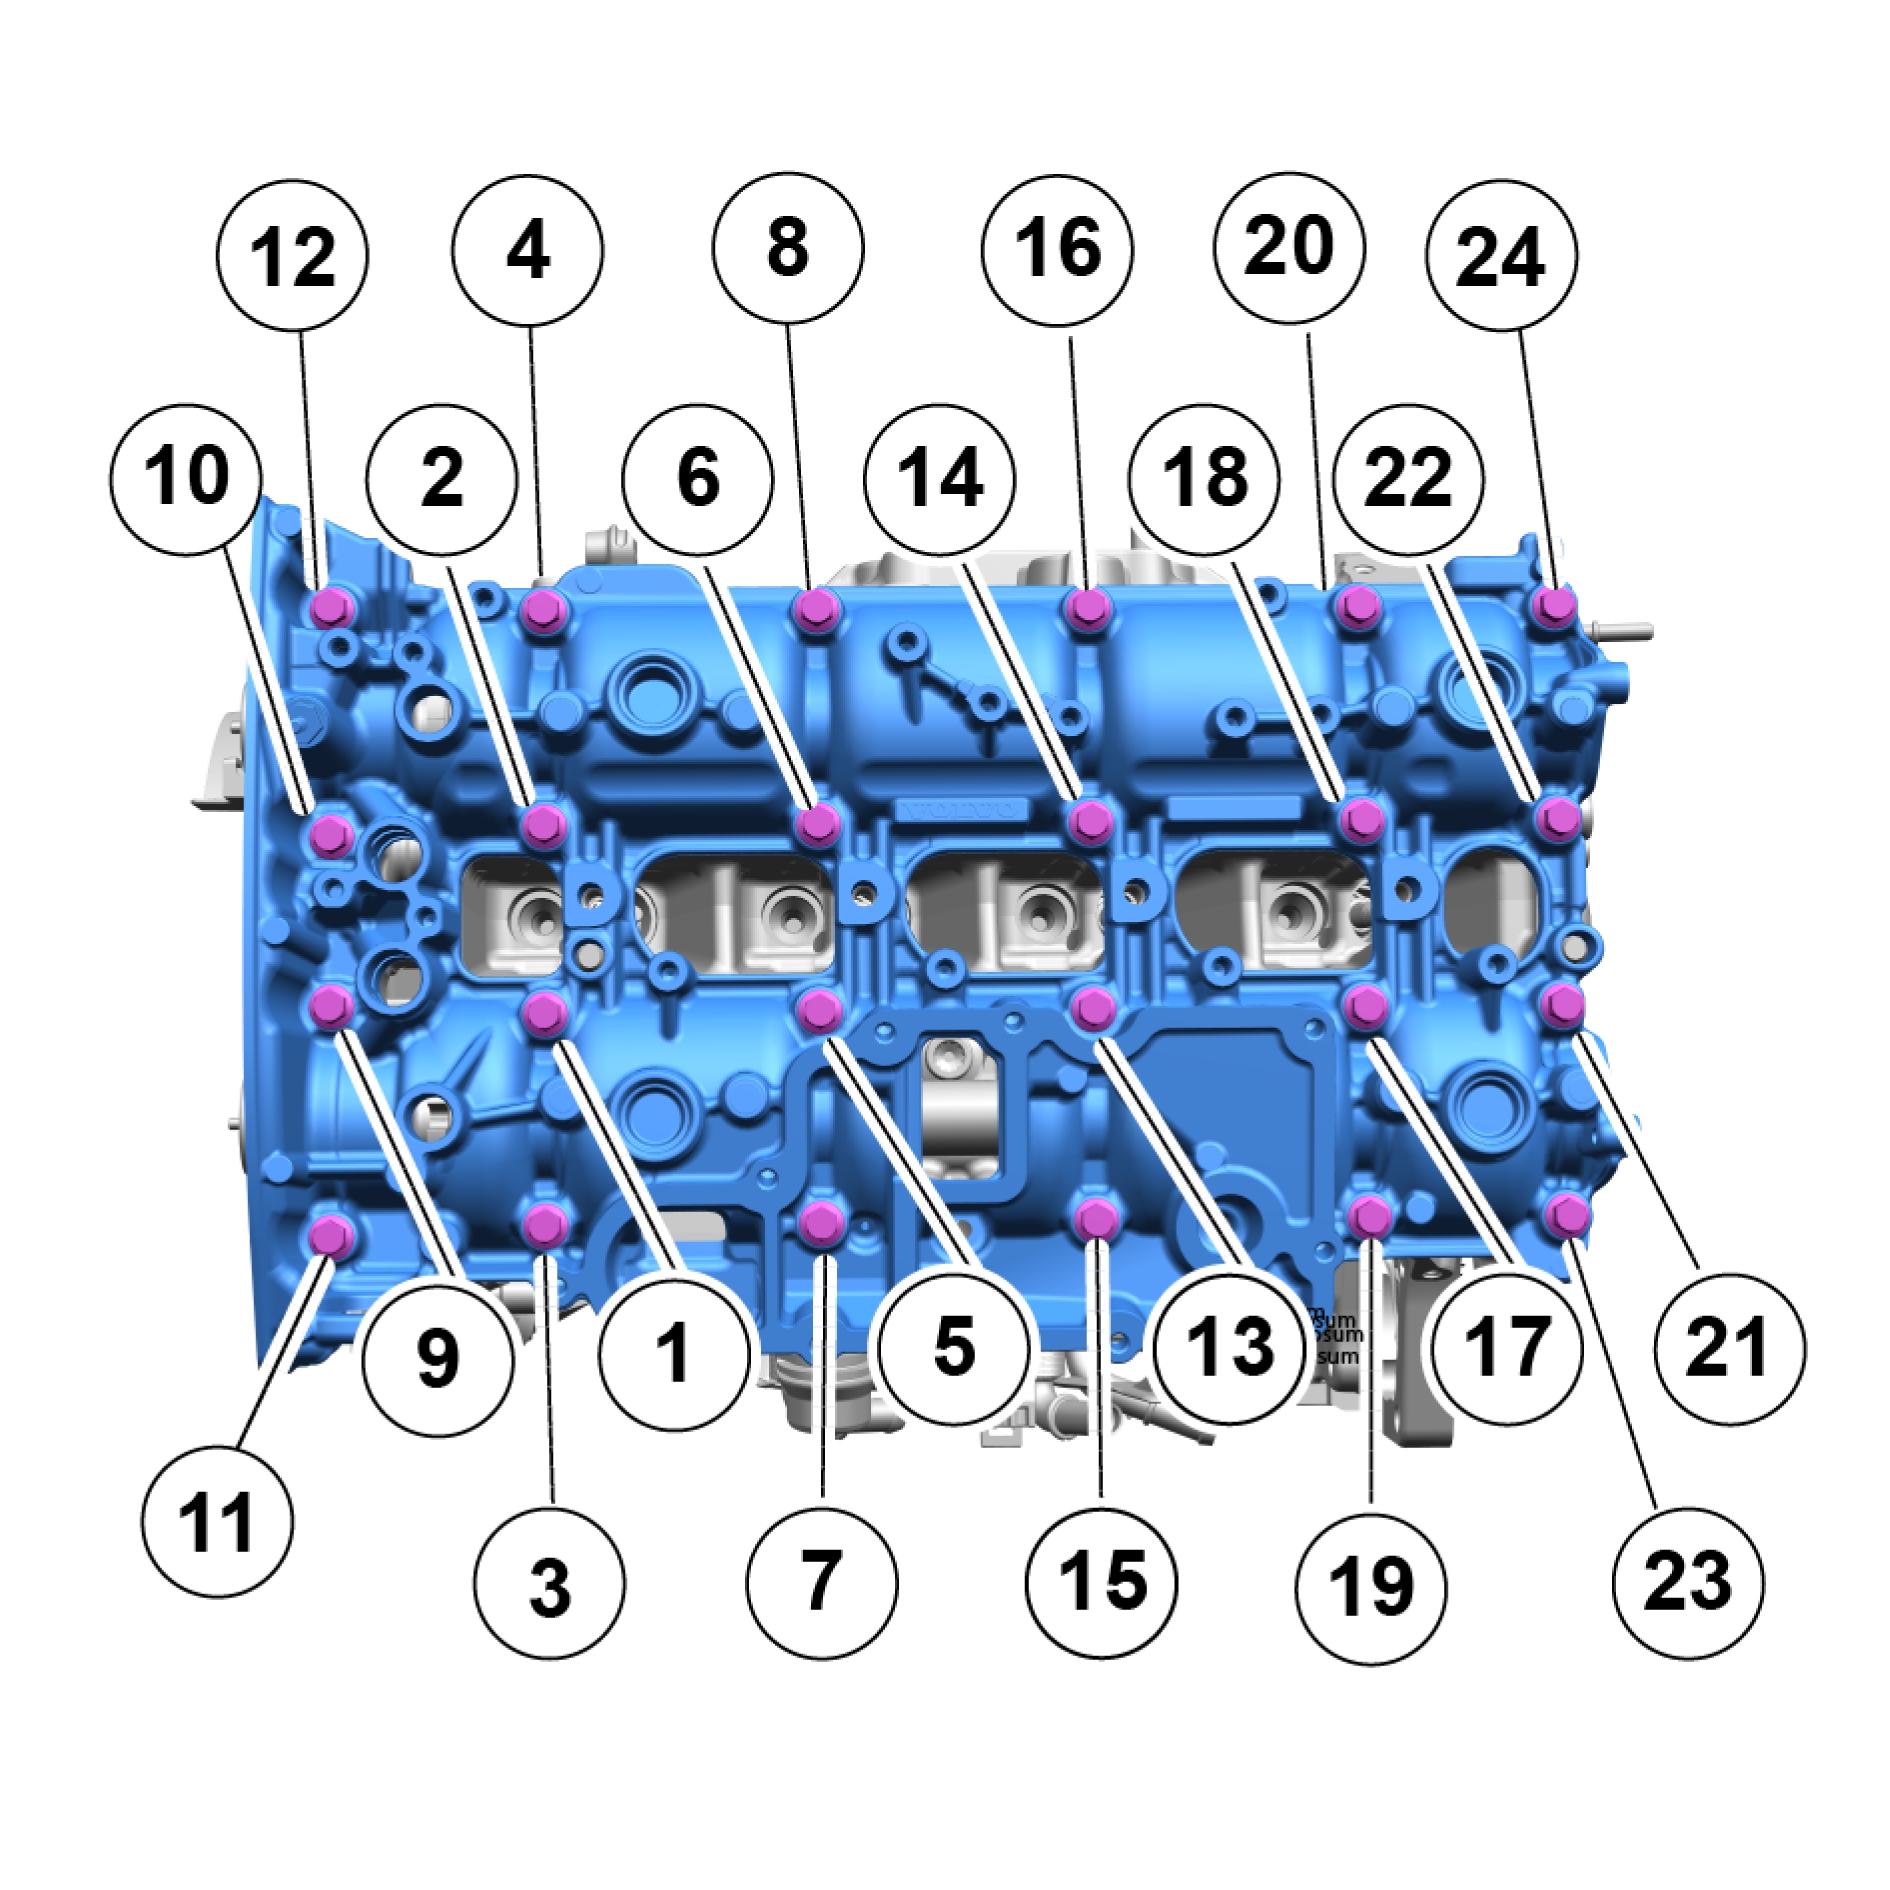
Install the marked component.
Tighten the screws.
Torque: 17 Nm
Make sure that new screws are installed.
Only tighten the screws finger tight at this stage.
Make sure to follow the sequence indicated.
Bracket engine mounting to cylinder head, torque: 50 Nm
Make sure to follow the sequence indicated.
Bracket engine mounting to cylinder head, 120°.
Install the screw M6, torque: 10 Nm
Balance Shaft Assembly, replace
Removal
Remove the vibration damper refer to:
Vibration damper, replaceRemove the oil pump refer to:
Oil pump, replaceRemove the marked component.
The item is to be reused.
Remove the screws.
Remove the marked component.
Make sure that the component is positioned correctly.
Make sure that the component is positioned correctly.
Refer to Spare part catalogue for information on correct component/ fastener.
Install the special tool: 999 7809
Installation
Make sure that new screws are installed.
Install the marked component.
Tighten the screw with hands only.
Remove the tool.
Install the tool special tool: 999 7432
Install the measurement gauge against the balance shaft assembly. Knock the balance shaft assembly towards the oil pressure switch until the measurement gauge stops changing value. Reset the measurement gauge.
Tap the balance shaft assembly in the direction away from the oil pressure sensor until it reaches the specified value.
Leave the measurement gauge on when pulling the screws in the next step and check that the value is not changed.
Make sure that new screws are installed.
Make sure to follow the sequence indicated.
Tighten the screws
Stage 1, torque: 8 Nm
Stage 2: 210 °
Install the marked component, torque: 14 Nm
Install the oil pump refer to:
Oil pump, replaceInstall the vibration damper refer to:
Vibration damper, replaceCamshafts, replace
Removal
Remove the screws.
Remove the marked component.
Remove the screws.
Remove the marked component.
Remove the screws.
Remove the marked component.
Loosen each screw 2 turns at a time until all screws are removed.
Remove the marked component.
Note the location of the component before removal.
Take extra care when handling the components.
Remove the marked detail/details.
Installation
Take extra care not to damage the mating faces.
Make sure that the oil galleries are clean and free of foreign material.
Make sure that the mating faces are clean and free of foreign material.
Clean the marked area with abrasive cloth and isopropanol.
Take extra care not to damage the mating faces.
Make sure that the oil galleries are clean and free of foreign material.
Make sure that the mating faces are clean and free of foreign material.
Clean the marked area with abrasive cloth and isopropanol.
Apply engine oil.
Apply engine oil.
Make sure that the components are positioned correctly.
Install the marked component.
Make sure that the components are positioned correctly.
Make sure that the components are positioned correctly.
Make sure that the components are positioned correctly.
The component must be installed within 5 minutes of applying the sealant.
Use chemical gasket.
Make sure that equal pressure is applied to the full length of the component.
Make sure to follow the sequence indicated.
Install the marked component.
Install the screws.
Tighten each screw 2 turns at a time M7, torque: 17 Nm
Install the marked component.
Install the screws M6, torque: 10 Nm
Install the marked component.
Install the screws.
1, M6, torque: 10 Nm
1, M8, torque: 24 Nm
Install the marked component.
Install the screws.
1, M5, torque: 5 Nm
1, M6, torque: 10 Nm
VVT unit, replace
Removal
Remove the Timing belt, refer to:
Timing belt, replaceRemove the special tool.
Be prepared to collect escaping fluid.
Note the location of the component before removal.
Remove the marked component.
Remove the marked component.
Do not use impact screwdriver/wrench
1. Special tool: 999 7684
2. Special tool: 999 7761
Loosen the screws.
Remove the screws.
Be prepared to collect escaping fluid.
Remove the marked component.
Make sure that marked component is not rotated relative to the VVT unit, and that the oil galleries are at the center of each other.
Check the component. If it displays any type of damage, it must be replaced.
Installation
Make sure that the component is not loose
Check the component. If it displays any type of damage, it must be replaced.
Make sure that the area around the component is clean and free of foreign material.
Apply oil to the marked surface.
Make sure that the area around the component is clean and free of foreign material.
The graphic shows the back of the component.
Note the position.
Install the marked component.
Install new screws and tighten finger tight at this stage.
Install the screws.
Install the tool and tighten the screws.
VVT unit, center screw, torque: 90 Nm
Special tool: 999 7760
Release the locks.
Note the placing of the tool.
Install the tool.
A click confirms that the component is in the correct position.
A click confirms that the component is in the correct position.
Remove the Special Tool.
Use new seals.
Only tighten the bolts finger tight at this stage.
Install the marked component.
Tighten the screws M6, torque: 10 Nm
Install the Timing belt, refer to:
Timing belt, replaceThrottle body, replace
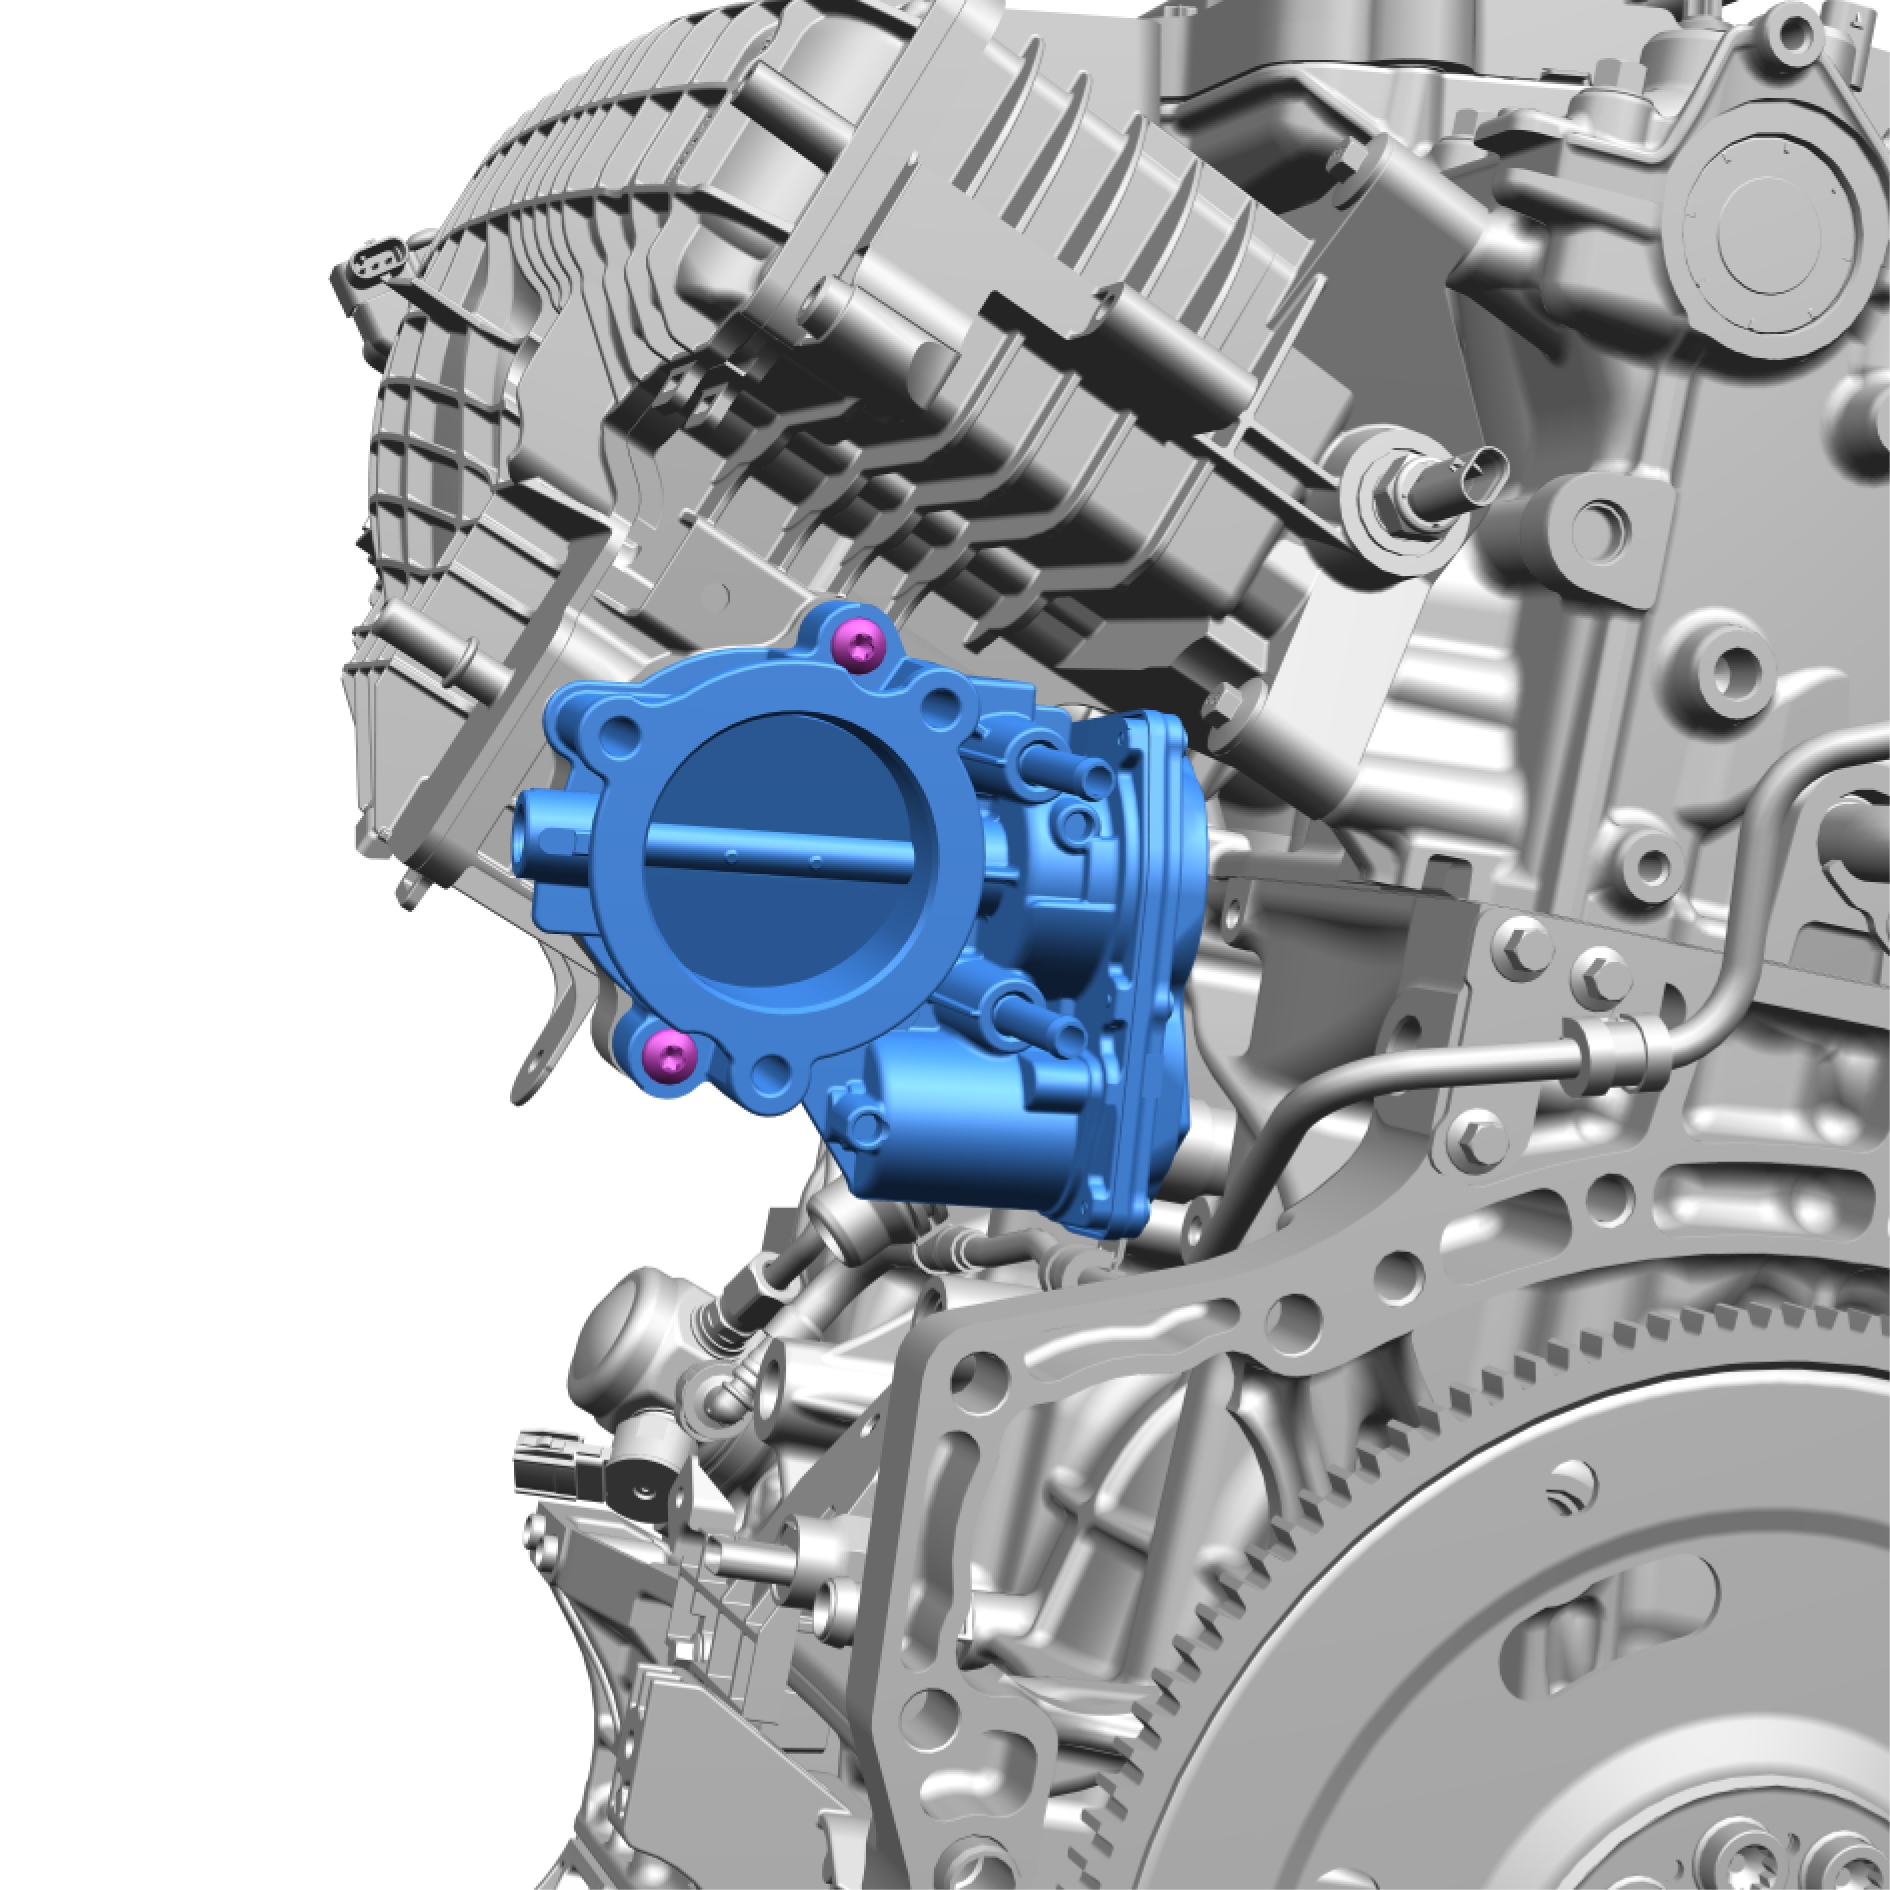
Remove the screws.
Torque: 7 Nm
Remove the marked component.
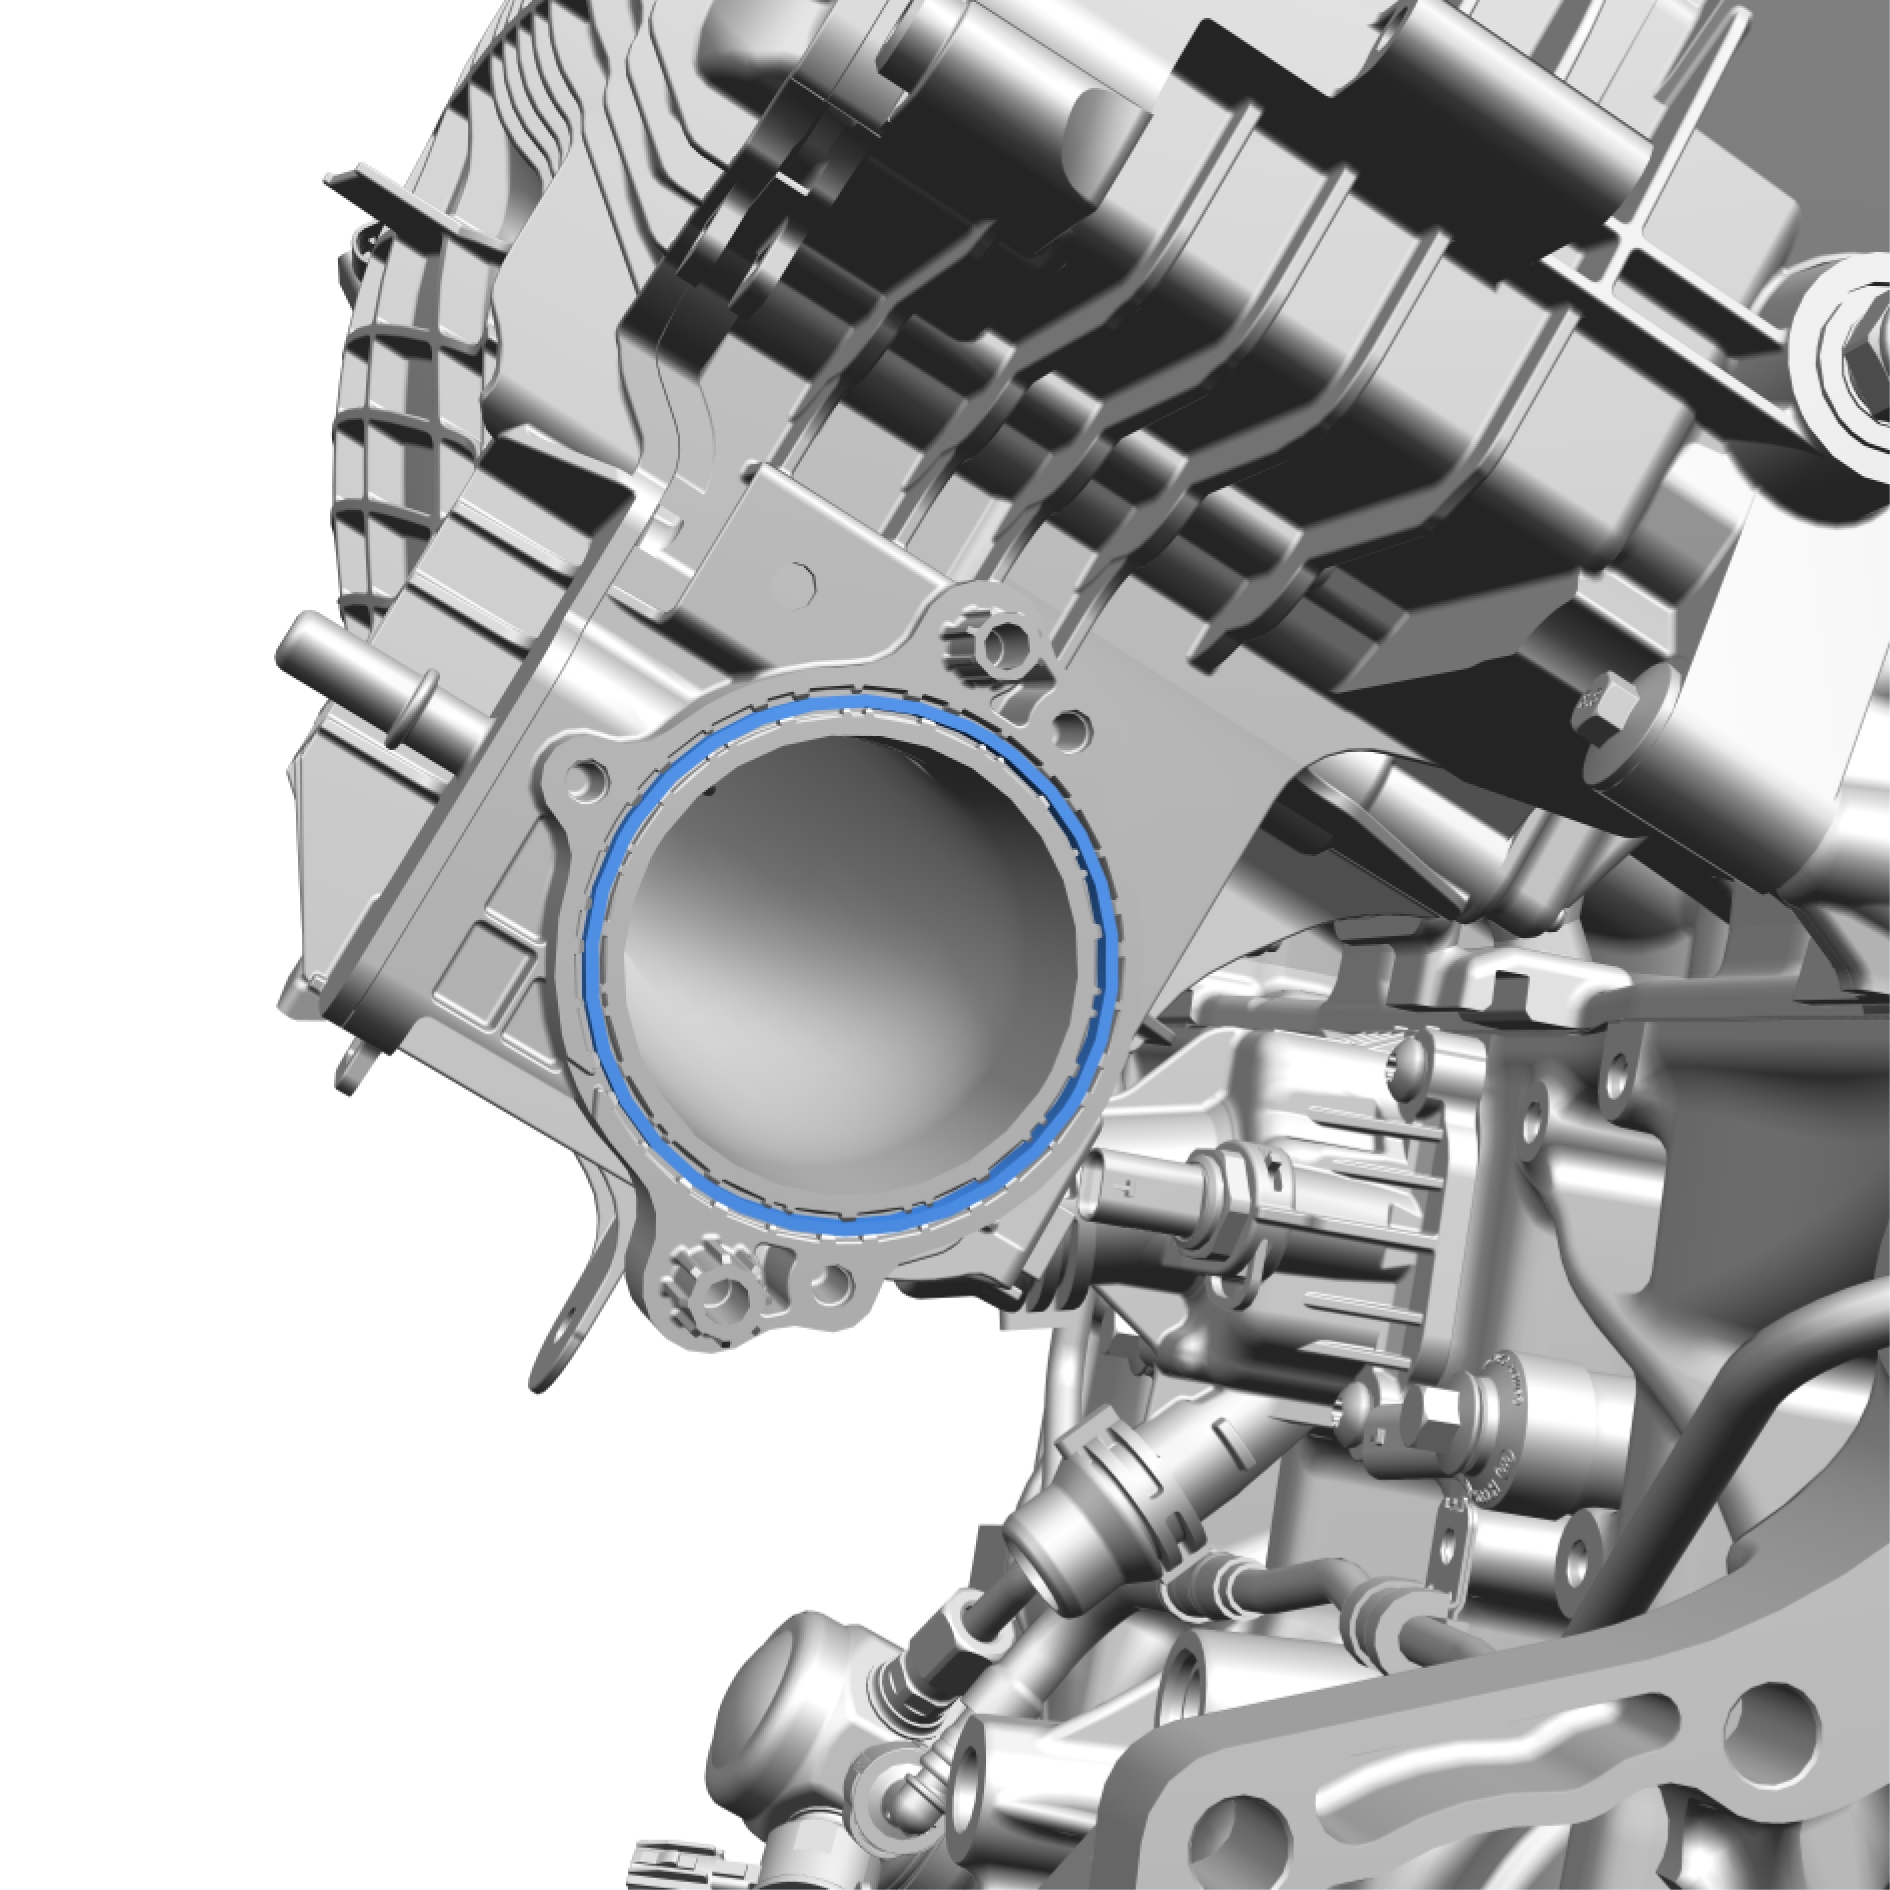
Remove and discard the marked component.
Installation
Install in reverse order.
Induction pipe, replace
Removal
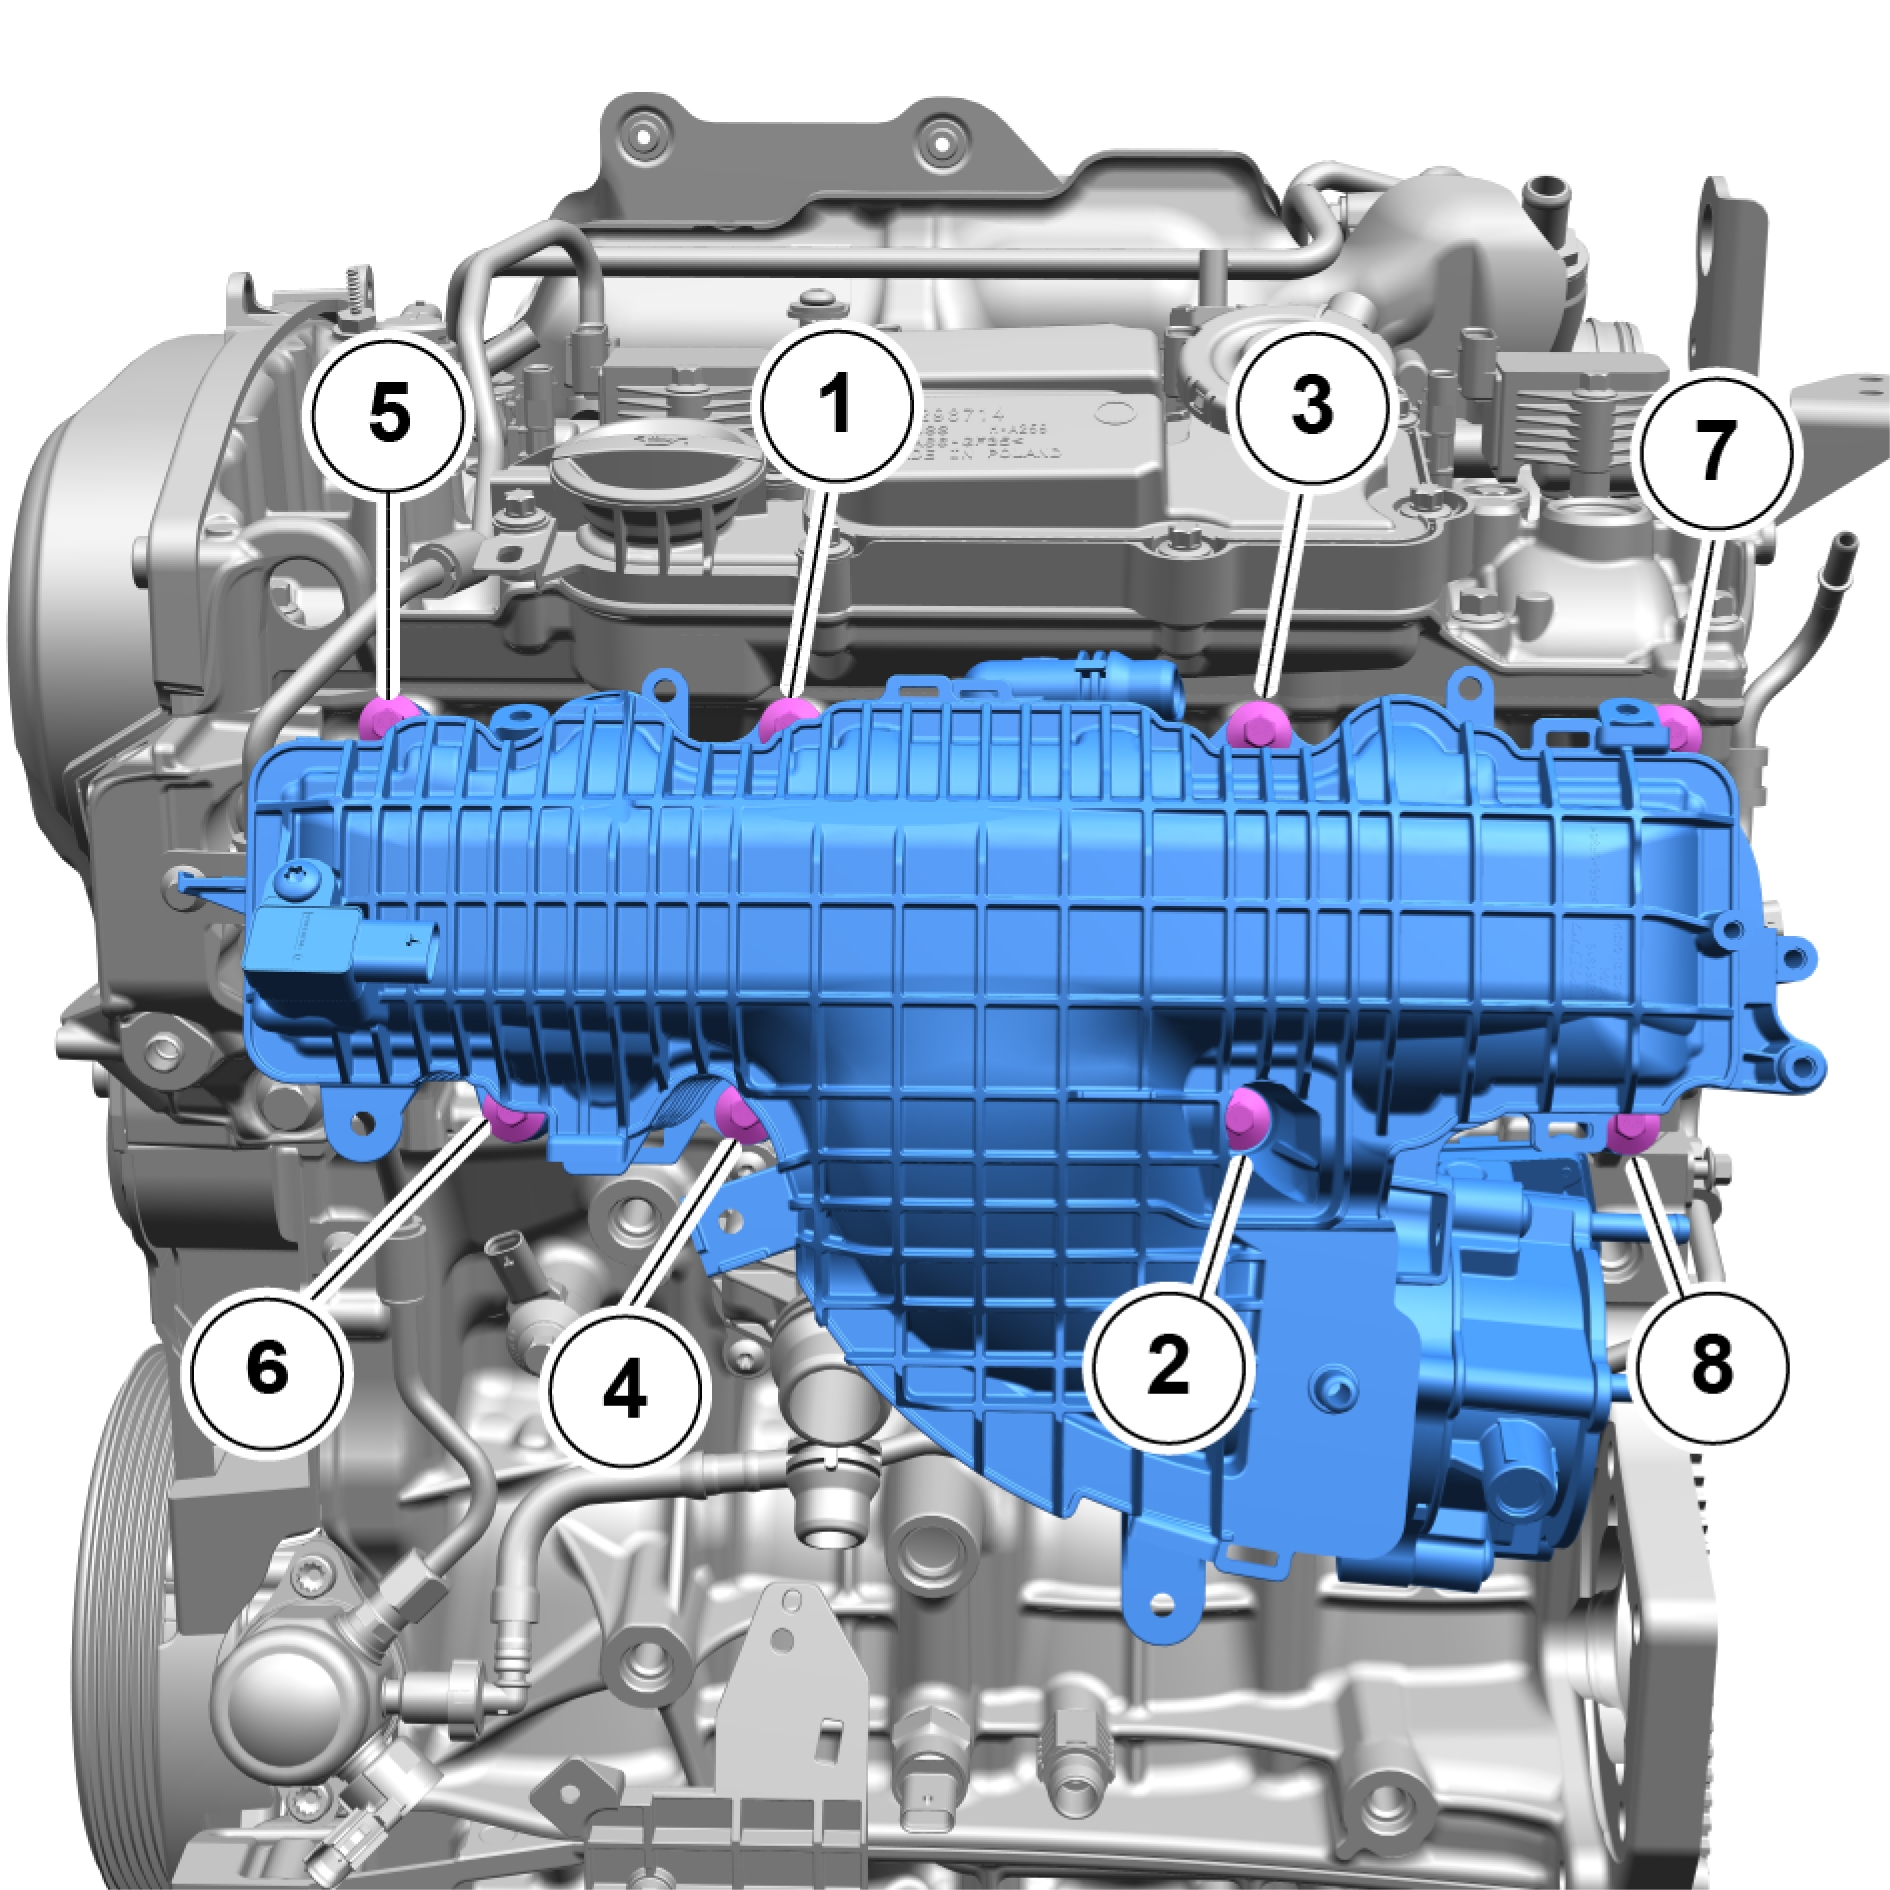
Tightening schedule for the installation.
Remove the screws.
Torque: 10 Nm
Remove the marked component.
Transferring components
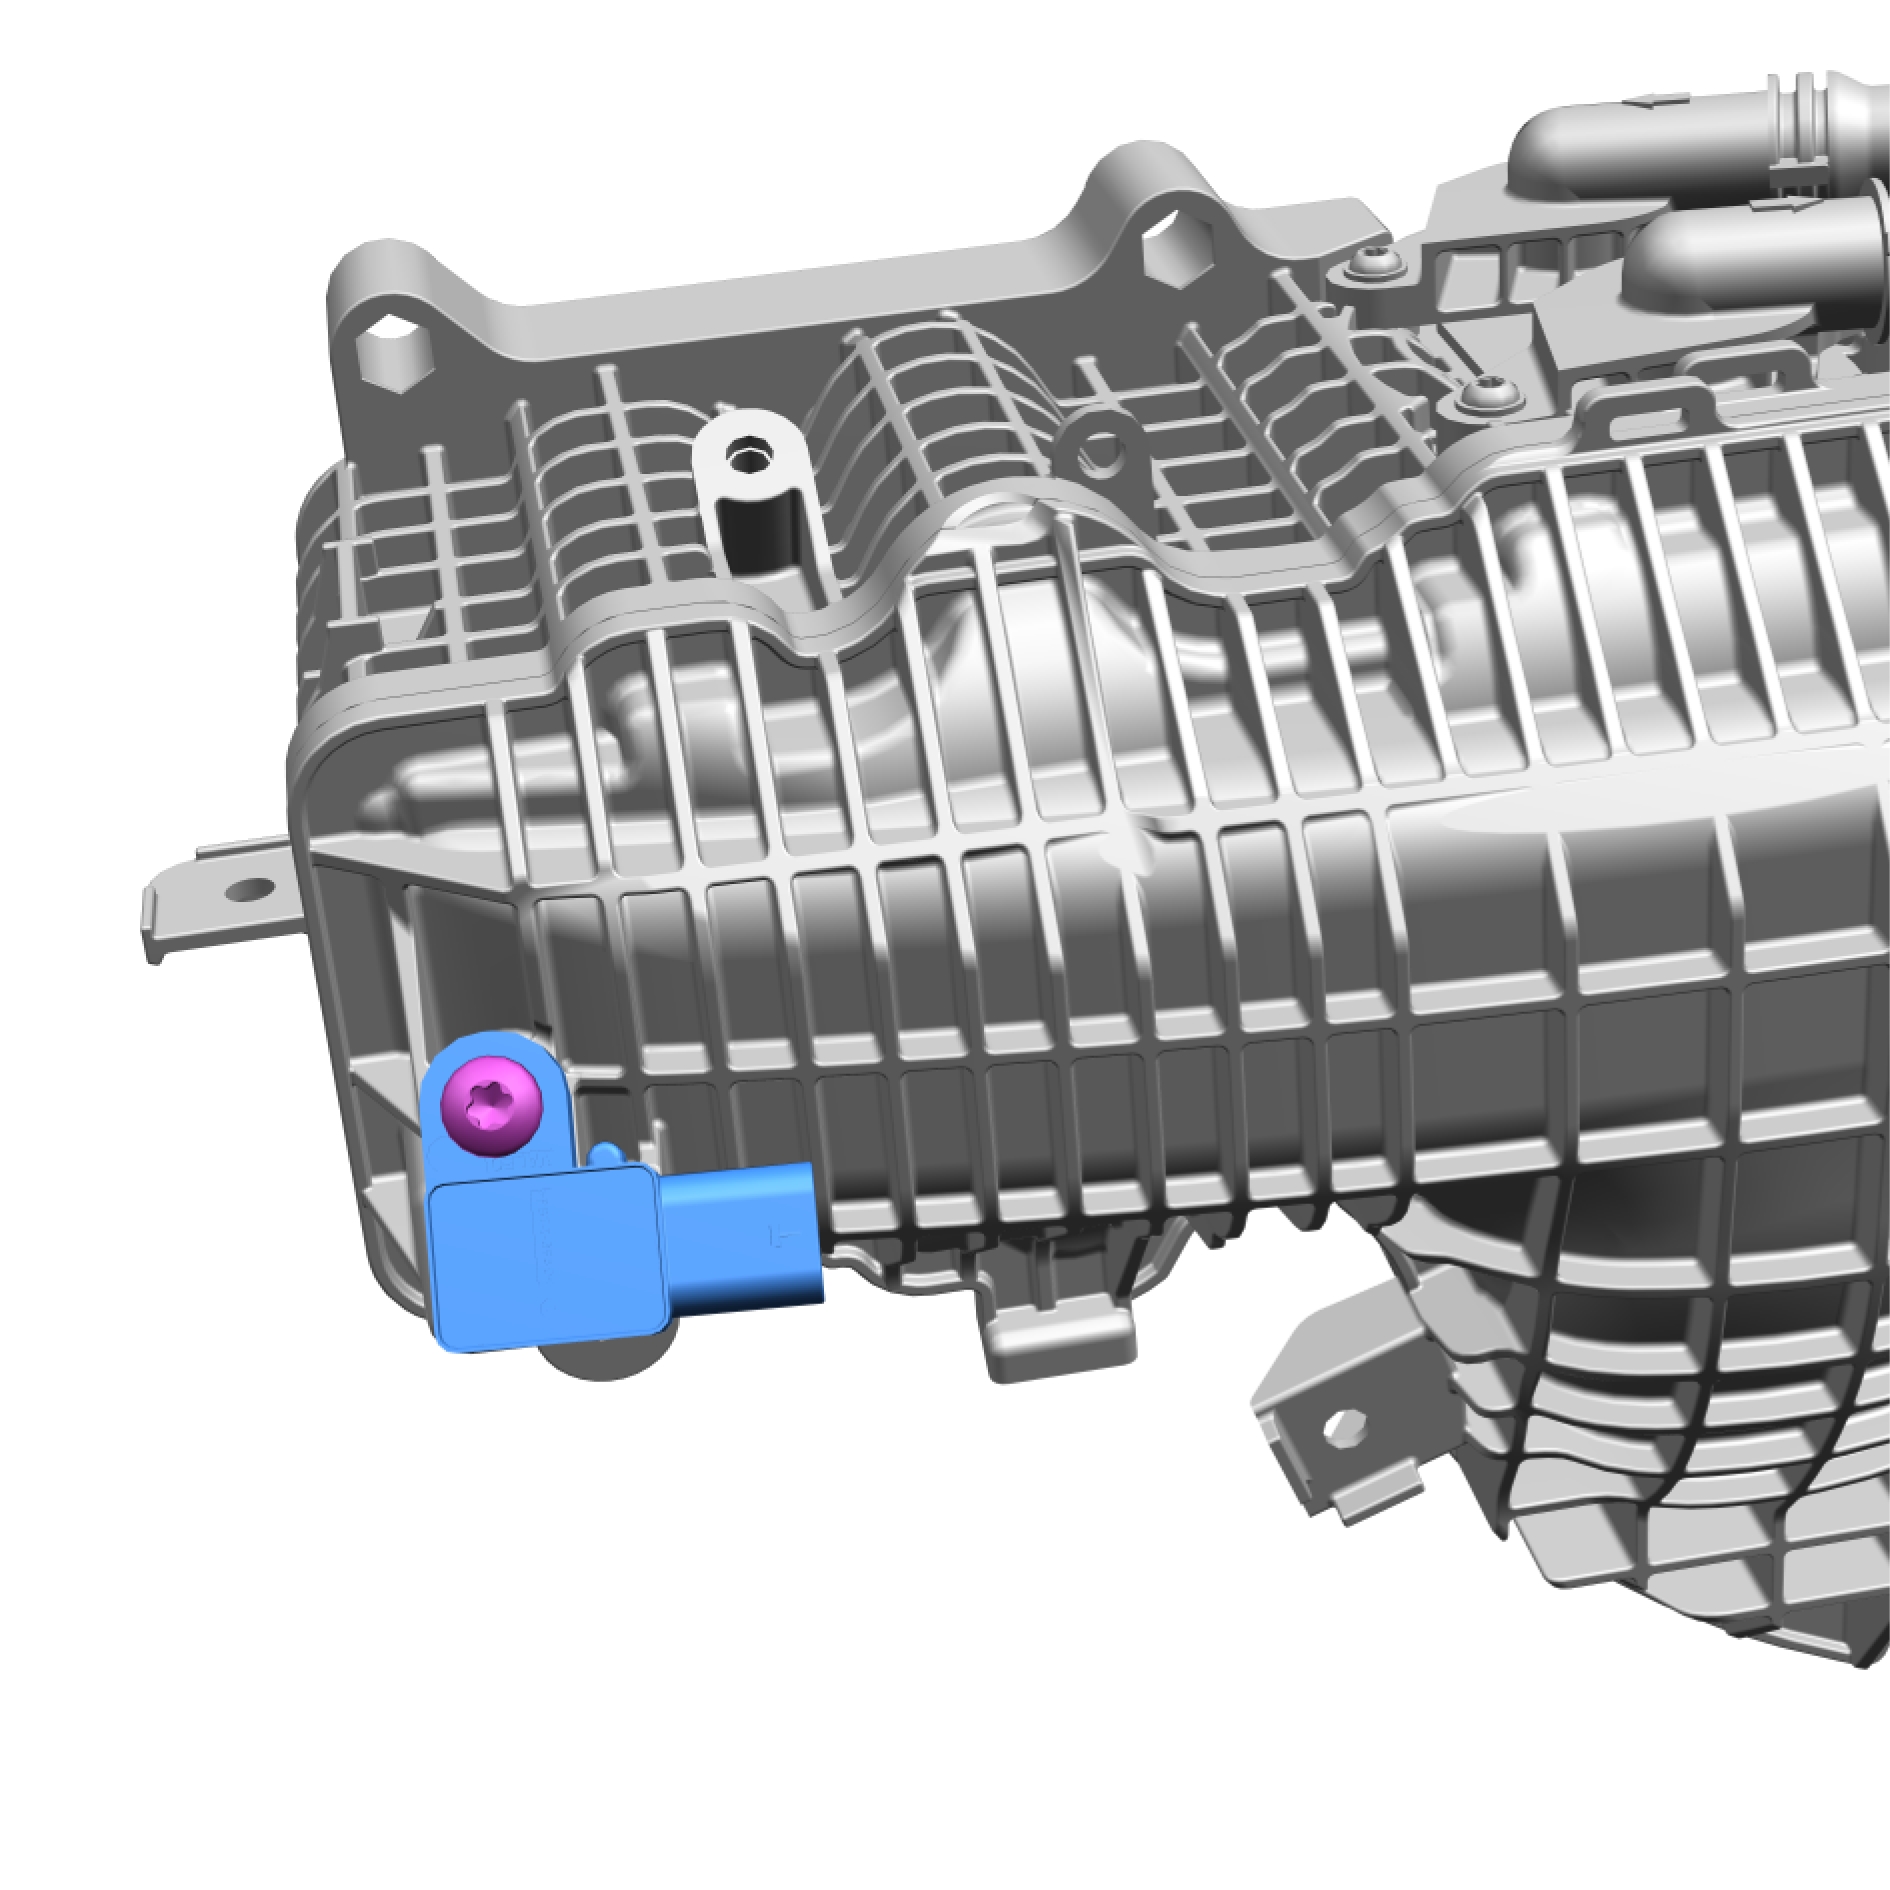
Remove the screw.
Torque: 5 Nm
Remove the marked component
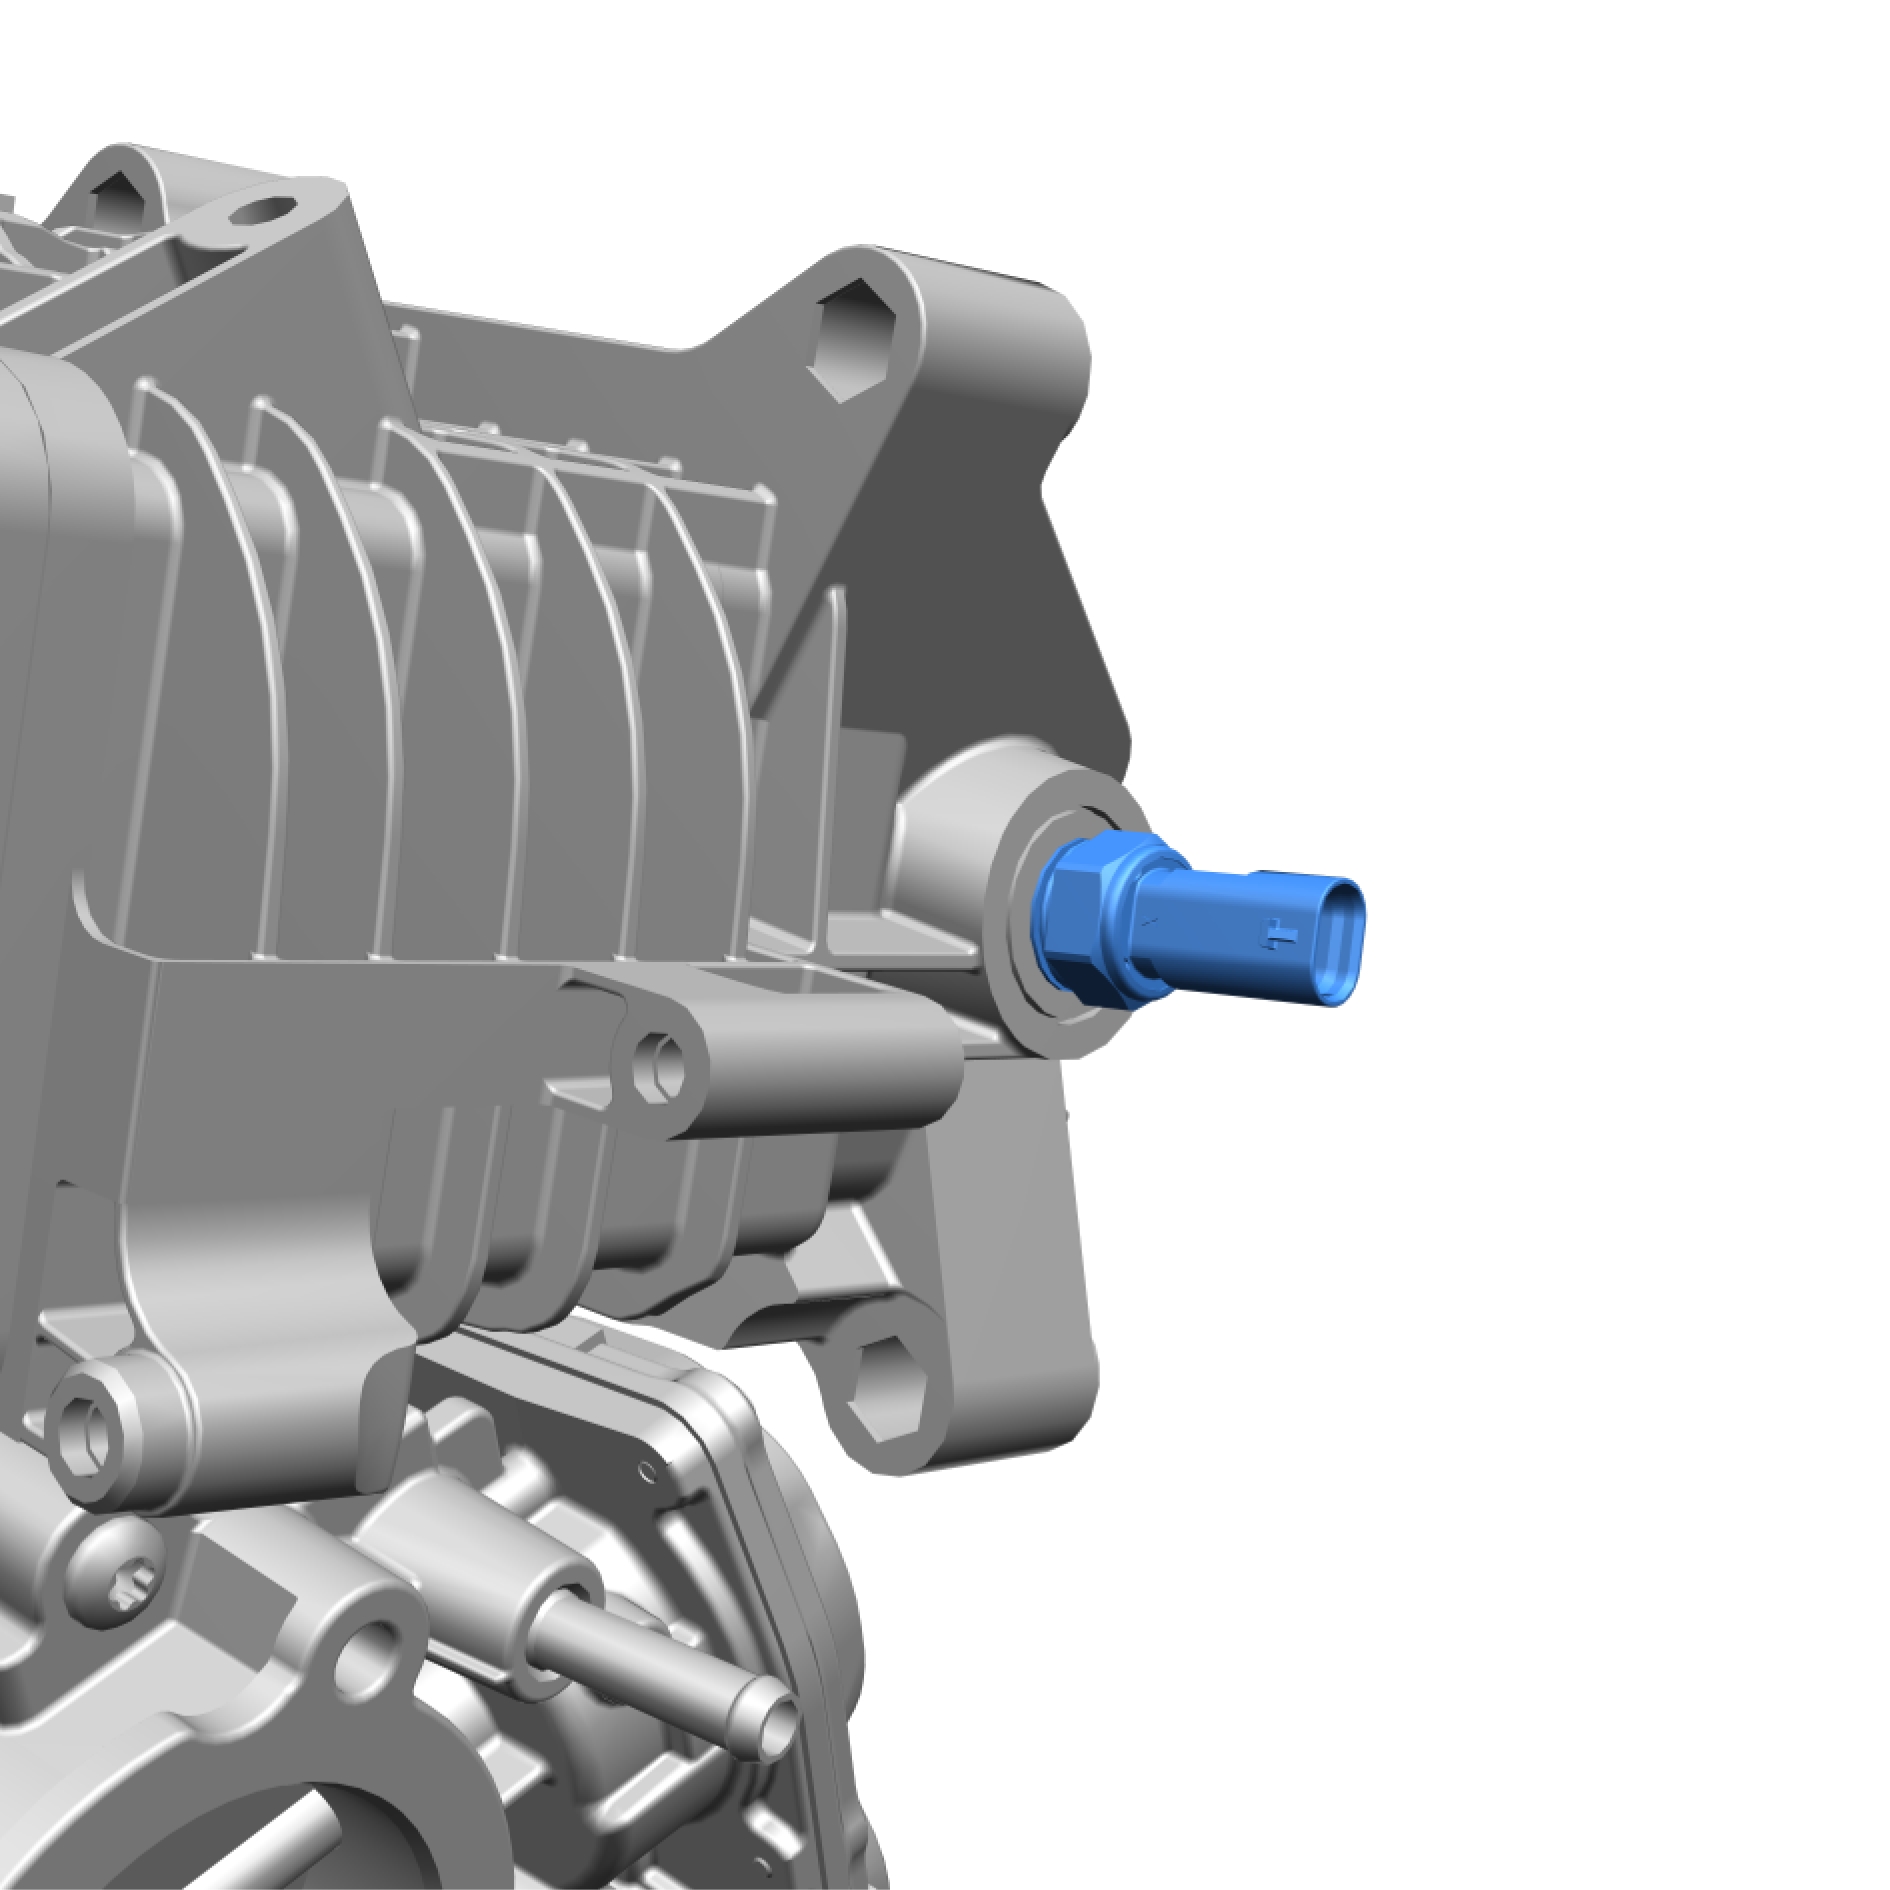
Remove the marked component.
Torque: 22 Nm
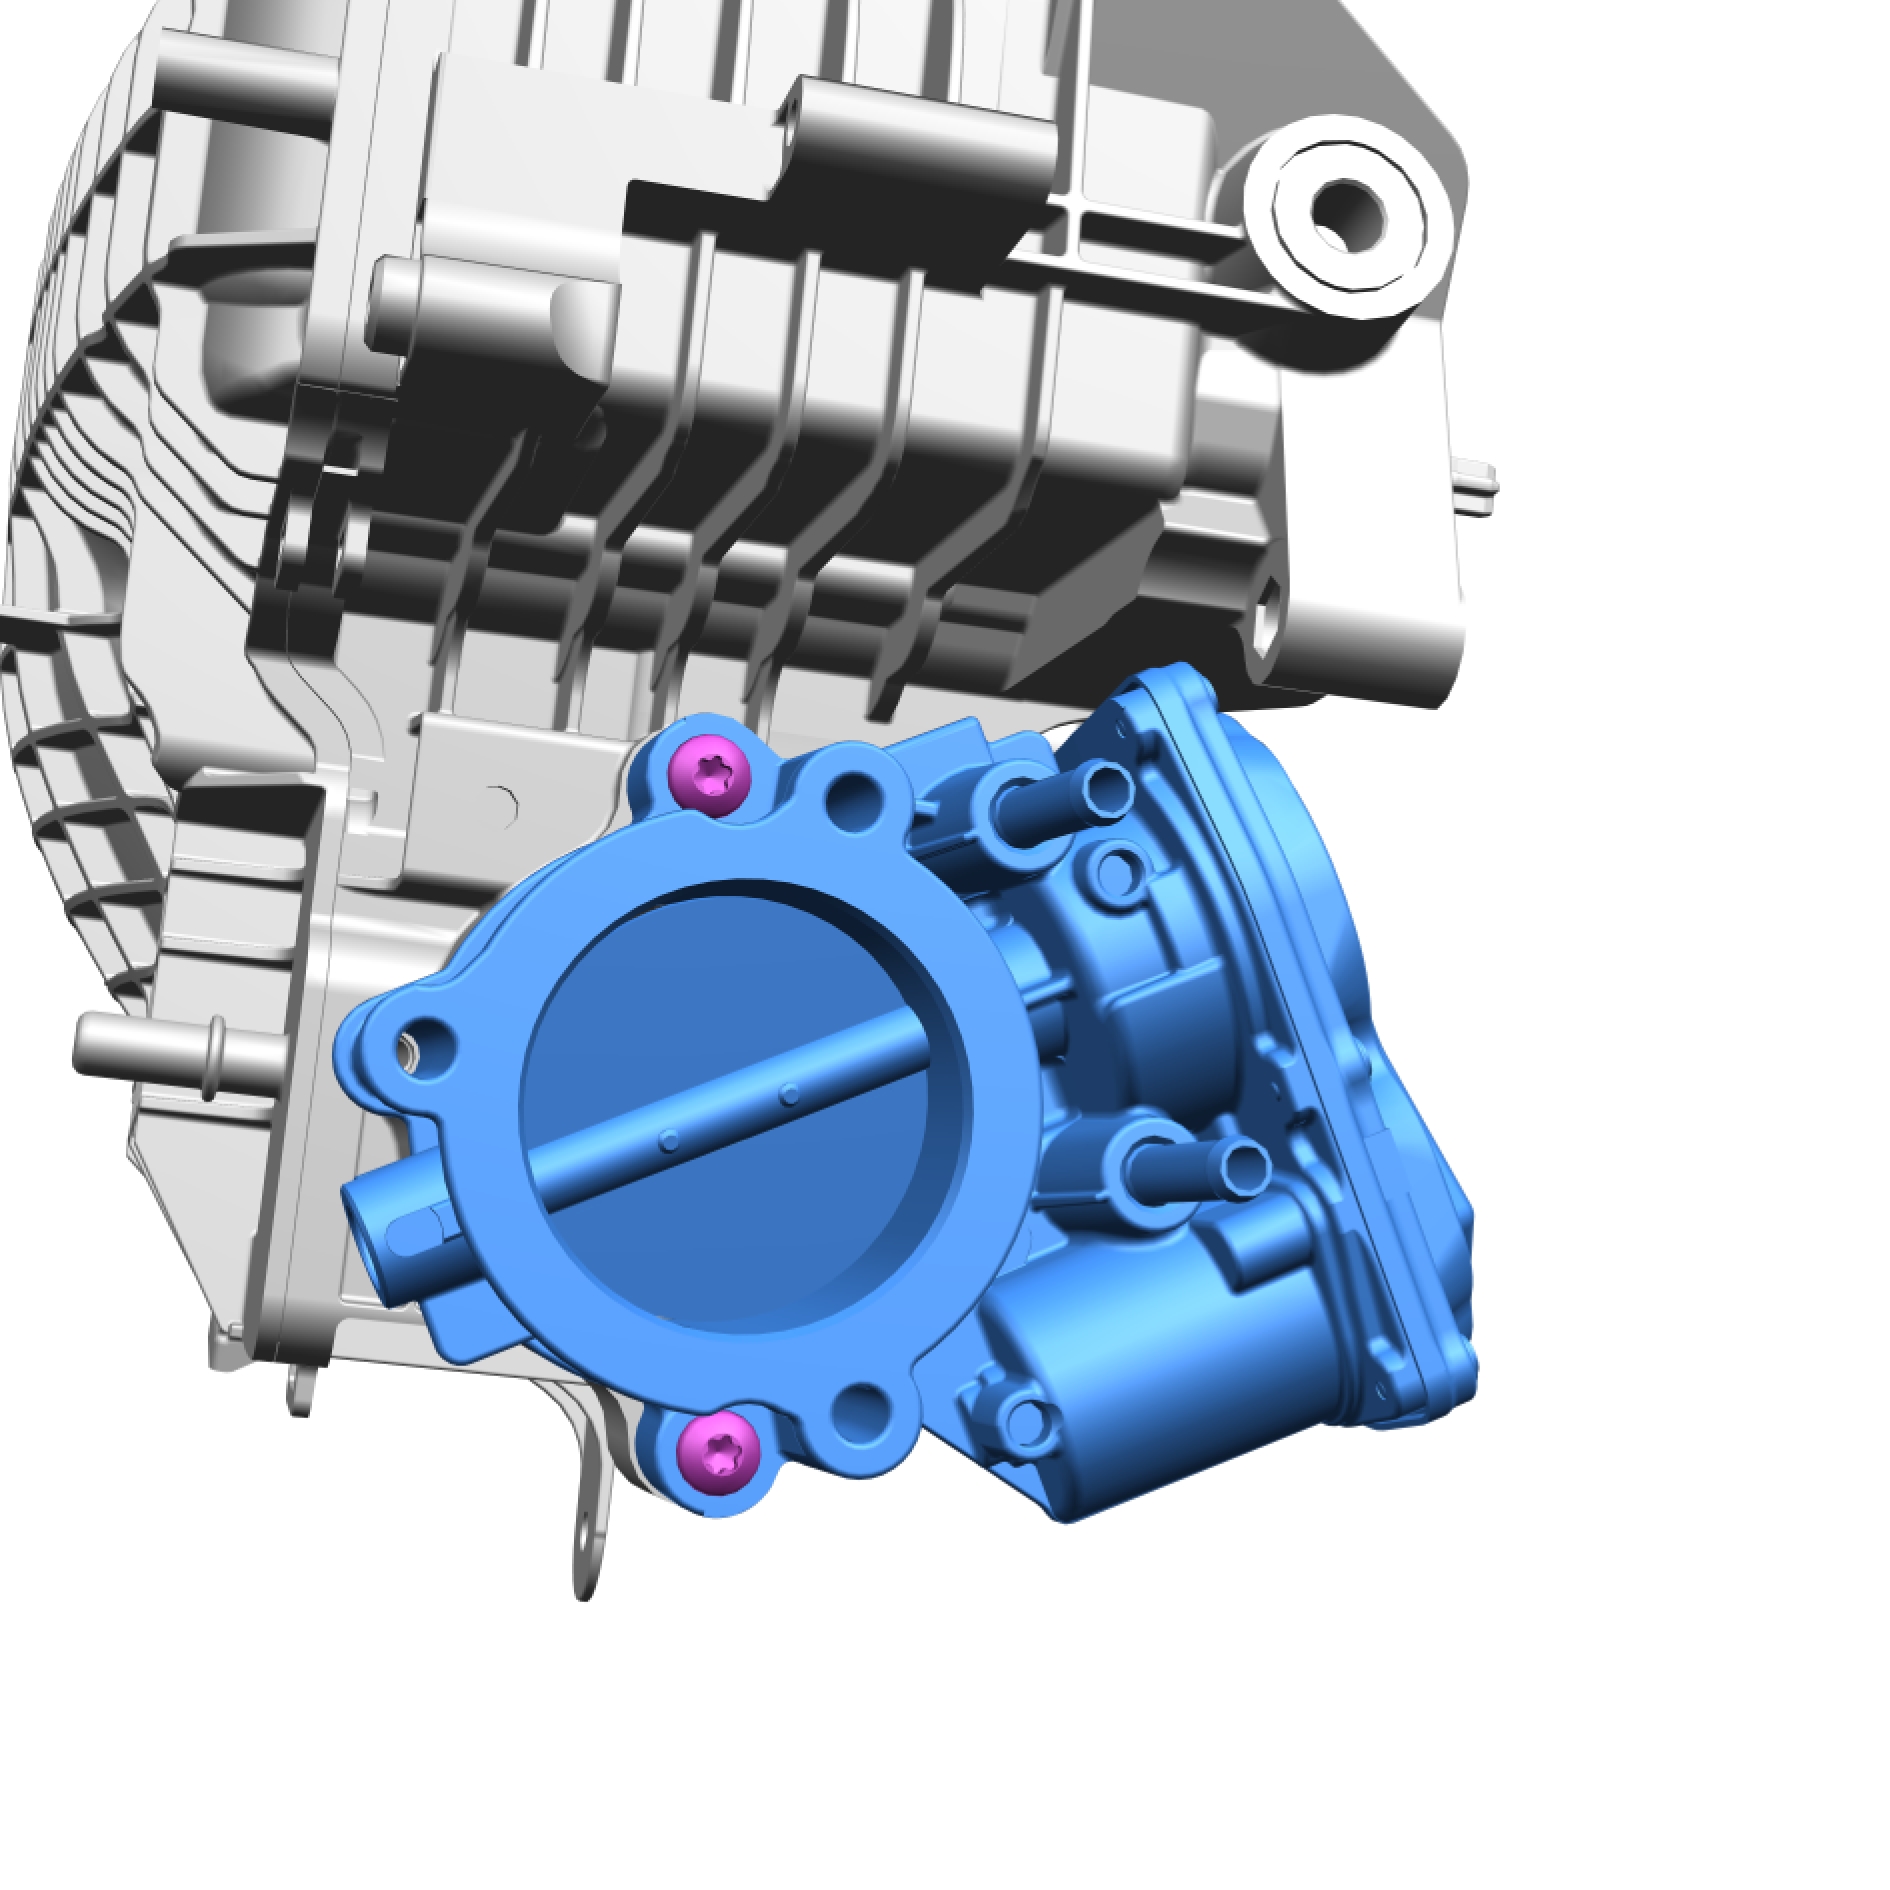
Remove the screws.
Torque: 7 Nm
Remove the marked component.
Installation
Install in reverse order.
Oil filter, replace
Removal
Remove the screw.
Torque: 5 Nm
Remove and discard the marked component.
Make sure that the area around the component is clean and free of foreign material before removal.
Install special tool: 999 5679
Remove the marked component.
Torque: 25 Nm
Remove and discard the marked components.
Installation
Install in reverse order.
Oil cooler engine, replace
Removal
Remove the clip.
Remove the clip.
Remove the marked component.
Remove the screws.
Torque: 10 Nm
Remove the marked component.
Remove and discard the marked component.
Tightening schedule for the installation.
Remove the screws.
Torque: 16 Nm
Remove the marked component.
Remove and discard the marked components.
Installation
Install in reverse order.
Oil pan bushing, replace
Removal
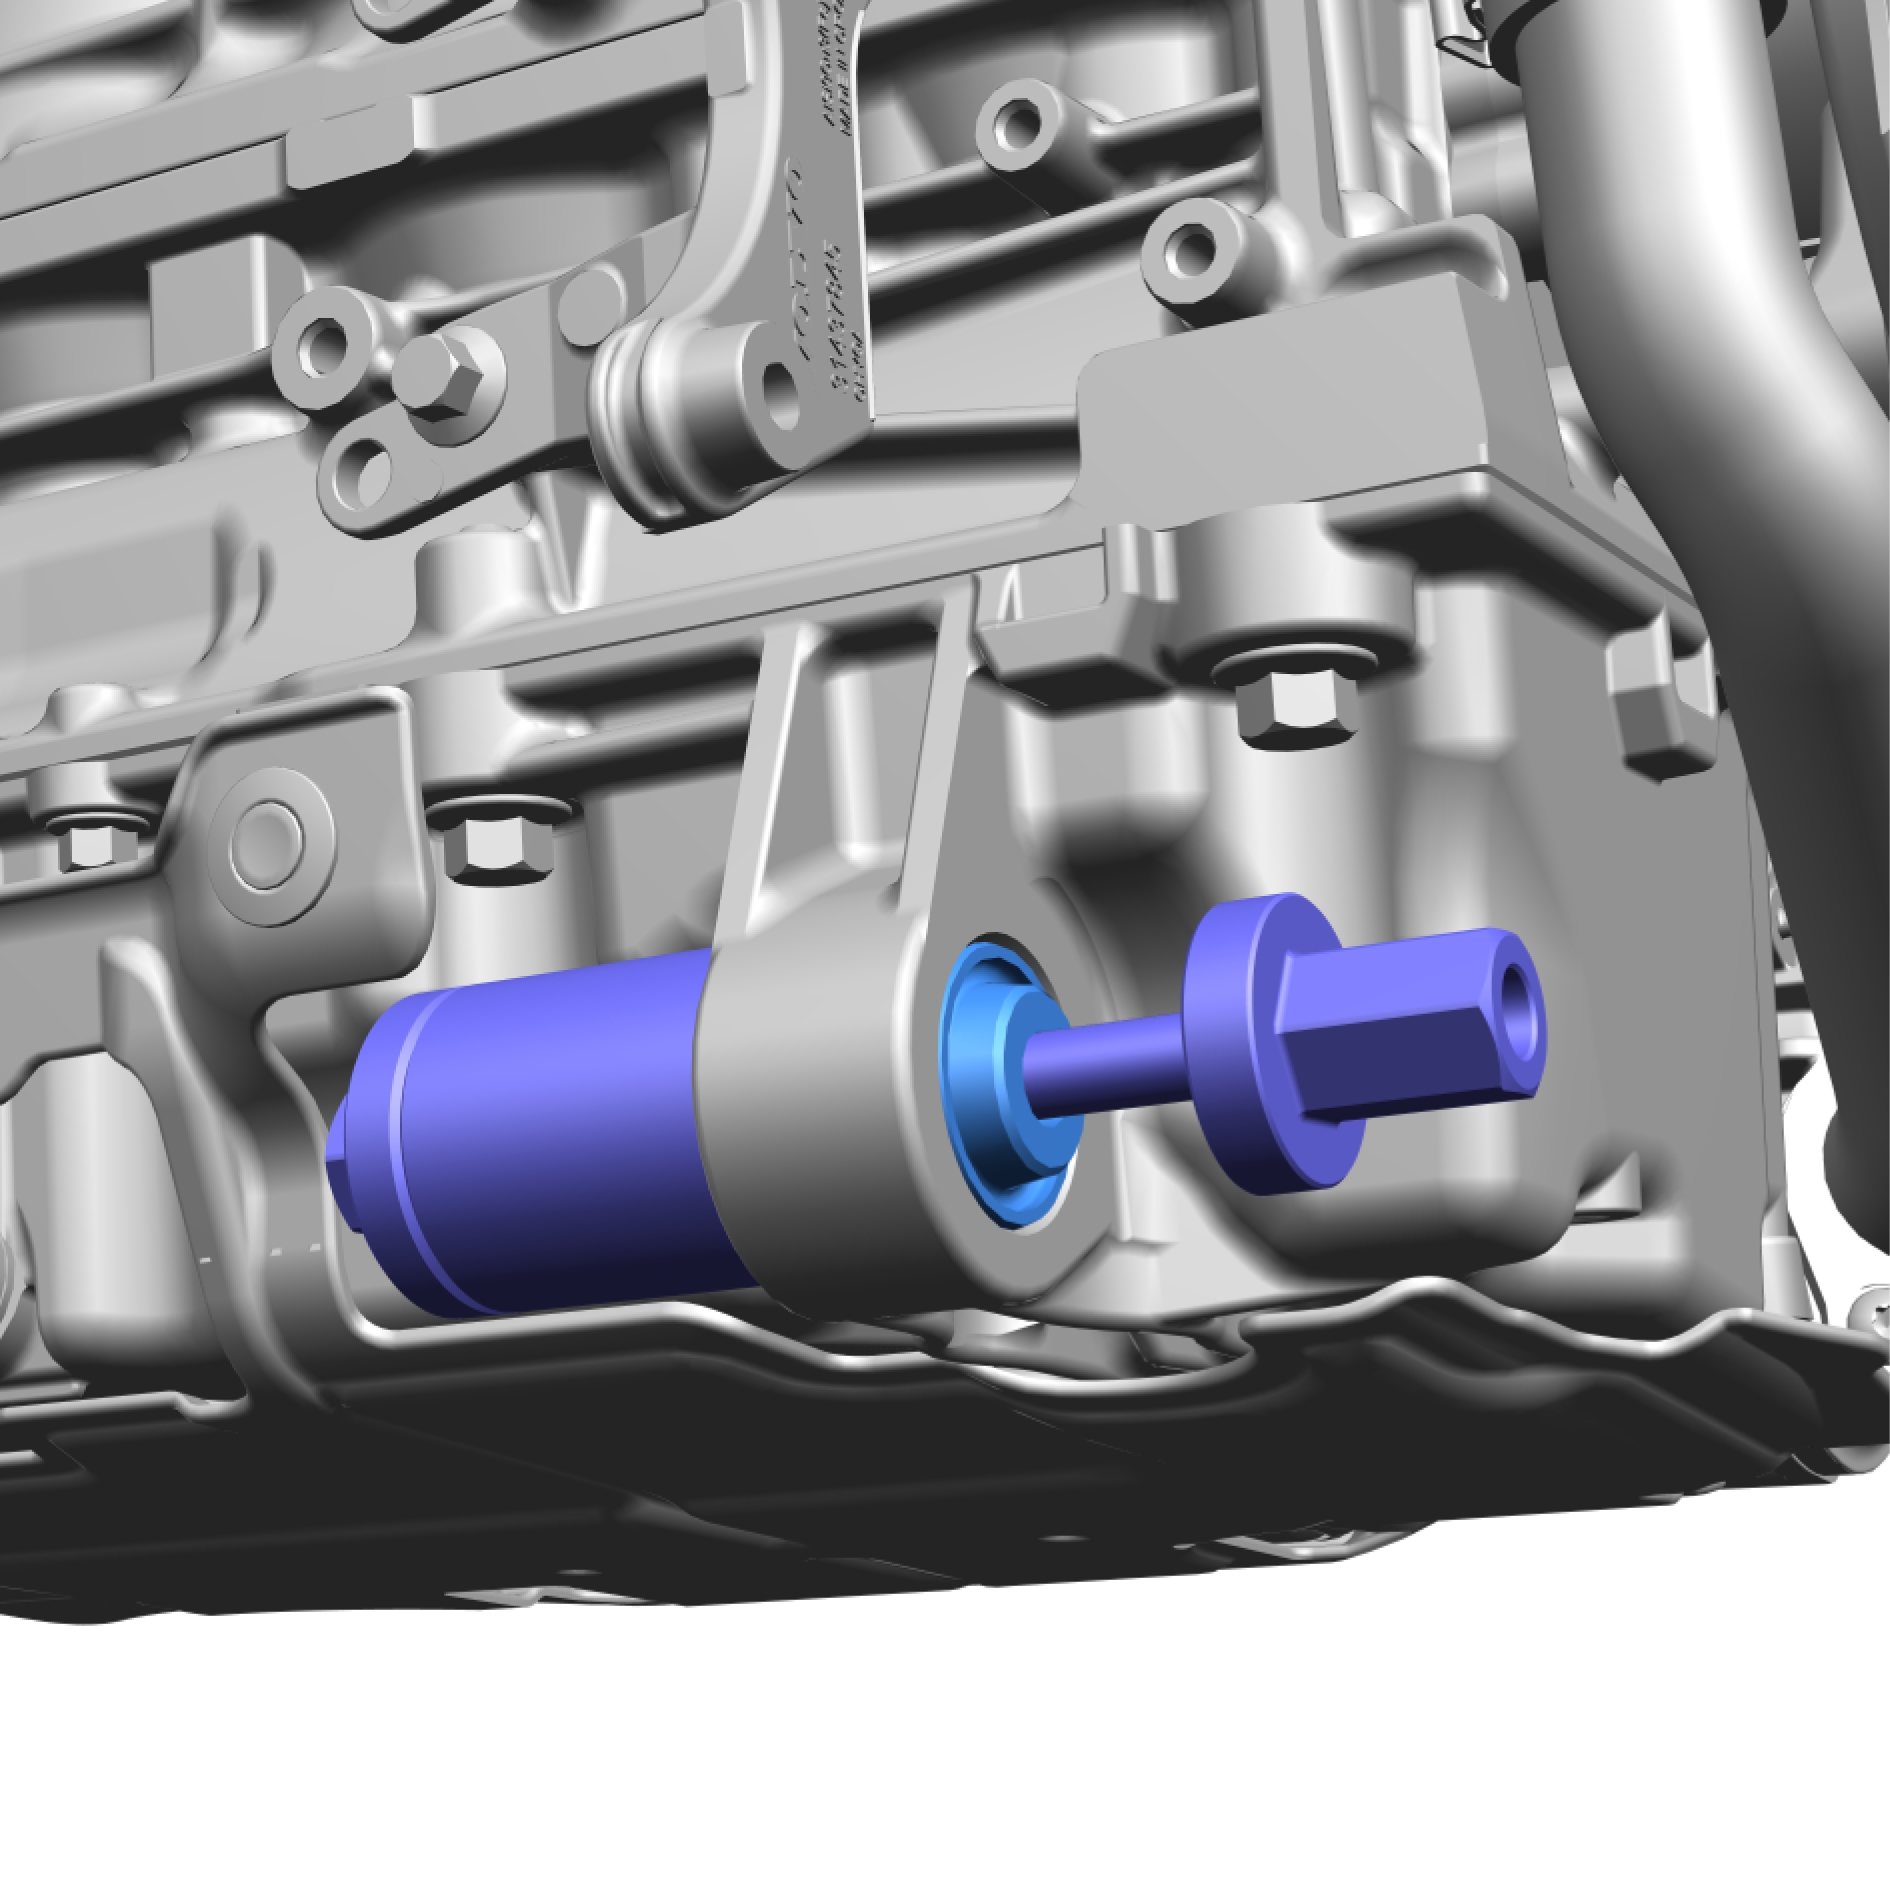
Install special tool: 999 7741
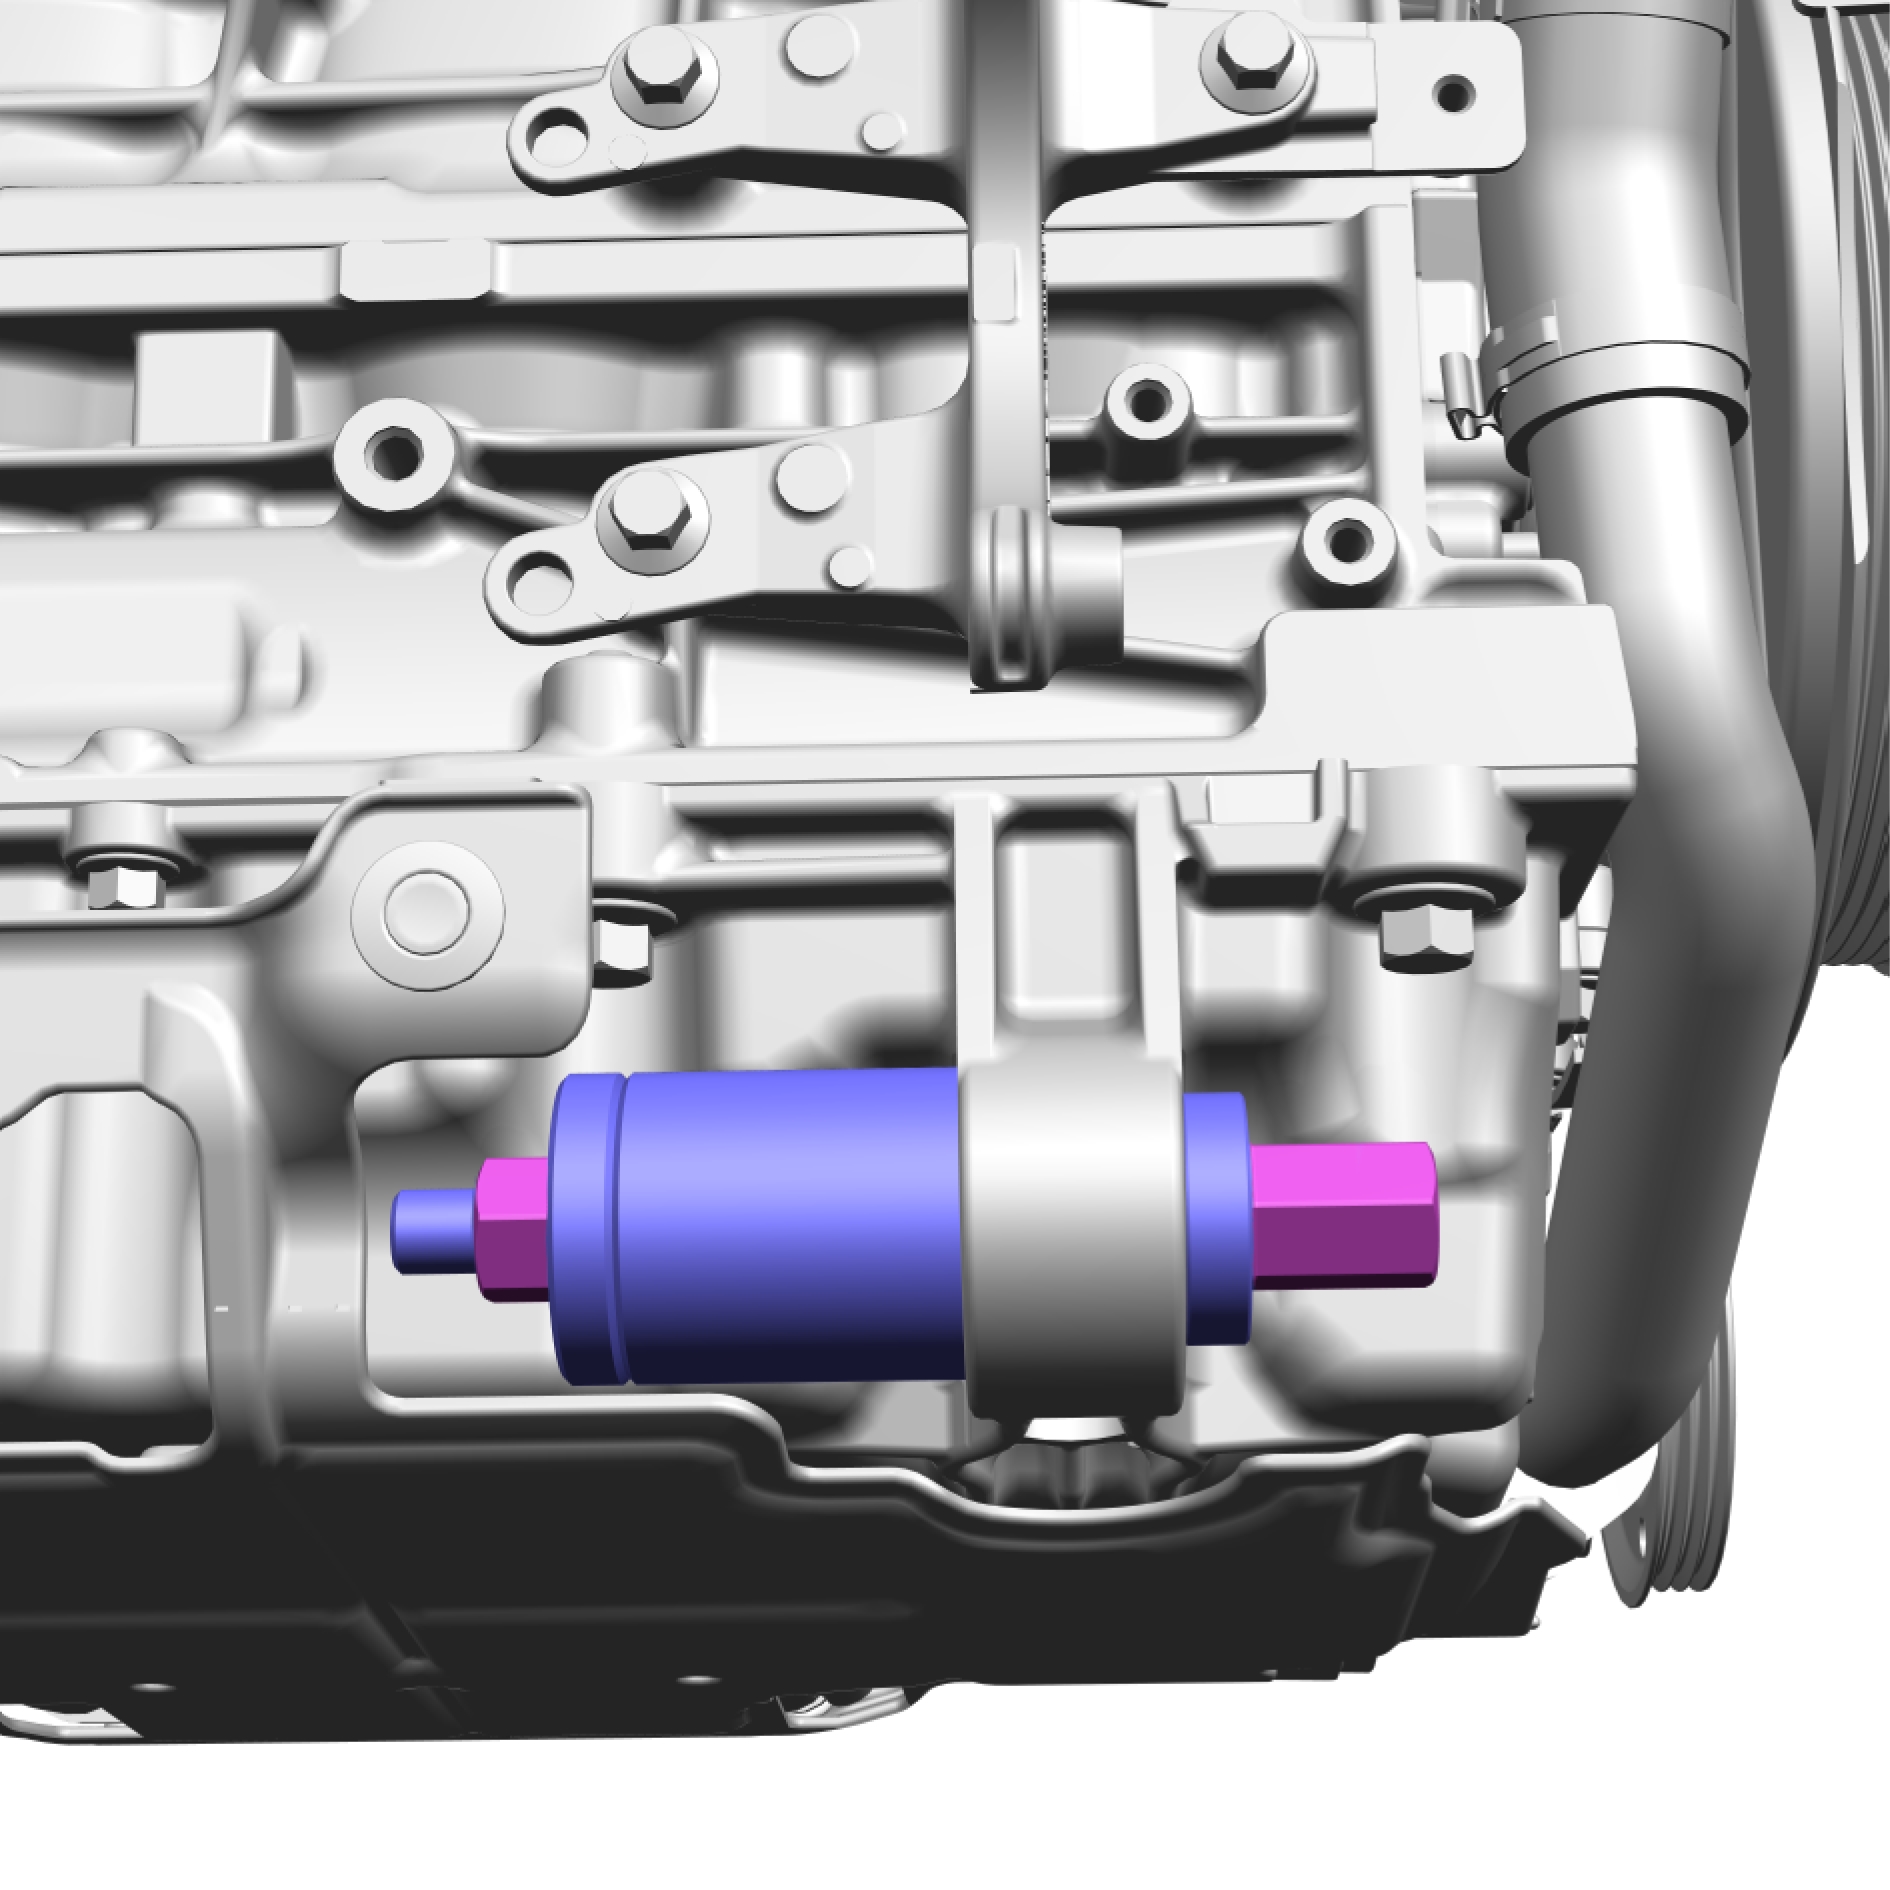
Tighten the nuts to press out the bushing.
Installation
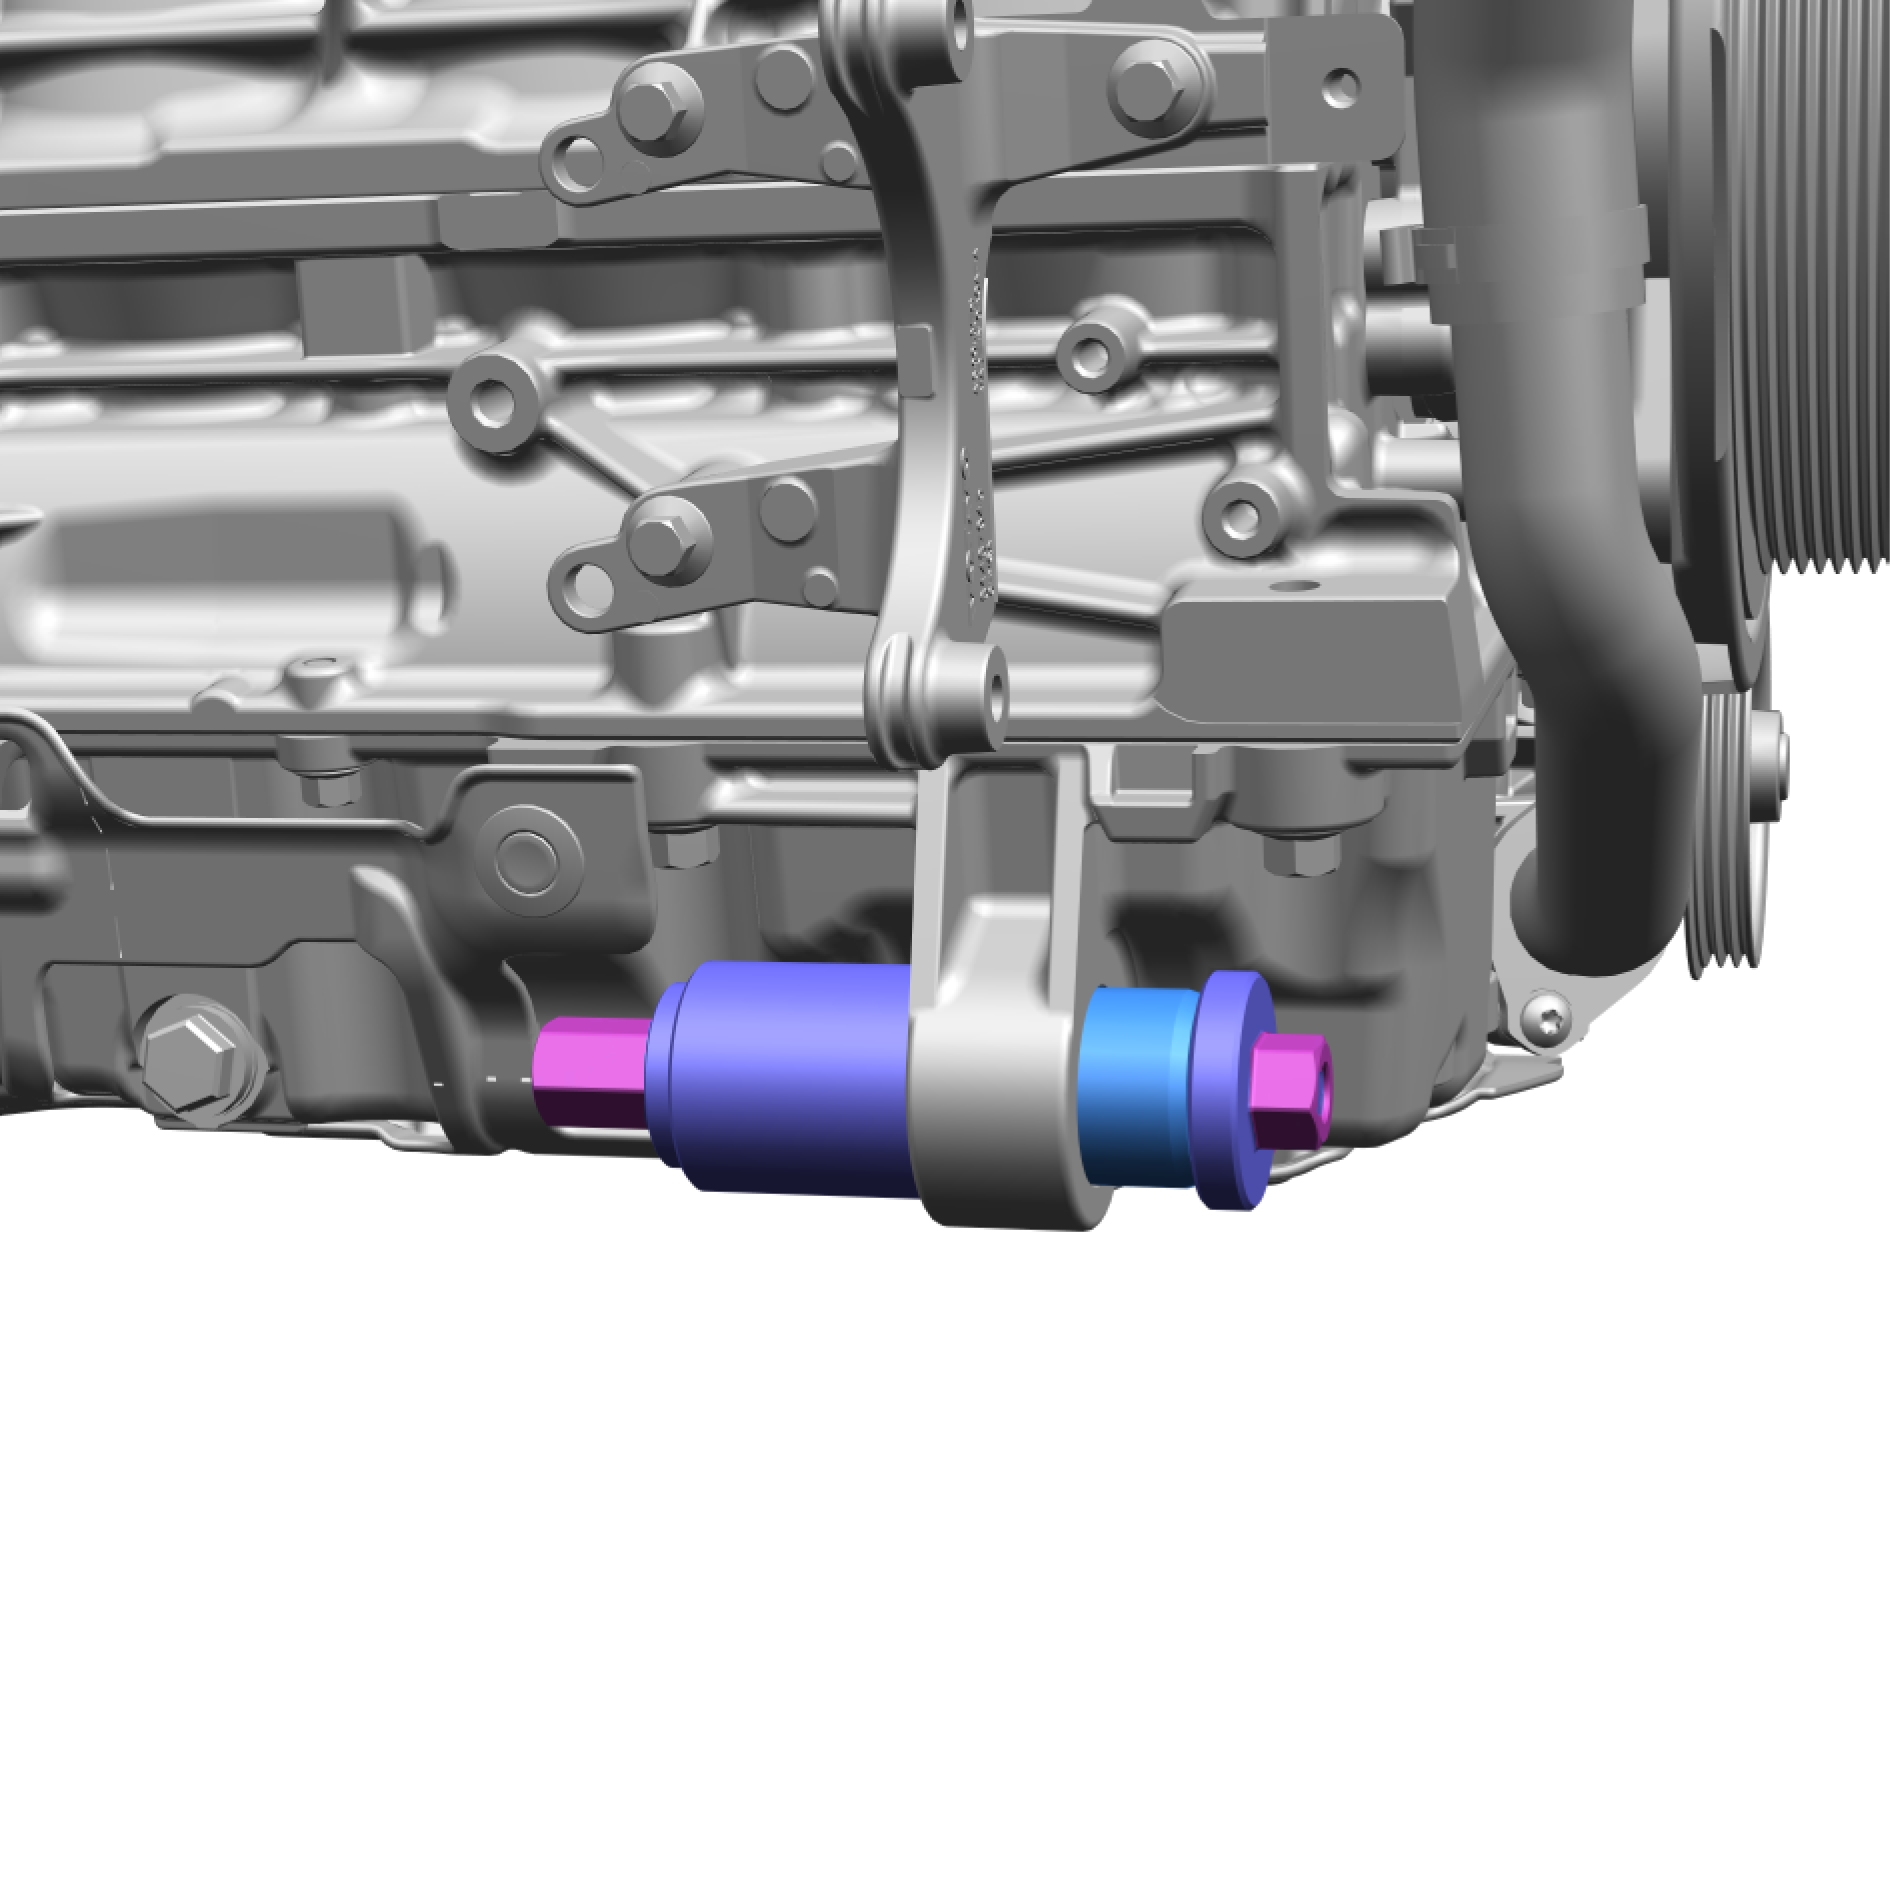
Install the marked component.
Tighten the nuts to press in the bushing.
Oil pan bushing, replace
Removal
Install special tool: 999 7741
Tighten the nuts to press out the bushing.
Installation
Install the marked component.
Tighten the nuts to press in the bushing.
Installing engine
Installation
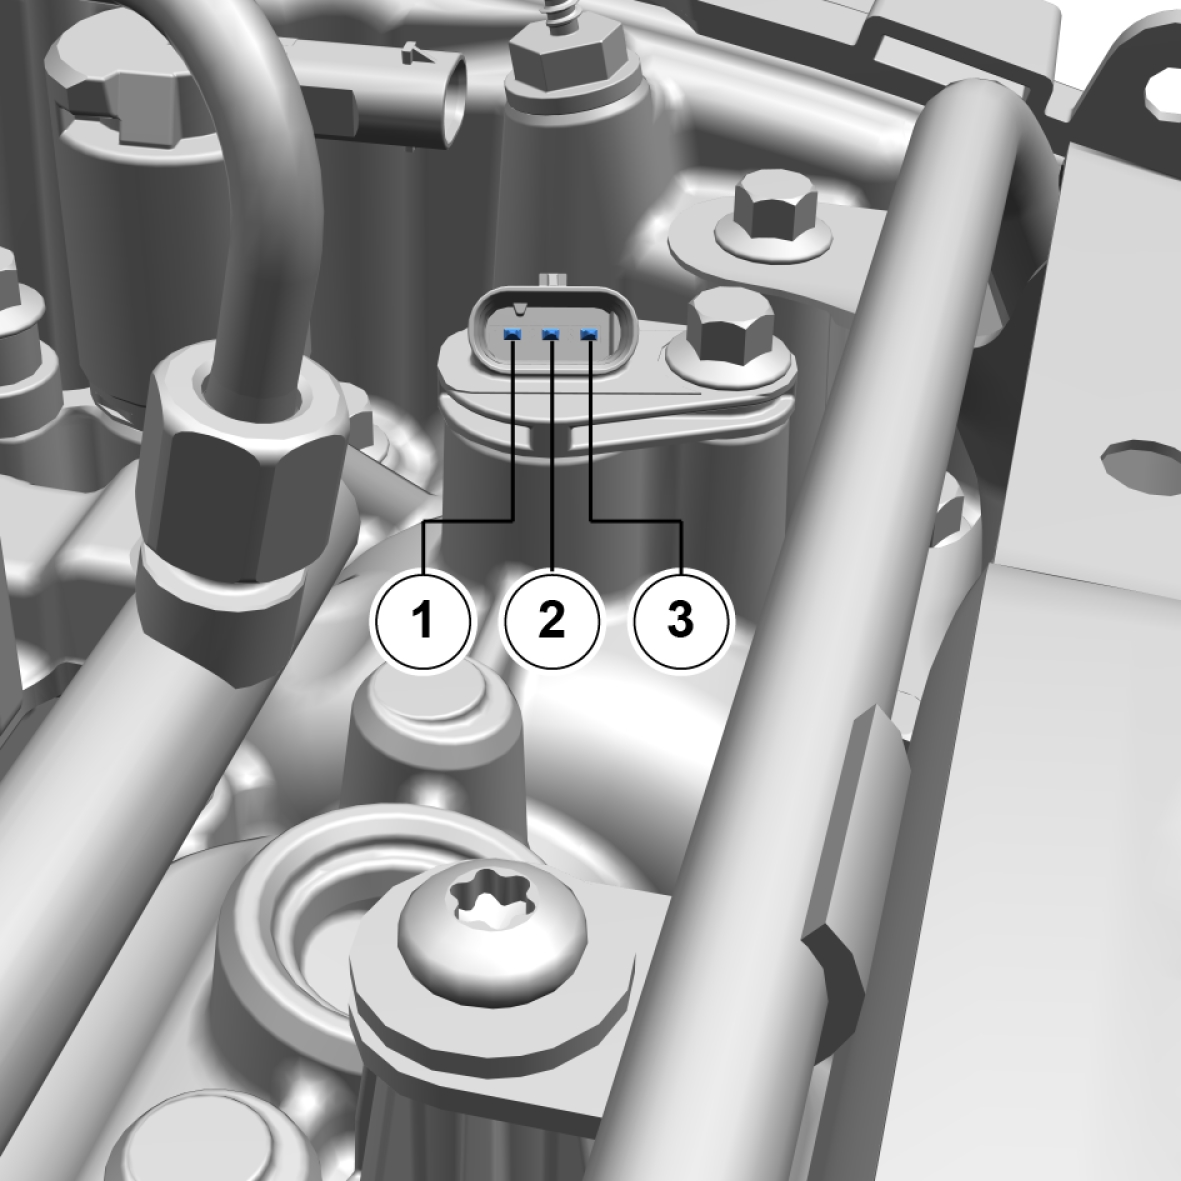
Install the screws.
1, M8, torque: 24 Nm
Install the following items:
dfg
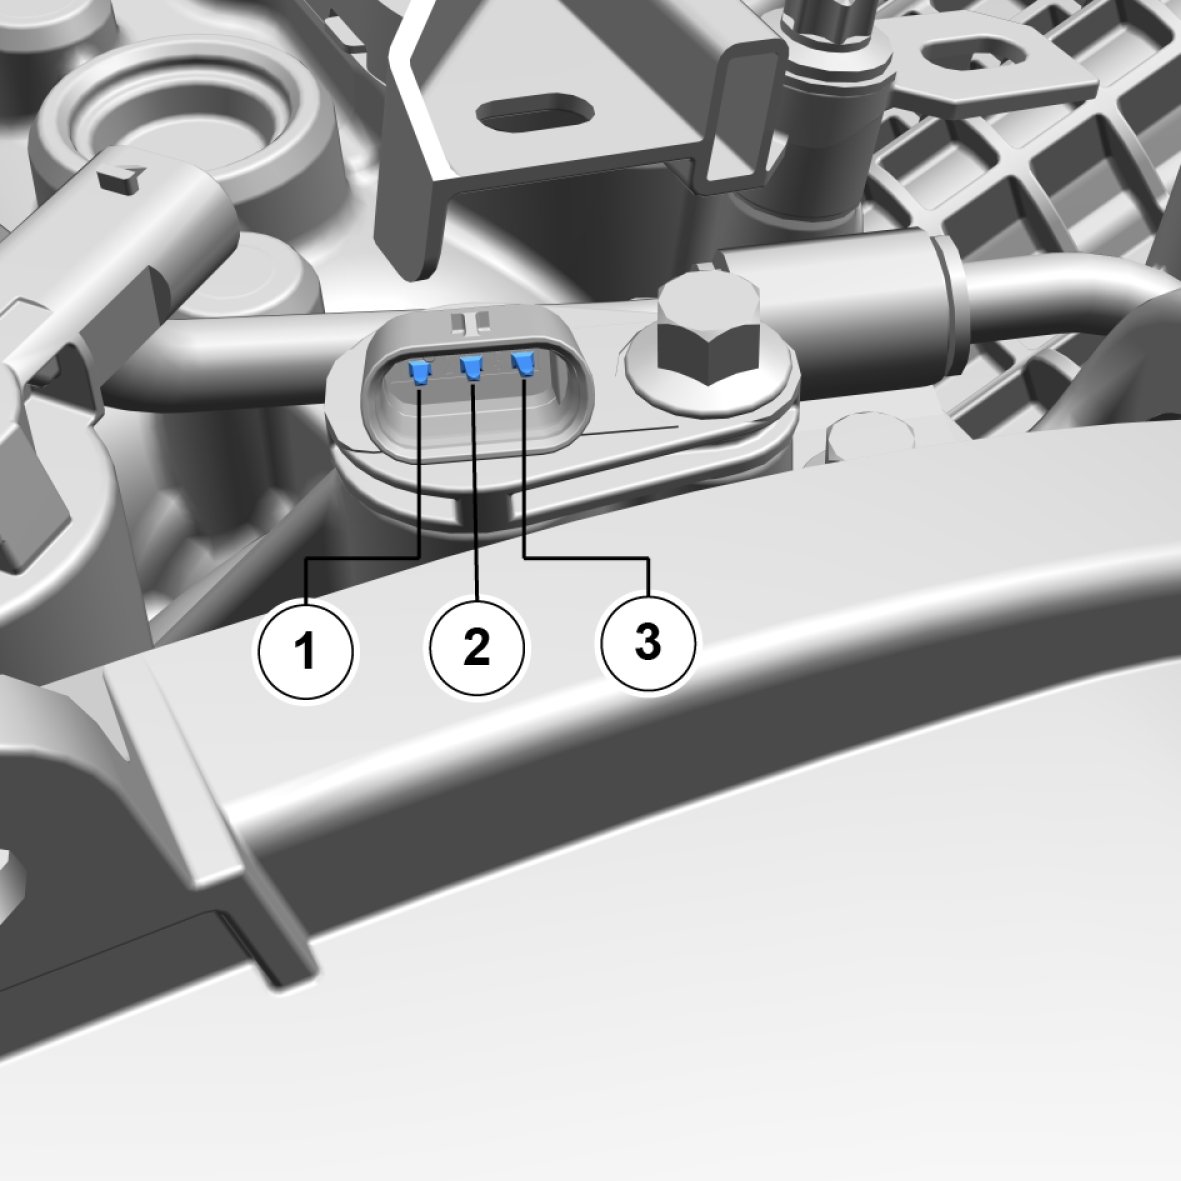
Install the marked component.
Install the screws.
1. M6, torque: 10 Nm
2. M7, torque: 17 Nm
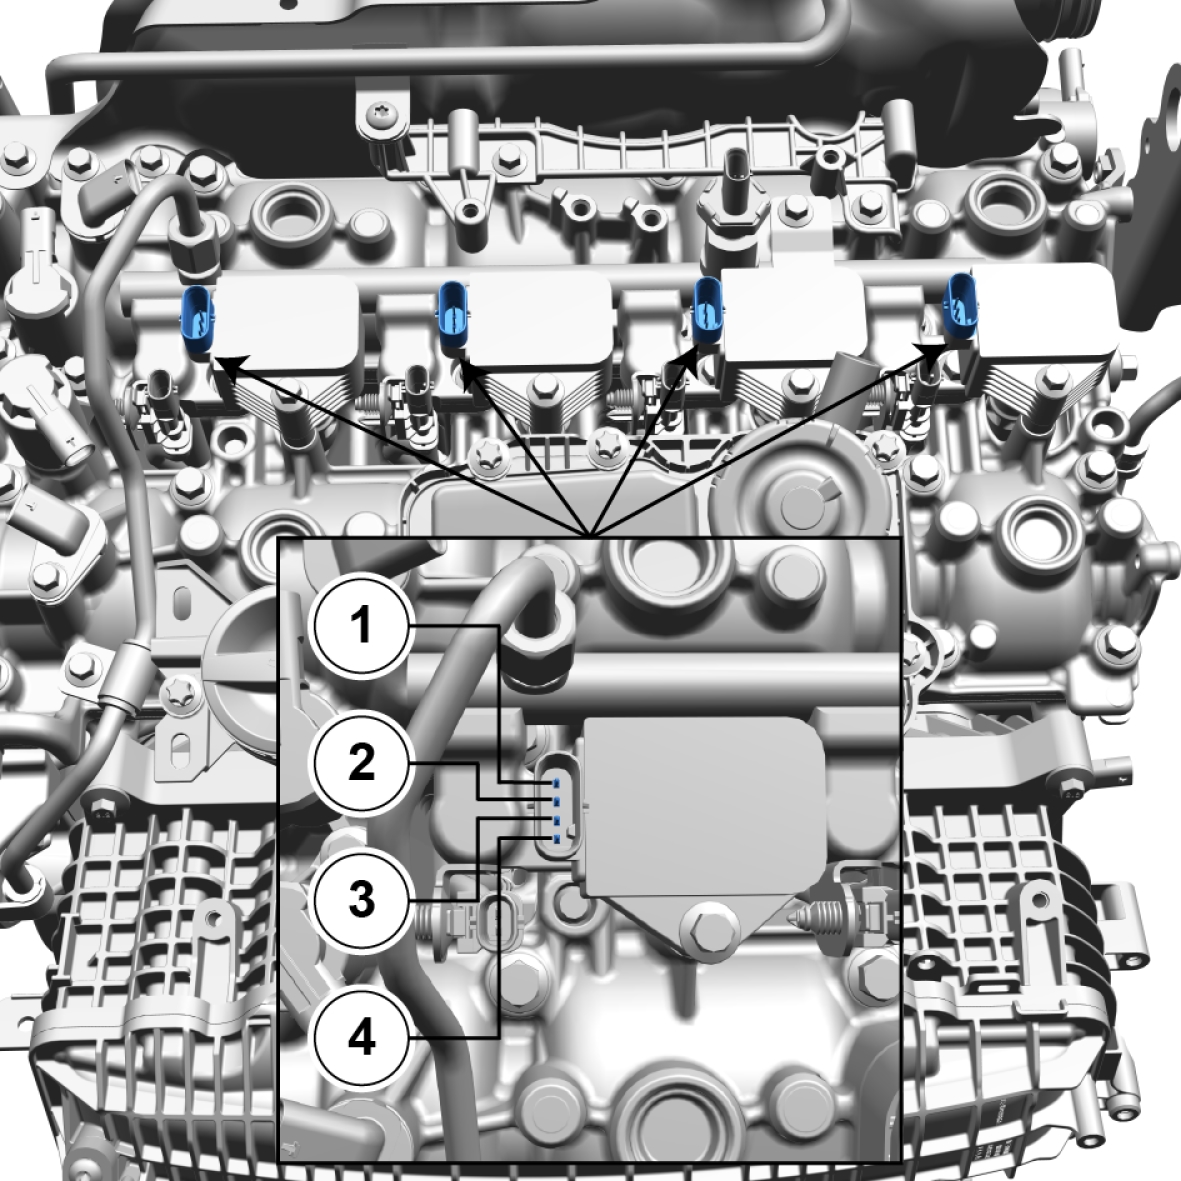
Use new seals.
Install the marked component.
Install the screws, M6, torque: 10 Nm
Install the marked component.
Install the clip(s).
Install the marked component.
Install the clips.
Install the marked component.
Install the screws, M6, torque: 10 Nm
Install the marked component.
Install the screws.
1, M5, torque: 5 Nm
1, M6, torque: 10 Nm
Use new seals.
Install the marked component.
Install the screws.
1. M6, torque: 10 Nm
2. M5, torque: 5 Nm
Install the marked component.
Install the screw M6, torque: 10 Nm
Install the marked component.
Install the nut M6, torque: 10 Nm
Install the marked component.
Install the screws M8, torque: 24 Nm
Install the screw M6, torque: 10 Nm
A click confirms that the component is in the correct position.
Install the hose.
Install the marked component.
Install the marked component. Install the screws M6, torque: 10 Nm
Install the marked component.
Install the screws M6, torque: 10 Nm
Make sure that the components are positioned correctly.
Install the marked components.
Install the screws knock sensor, torque: 20 Nm
Use a new seal.
Install the marked component.
Install the screws M6, torque: 10 Nm
Install the marked component.
Install the screw M6, torque: 10 Nm
Clean the surface.
Check the component. If it displays any type of damage, it must be replaced.
Check the surfaces for abrasion.
Make sure that the components are positioned correctly.
Install the marked component.
Make sure that the installation marks are aligned.
If necessary turn the engine.
Measure
Check the component. If it displays any type of damage, it must be replaced.
Make sure that the seal remains correctly located.
Use a new seal.
Install the marked component.
Install the screws.
Use hands only.
Tighten each bolt 1 turn at a time.
Tighten the bolts injection pump, torque: 30 Nm
A click confirms that the component is in the correct position.
Install the marked component.
Only tighten the nuts finger tight at this stage.
Install the marked component.
Make sure to replace the marked component with a new.
Install the screws M6, torque: 10 Nm
Tighten the nuts, use special tool 981 4129
Stage 1: 18 Nm
Stage 2: 30 Nm
Camshaft position sensor - exhaust
fdgdfgfdgdf
Camshaft position sensor - intake
Camshaft position sensor - intake
| Pin | Target |
|---|---|
| 1 | Positive + |
| 2 | Negative - |
| 3 | Signal |
Camshaft_test
Description
Pin Out
| Pin | Description |
|---|---|
| 1 | Negative - |
| 2 | Positive + |
| 3 | Signal |
Camshaft position sensor - exhaust
Description
Pin Out
| Pin | Description |
|---|---|
| 1 | Negative - |
| 2 | Positive + |
| 3 | Signal |
Temp sensor - coolant
Description
Pin Out
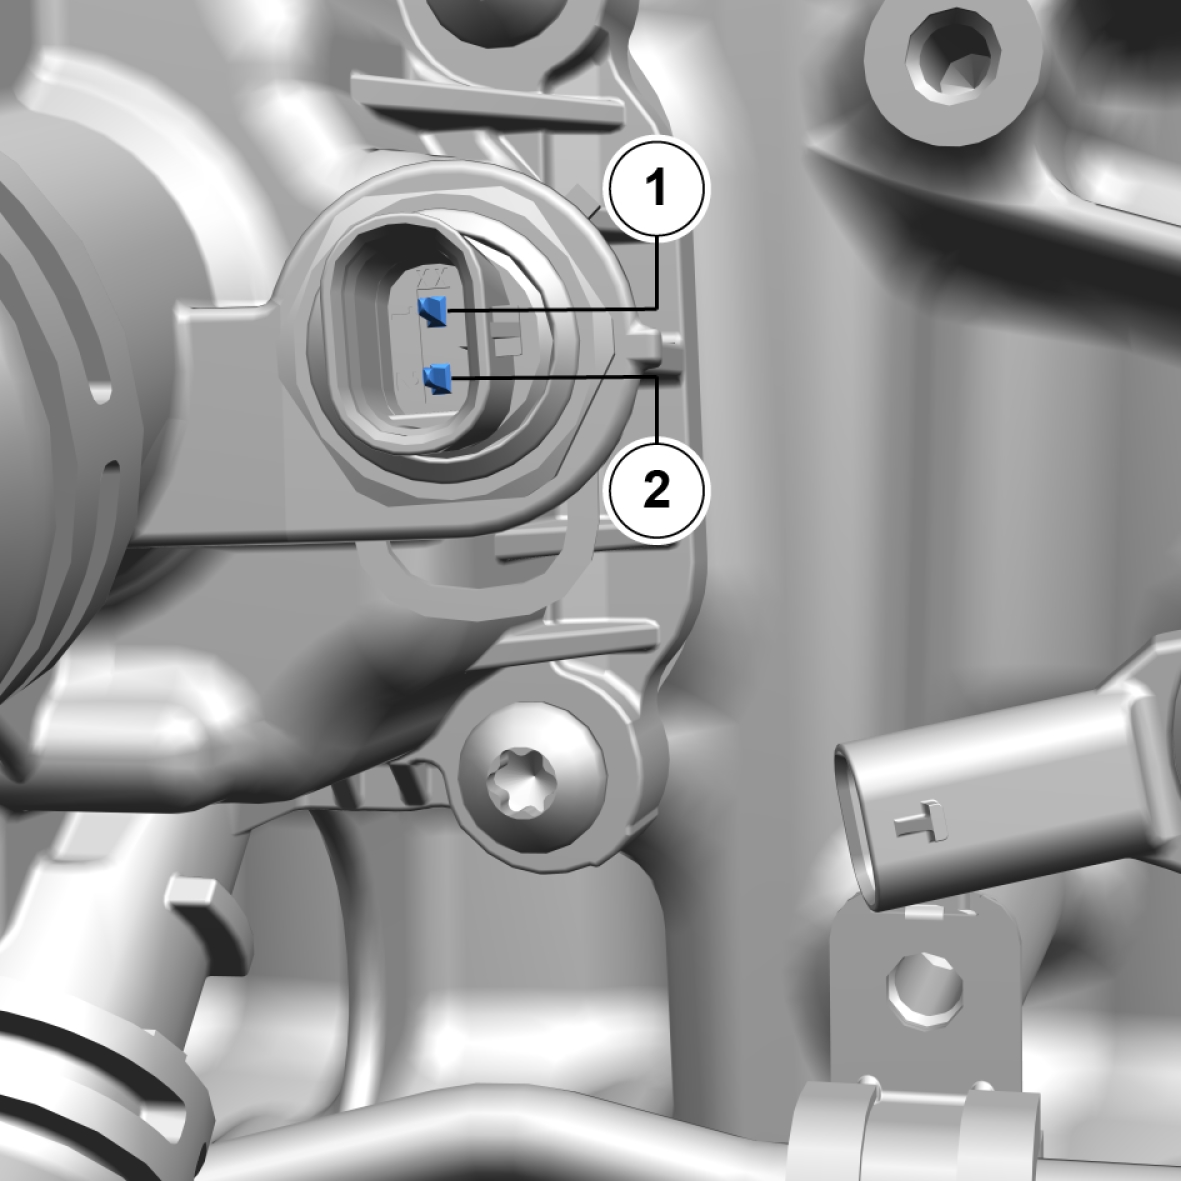
| Pin | Description |
|---|---|
| 1 | Positive + |
| 2 | Negative - |
Camshaft position sensor - intake
Description
Pin Out
| Pin | Description |
|---|---|
| 1 | Negative - |
| 2 | Positive + |
| 3 | Signal |
Crankshaft position sensor
Description
Pin Out
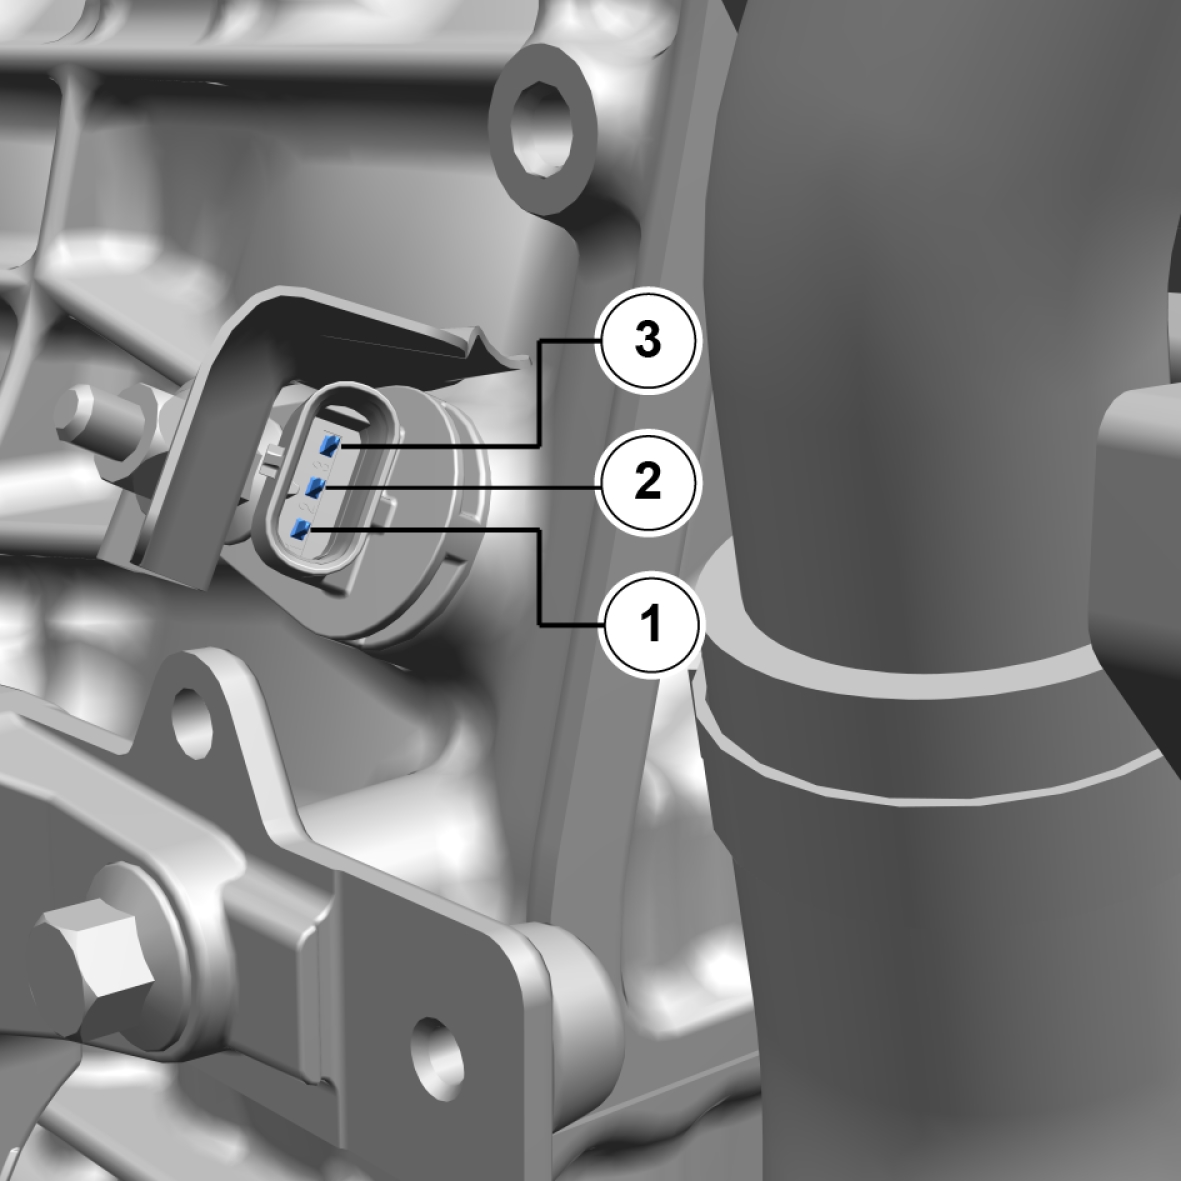
| Pin | Description |
|---|---|
| 1 | Negative - |
| 2 | Positive + |
| 3 | Signal |
Fuel pressure sensor
Description
Pin Out

| Pin | Description |
|---|---|
| 1 | Negative - |
| 2 | Positive + |
| 3 | Signal |
Fuel pump - High Pressure
Description
Pin Out
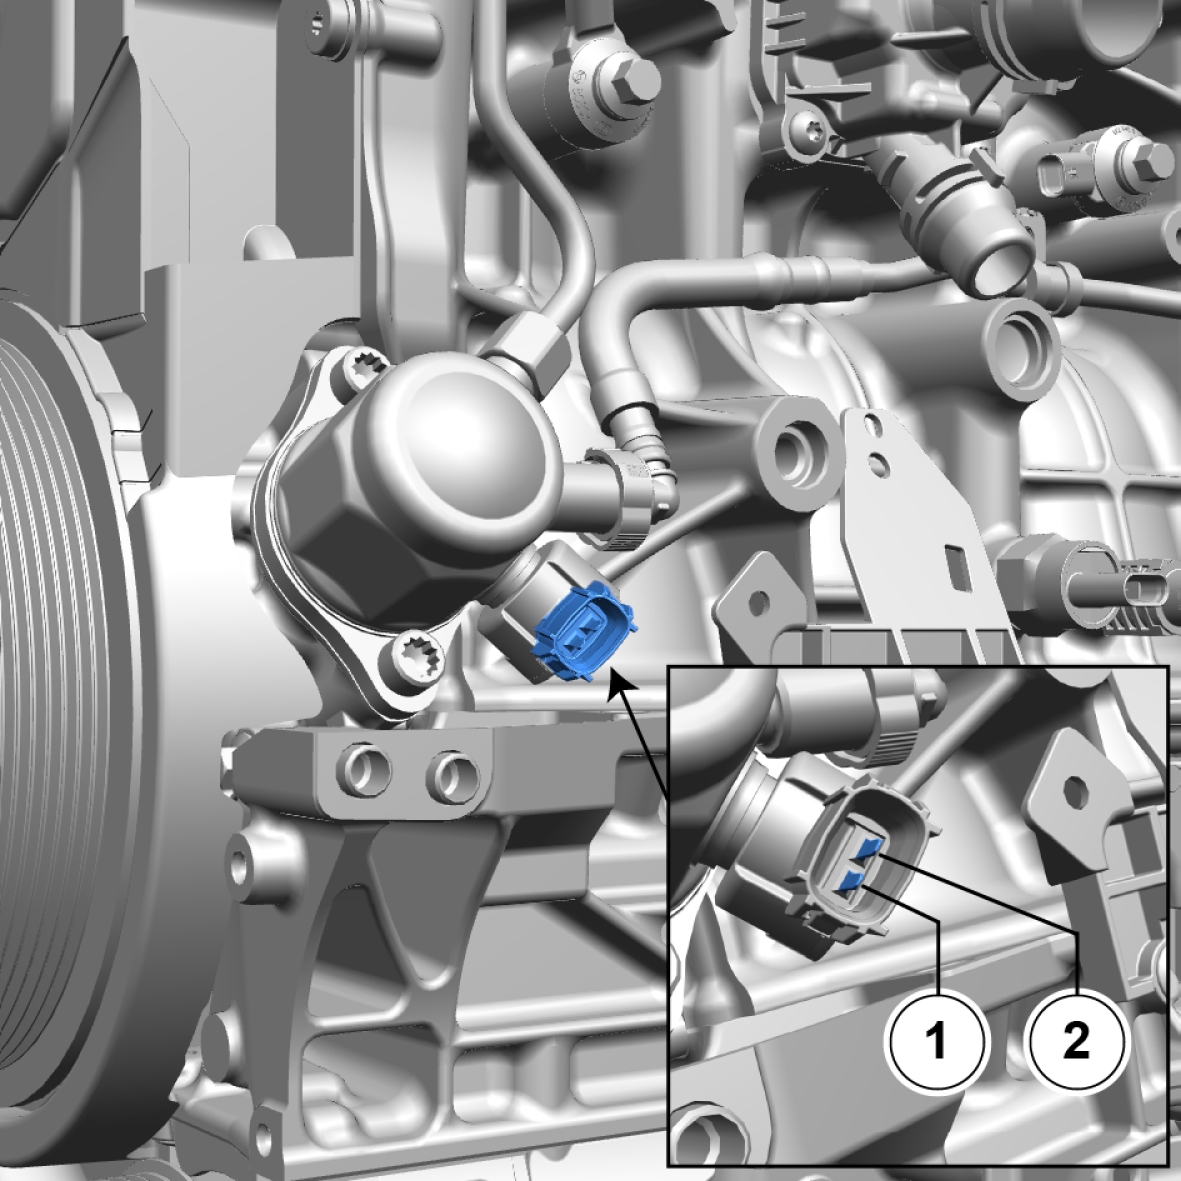
| Pin | Description |
|---|---|
| 1 | Positive + |
| 2 | Negative - |
Ignition coils
Description
Pin Out
| Pin | Description |
|---|---|
| 1 | Positivt + |
| 2 | Negative - |
| 3 | Signal |
| 4 | Pulse |
Fuel injectors
Description
Pin Out
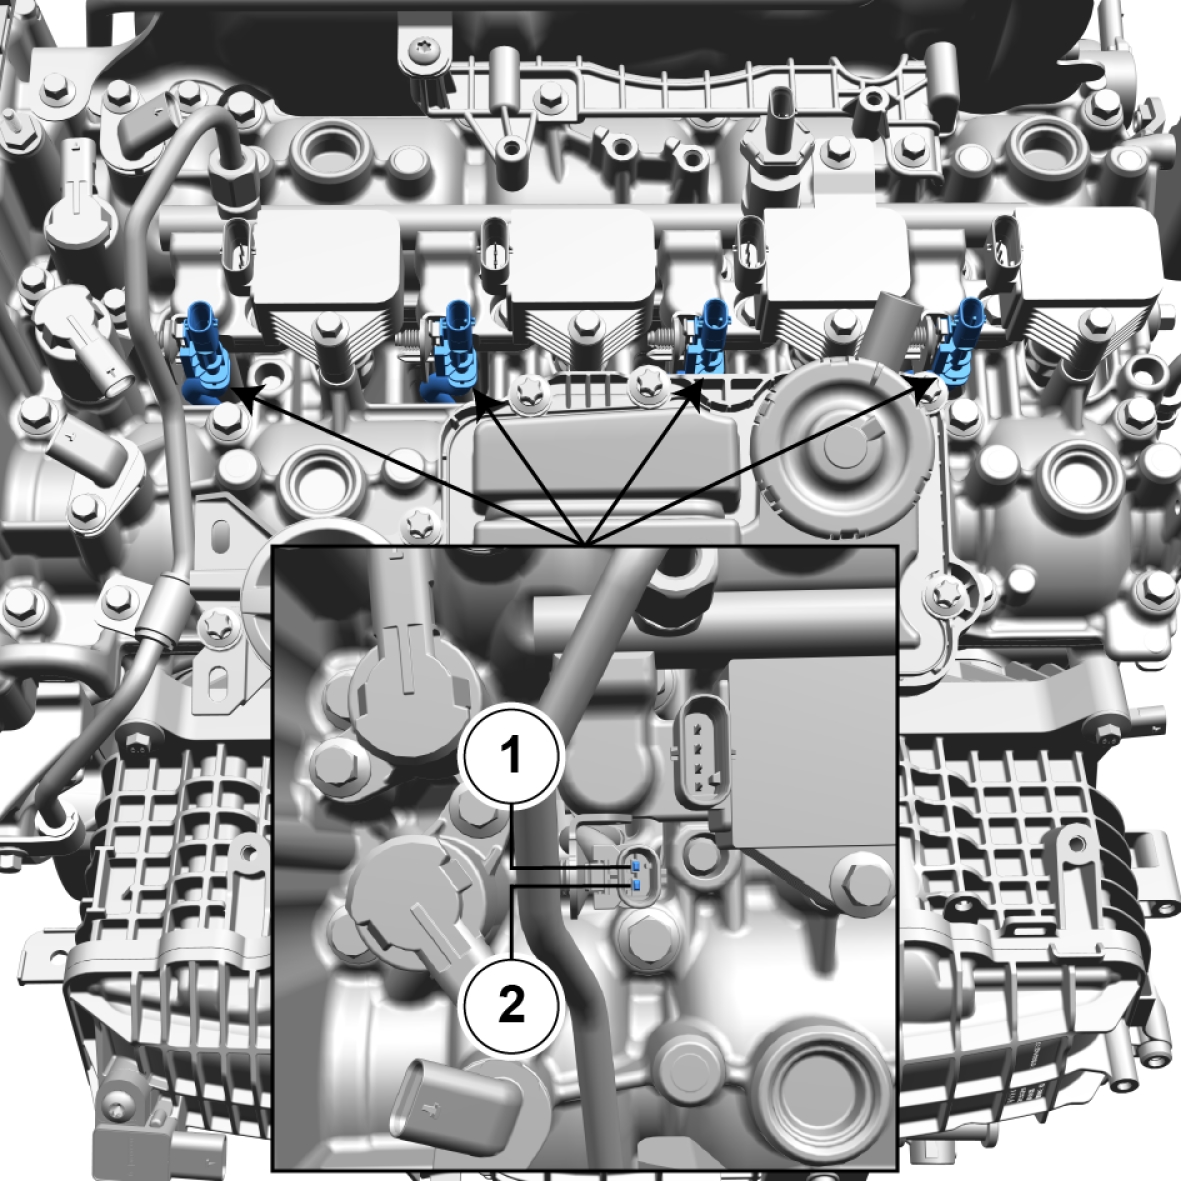
| Pin | Description |
|---|---|
| 1 | Positive + |
| 2 | Negative - |
Knock sensor
Description
Pin Out
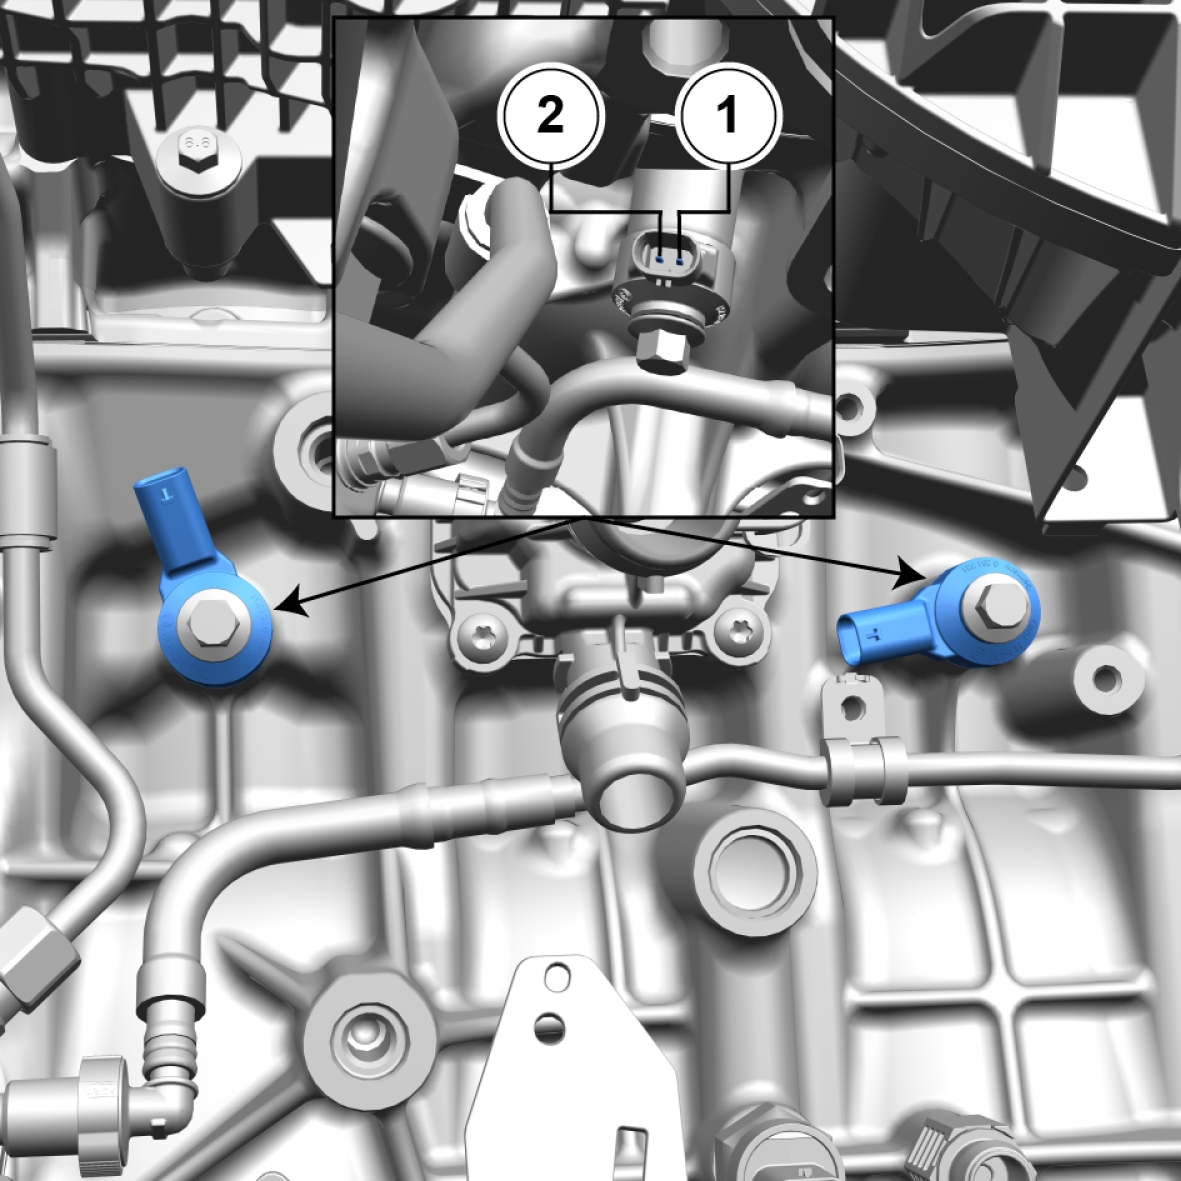
| Pin | Description |
|---|---|
| 1 | Positive + |
| 2 | Negative - |
MAP sensor
Description
Pin Out
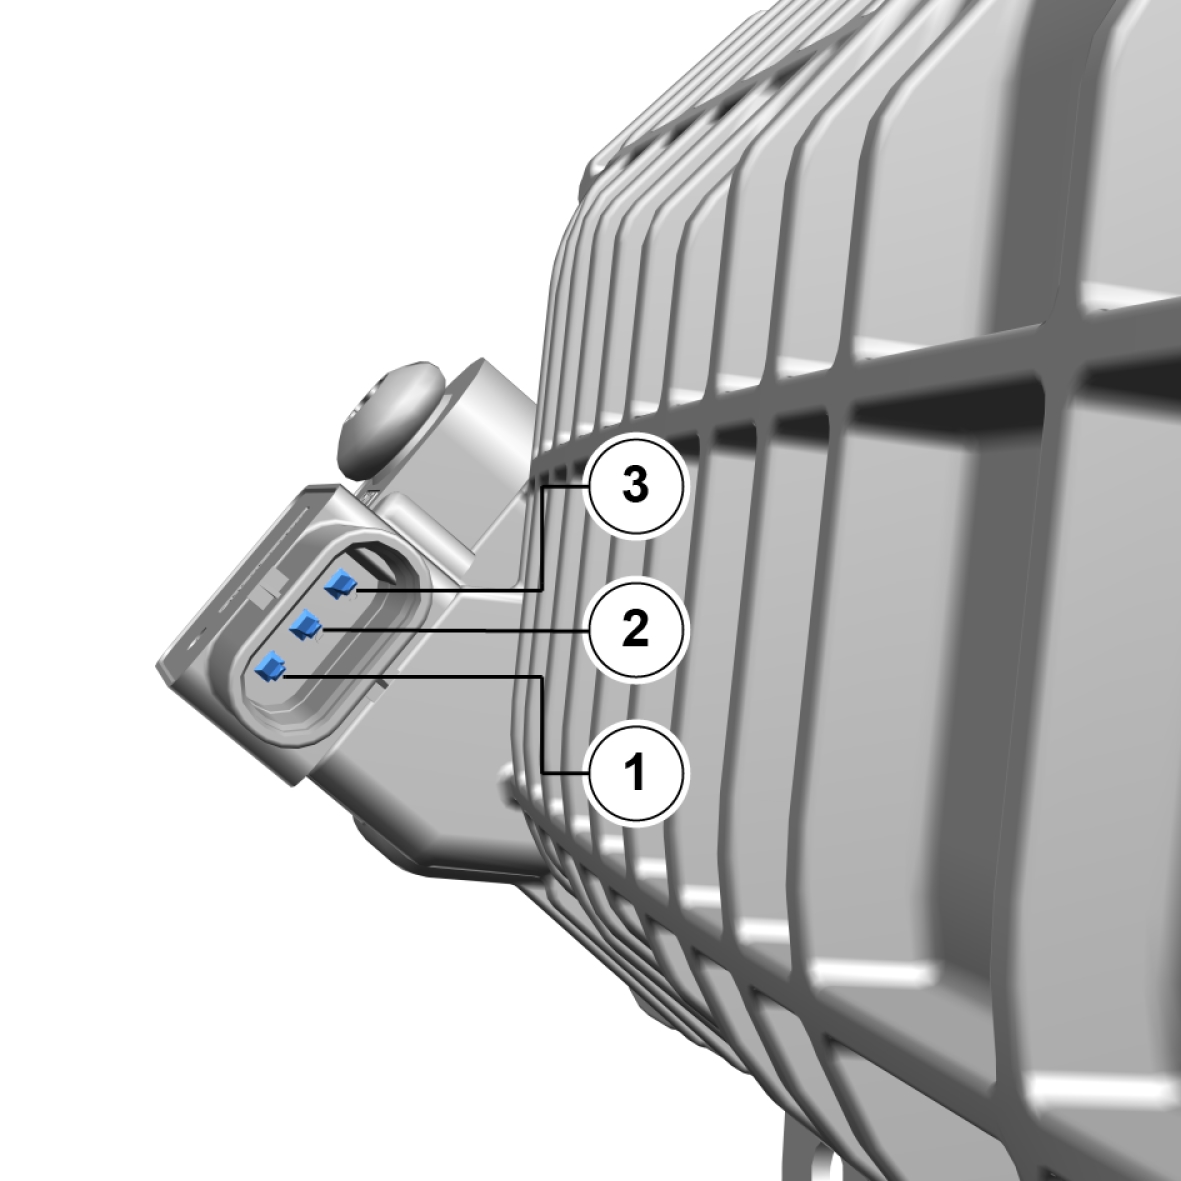
| Pin | Description |
|---|---|
| 1 | Negative - |
| 2 | Positive + |
| 3 | Signal |
Oil level sensor
Description
Pin Out
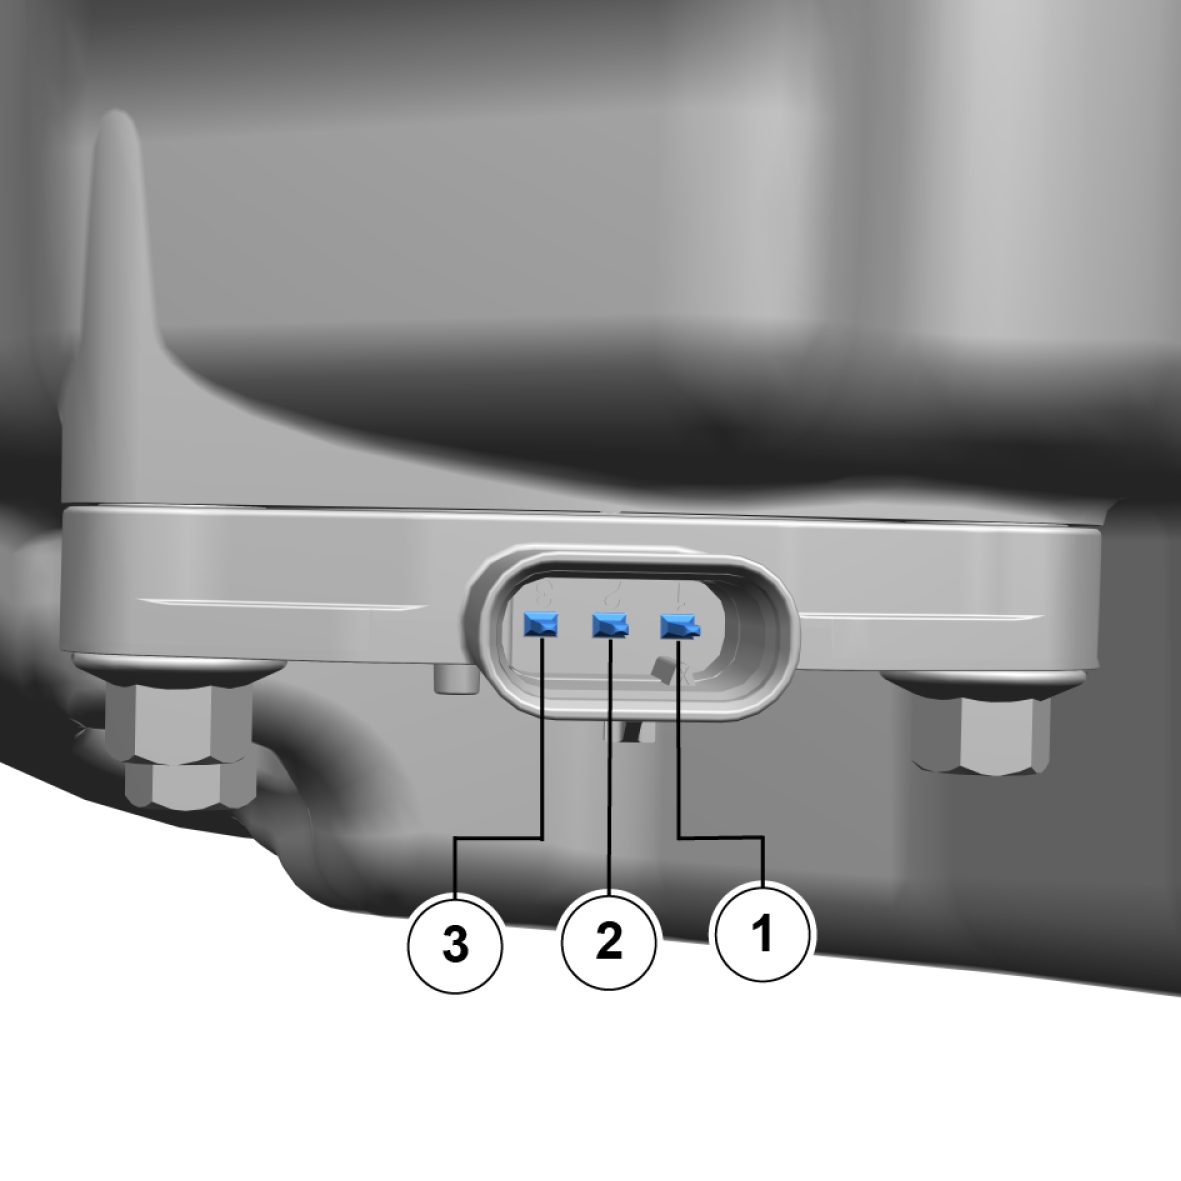
| Pin | Description |
|---|---|
| 1 | Negative - |
| 2 | Positive + |
| 3 | Signal |
Oil pressure sensor
Description
Pin Out
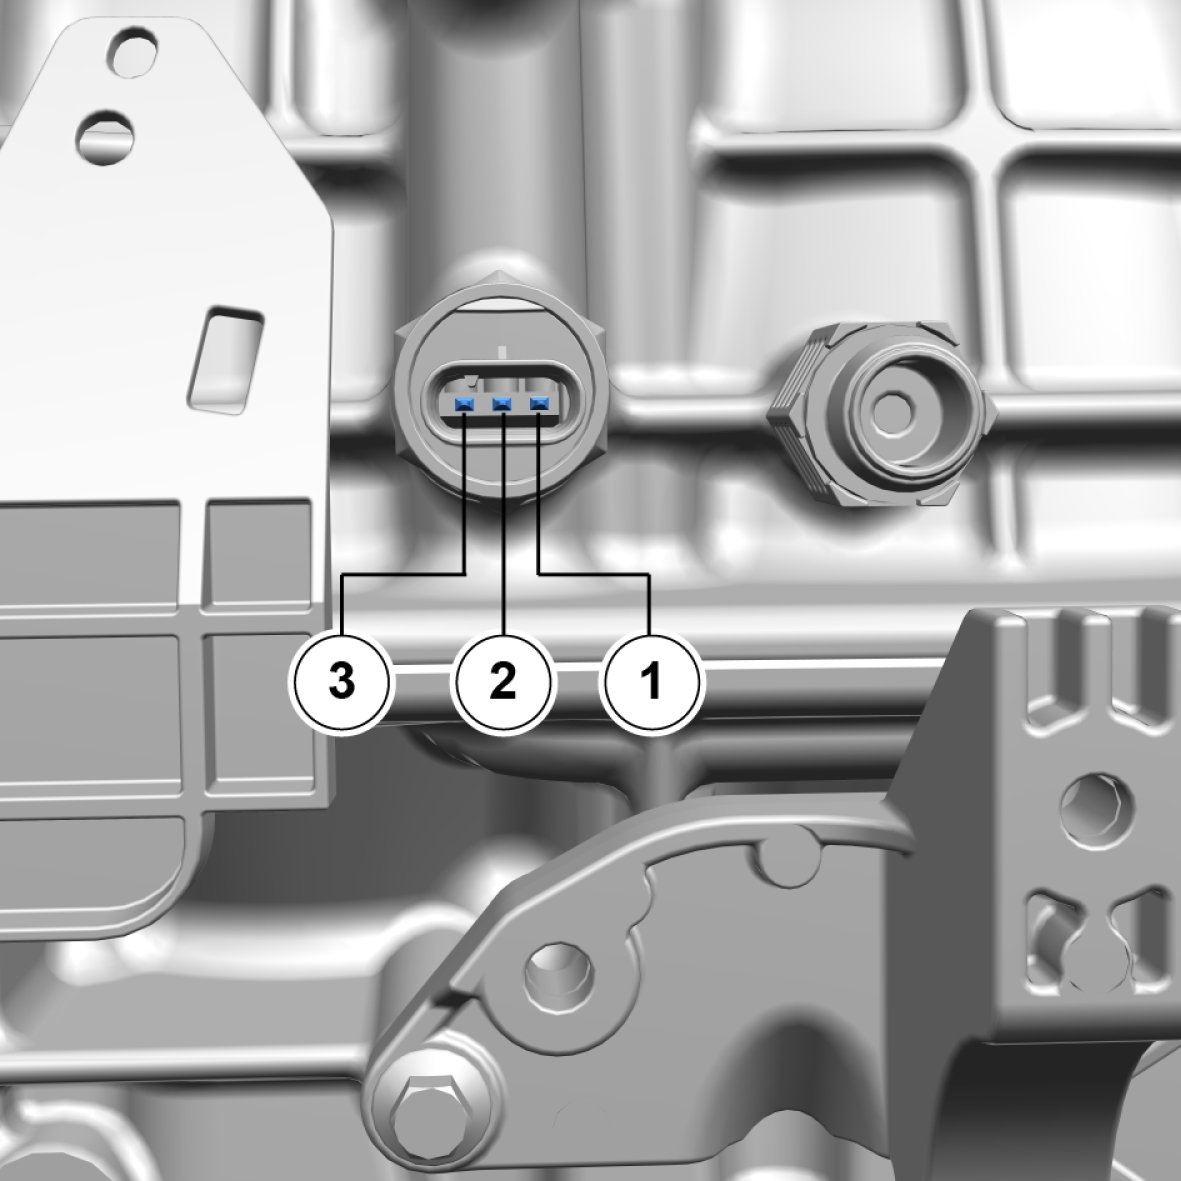
| Pin | Description |
|---|---|
| 1 | Negative - |
| 2 | Positive + |
| 3 | Signal |
Oil pump
Description
Pin Out
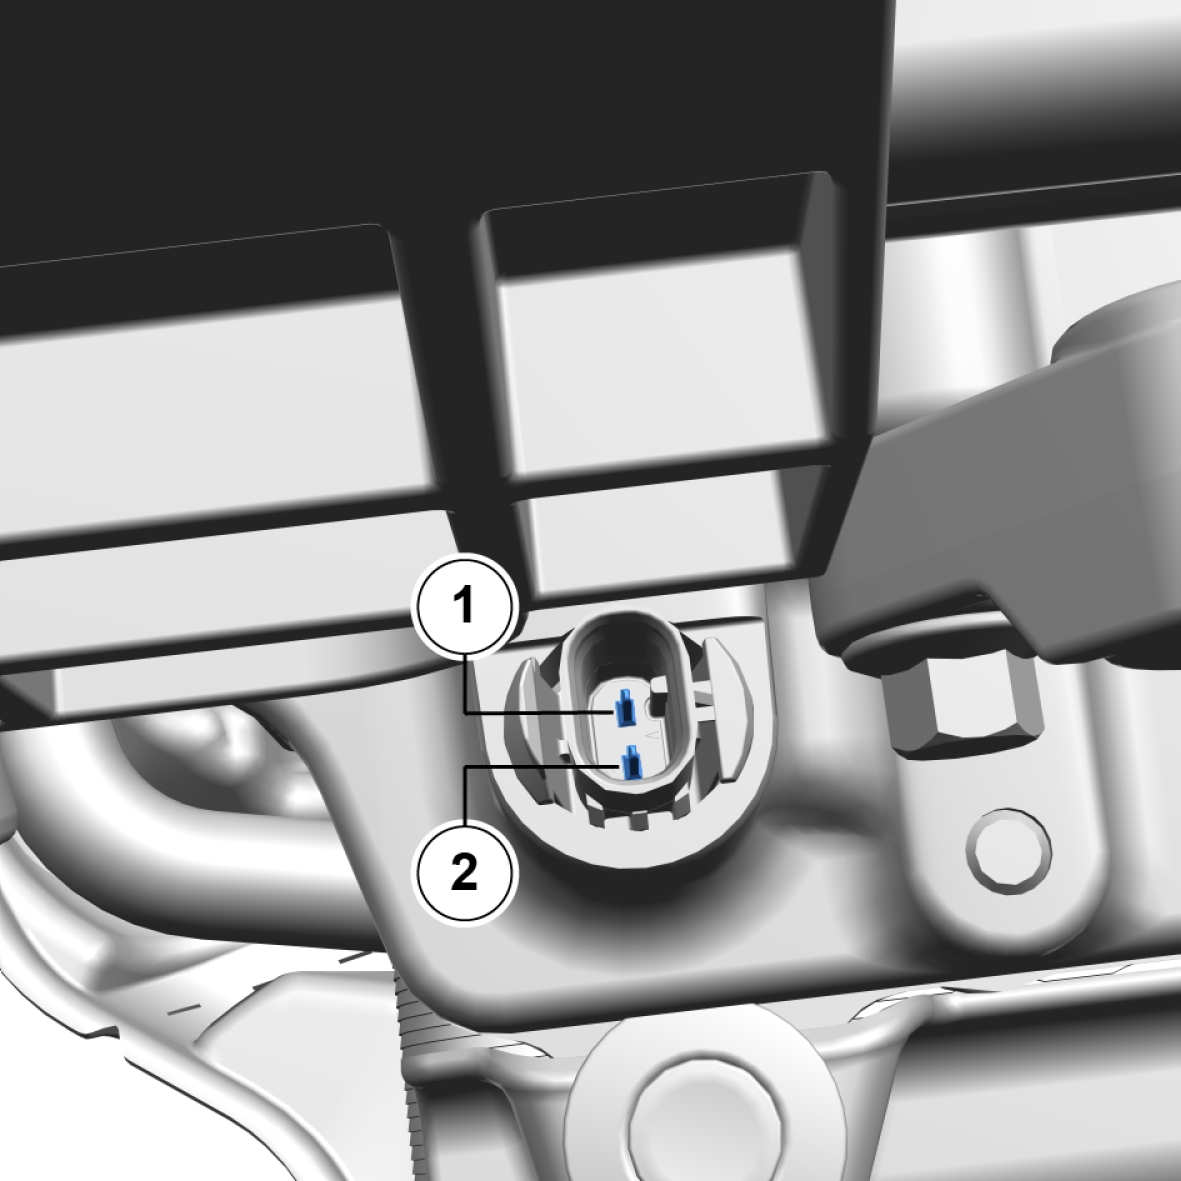
| Pin | Description |
|---|---|
| 1 | Positive + |
| 2 | Negative - |
Camshaft solenoid - exhaust
Description
Pin Out
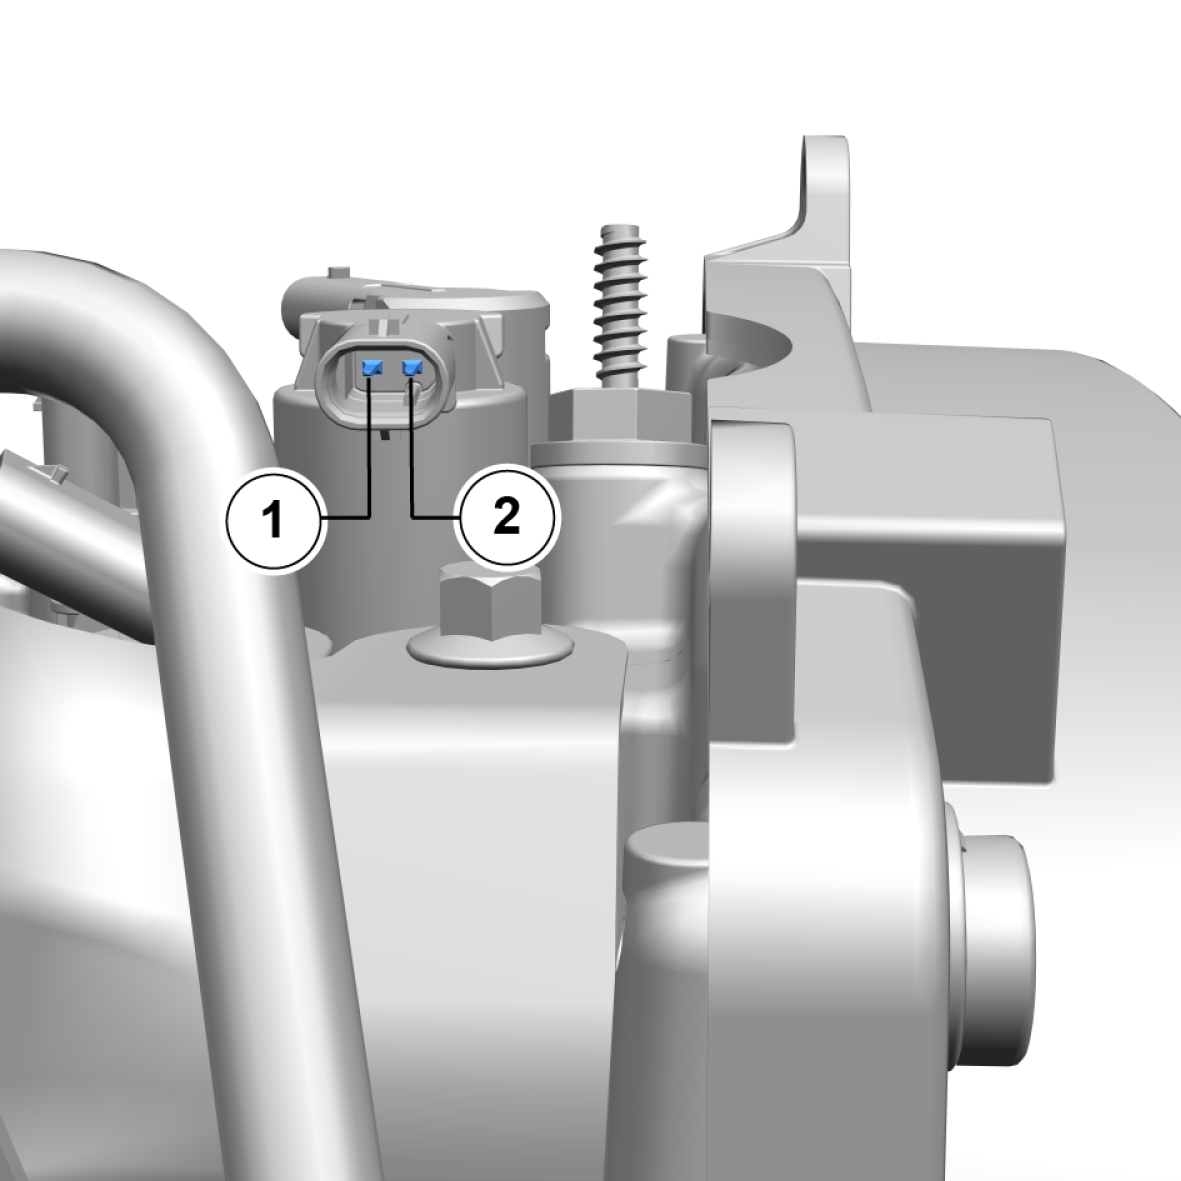
| Pin | Description |
|---|---|
| 1 | Positive + |
| 2 | Negative - |
Camshaft solenoid - intake
Description
Pin Out
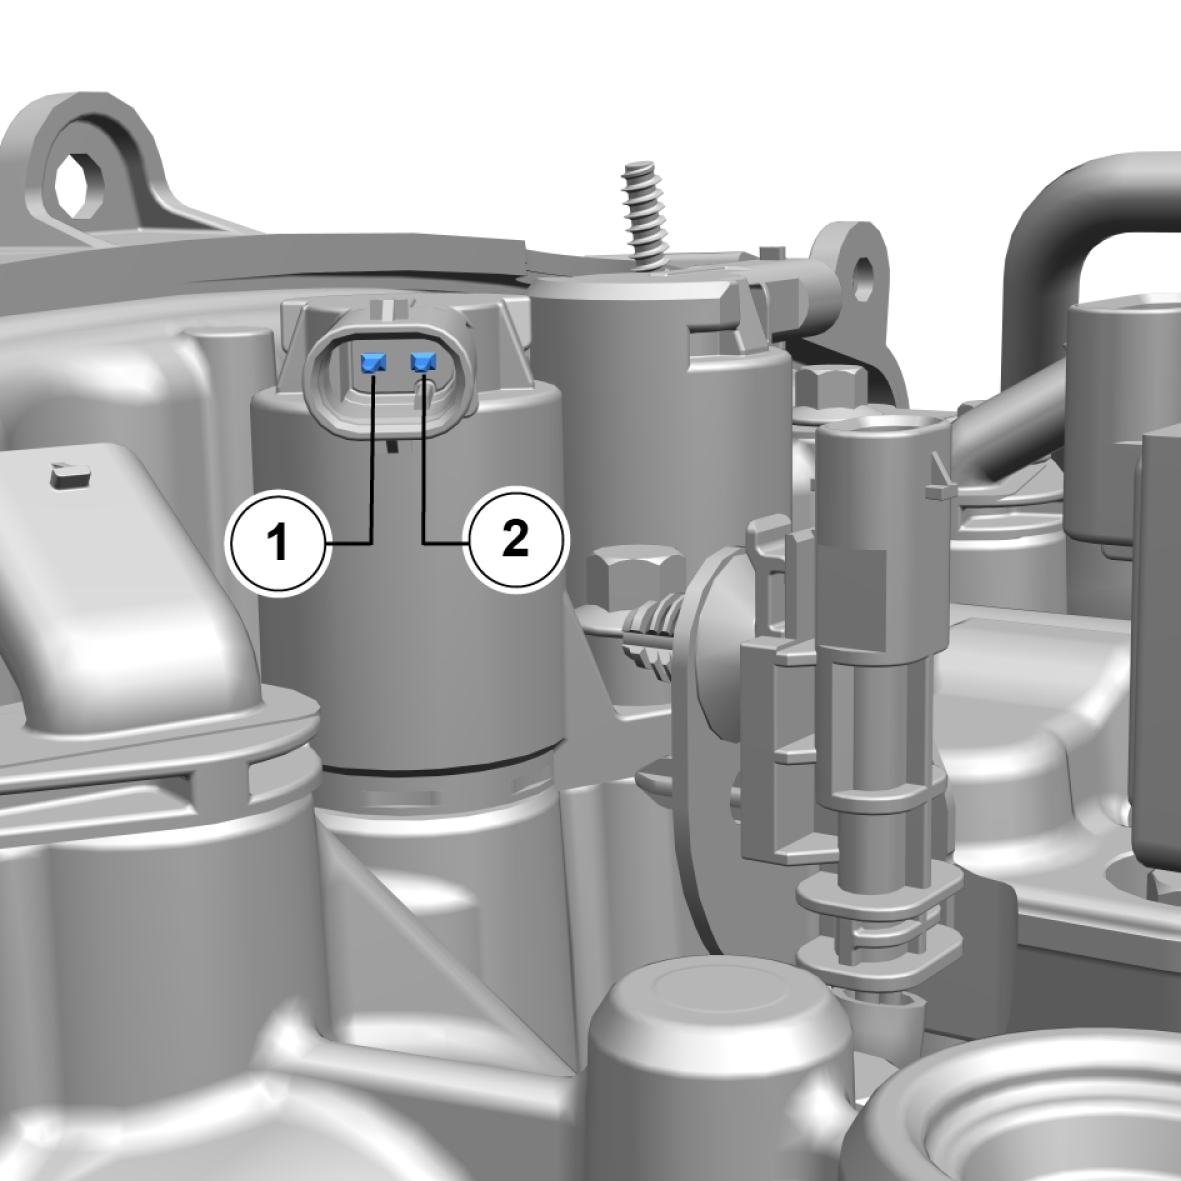
| Pin | Description |
|---|---|
| 1 | Positive + |
| 2 | Negative - |
Temp sensor - air intake
Description
Pin Out
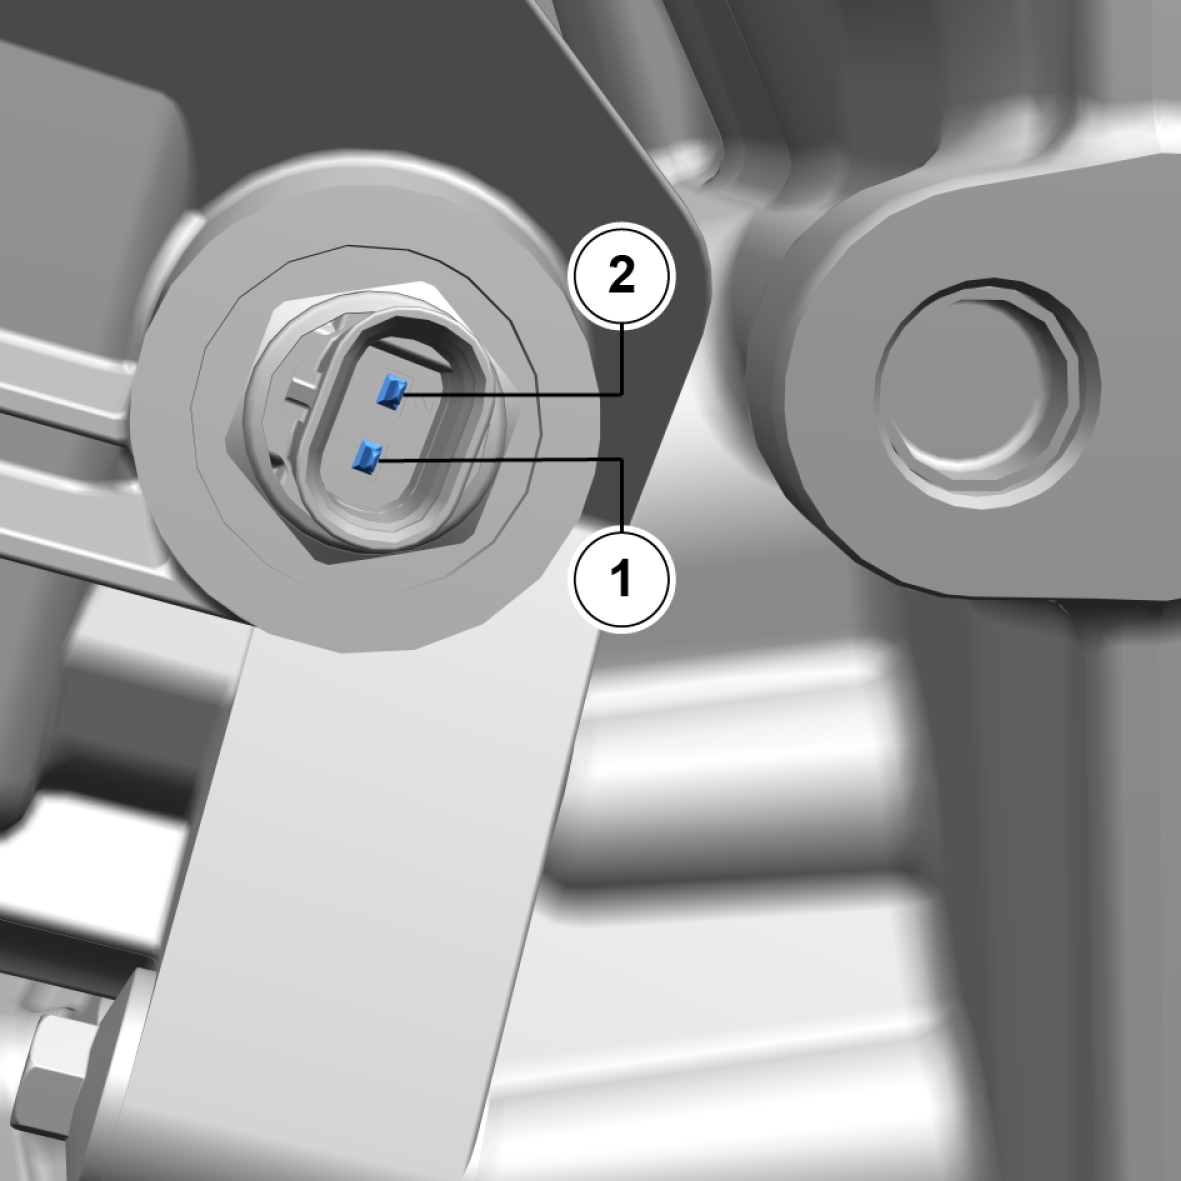
| Pin | Description |
|---|---|
| 1 | Positive + |
| 2 | Negative - |
Throttle house
Description
Pin Out
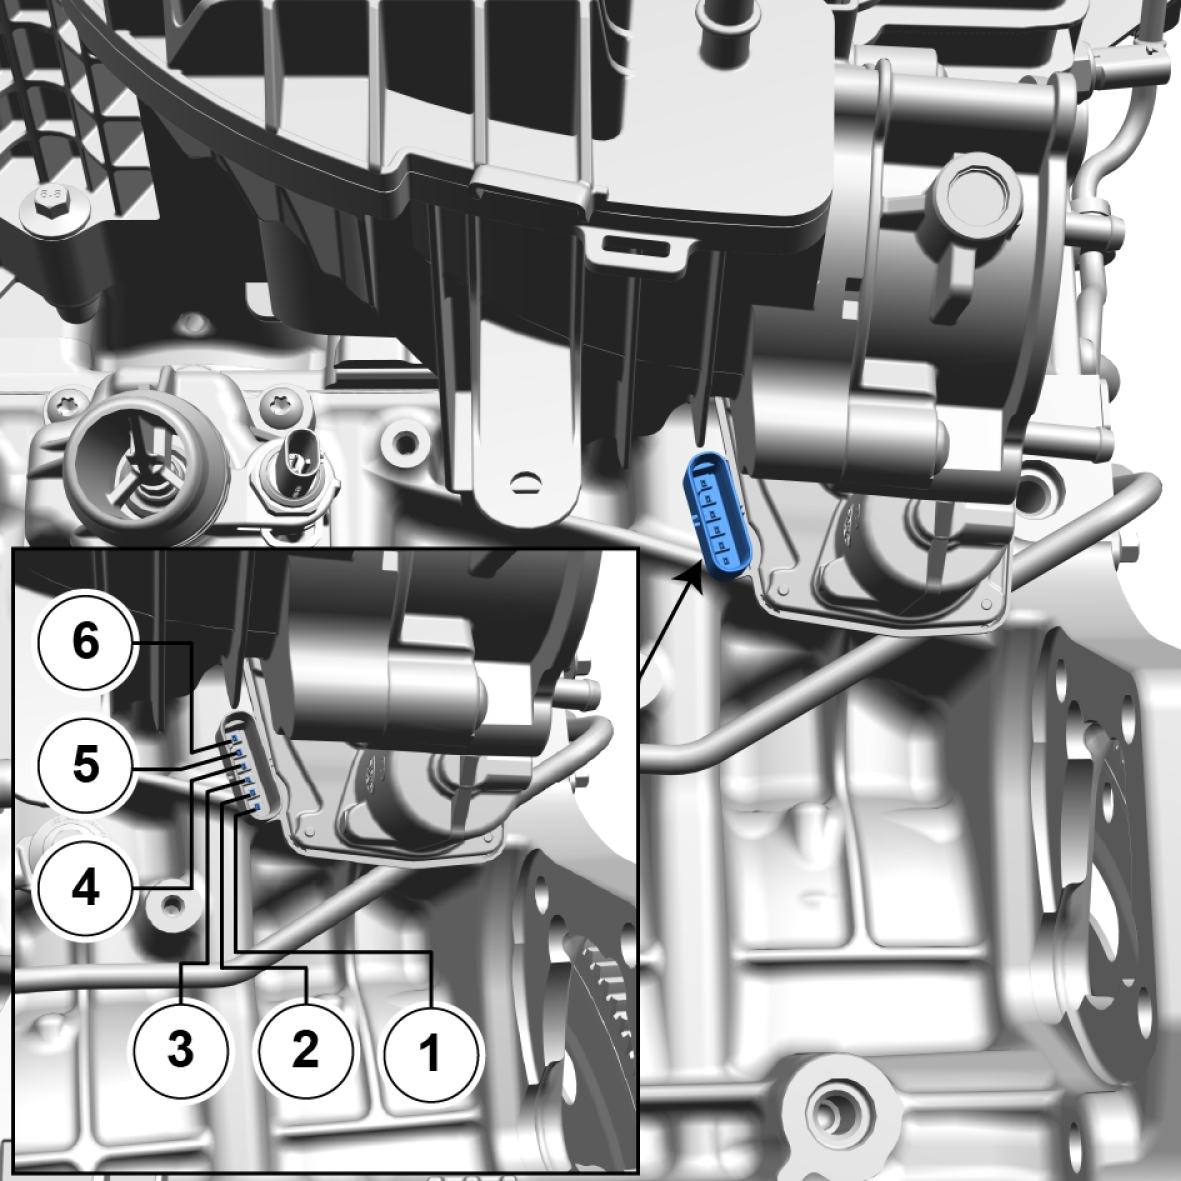
| Pin | Description |
|---|---|
| 1 | Negative - |
| 2 | Positive + |
| 3 | Signal |
| 4 | Pulse |
| 5 | Full gas |
| 6 | No gas |
Coolant system - overview conections
Location
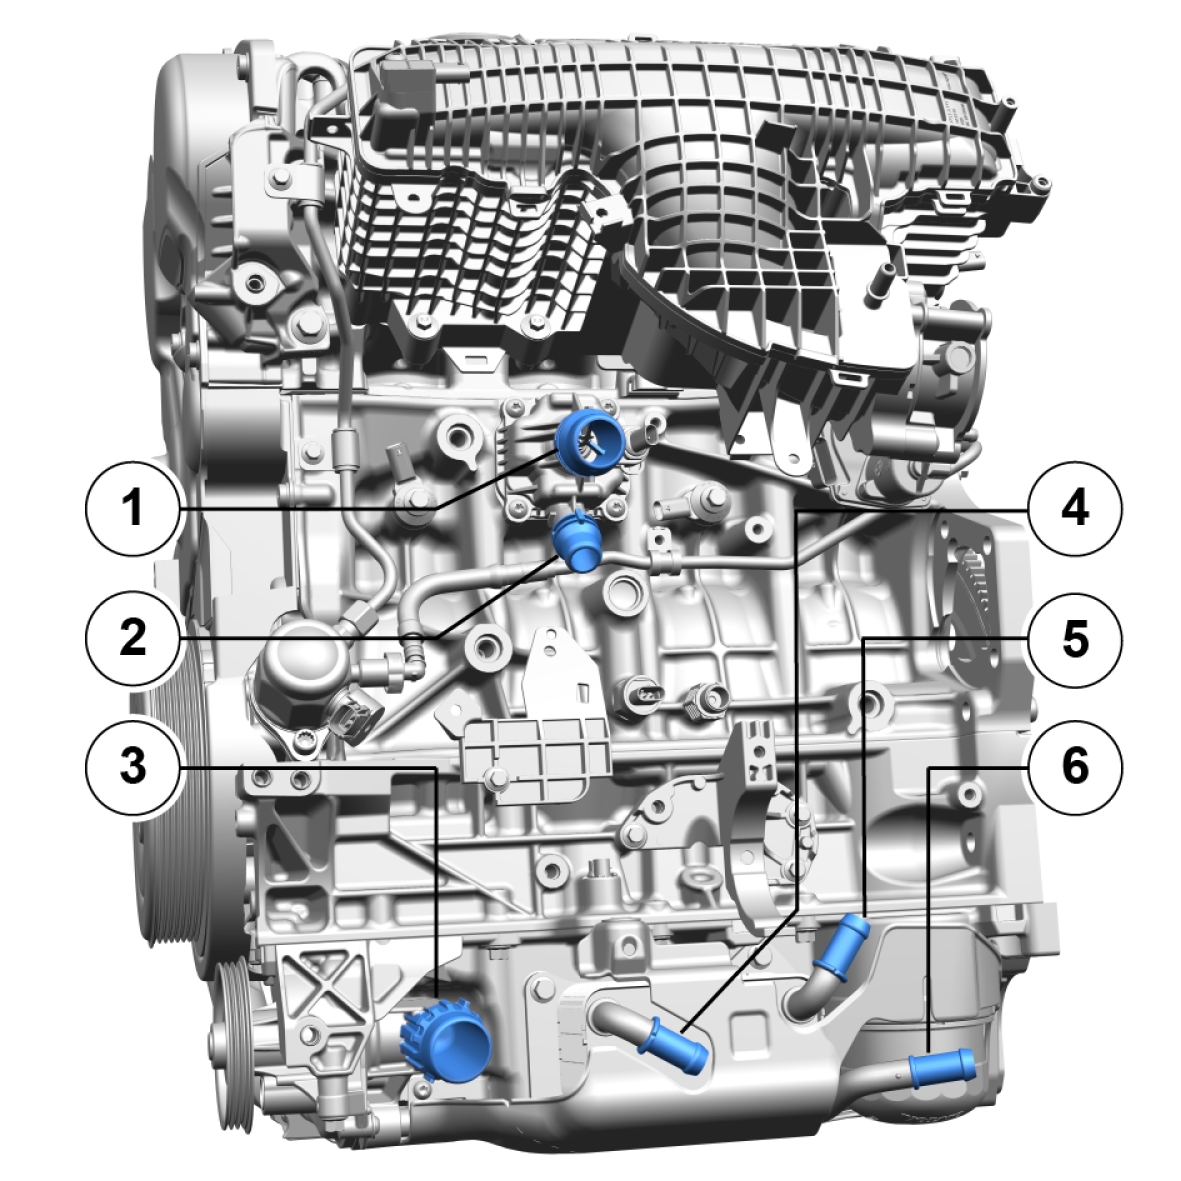
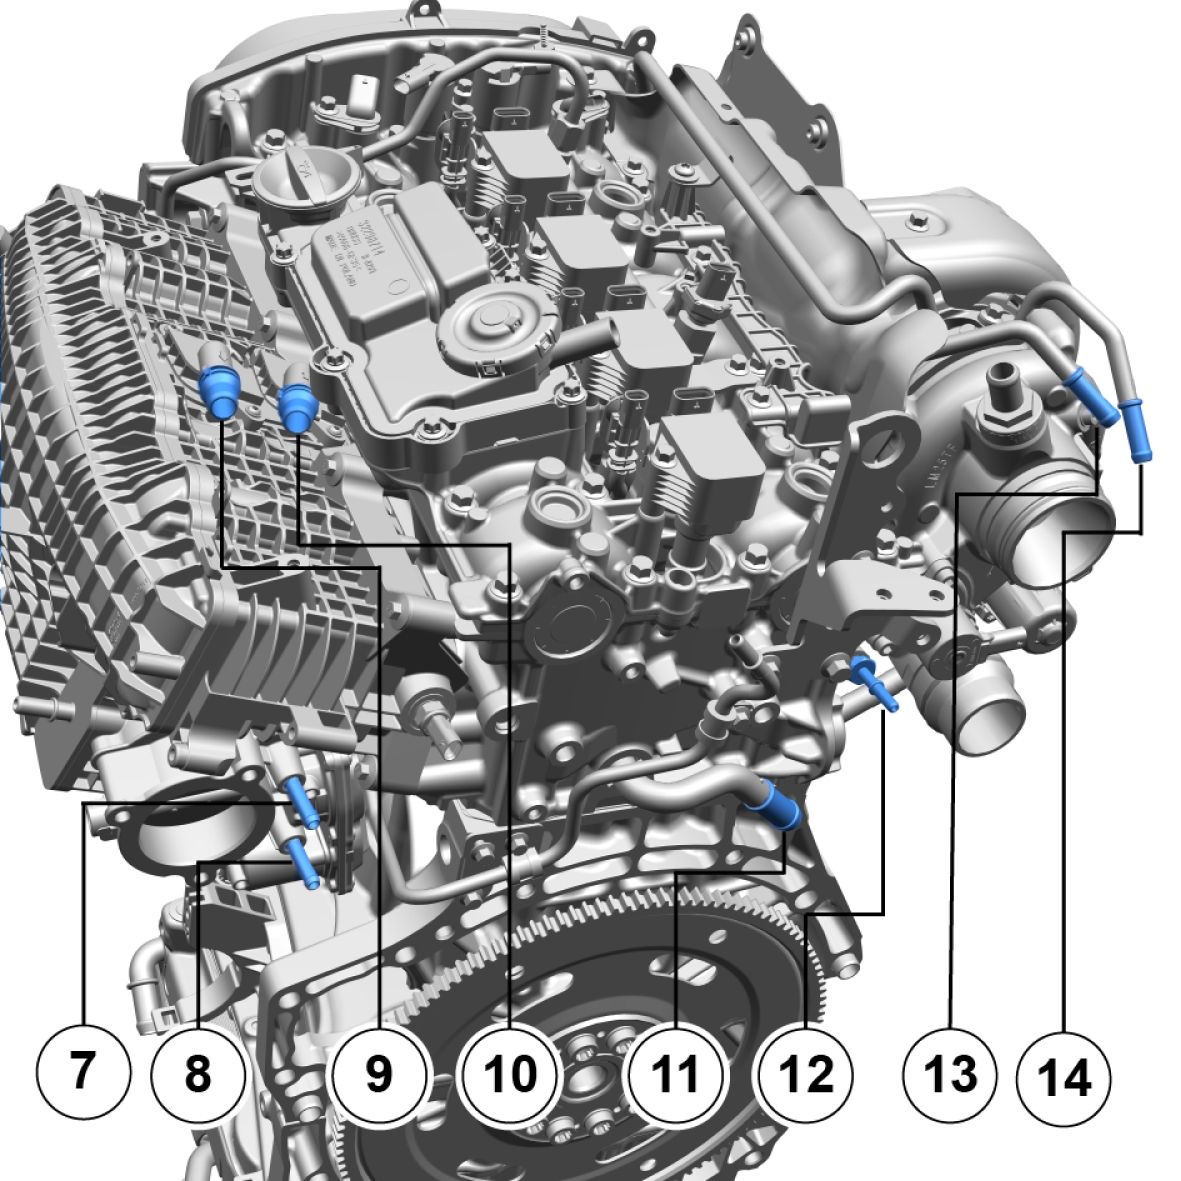
| Pos | Description | Connection |
|---|---|---|
| 1 | Thermostat - inlet | VDA NW26 |
| 2 | Thermostat - outlet | VDA NW16 |
| 3 | Waterpump - inlet | VDA NW32 |
| 4 | Oil cooler - outlet | Spigot diameter 16 mm* |
| 5 | Oil cooler - inlet | Spigot diameter 16 mm* |
| 6 | Waterpump - out | Spigot diameter 16 mm* |
| 7 | Throttle house - in | Spigot diameter 8 mm* |
| 8 | Throttle house - out | Spigot diameter 8 mm* |
| 9 | WCAC - outlet | VDA NW12 |
| 10 | WCAC - inlet | VDA NW12 |
| 11 | HVAC | Spigot diameter 16 mm* |
| 12 | Bleeder - out | SAE J2044 6.30 (1/4”) |
| 13 | Turbo - outlet | Spigot diameter 10 mm* |
| 14 | Turbo - inlet | Spigot diameter 10 mm* |
*Use clamp according DIN 3021-3.
Electrical overview
Location
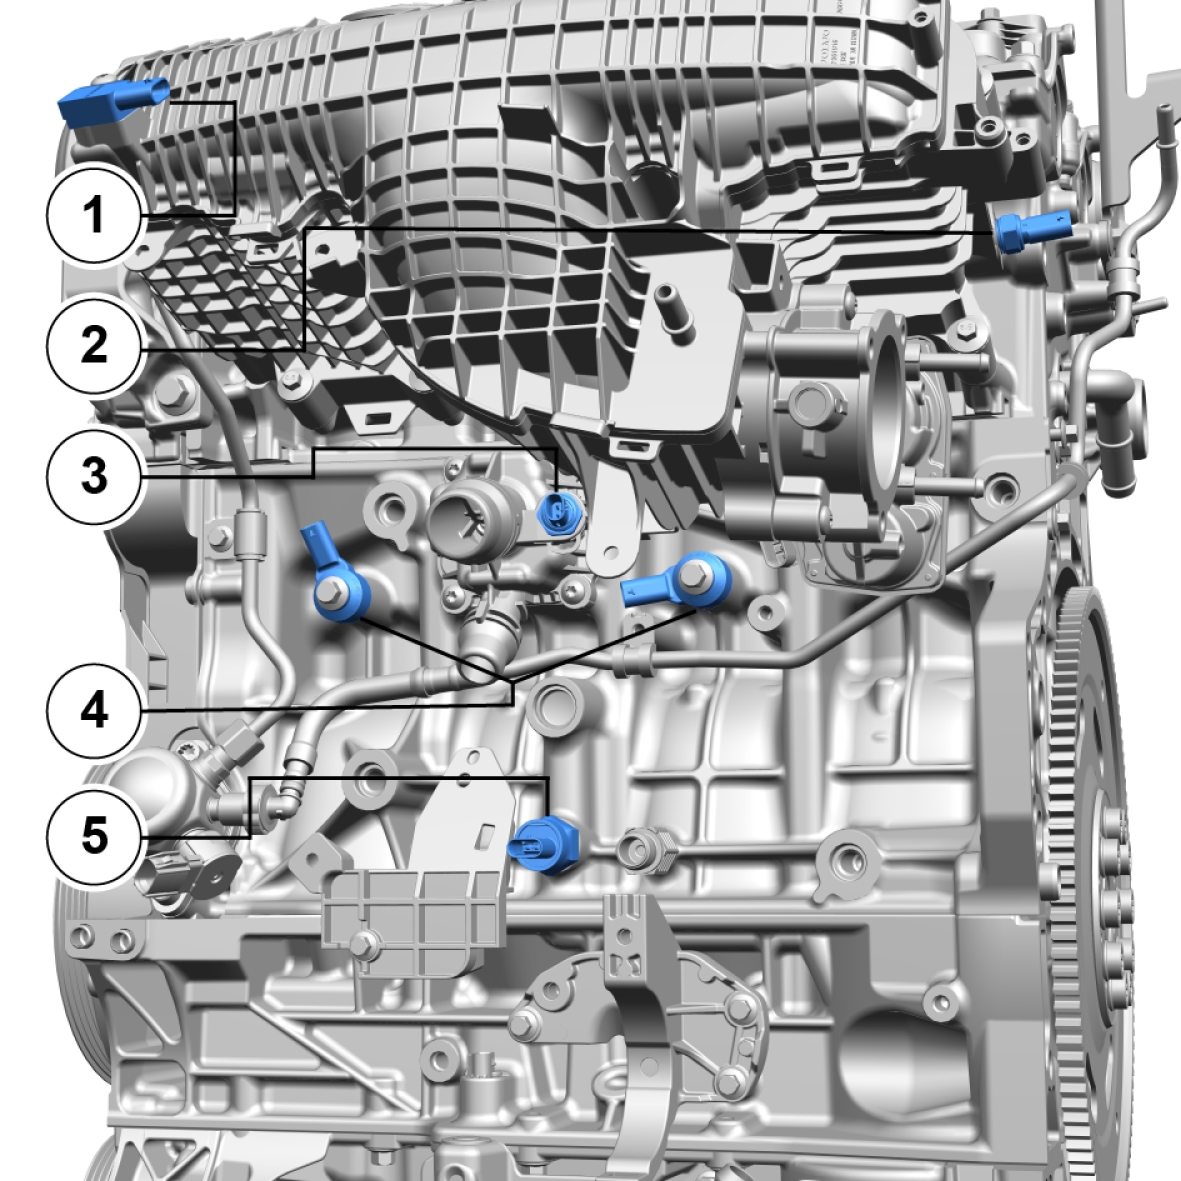
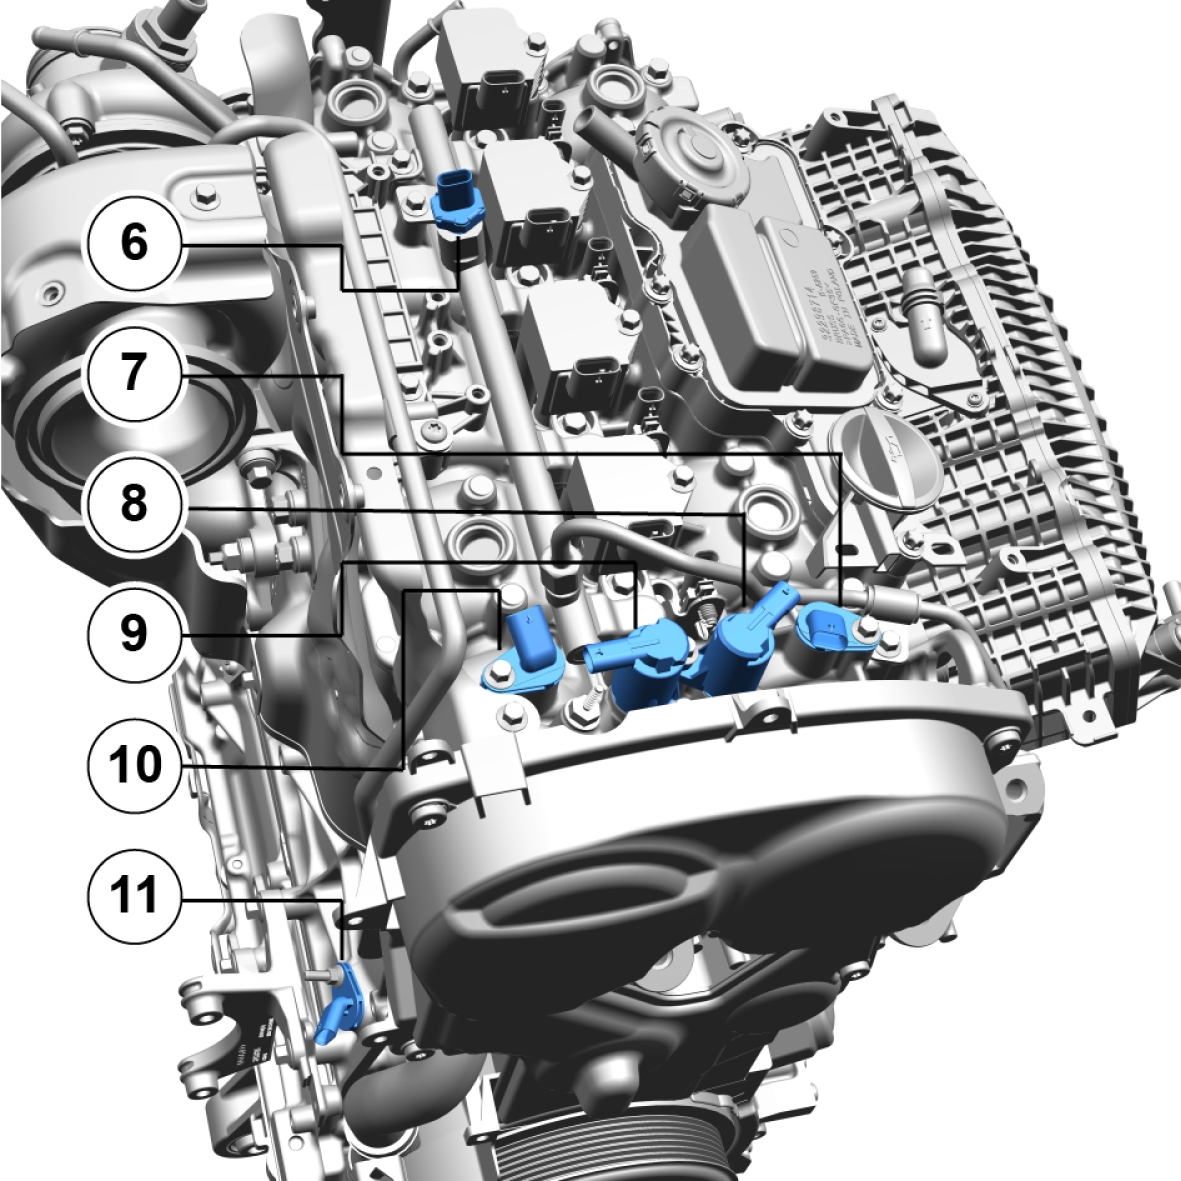
| Pos | Describtion |
|---|---|
| 1 | MAP sensor |
| 2 | Tempature sensor - intake |
| 3 | Tempature sensor - coolant |
| 4 | Knock sensors |
| 5 | Oil pressure sensor |
| 6 | Fuel pressure sensor |
| 7 | Camshaft position sensor - intake |
| 8 | VVT solenoid - intake |
| 9 | VVT solenoid - exhaust |
| 10 | Camshaft position sensor - exhaust |
| 11 | Crankshaft postion sensor |
Measurements
Location
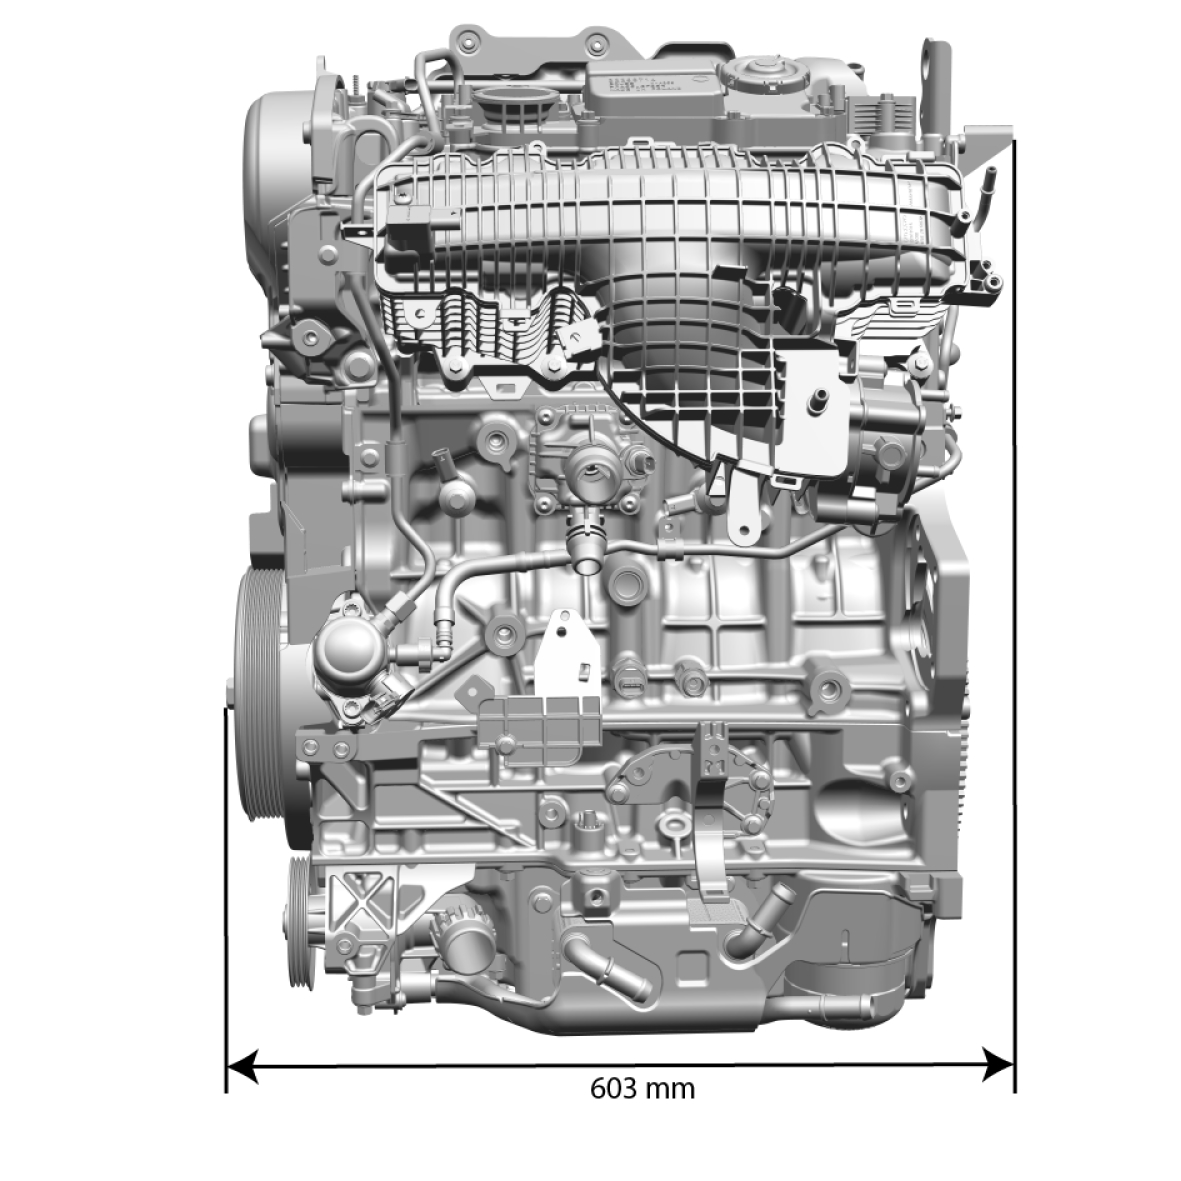
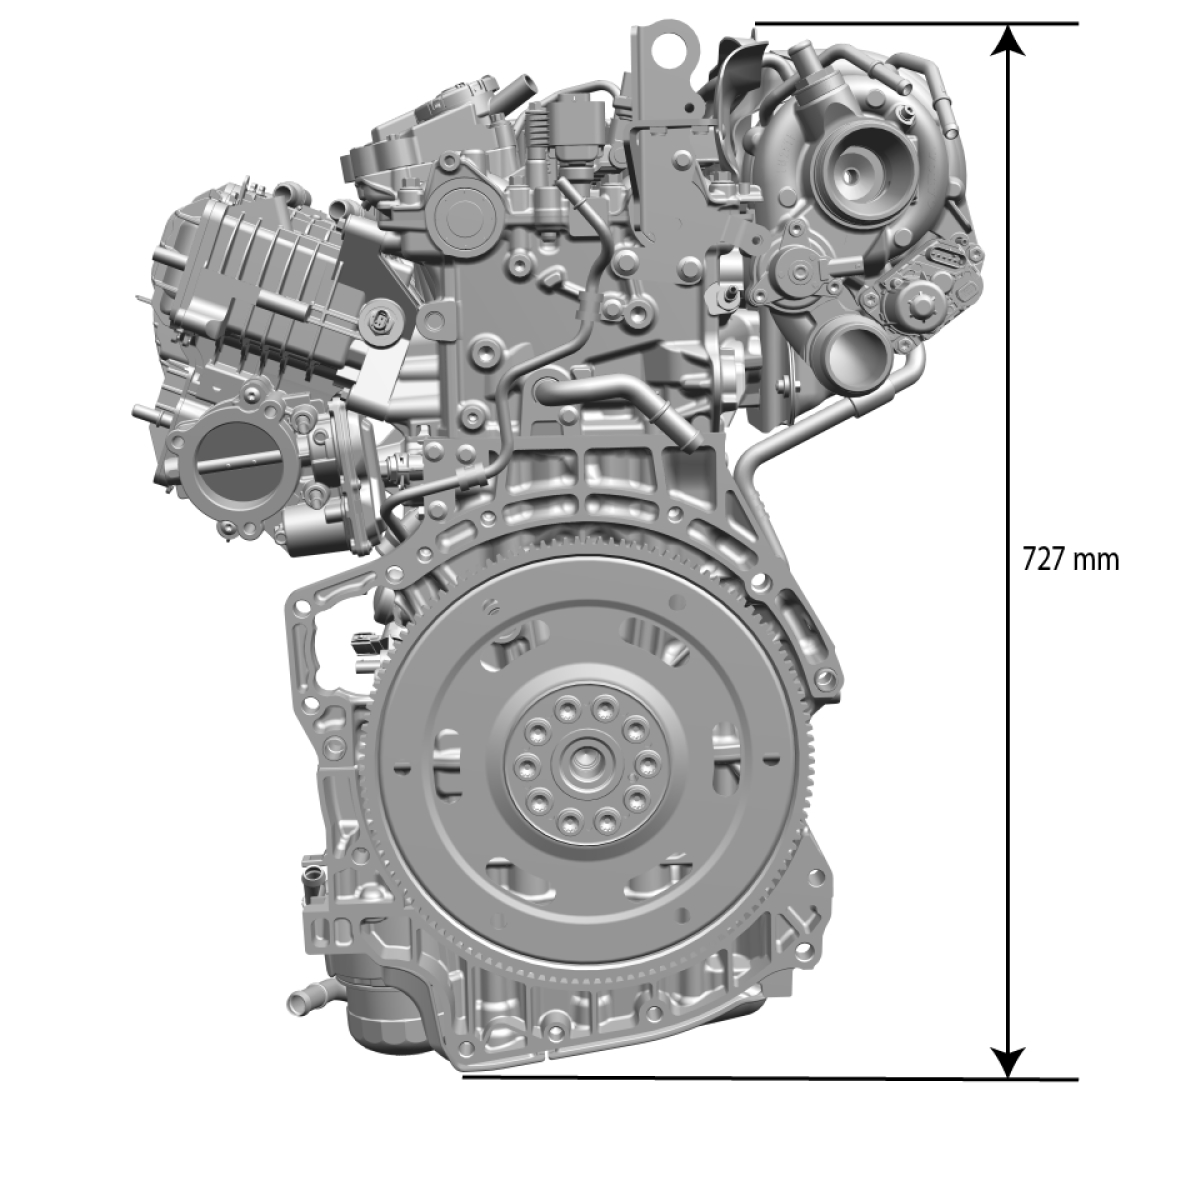
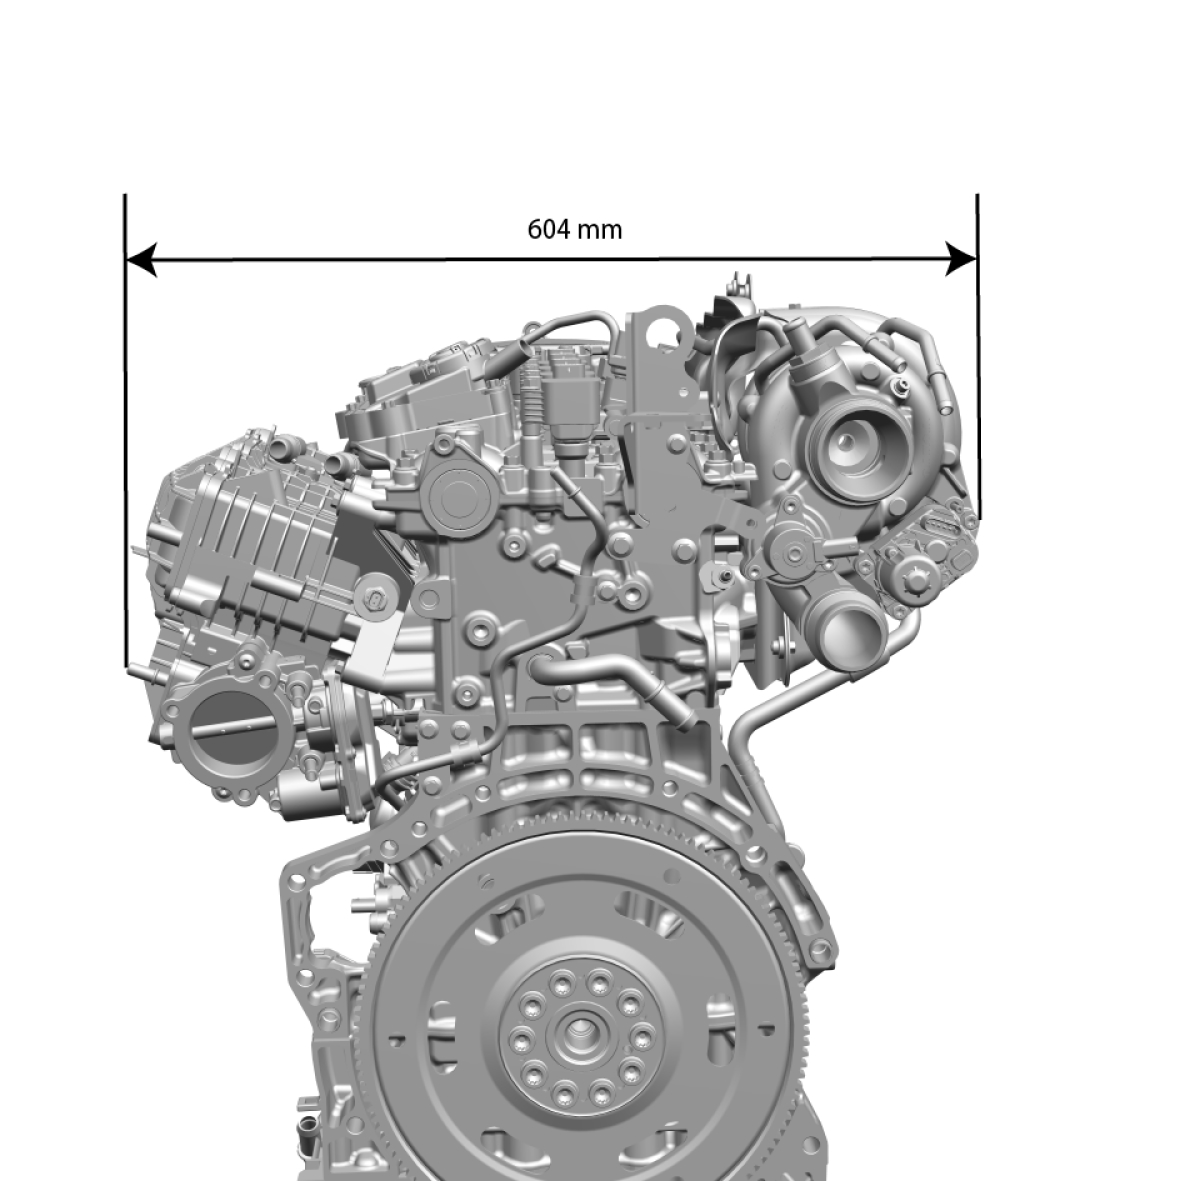
Coolant system - flow chart
Location

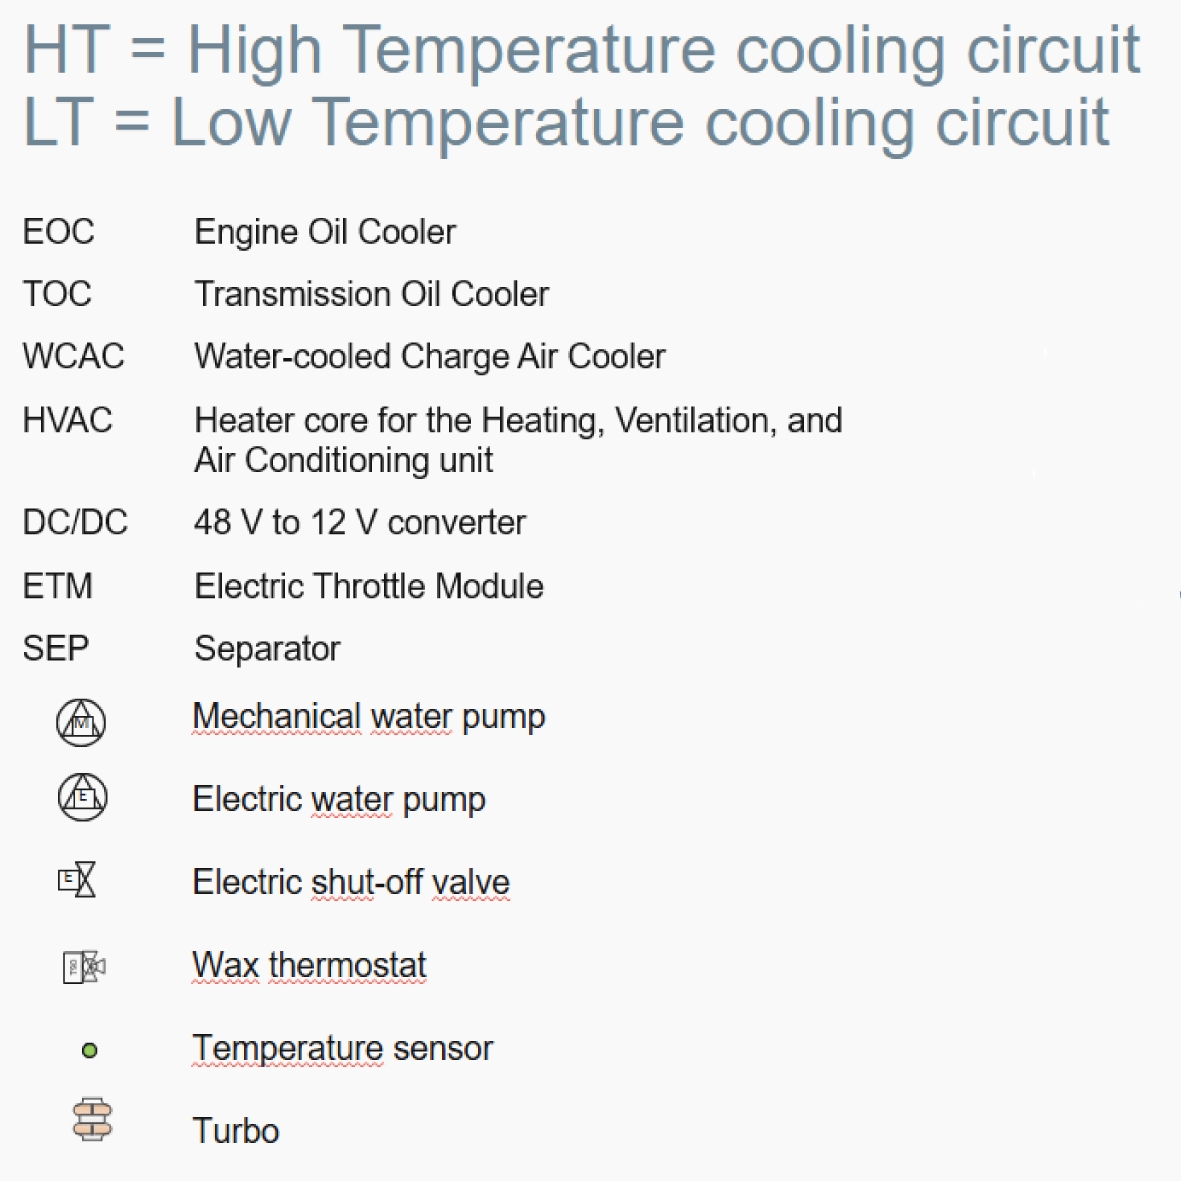
Coolant temperatures during different Thermo testing cycles
Temperatures: @1.45 bar
Thermostat: 90-105 °C*
| RL180 | Top speed | Hill Climbing | City driving cycle [38/46 °C] |
|---|---|---|---|
| 105 °C | (Peak) 116 °C | (Peak) 126 °C** | 110 °C |
(*) Opening and fully opened
(**) Torque reduction starts at 123 °C and at 115 °C <90% of rated torque
Outer Cooling System
| Coolant circuit | Heat rejection at max power [kW] |
|---|---|
| HT circuit | 120 |
| LT circuit | 30 |
Inner Cooling System
| Coolant Circuit | [kW @ RPM] |
|---|---|
| Rejected heat to cooling system | 124 @ 5500 rpm |
| whereof, | |
| Rejected heat to LT circuit | 32 @ 5500 rpm |
Pressure drop (static) allowed in cooling circuits
| Coolant Circuit | Value |
|---|---|
| HT circuit | 125 kPa @ 3 kg/s |
| LT circuit | 32 kPa @ 0.5 kg/s |
Coolant specification
| Product | Classification | Volume* |
|---|---|---|
| Anti-freeze | TR-31854114-002 (BASF G64)** | ? |
* This is only the volume in the engine
** Always follow the recommended mixture
Engine
| Engine | Gen3 MP Miller |
|---|---|
| Engine code | M1 |
| Cylinders | 4 |
| Bore/Strokle (mm) | 82/93.2 |
| Conrod length (mm) | 143.8 |
| Compression ratio | 11.5 |
| Volume (cm3) | 1969 |
| Firing order | 1-3-4-2 |
| Cam duration: intake/exhaust (CA) | 155/193 |
| Peak power (HP/kW) | 250/184 |
| Peak torque (Nm) | 360 |
| Max power at (RPM) | 5400-5700 |
| Max torque at (RPM) | 2000-4500 |
| Max RPM continuous/peak (3sec) | 6200/6500 |
Pistons
|
Standard |
The diameter is measured 20 mm from the bottom of the piston |
|---|---|
|
D-marked¹ .........mm |
81.95 |
|
¹The pistons are not classified |
Valves
|
Intake |
|
|---|---|
|
Length (A) ........mm |
112,91 |
|
Diameter on crown (B) ........mm |
30,5 |
|
Diameter on shaft (C) ........mm |
5.97 |
|
Valve angle (D) ........° |
60,5 |
|
Clearance in guide ........μm |
30 |
|
Exhaust |
|
|---|---|
|
Length (A) ........mm |
106,97 |
|
Diameter on crown (B) ........mm |
26.5 |
|
Diameter on shaft (C) ........mm |
5,94 |
|
Valve angle (D) ........° |
60,5 |
|
Clearance in guide ........μm |
58 |
Valve seats
|
Seat angle ........° |
30 |
Cylinder head
|
Maximum distortion, longitudinal ..........mm |
0.05 |
|
Maximum distortion, transverse ..........mm |
0.02 |
|
NOTE
Surface grinding of the cylinder head is not permitted. It shall be replaced in case of excessive distortion |
|
Crankshaft
|
Radial run-out main bearing journal ........mm |
max. 0.040 |
|
Axial play (measured in the engine with the intermediate section tightened) ........mm |
0,07-0,27 |
|
Main bearing journal, radial runout ........mm |
0,022-0,035 |
Big end journals
|
Diameter, standard¹ ...........mm |
50 +0/-0.019 |
|
Bearing recess width ........mm |
24 ±0.1 |
|
Maximum out-of-round ........mm |
0.004 |
|
Max. straightness deviation ........mm |
0.004 |
|
¹The variation in diameter for each bearing journal must not exceed 0.008 mm. |
|
Main bearing journals
|
Diameter, standard¹ ...........mm |
60 +0,003/-0,016 |
|
Axial bearing width ........mm |
26+0/-0,04 |
|
Maximum out-of-round ........mm |
0.004 |
|
Max. straightness deviation ........mm |
0.004 |
|
¹The variation in diameter for each bearing journal must not exceed 0.008 mm. |
|
Connecting rods
|
Diameter, bearing recesses |
|
|---|---|
|
Big end ........mm |
53 +0,013/0 |
|
Small-end ........mm |
29 +0,028/+0,033 |
|
Maximum ovality in the bearing recesses ........mm |
0.006 |
|
Length |
|
|---|---|
|
Big end - Small end ........mm |
147,08 |
Oil pressure
|
Rotation speed |
Oil pressure (min.) |
|---|---|
|
825 (rpm |
1.6 bar |
|
3000 (rpm) |
4.2 bar |
| ¹The oil pressure that is given is for an oil temperature of 80° C, which is achieved after 10-15 minutes of driving |
Thermostat
|
Begins to open at |
90°C |
|
Fully open at |
105°C |
Chemicals
| Product | Volume |
|---|---|
| Engine Oil | 5.2 litre |
| Coolant | 4 litre |
| Product | Classification |
|---|---|
| Engine Oil | 0W20 ACEA C5-2021 |
| Coolant | TR-31854114-002 (BASF G64) |
Service
| Year/KM/Hrs | 1/30000/650 | 2/60000/1300 | 3/90000/1950 | 4/12000/2600 | 5/15000/3250 | 6/18000/3900 | 7/21000/4550 | 8/24000/5200 |
|---|---|---|---|---|---|---|---|---|
| Engine oil and oil filter - replace | X | X | X | X | X | X | X | X |
| Spark plugs - replace | X | X | X | X | ||||
| Timing belt - replace | X | |||||||
| Engine - check for leaks | X | X | X | X | X | X | X | X |
| Coolant - check for leaks | X | X | X | X | X | X | X | X |
| Coolant level - adjust if needed | X | X | X | X | X | X | X | X |
| Coolant - check freeze point | X | X | X | X | X | X | X | X |
Crank case ventilation
Location
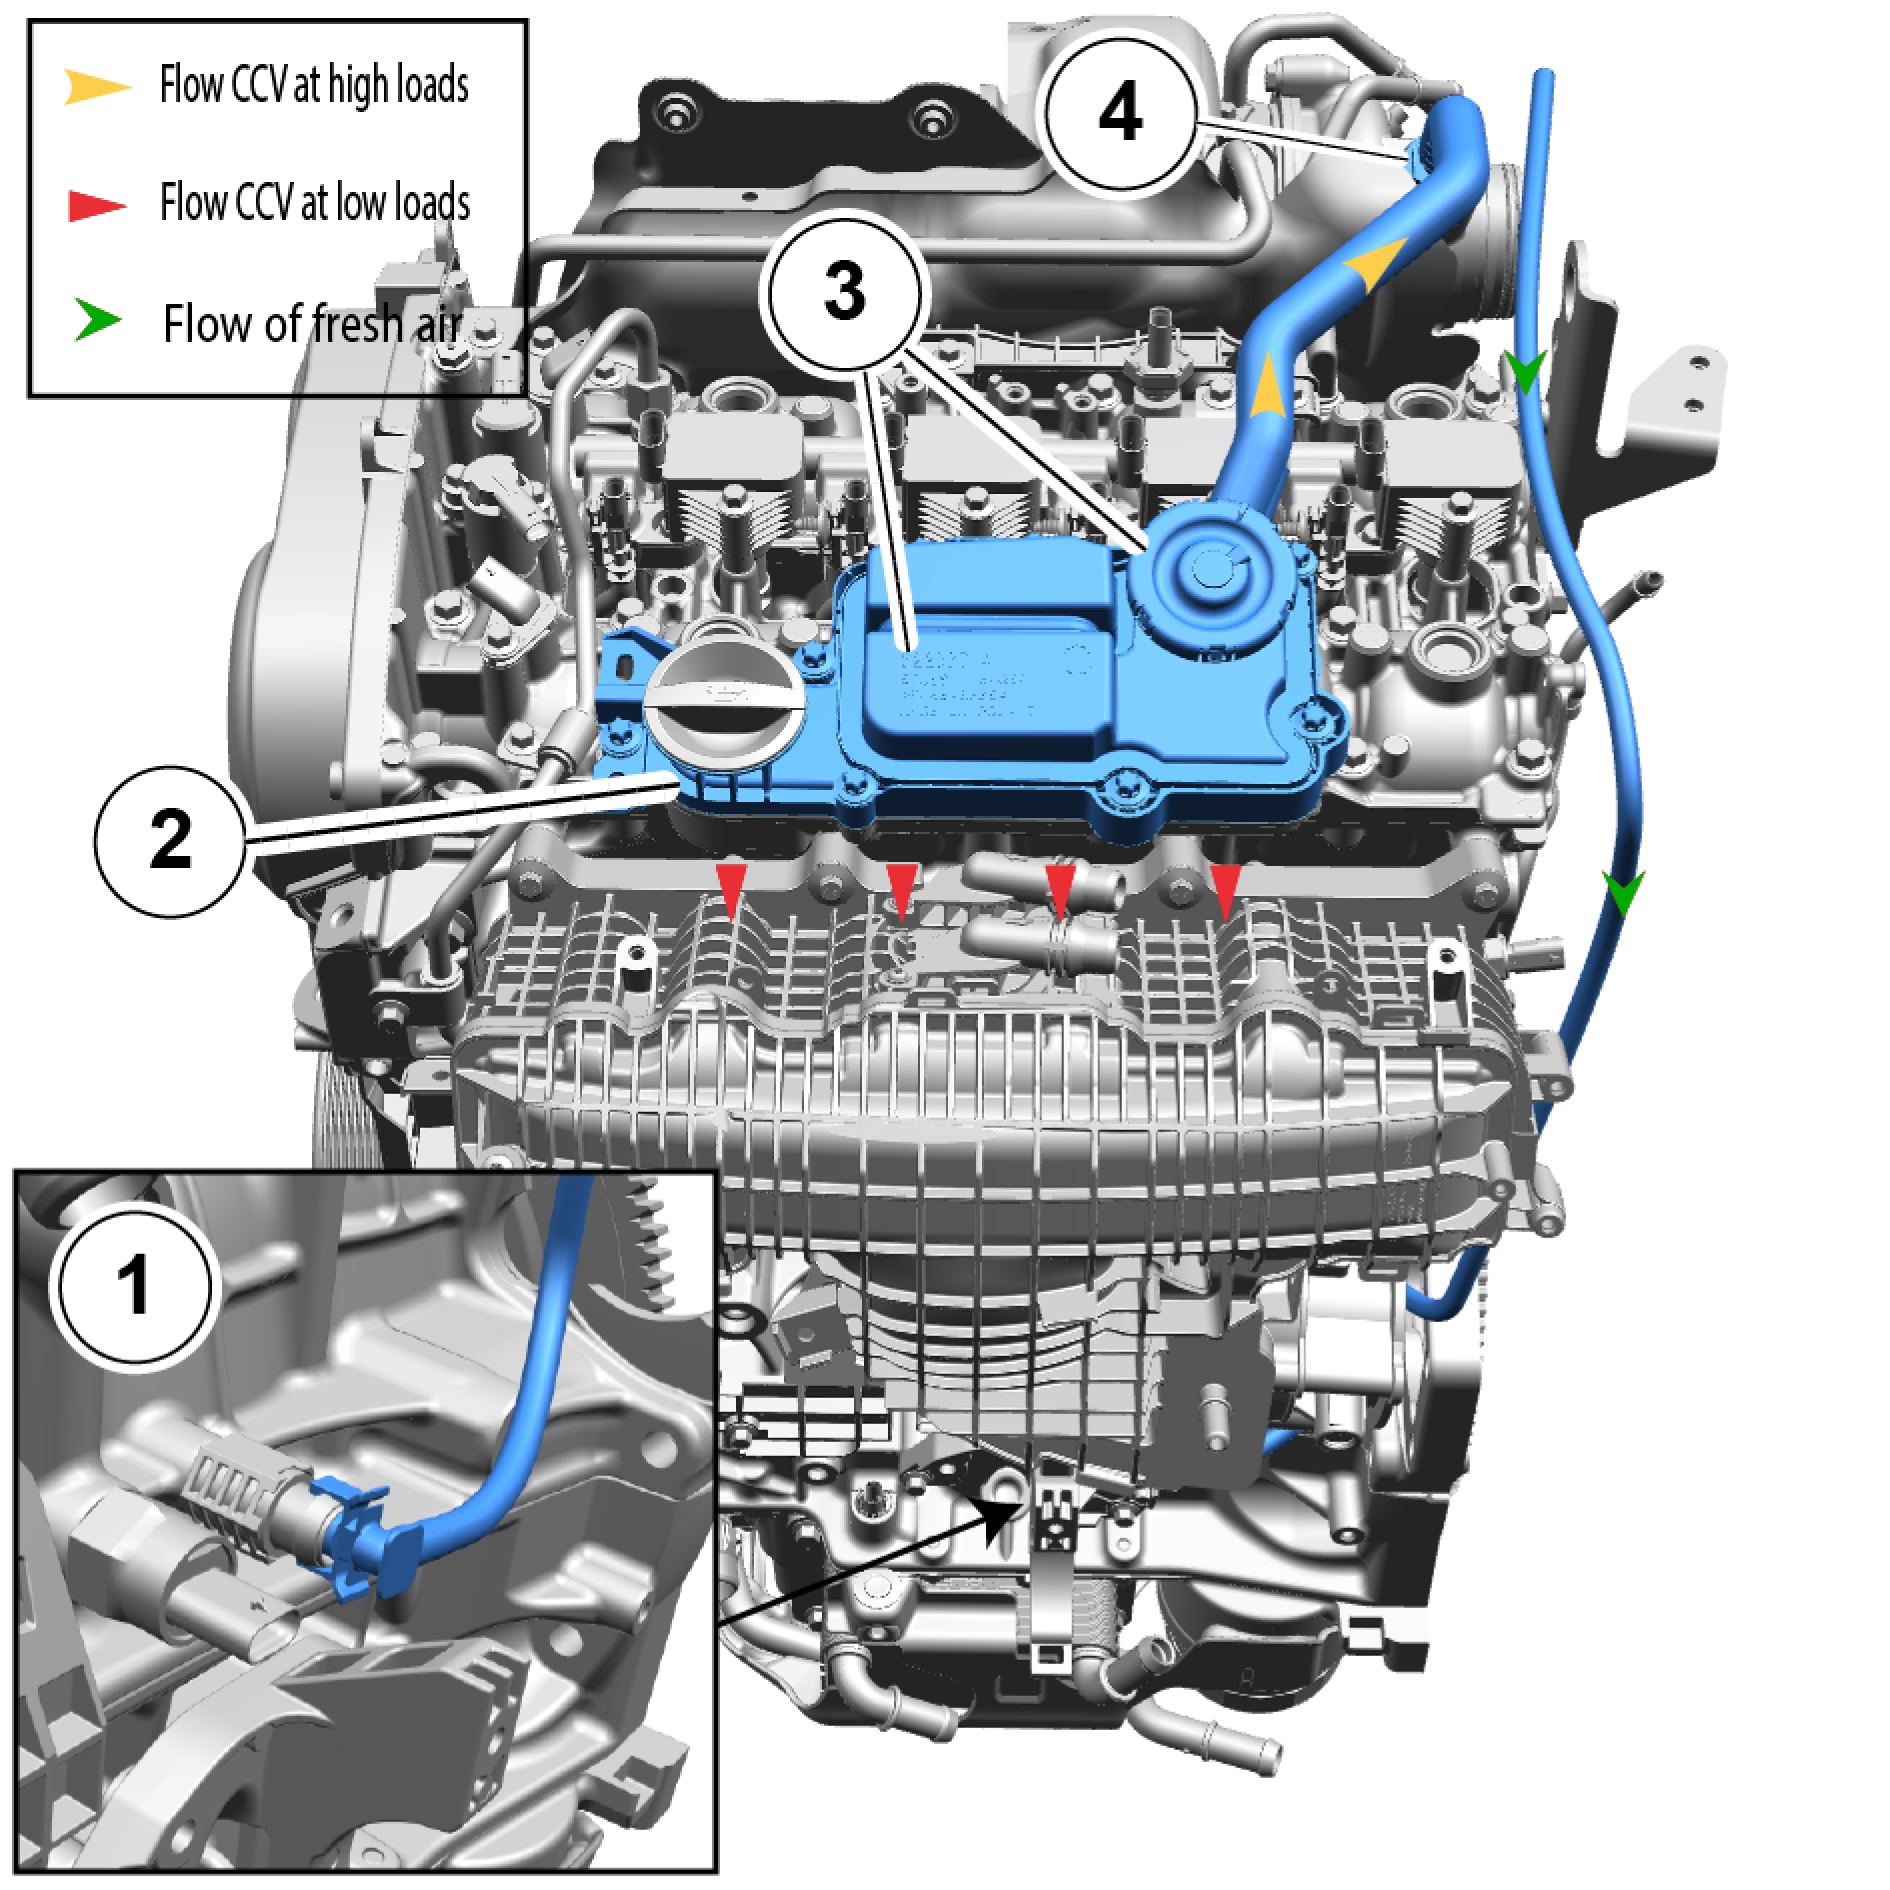
1, Connect hose to breather with quick connector HR72343?
2, Feeding gases from crank case into separator.
3, Separation volume with integrated PCV and pressure regulator.
4, Check valve clean side ofh the turbo.
Fuel system
Components
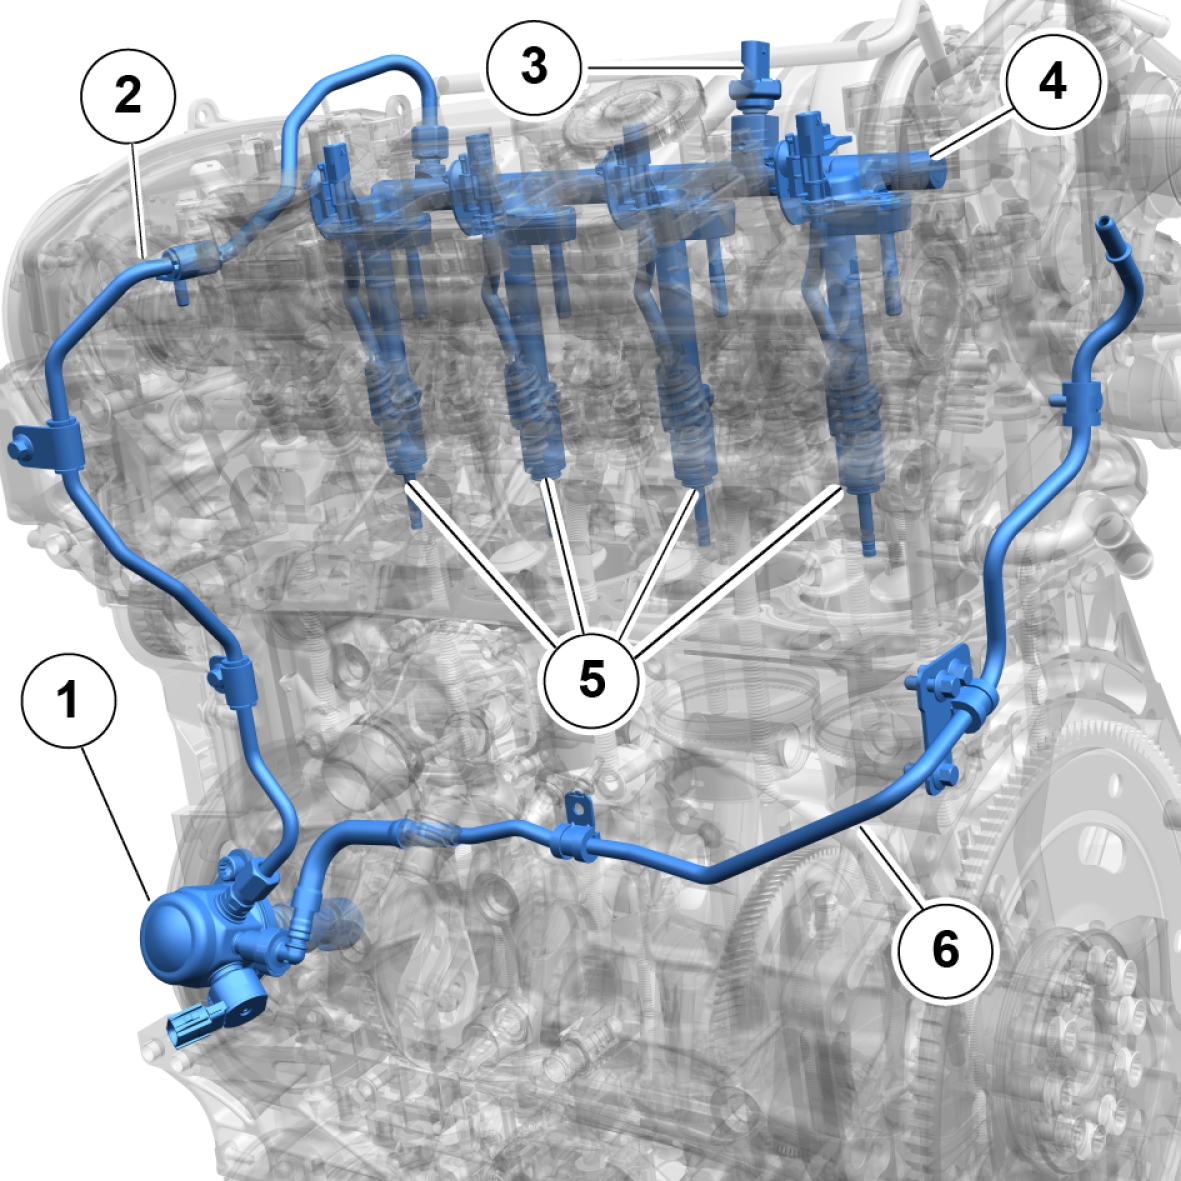
| Pos | Description |
|---|---|
| 1 | High pressure fuel pump |
| 2 | High pressure fuel pipe |
| 3 | Fuel pressure sensor |
| 4 | Fuel rail |
| 5 | Fuel injectors |
| 6 | Low pressure feed line |
Low pressure fuel system
| Fuel flow at idle | Max Fuel flow | Min Pressure | Max Pressure |
|---|---|---|---|
| max 0.9 l/h | 115 l/h @ 3 bar | 3 bar. (4 bar normal) | 30 l/h @ 6 bar (at start) |
High pressure fuel system
| Max fuel pressure | Flow rate (n-heptane) |
|---|---|
| 450 bar | 12,5 cc/ sec. @ 100 bar |
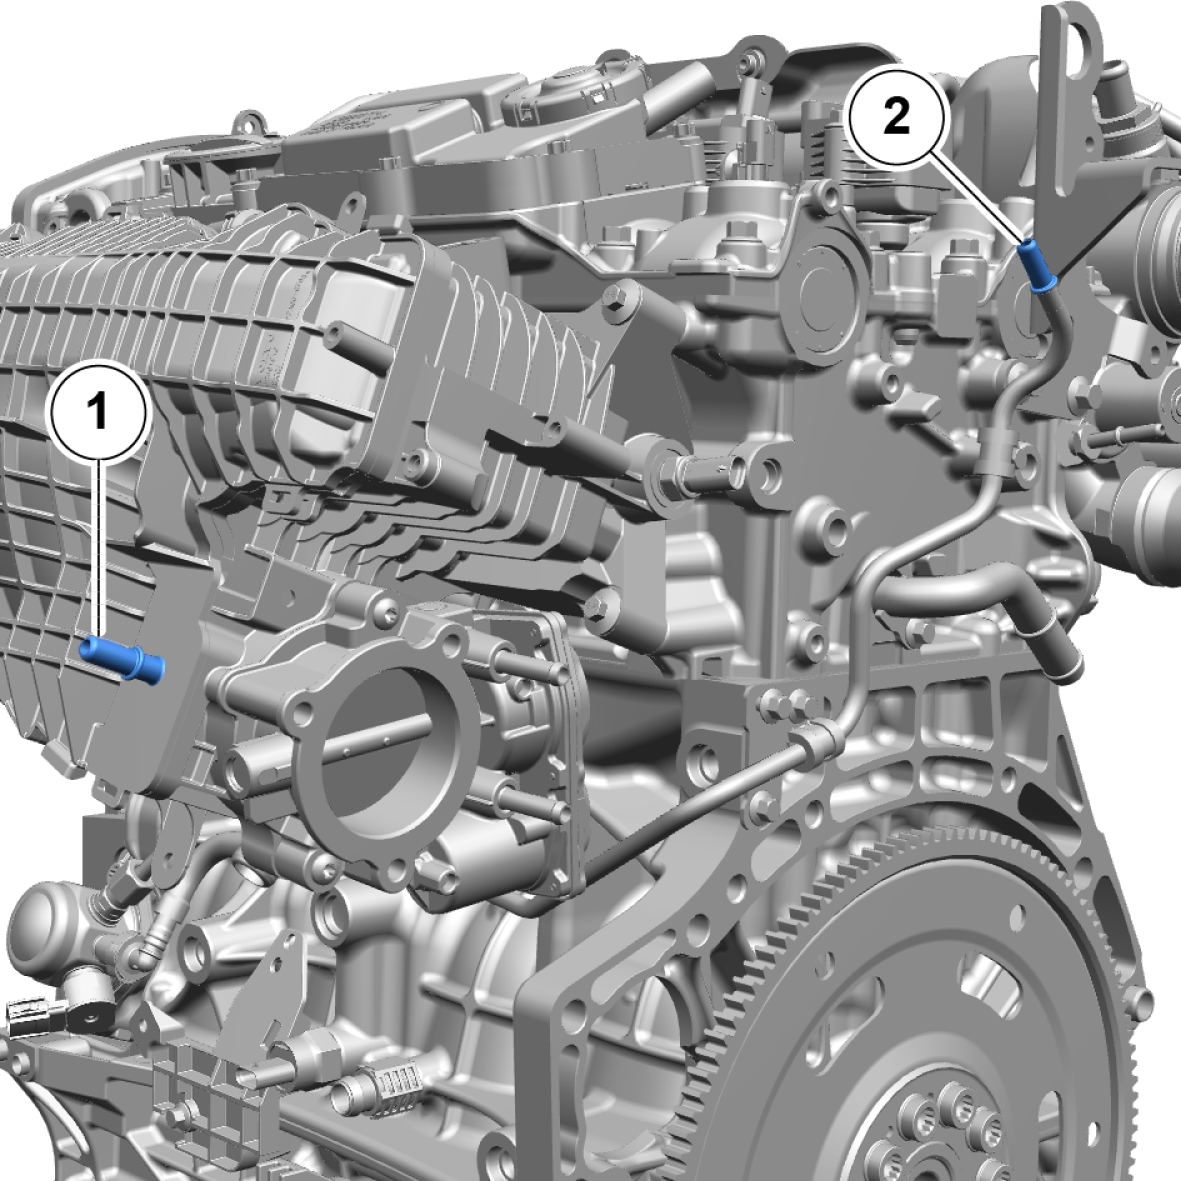
| Pos | Description |
|---|---|
| 1 | Connection for EVAP, use connector? |
| 2 | Connection Low pressure feed line, use connector? |
EVAP
Components
| Pos | Description |
|---|---|
| 1 | High pressure fuel pump |
| 2 | High pressure fuel pipe |
| 3 | Fuel pressure sensor |
| 4 | Fuel rail |
| 5 | Fuel injectors |
| 6 | Low pressure feed line |
Requirements
Gas excxhange
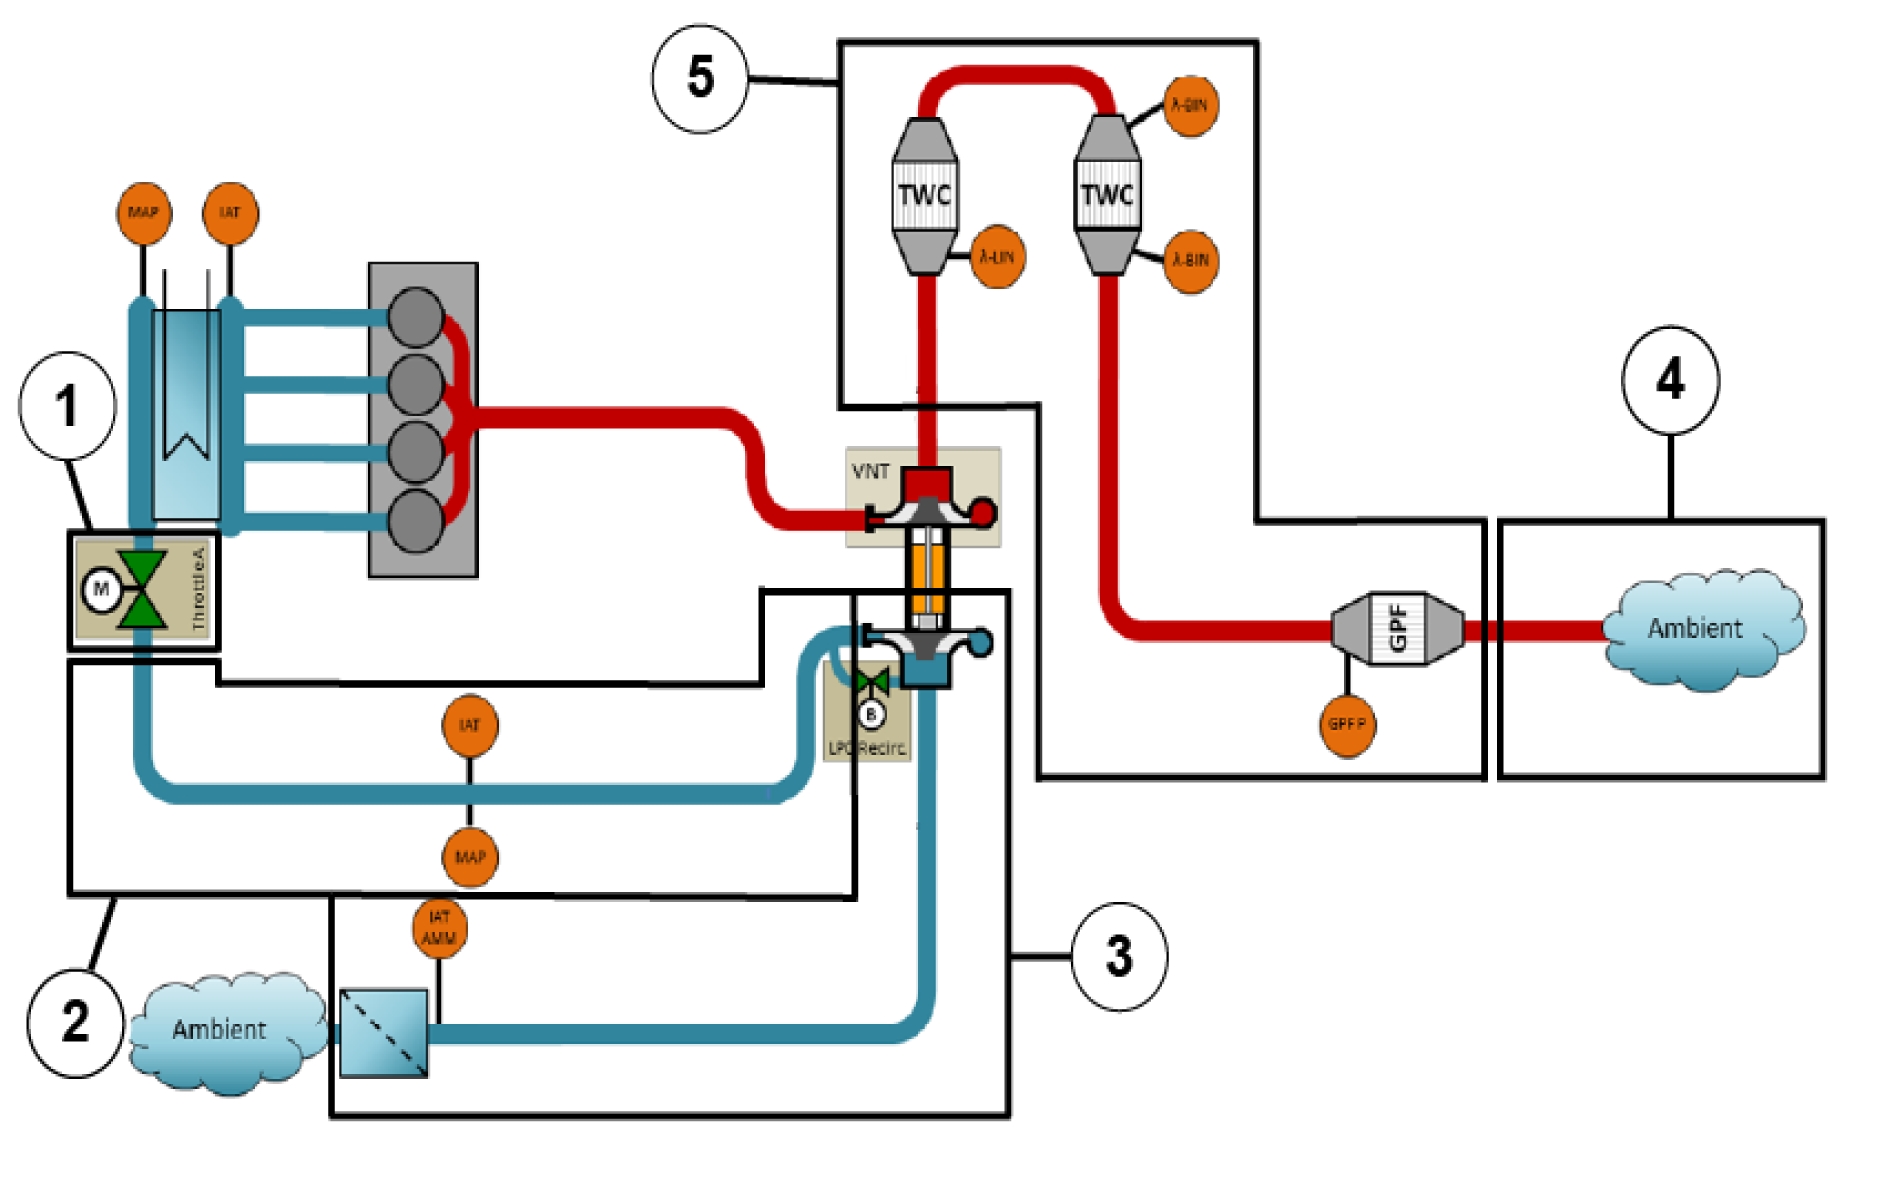
1, Pressure drop throttle to intake manifold
| Total Δp [kPa] | At MF [kg/h] | At T [degC] |
|---|---|---|
| 6 | 720 | 170 |
2, Pressure drop hot charge duct
| Total Δp [kPa] | At MF [kg/h] | At T [degC] |
|---|---|---|
| 3.0 | 720 | 170 |
3, Pressure drop dirty and clean side ducts
| Total Δp [kPa] | At MF [kg/h] |
|---|---|
| 1.9 | 720 |
4, Exhaust Cold End
| Total Δp [kPa] | Static Δp [kPa] | At MF [kg/h] | At T [degC] |
|---|---|---|---|
| 30.5 | 21.9 (with Di=62.8mm) | 900 | 775 |
5, Pressure drop over aftertreatment system
| Emission class | Mass flow | Inlet temperature | Incl. GPF? | Total pressure drop |
|---|---|---|---|---|
| EU6d | 810 kg/h | 1082°C | Y (detailed) | 40 kPa |
Estimated engine air request at RON98, TAmb = 25°C, PAmb = 1 bar:
| Max engine air flow | 200 g/s = 720 kg/h |
| Max (static) boost pressure | 3.2 bar abs |
| Max (static) boost temperature | 200 °C |
Estimated engine exhaust flow at RON98, TAmb = 25°C, PAmb = 1 bar:
| Max engine exhaust flow | 220 g/s = 792 kg/h |
| Max (static) temperature before turbine | 980 °C |
Do not exceed the following parameters due to engine failure.
Turbocharger speed
| Hardware limit (rpm) | Calibration req. = 95% of HW (rpm) |
|---|---|
| 195,000 | 185,250 |
Turbo temperature
| Location | Temperature |
|---|---|
| Max (static) temperature before turbine | 980 °C |
Compression pressure in engine
| Compression pressure maxima are |
|---|
| 50 bar up to 4500 rpm, thereafter linear increase up to 57 bar @5900rpm |
Following these requrirements you will achieve a Power/Torque curve as shown below.
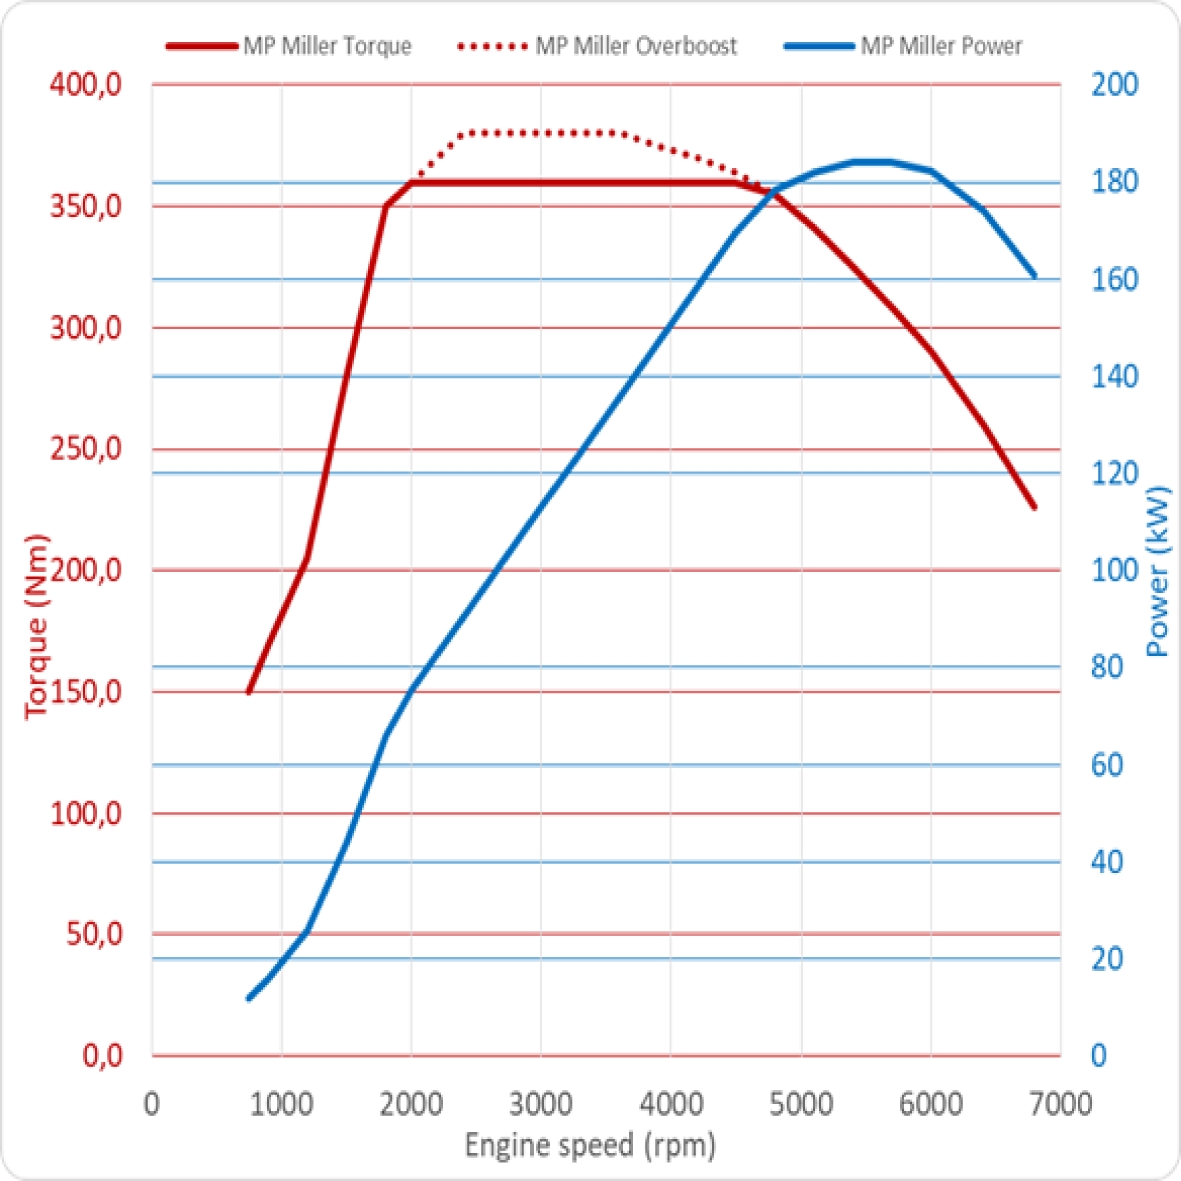
Engine
Specifications
| Engine | Gen3 MP Miller |
|---|---|
| Engine code | M1 |
| Cylinders | 4 |
| Bore/Strokle (mm) | 82/93.2 |
| Conrod length (mm) | 143.8 |
| Compression ratio | 11.5 |
| Volume (cm3) | 1969 |
| Firing order | 1-3-4-2 |
| Cam duration: intake/exhaust (CA) | 155/193 |
| Peak power (HP/kW)* | 250/184 |
| Peak torque (Nm) | 360 |
| Max power at (RPM) | 5400-5700 |
| Max torque at (RPM) | 2000-4500 |
| Max RPM continuous/peak (3sec) | 6200/6500 |
* Performance target valid at ambient 983 hPa and 25°C and for RON98 fuel.
Chemicals
Specification
| Product | Volume |
|---|---|
| Engine oil | 6.1 litre |
| Coolant (mixed 50/50) | 4 litre? |
| Product | Classification |
|---|---|
| Engine oil | 0W20 ACEA C5-2021 |
| Coolant | TR-31854114-002 (BASF G64) |
Service
Service Schedule
| Year/KM/Hrs | 1/30000/650 | 2/60000/1300 | 3/90000/1950 | 4/12000/2600 | 5/15000/3250 | 6/18000/3900 | 7/21000/4550 | 8/24000/5200 |
|---|---|---|---|---|---|---|---|---|
| Engine oil and oil filter - replace | X | X | X | X | X | X | X | X |
| Spark plugs - replace | X | X | X | X | ||||
| Timing belt - replace | X | |||||||
| Engine - check for leaks | X | X | X | X | X | X | X | X |
| Coolant - check for leaks | X | X | X | X | X | X | X | X |
| Coolant level - adjust if needed | X | X | X | X | X | X | X | X |
| Coolant - check freeze point | X | X | X | X | X | X | X | X |
Oil system
Location

Oil pressure requirements
| Min difference max/min oil level | Min. oil pressure at idle | Pressure requirement due to piston cooling |
|---|---|---|
| 1.5 litre | 1.5 bar at all temperatures | 1.5-3 bar? |
Oil temperature
| Continuously | Peak |
|---|---|
| <130 °C | <142 °C (with 0W20) |
Oil specification
| Classification | Viskocity | Volume |
|---|---|---|
| ACEA C5-2021 | 0W-20 | 6.1 litre |